

Page 1
POWER
DIM
INPUT
VOLUME
POWER
DIM
INPUT
VOLUME
OPTO CONTROL
IN
LOOP
OUT
CS2 STEREO POWER AMPLIFIER
RIGHT CHANNELRIGHT SPEAKER LEFT CHANNEL LEFT SPEAKER
SERIAL NO.:
INPUT INPUT
PHASE
AC POWER
50/60Hz
XLR-1
XLR-2 XLR-1
XLR-2
RCA-2 RCA-3RCA-1 RCA-2
B.M.C. AUDIO
MADE BY B.M.C. GERMANY
WEEE - Reg. - Nr.:
DE18339144
RCA-3RCA-1
RC-1
DAC
CD
IN
AMP
VOL
VOL
IN
df
ovs ups
+10
0
987
654
3
21
clear
checkprog
disp
rep.
mute
mute
1311-EN
Power (turn)
Dimmer
Input
Volume
Input Indicator
DIGM display
Power Meter
B.M.C. Audio CS2
Quick Start Guide
B.M.C. Audio CS2
Owner’s Manual
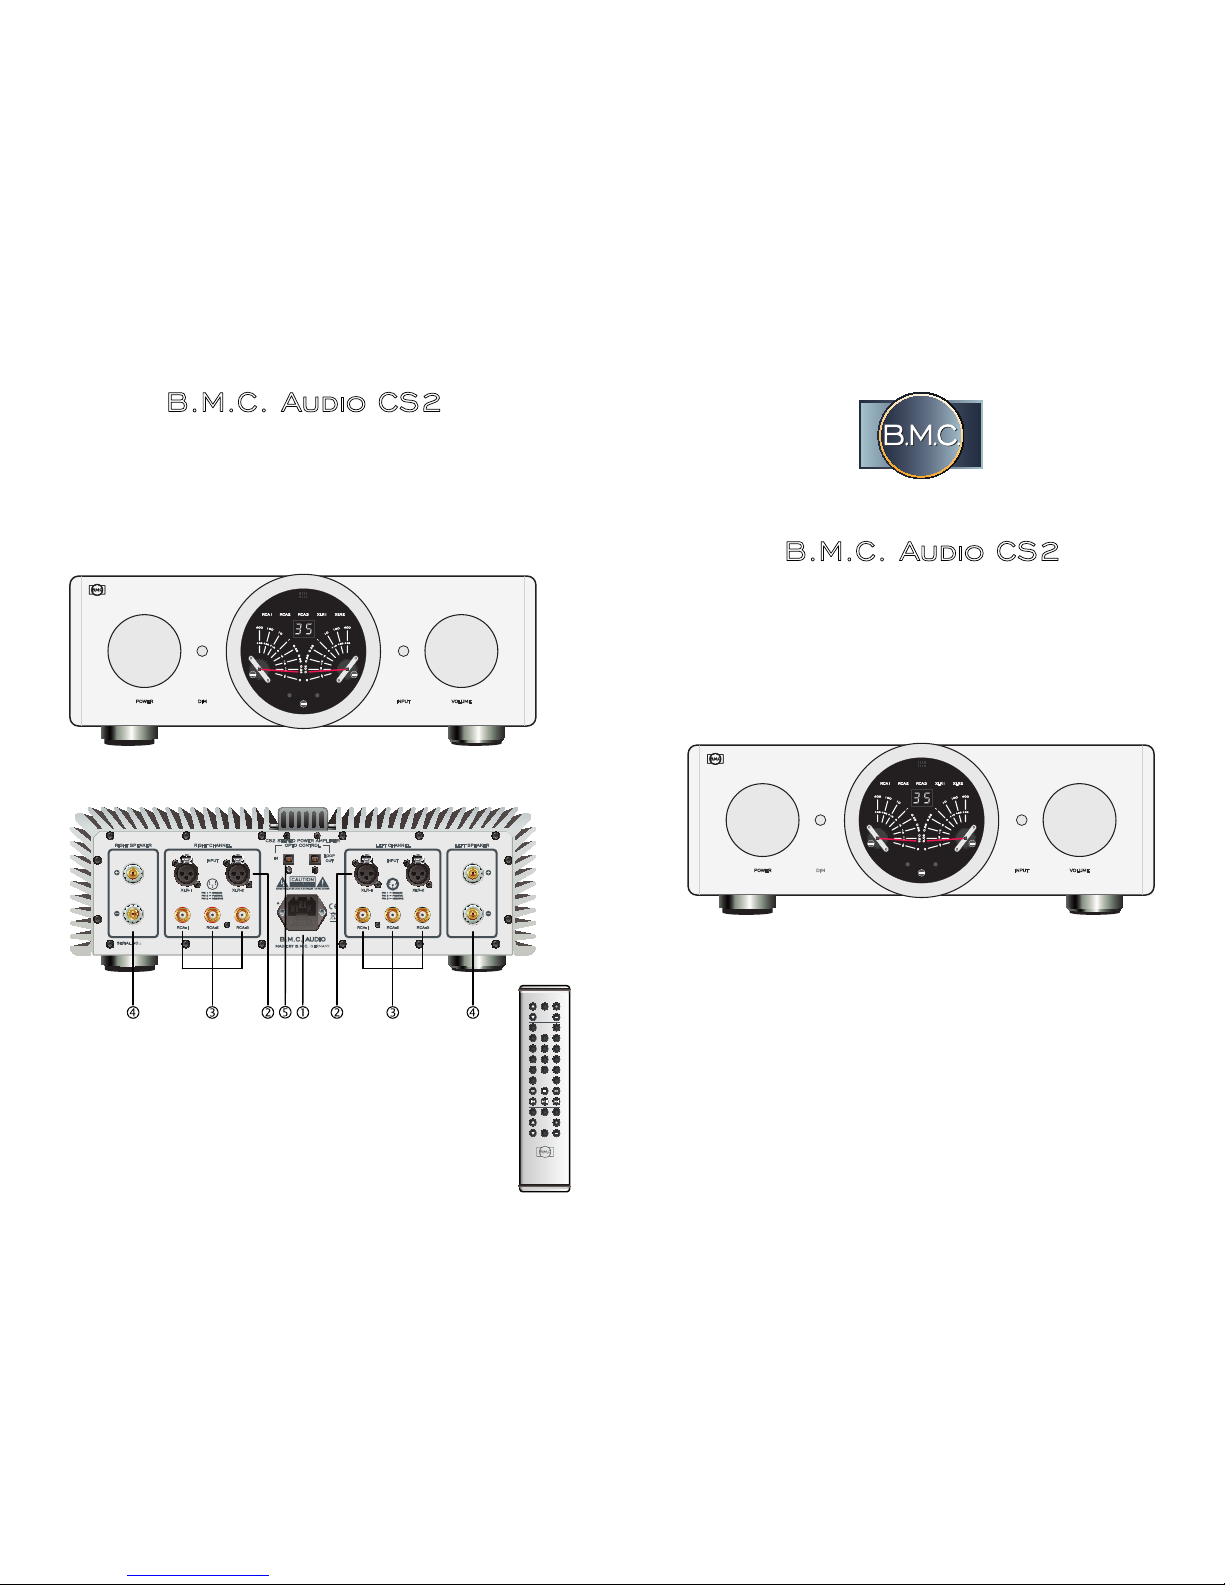
The CS2 is as easy to use as any amplifier: Connect the AC power, the input sources
and the speakers. Power on, select an input, adjust the volume - enjoy!
In a consistent B.M.C. system using the optical DIGM control, the amplification gain
of the CS2 will be controlled by the DAC volume control.
AC Power Connection
‚ XLR Inputs
ƒ RCA Inputs
„ Speaker Terminals
… Optical DIGM Control Input
Never plug or unplug any cables while the CS2 is powered on!
Find a detailed user guide inside this manual.
Page 2
B.M.C. Audio GmbH
Germany
www.bmc-audio.com
Introduction
Front Panel Functions
Rear Panel Functions
Input Selection and Display
DIGM Volume Adjustment and Display
Remote Control
Troubleshooting, Maintainance, Service
Important Safety Information
General Safety Precautions
CE / FCC declaration, Recycling
Content of Packing
Power Meter in Watt and dB
Technical Specifications
Quick Start Guide
3
4
5
6
7
8
9
10
11
12
13
14
15
16
Table of Content
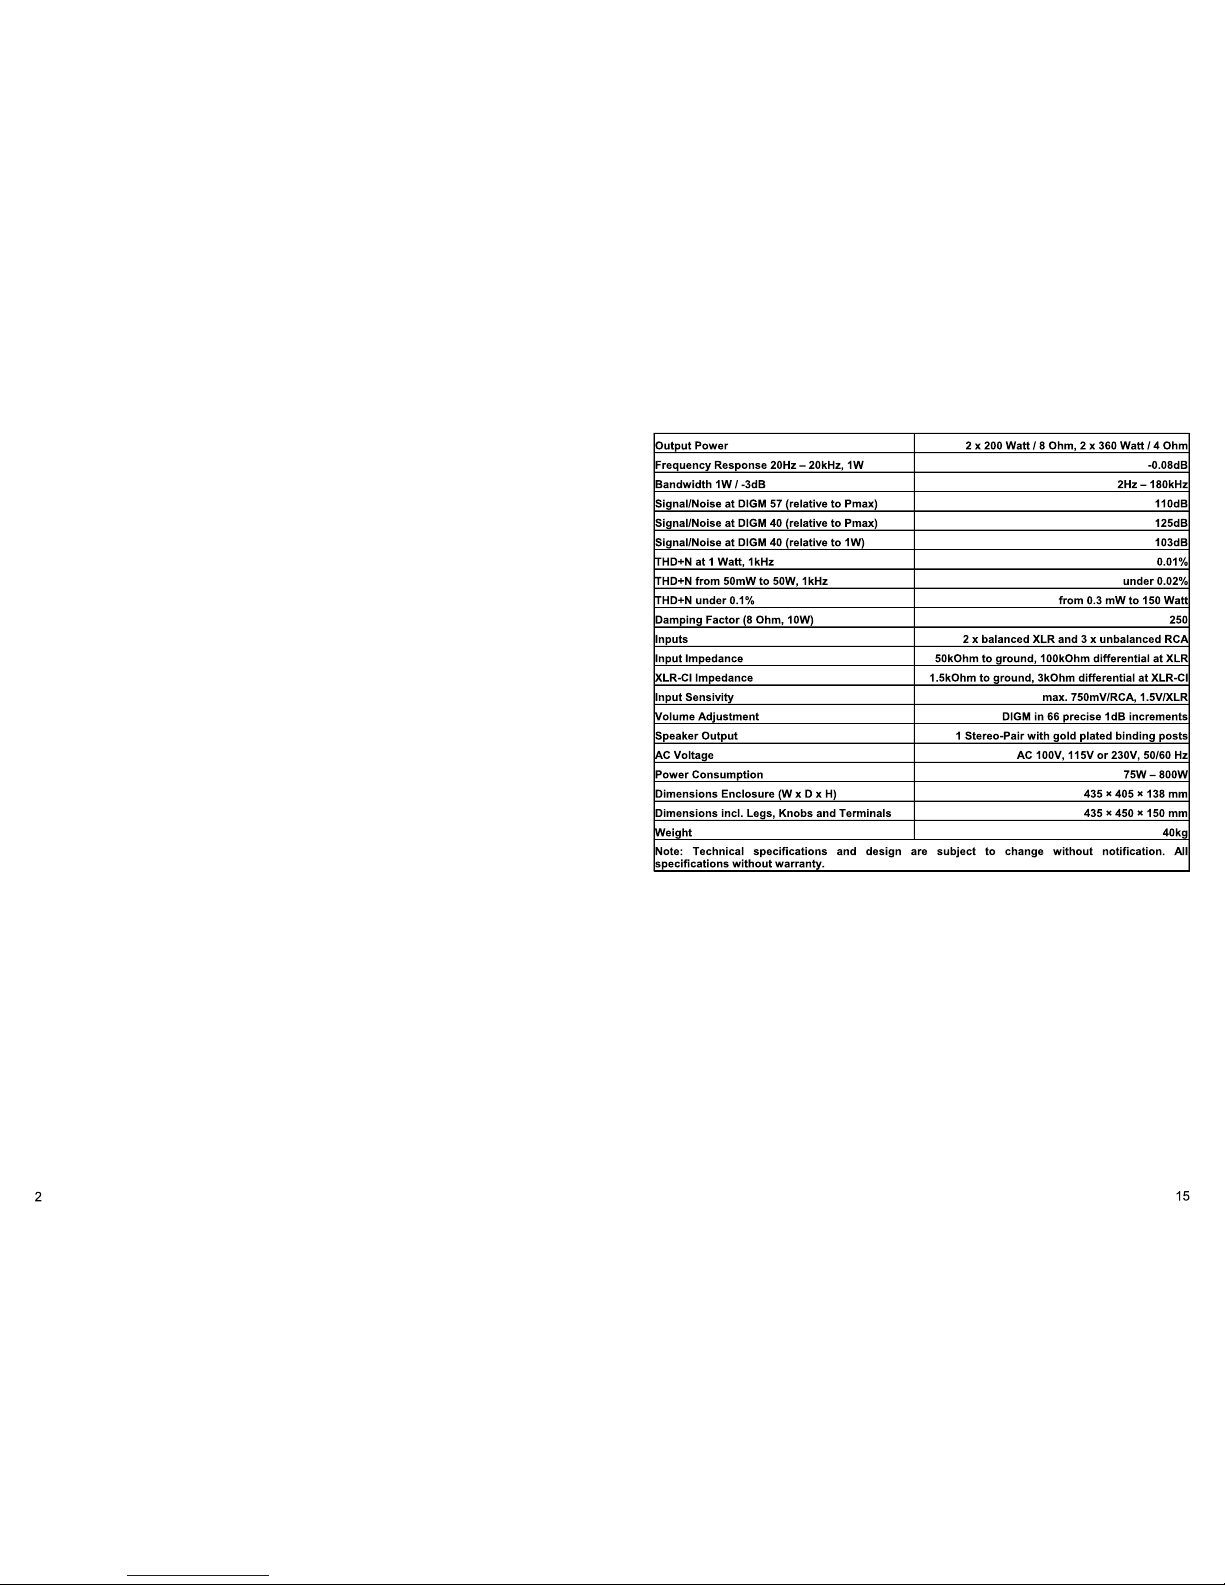
Technical Specifications
Page 3

Power Meter in Watt and dB
Power Meter in Watt and dB
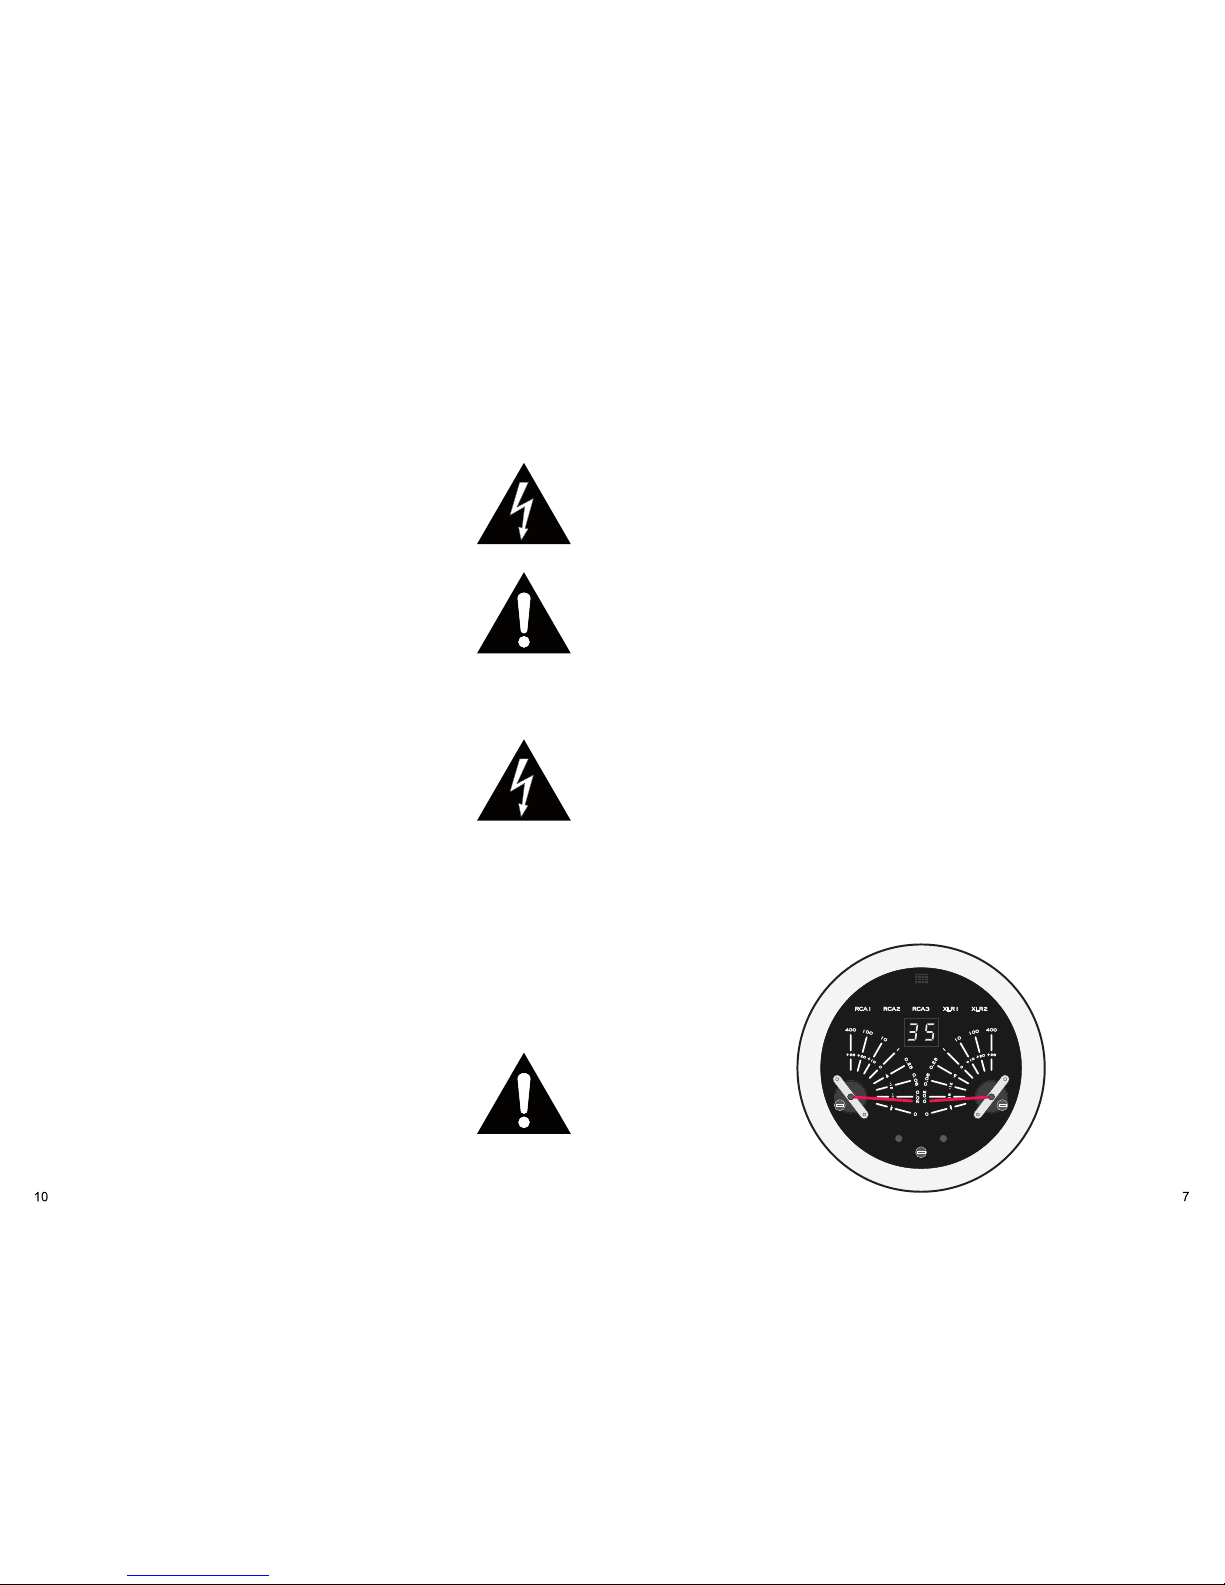
The Stereo Power Meter displays the output power in Watt at 4-Ohm speakers, and
in dB relative to 1 Watt.
Since these electro-mechanical instruments are innately too slow for music pulses,
an electronic circuit analyzes the signals at the speaker output and memorizes the
result until the needle has been able to display it.
The dB level indicator refers to 0dB = 1 Watt.
Decibels (dB) is related logarithmically to power in the following way:
-30dB = one thousandth of the power
-20dB = one hundredth of the power
-10 dB = one tenth of the power
-6dB = a quarter of the power
-3 dB = half the power
+3 dB = twice the power
+6 dB = fourfold the power
+10 dB = tenfold the power
+20 dB = hundredfold the power
+26 dB = fourhundredfold the power
+30 dB = thousandfold the power
Congratulations on the purchase of this exceptional LEF-power amplifier! We would
like to say thank you to support our concept of a very short signal path, for there is the
advantage of being able to select just the required gain.
B.M.C.’s CS2 volume control DIGM = Discrete Intelligent Gain Management avoids
both unnecessary high gain and additional amplifier stages, as well as attenuating the
input signal, as it is done in traditional solutions. The gain required for the desired
sound level is set in the amplifier stage.
The great power supply with 2kW toroid transformer, Balanced-Current Capacitors
and complete stabilization, for the power section as well, is designed unusually
extensive and lavish. This is the ideal base for a silent background and for playing the
very finest detail, as well as explosive dynamics.
CS2 offers 3 different Operating Modes
1: The classical integrated Amplifier mode, with the volume controlled at the unit - or
at the remote control RC1. The volume is managed by DIGM and the CI mode (current
injection) can manually be activated for any XLR input by holding the input key for 5
seconds. CI mode is recommended only for connected B.M.C. components like
BDCD1.1 or the MCCI phono stage.
2: The classical Power Amplifier mode, with volume controlled by a preamplifier.
There is still the advantage of a gain presetting by DIGM, may be for better
signal/noise ratio, adjustment of channels for home cinema use, or matching the CS2
to a mixing console of a recording or mastering studio. Due to the numeric display the
preference gain can be set easily again after an new amplifier power-on.
3: In a consistent B.M.C. Audio chain with an OPTO CONTROL connection DIGM can
be set by the B.M.C. DAC. The DIGM function will be same to the Amplifier mode (1),
with the difference of where to turn the Volume knob. The big advantage of this
operating mode is: You can use any balanced input in CI (Current Injection) mode with
it's audiophile advantage of an advanced and exceptional signal path.
Page 4
POWER
DIM
INPUT
VOLUME
CS2
AC Power Cable
Remote Control RC1
DIGM optical waveguide
Owner's Manual
Please keep the packing for eventual later transportation.
In classical integrated amplifier mode
by default all inputs are operating
traditionally and are compatible to any
source component.
In case of a B.M.C. component like
BDCD or MCCI more sound quality is
ach iev ed b y usi ng o u r “c urre nt
injection” (CI) input mode for balanced
inputs.
Select either XLR1 or XLR2, then again
press the input key and hold it for about
5 seconds. The XLR-CI will light up and
this configuration is stored for the
individual input.
Do the same procedure again to disable
CI for the selected XLR input.
Note: Never use CI inputs for nonB.M.C. components. In most cases the
sound quality will decrease due to
incompatibility and in some cases even
a damage of the source unit might
occur.
Front Panel Functions
Content of Packing
Advanced Functions
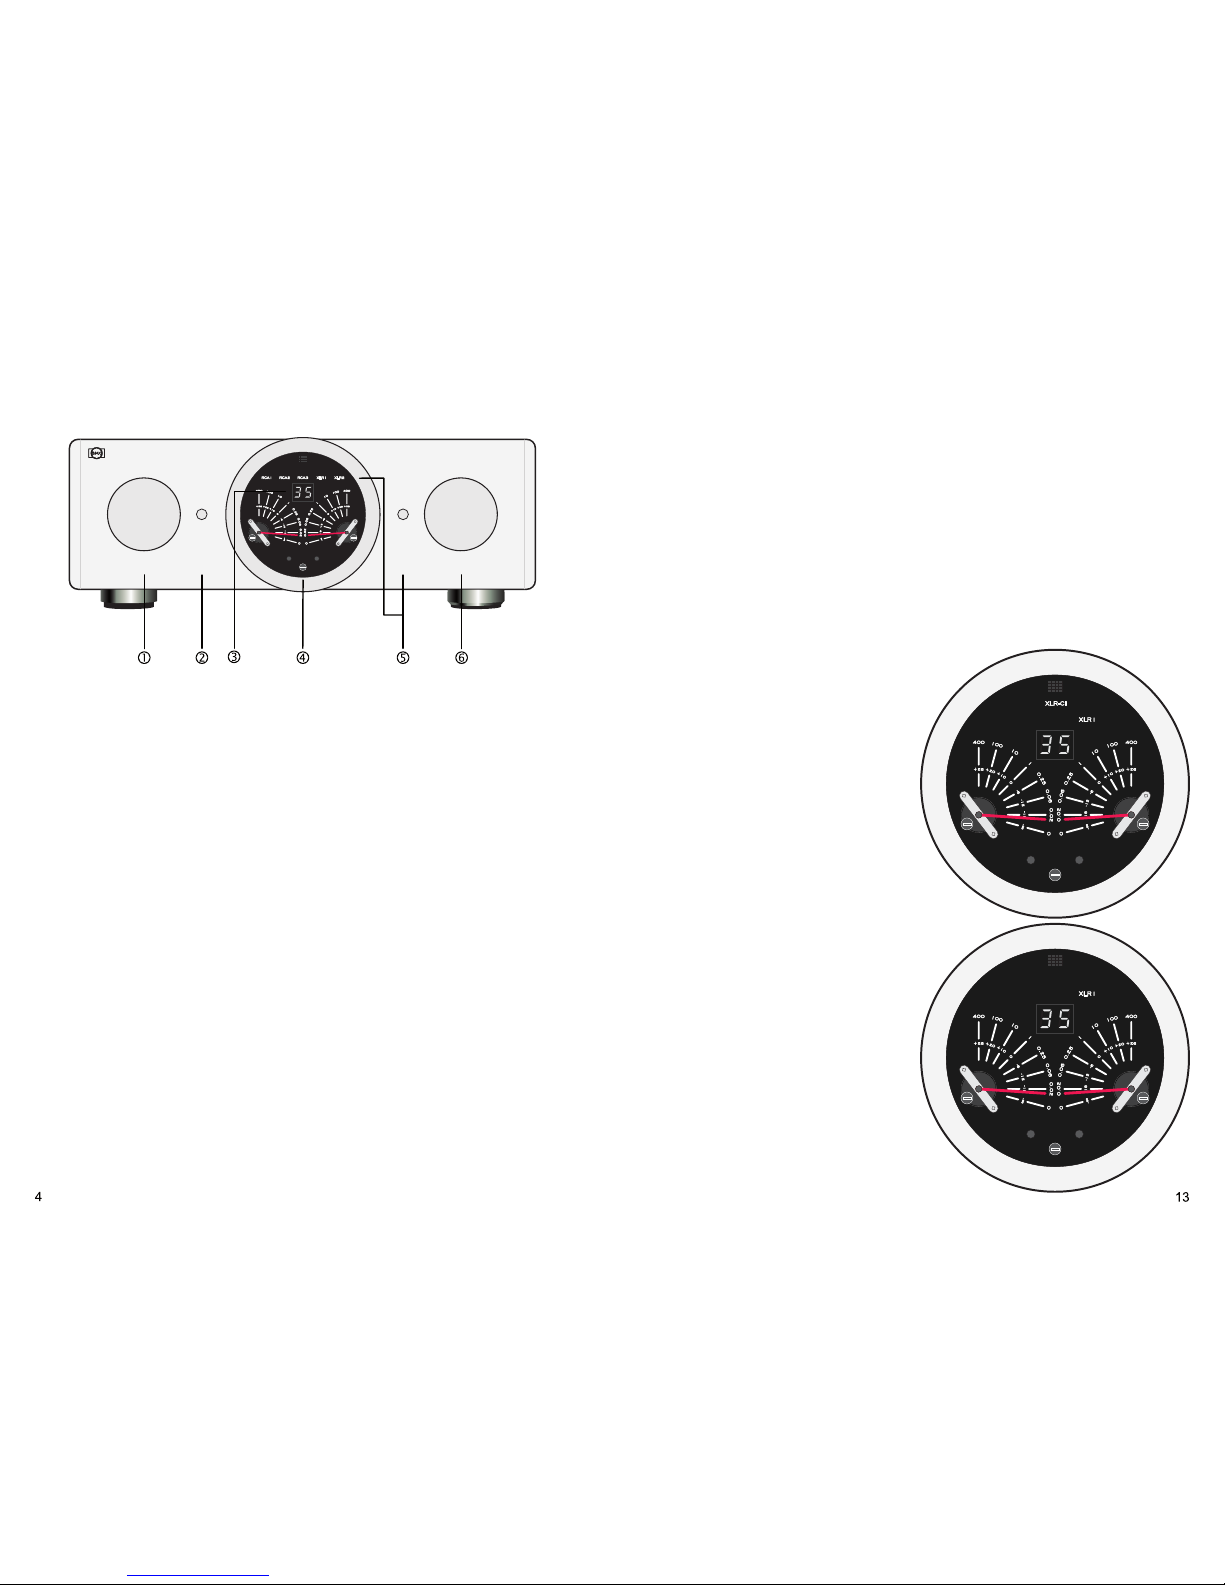
➀ POWER
Turn for powering ON and OFF the unit
➁ DIM
To dim the lights of this window
➂ DIGM Display
Shows the selected DIGM Gain (00-66)
➃ Power Meter
Shows actual power in WATT (at 4 Ohm)
Level indicator in dB, reference level 0 dB is 1 W
➄ INPUT
Toggle switch to select the INPUT
The selected INPUT is lit up
➅ VOLUME DIGM
DIGM = Discrete Intelligent Gain Management
The amplifier's gain can be adjusted in precise 1dB increments
The selected value (00 - 66) will be displayed
If an OPTO CONTROL connection is active, DIGM is controlled by the DAC
Page 5
OPTO CONTROL
IN
LOOP
OUT
CS2 STEREO POWER AMPLIFIER
RIGHT CHANNELRIGHT SPEAKER LEFT CHANNEL LEFT SPEAKER
SERIAL NO.:
INPUT INPUT
PHASE
AC POWER
50/60Hz
XLR-1
XLR-2 XLR-1
XLR-2
RCA-2 RCA-3RCA-1 RCA-2
B.M.C. AUDIO
MADE BY B.M.C. GERMANY
WEEE - Reg. - Nr.:
DE18339144
RCA-3RCA-1
CE Declaration of Conformity
B.M.C. AUDIO GmbH declares that this product is in conformance with the Low Voltage Directive 73/23/EEC
and Electromagnetic Compatibility 89/336/EEC as amended by 92/31/EEC and 93/68/EEC.
The conformity of this product with the regulations of Directive number 73/23/EEC (LVD) is proved by full
compliance with the following standards:
Standard number Date of issue Test type
EN60065 2002 General requirements
Marking
Ha
zardous radiation
Heating under normal conditions
Shock hazards under normal
operating conditions
Insulation requirements
Fault conditions
Mechanical strength
Parts connected to the mains supply
Components
Terminal devices
External flexible cords
Electrical connections and mechanical fixings
Protection against electric shock
Stability and mechanical hazards
Resistance to fire
The conformity of this product with the regulations of Directive number 89/336/EEC (EMC) is proved by full
compliance with the following standards:
Standard number Date of issue Test type
EN55013 2001 Conducted emissions
EN55013 2001 Absorbed emissions
EN55020 2002 Immunity
FCC notice
Note: This equipment has been tested and found to comply with the limits for Class B devices, according to
Part 15 of the FCC Rules. These limits are designed to provide reasona
ble protection against harmful
interference in a residential installation. This equipment generates, uses and can radiate radio frequency
energy and, if not installed and used in accordance with the instructions, may cause interference to radio
communications. There is no guarantee that interference will not occur in a particular installation. If this
equipment does cause harmful interference to radio or television reception, which can be determined by
turning th
e equipment off and on, the user is encouraged to try to correct the interference by one or more of
the following measures:
Connect this unit to a different outlet than the receiver.
Relocate or reorient the receiving antenna.
Increase space between this equipment and receiver.
Consult your dealer or an experienced radio/TV technician.
Waste Electrical and Electronic Equipment (WEEE) Directive
Waste Electrical and Electronic Equipment Directive Directive 2002/96/E
C of the European Parliament and of
the Council.
The bin symbol is shown on this product. It indicates that the product should not be disposed of with regular
household waste, but should be disposed of separately.
Electrical and electronic equipment may contain materials that are hazardous to the environment or human
health and therefore should be disposed of at a designated waste facility or returned to your retailer for
appropriate recycling.
If you wish to dispose of thi
s unit and it still functions, please consider recycling/reusing it by selling it, trading it
in at your dealer for new equipment, giving it away to friends or donating it to a charity shop.
CE / FCC Declaration, Recycling
Rear Panel Functions
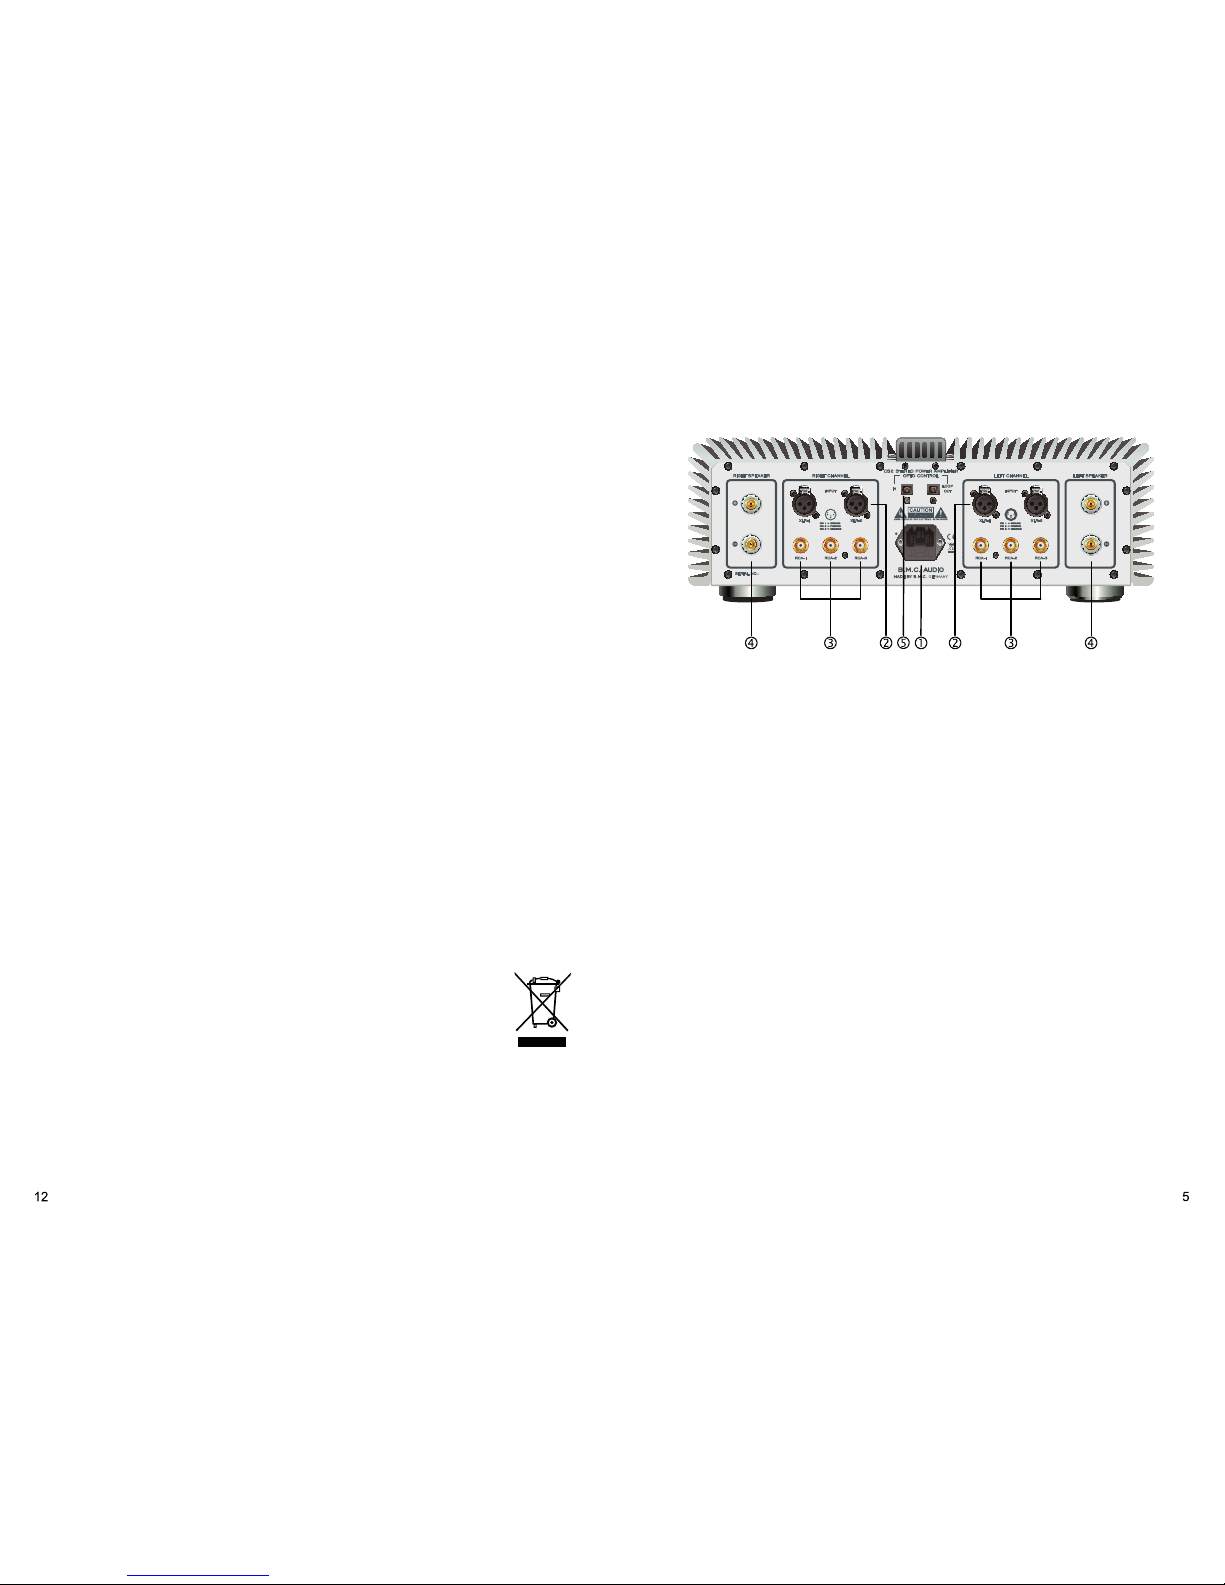
POWER SUPPLY
➀ AC LINE
Terminal for connecting the AC power line
Your local voltage should fit to the specified voltage on the back panel
INPUTS
➁ XLR 1, XLR 2
Balanced 47 kOhm XLR Inputs
In CI mode the input load is significantly higher.
➂ RCA1, RCA2, RCA3
Unbalanced 47 kOhm RCA Inputs
OUTPUT
➃ SPEAKER
Speaker Binding Post for connecting 4-8 Ohm Speakers
B.M.C. Link
➄ OPTO CONTROL IN / LOOP OUT
Optical connection to a B.M.C. DAC for DIGM control
(LOOP OUT for further distribution of the OPTO CONTROL signal)
Page 6

Select INPUT by pressing the INPUT switch on the front of the CS2, or the INUP/DOWN buttons of the remote control RC1, AMP section.
The selected input is displayed in the meter window of the CS2.
During the switching procedure the music signal will be faded down and up again,
thus avoiding hard switching noise.
Whenever the CI-mode is active an additional “XLR-CI” lights up in the display.
Input Selection and Display
General Safety Precautions
1. Read this owner's manual.
2. Keep the owner's manual.
3. Pay attention to all imortant safety information an warnings.
4. Follow the manual instructions.
5. Never use the unit close to water or in a humid sourrounding, like basins, a humid
basement, swimming pools...
6. For cleaning use a dry micro fiber cloth exclusively.
7. Do not block any ventilation openings. Install in accordance with the
manufacturer's instructions. If placed in a shelf make shure to keep about 15cm to
each side and 30cm to the top. Do not place the unit in a way covering the bottom
plate like a sofa, a bed, thick carpets or blankets.
8. Do not install the unit near any heat sources such as radiators, heat registers,
stoves, or other apparatus (including amplifiers) that produce heat.
9. Do not spoil the safty meaning of earthed AC power cables! The earth contact pin
serves your safety. In case the attached cable does not match to your AC-Line wall
socket, please ask an electrician to replace such outdated wall outlet.
10. Protect the unit's power cord from being walked on or pinched, especially around
the plugs, convenience receptacles, and where it exits the unit's casing.
11. Only use attachments/accessories specified by the manufacturer.
12. Only use the unit with a cart, stand, tripod, bracket, or table specified by the
manufacturer or sold with the unit. If using a cart, exercise caution when moving
the cart unit combination to avoid injury from it tipping over.
13. Unplug the unit during lightning storms or when leaving it unused for extended
periods of time.
14. Refer all servicing to qualified service personnel. Servicing is required when the
unit itself, its power-supply cord, or plug has been damaged in any way, when
liquids have been spilled onto the unit, when foreign objects have fallen into the
unit, when the unit has been exposed to rain or moisture, when the unit does not
operate normally, or when the unit has been dropped.
15. Plug the AC power cord into an easily accessible AC wall outlet, so it can be quickly
unplugged in case of emergency.
16. Remove the AC wall plug for seperating the unit from the AC power line. The AC
plug should always be accessible.
17. Do not expose the unit to drips or splashes. Do not place any objects filled with
liquids, such as vases, on the unit.
18. Do not place any open fire close to the unit, like candles.
19. This unit was designed to work properly in a temperature range from 15°C to 30°C
and a maximum of 80% humidity.
20. AMP CS2 is heavy, 40 kg or about 88 lb. Please handle with care!
Page 7
AMP CS2's amplification (gain) can be selected by turning the volume knob or by
remote control, not as usual by attenuating the input level, but by setting the gain
lossless according to the actual requirements.
The DIGM setting is always “10" after Power OFF / ON, for having a safe volume
protecting your speakers.
In a consistent B.M.C. chain with an optical DIGM Control connection the gain will be
selected by the B.M.C. DAC volume control.
DIGM = Discrete Intelligent Gain Management
The gain adjustment is done in precise 1 dB increments, which are indicated on the
DIGM LED display: 00 - 66.
At DIGM 39 gain is about 1:1.
At DIGM 55 gain is so high that a full scale signal from a digital device with standard
level output (eg B.M.C. DAC1 or BDCD1) will drive AMP CS2 close to maximum, without
pushing it into clipping.
(For analog devices, there is unfortunately no well-defined limit.)
About DIGM 55 is recommended as a Standard Power Amplifier Gain Setting for high
listening levels. For lower listening levels a lower DIGM setting is recommended for
less noise and a better sound.
DIGM 66 is the highest possible gain setting with about the same amplification as
other power amplifiers. We recommend using DIGM 66 only if required. A lower
DIGM setting compensates by better sound quality.
At DIGM 00 the input is switched off for a complete mute.
Explanation of the used symbols:
The lightning flash with an arrowhead, encircled by a triangle,
is intended to alert the user to potential hazards of electric
shock within the product's enclosure.
The exclamation mark, encircled by a triangle, is intended to
point out to the user that there are important operating and
maintenance (servicing) instructions in this manual.
Caution:
To reduce the risk of electric shock, do not remove the
cover or rear panel. The unit does not contain any userserviceable parts. Any burnt fuses inside this unit should
be replaced by qualified service personnel only. Please
leave service and maintenance to qualified service
personnel. Reduce the risk of electric shock, do not
remove the cover or rear panel. It does not contain any
user-serviceable parts. Refer servicing to qualified service
personnel.
WARNING :
TO PREVENT FIRE OR SHOCK HAZARD, DO NOT EXPOSE
THIS APPLIANCE TO RAIN OR MOISTURE.
Power Cord
The unit is shipped with a power cable matching the power
outlets in the country of sale. Only the included power cable
has been approved for use with the AMP CS2.
In case of questions please consult an electrician.
Important Safety Information
DIGM Volume Adjustment and Display
Page 8
RC-1
DAC
CD
IN
AMP
VOL
VOL
IN
df
ovs ups
+10
0
987
654
3
21
clear
checkprog
disp
rep.
mute
mute
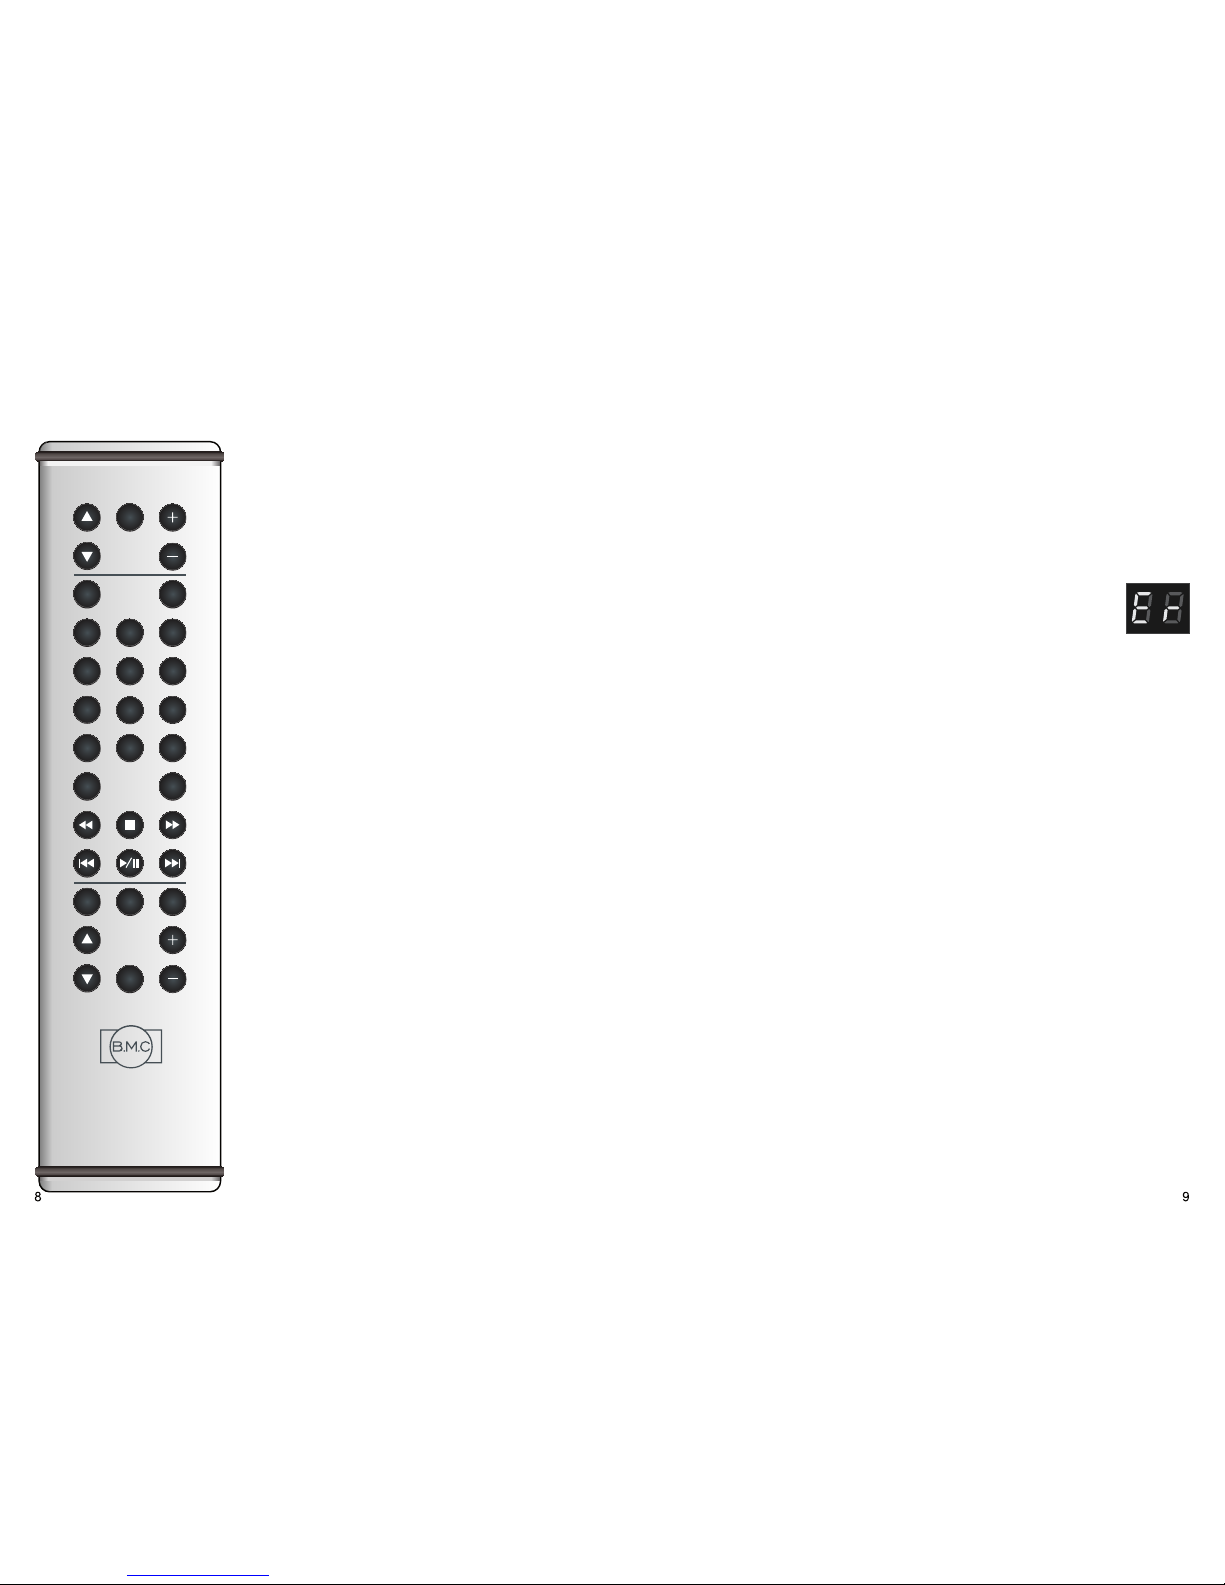
Use the AMP section on top of RC-1 for the classical
Amplifier mode
VOLUME +
Increase the sound volume
VOLUME -
Decrease the sound volume
MUTE
Mutes the signal.
Unmute by pressing MUTE again.
MUTE will not be cancelled by changing volume,
only by pressing MUTE again!
INPUT UP / DOWN
Changes to the next / previous INPUT
Use VOLUME and MUTE of the DAC section of
RC-1 for the B.M.C. chain mode with Volume
controlled by the B.M.C. DAC
BATTERIES
If the operating range of the RC1 remote control
decreases, change the batteries of the remote
control to new ones.
Open and close the battery case with a TORX-10
screwdriver.
Insert new batteries of type AA / Mignon in correct
+/- polarity.
Alkalin e b atter ies may be used as well as
rechargeable NiMH, but never mixed.
Whenever you suspect a malfunction of the unit, please first check a possible cause by
proceeding the below list, before contacting your local dealer or the B.M.C. Audio
service.
No Function or Display
· Check the AC-power cable is connected at both sides.
· Make sure there is AC power available at the wall outlet.
· Check the power switch position.
ERROR displayed
· An internal error occurred. Please switch off the unit, wait at least 1 minute, and
switch on again. If error occurs again, switch off the unit and contact your dealer or
B.M.C. Audio service center.
No music
· Check the interconnections of the audio system
· Check the function of the signal source
· Check the amplifier input and volume setting
Remote control non-functional
· Aim at the middle of the display from short distance
· If the operating range decreases, change the batteries of the remote control to
new ones of type AA
Note: The CS2 has a micro-computer inside which may "hang-up" due to static
discharge or other voltage sparks. In this case power off the unit, wait for about 1
minute and power on again.
Maintainance
· The CS2 requires no user maintenance.
· Clean the unit with a dry micro-fiber cloth only.
· Take special care not to scratch the acrylic
window.
Service
In case you have to contact the B.M.C. Audio Service Center, please prepare the
following information:
·
Model-name, serial number and date of purchase.
· Name, tel. and address of the dealer.
· Precise description of the malfunction.
Remote Control Troubleshooting
 Loading...