

Page 1
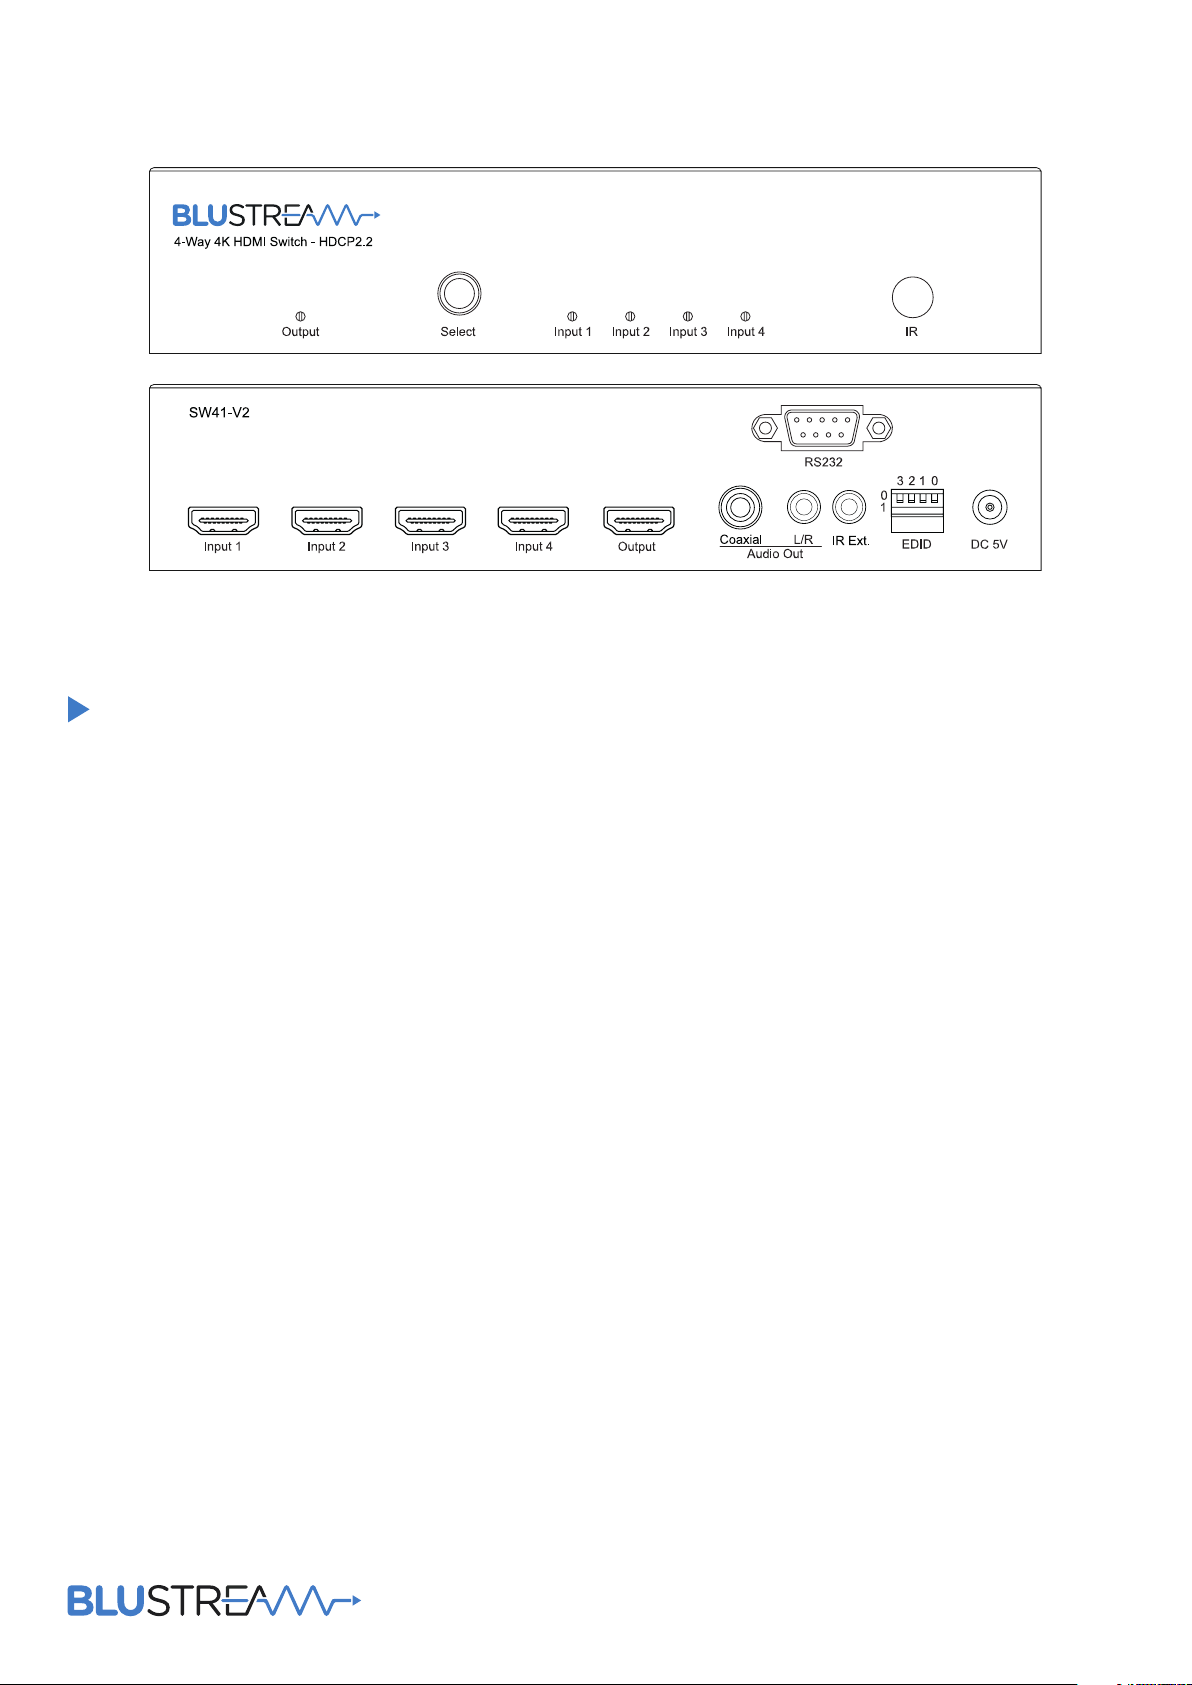
SW41AB-V2
User Manual
Revision: 1.1 - November 2019
Page 2

SW41AB-V2 USER MANUAL
Thank you for purchasing
this product.
For optimum performance and safety,
please read these instructions carefully
before connecting, operating or
adjusting this product. Please keep this
manual for future reference.
Surge protection device
recommended
This product contains sensitive electrical
components that may be damaged
by electrical spikes, surges, electric
shock, lightning strikes, etc. Use of surge
protection systems is highly recommended
in order to protect and extend the life of
your equipment.
Contents
Introduction 03
Features 03
Panel Descriptions 04
Infrared Remote Control 05
Infrared Distribution 05
EDID Control 06
Application Diagram 07
Safety And
Performance Notice
Do not substitute or use any other power
supply other than the enclosed unit, or a
Blustream approved replacement.
Do not disassemble the unit for any reason.
Doing so will void the manufacturer’s
warranty.
Specifications 08
Package Contents 08
Maintenance 08
RS-232 Control 09
RS-232 Commands 10
IR Commands 10
Installer Notes 11
02
www.blustream.com.au | www.blustream.co.uk
Page 3

SW41AB-V2 USER MANUAL
The SW41AB-V2 is a 4-way HDMI switch with integrated audio breakout and the
Introduction
FEATURES:
• Features 4 x HDMI inputs which can be switched to a single HDMI output
• Supports full HDMI 2.0 specification 4K UHD video (4K @ 60Hz 4:4:4)
• HDCP 2.2 compliant
• Auto-switching capabilities
• Supports 3D signal display
• Supports all industry standard video resolutions including VGA-WUXGA and 480i-4K
• Supports all known HDMI audio formats including Dolby TrueHD, Dolby Atmos, Dolby Digital Plus and DTS-HD
Master Audio transmission
• HDMI audio breakout to analogue L/R audio and coaxial digital outputs concurrently
• Control via front panel, RS-232 or IR
• Advanced EDID management
ability to auto-switch. The switch supports full HDMI 2.0 and HDCP 2.2 with video
resolutions up to and including 4K @ 60Hz 4:4:4.
contact [email protected] | [email protected]
03
Page 4
SW41AB-V2 USER MANUAL
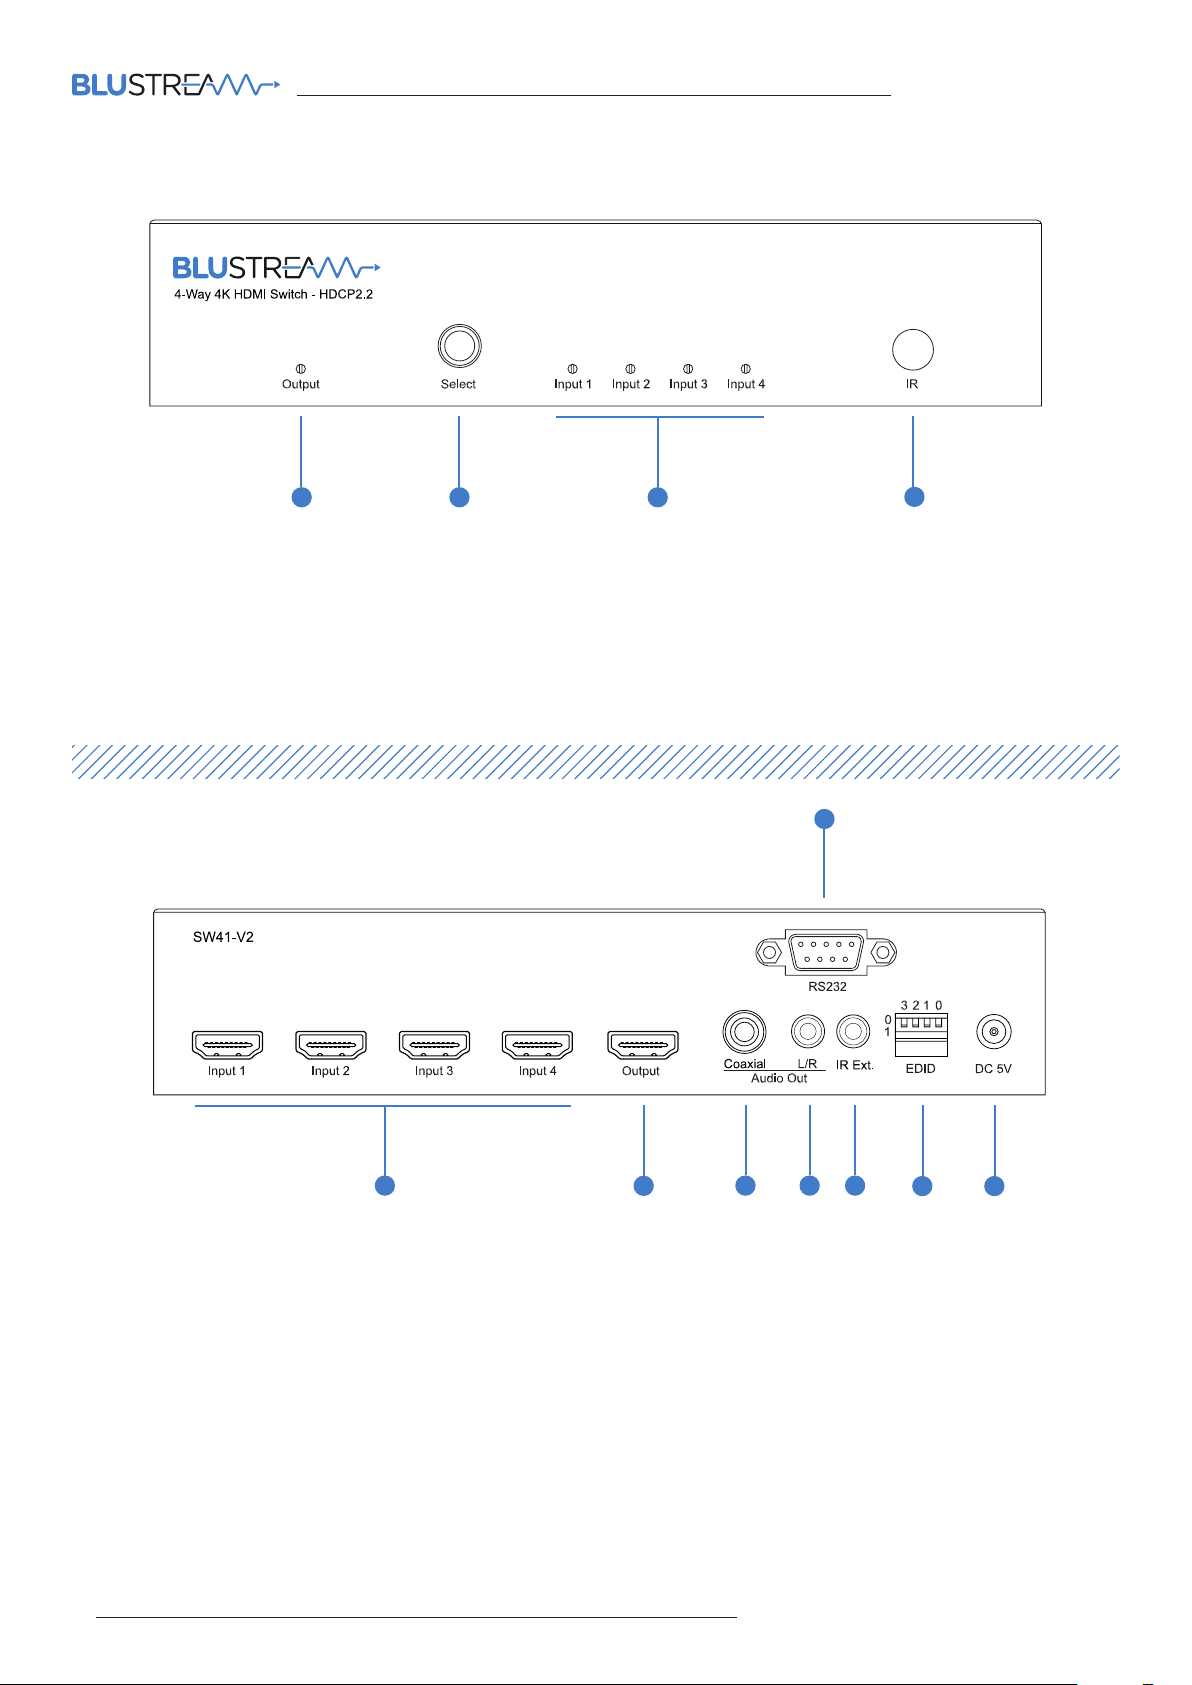
Front Panel
1 2 3 4
1 Output LED indicator - indicates if a display device is connected to the switches HDMI output
2 Select button - press to toggle between HDMI inputs. Auto-switching function is enabled / disabled by pressing
and holding the Select button for 5 seconds. Output light will flash 3 times to confirm switching function enabled /
disabled
3 Input LED indicators - displays the HDMI input currently active
4 IR receiver window
Rear Panel
1
8
2
3 4 5
6 7
1 HDMI inputs - connect to HDMI source devices
2 HDMI output - connect to a HDMI display device
3 Coaxial digital output (S/PDIF) - de-embedded from selected HDMI input
4 Analogue audio Le/Right output (3.5mm stereo jack) - de-embedded from the selected HDMI input. Source input
must be PCM 2 channel audio for the analogue output to work. The SW41AB-V2 does not down-mix multi-channel
audio signals
5 External IR port - connect supplied Blustream 5V IR receiver, or control processor to control the switcher
6 EDID DIP switches - see page 06
7 Power port - use supplied Blustream 5V/2A DC adaptor to power the switcher
8 RS-232 port - for control of the switcher from a PC or control processor
04
www.blustream.com.au | www.blustream.co.uk
Page 5
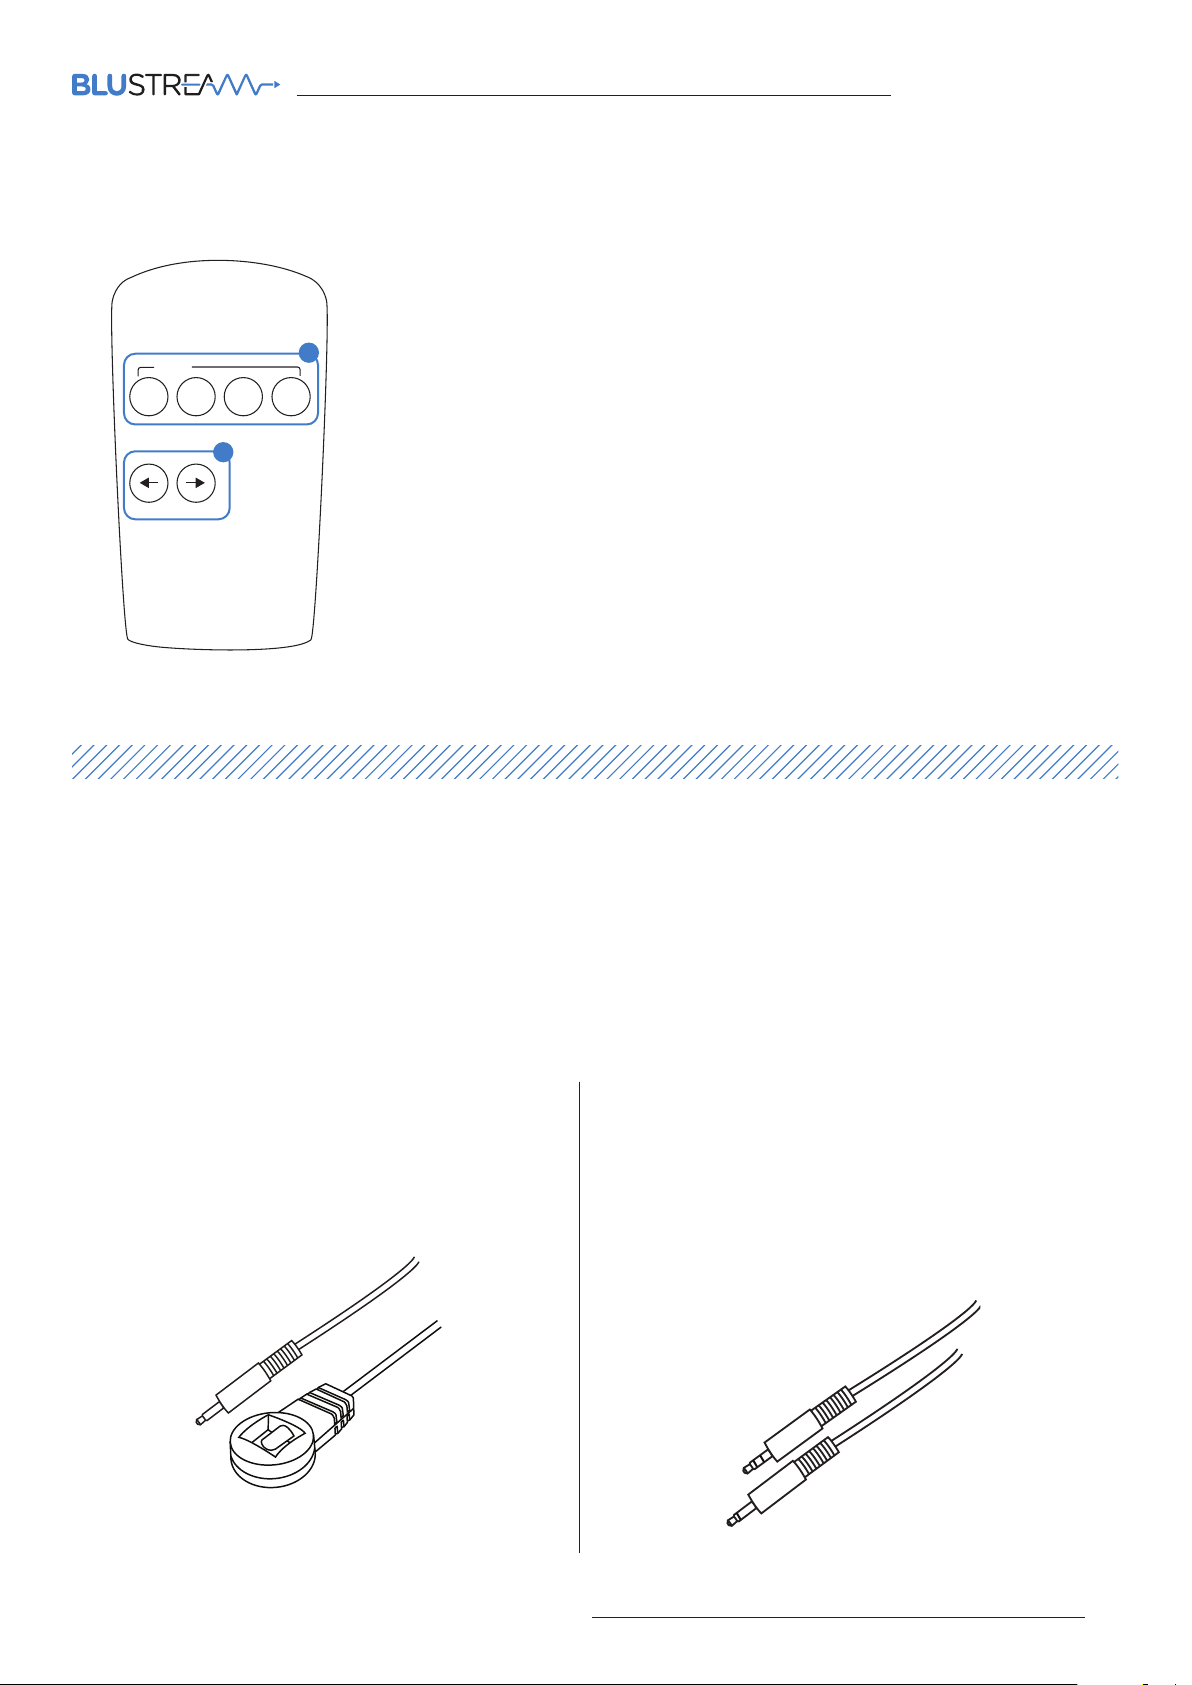
Infrared Remote Control - REMSW41
1 Direct HDMI input selection buttons
2 Scroll through inputs - HDMI input 1 - 2 - 3 - 4 - 1...
Input
1 2 3 4
2
1
SW41AB-V2 USER MANUAL
Infrared (IR) Distribution
The Blustream range of HDMI products include multiple options for control and routing of IR.
IMPORTANT: Blustream Infrared products are all 5V and NOT compatible with alternative manufacturers
Infrared solutions. When using third party 12V IR control solutions please use the Blustream IRCAB cable for
IR conversion (12V to 5V) - sold separately.
Each Blustream HDMI product is supplied with the necessary IR hardware required:
IR Receiver - IRR
Blustream 5V IR receiver (supplied) to receive IR signal
and control the SW41AB-V2
IR Control Cable - IRCAB
Blustream IR Control cable 3.5mm Mono to 3.5mm Stereo
for linking third party control solutions to Blustream
products.
Compatible with 12V IR third party products.
Note: Cable is directional as indicated - not supplied
contact [email protected] | [email protected]
05
Page 6
SW41AB-V2 USER MANUAL
EDID Control
EDID (Extended Display Identification Data) is a data structure that is used between a display and a source. This data is used
by the source to find out what audio and video resolutions are supported by the display, from this information the source will
discover what the best audio and video resolution that need to be output.
While the objective of EDID is to make connecting a digital display to a source a simple plug and play procedure, issues do arise
when multiple displays or video matrix switching is introduced because of the increased number of variables.
By pre-determining the video resolution and audio format of the sources and display device you can reduce the time needed for
EDID hand shaking thus making switching quicker and more reliable.
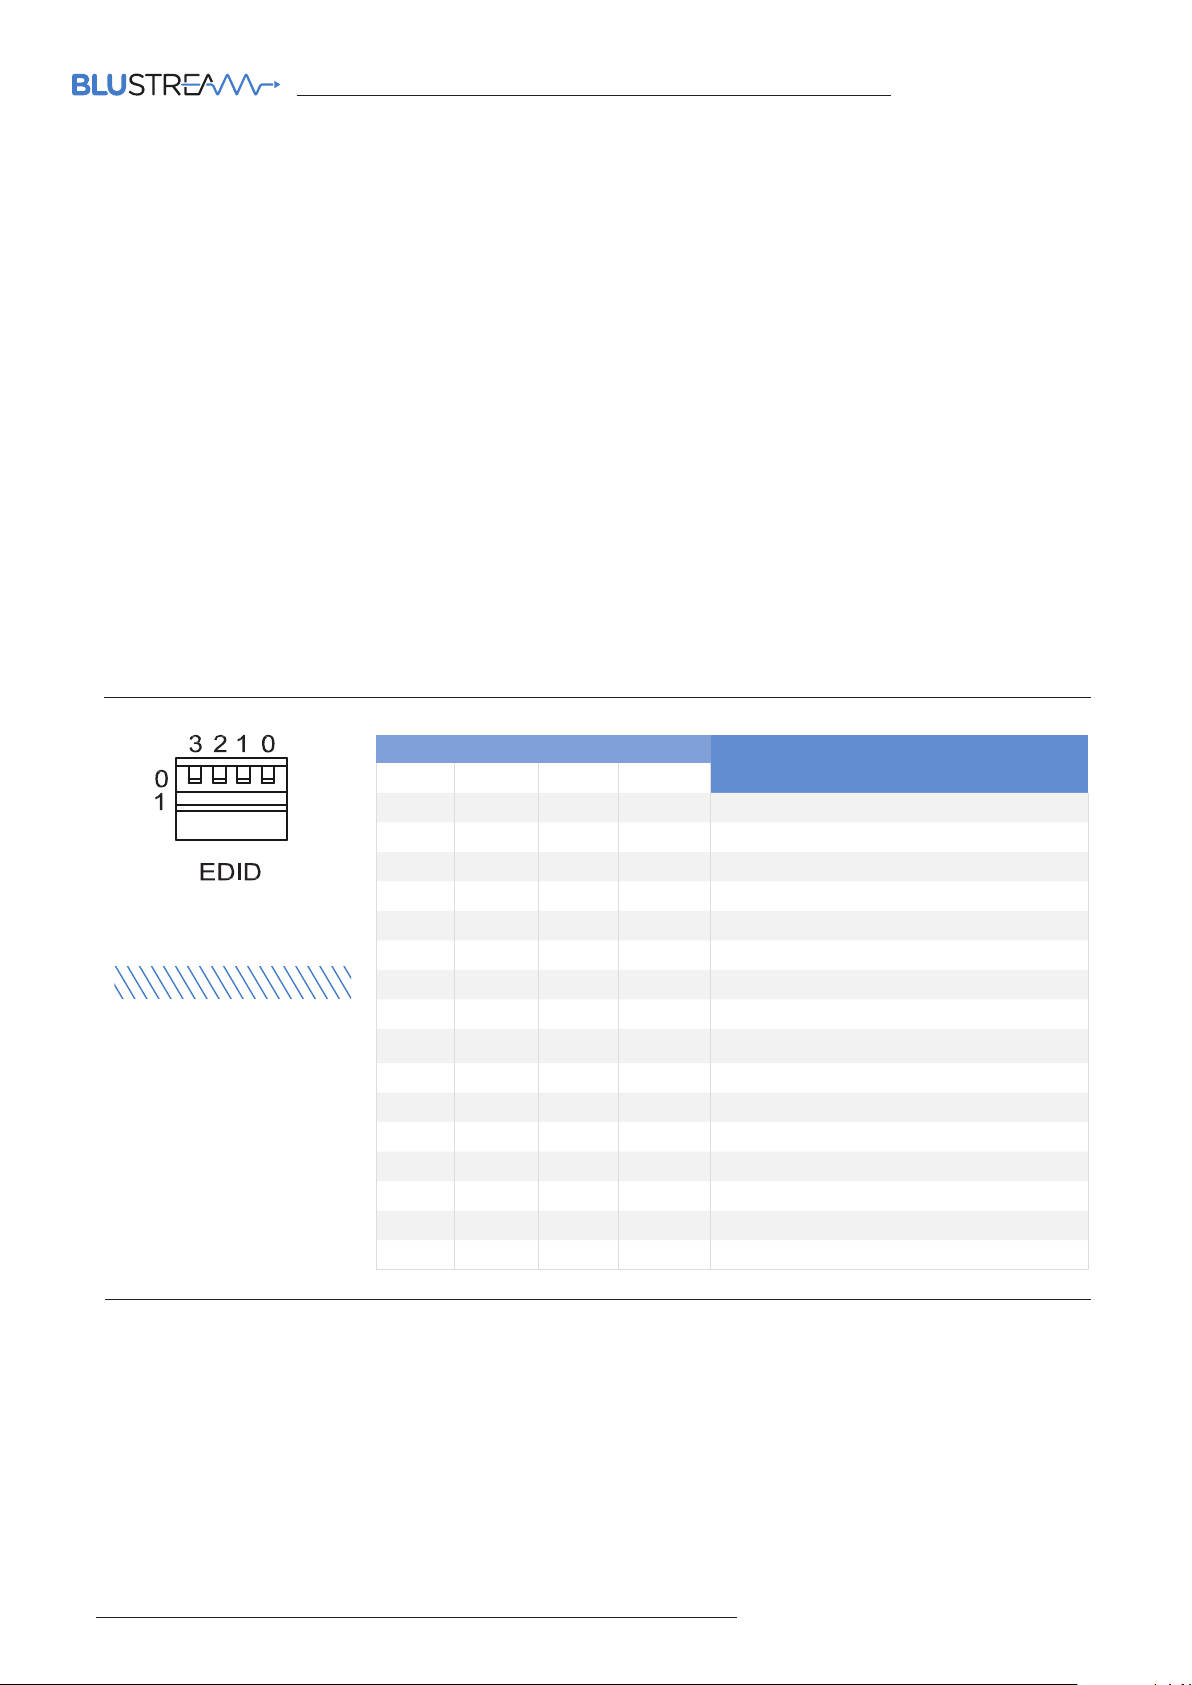
Configuration of the switcher EDID settings can be achieved using the product dip-switches on the SW41AB-V2. EDID dip-switch
settings are shown below.
NOTE: You must power cycle the product aer making EDID changes. For some sources it may be necessary to power cycle the
source, or switcher, aer EDID changes have been made for the source to update its video & audio output settings.
Global EDID Settings
Dip-switch position ‘0’ = O
Dip-switch position ‘1’ = On
DIP ON /OFF SWITCHING POSITIONS
3 2 1 0
OFF OFF OFF ON 1080p / 2ch PCM
OFF OFF ON OFF 1080p / 5.1ch PCM/DTS/Dolby
OFF OFF ON ON 1080p / 7.1ch PCM/DTS/Dolby/HD
OFF ON OFF OFF 1080i / 2ch PCM
OFF ON OFF ON 1080i / 5.1ch PCM/DTS/Dolby
OFF ON ON OFF 1080i / 7.1ch PCM/DTS/Dolby/HD
OFF ON ON ON 4K@60Hz 4:2:0 / 2ch PCM
ON OFF OFF OFF 4K@60Hz 4:2:0 / 5.1ch PCM/DTS/Dolby
ON OFF OFF ON 4K@60Hz 4:2:0 / 7.1ch PCM/DTS/Dolby/HD
ON OFF ON OFF 4K@60Hz 4:4:4 / 2ch PCM
ON OFF ON ON 4K@60Hz 4:4:4 / 5.1ch PCM/DTS/Dolby
ON ON OFF OFF 4K@60Hz 4:4:4 / 7.1ch PCM/DTS/Dolby/HD
ON ON OFF ON DVI 1280x1024 @60Hz no audio
ON ON ON OFF DVI 1920x1080 @60Hz no audio
ON ON ON ON DVI 1920x1200 @60Hz no audio
OFF OFF OFF OFF Copy EDID from Output 1
EDID TYPE
06
www.blustream.com.au | www.blustream.co.uk
Page 7
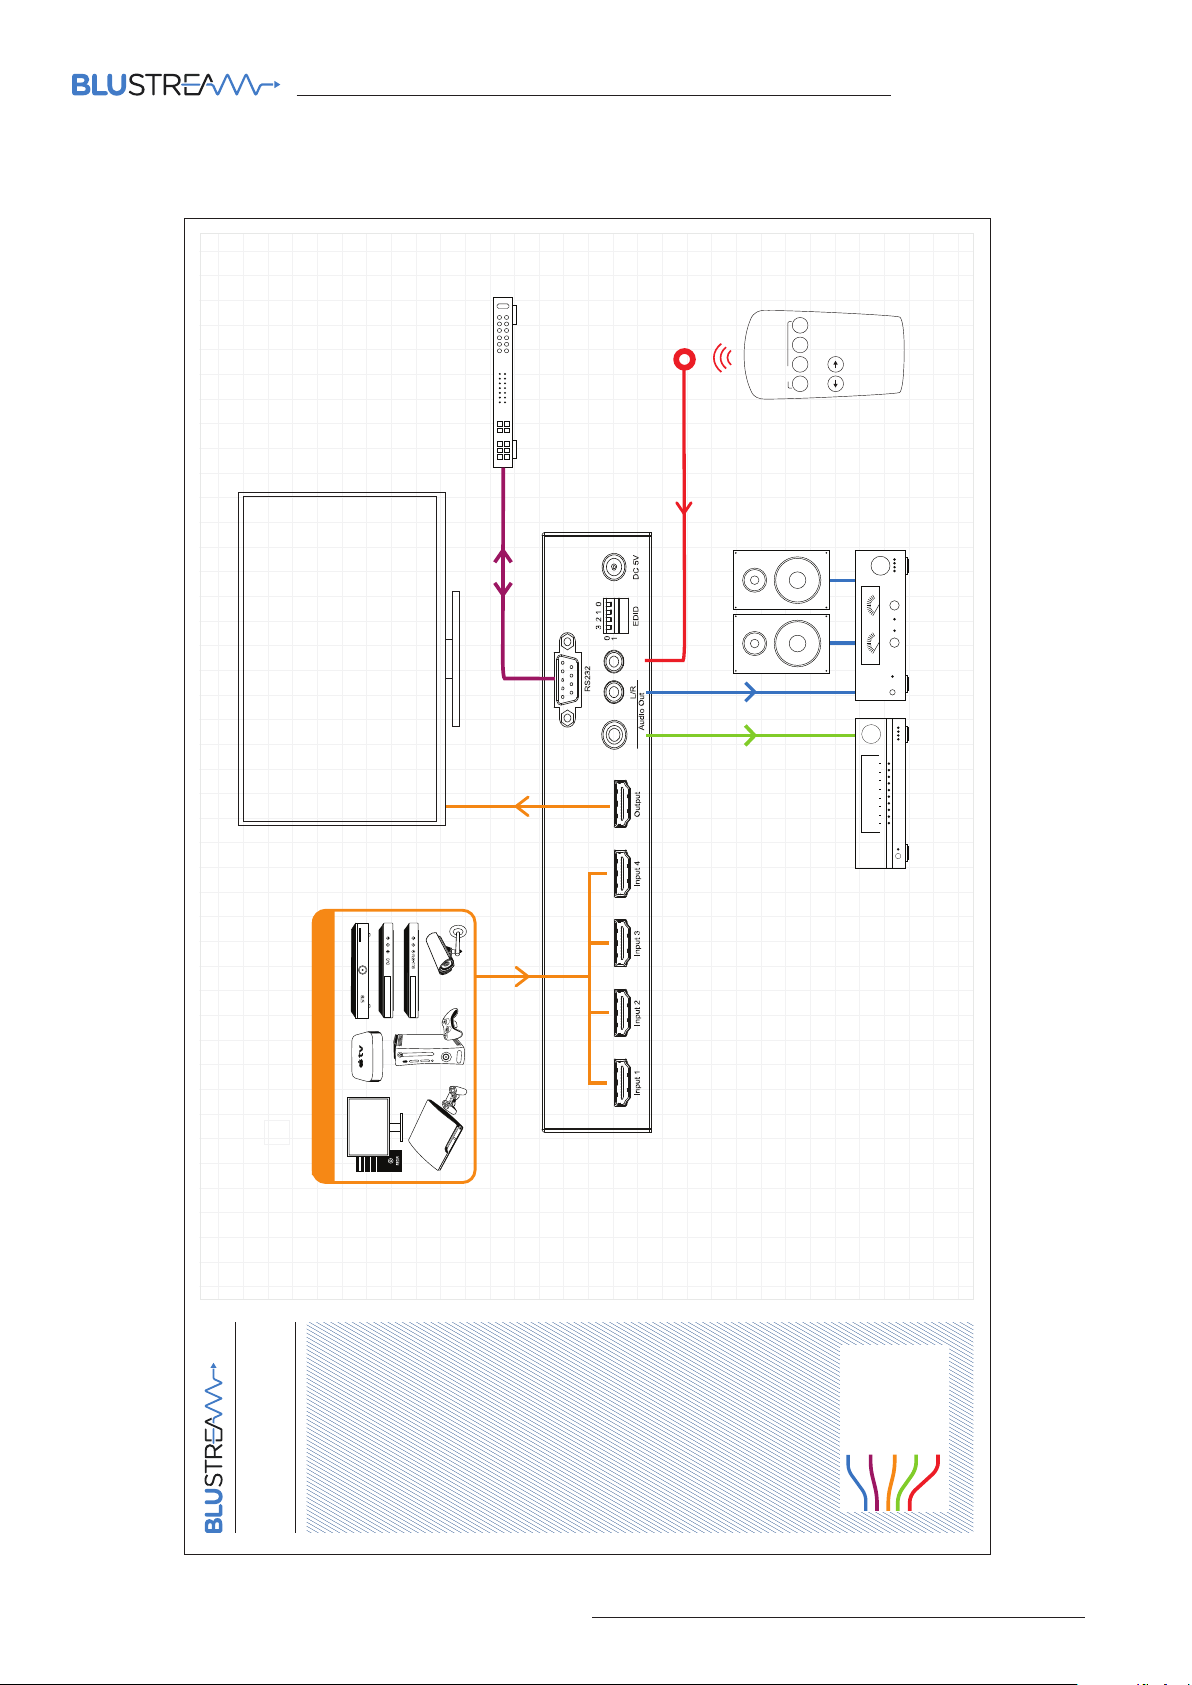
Application Diagram
Control Processor
IR Ext.
SW41AB-V2 USER MANUAL
Input
1 2 3 4
UP TO 4x 4K UHD SOURCES
Coaxial
4K UHD DISPLAY
SW41-V2
Example Schematic
SW41AB-V2
contact [email protected] | [email protected]
Analogue Audio
RS232 Cable
HDMI
Digital Audio
IR Receiver Cable
07
Page 8

Specifications
• Video Input Connectors: 4 x HDMI Type A, 19-pin, female
• Video Output Connectors: 1 x HDMI Type A, 19-pin, female
• Audio Output Connectors: 1 x RCA (S/PDIF) & 1 x Analogue audio L/R (3.5mm stereo jack)
• IR Input Ports: 1 x 3.5mm stereo jack
• RS232 Serial Port: 1 x DB9, female
• Dimensions (WxDxH): 196 x 104 x 41mm, including connections, without feet (removable)
• Shipping Weight: 0.9kg
• Operating Temperature: 32°F to 104°F (0°C to 40°C)
• Storage Temperature: -4°F to 140°F (-20°C to 60°C)
• Power Supply: 1 x 5V/1A DC
NOTE: Specifications are subject to change without notice. Weights and dimensions are approximate.
SW41AB-V2 USER MANUAL
Package Contents
• 1 x SW41AB-V2
• 1 x REMSW41 Remote Control
• 1 x 5V/1A DC Power Supply
• 1 x IR Receiver (IRR)
• 1 x Mounting Bracket Set
• 1 x User Manual
Maintenance
Clean this unit with a so, dry cloth. Never use alcohol, paint thinner, or benzene to clean this unit.
Components inside this unit are not user serviceable. Do not remove the protective cover from the unit. Removing any
panel from this product will invalidate the manufacturers warranty.
08
www.blustream.com.au | www.blustream.co.uk
Page 9
SW41AB-V2 USER MANUAL
RS-232 Control
The SW41AB-V2 switch can be controlled via a 9-pin serial cable.
See page 10 for the full list of control protocols.
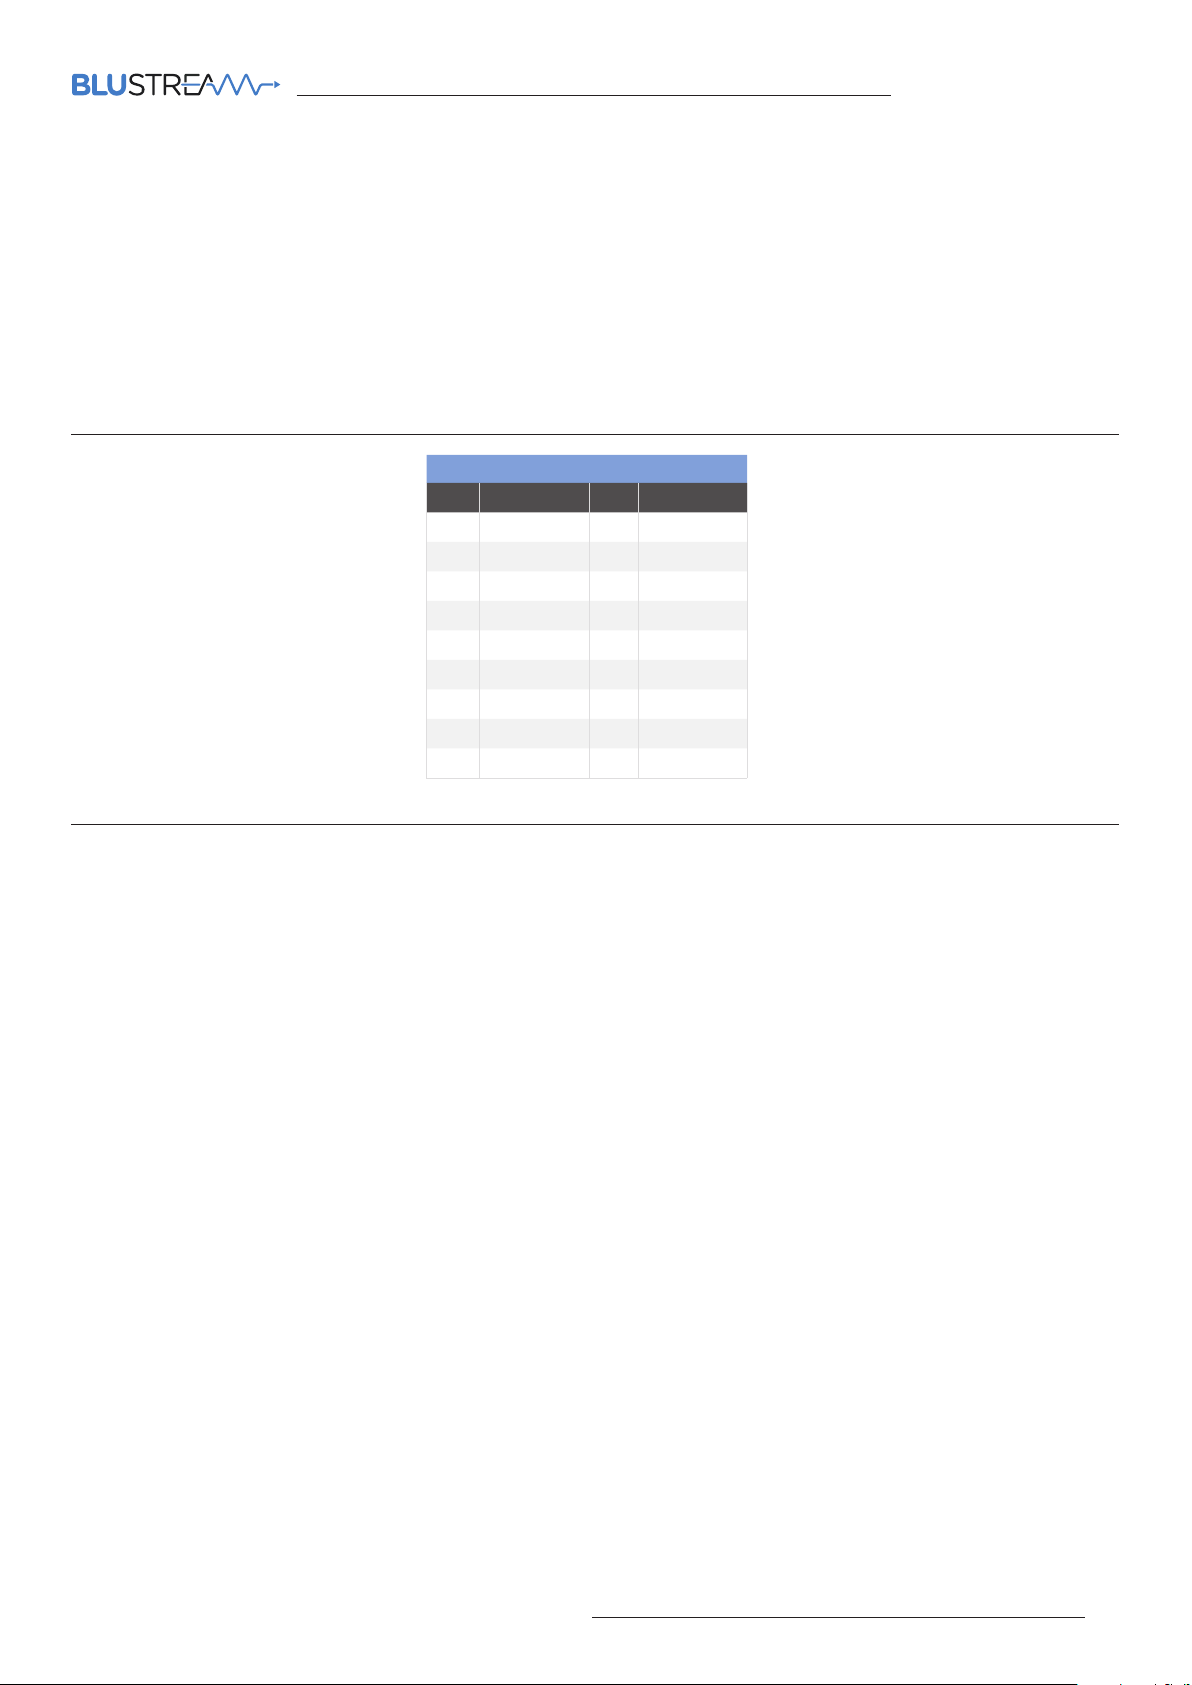
Details of RS-232 pin assignment and communication are below. Please note that depending on your control device
serial port pin configuration you may require either a ‘Straight’ RS-232 cable or ‘Null-modem’ type.
RS-232 Settings
Baud Rate: 57600 bps
Data Bit: 8-bit
Parity: None
Stop Bit: 1-bit
Flow Control: None
BLUSTREAM RS-232 CONTROL SYSTEM
PIN Assignment PIN Assignment
1 NC 1 NC
2 Tx 2 Rx
3 Rx 3 Tx
4 NC 4 NC
5 GND 5 GND
6 NC 6 NC
7 NC 7 NC
8 NC 8 NC
9 NC 9 NC
Commonly Used Serial Commands
There are several commands that are commonly used for control and testing:
STATUS Status will give feedback on switch such as zones on, type of connection etc
PON Power on
POFF Power o
OUTFRyy (where ‘yy’ is the input)
Example: OUTFR04 (this would switch the output to source input 4)
Common Mistakes
• Carriage return – some programs do not require the carriage return where as other will not work unless sent directly
aer the string. In the case of some Terminal soware the token <CR> is used to execute a carriage return. Depending
on the program you are using this token maybe dierent. Some other examples that other control systems deploy
include \r or 0D (in hex)
• Spaces – Blustream commands do not require space between commands unless specified. There may be some
programs that require spacing in order to work.
- How the string should look is as follows OUTFR03
- How the string may look if spaces are required: OUT{Space}FR{Space}03
• Baud rate or other serial protocol settings not correct - see above
contact [email protected] | [email protected]
09
Page 10
SW41AB-V2 USER MANUAL
RS-232 Commands
RS-232 COMMAND DESCRIPTION
? Print Help Information
HELP
STATUS Print System Status and Port Status
IRON/OFF Set System IR Control On or O
KEYON/OFF Set System KEY Control On or O
RESET Reset System To Default Setting (Type “Yes” To Confirm, “No” To Discard)
OUTFRyy Set OUTPUT From INPUT:yy
OUTON/OFF Set OUTPUT Port On or O
OUT AUTO ON/OFF Set OUTPUT Port to Auto Switch On or O
SW41AB-V2 IR Commands
Print Help Information
SW41 NEC IR: CUSTOMER CODE 1898 HEX IR
0000 006D 0000 0022 0157 00AC 0016 0016 0016 0016 0016 0016 0016 0041 0016
0041 0016 0016 0016 0016 0016 0016 0016 0016 0016 0016 0016 0016 0016 0041 0016
Input 1 50
Input 2 55
Input 3 48
Input 4 4A
Back
(Input 4, 3, 2, 1, 4...)
Forward
(Input 1, 2, 3, 4, 1...)
06
05
0041 0016 0016 0016 0016 0016 0041 0016 0016 0016 0016 0016 0016 0016 0016 0016
0041 0016 0016 0016 0041 0016 0016 0016 0041 0016 0041 0016 0041 0016 0041 0016
0016 0016 0041 0016 0016 0016 0041 0016 0689
0000 006D 0000 0022 0157 00AC 0016 0016 0016 0016 0016 0016 0016 0041 0016
0041 0016 0016 0016 0016 0016 0016 0016 0016 0016 0016 0016 0016 0016 0041 0016
0041 0016 0016 0016 0016 0016 0041 0016 0041 0016 0016 0016 0041 0016 0016 0016
0041 0016 0016 0016 0041 0016 0016 0016 0016 0016 0041 0016 0016 0016 0041 0016
0016 0016 0041 0016 0016 0016 0041 0016 0689
0000 006D 0000 0022 0157 00AC 0016 0016 0016 0016 0016 0016 0016 0041 0016
0041 0016 0016 0016 0016 0016 0016 0016 0016 0016 0016 0016 0016 0016 0041 0016
0041 0016 0016 0016 0016 0016 0041 0016 0016 0016 0016 0016 0016 0016 0041 0016
0016 0016 0016 0016 0041 0016 0016 0016 0041 0016 0041 0016 0041 0016 0016 0016
0041 0016 0041 0016 0016 0016 0041 0016 0689
0000 006D 0000 0022 0157 00AC 0016 0016 0016 0016 0016 0016 0016 0041 0016
0041 0016 0016 0016 0016 0016 0016 0016 0016 0016 0016 0016 0016 0016 0041 0016
0041 0016 0016 0016 0016 0016 0041 0016 0016 0016 0041 0016 0016 0016 0041 0016
0016 0016 0016 0016 0041 0016 0016 0016 0041 0016 0016 0016 0041 0016 0016 0016
0041 0016 0041 0016 0016 0016 0041 0016 0689
0000 006D 0000 0022 0157 00AC 0016 0016 0016 0016 0016 0016 0016 0041 0016
0041 0016 0016 0016 0016 0016 0016 0016 0016 0016 0016 0016 0016 0016 0041 0016
0041 0016 0016 0016 0016 0016 0041 0016 0016 0016 0041 0016 0041 0016 0016 0016
0016 0016 0016 0016 0016 0016 0016 0016 0041 0016 0016 0016 0016 0016 0041 0016
0041 0016 0041 0016 0041 0016 0041 0016 0689
0000 006D 0000 0022 0157 00AC 0016 0016 0016 0016 0016 0016 0016 0041 0016
0041 0016 0016 0016 0016 0016 0016 0016 0016 0016 0016 0016 0016 0016 0041 0016
0041 0016 0016 0016 0016 0016 0041 0016 0041 0016 0016 0016 0041 0016 0016 0016
0016 0016 0016 0016 0016 0016 0016 0016 0016 0016 0041 0016 0016 0016 0041 0016
0041 0016 0041 0016 0041 0016 0041 0016 0689
10
www.blustream.com.au | www.blustream.co.uk
Page 11

Page 12

www.blustream.co.uk
www.blustream.com.au
 Loading...