

Page 1
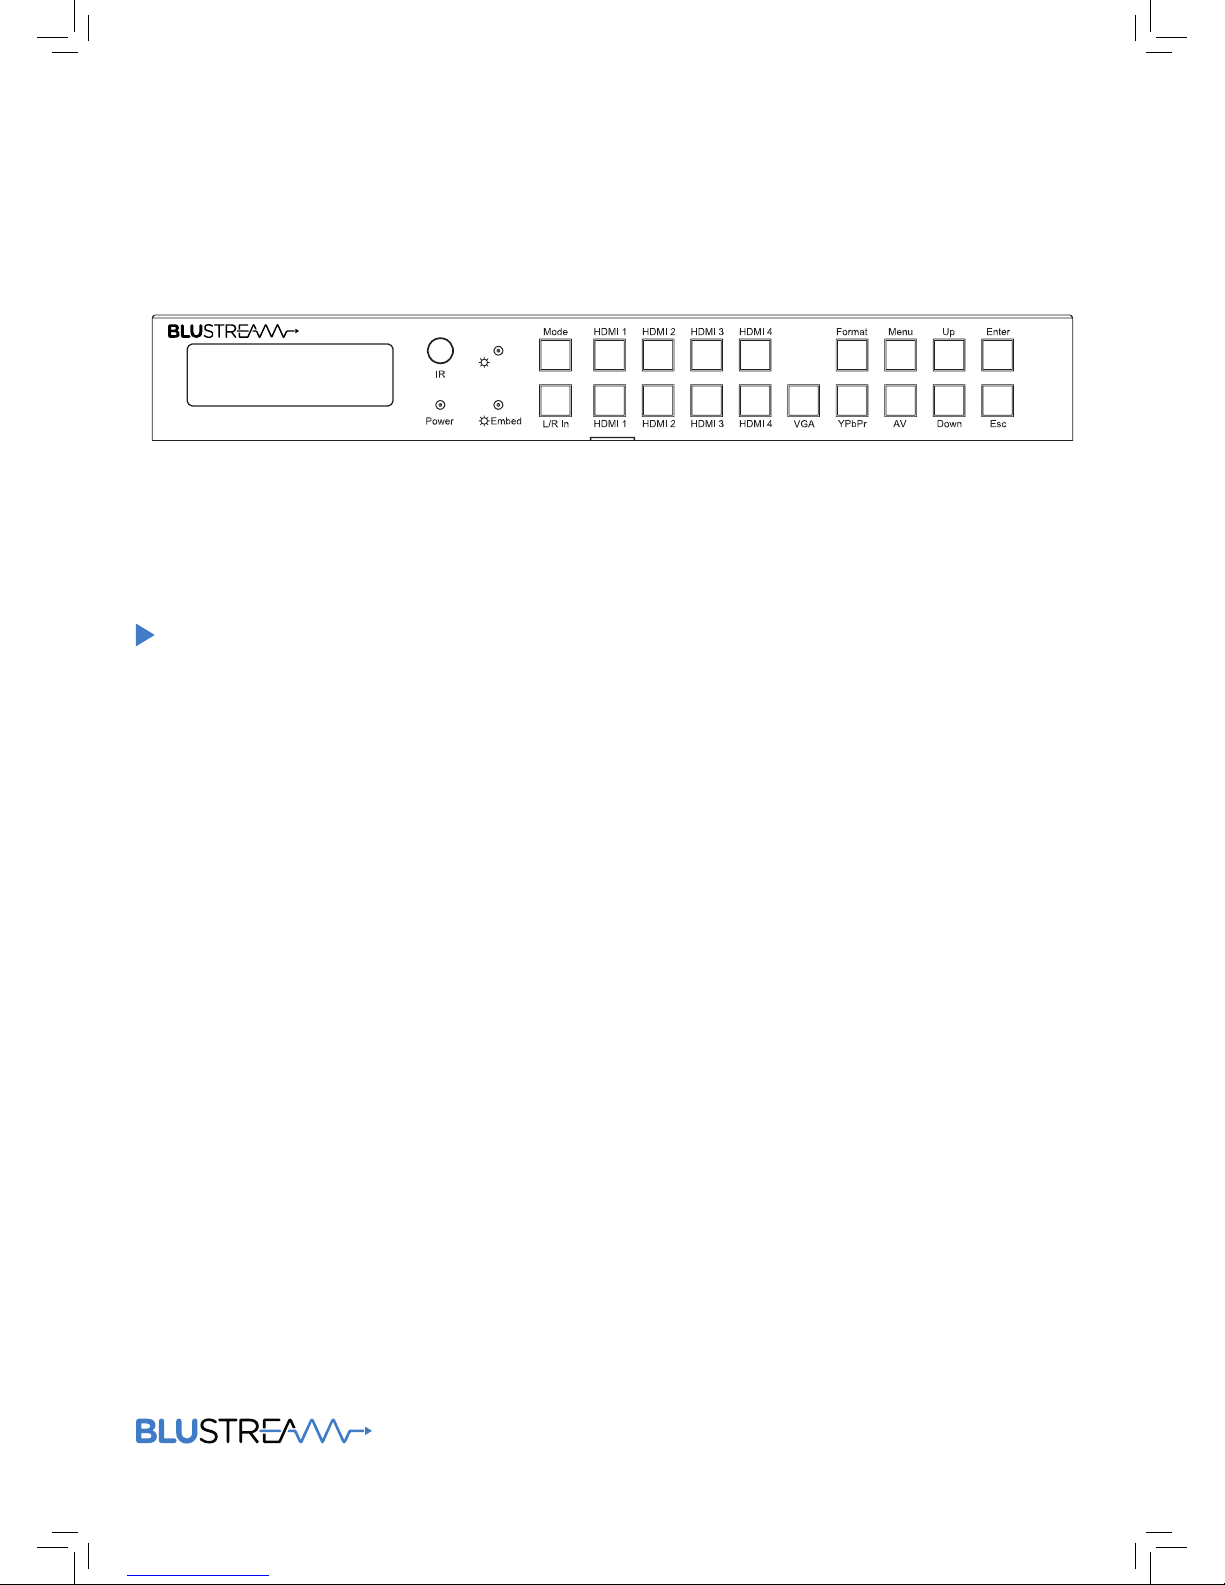
MFP72
User Manual
7 input Multi-format Presentation Switch
Matrix
Switching
Page 2
MFP72 USER MANUAL
02
www.blustream.co.uk
Surge protection device
recommended
This product contains sensitive electrical components that may be damaged
by electrical spikes, surges, electric
shock, lightning strikes, etc. Use of
surge protection systems is highly
recommended in order to protect and
extend the life of your equipment.
Features
03
Panel Descriptions
04/05
Remote Control Descriptions
05
IR Distribution
06
EDID Configuration
07
Application Diagram
08
Specifications
09
Package Contents
09
Maintenance
09
RS-232 Information
10
Contents
Thank you for purchasing
this product.
For optimum performance and safety,
please read these instructions carefully before connecting, operating or
adjusting this product. Please keep this
manual for future reference.
Page 3

MFP72 USER MANUAL
03
contact [email protected] / [email protected]
Our MFP72 is a multi-format presentation switcher with in-built video scaling, audio
embedding, audio de-embedding and EDID management.
The MFP72 works in 2 modes, first as a 7 input dual output switcher, alternatively each
output can work independently with output 1 routing the 4x HDMI inputs only and Output
2 switching all 7 video/audio inputs.
With control of the switcher using the front-panel push buttons, IR remote control or RS232 interface it is an ideal solution for commercial installations.
Introduction
FEATURES:
• Switcher can function in 2 modes: Splitter mode - Both HDMI output 1 & 2 display the
same selected input.
Matrix Switcher mode - HDMI inputs are
independently switchable to HDMI outputs 1 & 2.
HDMI output 1 has access to HDMI inputs 1-4 (HDMI
signal pass-through including 4K resolution), whilst
output 2 has access to all HDMI and Analogue video
inputs with associated audio.
• Built-in video scaling, both up-scaling (maximum of 1080p)
and down-scaling capabilities (including 4K to lower
resolutions).
• Video inputs support all industry standard video
resolutions including VGA-WUXGA and 480i-4K.
• Scaled video output resolutions include 720p, 1080P,
1280x1024, 1024x768, 1360x768, 1440x900 & 1680x1050.
• Audio embedding - Independent Analogue L/R audio input
can be embedded to HDMI outputs + Analogue L/R audio
and Coaxial digital outputs concurrently (Feature available
on HDMI outputs 1 + 2 in Splitter mode and HDMI output 2
only in Matrix Switcher mode).
• HDMI audio breakout to Analogue L/R audio and Coaxial
digital outputs concurrently (linked to HDMI output 2 when
in Matrix Switcher mode).
• Volume control of HDMI, Analogue L/R audio and Coaxial
digital outputs.
• Supports all known HDMI audio formats on HDMI pass-
through, including Dolby TrueHD, Dolby Atmos, Dolby
Digital Plus and DTS-HD Master Audio transmission.
• Front panel display for status feedback.
• Control via front panel, IR and RS-232.
• 3rd Party drivers available for all major home control
brands.
• Advanced EDID management.
• HDCP compliant.
Page 4
MFP72 USER MANUAL
04
www.blustream.co.uk
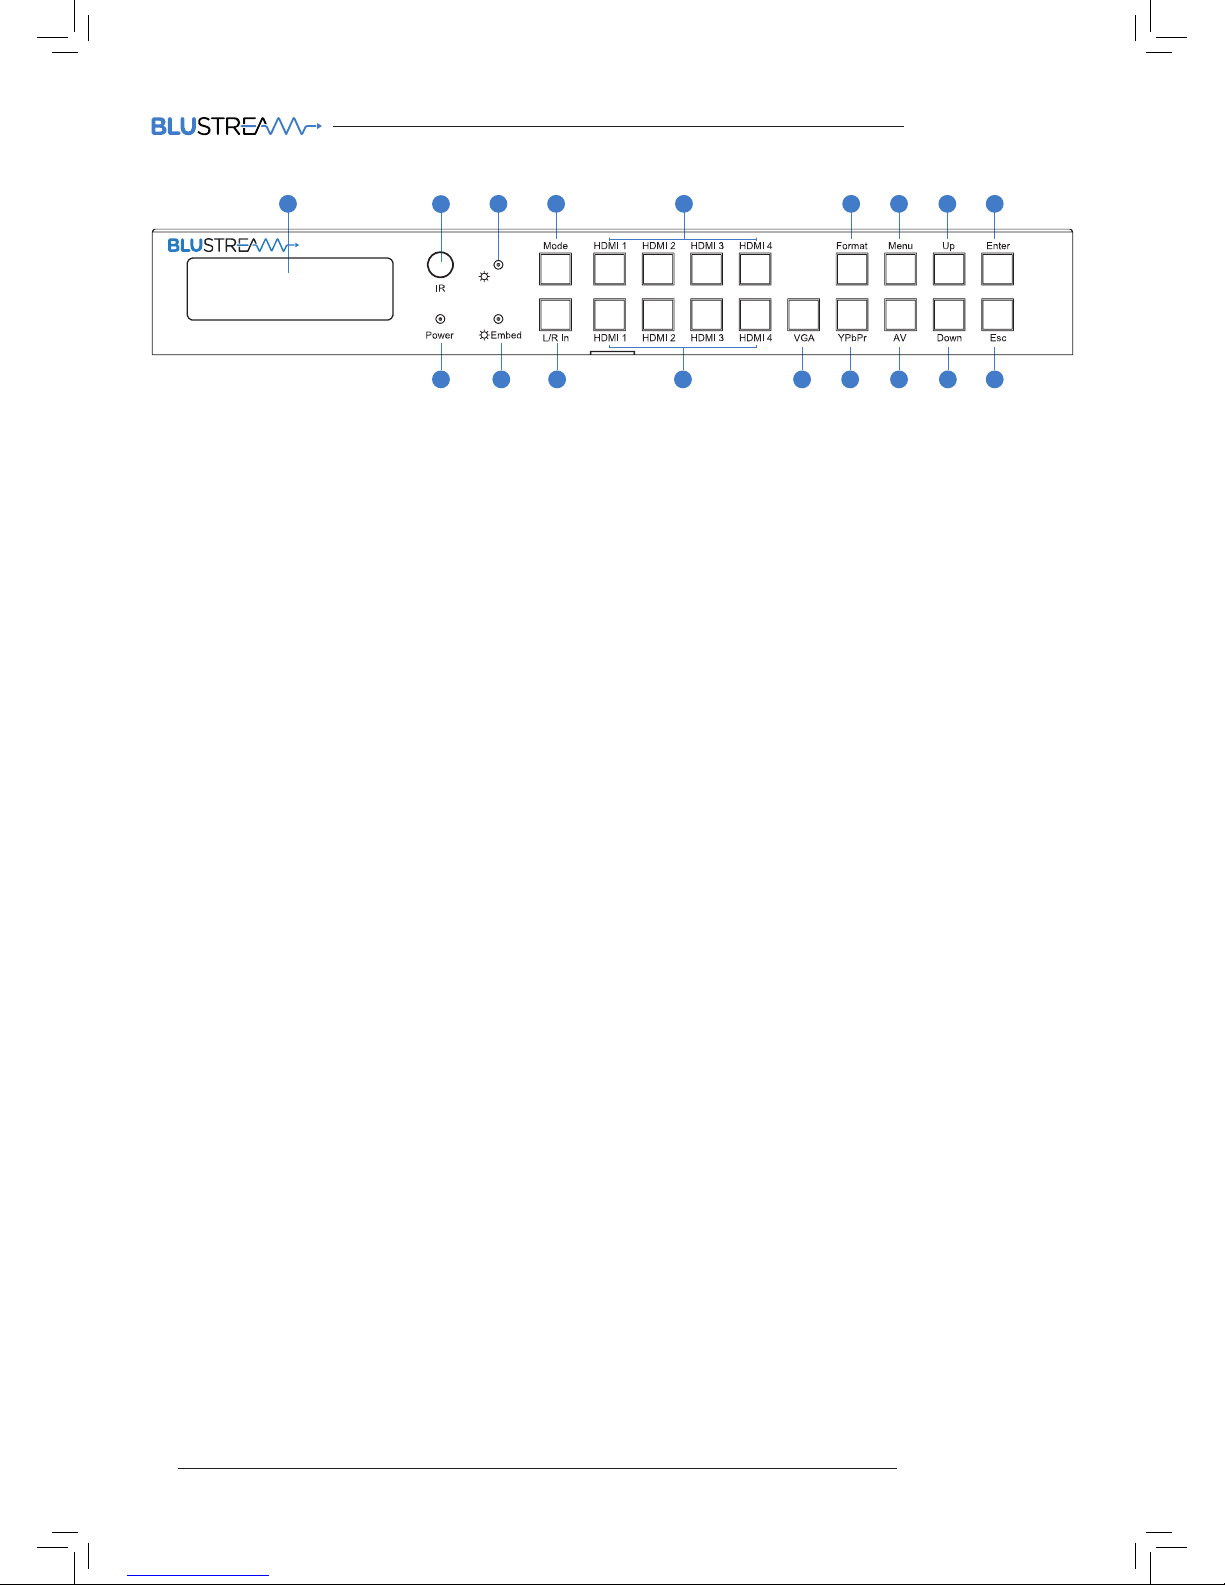
1 LCD display - Shows the status of
input-output selection, EDID info etc.
2 IR receiver window.
3 Matrix Switcher LED indicator
- When the LED is lit, Matrix
Switcher mode is active and
both HDMI outputs switch
independently. When the LED is
not lit the Matrix switcher is in
Splitter mode and both HDMI
outputs will display the same
selected video input.
4 Mode button - Press to switch between
Matrix Switcher and Splitter modes.
5 HDMI input selection buttons for
HDMI output 1 when in Matrix
Switcher mode.
6 Format set button - Press to set the
output resolution.
7 Menu button - Press to enter EDID
set mode, volume setting or F/W
information.
8 Up selection button - Press to
change segment’s value.
9 Enter button - Press to confirm the
settings.
q Power LED indicator - Indicates the
status of power.
w Embed LED indicator - When the
LED is lit, Audio embed mode
is active. When active the L/R
Analogue input will be embedded
onto the HDMI outputs. In
Splitter mode analogue audio is
embedded to both of the HDMI
outputs with the ability to adjust
the volume. In Matrix Switcher
mode Analogue audio will only be
embedded onto HDMI output 2.
e L/R in selection button - Press to
embed the Analogue L/R audio
input to the HDMI outputs (as
above).
r HDMI input selection buttons 1 to
4 - Press to select the HDMI input
switched to output 2 in Matrix
Switcher mode, or both HDMI
outputs in Splitter mode.
t VGA input selection button - Press
to select the VGA input with
associated Analogue L/R audio.
y YPbPr (Component video) input
selection button - Press to select
the YPbPr input with associated
Analogue L/R audio input.
u AV input selection button - Press to
select the AV input with associated
Analogue L/R audio input.
i Down selection button - Press to
change segment’s value.
o ESC-Press to exit the menu.
Notes:
• Volume can be changed using IR, RS-232 control or from the front panel UP
and DOWN buttons when in the volume menu.
• During F/W mode, pressing the Enter button will show the current F/W
information.
10 11 12 13 14 15 16 17 18
Front Panel
1
2
3 4 5 6 7 8 9
7 input Multi-format Presentation Switch
Matrix
Switching
Page 5
MFP72 USER MANUAL
05
contact [email protected] / [email protected]
Remote Control Description
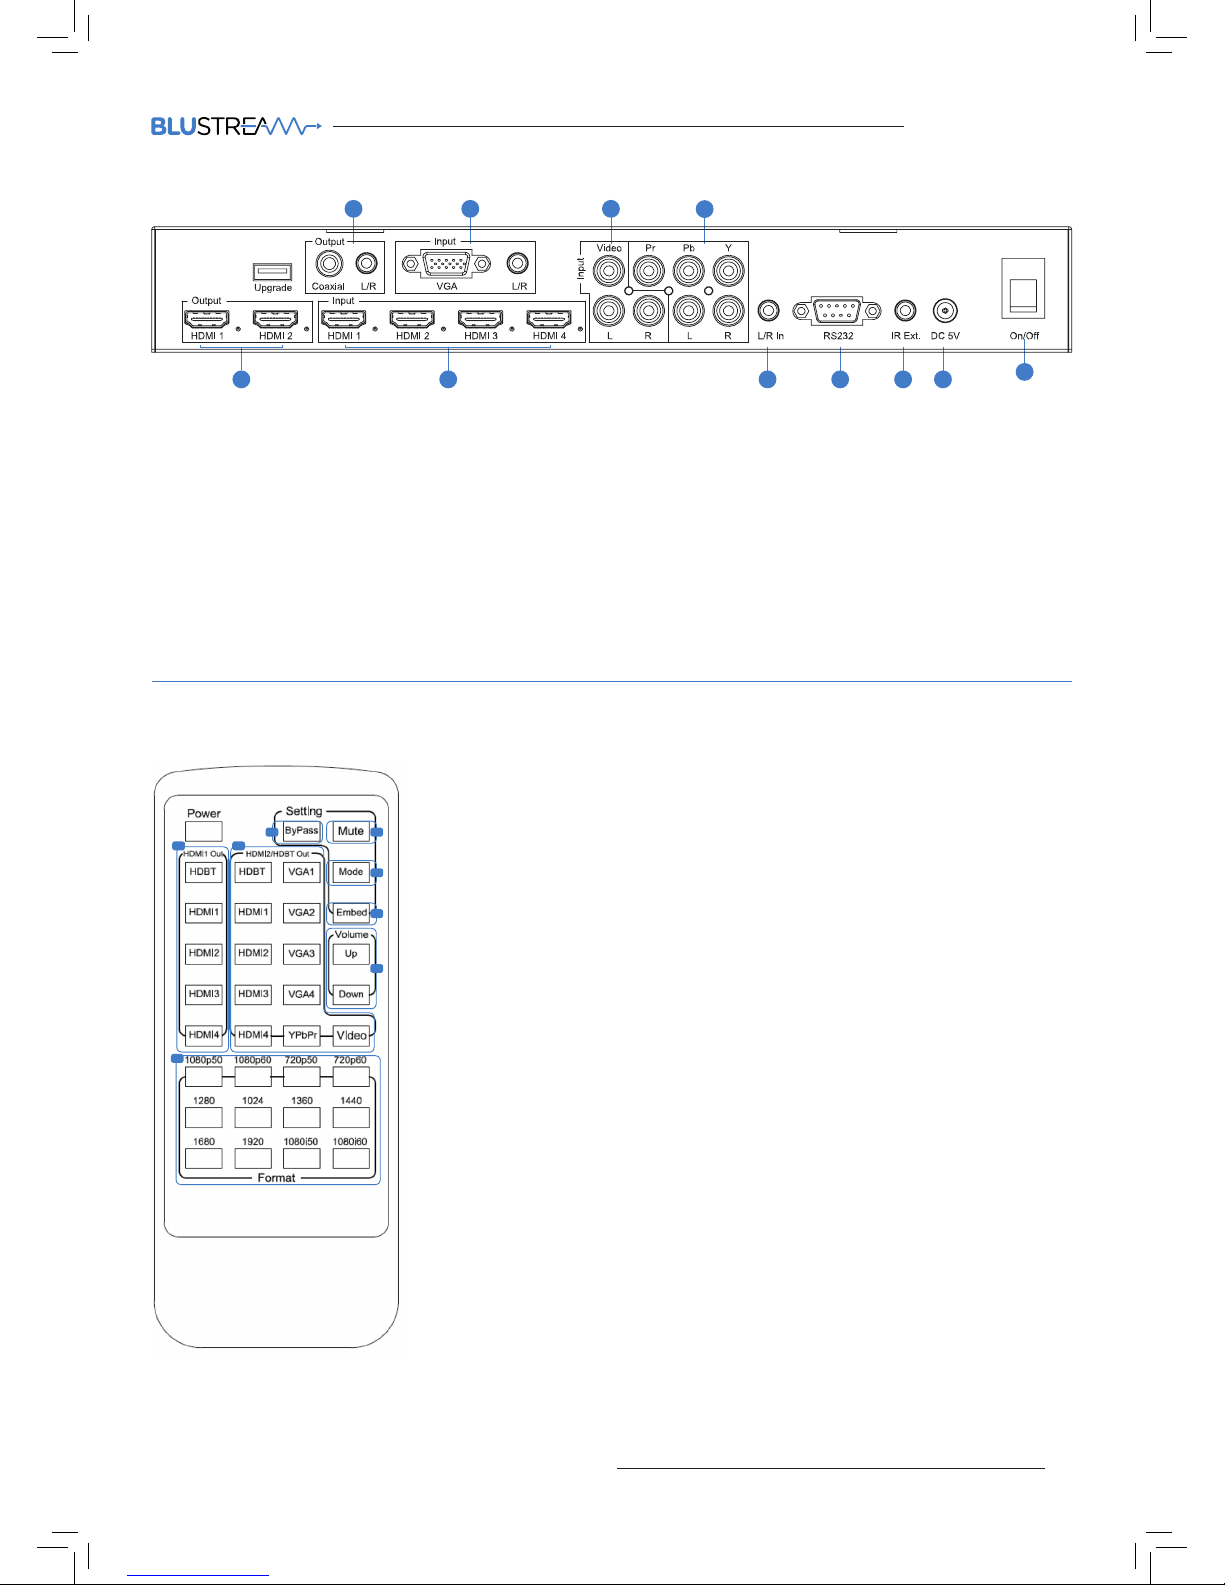
OUTPUT AND INPUT SELECTION
A Source selection for HDMI output 1 when in Matrix Switcher mode.
B Source selection for HDMI output 2 when in Matrix Switcher mode or both HDMI outputs
when in Splitter mode.
VIDEO OUTPUT RESOLUTION
C. The MFP72 includes in-built video scaler. To change the HDMI output video resolution
press the required resolution button on the bottom of the Blustream remote control.
Settings
D. Bypass: Audio on HDMI outputs is from HDMI input selected.
E. Mute: Mutes the audio on all outputs (HDMI, Coaxial digitial and Analogue audio).
F. Mode: Switches between Matrix Switcher mode and Splitter mode.
G. Embed: Audio on HDMI outputs is from L/R Analogue audio input (3.5mm Jack).
VOLUME CONTROL
H. Adjust the audio Volume on all outputs (HDMI, Coaxial digitial and Analogue audio).
A
C
B
D E
F
G
H
5
Rear Panel
1 2 3
4
6 7 8 9 10
11
MFP72
1 Coaxial digital and analogue audio
outputs - Extracted audio will always
follow HDMI output 2 source selection.
Note: input must be 2ch PCM for
Analogue audio output to work.
2 VGA input - VGA input with associated
L/R analogue audio input.
3 AV input - Composite video input with
associated L/R analogue audio input.
4 YPbPr input - YPbPr input (Component
video) with associated L/R analogue
audio input.
5 HDMI outputs 1 and 2.
6 HDMI input 1 to 4 - Connect to HDMI
sources
7 L/R In - Enables Analogue audio to be
embedded onto both HDMI outputs
in Splitter mode and HDMI output 2 in
Matrix Switcher mode.
8 RS232 port - For control of the switcher
from PC or control processor
9 IR Ext. - Connect to Blustream IR
receiver or control processor when
using Blustream IRCAB cable (sold
separately).
q Power port - Use supplied 5V/2A DC
power supply.
w Power switch - Power on/o the unit.
Page 6

MFP72 USER MANUAL
06
www.blustream.co.uk
The Blustream range of matrix and switcher products include multiple options for control and routing of IR.
IMPORTANT: Blustream Infrared products are all 5v and NOT compatible with alternate manufacturers Infrared solutions.
When using third party 12v IR control solutions please use Blustream IRCAB cable for IR conversion (sold separately).
Each Blustream Matrix and HDBaseT receiver is supplied with all necessary IR hardware required and includes:
IR Emitter
Blustream IR Emitter designed for discrete IR control of
hardware
IR Receiver
Blustream IR receiver to receive IR signal and pass-through
Blustream products
IR Control Cable
Blustream IR Control cable 3.5mm Mono to 3.5mm Stereo for
linking third party control solutions to Blustream products.
Will work with 12v IR third party products.
Note: Cable is directional as indicated
Infrared 3.5mm Pin-Out
IR Emitter - Mono 3.5mm
IR Receiver - Stereo 3.5mm
Infrared (IR) Distribution
Signal
Ground
Signal
5V
Ground
Page 7

MFP72 USER MANUAL
07
contact [email protected] / [email protected]
EDID Control
EDID (Extended Display Identification Data) is a data structure that is used between a display and a source.
This data is used by the source to find out what audio and video resolutions are supported by the display
then from this information the source will determine what the best resolution is to output.
While the objective of EDID is to make connecting a digital display to a source a simple plug and play
procedure issues do arise when multiple displays or video matrix switching is introduced because of the
increased number of variables.
By pre-determining the video resolution and audio format of the source and display device you can
potentially work around compatibility issues associated with some display and source combinations.
1 Using EDID dip-switches on the rear panel of the unit. Please see table below for settings.
Note: You must power-cycle the switcher aer changes have been made in order for the EDID
settings to update.
2 Using Matrix Front Panel Buttons
a. Press MENU button
b. Panel will display ‘EDID settings’. Press SELECT button
c. Select the input you wish to fix the EDID on or select ‘All’. Use UP/DOWN buttons to toggle selection and
SELECT button to confirm
d. Select video resolution required (4K, 1080p, 3D etc). Use UP/DOWN buttons to toggle selection and
SELECT button to confirm
e. Select audio format required (2.0, 5.1, 7.1). Use UP/DOWN buttons to toggle selection and SELECT button
to confirm
The EDID configuration can be altered in 2 ways:
[DIP]=0000: HDMI 1080p@60Hz, Audio 2CH PCM
[DIP]=0001: HDMI 1080p@60Hz, Audio 5.1CH PCM/DTS/Dolby
[DIP]=0010: HDMI 1080p@60Hz, Audio 7.1CH PCM/DTS/Dolby/HD
[DIP]=0011: HDMI 1080p@60Hz, Audio 2CH PCM
[DIP]=0100: HDMI 1080p@60Hz, Audio 5.1CH PCM/DTS/Dolby
[DIP]=0101: HDMI 1080p@60Hz, Audio 7.1CH PCM/DTS/Dolby/HD
[DIP]=0110: HDMI 1080p@60Hz, Audio 2CH PCM
[DIP]=0111: HDMI 1080p@60Hz, Audio 5.1CH PCM/DTS/Dolby
[DIP]=1000: HDMI 1080p@60Hz, Audio 7.1CH PCM/DTS/Dolby/HD
[DIP]=1001: HDMI 1080p@60Hz, Audio 2CH PCM
[DIP]=1010: HDMI 1080p@60Hz, Audio 5.1CH PCM/DTS/Dolby
[DIP]=1011: HDMI 1080p@60Hz, Audio 7.1CH PCM/DTS/Dolby/HD
[DIP]=1100: HDMI 1080p@60Hz, Audio 2CH PCM
[DIP]=1101: HDMI 1080p@60Hz, Audio 5.1CH PCM/DTS/Dolby
[DIP]=1110: HDMI 1080p@60Hz, Audio 7.1CH PCM/DTS/Dolby/HD
[DIP]=1111: HDMI EDID copy (EDID copied from HDMI output 2 display)
EDID Dip-switch settings:
NOTE: If the source selected is a VGA input the switcher will automatically output the best resolution possible.
Page 8
MFP72 USER MANUAL
08
www.blustream.co.uk
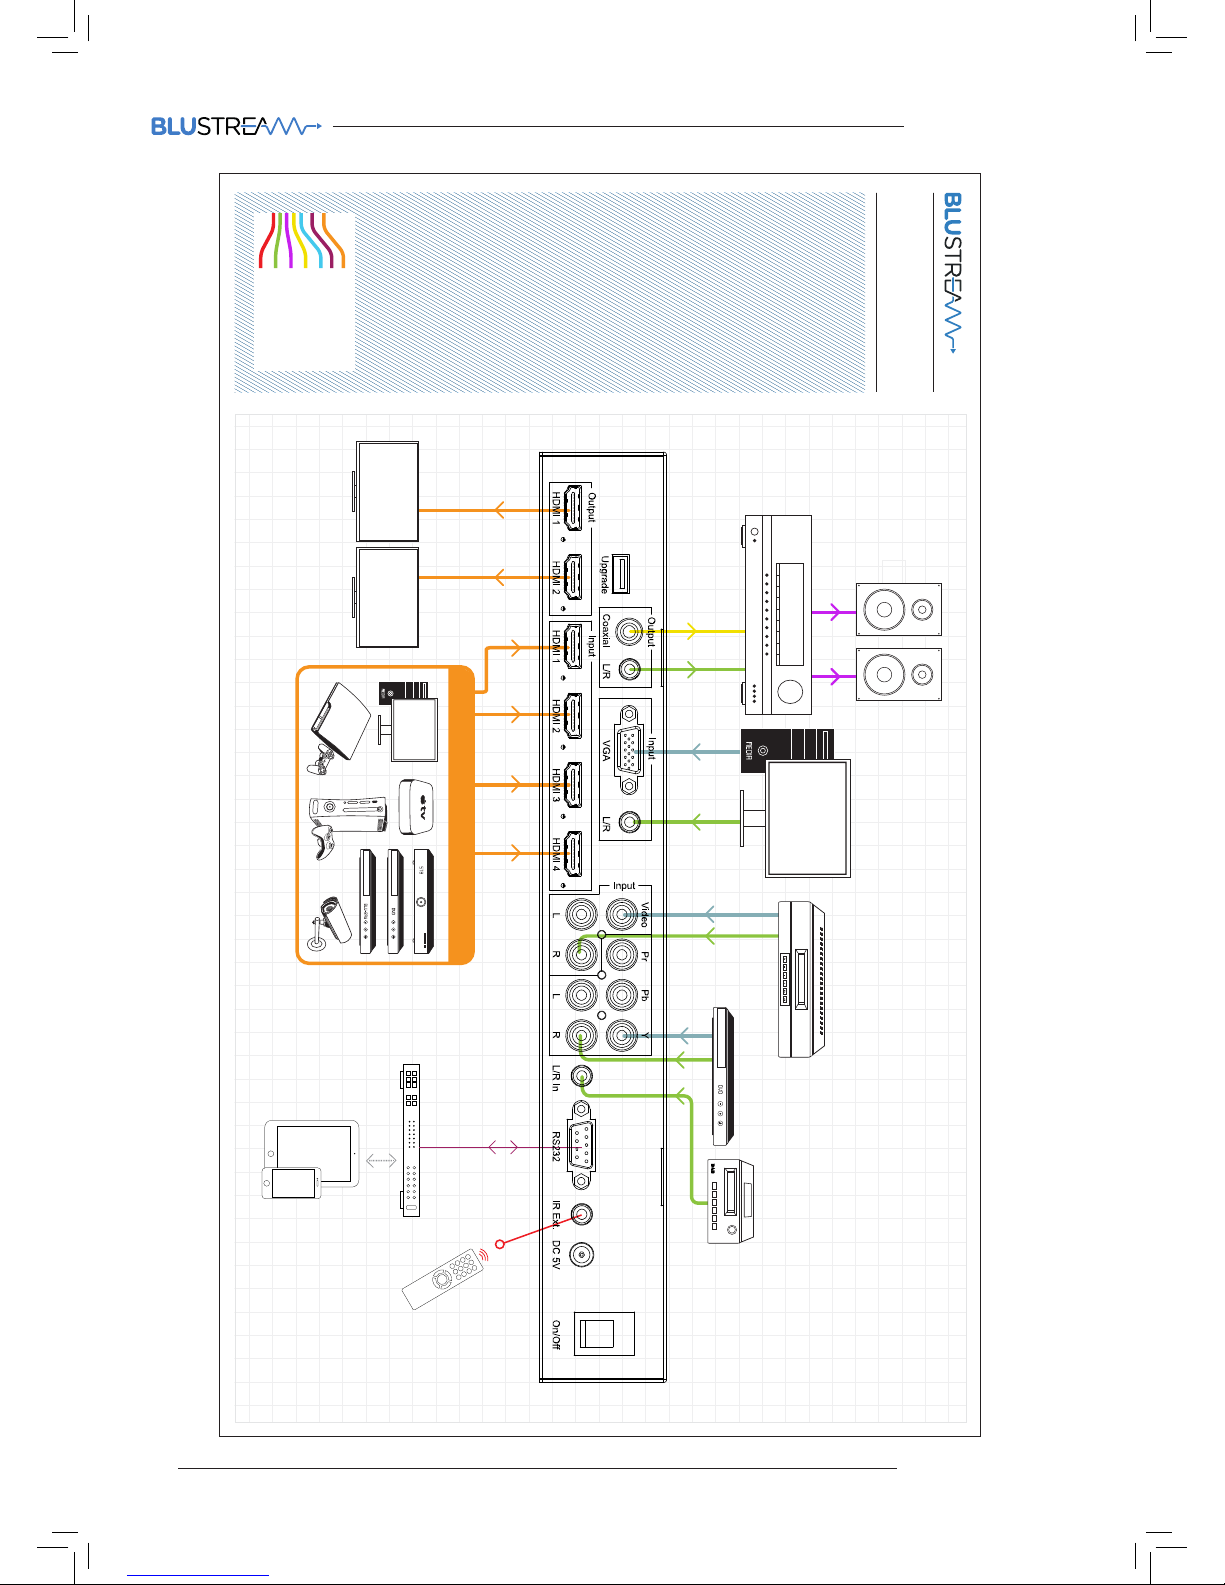
Example Schematic
MFP72
Optical Digital
RS232
HDMI
Coaxial Digital
Speaker Cable
Analogue L/R Audio
IR Cable
DISPLAYDISPLAY
MAXIMUM 4 SOURCES
Control
Processor
VCR
Page 9

MFP72 USER MANUAL
09
contact [email protected] / [email protected]
Video Input Connectors: 4x HDMI Type A, 1x VGA, 1xYPbPr, 1x
Composite
Video Output Connectors: 2x HDMI Type A
Audio Input Connectors: 2x 3.5mm Analogue audio stereo jack,
4x Analogue audio RCA (2 x L/R)
Audio Output Connectors: 1x 3.5mm Analogue audio stereo
jack, 1x SPDIF Coaxial digital
RS-232 serial port: 1x DB 9 connector
IR Input ports: 1x 3.5mm stereo jack
Dimensions (W x H x D): 323mm x 135mm x 44mm, without feet
Shipping Weight: 1.5Kg
Operating Temperature: 32°F to 104°F (0°C to 40°C)
Storage Temperature : -4°F to 140°F (-20°C to 60°C)
Power Supply: DC 5V/2A
Package Contents:
• 1x MFP72
• 1x 5V/2A power supply
• 1x Remote control
• 1x IR Receiver
• 1x mounting kit
Maintenance
Clean this unit with a so, dry cloth. Never use alcohol, paint thinner or benzene to clean this unit.
Specifications:
Page 10
MFP72 USER MANUAL
10
www.blustream.co.uk
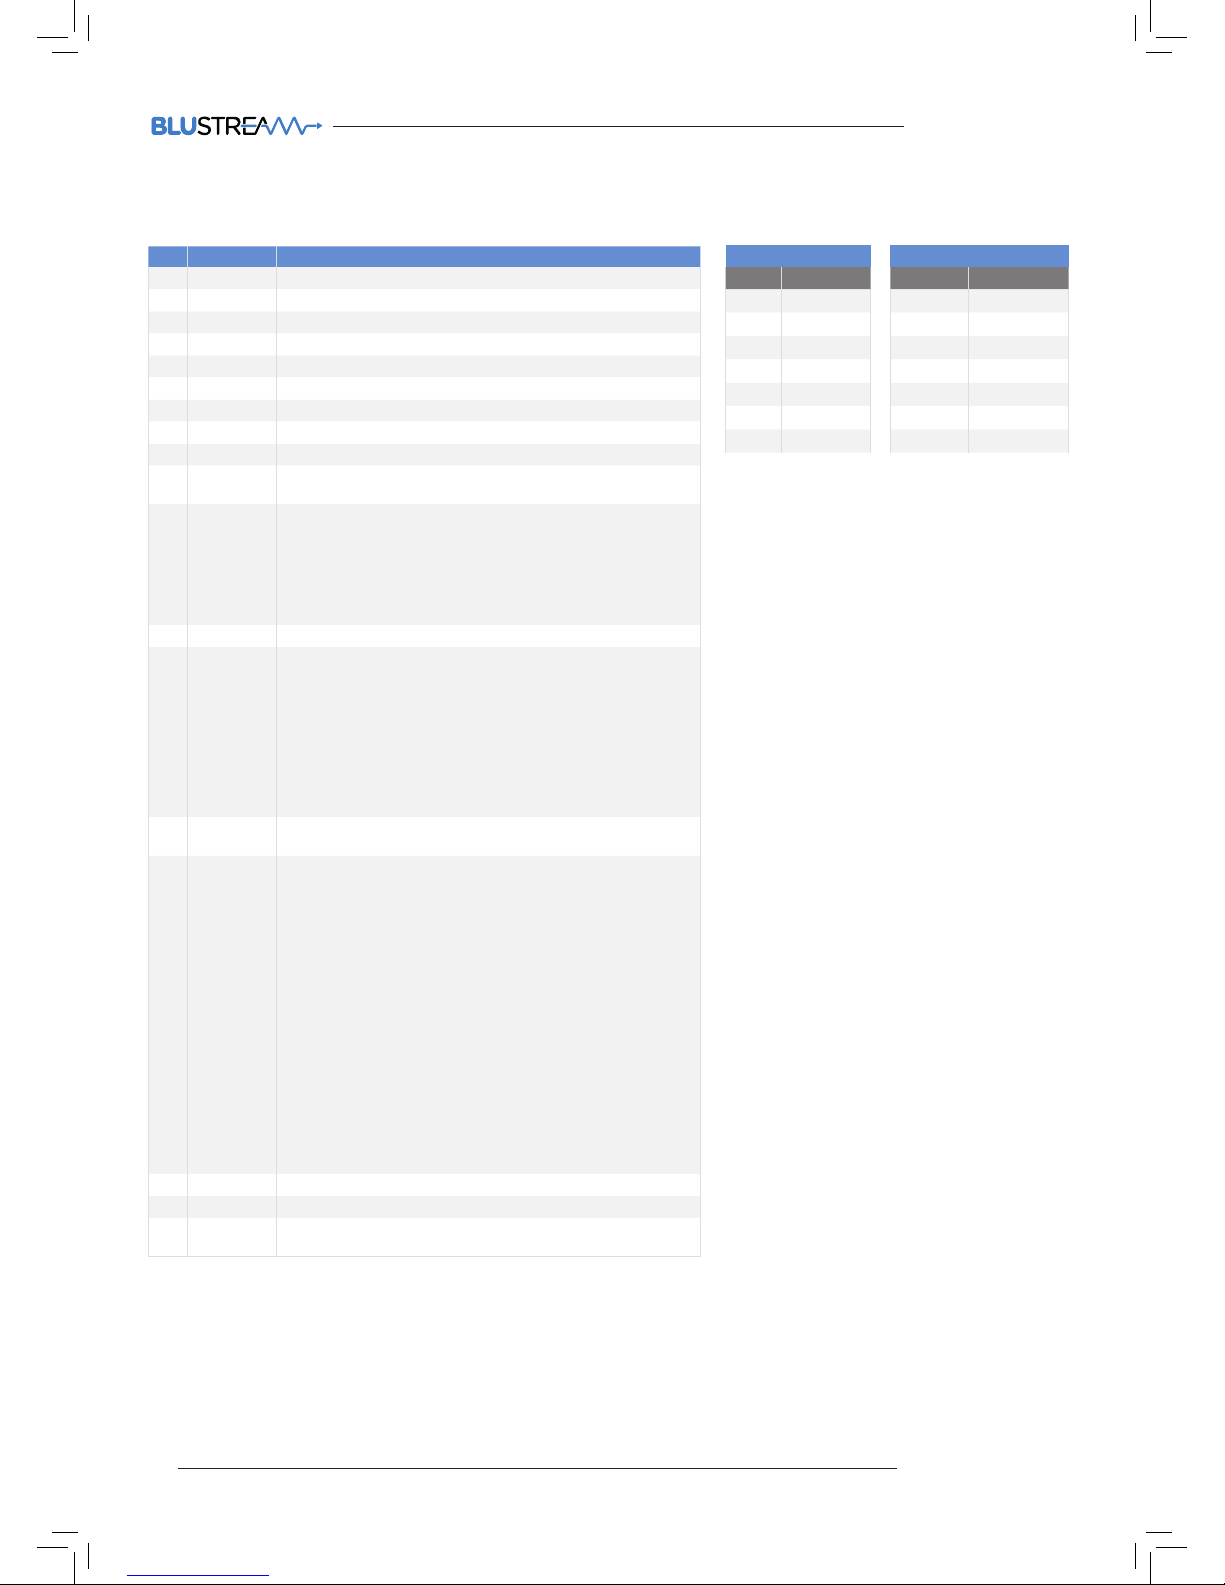
NO. Command Action
1 ? Print Help Information
2 HELP Print Help Information
3 STATUS Print System Status And Port Status
4 PON Power On, System Run On Normal State
5 POFF Power O, System Run On Power Save State
6 IRON/OFF Set System IR Control On Or O
7 KEYON/OFF Set System KEY Control On Or O
8 DBGON/OFF Set Debug Mode On Or O
9 BEEPON/OFF Set Onboard Beep On Or O
10 RESET
Reset System To Default Setting
(Should Type “Yes” To Confirm, “No” To Discard)
11 OUTxxFRyy
Set OUTPUT:xx From INPUT:yy
xx=00: Select All OUTPUT Port
xx=[01...02]: Select One OUTPUT Port
yy=[01...04]: HDMI Input 01 ~ 04
yy=AV: AV Input( Output 02 Only )
yy=COMP: Component Input( Output 02 Only )
yy=VGA: VGA Input( Output 02 Only )
12 OUTSP/MX Set OUTPUT To Splitter or Matrix Mode
13 OUTRESrr
Set Scaler Output Resolution
rr=01: 1080P@50Hz
rr=02: 1080P@60Hz
rr=03: 720P@60Hz
rr=04: 720P@50Hz
rr=05: 1280x1024@60Hz
rr=06: 1024x768@60Hz
rr=07: 1360x760Hz
rr=08: 1440x900@60Hz
rr=09: 1680x1050@60Hz
14 EDIDxxCPyy
Set Input:xx EDID Copy From Output:yy yy=[00]:
yy=[01...08]
15 EDIDxxDFzz
Set Input:xx EDID To Default EDID:zz
xx=00: Select All INPUT Port
xx=[01...04]: Select One INPUT Port
yy=[01...02]: Select One OUTPUT Port
zz=00: HDMI 1080p@60Hz, Audio 2CH PCM
zz=01: HDMI 1080p@60Hz, Audio 5.1CH PCM/DTS/DOLBY
zz=02: HDMI 1080p@60Hz, Audio 7.1CH PCM/DTS/DOLBY/HD
zz=03: HDMI 1080i@60Hz, Audio 2CH PCM
zz=04: HDMI 1080i@60Hz, Audio 5.1CH PCM/DTS/DOLBY
zz=05: HDMI 1080i@60Hz, Audio 7.1CH PCM/DTS/DOLBY/HD
zz=06: HDMI 1080p@60Hz/3D, Audio 2CH PCM
zz=07: HDMI 1080p@60Hz/3D, Audio 5.1CH PCM/DTS/DOLBY
zz=08: HDMI 1080p@60Hz/3D, Audio 7.1CH PCM/DTS/DOLBY/HD
zz=09: HDMI 4K2K, Audio 2CH PCM
zz=10: HDMI 4K2K, Audio 5.1CH PCM/DTS/DOLBY
zz=11: HDMI 4K2K, Audio 7.1CH PCM/DTS/DOLBY/HD
zz=12: DVI 1280x1024@60Hz, Audio None
zz=13: DVI 1920x1080@60Hz, Audio None
zz=14: DVI 1920x1200@60Hz, Audio None
16 AUDSCAORG Scaler Audio Input Follow Port Selection
17 AUDSCAANA Scaler Audio Input From Analog L/R Signal
18 AUDxx
Set Scaler Audio Volume
xx=[00...30]: Volume Value
RS232 and Telnet Commands
MFP72
PIN Assignment
1 NC
2 Tx
3 Rx
4 NC
5 GND
6 NC
7 NC
REMOTE CONTROL CONSOLE
PIN Assignment
1 NC
2 Rx
3 Tx
4 NC
5 GND
6 NC
7 NC
RS-232 Pin Assignment
Baud Rate: 57600 bps
Data Bit: 8-bit
Parity: None
Stop Bit: 1-bit
Flow Control: None
Page 11

www.blustream.co.uk
www.blustream.com.au
 Loading...