

Page 1
Blusens Web:tv
1
ENGLISH
Web:tv
User
Manual
Page 2

USER MANUAL
2
Index
1. 1. SAFETY INFORMATION .................................8
2. CONTENTS OF THE BOX .................................16
3. OVERVIEW OF THE DEVICE .............................17
3.1. Main Features .................................................18
3.2. Main Unit .........................................................20
4. INSTALLATION ................................................24
4.1. Basic Configuration ........................................24
4.1.1.Electrical Connection .....................................24
4.1.2.TV Connection ................................................25
4.1.3.TDT Antenna Connection ...............................26
4.1.4.Internet connection via Ethernet ...................27
4.1.5.Wireless internet connection .........................29
4.2. Advanced configuration ..................................31
4.2.1.Digital audio connection ................................31
4.2.2.Network configuration ...................................32
4.2.2.1.Internet connection via Ethernet cable .......33
Page 3

Blusens Web:tv
3
ENGLISH
4.2.2.2.Wireless internet connection ......................36
4.2.3.Language settings ........................................40
4.2.4.Output configuration .....................................40
4.2.5.Restore factory settings ...............................41
4.2.6.Firmware update ...........................................42
4.2.7.Information ....................................................43
5. STARTING UP ..................................................44
5.1. To turn Web:tv on/off .......................................44
5.1.1.Standby configuration via Web .......................44
5.2. Basic Operations with the remote control ......47
5.3. Updating Web:TV .............................................48
5.4. MAIN MENU ....................................................49
6. DTV ..................................................................51
6.1. DTV TV .............................................................51
6.1.1.Configuration .................................................51
6.1.1.1.Search Channels .........................................52
6.1.1.1.1.Sort Channels ...........................................53
6.1.1.2.Add Channels ..............................................55
6.1.2.Watch DTV TV .................................................56
Page 4

USER MANUAL
4
6.1.2.1.Remote Control Options ..............................57
6.1.2.2.Shortcut Menu options ................................58
6.1.3.Program Guide ..............................................60
6.1.4.Timeshift ........................................................62
6.1.5.Recording .......................................................64
6.1.5.1.Direct Recording .........................................64
6.1.5.1.1.From the remote control ..........................64
6.1.5.1.2.From the shortcut menu ..........................65
6.1.5.2.Scheduled Recording ..................................66
6.1.5.2.1.Scheduled from jobs ...............................66
6.1.5.2.2.Scheduled from the Program Guide. .......69
6.1.5.3.Viewing a Recording ....................................70
6.2. DTV Radio ........................................................72
6.2.1.Configuration .................................................72
6.2.1.1.Search Channels .........................................72
6.2.1.2.Sort Channels..............................................73
6.2.1.3.Add Channels ..............................................75
6.2.2.Escuchar Radio TDT .......................................76
6.2.2.1.Remote Control Options ..............................77
Page 5

Blusens Web:tv
5
ENGLISH
6.2.2.2.Shortcut Menu Options ...............................78
6.2.3.Timeshift ........................................................80
6.2.4.Recording .......................................................81
6.2.4.1.Direct Recording .........................................82
6.2.4.1.1.From the remote control ..........................82
6.2.4.1.2.From the shortcut menu ..........................83
6.2.4.2.Scheduled Recording ..................................84
6.2.4.2.1.Scheduled from Jobs ..............................84
6.2.4.3.Playing a Recording ....................................87
7. MULTIMEDIA PLAYBACK ................................89
7.1. Audio Playback ................................................89
7.1.1.Shortcut menu ...............................................90
7.1.2.Remote Control ..............................................91
7.2. Video Playback ................................................92
7.2.1.Shortcut menu ...............................................93
7.2.2.Remote Control ..............................................95
7.3. Viewing Photos ................................................96
7.3.1.Menu Contextual ............................................97
7.3.2.Remote Control ..............................................98
Page 6

USER MANUAL
6
8. USB..................................................................99
8.1. Access, Navigation, Options ............................99
9. LOCAL NETWORK .........................................102
9.1. Multimedia Client /Samba/NFS ....................102
9.2. Acceso, navegación y opciones ..................... 102
10. NETWORK SERVICES .................................... 106
10.1.Multimedia Server ........................................106
10.2.Samba Server ................................................107
10.3.NFS Server ....................................................107
10.4.LiveTV ............................................................108
10.5.Web Interface ................................................112
11. INTERNET .....................................................116
11.1.Web Browser .................................................116
11.2.Blusens TV ....................................................120
11.3.Internet TV .....................................................121
11.4.Internet Radio ...............................................125
11.5.Favorites ........................................................129
11.6.Add URL ........................................................130
11.7.Community ....................................................130
Page 7

Blusens Web:tv
7
ENGLISH
11.8.Blusens News ............................................... 132
11.9.Search internet channels (TV/Radio) ............ 133
12. APLICACIONES .............................................134
12.1.Snake .............................................................135
12.2.State Lotteries and Betting ...........................135
12.3.News Readers ...............................................136
12.4.Weather .........................................................137
12.5.Mail App (electronic mail) ............................. 138
12.6.Blusens Store ................................................142
13. VIDEOCLUB ...................................................143
14. FIRMWARE UPDATE......................................148
14.1.Automatic update ..........................................149
14.2.Update from USB .......................................... 150
15. MENU CONTEXTUAL .....................................152
16. TROUBLESHOOTING .....................................156
17. SPECIFICATIONS ...........................................158
Page 8
USER MANUAL
8
1. SAFETY INFORMATION
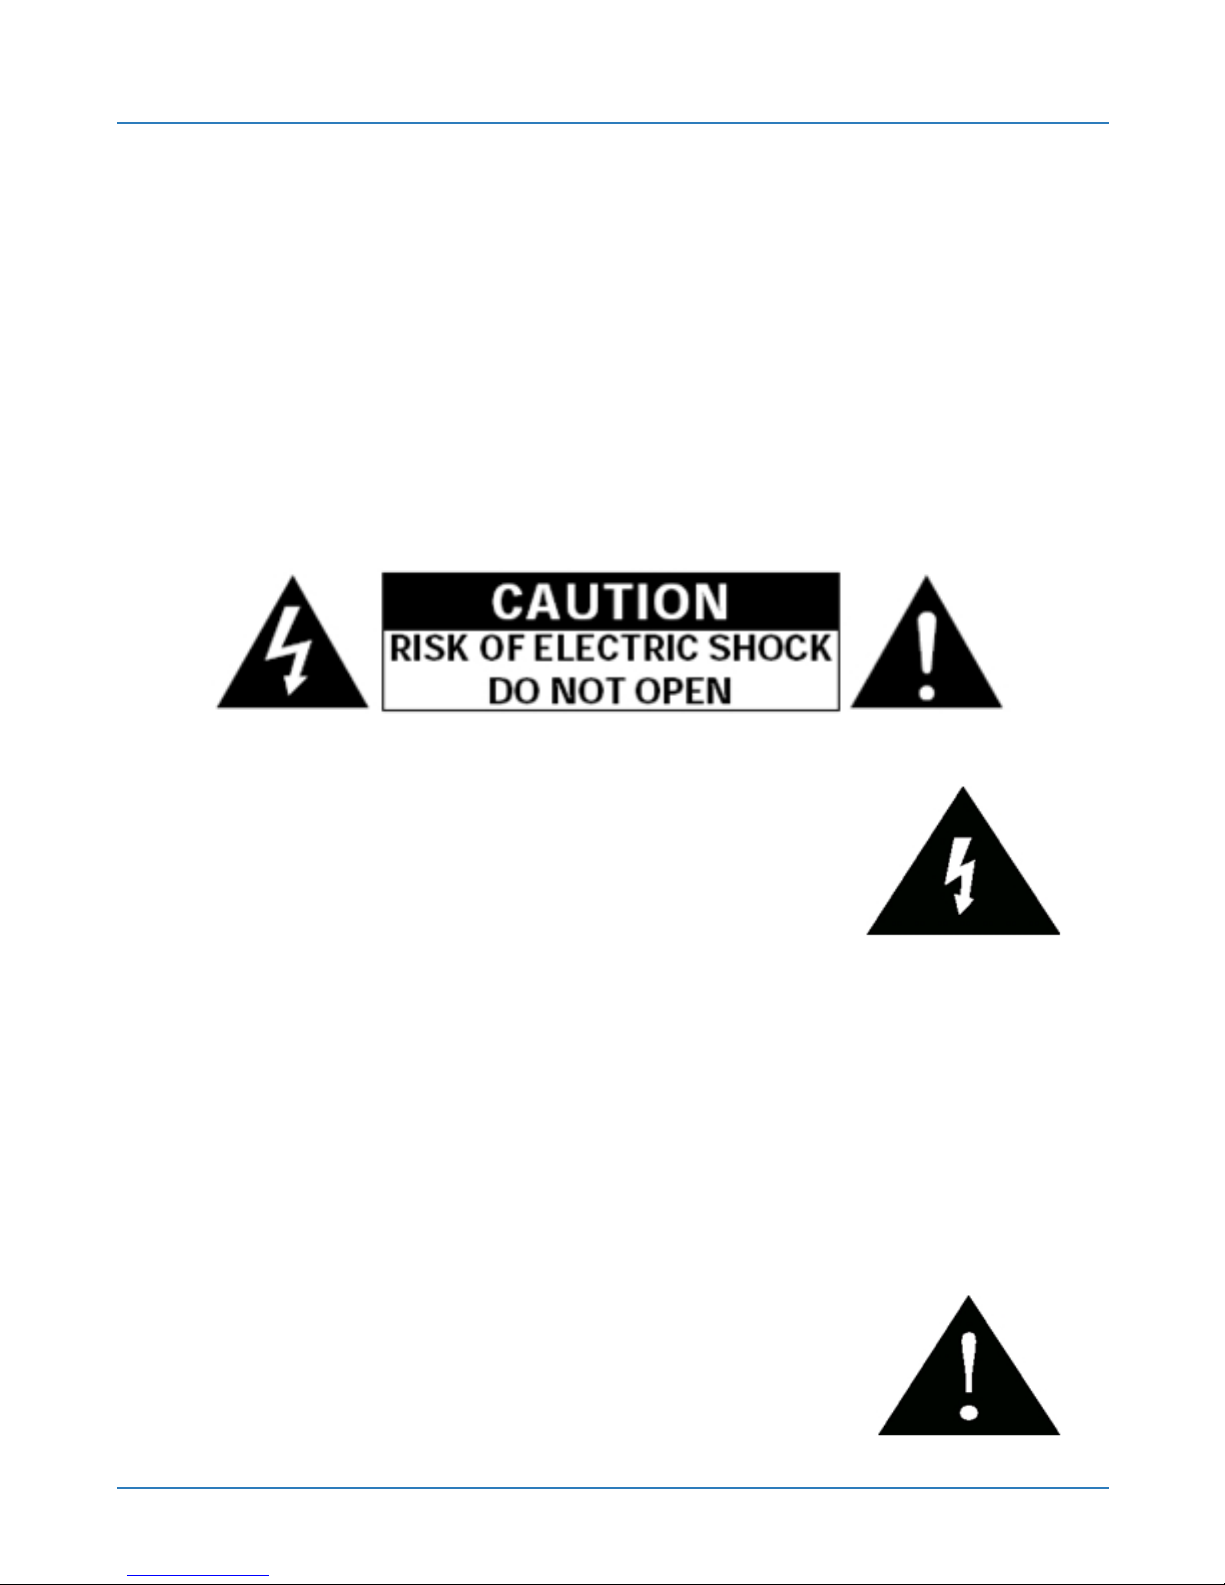
PRECAUTION: TO REDUCE THE RISK OF ELECTRIC
SHOCK DO NOT REMOVE COVER (OR BACK PANEL).
NO USER MANAGEABLE ELEMENTS INSIDE. CONTACT
QUALIFIED PERSONNEL.
This symbol is intended to alert
the user to the presence of hazardous
voltages which lack insulation, which may
be of sufficient magnitude to constitute a risk of electric
shock to persons.
This symbol is intended to alert the user about the
existence of important operating and maintenance
information in the manual accompanying
the appliance.
Page 9

Blusens Web:tv
9
ENGLISH
WARNING: TO REDUCE THE RISK OF FIRE OR
ELECTRIC SHOCK, DO NOT EXPOSE THIS APPLIANCE
TO RAIN OR MOISTURE.
PRECAUTION: Using controls or adjustments or
using processes other than those specified herein may
result in hazardous radiation exposure.
Please study this manual carefully and keep it handy.
However, there are some installation and operation
precautions to keep in mind:
1. READ THE INSTRUCTIONS: All safety and operating
instructions should be read before operating the
product.
2. KEEP THE INSTRUCTIONS: The safety and operating
instructions should be retained for future reference.
3. HEED THE INSTRUCTIONS: All warnings on the
product and the operating instructions should be
heeded.
4. FOLLOW THE INSTRUCTIONS: All instructions for
use and operation should be followed.
Page 10

USER MANUAL
10
5. CLEANING: Unplug the product from the wall outlet
before cleaning. Do not use liquid or aerosol cleaners.
Use a damp cloth for cleaning.
6. CONNECTION: Do not use connectors which are not
recommended by the manufacturer as they may cause
damage.
7. WATER AND MOISTURE: Do not use this product near
water - for example, near a bathtub, sink or drain - in
a wet basement or near a swimming pool or the like.
8. VENTILATION: The slots and openings in the cover are
arranged for ventilation and to ensure reliable operation
of the product and to protect it from overheating,
and these openings must not be blocked or covered.
The openings should never be blocked by placing the
product on a bed, sofa, rug or similar surfaces. This
product should not be integrated into structures such
as shelves or drawers unless you provide adequate
ventilation or if the manufacturer’s instructions allow.
Page 11

Blusens Web:tv
11
ENGLISH
9. POWER SUPPLY: This product should be connected
only to the type of power source indicated on the rear
panel. If you are unsure of the type of power in your
home, consult your dealer or local power company.
For products intended to operate as being powered
from batteries or other sources, refer to operating
instructions.
10. PROTECTION OF THE POWER CORD: The power
cords should be placed in a way that they cannot easily
be stepped on or trapped by objects on or against them,
paying particular attention to cords in plugs, connectors
and the place where they exit the product.
11. PLUG CONNECTOR: The product is equipped with
a plug connector with overload protection. This is a
safety feature. If substitution is required, make sure the
technical service has used a replacement plug specified
by the manufacturer with the same overload protection
as the original plug.
Page 12

USER MANUAL
12
12. GROUNDING OF OUTDOOR ANTENNA: If an outside
antenna or cable system is connected to the product,
make sure the antenna or cable are grounded to
provide protection against voltage surges or static
charges. Article 810 of the NEC (National Electrical
Code) ANSI/NFPA 70 provides information regarding
proper grounding of the mast and structure, the guide
wire to an antenna discharge unit, size of grounding
conductors, location of antenna discharge unit,
connection to grounding electrodes and requirements
for the grounding electrode. See the image below:
13. LIGHTNING: For added protection of the product
during a lightning storm or when not being used for a
long period of time, unplug the product from the wall
outlet and disconnect the antenna or cable system. This
will prevent damage to the product due to lightning and
power surges.
14. POWER LINES: An outside antenna system should
not be placed near power lines or other electric light or
Page 13

Blusens Web:tv
13
ENGLISH
power circuits or where it can fall into such power lines
or circuits. When installing an outside antenna system,
take extreme care to avoid contact with such power
lines or circuits as contact with them might be fatal.
15. OVERLOAD: Do not overload wall outlets, extenders
or connectors as this may harbor a risk of fire or electric
shock.
16. ENTRY OF OBJECTS OR LIQUIDS: Never insert
objects of any kind into the product through the openings
as they may touch dangerous voltage points or short
out parts that could cause fire or electric shock. Never
spill liquid on the product.
17. REPAIR: Do not attempt to repair this product
yourself as opening or removing covers may expose
you to dangerous voltages or other hazards. Leave all
servicing to qualified service personnel.
18. DAMAGES REQUIRING REPAIR: Unplug the product
from the wall outlet and refer to qualified personnel in
the following cases:
Page 14

USER MANUAL
14
When the power cord or plug is damaged.
If liquid has been spilled or objects have fallen into
the product.
If the product has been exposed to rain or water.
If the product does not operate normally by following
the operating instructions. Adjust only the controls
covered by the operating instructions as an improper
adjustment of other controls may result in damage and
often requires hard work by a qualified technician to
restore the product to normal operation.
If the product has been hit or otherwise damaged.
When the product exhibits a change in performance.
This indicates the need for repair.
19. SPARE PARTS: When you need spare parts, make
sure the technical service uses spare parts specified by
the manufacturer or with the same characteristics as
the original. Unauthorized substitutions may result in
fire or other damages.
Page 15

Blusens Web:tv
15
ENGLISH
20. SAFETY CHECK: To complete any repair of the
product, ask the technical service to perform safety
checks to ensure that the product works properly.
21. HEAT: The product should be situated away from
heat sources such as radiators, heat registers, stoves
or other products (including amplifiers) that produce
heat.
Page 16
USER MANUAL
16
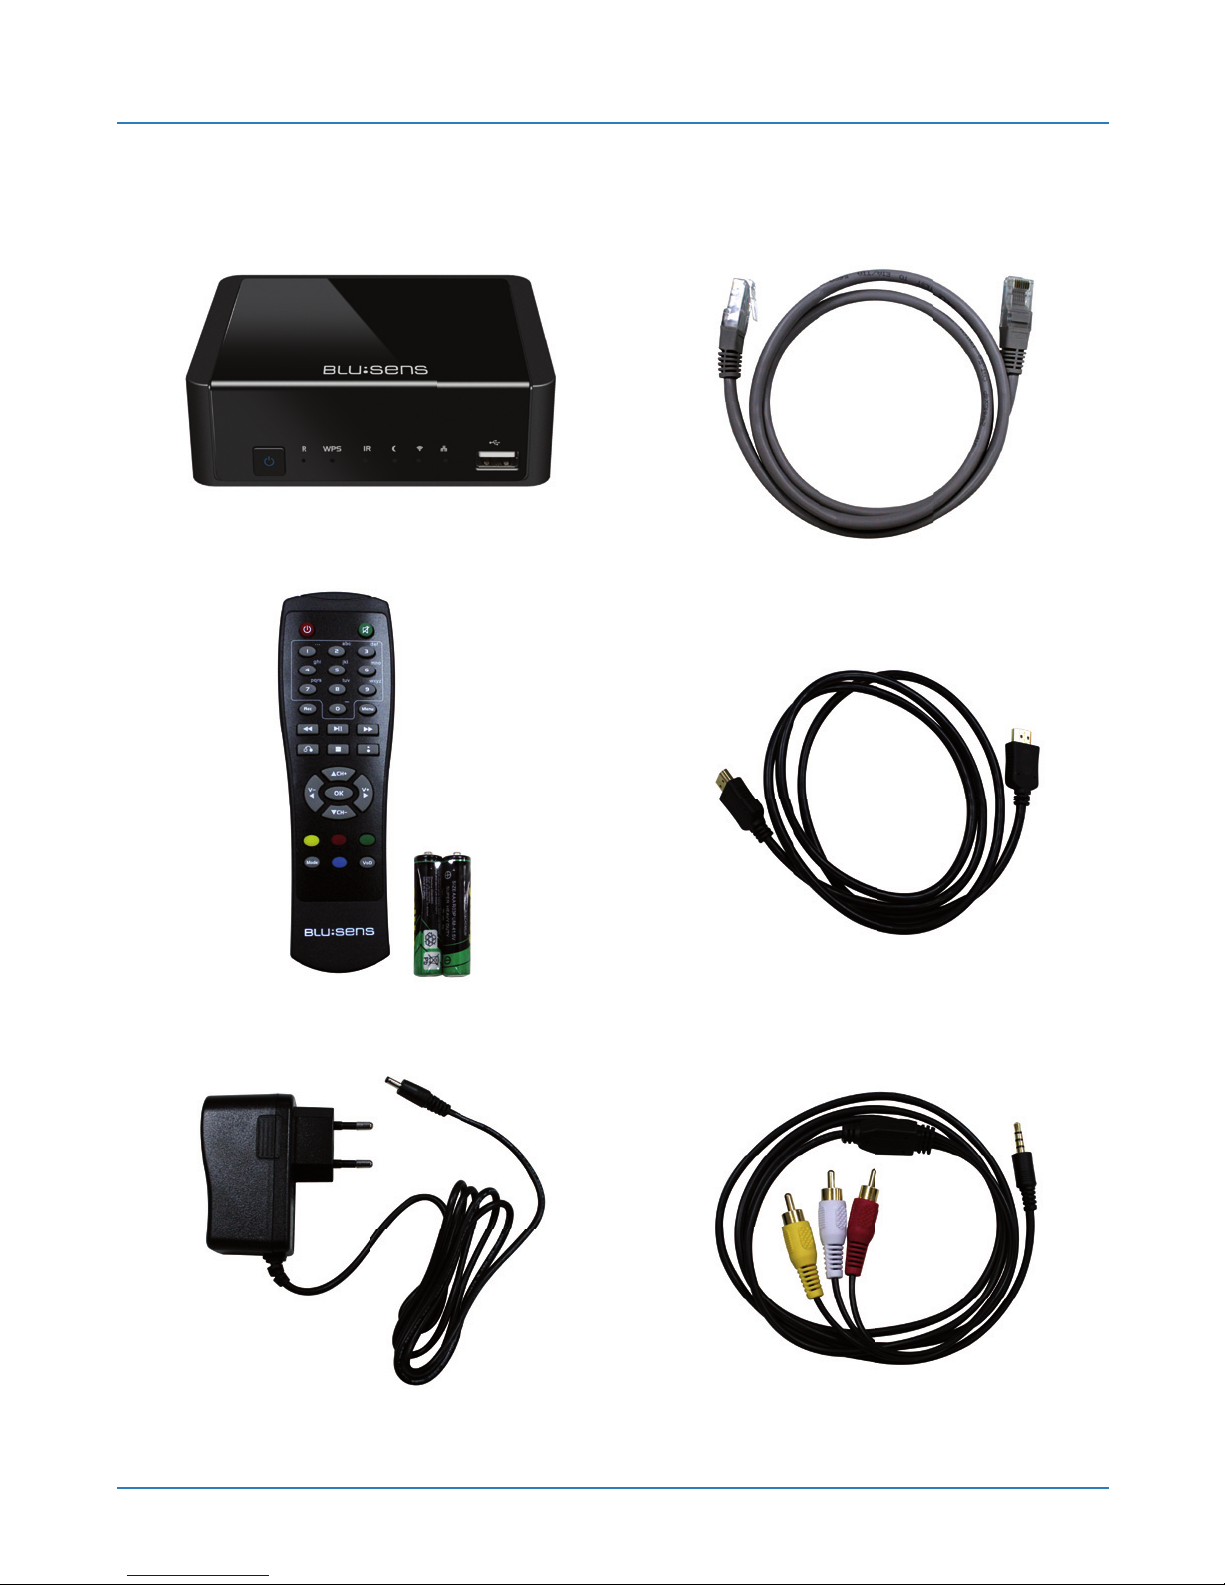
Web:TV
Remote Control
Charger
Ethernet Cable
HDMI Cable
AV Cable
2. CONTENTS OF THE BOX
Page 17

Blusens Web:tv
17
ENGLISH
3. OVERVIEW OF THE DEVICE
Web:tv is a device as small as the palm of the hand
that takes the Internet to your television.
A device that allows you to see what you want,
whenever and wherever.
Web:tv turns your television into a high-performance
device: Wireless, internet TV, HD DTV, USB, HDMI and
much more.
It is an advanced high definition multimedia player
that can connect over a network to your computer,
network devices, USB hard drives, etc...
It includes Blusens Online Videoclub, a web browser
and external applications.
Page 18

USER MANUAL
18
3.1. Main Features
Internet TV.
Videoclub on-line.
Internet Radio.
HD 1080p multimedia player.
High definition DTV tuner.
Timeshift recorder.
EPG electronic program guide.
Web browser.
Internet Applications (Widgets).
Email client.
On-line video streaming.
Access to the home network (PC, NAS...).
Multimedia and file server (SAMBA, NFS).
DTV channel stream server (LiveTV).
Internal memory for Timeshift support or
progressive download (2h in SD or 45 min in HD).
High-speed 300 Mbits/sec WIFI/n.
Page 19

Blusens Web:tv
19
ENGLISH
HDMI 1.3
2xUSB host for connecting external storage devices.
Video formats: AVI, MPG/MPEG, VOB, MKV, MP4/
MOV, ASF, MPEG ES/PS/TS/M2TS, WMV.
Audio formats: MP3, WMA, WAV, MKA.
Image formats: JPEG, GIF, BMP,PNG
Online update
Web interface
Allows file management of USB or LAN devices
(move, copy, paste, delete...)
Page 20
USER MANUAL
20
3.2. Main Unit
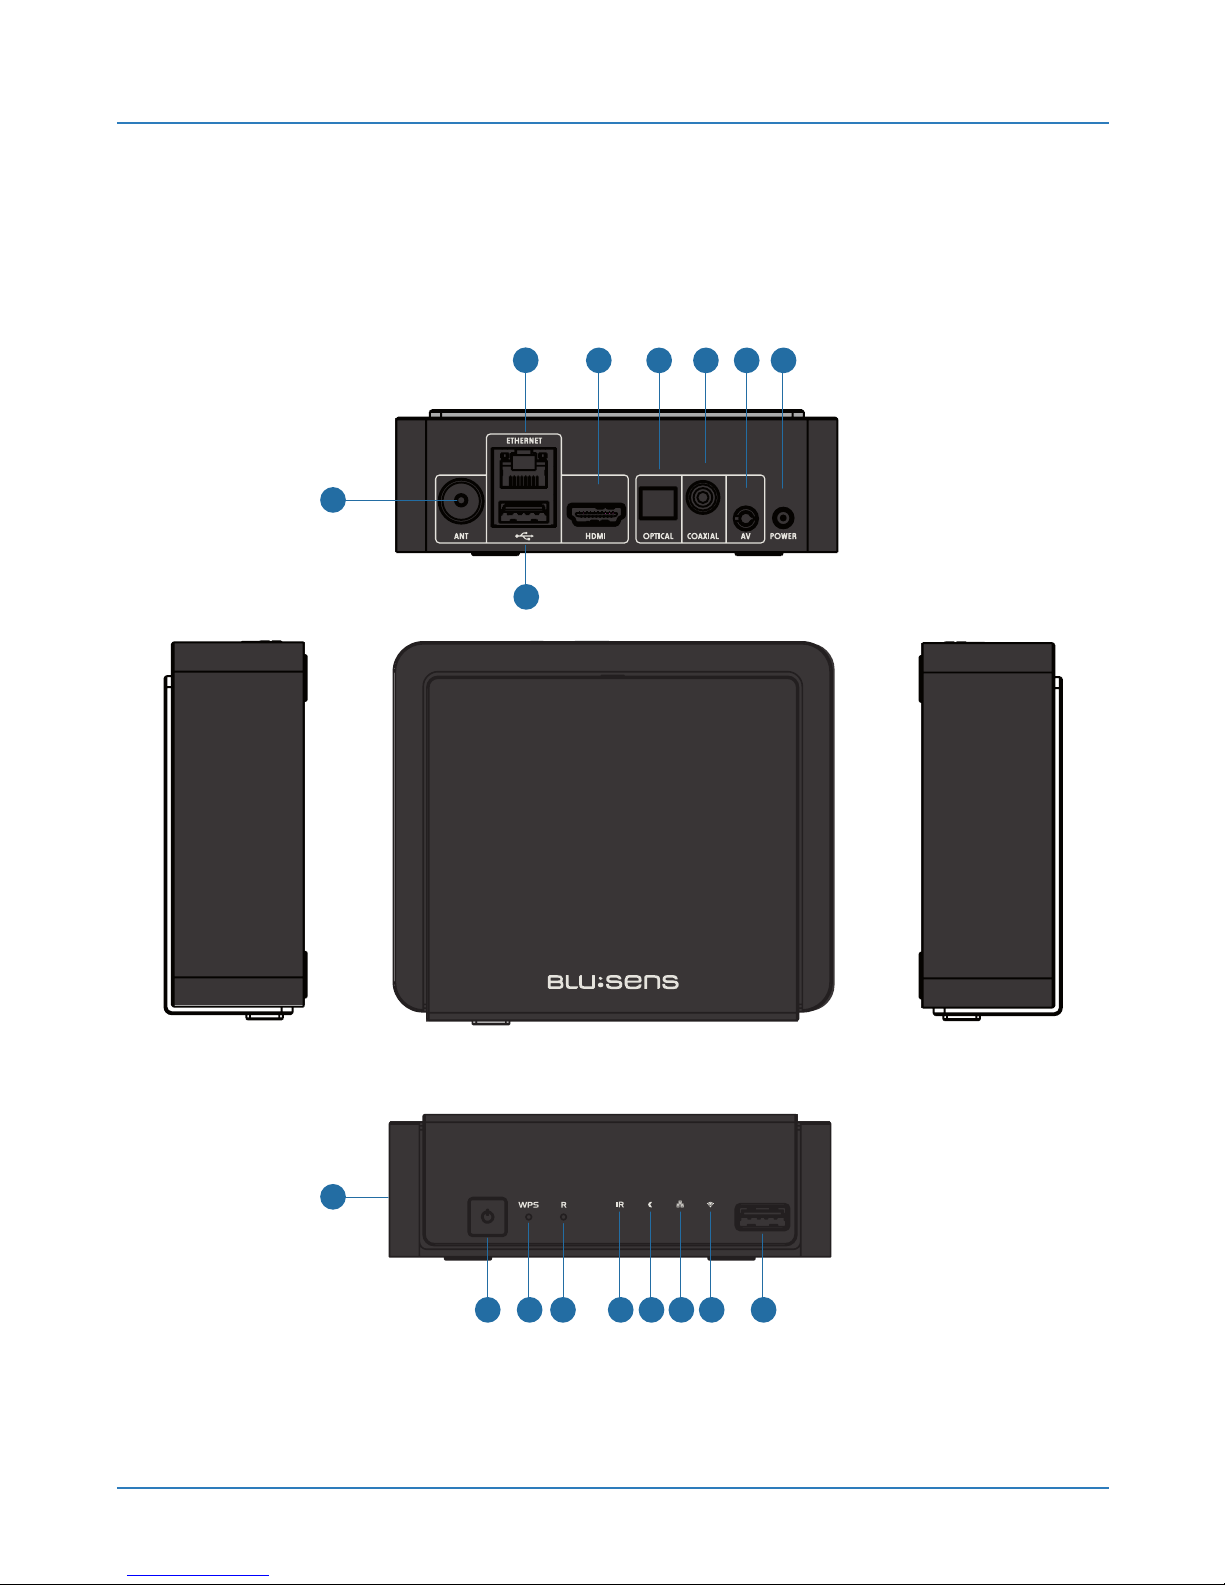
1
1
2
3 4 5 6 7
7
8
9 10 11 16151412 13
Page 21

Blusens Web:tv
21
ENGLISH
1. RF Antenna Input: RF signal input connection.
2. ETHERNET: Ethernet data connection 10/100.
3. HDMI: Video output connection for HDMI 1.3.
4. OPTICAL: Digital optical audio output.
5. COAXIAL: Digital coaxial audio output.
6. AV: Audio output and composite video connection.
7. POWER: Power input of the device.
8. USB: Rear USB 2.0 port.
9. ON/OFF: On / Off button (Web:TV is on when the LED is lit).
10. WPS: Wps wireless synchronization button.
11. R: Reset button.
12. IR: LED indicator of the remote control reception.
13. Standby: Standby LED indicator (Web:TV is on standby
when the LED is lit).
14. Wlan: Wireless status LED (Web:TV is connected when the
LED is lit).
15. Ethernet: Ethernet connection status LED (Web:TV is
connected when the LED is lit).
16. USB: Front USB 2.0 port.
17. High-speed 300 Mbit/sec WIFI/n antennas
Page 22
USER MANUAL
22
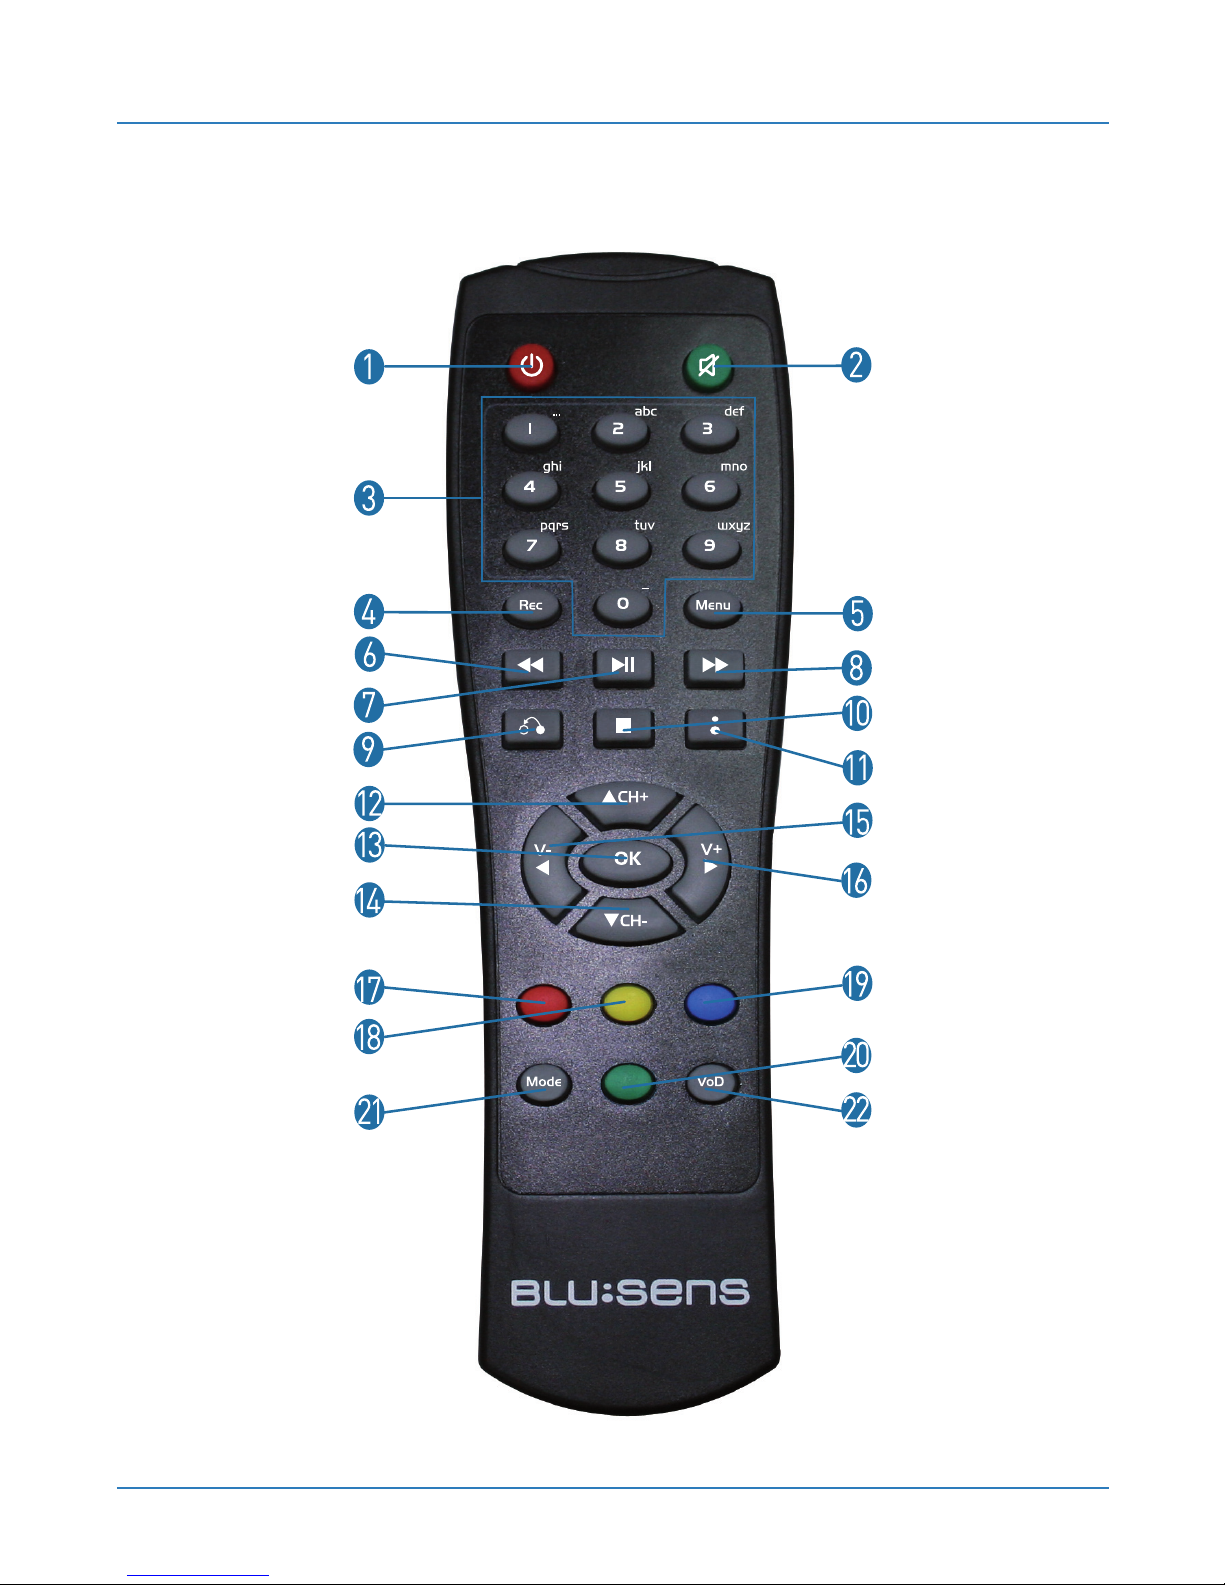
3.3.Remote Control
Page 23

Blusens Web:tv
23
ENGLISH
1. Standby
2. Mute
3. Alphanumeric keypad
4. Record
5. Menu
6. Fast rewind
7. Play/pause/Timeshift
8. Fast forward
9. Back / Previous channel
10. Stop
11. Options / Screen keypad
12. Up/CH+/Next
13. OK
14. Down/CH-/Previous
15. Left/VOL-
16. Right/VOL+
17, 18, 19, 20. Hotkeys.
21. Mode (aspect ratio 16:9/4:3)
22. Direct access to Videoclub
Page 24
USER MANUAL
24
4. INSTALLATION
Make sure you have correctly selected the video
source from the television (AV, HDMI, ...) according to
the type of connection you select for your WEB:TV.
4.1. Basic Configuration
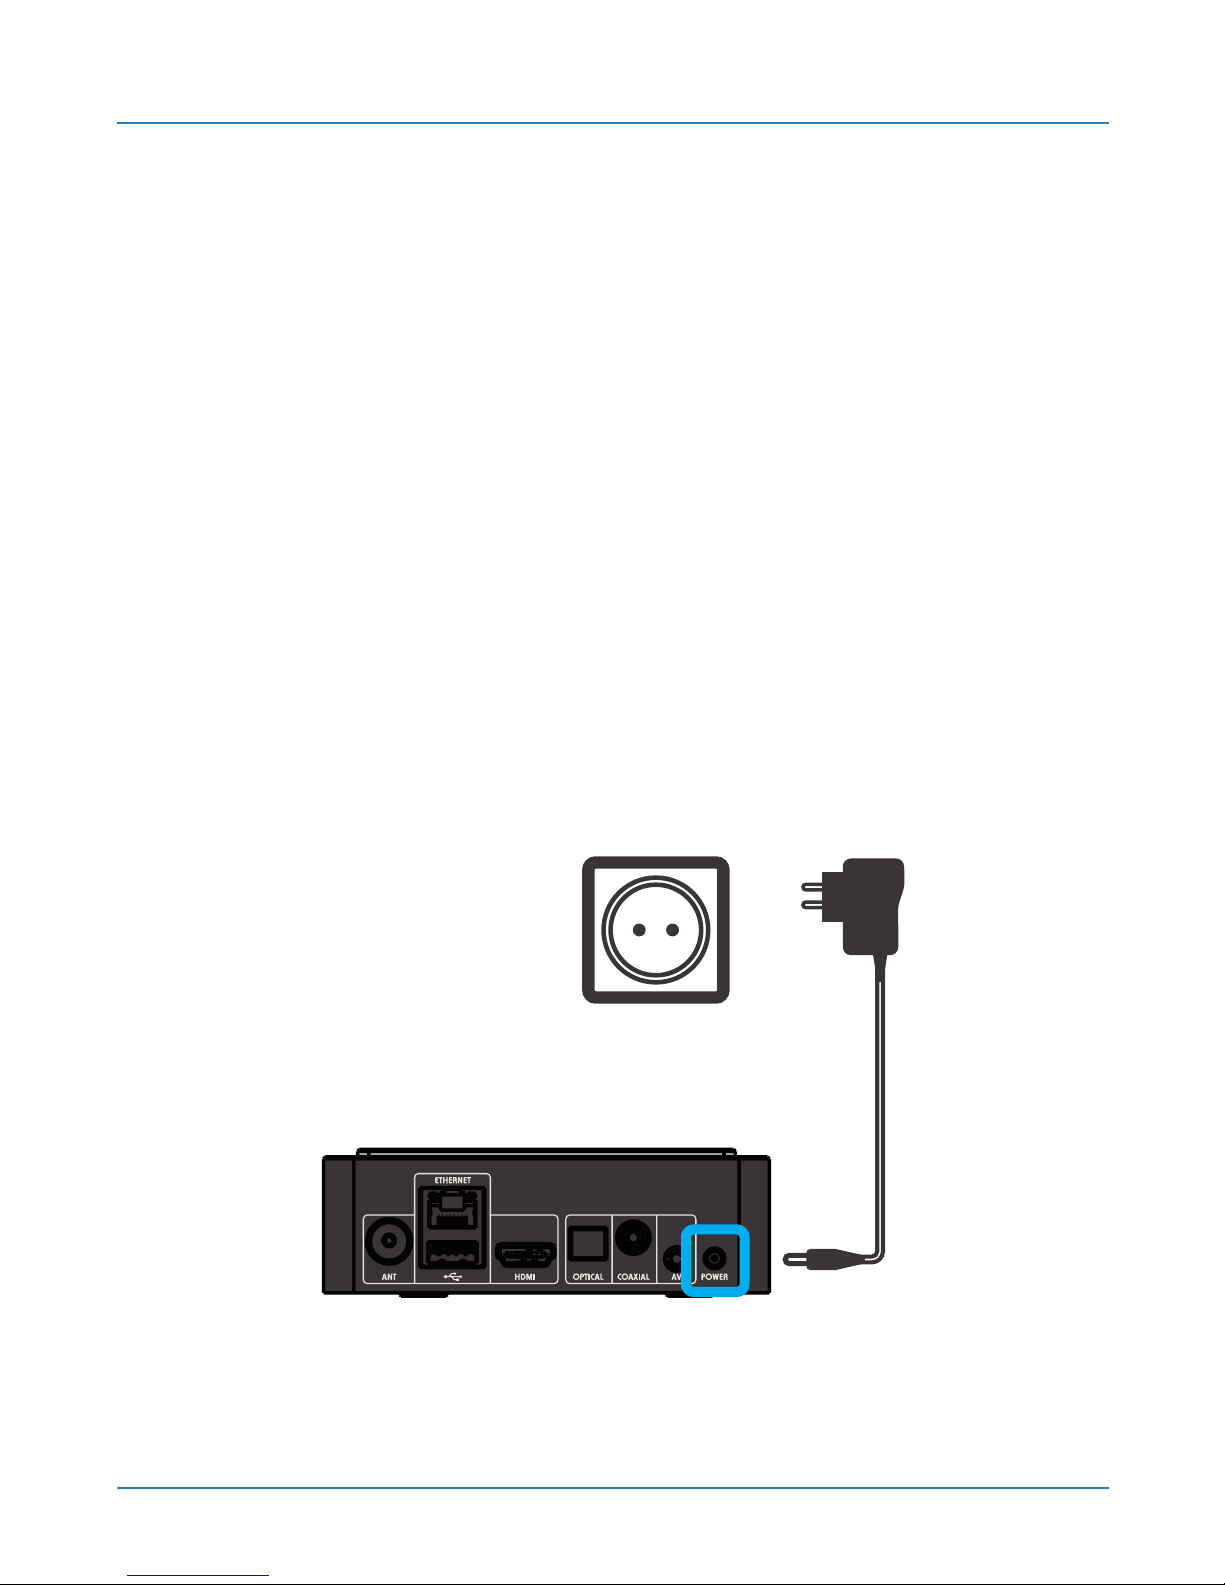
4.1.1. Electrical Connection
Connect the charger that came with the device to
the power outlet and the input source.
Page 25
Blusens Web:tv
25
ENGLISH
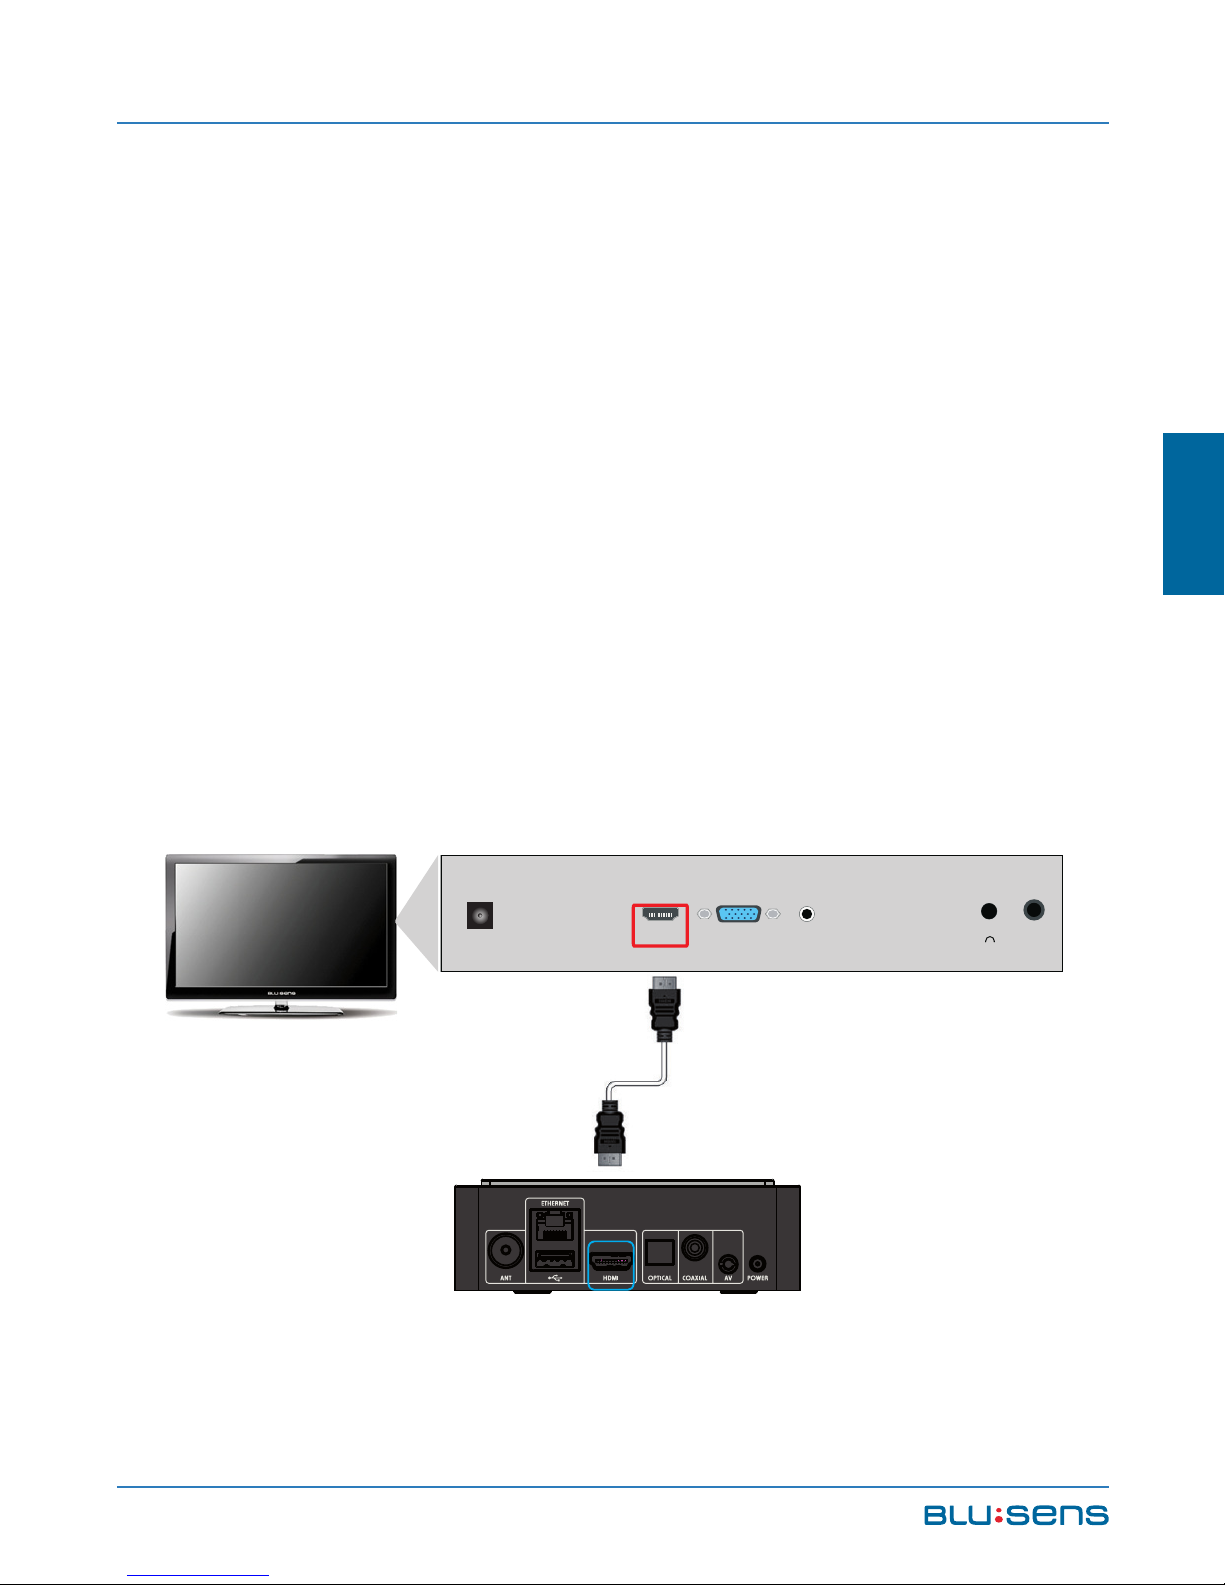
4.1.2. TV Connection
HDMI Output Connection
This connection is the most recommended to
operate with your Web:tv system.
Connect the HDMI cable to the HDMI output of your
Web:tv.
Connect the other end of the HDMI cable to HDMI
input on your screen.
HDMI1 VGA PC-IN
POWER
Page 26
USER MANUAL
26
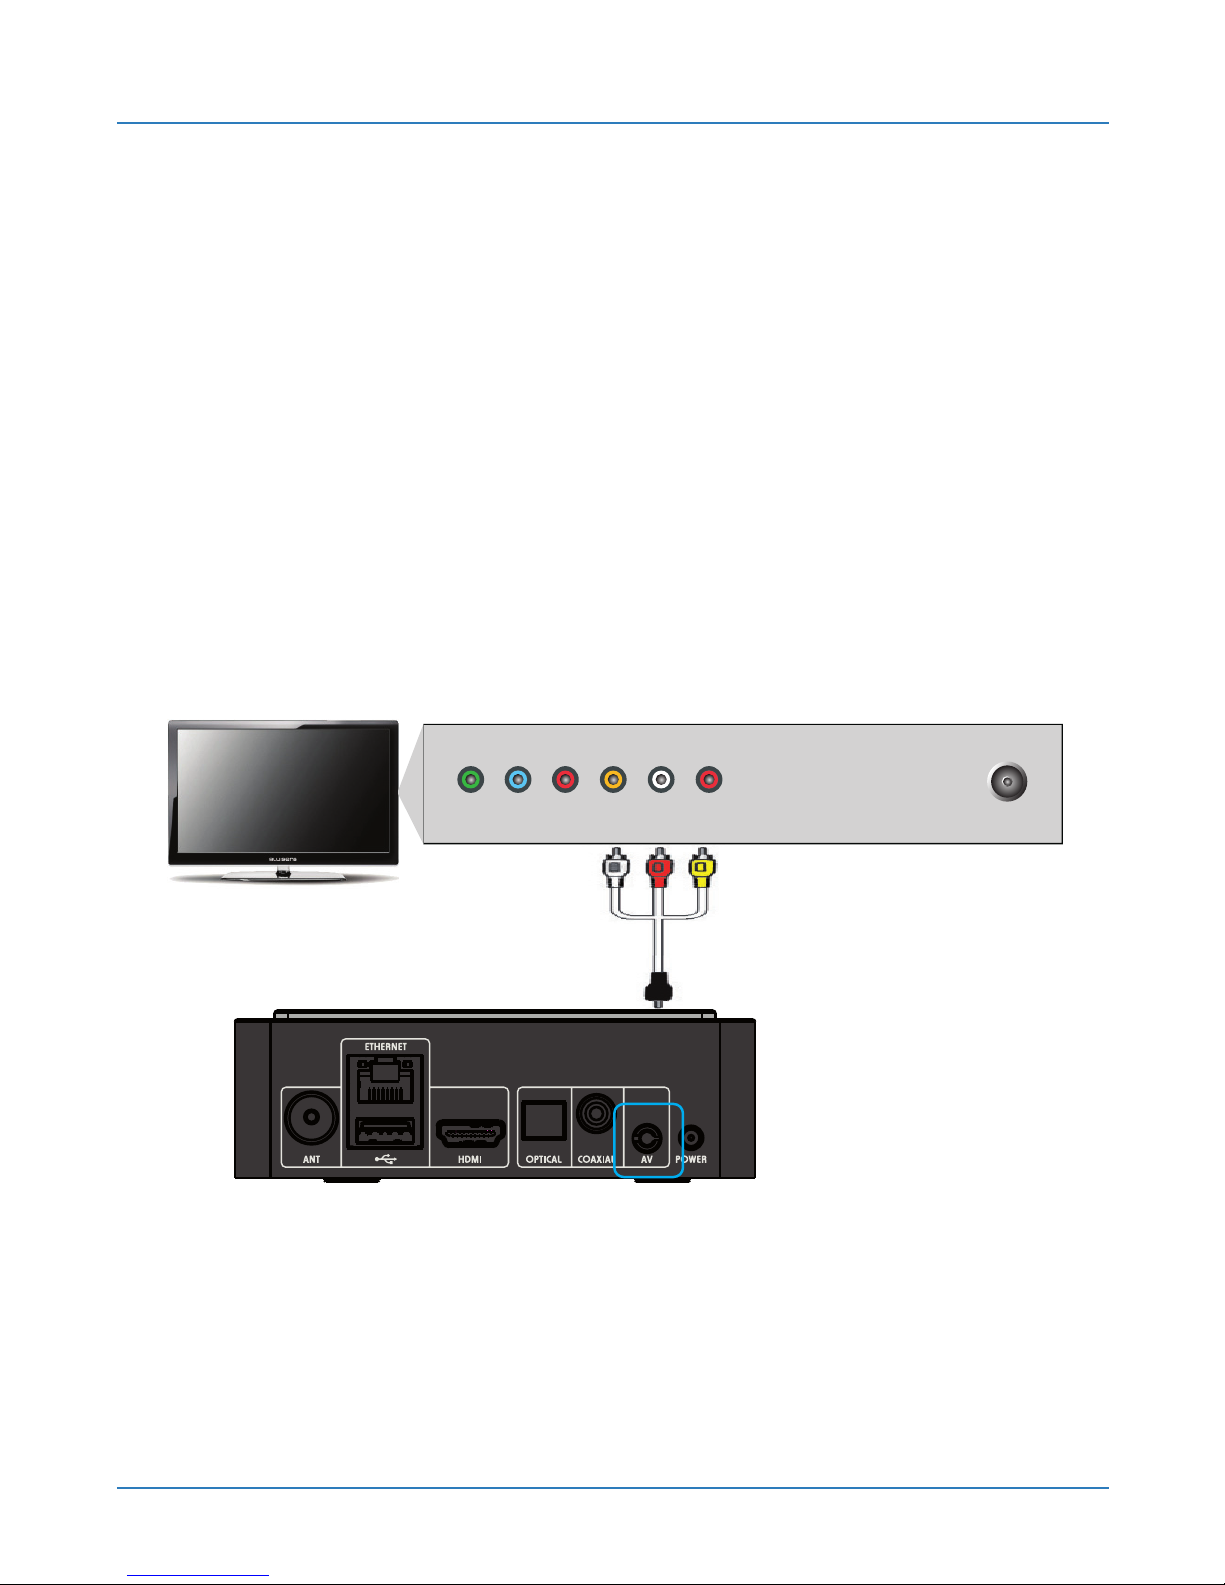
AV Output Connection.
Alternative to HDMI connection.
Connect the RCA cable jack to the AV out output of
your Web:tv.
Connect the other end of the cable to the RCA input
on your TV (or to the SCART input, using the RCA-
SCART adapter).
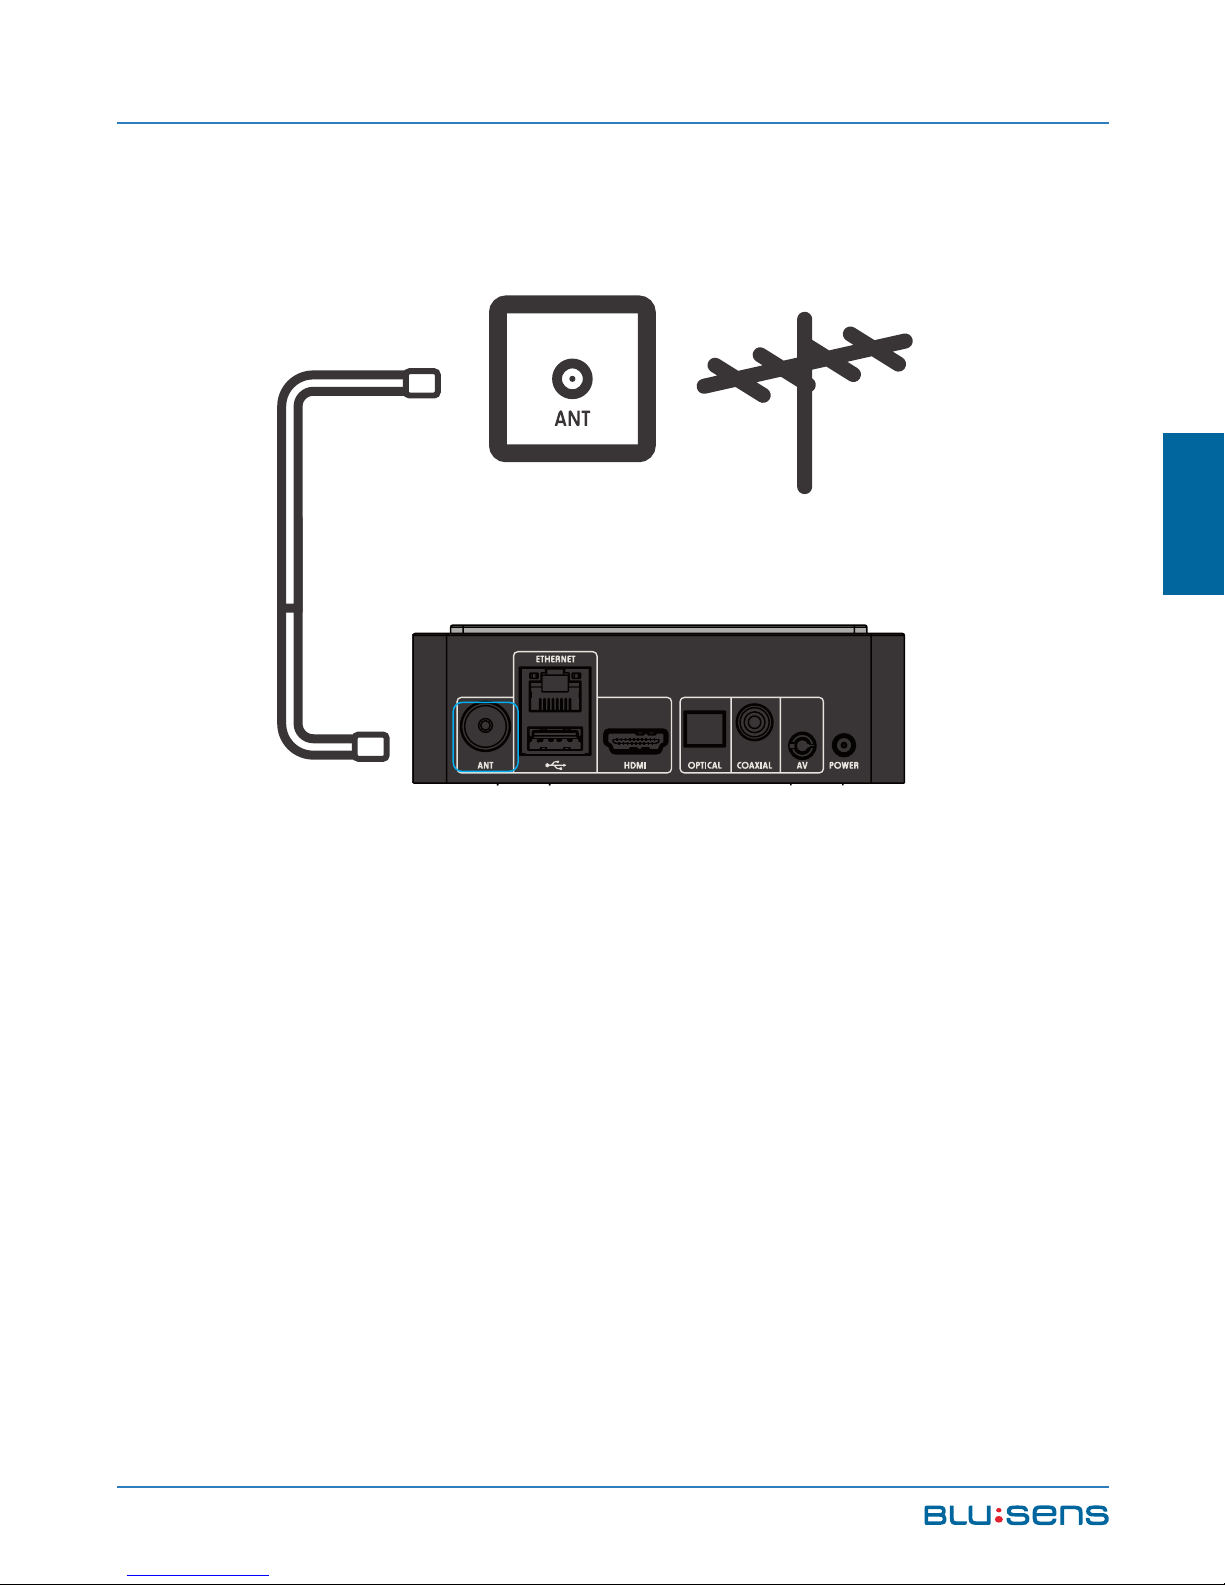
4.1.3. TDT Antenna Connection
You must make this connection if you want to tune
TDT with your Web:tv system.
VIDEO
L-in
R-inY Pb Pr RF
Page 27
Blusens Web:tv
27
ENGLISH
Connect an RF antenna cable (from the wall outlet
or laptop) to the ANT input of your Web:tv.
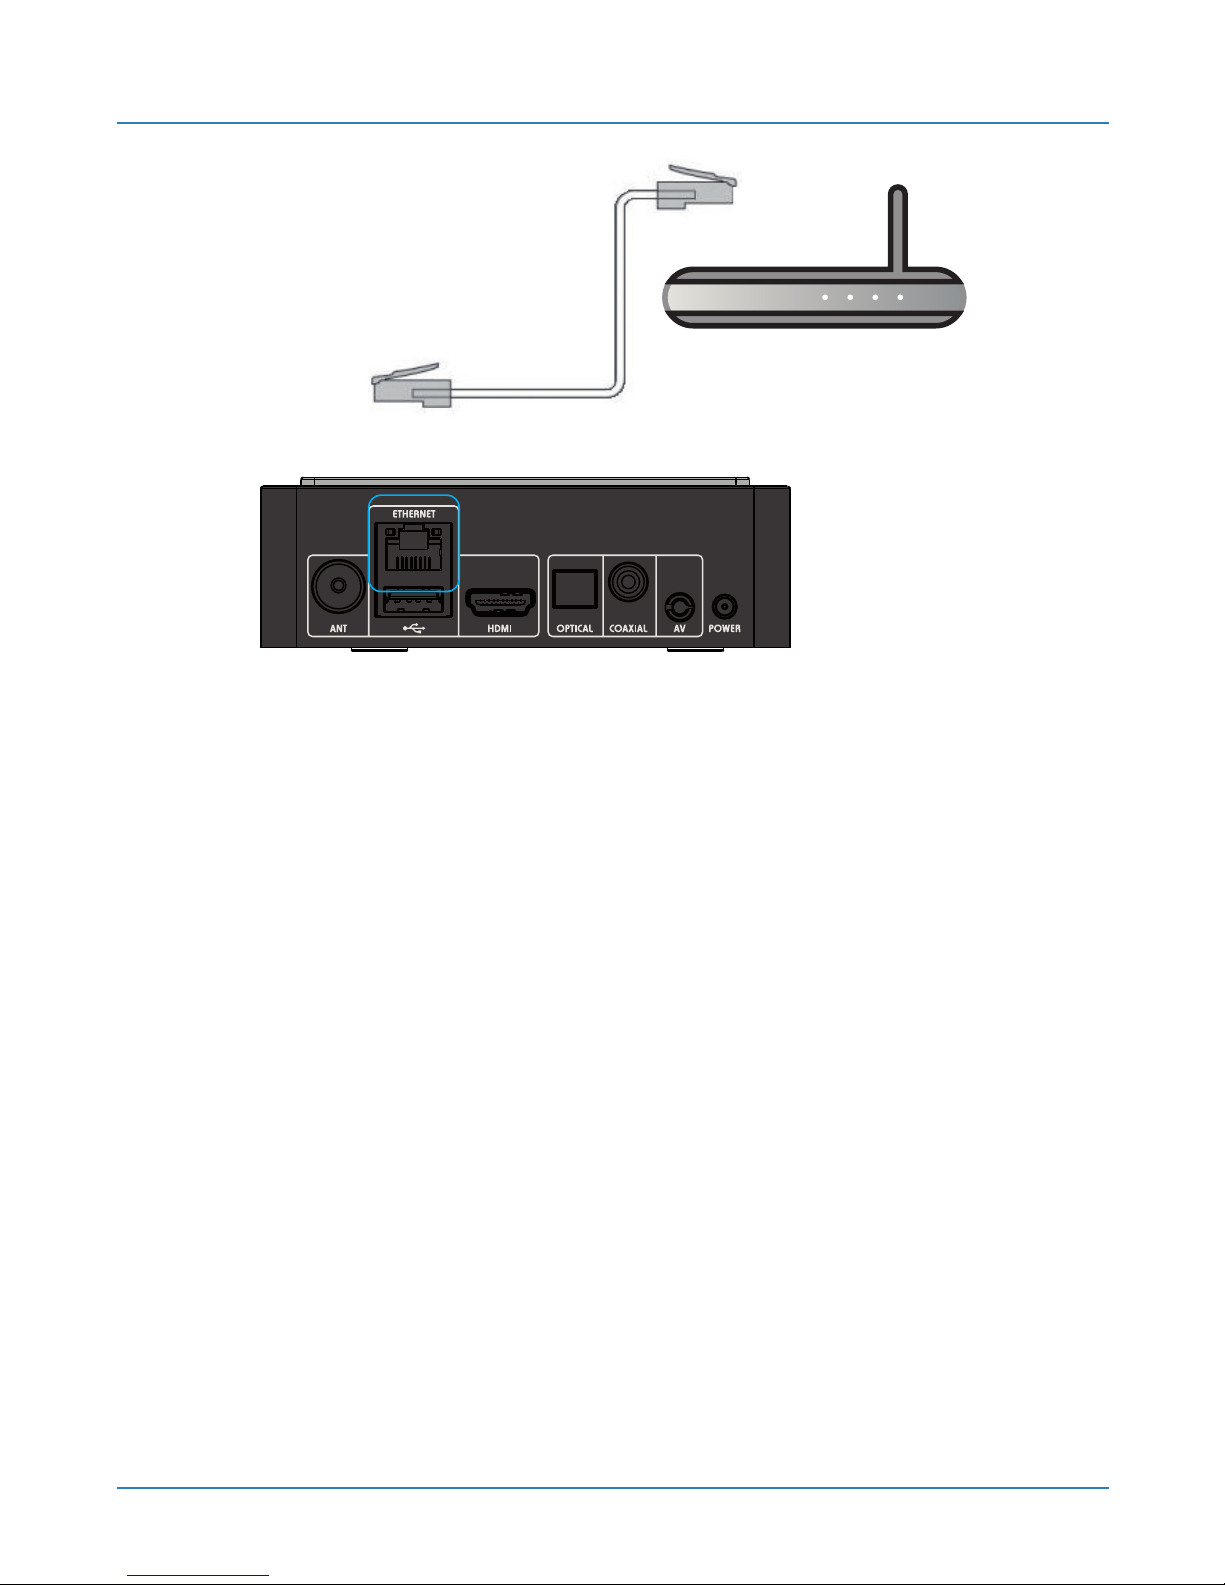
4.1.4. Internet connection via Ethernet
For this mode of connection you need to use a
local Ethernet network already installed in your home
through an Ethernet Router or the like (Switch, HUB...)
Connect one of the pins of the cable to the ETH port of
your Web:tv and the other end of the cable to the port of
your router, Switch, HUB device...
Page 28
USER MANUAL
28
If your router has the DHCP server enabled
(enabled by default on most routers), your Web:tv
will automatically configure the Internet connection.
Otherwise, you must configure the connection manually
(see chapter 4.2.2.1 of this manual).
Page 29
Blusens Web:tv
29
ENGLISH
After this, the network will be automatically
configured and Web:tv will be ready to surf the Internet.
4.1.5. Wireless internet connection
For this mode of connection you need to use a
Wireless network already installed in your home via a
Wireless Router.
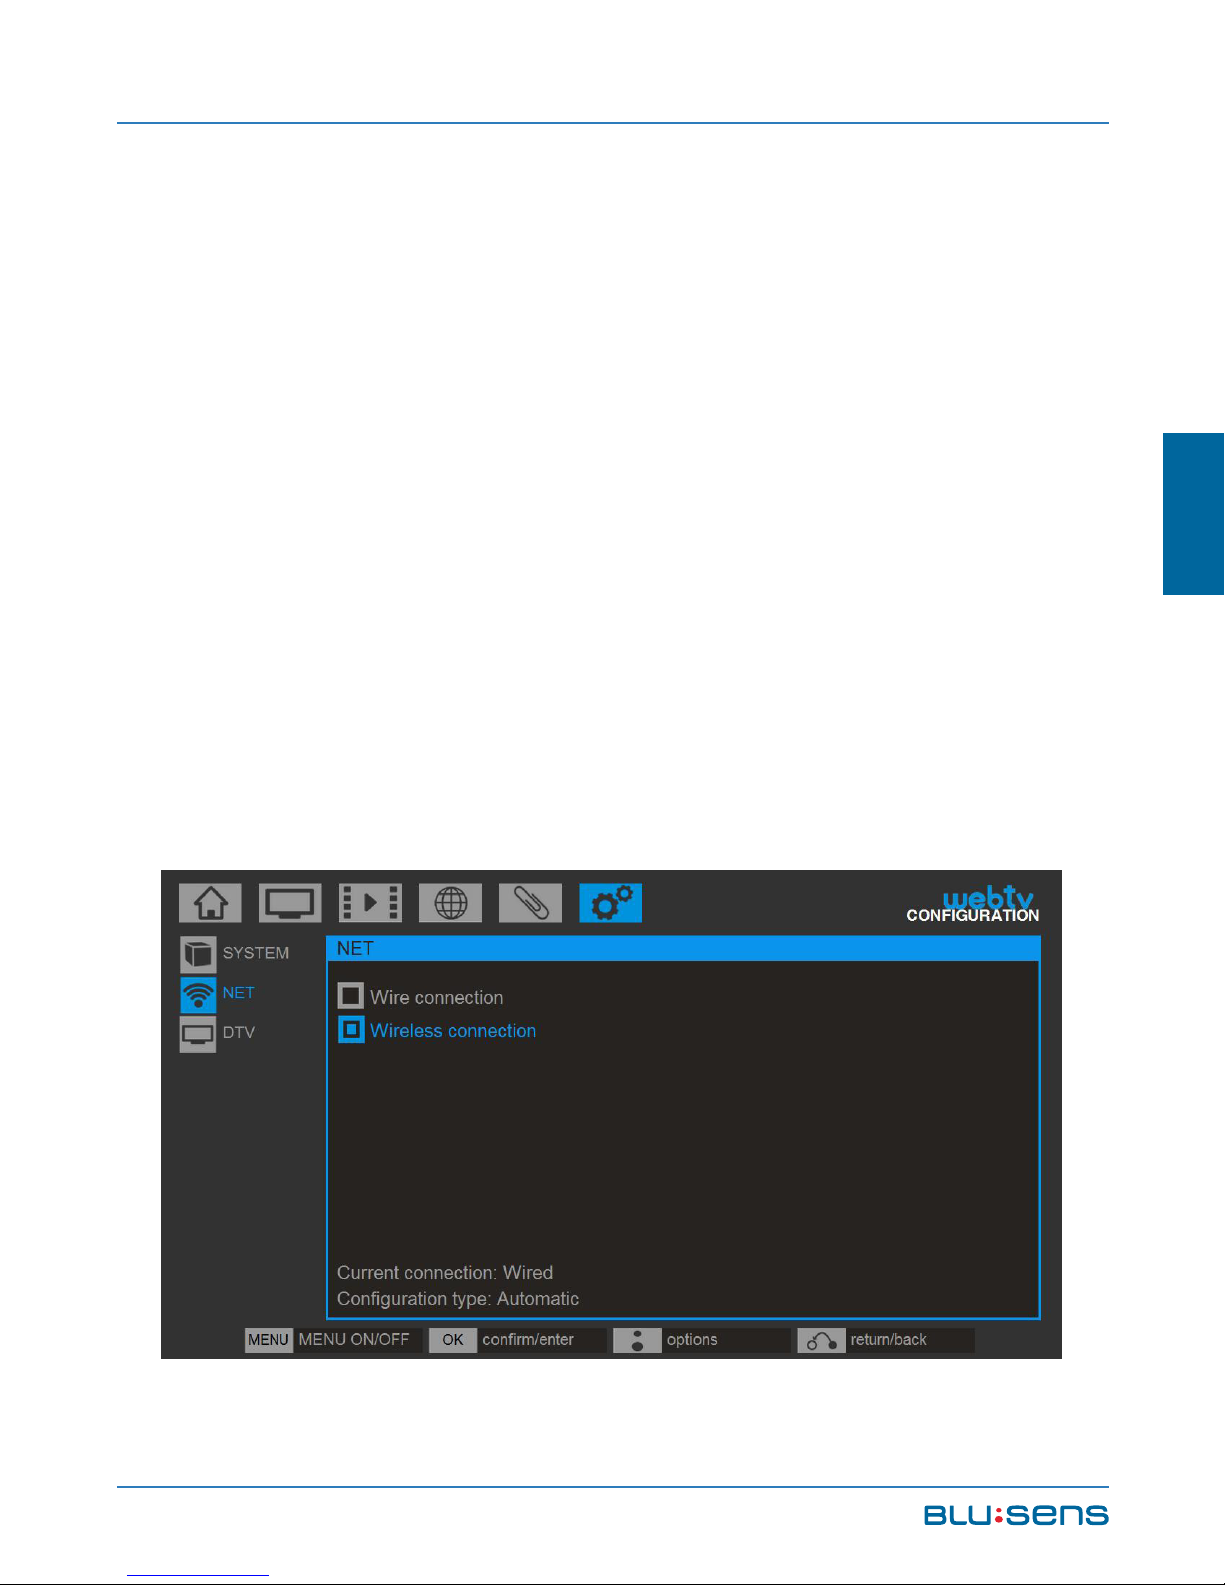
To configure the wireless network of your Web:tv
you must access CONFIGURATION/NET and select the
wireless connection option.
Page 30
USER MANUAL
30
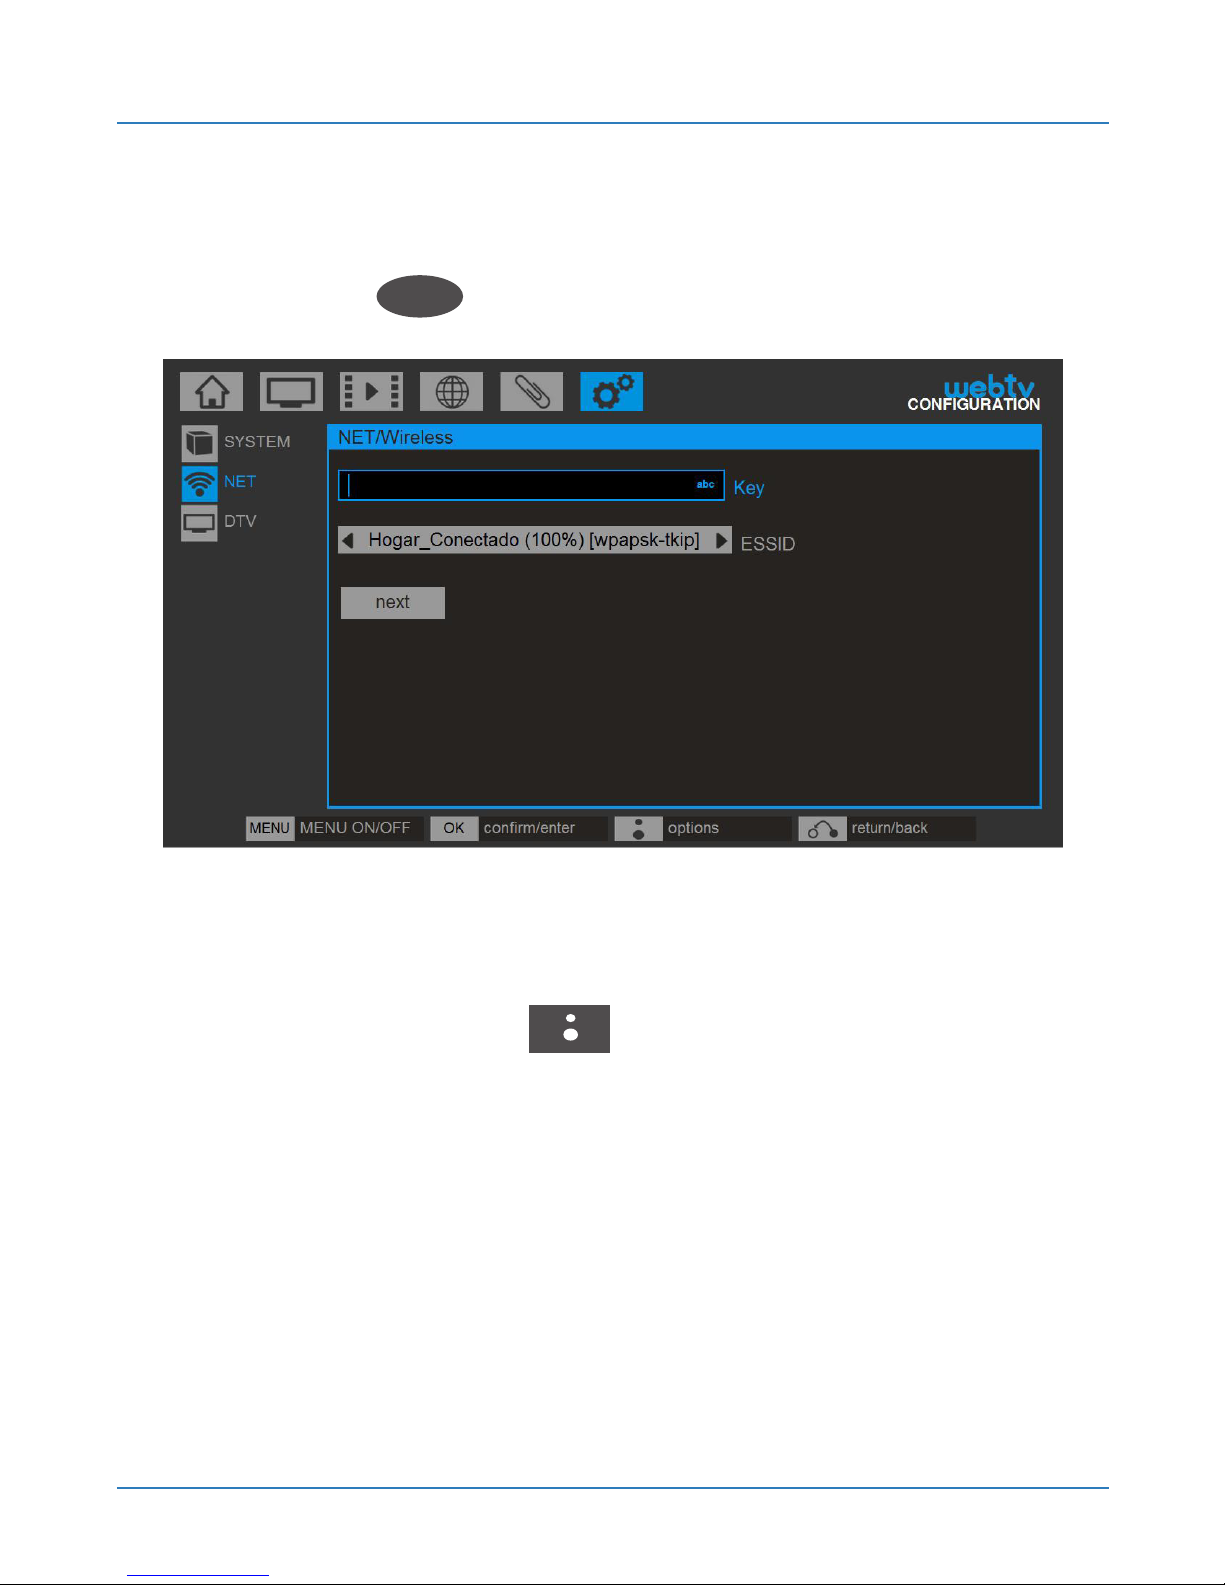
In the ESSID field select the wireless network you
want to connect to using the left and right arrow keys,
and click OK
OK
.
Then enter the network key using the alphanumeric
keypad of the remote control or the keyboard on the
screen (BLUSENS key ) and confirm the operation.
Remember that the wireless key is case sensitive.
If your router has the DHCP server enabled
(enabled by default on most routers) select AUTOMATIC
CONFIGURATION and your Web:tv will automatically
configure the Internet connection. Otherwise, you must
Page 31

Blusens Web:tv
31
ENGLISH
configure the connection manually (see chapter 4.2.2.2
of this manual)
4.2. Advanced configuration
4.2.1. Digital audio connection
This connection will allow you to obtain a digital
quality audio output, connecting your Web:tv to your
HiFi system.
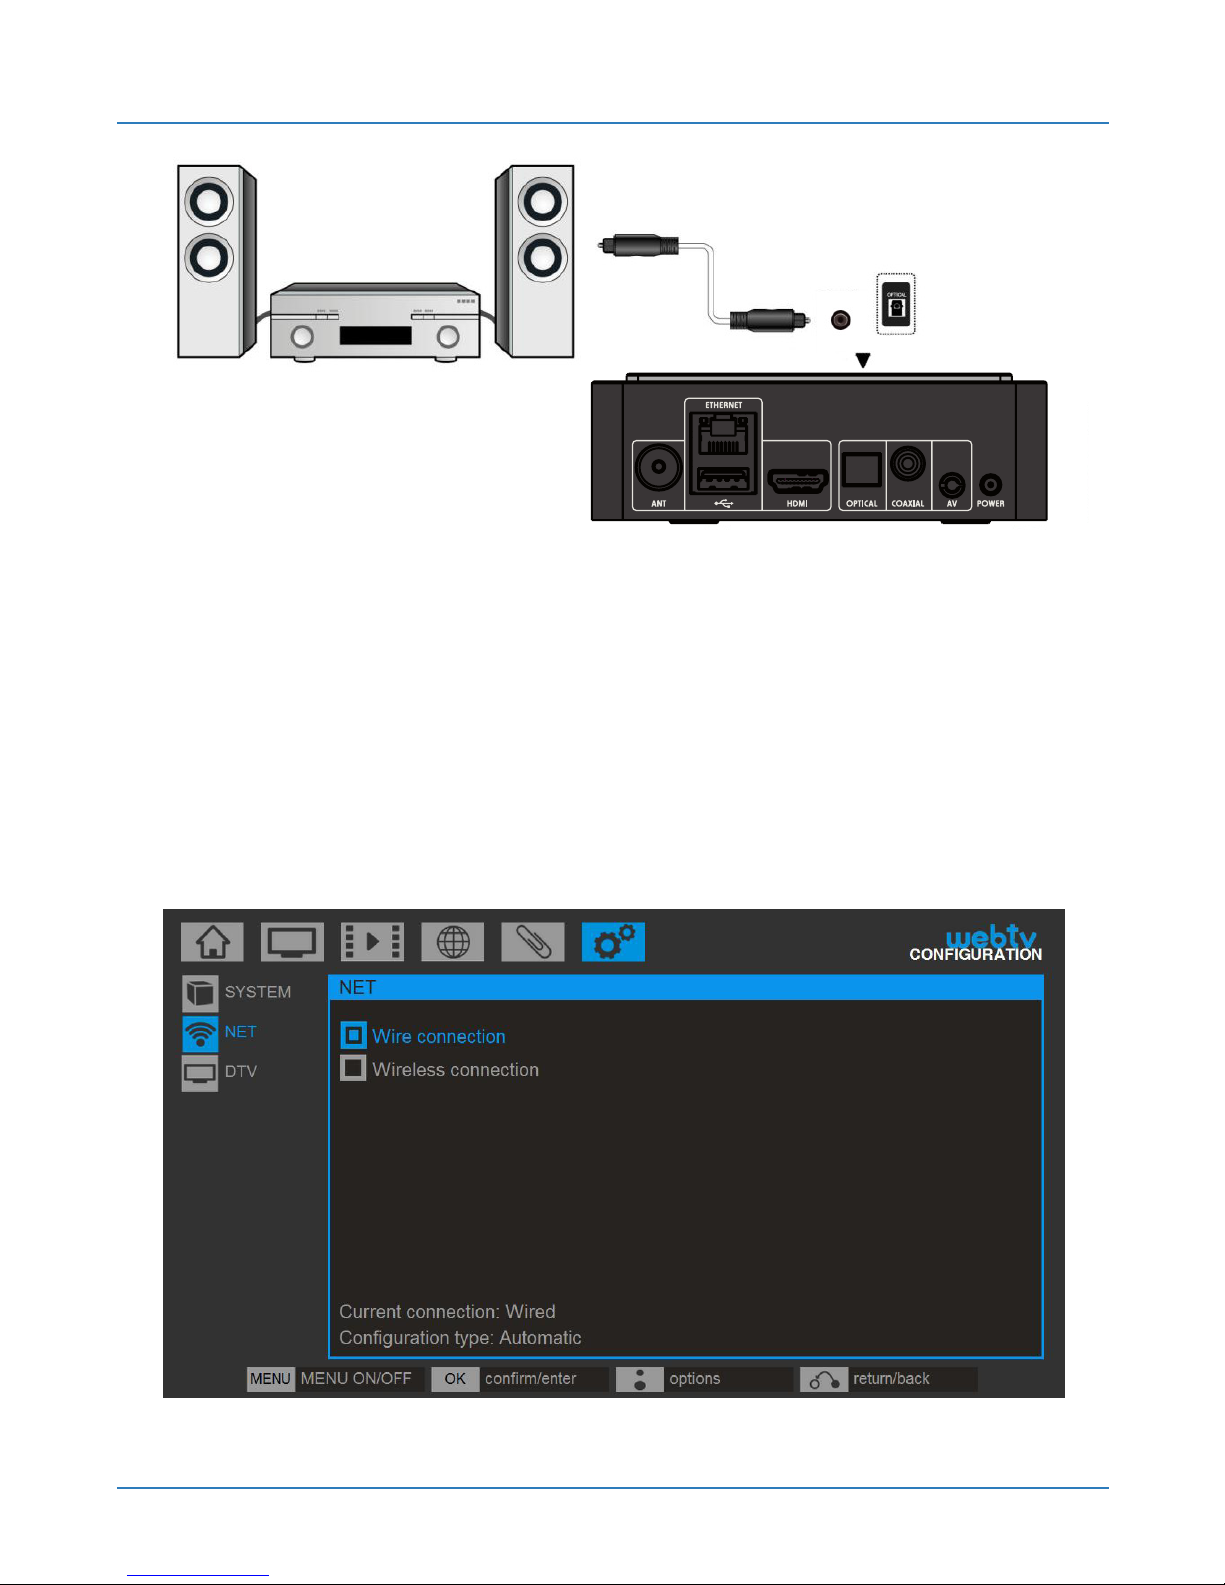
Connect a S/PDIF coaxial output cable from your
Web:tv to your audio system, or,
Connect the optical cable to the “Optical S/PDIF”
output of your Web:tv, and the other end to your audio
system.
This connection allows your advanced audio system
to decode audio codecs not supported by Web:tv
Page 32
USER MANUAL
32
4.2.2. Network configuration
The NETWORK option of the CONFIGURATION menu
allows you to configure your Web:tv connection to the
network, offering two possible modes of connection:
wired or wireless.
Page 33

Blusens Web:tv
33
ENGLISH
Select one of the following options depending on the
type of connection you have.
4.2.2.1.Internet connection via Ethernet
cable
This type of connection lets you connect to a router,
access and play multimedia files stored on desktop
PCs, laptops and other compatible storage units, and
vice versa, without doing any copying or downloading.
Additionally this type of connection will allow you output
by ADSL or fiber towards the exterior to gain access to
multimedia contents located in external servers (for
example Videoclub On-line, Internet TV,...) as well as
to use Internet applications (for example web browser,
news, mail, ...).
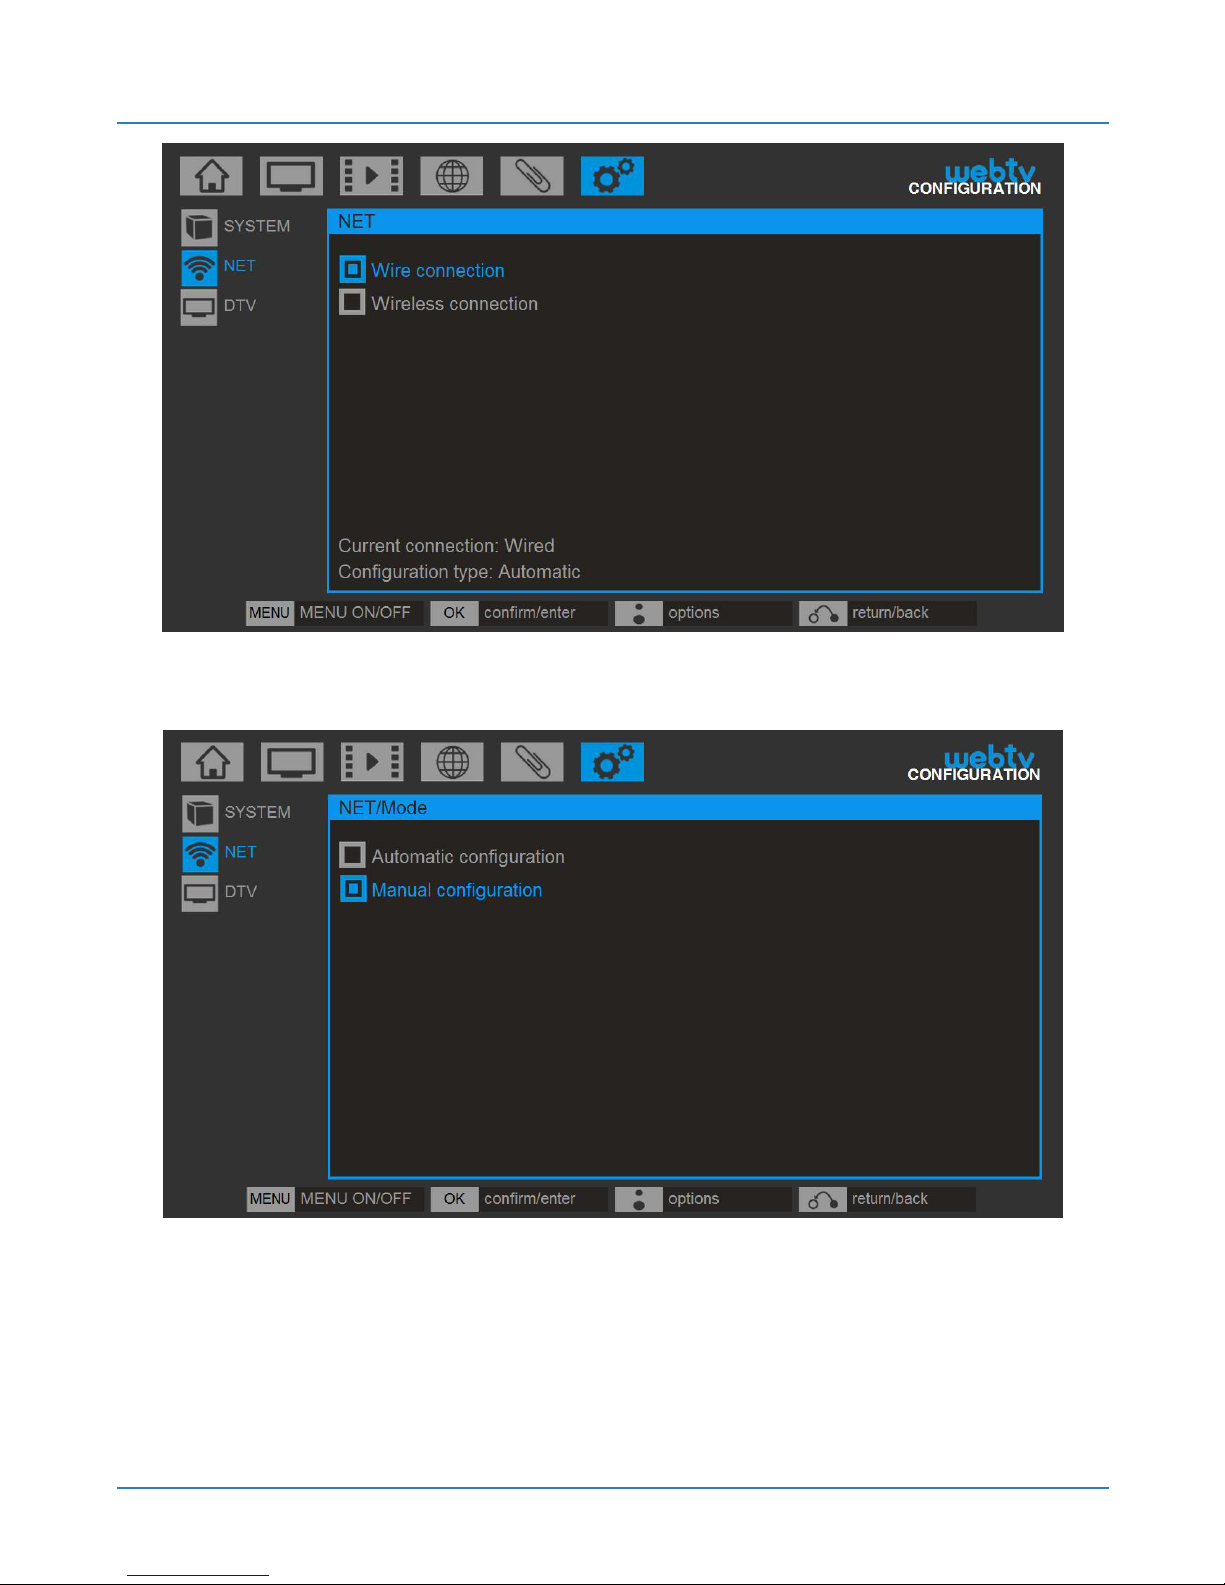
To configure the type of cable connection make sure
you have connected an ethernet cable to the ETH port
of your Web:tv.
Select the cable connection option.
Page 34
USER MANUAL
34
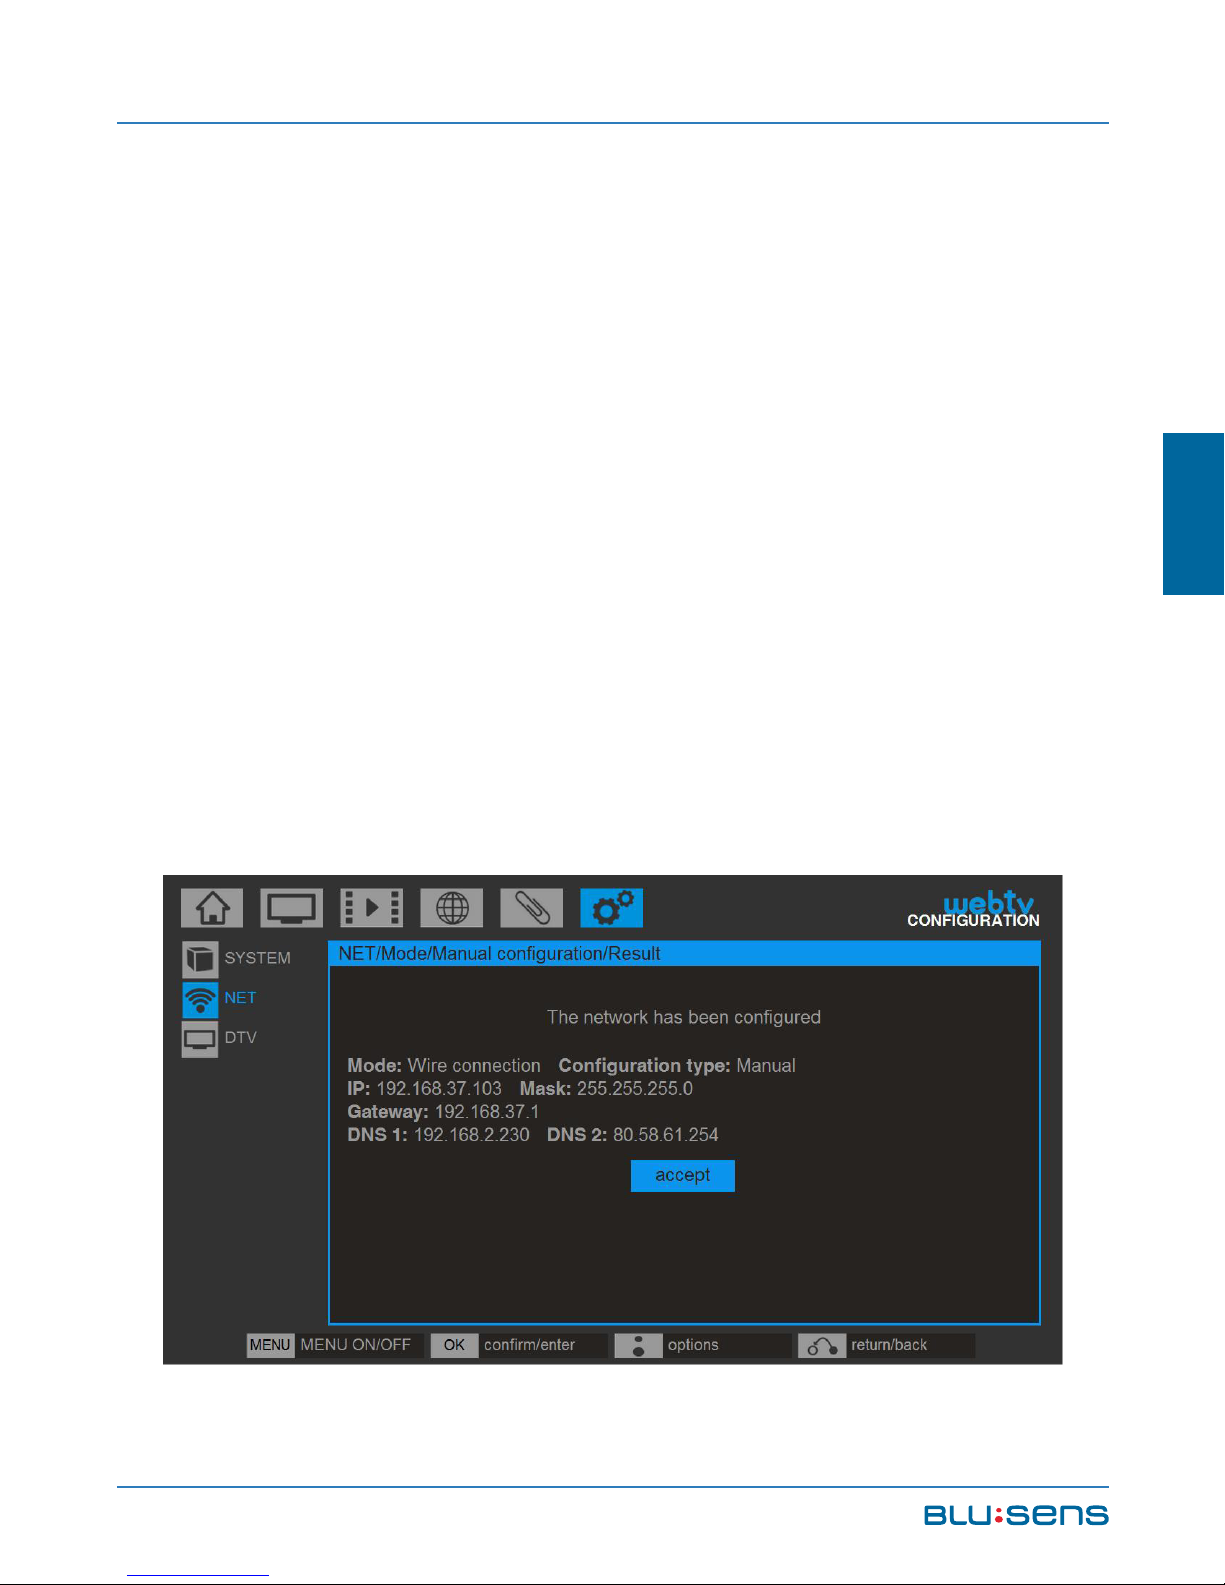
Then select the type of configuration:
Page 35
Blusens Web:tv
35
ENGLISH
Automatic configuration (recommended). Select
this option if your router has the DHCP server enabled
(enabled by default on most routers). Your Web:tv will
automatically configure the Internet connection.
Manual configuration (advanced users). Select this
option to configure the network parameters yourself.
Manually enter the IP, subnet mask, gateway and DNS.
NOTE: All fields are required. If you only have one
DNS you can complete the DNS2 field with the same
data as DNS1.
Page 36
USER MANUAL
36
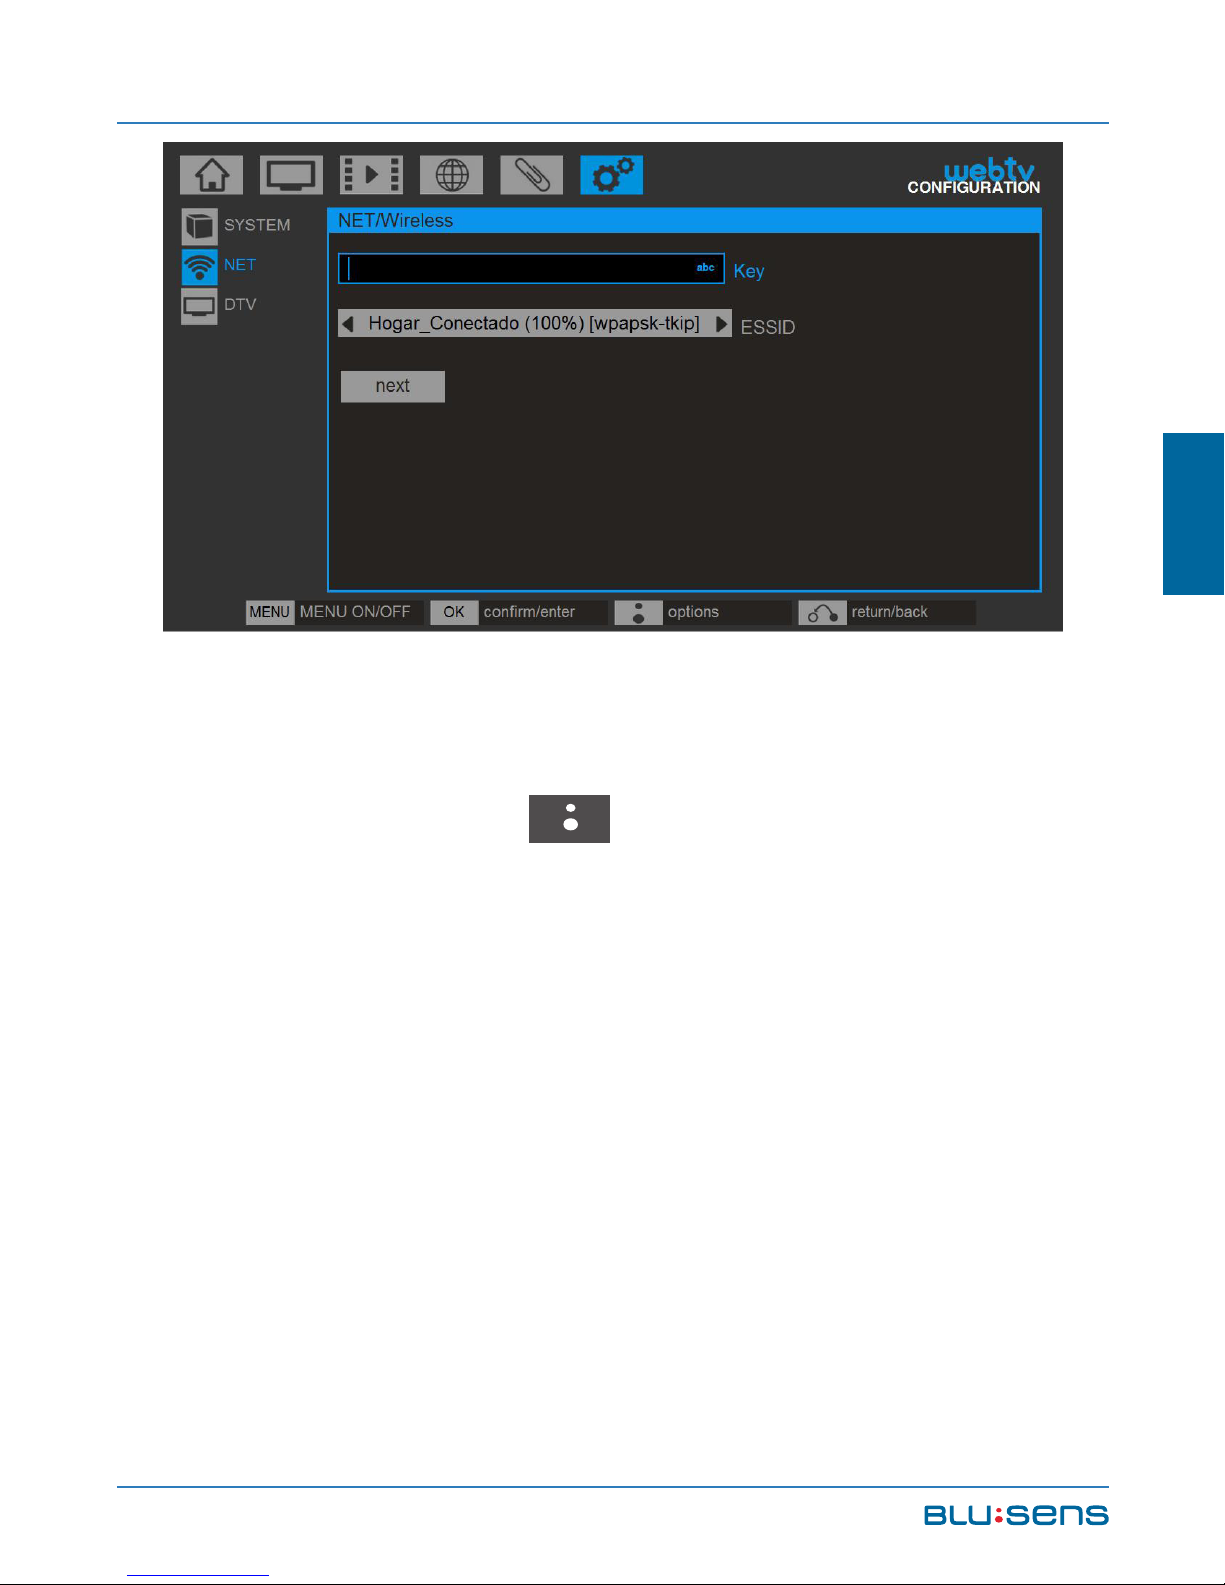
4.2.2.2.Wireless internet connection
Web: tv automatically detects available wireless
networks and connects to them after entering the
password.
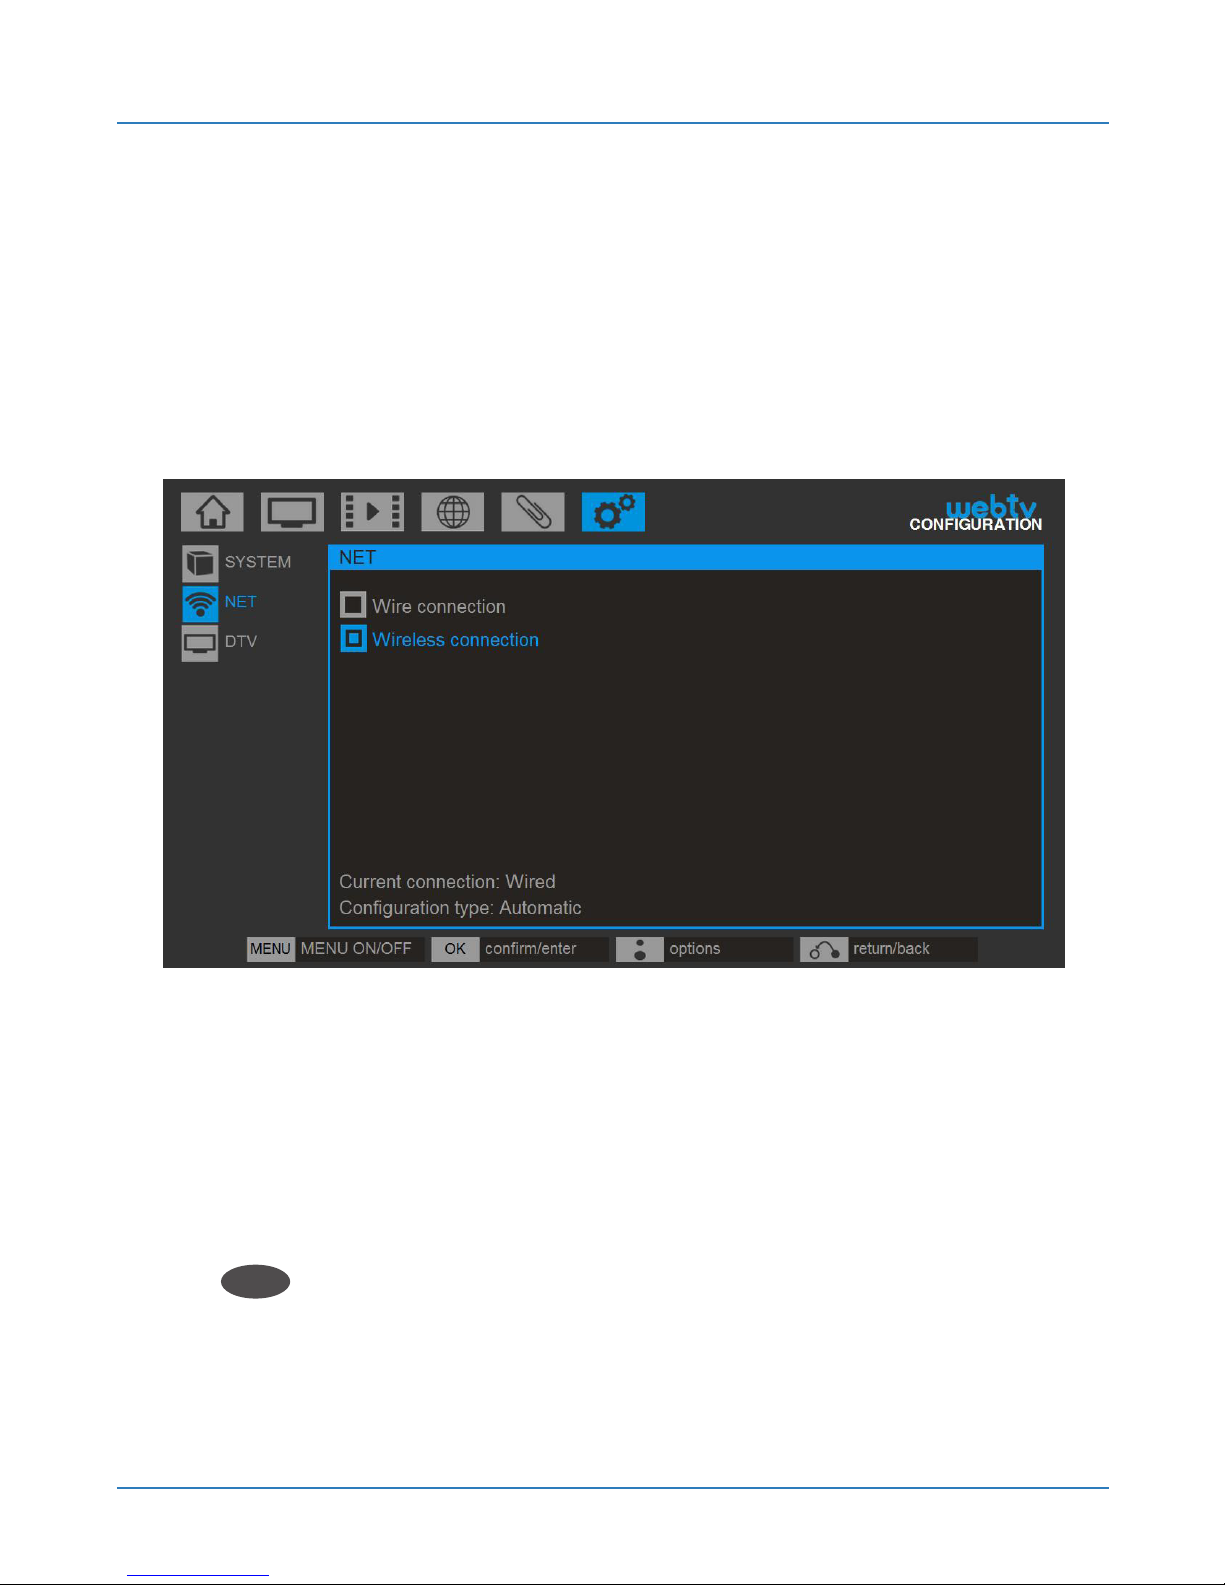
To configure the wireless connection type select
WIRELESS CONNECTION.
In the ESSID field select the wifi network you want
to connect using the left and right arrow keys, and click
OK
OK
.
Page 37
Blusens Web:tv
37
ENGLISH
Then enter the network key using the alphanumeric
keypad of the remote control or the keyboard on the
screen (BLUSENS key ) and confirm the operation.
Remember that the wifi key is case sensitive.
NOTE: To switch between lowercase, uppercase and
numbers, press the UP key. To delete a character press
the LEFT key.
In any type of connection, in case of error in the
configuration or wrong key, the system displays a
warning.
Page 38
USER MANUAL
38
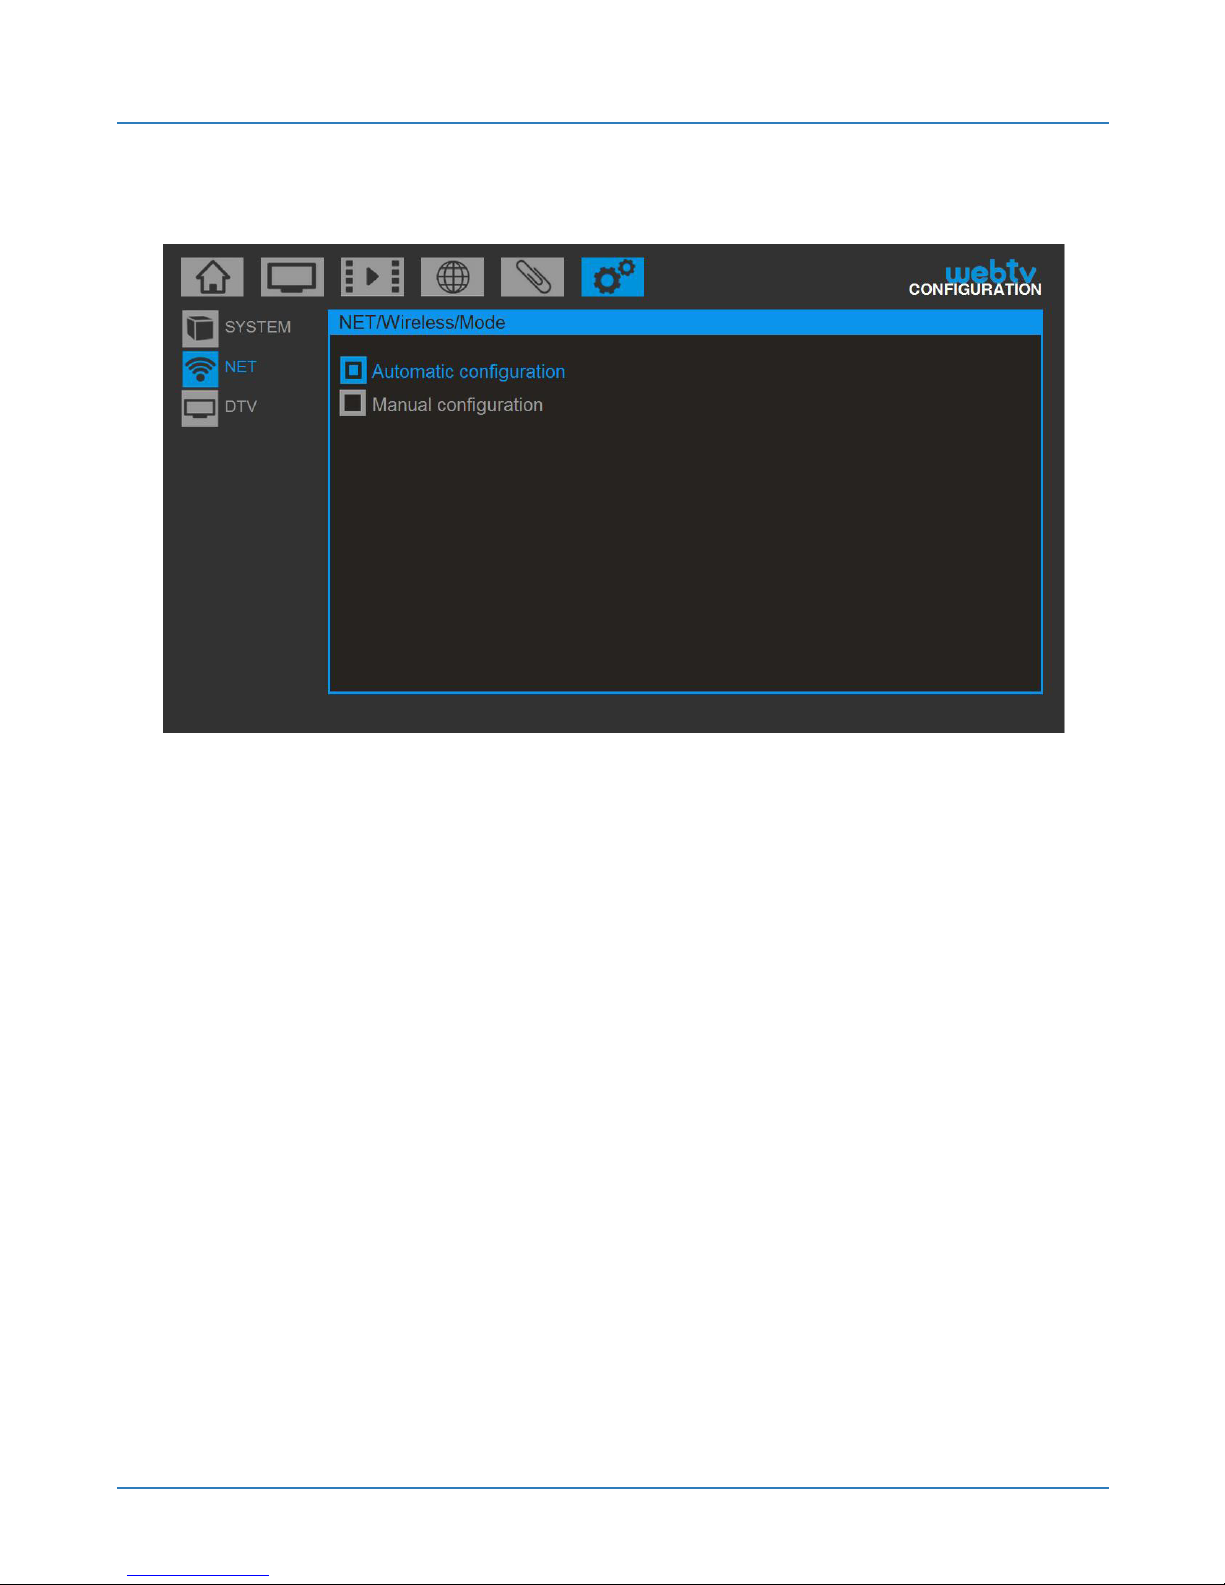
Then press Next and you will see the two possible:
Automatic configuration (recommended). Select
this option if your router has the DHCP server enabled
(enabled by default on most routers). Your Web:tv will
automatically configure the Internet connection.
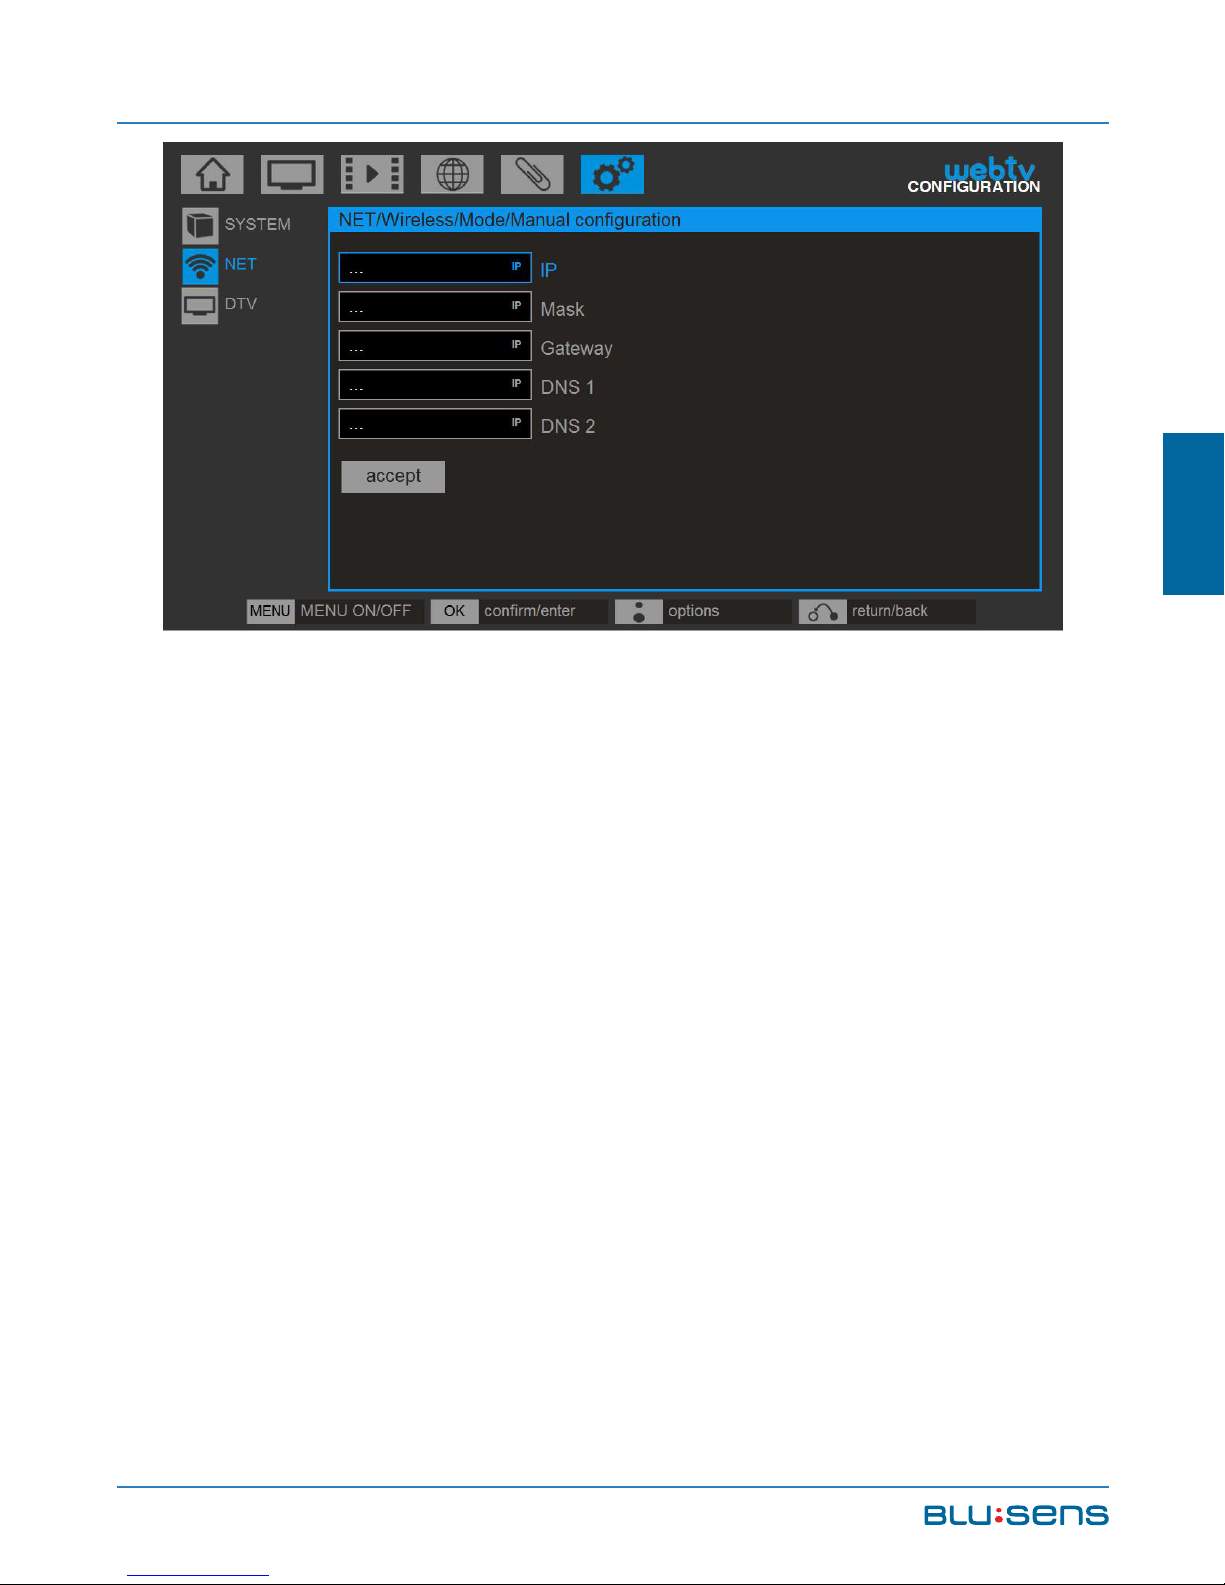
Manual configuration (advanced users). Select this
option to configure the network parameters yourself.
Manually enter the IP, subnet mask, gateway and DNS,
password, etc.
Page 39
Blusens Web:tv
39
ENGLISH
NOTE: All fields are required. If you only have one
DNS you can complete the DNS2 field with the same
data as DNS1.
NOTE: To switch between lowercase, uppercase
and numbers, press the UP key. To delete a character
press the LEFT key .
In any type of connection, in case of error in the
configuration or wrong key, the system displays a
warning.
Page 40
USER MANUAL
40
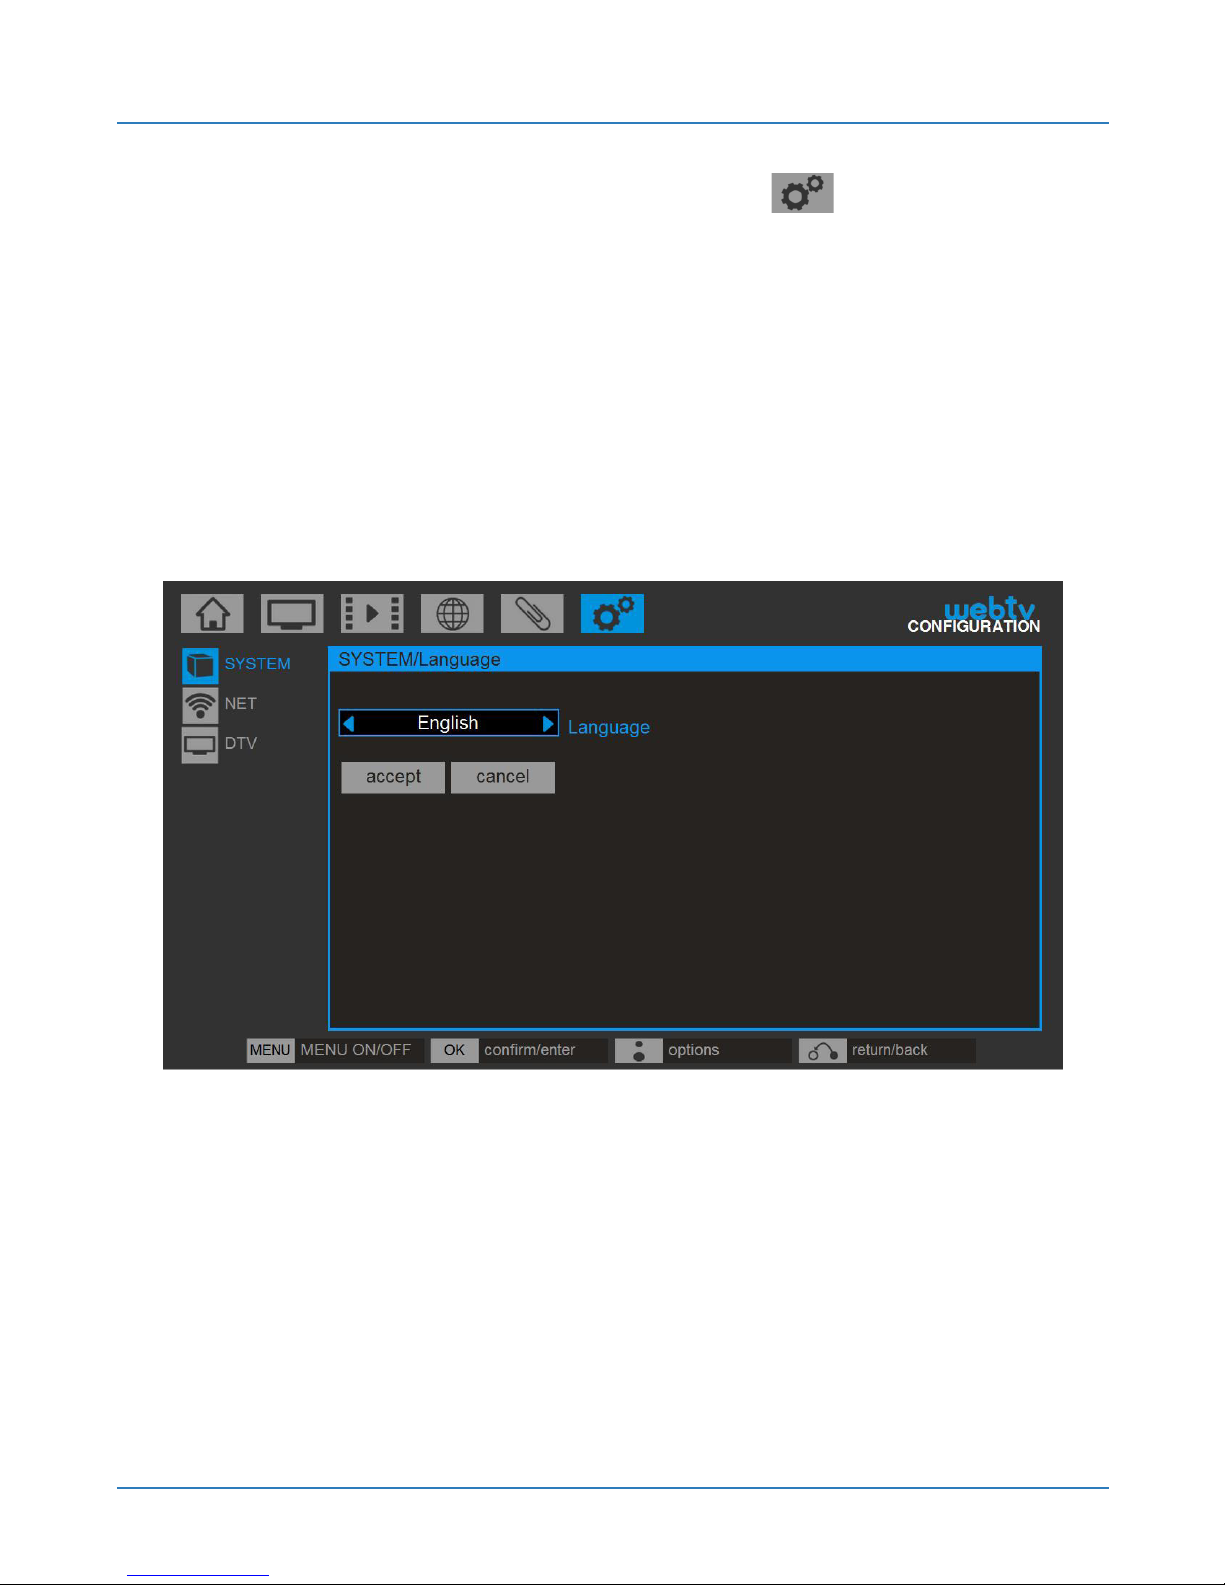
Select CONFIGURATION/SYSTEM to change the
following operating system parameters of your Web:tv:
4.2.3. Language settings
Select the desired language for the system menus
from the available options.
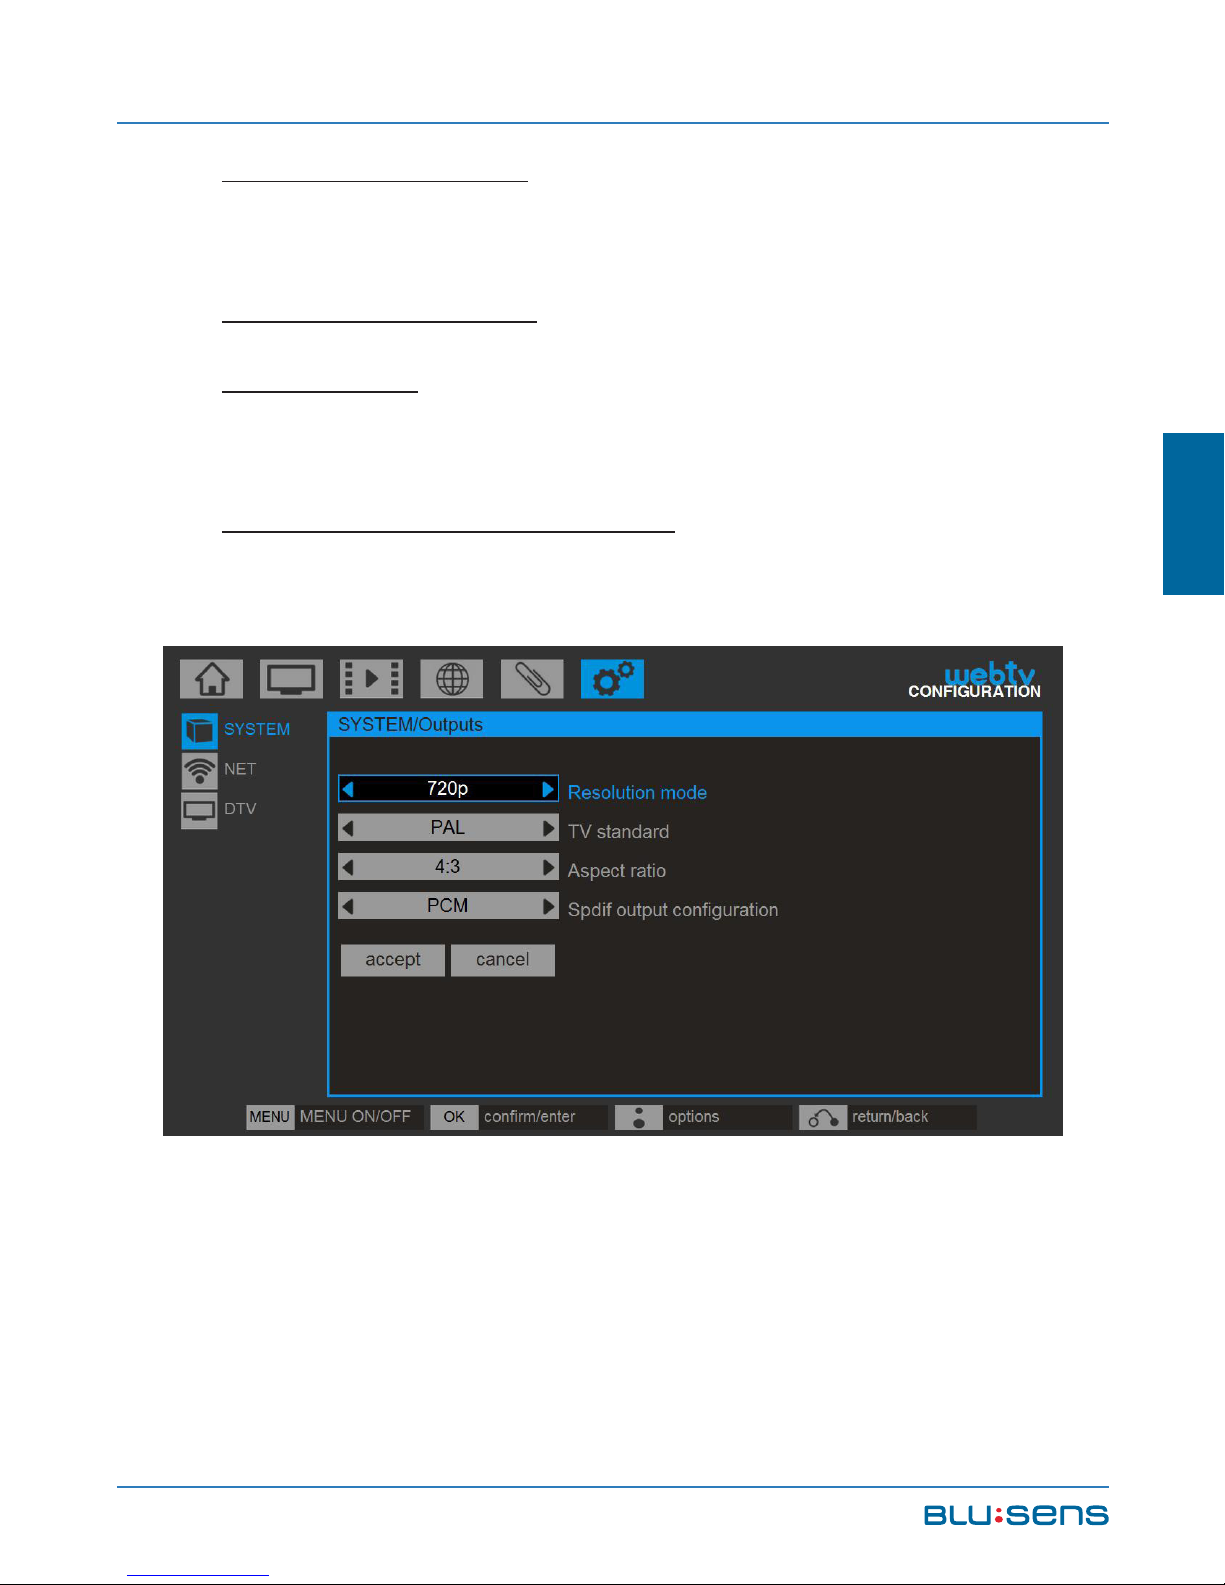
4.2.4. Output configuration
Access this option to configure the video and audio
output.
Page 41
Blusens Web:tv
41
ENGLISH
Resolution mode: Select the most appropriate
resolution for your screen.
Television standard: Select the television input.
Aspect ratio: Select the most appropriate aspect for
your screen, 16:9 or 4:3.
SPDIF output configuration: Set the desired mode
for digital audio output.
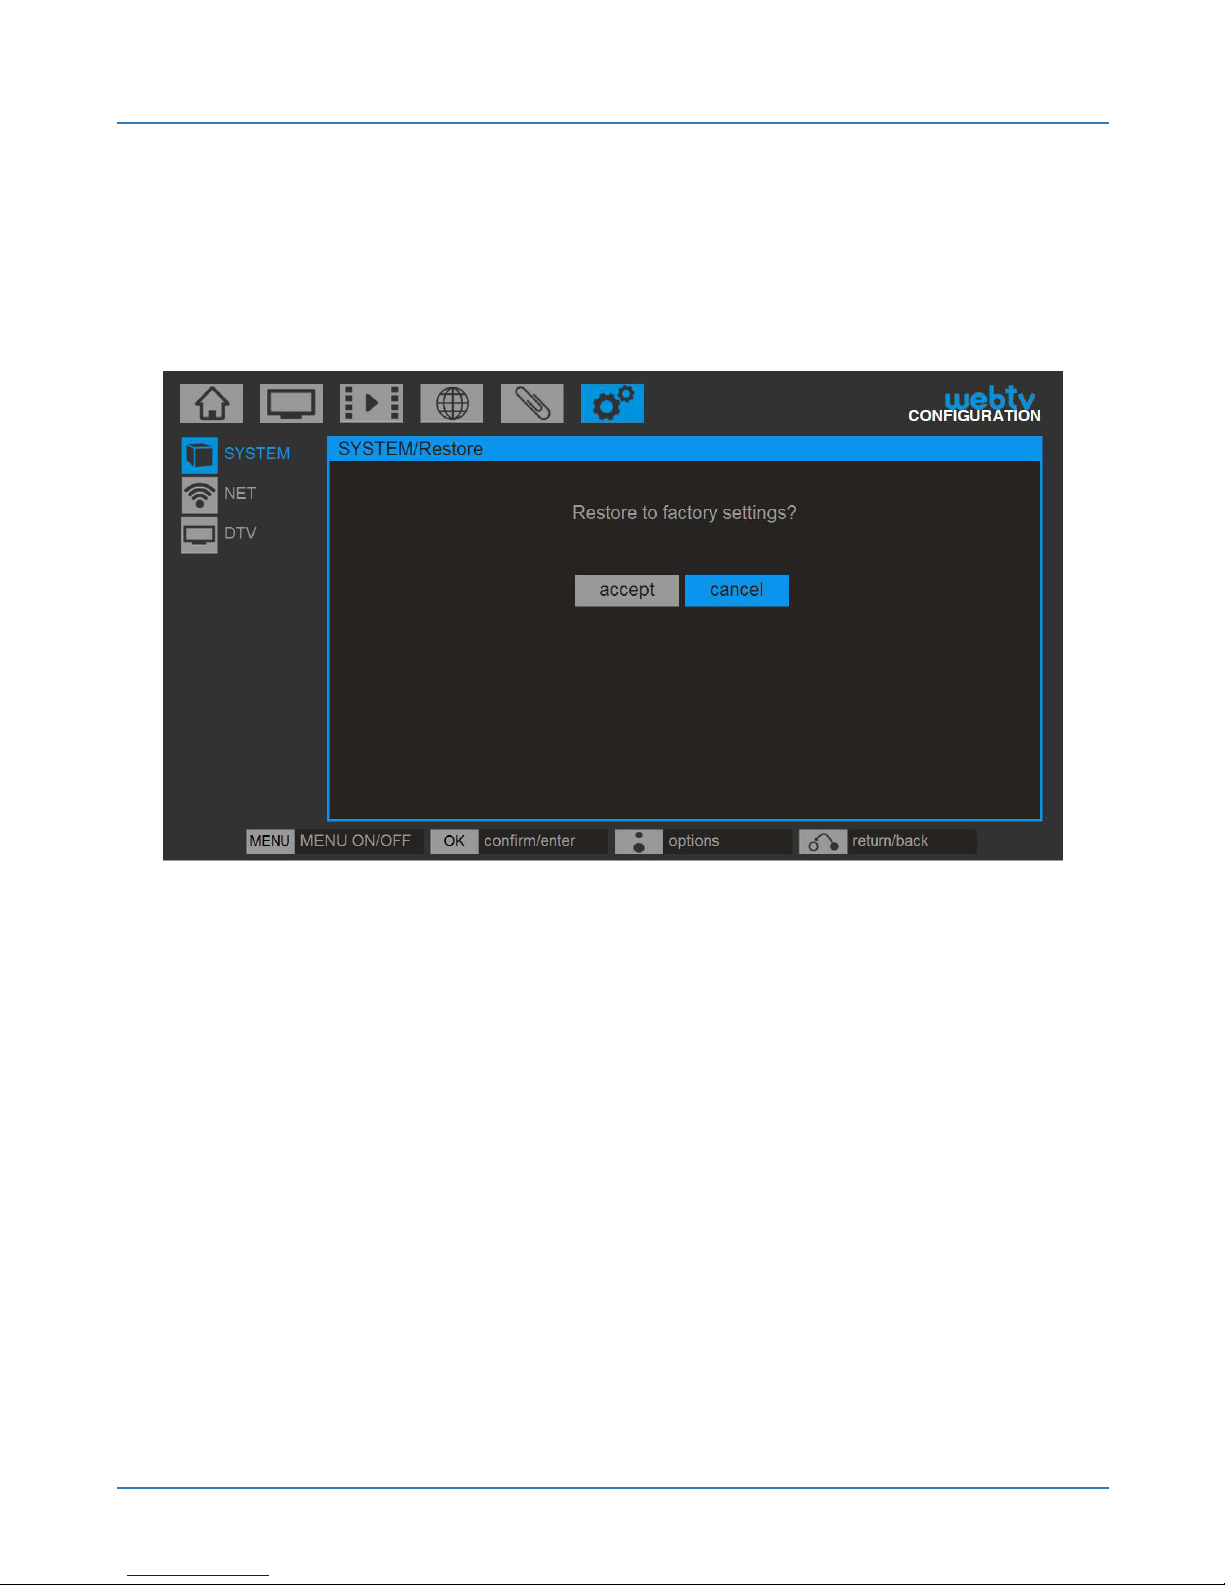
4.2.5. Restore factory settings
Select this option to restore the default settings
on your system. This operation will erase the channel,
date, language, ... configuration but not the recordings
Page 42
USER MANUAL
42
(although if the DVB/FOLDER list will disappear, you
must search for the recordings in the “recordings”
folder on the hard disk where you have made them).
4.2.6. Firmware update
Firmware update (Software) is performed to improve
the functions of your Web:tv. Through this process you
can check if there is a new firmware version for your
system and if you want you can start the firmware
update through this section. See Chapter 14. Firmware
Update to learn about this mode of update.
Page 43
Blusens Web:tv
43
ENGLISH
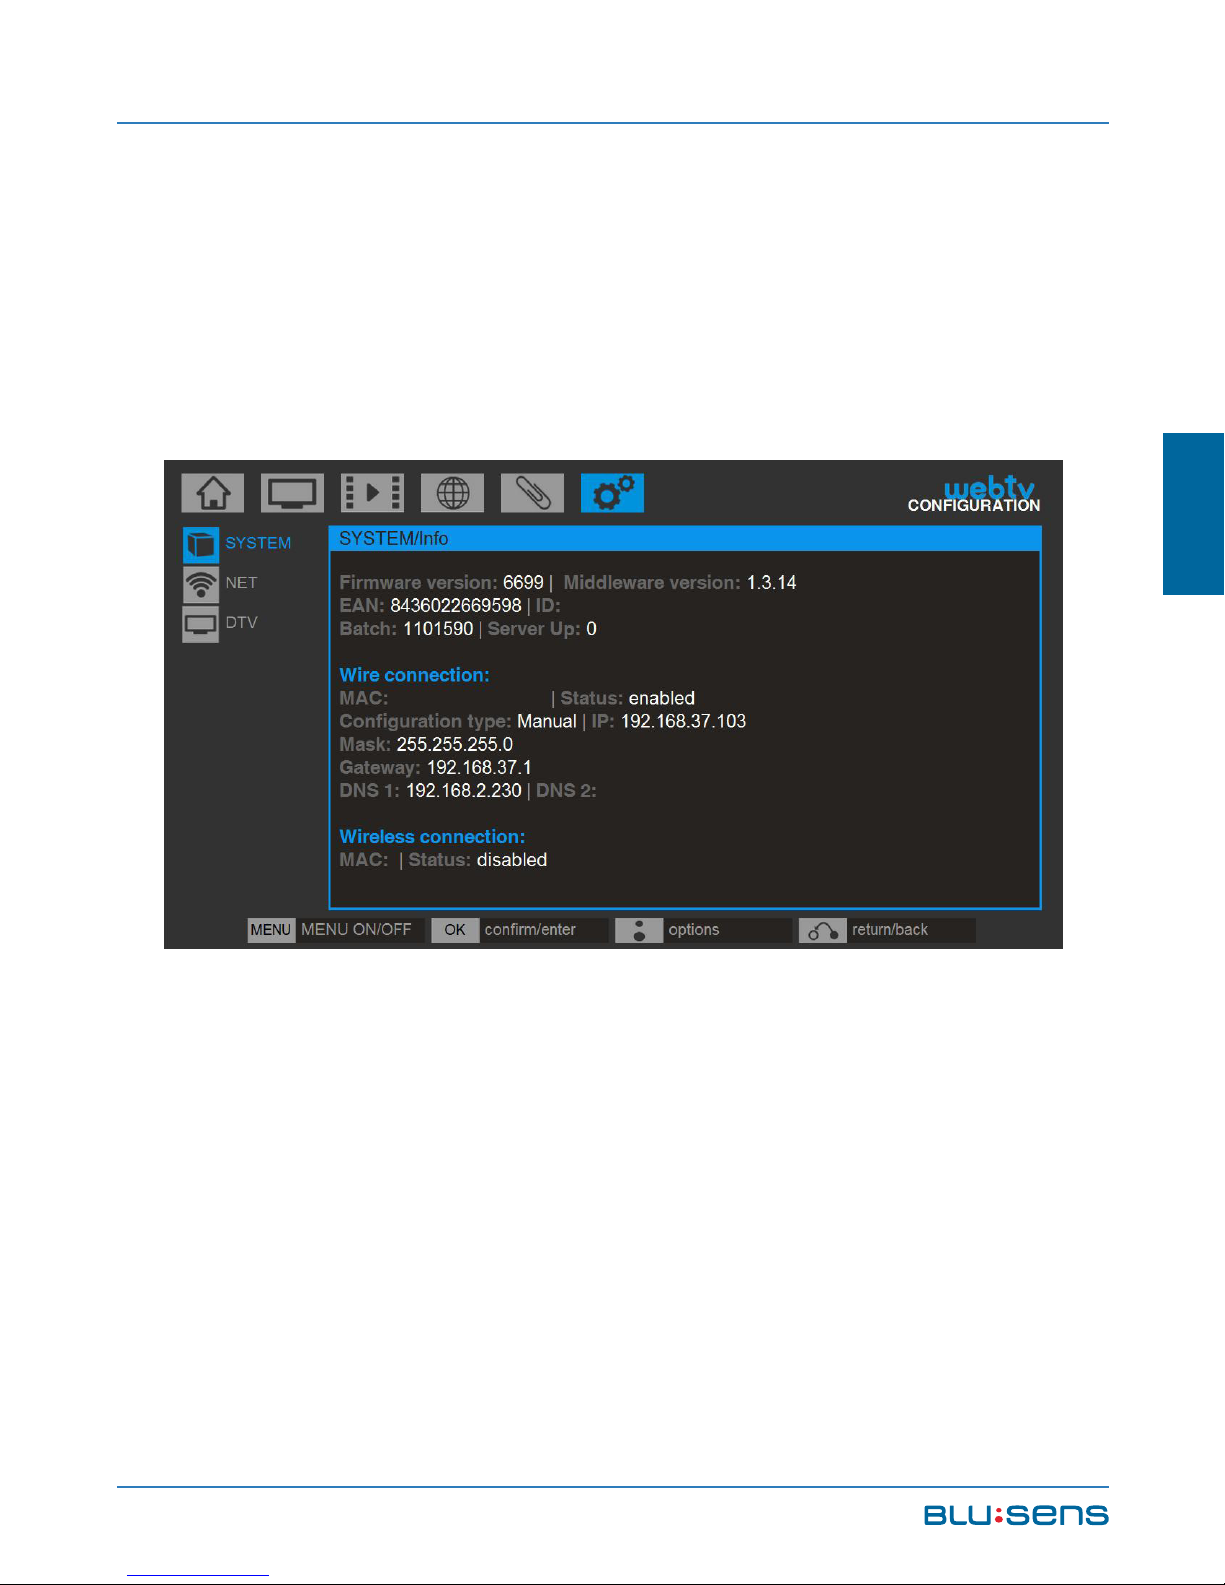
4.2.7. Information
Access information on the firmware version
installed on your Web:tv, such as network information,
etc.
Page 44
USER MANUAL
44
5. STARTING UP
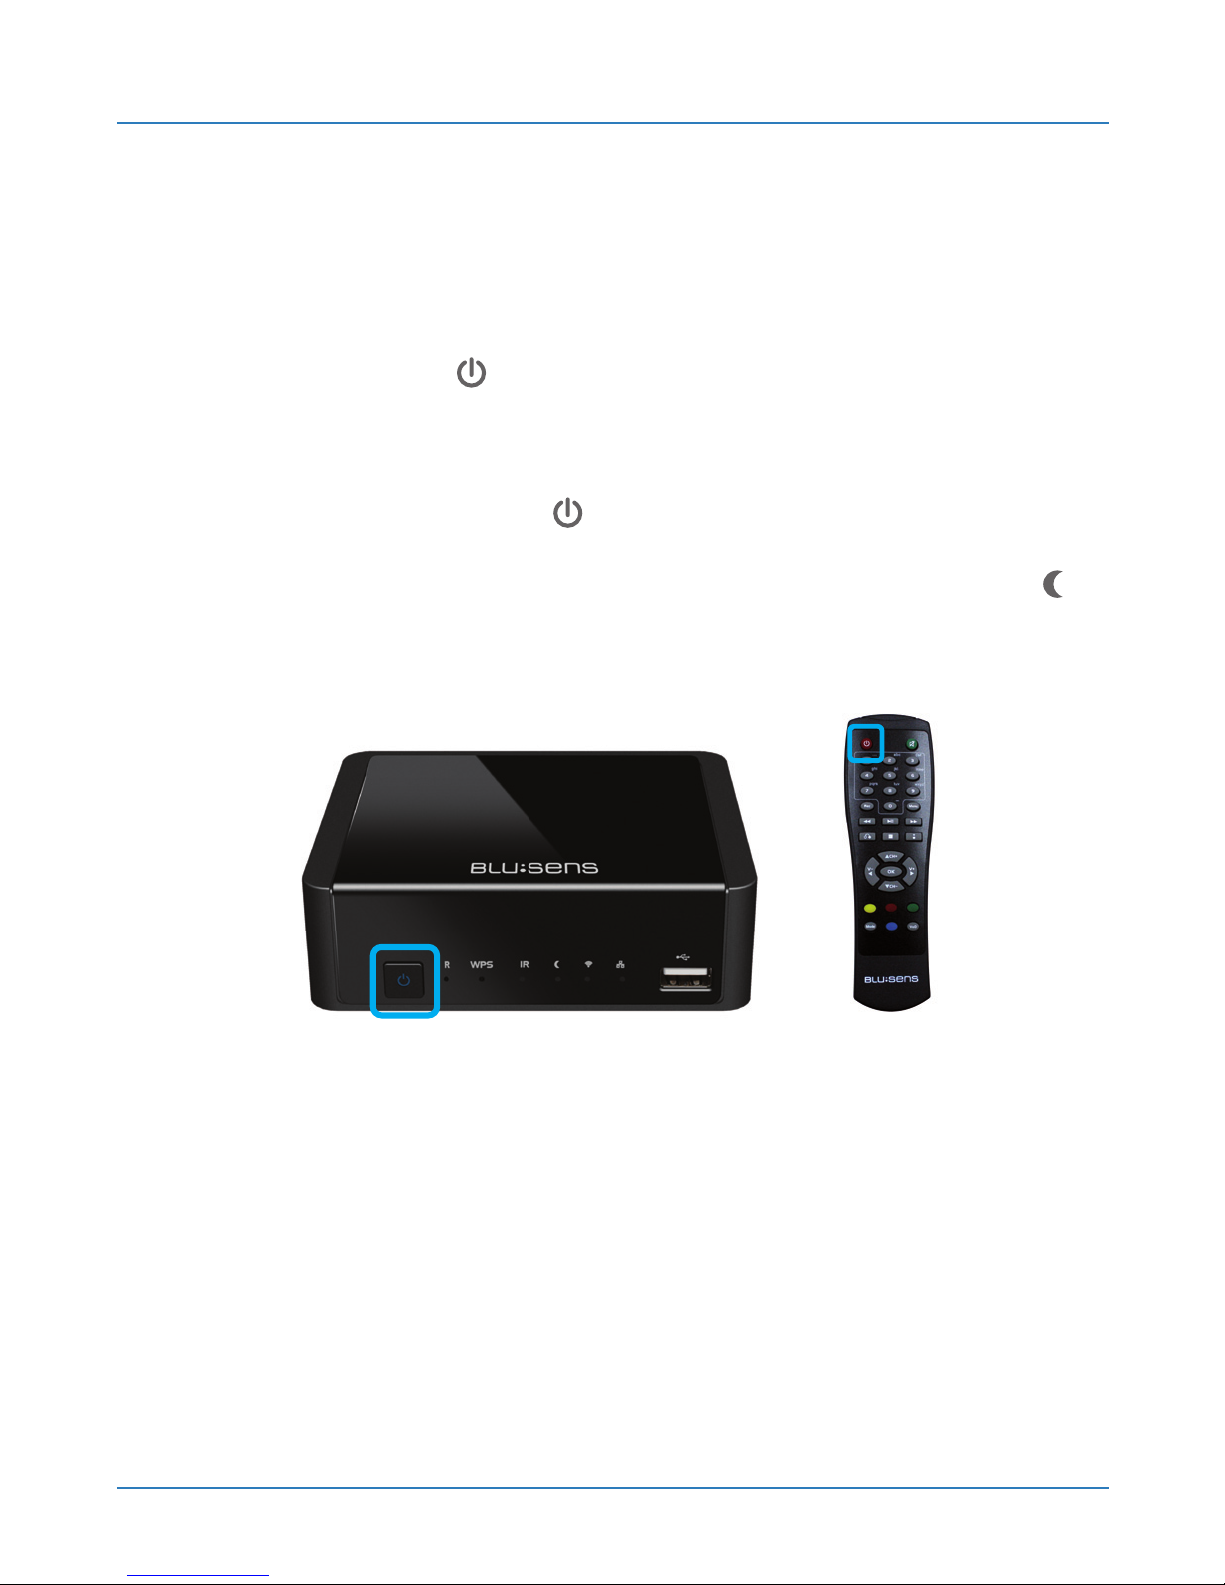
5.1. To turn Web:tv on/off
Pressing the button on the device turns Web:tv
on and off.
When you press the button on the remote control
the device will be in Standby mode. At this point the
LED will be lit.
5.1.1. Standby configuration via Web
From a browser on your computer, you can access
the web interface of Web:tv and change the Standby
mode of the device.
To access the configuration menu of the web
interface simply enter the IP address of your Web:tv in
Page 45
Blusens Web:tv
45
ENGLISH
a web browser from the same local network where it is
connected to Web:tv.
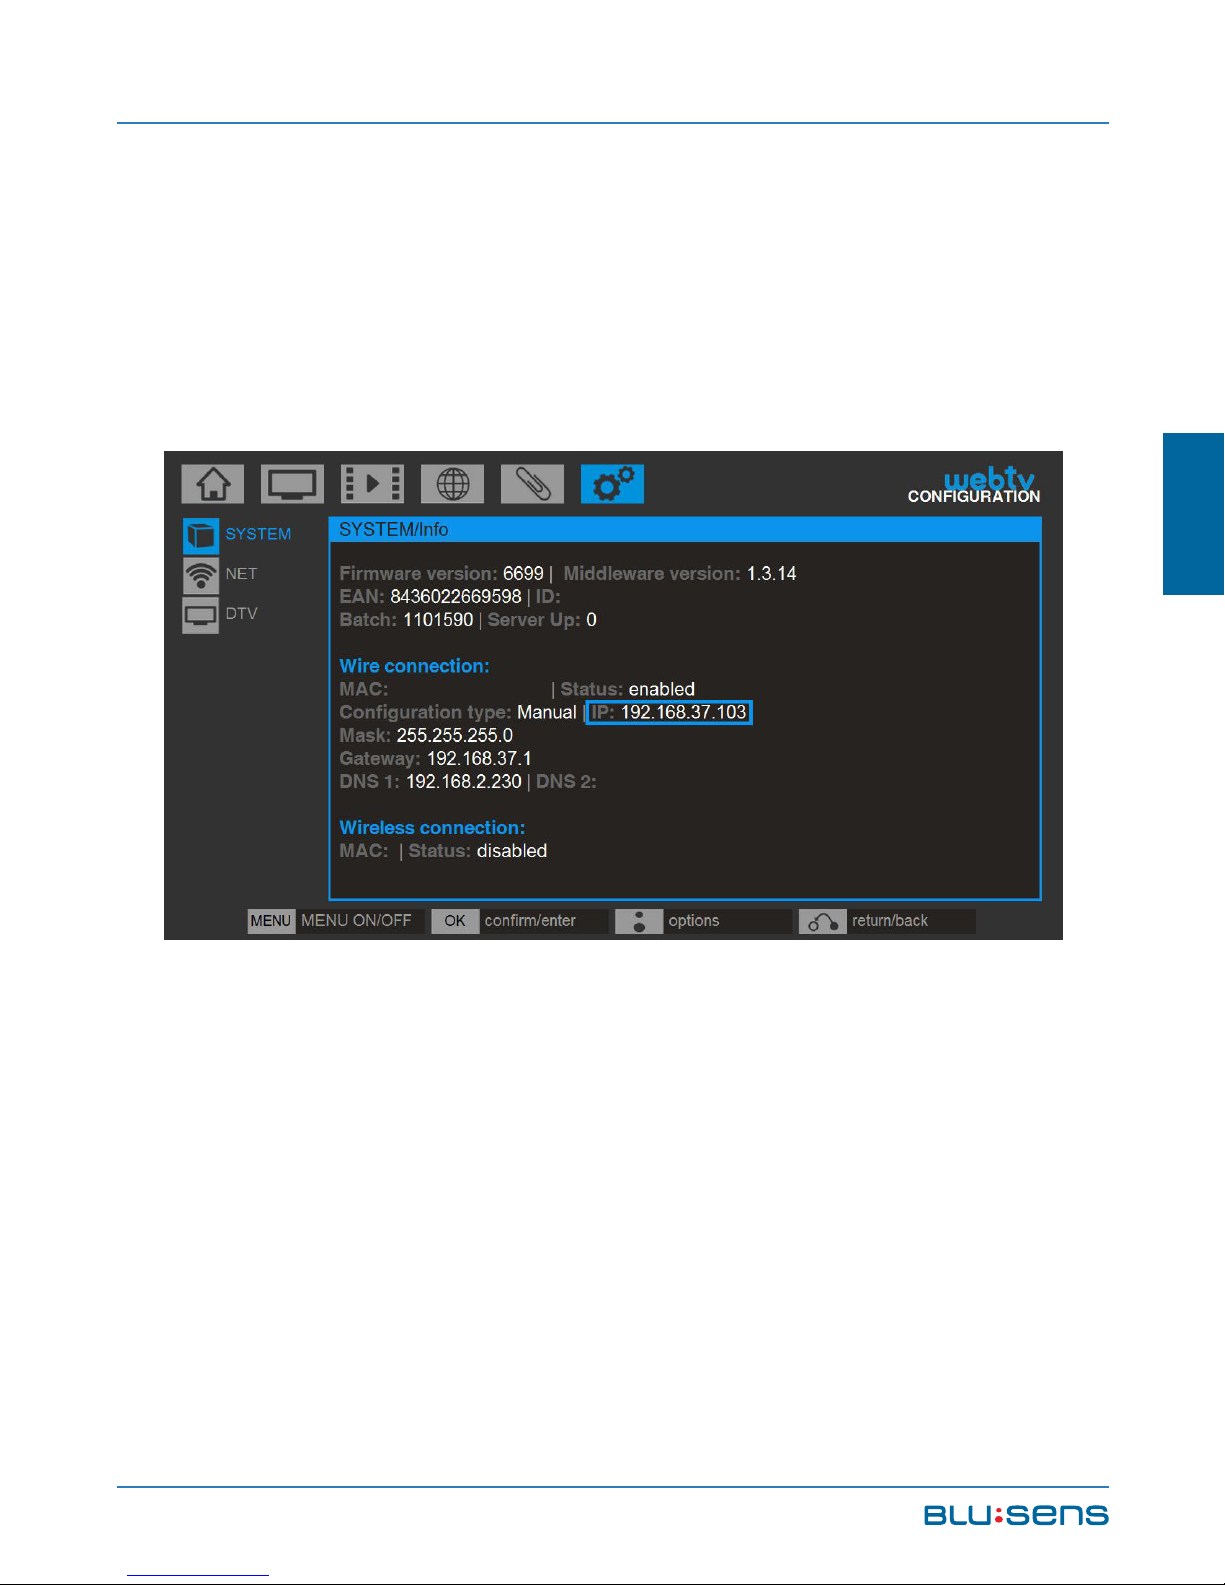
To find the IP of Web:tv you can access
CONFIGURATION/SYSTEM/INFORMATION.
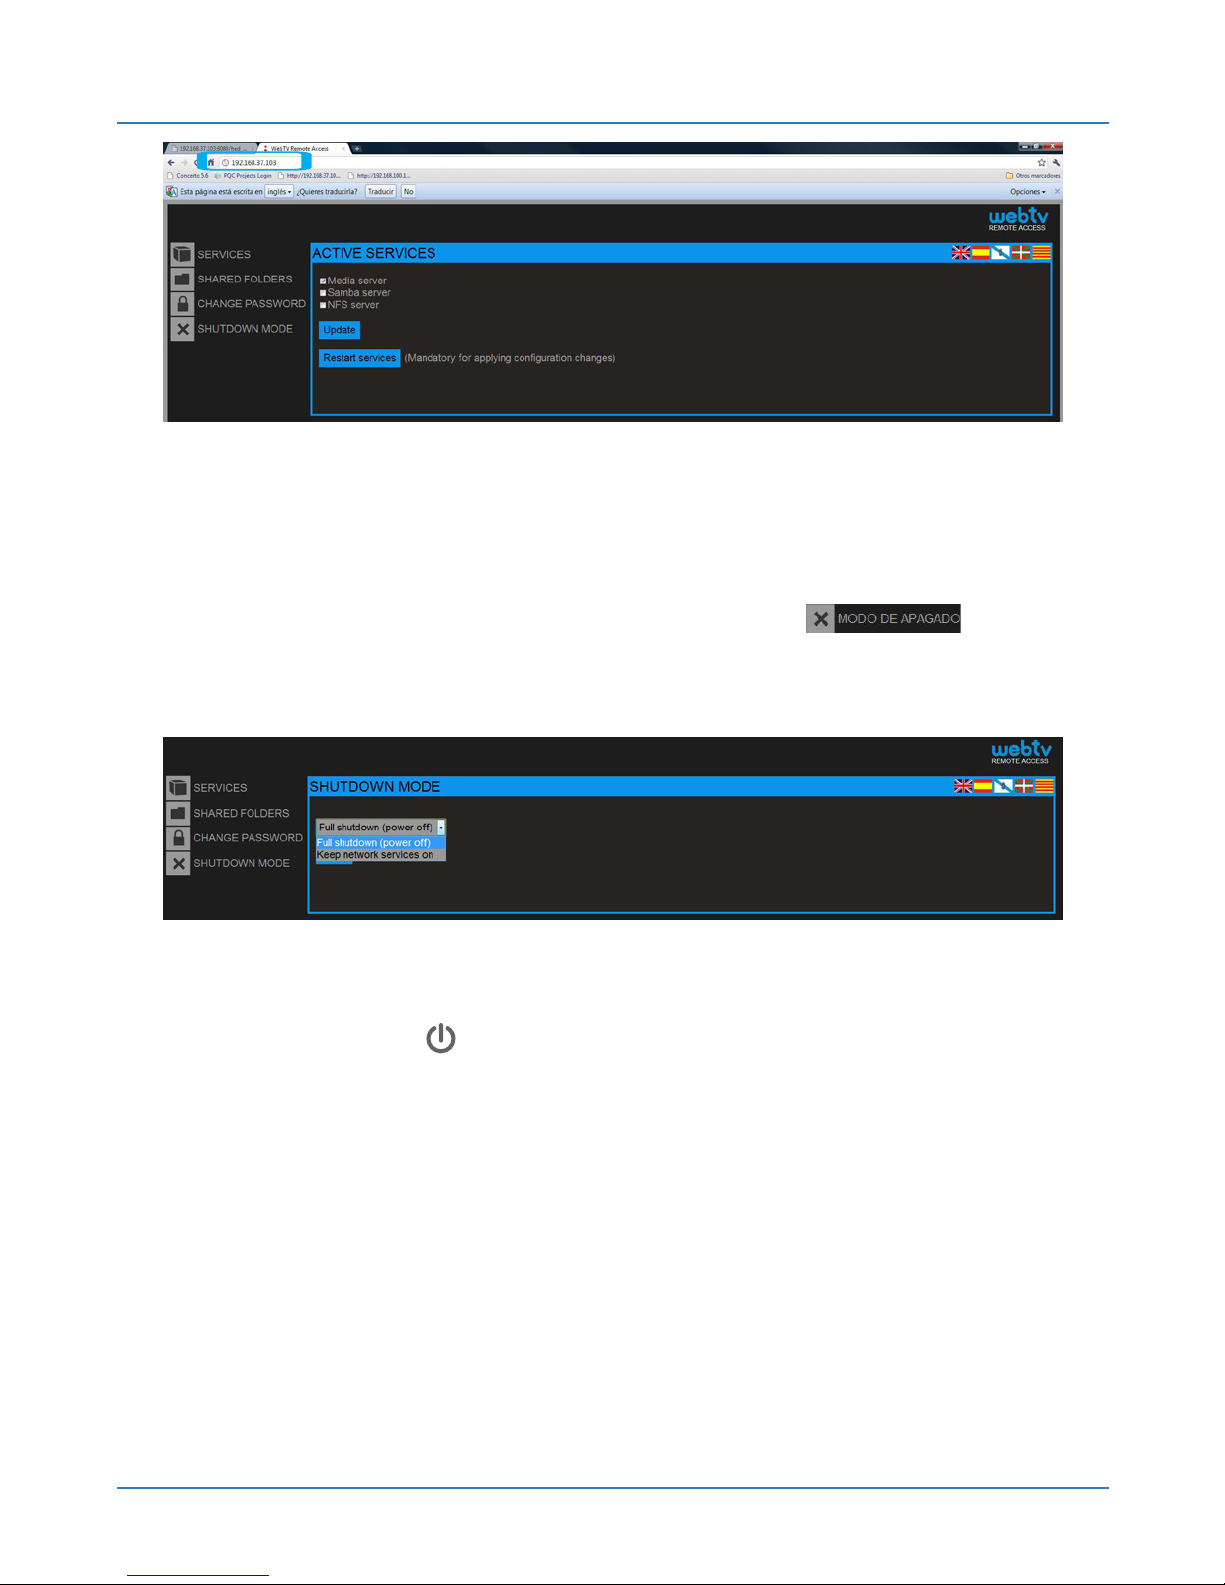
Then access a web browser and type in the IP
address bar as shown in the example.
Page 46
USER MANUAL
46
NOTE: The default data for access to the web
interface are: User: admin / Password: 1234 (see
chapter 10.5). Go to “Shutdown mode”
To change the standby mode there are two options:
1.Complete shutdown: Web:tv turns off completely
when you press .
2.Powered network services: Web:tv will turn off but
the network services will continue to operate.
After selecting you will have to accept to save the
changes.
Page 47
Blusens Web:tv
47
ENGLISH
5.2. Basic Operations with the remote
control
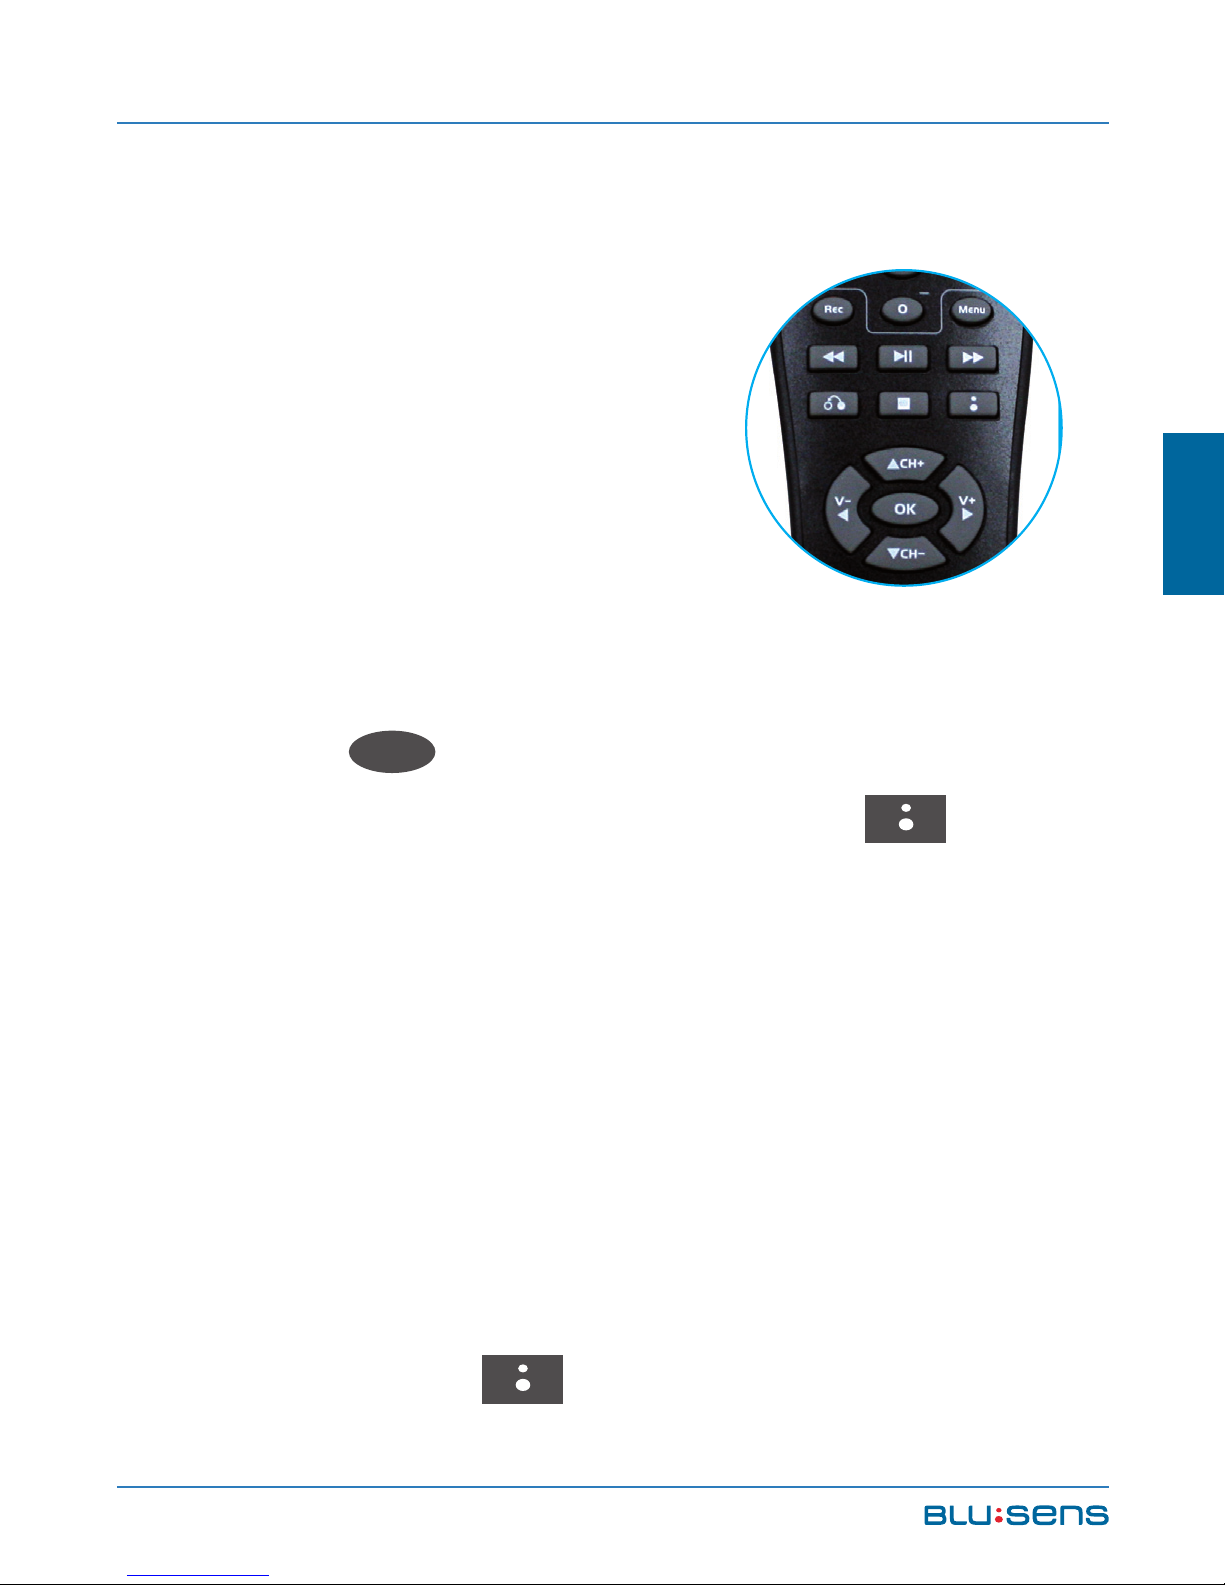
Use the direction buttons to
scroll through the available icons
and options in the menus. The
alphanumeric keypad allows you
to enter numbers or characters to access different
functions.
The OK
OK
button will allow you to move forward,
confirm and reproduce, while the BLUSENS button
provides shortcut options (fast forward and rewind,
stop, etc) showing the shortcut menu, presenting the
information/options window or showing the onscreen
keyboard.
To enter letters in the device (for example to enter
the wireless network key) use the alphanumeric keypad
of the remote control or the keyboard on the screen (by
pressing BLUSENS ). To switch between lowercase
Page 48
USER MANUAL
48
/ uppercase / numbers press the UP key. To delete a
character press the LEFT key.
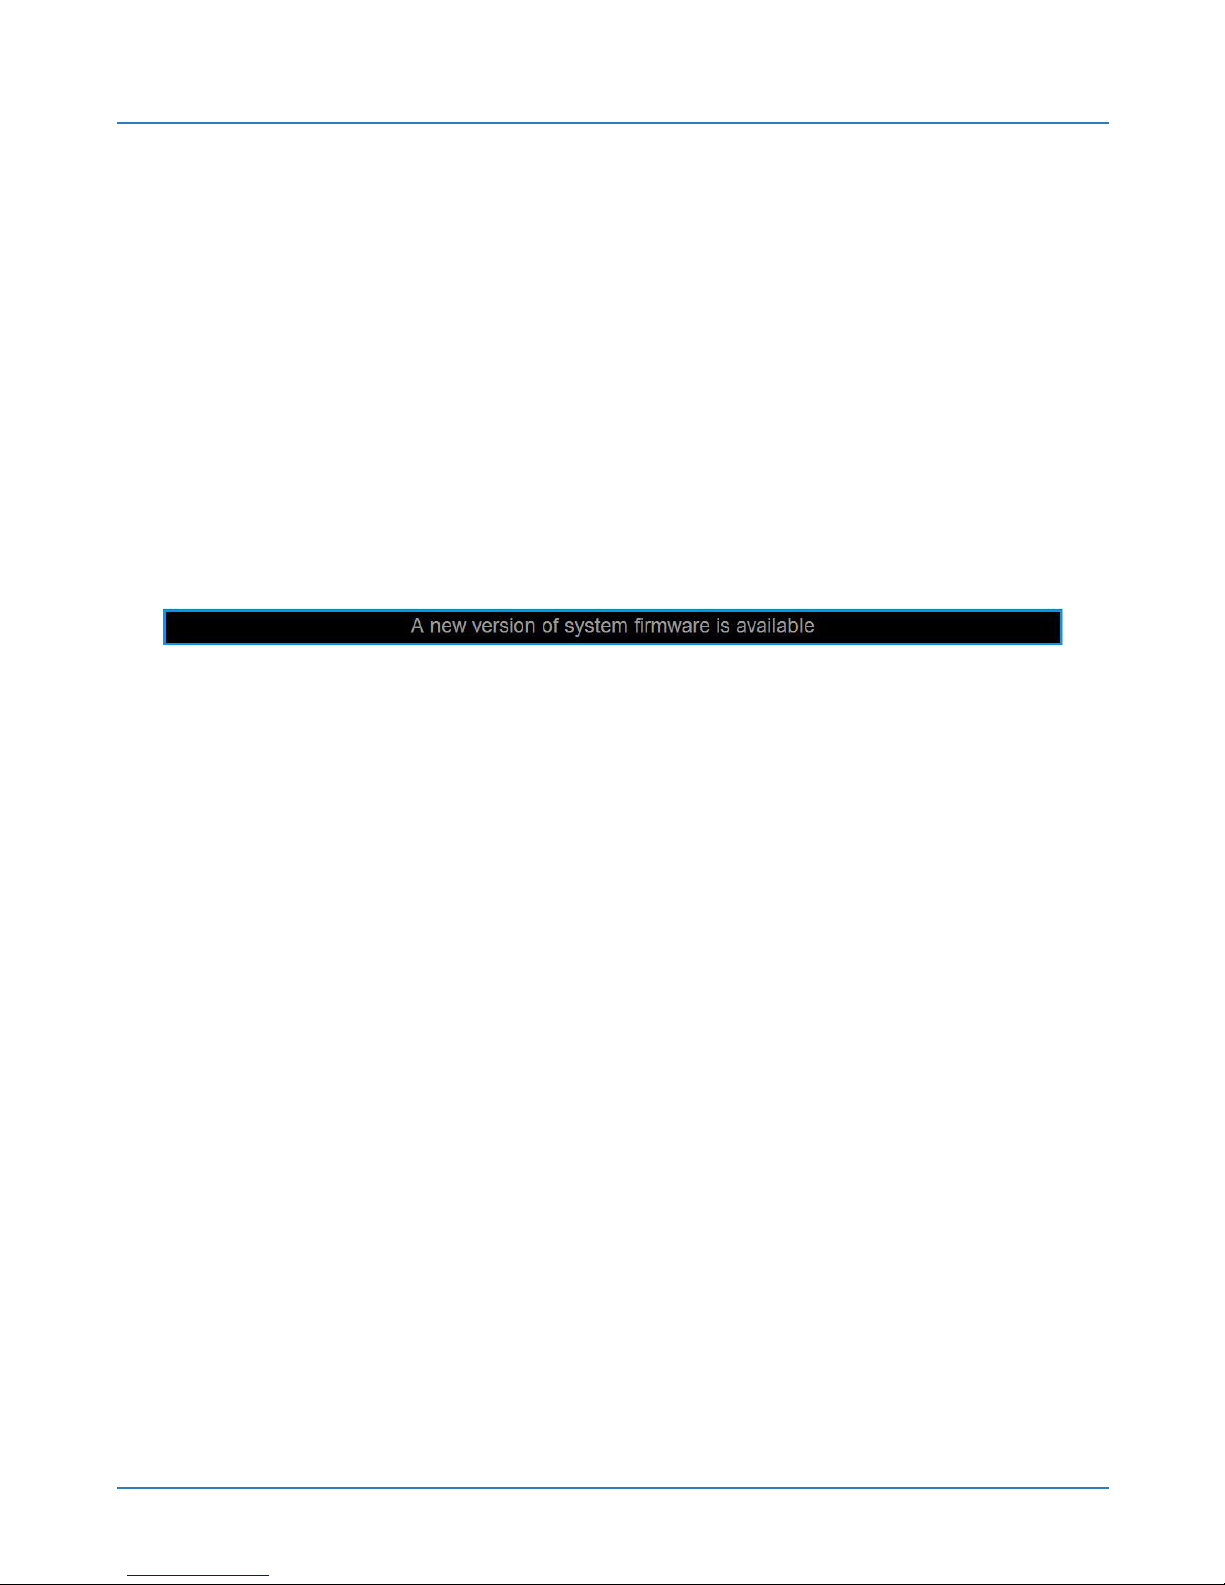
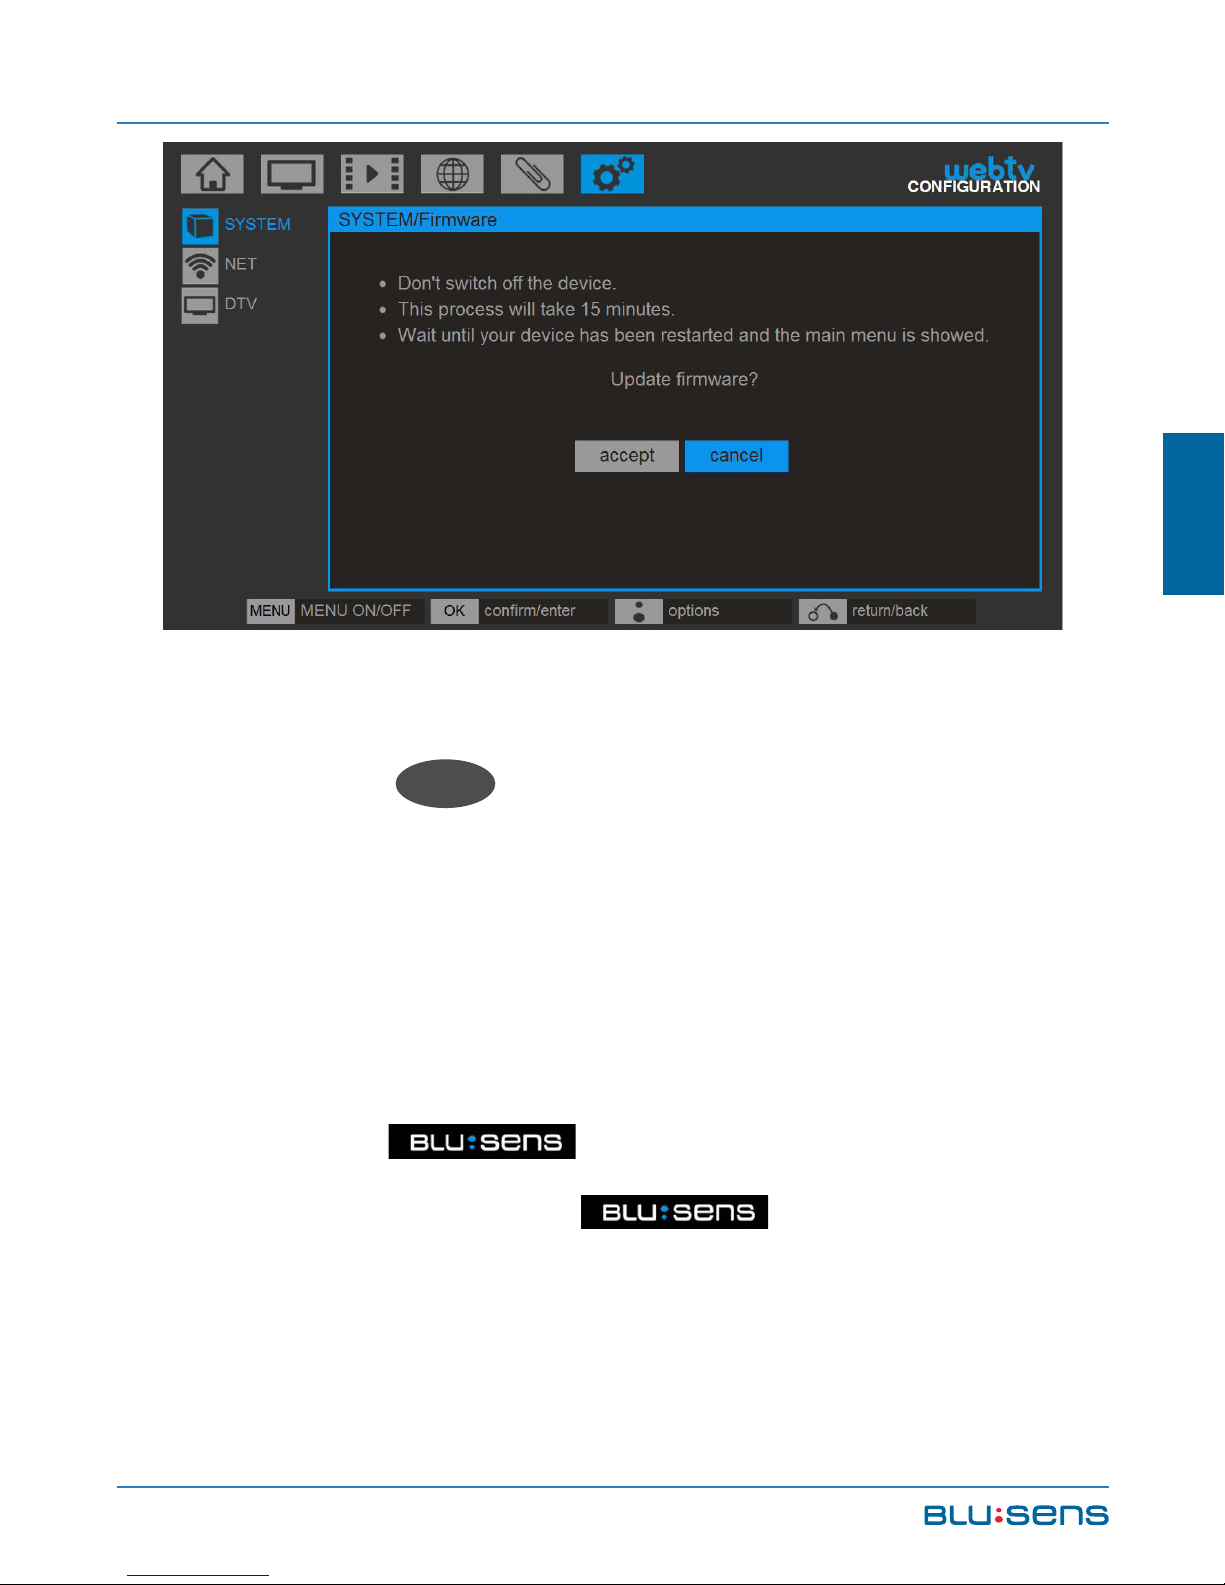
5.3. Updating Web:TV
The system automatically detects if there is a new
update and prompts you with a notice such as in the
figure on the availability of the upgrade.
This notice will be displayed every time you turn
on Web:tv until they interact. Go to CONFIGURATION /
SYSTEM / FIRMWARE UPDATE to update the firmware.
Confirm the operation to initialize the update.
Page 49
Blusens Web:tv
49
ENGLISH
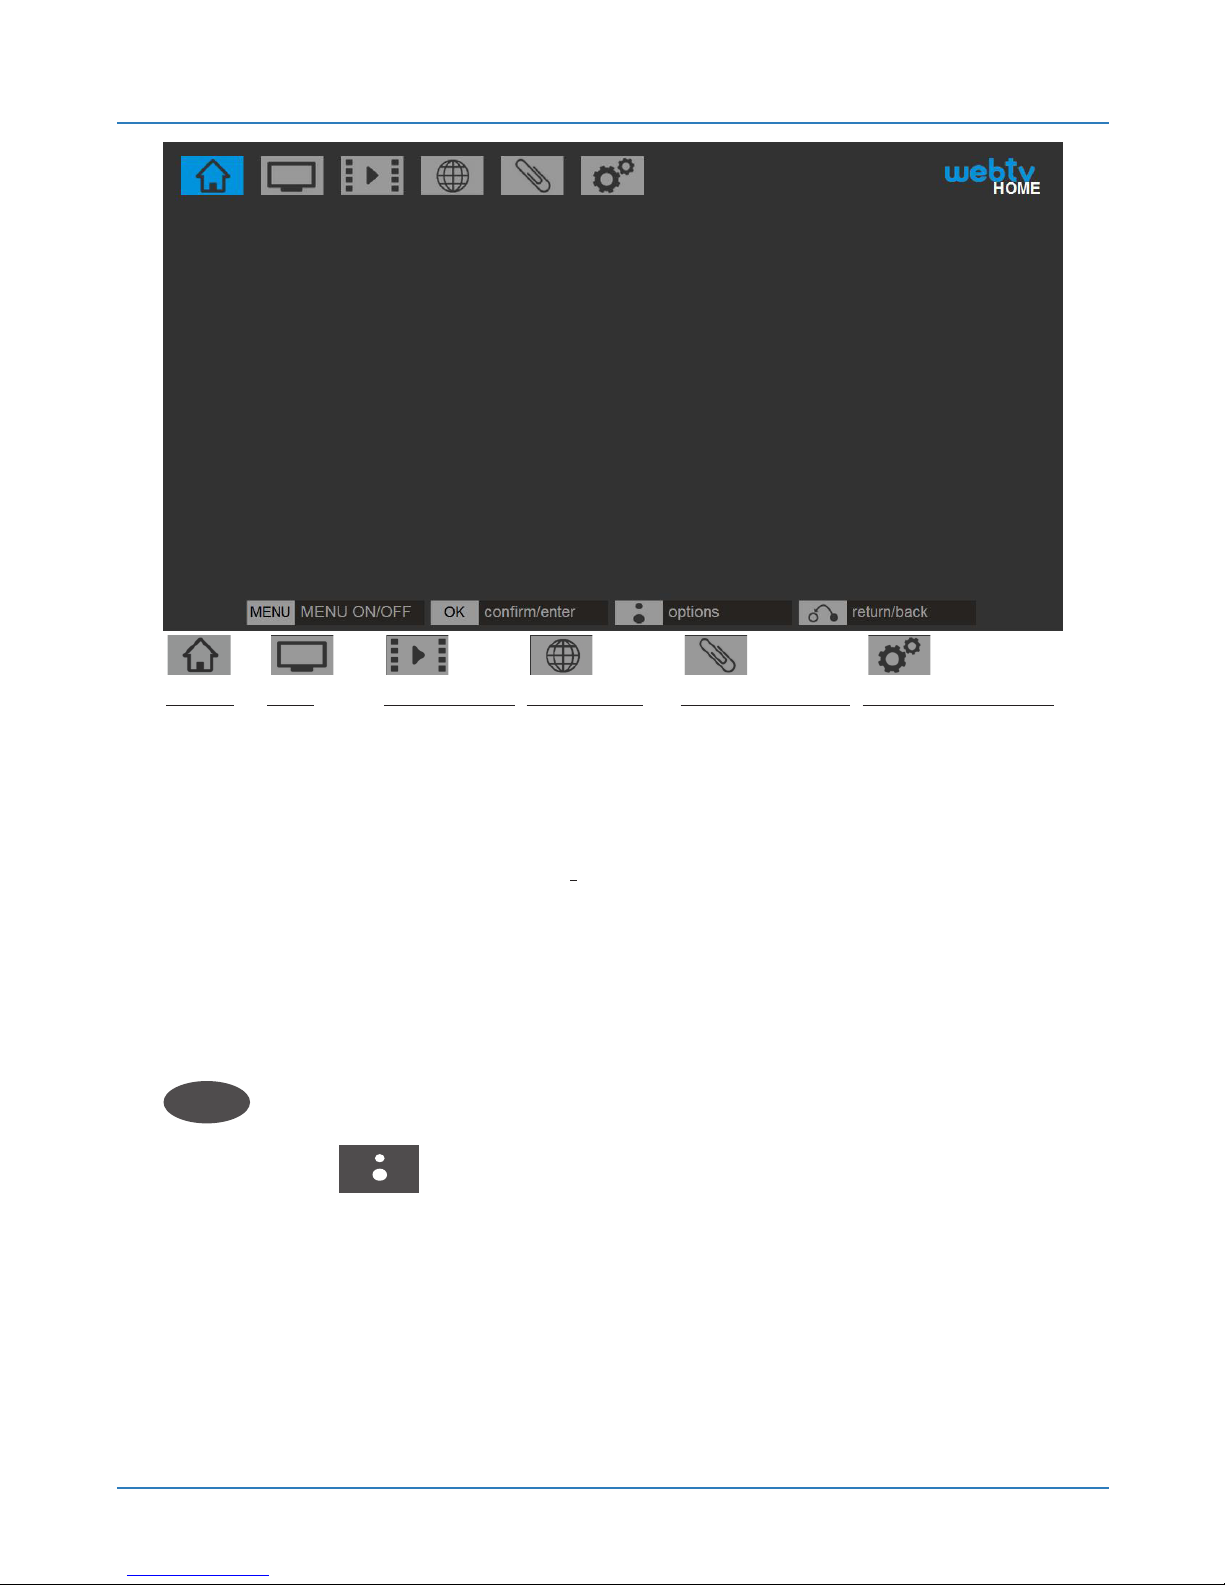
5.4. MAIN MENU
Press the
Menu
button on your remote control to
show and hide the main menu of Web:tv and display
the various options available to manage, reproduce and
distribute content with your device. You can view this
menu at any time, even if you are viewing a video file.
When the indicator is active you cannot
perform operations. (The indicator appears
on the top left).
Page 50
USER MANUAL
50
HOME
DISCS
LAN
DVB
TV
RADIO
GUIDE
JOBS
FOLDER
VIDEOCLUB INTERNET
BROWSER
BLUSENS TV
INT. TV
INT. RADIO
ETC.
APLICACIONES CONFIGURACION
SYSTEM
NET
DTV
In any of the options listed above use the navigation
keys to scroll through the various options, the OK
OK
button to confirm and reproduce, while the
BLUSENS button will open or close the shortcut
options showing the shortcut menu or submitting the
information window.
Page 51
Blusens Web:tv
51
ENGLISH
6. DTV
Your Web:tv has a high-definition DTV tuner that
allows you to tune DTV channels, both of television and
HDTV and Radio.
6.1. DTV TV
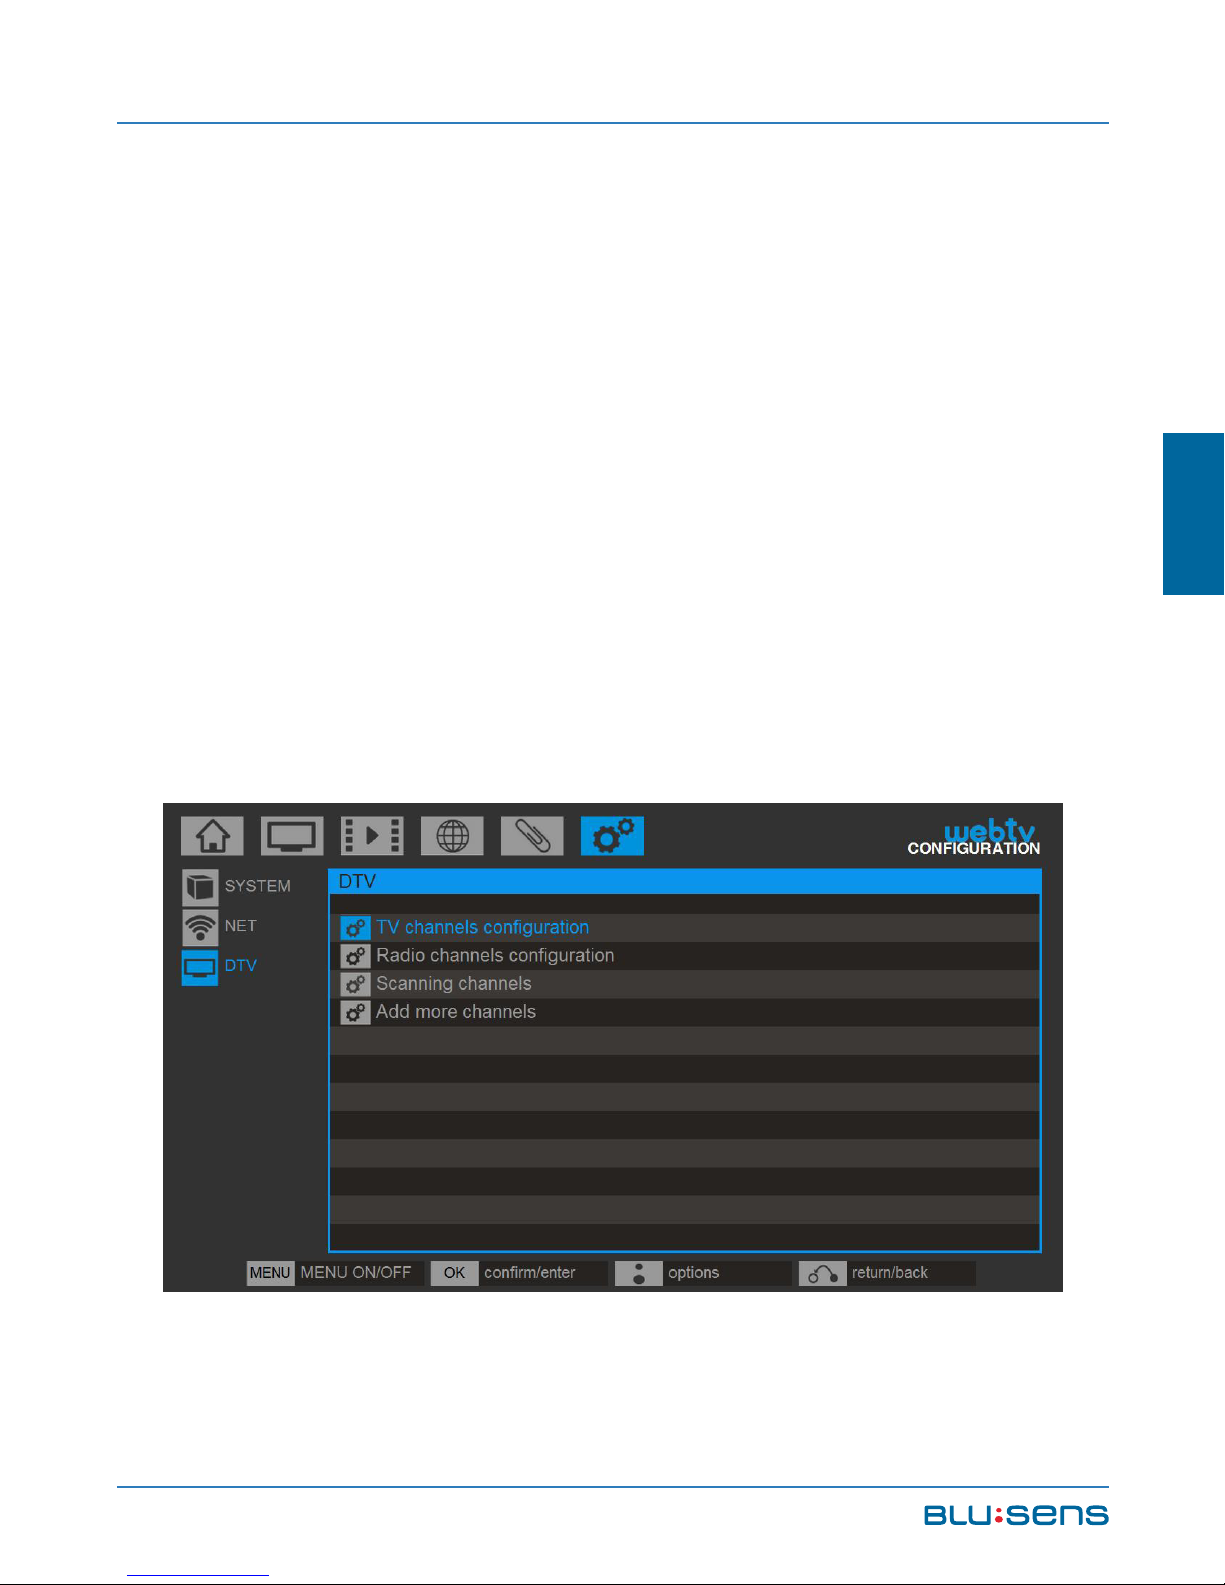
6.1.1. Configuration
Go to CONFIGURATION/DTV to display the DTV
configuration options.
Page 52
USER MANUAL
52
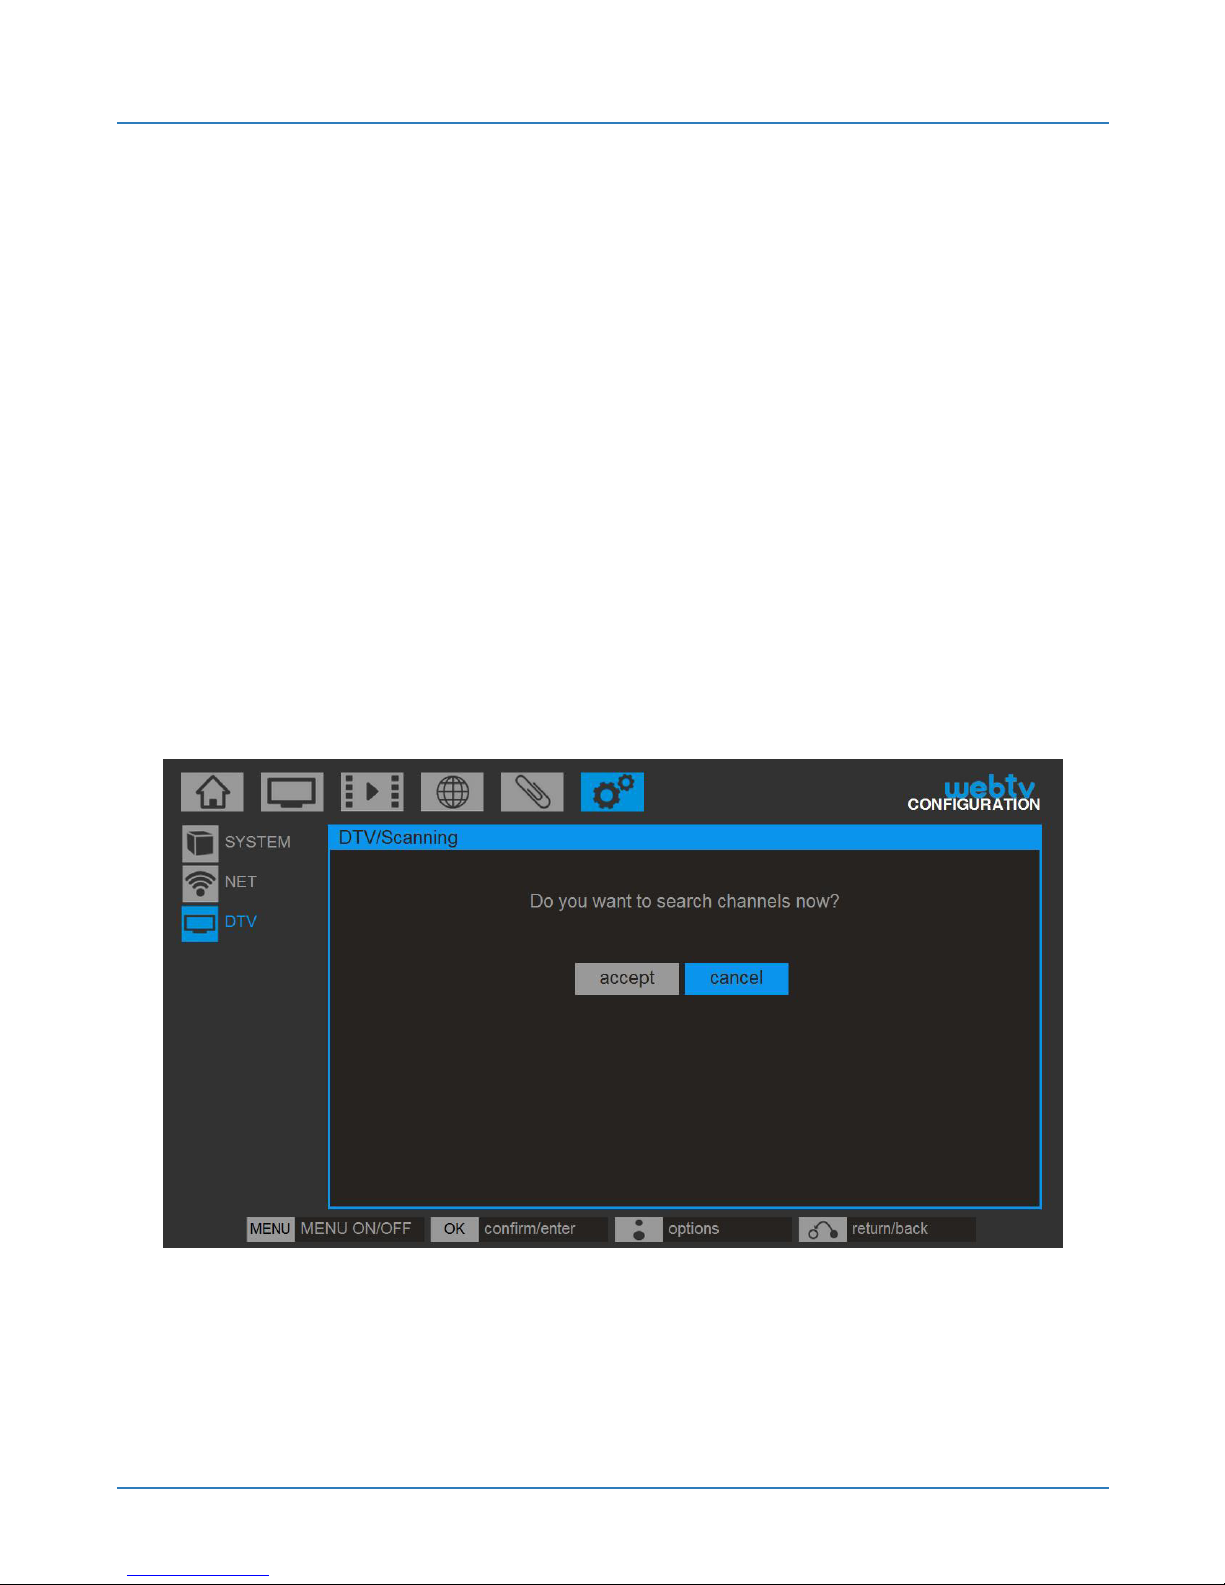
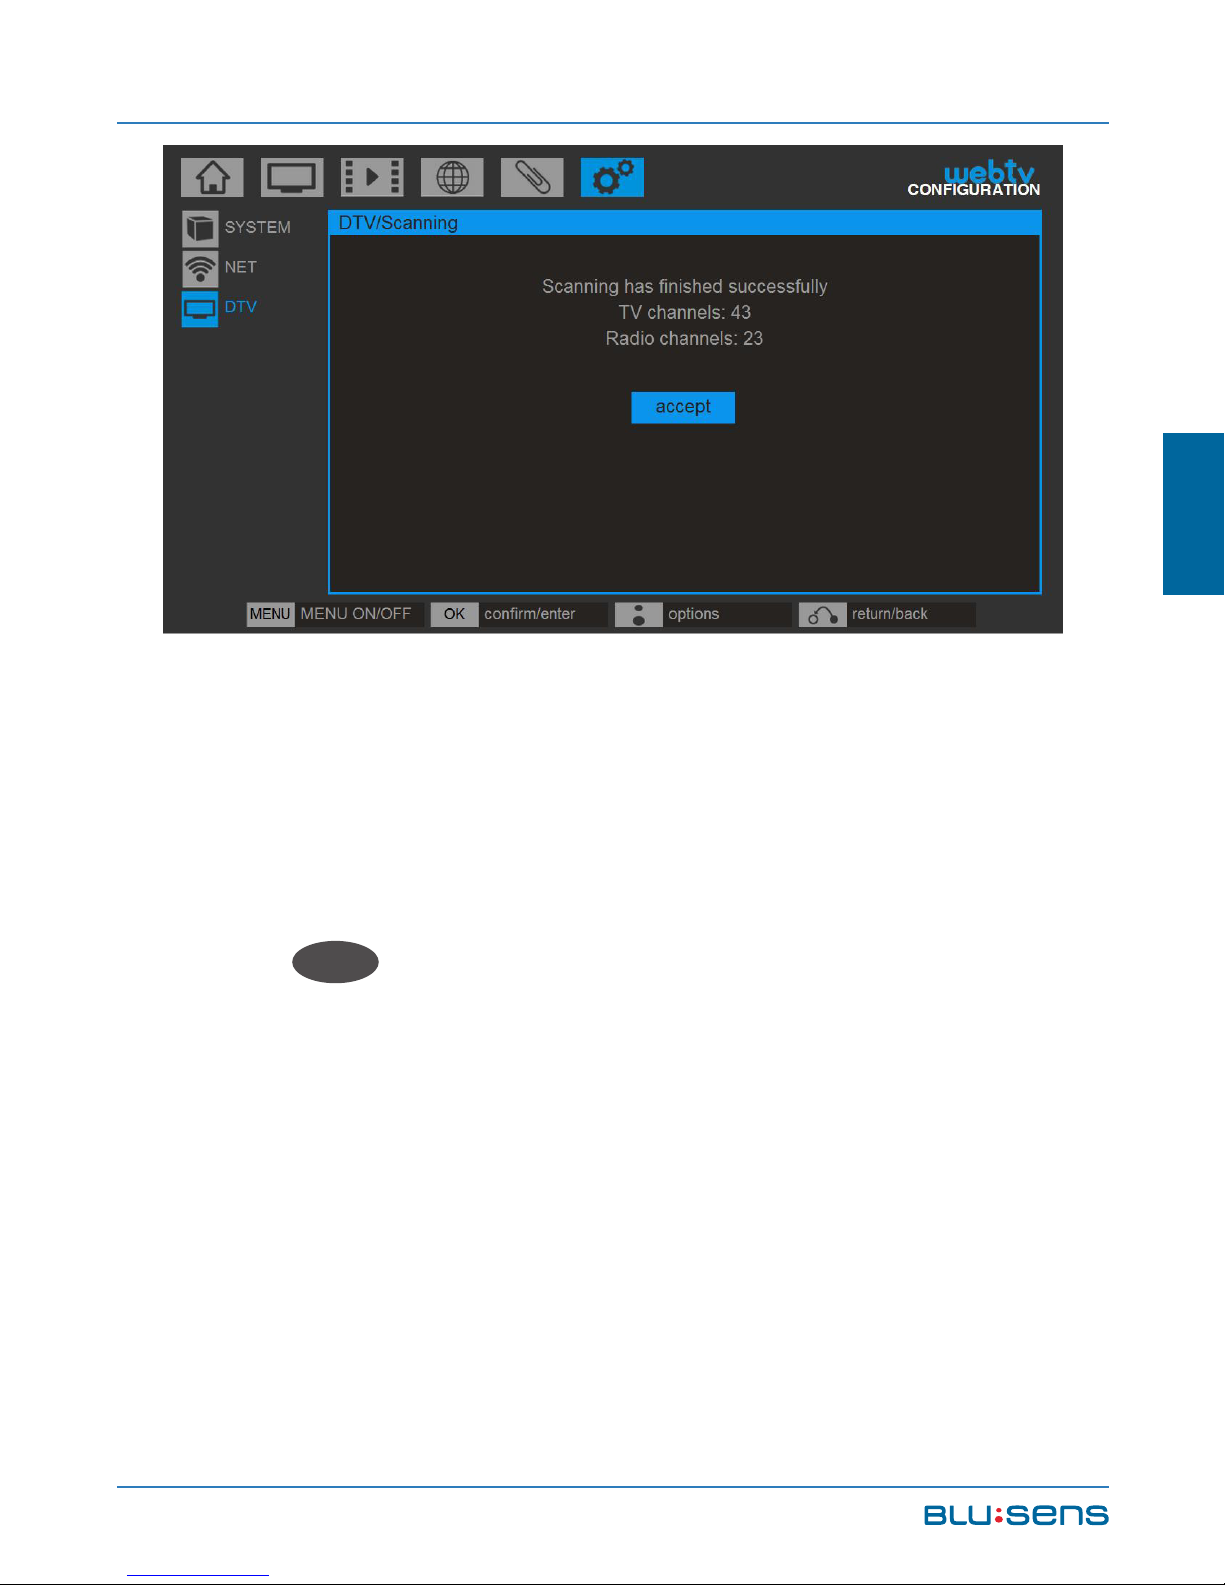
6.1.1.1.Search Channels
Select this option to perform an automatic search of
DTV channels. Go to CONFIGURATION/DTV/AUTOMATIC
SEARCH.
Your Web:tv will search TV and Radio channels
together, separating them by type.
When you do this you lose the previously stored list
and their order
Page 53
Blusens Web:tv
53
ENGLISH
6.1.1.1.1.Sort Channels
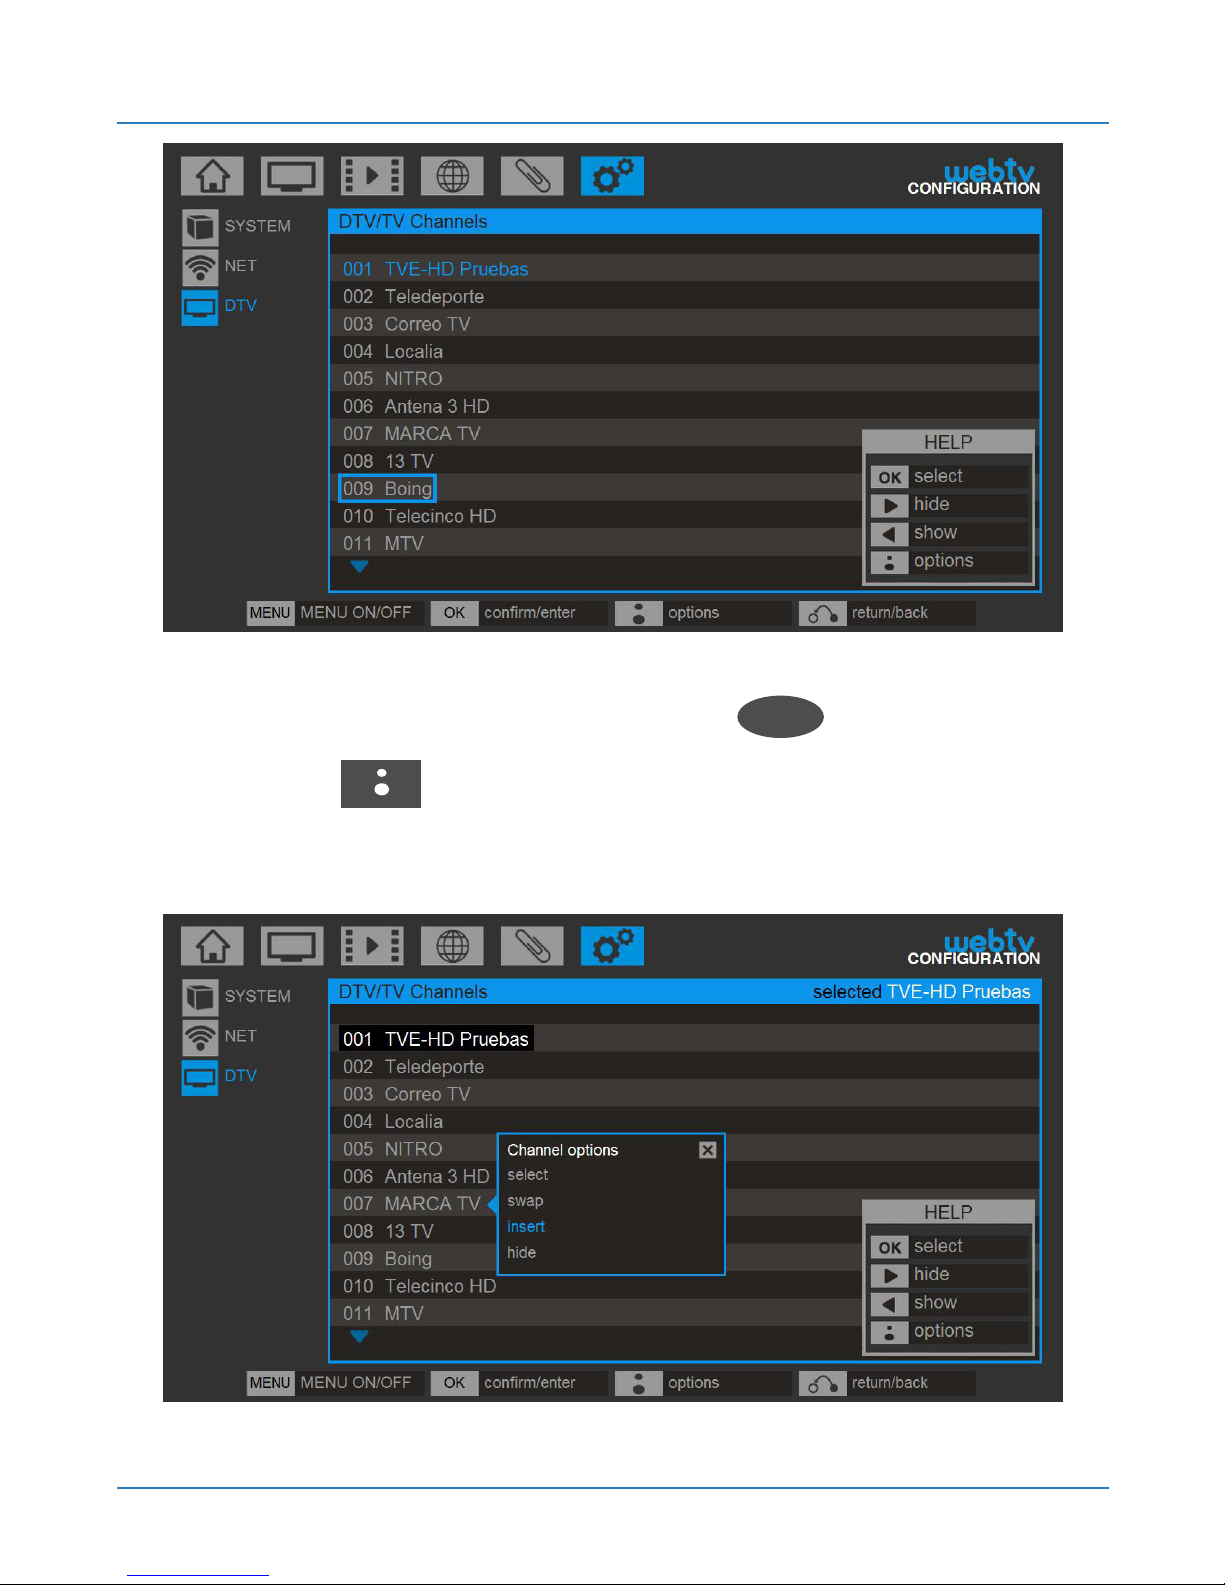
To sort the TV channels go to CONFIGURATION/
DTV/MANAGE TV CHANNELS. Navigate with the Up and
Down keys to the channel you want to sort and press
the OK
OK
button, it selects that channel.
Page 54
USER MANUAL
54
Then navigate to the position where you want to
place the channel and press OK
OK
again (or the
BLUSENS button) to display the options for this
channel:
Page 55

Blusens Web:tv
55
ENGLISH
Select: Select the channel to work on it.
Swap: Swap the selected channel with the selected
position.
Insert: Insert the channel in that position by moving
the other channels.
Hide: The channel will not appear on the list of
channels, nor the program guide.
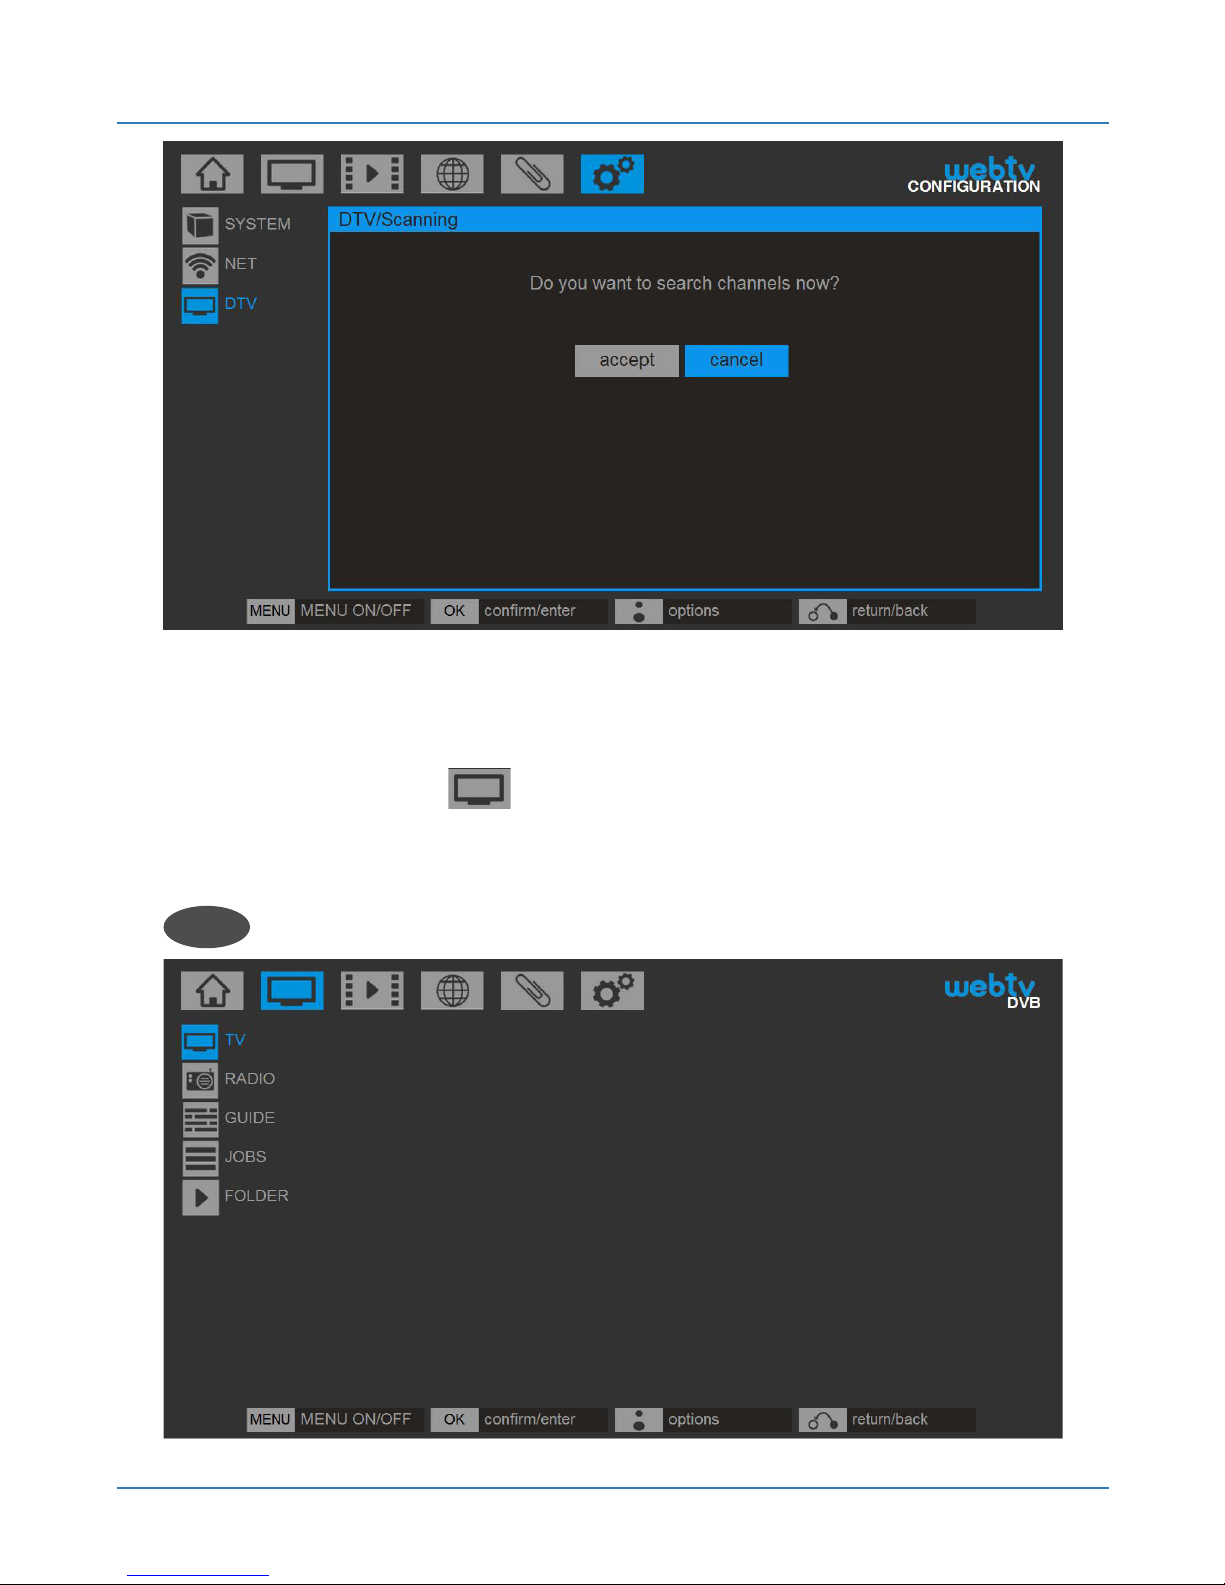
6.1.1.2.Add Channels
Use this option to perform an automatic search for
new DTV channels and add them to your list without
losing your channels or your current sorting order.
To add more channels select CONFIGURATION/
DTV/ADD CHANNELS. Select this option to perform an
automatic search for new DTV channels and add them
to the list.
Page 56
USER MANUAL
56
6.1.2. Watch DTV TV
Go to DVB/TV for viewing.
To watch TV you must select DVB/TV and press OK
OK
.
Page 57
Blusens Web:tv
57
ENGLISH
6.1.2.1.Remote Control Options
While viewing a DTV TV channel you can
perform the following functions from the
remote control:
OK
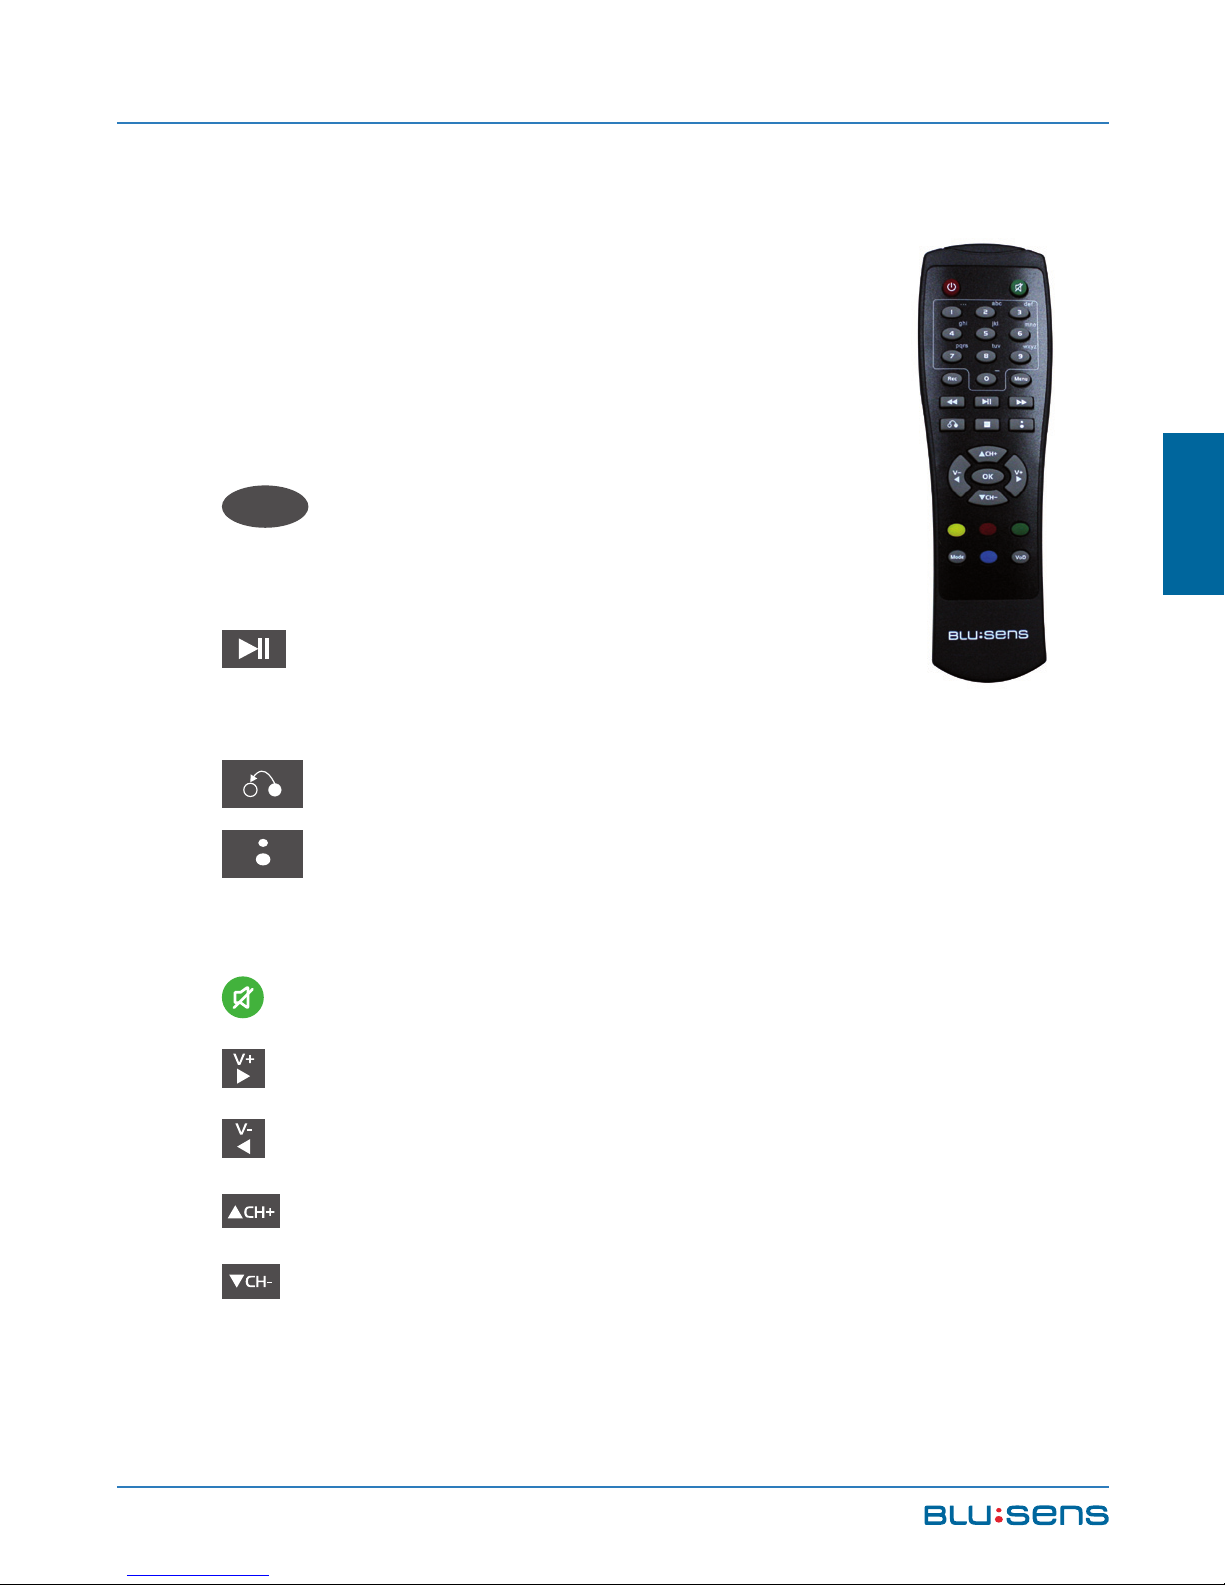
OK. Displays channel list. Select a
channel and press OK to display it.
PLAY / PAUSE. Activates timeshift
(see 6.1.4).
: Return to the previous channel.
: Shows/Hides the shortcut menu (see chapter
6.1.2.2)
MUTE: Mutes the device.
V+: Increase volume.
V-: Decrease volume.
CH+: Next channel.
CH-: Previous channel.
Page 58
USER MANUAL
58
REC
: Starts recording the channel being viewed.
Each press increases the recording time.
MENU
: Shows/hides the main menu.
Numeric keypad: Changes the channel number.
MODE
: Changes the aspect ratio (4:3/16:9).
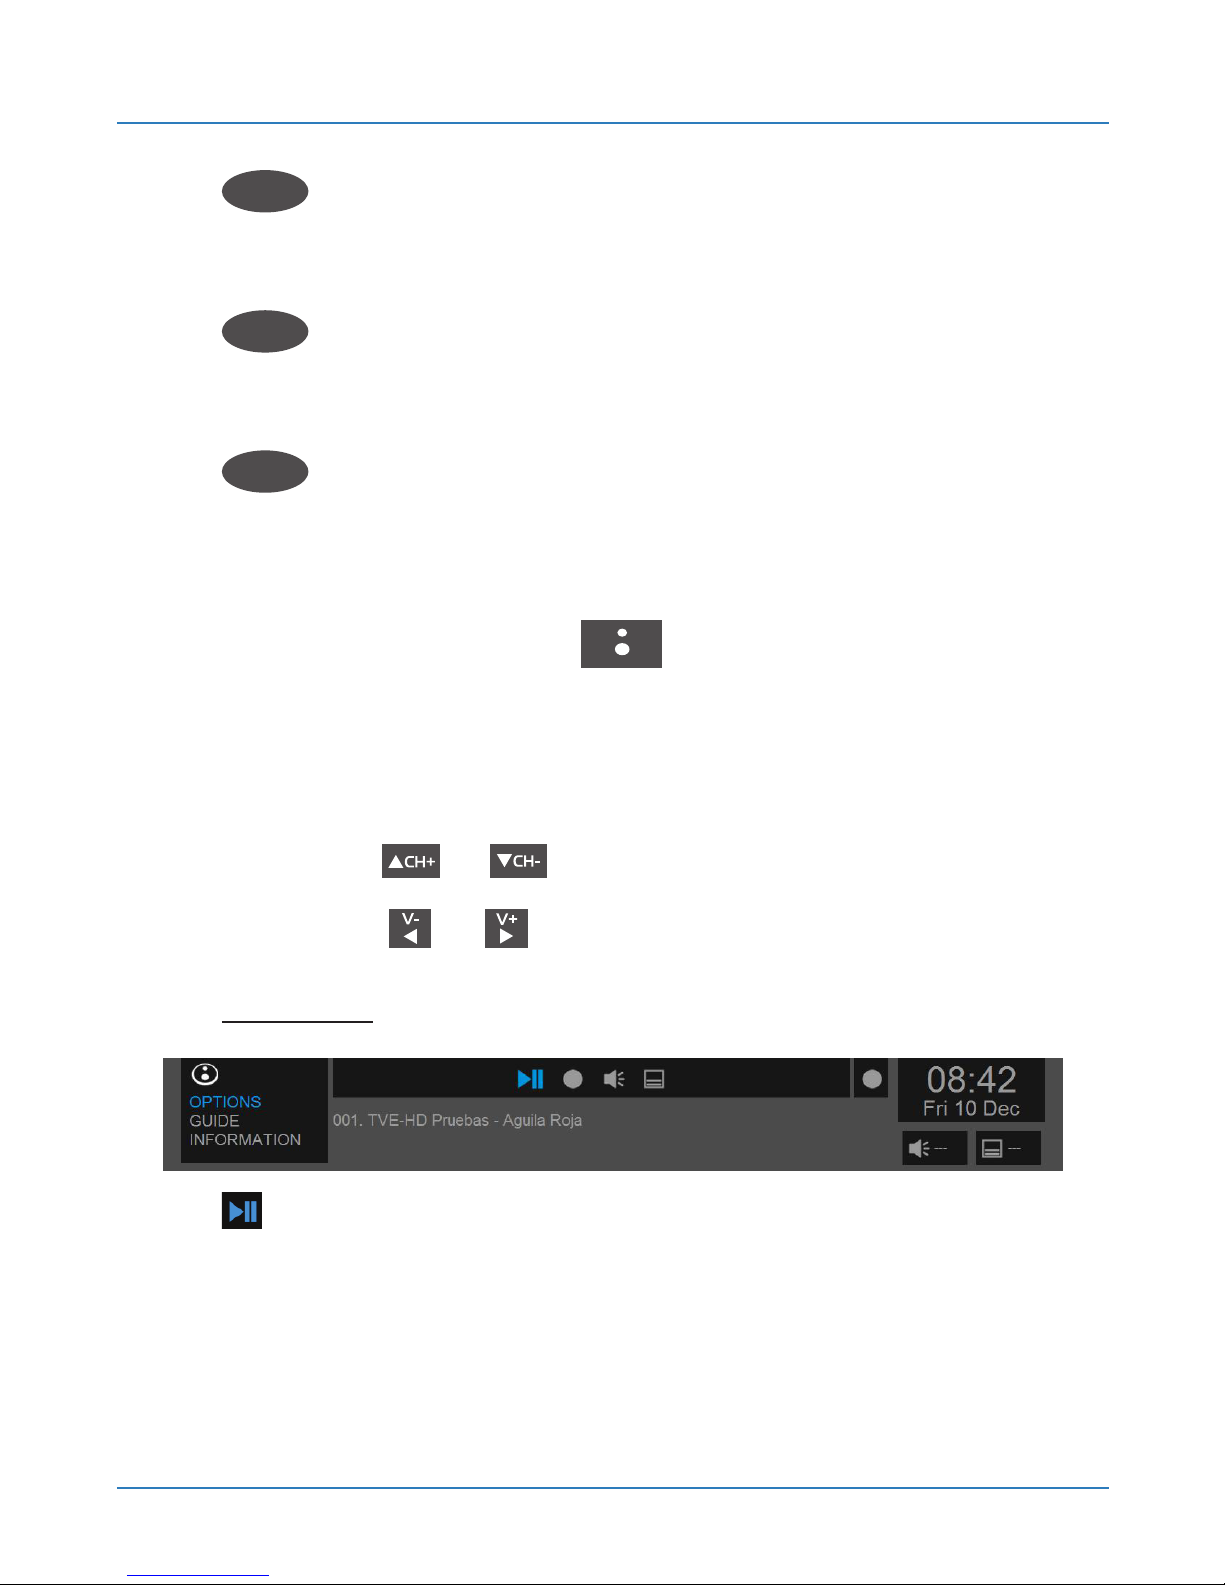
6.1.2.2.Shortcut Menu options
Press the BLUSENS button while viewing a
DTV channel to display the shortcut menu at the top of
the screen.
Press the or buttons to manage the different
sections and or to select the options.
OPTIONS:
PLAY / PAUSE. Activates the Timeshift function
(see chapter 6.1.4).
Page 59
Blusens Web:tv
59
ENGLISH
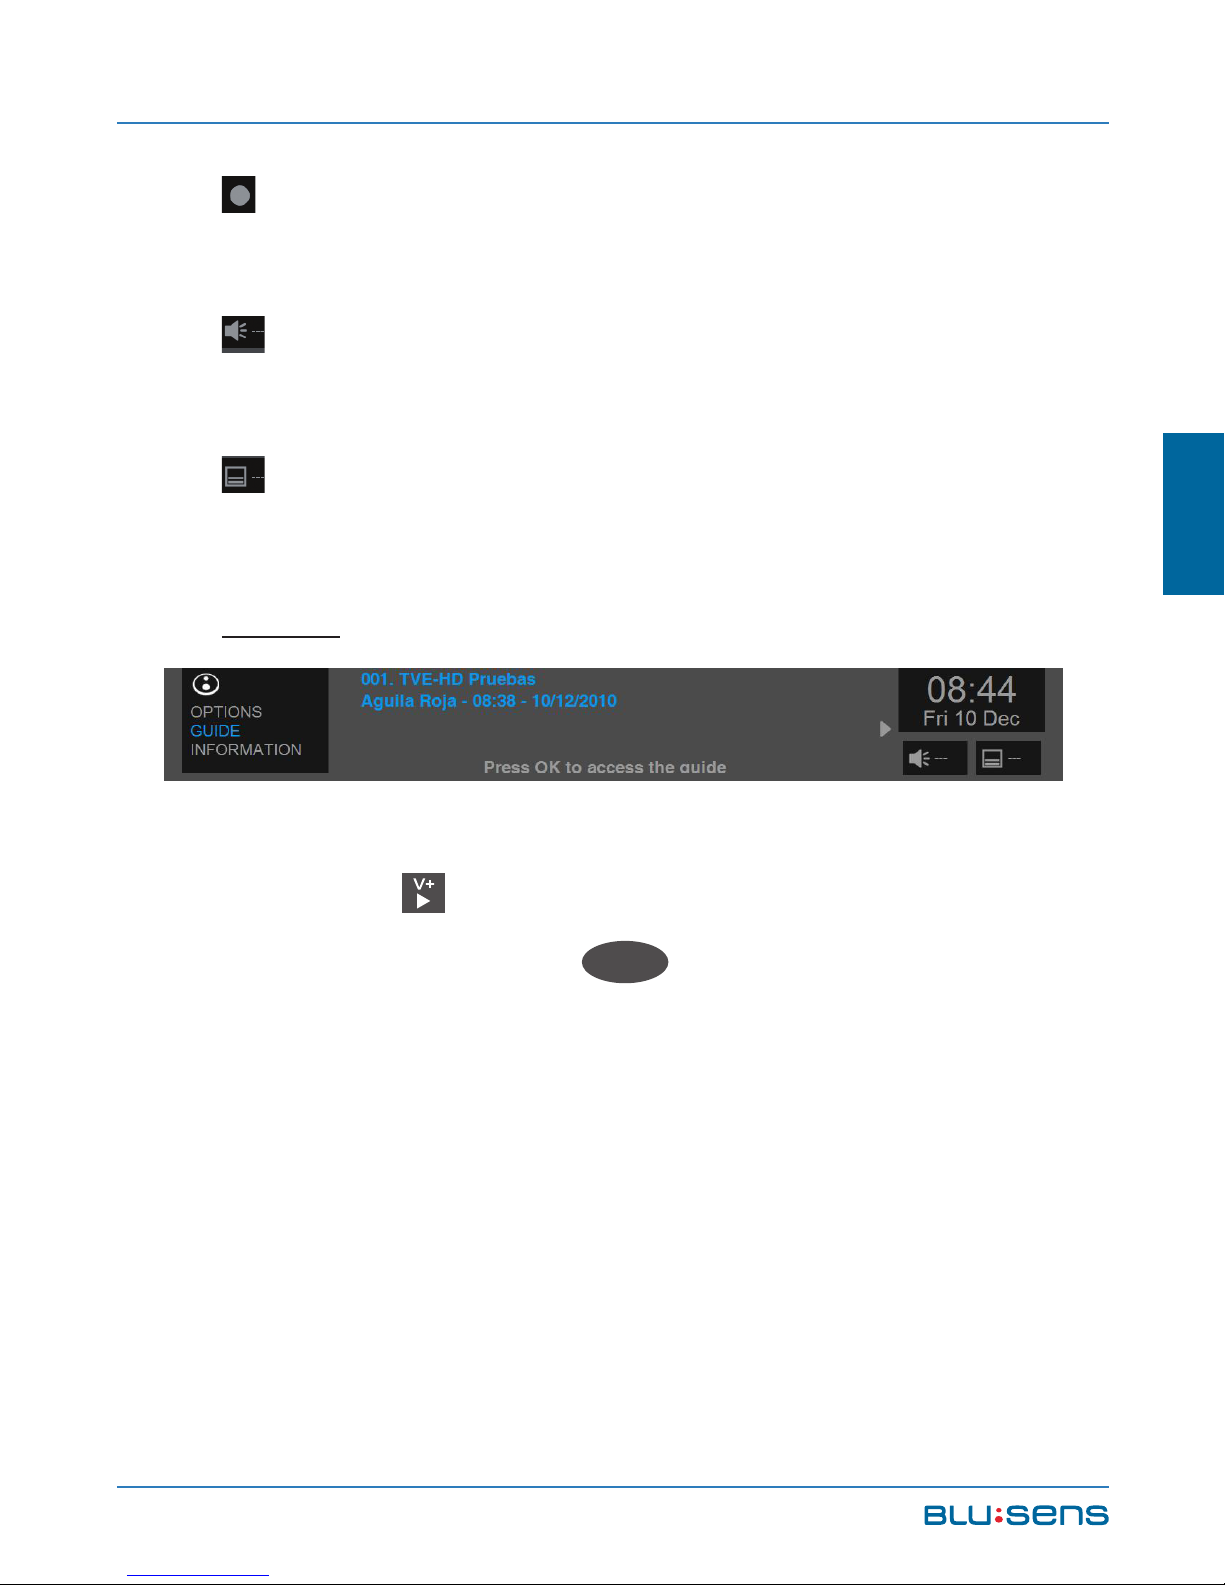
REC. Starts recording a DTV channel. Each press
increases the recording time.
LANGUAGES. Allows you to change the selected
audio among the list of available audio for that program.
SUB: Allows you to activate and select available
subtitles for that program.
GUIDE:
Displays information on the channel and you are
viewing. Click to view the next program to be aired
on that channel. Press
OK
to directly access the
program guide (see chapter 6.1.3).
Page 60
USER MANUAL
60
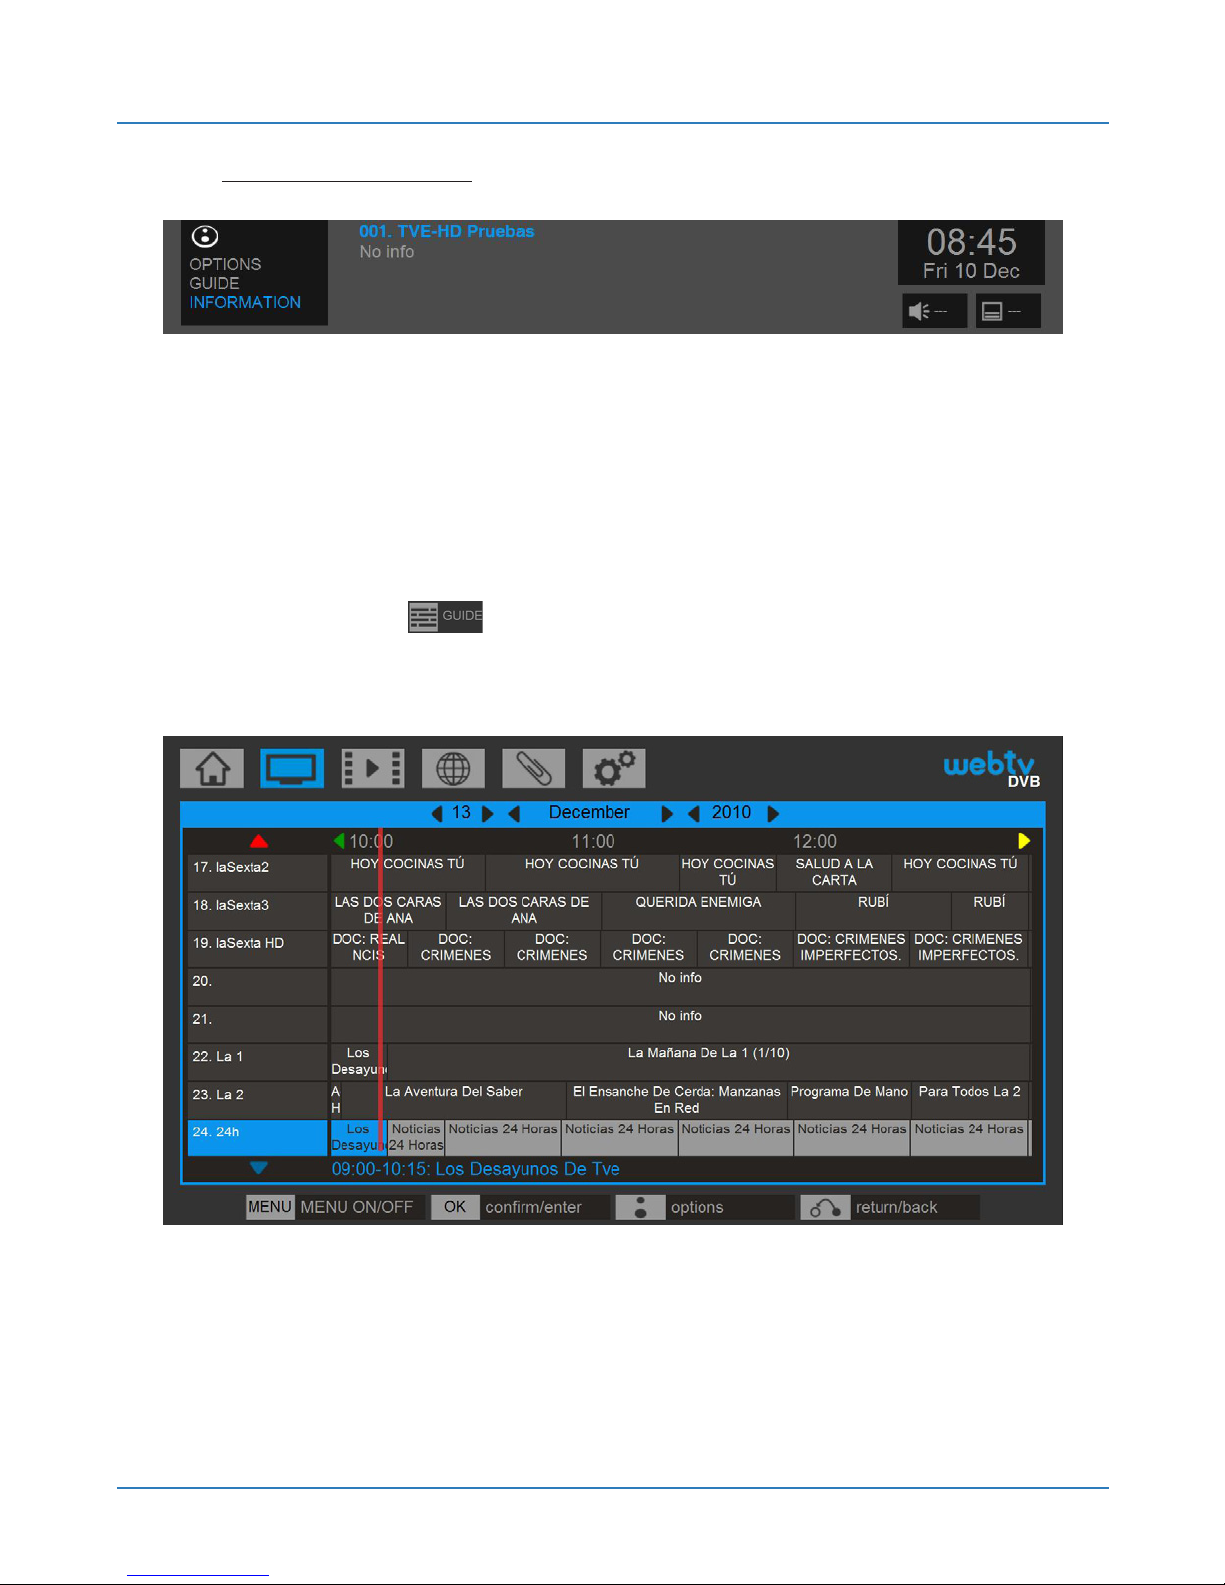
INFORMATION:
Displays information about the audio and video
formats of the broadcast.
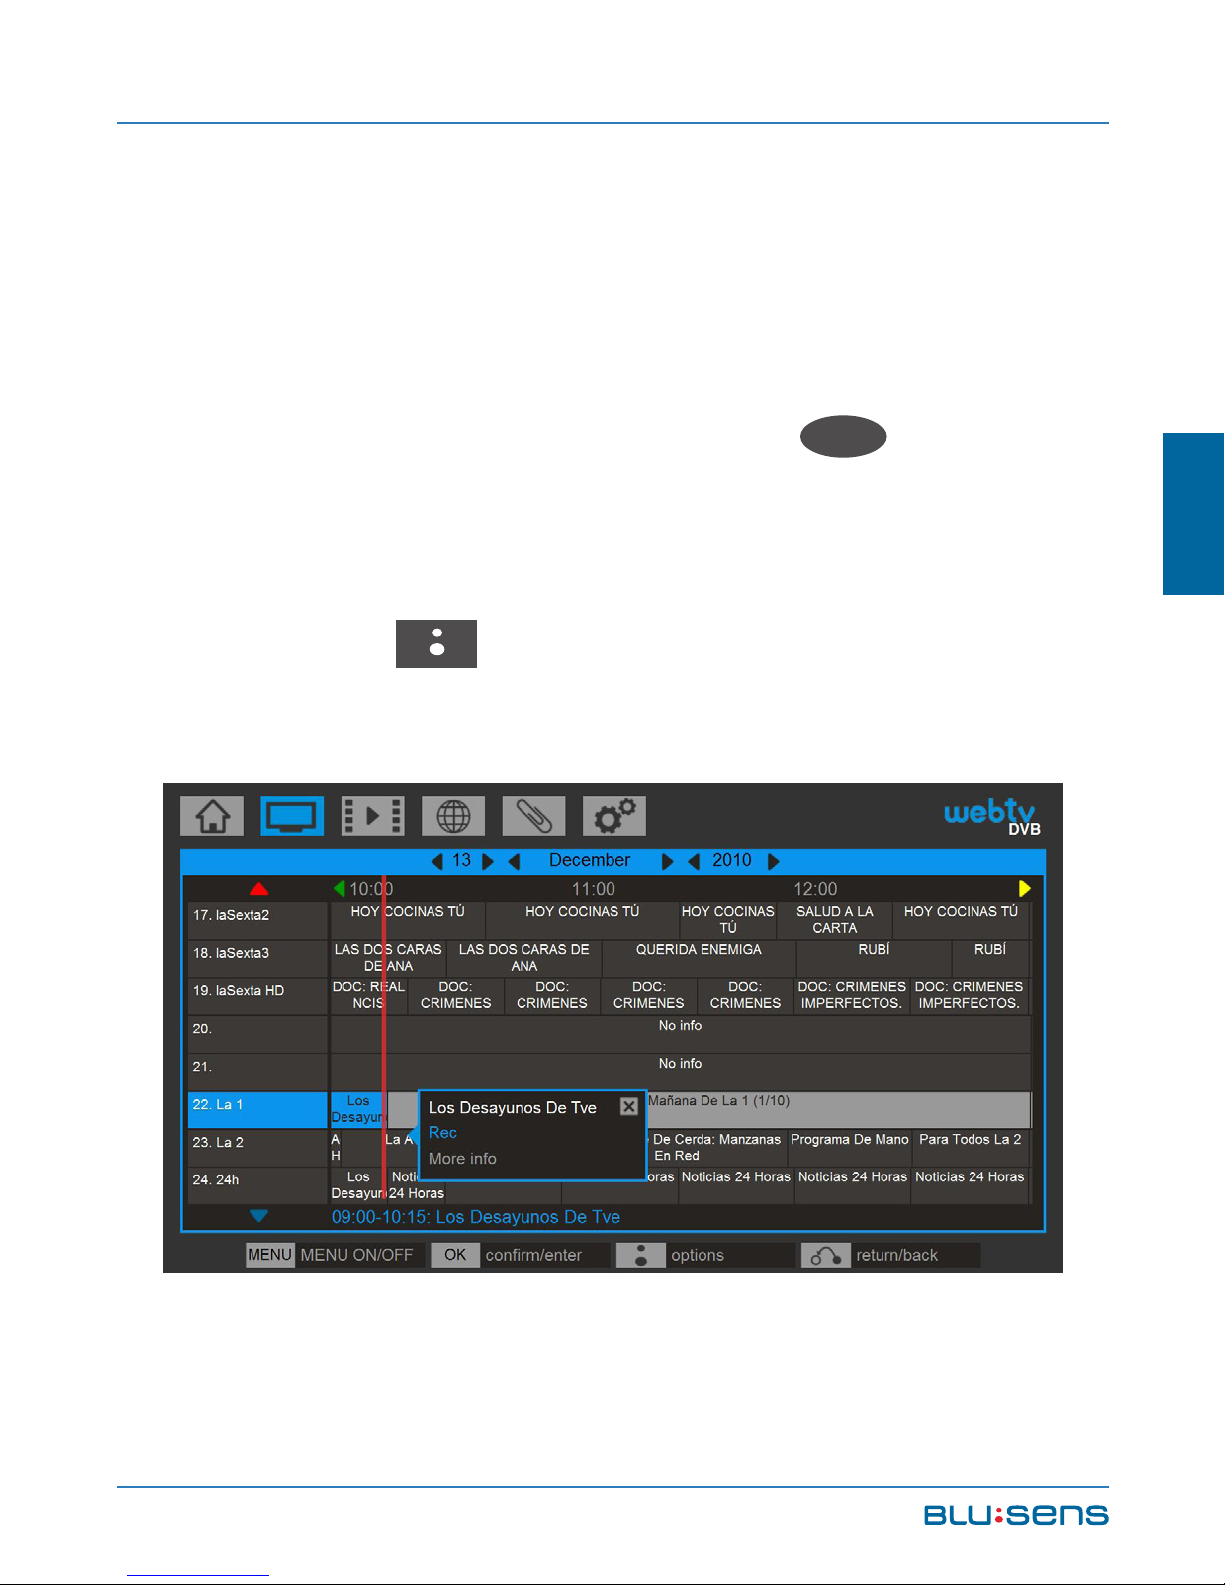
6.1.3. Program Guide
Select the icon to go to the EPG (Electronic
Program Guide).
Page 61
Blusens Web:tv
61
ENGLISH
The EPG interface displays a list of channels stored
along with information about the programs being
broadcast.
To navigate through the channels use the navigation
keys. Select a channel and press OK
OK
to display
that channel.
Use the navigation keys to select a program. Press
the BLUSENS button to go to the available options
window for the selected program.
Page 62

USER MANUAL
62
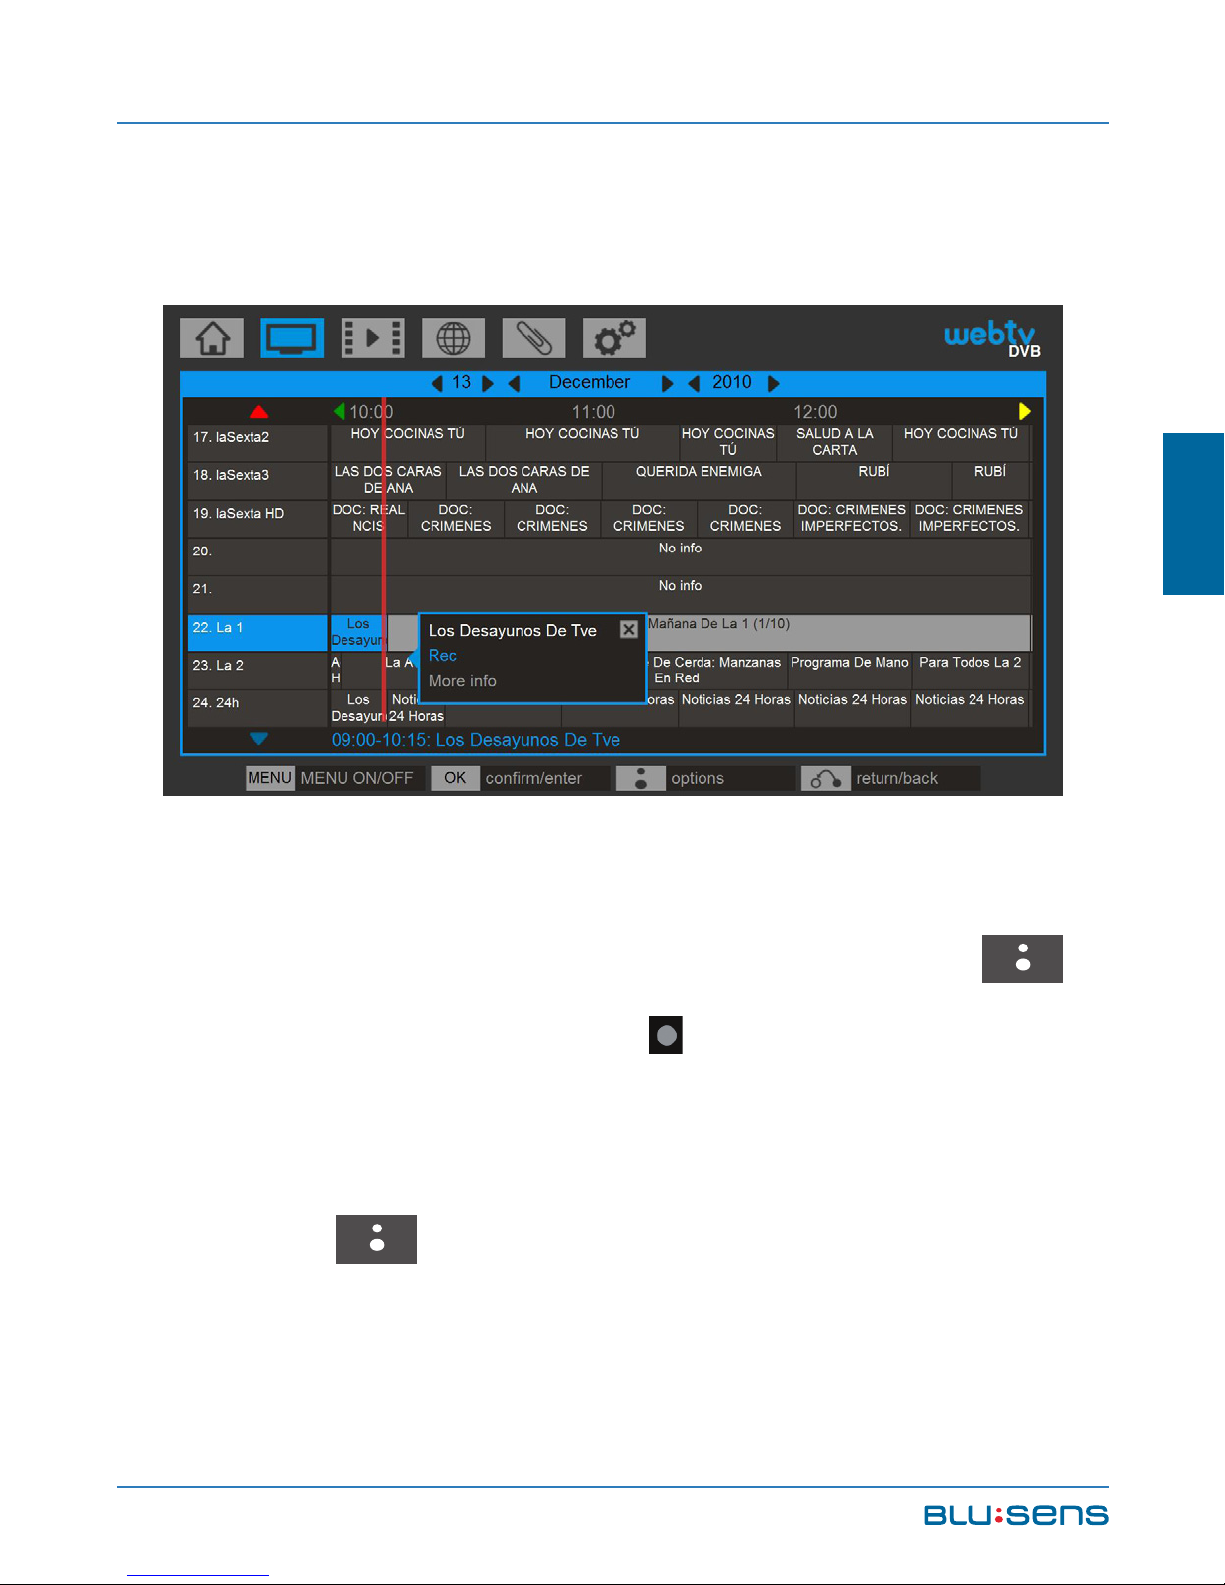
Contains More information, that will open the
information on the selected program and the Record
option that will create a new recording task to record
that program (see chapter 6.1.5.2.2).
Press Return/Back and use the navigation keys to
change the date of the EPG (press the OK
OK
button
to go to each field).
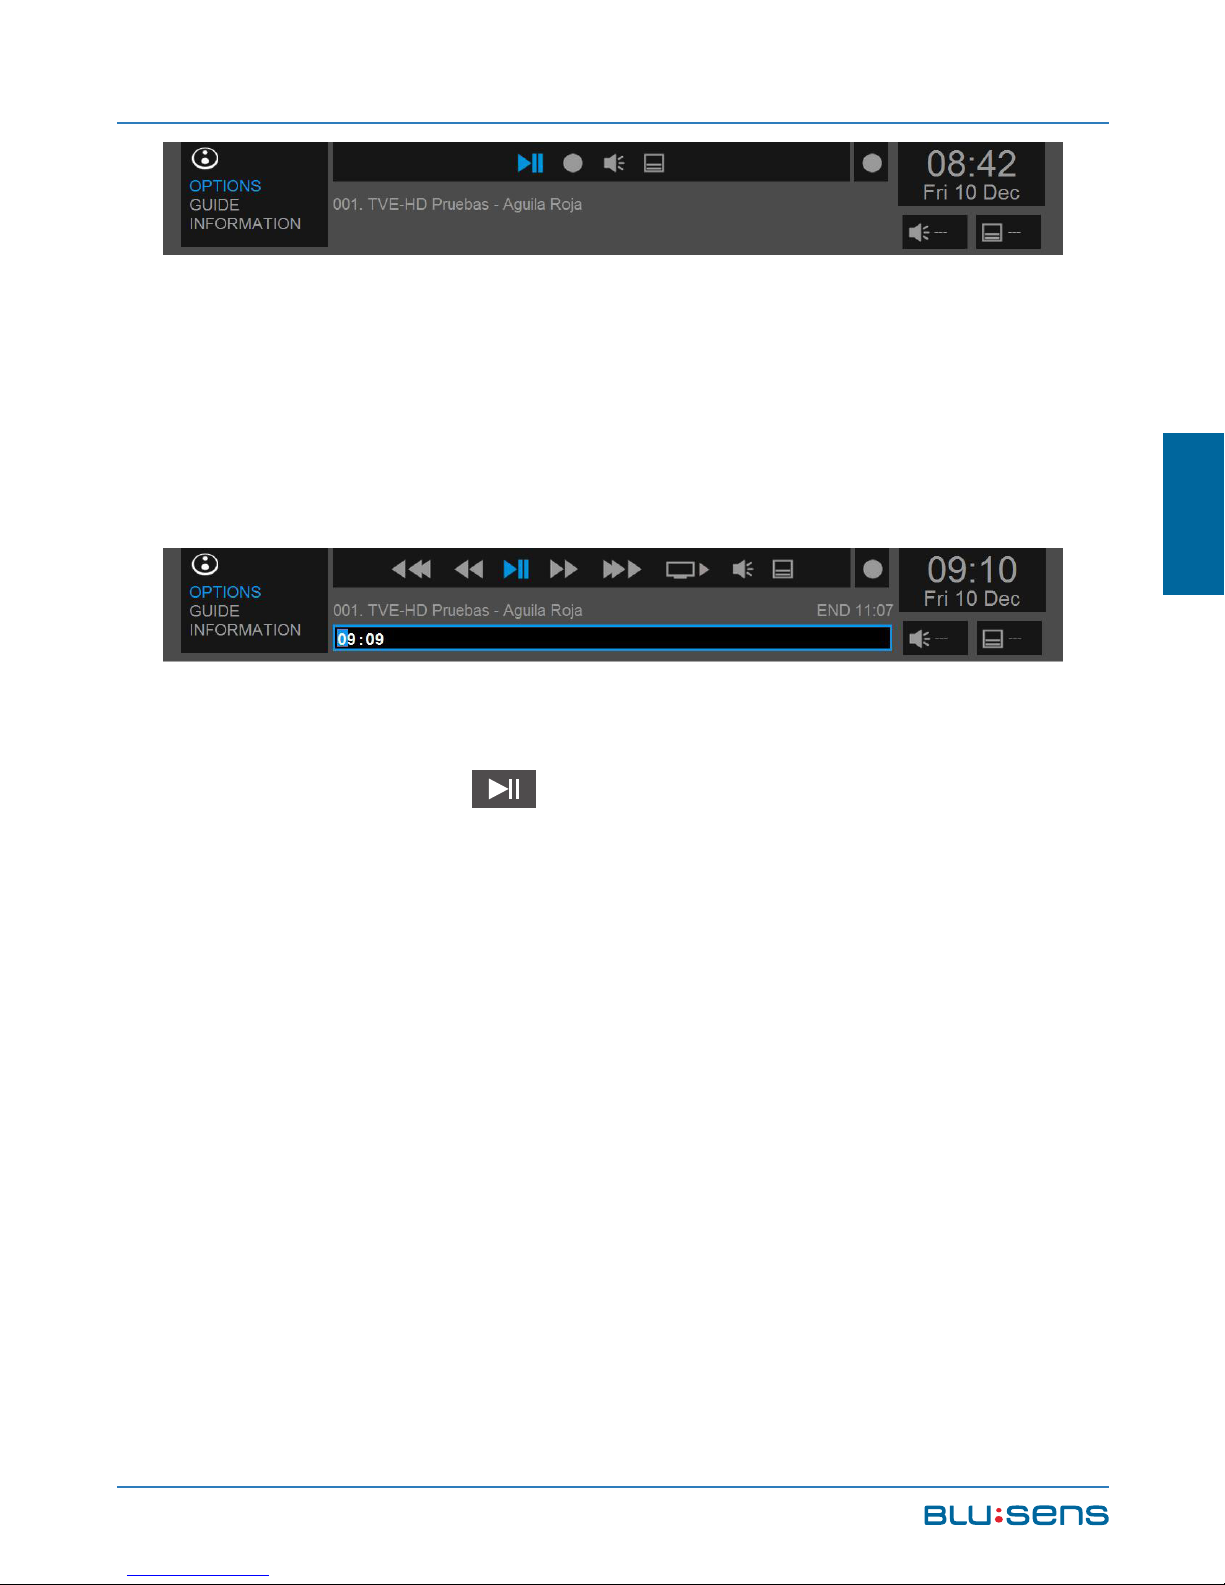
6.1.4. Timeshift
This feature allows you to pause the DTV channel
you are viewing, allowing playback to recover from that
point at any time.
Your Web:tv offers 2 options to activate the Timeshift
function:
Pressing the button of the remote control.
From the shortcut menu using the icon.
Page 63
Blusens Web:tv
63
ENGLISH
From that time the device starts recording until it
stops or the space reserved for that purpose has been
filled (buffer).
To continue playing from the point where the viewing
was paused, press . You scroll through the progress
bar with the corresponding options. You can also change
audio and subtitles.
In this case we will have a progress bar within
the options area with the total length of the Timeshift
buffer. This bar has information on total time, remaining
recording time and viewed recording time.
Page 64

USER MANUAL
64
To return to live television select the option.
6.1.5. Recording
Your Web:tv allows you to record DTV and DTV-HD
channels. Your Web:tv will record all the channel
information, including all the audios and subtitles
allowing them to be changed during playback of the
recording. The recordings will be made in a “recordings”
folder of your USB (pendrive, hard disk, etc.). There are
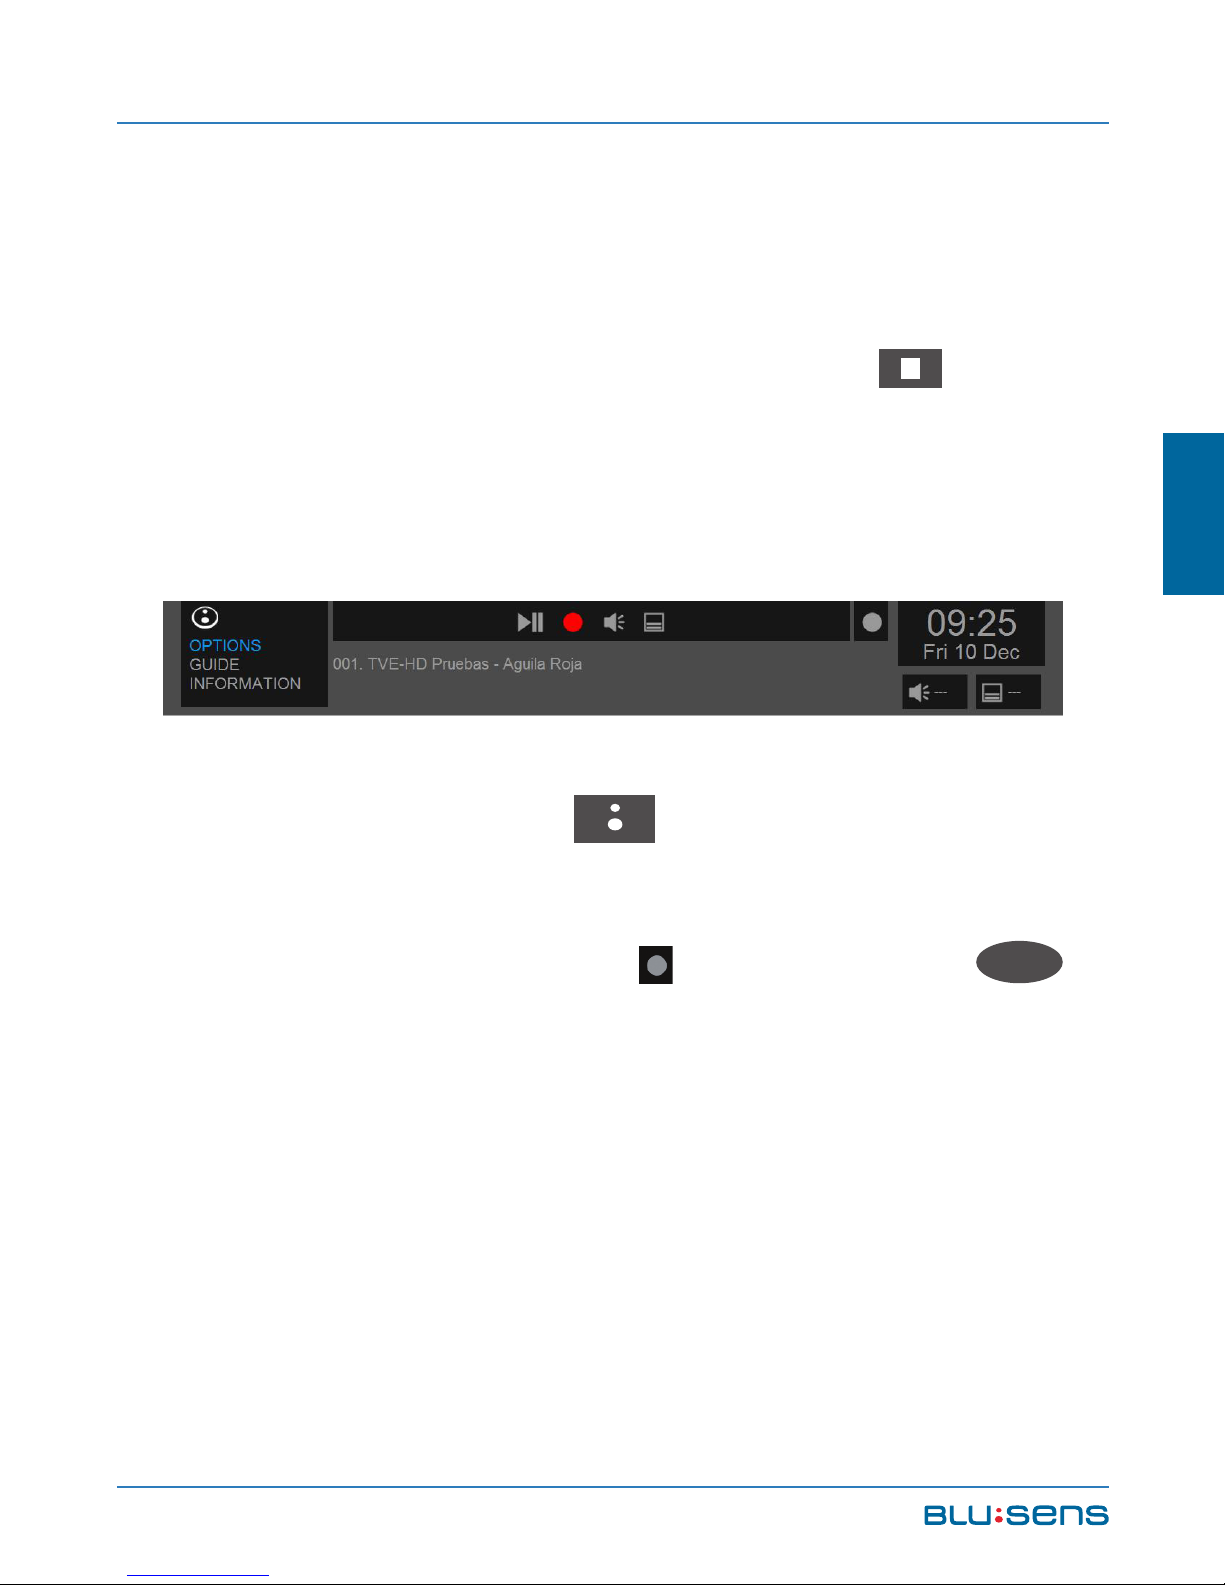
several ways to activate this feature. The icon of the
shortcut menu will turn red to indicate that recording is
in progress.
6.1.5.1.Direct Recording
6.1.5.1.1.From the remote control
To directly record from a channel from the current
time press the REC
REC
button on the remote control.
Page 65
Blusens Web:tv
65
ENGLISH
The device will directly record the channel you are
viewing. Each press will increase the recording time
(30, 60, 90, 120, 240, 480, off minutes).
To stop recording just press the STOP button
and this will be stored automatically.
6.1.5.1.2.From the shortcut menu
To directly record from a channel from the current
time press the BLUSENS button, while viewing the
desired channel, to display the SHORTCUT MENU. In
OPTIONS select the RECORD icon and press OK
OK
. From this point your Web:tv will record that channel
during the selected time period (1 press: 30 minutes; 2
presses: 60 minutes, 90, 120, 180, 240, 480 minutes;
off).
Page 66
USER MANUAL
66
To stop recording just press the STOP button in
the shortcut menu or the remote control.
6.1.5.2.Scheduled Recording
6.1.5.2.1.Scheduled from jobs
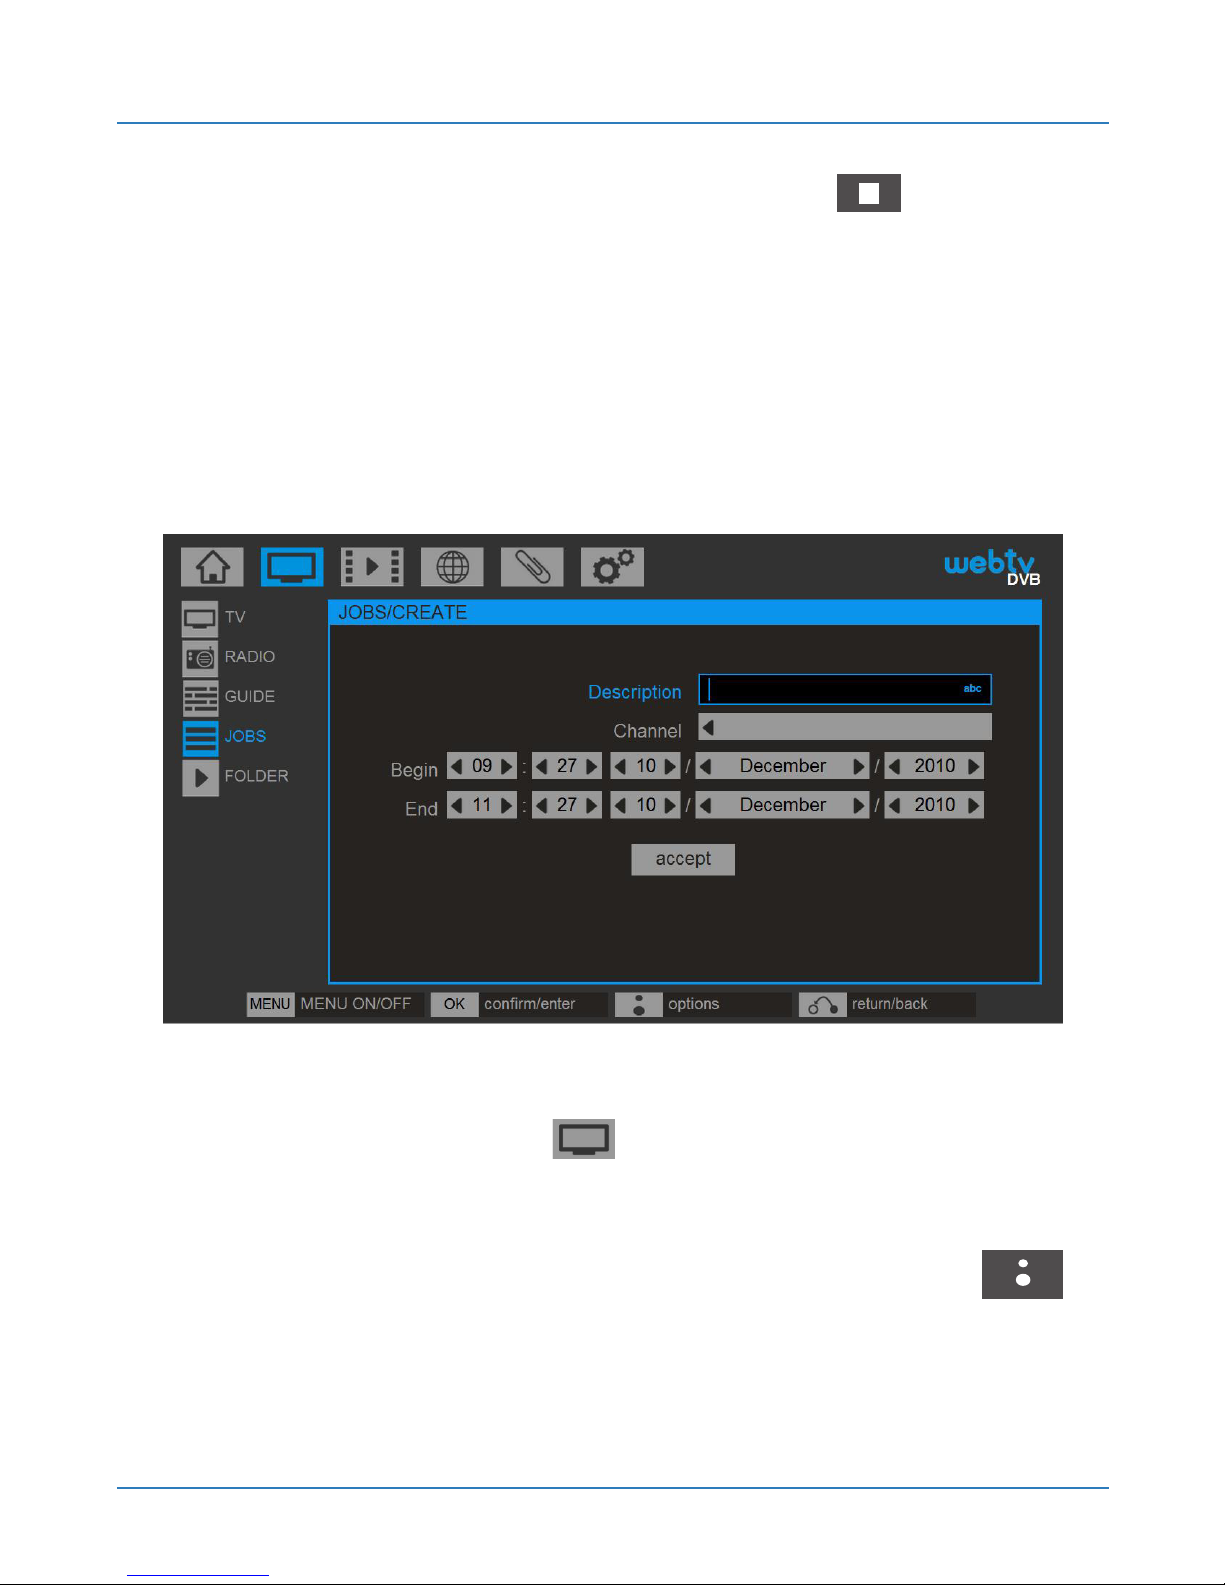
To schedule the recording of one channel and at a
time go to DVB / JOBS to create a new scheduled
task. If there are no tasks, the system gives us a new
one. If there is any task press the BLUSENS
button and select CREATE NEW.
Page 67
Blusens Web:tv
67
ENGLISH
In both cases a screen opens to configure the
recording. Enter a name for the recording. Select the
channel you want to record, set the date and time to
start and end the recording, select ACCEPT and press
OK
OK
, a new task will be added to the existing task
list.
Your Web:tv will automatically record even if it is on
Standby. If you are viewing a different channel Web:tv
will automatically change to the channel to be recorded.
Page 68

USER MANUAL
68
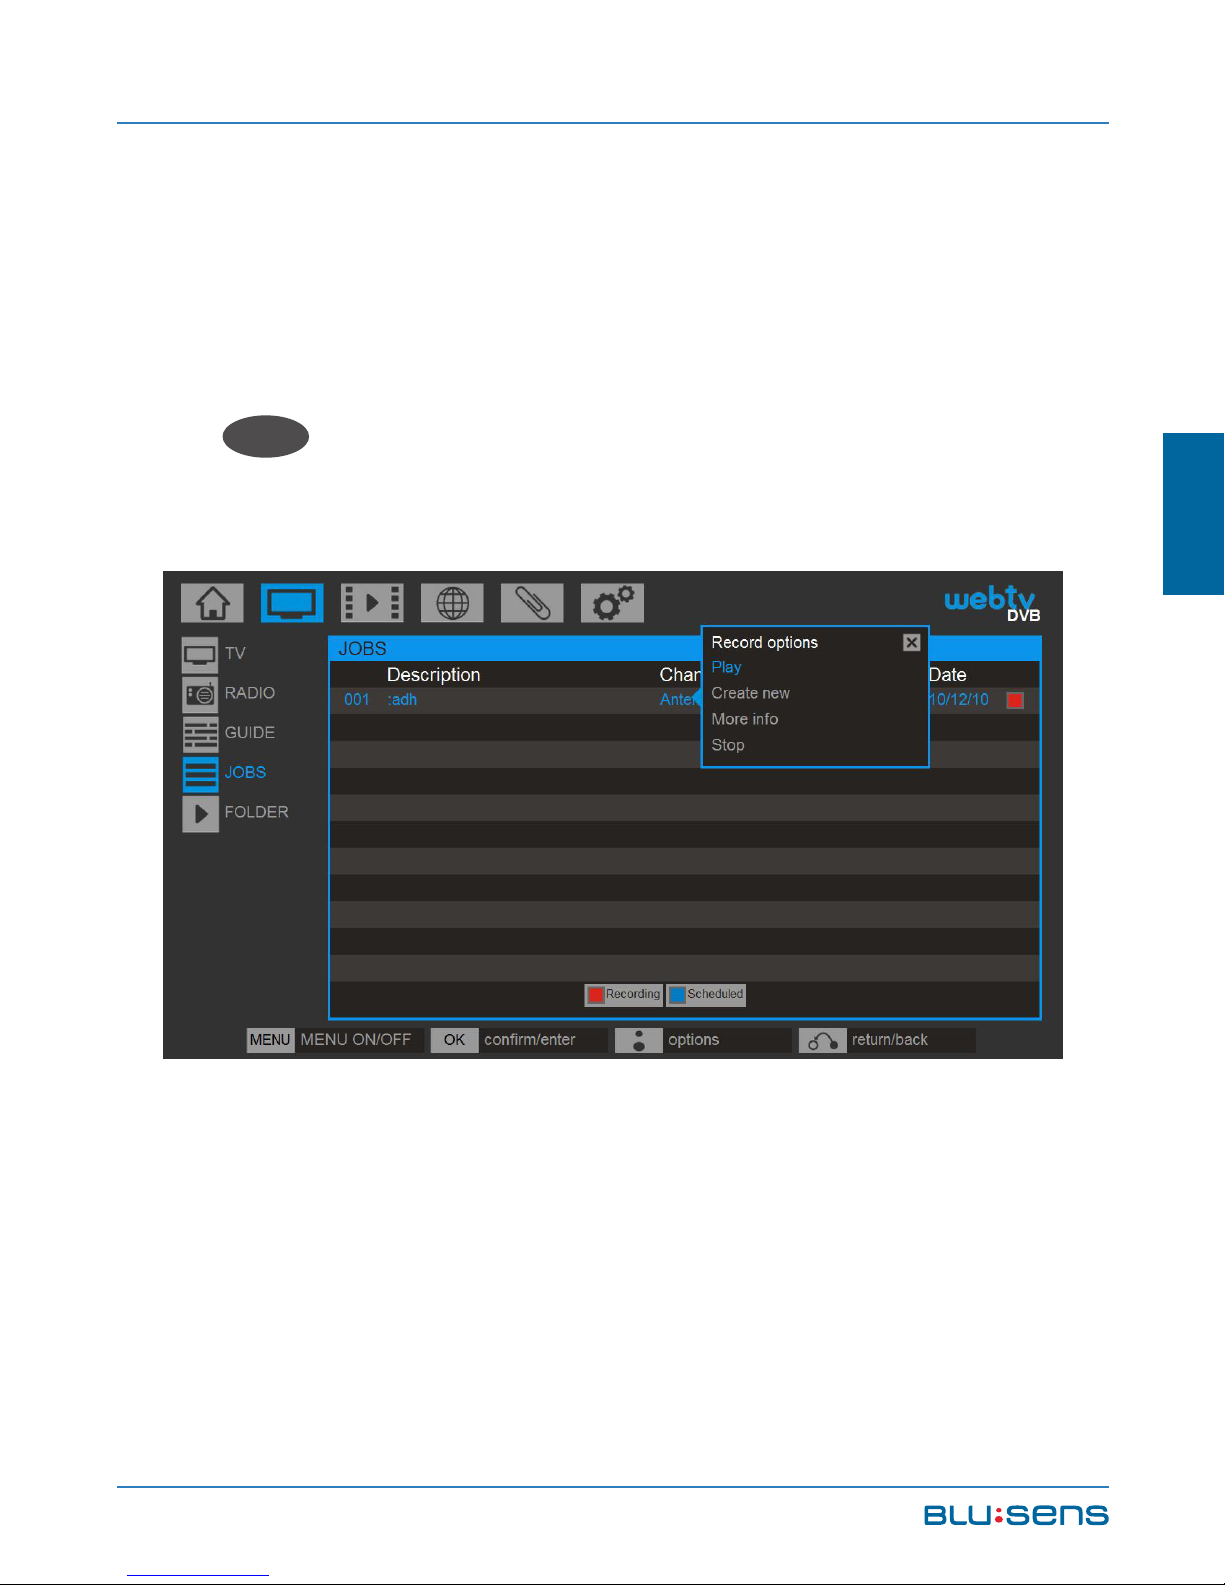
In the task list basic information about each task
and the status (recording, scheduled) will be displayed.
Press the BLUSENS button to display the
recording options:
Play: (if the recording is in progress) lets you start
playback while the system continues recording.
Edit: (if the recording is not in progress) a screen
opens where you can modify all recording parameters,
such as channel, description, quality, recording hours,...
Create New: a screen opens to schedule a new
recording.
More Info: displays the task information.
Stop: (if the recording is in progress) stops the
recording and saves it to the hard disk. (if the recording
is not in progress) cancels the recording and removes
the recording from the task list.
Page 69
Blusens Web:tv
69
ENGLISH
6.1.5.2.2.Scheduled from the Program
Guide.
To record a particular program go to DVB / GUIDE
(EPG), select the program you want to record, moving it
using the navigation keys. Press the BLUSENS
button and select RECORD . The schedule of the
recording will automatically go to the JOBS list. To
change a task go to DVB/JOBS. Select it, press the
BLUSENS button and select edit.
Page 70
USER MANUAL
70
NOTE: The accuracy of the information in the
Program Guide depends solely on the transmission
channel and therefore may not be 100% accurate.
6.1.5.3.Viewing a Recording
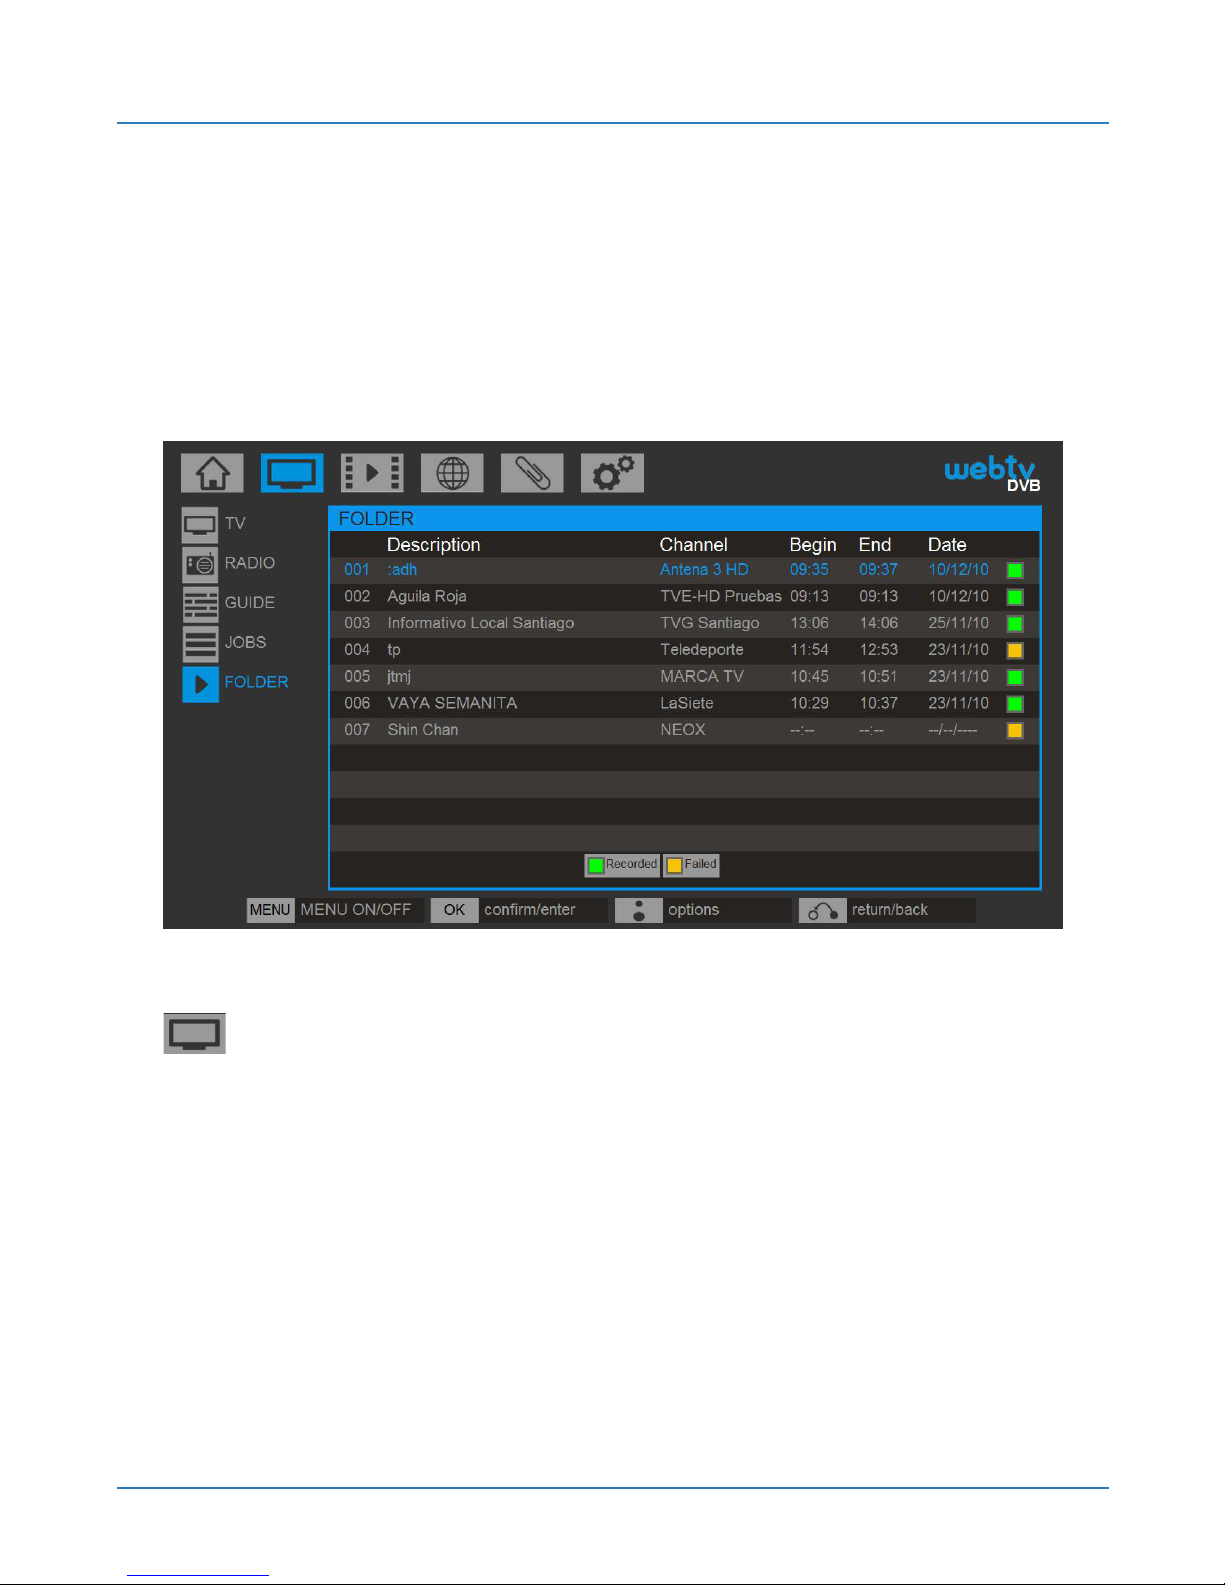
The recordings made are available in DVB/FOLDER
(Make sure you have connected the USB device in
which the recording took place). The list of recordings
shows basic data on each recording and an indicator
whether the recording was successful or if an error
occurred.
Page 71
Blusens Web:tv
71
ENGLISH
Make sure you have connected the USB device in
which the recording took place.
Select a recording from the list and press OK
OK
or PLAY to play the recording.
During playback you can change the audios and
subtitles from the corresponding options in the shortcut
menu.
In the list of recordings press the button to
see the options available for recording:
Play: plays the selected recording.
More Info: displays the information available for the
recording.
Delete: deletes the recording from the list and
erases it from the storage device.
NOTE: The recordings are automatically saved in
the “RECORDINGS” folder of your USB device.
Page 72
USER MANUAL
72
6.2. DTV Radio
6.2.1. Configuration
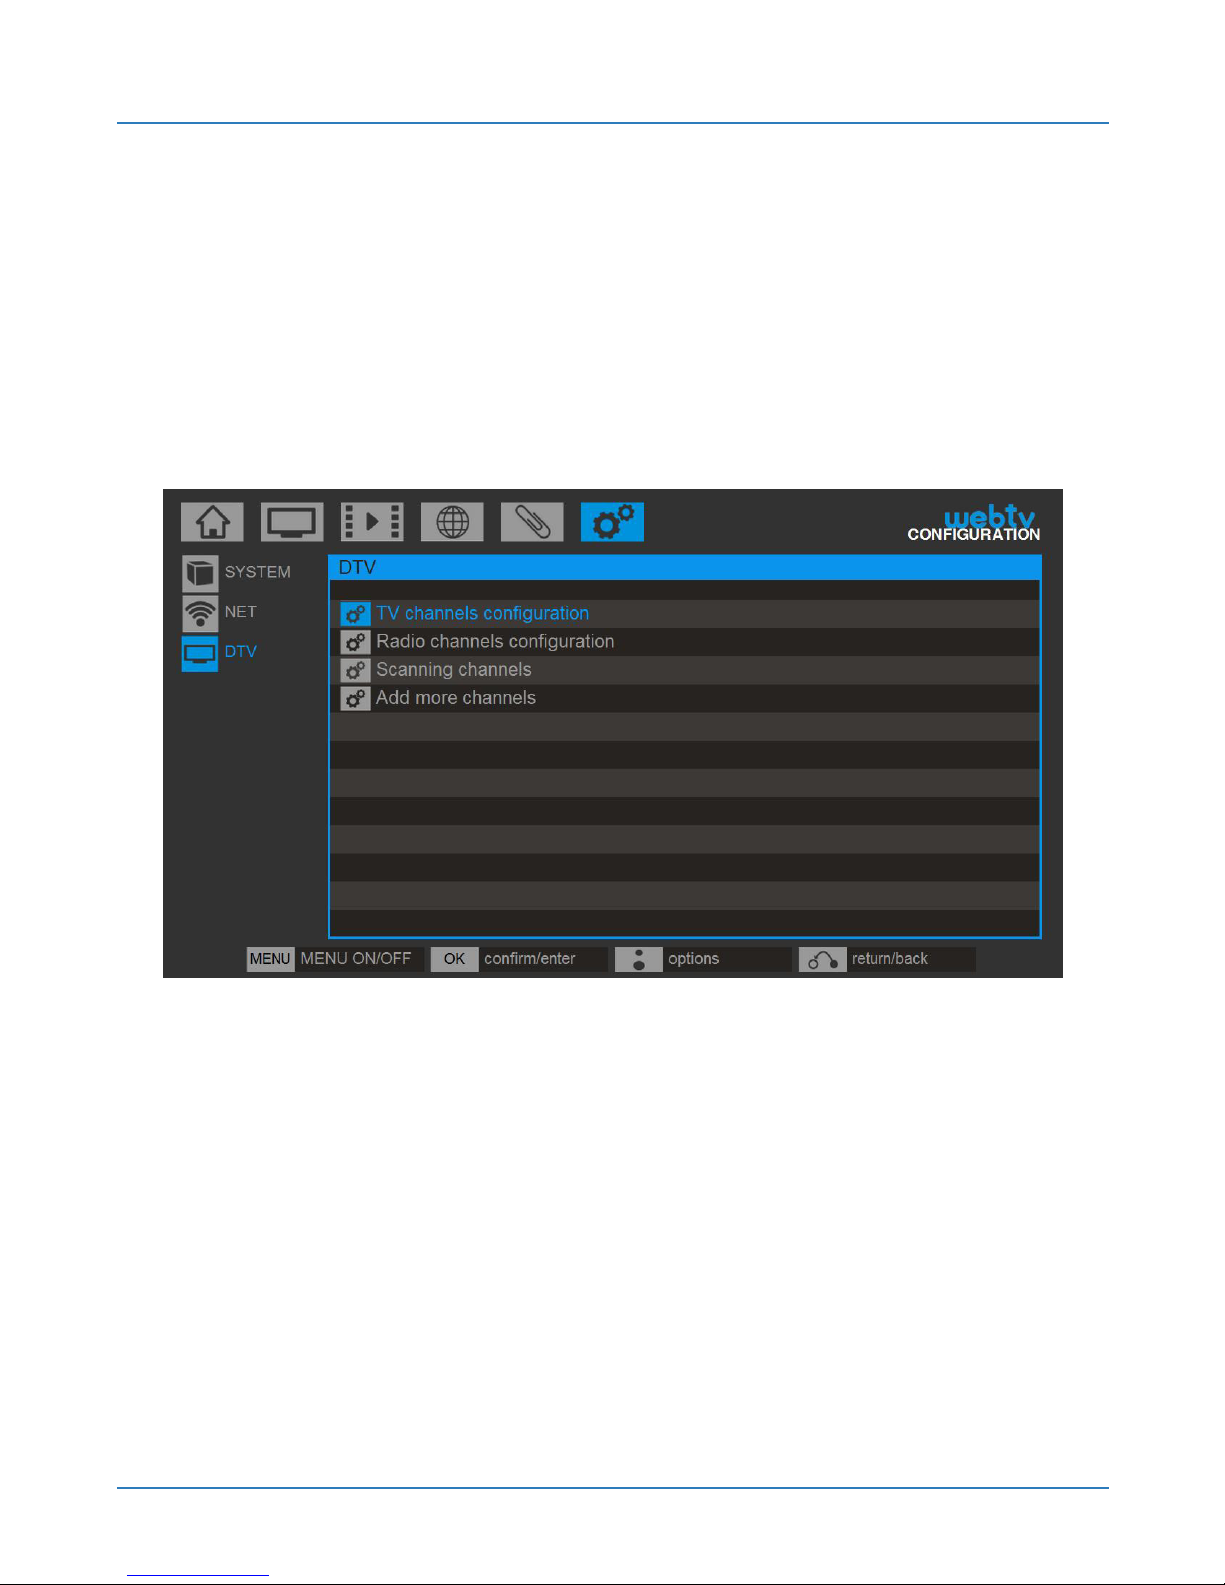
Go to CONFIGURATION/DTV to display the DTV
configuration options.
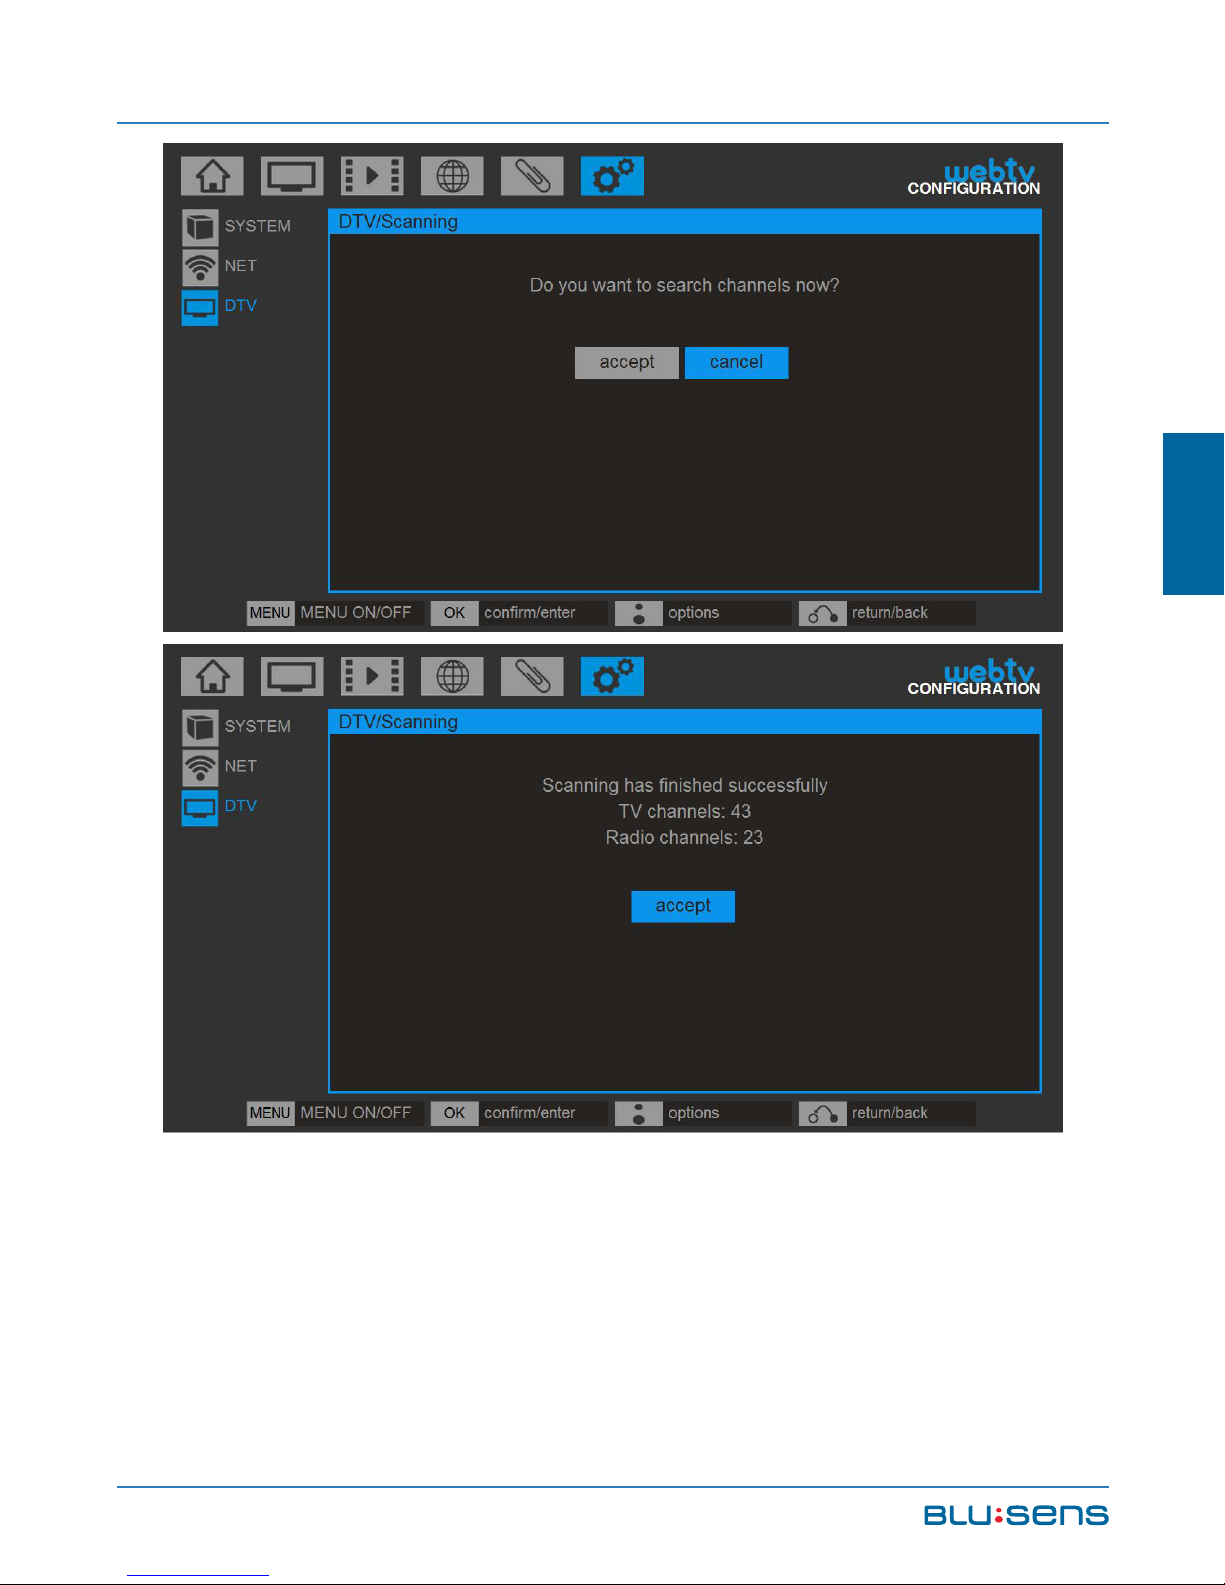
6.2.1.1.Search Channels
Select this option to perform an automatic search of
DTV channels. Go to CONFIGURATION/DTV/AUTOMATIC
SEARCH.
Your Web:tv will search TV and Radio channels
together, separating them by type.
Page 73
Blusens Web:tv
73
ENGLISH
6.2.1.2.Sort Channels
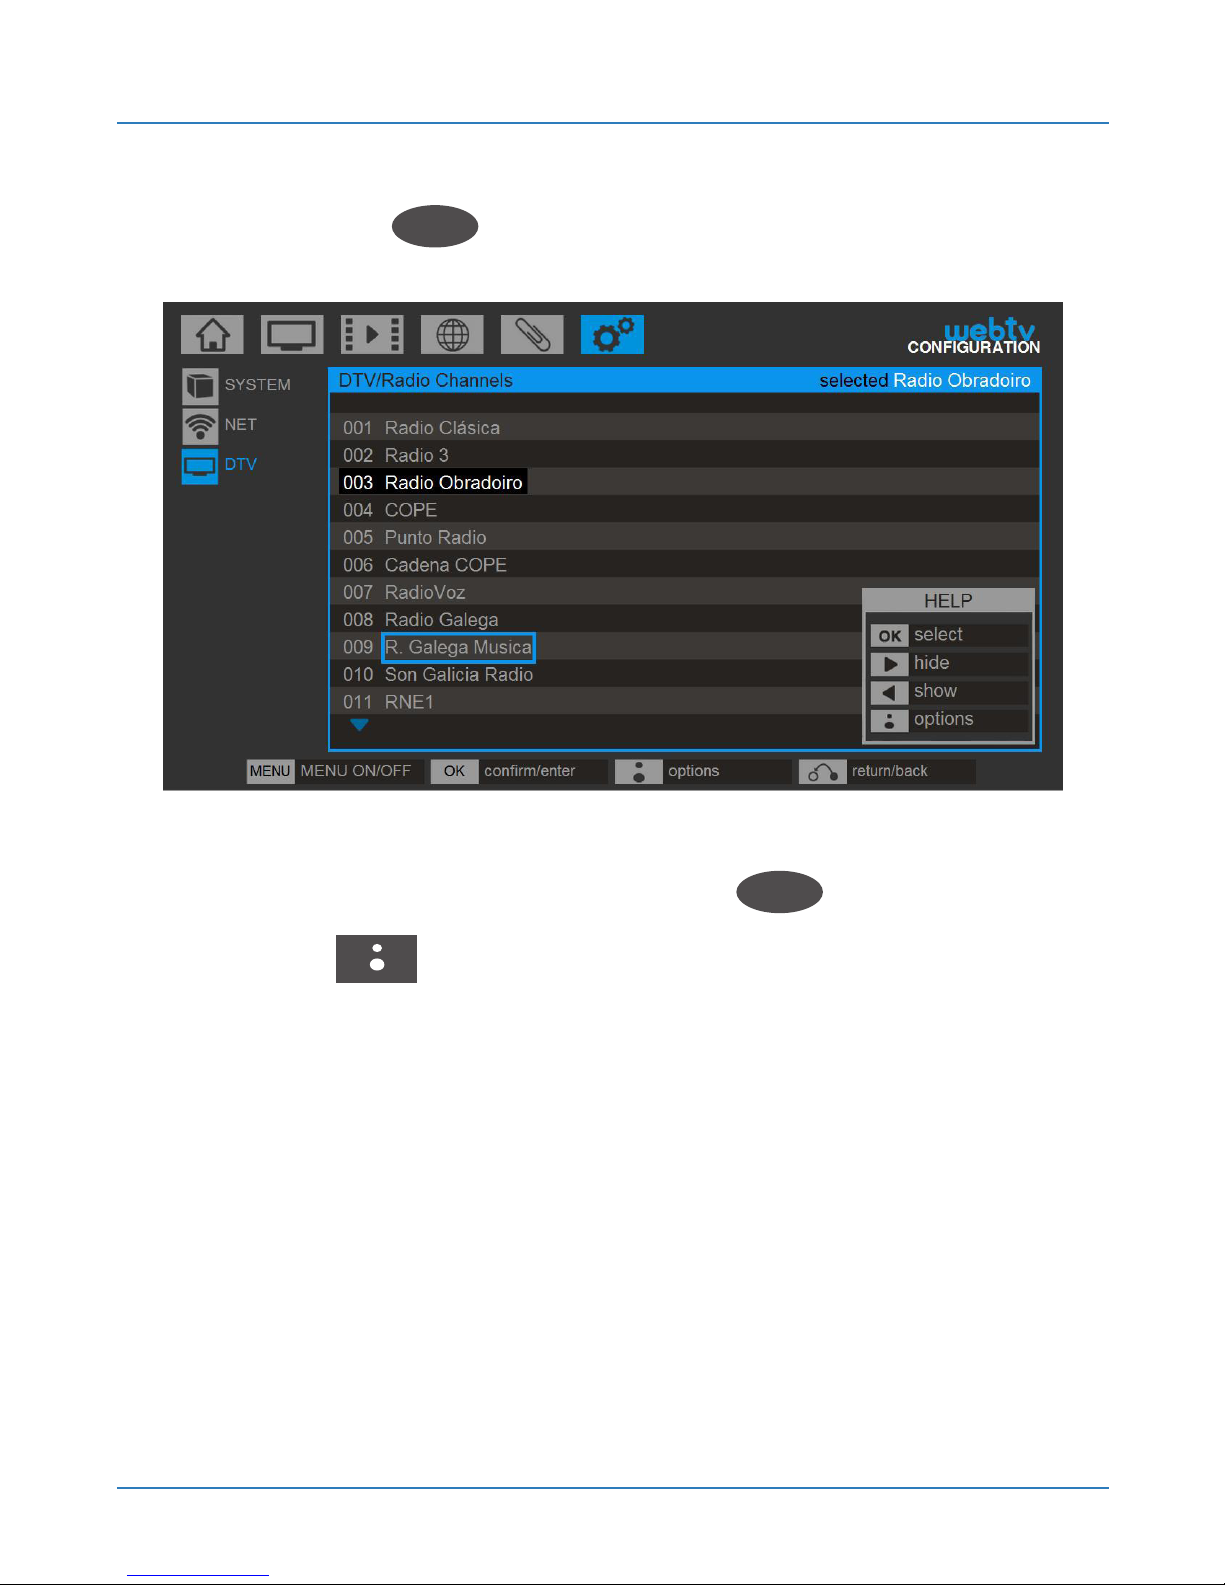
To sort the TV channels go to CONFIGURATION/
DTV/MANAGE RADIO CHANNELS. Navigate with the
Page 74
USER MANUAL
74
Up and Down keys to the channel you want to sort and
press the OK
OK
button, it selects that channel.
Then navigate to the position where you want to
place the channel and press OK
OK
again (or the
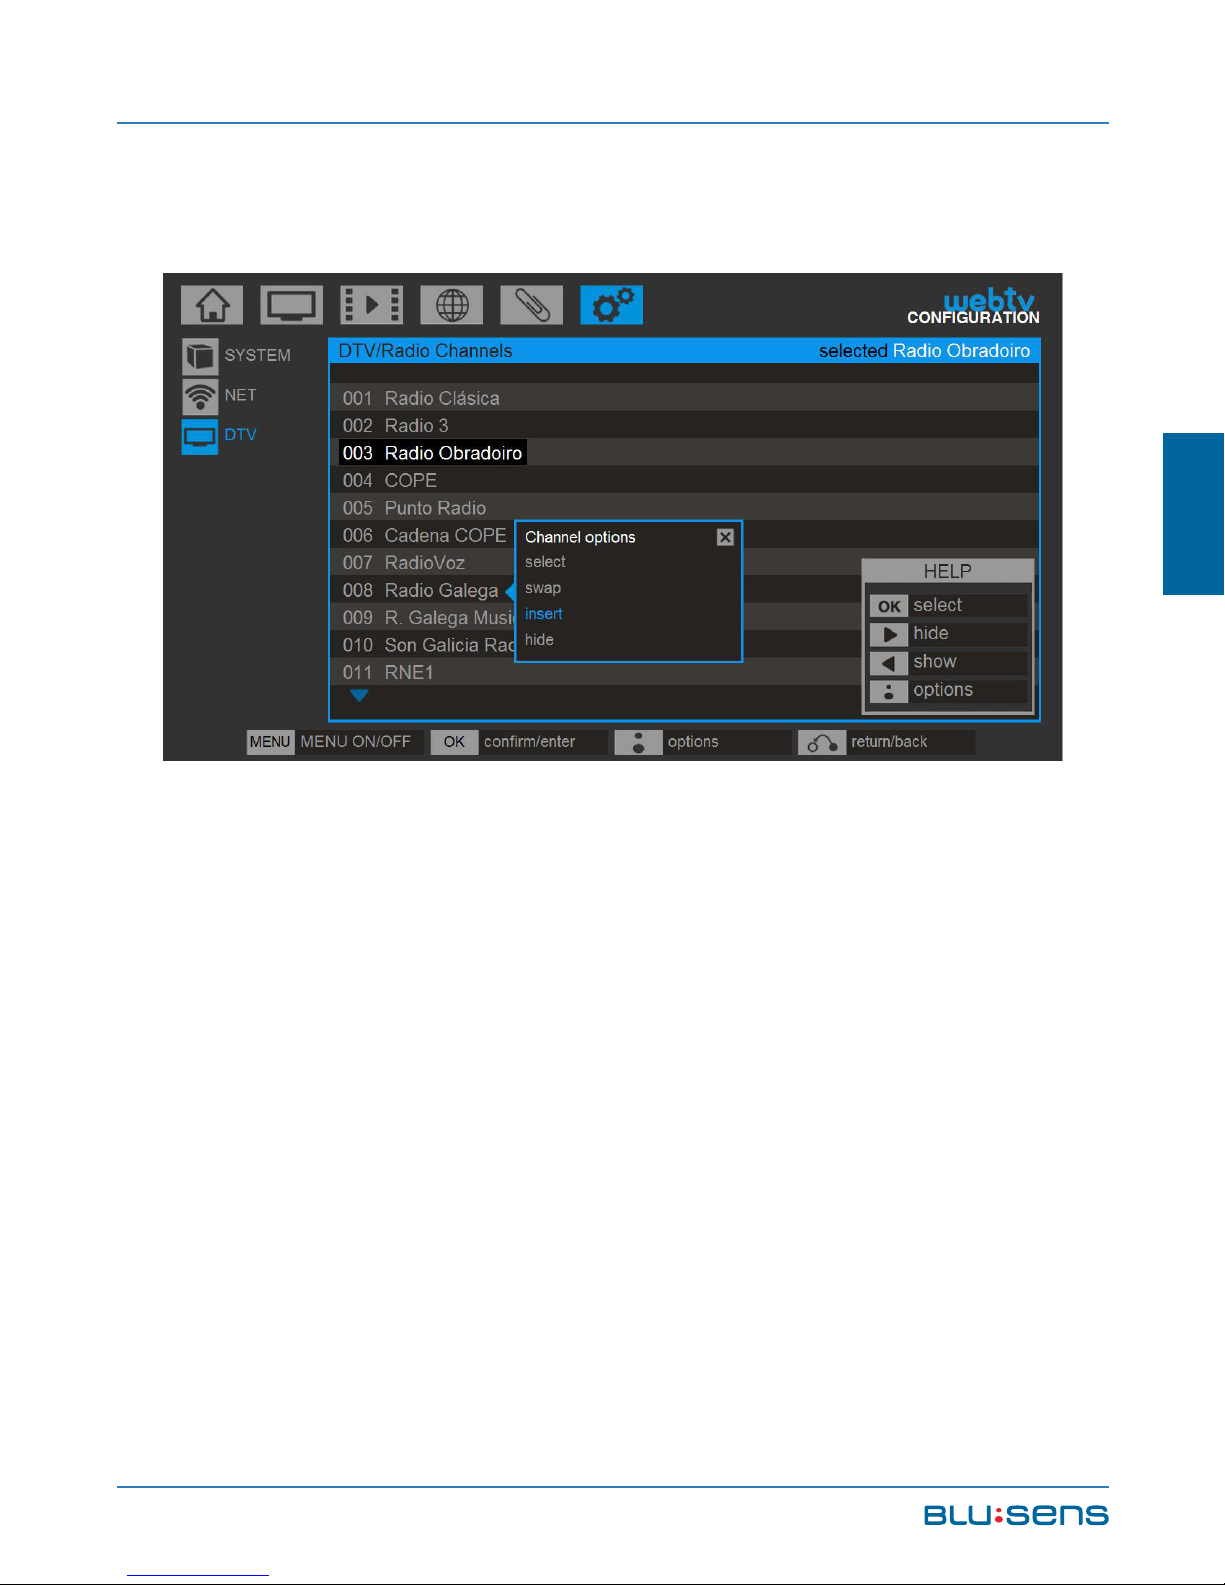
BLUSENS to display the options for this channel:
Select: Select the channel to work on it.
Swap: Swap the selected channel with the selected
position.
Insert: Insert the channel in that position by moving
the other channels.
Page 75
Blusens Web:tv
75
ENGLISH
Hide: The channel will not appear on the list of
channels.
6.2.1.3.Add Channels
Use this option to perform an automatic search for
new Radio and TV channels and add them to your list
without losing your channels or your current sorting
order.
To add more channels select CONFIGURATION/
DTV/ADD CHANNELS. Select this option to perform an
automatic search for new radio and TV channels and
add them to the list.
Page 76
USER MANUAL
76
6.2.2. Escuchar Radio TDT
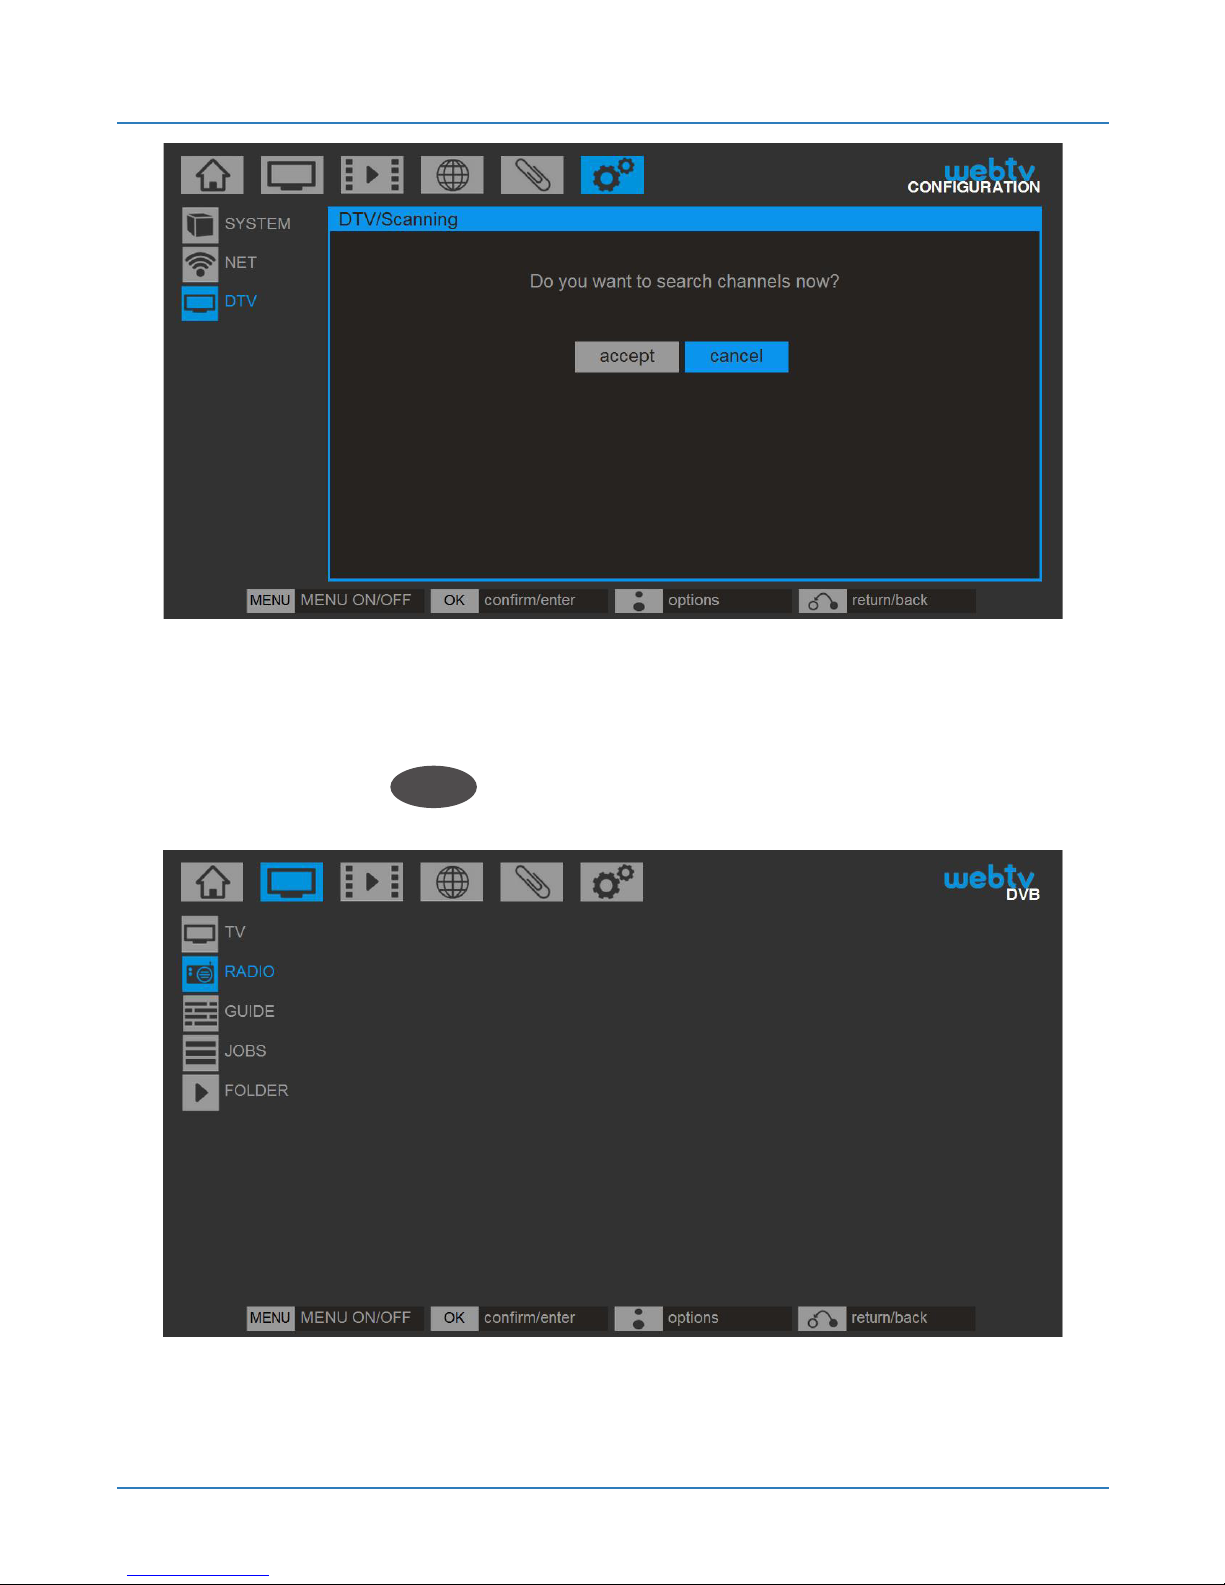
To listen to the Radio you must select DVB/RADIO
and press OK
OK
.
Page 77
Blusens Web:tv
77
ENGLISH
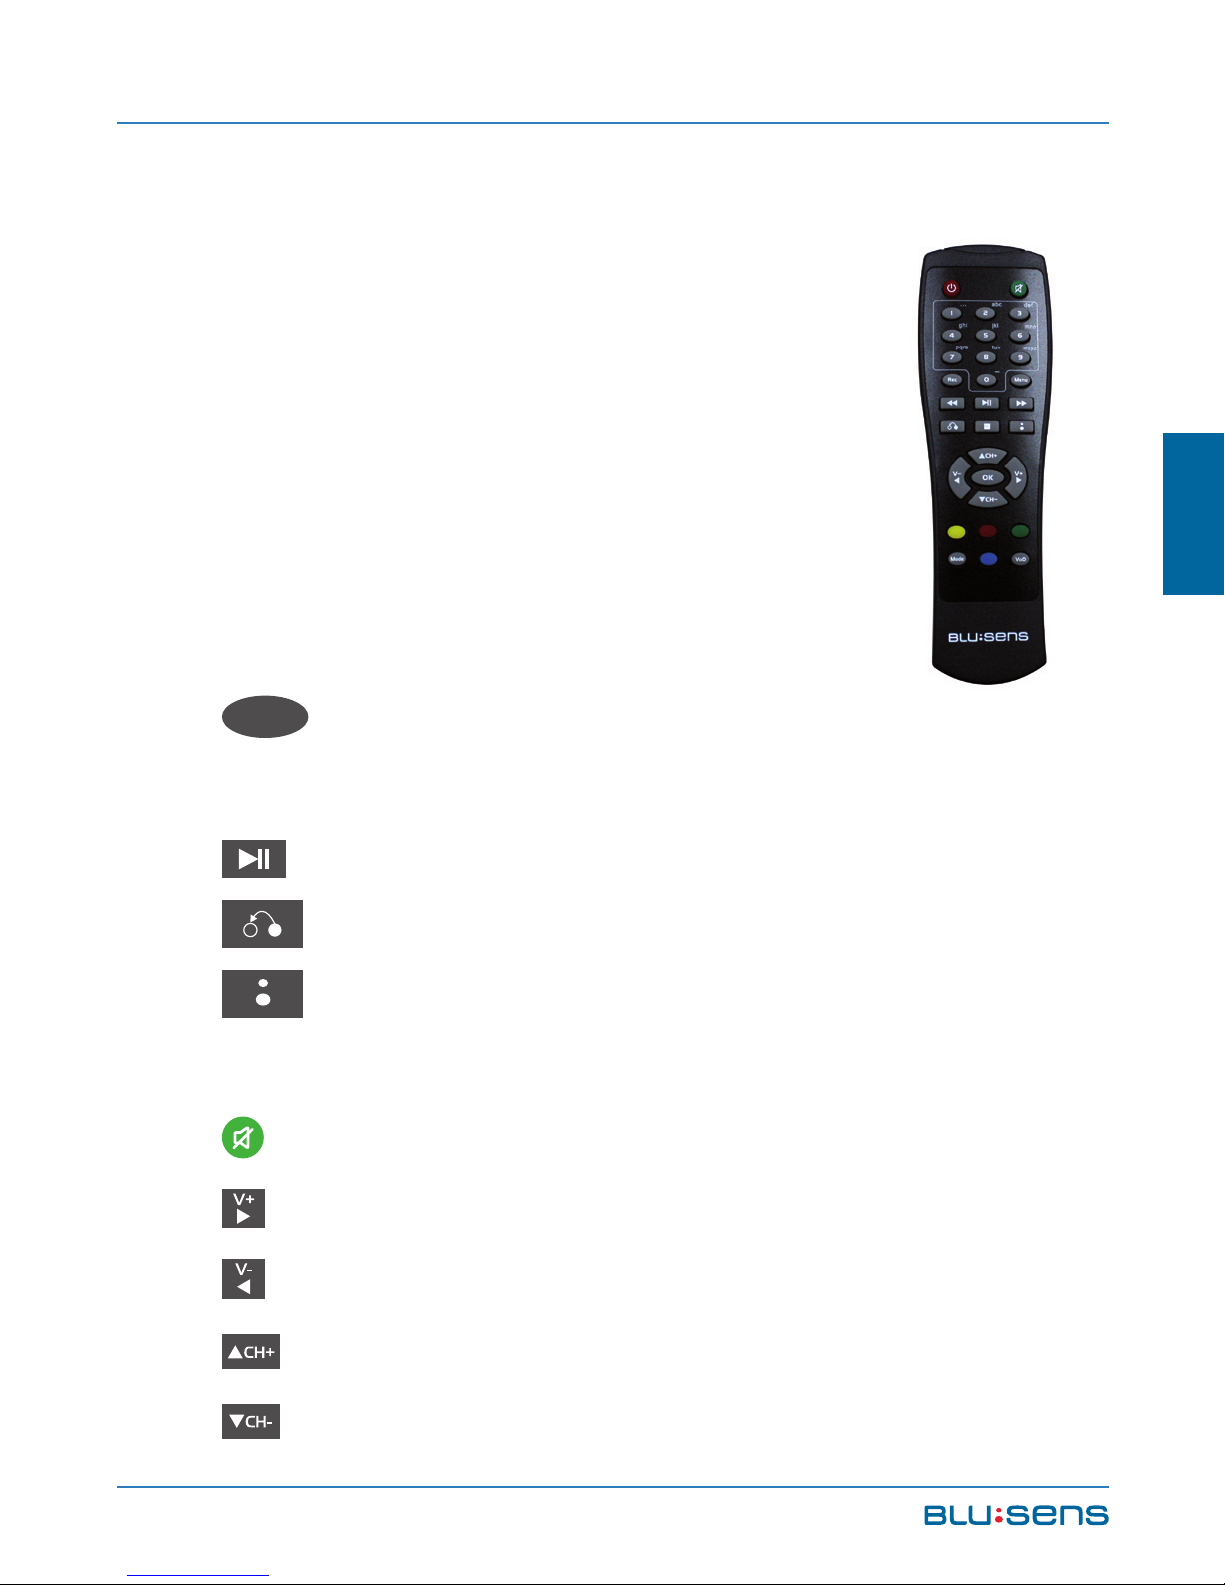
6.2.2.1.Remote Control Options
While listening to a Radio channel you
can perform the following functions from
the remote control:
While viewing a DTV TV channel you can
perform the following functions from the
remote control:
OK
OK. Displays channel list. Select a
channel and press OK to listen it.
PLAY / PAUSE. Activates timeshift (see 6.1.4).
: Return to the previous channel.
: Shows/Hides the shortcut menu (see chapter
6.2.2.2)
MUTE: Mutes the device.
V+: Increase volume.
V-: Decrease volume.
CH+: Next channel.
CH-: Previous channel.
Page 78

USER MANUAL
78
REC
: Starts recording the channel being listened
to. Each press increases the recording time.
MENU
: Shows/hides the main menu.
Numeric keypad: Changes the channel number.
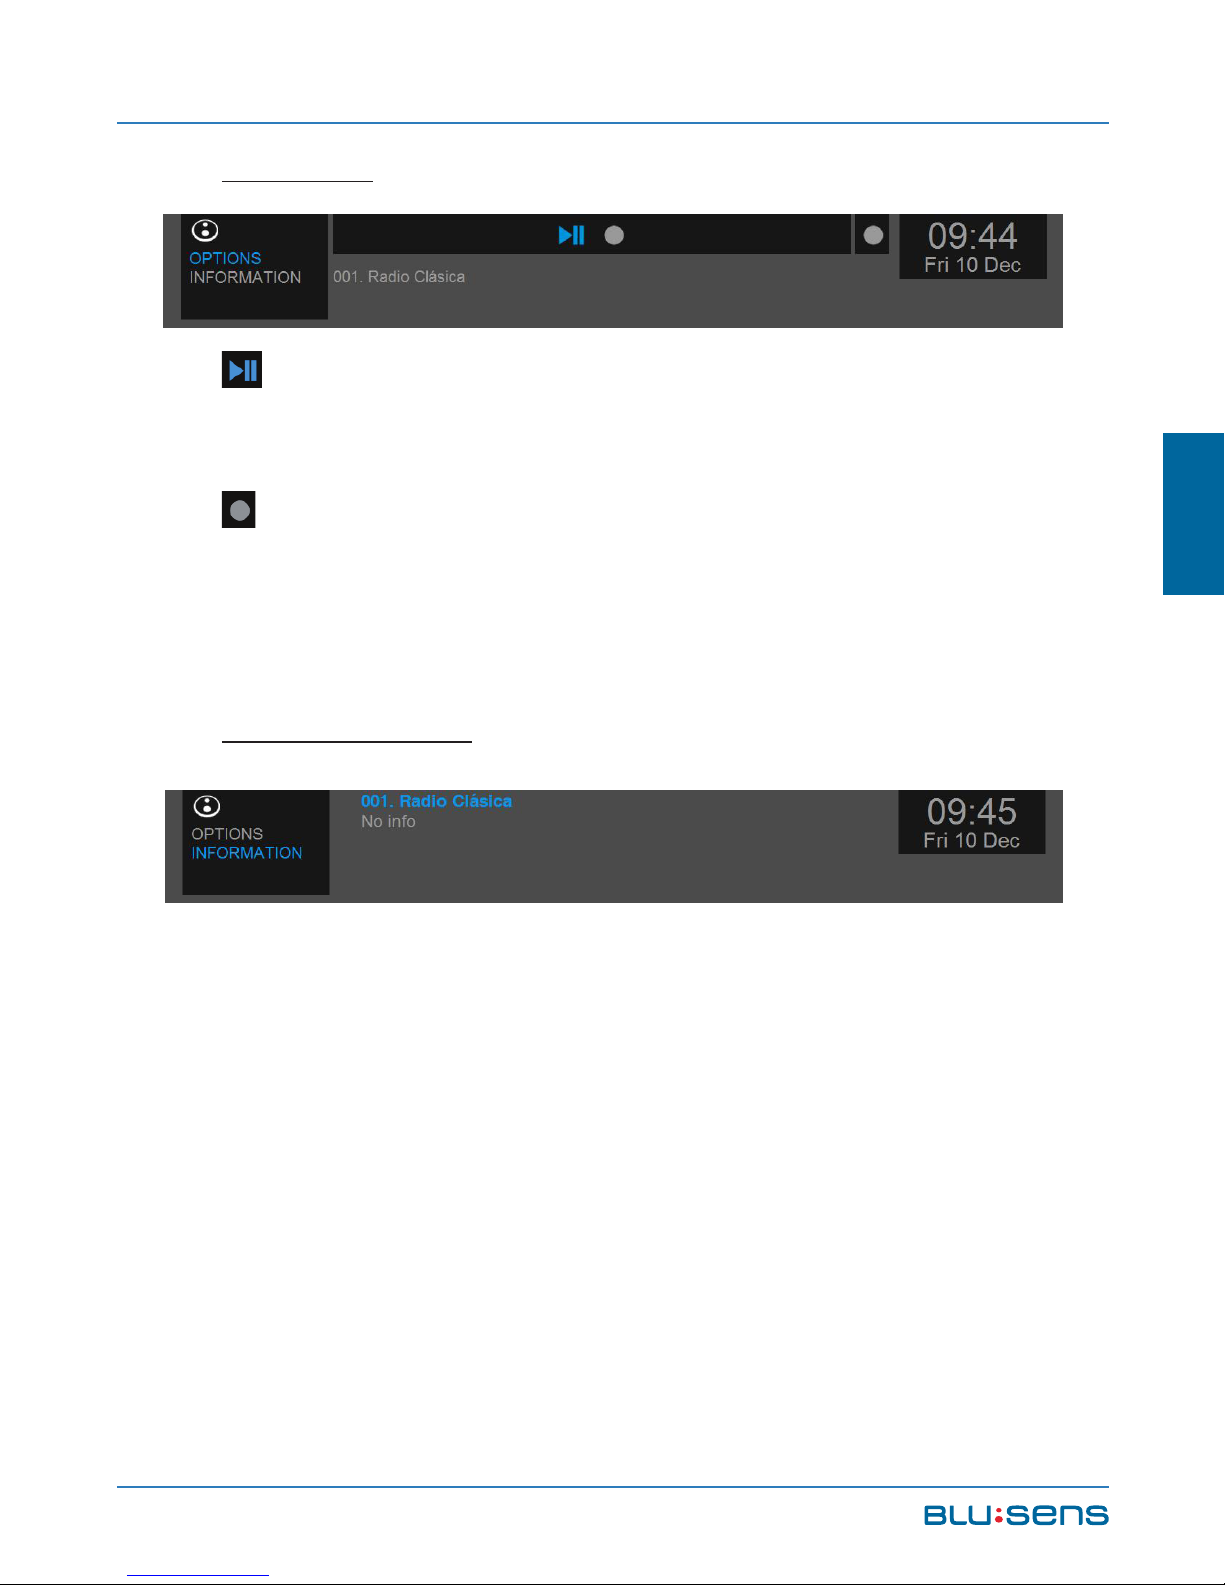
6.2.2.2.Shortcut Menu Options
Press the BLUSENS button while listening to
a Radio channel to display the shortcut menu at the top
of the screen.
Press the or buttons to manage the
different options.
Page 79
Blusens Web:tv
79
ENGLISH
OPTIONS:
PLAY / PAUSE. Activates the Timeshift function
(see chapter 6.2.3).
REC. Starts recording a Radio channel. Each
press increases the recording time.
INFORMATION:
Displays information about the audio formats of the
broadcast.
Page 80
USER MANUAL
80
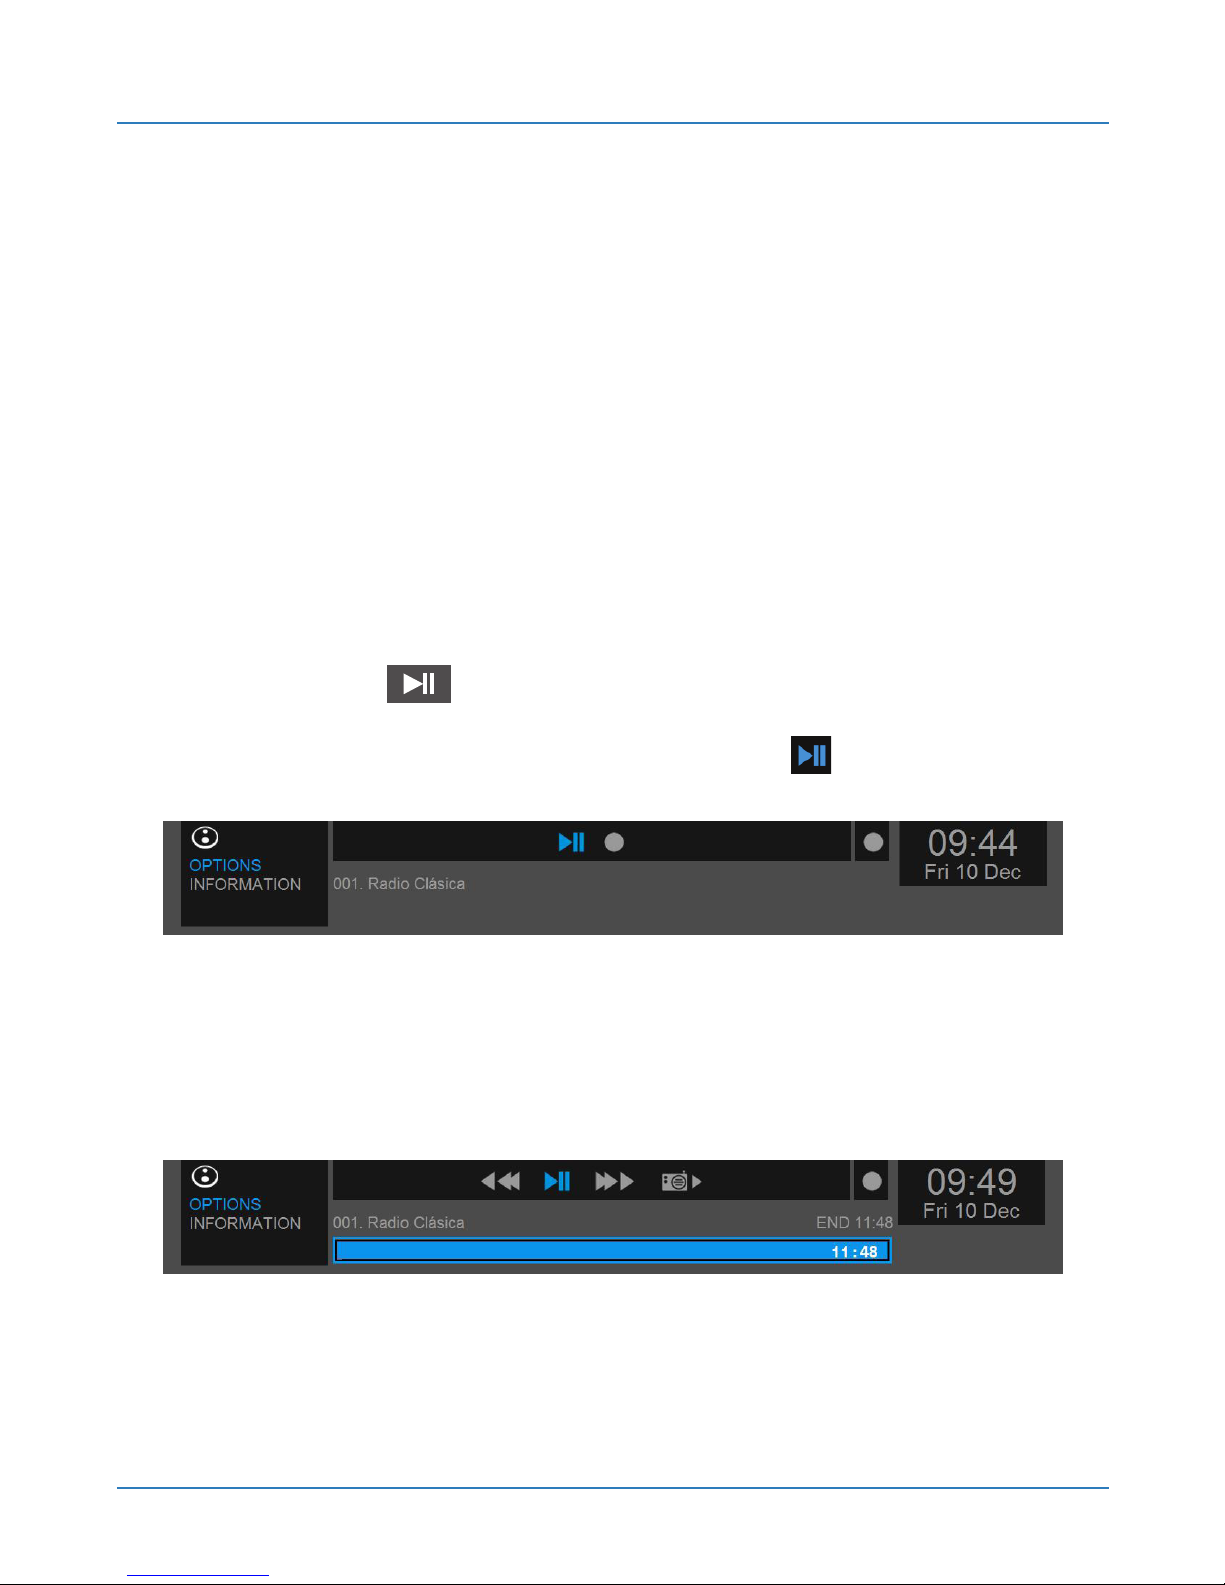
6.2.3. Timeshift
This feature allows you to pause the Radio channel
you are listening to, allowing playback to recover from
that point at any time.
Your Web:tv offers 2 options to activate the Timeshift
function:
Press the button of the remote control.
From the shortcut menu using the icon.
From that time the device starts recording until it
stops or the space reserved for that purpose has been
filled (buffer).
Page 81

Blusens Web:tv
81
ENGLISH
To continue playing from the point where listening
was paused, press . You scroll through the progress
bar with the corresponding options.
In this case we will have a progress bar within the
options area with the total length of the Timeshift buffer.
This bar has information on total time, remaining
recording time and viewed recording time. To return to
live Radio select the option.
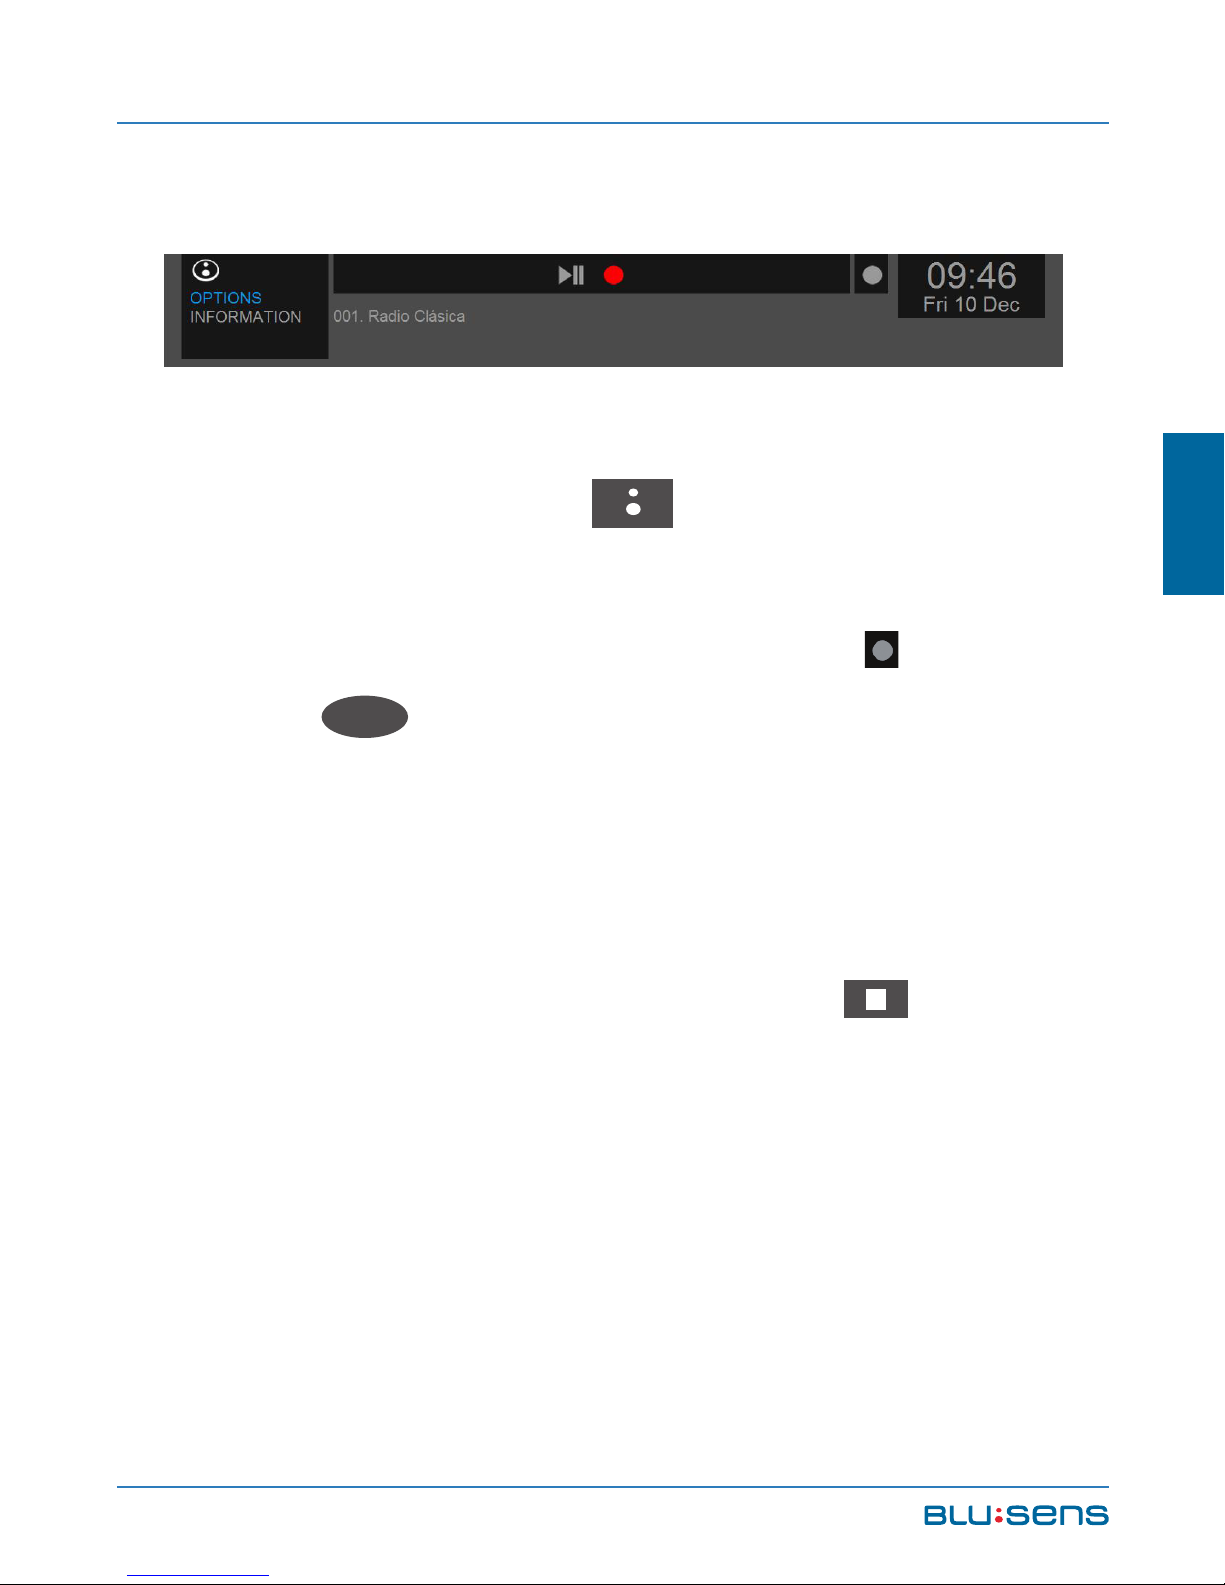
6.2.4. Recording
Your Web:tv allows you to record RADIO channels.
Your Web:tv will record all the channel information. The
recordings will be made in a “recordings” folder of your
USB (pendrive, hard disk, etc.). There are several ways
to activate this feature. The icon of the shortcut menu
will turn red to indicate that recording is in progress.
Page 82

USER MANUAL
82
6.2.4.1.Direct Recording
6.2.4.1.1.From the remote control
To directly record from a channel from the current
time press the REC
REC
button on the remote control.
The device will directly record the channel you are
listening to. Each press will increase the recording time
(30, 60, 90, 120, 180, 240, 480, off minutes).
To stop recording just press the STOP button
and this will be stored automatically.
Page 83
Blusens Web:tv
83
ENGLISH
6.2.4.1.2.From the shortcut menu
To directly record from a channel from the current
time press the BLUSENS , button, while listening
to the desired channel, to display the SHORTCUT
MENU. In OPTIONS select the RECORD icon and
press OK
OK
. From this point your Web:tv will record
that channel during the selected time period (1 press:
30 minutes; 2 presses: 60 minutes, 90, 120, 180, 240,
480 minutes; off).
To stop recording just press the STOP button in
the shortcut menu or the remote control.
Page 84
USER MANUAL
84
6.2.4.2.Scheduled Recording
6.2.4.2.1.Scheduled from Jobs
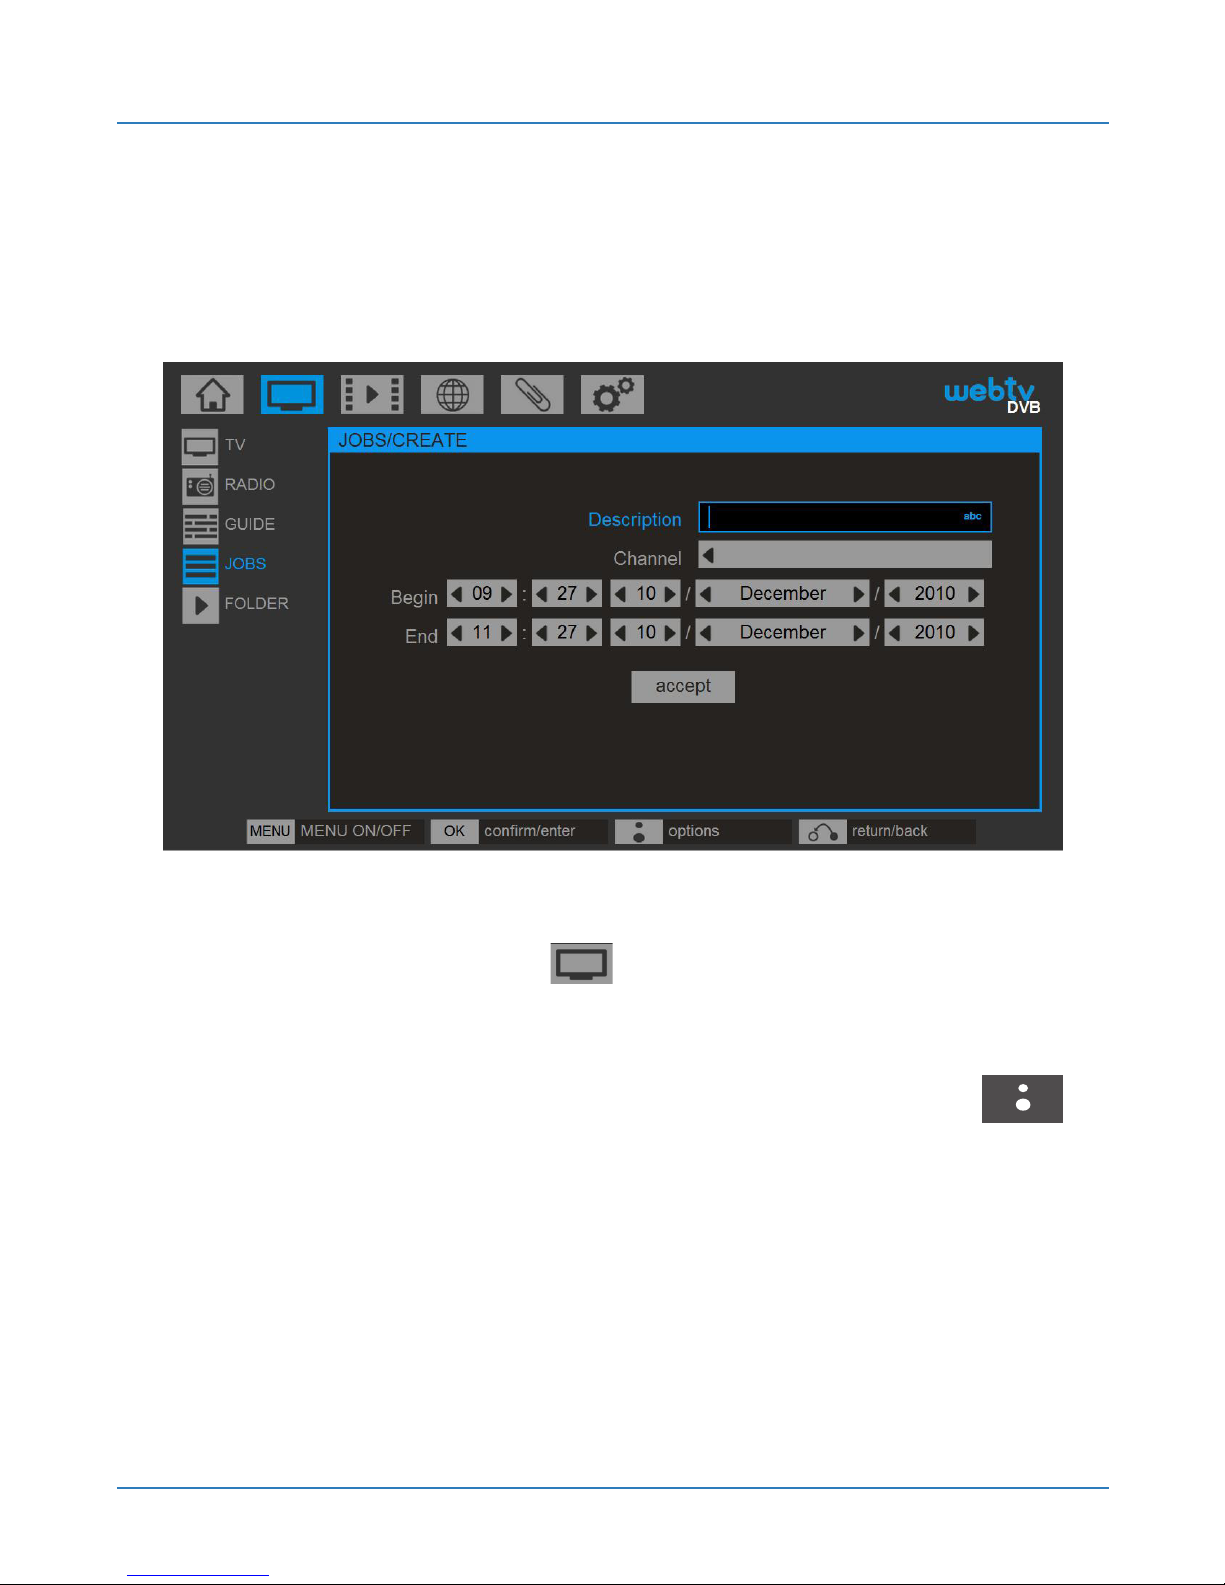
To schedule the recording of one channel and at a
time go to DTV / JOBS to create a new scheduled
task. If there are no tasks, the system gives us a new
one. If there is any task press the BLUSENS
button and select CREATE NEW. In both cases a screen
opens to configure the recording. Enter a name for the
recording. Select the channel you want to record, set
the date and time to start and end the recording, select
Page 85
Blusens Web:tv
85
ENGLISH
ACCEPT and press OK
OK
. A new task will be added
to the existing task list.
Your Web:tv will automatically record even if it is on
Standby. If you are viewing a different channel Web:tv
will automatically change to the channel to be recorded.
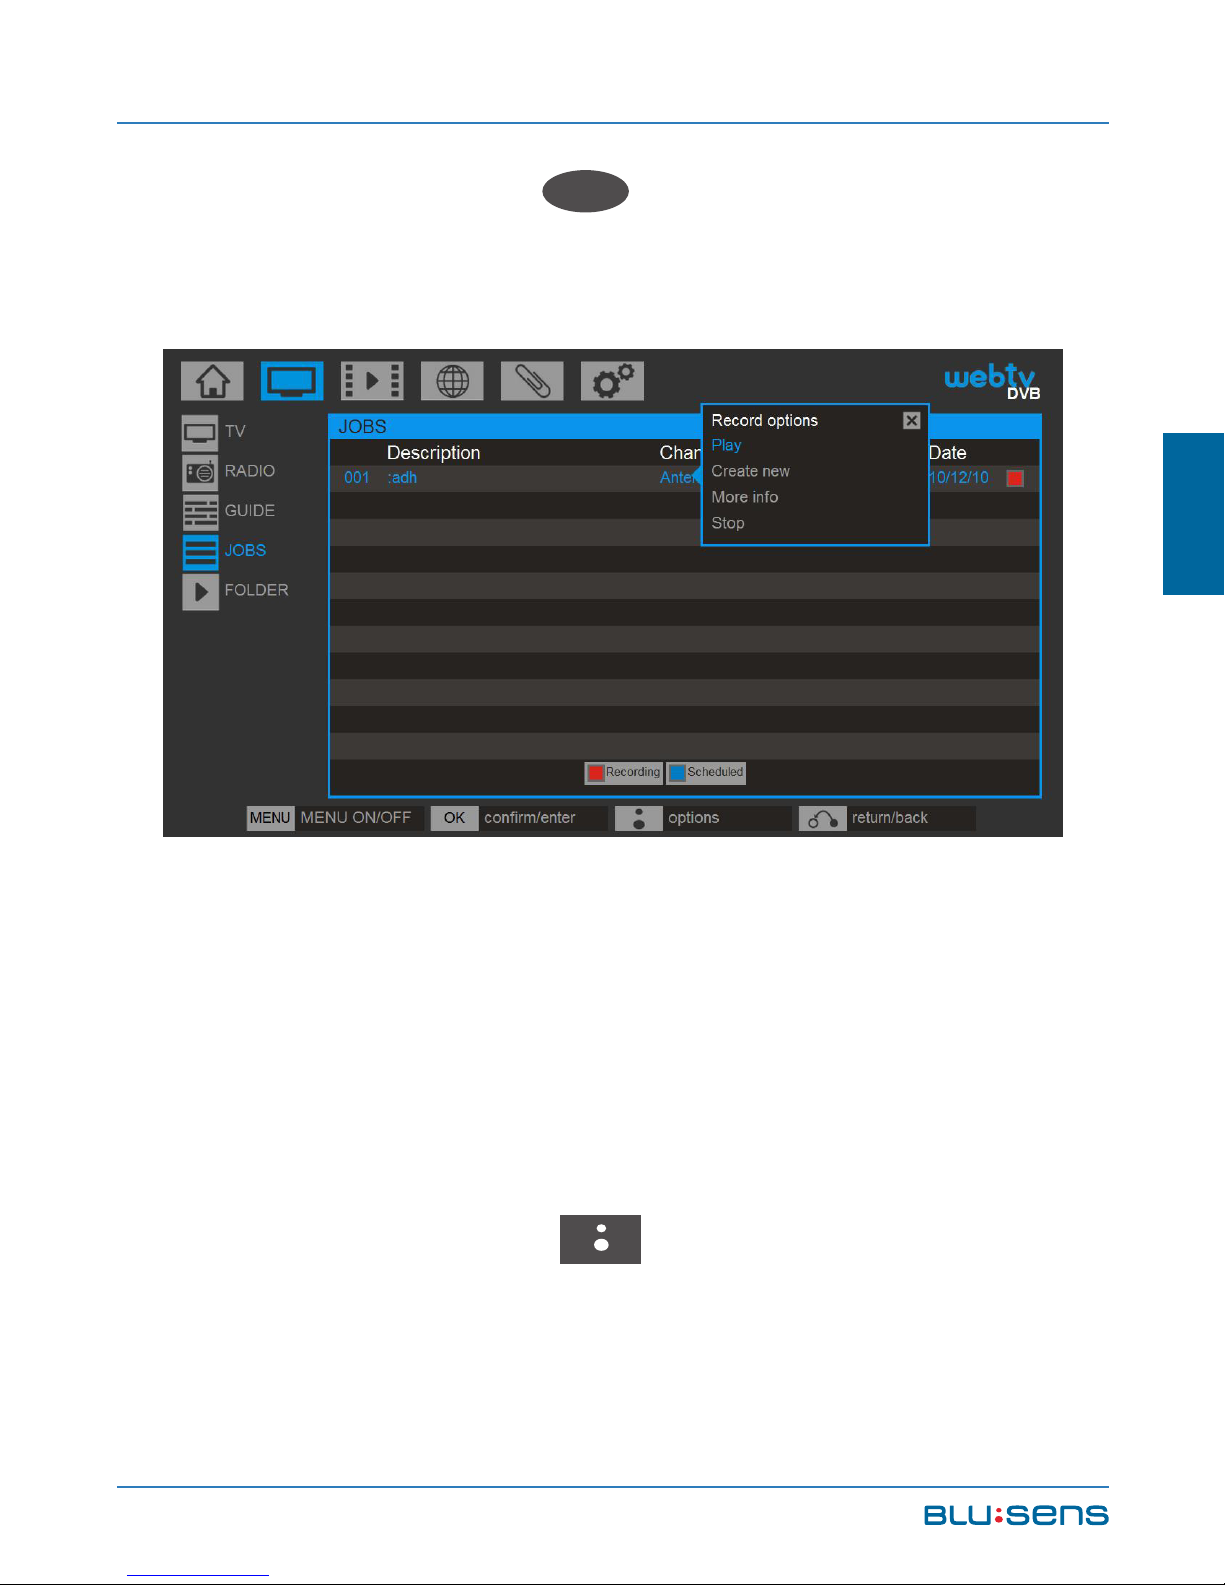
In the task list basic information about each task
and the status (recording, scheduled) will be displayed.
Press the BLUSENS button to display the
recording options:
Page 86

USER MANUAL
86
Play: (if the recording is in progress) lets you start
playback while the system continues recording.
Edit: (if the recording is not in progress) a screen
opens where you can modify all recording parameters,
such as channel, description, quality, recording hours,...
Create New: a screen opens to schedule a new
recording.
More Info: displays the task information.
Stop: (if the recording is in progress) stops the
recording and saves it to the hard disk. (if the recording
is not in progress) cancels the recording and removes
the recording from the task list.
NOTE: When you select Radio channels, you must
keep in mind that these are at the bottom of the list of
TV channels.
Page 87
Blusens Web:tv
87
ENGLISH
6.2.4.3.Playing a Recording
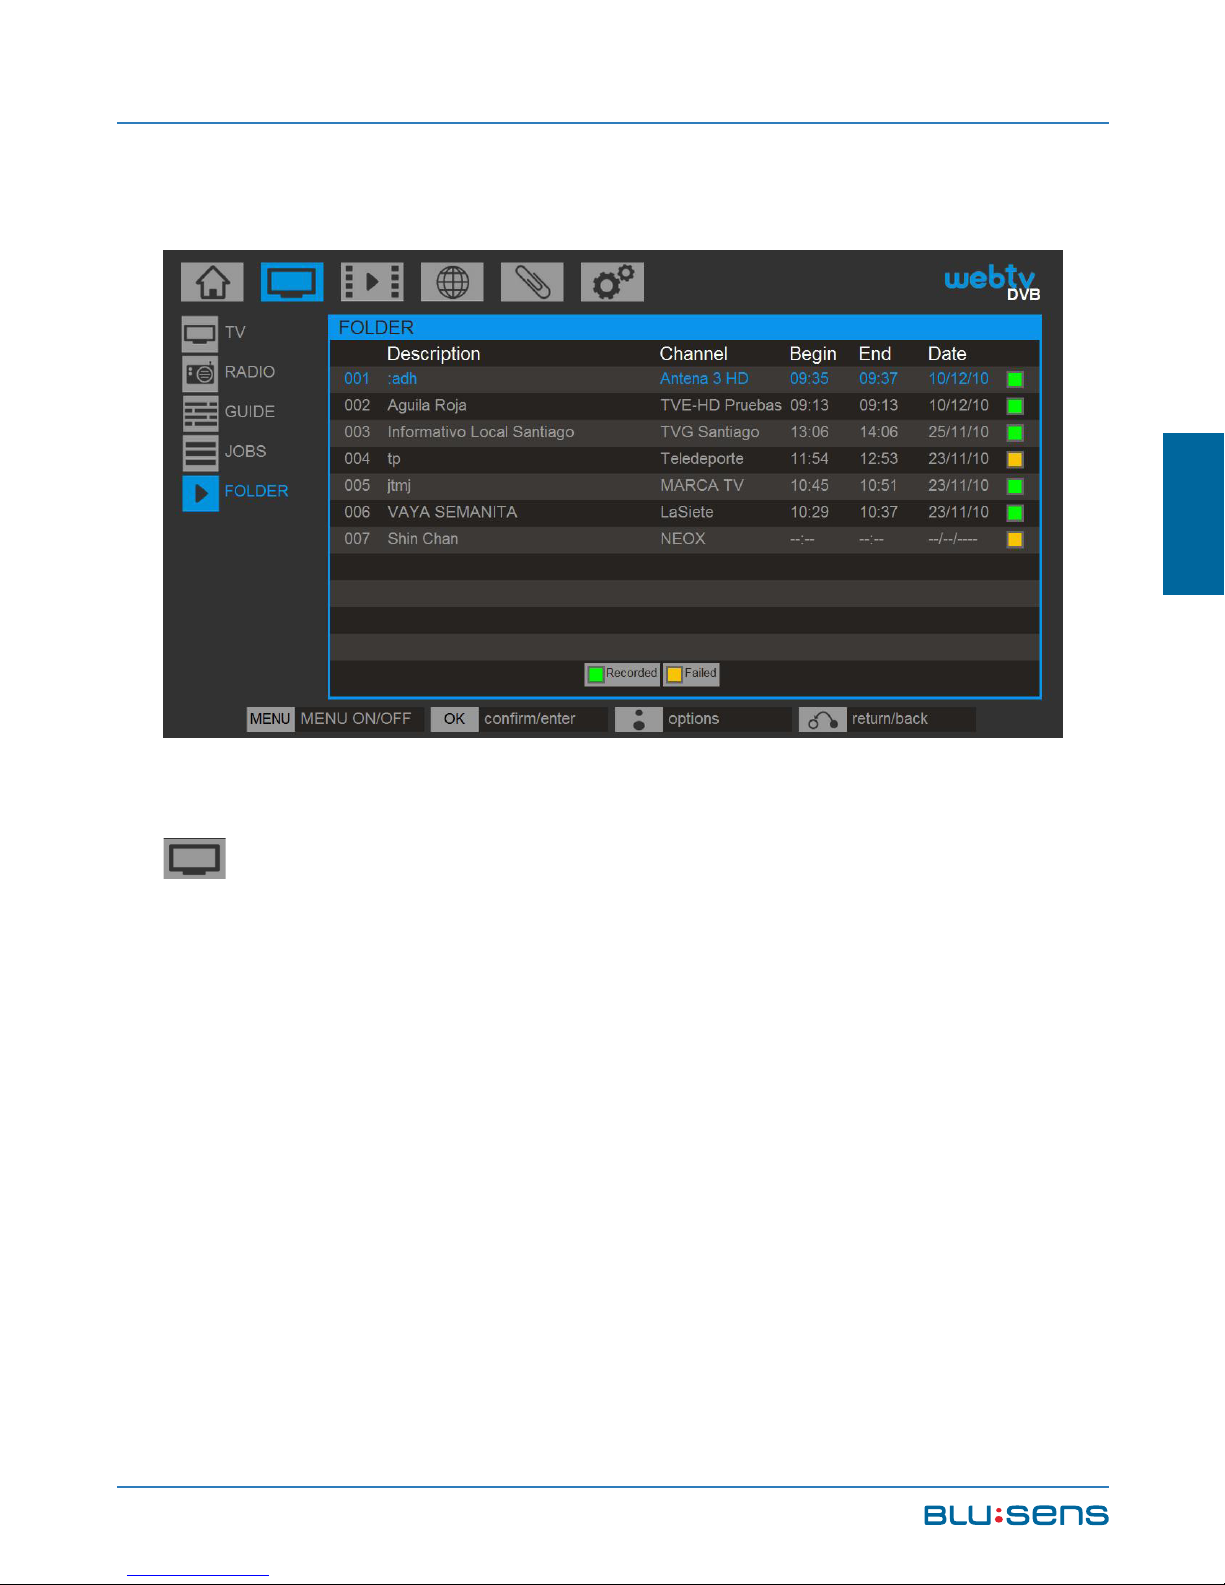
The recordings made are available in DTV/FOLDER
(Make sure you have connected the USB device in
which the recording took place). The list of recordings
shows basic data on each recording and an indicator
whether the recording was successful or if an error
occurred. Make sure you have connected the USB
device in which the recording took place.
Page 88
USER MANUAL
88
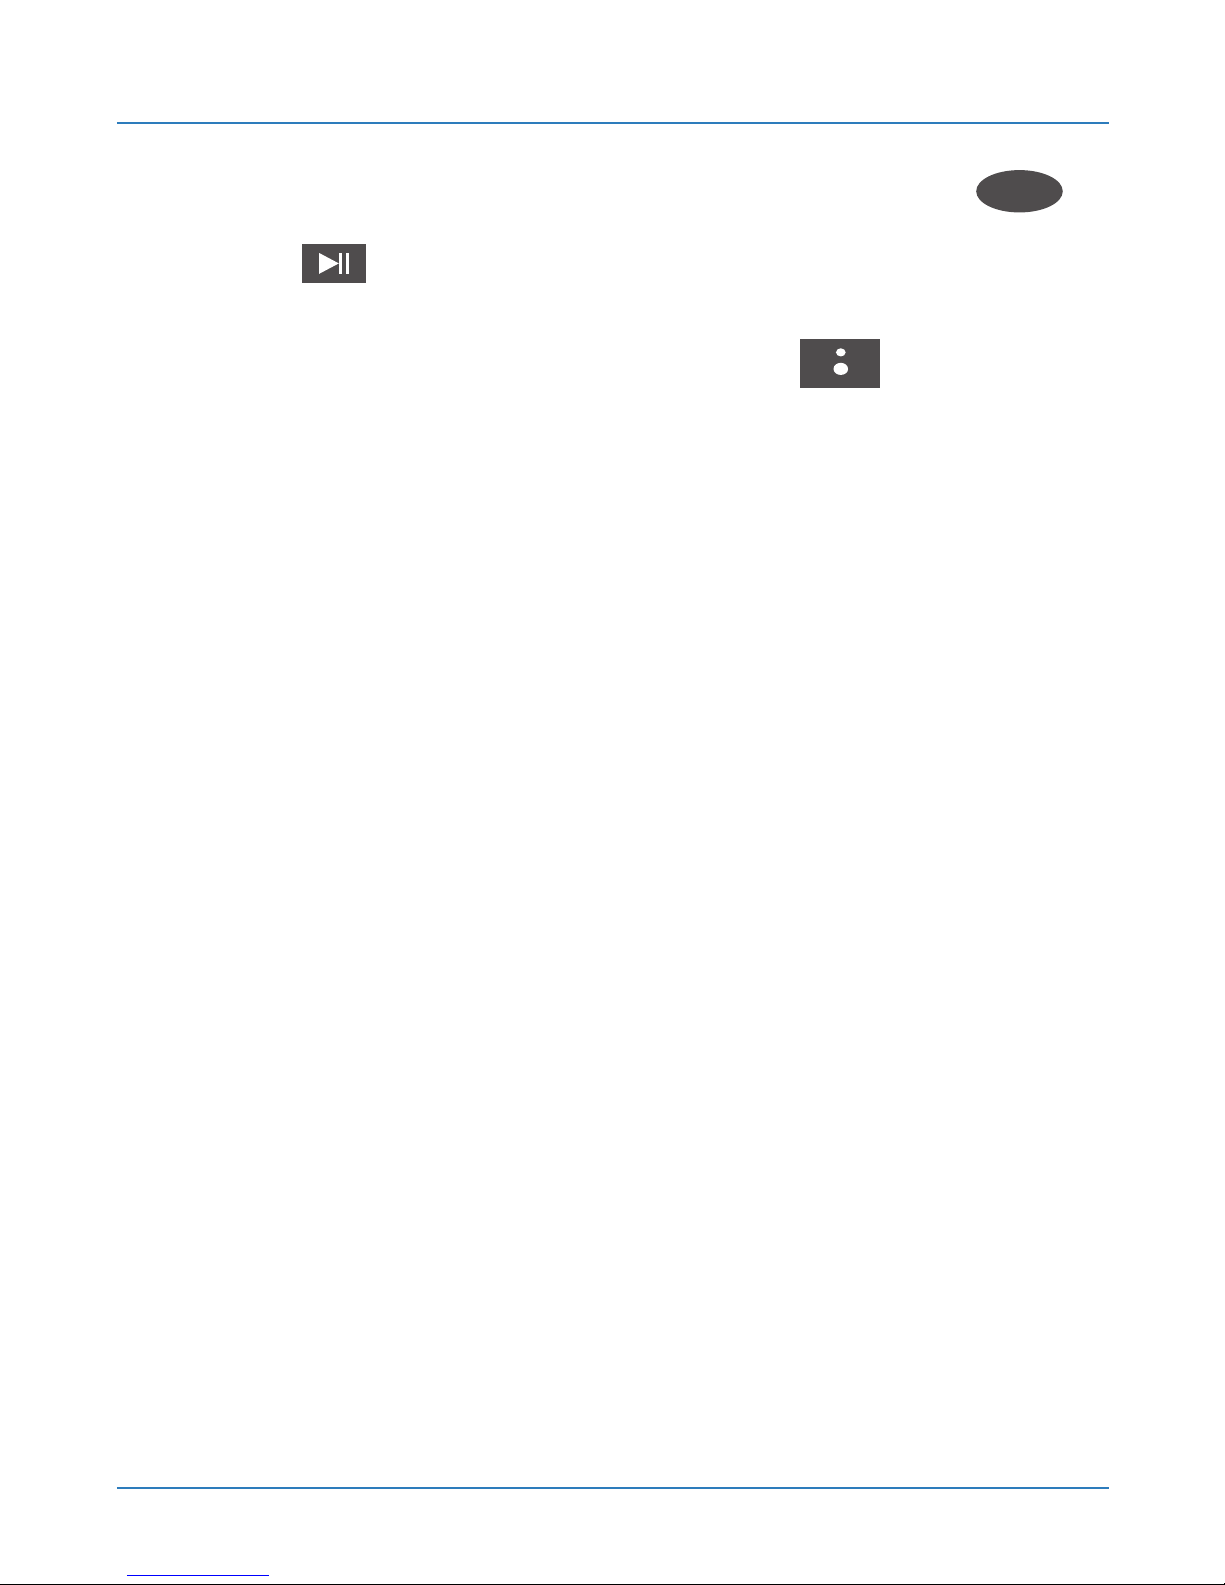
Select a recording from the list and press OK
OK
or PLAY to play the recording.
In the list of recordings press the to see the
options available for recording:
Play: plays the selected recording.
More Info: displays the information available for the
recording.
Delete: deletes the recording from the list and
erases it from the storage device.
NOTE: The recordings are automatically saved in
the “RECORDINGS” folder of your USB device.
Page 89
Blusens Web:tv
89
ENGLISH
7. MULTIMEDIA PLAYBACK
7.1. Audio Playback
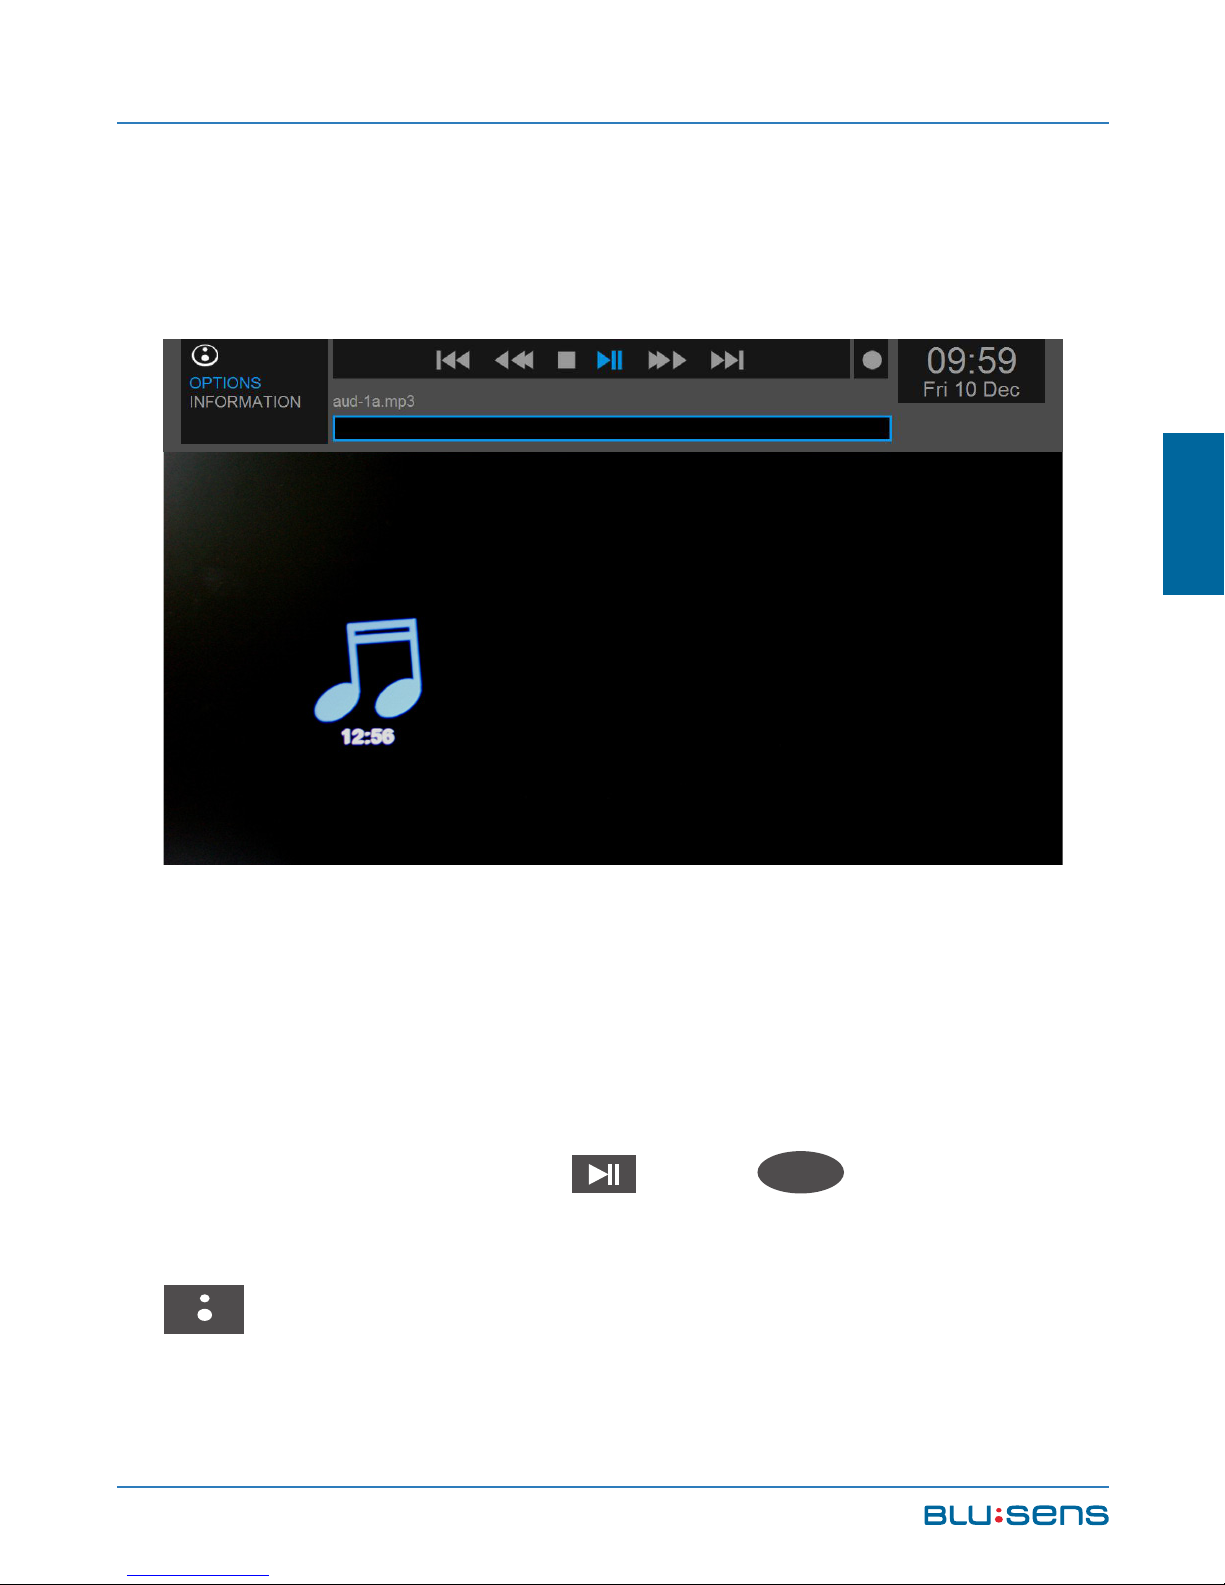
Your Web:tv lets you play audio files in many formats.
To play a file go to its location, either a USB disk (HOME
/ DISCS) or a local network device (HOME / LAN).
Browse through the device to find the desired file.
Select it and press Play or OK
OK
to play it. To
play the entire contents of a folder, select it, press the
button and select “Play Folder”.
Page 90
USER MANUAL
90
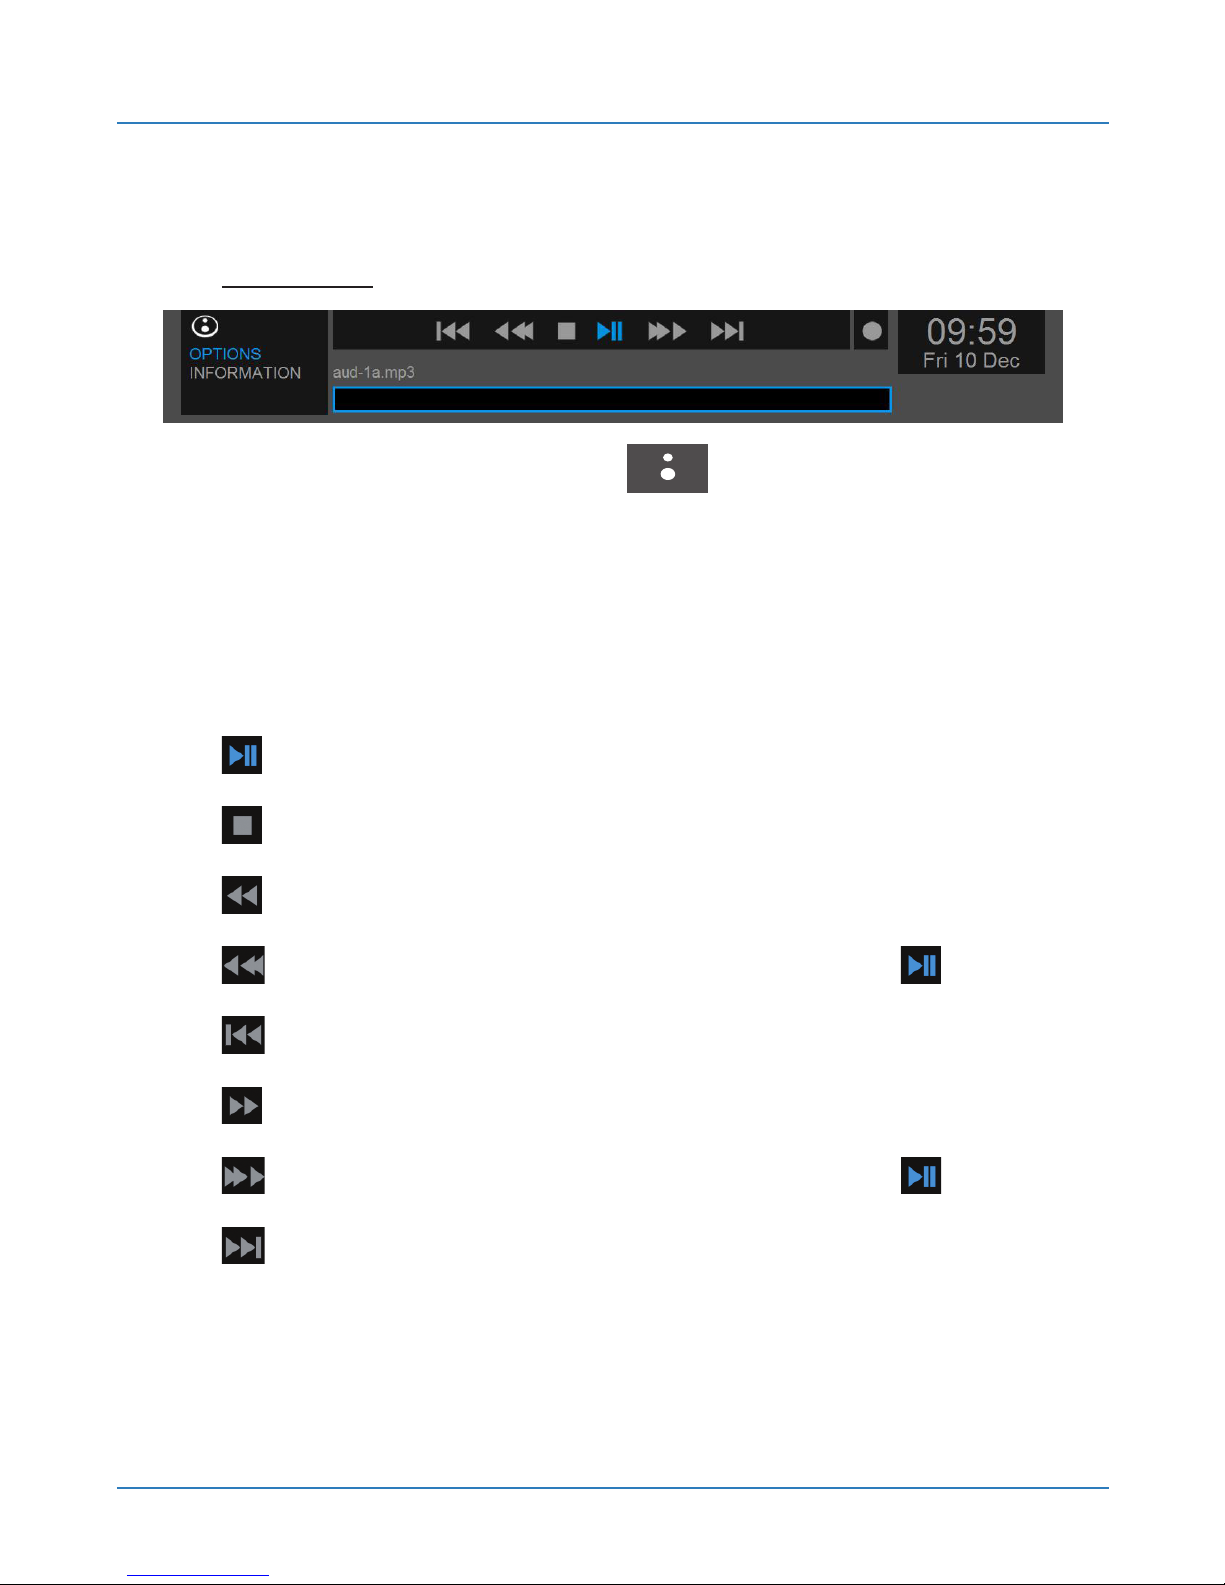
7.1.1. Shortcut menu
OPTIONS
Pressing the BLUSENS button while playing
an audio file can show / hide the shortcut menu from
which you can view all file information as well as
playback options.
PLAY / PAUSE. Starts and pauses playback.
STOP. Stops playback.
RW. Fast rewind.
RW. Fast rewind in progress bar. Press to play.
RW. Previous track.
FF. Fast forward.
FF. Fast forward in progress bar. Press to play.
FF. Next track.
Page 91
Blusens Web:tv
91
ENGLISH
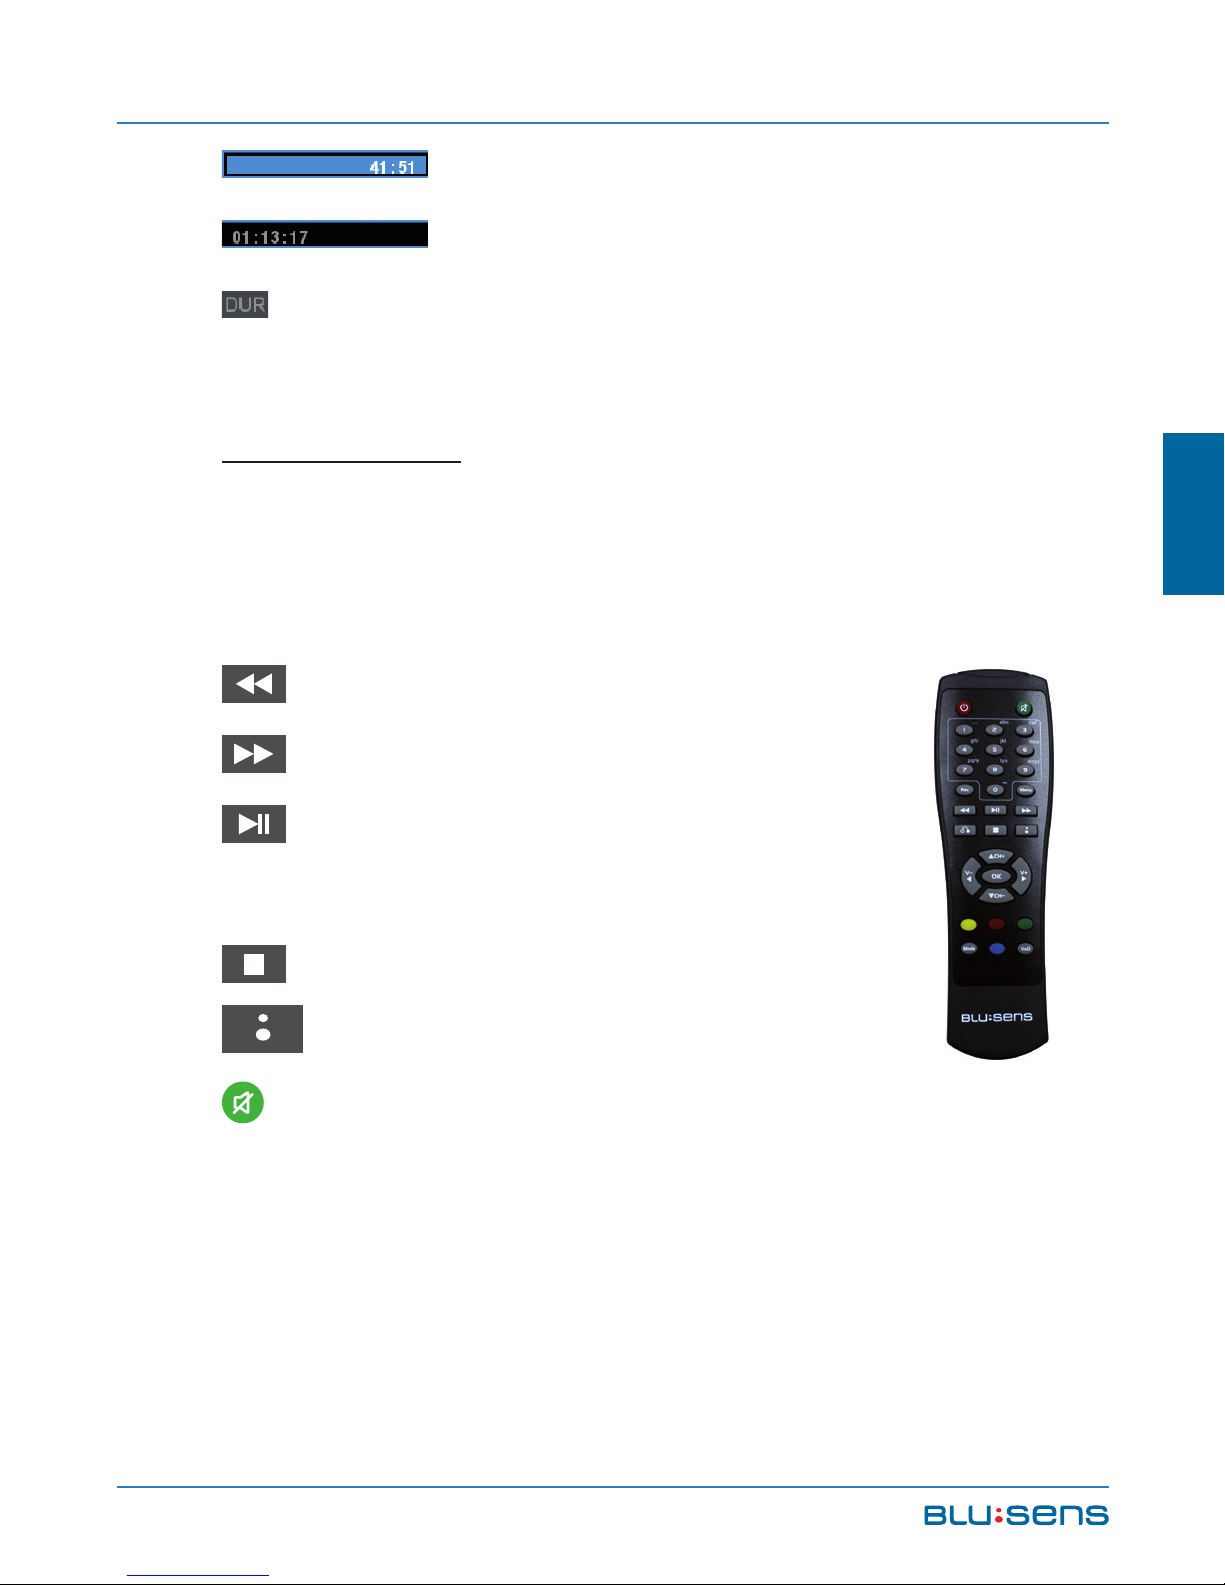
: Elapsed playback time.
: Remaining playback time.
DUR: Shows the total track length in the audio
file.
INFORMATION
Displays information about audio playback formats.
7.1.2. Remote Control
RW. Fast Rewind.
FF. Fast forward.
PLAY / PAUSE. Starts and pauses
playback.
STOP. Stops playback.
: Shows/Hides the shortcut menu
MUTE: Mutes the device.
Page 92
USER MANUAL
92
V+: Increase volume.
V-: Decrease volume.
CH+: Next file.
CH-: Previous file.
7.2. Video Playback
Your Web:tv lets you play video files in many formats.
To play a file go to its location, either a USB disk
(HOME / DISCS) or a local network device (HOME /
LAN). Browse through the device to find the desired file.
Page 93
Blusens Web:tv
93
ENGLISH
Select it and press Play or OK
OK
to play it. To
play the entire contents of a folder, select it, press the
button and select “Play Folder”.
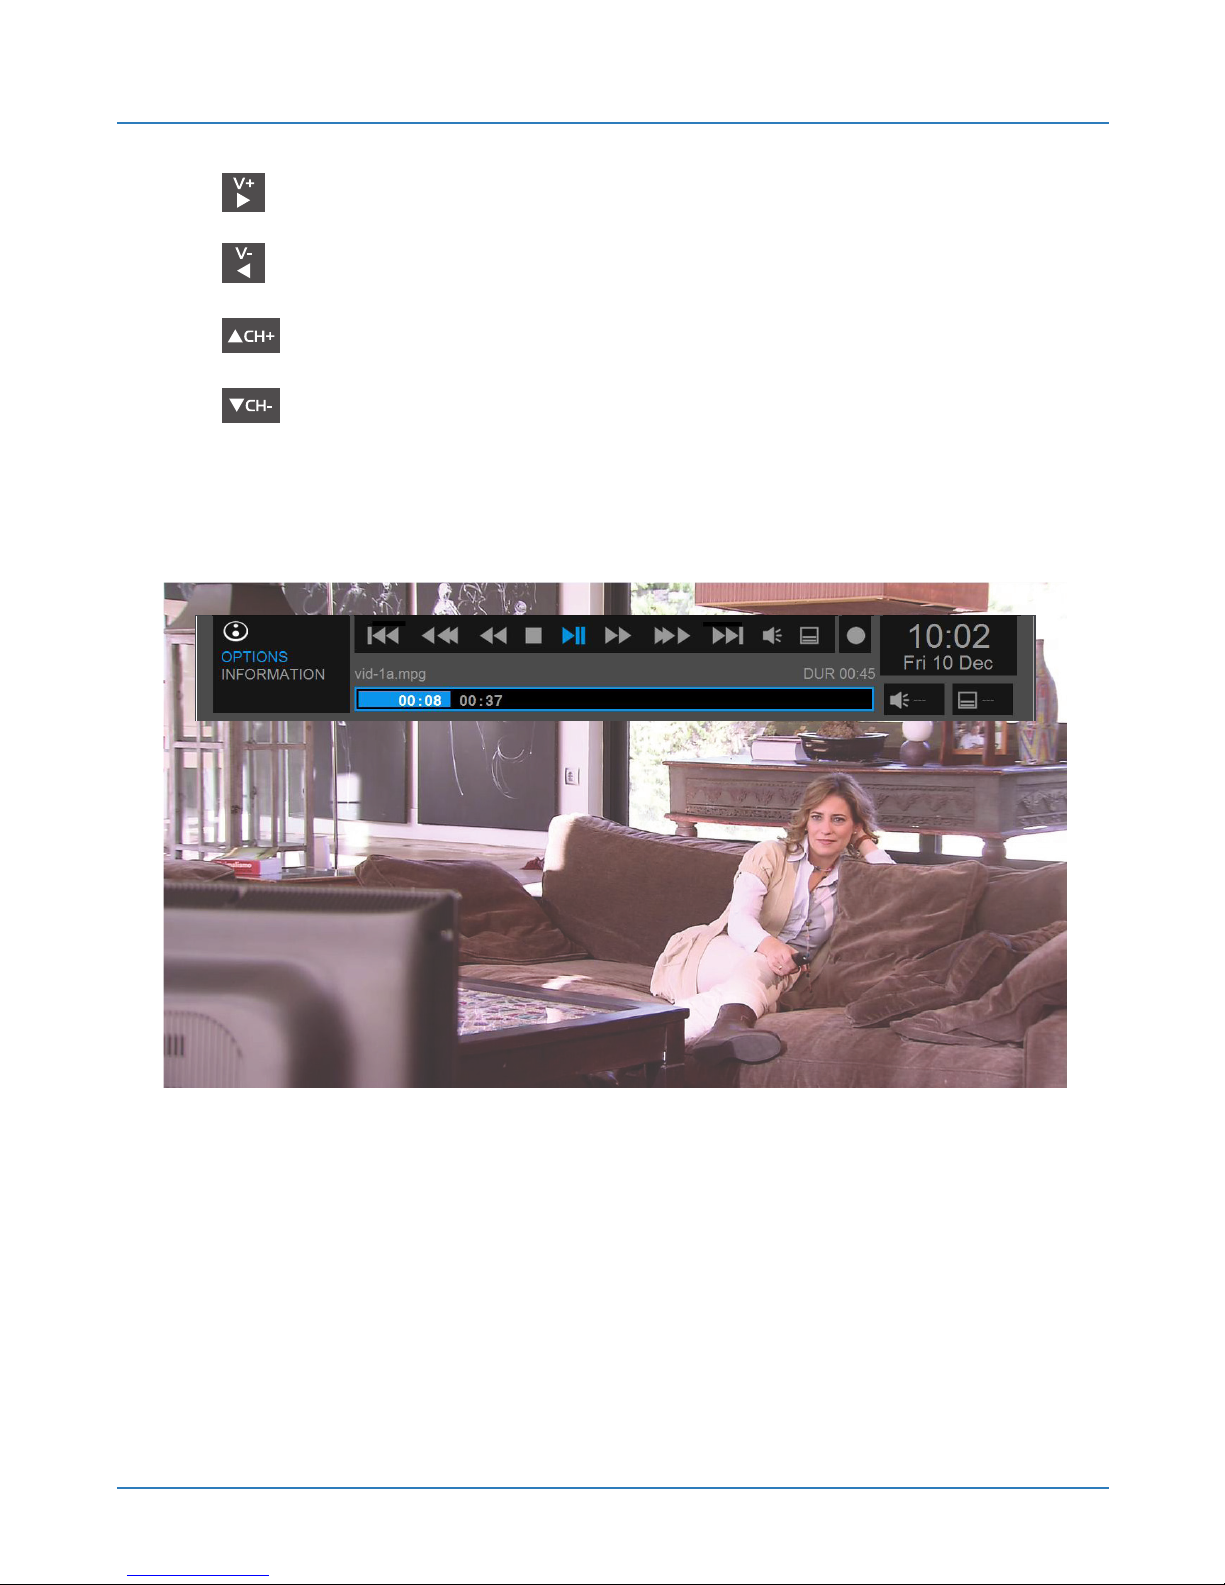
7.2.1. Shortcut menu
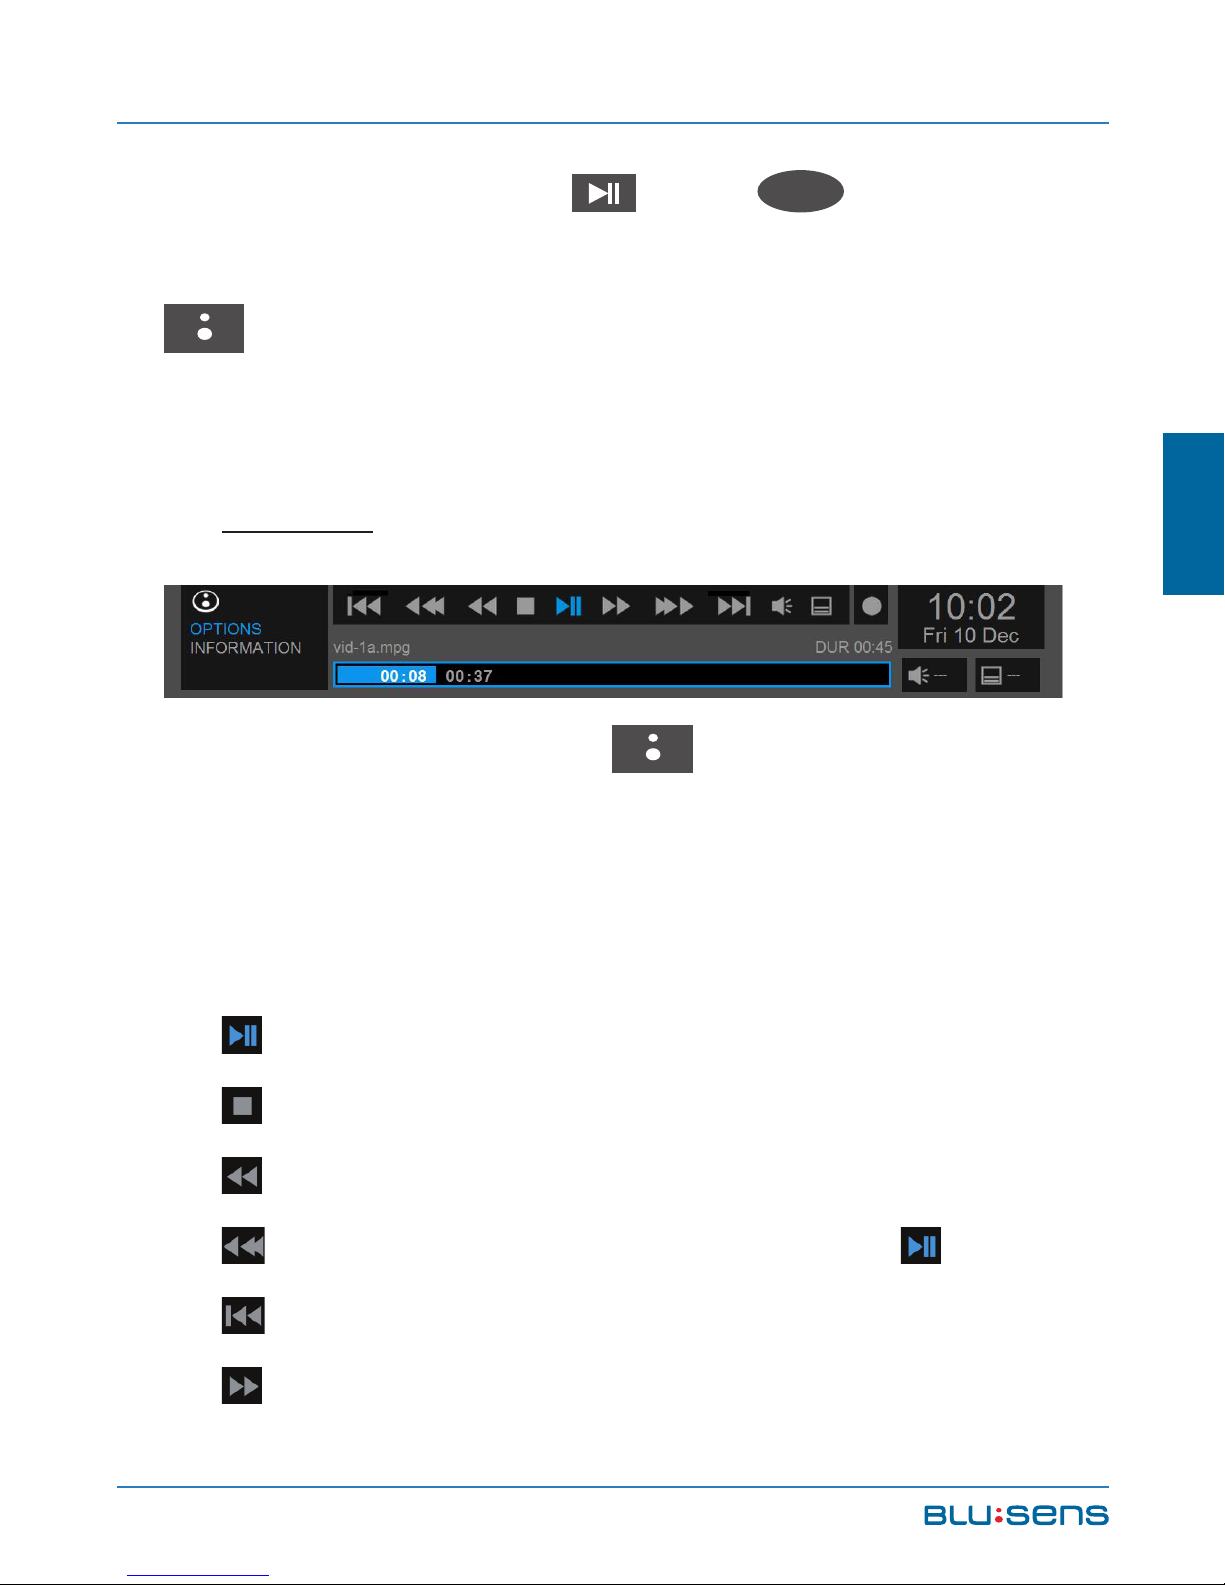
OPTIONS
Pressing the BLUSENS button while playing a
video file can show / hide the shortcut menu from which
you can view all file information as well as playback
options.
PLAY / PAUSE. Starts and pauses playback.
STOP. Stops playback.
RW. Fast rewind.
RW. Fast rewind in progress bar. Press to play.
RW. Previous track.
FF. Fast forward.
Page 94
USER MANUAL
94
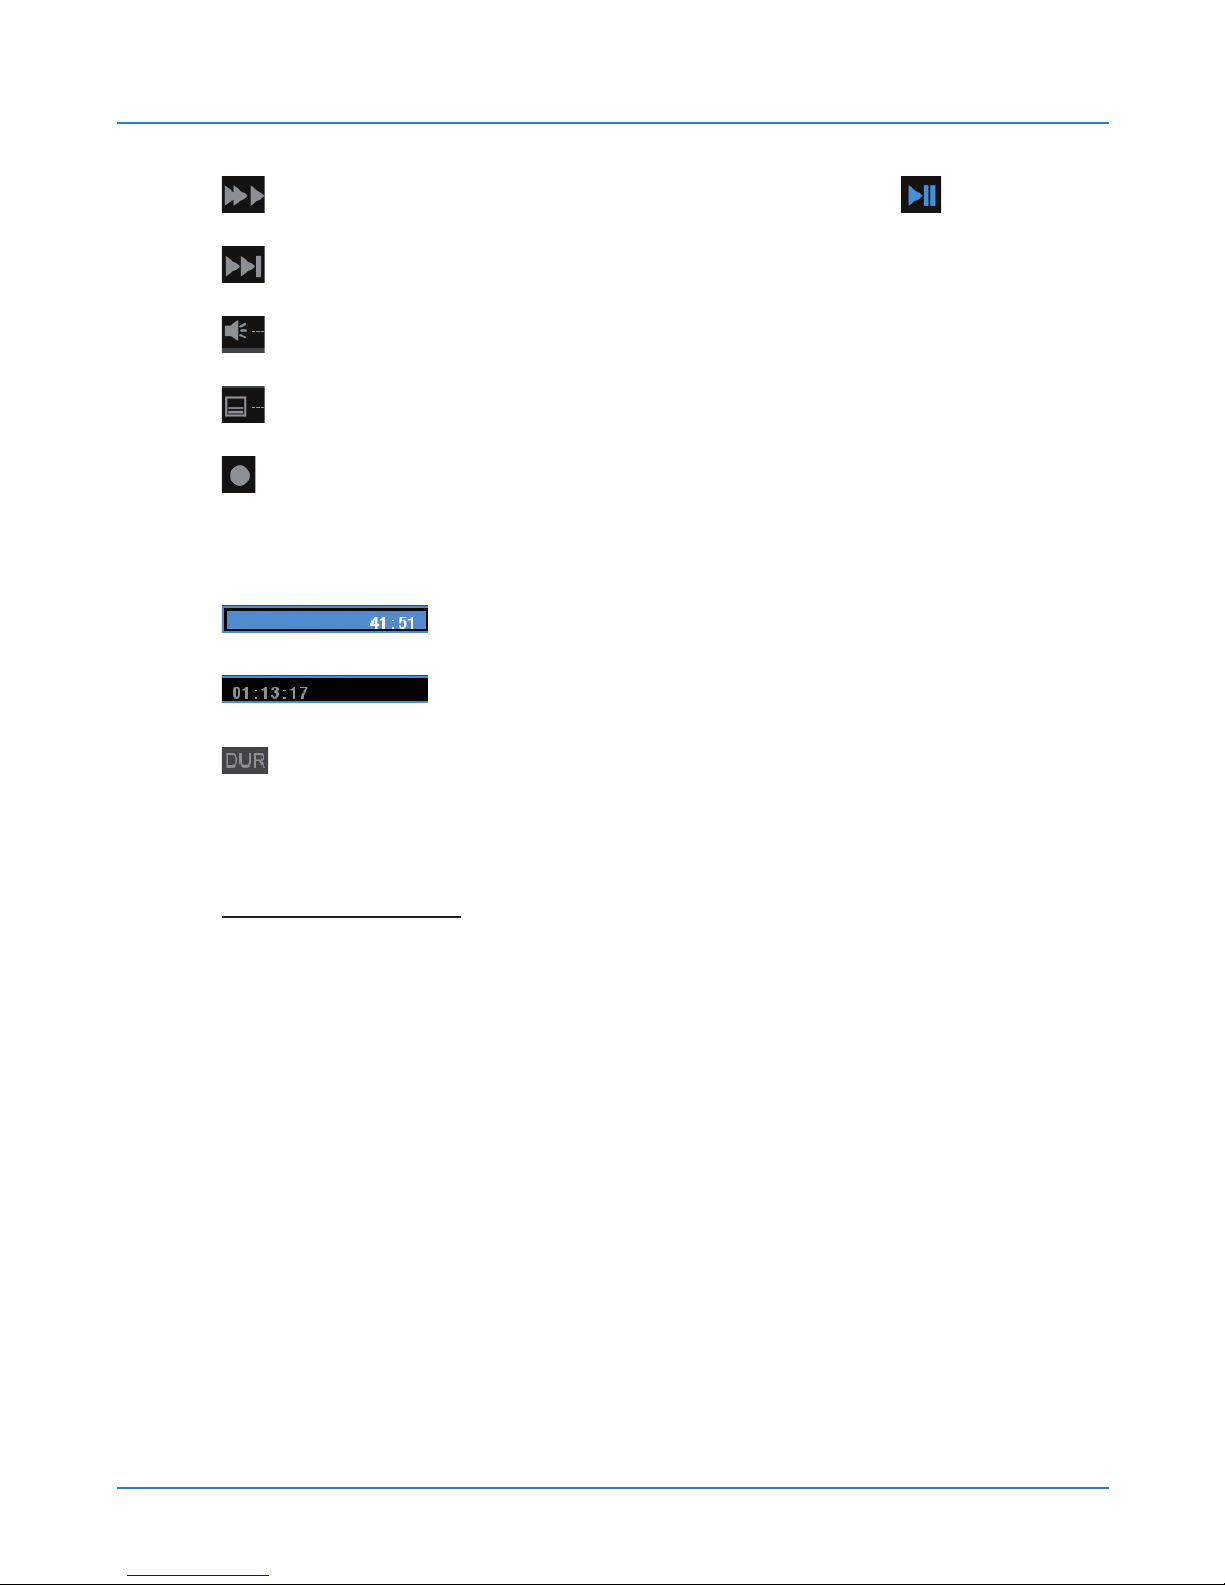
FF. Fast forward in progress bar. Press to play.
FF. Next track.
LANGUAGES. Changes the playback language.
SUB: Enables playback subtitles.
. Indicates whether recording is active or not. If
activated the indicator is in Red.
: Elapsed playback time.
: Remaining playback time.
DUR: Shows the total track length in the audio
file.
INFORMATION
Displays information about audio and video playback
formats.
Page 95
Blusens Web:tv
95
ENGLISH
7.2.2. Remote Control
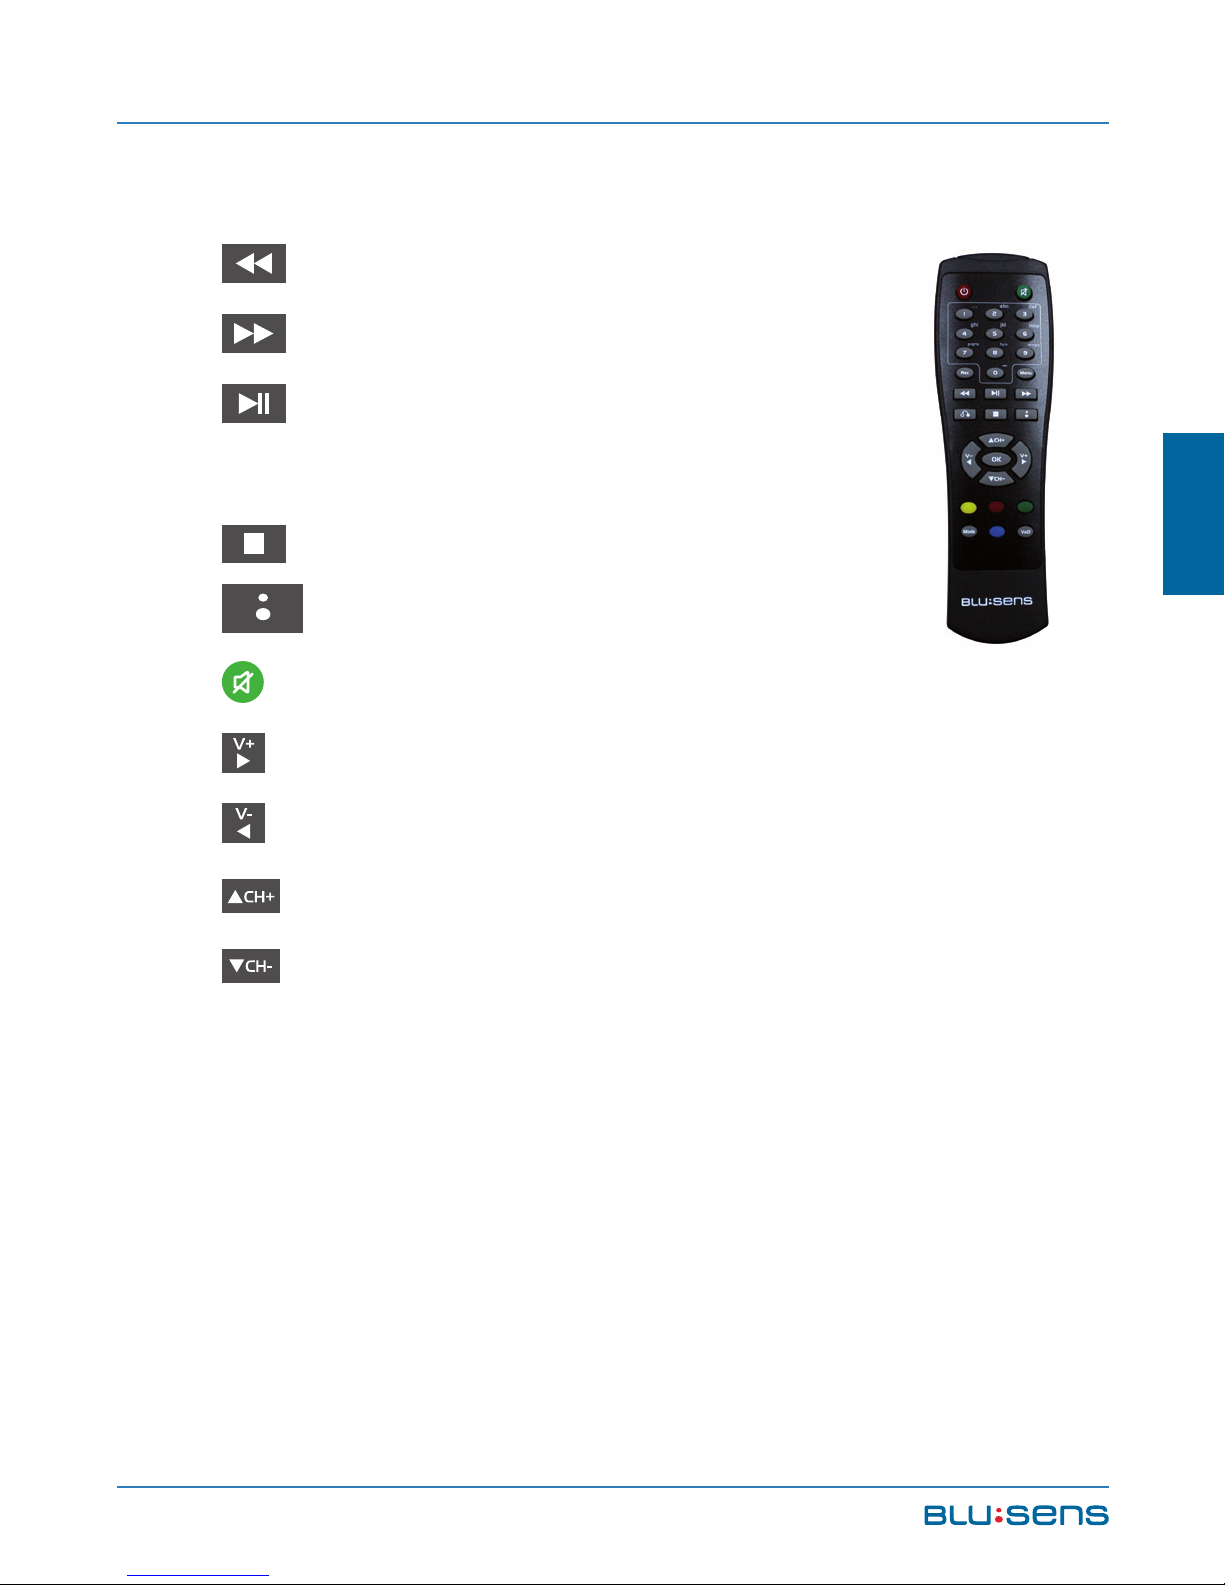
RW. Fast Rewind.
FF. Fast forward.
PLAY / PAUSE. Starts and pauses
playback.
STOP. Stops playback.
: Shows/Hides the shortcut menu
MUTE: Mutes the device.
V+: Increase volume.
V-: Decrease volume.
CH+: Next file.
CH-: Previous file.
Page 96
USER MANUAL
96
7.3. Viewing Photos
Your Web:tv lets you view image files in many
formats. To view a file go to its location, either a USB
disk (HOME / DISCS) or a local network device (HOME /
LAN). Browse through the device to find the desired file.
Select it and press Play or OK
OK
to view it. To
view the entire contents of a folder, select it, press the
button and select “Play Folder”.
Page 97
Blusens Web:tv
97
ENGLISH
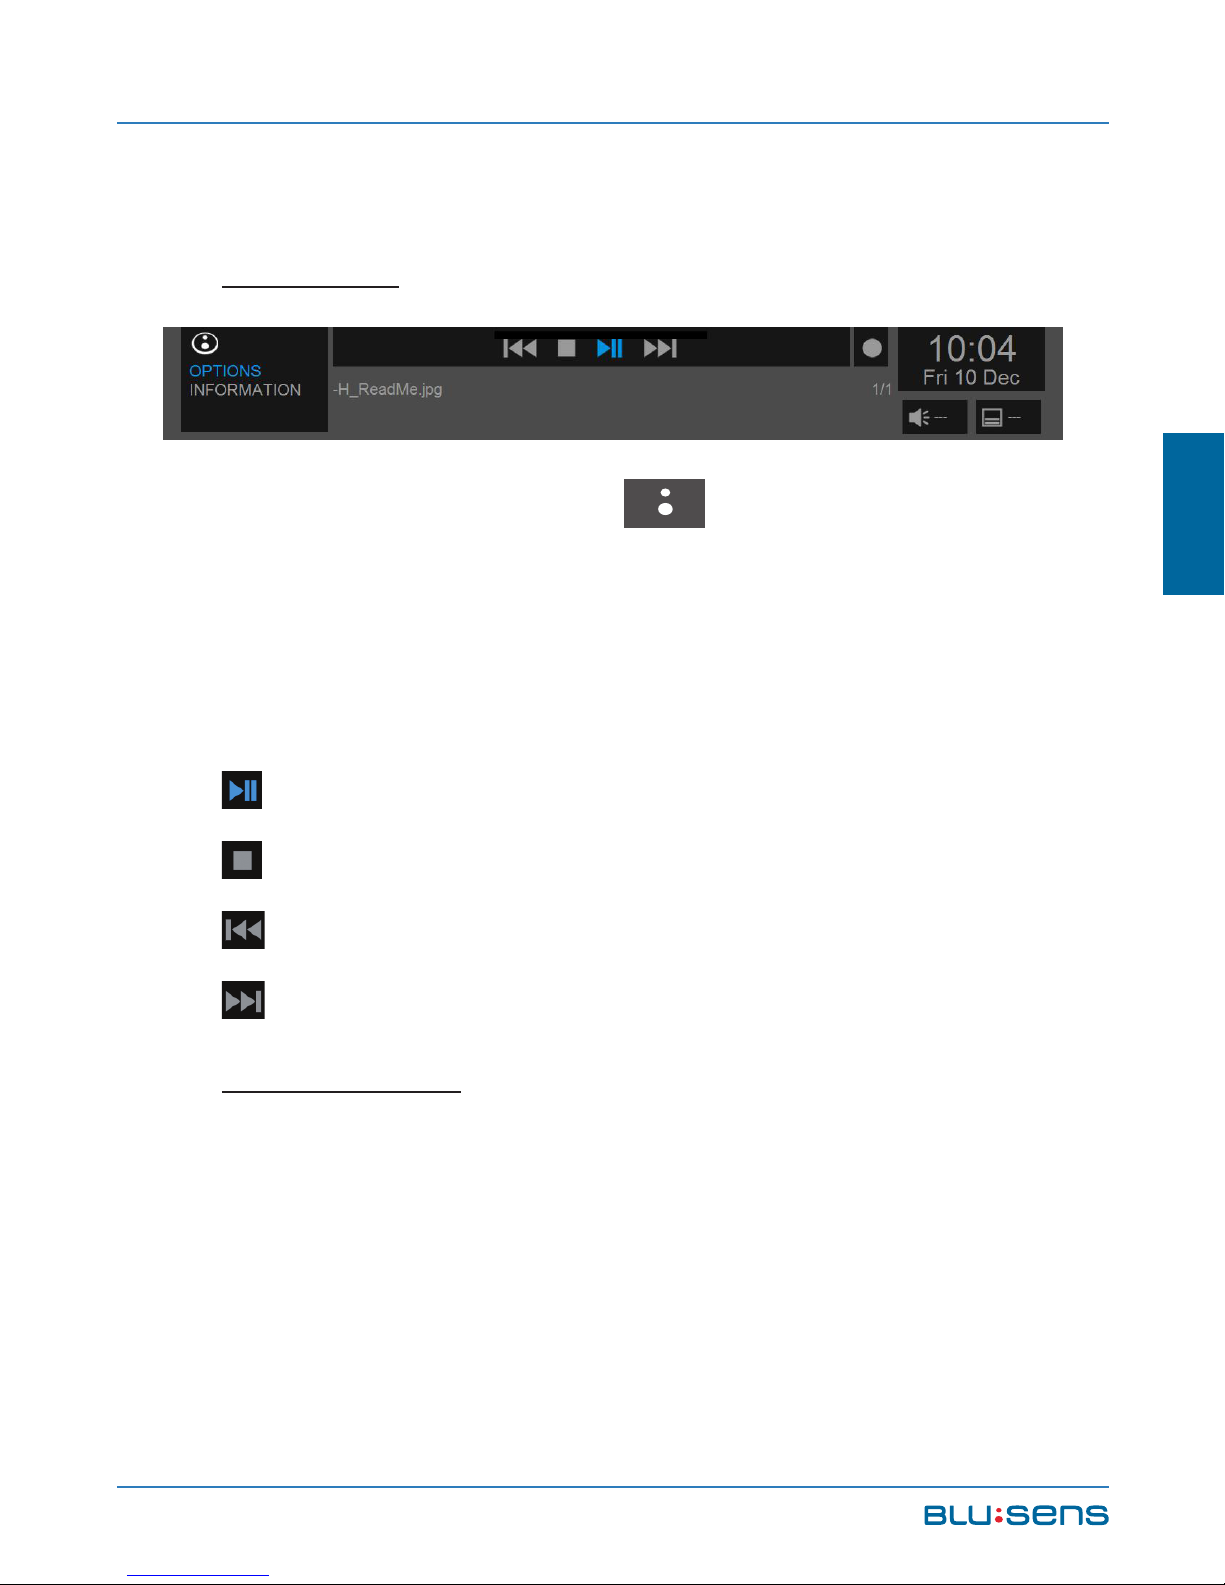
7.3.1. Menu Contextual
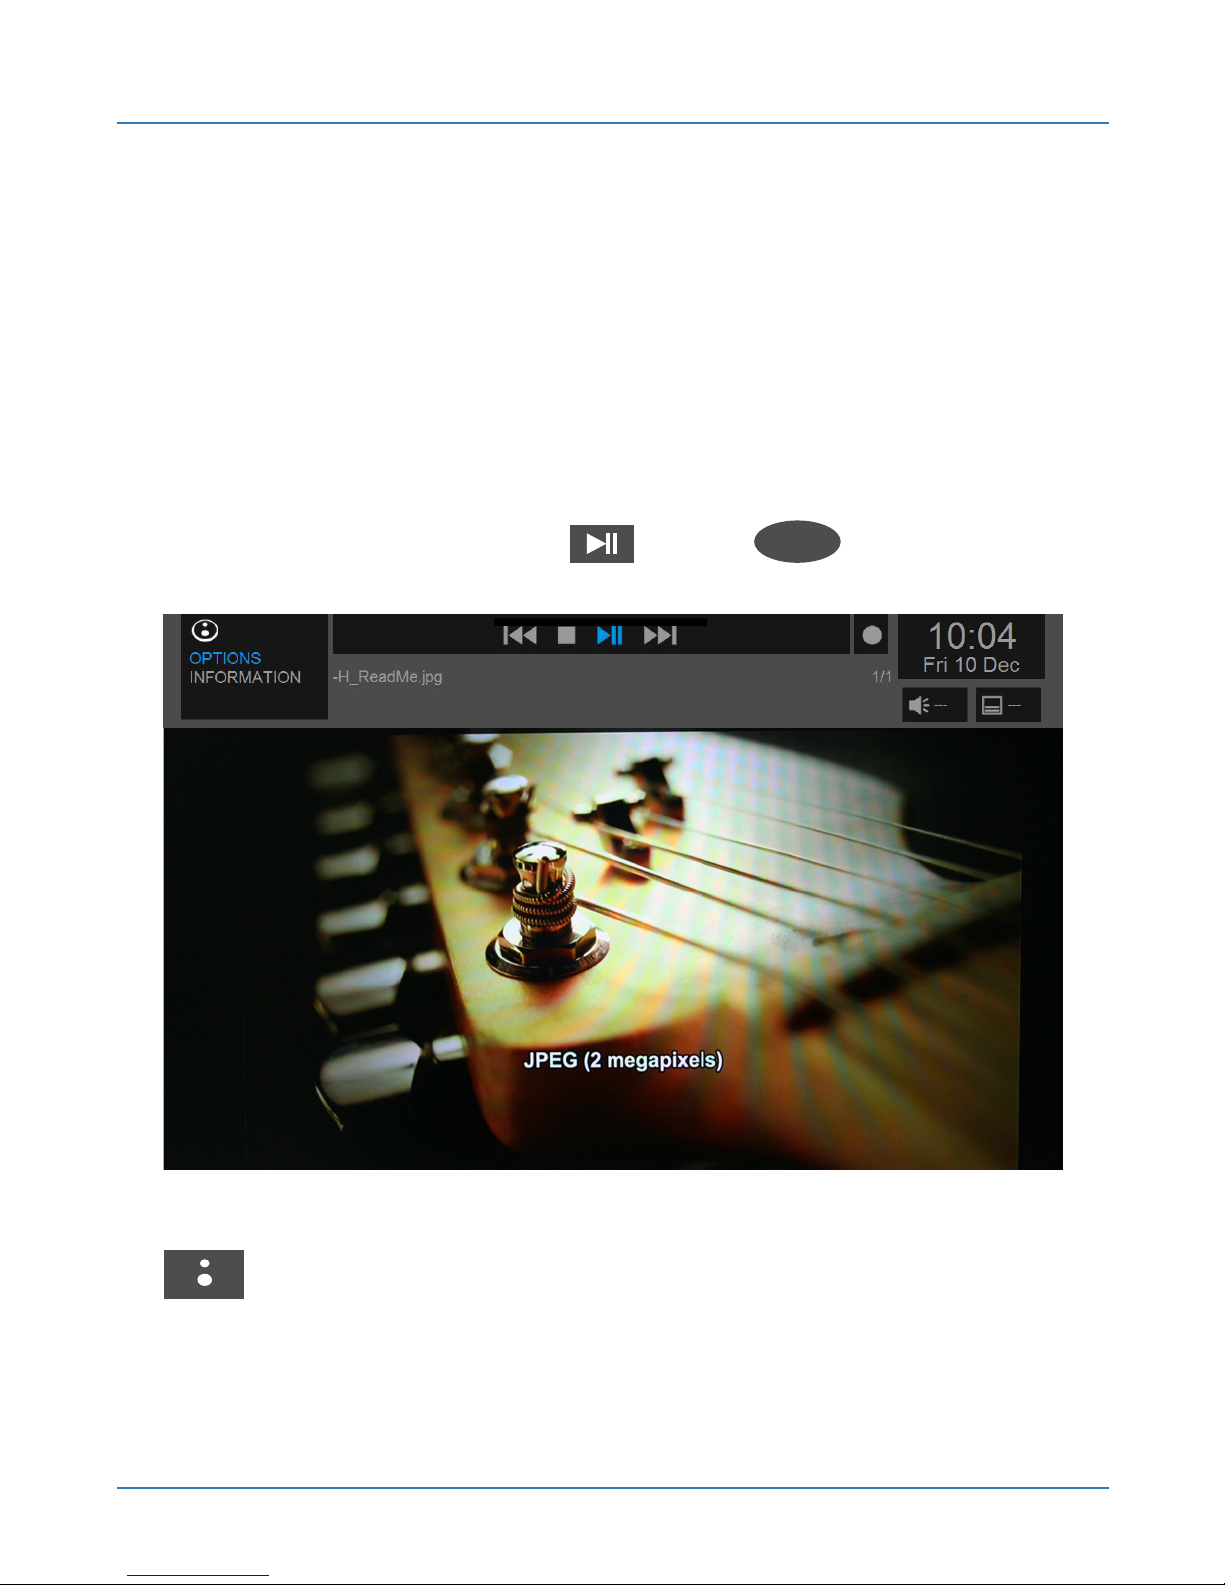
OPCIONES
Pressing the BLUSENS button while viewing
an image file can show / hide the shortcut menu from
which you can view all file information as well as
playback options.
PLAY / PAUSE. Starts and pauses the display.
STOP. Stops the display.
RW. Previous image.
FF. Next image.
INFORMATION
Displays information about image formats and size.
Page 98
USER MANUAL
98
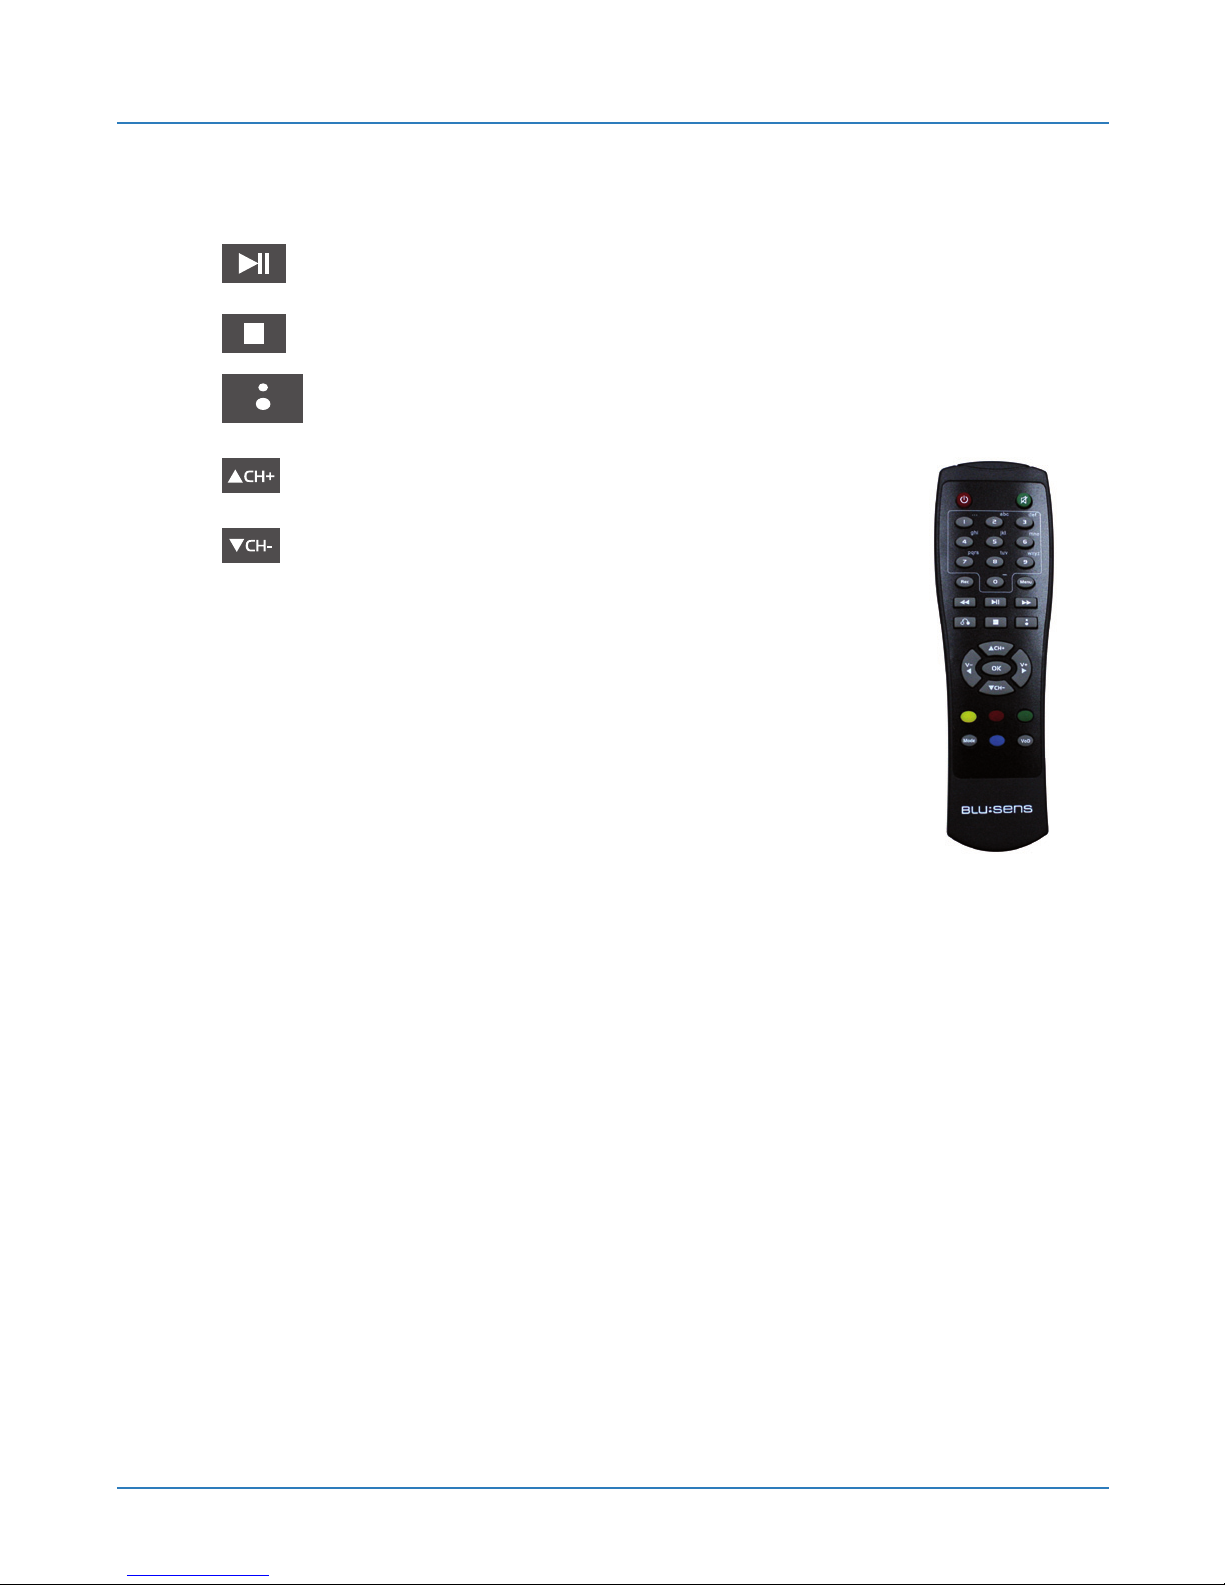
7.3.2. Remote Control
PLAY / PAUSE. Starts and pauses the display.
STOP. Stops the display.
: Shows/Hides the shortcut menu
CH+: Next file.
CH-: Previous file.
Page 99
Blusens Web:tv
99
ENGLISH
8. USB
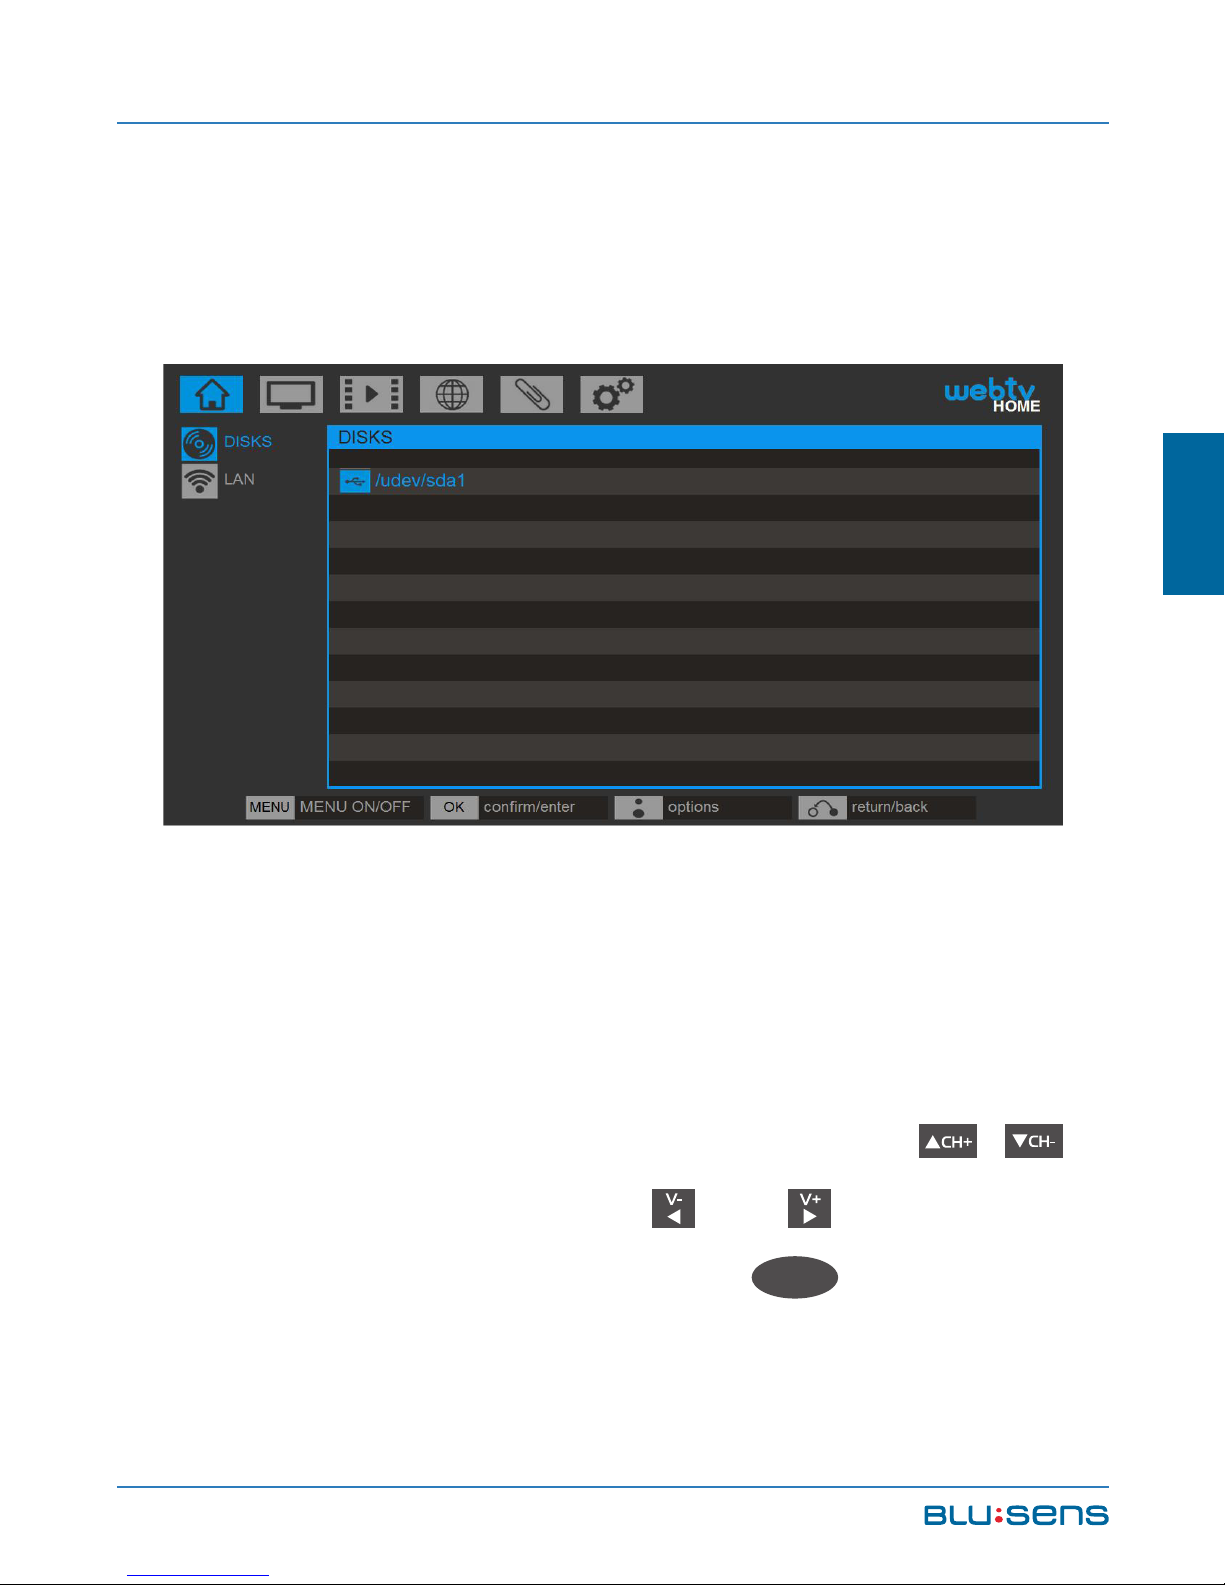
8.1. Access, Navigation, Options
Your Web:tv allows you to connect storage devices
such as pendrives, hard disks, CD/DVD readers (read
only), etc... to front and rear USB ports.
To access the devices connected to the USB ports of
your Web:tv go to HOME/DISCS. Press the ,
buttons to navigate through and folders or to
enter and exit the directories, OK
OK
to access or
Page 100
USER MANUAL
100
play files, select to go up a level or to return
directly to the list of disks.
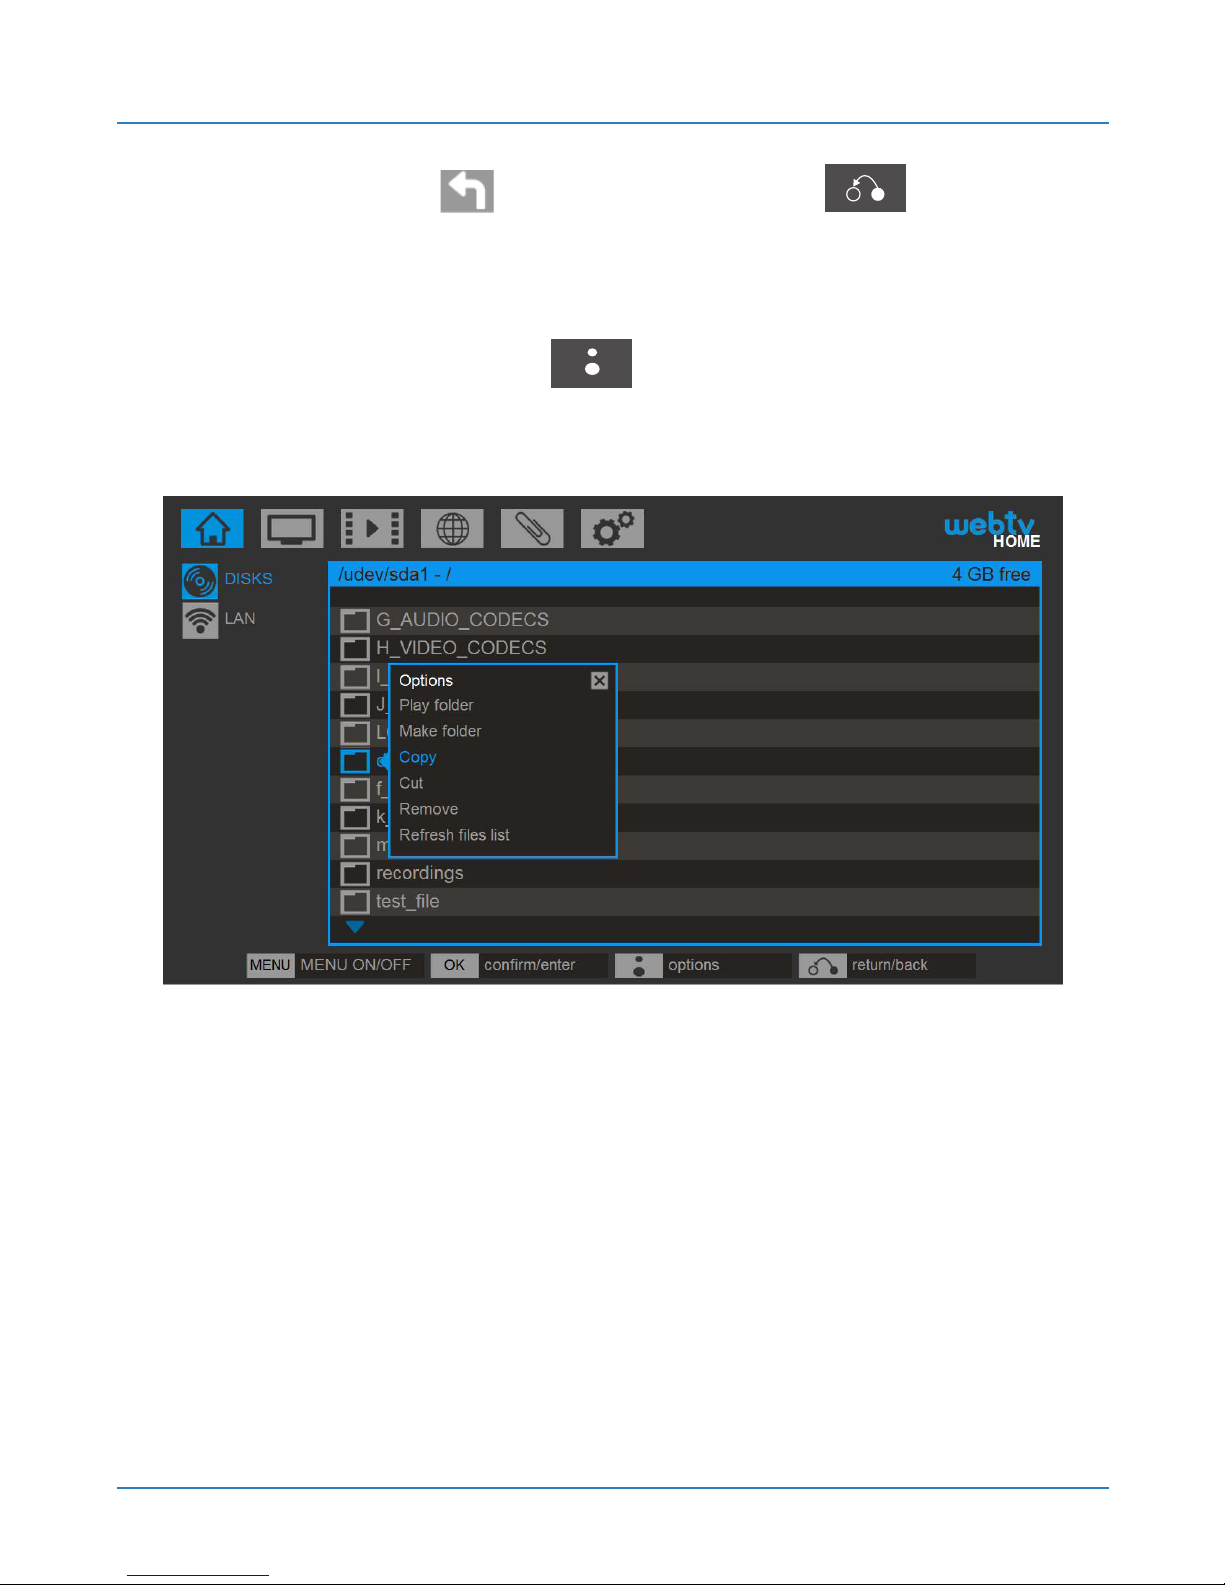
Press the BLUSENS button to view the possible
options:
Play folder: Selects the whole folder and start a
playlist of all your files.
Create folder: Creates a new folder on the USB disk.
Copy: Copies the file keeping it in the original
location.
 Loading...