

| 100 Watts Tube Guitar Amp designed by Thomas Blug
™
AMP1
®
BluGuitar
MANUAL

2
3
™
TABLE OF CONTENTS
Introduction 4-11
Setups
AmpHead 12
StompAmp 13
Recording 14
Programmable Guitar System 15
AMP1+ REMOTE1+ LOOPERKIT = fully programmable professional guitar system 16-17
Control Panel 18-19
Inputs 20-21
CUSTOM CONTROL 22-23
Nanotube, Power Amp and Speaker 24-25
Recording Out 26-27
AMP1’s Channels
Clean Channel 28
Vintage 29
Classic 30
Modern 31
Tone Control 32
Boost, Reverb, Noisegate 33
FX Loop 34-35
FOOTSWITCH / MIDI1 / REMOTE & MIDI 36-37
REMOTE1 & your favourite sounds on the foot pedals 38-39
PowerSoak, Accessories 40-41
Academy Of Tone
Your Sound in the Band 42-43
Mastering Different Sound 44-45
Home & Recording 46-47
Troubleshooting and Maintenance 48-49
Safety Instructions 50-52
Technical Data 53
AMP1 Family 54-55
™
I HAVE A DREAM
Dear Guitar buddy,
Many congratulations on your
™
AMP1
is an extraordinary amplifier, and its back story is just as unusual…
AMP1
™
purchase!
… I had a dream. This dream has come true,
and you’re holding it in your hand right now.
I’ve always dreamed of an amp that can fulfil all my professional requirements onstage and
in the studio, and that at the same time is so small and light I can always have it with me in
my gigbag. The powerful tones of guitarists like Jimi Hendrix, Jeff Beck and Ritchie Blackmore
have inspired and influenced me. As a professional guitarist, sound designer and co-develop-
er of numerous guitar amps, I feel committed to continuing these powerful tonal traditions
that are naturally assertive and full of character. As well as my own trademark sounds, my
work requires me to have a wide tonal palette – from jazz to metal – and all in professional
quality. My dream was to put the immense power and character of vintage tube amplifiers
into one small package that would fit in your glove compartment or gigbag – without com-
promising on the tones. Sounds like Mission Impossible!
My dream amp should suit any guitarist, whether he or she plays country, blues or heavy
metal. It should also suit everyone from purists to full-on sound geeks, without weighing
them down with unnecessary features, but also leaving all the vital functions intact!

4
5
™
TUBEAMP EVOLUTION
1950s and 60s
The main function of the first tube amps in the 50s was to get guitars heard over
bands and orchestras. When distorted guitar tones were at last discovered in the
60s, this radical stylistic device paved the way for new genres like rock. In those
days, before the birth of the PA system, the only source of sound for concert audiences came from the onstage amps themselves. Because of this, volume was the
key feature of the 60s tube amp.
1970s and 80s
In the 70s and 80s, guitarists demanded more and more features from their amps.
Multiple channels and an effects loop became the new amp standard. The newly
emerging digital technology brought programmable amps into the marketplace for
the first time. However, a massive flood of additional features meant that before
long, hardly anyone was able to make good use of them.
1990s
Seeing as the first digital modelling amps offered a bunch of presets, but couldn’t
convince tonally, the 90s saw a return back to the true virtues of the tube amp.
Traditional build types – like Plexi or Tweed – experienced a renaissance as players
once again expressed the desire for more individual tones. Some classic amp models
were upgraded with MIDI interfaces to be more flexible.
Since 2000
Since the turn of the century, a clear trend towards smaller, more portable amps
has appeared – seeing as not every guitarist wants to have to take a van to the gig.
However, these so-called “Lunchbox Amps” are often limited to just one sound.
Should a genuinely clean or heavy sound be desired, these small specialist amps
are often lacking in headroom, dynamics, tone and assertiveness. While 30 watts
may be enough for a living room, they quickly reach their limits when playing on big
stages, at open air gigs, or even in the practice room. The sound becomes “muddy”
and can’t fill the space. Sometimes you just need the power reserves of a 100-watt
amp; it’s just that no one wants to lug these heavy boxes around nowadays.
Powerful All-Tube Amps
Big amps want to be played loud, though, but in many situations, they’re just too
loud, and clog up the stage sound. Everyone – the crowd, the soundman, and
the band – ends up being unhappy with the results. Despite this, many guitarists
don’t want to go without the fat, warm sound of a driven tube amp. They buy into
the purist solution of a full-tube amp with PowerSoak. A PowerSoak enables the
player to push the amp into saturation while limiting the volume to more tolerable
levels. Unfortunately, due to flaws in the system, the PowerSoak also leads to a
loss in sound quality. The power reduction doesn’t just reduce the volume, but
also the power amp’s “Current Feedback”, which leads to a flatter, less lively
tone. To combat this problem, it was necessary to develop a new power reduction
system that doesn’t compromise on sound quality.
Most of today’s amps are still based on the philosophies of yesterday. In order
to fully meet musicians’ current needs, I have had to go down completely new
technological and conceptual paths.
™
Time For A New Standard 100 Watt Compact Tube Amp
Pros
•
good, individual tone
•
few control
buttons/features
•
easy operation
Cons
•
not flexible
•
normally only works in one
1960
1970
situation
The New Standard:
™
AMP1
- 100W TUBE TONE POWER
In 2014,
stress-free operation and professional features.
™
AMP1
becomes the first ever guitar amp to bridge the previously insurmountable gap between the loud, characterful tube sound, and easy transportation,
™
AMP1
is the first of a new generation of amps: without compromise on sound quality and performance, suitable for
any application, and always with you wherever you need it. As a guitarist, with
™
AMP1
heralds the start of a new tube amp era.
1980
AMP1
1990
™
, you’re ready for anything, anywhere.
2010
2000
Pros
•
flexibe
•
versatile
Cons
•
compromises on sound
•
complicated operation
•
too many features
™
AMP1
is an amp with genuine character. You can play any style with it.
™
AMP1
’s uniquely customisable sounds and features give you the freedom to realise, save
and recall all your favourite tones at any time. Despite its versatility and its remarkable options for expansion, AMP1TM does not burden you with any unnecessary
features, so you can concentrate on the most important thing: making music.
I wanted to create an amp that would deliver the perfect sound in ANY SITUATION: from 0.15 Watts at home to 100 Watts on big stages.
4 5

6
7
™
INDIVIDUAL
During my career as a pro guitarist, I have had the chance to test nearly all the
legendary guitar amps of the past five decades, and have tried countless FX units.
Thanks to my experience, today I know what good tone depends on, and how to
recognise what is unnecessary or even disruptive. To find your own tone, you need
room to manoeuvre. But too many features are not the answer!
make you stand out from the crowd. It offers you every possibility to find your own
personal tone without having to get lost in a jungle of countless functions.
If you’re a player who needs just a few basic sounds, then
match. Should you want more sounds to play with, though,
bunch of extra possibilities. Plus, if you want to integrate your favourite pedals into
AMP1
™
setup, use the
REMOTE1
your
fully programmable switching system featuring four true bypass relay loops. You
decide what you need.
My tip: less is often more! ;-)
™
with the
AMP1
REMOTE1
LOOPERKIT
™
AMP1
will
™
is your perfect
™
offers a
™
to create a
™
UNIQUE
Only with ‘your tone’ will you become one with your guitar. Find it, and you’ll be
truly happy. You’ll hear and feel that it’s not just
but that its playing feel will also draw you in – until you’re hooked!
direct response, booming bass that never muddies, trebles that never get tinny and
annoying, and almost unfathomable depth of tone allow you to become one with
AMP1
™
you’ll find your own tone!
6
your guitar. With
AMP1
™
’s tones that inspire you,
AMP1
™
’s
EVERyTHINg yOU NEED –
ALwAys ON HAND
63

8
9
™
VERsATILE AND LOUD
™
AMP1
100-watt power amp delivers your own tonal palette with the best tube quality and
enormous sound pressure levels.
AMP1
a stunning journey through the history of the guitar amp (from Clean to Vintage to
Classic and Modern tones).
and Reverb controls, three integrated footswitches, a truly outstanding Speaker
Simulation mode for recording, and a headphone output, giving you all the options
you would expect from a modern, boutique tube amp.
On the other hand, thanks to its lively overtones,
fat at living room volume. And with the PowerSoak, you can even do an authentic
"Jimi" in your bedroom using just 0.15 watts of power.
is designed for professional use onstage and in the studio. The Nanotube
™
is incredibly LOUD! Four amazing, modifiable channels will take you on
™
AMP1
also features switchable and adjustable Boost
™
AMP1
also sounds balanced and
™
FLExIBLE
You can take your
It’s incredibly compact and very light. Just to make everything that little bit quicker
before and after the gig,
from) your pedalboard or amp cab in seconds thanks to
magnetic attachment system from BluGuitar
you can build
PowerSoak.
AMP1
AMP1
™
AMP1
with you wherever you are – it fits right in your gigbag.
™
AMP1
™
into a fully programmable amp system – including adjustable
™
offers you the ultimate in practicality and tonal flexibility.
can be securely attached to (and then removed
EASYLOCK
®
. With the
REMOTE1
™
– the
™ floor control
BOUTIQUE TO gO
6564
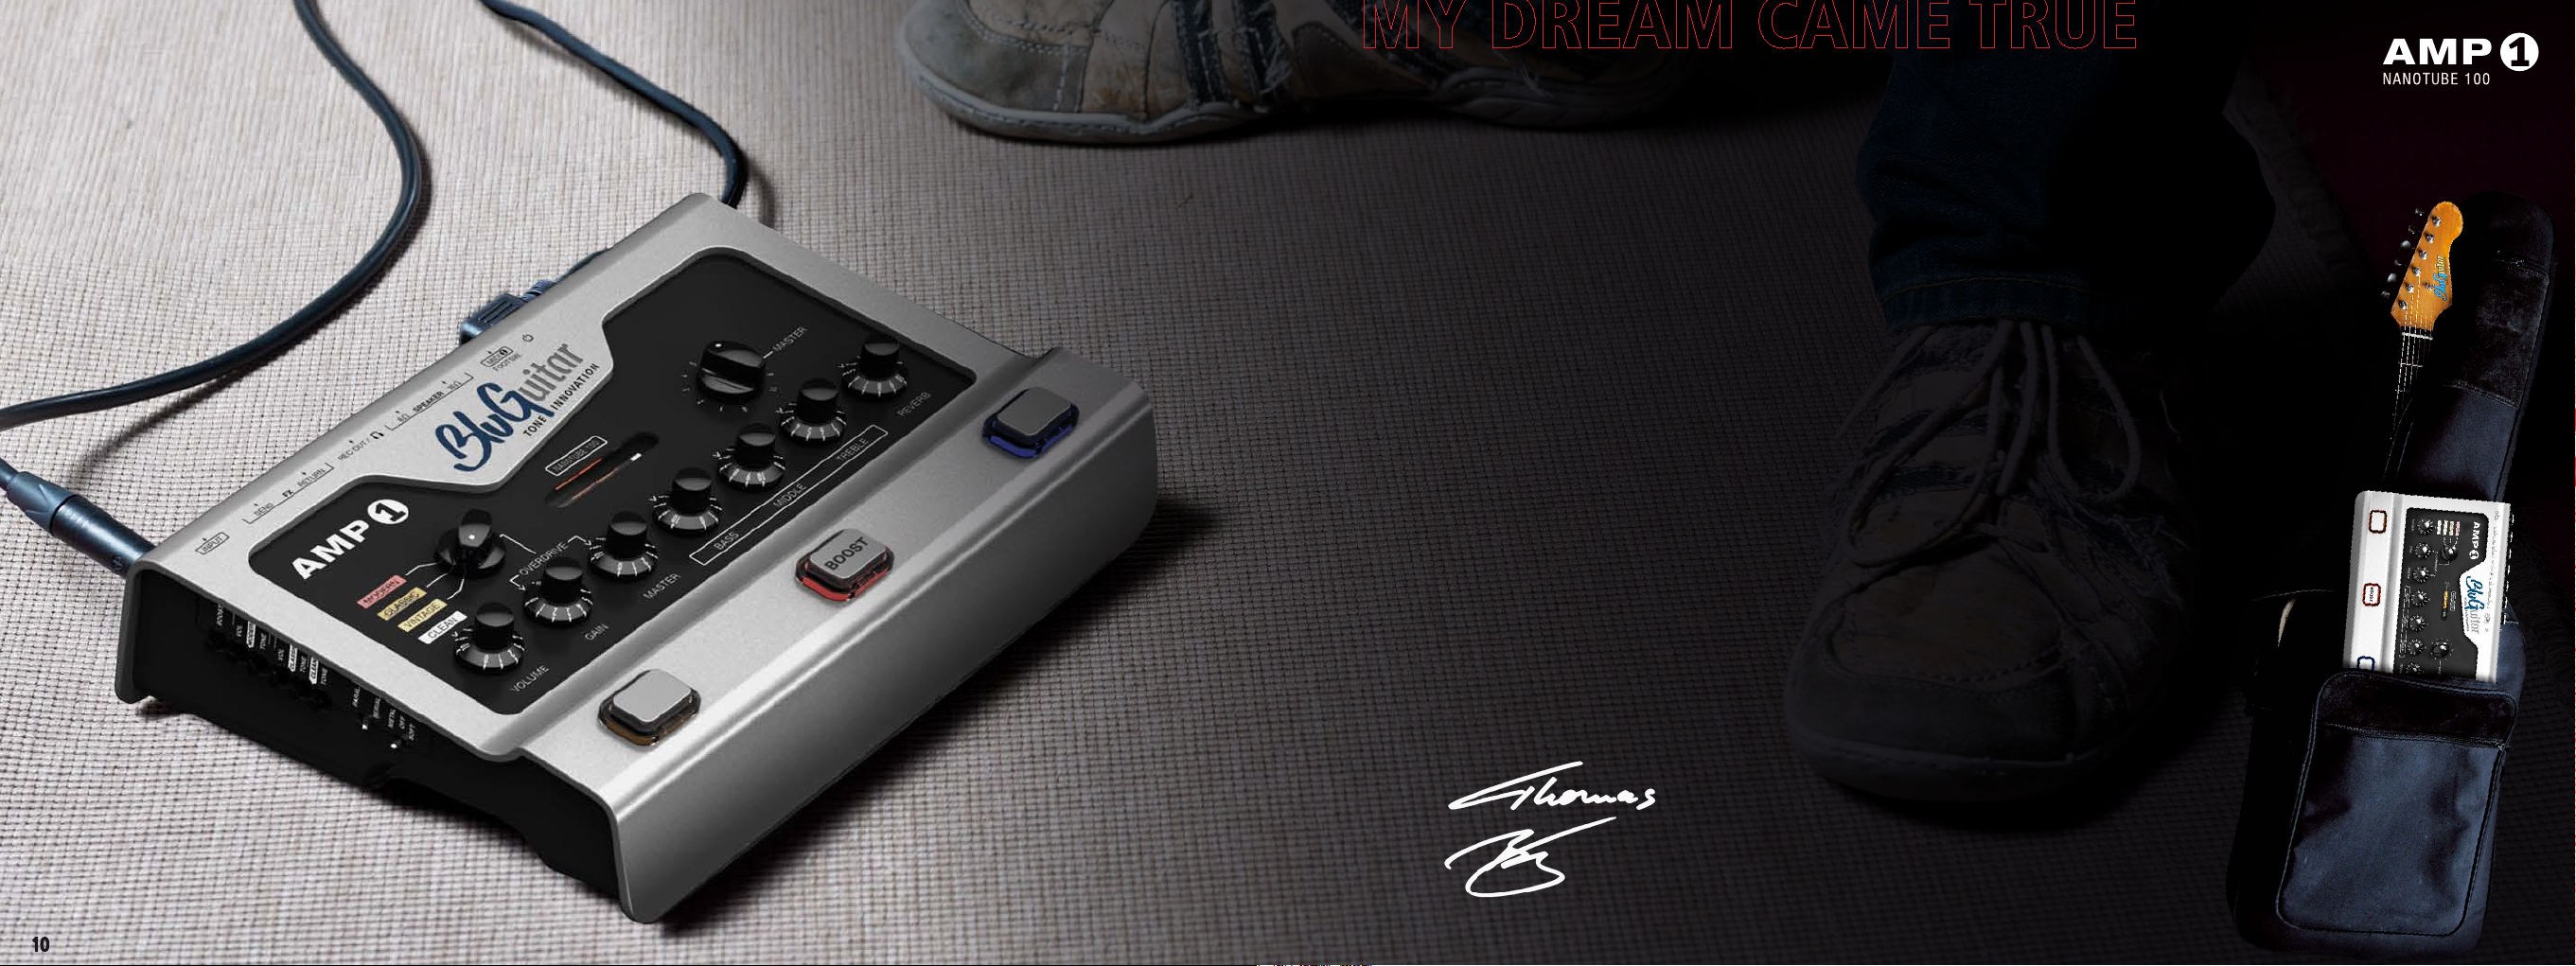
10
11
™
My DREAM CAME TRUE
For a very long time, it seemed to be impossible from a technical viewpoint –
but I finally managed to achieve the unachievable by collaborating with a brilliant
Russian engineer. By employing an unusual technical mix, we were able to keep a
100% analogue signal from the guitar to the loudspeaker, just like with a classic
tube amp:
years of experience as a pro musician and developer.
AMP1
™
was born! All of
™
AMP1
’s features draw on my 30-odd
™
To make my dream come true, I founded
complete and uncompromising implementation of my visions and product ideas.
As a guitarist, I only want to develop products that are also fun for me to use and
play with. For this reason, I hope I can offer really interesting products to every
guitarist out there.
As well as my personal signature tones,
numerous classic amps – from American clean to metal – all at professional quality. I have made this dream come true for every guitarist out there – and for me.
The dream of a huge sound in your gig bag. From now on,
companion wherever you are.
Have fun, and I wish you every success with it!
BluGuitar
AMP1
®
. This brand stands for the
™
naturally offers the tones of
™
AMP1
will be your
10 1110
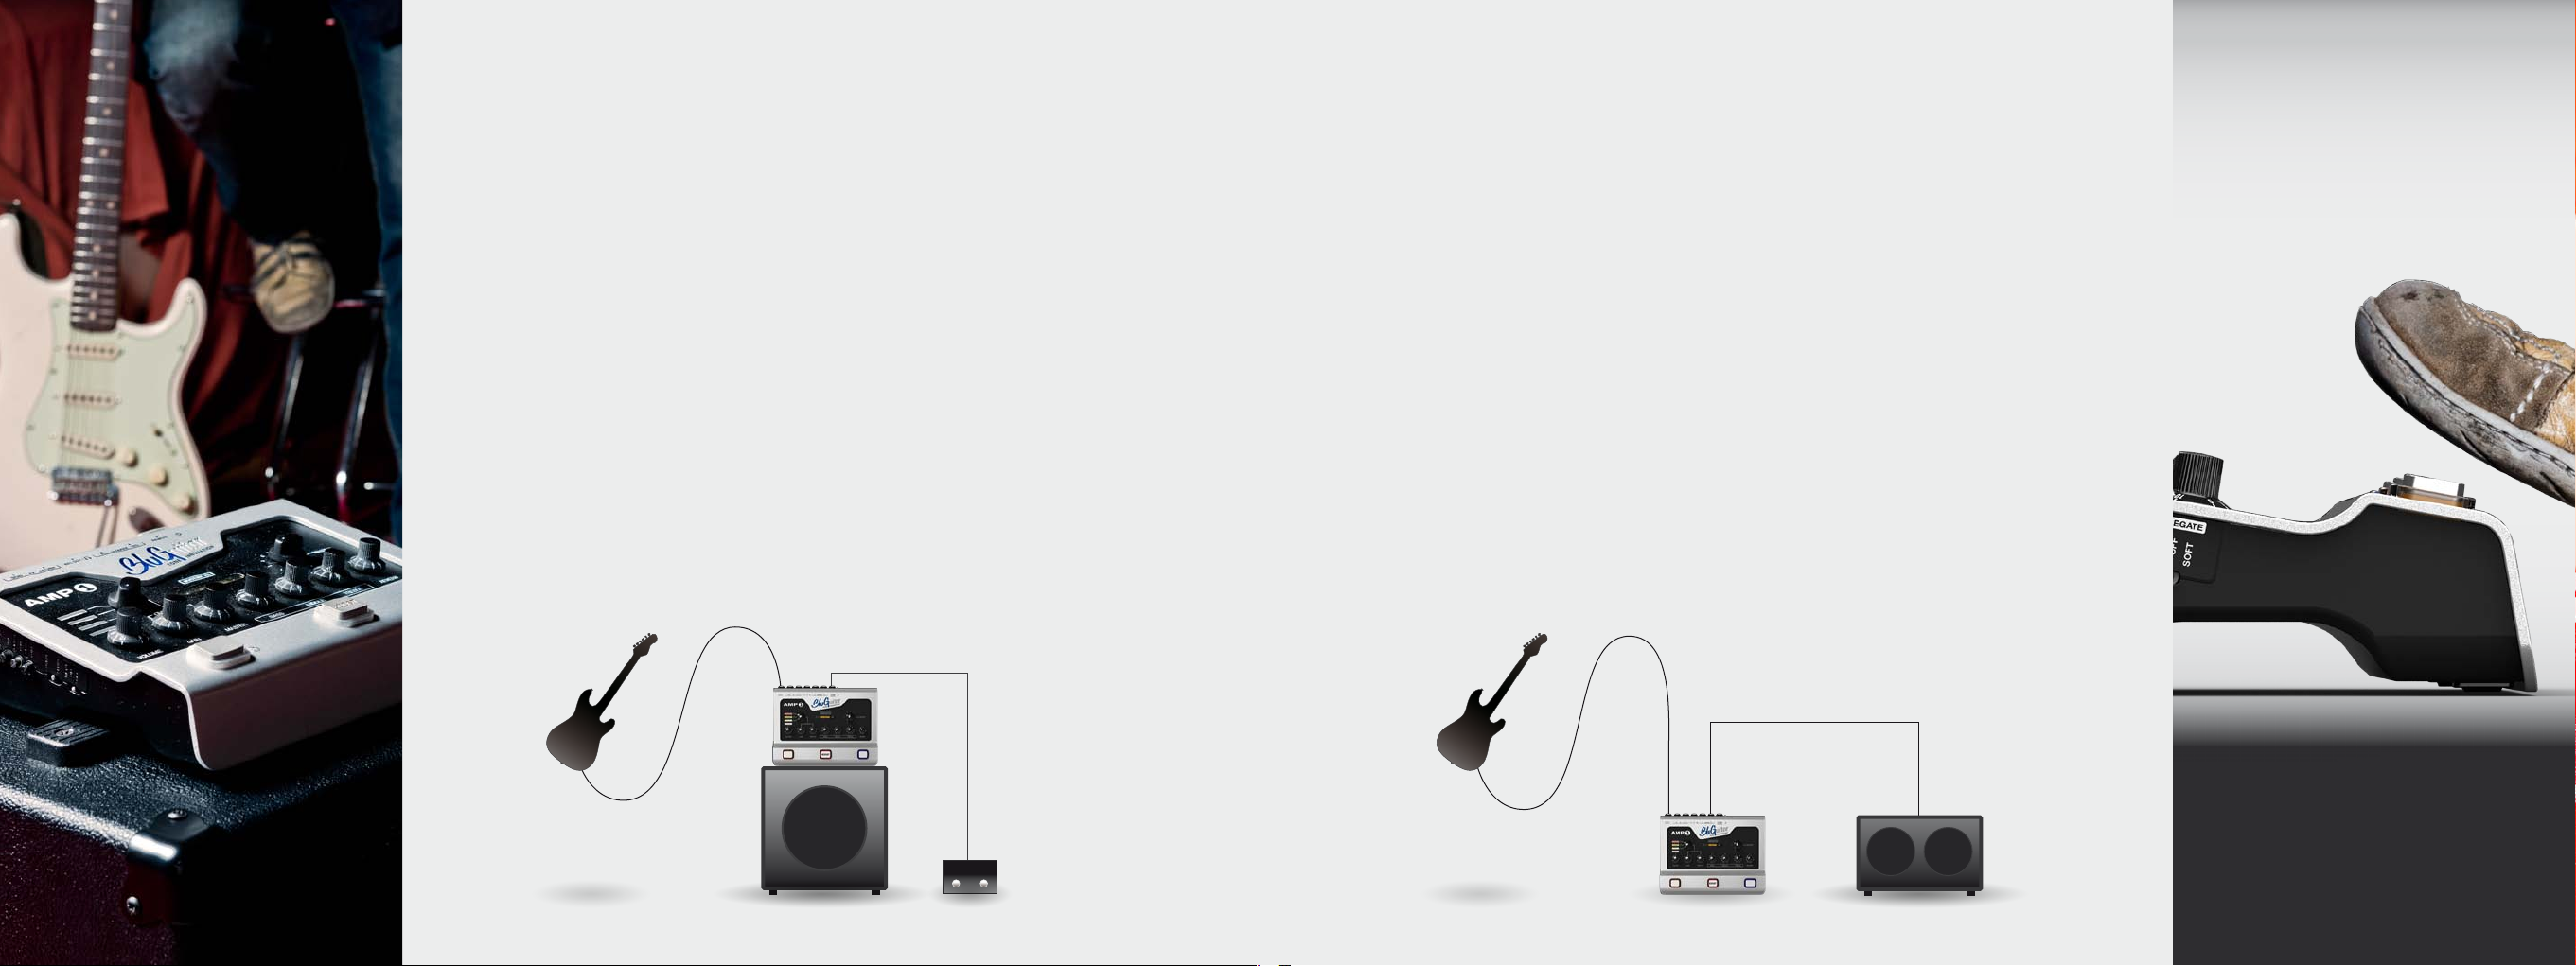
12
13
AmpHead StompAmp
™
AMP1
is a fully analogue guitar amp with four separate channels, amplified by a 100-watt Class D tube
power amp.
nels can be supplemented with an extra portion of gain via the built-in Boost control.
™
AMP1
features ONE Clean Channel and THREE Overdrive channels. Each of the four chan-
AMP1
™
is perfect for
use without a loudspeaker, just with headphones or for “Silent Recording” (see pages 27 ). You can use
™
AMP1
like an amp head on top of your cab, connect it up to your effects board and stompboxes,
or simply have it on the floor in front of you.
The underside of
™
AMP1
also features a handy recess that allows the system to sit safely on cabs that
have carry handles on top.
Put your
CLEAN/OVERDRIVE and BOOST On/Off settings. Your
™
AMP1
on a guitar cab, and you can use a standard double footswitch to select between
™
AMP1
is now a fully-fledged 100-watt amp
head!
™
AMP1
is equipped with numerous ports and features. With these, you can operate
AMP1
™
as a single or
multi-channel amp, or even as a completely programmable MIDI system.
Footswitch
t
u
p
n
I
™
AMP1
is designed so that you can have it as a fully-fledged, standalone amp right on the floor in front of
you. The illuminated footswitch 11 allows you to select between Clean and the desired Overdrive Chan-
nel. With 12, you activate the Boost, and with 13 you can choose Reverb.
For this use, you will need a longer speaker cable to plug your amp cab in with, as you should always put
the cab behind or next to you.
REMOTE1
™
has been developed for those of you who want direct access by footswitch to all four chan-
nels, the FX loop, Reverb, Boost, a second Master Volume, PowerSoak and programmable Gain.
REMOTE1
™
connects to
same time transfers all the switching functions to
controllers, the
For the optimal use of
MIDI1
™
AMP1
™
AMP1
simply via a normal guitar cable. The cable powers the unit, and at the
REMOTE1
™
. For controlling
™
AMP1
via other MIDI foot
Adapter is available (see page 37 ).
™
as a StompAmp, you can program the three footswitches with individual
sound settings (see page 39 ).
It’s your choice whether you want to use
with
REMOTE1
™
.
Input
™
AMP1
as a single, double or multi-channel system together
Speaker Out
12 1313
OVERDRIVE
BOOSTCLEAN/
OVERDRIVE
BOOSTCLEAN/
REVERB
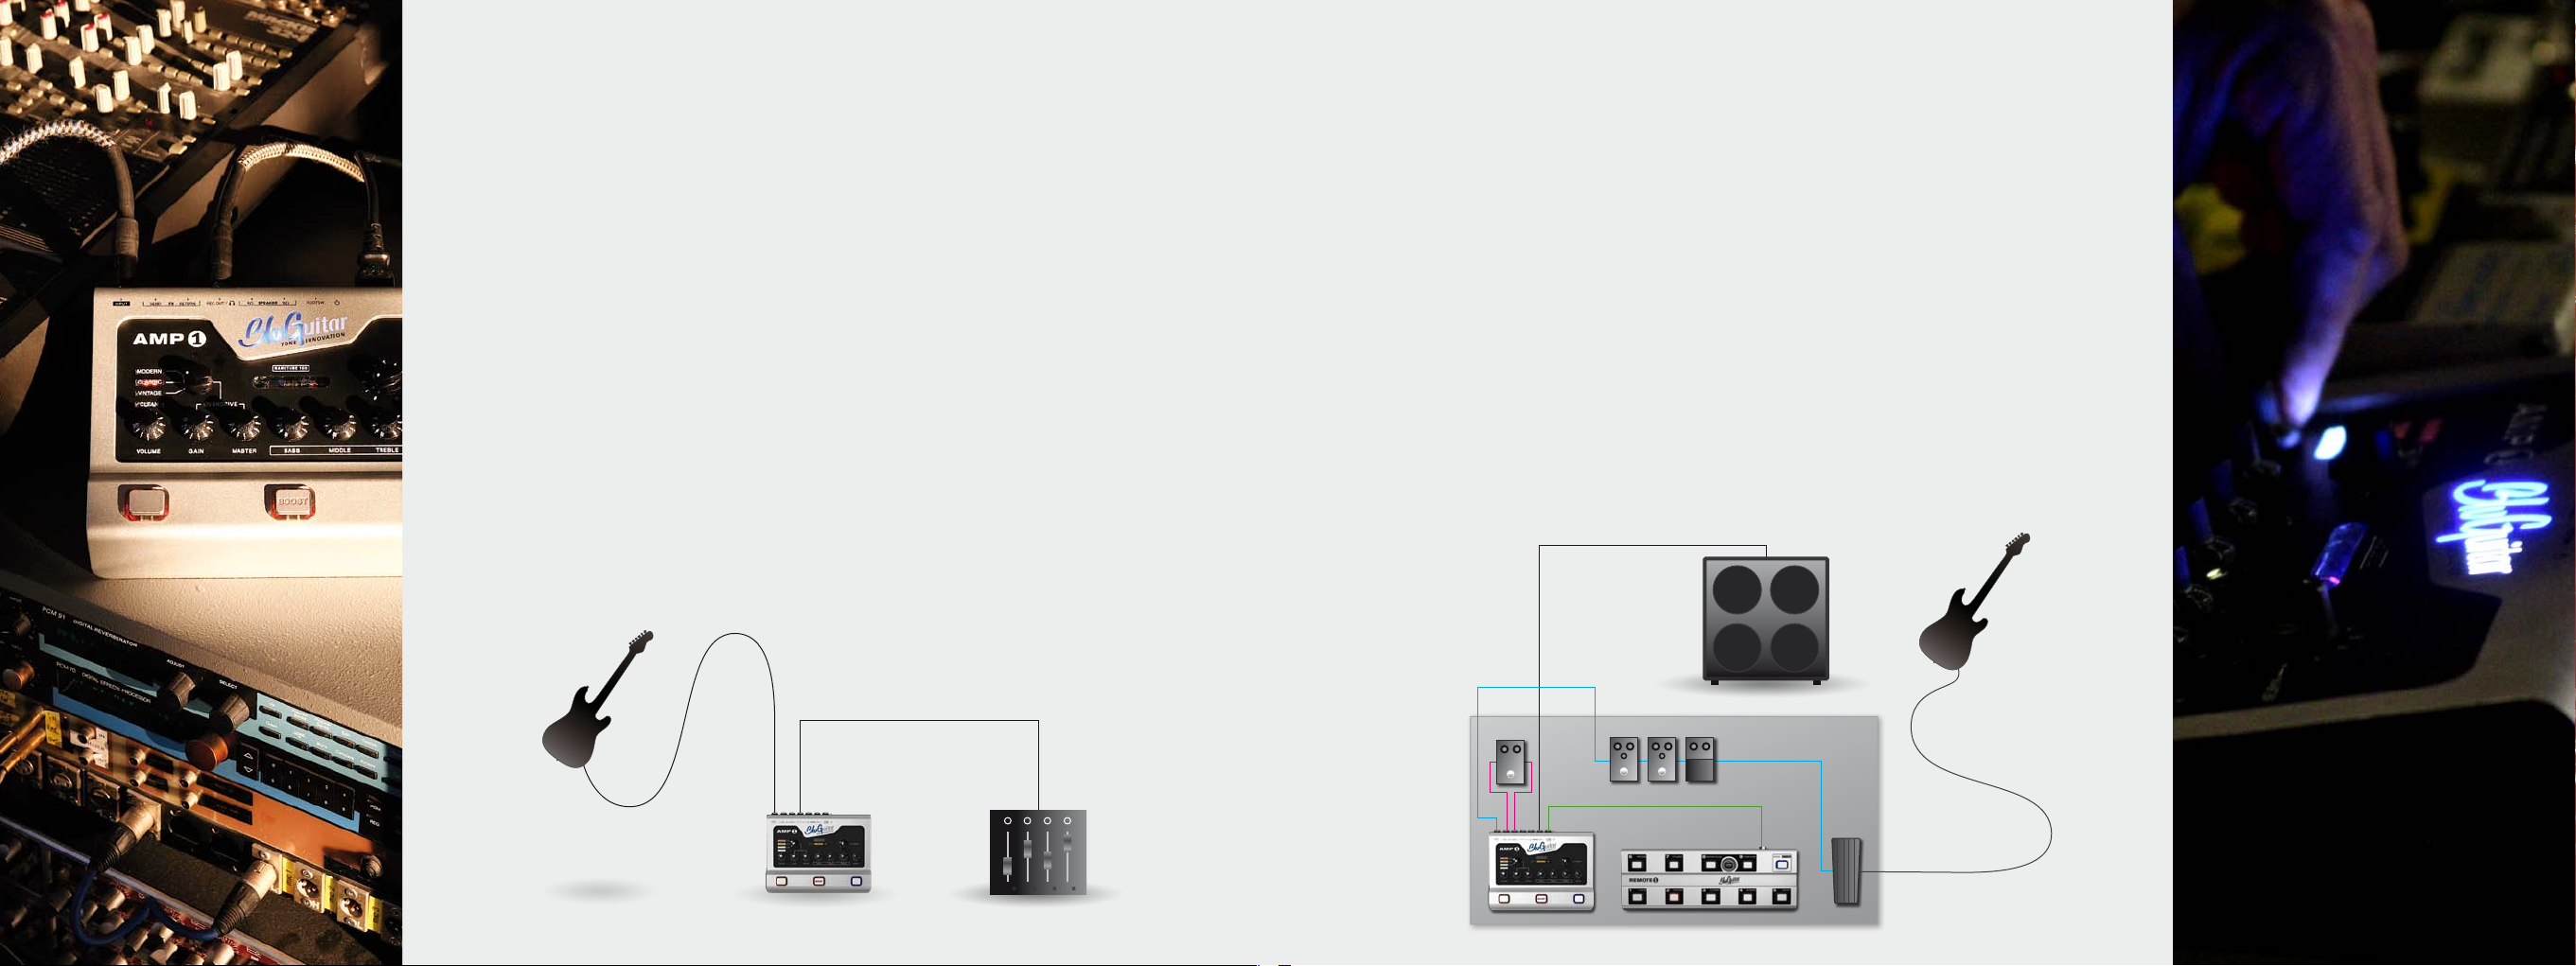
14
15
Recording
Programmable Guitar System
You can also use
™
AMP1
without loud speakers: just with headphones, or by connecting it to a mixing
desk or a home stereo system. Even without load, the amp won’t get damaged, whatever setting you
select. The Recording Out delivers the very authentic signal of a miked-up guitar cab.
That means you can make recordings at any time, or practice through headphones.
In this context, the Master Volume 3 then controls the volume of the Recording Out or headphones
(see pages 26 and 27 ).
Attention!
If you connect the Recording Out to your home stereo, make sure not to overload your hi-fi speakers.
This kind of speaker does not provide the volume levels needed to play in a band. However, it should
provide sufficient power to practice at moderate volumes in most cases. Compared with guitar amps, home
stereo speakers are designed to produce a deep bass response, which makes them a lot more sensitive.
Recording Out
Input
With
™
AMP1
it’s possible to build a complete 100-watt guitar amp and effects setup on a single pedalboard
for the first time ever. This will really help reduce the amount of cabling guitarists will need to use compared
to a normal amp/FX/pedalboard setup.
pedalboard. With
™
AMP1
– you can securely attach and then remove
EASYLOCK
™
(see page 40 ) – the magnetic attachment system for
movement (no fiddly Velcro required!) to use it as a “standalone”. With
™
AMP1
’s functions and create Presets too. With each Preset,
™
AMP1
is so light and compact that you can easily mount it to a
™
AMP1
to and from your pedalboard in one quick
™
, you can use all of
simultaneously sends a MIDI
REMOTE1
REMOTE1
™
program change command that can be used to switch external MIDI-enabled effects equipment.
For those who wish to use their own MIDI board, there is an adapter available that transforms
Remote port into MIDI:
™
AMP1
’s switching and control functions – just like you could with
™
MIDI1
. When plugged in, you can use your own MIDI board to operate all of
REMOTE1
™
(see page 38 ).
AMP1
™
’s
Speaker Out
FX-Loop
™
REMOTE1
14 15

16
17
AMP1
™
+ REMOTE1
™
+ LOOPERKIT
™
=
The pedalboard of the future!
A fully programmable professional guitar system
DIRECT ACCESS - MODE
This
REMOTE1
CLEAN, VINTAGE, CLASSIC, MODERN, BOOST, REVERB, FX-LOOP, as well as MasterVolume
and PowerSoak.
•MasterVolume expands your
footswitch-selectable second Master Volume.
•PowerSoak expands your
footswitch-selectable reduction in power.
•LEVEL controls the level of the previously selected function.
PRESET - MODE
In Direct Access Mode, every footswitch setting can be saved on one of the 36 Presets (which come in four
banks of 9). Like this, you can save the same sound with different volumes and effects as rhythm and solo
tones, for example. The Gain level is also controllable for each Preset, which opens up a lot of new sound
nuances. With each Preset, a MIDI program change command is sent via the MIDI-OUT connector to switch
external MIDI-enabled effects equipment. This way, you can control all of
stomp of your foot, and switch a MIDI FX unit to your chosen Preset at the same time.
LOOPERKIT
For players who want to integrate their favourite FX pedals into the
Looper Kit extension, which features four true bypass relay loops, is available. The switching status of the
Loops is saved together with the Presets. With just one stomp of the foot,
’s sound, the FX pedal in the FX Loop, and the four Loops simultaneously. This makes tap dancing on the
pedalboard a thing of the past! Thanks to the four True Bypass Loops, the signal only passes through the
FX units that are active within the specified Preset. This guarantees the shortest signal path, with as little
sound loss as possible.
™
mode enables the following convenient footswitch options:
™
AMP1
’s functionality by adding a controllable and
™
AMP1
’s functionality by adding a controllable and
AMP1
™
AMP1
guitar system, the optional
REMOTE1
™
’s functions with a simple
™
controls
AMP1
™
Speaker Out
™
REMOTE1
1 2 3 4FX-Loop
Looper Kit
With
™
AMP1
it’s possible to build a complete, programmable guitar amp and effects setup on your pedalboard for the first time ever. This doesn’t just save on weight and extra equipment, but also significantly
reduces the amount of cabling, which not only benefits your tone, but saves you an awful lot of time with
assembly and clear-up before and after the gig!
16 17
17

18
19
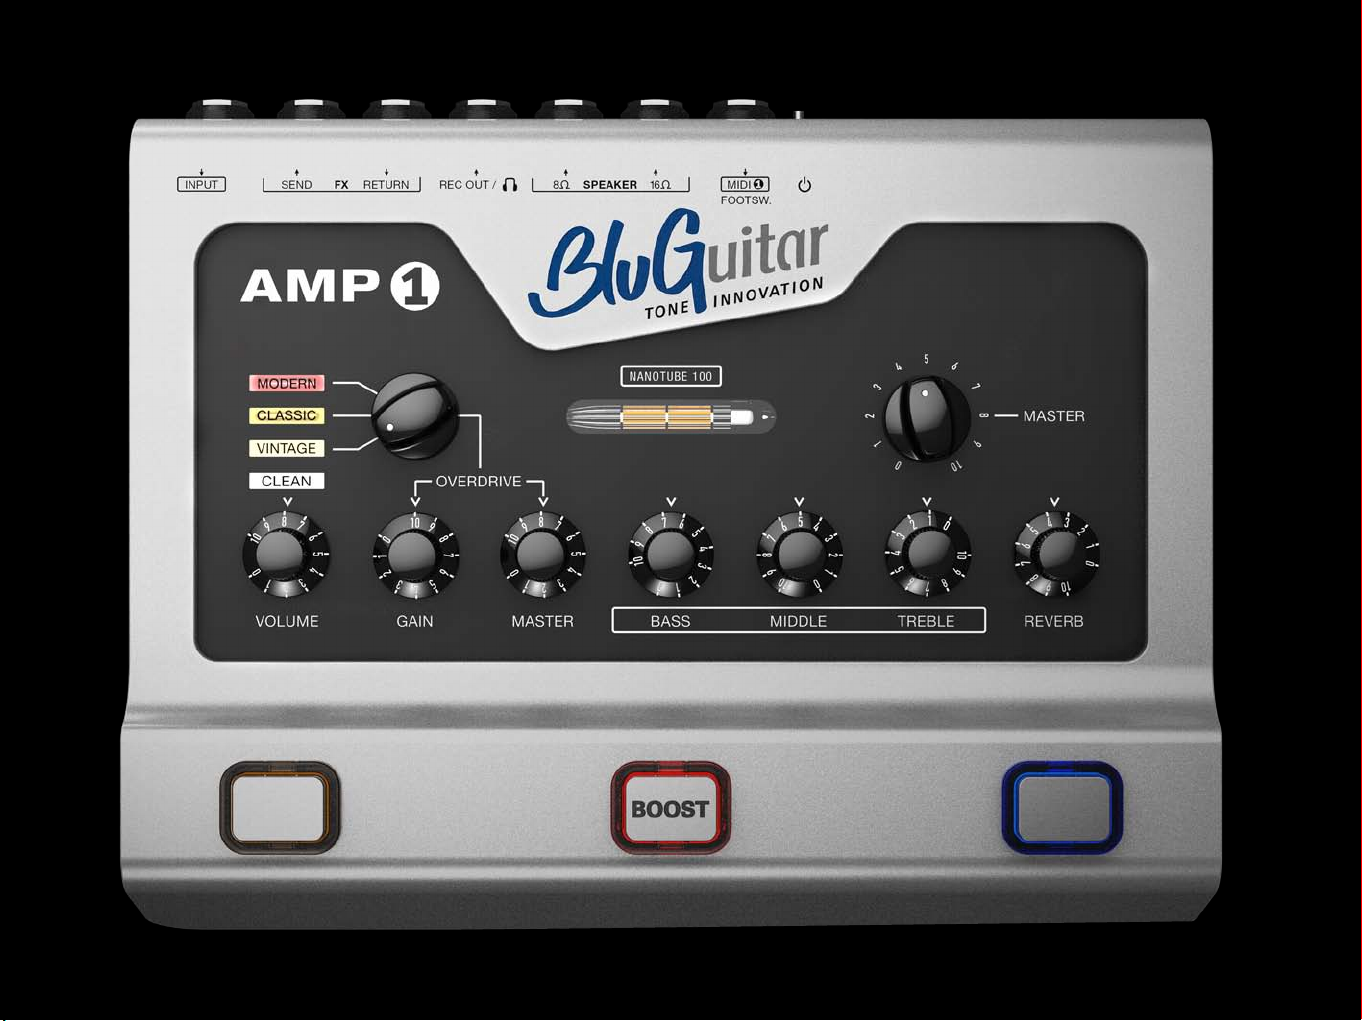
Control Panel
1
2
3
4
1 Overdrive Channel
Selection between
Pages 29-31
2 Nanotube
Sub miniature tube. Page 24
3 MasterVolume
Controls the overall volume of the 100-watt power amp.
Page 25
4 Clean Volume
Controls the Clean Channel’s volume and drive. Page 28
Vintage, Classic
™
and
Modern
10
5 Overdrive Gain
The GAIN knob controls the input sensitivity – and therefore the
distortion – of the Vintage Classic and Modern Channels
Pages 29-31
6 Overdrive Master
Controls the overall volume of all three Overdrive Channels (Vintage,
Classic and Modern), Pages 29-31. To regulate volume and tone
between the three Overdrive Channels, use the CUSTOM CONTROL™
Classic Volume 27 and Classic Tone 28, as well as Modern Volume 25
and Modern Tone 26.
11
6
5
12
7 8 9 13
™
AMP1
VOLUME determines the CLEAN Channel’s volume and drive. GAIN 5 controls the distortion, and MASTER 6 the volume of all three OVERDRIVE Channels.
MASTER controls the overall volume of the power amp and therefore the volume of all the sounds.
’s channels:
7-9 Sound Control
To regulate cabs, space etc. Sounds most balanced in central positions.
If necessary, don’t be afraid of extreme settings!
Page 32
10 Reverb
Regulates the volume of the added reverb signal. The reverb is
modelled on the warmth and musicality of a classic spring reverb.
Page 33
11 Clean / Overdrive Channel
Here you switch between CLEAN and OVERDRIVE.
12 Boost on/off
The Boost switches a 2-level tube-like control in front of
channels. You can control its intensity via 24. Page 33
13 Reverb on/off
Switches Reverb on and off.
You can allocate your favourite sounds and recall them directly with the
three integrated footswitches 11, 12 and 13. Page 39
AMP1
™
’s

20
21
14 Input
Connect your guitar to AMP1 here. Please only use suitable, shielded
guitar cables!
15 FX-Loop Send
FX Loop between the preamp and the power amp. Connect this port to
the input of your FX equipment. Also usable as a Line Out.
Page 34
16 FX-Loop Return
FX Loop between the preamp and the power amp. Connect this port to
the output of your FX equipment. Also usable as a Line In.
Page 34
20 FOOTSW. / MIDI1 / REMOTE
Multifunction port for connecting: standard footswitch (single and
double footswitch, with or without LED) for switching Clean/Overdrive
(Tip) and Boost (Ring). Page 36
REMOTE1
™
or
MIDI1 ™
for switching:
•CLEAN •BOOST
•VINTAGE •REVERB
•CLASSIC •LOOP
•MODERN •MasterVolume
•POWERSOAK
•GAIN/CLEANVolume
Inputs
17 Rec Out
21 On/off power switch
Output for headphones and mixers. For use exclusively with head phones, just don’t connect a speaker. MASTER 3 then determines
headphone volume
Page 26
18 Speaker Out 8 Ohm / 100W
1619 17 15 141821 2023 22
Please use only one of the Speaker Out ports at a time, using the right
22 Mains plug socket
A modern switching power supply constantly provides all the internally
required operating voltages, regardless of network voltage. This enables
™
AMP1
to provide the exact same sound and performance anywhere
in the world – without the need for additional adjustment. All you need
is a suitable power cord with the country-specific mains power plug.
impedance. Page 25
23 Fan
19 Speaker Out 16 Ohm / 100W
Please use only one of the Speaker Out ports at a time, using the right
impedance. Page 25
The regulated fans become are activated when
intensely. The openings must remain uncovered, to ensure that
can be properly cooled at all times.
AMP1
™
is used
AMP1
™

22
23
™
Custom Contols - Customize your
Voicing
AMP1
™
’s channels – with the exception of the pure Vintage Overdrive Channel – feature infinitely adjustable sound filters that enable you to tune
™
AMP1
’s tone control for more “fullness” on a singlecoil guitar, and turn the tone control up to experience more “bite and attack”
All of
each channel’s character individually. On top of that, there is a control for the individual volume of each channel.
In general: turn down
on humbucker-equipped axes.
AMP1
- For your individual tone
™
CUSTOM CONTROL
2524 26 27
28
29 3130
24 Boost Character
Gain Boost with tube character – left Clean with a subtle treble
increase, right with light, inherent distortion for creamy lead sounds
Page 33
25 Volume Modern
Volume adjustment for Modern to match with Classic and Vintage.
Page 31
26 Tone Modern
From creamy, fat high gain to ultra modern metal.
Page 31
27 Volume Classic
Volume adjustment for Classic to match with Modern and Vintage.
Page 30
All four channels can be easily controlled with just a 3-band EQ. As well as different tonal ideas, you can also adapt different types of guitar to your
personal sound tastes.
28 Tone Classic
From 70s British rock to modern “wall of sound”.
Page 30
29 Tone Clean
From classic California Vintage Clean to Modern Sparkling.
Page 28
30 FX-Loop Switch
Serial/Parallel. Page 34
31 Noise-Gate Switch
Intelligent suppressor of unwanted excess noise. SOFT reduces noise,
and OFF turns off the Noise Gate. Switching to METAL produces an
ultra fast Noise Gate response with extreme damping, specifically for
metal riffing with Modern and Classic. When changing to Clean and
Vintage, the Gate is automatically switched to SOFT.
Page 33

24
25
NANOTUBE
™
MASTER 3
Connecting to a guitar amp cabinet
™
Nanotube
For decades, tubes have been the “sound makers” in guitar amps.
However, every type of tube used up to now has had weaknesses, such
as heat build-up, sensitive mechanics, short lifespans and – from an
electronics viewpoint – their bulky size. While American technicians
settled on semiconductors, their Russian counterparts re-examined and
optimised the proven tube technology instead, to develop a completely
reliable, shock-resistant tube to use for their space travel programme.
These sub-miniature vacuum tube tubes were reduced in terms of
size and weight, and consequently were more mechanically stable and
noticeably more resistant to microphonics.
The sub-miniature vacuum tube is characterised by its lower noise
levels at high input resistance and lower internal capacitance. This
results in outstanding musical properties. It is clearly superior to conventional tubes in efficiency, energy consumption and reliability. Thanks
to its mechanical strength, it can be constructed without a socket. It is
firmly soldered in place, which eliminates any contact problems with the
tube sockets. In comparison with classic tubes, sub-miniature vacuum
tubes are almost “indestructible”, and require no maintenance. This
tube is rock ‘n’ roll and is ideal for hard use in strongly vibrating loud
speakers or stage floors. It is the most technically advanced tube technology on offer today. However, until now, the sub-miniature vacuum
tube has never been used in guitar amps. When it came to market, the
zeitgeist – the spirit of the age – was different, with huge 100-watt tube
amps in fashion.
BluGuitar® relies on Nanotubes™. This means only
using selected vacuum sub miniature tubes that fulfil
our extremely high standards. The Nanotubes
in the power amp and gives
AMP1
™
™
works
100 Watts of
character, punch and the assertiveness you would
normally only get from a large 100-watt full tube amp.
The Nanotube lifespan:
The Nanotubes
™
tube is a Russian creation, which –
among other things – is used in the aerospace and
aviation industries. The specification requires 97% of
all Nanotubes
standard ECC83 tube. In addition,
Nanotubes
™
tubes to have triple the lifespan of a
™
AMP1
uses the
™
at a slightly lower operating voltage,
doubling the lifespan again.
This guarantees NANOTUBE
™
an extremely long
lifespan, and for this reason is constructed without a
socket. It should even outlive you!
Controls the overall volume of the amp with 100 Watts of power.
AMP1
™
power amp reacts just like a tube power amp. When it’s pushed to the maximum, it will first go into saturation, and then into overdrive. Please make
sure that the output power does not exceed the speaker’s maximum power.
The output stage can be operated at full load without any problems. The
fan will switch itself on automatically during periods of heavy usage to
ensure that everything stays cool. The amp is also overload and short-circuit
protected.
Warning: High volume levels can cause hearing damage and
can destroy speakers.
W
0
3
4
3
2
1
0
5
0
5
W
10
7
7
0
8
W
9
1
0
0
W
6
MASTER: power range of the amp
’s
™
AMP1
provides separate outputs for the usual impedances of guitar cabs:
1 x 8 Output 18
1 x 16 Output 19
Only one speaker output must be used at a time!
Tip: Of course you can connect multiple speakers to one output simultaneously, even with different impedances. Usually, speakers are connected in
parallel. If using two speakers with the same impedance, the overall impedance is always halved. If you have two 16-Ohm cabs, you have to connect
them in parallel, and then connect to
AMP1
™
’s 8-Ohm output.
The cab impedance should not be lower than the output impedance of the
amp, because
AMP1
™
’s power amp would otherwise produce more power
than desired. If used for prolonged periods over full load, the amp may
switch itself off due to overheating.
Power Amp and Speaker

26
27
Recording Out
You can connect either headphones or mixing desks to this multifunctional
port. An elaborate filter circuit simulates the sound of a guitar amp cabinet.
These days, there are lots of applications that require a good direct signal
from a Recording Out. That’s why
elaborate, fully analogue speaker simulations. A total of seven different
filters simulate the tonal character of a guitar amp. The signal sounds open
and fresh – without sounding scratchy – and delivers powerful bass, without
“booming”.
With such a large frequency spectrum, you can even fine-tune the Recording Out signal for every application – because removing certain frequencies
often sounds a lot more musical than adding frequencies. This way, you always
get your perfect, consistent sound, directly into the PA or for recording.
(More tips on Pages 46-47)
.
™
AMP1
works with one of the most
Connecting headphones
Connect headphones with a 6.3mm stereo jack through output 17.
™
AMP1
automatically activates a headphone amplifier when loudspeaker
ports 18 and 19 are not in use.
Connecting to a mixing desk
Connect RECORDING OUT 17 with a guitar cable or stereo jack cable with
the mixing desk’s Line In. The stereo jack provides a symmetrical signal, which
delivers a better signal if you’re using a cable longer than 10 metres. If you
want to use your mixing desk’s microphone input, you’ll need to adjust the
You regulate the headphone volume with the MASTER 3 control.
It is advisable to use some reverb. If you do, the guitar will sound a lot more
natural through the headphones, and you’ll have more fun playing.
level with an adapter (see image below).
The signal level is directly dependent on the MASTER and PowerSoak
(if activated) settings.
Silent Recording
™
AMP1
provides a well-balanced recording signal for silent recording without a loudspeaker. Because
feedback), the recording sound changes if you use a loudspeaker. You can hear the difference even when using quieter Master settings. When you’re connected
to a loudspeaker, the sound has less mids and more bite.
™
AMP1
’s power amp reacts to the loudspeaker (current
Recording Out
In-ear quality
These days, in-ear monitors are often used on stage to improve a band’s
sound. For this, the Recording Out signal is sent to a mixing desk, where
it is mixed with the other instruments. This mix is then sent to an in-ear
system. By using this elaborate speaker emulation, you get an authentic and constant guitar sound in an in-ear monitor system, which – in
contrast to a miked sound – never changes.
Kai Sonnhalter
Stereo jack XLR connector
10 k Ohm
Jack TIP
Jack GND
Jack Ring
330 Ohm
330 Ohm
10 k Ohm
50 V
10 uF
50 V
10 uF
XLP Pin2
Schematic for constructing an adapter to connect to a microphone input – with phantom power protection.
XLR Pin1
XLR Pin 3

28
29
CLEAN 1
VINTAGE 1
’s channels
™
AMP1
The Clean Channel delivers a wide spectrum of crystal clear (VOLUME up
to 5) to dynamically reacting, lightly overdriven tones. In principal, it works
like a classic California Clean amp with a ‘Bright’ switch. The more the volume is turned down, the more transparent and HiFi-like the Clean Channel
sounds. For my tastes, clean sounds are at their best just before you can hear
the signal starting to break up. The output factor from single coil pickups to
active humbuckers varies up to a factor of 10! Because of this, there is no
perfect Clean Volume setting that works for all pickups. To find your own
clean sound, first turn your clean volume to about 6 – depending on your
pickups, you may already hear noticeable amounts of overdrive – and then
turn it down until the tone becomes clean enough for your tastes (for single
coils, this would normally be 5-6, for humbuckers 3-5).
CLEAN-TONE 29 allows silky warm (backed off) and brilliant, glittery high (turned up) cleans for single coils and
humbuckers. The Clean Channel can also be overdriven,
which means it can deliver perfect sounds from blues to
classic rock. The Clean Channel is also ideal for combining
with FX pedals like boosts, overdrives and compressors.
By switching on the internal
BOOST, you can enormously
expand on the tonal spectrum of
the Clean Channel. If you have
the Boost on at the minimum
level, you’ll get fine, shimmering
highs. This can really freshen up
humbuckers, or produce those
ultra-clean “straight into the
California
Sparkling
mixing desk” single coil tones.
If you turn the Boost up more, the tube-like boost circuit will go into
overdrive. This way, you can use the Boost to switch between clean and
lightly distorted sounds. If Boost and Volume are both fully turned up,
this Channel will also deliver dynamic vintage lead sounds. For experts,
there’s an additional trick: the possibility to drive the power amp into
saturation or overdrive, and using the PowerSoak (which you can only
activate via
levels. This gives you the possibility to create very special sounds, like we
know from the Guitar Heroes of the 60´s and flower power era. This way
you can do exactly what those artists did: they turned their clean amps
up until the power amp was compressed or distorted.
REMOTE1
™
or MIDI) to turn the volume down to suitable
Humbucker
Single Coil
6
5
4
3
2
1
7
8
9
10
Tonal colour and overdrive of the Clean Channel.
Classic British overdrive. This Channel covers the versatile sonic spectrum
between almost clean and distorted sounds, ideally suited to anything from
blues to AC/DC. Full gain with boost is my trademark sound. I personally
control my gain with the volume pot on my guitar.
This purist Overdrive Channel, with its fat and dynamic distorted character,
cannot be edited by
its character. The 3-band EQ should be enough to adapt this sound to your
speaker and the room. In contrast to the Classic Channel, Vintage features
some compression, as you know from those classic cranked amps. If you
want to increase the effect even more, use the PowerSoak.
Combined with BOOST, you get expressive, creamy rhythm and lead
sounds. If you turn down the CUSTOM CONTROL
“woody” lead sounds; turn it up, and the lead tone is “creamier”.
Clean
™
AMP1
’s CUSTOM CONTROL™, as it would lose
™
Drive
Boost, you’ll get
Fig. 1: Boost Custom Control
The Vintage Channel delivers the good old honest TONE of rock ‘n’ roll.
Vintage responds to every playing nuance. It reveals the differences between
every pickup and guitar, and also lets you control the sound with your
volume pot.
Tip: For lightly distorted riffs, I recommend settings between 5 and 7 for
single coil pickups. If using high output pickups – like humbuckers or active pickups – you should test settings between 3 and 5. If you push the
gain control way up past 7, you can produce beautifully fat “power crunch
chords” and classic lead sounds.
Humbucker
6
5
4
3
2
1
7
8
9
10
Single Coil
Fig. 2: optimal gain in the Vintage Channel.

30
31
CLASSIC 1
MODERN 1
’s channels
™
AMP1
This “Brown Sound” is punchy, dynamic, elegant, clear and balanced in all
frequencies, and has all the necessary tight power and aggression for all
kinds of rock riffs. The sound cuts through the band without getting annoying or grating. Even with single coil pickups, there’s plenty enough Gain on
tap for creamy solo sounds and rock riffs.
You can also use the BOOST to increase the Gain. The extra overtones
provided by the Boost give the CLASSIC Channel a rich, singing tone. With
the PowerSoak (
overtones. In this way, you can fine-tune
sound like a “vintage” guitar amp.
The CUSTOM CONTROL
channel’s overtones and basses. Turned down, it creates woody, creamy 70s
sounds, and turned up, it results in hard, cutting, modern tones with more bite.
With CLASSIC VOLUME 27, you can match the volume level to the Vintage
Channel.
In combination with the Boost, you can also get musical high gain sounds
from this Channel. This makes legato and tapping playing techniques possible on any guitar. At low gain settings, the Channel also provides open,
well-rounded crunch sounds. Use more Gain to get a “hot-rodded” sound
(or Brown Sound), just like you know from boutique amps.
REMOTE1
™
) , you’ll get more compression and soft
™
AMP1
™
CLASSIC TONE 28 shapes the character of the
’s CLASSIC Channel to
Tip: Use your guitar’s volume control to coax out cleaner sounds
(backed off) and rich, overdriven tones (turned up) from this Channel.
80s Rock
70s Rock
Modern Rock &
Metal
Using CLASSIC TONE, you can dial in this Channel to your personal taste
to anything between the woody, rough sounding tones of the 70s and the
rich, modern sounds of a hot-rodded amp.
This Channel delivers American high-gain sounds with tight basses and gripping highs, thanks to its thick and rich overtone spectrum. The primary focus
of Modern is quick response and a very precise tonal resolution at high gain
levels.
The MODERN Channel delivers a merciless performance not just suited
to aggressive metal riffs (MODERN TONE turned up). Thanks to the direct
response, drop tunings become a great experience without going all muddy.
This Channel is also an interesting alternative for guitarists who are looking
for ultra-rich, creamy lead sounds. All this is possible thanks to MODERN
TONE's 26 (turned all the way down) flexibility. Using MODERN VOLUME
25, you can match the volume to the volume of the other Overdrive Chan-
nels.
Tight basses, combined with rich gain, are a basic requirement for modern rock and metal riffing. Classic amps fail in this regard, because their
response is often too slow and muddy.
™
AMP1
’s newly developed circuit design delivers a dry, direct tone without
altering the guitar’s basic sound. This revolutionary concept is the foundation for sounds that can also cut through the mix in a band context. The
new circuit, which features “tight and fat” gain stacking, is even capable
of conjuring up extra tight sounds from classic single-coil guitars. A metal
guitar will sound like metal guitar, and a classic vintage guitar will also be
recognisable.
Tips: To get even tighter aggressive metal riffs, the Gate 31 should be set to
Metal. Then, when you dampen the strings while using the Modern Channel,
all unwanted noise will be removed through the fast-acting Noisegate. This
will make the riffs super hard and dry.
When MODERN TONE 26 is turned all the way down, Modern even pro-
vides creamy tones for fans of classic overdrive sounds.
Hi Gain
Rock & Metal
Fat Screaming
Classic Lead
Ultra Metal
The CUSTOM CONTROL
™
tone selection offers a broad spectrum,
from rock and metal to doom.

32
33
BASS 7 MIDDLE 8 TREBLE 9
BOOST 12
NOISE GATE 31
For
the tone controls have been precisely tuned to the Channels, making a wide range of tonal nuances possible. Within each Channel, the tone controls access
specific frequency ranges that are characteristic to the selected Channel.
In contrast to more conventional tone controls,
in a cut in the mids – and vice versa. This makes tailoring your own perfect sounds considerably easier. Setting the controls to the centre position provides – depending on the speaker, room and your tonal tastes – a balanced frequency mix that you can start from before refining your sound.
If you want to fundamentally change the tonal character of a channel, use the relevant
developed for this purpose. This will help you a lot when playing – because if you change something on the tone control, for example if you want some more
mids, you’ll end up with more mids on all of the channels. I put a lot of time and practical testing into fine-tuning the channels, to make sure everything fits
together naturally. (Also see Academy of Tone, pages 42-47 )
™
AMP1
, we have developed a special set of tone controls that allow all four Channels to be used to optimum levels with a shared EQ. The effects of
™
AMP1
’s controls do not influence each other. That means that boosting the highs does not result
CUSTOM CONTROL
™
on the side of
AMP1
™
, which was specifically
Tip: To get to know the amp and its basic sounds, I recommend that you start off with all the tone controls in the centre position. Settings where all the
knobs are similarly positioned, like 7-7-7 or 9-9-9, also result in more balanced tones. The higher you turn the controls, the more open and more modern the
resulting sounds.
ATTENTION: The controls’ working ranges are designed to be very effective. When all the controls are set to 0, there won’t be any sound!
The Boost activates a 2-level tube simulation in front of
channels. With the boost control 24, you can regulate the tonal character from transparent to creamy with “inherent distortion”. Depending
on the channel, this makes more transparent, creamy or even aggressive
tones possible.
AMP1
™
’s
Tip: For stronger pickups with higher outputs, you’ll get light overdrive with
the Boost turned to halfway, which will make the tone in OVERDRIVE singing and creamy. On the other hand, if you want ultra-brilliant and pure clean
sounds, it’s advisable to keep the control turned less than halfway up.
You can activate the Boost with switch 12 or with a double footswitch
(ring), and also via MIDI and REMOTE1
™
.
The integrated NOISE GATE is an intelligent suppressor of unwanted
excess noise. Compared to external noise gates,
signal at several points in the circuit simultaneously, in order to react as
sensitively as possible.
This way, the NOISE GATE automatically and intelligently adapts to the
channels and their gain settings, so that as little signal as possible is lost.
Switch 31 offers three possibilities:
SOFT - for all classic guitar sounds. On this setting, the signal is kept intact
as much as possible, with unwanted noise only being removed when you’re
not playing.
OFF - this deactivates the gate.
METAL- ultra-fast and hard gate responsiveness, with extreme damping.
This setting is ideal for high-gain metal riffing. This setting is only usable on
the Modern and Classic Channels. When using Clean and Vintage, the Gate
is automatically switched to SOFT, so no clean sounds are lost.
AMP1
™
’s evaluates the
Tone controls
Clean
Boost Custom-Control
Drive
REVERB
™
AMP1
Volume 10, the reverb level is added to the dry signal. It is especially suitable for traditional clean sounds. It’s also advisable to use a bit of reverb
when practicing, especially if you’re using headphones.
’s digital reverb was modelled on a classic spring reverb. Using
Boost, Reverb, Noisegate

34
35
FX Loop
FX SEND 15
What else you can do with the FX Loop…
The FX Loop can be used in serial or parallel mode (Pic. 1) 30. In serial
mode, the signal passes completely through the FX unit. In parallel mode,
the FX signal is mixed with the direct signal. Modulation effects, equalizers and compressors must be used in series in order to function properly.
Of course, the sound quality depends on the quality of the effects unit(s)
themselves.
There are some FX units, like Delays, with which you can control the ratio
of the effect level and the dry level yourself. These effects should then only
provide the pure effect sound, and be used in PARALLEL 30. This way,
™
AMP1
’s analogue tube sound will not be interrupted at any point,
resulting in optimal sound quality.
You can switch between serial and parallel modes by using the CUSTOM
CONTROL
AMP1
PREAMP
™
30.
™
SEND RETURN
SERIAL
PARALLEL
™
AMP1
POWERAMP
Pic 1. Serial and parallel mode.
Effects Loop between the preamp and power amp. Connect the input of
your FX unit to this port.
FX RETURN 16
Connect the output of your FX unit to this port.
The FX Loop can be activated ort deactivated (bypass) via
™
MIDI1
.
REMOTE1
Tip:
The FX Loop can be switched on and off, and presets can be saved, via
REMOTE1
™
or MIDI in. This way, you can activate the desired channel and
the FX Loop simultaneously.
If you are using a MIDI-enabled FX unit, you can change your effects program via MIDI at the same time. For example, you can save a CLEAN sound
with chorus and reverb as a preset, or a dry, CLASSIC rhythm sound without
any FX, or a MODERN solo sound with delay, and each can be directly
recalled with one simple tap of the foot switch.
More on programming presets on page 37
™
or
If no effects device is looped into the FX Loop, you can use the FX Loop for different, unconventional things:
™
AMP1
as a preamp
The Send port can also be used as a Line Out. Here you could, for example,
connect another power amp.
™
AMP1
with a volume pedal
If you place an analogue volume pedal between SEND and RETURN, you can
use it to conveniently control
basic sound. This is a very handy feature, especially when playing live onstage
AMP1
™
as a power amp
(Pic 3.).
The Return port also doubles as a Line In. Here, you can connect a preamp.
The input sensitivity can be switched from 200mV to 1 Volt by using the FX
Loop level switch on the bottom.
FX RETURN
The power amp behaves like a tube amp, because the signal passes through
the tube. If using
™
AMP1
as a boutique distortion pedal
REMOTE1
You can go directly into a guitar amp from the SEND port. It is advisable to
™
, you can also use the PowerSoak function.
SERIAL
Pic 3. Volume pedal as Master Volume
set the amp to clean. You should also reduce AMP1TM’s Treble and Overdrive volume, because the SEND signal has a very high output level (Pic 2.)
So you don’t overdrive the input, the FX Loop level on the underside of
™
AMP1
should be set to -10dB.
™
AMP1
with additional audio sources
A second instrument or audio source (for example an MP3 player) can be
connected to the RETURN port in parallel mode (Pic 4.).
™
AMP1
’s overall volume without changing the
FX SEND
Volume-Pedal
InputOutput
FX-Loop
FX Loop Level
AMP1
™
’s underside you will find a recess with a small pressure switch,
On
which enables you to switch the sensitivity between -10dB (for foot pedals)
and +4dB (for studio FX).
High
FX-LOOP LEVEL
SWITCH
+4dB
Pic 2. Recess with FX Loop level switch
Low
-10dB
Input
FX SEND
Input
FX RETURN
PARALLEL
MP3
Pic 4. MP3 player in parallel mode.

36
37
FOOTSWITCH / MIDI1 / REMOTE 20
MIDI1
Port for both conventional single or double footswitches, and also for
that was specially designed to go with
AMP1
™
– and the MIDI IN adapter
REMOTE1
™
– the foot controller
™
MIDI1
.
AMP1
™
automatically detects which kind of footswitch or interface is connected! With a single footswitch, you can switch
between Clean mode and the Overdrive channel, which is available via the Overdrive selector switch 1.
With a double footswitch, the boost is also switchable.
When
REMOTE1
that controls all of
REMOTE1
™
or
MIDI1
™
and
AMP1
™
MIDI1
are connected, this jack port automatically becomes a serial data input
™
’s switching and control functions.
™
enable you (in conjunction with a MIDI controller) to switch the functions
CLEAN, VINTAGE, CLASSIC, MODERN, BOOST, REVERB, FX-LOOP, and additionally to control
MasterVolume and PowerSoak, as well as CLEAN VOLUME and GAIN. To connect
REMOTE1
™
, simply use a standard mono jack cable (for example a guitar cable or speaker cable).
AMP1
™
with
NOTE: Apart from (passive) standard footswitches (with and without LED display), you may
exclusively connect the BluGuitar
®
REMOTE1
™
foot controller or BluGuitar
®
MIDI1 ™
adapters
to this 6.3mm stereo jack port. Connection to another foot controller may cause defects to
this controller and/or to
AMP1
™
’s internal electronics.
ATTENTION: The connecting cable should generally only be plugged in/removed when the
amp is switched off, in order to prevent faulty switching on the amp.
If you want to build an individual programmable guitar system using the MIDI controller of your choice, you
can control
This turns
™
AMP1
using the BluGuitar®
™
AMP1
’s remote port into a MIDI In port. This allows you to recall all of
MIDI1 ™
adapter interface.
AMP1
™
’s switching
functions via MIDI program change commands. Additionally, control change commands CC 007 (Master-
Volume), CC 020 (Gain) and CC 030 (PowerSoak) are also received. You put
face’s port into
interface electronics are powered by
Every available switching possibility on
™
AMP1
’s REMOTE port: on the opposite end is a 5-pin DIN socket for the MIDI IN. The
™
AMP1
, meaning that no extra power supply or cables are required.
™
AMP1
can be recalled via MIDI programm change commands,
MIDI1 ™
’s adapter inter-
when the corresponding command is sent from MIDI Channel 1. You can create up to 128 presets by
"MIDI-Learn" assigning.
Select your setting on
While the
MIDI1 ™
adapter is plugged in, MIDI-Learn is activated when holding the BOOST switch for a
few seconds. Now fast blinking of the REVERB LED indicates that
AMP1
™
™
AMP1
is waiting for MIDI programm
change command.
When sending any MIDI programm change command within the next 10 seconds, the setting is stored.
The REVERB Led stops blinking. Anytime this MIDI programme change command is send,
AMP1
™
switches to the desired state.
MIDI CONTROL-CHANGE:
MIDI RECEIVE CHANNEL: 1
128 Programm Change Befehle
MIDI Programm Change Nummer: 000 - 127
Master: CC 007
Gain: CC 020
FOOTSWITCH / MIDI1 / REMOTE & MIDI
Configuration of the Remote stereo jack port
Jack Tip: Kanal
Jack GND
PowerSoak: CC 030
Jack Ring: Boost
36 37

38
39
REMOTE1
REMOTE1
REMOTE1
™
- the programmable footswitch with MIDI
Assign your favourite sounds to the footswitches
™
REMOTE1
REMOTE1
™
is designed to be a convenient remote control for
AMP1
™
.
“Direct Access Mode” (Mode Switch is not lit)
The incredibly convenient remote control for your AMP1
Every switch on the foot controller is assigned to one of
™
.
AMP1
™
’s func-
tions. Now you can directly select the CLEAN, VINTAGE, CLASSIC and
MODERN Channels as well as switching BOOST, REVERB and the
FX-LOOP. In addition,
™
AMP1
, with a second controllable Master Volume and a controllable
REMOTE1
™
expands the functions of your
and switchable PowerSoak. A standard jack cable (guitar or speaker
cable) connects
AMP1
™
and
REMOTE1
™
and powers the system.
“Preset Mode” (Mode Switch lights up blue)
A fully programmable guitar system
REMOTE1
™
offers 4 banks, each with 9 memory locations, on which you
can save your own, preferred sound settings. Each channel can be freely
combined with or without BOOST, REVERB, FX-LOOP and any desired
MasterVolume andPowerSoak level, which can then be stored to one
of the presets. This allows you to save the same sound e.g. as rhythm
and solo sounds with different volume levels.
For each switching state,
REMOTE1
™
simultaneously sends a program
change command for switching external MIDI effect devices via its MIDI
out port (see table on page 37 ). This turns
™
AMP1
into a programmable
MIDI guitar system.
LOOPERKIT
Those who want to program their favourite guitar pedals with
to avoid pedalboard tap dancing should use the
™
(optional extension module for connecting effects pedals)
REMOTE1
LOOPERKIT
™
, which
™
features four true bypass relay mono loops. The True Bypass wiring ensures
optimum signal quality. The four Loops can be individually assigned to
each preset, thereby combining the connected effects with the amp
settings.
The Looperkit is fixed to the side of
REMOTE1
™
with a screw. External
pedals are wired through a breakout box.
Note: If you want to use
REMOTE1
™
to directly switch the Presets of a device that is directly connected via the MIDI Out, the table on page 37 shows
you the program change commands that are sent from
As each of
AMP1
™
’s switching states is assigned a MIDI program change
REMOTE1
™
.
command (see Table), you have to assign each switching state its own
Preset at the FX unit. In order to make assigning these more comfortable,
almost all FX devices have built-in MIDI Mapping. The advantage for you is
that you always have the right FX program for your sound (switching state
™
AMP1
), no matter on which Preset this sound is situated at that time.
Please also note that some MIDI devices switch, for example, Program
1 via the program change command 0. Via MIDI Mapping in your FX
device, you have to then add a 1 to this Table, in order to activate the
desired program.
You can use
AMP1
™
’s integrated footswitches in two different modes:
Standard or Personal Preset.
Standard-Mode:
In Standard Mode, the left footswitch always switches between CLEAN and
OVERDRIVE. The middle switch switches the BOOST, and the right switch
the REVERB.
Personal Preset Mode with three Presets:
In addition, you can freely assign three of your most loved sound settings
from CLEAN, VINTAGE, CLASSIC and MODERN – including BOOST and
REVERB – to your
AMP1
™
’s footswitches. The settings are stored, and will
even remain available if you turn the power off. The Personal Preset Mode is
exceptionally handy when you prefer to play with only three different sounds,
or if you want to work without
REMOTE1
™
or an additional MIDI board.
The factory default setting is programmed as follows:
Clean /
Overdrive Boost
Recalling the Preset Mode:
Switch off your
AMP1
™
. Then switch it on again while pressing down the
REVERB footswitch. Now your are in Preset-Mode. Previously saved settings are assigned to the three footswitches. Note that the footswitches’
LEDs now show the active sound functions, not which footswitch is active.
To change back to Standard Mode, switch off your
AMP1
™
and then
switch it on again while pressing down the REVERB footswitch.
Programming your own Presets:
If you wish to change the default factory programmed sounds in Personal
Preset Mode, first select your desired sound, e.g. VINTAGE with BOOST
and REVERB. Then hold down the REVERB footswitch for three seconds.
The REVERB footswitch will start flashing. Now, by pressing down on one
of the three footswitches, you can store your sound to that footswitch. In
this way, you can add two more sounds to the two remaining footswitches.
BONUS: Four Channels and switchable Boost
In addition, in Preset Mode you can also use a standard double footswitch
to switch between CLEAN and OVERDRIVE, giving you an additional
CLEAN channel when the three internal footswitches are assigned with
VINTAGE, CLASSIC and MODERN.
The second button on a double footswitch turns the BOOST off if it was
originally selected in the Preset, or on if it wasn’t. In this way, I have all four
Channels in my mini setup directly available!
Your favourite sounds on the footswitches
VINTAGE +
BOOST + REVERB
CLASSIC +
REVERB
MODERN +
REVERB
3939

40
41
MASTER
LEVEL
2ND MASTER
In connection with
and control it within a 10dB range. This will let you use all your different sounds at two different volumes.
Classically speaking, that would be rhythm and solo volumes!
For this, you activate the “MasterVolume” button on
ton will become active. Then, using this knob, you can control the MasterVolume. Pressing the
“MasterVolume” button again will take you back to the first MasterVolume.
REMOTE1
to save any of your sounds’ volumes in Preset Mode.
REMOTE1
™
can also save all of your settings to one of its nine Presets. This way, you have the possibility
™
, a 2nd Master Volume is available. You can activate this via a footswitch,
REMOTE1
™
™
, and the knob directly next to the but-
REMOTE1
™
EASYLOCK
For fixing your
the board, and two magnetic counterparts that you screw to your
™
AMP1
off your pedalboard at any time and easily transport it in your gigbag at those times when
you don’t want to lug around the whole shebang.
2nd Master and Accessories
40 414141
™
AMP1
to a pedalboard. The set consists of two magnets, which are screwed on to
™
AMP1
. In this way, you can take
AMP1
™
Pedalboard,
Cabinet, etc.
Fixing EASYLOCK
™
via a woodscrew.
EASYLOCK
™
PowerSoak
In connection with
The PowerSoak was invented so that the sound of a fully saturated tube amp could be reduced to tolera-
ble levels. The “lively” sound of a tube power amp set to maximum gain and overdrive is very popular.
Most PowerSoaks use thick power resistors to convert the high power at the speaker output into heat.
With classic PowerSoaks, the sound gets more deadened, the more you decrease the volume.
™
AMP1
’s PowerSoak works in a completely new, very sound neutral way, and without any power resi-
stors. When PowerSoak is activated, the LEVEL control reduces the power amp’s power rating smoothly.
For this, the standard routing has been divided into two ranges, the 100% sound neutral “STAGE”, and
the somewhat milder sounding “HOME”. After the centre position on the LEVEL control is reached, the
PowerSoak switches automatically from “HOME” to “STAGE”.
In order to make the PowerSoak responsive, the power of the power amp at the Master must obviously
be higher than the chosen power reduction of the power amp. That is: crank the Master and reduce it again
with the PowerSoak!
M
O
H
REMOTE1
W
1
E
W
5
,
1
W
5
1
,
Power ranges with PowerSoak
™
, a 2-stage PowerSoak is available
0
S
2W
7W
T
A
W
G
2
0
E
0
W
1
0
4
0
W
™
AMP1
works in two ranges:
Home from 150m Watts to 2 Watts
Stage from 7-100 Watts
’s PowerSoak

42
43
Your tone in the band
™
Academy of Tone
I want to use these pages to give you some tips on how to sound better
– and more at home – in your band. In short, how you arrive at ‘your’
tone. A tone that sounds great in your living room at low volumes will
generally not work in a band context. Why?
Well, it’s because many instruments are being used simultaneously in
the band. Their frequencies all overlap, and only the distinctive parts of
the sonic spectrum will come through.
Indeed, there are loads of different roles in bands, so the “frequency
soup” differs depending on the group.
That said, most bands don’t just have bass and drums, but more common features that we have to take into consideration in order to master any situation.
For me, AC/DC is a great example of how a band’s sound works. With two
guitars, bass, drums and vocals, you get the feeling that this is a band whose
guitars always sound amazing.
Level
20 Hz
50 Hz
80 Hz
100 Hz
200 Hz
400 Hz
1 kHz
The reason for that is simple: the two guitars have plenty of space because
all the other instruments are secondary to them and give them plenty of
room, frequency-wise, in the mix. AC/DC’s sound was probably created and
refined through trial and error in the rehearsal room. So you can see that
every great sounding group has developed their own recipe for their own
band sound, and you’ll find that in every genre – from jazz to metal.
Not enough Mids
Sounds that you’ve created at home (i.e. on your own, without fellow musicians) just don't cut the mustard in a band context. Tones that sounded fat,
bold and aggressive when you were playing at home use exactly the same
frequencies as the bass and drums, and so won’t stand out at all.
Tip:
Use less Bass. Turn the Mids up, and even decrease the Highs to experience a
different sort of High with AMP1
2 kHz
4 kHz
™
’s CUSTOM CONTROL™.
8 kHz
16 kHz
Bass Drum
Bass
Guitar
Vocals
Cymbals
Frequency
20 kHz
You’ll still need to make sure these agree with the other instruments in the
band, though.
Hint: The classic EQs on guitar amps make the Mids disappear when you turn
the Highs up, and add Mids when you decrease the Highs.
In contrast, the controls on AMP1
™
’s 3-band EQ do not influence each
other. This makes searching for the best sound settings much easier. The
EQ should be used for adjusting to speakers and space, and for setting the
basic character of the channels, it is better to use the Custom Controls. Once
you’ve found a great tone, you can remember the settings like a numerical
code. My code is 5-5-5 (Bass-Middle-Treble).
Chiming Highs:
In a band context, clean tones often sound too thin. Because of the overlap
of Mids from the other instruments, the only Highs we hear are piercing.
Here, it can often help simply to turn up the Mids or backing off the Highs.
AMP1
™
’s CLEAN Channel, I designed a special Character Control that
For
allows you to enjoy the stable Mids you know from classic guitar combo
amps. To access it, just turn the
Clean Tone
29 CUSTOM CONTROL™
anticlockwise – depending on your speakers, of course, you might want to
turn it up a bit more. The Middle control should not be at less than 5.
Thumping bass vs. smaller tones
It often happens that the bass and guitars are using similar frequencies.
This can lead to rumbling and throbbing sounds. Test things out a bit, and
try turning your Bass control up and down in a band context. If nothing’s
rumbling, then you can play with plenty of bass. This’ll make the guitar
sound bigger…
If your bassist allows it, try turning his 120Hz control down. Any rumbling should disappear completely, and you’ll have a super fat tone!
To get a better feeling of frequencies and how they overlap, you can also
try playing your guitar along to a backing track. You should set your amp
up so that it sounds good with the backing track and cuts through the
mix.
When the backing track stops, you might be surprised at how your dry
tone sounds. It should be noted that the recorded signal – in comparison
with a live band, whether onstage or in the practice room – will have
been thinned out, and the frequencies processed, at the mixing stage.
It’s worth experimenting with the tone controls on occasion, until you
find your perfect sound for your situation (be that in the band or recording at home).

44
45
™
Academy of Tone
Mastering different sounds
Modern amps often let you save a range of different sounds that can then be accessed by footswitch. When the need arises, and with skilful use, this
variety can really enrich a band’s sound. Right now, such a wealth of sounds is in demand with guitar players in cover bands, who need to be able to
accurately reproduce the widest variety of music styles authentically. From personal experience, I can say that a small but perfectly functioning set of
sounds is usually better than an elaborate tap dance on the pedalboard. On top of that, each sound requires a different playing style, and each of these
has to be mastered first. It takes a long time for a player to really get to know the varied playing styles, and to be “in control” of the numerous sounds
and playing techniques. Because of that, you shouldn’t get too stressed – you want to focus on actually playing the guitar, and not on chasing as many
sounds as possible.
While watching some live bands I’ve noticed how the guitars simply disappear when the rest of the band starts playing too, even though the players
on stage can still hear their own sound loud and clear. In particular, the channel switch between Overdrive and Clean – which is something virtually
every player uses – seems to cause problems. The reason for this is very simple: the frequency spectrum varies too much. While the Clean sound works,
the Overdrive sound disappears – in this case, lots of the Mids are normally missing. If the Overdrive sounds full and fat, but clean tones are thin, then
there’s too many Highs and, at the same time, too few Mids. Tones that sound amazing when the guitarist plays unaccompanied often sound thin and
lack substance in a full-band context.
Stompboxes and overdrive pedals have never been more popular. The main reason for this is that they actually work! If you run a pedal through a clean
or slightly overdriven amp, then the frequency settings you’ve chosen on the amp will remain largely and noticeably intact and audible. The main reason
for this is that you don’t need to change the tonal settings on the amp at all. The sound changes from the pedal stay within the acceptable range, without changing the frequency spectrum of the amp.
™
AMP1
matched to each other in terms of frequency. With the effective 3-band EQ,
the overall sound can be quickly and easily adapted to suit your amp cab
and your band’s sound. The biggest advantage of this is when playing live,
where you would otherwise have to adjust four tonal settings. Using the
CUSTOM CONTROL™, you can add nuanced timbres to each individual
sound. For me,
I adjust all my other sounds. You can also achieve beautiful clean sounds
through this channel by backing off the volume pot on your guitar.
To make the sounds match perfectly, I first select the VINTAGE Channel,
and then switch to the CLEAN Channel. Then I use CUSTOM CONTROL™
Clean Tone to adjust the sounds to each other.
AMP1
When you turn the CLEAN TONE anticlockwise, you’ll get the typical
“Californian” clean sounds for country and funk, with plenty of fullness
in the Mids. This works particularly well with single coil pickups. If your
guitar has humbuckers and you want pearly clean tones, use it in
’s four channels were constructed separately and were optimally
™
AMP1
™
CUSTOM CONTROL™ TONE:
’s Vintage Channel is the reference point to which
“split coil” mode or turn the CUSTOM CONTROL™ clockwise. With the
Clean Tone turned all the way down, most humbuckers will deliver balanced, warm, rounded jazz tones.
If you turn the Classic Tone control anticlockwise, you’ll get classic
sounds, while turning it clockwise will result in more modern tones.
I would advise you to turn these down slightly if you’re using single
coils, or up a bit if you’re using humbuckers. MODERN TONE is a totally
extreme control, which will give you two completely different –
and seemingly incompatible – tonal options. Turned down, you get
creamy, warm, singing Classic Lead Sounds that don’t grate at all – in
the style of Gary Moore or Eric Johnson. Turning it up gives you the exact opposite: the world of metal, featuring ultra-modern metal sounds
with extreme amounts of bite and dry bass that’ll make classic rock
fans’ hair stand on end, but will bring a massive smile to the faces of
metalheads. Here, you must show your own colours!
44
4544

46
47
Home & Recording
™
Academy of Tone
Home
At home, what you want is as vibrant and full a sound as possible at living
room levels. With
™
AMP1
, a single 1x12 cab will do the job (Nano CAB or
FAT CAB). If you just love the punch and overtones of a howling tube amp,
you’ll need a PowerSoak to tame the volume levels. Using the
REMOTE1
™
foot controller, you can operate AMP1TM’s integrated POWERSOAK within
the home from anywhere between 150 mW and 2 Watts.
If there’s no guitar speaker available, you can connect your headphones
or home stereo to
™
AMP1
’s Recording Out port. Be careful with the
volume levels, though!
The Recording Out simulates the sound of a guitar speaker with a very
elaborate 7-stage analogue filter circuit. In contrast to digital solutions, the
signal is never converted, and therefore has a super quick response,
with no latency.
Recording
There are many options available to you if you want to record with
AMP1
™
.
The simplest is to use the Recording Out and, at the mixing stage, use a
few effects to position the direct and dry guitar sound perfectly in the mix.
This works fine even without a connected loudspeaker. When you do use a
loudspeaker – even if it’s only at room volume levels – the sound from the
Recording Out will be that little bit more vibrant and punchy because of the
“current feedback”. This current has an effect on the sound, since it allows
the power amp and speaker to work together in tandem. With
REMOTE1
™
and the help of the PowerSoak, you can bring the amp into saturation while
reducing the power. This lets you keep the volume level bearable and you will
also get more overtones and punch from the amp for your recording.
Of course, you can also position a microphone in front of the loudspeaker
for recording. In that case, I would record both the microphone signal and
the direct Recording Out signal. In your recording software, after you have
recorded you should make sure you compensate for the time lag differences
from all signals, to make certain they are all in phase with one another.
Later, when you get to the mixing stage, you can still make any necessary
adjustments to the mix ratios.
Miking up – an art in itself
Anyone who has ever tried to record a guitar amp with a microphone will
have had the following experience: through the microphone, the signal
sounds completely different to what you hear when you’re stood directly
in front of the amp. So, how do you mike up an amp correctly? Here are a
few tips from my experience. Put the microphone really close to the speaker
– this is also known as “close miking”. If you were to put the mic further
away, then power and presence would be lacking. Sure, if you have a large
recording space, you can record the amp with multiple mics. The different
amounts of time it takes the sound to reach the mics can result in so-called
Sharp highs
Cold frequencies
Middle frequencies
Warm, muffled frequencies
Fig. 1: Sound zones
Fig. 2: Miking up a loudspeaker
phase shifts. The time differences, though, can be compensated for with
modern recording software. Here, the craft of the sound engineer begins.
In the studio, but also live, close miking – without any ambient sound – is
almost always used. If a certain sound space is required, it is conveniently
supplied by the mixing desk. In live situations, the picked up guitar sound is
sent back through a PA system into sound spaces with sufficient reflections.
Therefore, in these cases, close miking is the right solution. The decisive
factor is always the quality of the direct – close miked – signal.
Naturally, a miked guitar speaker offers up the most authentic solution. But
the placement of the mic in front of the speaker is an art, because every
centimetre you move it alters the sound radically, making a balanced sound
very hard to find. I’ve spent hours in front of a speaker, moving the mic
around and finding the best position and angle, in order to find and then
mark my own “sweet spot”…
The sound of the recording is one thing, but the playing feel also has
to be right. The sound also has to be big and powerful, otherwise you
won’t ‘feel’ it.
Mixing
Regardless of whether you’re recording with a mic or through the direct
Recording Out signal, a little post-production – with echo (even just a bit,
so it’s almost inaudible), reverb, and minimal EQ and compression – will
make your sound vibrant and natural, and will deliver professional sounding
results.
There are three different types of reverb that help me with this: Plate, the
good old plate reverb, which can be heard on early Van Halen albums. Their
sound simulates larger rooms, like sports halls. During mixing, I use plate
reverb to define the depth of the room in which the guitar is being played.
The reverb time is between 1.5 and 3.5 seconds. Room – a small room can
get the guitars to sound particularly wide. You can also use this effect in
conjunction with short delays. Nowadays, I also like to use short convolution
reverb IR Responses for this. In the 80s, the ‘Eventide’ Chorus was particularly fashionable.
The simulation of a real genuine space, in my opinion, is very well suited for
giving a sound real height, as well as depth. It’s also worth trying out mixing
the various miked and Recording Out signals.
Trying out a mix with all of these effects is worth it – mainly because you
need to check the different volumes against each other. Often I only use very
little of two of these effects, but the third one very prominently. If I were only
to use one of the effects, though, something would be missing.
It’s also worth lightly EQing and compressing the guitar and reverb signals
again. This is because every instrument needs its own space in the mix, and
everything you take away somewhere gives other instruments more room.
Here’s the motto: slim down everything as much as possible without losing
character or making the sound lifeless.
46 47

48
49
Troubleshooting
What to do as standard when looking for the cause of a fault
Check if all cables (guitar, FX, and speaker cables) have been correctly
plugged in and are in full working order. Take out all FX devices and test
™
AMP1
AMP1
There is no power. Ensure you’ve connected the cable to the mains correctly.
AMP1
I still don’t hear anything
•TheVOLUMEcontrolontheguitaristurneddown.
•
•Allsoundcontrolsaresetto0.
•TheFXpathisactivated,andissettoSERIAL,buttheconnected
FX device is not working.
The CLEAN Channel sounds overdriven
Turn the Boost off, and turn down control 24. Turn the CLEAN Volume
down to 3. From 5, standard guitar pickups will start to overdrive. Powerful pickups can fully saturate when the Clean Channel is only at 3. So
don’t worry – if the Volume can’t be turned up much, this is deliberate!
The best clean amps don’t have a Master. For this reason, turn up the
Master! Now you can slowly turn up the CLEAN Volume up to the
point that the sound starts to go into overdrive. After that, you can also
Faults and possible causes
reactivate the Boost and carefully turn up its control 24, until you get a
sound you like.
first without any peripheral devices.
™
won’t switch on
™
is correctly cabled up and switched on, but
™
AMP1
’s MASTER and/or VOLUME controls are turned down.
The footswitches don’t show my selected function
™
AMP1
is in Preset Mode 39.
To return to Normal Mode, switch
Channel button.
™
AMP1
on while holding down the
The amp is not reacting to external control com-
™
mands from the
•Is
REMOTE1
•Isthejackcableyou’reusinginfullworkingorder?
•WhentheswitchesontheRemotelightup,thereisaconnection.
REMOTE1
™
connected to the Remote port?
foot controller
When using FX units, the sound is undefined
and “muddy”
The FX unit provides a direct signal that is mixed with the original signal
in the parallel FX path. Depending on the FX you’re using, the phase
length of the direct signal when mixed in parallel with
to phase cancellation. This is particularly the case with digital FX devices,
because by changing from analogue into digital and back, latency naturally occurs. This changes the phase length.
To prevent this from happening, you should turn down the direct signal
in the FX device. If that’s not possible, switch the FX path to SERIAL.
AMP1
™
can lead
Humming noises. This topic is very complex, and
there are different causes!
•Theshieldingofthejackcableyouareusingisdamagedattheinputor
the effects path. Test this by exchanging the cable.
•Networkgroundingisnotworkingcorrectlyorismissingcompletely:
exchange power cord, try a different power socket.
•Strongexternalmagneticeldsareaffectingthepickup,cableconnections
or even the amplifier. Check whether
situated near power transformers and/or electric motors, and make sure to
keep a sufficient distance from these.
AMP1
™
and connected cables are
“Bright humming noises” / “whirring”
(These noises often occur on stage near dimmer packs)
•Changeelectricalcircuit.Keepasufcientdistance.Switchthelighting
system to full power and leave it there.
•Groundloop:isthereaconnection(forexampleviaashieldedcable)
between
grounding via its own power plug?
If you do not have the skills or knowledge required, please consult an authorised service workshop or a service professional.
™
AMP1
and other equipment, which is also connected to network
Maintenance and Service
™
How can I extend the lifespan of my
•Avoidextremeshaking
•Alwaysmakesureventilationslotsareuncovered,foranundisturbed
air circulation
•Neverexpose
•Preventdustandmoisturefromenteringthedevice.
•Neverconnectdeviceswithexcessivelyhighoutputlevelsto
AMP1
™
’s input ports.
•No“doityourself”repairs!Thereplacementofinternalfusesalsoshould
be done by an experienced technician.
•No“doityourself”replacingoftubes!Thetubesusedin
characterised by exemplary build quality and an extremely long lifespan.
It’s extremely unlikely that you’ll have change tubes as would be the case
with typical tube amps.
AMP1
™
to extreme heat or cold.
AMP1
AMP1
?
™
are

50
51
Important Safety Instructions! Please read before connecting!
This product has been built in accordance with IEC 60065 and left the
factory in safe working order. In order to maintain this condition and ensure
safe operation, the user must follow the advice and warnings in the
operating manual.
The device conforms to Protection Class 1 (protectively earthed). If this
product is used in vehicles, ships or aircraft or at altitudes exceeding 2000m
above sea level, make sure to follow the appropriate safety regulations,
which may exceed the IEC 60065 requirements.
WARNING: To avoid the risk of fire and electric shock, do not expose the
device to moisture or rain. Do not open the housing – no user serviceable
parts are contained inside. Must only be serviced by qualified service
personnel.
This symbol, wherever it appears, alerts you to the presence of
dangerous, uninsulated dangerous voltage inside the enclosure –
voltage that may be sufficient to constitute a risk of electric shock.
This symbol, wherever it appears, alerts you to the presence of
externally accessible dangerous voltage. External wiring connected to
any terminal marked with this symbol must be a pre-assembled cable
Safety Instructions
complying with the manufacturers’ recommendations, or must be wiring
installed by qualified personnel only.
This symbol, wherever it appears, alerts you to important
operating and maintenance instructions in the accompanying
literature. Please read the manual.
This symbol, wherever it appears, alerts you: Take care!
Hot surface! To prevent burns, do not touch.
The CE mark is a conformity marking that confirms compliance
with the valid EMC directive (2004/108/EG). The standards EN
61000-6-1, EN 61000-6-3 and the Low Voltage Directive
(2006/95/EG) with standard EN 60335-1 are also complied with.
This device complies with directive (2002/96/EG) WEEE. Appliance
must not be disposed of with household waste, but must be recycled at the appropriate collection points for electrical and electronic
equipment/waste.
•Pleasereadtheseinstructions.
•Keeptheseinstructions.
•Thespecicationplateandtechnicaldatacanbefoundontheunderside
of the device.
•Followallwarningsmarkedontheproductandfollowallinstructionsin
this manual.
•Donotusethisproductnearwater.Donotplacetheproductnearwater,
bathtubs, washbasins, kitchen sinks, wet areas, swimming pools or damp
rooms.
•Donotplaceobjectsthatcontainliquidontheproduct(suchasvases,
glasses, bottles, etc.)
•Cleanonlywithadrycloth.
•Donotremoveanycoversorsectionsofthehousing.
•Toavoidtheriskofelectricshock,thegroundingofthisproductmust
always be maintained. Use only the supplied power cable, and always
maintain the function of the lateral grounded contacts of the mains
connection. Do not attempt to bypass the safety purpose of the grounded
plug.
•Protectthepowercablefrombeingwalkedonorsqueezed,particularly
near plugs, electrical sockets, and the point where they exit the device!
Power supply cables should always be handled with care. Check power
cables for cuts and signs of wear and tear at regular intervals, especially
around the plug and the point where the cable exits the device.
•Neveruseadamagedpowercable.
•Unplugthedeviceduringthunderstormsorwhenunusedforlongperiods
of time.
•Referallservicingtoqualiedservicepersonnel.Servicingisrequired
when the unit has been damaged in any way, such as:
- When the power cable or plug is damaged or frayed.
- If liquid has been spilled or objects have fallen into the device.
- If the device has been exposed to rain or moisture.
- If the device does not operate normally when the operating instructions
are followed.
- If the device has been dropped or the housing has been damaged.
•Donotconnectexternalspeakerstothisproductwithanimpedance
lower than the minimum impedance given on the product or in this
manual. Use only cables with an adequate cross section in accordance
with the local safety regulations.
•Neverexposethedevicetodirectsunlight.
•Donotinstallthedevicenearheatsourcessuchasradiators,heatex
changers, ovens or other devices that produce heat.
•Donotblocktheventilationopenings.Installthedeviceinaccordance
with manufacturer’s instructions. The device must not be incorporated
into a built-in installation, for example a rack, unless proper ventilation is
provided.
•Allowthedevicetorestforatleastonehourafterithasbeenmovedfrom
cold to warm surroundings. Risk of condensation water inside the unit.
•Neverusethedevicenearopenre.
•Thedevicemustbeplacedatleast20cmawayfromwalls,mustnotbe
covered, and it must be ensured that at least 50cm of free air space is left
above the device.
CAUTION: When in Lead mode, extremely high gain and volume levels can cause strong feedback. Avoid this at all costs, as this may
cause hearing loss, and speakers may be damaged! For this reason, when operating at higher volumes, reduce the Gain, Treble and
Presence settings!

52
53
•Thedevicemayonlybeusedwithstands,tripods,tablesorbrackets
specified by the manufacturer or sold with the product.
•Useonlyaccessoriesrecommendedbythemanufacturer.Thisappliestoall
kinds of accessories, for example protective covers, transport bags, stands,
wall or ceiling mounting equipment. When attaching any kind of
accessories to the product, always follow the instructions provided by the
manufacturer. Only use the fixing points on the product as specified by the
manufacturer.
•ThedeviceisNOTsuitabletobeusedbyanypersonorindividuals
(including children) with reduced physical, sensory or mental ability, or by
individuals with insufficient experience and/or knowledge to operate such
an appliance. Children under four years of age must be kept away from
the device at all times.
•Neverpushobjectsofanykindintothedevicethroughhousingslotsas
they might touch dangerous voltage points or cause short outs. This could
result in the risk of fire or electric shock.
•Thedeviceiscapableofproducingsoundpressurelevelsinexcessof
90dB. This could lead to permanent hearing damage! Exposure to
extremely high noise levels may cause permanent hearing loss. If
continuously exposed to such high volume levels, hearing protection
should be worn.
•Themanufactureronlyguaranteesthesafety,reliabilityandperformance
of this device under the following conditions:
- Installation, extension, re-adjustment, modifications or repairs are
carried out by the manufacturer or by authorised personnel.
- The electrical installation of the relevant part complies with the
requirements of IEC (ANSI) specifications.
- The device is used in accordance with the operating instructions.
- The electrical safety of the device is regularly checked and tested by a
qualified technician.
Technical Data:
Input: unbalanced jack
Sensitivity: OV-15V P2P maximum
Input impedance: 2 M Ω
Power output: about 100 watts
Speaker connections
Input jacks: 1 x 8 Ω, 1 x 16 Ω
FX Send/Return: unbalanced jack
FX Send-Output and FX-Return Input levels dependent on switching
LOW: -10dBU +/-1dB or 0.7V P2P
HI: +4dBU +/-1dB or 3.46V P2P
FX Send-Output impedance: < 1.3kΩ
FX Return-Input impedance: > 18kΩ
Mains voltage range: 100-240V +/- 10 % 50-60 Hz
Power consumption: max. 150 watts
Fuses: internal: 3.15 SB
Logic MIDI control system:
STM 8 S
System interfaces:
Upgradeable with external programming device
BluGuitar
Dimensions:
Width: 245 mm
Height: 68 mm
Depth: 192 mm
Weight: 1.2 kg
®
specific, anachronous data protocol.
Safety Instructions
Ambient operating temperature range:
0 °C to + 35 °C
We reserve the right to perform technical modifications without prior notice.
© Copyright 2014 BluGuitar GmbH.
Reproduction of this manual is expressly prohibited. All rights reserved.
BluGuitar GmbH
Universität des Saarlandes
Campus Starterzentrum, Geb. A1 1
D-66123 Saarbrücken
Technical Data
Phone: +49 (0)681 3022054
E-Mail: mail@bluguitar.com
www.bluguitar.com

AMP
MASTER
LEVEL
VOLUME GAIN
MASTER
LEVEL
VOLUME GAIN
AMP
MIDI
REMOTE
LOOPER KIT
FEATURES
100 WATT POWER, CLEAN, VINTAGE, CLASSIC, MODERN, BOOST, REVERB,
™
CUSTOM CONTROL
access to all AMP1 switching functions by MIDI Program Change
2ND MASTERVOLUME, POWERSOAK, MIDI OUT
, FX-LOOP (serial - parallel), PHONES, RECORDING OUT
MIDI IN-ADAPTER for AMP1
programmable GAIN for all 4 Channels
36 Presets in 4 Banks à 9 Sounds
4 TRUE-BYPASS-RELAIS-LOOPS
SWITCHING
CLEAN - OVERDRIVE, BOOST, REVERB
Your 3 favourite sounds as Presets on internal Footswitches
CLEAN, VINTAGE, CLASSIC, MODERN, BOOST, REVERB, FX-LOOP,
128 PRESETS*,
POWERSOAK LEVEL and GAIN for all 4 Channels by MIDI Control Change
2ND MASTER
* REQUIRES STANDARD MIDI PEDAL ** REQUIRES MIDI PEDAL WITH CONTROLER
CLEAN, VINTAGE, CLASSIC, MODERN, BOOST,
REVERB, FX-LOOP , 2ND-MASTER, POWERSOAK
PRESETMODE: 4 BANKS à 9 PROGAMMABLE PRESETS
Programmable with REMOTE1
**
, POWERSOAK**, access to
2ND MASTER,
HOME & STUDIO
CLUB STAGE
OPEN AIR
ARENA
PERFECT
54 55
FOR
Recording Out
NANOCAB
FATCAB
2x12 Box
4x12 Box

BluGuitar.com
1 2 3 4
1 2 3 4
 Loading...