


Blue Tiger Advantage PLUS
User Manual
bluetigerusa.com

CONTENTS
Thank You 3
Please Read this Reference Manual 3
Features 3
Charge the Battery 4
Connecting Headset to Device 4
Pairing 4
Phone Calls 5
Answer Call
End Call
Ignore Incoming Call (1st or 2nd call)
Answer 2nd Incoming Call
Custom User Functions 6
Changing Language
Turning the Blue Tiger LED On/O
Microphone Mute
Voice Activation
Understanding LED Lights and Tones 7
Position the Boom 8
Adjust Headband 8
Mic Boom Tension & Headband Disassembly 9
Microphone Orientation 10
Patents 11
Specications 11
Cleaning and Maintenance 11
Troubleshooting 12
Battery Safety Guidelines 13
Warranty and Customer Support 13
Safety and Regulatory Information 14

THANK YOU
We appreciate your purchase of the Blue Tiger Advantage PLUS Headset. This rugged
wireless Headset combines high-quality audio performance, environmental durabilit y, and
lightweight comfort without sacricing stability during active use.
PLEASE READ THIS REFERENCE MANUAL
Please take the time to follow the instructions in this reference guide carefully.
It will help you set up and operate your Advantage PLUS Headset properly and enjoy its
advanced features. Please save this guide for future assistance.
FE AT UR E S
Adjustable
Headband
Snap Fit
Bi-Directional Noise
Cancellation
Microphone
NF C Tag
Flexible
T-Pa d
Flexible
Microphone
Boom
Ear Cushion
Boom
Tightening
Knob
Volume
Buttons
USB
Charging
Port
Multi-Function
Button (MFB)
LED
3

CHARGE THE BATTERY
1. Remove the USB Charging Port Cover and connect Charging Cable to a USB adapter.
2. Insert the Charging Cable into the Headset USB Port.
3. Charge for 3 hours prior to use.
Solid Red LED indicates charging.
Solid Blue LED indicates headset is fully charged.
CONNECTING HEADSET TO DEVICE
To use the Advantage PLUS Headset with a Bluetooth Device, such as a smartphone or
laptop computer, you must rst establish a wireless connection between the Headset and
the intended device. This process is called “Pairing”.
PAIRING
The Headset may be paired with Bluetooth devices using one of two methods:
1. Standard Bluetooth pairing where the headset is discovered by the Bluetooth Device.
2. Touch-to-Pair with devices supporting an NFC Connection.
Headset must be within close proximity of the Bluetooth Device to complete pairing. To
initiate pairing, Headset must be powered o. If the Headset is ON, turn the Headset OFF
by pressing the Multi-Function Button (MFB) for 2.5 seconds.
1. Initiate Standard Bluetooth pairing by pressing the MFB for 6 seconds - press and hold
the button - until you hear “Pairing, Please Wait” and the LED alternately ashes red and
blue. Use the Bluetooth Device’s Bluetooth search and pairing functionality (refer to the
Device or Host documentation if necessar y) and select “AdvantagePLUS”. If necessary,
enter four zeros (0000) for the passcode and accept connection.
2. For Touch-to-Pair, initiate Standard Bluetooth Paring before touching Headset NFC tag
to NFC tag of Host. The Headset NFC Tag is located in the Microphone A ssembly.
4 | Blue Tiger Advantage PLUS User Manual v1.2

Once successfully paired, you will hear “Device Connected” and the LED will ash blue, once
every two seconds indicating the Headset and Bluetooth Device are connected. The
Headset may be paired to a new Bluetooth Device using the above procedure. Note that
this will undo the pairing to the current Bluetooth Device.
Once the Headset and Bluetooth Device have been paired, the Headset and Bluetooth
Device will automatically reconnect the next time they are both powered on and in close
proximity to each other.
Multipoint Pairing
It may be useful to have the Headset connected to 2 devices simultaneously. For example,
to 2 dierent smartphones, or to a phone and a laptop computer. This is called Multipoint
pairing. For Multipoint pairing:
1. Turn o Bluetooth on the 1st connected Device.
2. Turn on Bluetooth on the second Device.
3. Initiate Pairing on the Headset (refer to Pairing section).
4. Pair the Headset with the second Device. You should hear an alert, “Device Connected”.
5. Turn ON Bluetooth on the 1st Device. Using the Device Bluetooth search menu,
reconnec t to the AdvantagePLUS Headset. You should hear a second “Device
Connected” aler t.
Your Headset is now connected with both devices and can now accept a call or listen to
audio/video from either device.
For more information or assistance with Multipoint Pairing, please contact Customer
Support (see Warranty and Customer Support section).
PHONE CALLS
Answer Call
To answer a phone call, tap or press the Multi-Function Button (MFB) for 0.5 seconds or less.
End Call
To end a call (hang up), press and hold the MFB for 1 second.
Ignore Incoming Call (1st or 2nd call)
Press and hold the MFB for 1 second.
Answer 2nd Incoming Call
To answer a second incoming call and end the ongoing call, tap or press the MFB for 0.5
seconds.
To answer a second incoming call and place the ongoing call (the rst call) on HOLD, double
press the MFB. To end the second call and resume the 1st call on HOLD, tap or press the
MFB for 0.5 seconds.
5

CUSTOM USER FUNCTIONS
Changing Language
Change the Headset voice prompt language by pressing the Multi-Function Button (MFB)
and Vol+ button simultaneously for 1 second. This function can only be activated in
standby or connected mode. The following languages are selectable: English, French,
German, and Spanish. Each successive but ton press will cycle to the next language.
Turning the Blue Tige r LED On/O
The Blue Tiger LED can be turned o by pressing Vol+ and Vol- simultaneously for 5
seconds. This function can only be activated in standby or connected mode.
To turn the LED back on, press Vol+ and Vol- simultaneously for 5 seconds.
Microphone Mute
During phone calls, the microphone can be muted by pressing Vol+ and Vol- for 1 second.
User will hear a prompt “Mute On”. A double tone will alert user every 10 seconds that the
microphone is muted.
Pressing Vol+ and Vol- for 1 second will deactivate the Microphone Mute func tion. User will
hear a prompt “Mute O”.
Voice Activation
To initiate the Bluetooth Device’s Voice Assistant (such as Apple Siri, Go ogle Assistant,
Samsung Bixby, etc.), double press the MFB. Listen for the tone then begin speaking.
Apple and S iri are trademar ks of Apple Inc. , registered in th e U.S. and other cou ntries. Googl e and Google
Assist ant are trademark s of Google LLC. S amsung and Bixby ar e trademarks o f Samsung Elect ronics Co., LTD.
6 | Blue Tiger Advantage PLUS User Manual v1.2

UNDERSTANDING LED LIGHTS AND TONES
Primary Features Headset Control LED Light Tones
Pairing
Pairing Complete Automati c No LED Outp ut “Device Connected”
Pairing Failure Automa tic No LED Out put “Pairing Incomplete”
Power On/O Press MFB for 2. 5 seconds Blue/Re d Flash 3 Times
Volume
Connected Automatic
Microphone Mute
Change Language Press MFB an d Vol+ for 1 second No LED Outp ut “English Selected”
Turn LED On/O
Not Connected Automatic Blue Solid “Lost Connection”
Link Lost Automatic No LED output “Lost Connec tion”
Low Batte ry Warning Automat ic
Low Battery Shutdown Automatic Red Flash 3 T imes 4 Descending
A/V Playback Features
A/V Streaming Automatic
Play or Pause Press MFB for 0 .5 seconds No LED Out put Short H igh
Track Forward P ress Volume Up for 1 se cond No LED Outp ut Short Hig h
Track Backward Press Volu me Down for 1 secon d No LED Output Sho rt High
Phone Call Features Headset Control LED Light Tones
Answer/End Call Press MFB fo r 0.5/1 seconds No LED Outp ut One Shor t/Two Short
Call Ongoing Automatic
Ignore 1st Call/2nd Call Press MFB for 1 s econd N o LED Output Long Low
Answer Second Call/
Hang up Ong oing Call
Answer Second Call/
Hold Ongoing Call
Switch bet ween 1st and
2nd Call
2nd Call Ongoing Automatic
Last Number Redial
Voice Activation Doub le Press MFB No LED Output One Shor t
Powered O, Pr ess MFB for 6
Seconds
Press Volume + o r Volume - to
Increase or Decrease Volume
Press Vol+ and Vol - simultaneo usly
for 1 secon d to Mute/Unmute
In Connec ted Mode, Press Vol+
and Vol- for 5 s econds
Blue and Re d Alternate
Flash
No LED Outp ut
Blue Flash O nce Every 2
seconds
No LED Outp ut
No LED N/A
Red Flash Twice Eve ry 2
Seconds
“Pairing , Please Wait”
“Blue Tiger
Activated”, “Blue
Tiger O ”
< Increase Volume
> Decreas e Volume
Double Short
“Mute On”, “Mute
O”
“Battery Low ”
Headset Control LED Light Tones
Blue Flash Twice Eve ry 2
seconds
Blue Flash O nce Every 3
seconds
Press MFB for 0 .5 seconds No LED Out put One Shor t
Double Pr ess MFB No LED Output Lo ng Low
Double Pr ess MFB No LED Output N /A
Flash Red On 1 S econd,
Press Volume + a nd Volume – for
0.5 seconds
O 1 Secon d
No LED Outp ut Long Low
N/A
N/A
N/A
7
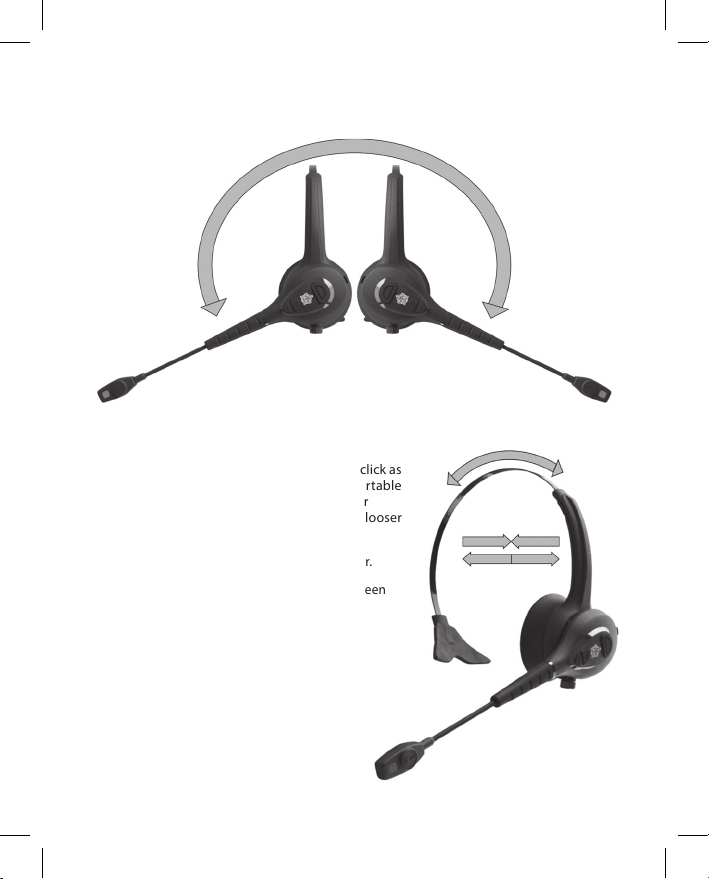
POSITION THE BOOM
Do not rotate the boom beyond the stop point.
Stop Point
Left Side Boom Placement
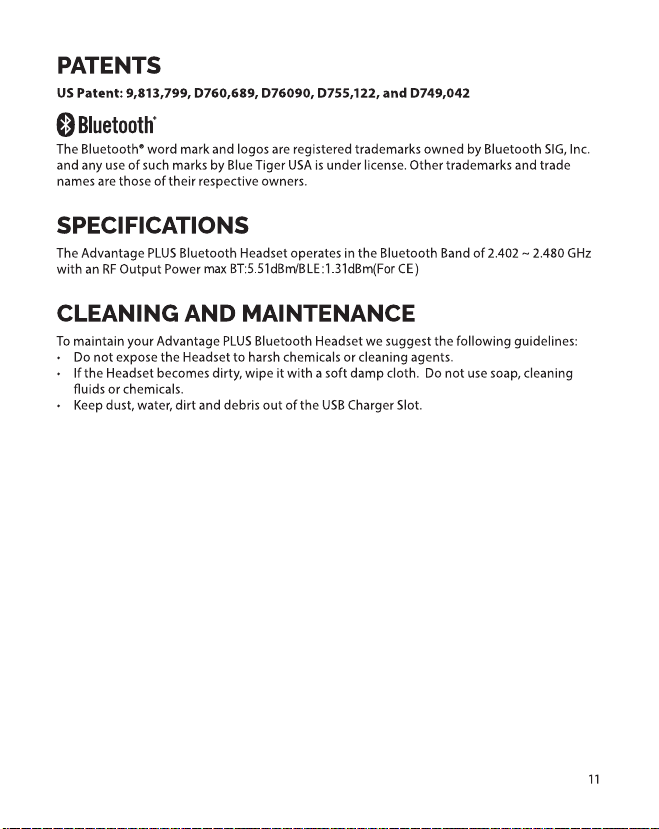
ADJUST HEADBAND
The black coated stainless-steel headband will click as
it is lengthened or shortened to size for a comfortable
position. The headband can also be squeezed or
stretched by carefully bending for a tighter or a looser
t to the head. When adjusting the headband:
• Position the ear cushion in the center of the ear.
• Position the T-Pad above the ear, half way between
the top of the ear and the top of the head.
8 | Blue Tiger Advantage PLUS User Manual v1.2
Stop Point
Right Side Boom Placement
Adjust Size
Tighter Fit
Looser Fit

MIC BOOM TENSION & HEADBAND
DISASSEMBLY
The microphone boom position tension can be adjusted. Simply tighten or loosen the mic
boom by tightening or loosening the Boom Tightening Knob (Set Screw) as shown.
1. Loosen the Headband Set Screw (counterclockwise) or tighten (clockwise) to loosen or
tighten the boom position up or down.
It is not necessary to disassemble your Advantage PLUS Headset. However, if the headband
were to become separated from the mic boom, simply reattach it as shown and tighten the
Set Screw. This feature allows for future accessories.
Reattach the Bluetooth Headset Module (mic boom) to headband and tighten the Set Screw.
2.
9

INSTALL WINDSCREEN AND EAR CUSHION
The microphone Windscreen and the speaker Ear Cushion are both easily replaceable.
1. Slide the mic Windscreen over the microphone assembly like a sock.
2. The Ear Cushion snaps on to the headband assembly. Unsnap the cushion from the
headband to replace or interchange between the foam or leather cushions (both included).
MICROPHONE ORIENTATION
Talk Side
Noise Cancellation Side
Speech Recognition Microphone
Talk Indicator
NF C Tag
Noise Cancellation Microphone
10 | Blue Tiger Advantage PLUS User Manual v1.2
Volume levels are measured in decibels (dB). Exposing your ears to any noise at or
above 85 dB can cause gradual hearing loss.
According to the Occupational Safety and Health Administration (OSHA), listening
to volume levels over 100 dB for more than two hours at a time can lead to
hearing loss.
*Your Advantage PLUS headset has the capability to reach a colume level that
exceeds 100 dB.
**Please exercise caution.
http://www.osha.gov/SLTC/noisehearingconservation/#loud

TROUBLESHOOTING
Operation Problem Possible Solution
Make sure Headse t is fully cha rg e d.
Operating Headset will not Turn On.
Does not Pair.
Pairing
Headset a ppears to be
connec ted but cannot
communicate with the
intended Bluetooth Device.
LED
NFC NFC Does not Pair
No LED light visible on
Headset.
12 | Blue Tiger Advantage PLUS User Manual v1.2
Make sure Headset is cha rged by placing
USB Cable in USB Charging Slot and
follow the Headset charging instructions.
Headset s hould be OFF when beginning
the pairing process.
Make sure inte nded Bluetooth Device is
turned on.
Make sure the H eadset is within 12 inches
of intended Bluetooth Device.
Make sure you s elect “Advantage PLUS”
on the Bluetooth Device’s Bluetooth
search menu
Headset m ay be connected with a
dierent Bluetooth Device.
1. M ake sure the intended B luetooth
Device is wi thin 12 inches of H eadset.
2. Make sure all other non-intended
Bluetooth Devices are at least 10 feet
away from the Headset.
3. Turn o the Headset and start the
pairing process again.
Press Vol+ AND Vol- together for 5 seconds
to turn LED ON. Pressing Vol+ and Volagain, together for 5 seconds, will turn the
LED OFF. The LED on/o control will NOT
function while streaming audio or while a
call is in progress.
For Touch-to-Pair, initiate Standard
Bluetooth Paring before touching the
Headset NFC tag to the NFC tag of the
Bluetooth Device. The Headset NFC Tag is
located in Microphone Assembly.

SAFETY AND REGULATORY INFORMATION
• Warnings for use of Wireless Devices.
Please obs erve all warnin g notices with
regard to th e usage of wirele ss devices.
• Potentially Hazardous Atmospheres
– Vehicle s Use. You are reminde d of the
need to ob serve restric tions on the use of
radio dev ices in fuel depo ts, chemical
plants et c. and areas where t he air contains
chemica ls or particles (su ch as grain, dust,
or metal p owders) and any other a rea
where you w ould normally be a dvised to
turn o your vehicle engine.
• Potentially Hazardous Atmospheres –
Fixed Installations. You are reminded of
the need t o observe restr ictions on the us e
of radio de vices in fuel dep ots, chemical
plants et c. and areas where t he air contains
chemica ls or particles (su ch as grain, dust,
or metal p owders).
• Cont ains small part s which can be a
choking hazard.
• No t suitable for chil dren under age 3.
• Th is product conta ins magnets whic h can
be harmf ul to pacemakers, o r similar
medical devices.
• To reduc e the risk of re or ele ctrical shock ,
do not exp ose the produc t to rain or
moisture.
• As w ith any electro nic products, u se care
not to spill l iquids into any par t of the
system . Liquids can cause a f ailure and/or a
re hazard.
• Do n ot place any naked am e sources, such
as lighted c andles, on or nea r the
apparatus.
• Use c aution when usin g your headset whil e
operati ng a vehicle or enga ging in any
activi ty that require s your full attenti on.
Check and f ollow local laws re garding
mobile phone and headset use. Some
jurisdictions impose specic limitations,
such as single earpiece conguration, on
the use of su ch products whi le driving.
• So unds that you rely on as r eminders or
warnings may sound dierent when using
a headse t. Be aware of how thes e sounds
may vary i n character so you c an recognize
them as needed.
14 | Blue Tiger Advantage PLUS User Manual v1.2
• Do n ot leave a batter y on prolonged
charge wh en not in use.
CAUTIO N:
• Do n ot make modicati ons to the headset
or accessories. Unauthorized alterations
may compro mise safety, regu latory
compliance, and product performance and
warranty.
• Prevention of Hearing Loss
• To preven t possible heari ng damage, do
not liste n at high volume level s for long
periods.
• Use o nly with the suppli ed power supply
meetin g local regulato ry requiremen ts (ex.
UL, CSA, V DE, CCC).
• Use c aution when usin g a Headset while
operating a motor vehicle or anywhere the
inabilit y to hear outsid e sounds may
present a d anger to you or other s.
• Th e Advantage PLUS Head set does not
require scheduled cleaning. Should
cleanin g be necessary, simp ly wipe the
outsid e surfaces with a so ft damp cloth.
Regulatory Information
All Blue T iger USA devices are de signed to be
complian t with rules and reg ulations in the
locatio ns they are sold and w ill be labeled as
required. This regulatory information applies
to Model n umber 17-150401.
International
This device complies with internationally
recognized standards covering human exposure
to electromagnetic elds from radio devices.
Wireless Device Country Approvals
Regulatory markings, subject to certication,
are appli ed to the device sign ifying the ra dio
(s) is/are approv ed for use in the fol lowing
countries: United States, Canada, and Europe.
Note: Europe includes Austria, Belgium,
Bulgaria, Czech Republic, Cyprus, Denmark,
Estonia, Finland, France, Germany, Greece,
Hungary, Iceland, Ireland, Italy, Latvia,
Liechtenstein, Lithuania, Luxembourg, Malta,
Netherlands, Norway, Poland, Portugal,
Romania, Slovak Republic, Slovenia, Spain,
Sweden, Switzerland and the United Kingdom.


 Loading...