

Page 1
Blue Tiger Advantage
User Manual
bluetigerusa.com
Page 2

CONTENTS
Thank You 3
Please Read this Reference Manual 3
Features 3
Charge the Battery 4
Connecting Headset to Device 4
Pairing 4
Phone Calls 5
Answer Call
End Call
Ignore Incoming Call (1st or 2nd call)
Answer 2nd Incoming Call
Custom User Functions 6
Changing Language
Turning the Blue Tiger LED On/O
Microphone Mute
Voice Acrivation & Voice Dialing
Understanding LED Lights and Tones 7
Position the Boom 8
Adjust Headband 8
Install Windscreen & Ear Cushion 9
Microphone Orientation 10
Specications 11
Cleaning and Maintenance 11
Troubleshooting 12
Battery Safety Guidelines 13
Warranty and Customer Support 13
Safety and Regulatory Information 14
Page 3
THANK YOU
We appreciate your purchase of the Blue Tiger Advantage Headset.
This rugged wireless Headset combines high-quality audio performance, environmental
durability, and lightweight comfort without sacricing stability during active use.
PLEASE READ THIS REFERENCE MANUAL
Please take the time to follow the instructions in this reference guide carefully.
It will help you set up and operate your Advantage Headset properly and enjoy its
advanced features. Please save this guide for future assistance.
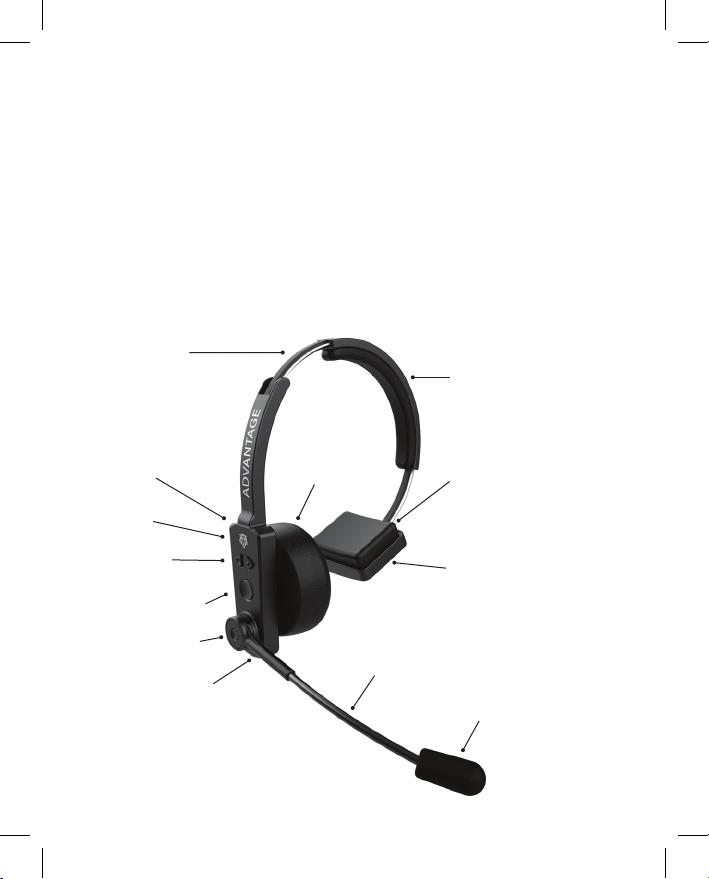
FE AT UR E S
Adjustable
Headband
Removable
Padded Headband
NFC
Pairing Tag
Blue Tiger
LED
Volume
Buttons
Multi-Function
Button (MFB)
Mute Button
USB Charging
Port
Removable
Leatherette
Ear Cushion
Flexible
Microphone
Boom
Cushioned
Leatherette T-Pad
Li-Polymer Battery
Located in T-bar
for Optimal Balance
Bi-Directional
Noise Cancellation
Microphone
3
Page 4
CHARGE THE BATTERY
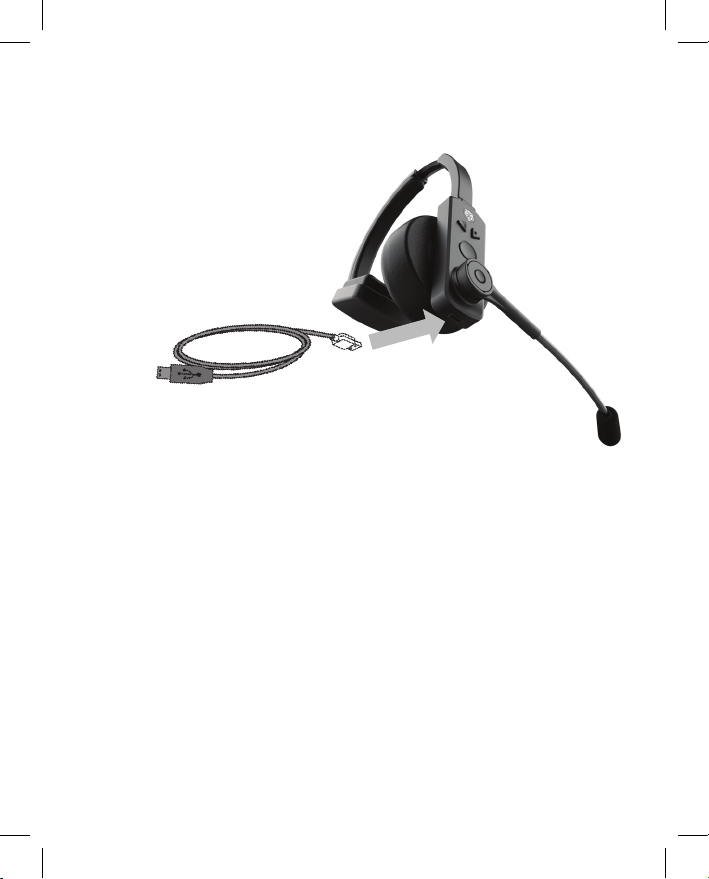
1. Insert the Charging Cable into the Headset USB Por t.
2. Charge for 3 hours prior to use.
Solid Red LED indicates charging.
Solid Green LED indicates headset is fully charged.
CONNECTING HEADSET TO DEVICE
To use the Advantage Headset with a Bluetooth Device, such as a mobile computer or
industrial tablet, you must rst establish a wireless connection between the Headset and
the intended device. This process is called “Pairing”.
PAIRING
The Headset may be paired with Bluetooth devices using one of two methods:
1. Standard Bluetooth pairing where the headset is discovered by the Bluetooth Device.
2. Touch-to-Pair with devices supporting an NFC Connection.
Headset must be within close proximity of the Bluetooth Device to complete pairing. To
initiate pairing, Headset must be powered o. If the Headset is ON, turn the Headset OFF
by pressing the Multi-Function Button (MFB) for 2.5 seconds.
1. Initiate Standard Bluetooth pairing by pressing the MFB for 5 seconds (press and hold the
button until you hear “Pairing, Please Wait”). The LED alternately ashes red and blue.
Use the Bluetooth Device’s Bluetooth search and pairing func tionality (refer to the Device
or Host documentation if necessary) and select “BT Advantage” (or “BT Adva” on some
phones). If necessary, enter four zeros (0000) for the passcode and accept connection.
2. For Touch-to-Pair, initiate Standard Bluetooth Paring before touching Headset NFC tag to
NFC tag of Host. The Headset NFC Tag is located in the housing above the Blue Tiger LED.
Once successfully paired, you will hear “Pairing Successful” and the LED will ash blue, once
4 | Blue Tiger Advantage User Manual v1.0
Page 5

every two seconds indicating the Headset and Bluetooth Device are connected. The
Headset may be paired to a new Bluetooth Device using the above procedure. Note that
this will undo the pairing to the current Bluetooth Device.
Once the Headset and Bluetooth Device have been paired, the Headset and Bluetooth
Device will automatically reconnect the next time they are both powered on and in close
proximity to each other.
Multipoint Pairing
It may be useful to have the Headset connected to 2 devices simultaneously. For example,
to 2 dierent smartphones, or to a phone and a laptop computer. This is called Multipoint
pairing. For Multipoint pairing:
1. Turn o Bluetooth on the rst connected Device, and turn on Bluetooth on the second Device.
2. Initiate Pairing on the Headset (refer to Pairing section, step 1).
3. Pair the Headset with the second Device. You should hear an alert, “Device Connected”.
4. Turn ON Bluetooth on the 1st Device. Using the Device Bluetooth search menu, reconnect
to the BT Advantage Headset. You should hear a second “Device Connected” alert.
Your Headset is now connected with both devices and can now accept a call or listen to
audio/video from either device.
For more information or assistance with Multipoint Pairing, please contact Customer
Support (see Warranty and Customer Support section).
PHONE CALLS
Answer Call
To answer a phone call, tap or short press the Multi-Function Button (MFB) once.
End Call
To end a call (hang up), tap or short press the MFB once.
Ignore Incoming Call (1st or 2nd call)
Press and hold the MFB for 1 second.
Answer 2nd Incoming Call
To answer a second incoming call and release the rst call, tap or short press the MFB.
To answer a second incoming call and place the rst call on HOLD, double tap the MFB
(2 short presses).
To switch between active call and call on HOLD, double tap the MFB (2 short preses).
To end the second call and return to the call on HOLD, tap or short press the MFB.
5
Page 6

CUSTOM USER FUNCTIONS
Changing Language
Change the Headset voice prompt language by pressing the Mute button and Vol- button
simultaneously for 5 seconds. This function can only be activated in standby or connected
mode. The following languages are selectable: English, French, German, and Spanish.
Press Mute and Vol- simultaneously again for 5 seconds to advance to the next language.
Turning the Blue Tige r LED On/O
The Blue Tiger LED can be turned OFF by pressing Mute and Vol+ buttons simultaneously
for 5 seconds. This function can only be ac tivated in standby or connected mode.
To turn the LED back ON, press Mute and Vol+ buttons simultaneously again for 5 seconds.
Microphone Mute
During phone calls, the microphone can be muted by pressing the Mute button for 1
second. User will hear a prompt “Mute On”.
A double tone will aler t user every 10 seconds while the microphone is muted.
Pressing the Mute button again for 1 second will deactivate the Microphone Mute function.
User will hear a prompt “Mute O”.
Voice Activation
To initiate the Bluetooth Device’s Voice Assistant (such as Apple Siri, Google Assistant,
Samsung Bixby, etc.), double press the MFB. Listen for the tone from your device, then
begin speaking.
Apple and S iri are trademar ks of Apple Inc. , registered in th e U.S. and other cou ntries. Googl e and Google
Assist ant are trademark s of Google LLC. S amsung and Bixby ar e trademarks o f Samsung Elect ronics Co., LTD.
6 | Blue Tiger Advantage User Manual v1.0
Page 7
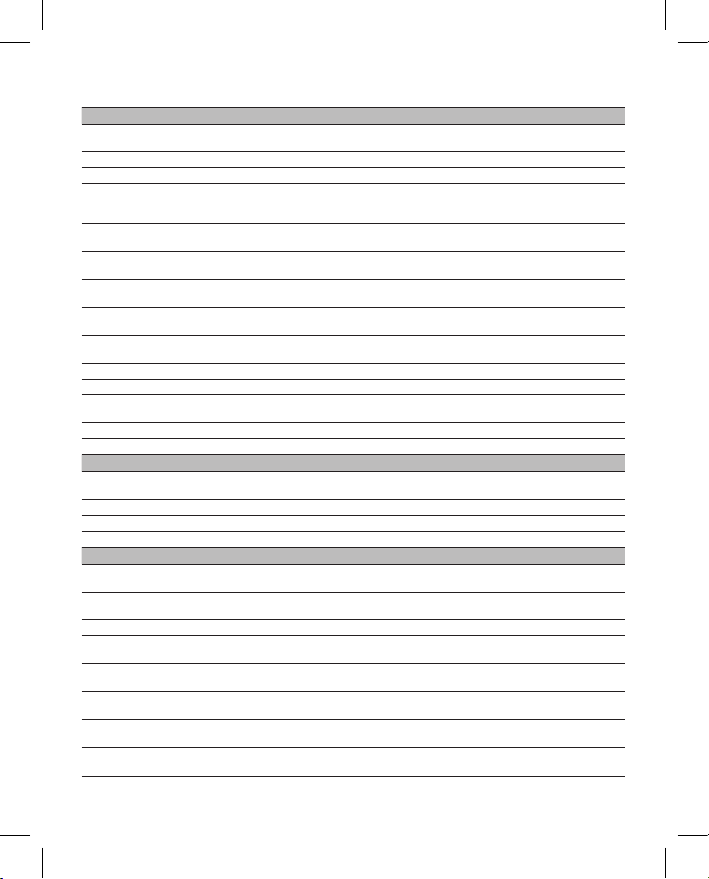
UNDERSTANDING LED LIGHTS AND TONES
Primary Features Headset Control LED Light Tones
Pairing
Pairing Complete Automati c No LED Outp ut “Device Connected”
Pairing Failure Automa tic No LED Out put “Pairing Incomplete”
Power On/O Press MFB for 2. 5 seconds Blue/Re d Flash 3 Times
Volume
Connected Automatic
Microphone Mute
Change Language
Turn LED On/O
Not Connected Automatic Blue Solid “Lost Connection”
Link Lost Automatic No LED output “Lost Connec tion”
Low Batte ry Warning Automat ic
Low Battery Shutdown Automatic Red Flash 3 T imes “Blue Tiger O ”
Battery Fully Charged Au tomatic Green Solid N/A
A/V Playback Features
A/V Streaming Automatic
Play or Pause Press MFB for 0 .5 seconds No LED Out put N/A
Track Forward P ress Volume Up for 1 se cond No LED Outp ut N/A
Track Backward Press Volu me Down for 1 secon d No LED Output N /A
Phone Call Features Headset Control LED Light Tones
Answer/End Call Press MFB fo r 0.5 seconds No LED Ou tput
Call Ongoing Automatic
Ignore 1st Call/2nd Call Press MFB for 1 s econd N o LED Output 2 N otes Falling
Answer Second Call/
Hang up Ong oing Call
Answer Second Call/
Hold Ongoing Call
Switch bet ween 1st and
2nd Call
2nd Call Ongoing Automatic
Last Number Redial
Voice Activation Doub le Press MFB No LED Ou tput One Sh ort
Powered O, Pr ess MFB for 5
Seconds
Press Volume + o r Volume - to
Increase or Decrease Volume
Press Mute Bu tton at base of Mic
Boom to Mute/Unmute
Press Mute an d Vol- for 5 seconds
to cycle to n ext language
In Connec ted Mode, Press Mu te
and Vol+ for 5 se conds
Blue and Re d Alternate
Flash
No LED Outp ut
Blue Flash O nce Every
2 seconds
No LED Outp ut
No LED Outp ut
No LED Outp ut /
LED Output resumes
Red Flash Twice Eve ry
2 Seconds
“Pairing , Please Wait”
“Blue Tiger
Activated”, “Blue
Tiger O ”
“Volume Maximum”
“Volume Minimum”
“Device Connected”
“Mute On”, “Mute O”
Reminde r tone ea. 10 sec
“English Selected”
“Español Seleccionado”
N/A
“Battery Low ”
Headset Control LED Light Tones
Blue Flash Twice Eve ry
2 seconds
Blue Flash O nce Every
3 seconds
Press MFB for 0 .5 seconds No LED Out put One Sho rt
Double Pr ess MFB No LED Outp ut Long Low
Double Pr ess MFB No LED Outp ut N/A
Red Flash eve ry
Press Volume + a nd Volume – for
0.5 seconds
2 seconds
No LED Outp ut Long Low
N/A
2 Notes Risi ng
One Shor t
N/A
N/A
7
Page 8
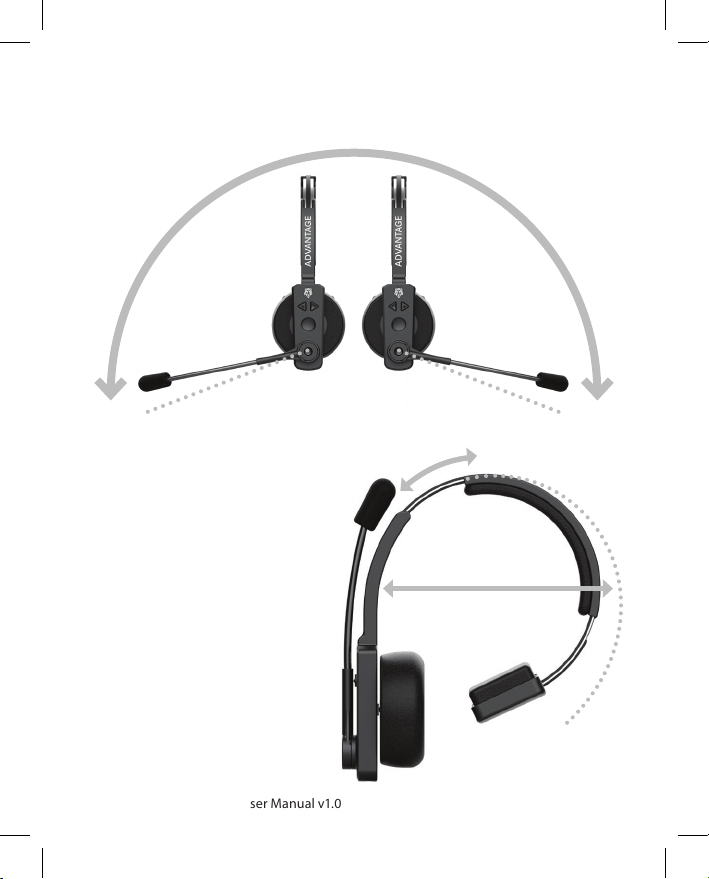
POSITION THE BOOM
Do not rotate the boom beyond the stop point to avoid damaging the headset.
Stop PointStop Point
ADJUST HEADBAND
The black coated stainless-steel headband
will click as it is lengthened or shor tened to
size for a comfortable position (1).
The headband can also be squeezed or
stretched by carefully bending for a tighter
or a looser t to the head (2).
When adjusting the headband:
• Position the ear cushion in the center
of the ear.
• Position the T-Pad above the ear, half
way between the top of the ear and
the top of the head.
• Slide the leather headband to a
comfortable position or remove it
completely if preferred.
8 | Blue Tiger Advantage User Manual v1.0
1
3
2
Page 9
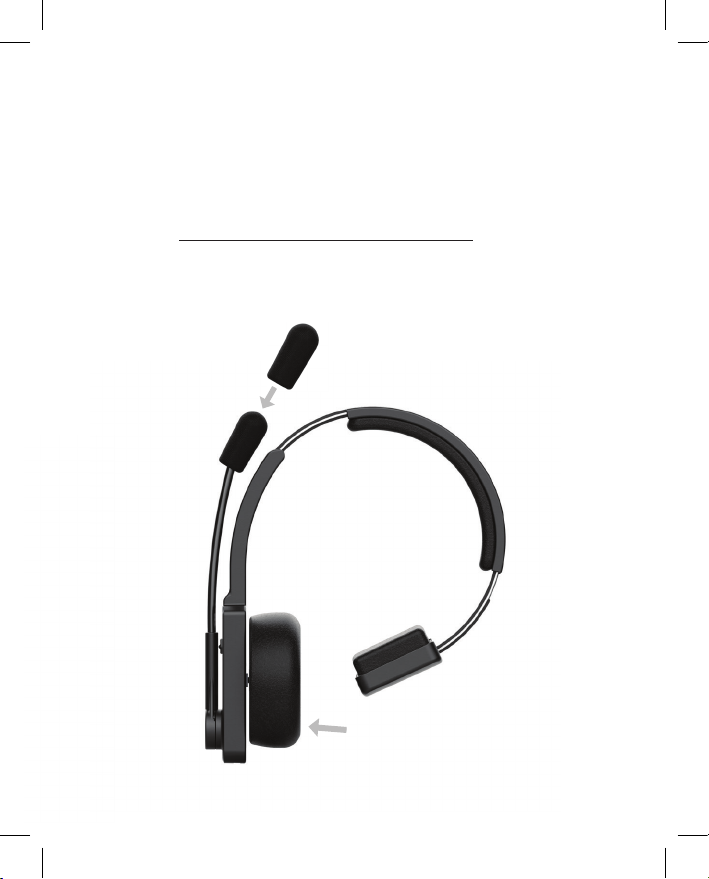
INSTALL WINDSCREEN AND EAR CUSHION
The Microphone Windscreen and the speaker Ear Cushion are both easily replaceable.
1. Slide the Mic Windscreen over the microphone asse mbly like a sock.
2. The Ear Cushion ts on to the speaker housing assembly. Gently “peel” the cushion o of the
housing to replace or interchange bet ween the foam or leather cushions (both included).
3. Fitting the leather cushion can be tedious. For a demonstration on how to interchange ear
cushions, visit: http://bluetigerusa.com/pages/advantage-learn
Ensure speaker housing
ange is tuc ked into
cushion all around
9
Page 10
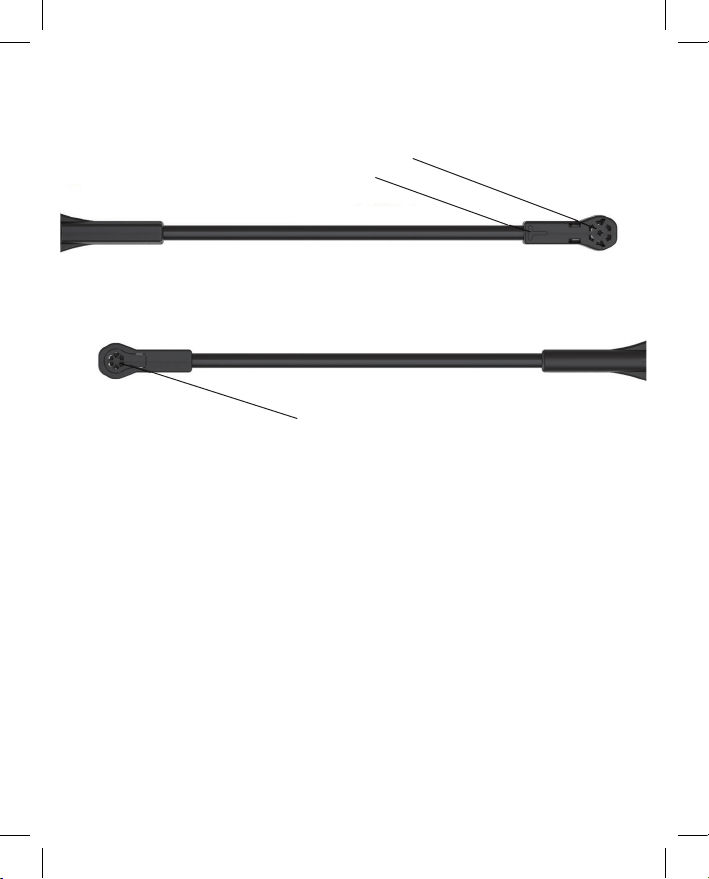
MICROPHONE ORIENTATION
Talk Side
Speech Recognition Microphone
Noise Cancellation Side
Talk Indicator
Noise Cancellation Microphone
10 | Blue Tiger Advantage User Manual v1.0
Page 11

The Bluetooth® word mark and logos are registered trademarks owned by Bluetooth SIG, Inc.
and any use of such marks by Blue Tiger USA is under license. Other trademarks and trade
names are those of their respective owners.
SPECIFICATIONS
The Advantage Bluetooth Headset operates in the Bluetooth Band of 2.402 ~ 2.480 GHz
with an RF Output Power < 10dBm.
CLEANING AND MAINTENANCE
To maintain your Advantage Bluetooth Headset we suggest the following guidelines:
• Do not expose the Headset to harsh chemicals or cleaning agents.
• If the Headset becomes dirty, wipe it with a sof t damp cloth. Do not use soap, cleaning
uids or chemicals.
• Keep dust, water, dirt and debris out of the USB Charger Slot.
11
Page 12

TROUBLESHOOTING
Operation Problem Possible Solution
Make su re Head se t is fu ll y charge d.
Operating He adset will not Turn On.
Does not Pa ir.
Pairing
Headse t appears to be
connec ted but cannot
communic ate with the
intended Bluetooth Device.
LED No LED light visible on Headset.
NFC NFC Does not Pair
Make sure He adset is charged b y placing
USB Cable in U SB Charging Slot and f ollow
the Headset charging instructions.
Headse t should be OFF when b eginning the
pairing process.
Make sure int ended Bluetoo th Device is
turned on.
Make sure th e Headset is withi n 12 i nches of
intended Bluetooth Device.
Make sure you select “BT Advantage”
(or “BT Adv ”) on the Bluetoo th Device’s
Bluetooth search menu
Headse t may be connected w ith a dierent
Bluetooth Device.
1. Make sure the inte nded Bluetoot h Device
is within 12 inche s of Headset.
2. Make sure all other non-intended
Bluetooth Devices are at least 10 feet away
from the Headset.
3. Turn o the Headset and start the pairing
process again.
It may be use ful to Reset the Dev ice Pairing
List on the h eadset. To do so: Press th e MFB
and the Mut e Button simulta neously for at
least 2 se conds until the LED as hes Green 3
times. You wil l now need to pair the h eadset
again to you r devices.
Press Vol+ AND Vol- together for 5 seconds to
turn LED ON. Pressing Vol+ and Vol- again,
together for 5 seconds, will turn the LED OFF.
The LED on/o control will NOT function
while streaming audio or while a call is in
progress.
For Touch-to-Pair, initiate Standard Bluetooth
Paring before touching the Headset NFC tag
to the NFC tag of the Bluetooth Device. The
Headset NFC Tag is located in Microphone
Assembly.
12 | Blue Tiger Advantage User Manual v1.0
Page 13

BATTERY SAFETY GUIDELINES
• PROLONGED E XPOSURE TO HIGH VOLUME LEVELS CAN DAMAGE YOUR H EARING. To avoid
injury, set the volume to the lowest comfortable level. If you experience ringing in your ears, or
voices sound mued, stop using the headset. Avoid raising the vo lume to block out noisy
surroundings. Your ears may adapt to volume that is too high, which could result in permanent
hearing loss without any noticeable discomfort.
• Do not leave th e Headset batter y on prolonged charg e when not in use.
• The area in which the Headset is charged should b e clear of debris and comb ustible materials or
chemicals. Improper charging use may result in a re, explosion, or other hazard.
• To charge the Headset Battery, the Headset and USB Charger temperatures must be between
50°F – 95°F (10°C – 35°C).
• Do not use incompatibl e Batteries and/or Chargers. Use of an incompatible USB Charger may
present a risk of re, explosion, leakage, or other hazard. If you have any questions ab out the
compatibility of a USB Charger, contact your Distributor Customer Support.
• Do not disassemble, open, crush, bend, deform, puncture, or shred.
• Severe impact from dropping any B attery-Op erated Device on a hard surface could cause the
Battery to overheat.
• Do not shor t circuit Headset or allow metallic or conductive obje cts to contact the USB
Charging Slot.
• Do not modify or remanufac ture, attempt to inser t foreign object s into the USB Charging Slot,
immerse or expose to w ater or other liquids, or e xpose to re, explosion, or other hazard.
• Do not leave or store the Headset in or near areas that might get ver y hot, such as in a parked
vehicle, near a radiator or other heat source.
• Do not place Headset into a microwave oven, conventional oven, toaster oven, washer, dryer,
dishwasher, or other mechanical devices.
• Headset usage by children should be super vised.
• Please follow local regulations to promptly dispose of used Headset.
• Do not dispose of Headset in re.
• In the event of a B attery leak, do not allow the liquid to come in contact with the skin or eyes. If
contact is made, wash the aected area with large amounts of water and se ek medical advice.
• If you suspe ct damage to your Headset, contact Blue Tiger USA Customer Suppor t to arrange
for inspection.
WARRANTY AND CUSTOMER SUPPORT
• For the complete Blue Tiger USA Product Warrant y Statement, visit:
https://bluetigerusa.com/pages/product-warranty
• If you have problem using your equipment, contac t Blue Tiger USA Custome r Support. Our
Texas Based Customer Support Team is available Toll-Free, Mo nday – Friday, 8 AM – 5 PM
Central Time, 1- 80 0- 935 -1165
• For the lates t version of this User Manual visit:
https://bluetigerusa.com/pages/user-manuals-1
13
Page 14

SAFETY AND REGULATORY INFORMATION
• Warnings for use of Wireless Devices.
Please obs erve all warnin g notices with
regard to th e usage of wirele ss devices.
• Potentially Hazardous Atmospheres
– Vehicle s Use. You are reminde d of the
need to ob serve restric tions on the use of
radio dev ices in fuel depo ts, chemical
plants et c. and areas where t he air contains
chemica ls or particles (su ch as grain, dust,
or metal p owders) and any other a rea
where you w ould normally be a dvised to
turn o your vehicle engine.
• Potentially Hazardous Atmospheres –
Fixed Installations. You are reminded of
the need t o observe restr ictions on the us e
of radio de vices in fuel dep ots, chemical
plants et c. and areas where t he air contains
chemica ls or particles (su ch as grain, dust,
or metal p owders).
• Cont ains small part s which can be a
choking hazard.
• No t suitable for chil dren under age 3.
• Th is product conta ins magnets whic h can
be harmf ul to pacemakers, o r similar
medical devices.
• To reduc e the risk of re or ele ctrical shock ,
do not exp ose the produc t to rain or
moisture.
• As w ith any electro nic products, u se care
not to spill l iquids into any par t of the
system . Liquids can cause a f ailure and/or a
re hazard.
• Do n ot place any naked am e sources, such
as lighted c andles, on or nea r the
apparatus.
• Use c aution when usin g your headset whil e
operati ng a vehicle or enga ging in any
activi ty that require s your full attenti on.
Check and f ollow local laws re garding
mobile phone and headset use. Some
jurisdictions impose specic limitations,
such as single earpiece conguration, on
the use of su ch products whi le driving.
• So unds that you rely on as r eminders or
warnings may sound dierent when using
a headse t. Be aware of how thes e sounds
may vary i n character so you c an recognize
them as needed.
14 | Blue Tiger Advantage User Manual v1.0
• Do n ot leave a batter y on prolonged
charge wh en not in use.
CAUTIO N:
• Do n ot make modicati ons to the headset
or accessories. Unauthorized alterations
may compro mise safety, regu latory
compliance, and product performance and
warranty.
• Prevention of Hearing Loss
• To preven t possible heari ng damage, do
not liste n at high volume level s for long
periods.
• Use o nly with the suppli ed power supply
meetin g local regulato ry requiremen ts (ex.
UL, CSA, V DE, CCC).
• Use c aution when usin g a Headset while
operating a motor vehicle or anywhere the
inabilit y to hear outsid e sounds may
present a d anger to you or other s.
• Th e Advantage PLUS Head set does not
require scheduled cleaning. Should
cleanin g be necessary, simp ly wipe the
outsid e surfaces with a so ft damp cloth.
Regulatory Information
All Blue T iger USA devices are de signed to be
complian t with rules and reg ulations in the
locatio ns they are sold and w ill be labeled as
required. This regulatory information applies
to Model n umber 17-140301.
International
This device complies with internationally
recognized standards covering human exposure
to electromagnetic elds from radio devices.
Wireless Device Country Approvals
Regulatory markings, subject to certication,
are appli ed to the device sign ifying the ra dio
(s) is/are approv ed for use in the fol lowing
countries: United States, Canada, and Europe.
Note: Europe includes Austria, Belgium,
Bulgaria, Czech Republic, Cyprus, Denmark,
Estonia, Finland, France, Germany, Greece,
Hungary, Iceland, Ireland, Italy, Latvia,
Liechtenstein, Lithuania, Luxembourg, Malta,
Netherlands, Norway, Poland, Portugal,
Romania, Slovak Republic, Slovenia, Spain,
Sweden, Switzerland and the United Kingdom.
Page 15

CE NOTIC E TO USERS
Blue Tig er USA hereby decla res that this
product is in compliance with the essential
requirements and other relevant provisions EU
RED - DIREC TIVE 2014/53/EU & EU-LOW
VOLTAGE DIRECTIV E 2014/35/EU and al l other
applicable EU directive requirements.
FCC NOTICE T O USERS
This devi ce complies with FCC an d Industry
Canada RF r adiation exp osure limits set f orth
for gene ral population . It must not be
co-located or be operating in conjunction with
any other antenna or transmitter.
In the United States:
This equi pment has been te sted and found to
comply wi th the limits for a Cl ass B digital
device, pu rsuant to Part 15 of the FCC Rul es.
These lim its are designe d to provide
reasonable protection against harmful
interference in a residential installation. This
equipment generates, uses, and can radiate
radio frequency energy and, if not installed
and used in a ccordance with th e instruction s,
may cause harmful interference to radio
communications.
However, this is no guarantee that interference
will not oc cur in a particul ar installation . If this
equipment does cause harmful interference to
radio or television reception, which can be
determi ned by turning the e quipment o and
on, you are e ncouraged to tr y to correct the
interf erence by one or mor e of the following
measures:
• Reorient or relocate the receiving antenna.
• Increase the separation between the
equipment and receiver.
• Con nect the Head set Charger to an out let
on a diere nt circuit than the o ne to which
the recei ver is connecte d.
• Consult the dealer or an experienced radio/
TV tech nician for help.
Changes or modications not expressly
approved b y Blue Tiger USA cou ld void the
user’s aut hority to oper ate this equipme nt.
In USA and Canada:
RFWarningSt atement
Thedevi cehasbeenevaluate dtomeetgenera l
RFexpos urerequirement .Thedevicecanbe
usedinpo rtableexpo sureconditionwi thout
restriction.
This devi ce complies with p art 15 of the FCC
rules and License-exempt transmitter(s)/
receiver(s) that comply with Innovation,
Science and Economic Development Canada’is
license -exempt RSS(s). Op eration is subje ct to
the following two conditions:
1. This device may not ca use harmful
interference.
2. This device must accept any interference
received, including interference that may
cause undesired operation.
L'appareil a été éva lué pour répond re aux
exigences générales en matière d'exposition
aux radiofréquences.L'appareil peut être
utilisé dans des conditions d'exposition
portables sans restriction. Cet appareil
contient des émetteurs / ré cepteurs exemptés
de licence co nformes aux RSS (R SS)
d'Innovation, Sciences et Développement
économique Canada. L'exploitation est
autorisée aux deux conditions suivantes:
1. l'appareil n e doit pas produi re de brouillage , et
2. l'ut ilisateur de l'app areil doit accepte r tout
brouillage radioélectrique subi, même si le
brouillage est susceptible d'en
compromettre le functionnement.
This class B digital apparatus complies with
CAN ICES -3 (B) / NMB-3 (B)
Waste Electrical and Electronic Equipment
This sym bol on the produ ct or on its
packaging indicates that this product must not
be dispos ed of with your oth er household
waste. Ins tead, it is your resp onsibility to
dispose o f your waste equip ment by handing
it over to a desi gnated collec tion point for th e
recycl ing of waste elec trical and ele ctronic
equipment. The separate collection and
recycl ing of your waste eq uipment at the time
of dispos al will help to conse rve natural
resource s and ensure that it is re cycled in a
manner th at protects hum an health and the
environment.
15
Page 16

 Loading...