

Page 1
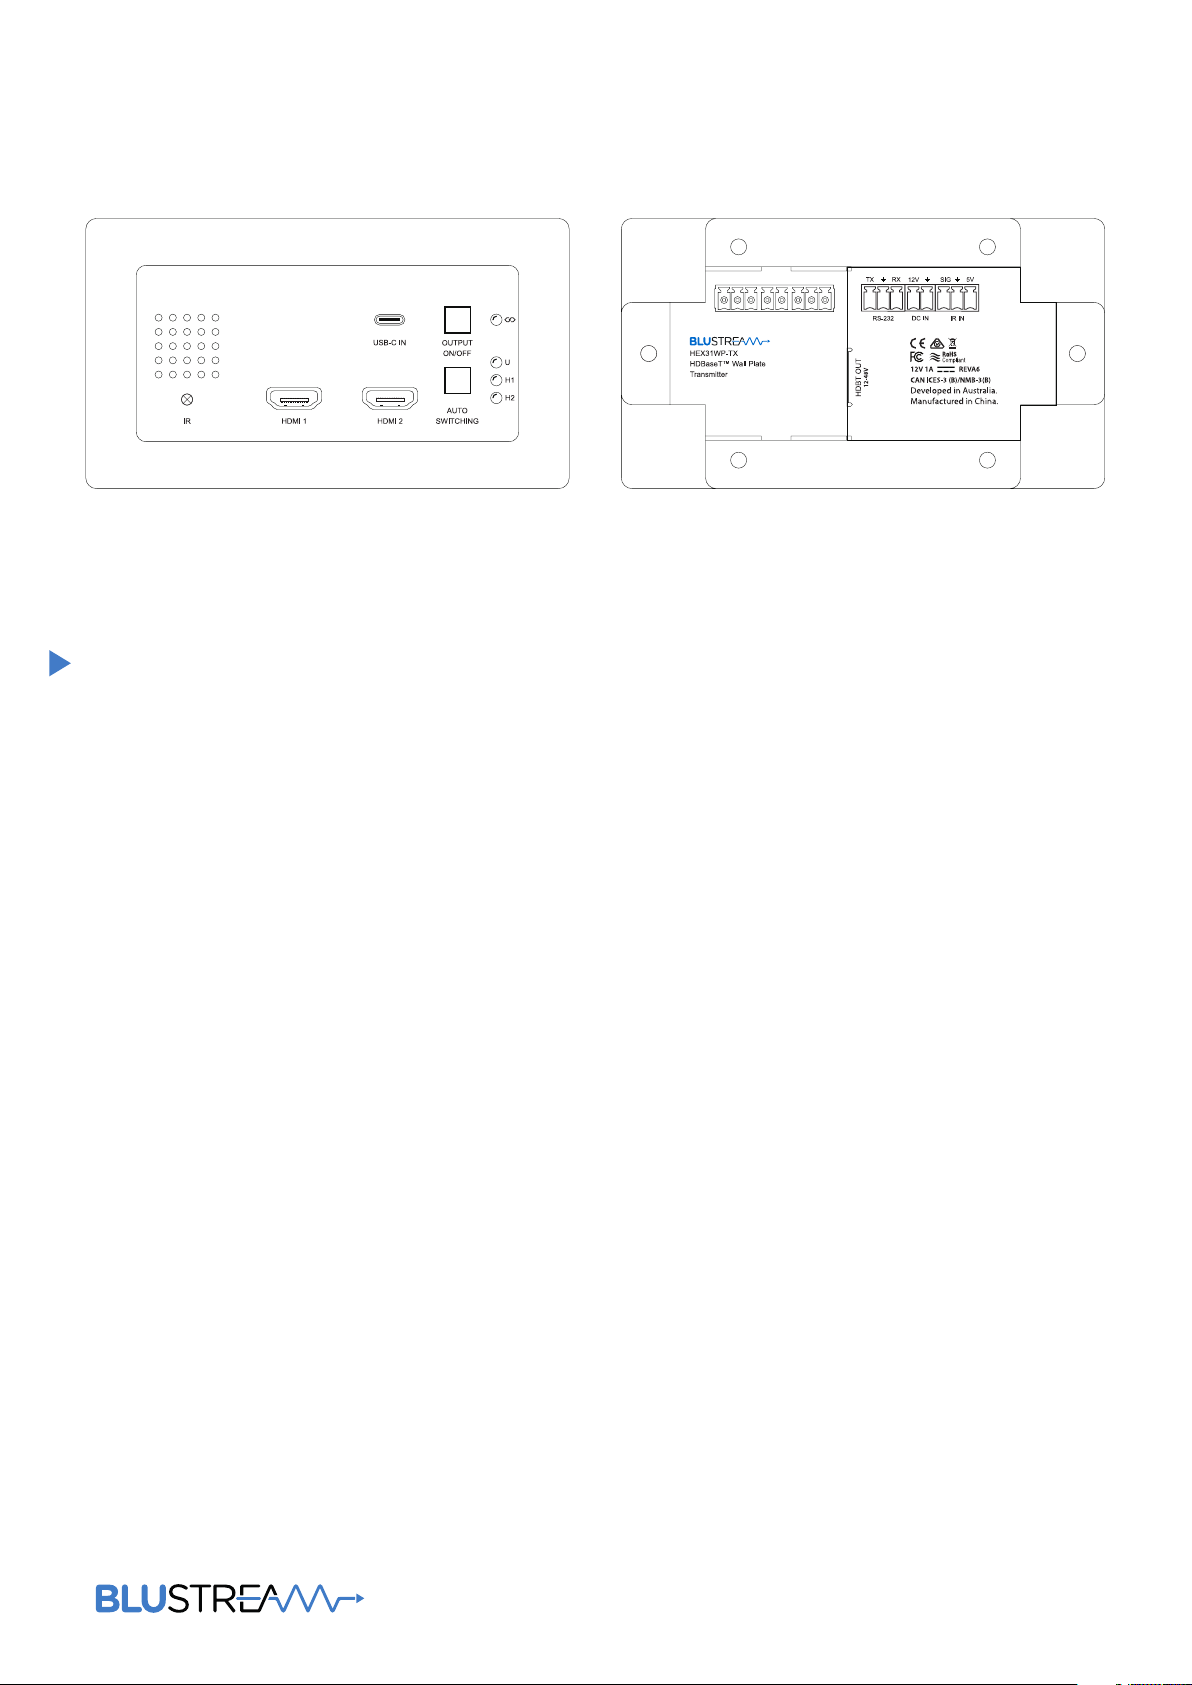
HEX31WP-TX
User Manual
RevA0 HEX31WP-TX User Manual
Page 2

Contents
HEX31WP-TX USER MANUAL
Thank you for purchasing
this product.
For optimum performance and safety,
please read these instructions carefully
before connecting, operating or
adjusting this product. Please keep this
manual for future reference.
Surge protection device
recommended
This product contains sensitive
electrical components that may be
damaged by electrical spikes, surges,
electric shock, lightning strikes, etc. Use
of surge protection systems is highly
recommended in order to protect and
extend the life of your equipment.
Introduction 03
Features 03
Panel Descriptions 04
Output On/O Function 05
Auto Switching 06
USB Type C 06
Mounting the HEX31WP-TX 06
EDID Control 07
Loading A Custom EDID 07
RS-232 Configuration 08
RS-232 Commands 08 - 09
Product Schematic 10
Specification 11
Package Contents 11
Maintenance 11
Installer Notes 12 - 13
02 www.blustream.com.au | www.blustream.co.uk
Page 3

HEX31WP-TX USER MANUAL
Our HEX31WP HDMI / USB-C wall plate HDBaseT™ Transmitter is a multi-format
Introduction
FEATURES:
• Features 2 x HDMI & 1 x USB-C inputs with manual / auto source selection
• Advanced HDBaseT™ technology oering distribution of video and audio over a single CAT cable
• Supports 4K UHD video up to 40m (3840 x 2160 @30Hz 4:4:4, 4096 x 2160 @24Hz 4:4:4, and 4K @60Hz 4:2:0)
• Extends HDMI at 1080p up to a distance of 70m
• USB-C input for Video / Audio interface with Windows®, Mac® & Chromebook™ PC’s as well as tablets or
smartphones using the same connector type
4K input switcher solution delivering HDMI and USB-C inputs up to 70m at 1080p
(40m at 4K 60Hz 4:2:0). The HEX31WP-TX features both manual or automated
source selection and includes display on / o control via CEC, RS-232 and IR (via
compatible HDBaseT™ Receiver / Matrix). The HEX31WP-TX has been designed
to work with all Blustream HDBaseT™ Receiver and Matrix solutions, be installed
in both UK and European backboxes, and can be powered locally or from
compatible Blustream HDBaseT™ products.
• Supports all known HDMI audio formats including Dolby TrueHD, Dolby Atmos, Dolby Digital Plus and DTS-HD
Master Audio transmission
• Input selection via front panel and RS-232
• Programmable ON / OFF button utilising IR, RS-232 or CEC for control of display device at HDBaseT™ Receiver
• Supports 12V-48V PoC from compatible Blustream HDBaseT™ Receiver / Matrix products
• Bi-directional RS-232 pass through
• Supports IR pass-through to HDBaseT™ device
• Compatible with all Blustream HDBaseT™ Receiver / Matrix products*
• Magnetic faceplate surround allowing both UK & EU backbox compatibility
• HDCP 2.2 compliant
*Technical performance is subject to the features supported on the connected HDBaseT™ device
03contact [email protected] | [email protected]
Page 4
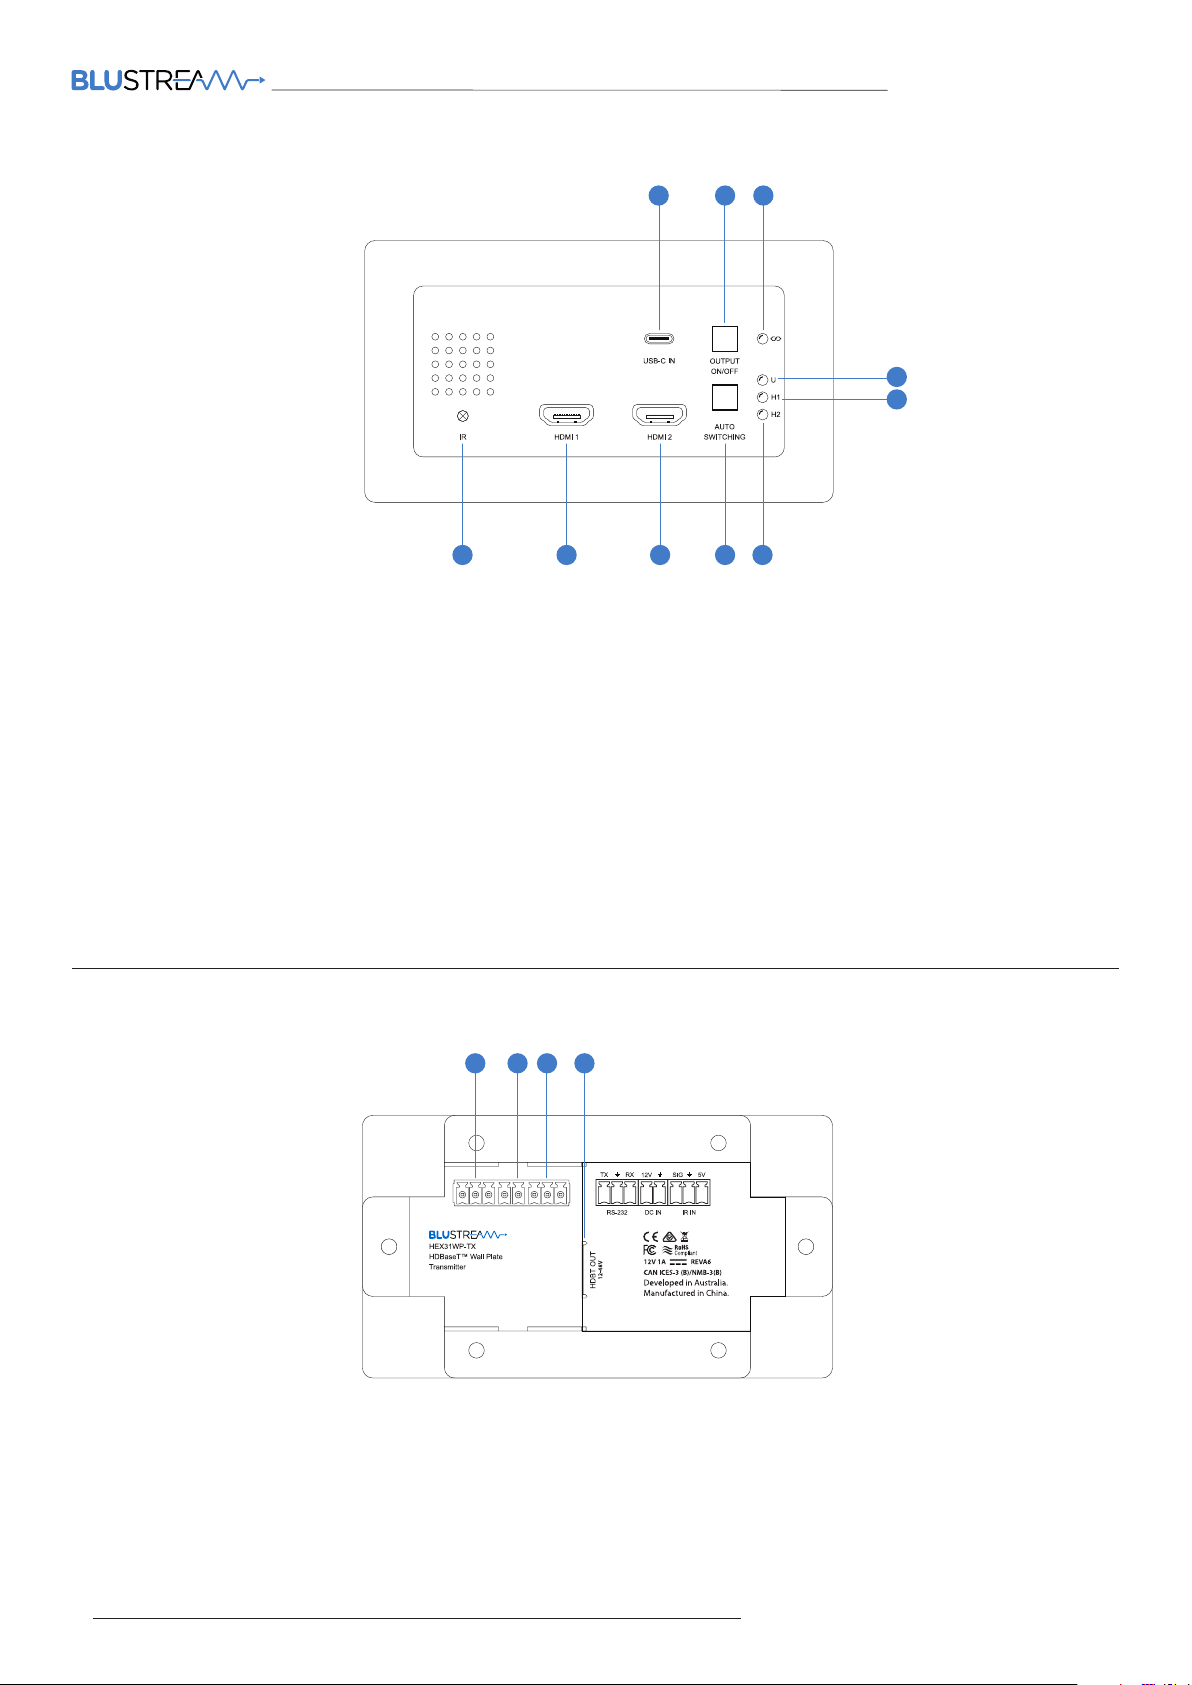
Front Panel Description
HEX31WP-TX USER MANUAL
21
3
9
10
4 5 6 7
8
1 USB-C Input - Type C USB port to connect to USB-C source device
2 Output ON / OFF Button - Triggers the output on / o sequence (see Output On / O section on next page)
3 HDBaseT™ link status indicator - Illuminates when the Transmitter is connected to the Receiver / Matrix successfully
4 IR Receiver - Built in IR sensor for IR pass through
5 HDMI Input 1 - Type A HDMI port to connect HDMI source device
6 HDMI Input 2 - Type A HDMI port to connect HDMI source device
7 Auto Switching Button - Press to change source, hold for 3 seconds to enable / disable auto signal sense switching
8 HDMI Input 2 Indicator - Illuminates when HDMI 2 input is connected
9 USB Input Indicator - Illuminates when USB-C input is connected
q HDMI Input 1 Indicator - Illuminates when HDMI 1 input is connected
Rear Panel Description
1211 13 14
w RS-232 - 3-pin phoenix connector for RS-232 pass through to / from compatible HDBaseT™ Receiver / Matrix products
e 12V DC Input - 2-pin phoenix connector to connect to Blustream 12V power supply (supplied)
r IR Receiver Input - 3-pin phoenix connector to connect to Blustream IR Receiver (phoenix block supplied, IR Receiver
not supplied)
t HDBaseT™ Output - RJ45 HDBaseT™ port to connect to the HDBaseT™ input port of the compatible Blustream
HDBaseT™ Receiver / Matrix device
04 www.blustream.com.au | www.blustream.co.uk
Page 5

HEX31WP-TX USER MANUAL
Output On/O Function
The HEX31WP-TX features a variety of ways that the unit can be automated to, or allow for, the powering of the display
connected to the HDBaseT™ receiver.
Output On/O Button
The Output On/O button can be programmed to power on, or o, the display connected to the HDBaseT™ Receiver
via CEC, IR or RS-232 as required by the user. The default setting on the unit is enabled for CEC (Consumer Electronic
Control), but disabled for IR and RS-232. When triggered, the Display On/O button will be illuminated. When removing
the last source device connection from the HEX31WP-TX, the display will (by default) remain powered.
The default function can be disabled (or re-enabled) as required - see below. Or refer to the RS-232 command section
of this user manual on page 08 for the full list of function commands.
Output On/O via CEC
As outlined above, the HEX31WP-TX wallplate, by default, will send out a Power On command via CEC automatically
when a video signal is sensed by the unit.
To disable this automatic feature via RS-232, send the following command:
CECAUTO OFF
To enable this automatic feature via RS-232, send the following command:
CECAUTO ON
Output On/O via IR Learning
The HEX31WP-TX can be programed to issue an IR command, via HDBaseT™ to the connected display device, when it
either detects a new signal / loss of signal, or when pressing the Output On/O button on the wall plate. To learn an IR
command into the unit, follow these steps:
1) Press and hold both Output On/O and Auto Switching buttons simultaneously for approximately 3 seconds until
both of the button LED’s flash alternately.
2) Use the Output On/O button to select between the command to be set as follows:
• A quick flashing LED for the Output On/O button indicates that Output On mode is selected
• A slow flashing LED for the Output On/O button indicates that Output O mode is selected
3) Within 30 seconds, point the IR remote control that you wish to learn at the IR sensor on the HEX31WP-TX and press
the respective button on the IR remote control.
4) The Output On/O button LED will stop flashing, and remain lit to indicate that the IR command has been learnt.
5) Press and hold the Auto Switching button for approximately 3 seconds until both the button LED’s turn o to exit IR
learning mode. The unit will return to normal operation 5 seconds aer.
Output On/O via RS-232
To enable RS-232 commands to be triggered on signal sense/loss or via the Output On/O button, send the following
commands via RS-232 to the unit:
1) To configure a command to be sent on signal sense, use the following RS-232 command:
RS232ON y:z:a
2) To configure a command to be sent on signal loss, use the following RS-232 command:
RS232OFF y:z:a
where: y = a: ASCII, h: HEX
z = 1: 2400, 2: 4800, 3: 9600, 4: 19200, 5: 38400, 6: 57600 (Default), 7: 115200
a = RS-232 command to be sent
You can also disable the RS232ON/OFF command by replacing y:z:a with DISABLE in the above commands.
05contact [email protected] | [email protected]
Page 6
HEX31WP-TX USER MANUAL
Auto Switching
The HEX31WP-TX can automatically switch sources based on when an input signal is detected or lost. This feature will
automatically switch to any new source that is connected to the HEX31WP-TX, and subsequently will switch back to the
previous source when a signal is lost.
To enable or disable this feature, press and hold the the Auto Switching button for 3 seconds. The Auto Switching
button LED will blink to confirm this command has been received.
The Auto Switching button will remain lit when auto switching is enabled.
USB Type C
The USB-C input of the HEX31WP-TX gives instant connectivity with laptops and smart devices with USB-C, negating
the requirement of having to use USB-C to HDMI adaptors to obtain AV connectivity.
Not all USB-C cables support the transfer of Video and Audio. A type 3.1 USB-C cable must be used to ensure AV can
be transferred over the USB-C cable. The cables supplied with laptops or mobile devices are normally reserved for
charging only and are generally not type 3.1.
The USB-C input of the HEX31WP-TX does not support charging of mobile devices.
Mounting the HEX31WP-TX
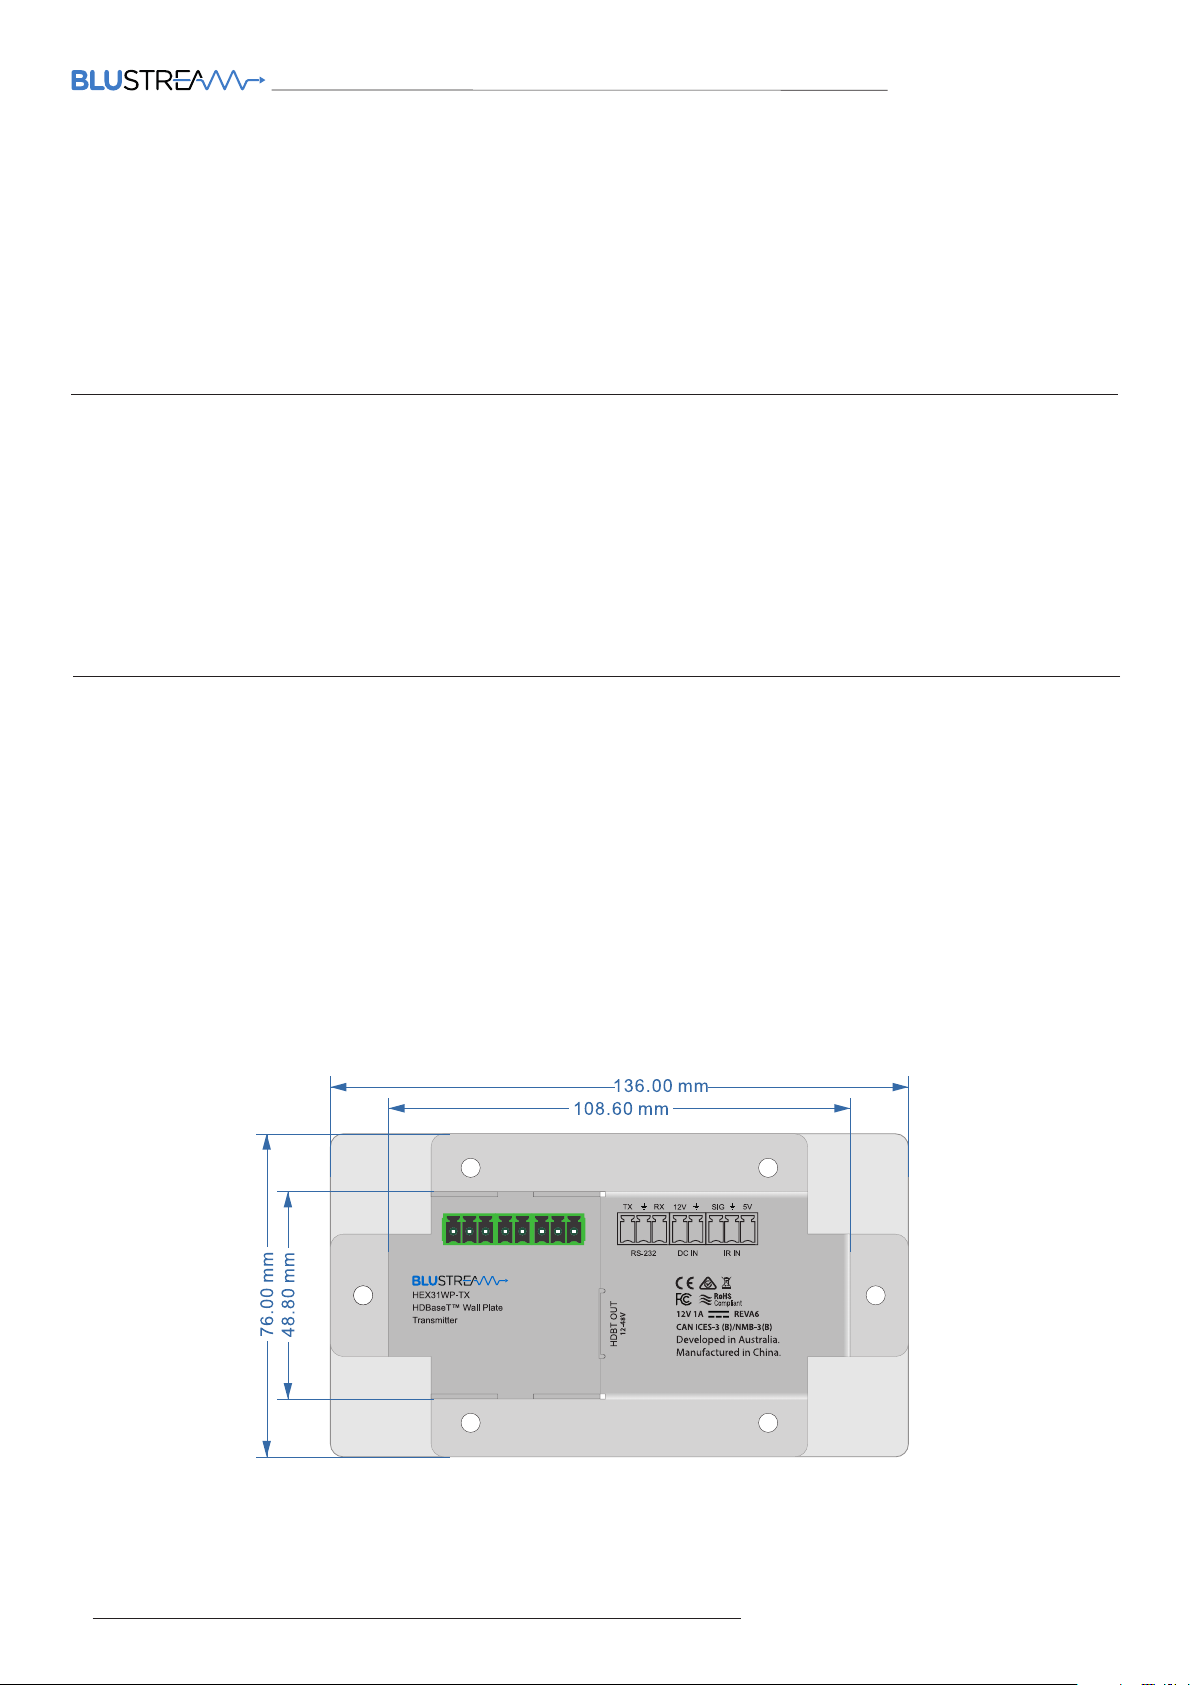
The HEX31WP-TX has been designed to fit into a standard UK or European double-gang backbox. The mounting holes
are hidden under the magnetic faceplate on the le / right (for UK backboxes), and top / bottom (for EU backboxes).
A minimum backbox depth of 40mm is required, however, due to the normal operating temperature of HDBaseT™
equipment, we would recommend using a deeper backbox (47mm) to assist with additional heat displacement and air
circulation to the rear of the unit.
Prior consideration should be made to the choice of backbox, with particular emphasis to the location/s of cable entry
so that the maximum bend radius of the CAT cable is not exceeded.
If mounting the wallplate into a counter top, table top, or lecturn, a backbox may not necessarily be required. Please
see below technical drawing of the unit for overall and cut-out dimensions:
06 www.blustream.com.au | www.blustream.co.uk
Page 7

HEX31WP-TX USER MANUAL
EDID Control
EDID (Extended Display Identification Data) is a data structure that is used between a display and a source. This data
is used by the source to find out what audio and video resolutions are supported by the display. By pre-determining
the video resolution and audio format of the source and display device you can reduce the time needed for EDID hand
shaking thus making switching quicker and more reliable. Configuration of the EDID settings for each input can be
achieved using the following RS-232 commands to specify the required EDID:
EDIDxxDFzz
Where xx = Input: 00 refers to ALL inputs; 01 = input 1 (HDMI 1); 02 = input 2 (HDMI 2); 03 = input 3 (USB-C)
zz = EDID as shown below:
zz=00: HDMI 1080p@60Hz, Audio 2ch PCM
zz=01: HDMI 1080p@60Hz, Audio 5.1ch PCM/DTS/DOLBY
zz=02: HDMI 1080p@60Hz, Audio 7.1ch PCM/DTS/DOLBY/HD
zz=03: HDMI 1080i@60Hz, Audio 2ch PCM
zz=04: HDMI 1080i@60Hz, Audio 5.1ch PCM/DTS/DOLBY
zz=05: HDMI 1080i@60Hz, Audio 7.1ch PCM/DTS/DOLBY/HD
zz=06: HDMI 1080p@60Hz/3D, Audio 2ch PCM
zz=07: HDMI 1080p@60Hz/3D, Audio 5.1ch PCM/DTS/DOLBY
zz=08: HDMI 1080p@60Hz/3D, Audio 7.1ch PCM/DTS/DOLBY/HD
zz=09: HDMI 4K2K@30Hz, Audio 2ch PCM
zz=10: HDMI 4K2K@30Hz, Audio 5.1ch PCM/DTS/DOLBY
zz=11: HDMI 4K2K@30Hz, Audio 7.1ch PCM/DTS/DOLBY/HD
zz=12: HDMI 4K2K@60Hz 4:2:0 8 bit, Audio 2ch PCM
zz=13: HDMI 4K2K@60Hz 4:2:0 8 bit, Audio 5.1ch PCM/DTS/DOLBY
zz=14: HDMI 4K2K@60Hz 4:2:0 8 bit, Audio 7.1ch PCM/DTS/DOLBY/HD
zz=15: DVI 1280x1024@60Hz, Audio None
zz=16: DVI 1920x1080@60Hz, Audio None
zz=17: DVI 1920x1200@60Hz, Audio None
zz=18: DVI 1920x1200@60Hz, Audio 2ch
zz=19: Copy User EDID 1 - see below
zz=20: Copy User EDID 2 - see below
zz=21: EDID Pass through
Loading A Custom EDID
A custom EDID file can be loaded into the HEX31WP-TX. Some custom EDID’s can be found on Blustream’s website, or
use a 3rd party EDID tool to create a custom EDID. To load an EDID onto the HEX31WP-TX complete the following steps:
1) Rename the EDID file to be “EDID.bin”
2) Copy the EDID.bin file to a USB drive
3) Connect the USB drive to the HEX31WP-TX Micro-USB upgrade port (a USB to Micro USB cable may be required)
4) Connect your PC to the HEX31WP-TX RS-232 port via a serial RS-232 cable, see page 06 for RS-232 information
5) Send the command: EDID SAVE zz (where zz = 19 or 20 - see above) to save the EDID from the USB onto the
HEX31WP-TX into EDID position 19 or 20
6) Send the command: EDID 00 DF zz to recall the EDID for all inputs where zz is the position the EDID (19 or 20)
07contact [email protected] | [email protected]
Page 8

HEX31WP-TX USER MANUAL
RS-232 Configuration
The RS-232 port is used for configuration / control of the product, including pass through of RS-232 commands to a
compatible Blustream HDBaseT™ Receiver / Matrix device.
The default RS-232 communication settings are:
Baud rate: 57600
Data bit: 8
Stop bit: 1
Parity bit: none
Common Mistakes
• Carriage return – Some programs do not require the carriage return where as other will not work unless sent directly
aer the string. In the case of some Terminal soware the token <CR> is used to execute a carriage return. Depending
on the program you are using this token maybe dierent. Some other examples that other control systems deploy
include \r or 0D (in hex)
• Spaces – Blustream commands do not require space between commands unless specified. There may be some
programs that require spacing in order to work.
- How the string should look is as follows OUT01FR02
- How the string may look if spaces are required: OUT{Space}01{Space}FR{Space}02
• Baud rate or other serial protocol settings not correct - please confirm the settings being used match the RS-232
configuration settings above.
RS-232 Commands
? Print Help Information
HELP Print Help Information
STATUS Print System Status And Port Status
INSTA Print All Input Status
OUTSTA Print All Output Status
CTRLSTA Print All Control Status
RESET Reset System To Default Setting
KEY ON/OFF Set System Key Control On Or O
OUT xx FR yy Set Output xx From Input yy
Input: yy [01-03]
01 = HDMI 1
02 = HDMI 2
03 = USB-C
OUT xx SWITCH yy Set Output xx Auto Switching To aa
aa = AUTO
aa = MAN
NOSIGDLY xxx Set No Signal Delay Timeout to xxx
IR ON/OFF Set System IR Control On Or O
08 www.blustream.com.au | www.blustream.co.uk
Page 9

HEX31WP-TX USER MANUAL
RS-232 Commands Continued...
EDID xx DF zz EDID xx DF zz Set Input xx EDID To Default EDID zz
xx=[00]: All Input Port, [01...03]: Input Port
zz=00: HDMI 1080p@60Hz, Audio 2ch PCM
zz=01: HDMI 1080p@60Hz, Audio 5.1ch PCM/DTS/DOLBY
zz=02: HDMI 1080p@60Hz, Audio 7.1ch PCM/DTS/DOLBY/HD
zz=03: HDMI 1080i@60Hz, Audio 2ch PCM
zz=04: HDMI 1080i@60Hz, Audio 5.1ch PCM/DTS/DOLBY
zz=05: HDMI 1080i@60Hz, Audio 7.1ch PCM/DTS/DOLBY/HD
zz=06: HDMI 1080p@60Hz/3D, Audio 2ch PCM
zz=07: HDMI 1080p@60Hz/3D, Audio 5.1ch PCM/DTS/DOLBY
zz=08: HDMI 1080p@60Hz/3D, Audio 7.1ch PCM/DTS/DOLBY/HD
zz=09: HDMI 4K2K@30Hz, Audio 2ch PCM
zz=10: HDMI 4K2K@30Hz, Audio 5.1ch PCM/DTS/DOLBY
zz=11: HDMI 4K2K@30Hz, Audio 7.1ch PCM/DTS/DOLBY/HD
zz=12: HDMI 4K2K@60Hz 4:2:0 8 bit, Audio 2ch PCM
zz=13: HDMI 4K2K@60Hz 4:2:0 8 bit, Audio 5.1ch PCM/DTS/DOLBY
zz=14: HDMI 4K2K@60Hz 4:2:0 8 bit, Audio 7.1ch PCM/DTS/DOLBY/HD
zz=15: DVI 1280x1024@60Hz, Audio None
zz=16: DVI 1920x1080@60Hz, Audio None
zz=17: DVI 1920x1200@60Hz, Audio None
zz=18: HDMI 1920x1200@60Hz, 2ch/6ch PCM
zz=19: Copy User EDID 1
zz=20: Copy User EDID 2
zz=21: EDID Passthrough
EDID xx CP yy Set Input xx EDID Copy From Output yy
xx = Input on product (00 refers to ALL inputs, 01 = input 1 etc)
yy = Output on product (00 refers to ALL outputs, 01 = output 1 etc)
EDIDSAVE zz Save EDID File From USB Into User Slot zz
zz=19: User EDID 1
zz=20: User EDID 2
CECAUTO ON/OFF Set Auto CEC Commands When Detecting Video Input Signal On Or O
OUT xx CEC INPUT yy Send Output xx CEC Input yy Command
OUT xx CEC VOLUP Send Output xx CEC Vol Up Command
OUT xx CEC VOLDOWN Send Output xx CEC Vol Down Command
OUT xx CEC MUTE Send Output xx CEC Mute Toggle Command
OUT xx CEC PON Send Output xx CEC Power On Command
OUT xx CEC POFF Send Output xx CEC Power O Command
OUT xx CEC yy:yy:yy Send Output xx CEC yy.yy.yy Command
RS232BAUD z Set RS-232 Baud rate To x
z = 1: 2400, 2: 4800, 3: 9600, 4: 19200, 5: 38400, 6: 57600 (default), 7: 115200
RS232ON y:z:a When Detecting A Triggering Signal, Automatically Send y Type Of Command a To The
Third-party Device Whose Baud Rate Is z
RS232OFF y:z:a When Not Detecting A Triggering Signal, Automatically Send y Type Of Command a To
The Third-party Device Whose Baud Rate Is z
RS232ON DISABLE Disable Automatic RS-232 Commands When Detecting Signal
RS232OFF DISABLE Disable Automatic RS-232 Commands When Not Detecting Signal
09contact [email protected] | [email protected]
Page 10
HEX31WP-TX USER MANUAL
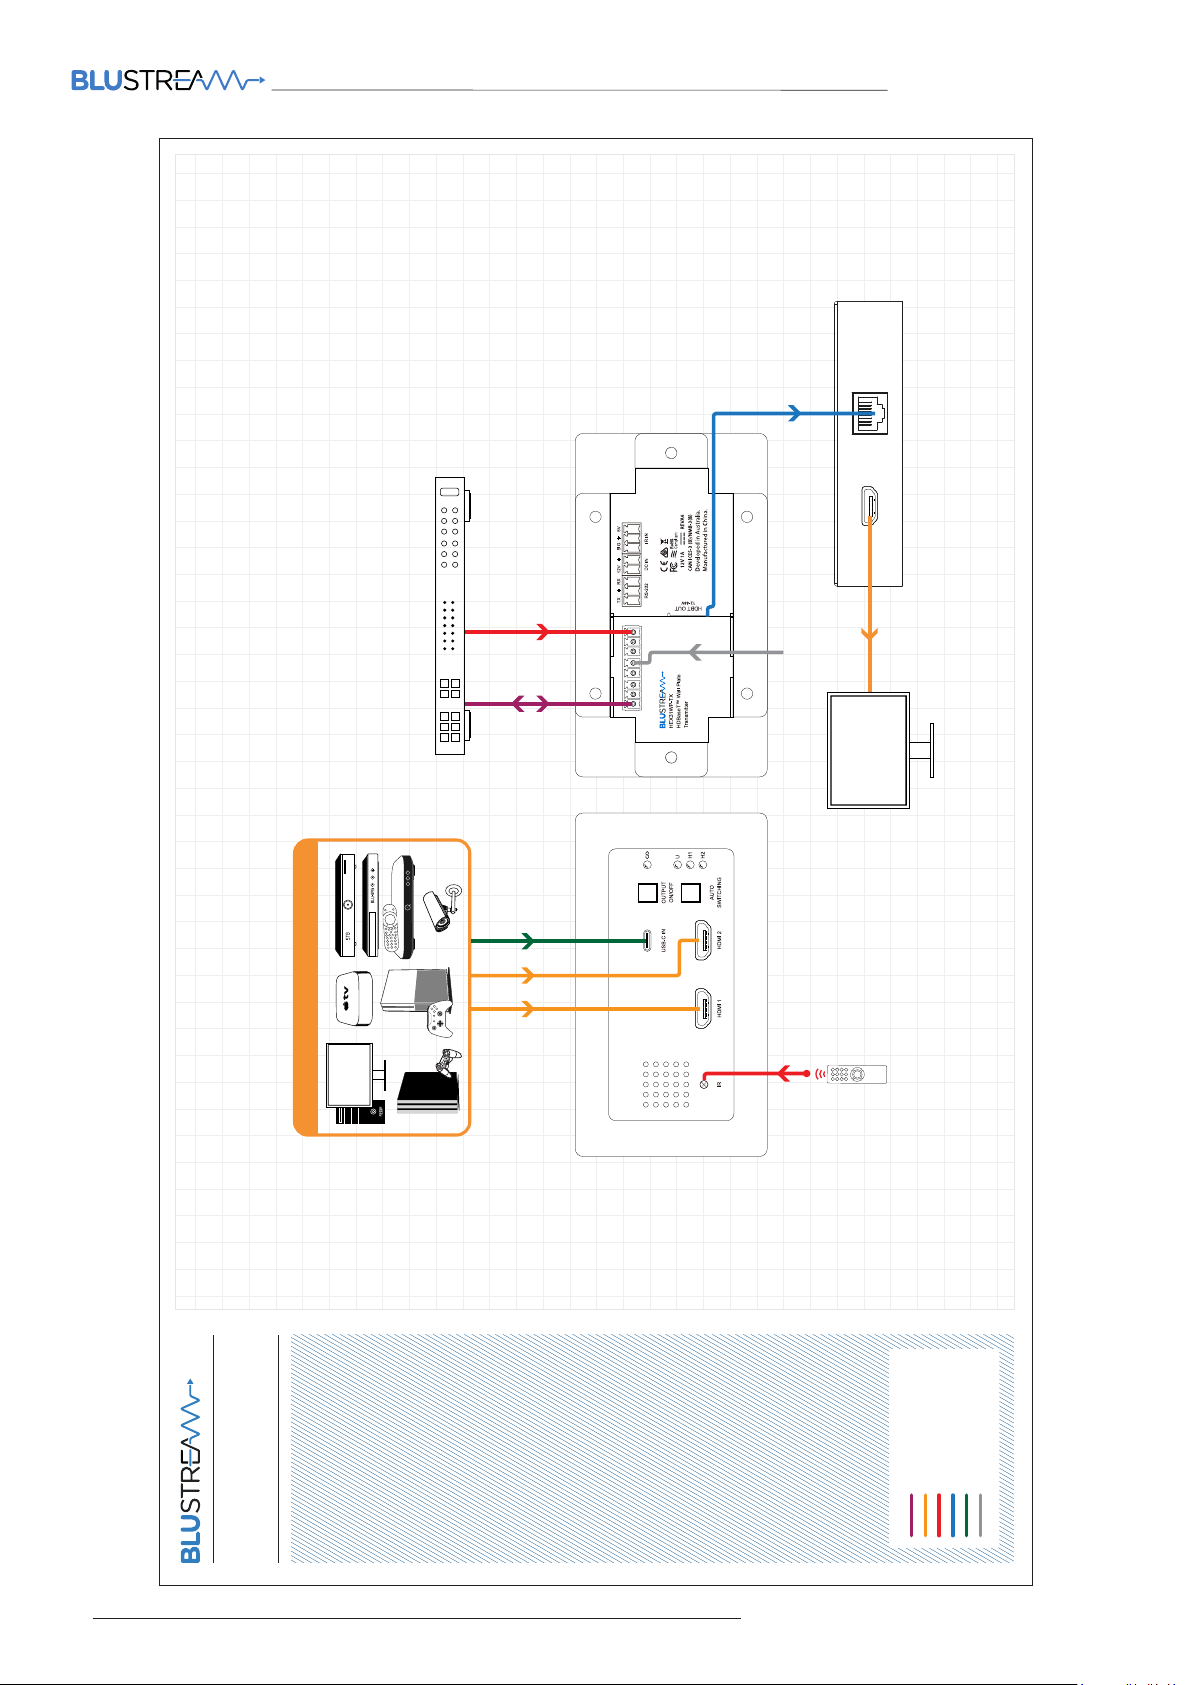
HDBaseT™ RX
Optional PSU when not
powered via HDBaseT™
Compatible Blustream HDBaseT™ Matrix or Receiver product.
* Technical performance is subject to the features supported
on the connected HDBaseT™ device.
HDMI & USB-C SOURCE
Control Processor
Display
RS-232
HDMI
Infrared
Cat 6
USB-C
DC Power
HEX31WP-TX
Example Schematic
10 www.blustream.com.au | www.blustream.co.uk
Page 11

Specifications
HEX31WP-TX
• Video Input Connectors: 2 x HDMI Type A, 19-pin, female; 1 x USB-C Type C, 24-pin, female
• Video Output Connectors: 1 x HDBaseT™ RJ45 connector
• RS-232 serial port: 1 x 3-Pin Phoenix connector
• IR Input port: 1 x 3-Pin Phoenix connector
• Product upgrade: 1 x Micro USB, female
• Local power input: 1 x 2-Pin Phoenix connector
• Casing Dimensions (W x H x D): 136mm x 76mm x 44mm (without faceplate)
• Faceplate Dimensions (W x H x D): 146mm x 86mm x 6mm
• Backbox Mounting Depth: 40mm (minimum), 47mm (recommended)
• Shipping Weight: 1.0kg
• Operating Temperature: 32°F to 104°F (-5°C to +55°C)
HEX31WP-TX USER MANUAL
• Storage Temperature : -4°F to 140°F (-25°C to +70°C)
• Power Supply: 12V/1A DC
NOTE: Specifications are subject to change without notice. Weights and dimensions are approximate.
Package Contents
HEX31WP-TX
• 1 x HEX31WP-TX
• 1 x 12V/1A DC Power Supply
• 1 x Magnetic Faceplate
• 1 x RS-232 to Phoenix Control Cable
• 1 x Quick Reference Guide
All packaging for the HEX31WP-TX is recyclable - please consider the environment and recycle.
Maintenance
Clean this unit with a so, dry cloth. Never use alcohol, paint thinner or benzene to clean this unit.
11contact [email protected] | [email protected]
Page 12

Installer Notes:
HEX31WP-TX USER MANUAL
12 www.blustream.com.au | www.blustream.co.uk
Page 13

Page 14

www.blustream.co.uk
www.blustream.com.au
 Loading...