

Page 1

HawkEye (PT) Plus
User Guide
Document Part 200254
Revision 1.3
Page 2

NOTICE
This guide is published and copyrighted by Blue Sky Network (BSN). All information and specifications in this
document are subject to change without notice. Nothing in this document is intended to create additional or
separate warranties or guarantees.
© 2014 Blue Sky Network, All Rights Reserved.
Blue Sky Network, 5333 Mission Center Rd. Suite 220, San Diego, CA 92108
Phone: +1 858 551 3894 | Fax: +1 858 225 0794
| W: www.blueskynetwork.com
Page 3

HawkEye (PT) Plus User Guide Table of Contents
TABLE OF CONTENTS
Notice ............................................................................................................................... 2
Table of Contents .............................................................................................................. 3
Introduction ...................................................................................................................... 6
Device Overview ................................................................................................................ 7
Accessories ................................................................ ....................................................... 8
Charging the battery .......................................................................................................... 8
Touchscreen ...................................................................................................................... 9
Power on .................................................................................................................................................... 9
Power Off/Lock ............................................................................................................................................ 9
Keyboards ................................................................................................................................................... 9
Using the search box .................................................................................................................................. 10
Using the slider bar .................................................................................................................................... 10
Home Screen ................................................................................................................... 11
Unlock ...................................................................................................................................................... 11
Status Symbols .......................................................................................................................................... 11
Date/Time ................................................................................................................................................. 12
Home Icons ............................................................................................................................................... 12
Favorite Icons ............................................................................................................................................ 12
Texting Menu .................................................................................................................. 13
Inbox ........................................................................................................................................................ 13
Drafts ....................................................................................................................................................... 13
Outbox...................................................................................................................................................... 13
Sent .......................................................................................................................................................... 14
Compose ................................................................................................................................................... 14
Contacts .................................................................................................................................................... 16
Blue Sky Network Page 3 of 34
Page 4

HawkEye (PT) Plus User Guide Table of Contents
Mbox Rate – Iridium Link Only .................................................................................................................... 16
Chk Mbox – Irdium link only ....................................................................................................................... 16
Memory .................................................................................................................................................... 17
Tracking Menu ................................................................................................................ 18
Tracking .................................................................................................................................................... 18
Rpt Rate .................................................................................................................................................... 18
Links ......................................................................................................................................................... 18
Geofences ................................................................................................................................................. 19
Motion ...................................................................................................................................................... 20
Mandown ................................................................................................................................................. 21
Call Out ..................................................................................................................................................... 22
Data Log .................................................................................................................................................... 22
Stats ......................................................................................................................................................... 22
Cancel QuickPosition/911 ........................................................................................................................... 22
Utilities Menu .................................................................................................................. 24
Utilities ..................................................................................................................................................... 24
Chk GPS .................................................................................................................................................... 24
Chk Iridium ................................................................................................................................................ 24
Chk GSM ................................................................................................................................................... 24
Test Rpt .................................................................................................................................................... 25
Chk-In ....................................................................................................................................................... 25
Waypts ..................................................................................................................................................... 25
Settings Menu ................................................................................................................. 26
Settings ..................................................................................................................................................... 26
Audio ........................................................................................................................................................ 26
Backlight ................................................................................................................................................... 26
Bluetooth .................................................................................................................................................. 26
Blue Sky Network Page 4 of 34
Page 5

HawkEye (PT) Plus User Guide Table of Contents
Calibrate ................................................................................................................................................... 27
Contrast .................................................................................................................................................... 27
Favorites ................................................................................................................................................... 27
Language .................................................................................................................................................. 27
LED ........................................................................................................................................................... 27
Search....................................................................................................................................................... 28
Security ..................................................................................................................................................... 28
Time/Date ................................................................................................................................................. 28
Unit Info.................................................................................................................................................... 28
User Info ................................................................................................................................................... 28
Additional Features .......................................................................................................... 29
Emergency (911/Quick Position) Button ...................................................................................................... 29
Status LED ................................................................................................................................................. 29
Powering Down ......................................................................................................................................... 29
Appendix A – Specifications .............................................................................................. 30
Mechanical Specifications .......................................................................................................................... 30
Electrical Specifications .............................................................................................................................. 30
Iridium Transciever .................................................................................................................................... 30
GSM Transceiver ........................................................................................................................................ 30
GPS Receiver ............................................................................................................................................. 30
Environmental Specifications (Electronics) ................................................................................................... 31
Environmental Specifications (Battery) ........................................................................................................ 31
Environmental Specifications (LCD) ............................................................................................................. 31
Appendix B – Revision History ........................................................................................... 32
Service Activations ........................................................................................................... 33
Support .......................................................................................................................... 34
Blue Sky Network Page 5 of 34
Page 6

HawkEye (PT) Plus User Guide Introduction
INTRODUCTION
The HawkEye Portable Tracker Plus (HawkEye (PT) Plus, HEPT Plus) is a dual-mode, handheld satellite/cellular
messaging and personal tracking device. It can be configured to operate single-mode with either the Iridium
satellite network or any GSM cellular network, and can also be configured to report in Iridium/GSM dual-mode. It
can transmit location information determined by a highly sensitive GPS receiver, inbound and outbound status,
text messaging, and emergency/alert notifications.
The HawkEye (PT) Plus offers a variety of services including:
Tracking The HEPT Plus can be programmed to automatically wake up and send a position
report at a set interval ranging from once every minute to once every forty-five days.
QuickPosition When the emergency 911 button is pushed, the HEPT Plus immediately sends
QuickPosition alerts to SkyRouter.
Free-Text Messaging The HEPT Plus allows users to send free-text; there are three different sets of
touchscreen keyboards available.
Canned Messages The HEPT Plus allows users to send canned (pre-defined) messages stored on the
device. Canned Messages can be configured using the HEPT Plus Manager application.
Waypoints The HEPT Plus lets users send waypoints to SkyRouter. When received by SkyRouter a
new waypoint is added to the map.
Check-In With the HEPT Plus a Check-In message can be sent to SkyRouter with the touch of a
button.
Motion Sensor The HEPT Plus has a built-in motion sensor; the device can be configured to send a
position report based on a predefined type of motion.
GeoFencing The HEPT Plus in conjunction with the HEPT Plus Manager Application allows the user
to configure multiple GeoFences defined as polygons (50 GeoFences with up to 50
points each), position reporting can be activated based on conditions set by these
GeoFences.
Data Logger The HEPT Plus can be configured to store up to 4,000 positions for later retrieval.
Blue Sky Network Page 6 of 34
Page 7
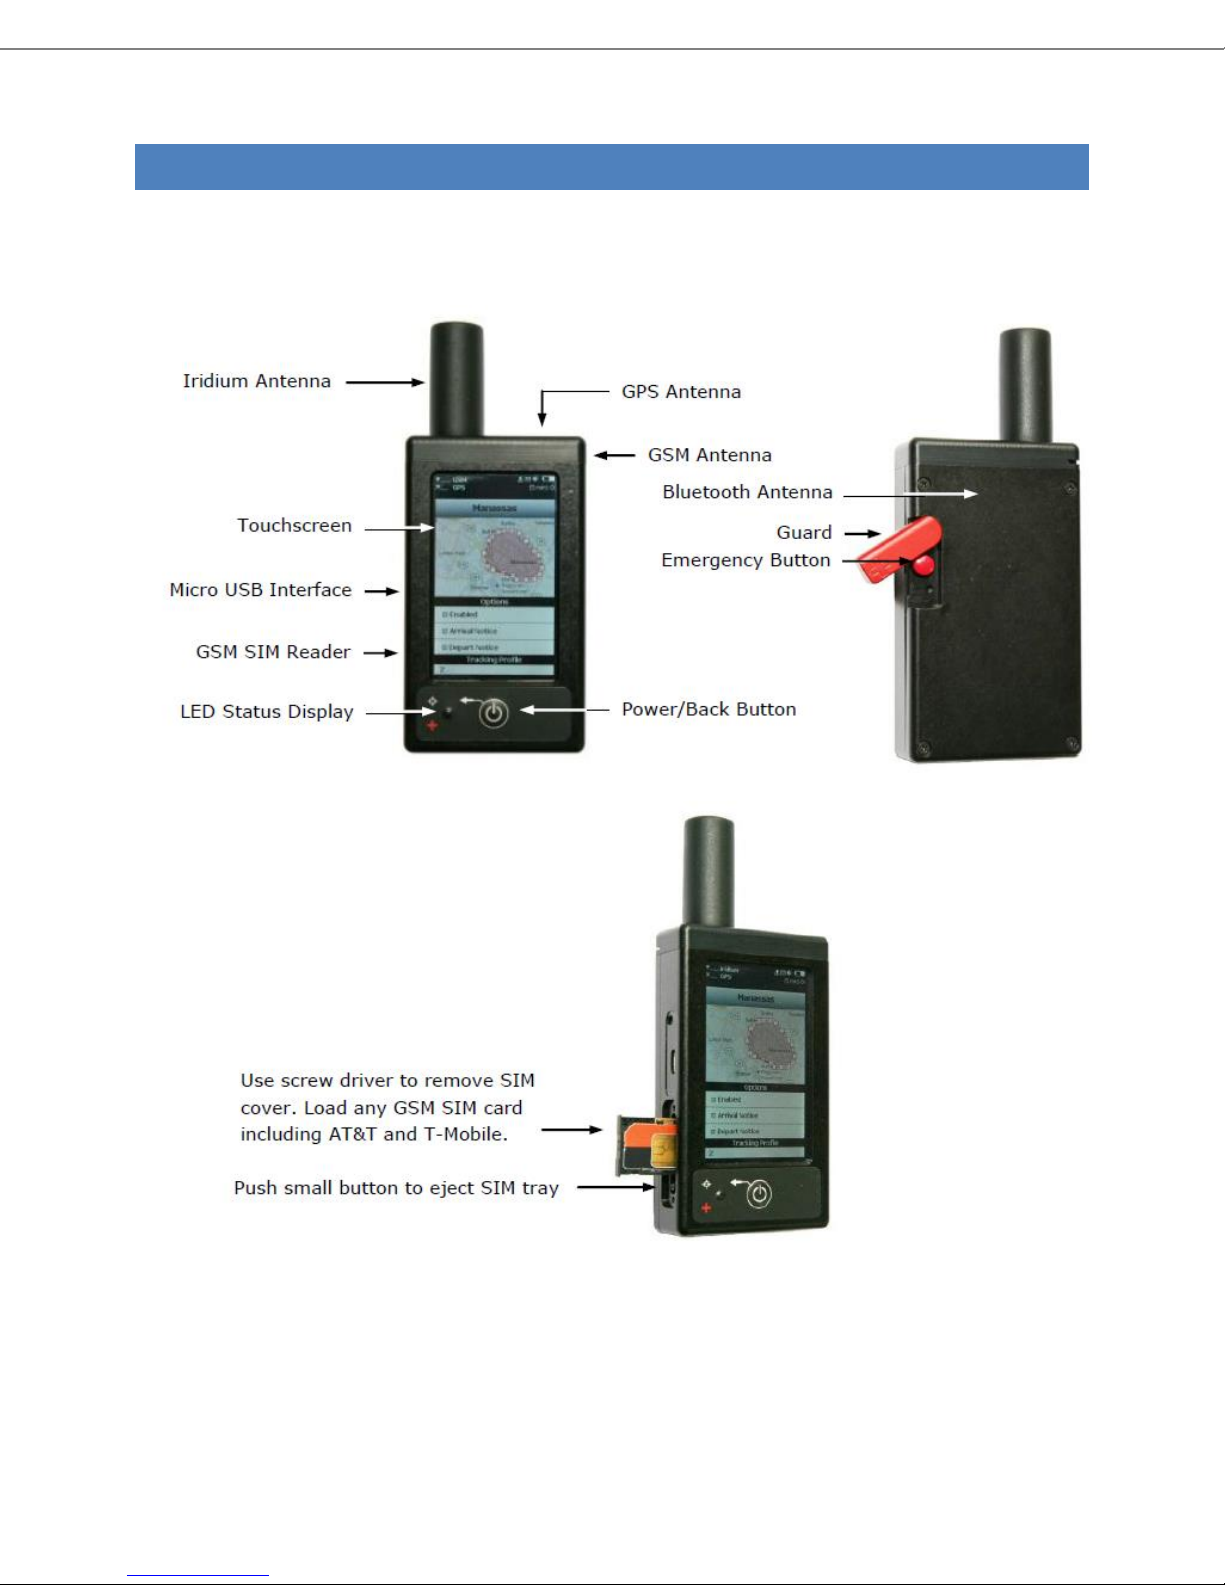
HawkEye (PT) Plus User Guide Device Overview
DEVICE OVERVIEW
Blue Sky Network Page 7 of 34
Page 8
HawkEye (PT) Plus User Guide Accessories
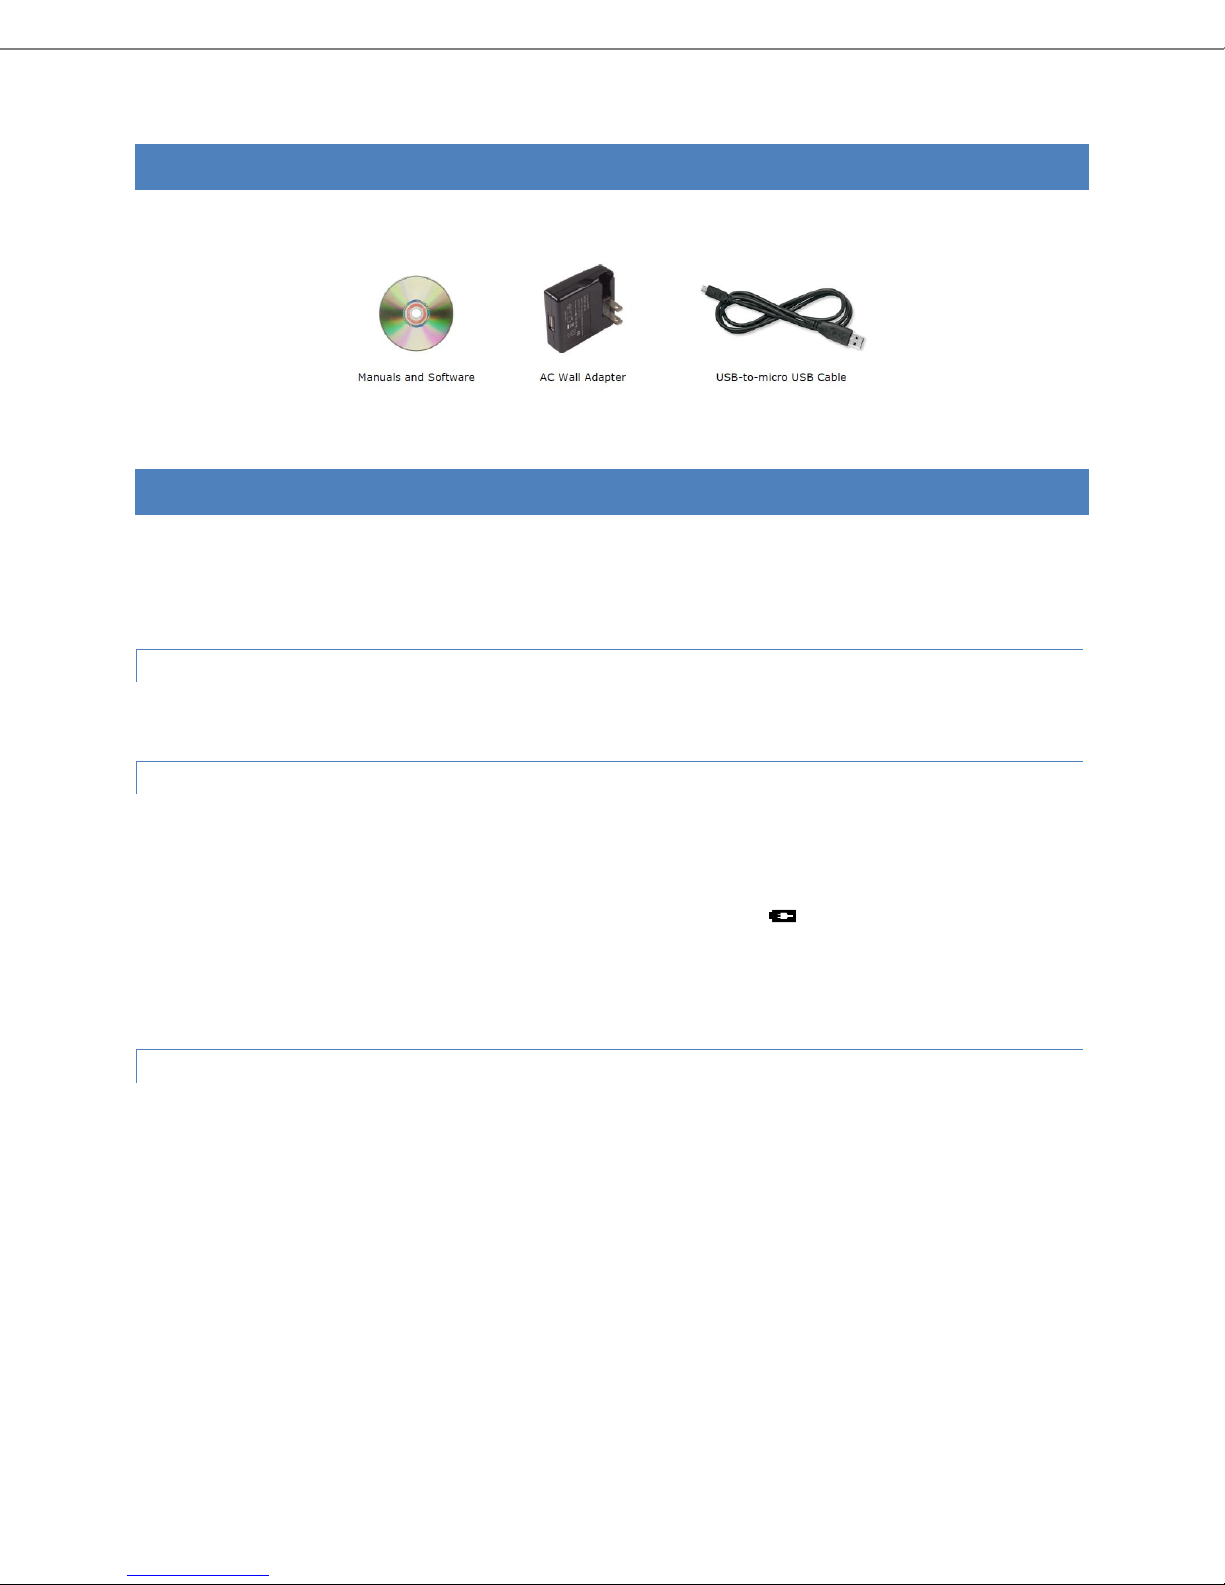
ACCESSORIES
The following accessories are included with the HawkEye PT Plus:
CHARGING THE BATTERY
When you receive the HawkEye (PT) Plus, the internal battery is already partially charged, we recommend that
users fully charge the HEPT Plus before use. The HEPT Plus can be charged using the supplied AC wall adapter or
by using the supplied USB cable and a USB port on a computer.
WALL AC ADA P TE R
Approximate charging time: 5 Hours
USB PORT
Approximate charging time: USB 1.0 ~1 Day
USB 2.0 ~12 hours
When the HEPT Plus is in the process of charging the battery status symbol will appear in the top right corner
of the touchscreen, when charging is complete a message will be displayed on the screen. The device does not
need to be turned off and can be used as normal whilst charging, however, the charging cycle will be faster when
the device is powered off.
BELOW 20% PO W E R
When the remaining battery power reaches less than 20% the battery symbol will turn red, a warning message will
display on the screen when the remaining power is less than 10%.
Blue Sky Network Page 8 of 34
Page 9
HawkEye (PT) Plus User Guide Touchscreen
TOUCHSCREEN
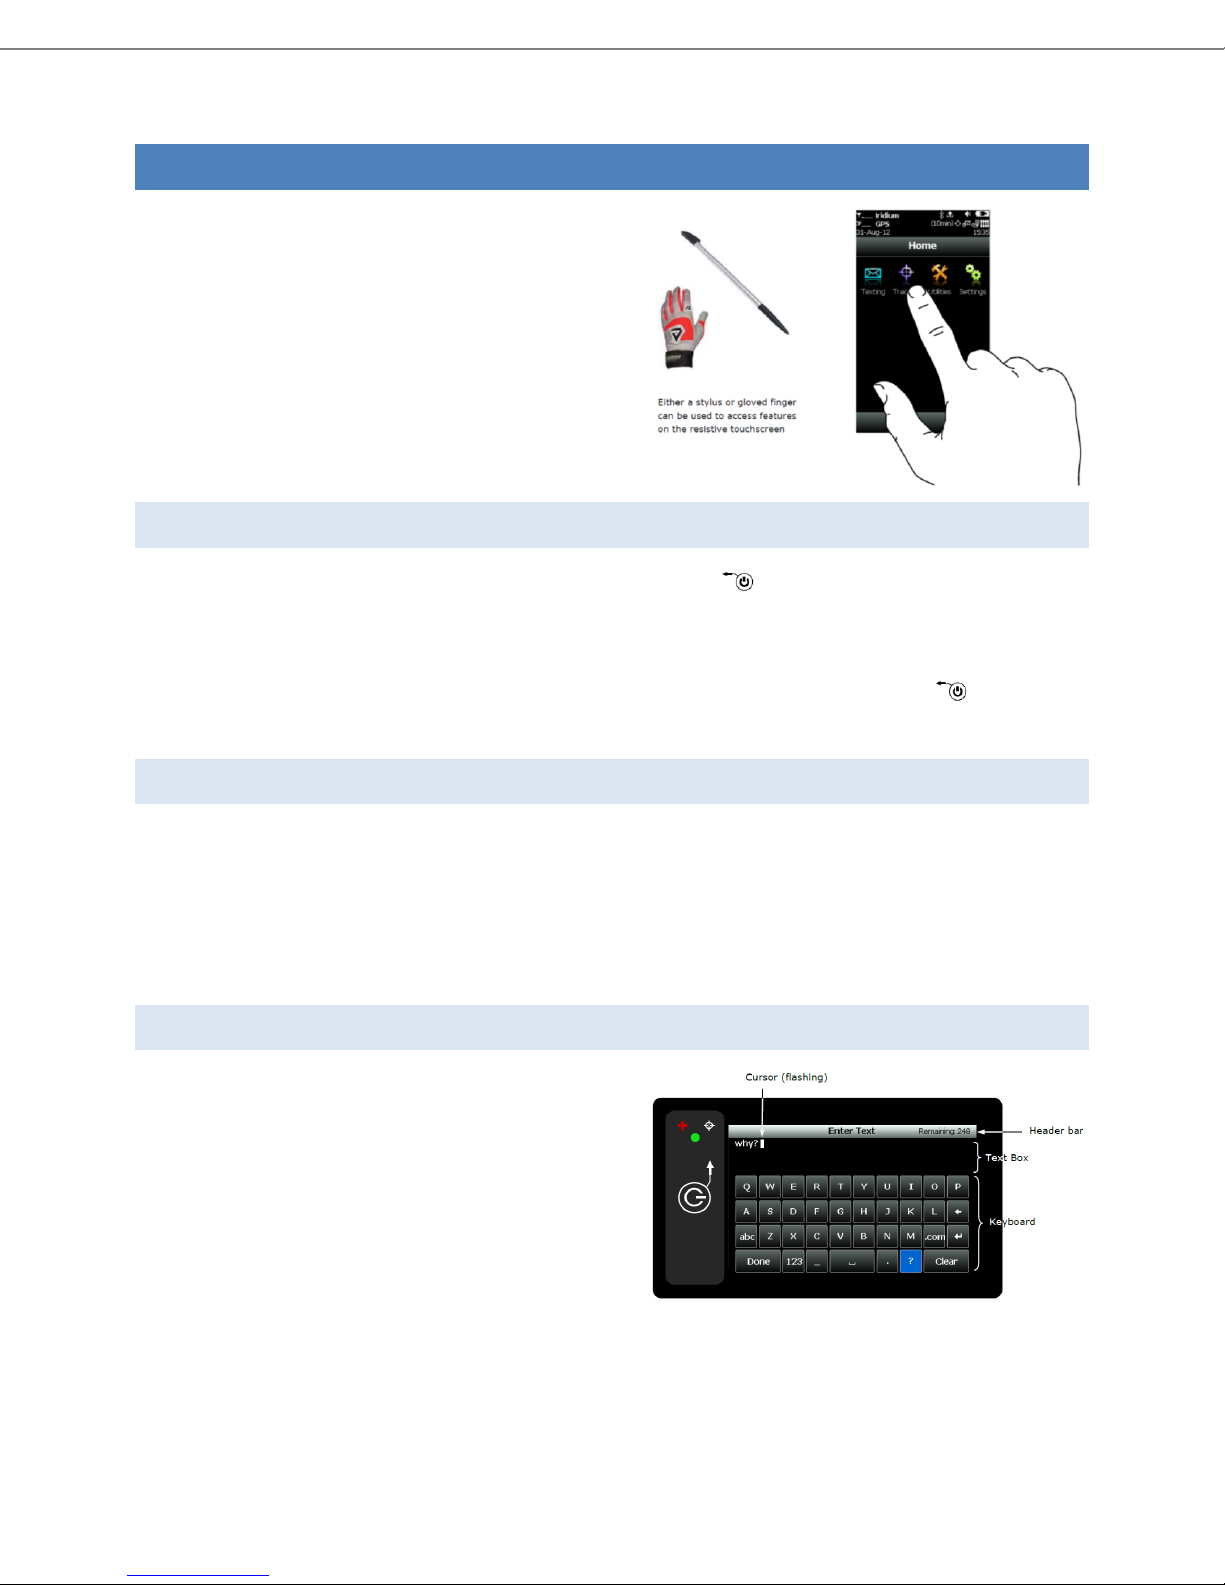
The HawkEye (PT) Plus has a resistive touchscreen, since
resistive touchscreens respond to pressure on the surface
this means that you can use the HEPT Plus while wearing
gloves and also with a stylus.
Resistive touchscreens are very durable, however, as with
any touchscreen, users must be careful not to damage it
with a sharp object. A resistive touchscreen requires
moderate finger pressure and the screen may also need to
be recalibrated from the Settings menu from time to time.
POWER ON
To power on the HawkEye (PT) Plus press/hold down the power/back button for approximately two seconds.
When the screen turns on users may notice a “Date/Time Unavailable” message, this is normally observed whilst
the HEPT Plus checks its internal clock against the data from the GPS receiver.
Once the device is powered on, touch any icon to access device features. Press the power/back key briefly to
go back to the previous screen.
POWER OF F / LOCK
The HawkEye (PT) Plus can be powered off at any time by holding down the power/back button for 3 seconds and
then selecting “Turn Off” from the “Power Down or Lock” prompt.
If the HEPT Plus is unlocked it will automatically lock and go to into a “sleep” mode after 90 seconds of inactivity.
To lock an unlocked HEPT Plus press and hold the power/back button for 3 seconds and then select “Lock” from
the “Power Down or Lock” prompt.
KEYBOARDS
The HawkEye (PT) Plus keyboards are displayed in
landscape mode, there are three different keyboard styles
offered: lower case, upper case and number/special
characters. Toggle between keyboards by pressing the
designated keys next to the “Done” key.
The keyboard screen is divided into three sections as
shown in the figure (right).
The right side of the header bar displays the remaining
number of characters that can be typed into the Text Box, when the remaining characters reaches 0 an alert will
sound since additional text cannot be entered.
Blue Sky Network Page 9 of 34
Page 10
HawkEye (PT) Plus User Guide Touchscreen
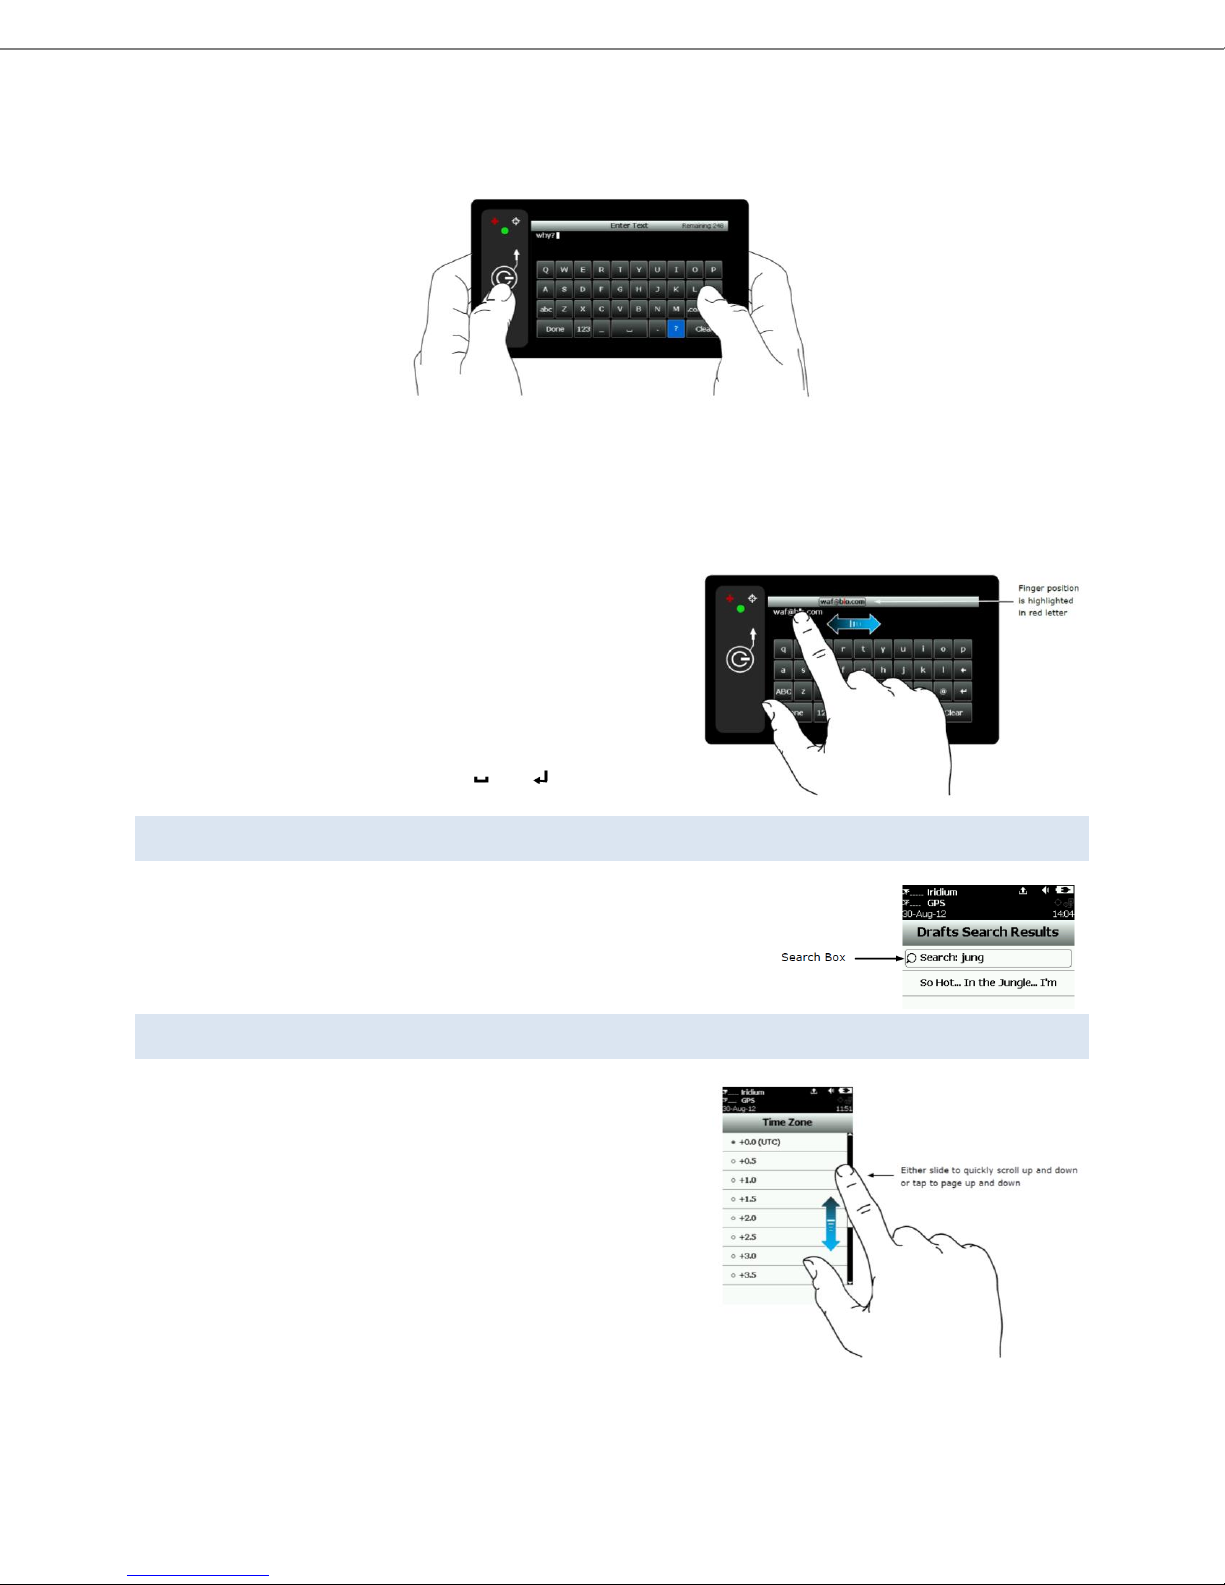
Use the keyboard to enter text into the text box, the recommended hand position is show in the figure (below):
When typing, the position of the cursor in the text box is identified by the flashing white block; this block will turn
red when the maximum character count has been reached (0 remaining).
Use the “Clear” button to erase the entire contents of the text box, press Unclear to undo the clear. When you are
done typing; tap the “Done” button to return to the previous screen. Pressing the back key whilst typing will
return to the previous screen and discard any changes.
Tapping anywhere inside the text box will move the cursor to
that location. Slide a finger inside the text box to select multiple
characters at once; the selection will be displayed in the header
bar as shown in the figure to the right. The position of the cursor
in that selection is displayed in red letter.
The space and enter keys will appear as and .
USIN G T HE SEA RCH B OX
The Search box will appear when accessing some menus; the Search box
allows users to search for specific keywords and terms. Search parameters
can be managed from the Settings/Search menu. Tap inside the Search box
to show the keyboard which can be used to input search items.
USIN G T HE SL IDER BA R
A slider bar is used to provide access to menu options that appear
off-screen, hold and slide the scroll bar to scroll through the menu
options. Tap above/below the slider to page up/down:
Blue Sky Network Page 10 of 34
Page 11
HawkEye (PT) Plus User Guide Home Screen
HOME SCREEN
UNLOCK
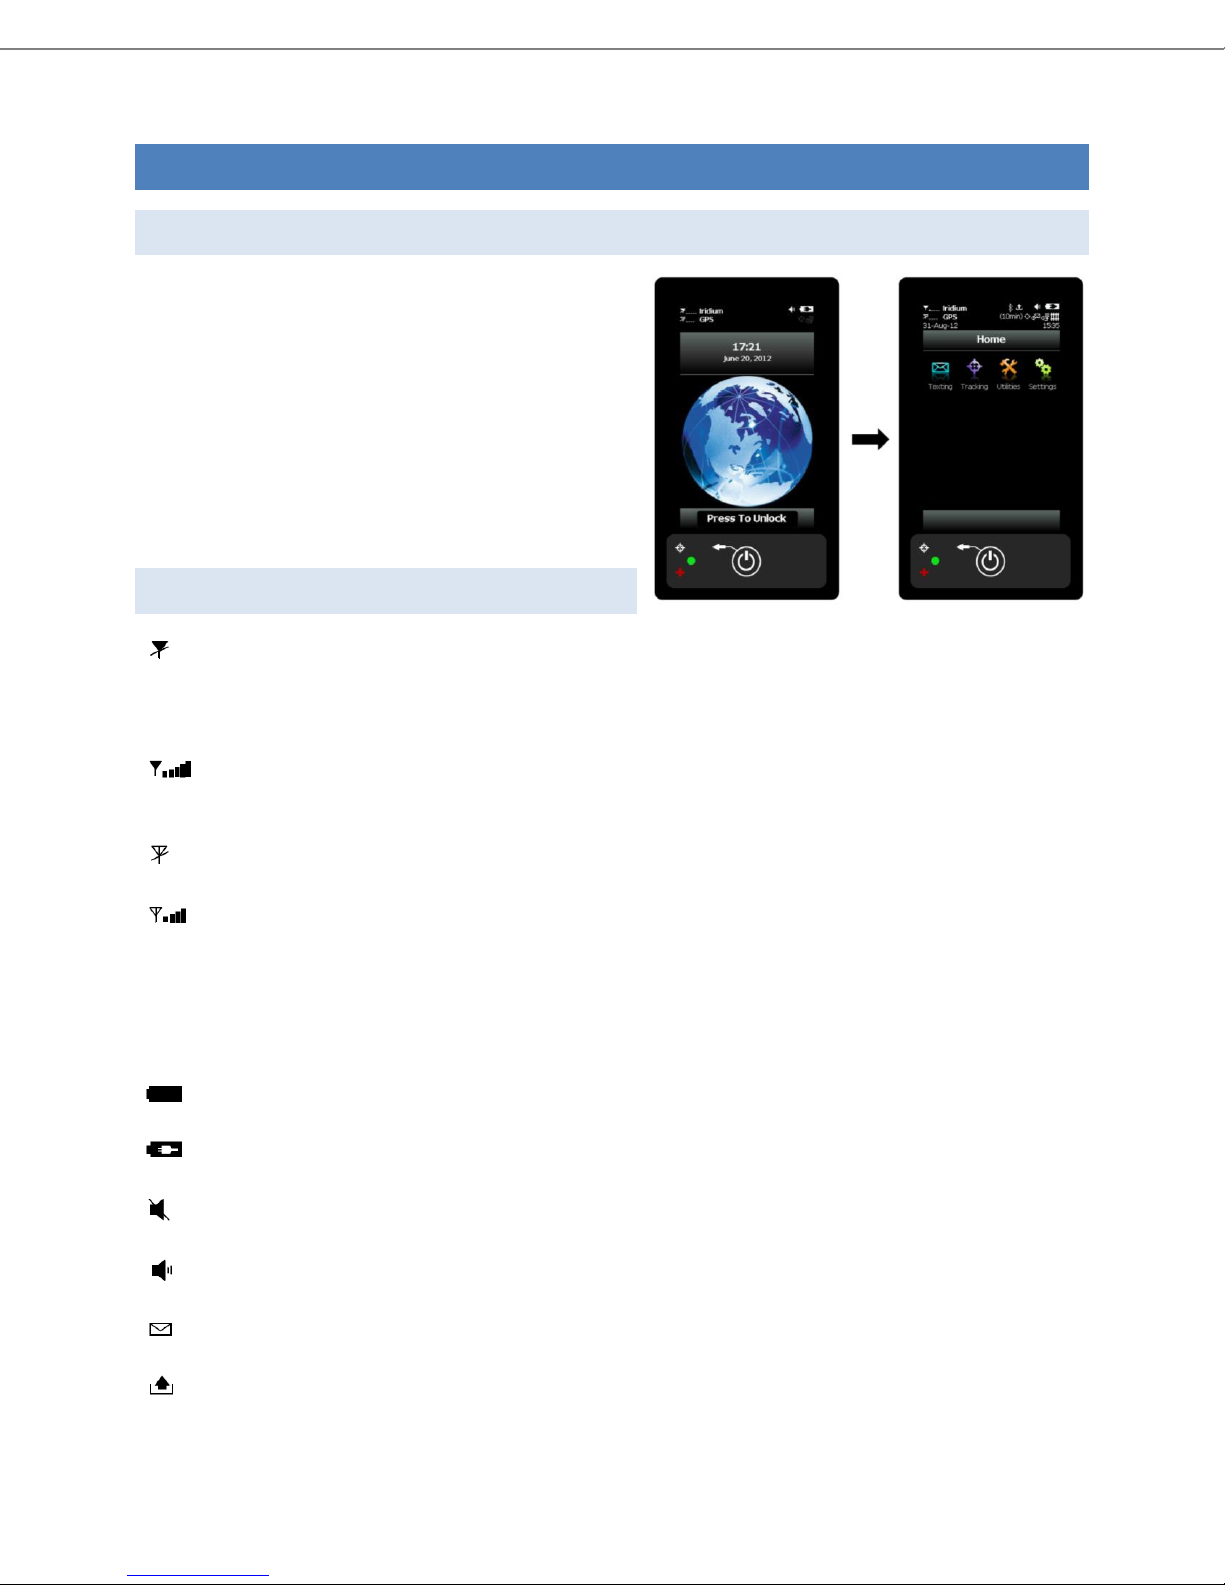
After the HawkEye (PT) Plus is powered up, unlock the
device by pressing the “Press To Unlock” button at the
bottom of the screen. If a PIN has been configured to
protect the device, you will need to enter the PIN before
the screen will be unlocked. The HEPT Plus is shipped
without PIN protection; the default factory PIN is 1111.
Once the device is unlocked you are presented with the
home screen. The top portion of the home screen shows
the Device status symbols.
STATUS SYMBOLS
Denotes the primary link used to transport reports/messages (Iridium or GSM label will appear). The
Iridium and GSM transceivers are turned off when they are not transmitting; a line is drawn over the
symbol to indicate when the primary link down.
Denotes the primary link is enabled and shows the signal strength. The signal strength indicator ranges
from 0-5 with 0 being the weakest and 5 being the greatest signal strength.
Denotes the GPS receiver is off. The GPS receiver powers down between reports to preserve battery life.
Denotes the GPS receiver is enabled and shows the signal strength:
1 bar - represents valid time and date fix
2 bars - represents a 2-D fix or dead reckoning
3 bars - represents a 3-D fix with HDOP higher than 2.0
4 bars - represents a 3-D fix with HDOP less than 2.0
Battery indicator
Denotes the battery is being charged
Denotes all audio alerts are muted
Denotes audio alert is on
Denotes there are unread message(s) present in the Inbox
Denotes message(s) is in the Outbox ready to be sent or message(s) in queue failed to send
Blue Sky Network Page 11 of 34
Page 12

HawkEye (PT) Plus User Guide Home Screen
Bluetooth – when the symbol is blue Bluetooth is connected; when the symbol turns white, Bluetooth is
on but disconnected.
GeoFence – GeoFence is on when the symbol is white, when the symbol is gray this means that GeoFence
tracking is turned off. If there are no defined GeoFence saved to the device the symbol will not appear.
Denotes Call Out, when the symbol is white Call Out is on, the symbol turns gray when Call Out is off. If
there are no Call Out times defined the symbol will not appear.
Mailbox check - when the symbol is white Mbox Check is on, when the symbol is gray Mbox Check is off.
Tracking - When the device is tracking (standard tracking, GeoFence tracking, etc.) this symbol appears
white. A countdown timer appears next to the tracking indicating how long is left until the next report.
The symbol is gray when tracking is off.
DATE/TIME
Date/Time formats are set under the Settings>Time>Date option. The date and time are acquired from the GPS
receiver, in order to acquire a valid date and time the GPS receiver must have at least 1 signal bar. When the GPS
receiver is unable to get a valid GPS fix the message “Date/Time unavailable” is displayed.
HOM E I CONS
There are four main icons displayed on the home screen of the HEPT Plus: Texting, Tracking, Utilities and Settings.
See the next section for further details on each of these sections.
FAVORITE ICONS
The bottom portion of the home screen is a customizable Favorites bar, allowing rapid acces s to your most used
options. Configure which icons will show here under Settings>Favorites, a maximum of four favorite icons are
permitted.
Blue Sky Network Page 12 of 34
Page 13
HawkEye (PT) Plus User Guide Texting Menu
TEXTING MENU
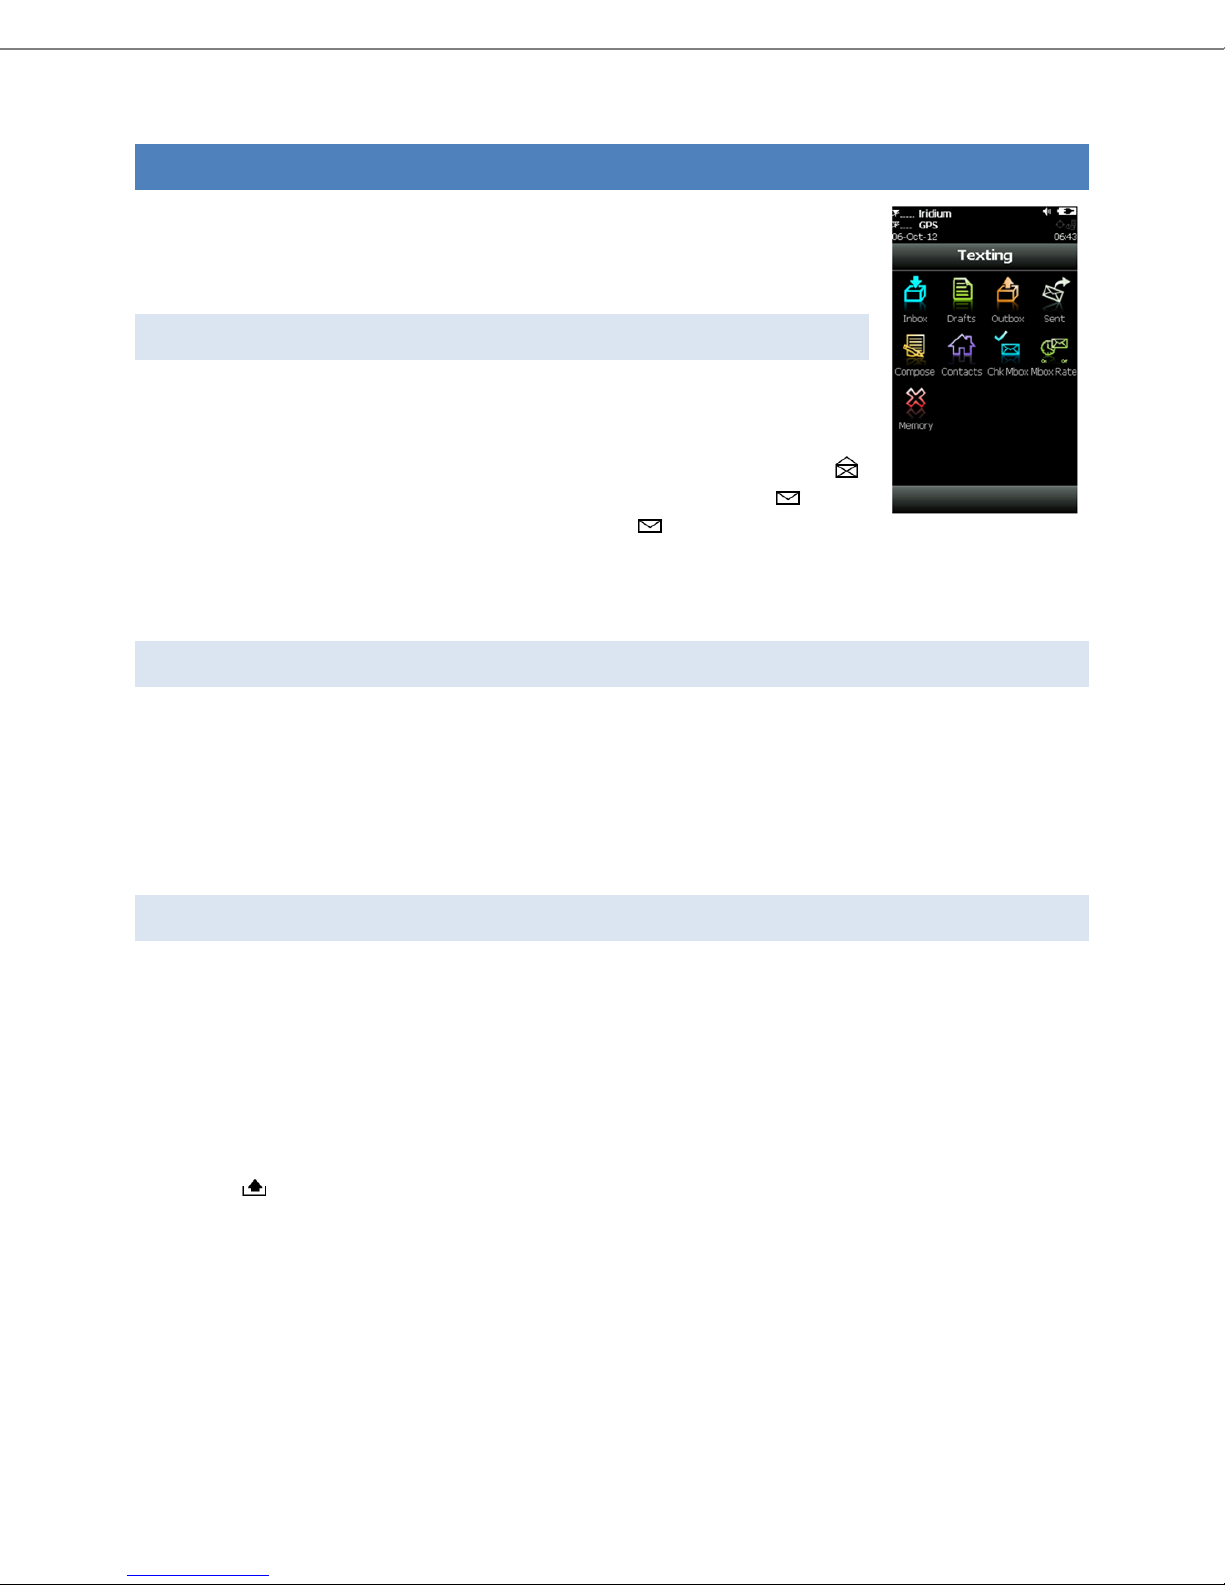
The Texting menu allows access for users to compose, save and view free-text messages,
send canned messages, check mailbox for incoming messages and configure an
automatic mailbox check interval.
INBO X
The Inbox folder contains read and unread messages which have been sent to the device
(incoming); they are displayed in descending chronological order (newest first).
Messages which have been read are identified by an open envelope symbol .
Messages which are Unread are identified by an unopened envelope symbol . When
there are unread messages in the inbox an envelope symbol will appear on top of the screen.
The internal speaker will sound an audible alert when new messages are received, this can be enabled under the
Settings>Audio menu.
DRAFTS
When messages created under the Compose menu are saved they are moved to Drafts. Messages in the Drafts
folder are displayed in a chronological descending order (newest first). When selecting a draft message the user is
taken back to the compose screen to finish the message. When the message is completed and has been sent a
Confirm and Success screen will appear to indicate that the message has been moved to the Outbox. If include
GPS option is enabled then GPS location will be attached to a message (NOTE: messages with include GPS may take
longer to send since the HEPT Plus will need to check the GPS location first).
OUT BOX
When messages are waiting to be sent or have failed sending they are stored in the Outbox. Messages which are
in the process of being sent are identified with a << symbol. Messages which have failed to send are identified by
the X symbol with red label. Messages which are queued for delivery do not show any symbol, HEPT Plus will try
to send any queued message for 2 minutes; the message will be de-queued after 2 minutes to avoid using battery
power.
Messages which have failed to send will remain in the Outbox. Outbox messages are sorted first in order of
priority, and then by chronological descending order. When there are queued or de-queued messages in the
Outbox the symbol appears on top of the screen.
Failed messages can either be deleted or re-queued for sending. When the user re-queues and successfully sends
an outbox message it will also attempt to resend other failed messages in the Outbox in the following order:
Category 1: (Highest Priority)
o Callout
o Cancel Emergency
o GeoFence Arrive/Depart
Blue Sky Network Page 13 of 34
Category 2:
o Check-In
o Queued Tracking Report
Page 14
HawkEye (PT) Plus User Guide Texting Menu
Category 3:
o Motion Report
o Statistics Report
o Test Report
Category 4: (lowest priority)
In the case where multiple items in the same category are present, the oldest item is sent first.
NOTE: The HEPT Plus will also automatically attempt to resend failed messages after a successful transmission by
any option involved accessing the network such as Tracking, Test Report and Waypoint. To prevent this behavior
from draining the battery, it is recommended that the user frequently maintain the Outbox and delete failed
messages when they are no longer needed.
o Remote Update Response
o Poll Report
o Text Message
o Waypoint
SENT
The sent folder stores a copy of every message that has been successfully sent from the HEPT Plus. Messages in
the Sent folder are stored in chronological descending order (newest first). The option to resend, forward and
delete a Sent message is offered.
Resend – moves the message to the Outbox and puts the message at the end of the queue.
Forward – puts the message back into Compose mode so that the user can add additional information to the
message and send it.
Delete – Permanently deletes the message.
COM POSE
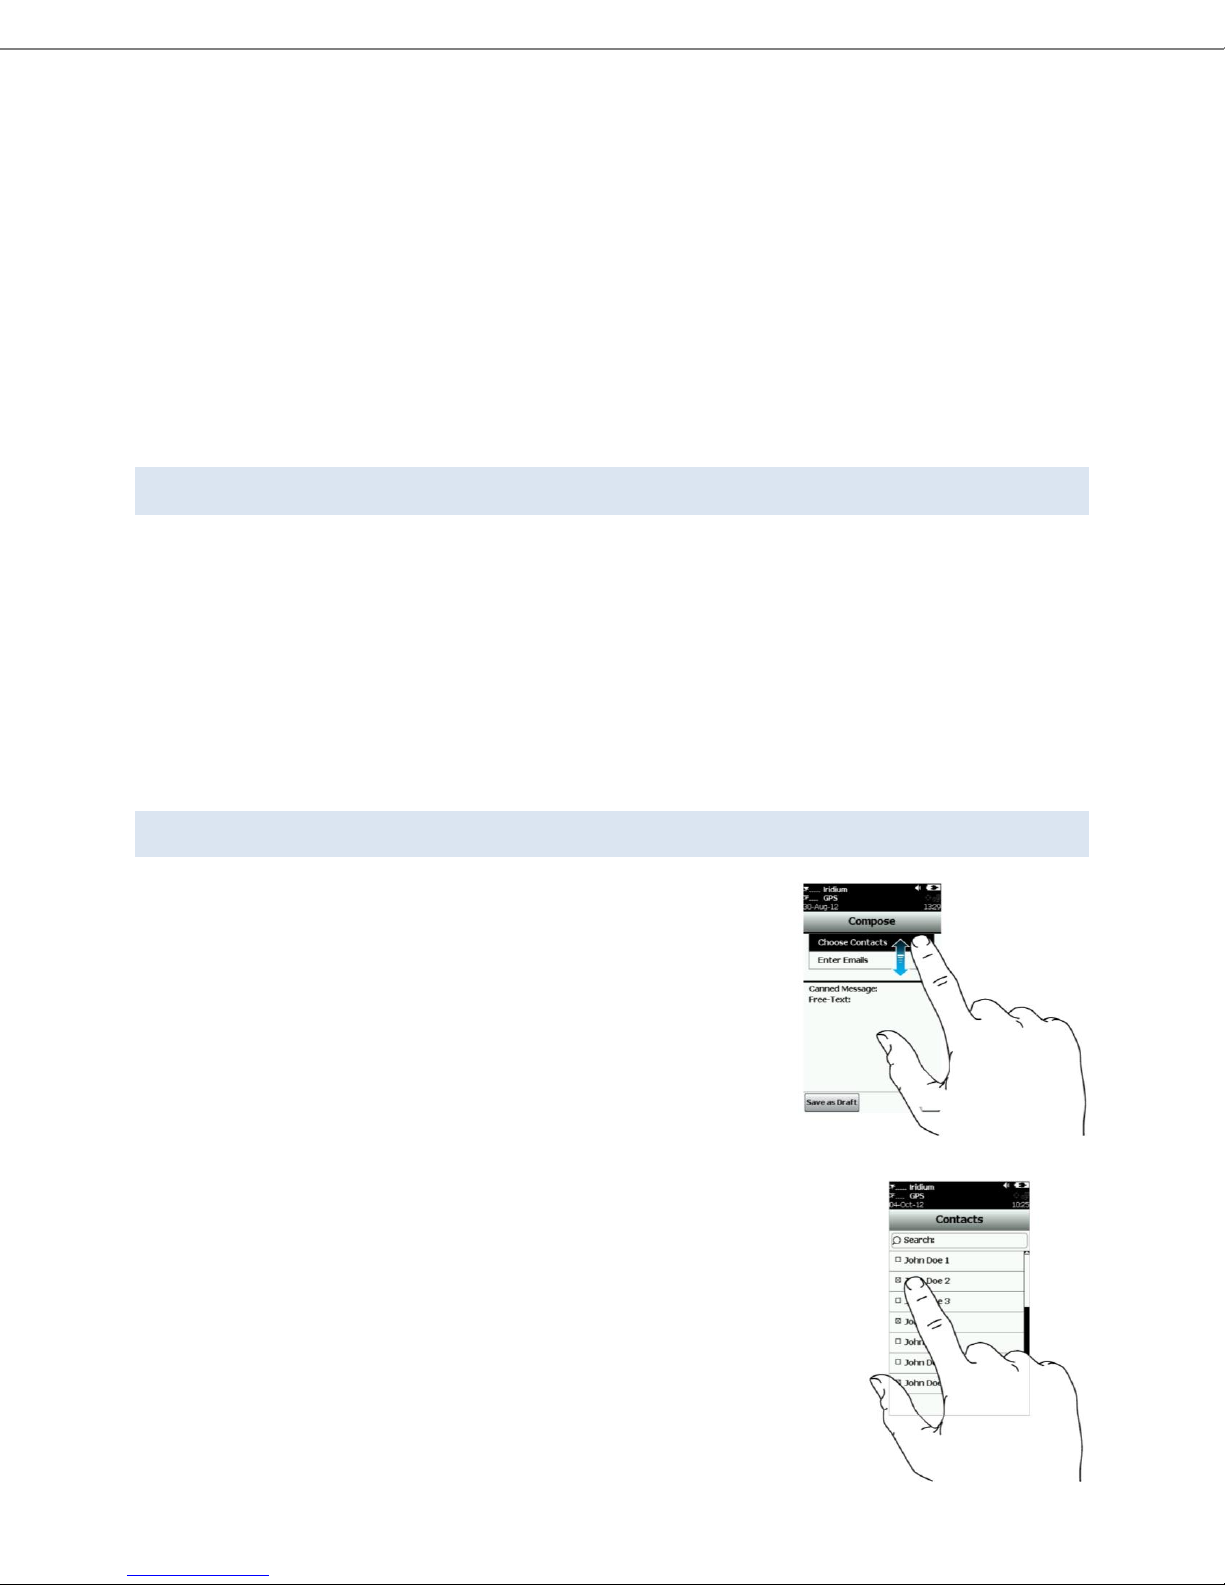
The Compose menu provides facilities to enter, edit and send free-text
messages, canned messages or a combination of canned and free-text
messages to an email address.
When the Compose menu is selected a screen will appear, the screen is split
into two sections. The first section covers the message destination options:
“To: Server” and “Emails”. “To Server” indicates that a copy of this message
will be sent to SkyRouter. Press and hold “Emails” to show two options:
Choose Contacts and Enter Emails. DO NOT lift the finger until the correct
choice is selected. Pressing the back button cancels any selection.
If Choose Contacts is selected a list of contacts will appear, they are sorted in
alphabetical order. Select a single or multiple contacts from the list and tap Add to
confirm the recipients. To remove a contact go back to Choose Contact and unselect
the contact from the list, then click Add again. Pressing the back button will cancel
any selection.
If Enter Emails is selected the landscape keyboard will appear. Multiple email
addresses must be separated with a comma; there is a 255 character maximum in this
field.
Blue Sky Network Page 14 of 34
Page 15
HawkEye (PT) Plus User Guide Texting Menu
The maximum allowable length of free-messages is 309 characters, this includes the message body and also any
email address recipients that are added to the message.
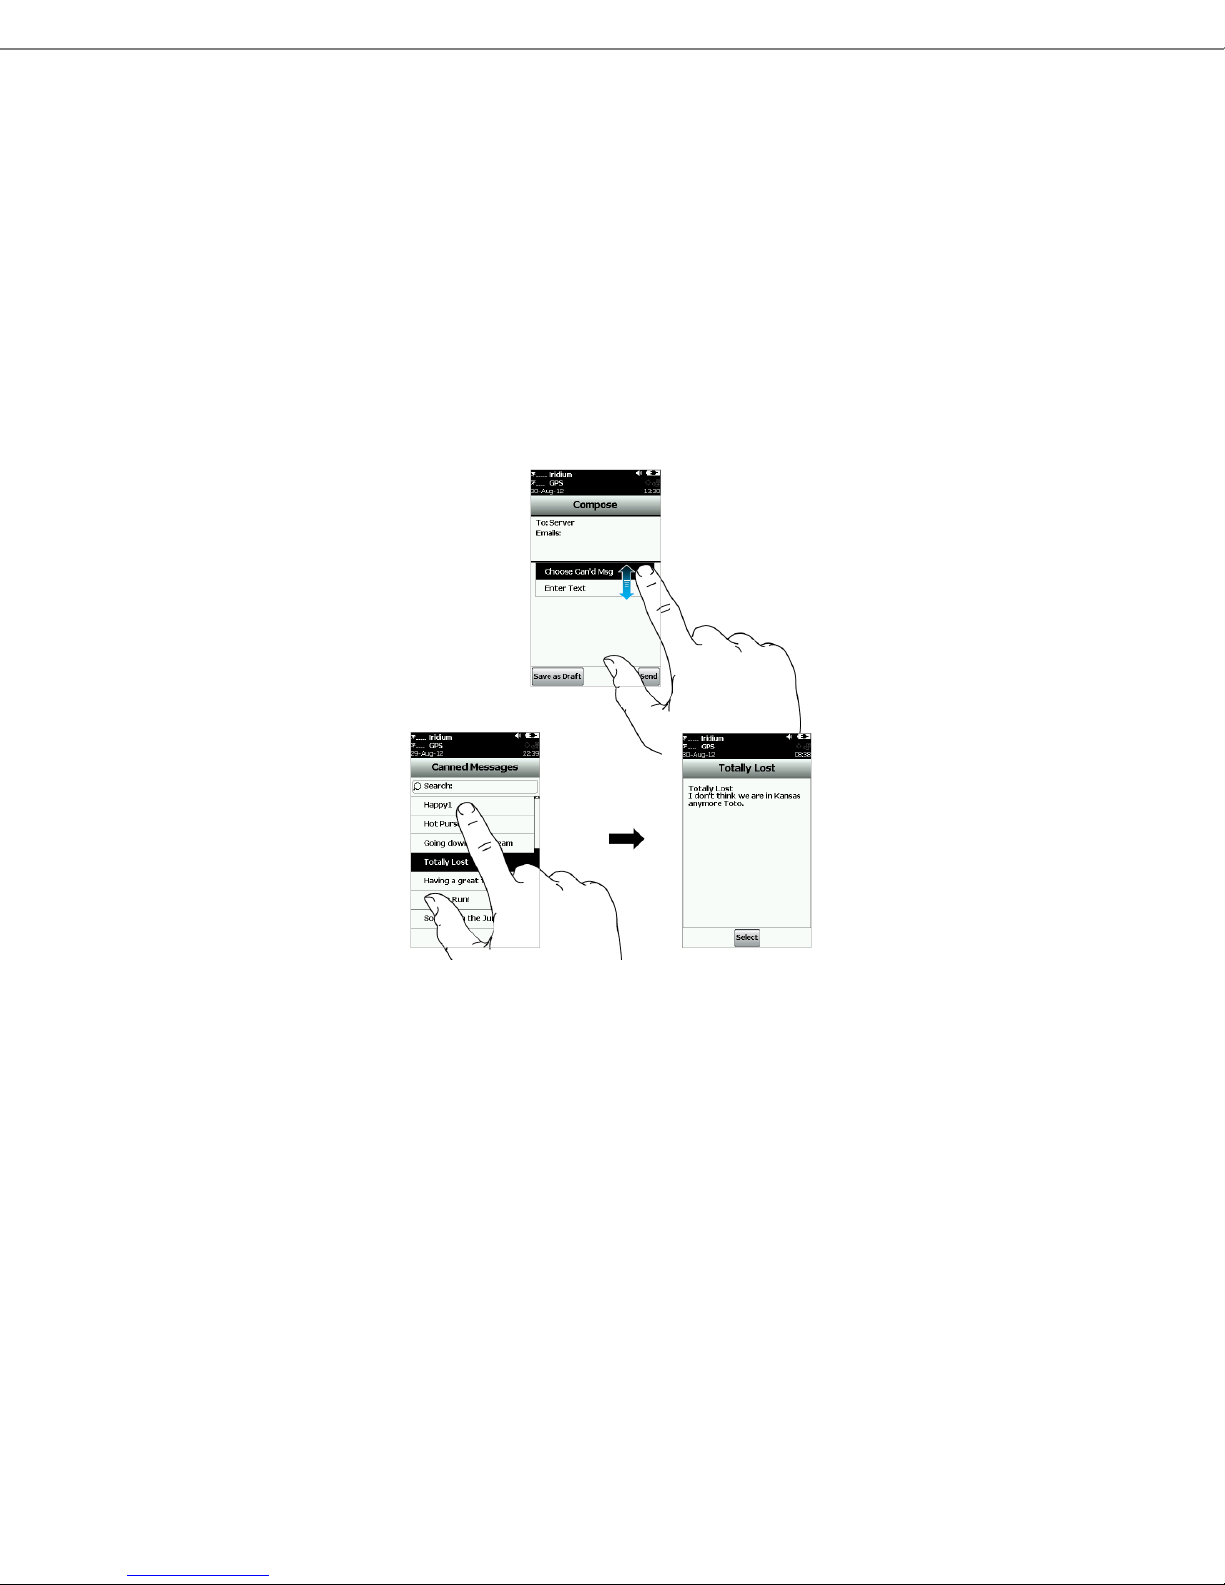
Canned Message - Pressing and holding Canned Message displays two options: Choose Can’d Msg and Enter Text:
Can’d Msg – select this option to display a list of canned messages; tap on a canned message to display
the entire message text; tap Select to select that message.
To remove a chosen canned message press and hold inside the Canned Message field to show the
Remove Can’d Msg option; select Remove Can’d Msg to remove the message.
NOTE: As with the contact list, the HawkEye (PT) Plus Manager Application can be used to enter Canned
Message presets on the HEPT Plus, please consult the HawkEye (PT) Plus Manager application User Guide
for further information on defining Canned Messages.
Enter Text – select this option to enter free-text messages in the landscape keyboard. If you have already
selected a canned message the free-text will be added to the end of the canned message content.
When the canned message and/or free-text message is complete press Send to send the message (the message is
moved to the Outbox), or select Save as Draft (the message is moved to the Drafts folder).
NOTE: the HEPT Plus must have signal to send the message.
Blue Sky Network Page 15 of 34
Page 16
HawkEye (PT) Plus User Guide Texting Menu
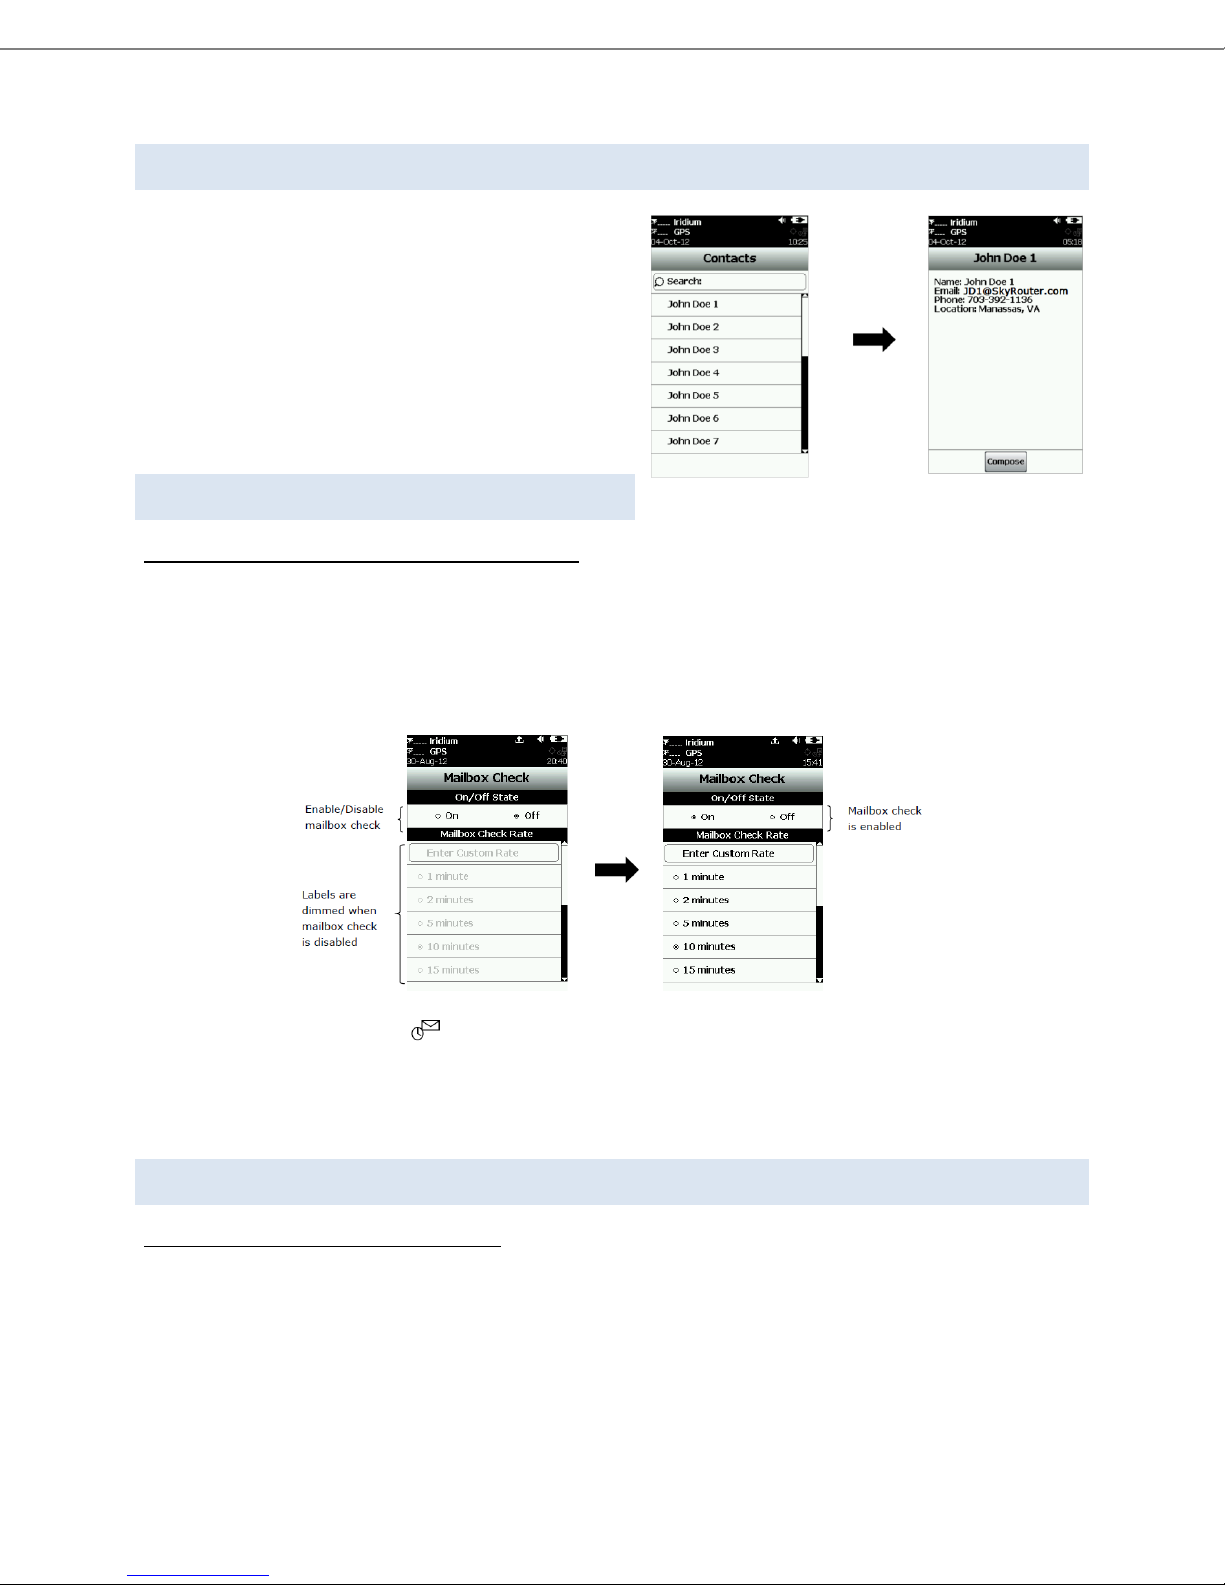
CON TA CTS
The Contacts option is a list of contacts that are saved into
the HEPT Plus memory. Contacts can store information such
as name, email, phone number and location.
Contacts can be managed using the HawkEye (PT) Plus
Manager Application (available for download from the
secure documents section of New SkyRouter), please see
the HawkEye (PT) Plus Manager Application User Guide for
further information on managing contacts.
MBOX RATE – IRIDIUM LINK ONLY
Only applies only when the Iridium link is enabled. The Mbox Rate option provides configuration options for
Mailbox Checks; this is an interval that the HEPT Plus will check to see if there are messages destined for the device
waiting at SkyRouter. Mailbox Checks are done using the Iridium Network only. The HEPT Plus will also check for
messages each time it reports to SkyRouter, so if your report rate is already set to a low value this option might not
be required. It is possible to select either a pre-defined rate from the list or to enter a Custom Rate using the
keyboard.
If mailbox check is enabled, the symbol appears white at the top of the screen. The HEPT Plus will then check
SkyRouter for messages at the next scheduled interval. The HEPT Plus will sleep between mailbox check intervals
in order to save battery life; the status LED will also flash once every 5 seconds. It is possible to disable the status
LED under Settings > LED (this can reduce power consumption).
CHK M BOX – I RDI UM LINK ON LY
Only applies when Iridium Link is enabled. Chk Mbox option allows the user to check the Iridium gateway for
messages which are waiting to be sent the device. Press the “Check” button to begin checking for mail - as
messages are downloaded the number of unread and queued messages is displayed.
Blue Sky Network Page 16 of 34
Page 17

HawkEye (PT) Plus User Guide Texting Menu
MEMORY
Mailbox contents are stored in Memory; options are offered to clear the contents of individual mailboxes (Inbox,
Outbox, Sent, Drafts), or all mailboxes at once.
Blue Sky Network Page 17 of 34
Page 18
HawkEye (PT) Plus User Guide Tracking Menu
TRACKING MENU
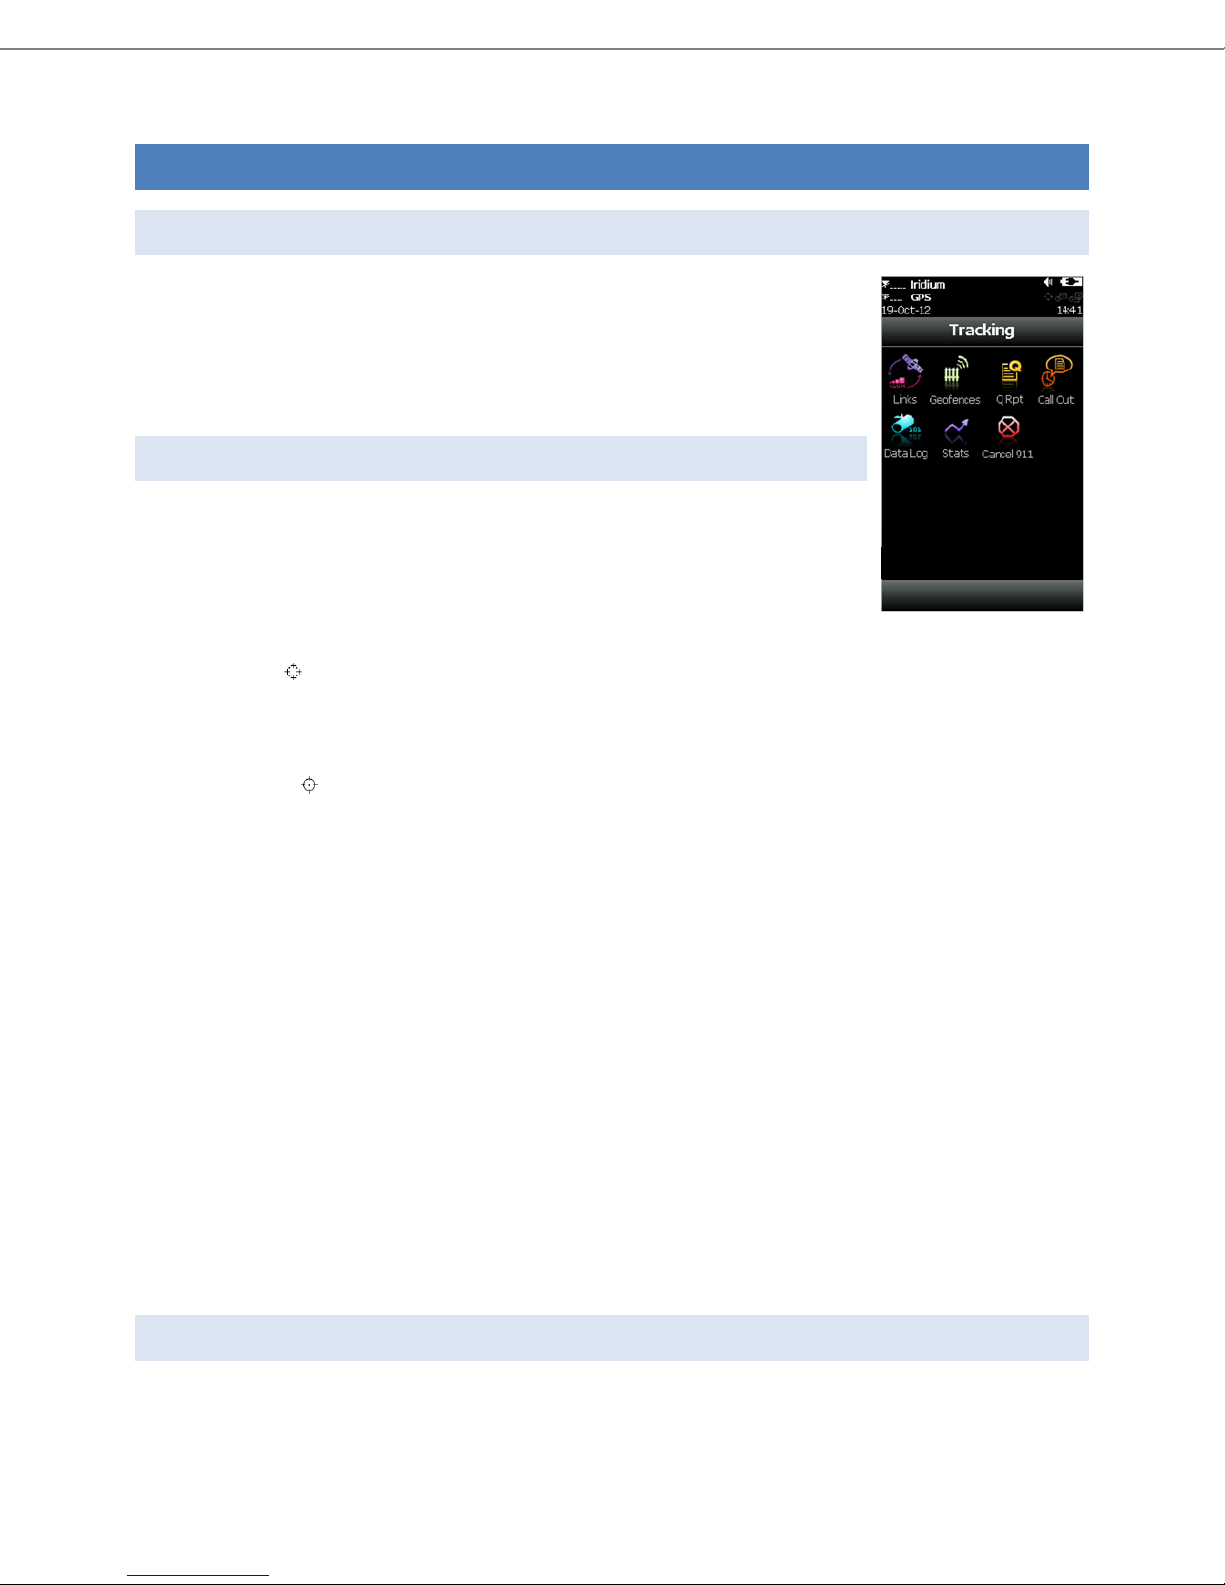
TRACK ING
The Tracking menu provides access to options such as Report Rate and Network Link
configurations. Some of the options such as GeoFences and Call Out require use of the
HawkEye (PT) Plus Manager Application for setup and management; please refer to the
HawkEye (PT) Plus Manager Application for further information on setup of those
features.
RPT RATE
The Rpt Rate option allows users to configure the rate at which NormalPositionReports
are sent from the HEPT Plus to SkyRouter, it also allows the user to enable Tracking or
disable Tracking completely. There are options to configure a predefined rate from the
list, or to configure a Custom Rate with the onscreen keyboard.
Use the On/Off radio buttons to enable/disable the HEPT Plus Tracking mode. When Tracking is set to ON the
Tracking symbol appears white at the top of the screen. When the HEPT Plus attempts to send a Position
Report the GPS receiver is powered on to acquire a GPS fix for transmission with the report.
NormalPositionReports are sent automatically at the configured interval (Rpt Rate). Between reports a countdown
timer is displayed in parentheses next to the tracking symbol. The HEPT Plus will sleep between position reports
and the status LED will flash every five seconds (the LED can be disabled during sleep under Settings>LED).
The QPOS/Emergency 911 button activated at any time, whether Tracking is Enabled or Disabled. Messaging can
also be used at any time regardless of the Tracking settings.
NOTE: When the Iridium link is being used and the device wakes up to send a position report. The antenna must
have full view of the sky or it may fail to send. Failed reports are not queued to be resent in the default
configuration. Under the Q Rpt menu, failed reports can be forced to stay in the Outbox until they are sent (see the
Outbox section of this guide).
The Reporting process can take up to two minutes; this is dependent on Iridium satellite visibility and the validity
of the current GPS ephemeris data. Ephemeris data stored on the GPS receiver is valid for two hours so that the
can use a hot-start GPS fix. If the configured Position Report Rate is set to more than two hours, the GPS receiver
will have to acquire a warm-start or cold-start GPS fix which can take ~29 seconds.
NOTE: The HEPT Plus will automatically attempt to resend any failed messages that remain in the Outbox after a
successful position report is sent to SkyRouter. The user should frequently maintain the Outbox and delete failed
messages which are no longer needed.
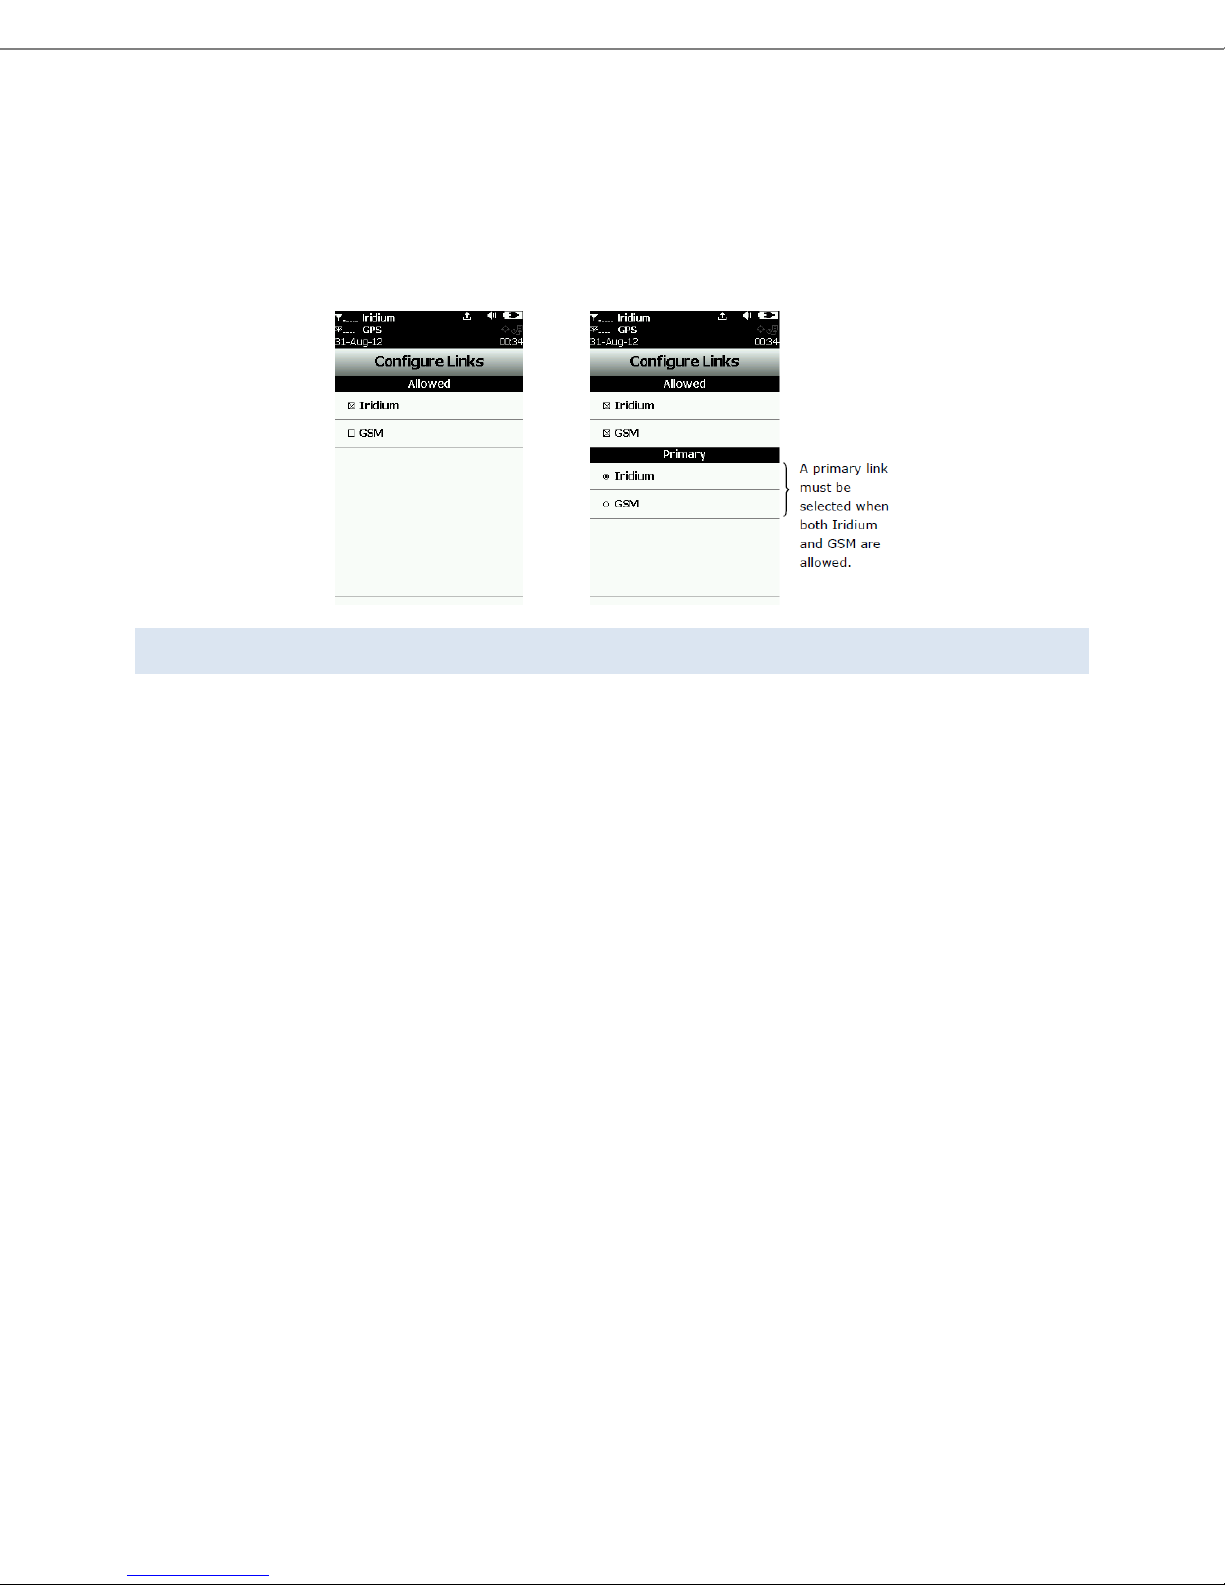
LINKS
The Links menu provides configuration options for which network(s) are used to transmit Position Reports and
messages. There are three options: Iridium only, GSM only, or both (Dual-Mode).
Blue Sky Network Page 18 of 34
Page 19
HawkEye (PT) Plus User Guide Tracking Menu
If both networks are enabled (Dual-Mode), another menu will appear in the lower portion of the screen prompting
the user to select a primary network. When both networks are available, the HEPT Plus will always use the primary
link to send messages and Position Reports, the secondary network is only utilized when the primary network is
not available. The transition between primary and secondary link is managed automatically by the HEPT Plus. The
default link setting is GSM and Iridium, with Iridium as the primary link.
GEOFENCES
A GeoFence is a set of connected latitude and longitude coordinates that defines a region or zone of interest.
GeoFences are a valuable tool that can help alert administrators and dispatcher to events that are based upon
their geographical boundaries.
GeoFence offers another Tracking option which can be tailored for specific applications; GeoFence Tracking can
work independently of the standard Tracking mode or can be implemented alongside standard Tracking.
GeoFences can be managed using the HawkEye (PT) Plus Manager Application, please see the HawkEye (PT) Plus
Manager Application User Guide for information on how to manage GeoFences.
A GeoFence must consist of a minimum 3 coordinates, the maximum coordinate count is 50. Each GeoFence has its
own tracking profile that causes the HEPT Plus to change tracking configurations while inside the GeoFence
boundaries. For example, allowing only the use of Iridium link or turning off all radio links for regions that require
radio silence. GeoFences can be configured to send “Enter GeoFence” and “Exit GeoFence” events upon entering
and/or exiting GeoFence boundaries.
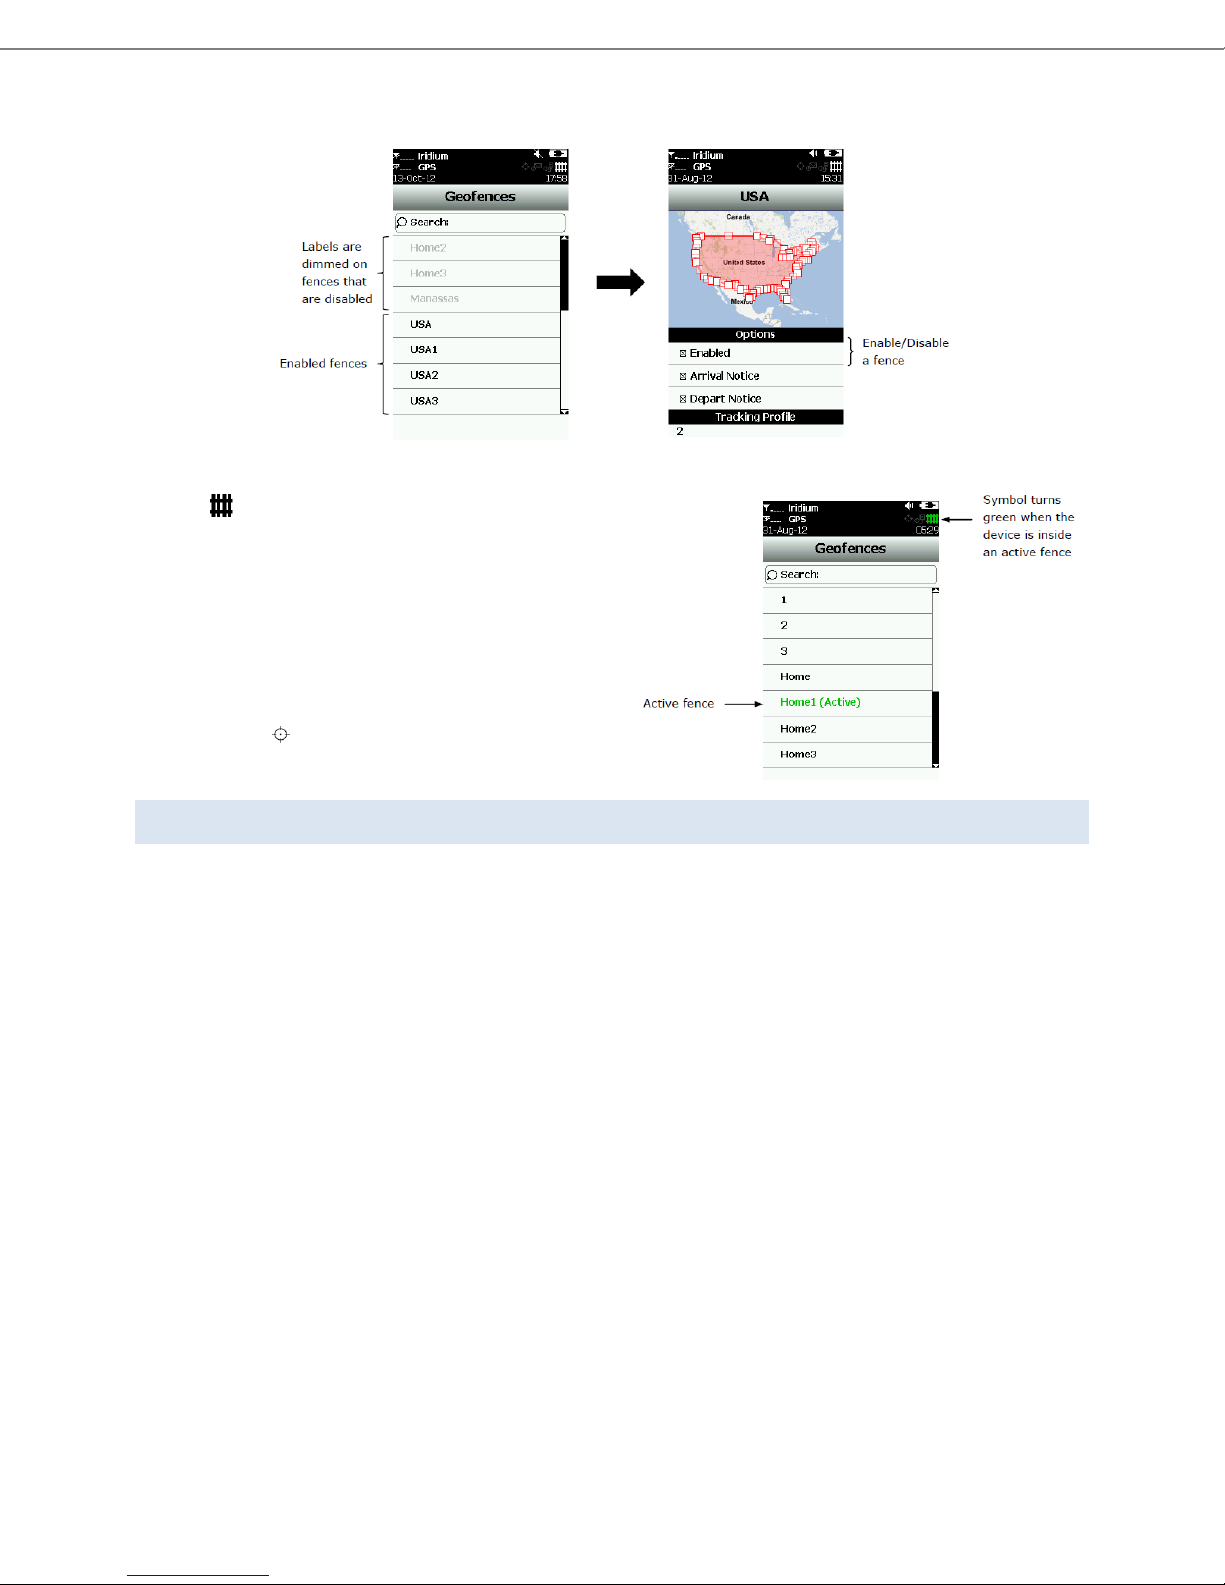
The GeoFence menu on the HEPT Plus device only provides the following capabilities:
Browse a list of GeoFences loaded into the device through the HawkEye (PT) Plus Manager Application
View the map showing boundaries for each GeoFence and configured notifications/events
Enable/Disable a GeoFence
All other GeoFence options must be managed through the Manager Application.
Blue Sky Network Page 19 of 34
Page 20
HawkEye (PT) Plus User Guide Tracking Menu
When GeoFences have been enabled, the GeoFence
symbol on top of the screen appears white. The HEPT
Plus will immediately check the GPS receiver data to
determine if the device is inside the boundaries of an
enabled GeoFence. If the HEPT Plus is inside an enabled
GeoFence, the GeoFence symbol will turn green. The
GeoFence label will also turn green and “Active” will
appear in parenthesis next to the label. When a
GeoFence(s) is enabled and the device is in sleep mode,
the status LED will flash once every five seconds (the
LED can be disabled under Settings>LED).
MOTION
DISCLAIMER: Except for those express warranties set forth in the Equipment
purchase & Service Agreement for this product; all warranties relating to this
product are expressly disclaimed, including, without limitation, warranties of
merchantability and fitness for a particular purpose. Any liability shall be limited
exclusively to repair or replacement of this Product. Under no circumstances
shall liability exist for incidental, consequential, or special damages related to the
handling or use of this Product. This Product should be handled and used in
strict accordance with the User Manual accompanying this Product.
This Product includes a “non-movement” feature which may be used to alert
parties monitoring a user’s location as to whether a user has changed position
after a certain amount of time (please see User Manual for specific details and
instructions on use). The non-movement feature may be subject to malfunction
due to user error, product defects, interrupted service or force majeure and
therefore should be used in addition to, and not instead of, other reasonable
safety precautions. The use of, and reliance on, the non-movement feature is at
your own risk.
Blue Sky Network Page 20 of 34
Page 21

HawkEye (PT) Plus User Guide Tracking Menu
MANDOWN
The HawkEye (PT) Plus has a built-in Motion sensor which is used for the Mandown feature.
Mandown is a Motion feature that detects if the user has stopped moving and responds to SkyRouter
when movement has not occurred for a configured amount of time.
NOTE: Motion events must be enabled for the active tracking Profile (see “Profiles” section) in order to
utilize Motion features.
The Mandown icon is not visible on the HawkEye (PT) Plus by default, the Mandown icon must be
enabled using the HawkEye (PT) Plus Manager Application.
HOW IT WORKS: MANDOWN
Once Mandown is enabled the Mandown “Time Down Duration” starts to count down.
o If movement occurs before the “Time Down Duration” expires; the “Time Down Duration”
is reset.
o If movement does not occur before the “Time Down Duration” expires; the device will
enter the “Count Down Duration” state.
Once the device enters the “Count Down Duration” state the device will show a prompt on the
screen asking “Are You OK?” and an audible beep is heard.
o If the user responds indicating that they are OK the “Time Down Duration” is reset.
o If the user does not respond the device will enter the Mandown state.
Once the Mandown state is reached the device will emit a siren noise continuously, the device
will also enter Quick Position Mode.
o Mandown state must be manually cancelled.
ENABLE/DISABLE MANDOWN FEATURE
The default configuration for Man Down is disabled; enable Mandown from the Mandown menu by
selecting the “On” radio button under “On/Off State”.
When Mandown is enabled the Mandown icon will appear in the top right portion of the screen. Additional
options for the Mandown feature can be configured using the Manager application.
TIME DOWN DURATION
The length of time which motion does not occur; the device will enter Count Down state if the device does
not move for this amount of time. The Time Down Duration can be set at any time, even if the Man Down
feature is disabled, tap in the “Time Down Duration” field and use the numeric keypad to enter the
duration value, acceptable values are between 1-65535 seconds. Press the back button at any time to
cancel.
COUNT DOWN DURATION
Once the “Time Down Duration” has been satisfied (without any movement); the device will display a
prompt on the screen “Are You OK?” and an audible beep is heard, if the user selects “Yes” the Mandown
“trigger timer” is reset; if the user does not select “Yes” or selects “No” the Mandown state is triggered.
Blue Sky Network Page 21 of 34
Page 22

HawkEye (PT) Plus User Guide Tracking Menu
The Count Down Duration can be set at any time, even if the Man Down feature is disabled, tap in the
“Count Down Duration” field and use the numeric keypad to enter the duration value, acceptable values
are between 1-65535 seconds. Press the back button at any time to cancel.
ALERTS
Alert types can be set at any time, even if the man down feature is disabled. Tap the checkbox next to
the alert type to enable that alert, tap again to disable the alert type.
Locator Alert: The Locator Alert sounds an audible siren tone from the device once the Man
Down timers have expired.
Start Emergency: Start Emergency, when enabled, causes the HEPT Plus to enter emergency
mode once the Man Down timers have expired.
Send Message: This feature is not supported.
CANCEL MANDOWN STATE
Cancel Man Down by selecting the “Cancel 911” option from the Tracking Menu.
CALL OUT
NOTE: Call Out options can only be configured via the HawkEye (PT) Plus Manager Application.
The Call Out feature allows users to configure the HEPT Plus to send a Position Report on a specific daily schedule
via a specific Link, Call Out times are defined in UTC/GMT. When a Call Out time is enabled the symbol will
appear white at top of the screen.
For more information on managing Call Out options please see the HawkEye (PT) Plus Manager Application User
Guide.
DATA LOG
By default the HawkEye (PT) Plus will record all Position Report data in circular memory. It is possible to enable
and disable this feature under the Data Log menu. When the circular memory becomes full the oldest reports are
replaced with the newest reports. Use the HawkEye (PT) Plus Manager Application to access the data log memory.
STATS
The Stats menu provides access to a more granular countdown timer showing the “Time to Next” Position Report.
The timer will display “Off” when Tracking is disabled. The lower portion of the screen displays the last successful
report sent by Tracking or QuickPosition/911 mode. Check-In, Way Point, Free-text and Canned Messages are not
considered Reports, and will not be displayed in Stats even if a message was sent successfully.
CANCE L QU I CKP OS I T I ON/ 9 1 1
Blue Sky Network Page 22 of 34
Page 23

HawkEye (PT) Plus User Guide Tracking Menu
If the QuickPosition (QPos)/911 mode has been enabled by pressing the button on the back of the HawkEye (PT)
Plus, disable it with the “Cancel 911” option. A QPos cancellation event is queued in the Outbox and will be
transmitted when the device has signal. The emergency mode ends immediately after the Cancel 911 option is
selected and confirmed. The emergency LED is turned off and the top portion of the screen turns from red to
black.
You cannot cancel the QuickPosition mode by powering off the HEPT Plus. The Cancel 911 option must be used to
cancel the QuickPosition mode.
Blue Sky Network Page 23 of 34
Page 24
HawkEye (PT) Plus User Guide Utilities Menu
UTILITIES MENU
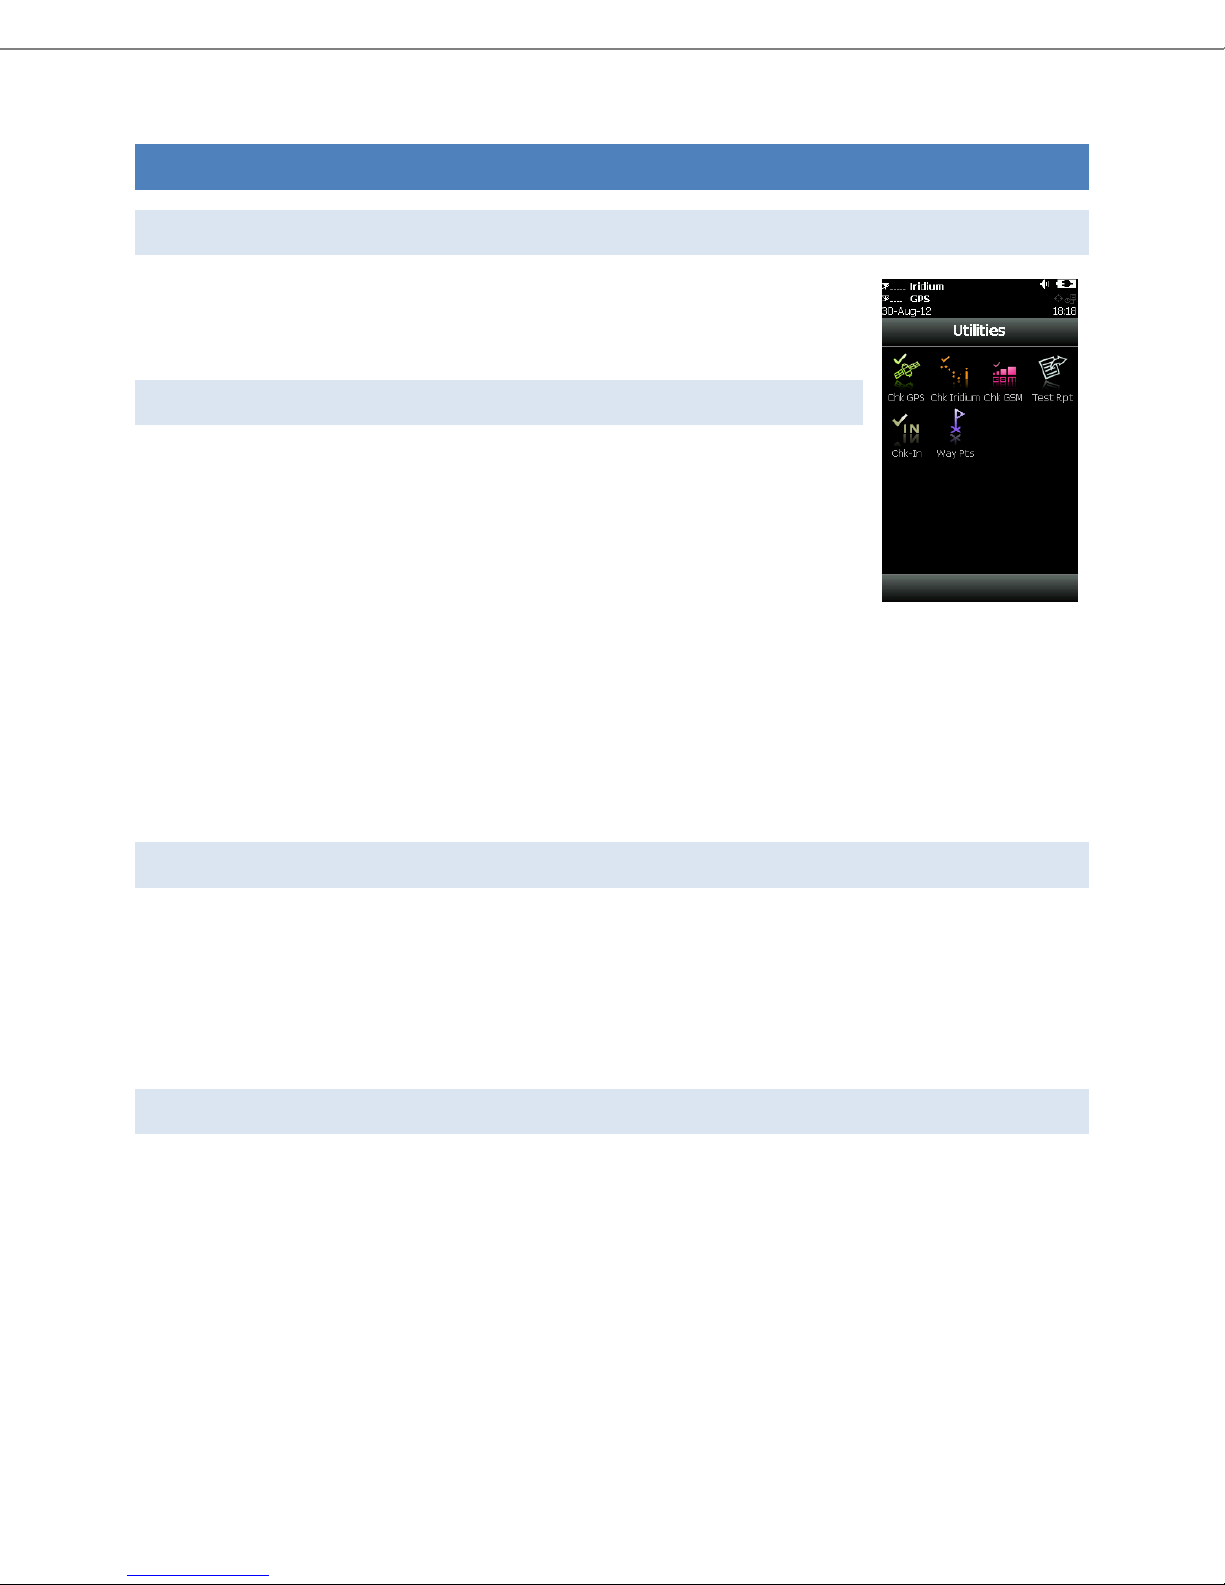
UTILITIES
The Utilities menu provides access to options that allow the user to check GPS and
network signal strengths. It is also possible to send Test Reports, Check-Ins, and send
Waypoints from this menu.
CHK GP S
Chk GPS is a diagnostic tool which can be used to ensure proper operation of the GPS
receiver.
Enabling the Chk GPS option enables the HawkEye (PT) Plus built-in GPS receiver to
check and display GPS data in real-time. The GPS receiver will remain on until the user
exits the Chk GPS option by pressing the back button. The Reset Ephemeris button will
erase saved ephemeris data from memory and download a new set of ephemeris data; this is usually used when
the device has not been powered on for a long time or has travelled a large distance while powered off.
GPS fix accuracy can be determined by the HACC (horizontal accuracy in meters) value, higher HACC values
indicate a less accurate GPS fix. The HACC value indicates a radius up to which the GPS fix can possibly be
inaccurate by. A good and stable fix is usually represented by a HACC of less than 30 meters, when the GPS
receiver is not able to acquire a fix HACC will gradually increase with a maximum value of 4294967.500. HACC can
be monitored in real-time, however, prolonged use of this feature will significantly deplete battery power.
CHK IR IDIUM
Chk Iridium is a diagnostic tool which can be used to ensure proper operation of the Iridium transceiver.
Enabling the Chk Iridium option immediately powers on the HEPT Plus Iridium transceiver and displays the Iridium
signal strength in real-time. The Iridium transceiver will remain powered on and continue to update signal
strength until the user closes the Chk Iridium screen by pressing the back button. Prolonged use of this feature will
significantly deplete battery power.
CHK GSM
Chk GSM is a diagnostic tool which can be used to ensure proper operation of the GSM transceiver.
Enabling the Chk GSM option immediately powers on the HEPT Plus GSM transceiver and displays GSM signal
strength in real-time; the device must have an active GSM SIM installed. The GSM transceiver will remain powered
on and continue to update until the user closes the Chk GSM screen by pressing the back button. Prolonged use of
this feature will significantly deplete battery power.
Blue Sky Network Page 24 of 34
Page 25

HawkEye (PT) Plus User Guide Utilities Menu
TEST RPT
Test Rpt is a diagnostic tool which can be used to ensure proper operation of the GPS receiver and both the GSM
and Iridium transceivers. This option can also be used as a manual tracking mode where the user will strategically
enable Test Rpt and Send NormalPositionReports to SkyRouter on demand.
Enabling Test Rpt causes the HawkEye (PT) Plus to immediately power on the GPS receiver on and update the GPS
fix. The GPS information is updated continuously and displayed in real-time even if there is not a valid fix. As with
the Chk GPS option, it is possible to monitor HACC to determine if a valid fix is possible, except, once a valid fix is
obtained the GPS receiver will be powered off and fix information is displayed on the screen. Send the GPS fix
information to SkyRouter by pressing “Send”.
The test report is actually a NormalPositionReport and will be displayed in SkyRouter as such. Sending a test
reports noes not disrupt the configured Tracking interval/rate.
CHK-IN
Selecting the Chk-In option causes the HawkEye (PT) Plus to immediately send a “Check-In” event to SkyRouter
with a single press of a button.
When the Chk-In button is pressed a confirmation message will appear. Once the user confirms, the HEPT Plus
immediately sends a Check-In event to SkyRouter; GPS location is automatically attached to this event.
WAYPTS
Waypoints (also known as “Locations”) are GPS locations that identify and mark a specific geographical point on
the map, this point can be named for future reference. Selecting “New” causes the HEPT Plus to turn on the GPS
receiver and acquire a fix, several options are then offered: go back without further action, re-acquire a new GPS
fix, label/name the point, or save the waypoint. After the waypoint is saved, the user can also send it to
SkyRouter. The waypoint will appear on the SkyRouter map as “Locations”.
Blue Sky Network Page 25 of 34
Page 26
HawkEye (PT) Plus User Guide Settings Menu
SETTINGS MENU
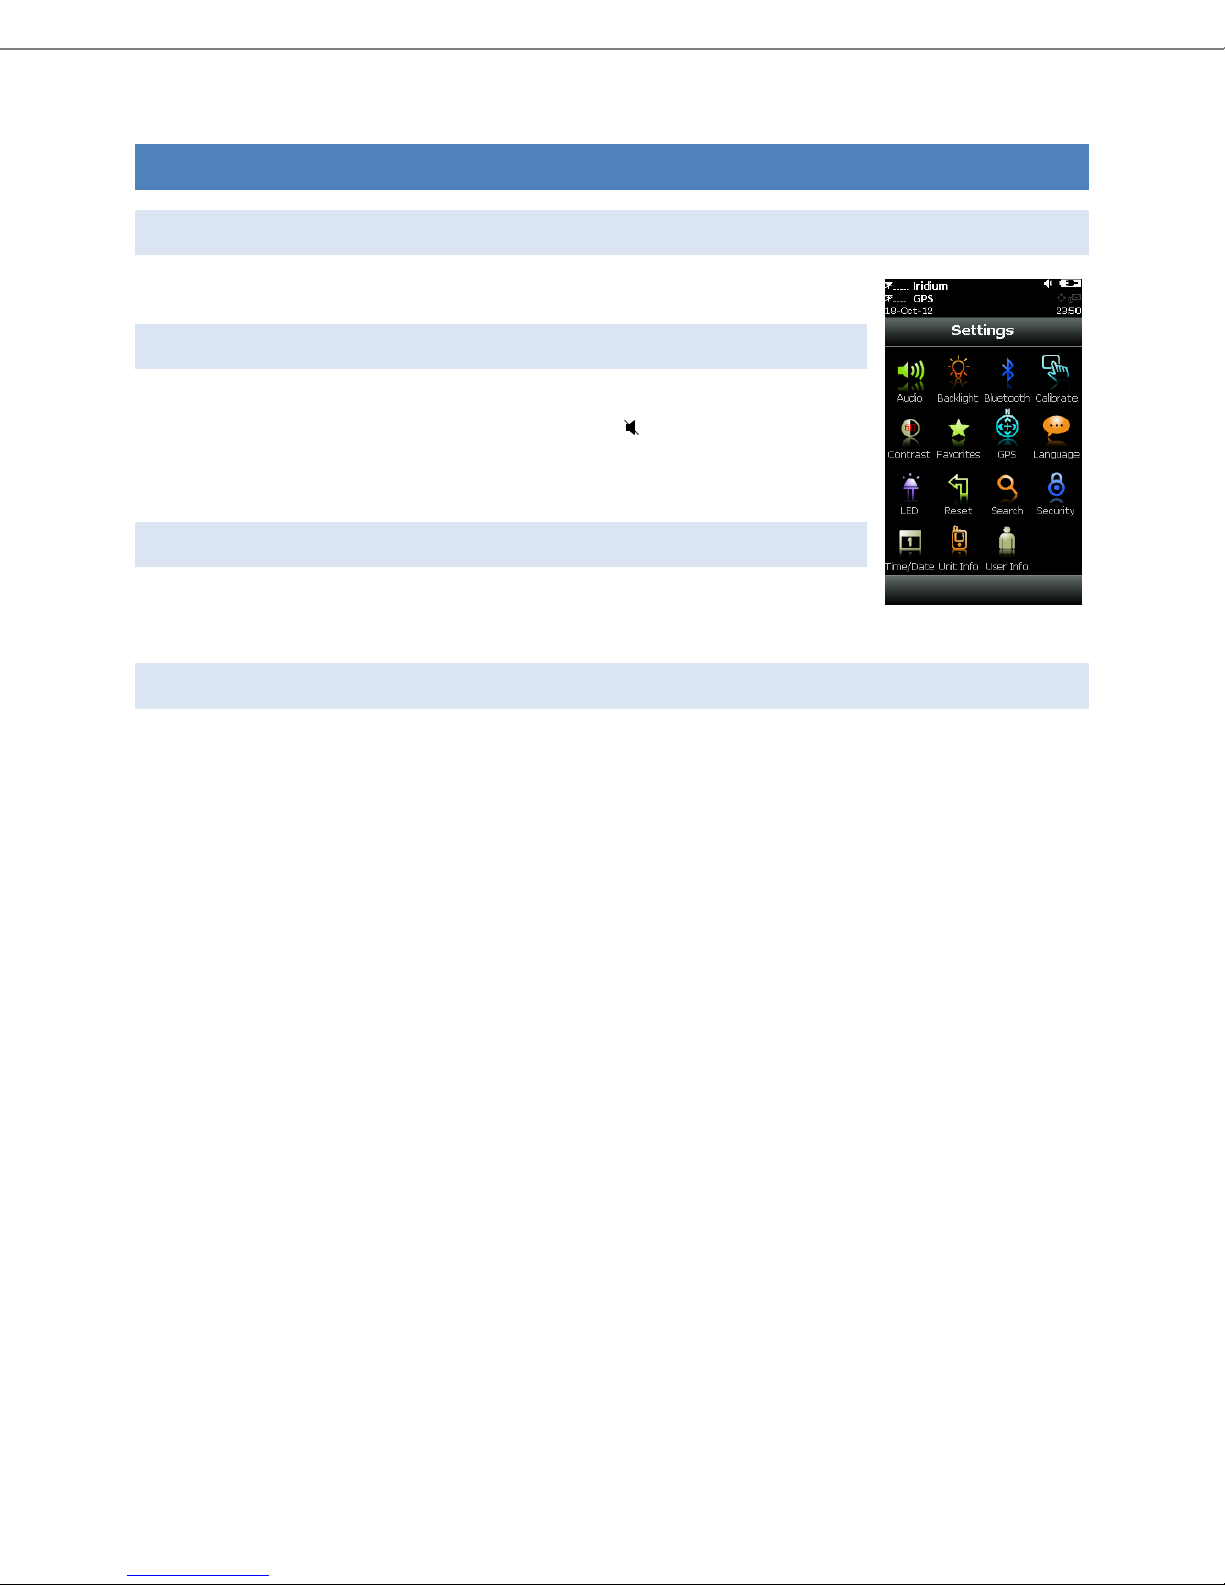
SETTINGS
Configure HawkEye (PT) Plus hardware settings under the Settings menu.
AUDIO
The Audio option allows the user to change alert frequency and tones; it is also possible
to mute message alerts and mute audio altogether. The icon appears at the top of
the screen if Mute All is enabled. Test audio before implementing by pressing
“Preview”.
BA C KLI G HT
Use the Backlight option to configure the inactive period that is required for the
HawkEye (PT) Plus backlight to turn off. We recommend setting this option to “Always on” for nighttime use.
BL UE T OOT H
The Bluetooth option is used to enable and disable the Bluetooth adapter, it is also possible to set the Bluetooth
PIN and change the Bluetooth broadcast name.
The Power menu allows the user to enable and disable the Bluetooth adapter; once the Bluetooth adapter is
enabled the Visible and Connectable options will become available. Any changes to Bluetooth options take several
seconds to implement. Selecting Visible causes the Bluetooth module to enter discoverable mode, this means that
other devices can discover the HEPT Plus Bluetooth adapter when searching for other devices. Enable the
Connectable option so that the HEPT Plus will accept incoming Bluetooth connections, if Connectable is disabled
the device will reject incoming connections.
The Security menu provides management for Bluetooth PIN and Authentication settings. PINs are used during the
pairing process when Authentication is enabled; the default PIN is ‘0000’. PINs must be a numeric value consisting
of less than or equal to 16 digits. The Authentication setting must be enabled in order to use PINs.
NOTE: If Authentication is disabled ANY device can connect to the HEPT Plus.
There are two options under the Device Information menu: Set Device Name and Summary Information.
Set Device Name – This is the name which the Bluetooth adapter will broadcast. The Device Name must
be less than or equal to 18 characters. If spaces are used any spaces used within the name they are converted to
an underscore “_”. The default Device Name is “SHOUT”
Summary Information – Displays the current Bluetooth device name, the Bluetooth MAC address, and the
Bluetooth firmware version.
Blue Sky Network Page 26 of 34
Page 27

HawkEye (PT) Plus User Guide Settings Menu
To pair your Bluetooth device with the HEPT Plus:
1. On the HEPT Plus - Turn on Bluetooth.
2. On the HEPT Plus - Enable the Connectable setting.
3. On the HEPT Plus - Enable the Visible setting.
4. On the HEPT Plus - Set the Bluetooth name.
5. On the HEPT Plus - Set the Bluetooth PIN.
6. On the HEPT Plus - Enable Bluetooth Authentication.
7. On the device you wish to connect from (laptop/desktop computer) – Start the Bluetooth pairing
process:
a. In the list of discovered devices select the Device Name of the HEPT Plus.
b. Enter the PIN you defined on the HEPT Plus.
c. The devices are paired.
CALI BRAT E
The HawkEye (PT) Plus has a resistive touchscreen which must be calibrated from time to time to ensure accurate
operation of the touchscreen. From the calibrate option it is possible to reset calibration back to factory settings
or alternatively manually calibrate. If the HEPT Plus is accidently recalibrated with bad settings and the
touchscreen is unresponsive, hold the power button for 8 seconds until a reset calibration message appears on the
screen.
CON TR A S T
The Contrast option is used to change the HawkEye (PT) Plus LCD brightness. Move the contrast slider-bar to the
desired level and press back to apply.
FAVORITES
The Favorites option allows users to customize shortcuts to menu options which will appear at the bottom of the
home screen. Adding shortcuts to the home screen allows quick and easy access to your most frequently used
options. Up to four customizable favorite icons may be utilized at one time.
LANGUAGE
The only language available at this time is English.
LED
The HawkEye (PT) Plus status LED alerts users when the device is in emergency mode, tracking mode, GeoFence
tracking, mailbox check or call out. When QPOS/911 Emergency Mode is enabled the LED is lit solid green, at all
other times (including during sleep mode) the LED flashes once every 5 seconds. LED features The LED can be
turned off for either of these two cases to save battery power using the LED option.
Blue Sky Network Page 27 of 34
Page 28

HawkEye (PT) Plus User Guide Settings Menu
SEARCH
The Search option allows user to set the search parameters for canned messages, contact list and mailboxes.
SECURITY
The Security option is used to enable or disable PIN code authentication. PIN codes are up to 4 numbers. If security
is enabled the configured PIN must be entered to unlock the HEPT Plus after it is powered up.
TIME/DATE
Define Time/Date option here, such as UTC time and date formats (for display on the LCD screen). It is also
possible to set the local time zone here.
UNIT INFO
The Unit Info option displays the HawkEye (PT) Plus model number, Iridium module IMEI number, Iridium FCC ID,
Iridium IC ID, GSM FCC ID, GSM IC ID, HEPT Plus firmware version and HEPT Plus bootloader version.
USER IN FO
The User Info option provides access to read user information entered using HawkEye (PT) Plus Manager
Application.
Blue Sky Network Page 28 of 34
Page 29
HawkEye (PT) Plus User Guide Additional Features
ADDITIONAL FEATURES
EMERGENCY (911/QUICK POSIT ION) BUTT ON
The emergency/911/QuickPosition button is located underneath the red trigger guard on the back of the
HawkEye (PT) Plus.
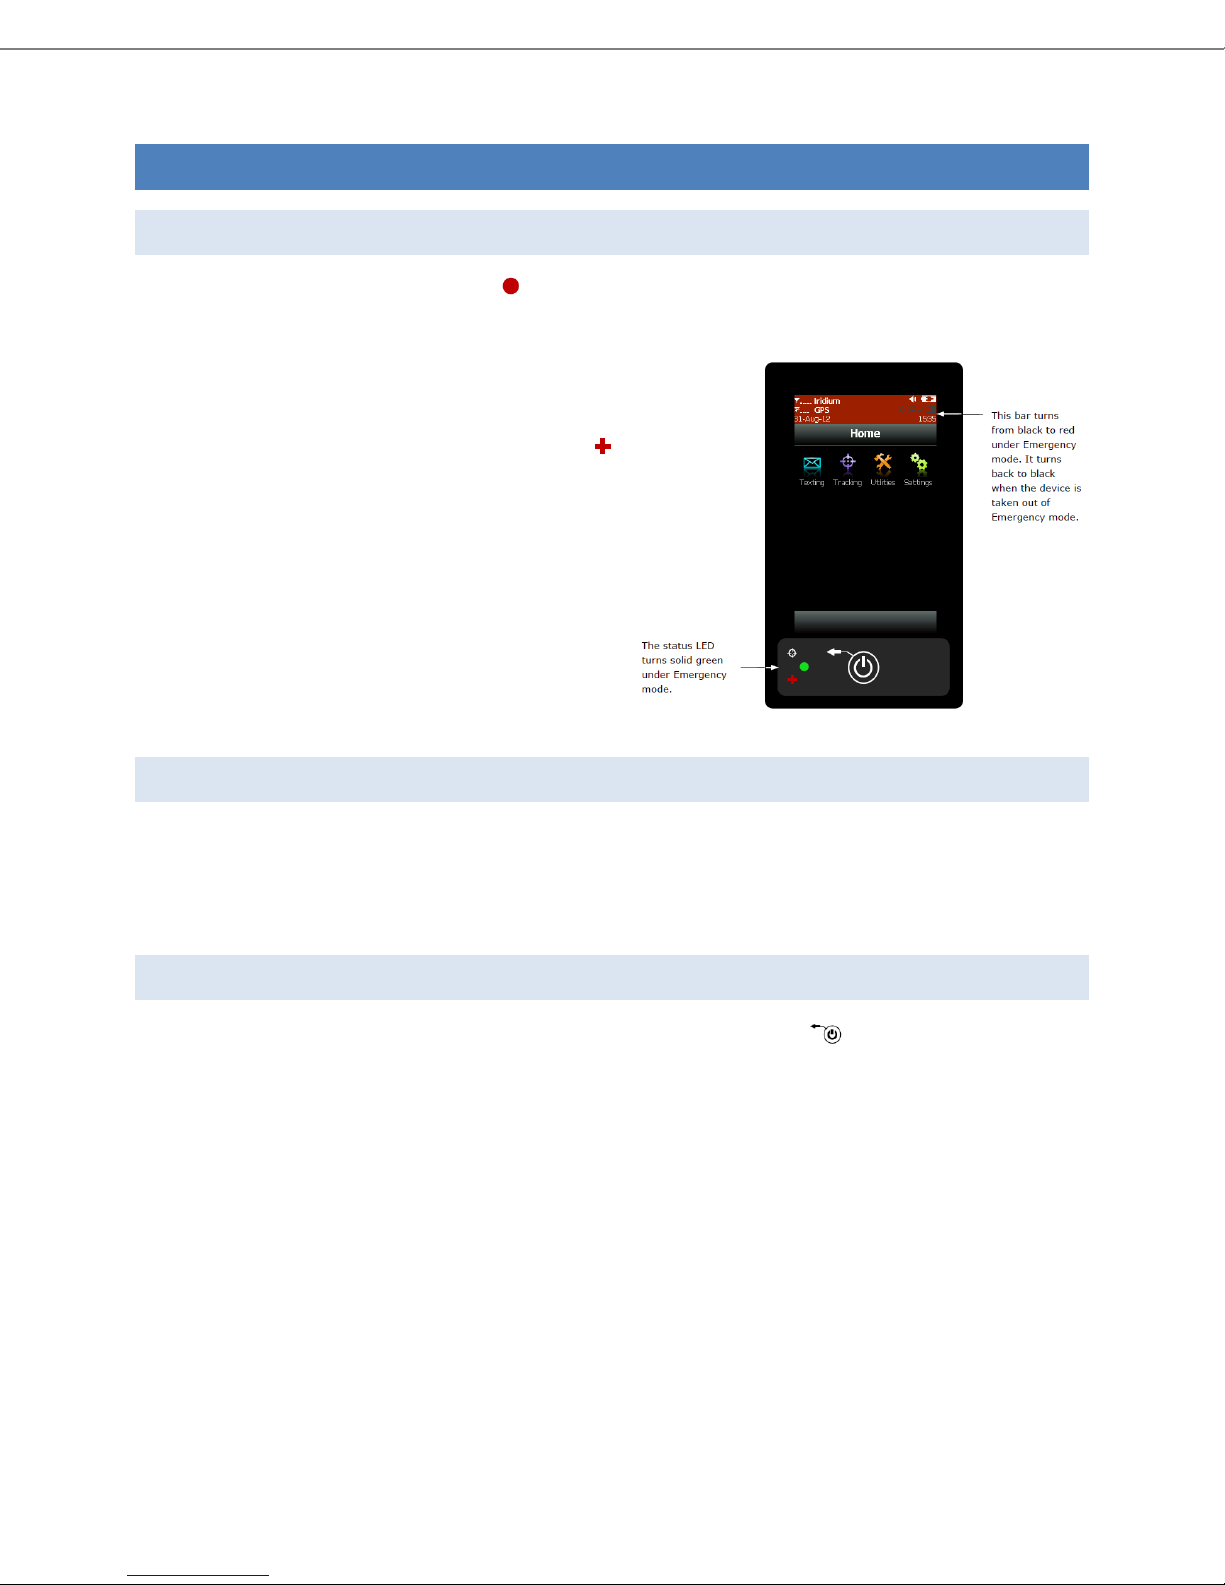
It is possible to use the emergency button to enable
QuickPosition at any time, even if the Tracking is disabled
or power is off. When the emergency button is pressed
and QuickPosition is enabled the emergency LED
illuminates solid green. The HEPT Plus then tries to send
three consecutive reports. After the initial three reports
have been sent the HEPT Plus resumes emergency
tracking at the defined Time Between Reports of the
emergency profile.
It is possible to deactivate the LED in the Settings/LED
menu to save battery. When the
Emergency/QuickPosition feature is activated the black
bar across the top of the screen turns red.
STATUS LED
The status LED located at the bottom left of the HawkEye (PT) Plus turns solid green when
Emergency/QuickPosition mode is enabled. The LED can be turned off to save power from the Settings > LED
menu. During normal Tracking mode, the LED flashes once every five seconds when the HEPT Plus is on sleep
mode; the LED can be turned off from the Settings > LED menu.
POWERING DOWN
The HawkEye (PT) Plus is powered off by pressing and holding the On/Off button for two seconds. A
“Powering Down” message will appear on the screen indicating Tracking and messaging will be disabled (during
the off state). The Powering Down message appears for 10 seconds before the device is shut down automatically ;
pressing the “Turn Off” button will power off the HEPT Plus immediately; pressing the “Lock” button will lock the
screen; pressing “Cancel” will stop the power down process and return to the previous screen.
Blue Sky Network Page 29 of 34
Page 30

HawkEye (PT) Plus User Guide Appendix A – Specifications
APPENDIX A – SPECIFICATI O N S
MECHANICAL SPECIFICATI O N S
Dimensions: 4.0” x 2.3” x 0.9” (102 mm x 58 mm x 23 mm)
Weight: ~7.8 oz (221 g)
Enclosure: Hard anodized aluminum housing/EMI shielding
Connector: Micro USB, SIM reader
Antennas: Iridium, GSM, GPS and Bluetooth
Key: One button power button
Emergency: Guarded button
LED: One status LED
Screen: 3.0” TFT 400 x 240
ELECTRICAL SPECIFICAT IONS
Main Input Voltage: 5.0VDC
Peak Current: 1.5A @ 5.0VDC
Battery Type: Lithium-Ion
Battery Capacity: 1.95 A-Hr
Charging Voltage: USB 1.0, USB 2.0 or 5VDC
Rechargeable Cycles: 500 times
IRID IUM T RANS CIEV ER
Operating Frequency: 1616 to 1626 MHz Duplexing Method: TDD
Multiplexing Method: TDMA/FDMA
Link Margin Downlink: 13 dB avg (free space) Link Margin Uplink: 7 dB avg (free space)
GSM TRANSCEIVER
Operating Frequency: LEON Quad-Band 850/900/1800/1900 MHz
Sensitivity: –110 dBm @850/900 MHz, –109 dBm @1800/1900 MHz
Power Class: Class 4 (33 dBm) for GSM/EGSM (850/900 MHz)
GPS RECEIVER
GPS Receiver: MAX-6Q
Receiver Type: L1, C/A, 50-channel
Update Rate: 5 Hz
Accuracy: 2.5 m CEP (position)
Acquisition: 27 seconds cold-start
Sensitivity: –162 dBm (tracking)
Class 1 (30 dBm) for DCS/PCS (1800/1900 MHz)
2.0 m CEP (SBAS)
<1 second hot-start
–160 dBm (hot-starts)
–148 dBm (cold-starts)
Blue Sky Network Page 30 of 34
Page 31

HawkEye (PT) Plus User Guide Appendix A – Specifications
ENVIRONMENTAL SPECIFICAT IONS (ELE CTR ON IC S)
Operating Temperature: –22oF to +158oF (–30oC to +70oC)
Operating Humidity: ≤ 75% RH
Storage Temperature: –40oF to +185oF (–40oC to +85oC)
Storage Humidity: ≤ 93% RH
ENVIRONMENTAL SPECIFICAT IONS (BATT ER Y )
Operating Temperature: –4oF to +140oF (–20oC to +60oC)
Operating Humidity: ≤ 90% RH
Storage Temperature: –4oF to +95oF (–20oC to +35oC)
Storage Humidity: ≤ 95% RH
Charge Temperature: 32oF to +113oF (0oC to +45oC)
ENVIRONMENTAL SPECIFICAT IONS (L CD)
Operating Temperature: –4oF to +131oF (–20oC to +55oC)
Operating Humidity Range: ≤ 90% RH
Storage Temperature Range: –4oF to +131oF (–20oC to +55oC)
Storage Humidity Range: ≤ 95% RH
Blue Sky Network Page 31 of 34
Page 32
HawkEye (PT) Plus User Guide Appendix B – Revision History
Date
Revision
By
Description
06/20/2013
1.0
MP
HawkEye (PT) Plus User Guide
11/07/2013
1.1
MP
Updated Bluetooth and removed Man Down section
02/06/2014
1.2
MP
Added Man Down disclaimer; added Man Down feature; changed
branding from + to Plus
APPENDIX B – REVISION HI ST O R Y
03/21/17 1.3
AN
Updated address
Blue Sky Network Page 32 of 34
Page 33

HawkEye (PT) Plus User Guide Service Activations
SERV I CE ACT I V A T IO N S
Blue Sky Network handles all activation requests. An activation request can be submitted through our website, the
link is shown below. You should receive an immediate email confirmation that your request has been submitted
and another email once the requested services have been activated. Please make sure your contact details are
accurate, this is how we contact you if there are any problems processing your request.
http://www.blueskynetwork.com/Support/ActivationForm.php
Blue Sky Network Page 33 of 34
Page 34

HawkEye (PT) Plus User Guide Support
SUPPORT
Please do not hesitate to contact us either via email, phone or by clicking the Support link in the upper right hand
corner. Thank you for using Blue Sky Network.
Blue Sky Network
5333 Mission Center Rd. Suite 220
San Diego, CA 92108
Phone: +1 858 551 3894 | Fax: +1 858 225 0794
E: [email protected] | W: www.blueskynetwork.com
Blue Sky Network Page 34 of 34
 Loading...