

Page 1

BUBBLEPACK
65W UNIVERSAL BATTERY PACK
OPERATING INSTRUCTIONS
Revision 1.0
www.blueshape.net Printed in Malta 2012
Page 2

The user is being alerted of the importance of going
through the literature accompanying this product and
getting familiarised with the important safety and
operating instructions, included.
Moreover, please follow the safety instructions below.
• Read the supplied instructions thoroughly and keep handy.
• Protect the equipment from humid environments. Avoid any
contact with water or other fluids. Do not use if any liquid has
been accidentally spilled inside the equipment.
• Unplug when not in use and avoid careless overload or short
circuits.
• Unplug and switch off the charger if not in use.
• It is recommended to send the unit to sleep mode when not in
use to avoid self-discharge.
• Avoid allowing the battery discharge to extremely low levels. It
is recommended to charge it periodically to a reasonable level
(say 50% or 3 LEDs) even when not in use.
• Avoid setting up near extreme heat sources such as in
scorching sunshine, fire places, radiators, stoves or other heat
generating equipment
• Do not remove cover or dismantle the apparatus. No user-
serviceable parts inside
• Use only as instructed by the manufacturer. If the equipment
develops a fault, have it repaired by qualified service personnel
only
• The equipment probably may become rather warm or even
hot during operation. This is not a sign of malfunction since
this equipment is designed and tested to withstand this. All
this is to be expected due to the high power handling of the
device within such a small volume.
2
Page 3
Package contents
• Bubblepack 65Wh battery
• Camera Adapter base
• Battery charger with mains cable
• BSTAP connector with 50cm cable
• Operating manual
Introduction
Bubblepack is a universal 65Wh, battery pack with multiple voltage
outputs.
The device is intended for fixing underneath a camera to supply
power to it and its accessories. The whole arrangement can also be
mounted on a tripod if needed.
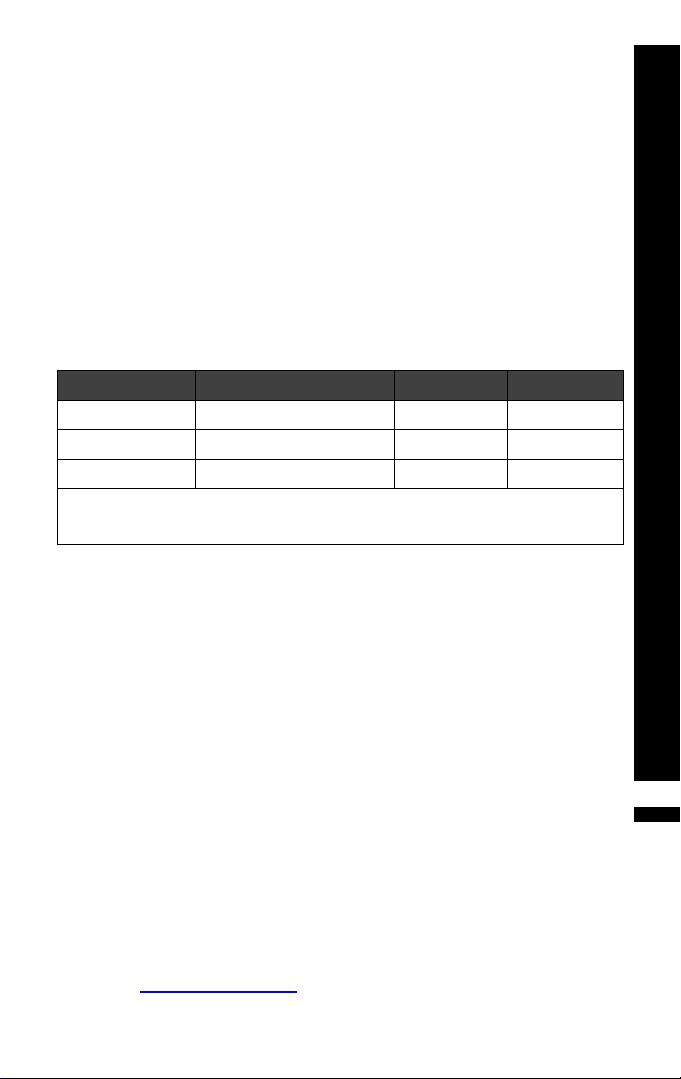
Outputs Range Connection Designation
14.8V /7A max 12.6V min ~ 16.8V max 2 x D-TAP HIGH
11.2V /5A max selected by switch 2 x BSTAP* LOW
8.4V /5A max selected by switch 2 x BSTAP* LOW
All LOW outputs are regulated
*BSTAP is a custom BLUESHAPE connector (blue)
Features
• Sturdy mechanical design
• Detachable (sliding) adapter with spring loaded, dual hooking
mechanism
• Lever arm for tight, low tolerance locking of adapter base to rail,
ensuring shake-free operation during shooting
• Adjustable positioning of adapter base on rail for achievement
of optimum camera balance
• Super compact, high energy density and lightweight assembly
• Stylish external looks
• Can be mounted on a standard tripod
• Choice of 3 voltage outputs @ high current
• Choice of 4 output connectors (2 x D-TAP, 2 x BSTAP)
• Comprehensive electrical safety/ energy saving features
• Full short-circuit /overload protection
• Convenient, 4 LED voltage based gas gauge
• High efficiency Li-ion battery charger included
• Can power a wide range of cameras using special accessories
(available extra) such as cables and battery eliminators. Please
visit www.blueshape.net for more information.
3
Page 4
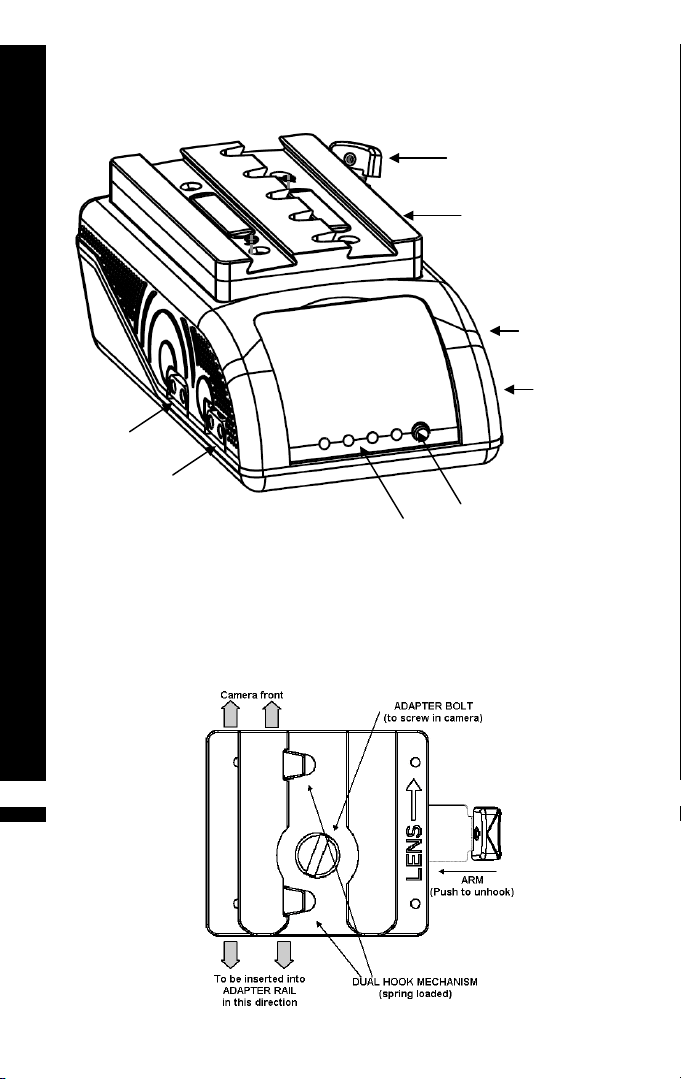
Bubblepack graphic description
(Battery)
14.8V Left out
D-TAP
8.4/11.1V Left out
BSTAP (BLUE)
(Adapter base)
not to scale
Voltage based
gas gauge
Locking arm
Adapter rail
Test button
14.8V Right out
D-TAP (hidden)
8.4/11.1V Right out
BSTAP (BLUE-hidden)
4
Page 5
Principle of operation
Bubblepack internally contains 8 high quality Li-ion battery cells that
can deliver a total of 65Wh. A battery management system and a
high efficiency step-down converter create a choice of 3 voltage
outputs - those most widely used in today's latest miniDV and DSC
cameras:
• 14.8V nominal
• 11.2V regulated and fixed
• 8.4V regulated and fixed
The safety circuit features the usual, over and under voltage battery
protections together with full output short circuit protections.
How to check the state of charge
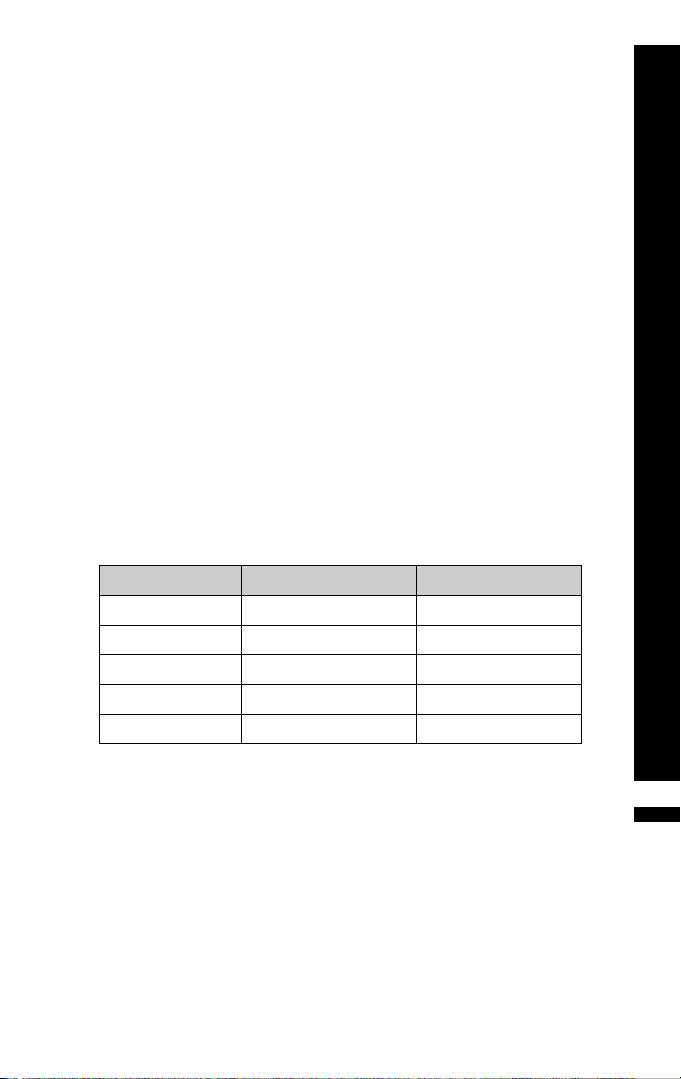
A 4-stage voltage-based gas gauge gives a rough indication of the
remaining capacity. The LED display is activated by the push button
switch on the front. The LED array displays the state of charge
based on the following criteria:
Voltage Approx. state of charge LEDs
> 15.85V 100% ~ 80% 4 LEDs on
15.85V ~ 15.63V 80% ~ 60% 3 LEDs on
15.63V ~ 15.00V 60% ~ 40% 2 LEDs on
15.00V ~ 14.60V 40% ~ 20% 1 LED on
< 14.35V <20% 1 LED flashing
5
Page 6

Auto turn-off modes
Further features include 'sleep mode' to minimise battery drain
during inactivity and when the battery pack reaches a low voltage
threshold of 12.6V. In 'sleep mode', the internal microprocessor
goes to low power mode thus minimising battery consumption.
The battery can go to sleep mode in 3 ways:
• automatically, if pack voltage is < 12.6V
• if there is no activity for 60 minutes
• if the test button is pressed for > 3 seconds until the LED
closest to the push button flashes. Note that Bubblepack can
still power applications during sleep
Wake-up
To wake up Bubblepack from sleep, just press the (test) push button
until the LEDs flash. The number of LEDs that will flash is in
accordance with the residual capacity of the pack at that time.
Short Circuit protection
In the event of a short circuit on the HIGH side, all 4 LEDs will flash.
The reset procedure is to press the test button so as to open the
relay. Following this, the LEDs flash in sequence and reactivate the
relay/power. If the short still persists, the same events will occur.
When the short is removed, Bubblepack will resume normal
operation. A second pressing of the test button will return a gas
gauge result.
6
Page 7
How to charge Bubblepack
A fast charger has been included in the package.
Simply connect the charger to one of the HIGH outputs on
Bubblepack and the device will charge. It is expected that the device
reaches full charge from empty within 2 ~ 3 hours. The LED on the
charger will be red during charging but will turn to green when
charge is completed. It is recommended to charge Bubblepack on
first use or after a long period of shelf life or inactivity.
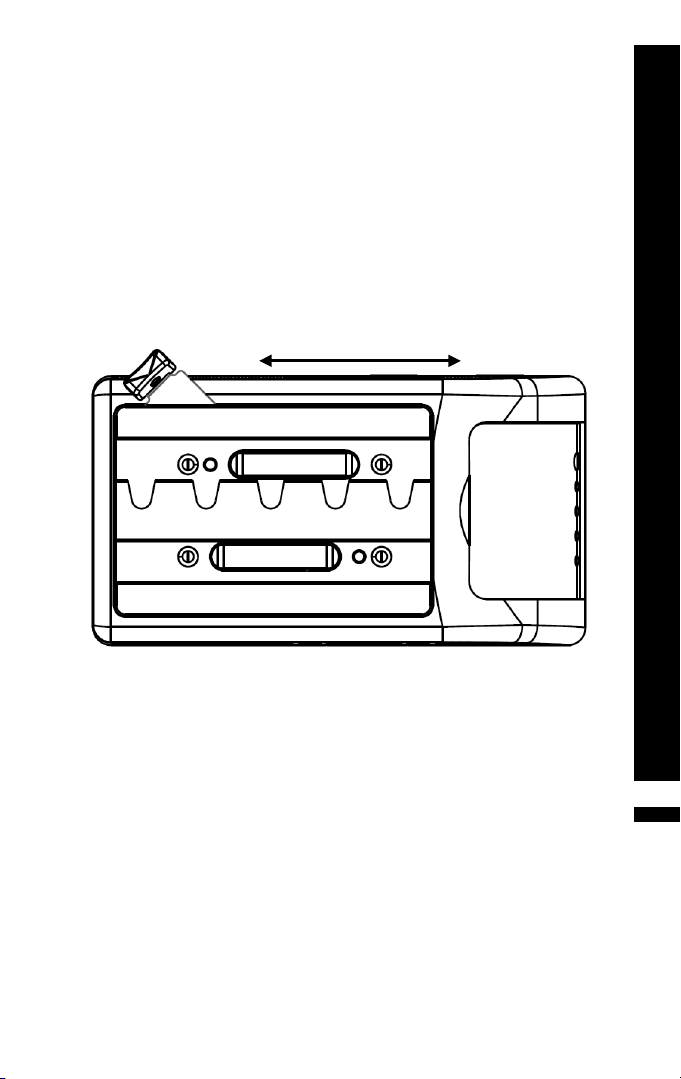
Purpose of the locking arm
LOCK UNLOCK
The adapter base is designed to slide with ease into the
corresponding rail profile on the battery. This enables the user to
determine the best 'notch position' for optimum balance.
It is of vital importance that camera shake is not present during
shooting when the camera and Bubblepack are mounted on a
tripod, The arm mechanism on Bubblepack locks the base with the
battery to unite and tighten the combination and reduce mechanical
clearances (and therefore, overall shake), to a negligible amount .
7
Page 8
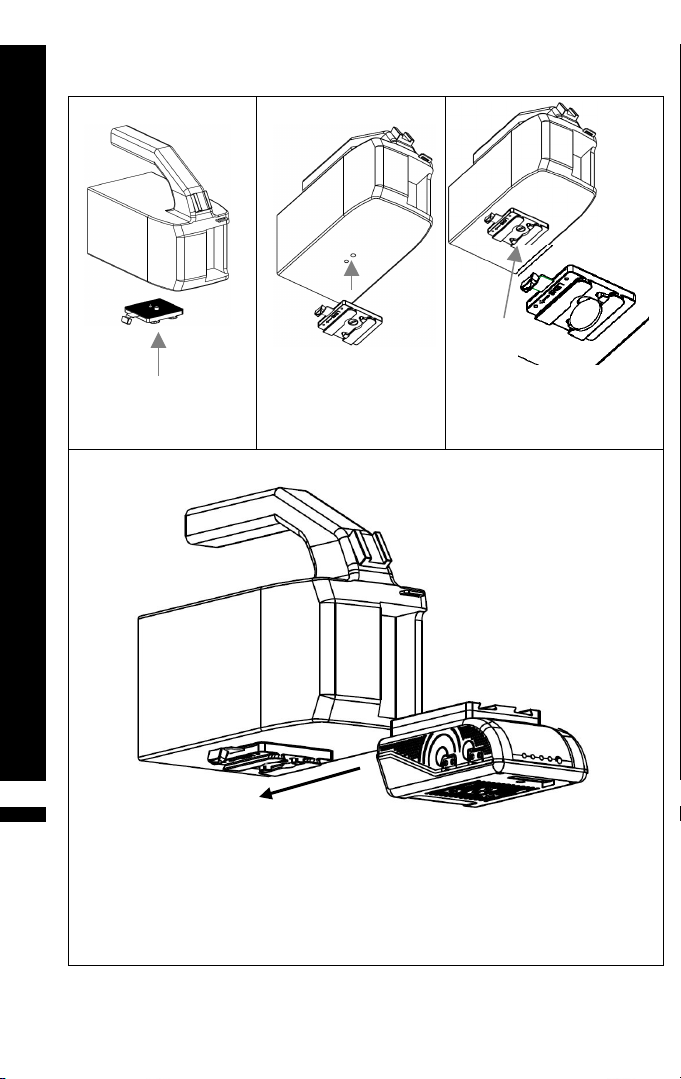
How to mount the camera
1. Position adapter
base underneath the
camera
8
4. Slide battery into adapter base as shown and lock the arm after
finding the best notch that gives the best balance
and determine the best lock-notch for best equilibrium
2. View showing
camera thread and
alignment hole
Slide battery in this direction
3. Use a coin to screw in
the adapter bolt into the
camera
Page 9

Technical specifications
Internal battery:
Cell type Li-Ion cylindrical rechargeable battery cells
Nominal voltage -HIGH 14.8V (range 12.6 - 16.8V)
Regulated Voltage -LOW (1) 11.2V +/- 2%
Regulated voltage -LOW (2) 8.4V +/- 2%
Nominal capacity 4.4Ah – 65Wh
Max. discharge current (D-TAP) 7A +/- 2%
Max. discharge current (BSTAP) 5A +/- 2%
Max output ripple content <50mV
Operating temperature range -10°C ~ +60°C (+14°F ~ +140°F)
Storage temperature range 0°C ~ +35°C (32°F ~ 95°F)
Dimensions 139 x 76 x 53mm (excluding adapter base)
Weight - Battery only 743g
Weight - Battery & adapter base 819g
Charger
Type
Li-ion 16.8V 3A
100 ~ 240V AC/ 50 ~ 60Hz
At our own responsibility we declare that this product is CE certified.
9
Page 10

Warranty
BLUESHAPE Bubblepack is warranted to be free from defects in
materials, workmanship and functionality for a period of 18 months
commencing from the date of purchase.
This warranty shall not apply to any products or parts of, that have
been subjected to misuse, negligence, accidental or abnormal
conditions of operation.
The buyer should always contact the place of purchase for any
return of defective product. It is important that the buyer provides us
with as much information as possible about the failure being
claimed.
In the event of product failure for which warranty applies, we will
repair or replace the product free of charge. In these cases, all
expenses including transport charges will be borne by us.
In the case where the failure has been caused by one of the causes
explained above, repairs should be billed at a nominal cost. Prior to
the carrying out of any repairs, we will inform the customer of the
estimated costs of these repairs.
These warranty conditions are the only ones applicable to our
products and overrule any other expressed or implied warranties.
We shall not be held liable for any damages resulting from warranty
statements other than those contained in this declaration.
In all warranty claims, the buyer must reproduce the original
purchase invoice.
10
Page 11

NEW CELL TOP Srl
VIA LIGURIA 4-6,
42100 REGGIO EMILIA, ITALY
TEL. +39 0522 518556
FAX. +39 0522 277084
WEB: www.blueshape.net
EMAIL: [email protected]
 Loading...