

Page 1
242351-3
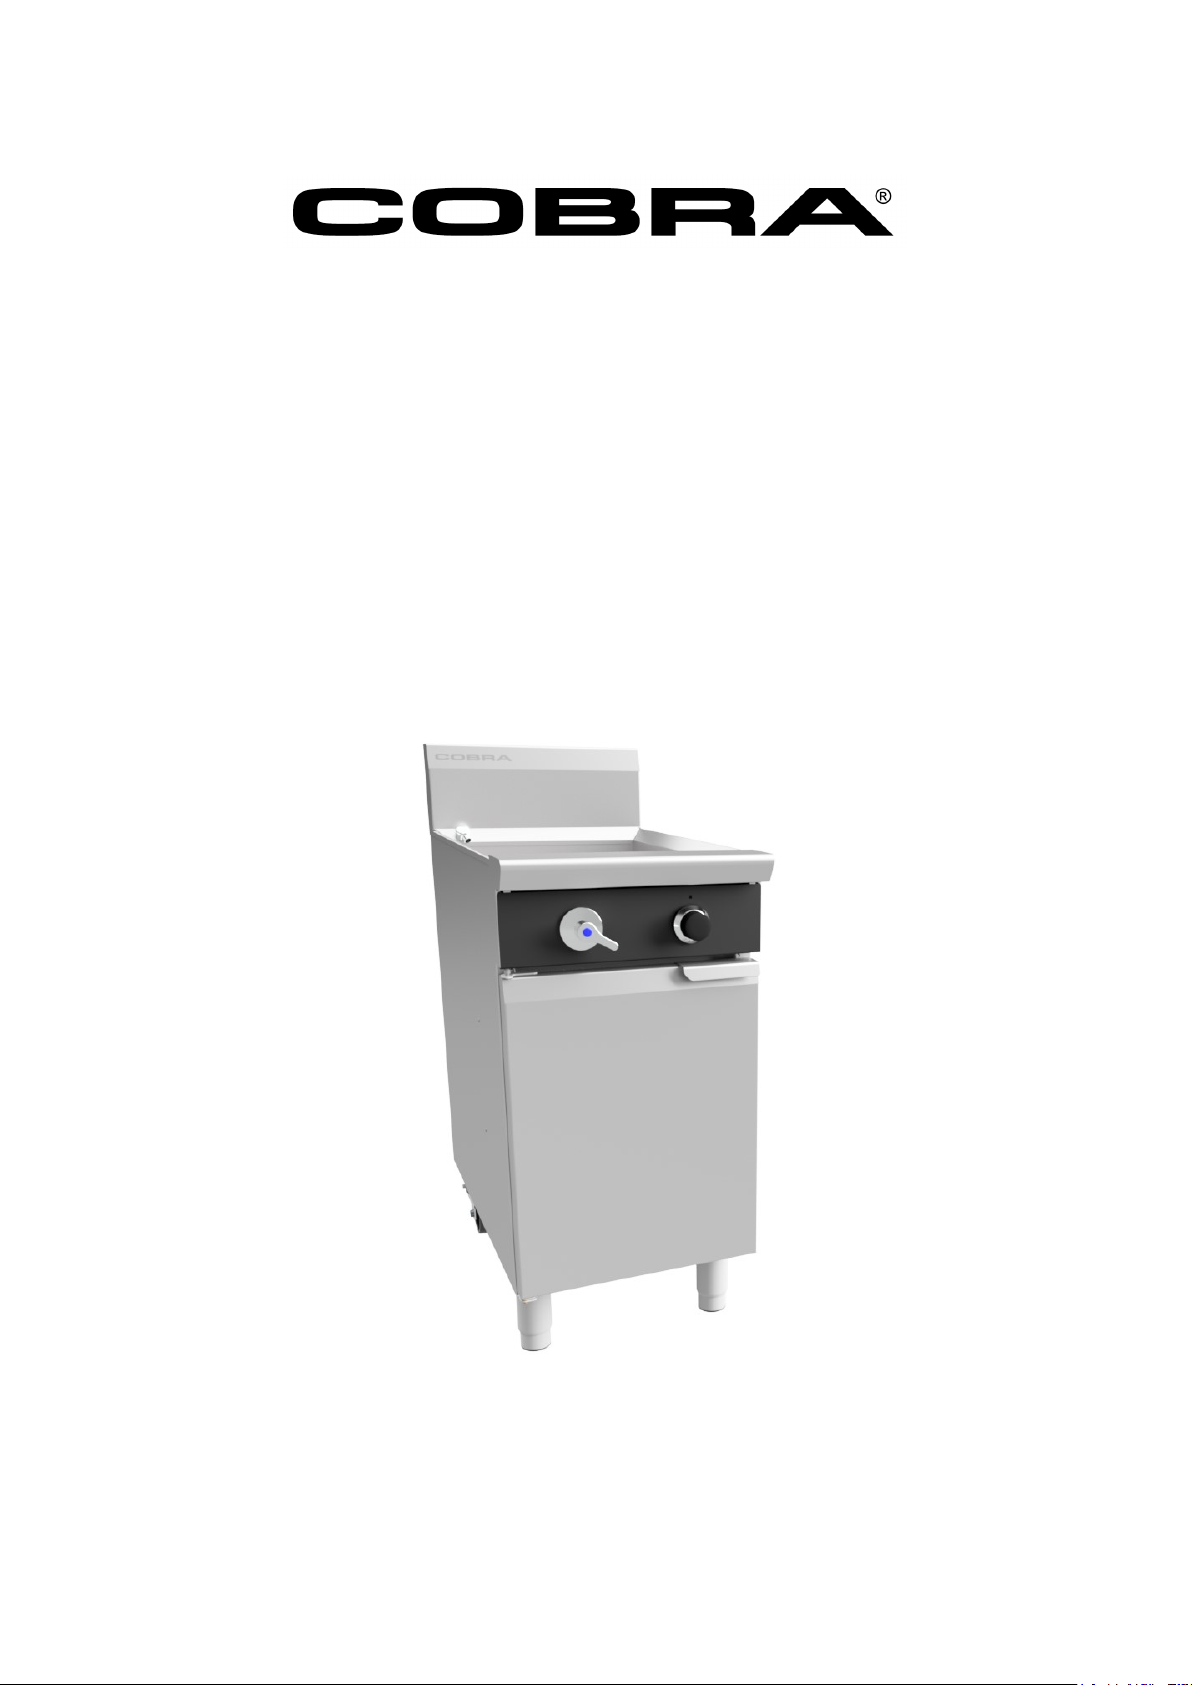
Gas Pasta / Noodle Cooker
Models:
CP 4 ( P ast a C oo k er )
CN 4 ( N oo d le Co o ke r )
I N S T A L L A T I O N A N D O P E R A T I O N M A N U A L
Page 2

The reproduction or copying of any part of this manual by any means whatsoever is strictly forbidden unless authorized
previously in writing by the manufacturer.
In line with policy to continually develop and improve its products, Moffat Ltd. reserves the right to change the
specifications and design without prior notice.
© Copyright Moffat Ltd. March 2020.
Moffat Limited
Rolleston 7675
New Zealand
AUSTRALIA
(fax): +61 (03 9518 3833
Service: (tel): 1800 622 216
Spares: (tel): 1800 337 963
Customer Service: (tel): 1800 335 315
(fax): 1800 350 281
CANADA
Serve Canada
Web: www.servecanada.com
E.Mail: [email protected]
Sales: (tel): 800 551 8795 (Toll Free)
Service: (tel): 800 263 1455 (Toll Free)
NEW ZEALAND
UNITED KINGDOM
(fax): +44 121 327 9711
Spares: (tel): +44 121 322 6640
(fax): +44 121 327 9201
Service: (tel): +44 121 322 6644
(fax): +44 121 327 6257
UNITED STATES
Moffat
Web: www.moffat.com
Sales: (tel): 1-800 551 8795 (Toll Free)
(tel): 336 661 1556
(fax): 336 661 9546
Service: (tel): 866 673 7937 (Toll Free)
REST OF WORLD
Page 3
CP4 GAS PASTA COOKER - (Single Tank - 40 Ltr).
CN4 GAS NOODLE COOKER - (Single Tank - 40 Ltr).
Model Numbers Covered in this Specification
General
Gas Connection
Gas Supply Requirements
Water Supply Requirements
Installation Requirements
Unpacking
Location
Clearances
Assembly
Gas Connection
Water Connection
Drainage Connection
Commissioning
Operation Guide
Description of Controls
Before Use
Filling the Tank
Lighting the Pilot Burner
Lighting the Main Burner
Turning ‘OFF’ the Pasta / Noodle Cooker
General
Draining and Cleaning
Daily Cleaning
Weekly Cleaning
Periodic Maintenance
Gas Conversion Procedure
Gas Specifications
Page 4
2
We are confident that you will be delighted with your COBRA Pasta / Noodle Cooker and it will become a
most valued appliance in your commercial kitchen.
To ensure you receive the utmost benefit from your new COBRA appliance, there are two important things
you can do.
Please read the instruction book carefully and follow directions given. The time taken will be well spent.
If you are unsure of any aspect of the installation, instructions or performance of your appliance,
contact your COBRA dealer promptly. In many cases a phone call could answer your question.
IMPROPER INSTALLATION, ADJUSTMENT, ALTERATION, SERVICE OR MAINTENANCE CAN CAUSE PROPERTY DAMAGE, INJURY OR DEATH.
READ THE INSTALLATION, OPERATING AND MAINTENANCE INSTRUCTIONS THOROUGHLY BEFORE INSTALLING OR SERVICING THIS
APPLIANCE.
INSTRUCTIONS TO BE FOLLOWED IN THE EVENT THE USER SMELLS GAS ARE TO BE POSTED IN A PROMINENT LOCATION. THIS INFORMATION
SHALL BE OBTAINED BY CONSULTING THE LOCAL GAS SUPPLIER.
GREAT CARE MUST BE TAKEN BY THE OPERATOR TO USE THE EQUIPMENT SAFELY TO GUARD IT AGAINST RISK OF FIRE.
THE APPLIANCE MUST NOT BE LEFT ‘ON’, UNATTENDED.
IT IS RECOMMENDED THAT A REGULAR INSPECTION IS MADE BY A COMPETENT SERVICEMAN TO ENSURE CORRECT AND SAFE
OPERATION OF YOUR APPLIANCE IS MAINTAINED.
DO NOT STORE OR USE GASOLINE OR OTHER FLAMMABLE VAPOURS OR LIQUIDS IN THE VICINITY OF THIS OR ANY OTHER
APPLIANCE.
DO NOT SPRAY AEROSOLS IN THE VICINITY OF THIS APPLIANCE WHILE IT IS IN OPERATION.
Page 5
3
Model Covered in this Specification -
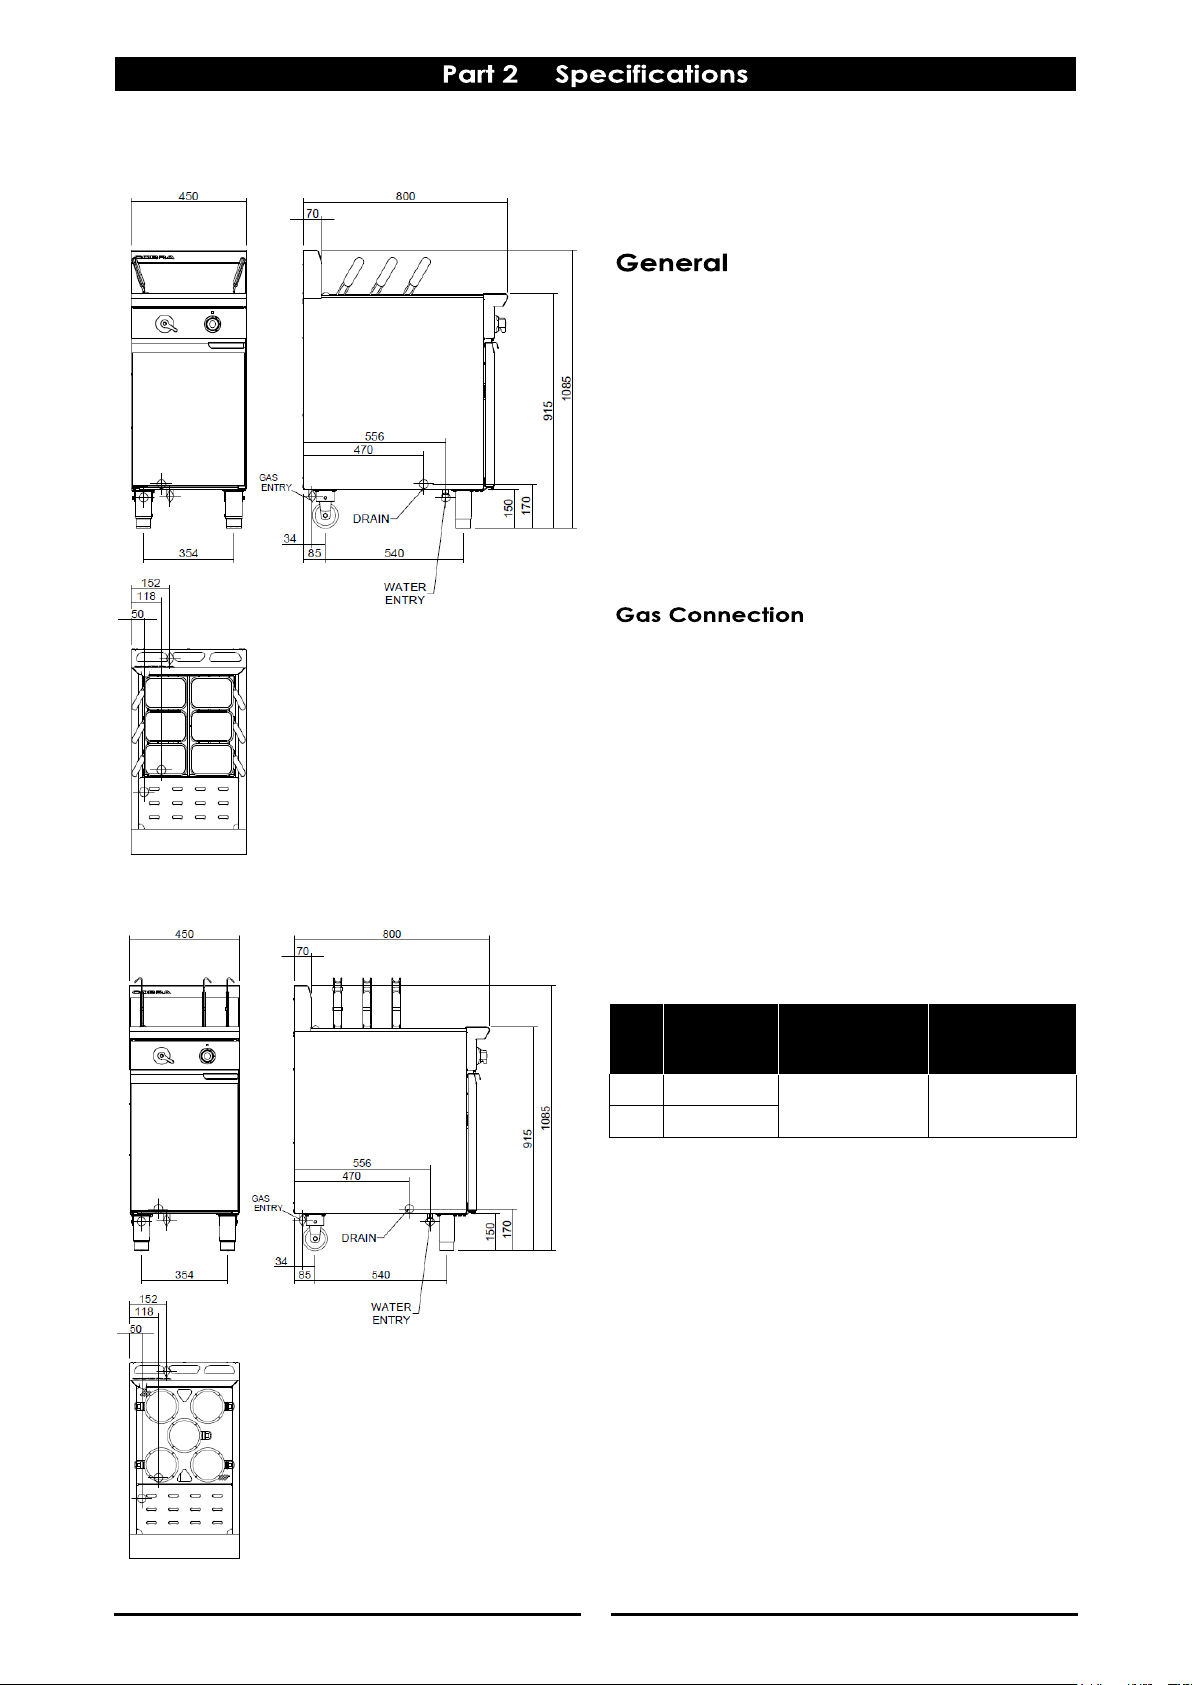
CP4 GAS PASTA COOKER (Single Tank - 40 Ltr).
CN4 GAS NOODLE COOKER (Single Tank - 40 Ltr).
A commercial heavy duty, gas fired high
performance Pasta / Noodle Cooker designed for
cooking commercial high production output, using
LPG (Propane), Natural Gas or Butane. The boiling
medium is contained within a heavy gauge stainless
steel tank, heated by one infra red surface burner
from beneath the tank.
This Pasta / Noodle Cooker features an Over
Temperature Safety Cut Out System with Full Flame
Failure Safety Controls.
An open tank design to make cleaning a simple
and easy task.
Gas supply connection point is located 152mm from
the left hand side, 33mm from the rear and 140mm
from the floor.
Gas Connection is 3/4” BSP male.
- Flexible Hose Connection
If a Gas Hose assembly is used to connect this
appliance, the hose and all fittings must have a
minimum ¾” (Natural Gas) or ½” (LPG) inside bore
diameter to ensure gas flow rate capacity
required by this appliance is achieved.
This must be verified by the operating pressure
testing at the maximum gas supply demand
condition.
The Gas Hose assembly should also be classified
for use in the commercial kitchen conditions, the
appliance will be used in.
Recommended Gas Hose Assembly Specification:
- AS/NZS 1869 Class B or D compliant or equivalent,
that meets the following requirements:-
Dimensions:-
Class
Max Working
Pressure
at 23 ± 2ºC
Working
Temperature
Range
Resistance to Oil
B
7.0 kPa
- 20ºC to + 125ºC
Oil resistant lining
and cover.
D
2.6 MPa
Page 6
4
- Australia:
- New Zealand:
- UK Only:
Category: II
2H3P.
Flue Type: A
1.
- All Other Markets:
NOTE:
(*) Burner operating pressure is to be measured at Burner Operating Pressure test point on gas
control valve, with burner operating at 'High Flame' setting.
Operating pressure is ex-factory set and is not to be adjusted, apart from when converting between
gasses, if required.
Refer to ‘Gas Conversion and Specifications' section in this manual for further details.
A cold water supply must be connected to water inlet connection (R 1/2" BSP), located 50mm from LH
side, 556mm from rear and 135mm from floor. Water connection should be plumbed in, in
accordance with National / Local Codes covering installation.
Maximum water supply pressure 550 kPa (80psi).
Tank max capacity - 40ltrs of water.
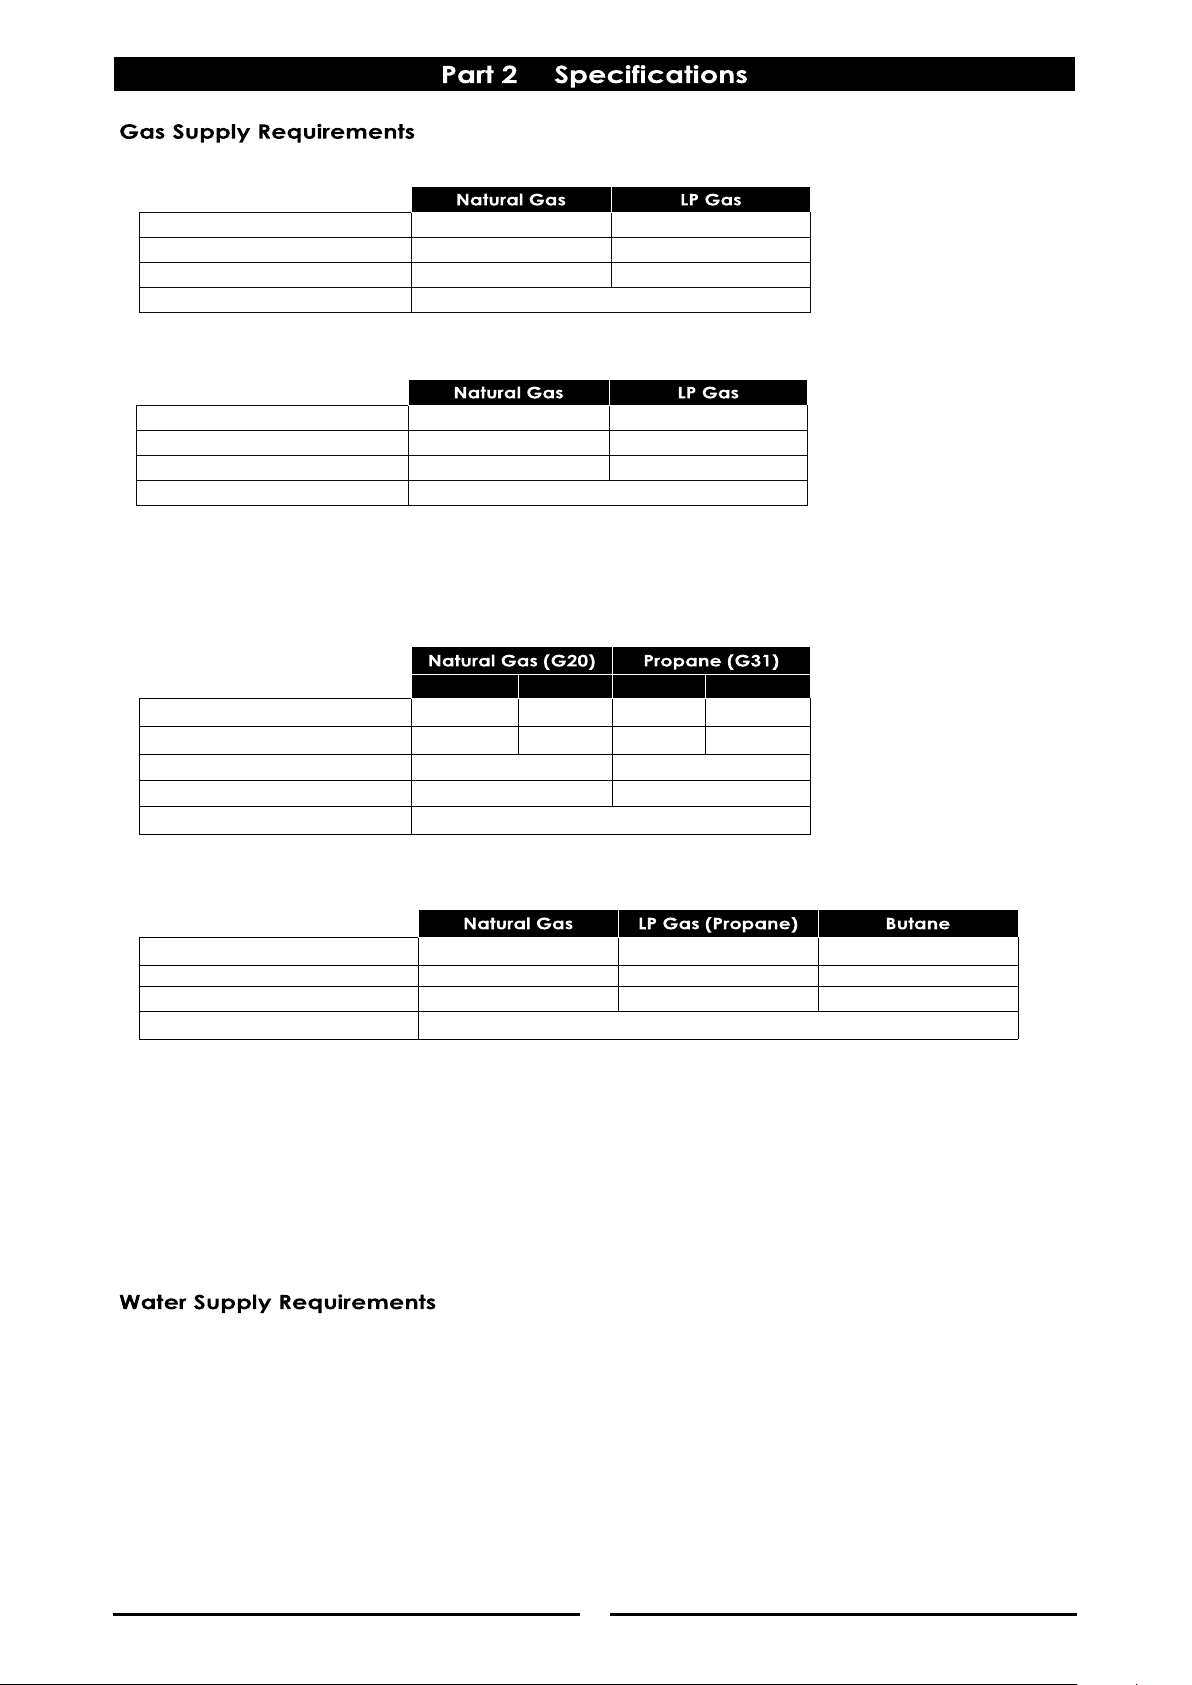
Input Rating (N.H.G.C.)
47 MJ/hr 47 MJ/hr 46 MJ/hr
Supply Pressure
2.75 - 4.50 kPa 2.75 - 4.50 kPa 1.13 - 3.40 kPa
Burner Operating Pressure (*)
2.6 kPa 2.6 kPa 0.92 kPa
Gas Connection ¾” BSP Male
Input Rating (N.H.G.C.)
46 MJ/hr 47 MJ/hr
Supply Pressure
1.13 - 3.40 kPa 2.75 - 4.50 kPa
Burner Operating Pressure (*)
0.92 kPa 2.6 kPa
Gas Connection ¾” BSP Male
Nominal Reduced Nominal Reduced
Heat Input (nett) 12.0 kW 5.4 kW 12.5 kW 6.2 kW
Gas Rate 1.27 m3/hr 0.42 m3/hr 0.97 kg/hr 0.48 kg/hr
Supply Pressure
20 mbar 37 mbar
Burner Operating Pressure (*)
9.5 mbar 27.7 mbar
Gas Connection
3
/4” BSP Male
Input Rating (N.H.G.C.)
46 MJ/hr 47 MJ/hr
Supply Pressure
1.13 - 3.40 kPa 2.75 - 4.50 kPa
Burner Operating Pressure (*)
0.92 kPa 2.6 kPa
Gas Connection ¾” BSP Male
Page 7
5
NOTE:
It is most important that this appliance is installed
correctly and that operation is correct before use.
Installation shall comply with local, gas, health and
safety requirements.
This appliance shall be installed with sufficient
ventilation to prevent the occurrence of
unacceptable concentrations of health harmful
substances in the room, the appliance is installed in.
Cobra Gas Pasta / Noodle Cookers are designed to
provide years of satisfactory service and correct
installation is essential to achieve the best
performance, efficiency and trouble-free operation.
This appliance must be installed in accordance with
National installation codes and in addition, in
accordance with relevant National / Local codes
covering gas and fire safety.
Australia / New Zealand:
AS/NZS 5601- Gas Installations.
United Kingdom: Gas Safety (Installation and
Use) Regulations 1998.
BS6173 - Installation of
Catering Appliances.
BS5440 - Parts 1 & 2 Installation
Flueing & Ventilation.
Ireland: IS 820 - Non Domestic Gas
Installations.
Installations must be carried out by qualified service
persons only. Failure to install equipment to the
relevant codes and manufacturer’s specifications
shown in this section will void the warranty.
Components having adjustments protected (e.g.
paint sealed) by manufacturer, are only to be
adjusted by a qualified service agent. They are not
to be adjusted by the installation person.
Remove all packaging and transit protection
from the appliance including all protective
plastic coating from the door outer panel and
exterior stainless steel panels.
For the CN4 Noodle Cooker, remove the
protective coating from the Basket Support
Frame.
Check the equipment and parts for damage.
Report any damage immediately to the carrier
and distributor.
Report any deficiencies to the distributor who
supplied the appliance.
Check that the available gas supply is correct to
that shown on the rating plate located on the
inside of the access door.
Check that the following parts have been
supplied with the appliance:-
CP4 Pasta Cooker
Baskets LH 165 x 125mm Qty 3.
Baskets RH 165 x 125mm Qty 3.
Basket Support Frame Qty 1.
CN4 Noodle Cooker
Noodle Baskets Qty 5.
Noodle Basket Support Frame Qty 1.
1. This appliance must be installed in a suitably
ventilated room to prevent dangerous build up
of combustion products.
2. Installation must allow for a sufficient flow of
fresh air for the combustion air supply.
Combustion Air Requirements
Natural Gas 13 m³/hr minimum.
LPG / Butane 13 m³/hr minimum.
3. Position the appliance in its approximate
working position.
4. All air for burner combustion is supplied from
underneath the appliance. The legs must
always be fitted and no obstructions placed on
the underside or around the base of the
appliance, as obstructions will cause incorrect
operation and / or failure of the appliance.
5. Components having adjustments protected
(e.g. paint sealed) by manufacturer are only
allowed to be adjusted by a qualified service
agent. They are not to be adjusted by the
installation person.
NOTE:
Do not obstruct or block the appliances flue. Never
directly connect a ventilation system to the
appliance flue outlet.
NOTE:
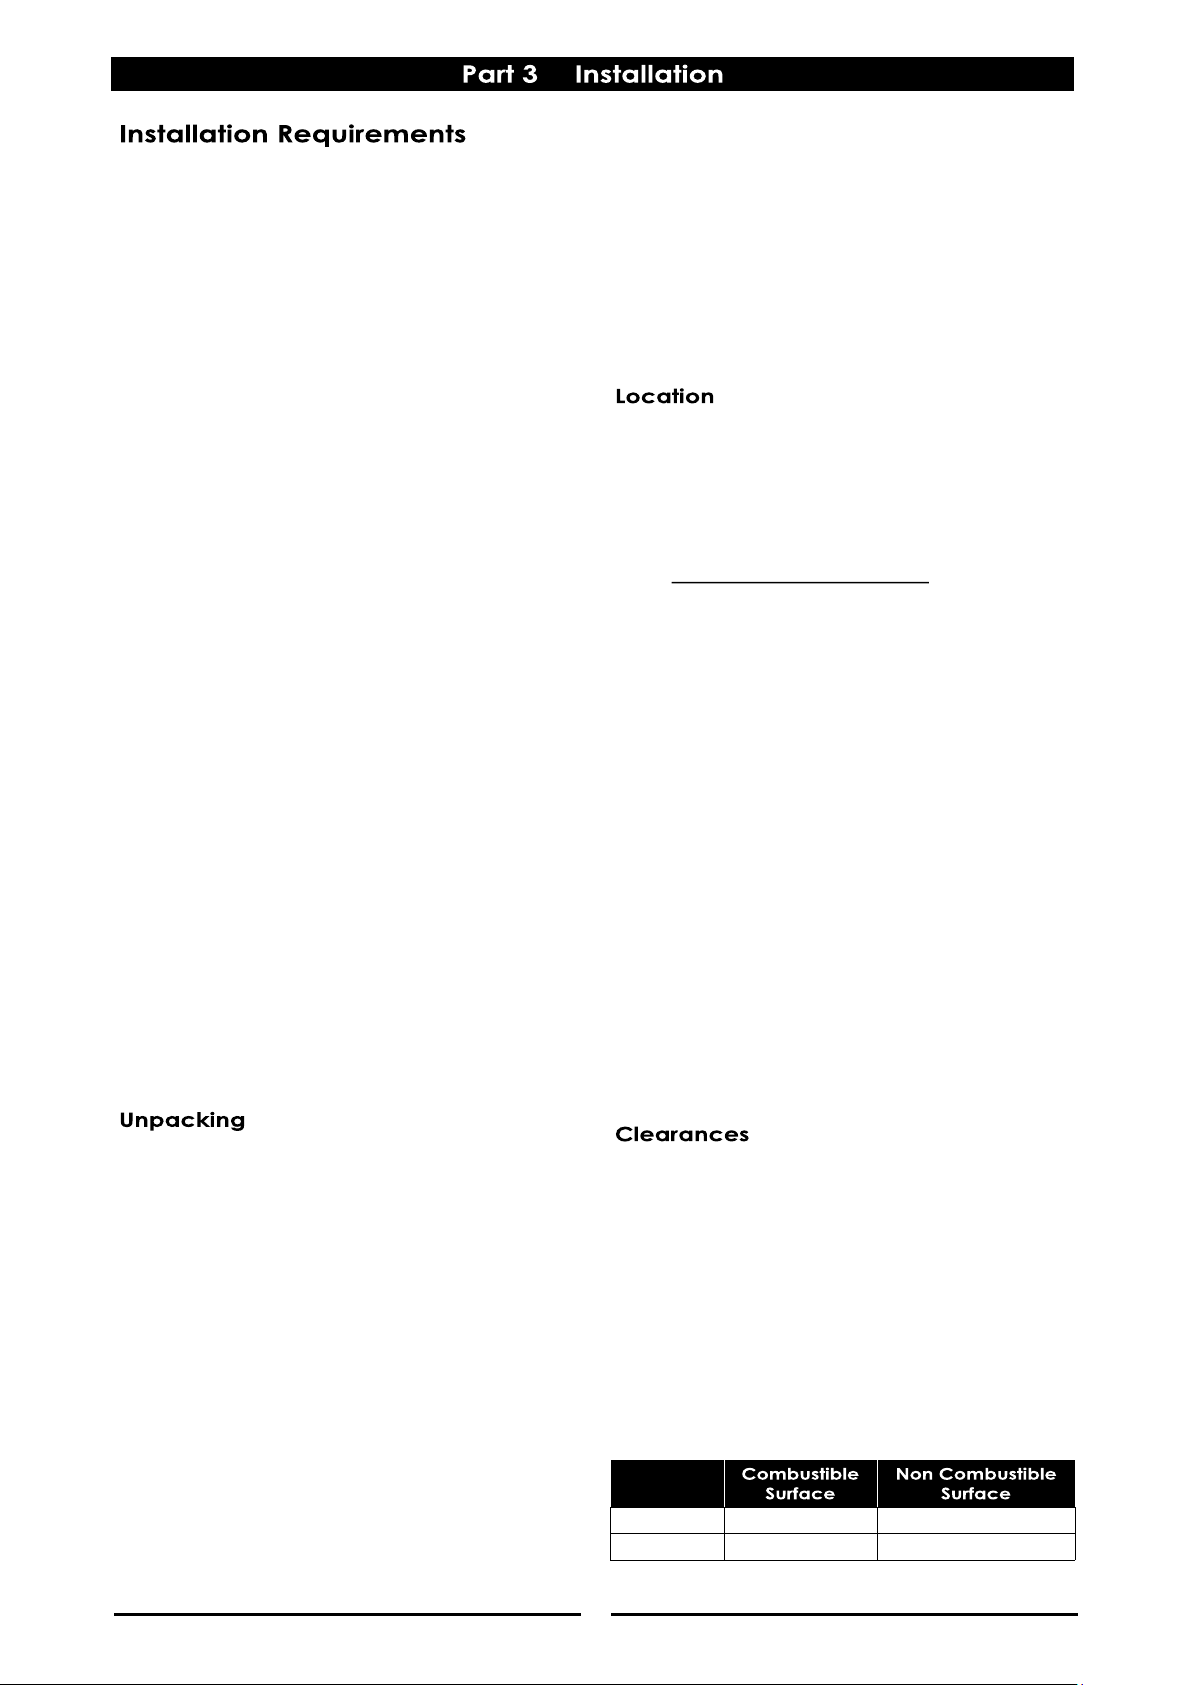
Only non-combustible materials can be used in
close proximity to this appliance.
To facilitate easy operation, drainage and servicing
of the pasta / noodle cooker, a minimum of 600mm
clearance should be maintained at the front of the
appliance.
Any gas burning appliance requires adequate
clearance and ventilation for optimum and troublefree operation. The following minimum installation
clearances are to be adhered to:
LH / RH Side 50mm 0mm
Rear 50mm 0mm
Page 8
6
This model is delivered completely assembled.
Ensure that the adjustable feet / rollers are securely
attached.
NOTE:
This appliance is fitted with adjustable feet /
rollers to enable the appliance to be positioned
securely and level. This should be carried out on
completion of the gas connection. Refer to the
‘Gas Connection’ section below.
The appliance rear leg housings are fitted with
Rear rollers to enable the appliance to be easily
moved for positioning and cleaning purposes.
NOTE:
ALL GAS FITTING MUST ONLY BE CARRIED OUT BY A
QUALIFIED SERVICE PERSON.
1. Cobra Pasta / Noodle Cookers do not require an
electrical connection, they function totally on
the gas supply only.
2. It is essential that the gas supply is correct for the
appliance to be installed and that adequate
supply pressure and volume are available. The
following checks should therefore be made
before installation:-
a. The Gas Type the appliance has been
supplied for is shown on coloured stickers
located above the gas entry point and next
to the rating plate. Check that this is correct
for the gas supply the appliance is being
installed for. The gas conversion procedure is
detailed in the ‘Gas Conversion Section’ of
this manual.
b. Supply Pressure required for this appliance is
shown in the “Specifications” section of this
manual. Check the gas supply to ensure that
adequate supply pressure exists.
c. Input Rate of this appliance is also stated on
the Rating Plate fitted to the inside of the
access door and in the ‘Specifications’
section of this manual. The input rate should
be checked against the available gas supply
line capacity. Particular note should be
taken if the appliance is being added to an
existing installation.
NOTE:
It is important that adequately sized piping runs
directly to the connection joint on the appliance,
with as few tees and elbows as possible to give
maximum supply volume.
3. Fit the supplied gas regulator into gas supply line
as close to the appliance as possible.
NOTE:
The gas pressure regulator provided with this
appliance is convertible between Natural Gas and
LPG as per ‘Gas Conversion Section’ in this manual.
Ensure regulator is converted to the correct gas
type that the appliance will operate on.
Regulator outlet pressure is fixed ex-factory for gas
type that regulator is converted to and it is NOT to
be adjusted.
Regulator connections are 3/4" BSP female.
Connection to appliance is 3/4" BSP male.
(Refer to 'Specifications' section for gas supply
location dimensions).
4. A suitable joining compound which resists the
breakdown action of LPG must be used on
every gas line connection, unless compression
fittings are used.
NOTE:
A Manual Isolation Valve must be fitted to individual
appliance supply line.
5. Locate the appliance into its final operating
position and using a spirit level, adjust the legs so
that the unit is level and at the correct height.
6. Connect the gas supply to the appliance.
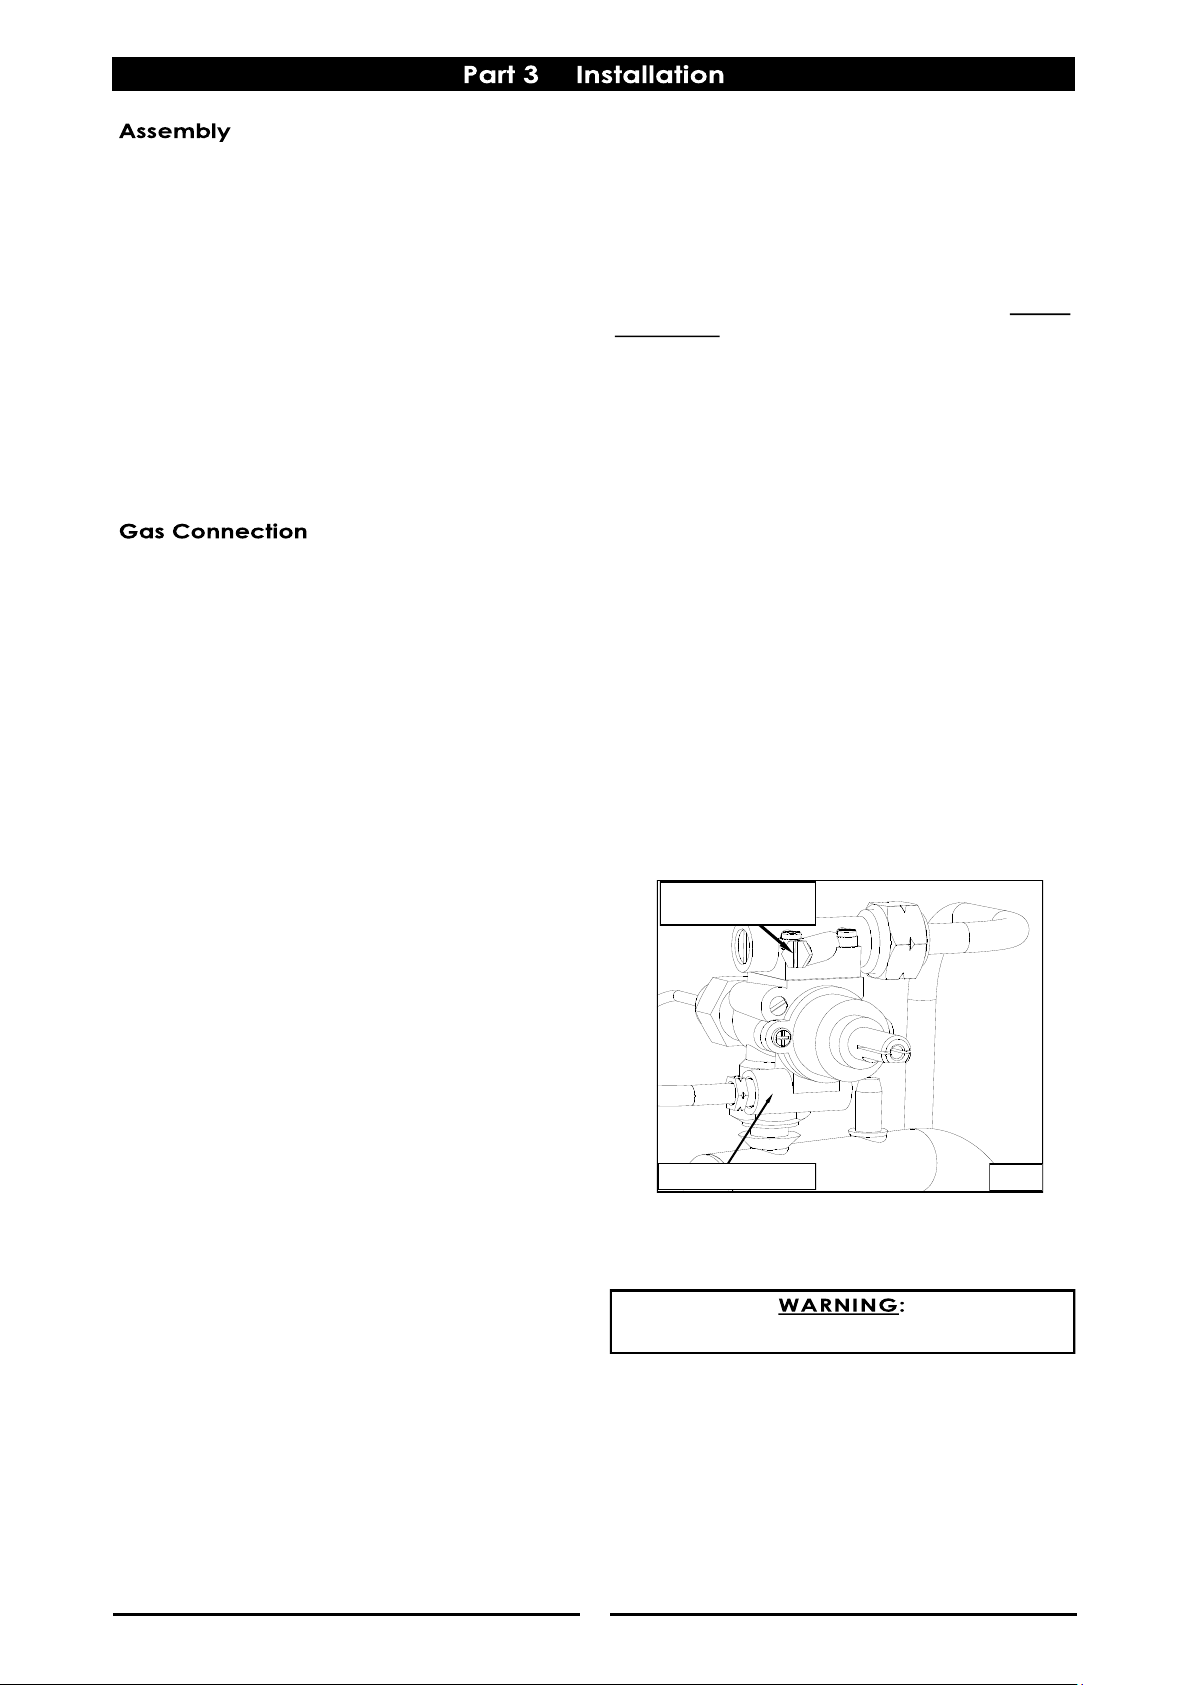
7. Check Burner Operating Pressure is as shown in
‘Specifications’ section, ‘Gas Supply
Requirements’ tables. (Measure at ‘Burner
Operating Pressure Test Point’) on front of gas
control valve).
8. Check all gas connections for leakages using
soapy water or other gas detecting equipment,
with the main burner operating.
NOTE:
Measure operating pressure at Burner Operating
Pressure test point on gas control, this is to be
carried out with burner operating at 'High Flame'
setting. Operating pressure is ex-factory set,
through appliance regulator and not to be adjusted,
apart from when carrying out gas conversion, if
required. Refer to ‘Gas Conversion and
Specification’ Section for further details.
DO NOT USE A NAKED FLAME TO CHECK FOR GAS LEAKAGES.
Fig 2
Burner Operating
Pressure Test Point
Gas Control Valve
Page 9
7
9. Verify the operating pressure remains correct.
10. Check the pilot flame size.
NOTE:
Water connection shall be installed in accordance
with local water regulations in force and the
applicable standard / code, e.g. EN 1717 in UK /
Ireland, PCA in Australia.
A cold water supply must be connected to water
inlet connection (R 1/2" BSP), located 50mm from LH
side, 556mm from rear and 135mm from floor.
Water connection should be plumbed, in
accordance with National / Local Codes covering
installation.
Water inlet pressure must be as follows:-
Minimum water supply pressure 150 kPa (22 psi).
Maximum water supply pressure 550 kPa (80 psi).
Water is drained from appliance by means of a
valve located behind front control panel.
A waste water tundish must be fitted below the
appliance drain outlet. This should be a minimum of
127mm (5”) major diameter.
If required the drain outlet can be extended in
order to exit above the tundish. All drain piping
must be with materials suitable for conveying boiling
water.
Drain connection is R1" BSP drain / overflow.
The following commissioning checks must be carried
out before the Pasta / Noodle Cooker is handed
over for use, to ensure the unit operates correctly
and operator(s) understand the correct operating
procedure.
1. Before leaving new installation;
a. Check the following functions in accordance
with operating instructions specified in
‘Operation’ section of this manual.
Light the Pilot Burner.
Light the Main Burner.
b. Ensure that each operator has been
instructed in areas of correct lighting,
operation and shutdown procedures for the
appliance.
2. This manual must be kept by owner for future
reference and a record of Date of Purchase,
Date of Installation and Serial Number of Unit
recorded and kept with this manual. (These
details can be found on Rating Plate attached to
inner R/H side of front access door panel. Refer
to Figure 1 in 'Installation' section).
NOTE:
If for some reason, it is not possible to get the
appliance to operate correctly, shut Off the gas
supply and contact supplier of this unit.
Page 10
8
1. Cobra Pasta / Noodle Cookers have been
designed to provide simplicity of operation and
100% safety protection.
2. Improper operation is almost impossible,
however bad operation practices can produce
a poor quality product. To use this Pasta /
Noodle cooker correctly, please read the
following sections carefully;
Filling the Tank with Water.
Lighting the Pilot Burner.
Lighting the Main Burner.
Draining and Cleaning.
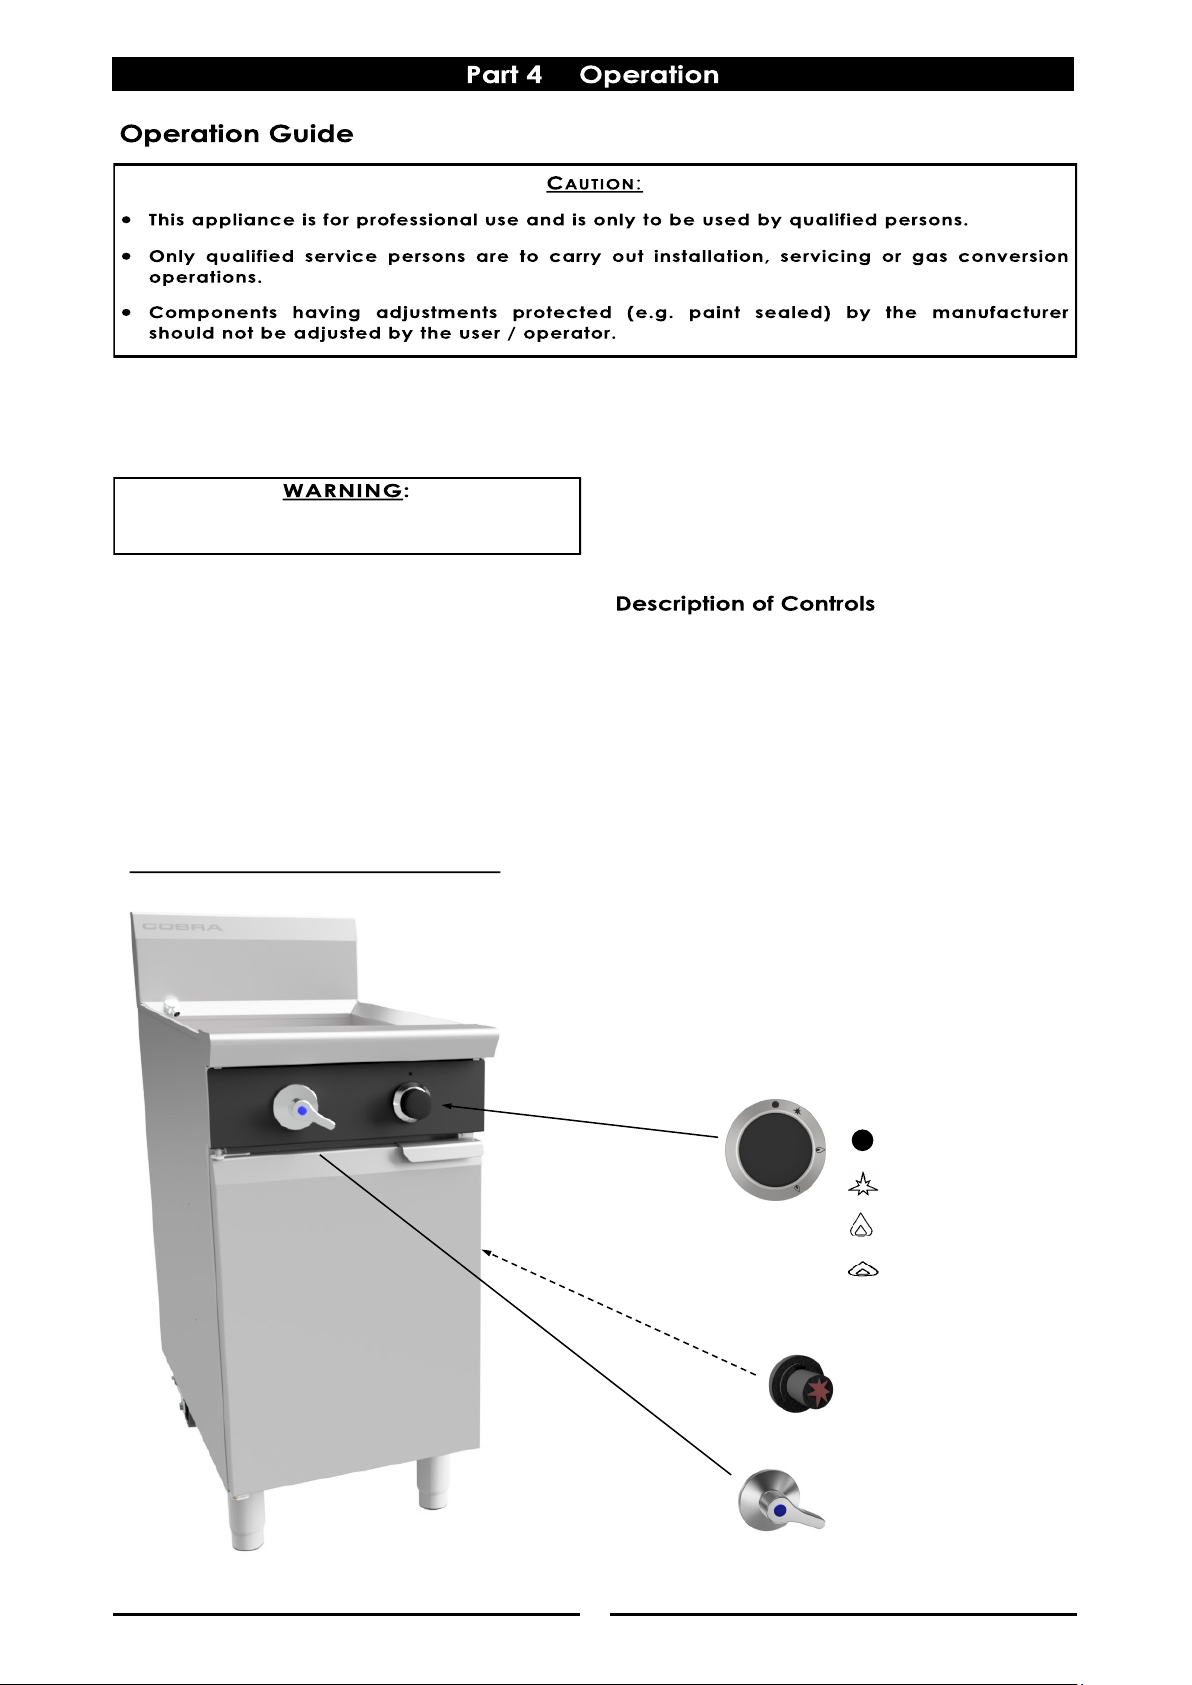
CP4 / CN4 Pasta / Noodle Cooker Controls
Burner Control
OFF Position
PILOT Burner
HIGH Flame
LOW Flame
Gas Control Knob
Piezo Igniter
(Behind Access Door)
Water Control Valve
NEVER OPERATE APPLIANCE WITH GAS CONTROL VALVE SET
BETWEEN ‘HIGH’ FLAME AND ‘PILOT’ POSITION.
A commercial heavy duty, gas fired Pasta /
Noodle Cooker using a fast fry infra red burner
system.
Available in single model type only.
This model is fitted with a single main burner with
a pilot burner and is controlled by a single gas
controller with flame failure protection to control
both the main burner and the pilot.
Open tank design to simplify cleaning operation.
Page 11
9
1. Check gas supply is turned On.
2. Check that no foreign articles are in the tank.
NOTE: Tank capacity - 40 Ltrs of water.
1. Before filling tank, always check that the drain
valve, behind the door, is closed. A locking slide
is provided on the valve and this should always
be locked ‘Closed’ position during use.
2. Turn water supply On. Open appliance water
valve and fill tank with water.
3. Water level will remain at a constant height as
there is an overflow at front of tank.
4. During cooking, water level will reduce as it
evaporates as steam when boiling and when it
overflows as loaded baskets are dropped into
tank.
5. To maintain correct water level, water tap
should be adjusted to give a water flow out of
water supply nozzle that just causes water to
continually flow out of overflow.
This method provides:
Maintained water level for cooking.
Skimming or flushing effect to prevent
the cooking water becoming gummed
up with residue.
GREAT CARE MUST BE TAKEN BY OPERATOR, TO USE THE PASTA COOKER SAFELY, TO GUARD AGAINST RISK OF INJURY AND
FIRE.
DO NOT LEAVE PASTA / NOODLE COOKER UNATTENDED DURING OPERATION.
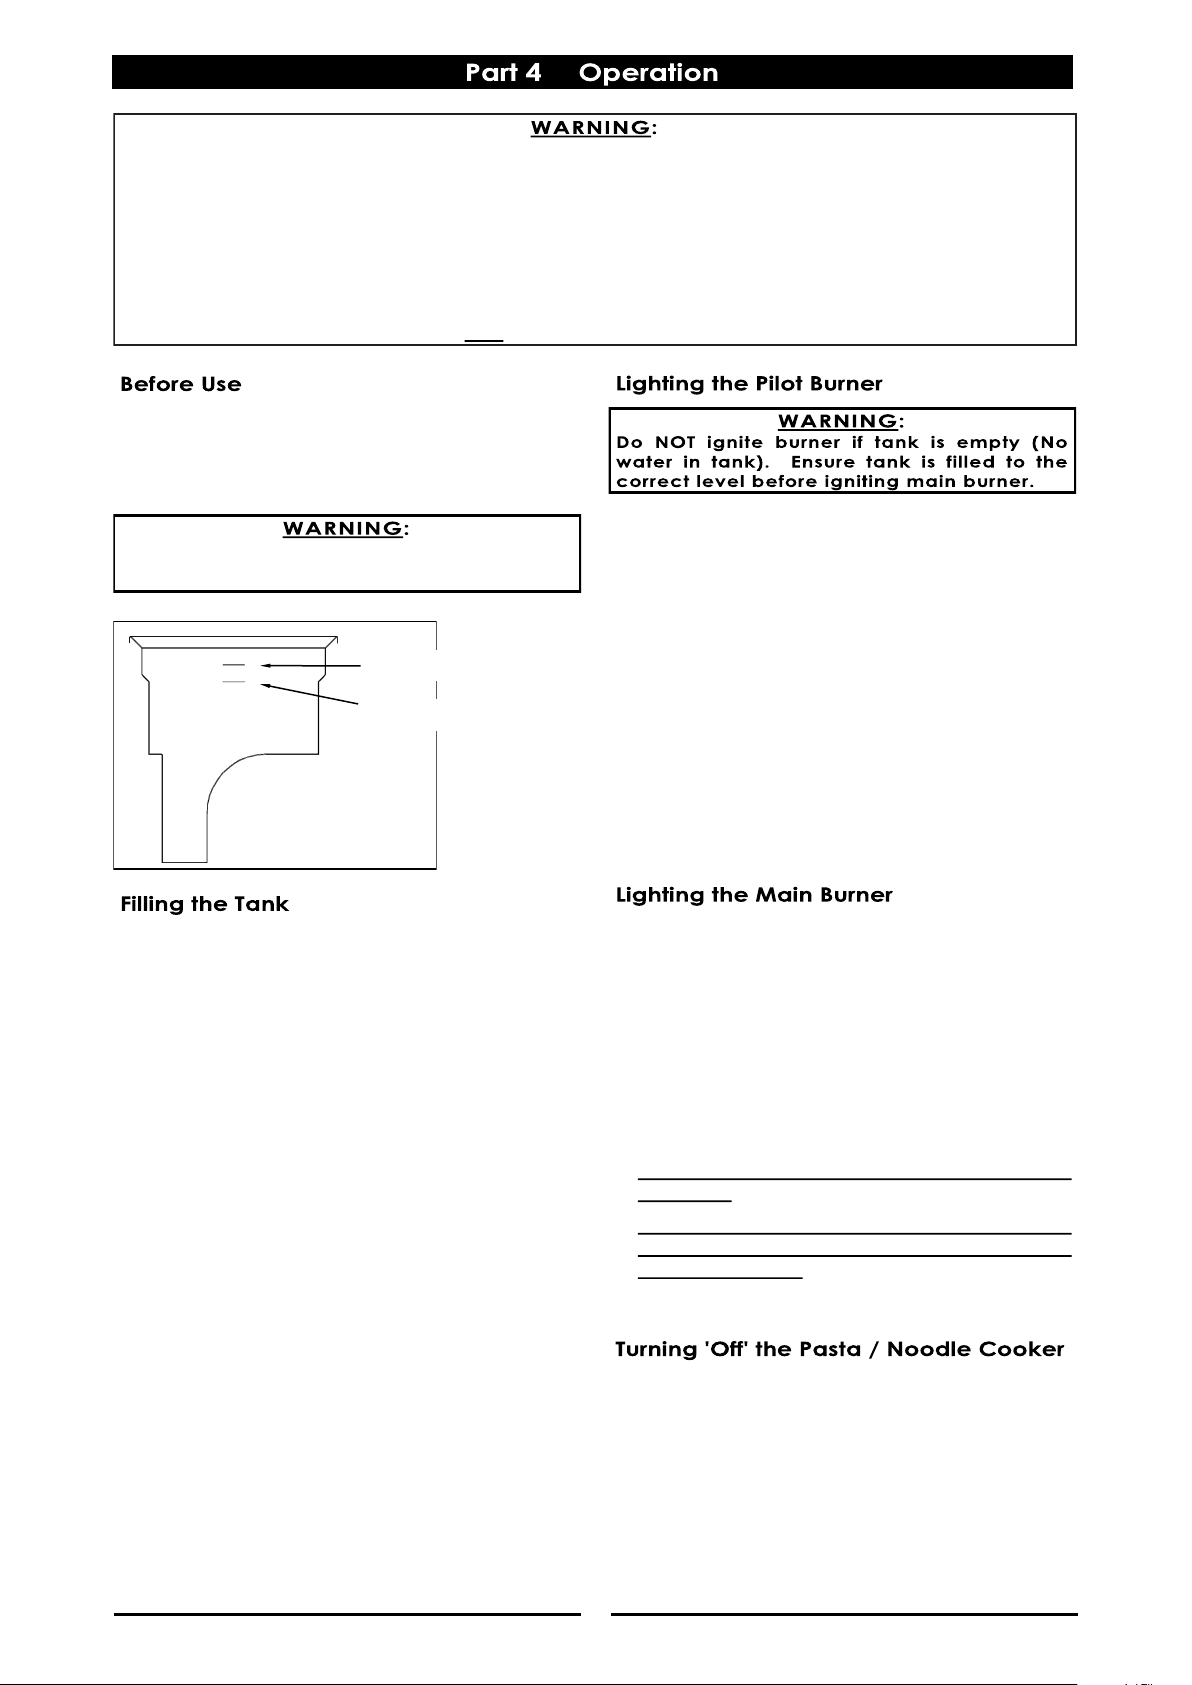
DO NOT OVER FILL WATER IN PASTA / NOODLE COOKER ABOVE UPPER FILL LEVEL MARK.
DO NOT ALLOW WATER IN PASTA / NOODLE COOKER TO FALL BELOW LOWER LEVEL MARK.
DO NOT USE FLAMMIBLE SOLVENTS AND CLEANING AIDS ON OR IN CLOSE PROXIMITY TO PASTA / NOODLE
COOKER WHILST COOKER IS STILL HOT.
DANGER OF FIRE EXISTS IF THE WATER LEVEL IS BELOW THE
MINIMUM “LO” INDICATED LEVEL
1. With pasta / noodle cooker tank full of water,
the pilot burner can be lit.
2. Check gas supply is turned On at mains supply.
3. Depress and rotate gas control knob to the
‘Pilot’ position and hold knob depressed.
4. Open front access door of appliance, depress
piezo igniter on bulkhead panel, until pilot burner
ignites.
5. Continue holding gas control knob depressed
for approx. 10 / 15 seconds after igniting pilot
burner, then release, pilot burner should remain
alight.
6. Ensure pilot burner is alight, by checking that
pilot flame is alight with access door open.
7. If pilot burner does not ignite, repeat Items 1 to 6.
1. Depress and rotate gas control knob to the High
Flame position, main burner will ignite
automatically off the pilot burner.
2. Gas control knob can be regulated between
High Flame and Low Flame position to regulate
cooking temperature.
3. It will take approximately 30 minutes to heat the
water in the tank from 20°C to 100°C.
IMPORTANT:
THE USE OF ROCK SALT IS NOT PERMITTED IN THIS
MACHINE .
NEVER add salt to cold water - always ensure that
the water in the pasta / noodle cooker is boiling
before adding salt.
Clean the pan regularly after each use.
To the ‘Pilot’ Position
a. Depress and rotate gas control valve anti-
clockwise to the Pilot position.
b. Main burner will extinguish and Pilot will
remain alight.
To the ‘Off’ Position
a. Depress and rotate gas control valve fully
anti-clockwise to Off position.
b. Pilot burner will extinguish.
INDICATES MINIMUM (SAFE) LEVEL.
WATER LEVEL SHOULD BE TOPPED UP.
CORRECT LEVEL FOR WATER WHEN
COOKING, KEEP TOPPED UP.
Page 12
10
CORRECT LEV EL FOR FRYING MEDIUM WHEN AT
FRYING TEMPERATURE, KEEP TOPPED UP
INDICATES CORRECT FR YING MED IUM LEVEL
WHEN COLD
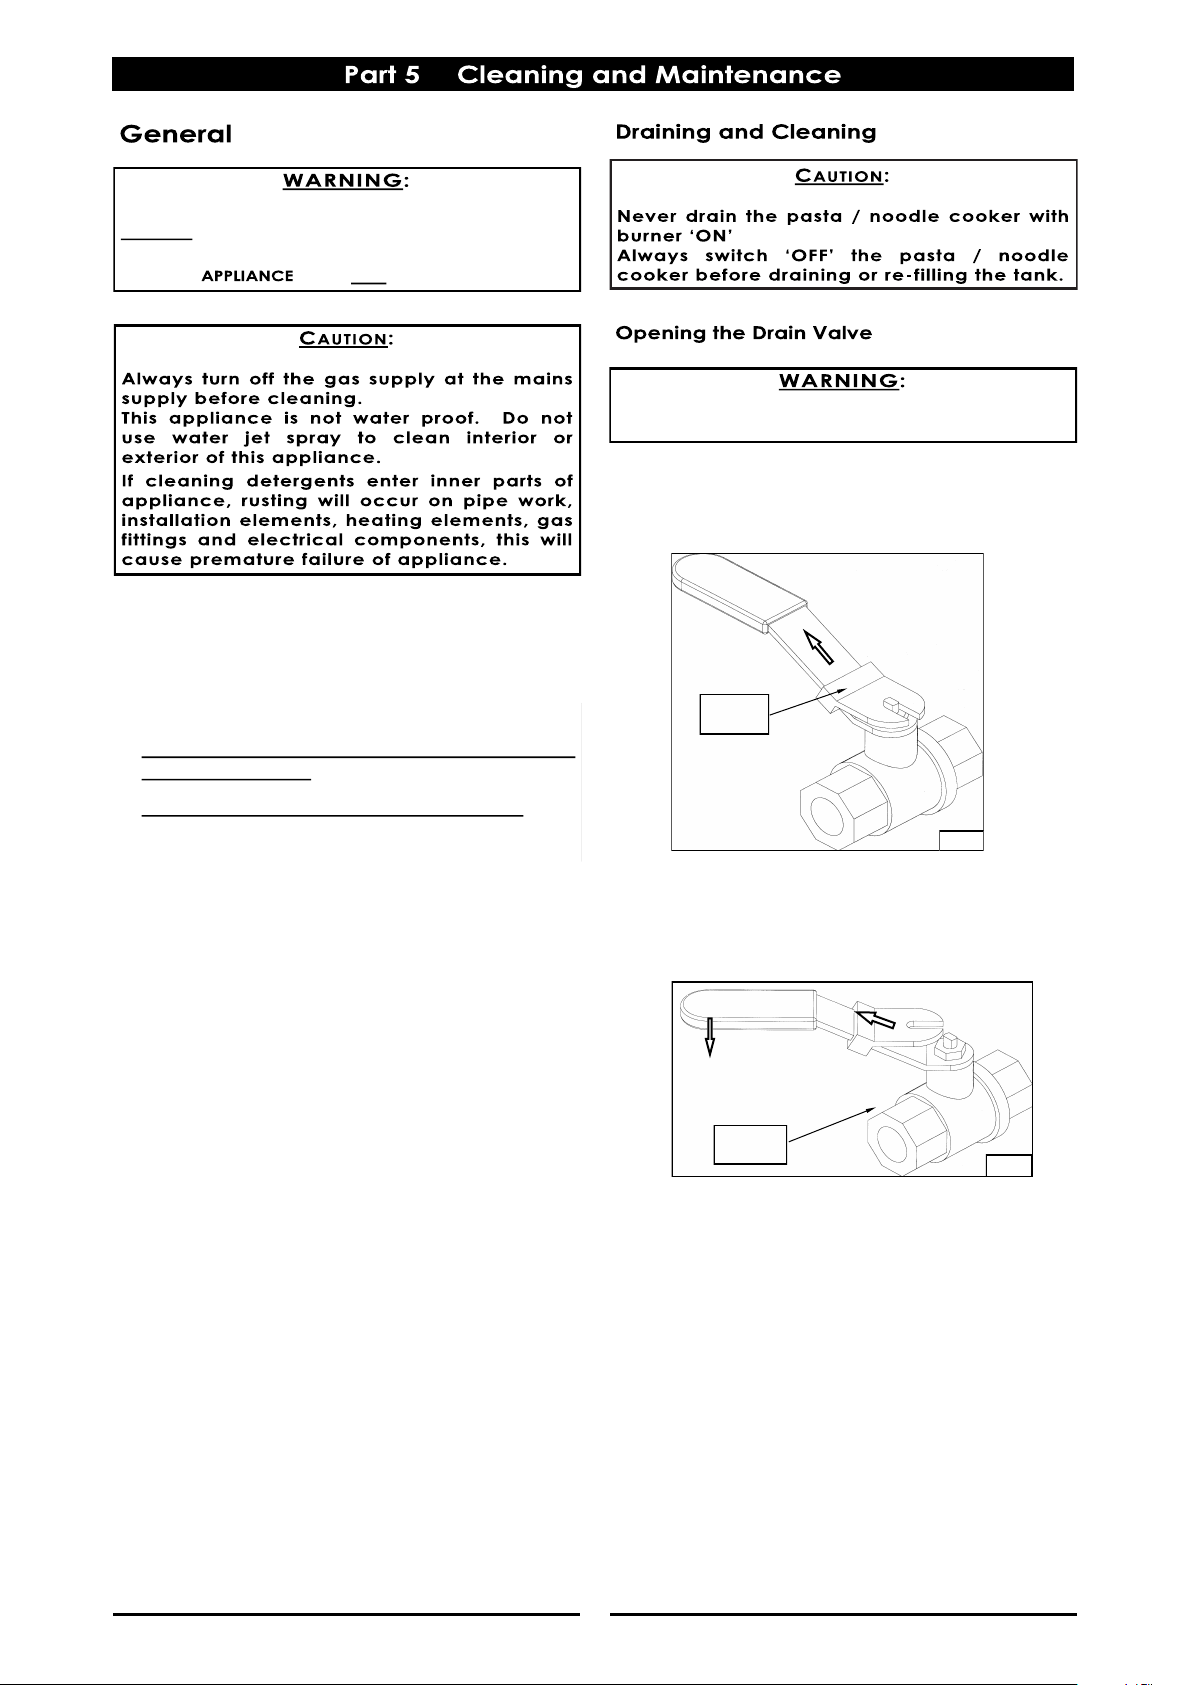
a. Lift the locking slide on valve handle (Fig 1) to
release valve.
b. While holding the locking slide in the
withdrawn position, rotate the handle
anti-clockwise (Fig 2) to open the valve.
c. When the valve is closed, the locking slide will
drop down over the locking valve to prevent
accidental opening of valve (see Fig 1).
To keep your pasta / noodle cooker clean and
operating at peak efficiency, observe the following
procedures:-
NOTE:
DO NOT clean appliance using high pressure
water or steam jets.
DO NOT pour water directly over appliance.
DO NOT use wire brushes.
DO NOT use combustible liquids to clean
appliance.
DO NOT use harsh abrasive detergents, sharp
scrapers, strong solvents or caustic detergents as
they will damage appliance.
DO NOT use any chloric or bleaching detergents
to clean appliance.
Ensure that any detergent or cleaning material
have been completely removed after each
cleaning.
DO NOT use saline or sulfuric acid preparations
for descaling the appliance.
Ensure that protective gloves are worn during the
cleaning process.
Clean the pan regularly after each use.
DO NOT USE FLAMMIBLE SOLVENTS AND CLEANING AIDS ON
OR IN CLOSE PROXIMITY TO THE PASTA / NOODLE COOKER
WHILST THE IS STILL HOT.
Fig 1
Locking
Slide
HOT WATER WILL BURN - DO NOT RUSH THIS JOB.
Fig 2
Locking
Slide
Page 13
11
1. Water should be drained and re-filled regularly.
Open drain valve slowly to minimise splashing.
Waste water will drain into a tundish fitted below
the appliance drain outlet.
2. When the tank is empty, open drain valve fully
and check for any particles or residue lodged in
the valve. Clean out the valve with a stiff nylon
brush. Do not use a wire brush or metal rods as
these will damage the valve seating and will
eventually lead to valve leakage.
3. If obstruction in the valve cannot be removed
with a brush, use a wooden probe to dislodge
the obstruction.
4. Clean the control panel using a damp cloth
lightly moistened with a solution of mild
detergent and hot water. Dry the control panel
thoroughly using a dry clean cloth.
5. Clean interior of pan regularly at the end of
each day. Do not use wire brushes on the pan.
Clean using a mild detergent and a hot water
solution using soft cloth or a soft bristled brush.
Dry the appliance thoroughly using a dry clean
cloth.
6. Once the daily cleaning operation is
completed, ensure the drain valve has been
closed and secured.
7. At the end of each day or at end of each shift,
Clean the exterior of the pasta / noodle
cooker using a mild detergent and hot water
solution using soft cloth or a soft bristled brush.
Clean the pasta / noodle baskets using a
mild detergent and hot water solution using a
soft cloth or a soft bristled brush. Rinse in fresh
water and thoroughly dry using a dry cloth.
NOTE:
If pasta / noodle cooker usage is very high, we
recommend that the weekly cleaning procedure
is carried out more frequently.
Ensure protective gloves are worn during
cleaning.
DO NOT use harsh abrasive detergents, strong
solvents, sharp scrapers or caustic detergents as
they will damage the surface of the Pasta /
Noodle cooker.
Ensure that the water supply is free of ferrous
particles. Any such particles deposited in the
bottom of the tank may cause the tank to rust.
Thoroughly clean the interior and exterior of the
pasta / noodle cooker regularly. Do not use wire
brushes on the pan. Clean using a mild detergent
and hot water solution using soft cloth or a soft
bristled brush. Dry the appliance thoroughly using a
dry clean cloth.
NOTE: In order to prevent rust forming on the steel
components, ensure that the detergent or cleaning
material has been entirely removed after each
cleaning process.
Stainless Steel Surfaces
a. Clean the interior and exterior surfaces of the
pasta / noodle cooker with hot water, a mild
detergent solution and a soft scrubbing brush.
Note that the gas control knob is a push fit onto
the gas valve spindle and can be removed to
allow cleaning of the front of the control panel.
b. Baked on deposits or discolouration may require
a good quality stainless steel cleaner or stainless
steel wool. Always apply cleaner when the
appliance is cold and rub in the direction of the
grain.
c. Dry all components thoroughly with a dry cloth
and polish with a soft dry cloth.
NOTE:
All maintenance operations should only be carried
out by a qualified service person.
To achieve the best results, cleaning must be
regular and thorough and all controls and
mechanical parts should be checked and adjusted
periodically by a qualified service person. If any
small faults occur, have them attended to promptly.
Don't wait until they cause a complete breakdown.
It is recommended that the appliance is serviced
every 6 months.
If appliance is not used for long periods, close gas
shut-off valve upstream of the appliance and clean
the appliance thoroughly.
The appliance should be inspected and the gas
exhaust flue cleaned by an authorized service
person at least every 6 months.
DO NOT ATTEMPT TO MOVE THE PASTA / NOODLE COOKER
WHILST IT IS FULL OF WATER.
PASTA / NOODLE COOKER
PASTA / NOODLE COOKER
Page 14
12
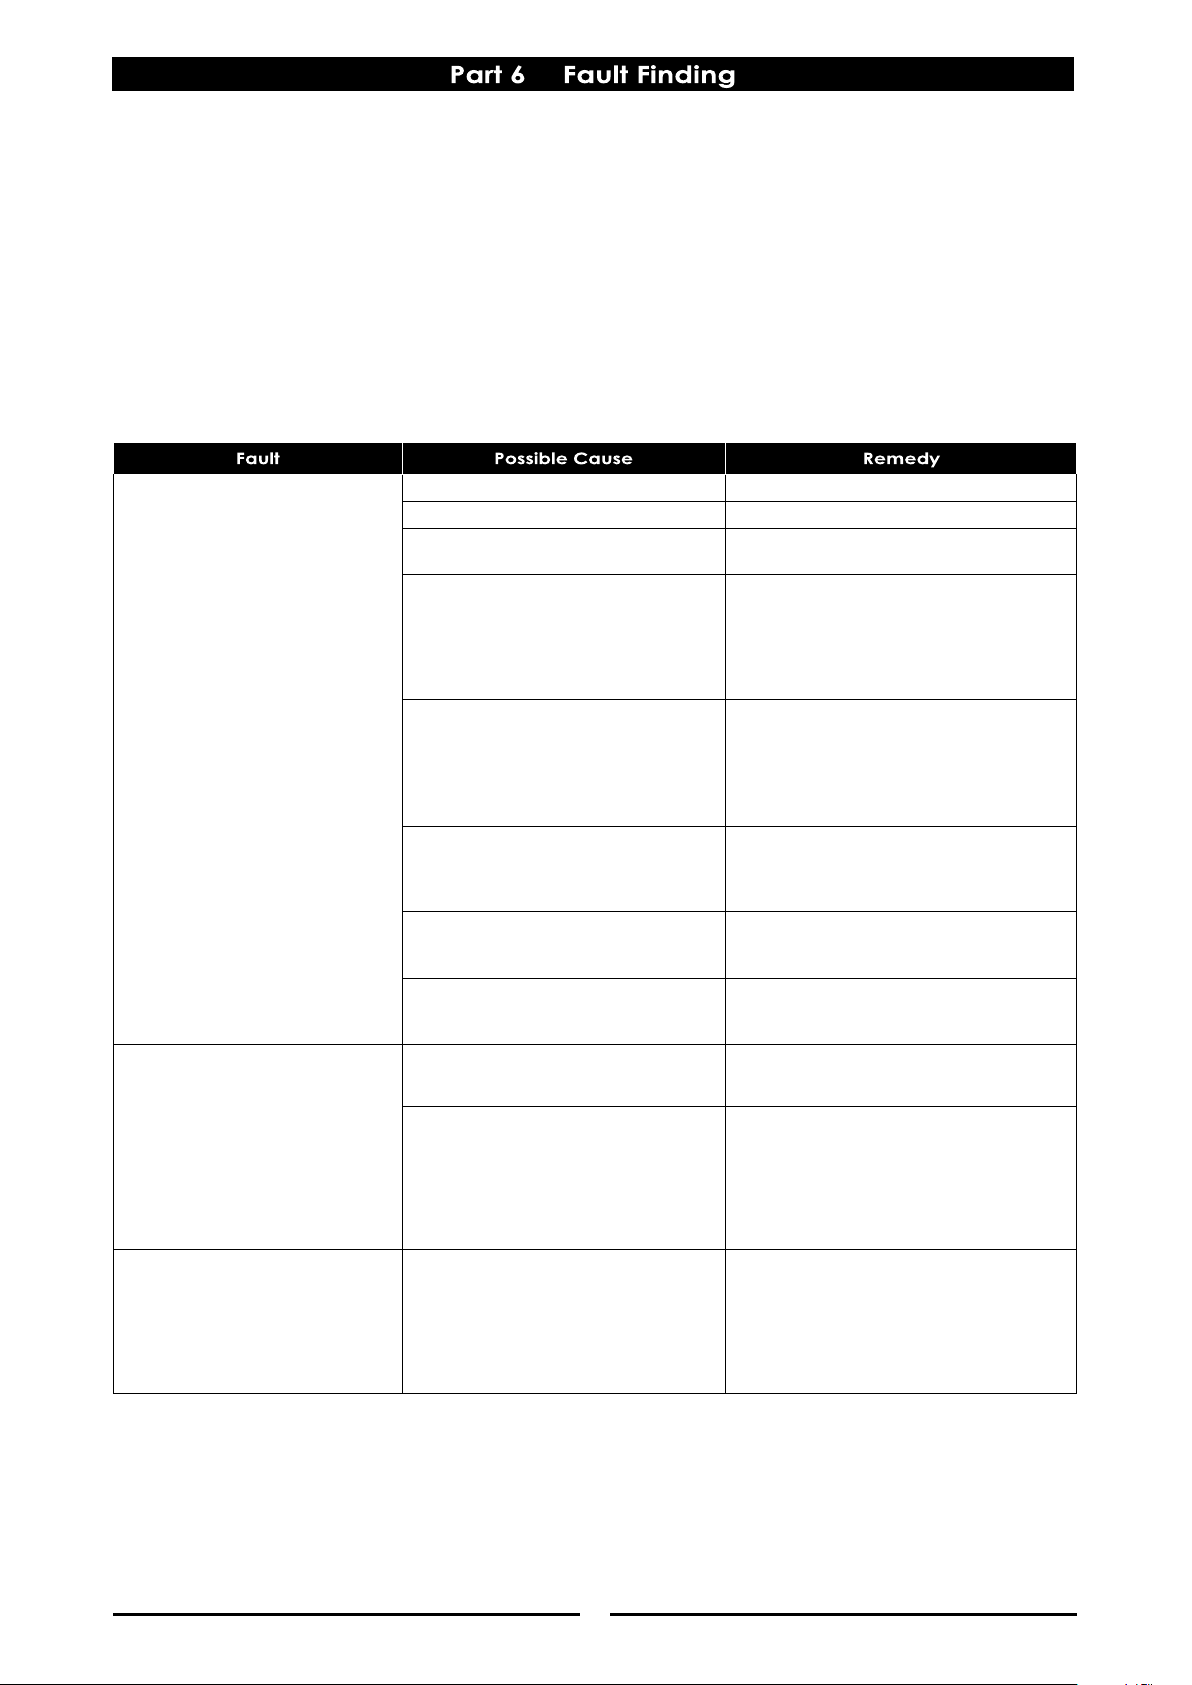
Pilot Burners will not ignite or
ignites with difficulty and will not
stay alight.
Check gas supply is turned On. Turn On gas supply.
Check gas supply is low or empty. Replenish gas supply.
Thermocouple connection loose. Tighten thermocouple connection.
Replace any damaged connectors.
Over temperature lead connection to
interrupter on thermocouple is loose.
Loose connections will cause
resistance to millivolt circuit and result
in pilot outage.
Tighten over temperature lead to the
interrupter on the thermocouple.
If sufficient pilot flame cannot be
obtained, remove pilot orifice from
pilot burner and check for blockage of
pilot burner and /or gas line also
check that correct size gas pipe has
been used.
If connections OK, check for gas at pilot
burner by manually lighting pilot burner.
Call service provider.
If pilot can be lit but flame too small to
impinge on thermocouple.
Check pilot injector for restriction. Clean
or replace Pilot Injector.
Check gas supply.
If pilot flame OK but goes out after
control knob released (after holding in
for approx. 30 secs).
Check for faulty thermocouple.
Call service provider.
If all of above in pilot and
thermocouple system checks out
satisfactorily but problem still persists.
Gas control valve is defective and needs
replacement.
Pilot Burner delay in ignition of
main burners.
Check operating pressure as stated in
‘Installation’ section.
Check gas supply.
Call service provider.
Check pilot flame size. Pilot flame for main burner ignition should
be approximately 1 inch long. Check pilot
burner injector size is correct. (See
‘Specifications’ section).
Check pilot injector for restriction. Clean
or replace Pilot Injector.
Main Burners will not ignite or
ignites with difficulty.
Insufficient gas pressure.
Main injector is blocked.
Gas valve is faulty.
Check gas pressure and adjust as
necessary.
Remove main injector and clean or
replace.
Replace. Call service provider.
This section provides an easy reference guide to the more common problems that may occur during
operation of your equipment. The fault finding guide in this section is intended to help you correct, or at
least accurately diagnose problems with your equipment.
Although this section covers the most common problems reported, you may encounter a problem not
covered in this section. In such instances, please contact your local authorised service agent who will make
every effort to help you identify and resolve the problem. Please note that the service agent will require the
following information:-
Model Trade Name and Serial Number of the Appliance. (both can be found on the Technical
Data Plate located on the appliance.
Page 15
13
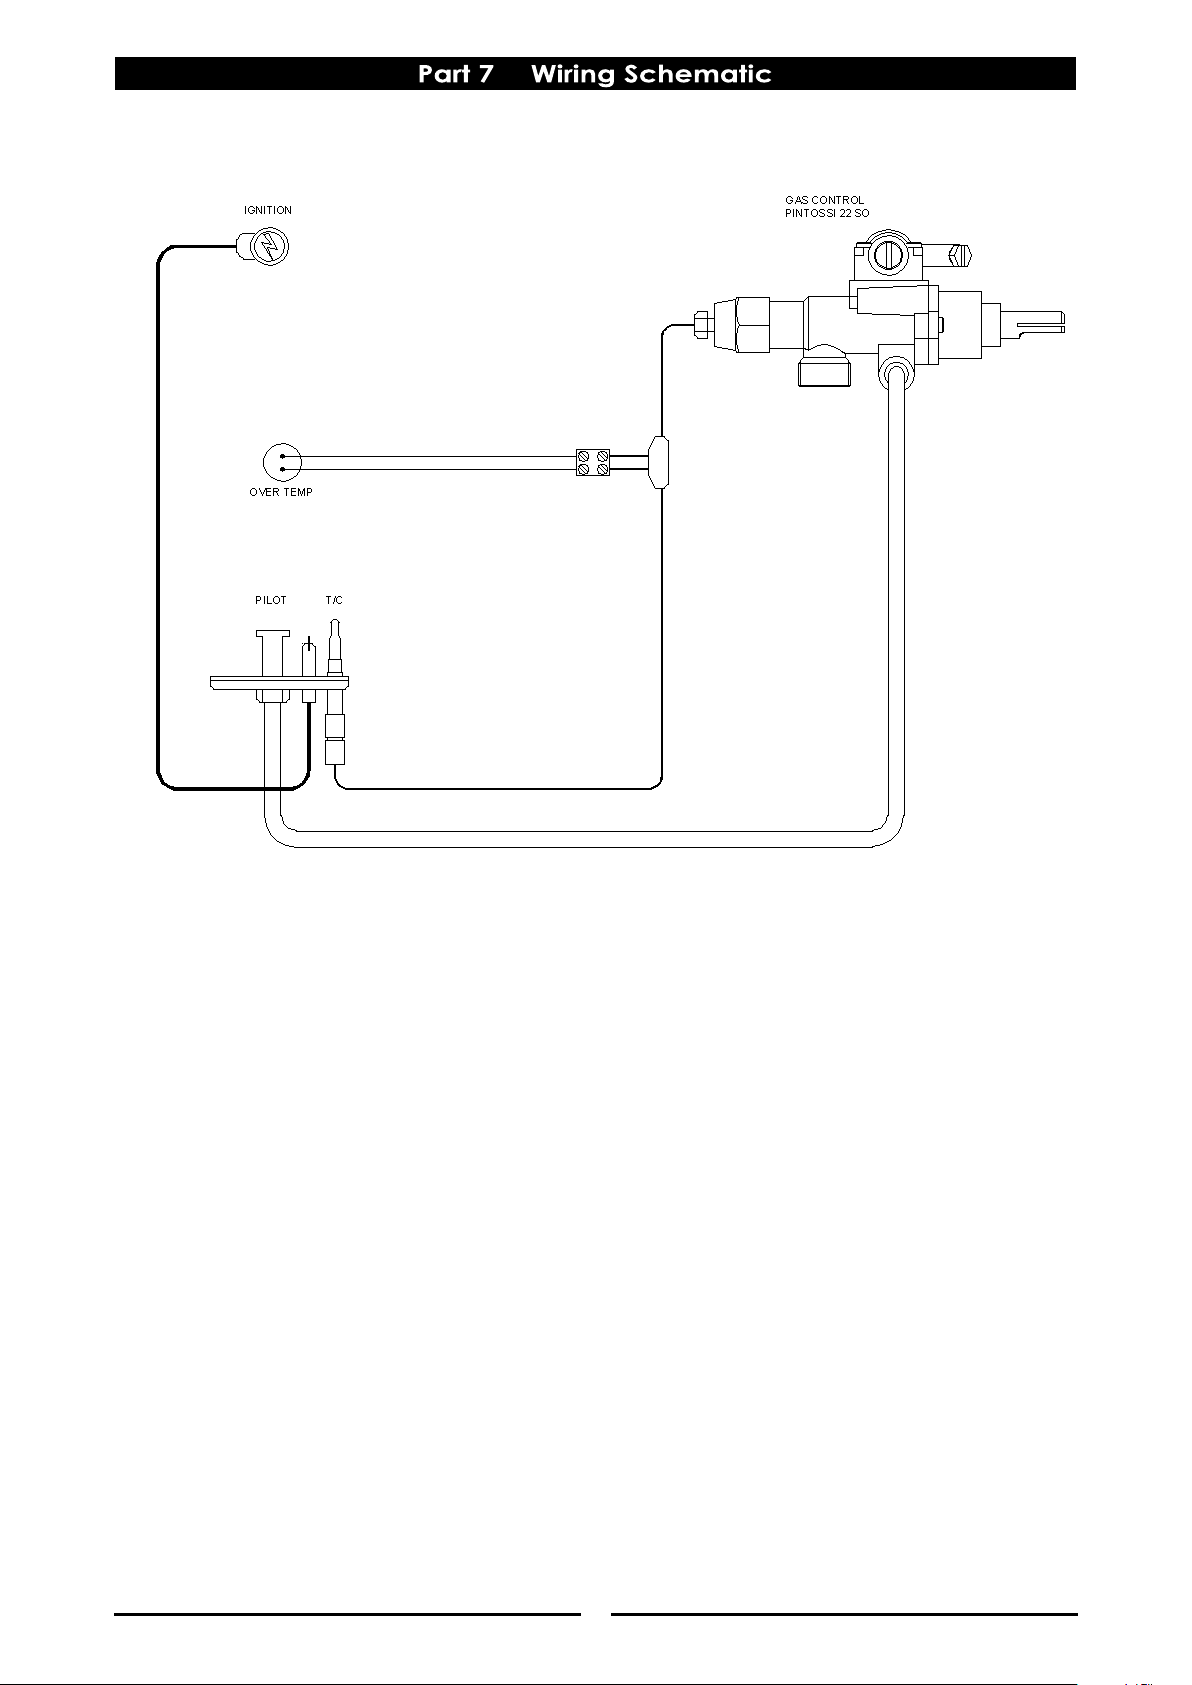
CN4 / CP4 Pasta Cooker
Page 16
14
NOTE:
These conversions should only be carried out by
qualified persons. All connections must be
checked for leaks before re-commissioning the
appliance.
Adjustment of components that have
adjustments / settings sealed (e.g. paint sealed)
can only be adjusted in accordance with the
following instructions and shall be re-sealed
before re-commissioning this appliance.
For relevant gas specifications refer to ‘Gas
Specifications Tables’ at rear of this section.
- NAT Gas / LPG / Butane Only.
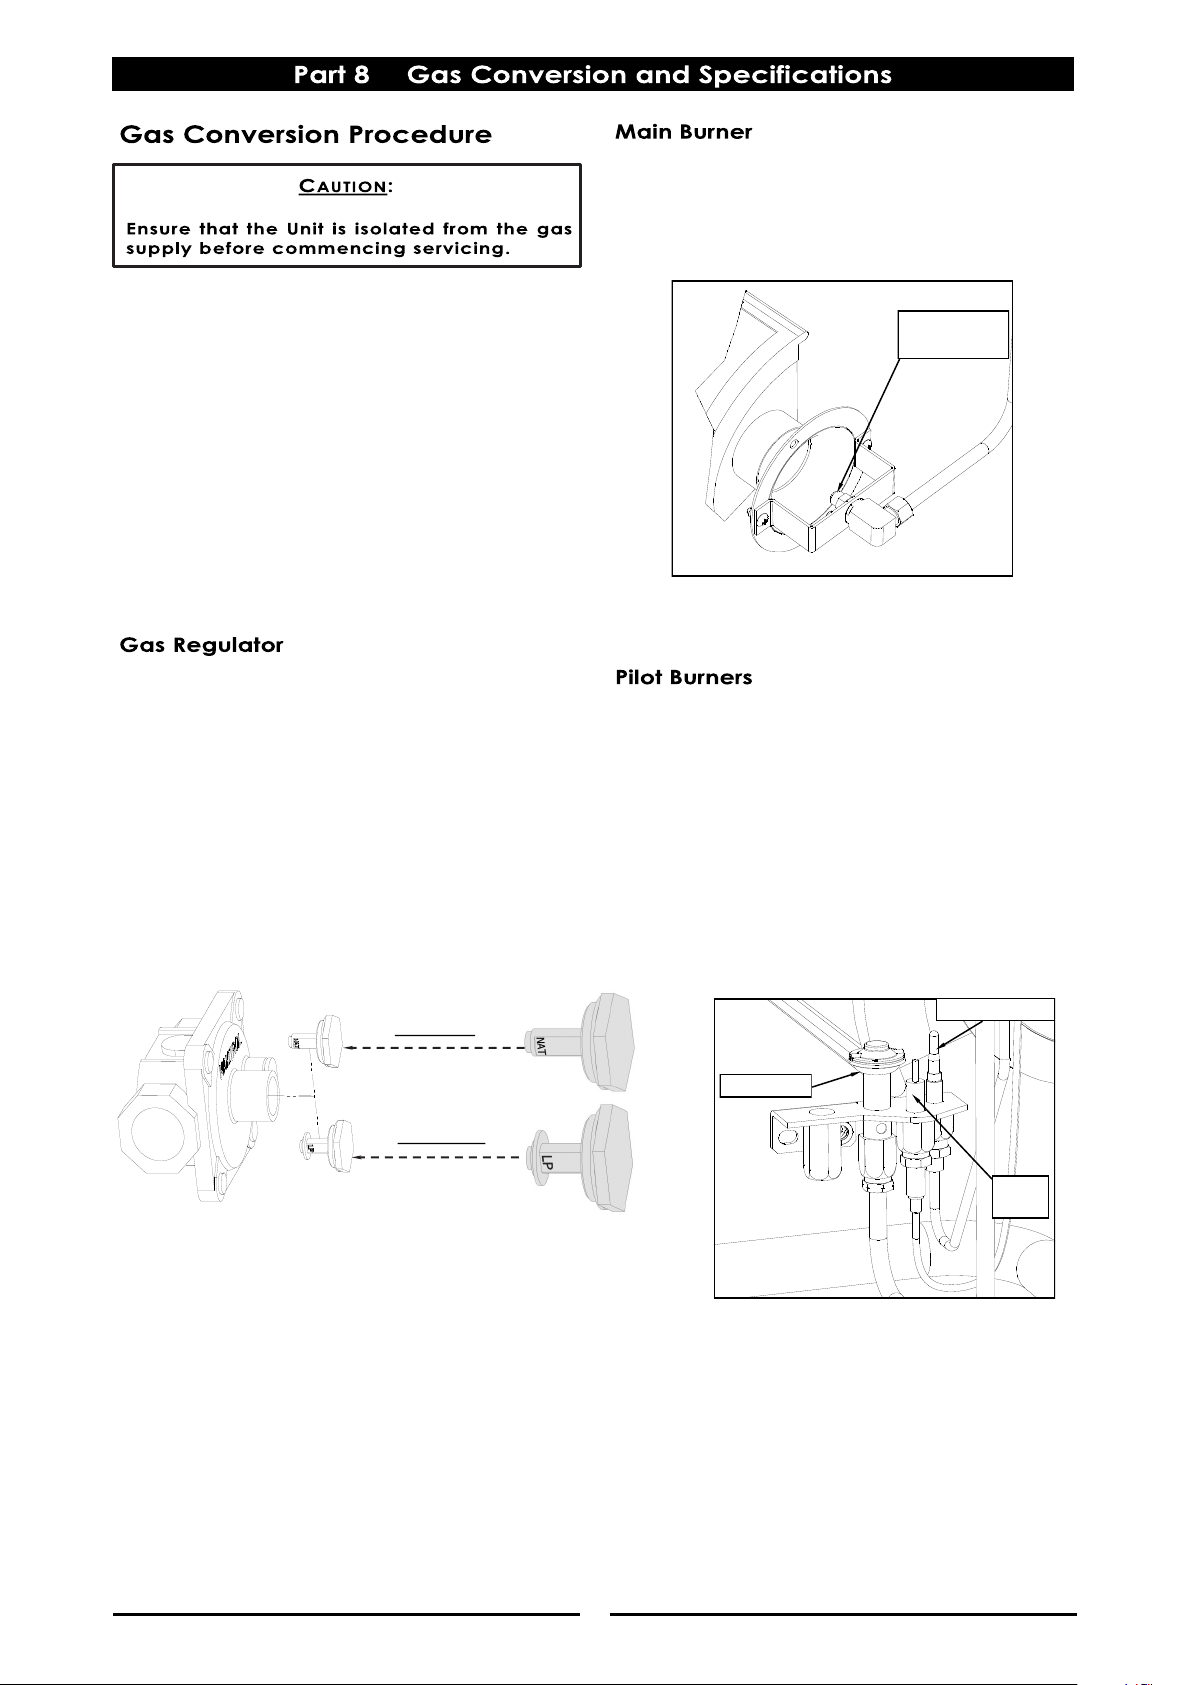
1. Unscrew cap on regulator and rotate pin to the
setting shown in ‘Gas Specifications’ tables
overleaf.
2. Refit cap to regulator.
NOTE:
Gas regulator supplied is convertible between
Natural Gas and LP Gas, but it’s outlet pressure is
fixed ex-factory and is NOT to be adjusted.
1. Open the cabinet door.
2. Remove main burner injector and replace with
correct size injector as shown in Gas
Specifications Table.
1. Remove the following:-
Gas supply tube to pilot burner.
NOTE:
Appliances fitted with piezo igniter electrodes,
remove electrode from mounting bracket before
unscrewing pilot supply tube.
2. Remove pilot burner injector and replace with
correct size injector as shown in ‘Gas
Specifications Table’ at rear of this section.
3. Refit the following:-
Gas supply tube to pilot burner.
Piezo igniter electrode.
Main Burner
Injector
Thermocouple
Piezo
Igniter
Pilot Burner
NOTE, Pin rotated
for Natural Gas
NOTE, Pin rotated
for LPG / Butane
Page 17
15
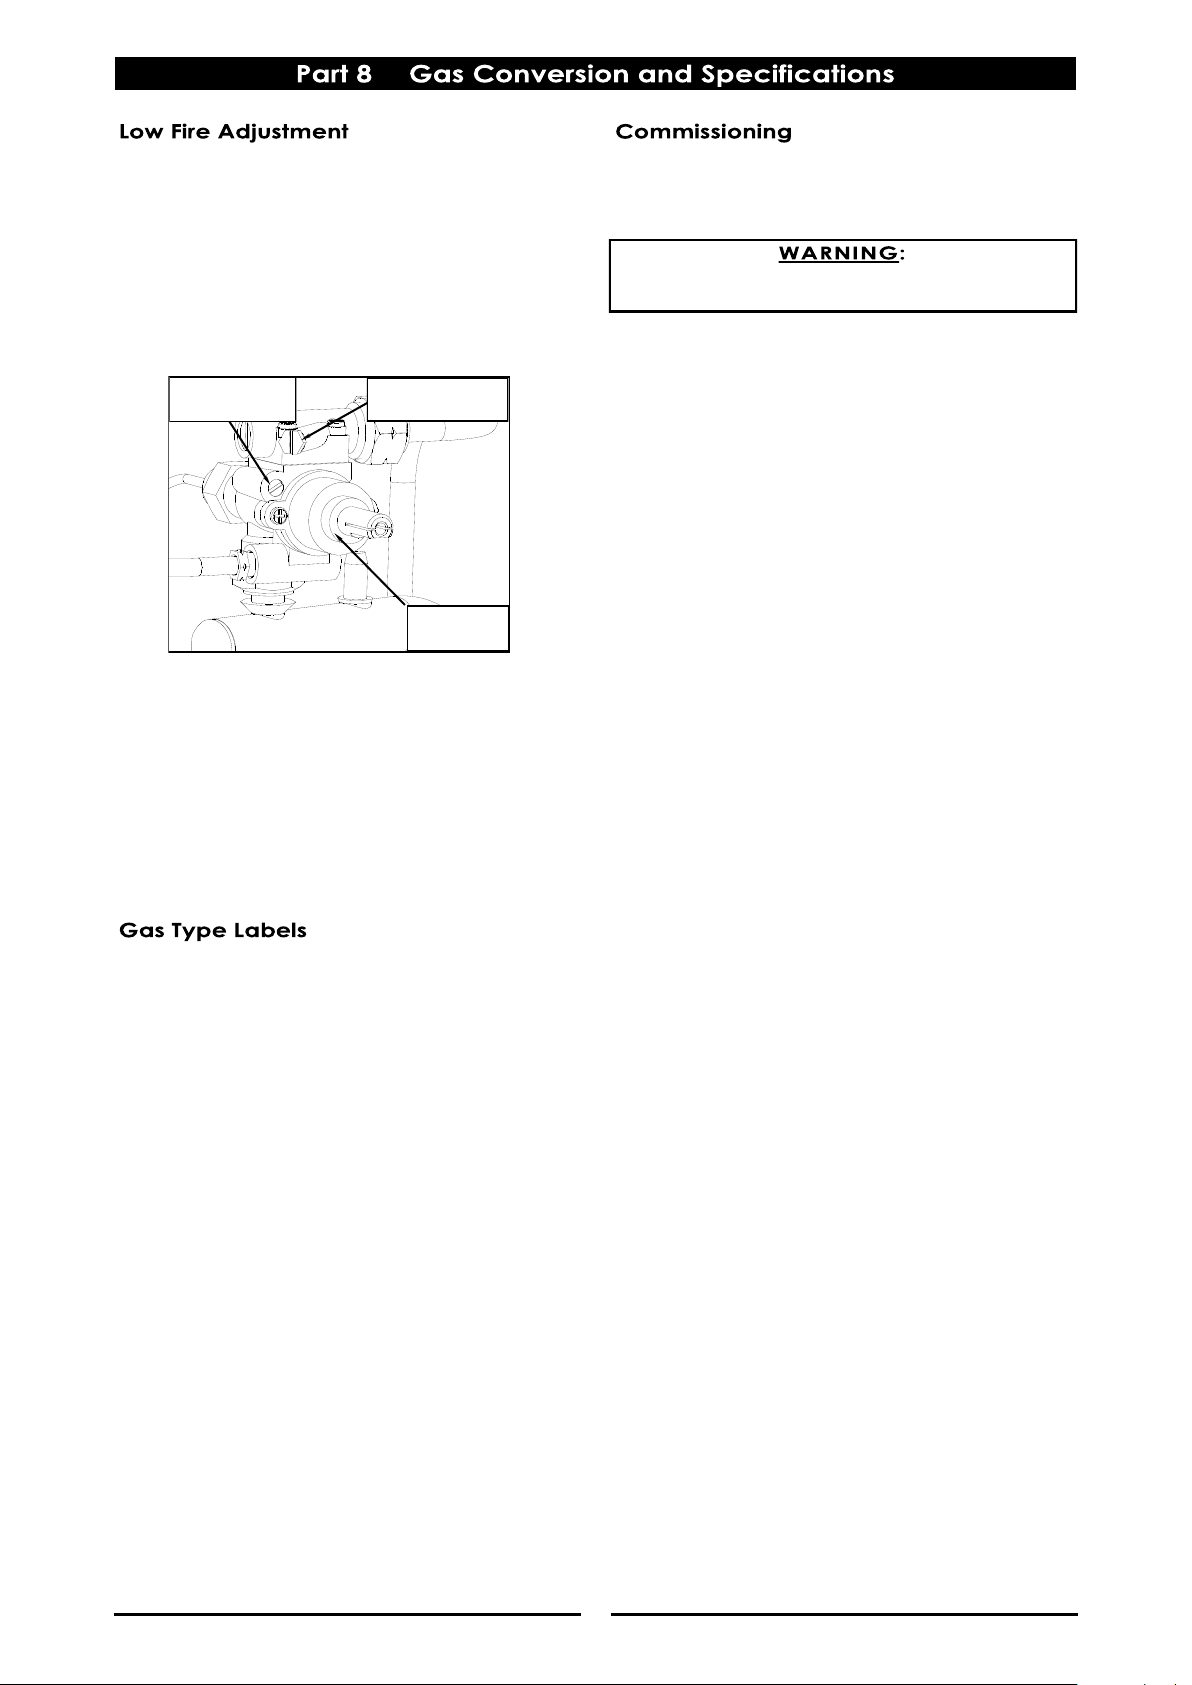
1. Set low fire screw as shown in Gas Specifications
Table at rear of this section.
2. Connect a manometer to upper test point
(Burner Operating Pressure) on gas control valve.
Turn ‘On’ gas and light the main burner
3. Ensure burner operating pressure is as shown in
Gas Specifications Table at rear of this section.
4. Check the flame size on the ‘Low’ position.
NOTE:
‘Low Fire Screw’ should be sealed with coloured
paint on completion of low fire adjustment.
5. Refit the following:-
Gas control knob.
Water control knob.
Control Panel.
On completion of gas conversion, replace gas type
labels located at:-
- Rear of unit, above gas connection.
- Beside rating plate.
Burner Operating
Pressure
Gas Control
Valve
Low Fire Adjust
Screw
Before leaving installation;
1. Check all gas connections for leakage using
soapy water or other gas detecting equipment.
2. Carry out a ‘Commissioning’ check of the
appliance as shown in Installation Section of this
manual.
3. Ensure any adjustments done to components
that have adjustments / settings paint sealed,
these are to be re-sealed.
NOTE:
If for some reason it is not possible to get appliance
to operate correctly, shut ‘Off’ gas supply and
contact supplier of this appliance.
DO NOT USE A NAKED FLAME TO CHECK FOR GAS LEAKAGES.
Page 18
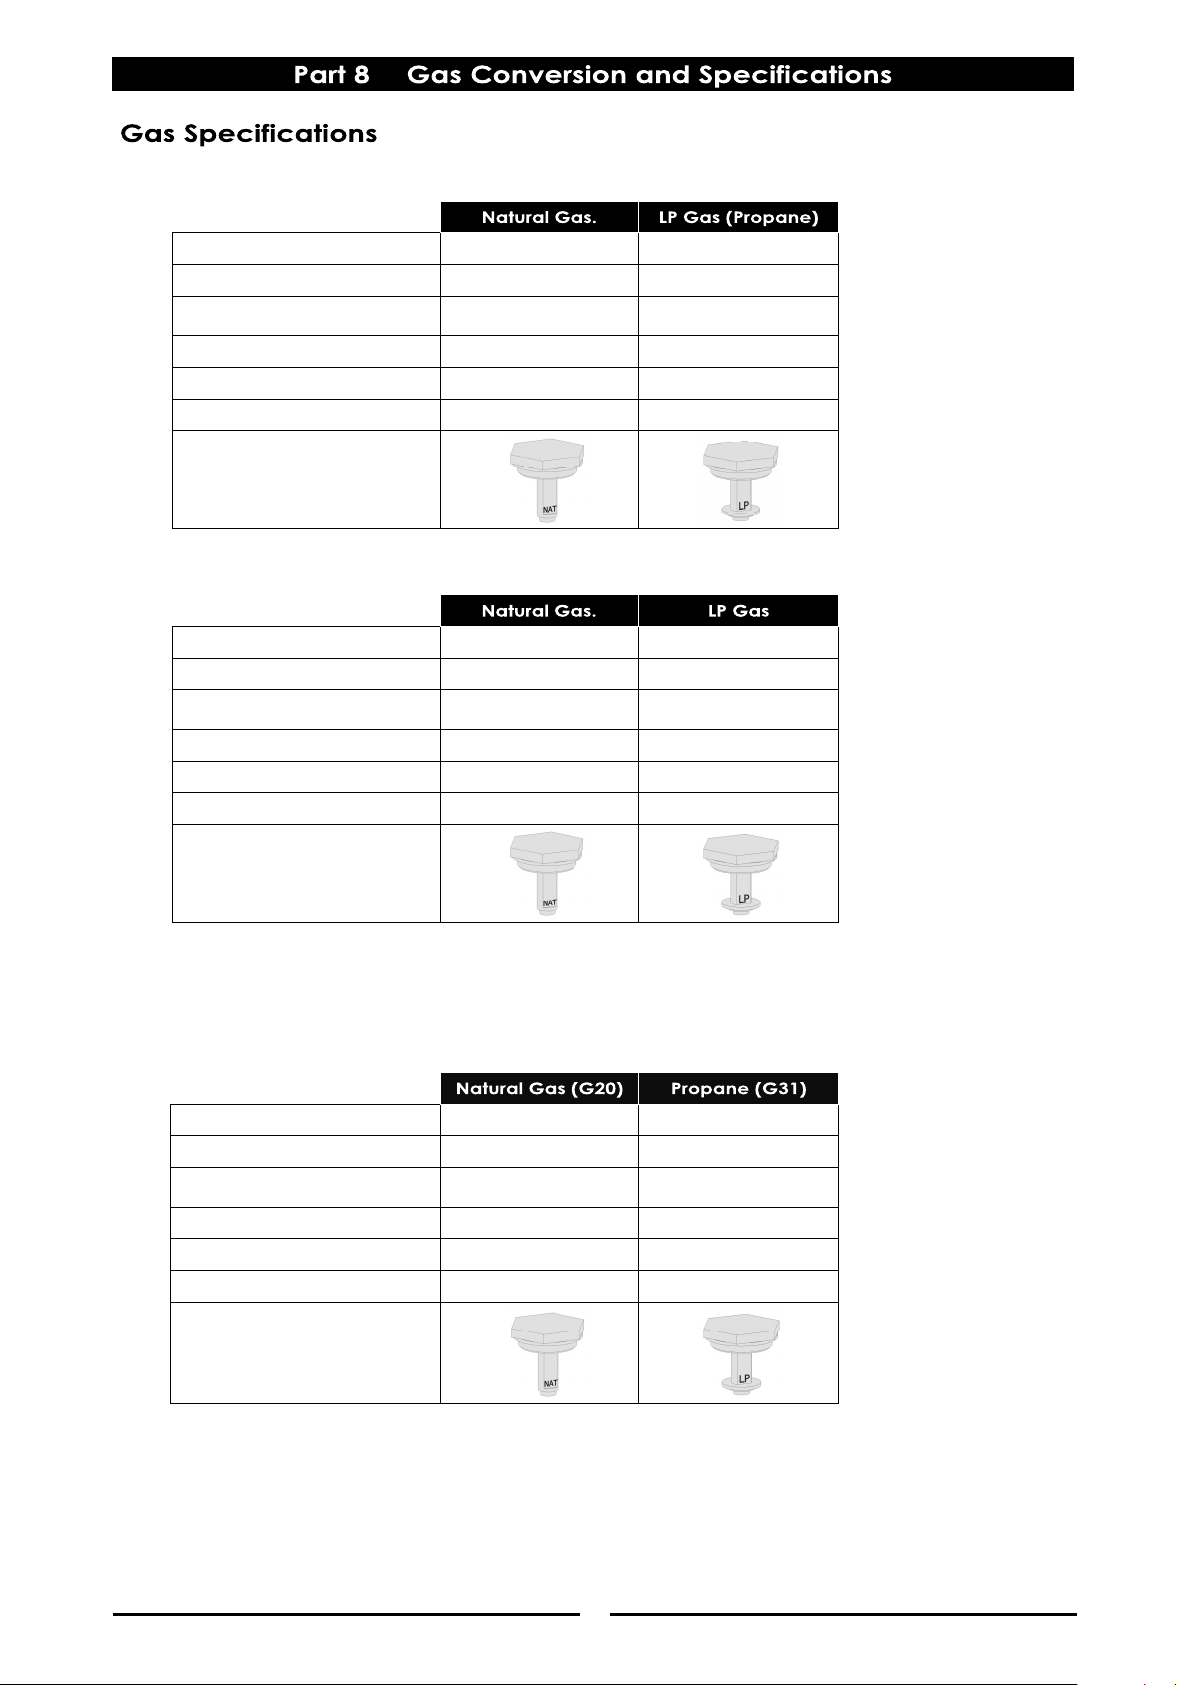
16
- Australia
- New Zealand:
- UK Only:
Category: II
2H3P.
Flue Type: A
1.
NOTE: (*) Measure burner operating pressure at upper test point (Burner Operating Pressure) on gas control
valve located behind control panel, this is to be carried out with burner operating at ‘High Flame’
setting. Operating pressure is ex-factory set, through the appliance regulator and is not to be
adjusted, apart from when carrying out gas conversion, if required. Refer to the details in this section
for further details.
Main Burner Injectors
Ø 3.10mm Ø 1.90mm
Pilot Burner Injectors
0.62 0.35
Low Fire Screw
Ø 1.55mm
2 Turns Out (c.c.w.)
Ø 1.55mm
Fully In (c.w.)
High Fire Screw
Fully Out (c.c.w.) Fully Out (c.c.w.)
Supply Pressure
1.13 - 3.40 kPa 2.75 - 4.50 kPa
Burner Operating Pressure (*)
0.92 kPa 2.6 kPa
Gas Regulator Cap Screw
Main Burner Injectors
Ø 3.10mm Ø 1.90mm
Pilot Burner Injectors
0.62 0.35
Low Fire Screw
Ø 1.55mm
2 Turns Out (c.c.w.)
Ø 1.55mm
Fully In (c.w.)
High Fire Screw
Fully Out (c.c.w.) Fully Out (c.c.w.)
Supply Pressure
20 mbar 37 mbar
Burner Operating Pressure
9.5 mbar 27.7 mbar
Gas Regulator Cap Screw
Main Burner Injectors
Ø 3.10mm Ø 1.80mm
Pilot Burner Injectors
0.62 0.35
Low Fire Screw
Ø 1.55mm
2 Turns Out (c.c.w.)
Ø 1.55mm
Fully In (c.w.)
High Fire Screw
Fully Out (c.c.w.) Fully Out (c.c.w.)
Supply Pressure
1.13 - 3.40 kPa 2.75 - 4.50 kPa
Burner Operating Pressure (*)
0.92 kPa 2.6 kPa
Gas Regulator Cap Screw
Page 19
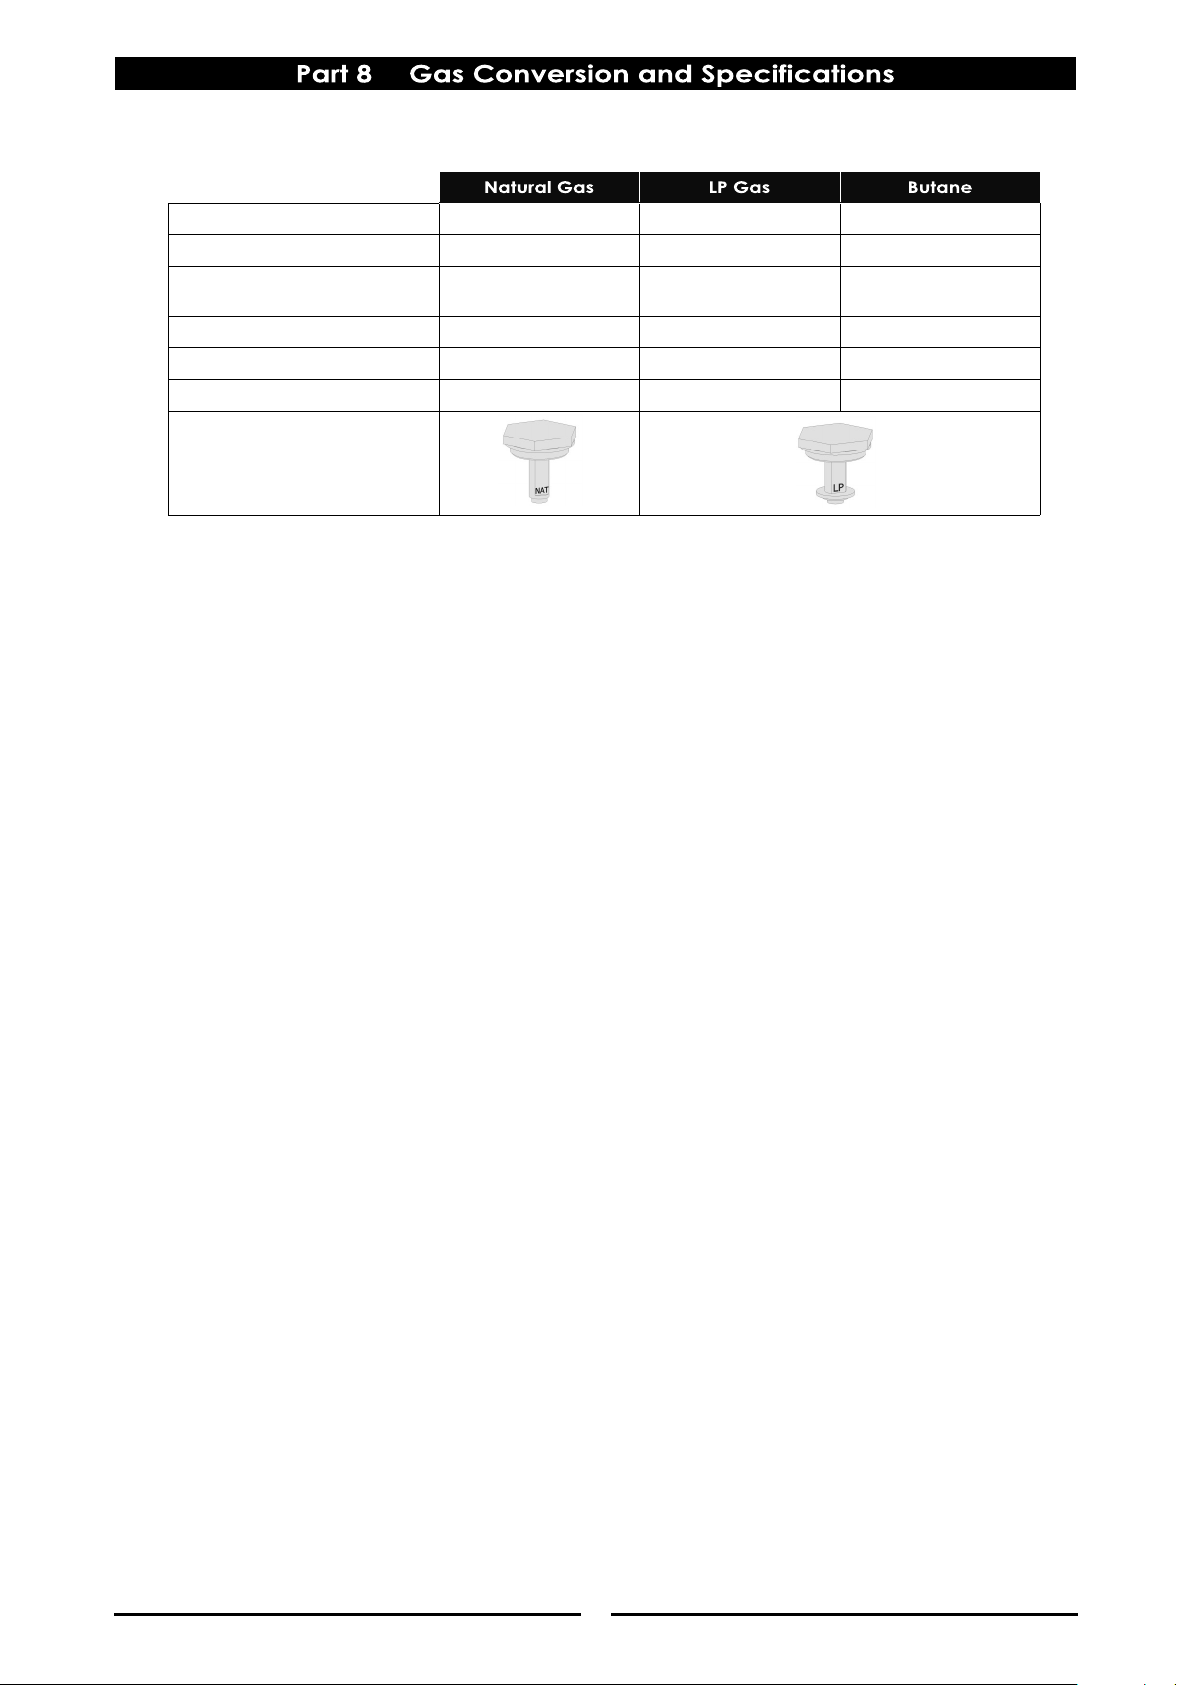
17
- All Other Markets:
(*) NOTE:
Measure burner operating pressure at upper test point (Burner Operating Pressure) on gas control
valve located behind control panel, this is to be carried out with burner operating at ‘High Flame’
setting. Operating pressure is ex-factory set, through the appliance regulator and is not to be
adjusted, apart from when carrying out gas conversion, if required. Refer to the information in this
section for further details.
Main Burner Injectors
Ø 3.10mm Ø 1.80mm Ø 1.70mm
Pilot Burner Injectors
0.62 0.35 0.35
Low Fire Screw
Ø 1.55mm
2 turns out (c.c.w.)
Ø 1.55mm
Fully In (c.w.)
Ø 1.55mm
Fully In (c.w.)
High Fire Screw
Fully Out (c.c.w.) Fully Out (c.c.w.) Fully Out (c.c.w.)
Supply Pressure
1.13 - 3.40 kPa 2.75 - 4.50 kPa 2.75 - 4.50 kPa
Burner Operating Pressure (*)
0.92 kPa 2.6 kPa 2.6 kPa
Gas Regulator Cap Screw
Page 20
18
018094 Thermocouple Interrupted.
229702 Overte mp 115°.
032190 Mai n Burner Injector (LPG/Propane ) - ø 1.90 mm.
032180 Mai n Burner Injector (LPG) - ø 1.80mm.
032310 Mai n Burner Injector (Nat Gas) - ø 3.10mm.
032170 Mai n Burner Injector (Butane) - ø 1.70mm.
018090K Pilot Burner.
018092 Pilot Injector (LPG / Butan e) 0.35.
018091 Pilot Injector (Nat Gas) - 0.62 .
229699 Gas Co ntrol Valve.
242363 Gas Co ntrol Knob (Cobra).
240553 Water Bal l Valve ¼ Turn, Lever Handle.
018095 Piezo H.T. Lea d.
227508 Piezo Ignitor.
022575 Burner Kit.
238674 Pasta Basket LH 1/6 165 x 125mm.
238819 Pasta Basket RH 1/6 165 x 125mm.
229682 Pasta Basket Suppor t Frame.
227856 Door M agnet Ca tch.
019390 Wa ter Dr ain Ball Valve.
229823 Overfl ow Hose.
242352 Adjustable Leg - (150mm) c/w Leg Plate.
229674 R ear R oller Asse mbly.
240507 Noodle Basket.
240510 Noodle Basket Support Tray.
228531 Gas Regulator ¾” BSP F/F Convertible (Nat. Gas, LPG, Butane).
CP4 Pasta Cooker
229836 Pasta Cooker Basket 1/4 165 x 165mm.
229837 Pasta Cooker Basket 1 /2 320 x 165 mm.
240516 Noodle Ki t (inclu des 5 Noodle Baskets + Noodle Basket Support Fr ame).
CN4 Noodle Cooker
238674 Pasta Basket LH 1/6 165 x 125mm.
238819 Pasta Basket RH 1/6 165 x 125mm.
229836 Pasta Cooker Basket 1/4 165 x 165mm.
229837 Pasta Cooker Basket 1 /2 320 x 165 mm.
229682 Pasta Basket Support Frame.
Replacement Parts List
When ordering spare parts, please quote part number and description as listed below. If part required is not
listed below, request part by description and quote model number and serial number which is shown on
rating plate.
IMPORTANT:
Only genuine qualified replacement parts should be used for the servicing and repair of this appliance.
he instructions supplied with the parts should be followed when replacing components.
For further information and servicing instructions, contact your nearest qualified service branch (contact details are
as shown on the reverse of the front cover of this manual).
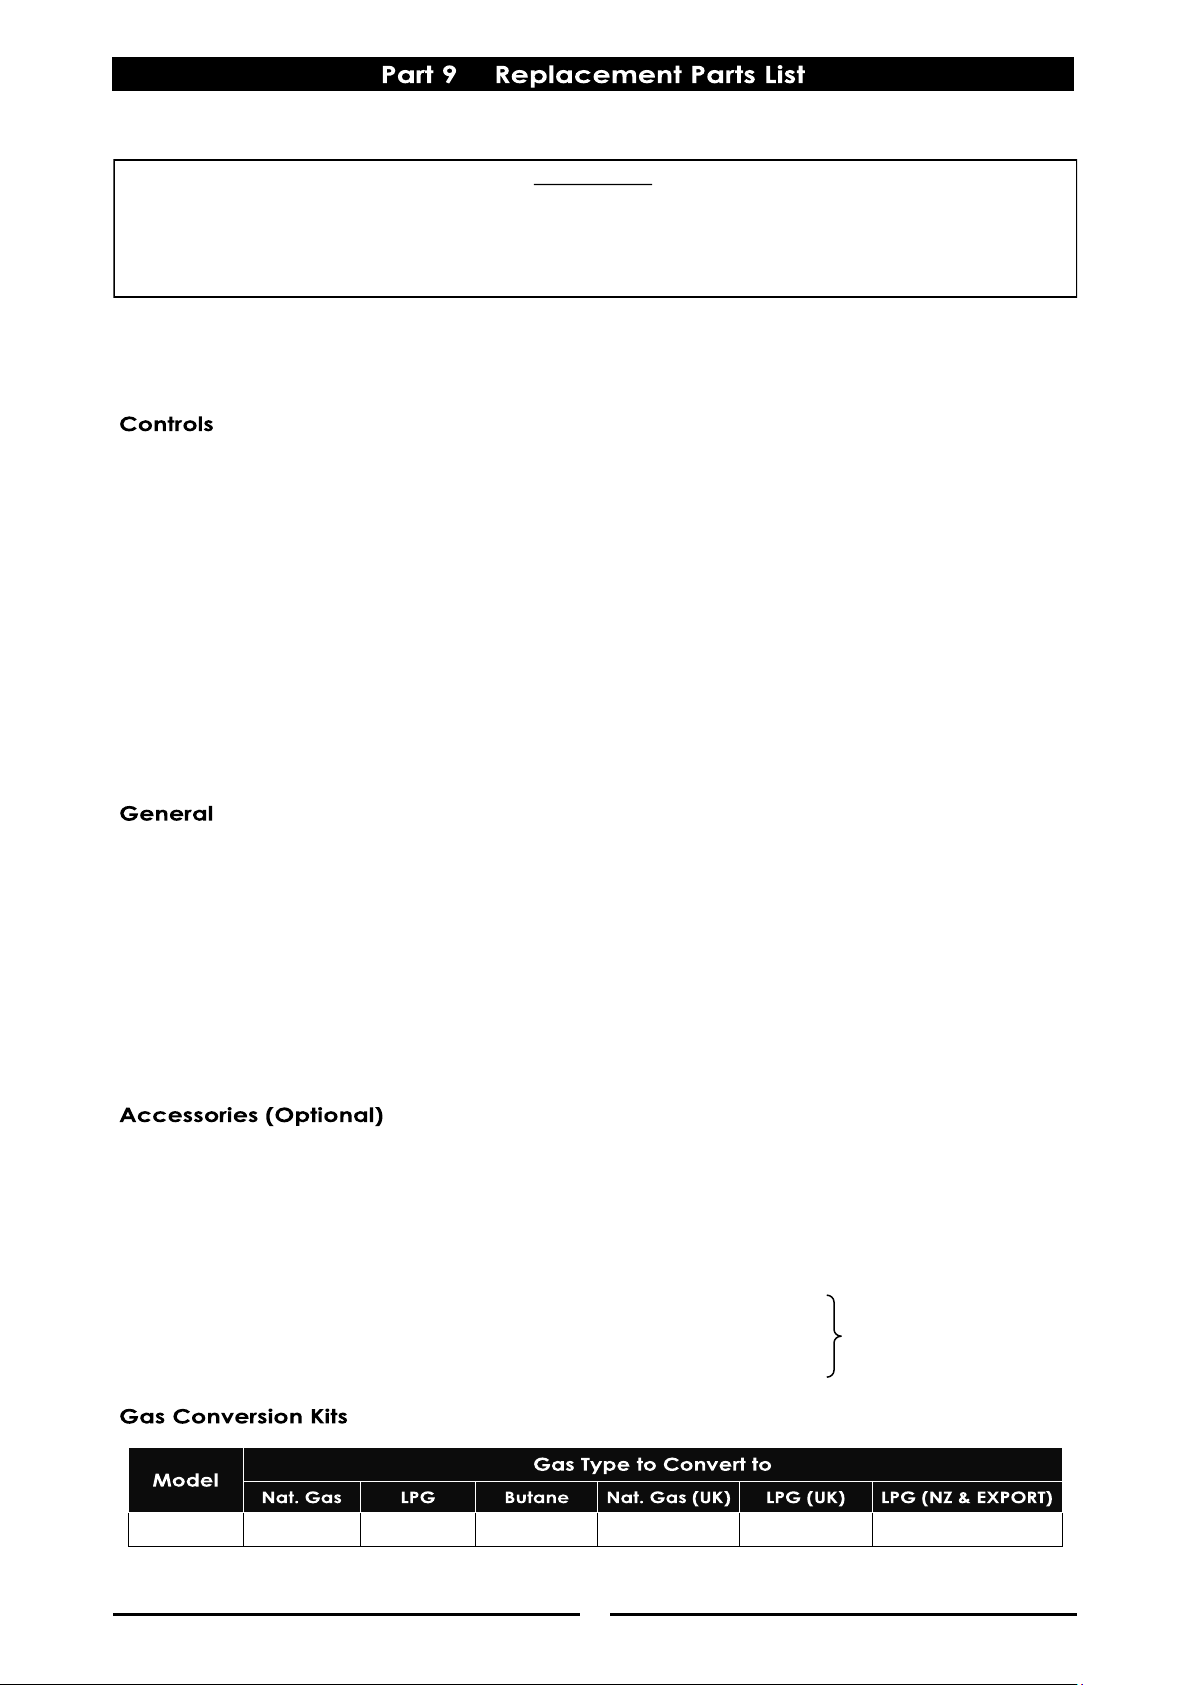
CN4 / CP4
232061 232060 232062 232061 232060 244511
Also requires Pasta Basket
Support Frame Part No.
229682
Page 21

 Loading...