

Page 1

GOLD
OWNER’S MANUAL
Outdoor Fireplace
Model No. WAF508H
WARNING
FOR YOUR SAFETY:
For Outdoor Use Only
(outside any enclosure)
WARNING
FOR YOUR SAFETY:
1. Improper installation, adjustment, alteration,
service or maintenance can cause injury or
property damage.
2. Read the installation, operation, and
maintenance instructions thoroughly before
installing or servicing this equipment.
3. Failure to follow these instructions could
result in fire or explosion, which could
cause property damage, personal injury, or
death.
Table of Contents
Important Safeguards . . . . . . . . . . . . . . . . . . . . . . . . . . . . . . . . . . . . . . . . . . . . . . . . . . . .1
Exploded View & Hardware . . . . . . . . . . . . . . . . . . . . . . . . . . . . . . . . . . . . . . . . . . . . . . . . 2
Assembly Instructions . . . . . . . . . . . . . . . . . . . . . . . . . . . . . . . . . . . . . . . . . . . . . . . . . . . .3
Operating Instructions . . . . . . . . . . . . . . . . . . . . . . . . . . . . . . . . . . . . . . . . . . . . . . . . . . 8
Lighting . . . . . . . . . . . . . . . . . . . . . . . . . . . . . . . . . . . . . . . . . . . . . . . . . . . . . . . . . . . .8
Tending the Fire . . . . . . . . . . . . . . . . . . . . . . . . . . . . . . . . . . . . . . . . . . . . . . . . . . . . . .8
Extinguishing . . . . . . . . . . . . . . . . . . . . . . . . . . . . . . . . . . . . . . . . . . . . . . . . . . . . . . . . 8
Cleaning and Care . . . . . . . . . . . . . . . . . . . . . . . . . . . . . . . . . . . . . . . . . . . . . . . . . . . . . .8
Inspecting . . . . . . . . . . . . . . . . . . . . . . . . . . . . . . . . . . . . . . . . . . . . . . . . . . . . . . . . . .8
Cleaning . . . . . . . . . . . . . . . . . . . . . . . . . . . . . . . . . . . . . . . . . . . . . . . . . . . . . . . . . . . .8
Storing . . . . . . . . . . . . . . . . . . . . . . . . . . . . . . . . . . . . . . . . . . . . . . . . . . . . . . . . . . . . .8
Repairing cracked or dislodged stone . . . . . . . . . . . . . . . . . . . . . . . . . . . . . . . . . . . . . . 8
Color Touch Up . . . . . . . . . . . . . . . . . . . . . . . . . . . . . . . . . . . . . . . . . . . . . . . . . . . . . . .8
Product Registration . . . . . . . . . . . . . . . . . . . . . . . . . . . . . . . . . . . . . . . . . . . . . . . . . . . . .9
Limited Warranty . . . . . . . . . . . . . . . . . . . . . . . . . . . . . . . . . . . . . . . . . . . . . . . . . . . . . . 9
Save these instructions for future reference.
If you are assembling this unit for someone else,
give this manual to him or her to read and save
for future reference.
Manufactured in China for:
Blue Rhino Global Sourcing, LLC
104 Cambridge Plaza Drive, Winston-Salem, NC 27104 USA
1.800.762.1142, www.bluerhino.com
© 2005 Blue Rhino Global Sourcing, LLC. All Rights Reserved
UniFlame® is a Registered Trademark of Blue Rhino Global Sourcing, LLC. All Rights Reserved WAF508H-OM-103 ES
Page 2
GOLD
Outdoor Fireplace Model No. WAF508H
WARNING
FOR YOUR SAFETY
1. This appliance is for outdoor use only, and shall NOT be used in a
building, garage, or any other enclosed area.
2. Do NOT use this outdoor fireplace for indoor heating. TOXIC carbon
monoxide fumes can accumulate and cause asphyxiation.
3. This outdoor fireplace is NOT for commercial use.
4. This outdoor fireplace is NOT to be operated by children.
5. This outdoor fireplace is NOT to be used in or on boats or recreational
vehicles.
6. Always use in accordance with all applicable local, state and national
codes. Contact your local fire department for details on outdoor
burning.
7. When using this outdoor fireplace, exercise the same precautions you
would with any open fire.
8. Always use this outdoor fireplace on a hard, level non-combustible
surface such a concrete, rock or stone. An asphalt or blacktop surface
may not be acceptable for this purpose. Do NOT use on wooden decks.
9. The use of alcohol, prescription or non-prescription drugs may impair
the consumer’s ability to properly assemble or safely operate this
outdoor fireplace.
22. Do NOT use in windy conditions.
23. Do NOT use this outdoor fireplace unless spark guards are securely
in place.
24. Do NOT use gasoline, kerosene, diesel fuel, lighter fluid or alcohol to
light or relight fires.
25. Keep all electrical cords away from a hot fireplace.
26. All surfaces of this outdoor fireplace are hot when in operation. To
avoid burns, do NOT touch fireplace until it has completely cooled
unless you are wearing protective gear (Potholders, gloves, BBQ
mittens, hot pads & etc.). Never touch ashes or coals to see if they
are hot.
27. Do NOT leave a lit outdoor fireplace unattended, especially around
children and pets.
28. Do NOT attempt to move or store this outdoor fireplace until all ashes
and coals are completely extinguished.
29. Do NOT remove ashes or coals until they are completely and fully
extinguished.
30. Use heat-resistant gloves or hot pads when contacting handles and
air vents.
10. Do NOT use this outdoor fireplace without reading the entire “Owner’s
Manual”.
11. This outdoor fireplace is for use with dry, seasoned hardwood. It will
burn hotter, more completely and create less smoke.
12. Do NOT burn charcoal briquets, lump charcoal, manufactured logs,
driftwood, trash, leaves, paper, cardboard, plywood, painted or stained
or pressure treated wood. Avoid using softwoods such as pine or
cedar that can throw sparks.
13. Do NOT alter this outdoor fireplace in any manner.
14. Do NOT use this outdoor fireplace until it is COMPLETELY assembled
and all parts are securely fastened and tightened.
15. Do NOT store or use gasoline or other flammable vapors or liquids in
the vicinity of this or any other appliance.
16. Do NOT store or use an LP gas cylinder within 10 feet (3.05 m) of this
outdoor fireplace while it is in operation.
17. Do NOT use this outdoor fireplace near automobiles, trucks, vans or
recreational vehicles.
18. Do NOT use in an explosive atmosphere. Keep outdoor fireplace
area clear and free from combustible materials, gasoline and other
flammable liquids.
19. Do NOT use this outdoor fireplace under any overhead or near any
unprotected combustible constructions. Avoid using near or under
overhanging trees and shrubs.
20. Always empty this outdoor fireplace before each use. Leave a thin
layer of ash to protect the bottom.
31. Use long, sturdy fireplace tools when adding or moving logs.
32. Do NOT place wood directly into bottom of the outdoor fireplace.
Place wood only on the wood pan/grid. Do NOT load firewood into the
chimney.
33. Do NOT overload the fireplace. Do not add additional firewood until
the fire burns down. NOTICE: If any portion of the base, hood or spark
guards of this outdoor fireplace are glowing red it is overloaded.
34. Make sure all doors can completely close before starting a fire.
35. Do NOT lean over this outdoor fireplace when lighting or when in use.
36. Do NOT place hot fireplace tools onto combustible surfaces such as
grass, wooden deck or furniture.
37. Avoid breathing smoke from the fire and avoid getting it into
your eyes.
38. This outdoor fireplace should be thoroughly inspected and cleaned on
a regular basis.
39. After a period of storage and/or non-use, check for signs of damage
and creosote build-up. Do NOT operate until necessary repairs and/or
cleanup are executed.
40. Do NOT use pressure washer to clean.
41. Use only Blue Rhino Global Sourcing, LLC factory authorized parts. The
use of any part that is NOT factory authorized can be dangerous and
will void your warranty.
42. Deaths, serious injury or damage to property may occur if the above
is not followed exactly.
21. Do NOT wear flammable or loose clothing when operating this outdoor
fireplace.
WARNING
FOR YOUR SAFETY
1. Clean up any dried repair adhesive on the fireplace and work space
after making repairs. Do not allow the liquid adhesive additive to dry
without clean-up.
2. Keep the two part adhesives (liquid and powder) away from children
and pets.
3. Clean up adhesive with water and discard adhesive and water properly.
4. Do NOT repair any stone on this outdoor fireplace until the fire is
COMPLETELY out, stone is cold and outdoor fireplace is cool to the
touch.
5. Keep children and pets away from repair area until dry.
6. Read ALL repair insturctions before repairing.
7. Do NOT use glue in temperatures below 32ºF (0ºC)
8. Do NOT use glue in high humidity.
9. All repairs have to be made in a well ventilated area.
10. Goggles MUST be worn before opening glue or powder bottles, to
prevent glue or powder from getting in eyes.
11. Do NOT inhale powder.
12. Do NOT ingest glue.
13. Do not reuse dried paste with water.
Page 3
Contact 1.800.762.1142 for assistance. Do not return to place of purchase.
page no.
2
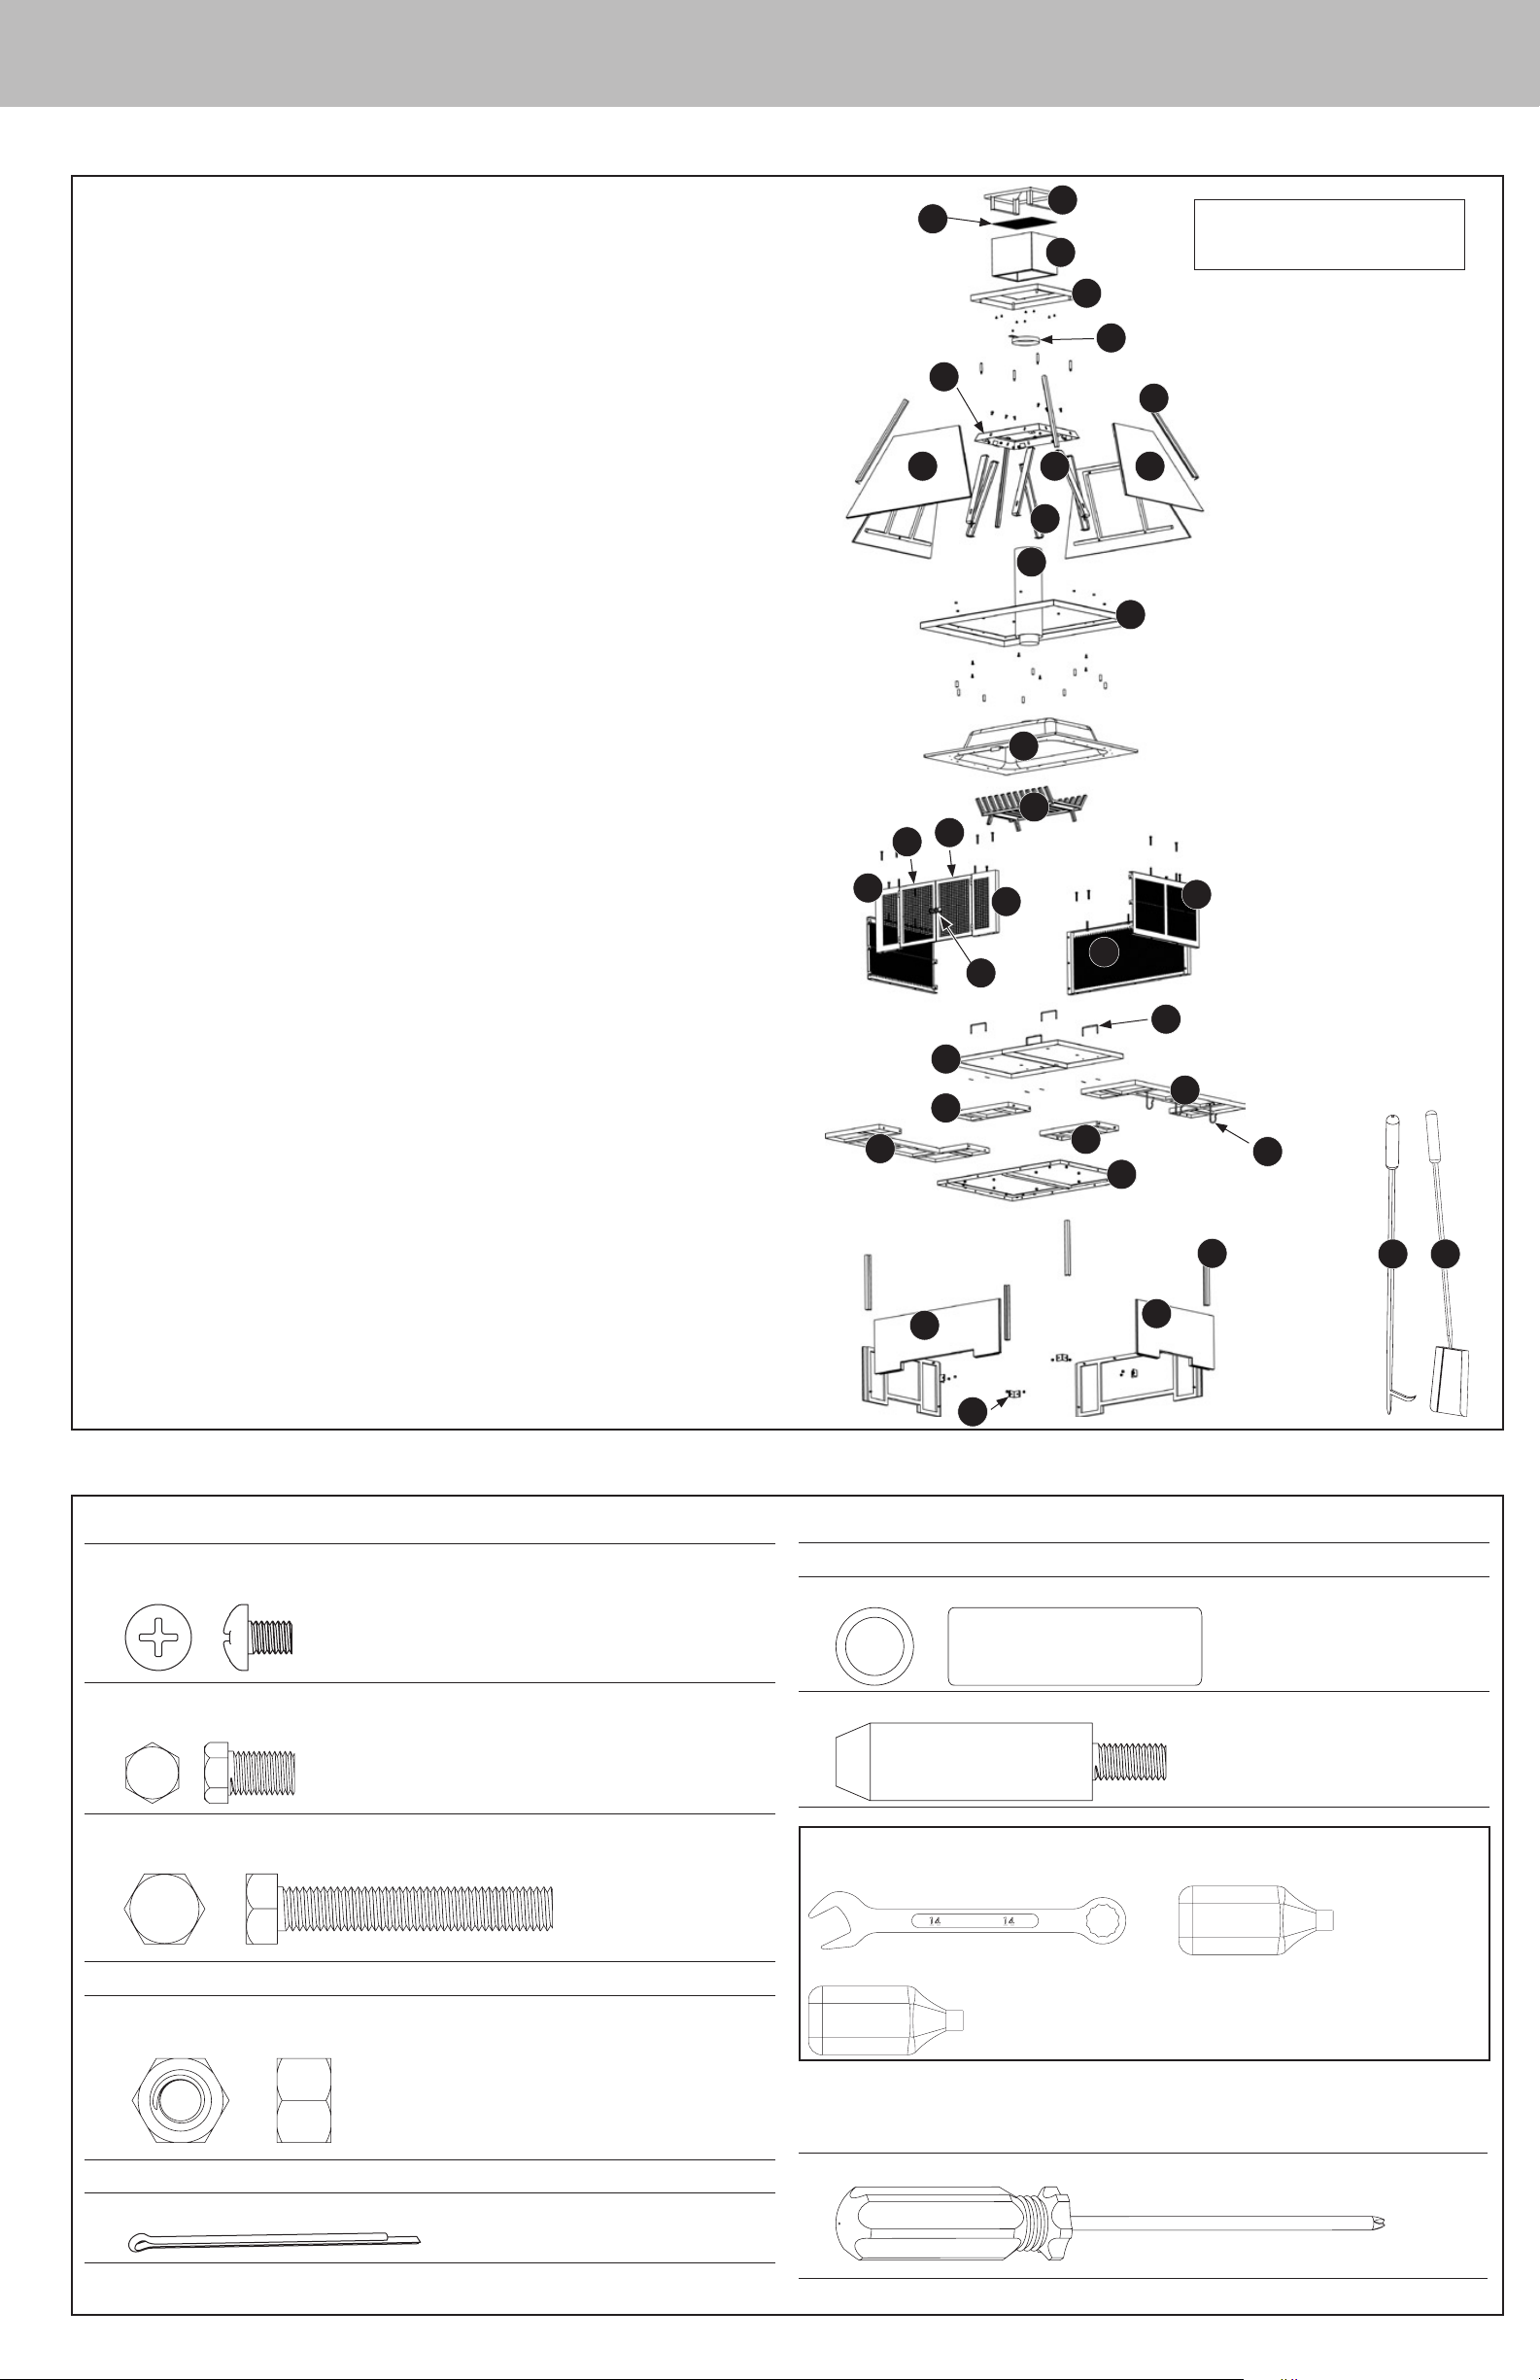
Exploded View
1. Top. . . . . . . . . . . . . . . . . . . . . . . . . . 55-05-045
2. Chimney Screen . . . . . . . . . . . . . . . . 55-05-013
3. Chimney. . . . . . . . . . . . . . . . . . . . . . 55-05-010
4. Chimney Base . . . . . . . . . . . . . . . . . 55-05-011
5. Inner Chimney . . . . . . . . . . . . . . . . . 55-05-028
6. Chimney Ring. . . . . . . . . . . . . . . . . . 55-05-012
7. Hood Inserts (4) . . . . . . . . . . . . . . . . 55-05-022
8. Hood Panel A (2). . . . . . . . . . . . . . . . 55-05-023
9. Hood Panel B (2). . . . . . . . . . . . . . . . 55-05-024
10. Hood Top . . . . . . . . . . . . . . . . . . . . . 55-05-027
11. Hood Supports A (2) . . . . . . . . . . . . . 55-05-025
12. Hood Supports B (4) . . . . . . . . . . . . . 55-05-026
13. Hood Base . . . . . . . . . . . . . . . . . . . . 55-05-021
14. Roof . . . . . . . . . . . . . . . . . . . . . . . . . 55-05-037
15. Wood Grate . . . . . . . . . . . . . . . . . . . 55-05-046
16. Chamber Base Plate (2) . . . . . . . . . . 55-05-008
17. Chamber Handle (4) . . . . . . . . . . . . . 55-05-009
18. Back Spark Guard . . . . . . . . . . . . . . 55-05-002
19. Side Spark Guard (2) . . . . . . . . . . . . 55-05-042
20. Front Spark Guard Left . . . . . . . . . . . 55-05-016
21. Front Spark Guard Right . . . . . . . . . . 55-05-017
22. Spark Guard Door Right . . . . . . . . . . 55-05-036
23. Spark Guard Door Left . . . . . . . . . . . 55-05-030
24. Door Handle* . . . . . . . . . . . . . . . . . . 55-05-015
25. Base Inserts (4) . . . . . . . . . . . . . . . . 55-05-004
26. Side Hearth Right . . . . . . . . . . . . . . . 55-05-041
27. Side Hearth Left . . . . . . . . . . . . . . . . 55-05-040
28. Tool Hook (3)*. . . . . . . . . . . . . . . . . . 55-05-044
29. Middle Hearth Back . . . . . . . . . . . . . 55-05-031
30. Middle Hearth Front . . . . . . . . . . . . . 55-05-032
31. Base Panel A (2) . . . . . . . . . . . . . . . . 55-05-005
32. Base Panel B (2). . . . . . . . . . . . . . . . 55-05-006
33. Base Frame . . . . . . . . . . . . . . . . . . . 55-05-003
34. “L” Bracket (4) . . . . . . . . . . . . . . . . . 55-05-001
35. Shovel . . . . . . . . . . . . . . . . . . . . . . . 55-05-039
36. Poker . . . . . . . . . . . . . . . . . . . . . . . . 55-05-035
*Pre-assembled.
20
2
10
9 11
22
23
16
30
27
32
34
24
21
14
5
15
12
1
Note: Product shown from the
3
bottom view to help with assembly.
4
6
7
8
13
19
18
17
26
29
28
33
25
36 35
31
Hardware / Actual Size
A. Screw 8 pcs
M6x8 Black Nickel Plated Truss Head Screw
B. Small Bolt 13 pcs
M8x12 Black Nickel Plated Hex Head Bolt
C. Large Bolt 13 pcs
M8x50 Black Nickel Plated Hex Head Bolt
D. Nut 39 pcs
M8 Black Nickel Hex Nut
F. Bolt Sleeve** 9 pcs
G. Pillar** 4 pcs
Tools provided
Wrench** 1 pc
Color Repair Bottle** 1 pc
Glue Bottle** 1 pc
E. Cotter Pin** 8 pcs
Additional Hardware Needed:
A. Screwdriver** 1 pc
** Not shown at actual size.
Page 4
GOLD
Outdoor Fireplace Model No. WAF508H
Assembly Instructions
DO NOT RETURN PRODUCT TO STORE.
For assistance call 1-800-762-1142 toll free. Please have your owner’s manual and serial
number available for reference.
For Easiest Assembly:
• To void losing any small components or hardware, assemble your product on a hard level
surface that does not have cracks or openings.
• Clear an area large enough to layout all components and hardware.
• When applicable, tighten all hardware connections by hand first. Once the Step is
completed go back fully tighten all hardware.
• Follow all Steps in order to properly assemble your product.
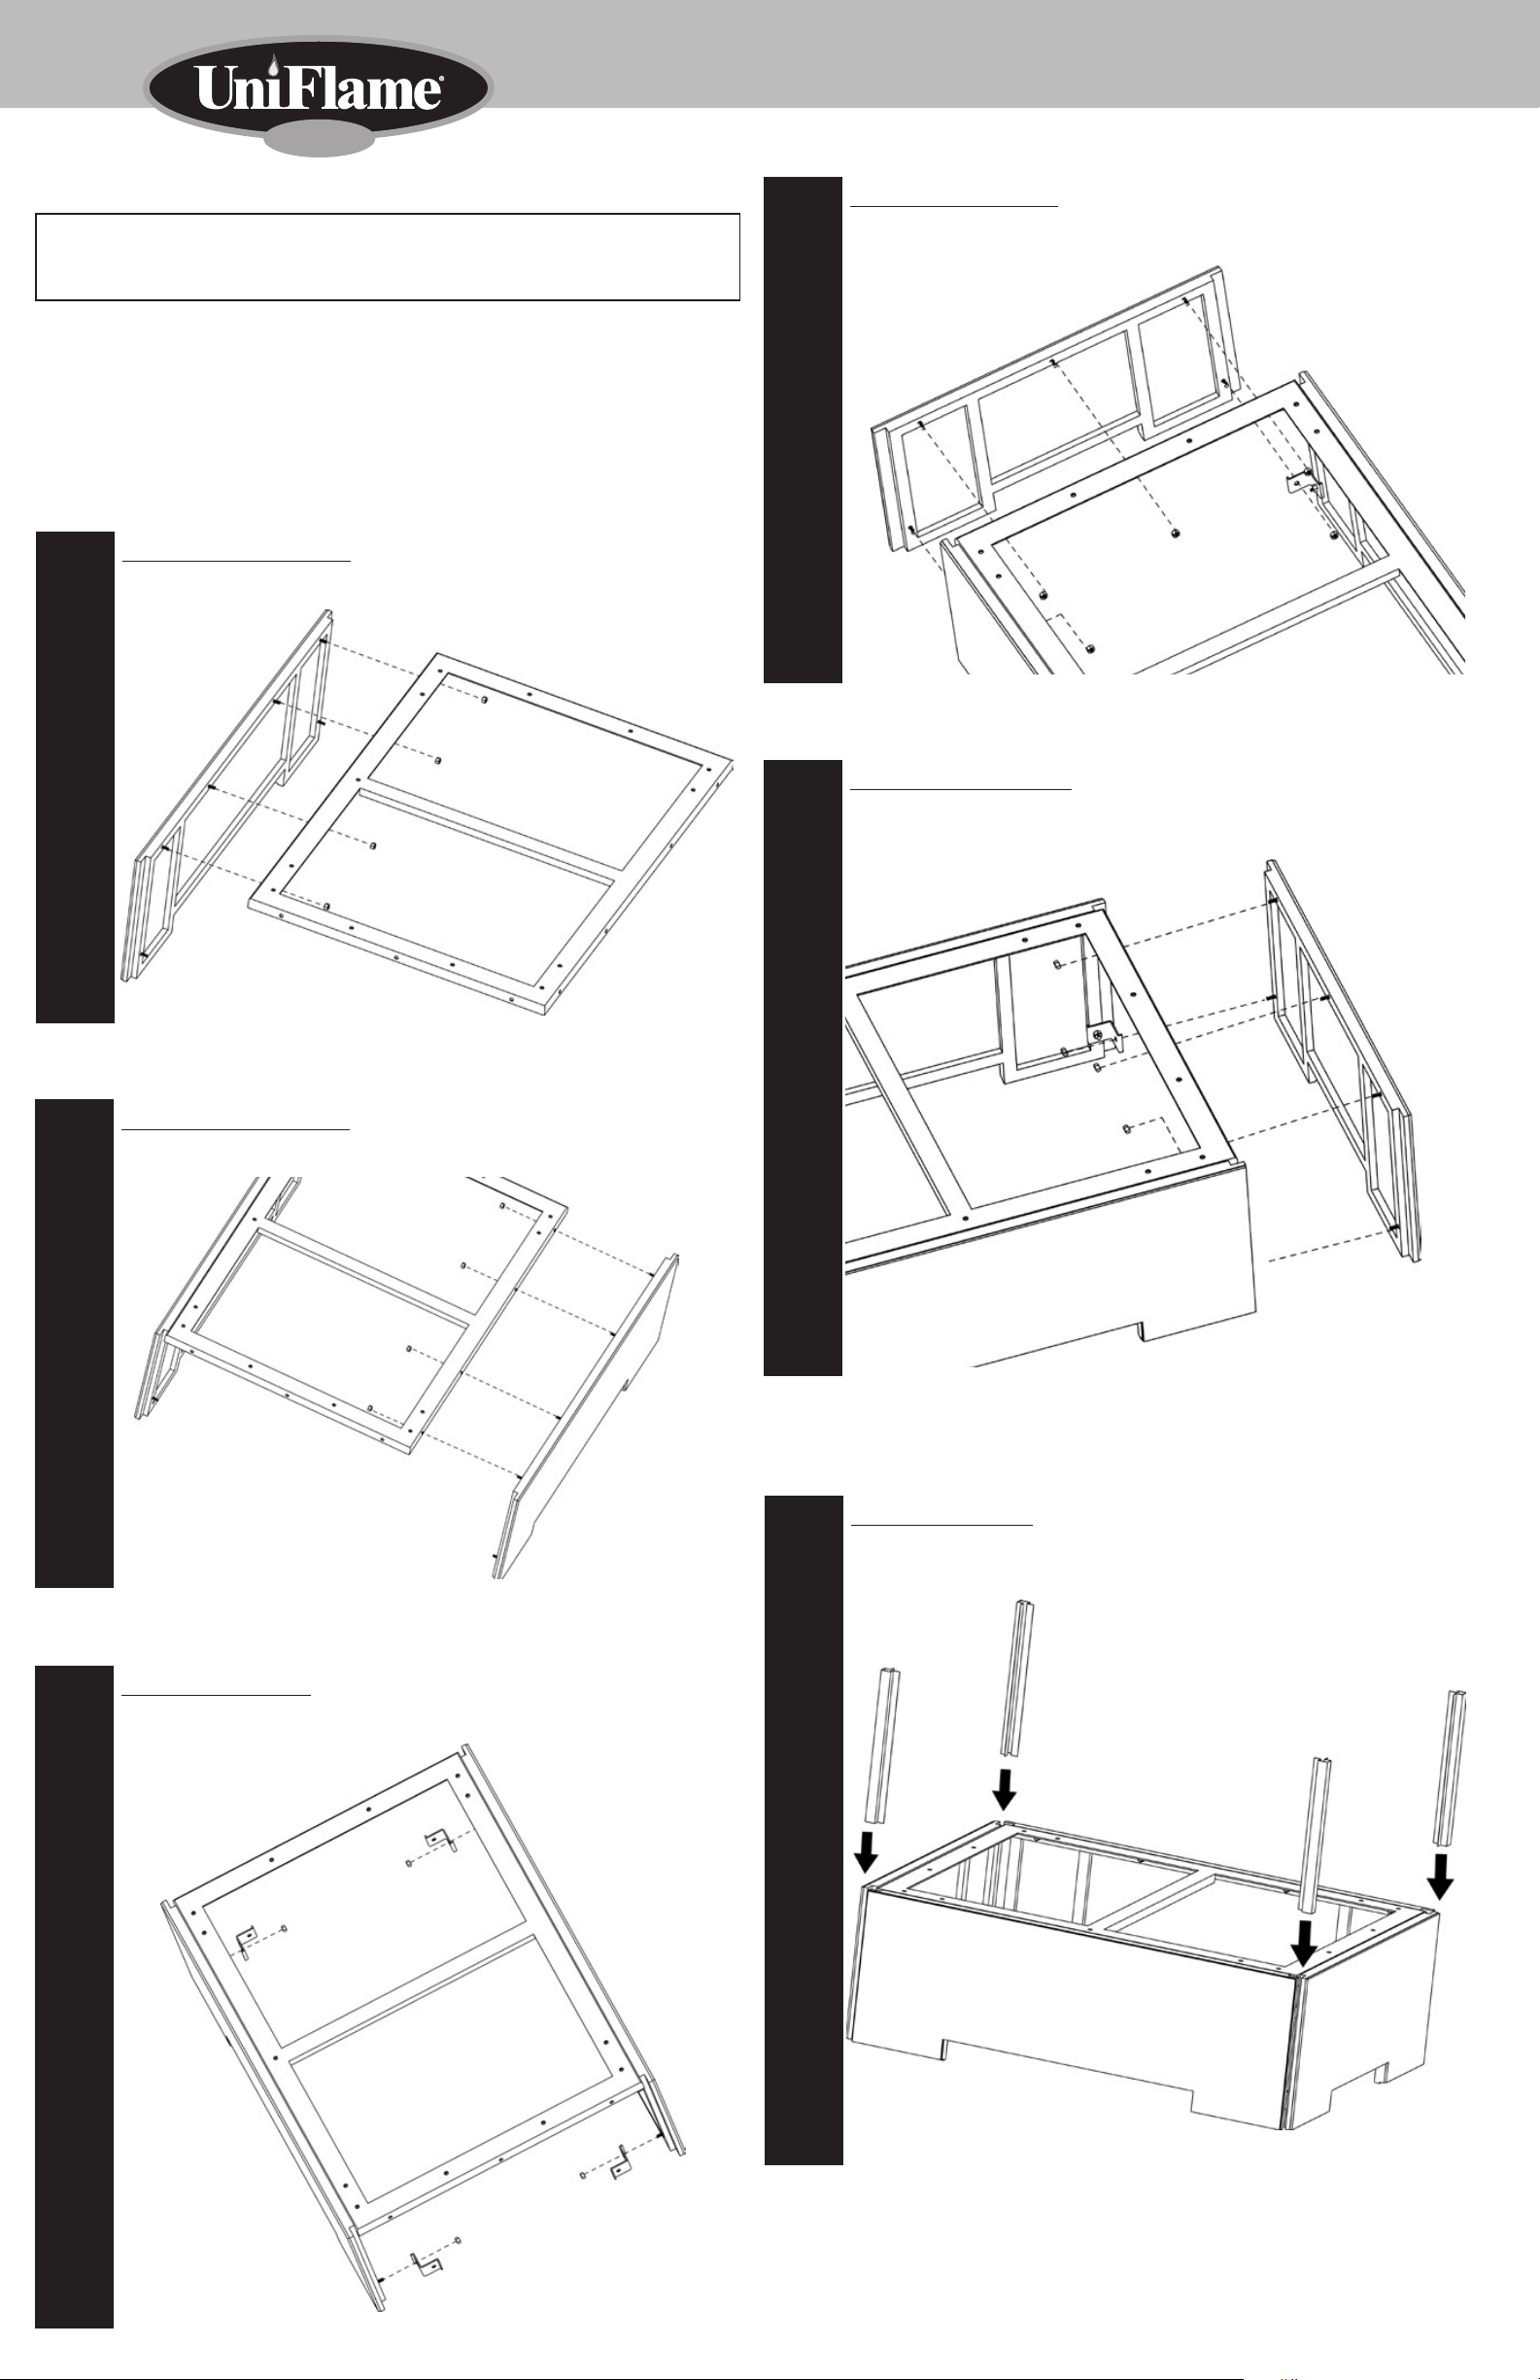
Step
Attach front base panel
Attach base panel B to base frame using 4 sets of nuts (D).
1
Step
4
Attach left side panel
Attach base panel A to base frame and “L” brackets using 5 sets of nuts (D).
Step
2
Attach back base panel
Attach base panel B to base frame using 4 sets of nuts (D).
Step
5
Attach right side panel
Attach base panel A to base frame and “L” brackets using 5 sets of nuts (D).
Step
3
Attach “L” brackets
A. Attach “L” brackets to base panels B using 4 sets of nuts (D).
Step
6
Insert base inserts
Slide base inserts between base panels.
Page 5
Contact 1.800.762.1142 for assistance. Do not return to place of purchase.
page no.
4
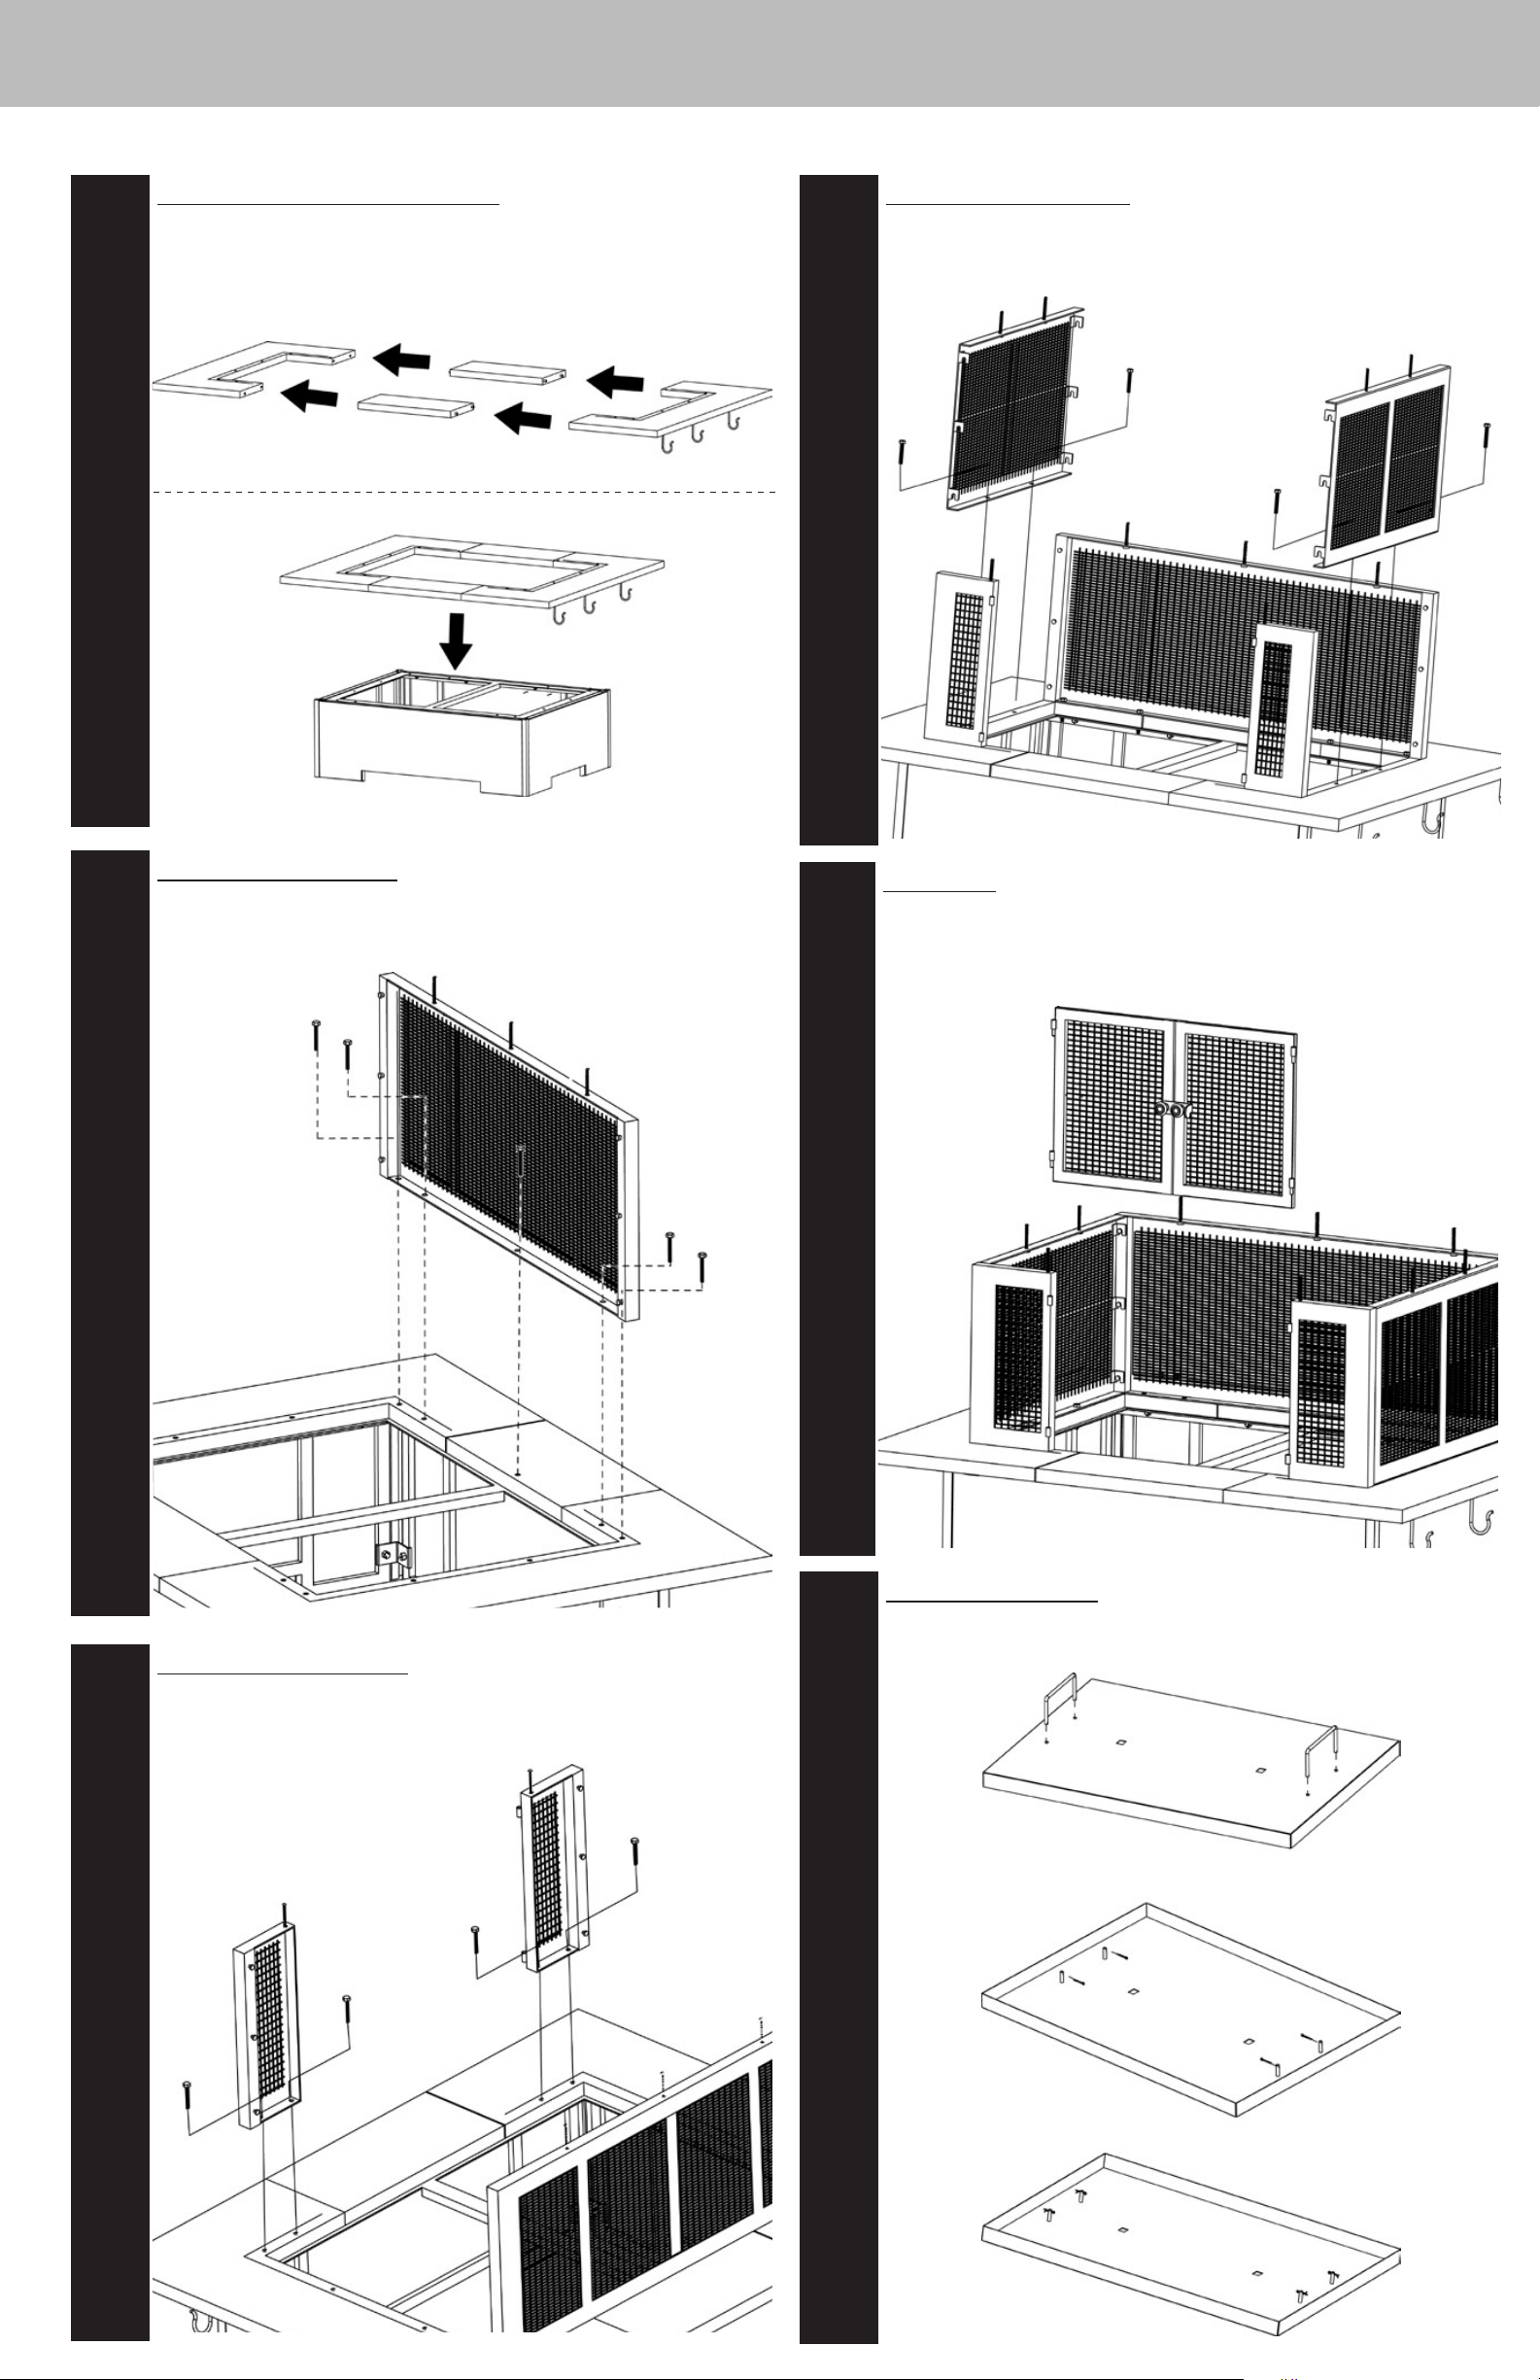
Step
7
Assemble hearth and attach hearth
A. Attach front and back hearths to left and right hearths.
B. Place hearth on base.
Note: Hearth will be secured to base when attaching spark guards.
Step
Attach side spark guards
Attach side spark guards to hearth and base using 4 large bolts (C).
Note: Do not fully tighten bolts.
10
Step
8
Attach back spark guard
Attach back spark guard to hearth and base using 5 large bolts (C).
Note: Do not fully tighten bolts.
Step
11
Attach door
A. Attach spark guard door left and right to front spark guards, by sliding door onto
front spark guard pegs.
B. Fully tighten all spark guard bolts.
Step
9
Attach front spark guards
Attach front spark guard left and right to hearth and base using 4 large bolts (C).
Note: Do not fully tighten bolts.
Step
Assemble base plates
Insert chamber handles into each chamber base plate, secure with 4 sets of cotter
pins (E).
12
Page 6
GOLD
Outdoor Fireplace Model No. WAF508H
Step
Insert base plates
Insert chamber base plates in base.
13
Step
Place bolt sleeves
Place 9 sets of bolt sleeves (F) onto spark guard bolts.
16
Step
Insert wood grate
Insert wood grate onto chamber base plates
14
Step
Assemble hood base
Attach hood supports A and B to hood base using 6 sets of small bolts (B).
Note: Do not over tighten bolts.
17
Step
15
Attach roof
Attach roof onto spark guards.
Note: May require doors open to attach.
Note: roof will be secured later.
Step
Attach hood top
Attach hood top to hood supports using 6 sets of small bolts (B).
18
Page 7

Contact 1.800.762.1142 for assistance. Do not return to place of purchase.
page no.
6
Step
Attach pillars
Attach 4 pillars (G).
19
Step
Attach front hood panel
Attach hood panel B to hood, by inserting bottom pegs into keyhole opening, secure
top using 2 sets of nuts (D).
22
Step
Attach hood assembly
Attach hood assembly to roof using 9 sets of nuts (D).
20
Step
Attach right hood panel
Attach hood panel A to hood, by inserting bottom peg into keyhole opening, secure
top using 2 sets of nuts (D).
23
Step
Attach back hood panel
Attach hood panel B to hood, by inserting bottom pegs into keyhole opening, secure
top using 2 sets of nuts (D).
21
Step
Attach left hood panel
Attach hood panel A to hood, by inserting bottom peg into keyhole opening, secure
top using 2 sets of nuts (D).
24
Page 8

GOLD
Outdoor Fireplace Model No. WAF508H
Step
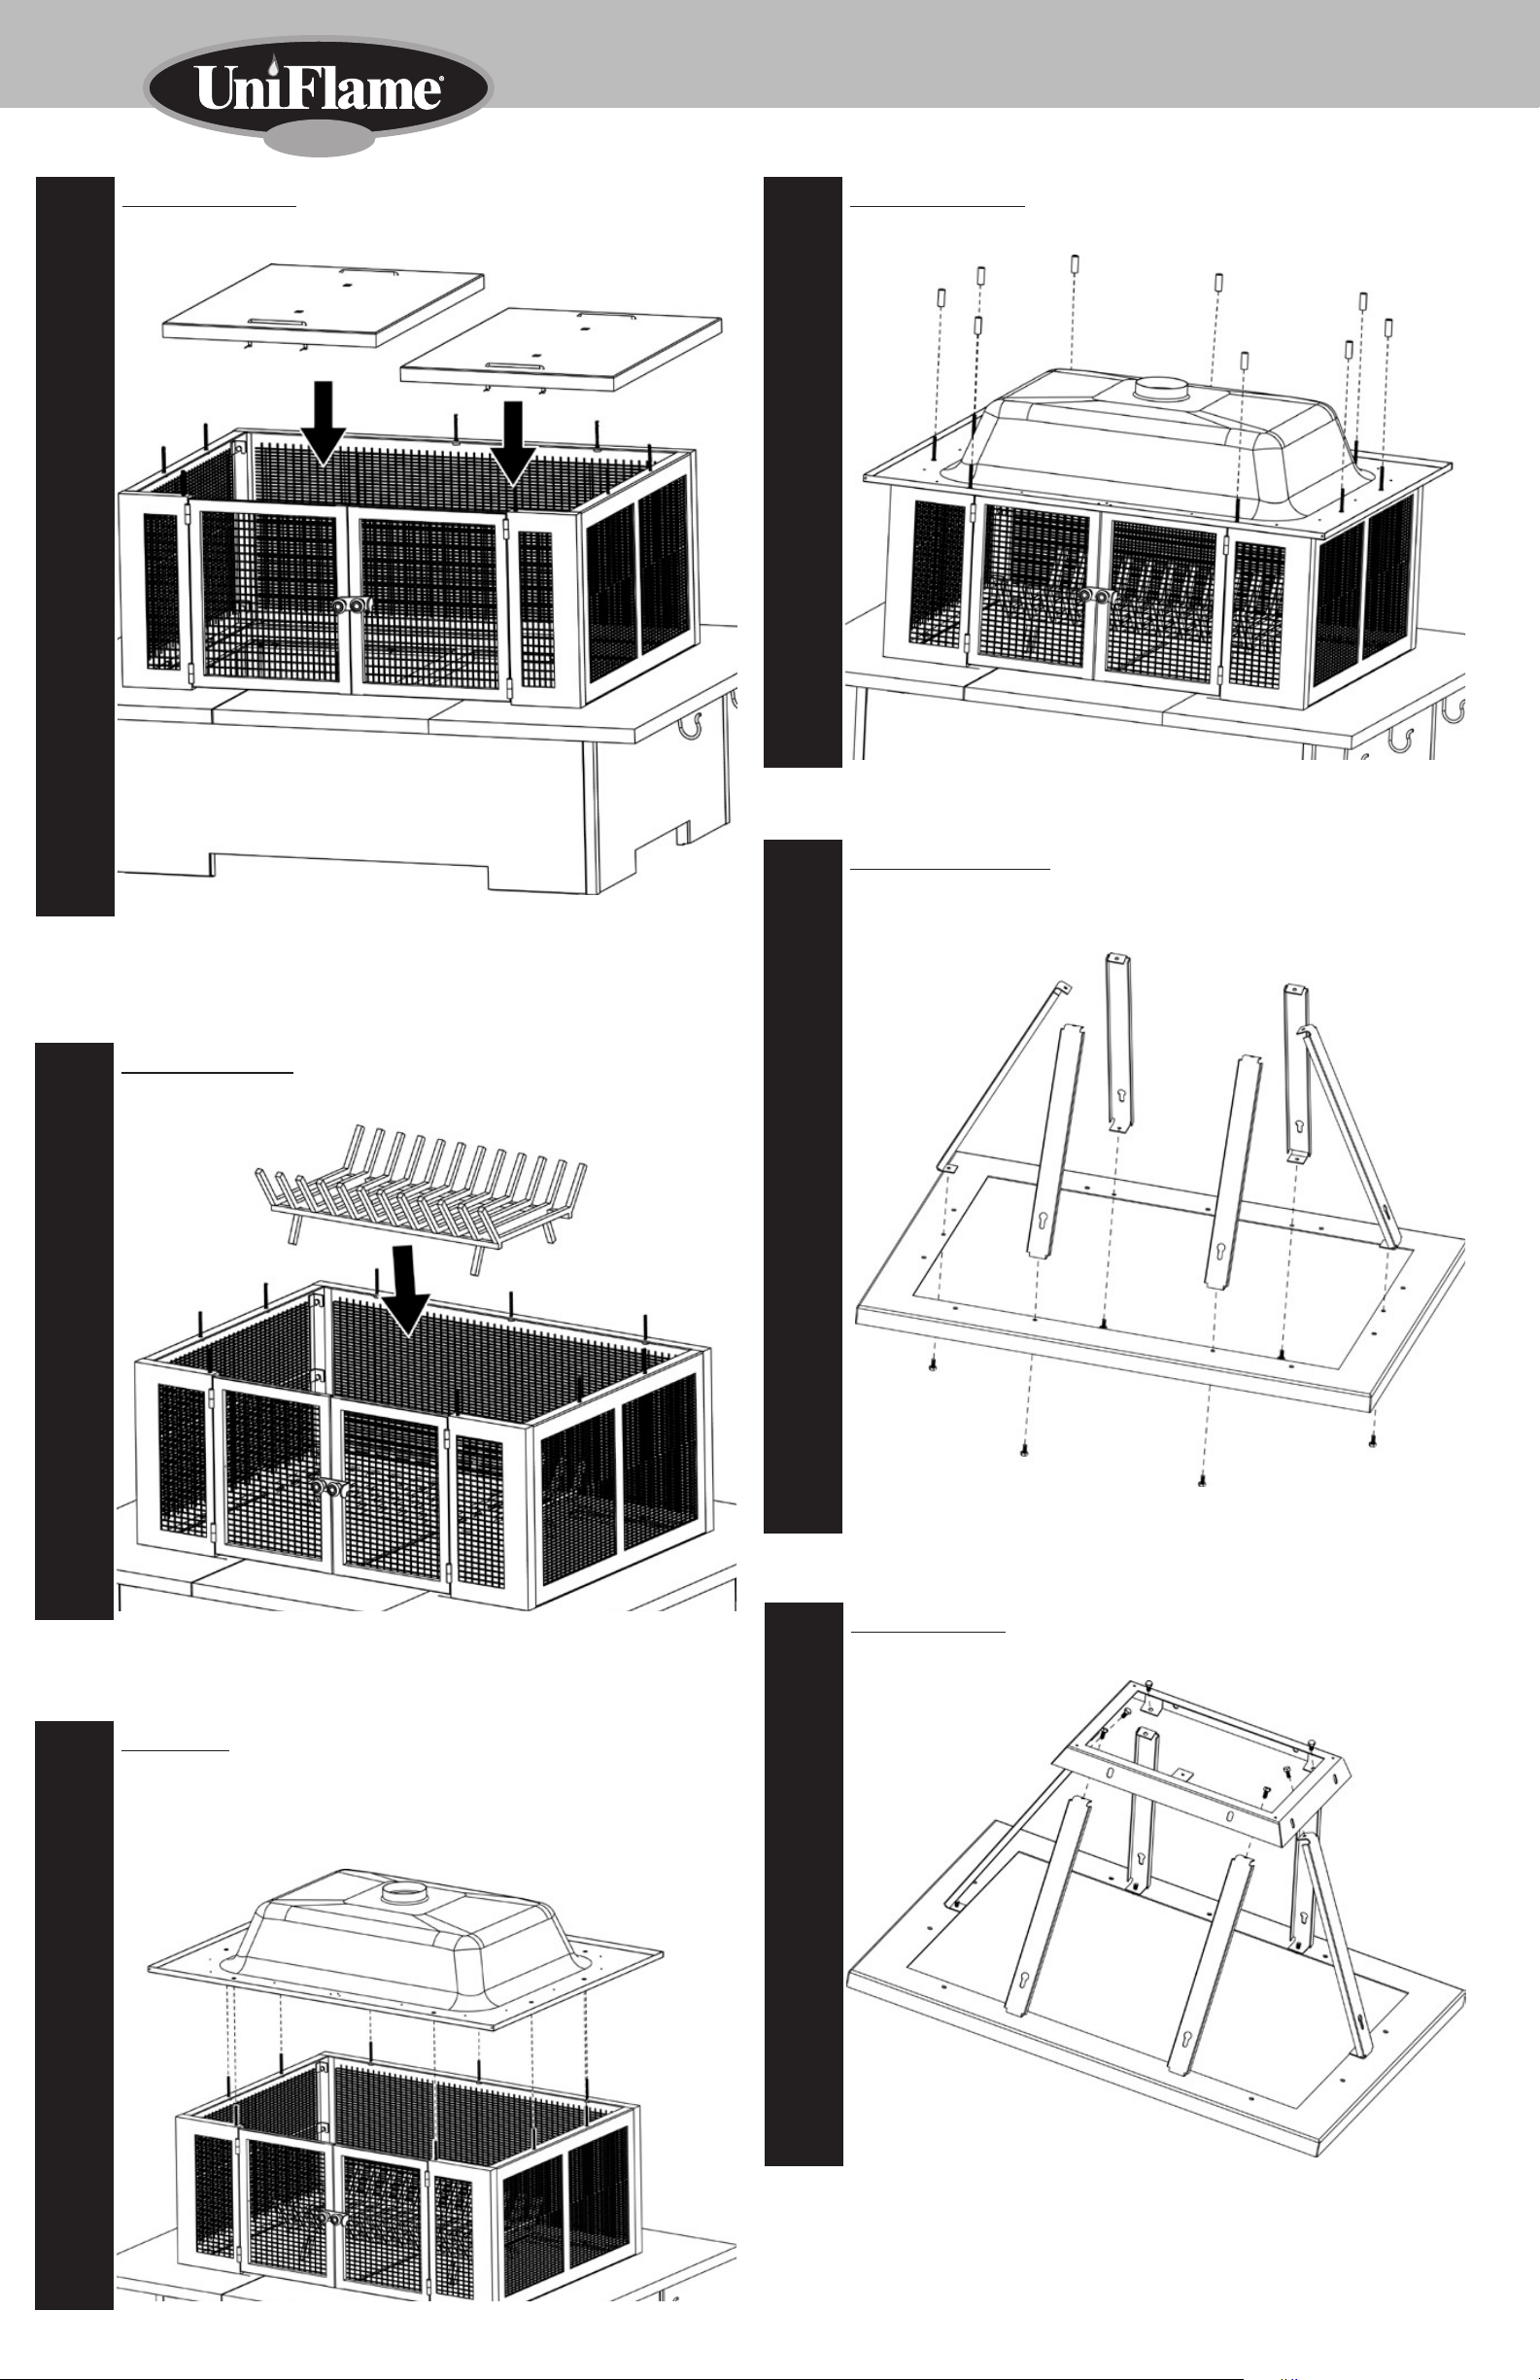
Secure hood assembly
Secure hood assembly by inserting hood inserts between hood panels.
25
Step
Attach chimney assembly
Attach chimney assembly to pillars on hood.
28
Step
Attach chiminey tube
Attach inner chimney tube and chimney ring to hood, using small bolt (B).
26
Step
Attach top
A. Insert chimney screen into chimney.
B. Insert top into chimney.
29
Step
Assemble chimney
Attach chimney to chimney base using 8 sets of screws.
Note: Philips screwdriver is not supplied.
27
Step
Completed
Congratulations your assembly is now complete. Read Operating Instructions
before proceed.
30
Page 9

Contact 1.800.762.1142 for assistance. Do not return to place of purchase.
page no.
8
Operating Instructions
WARNING
FOR YOUR SAFETY
Before using this outdoor fireplace, make sure you have read,
understand and are following all information provided in the Important
Safeguards presented on page 1. Failure to follow those instructions can
cause death, serious injury or property damage.
Lighting
1. Make sure there is only a small amount of ash in the bottom of the bowl.
2. Place a layer of dry kindling or a natural firestarter such as Fatwood™ onto the center of
the grate.
3. Place above that a layer of dry seasoned hardwood that is cut to lengths no more
than 14”.
4. Use a match to light kindling or firestarter.
5. Close doors once the kindling or firestarter is lit.
Tending the Fire
You may need to shift and/or add logs for an ideal experience.
Reminders:
• Always wear protective gloves or a pot holder when tending a fire.
Storage
Do NOT move or store this outdoor fireplace until the fire is COMPLETELY out.
1. Once the fire is out, coals are cold and outdoor fireplace is cool to the touch, remove
ashes and properly dispose.
2. Cover outdoor fireplace with a durable vinyl cover designed to fit this unit.
3. Store assembled in a location away from children and pets.
Note: If you do not use a cover, store this outdoor fireplace in a dry location to maximize
product life.
WARNING
FOR YOUR SAFETY
1. Clean up any dried repair adhesive on the fireplace and work space
after making repairs. Do not allow the liquid adhesive additive to dry
without clean-up.
2. Keep the two part adhesives (liquid and powder) away from children
and pets.
3. Clean up adhesive with water and discard adhesive and water
properly.
4. Do NOT repair any stone on this outdoor fireplace until the fire is
COMPLETELY out, stone is cold and outdoor fireplace is cool to the
touch.
• Wait until glowing coals have developed before adding any additional wood.
• Do NOT add gasoline, kerosene, diesel fuel, lighter fluid or alcohol to relight or
enhance an existing fire.
1. Carefully open access door.
2. While using a long handled fireplace tool, shift coals and logs to allow additional airflow.
3. If additional wood is required, place wood on top coals. Be careful not to shift ashes.
4. Close door.
Extinguishing
1. Allow fire to burn itself out.
2. Do NOT use water to extinguish as this is dangerous and can cause damage to this
outdoor fireplace.
Cleaning & Care
Inspecting
This outdoor fireplace should be inspected on a regular basis to ensure product safety and
longer product life.
Do NOT attempt to inspect this outdoor fireplace until the fire is COMPLETELY out.
1. Check all parts to make sure they are secure.
2. Check base, hood, wood rack, door and spark guards for any signs of damage or rust.
3. If damage to any component is detected, do NOT operate until repairs are executed.
5. Keep children and pets away from repair area until dry.
6. Read ALL repair insturctions before repairing.
7. Do NOT use glue in temperatures below 32ºF (0ºC)
8. Do NOT use glue in high humidity.
9. All repairs have to be made in a well ventilated area.
10. Goggles MUST be worn before opening glue or powder bottles, to
prevent glue or powder from getting in eyes.
11. Do NOT inhale powder.
12. Do NOT ingest glue.
13. Do not reuse dried paste with water.
Repairing cracked or dislodged stone
Items Needed:
Disposable brush
Gluing Instructions
1. Apply or brush glue onto the stone. Make sure there is an even coat and the glue
thickness is approximately 3/32 “ (2 mm) thick.
2. Hold stone to mating stone or metal plate for at least 1 (one) minute.
3. Do not move or use the outdoor fireplace for 48 hours.
4. Clean up any spilled or excess glue using soap and water.
Cleaning
This outdoor fireplace should be cleaned on a regular basis to promote safer experiences
and longer product life.
Note: After repeated use, a slight discoloration of the finish may occur.
Do NOT attempt to clean this outdoor fireplace until the fire is COMPLETELY out.
Do NOT use oven cleaner or abrasive cleaners as they will damage this product.
Do NOT clean any part of this outdoor fireplace in a self cleaning oven as it may
damage the finish.
Do NOT use pressure washer to clean this outdoor fireplace, as this may damage this
product.
1. Wipe exterior surfaces with a mild dishwashing detergent or baking soda.
2. For stubborn surfaces use a citrus based degreaser and a nylon scrubbing brush.
3. Rinse clean with water.
4. Remove built-up creosote from base, hood and spark guards with a chimney cleaning
product.
Color Touch Up
Items Needed:
Small container or tin foil
Disposable brush
Color Touch-up Instructions
1. Pour 1 (one) capful (2 g.) of powder into separate container
2. Add 60 mL (2.03 fl. oz.) of water into the separate container.
3. Once the powder has fully dissolved, brush the mixture onto the stone. This mixture
will make approximately 5.4 ft2 (.5 m2)
4. Let the color repaired stone sit for 48 hours before using the fireplace.
5. Dispose of any extra color mixture in the garbage.
6. Clean up any spilled mixture using soap and water.
Page 10

GOLD
Product Registration
Please register your product immediately at www.BlueRhino.com or call 1.800.762.1142.
Limited Warranty
Blue Rhino Global Sourcing, LLC (“Vendor”) warrants to the original retail purchaser of this
outdoor replace, and to no other person, that if this outdoor replace is assembled and operated
in accordance with the printed instructions accompanying it, then for a period of one (1) year from
the date of purchase, all parts in such outdoor replace shall be free from defects in material
and workmanship. Vendor may require reasonable proof of your date of purchase. Therefore, you
should retain your sales slip or invoice. This Limited Warranty shall be limited to the repair or
replacement of parts, which prove defective under normal use and service and which Vendor shall
determine in its reasonable discretion upon examination to be defective. Before returning any
parts, you should contact Vendor’s Customer Service Department using the contact information
listed below. If Vendor conrms, after examination, a defect covered by this Limited Warranty
in any returned part, and if Vendor approves the claim, Vendor will replace such defective part
without charge. If you return defective parts, transportation charges must be prepaid by you.
Vendor will return replacement parts to the original retail purchaser, freight or postage prepaid.
This Limited Warranty does not cover any failures or operating difculties due to accident, abuse,
misuse, alteration, misapplication, improper installation or improper maintenance or service
by you or any third party, or failure to perform normal and routine maintenance on the outdoor
replace, as set out in this owner’s manual.
Outdoor Fireplace Model No. WAF508H
This Limited Warranty is in lieu of all other express warranties. Vendor disclaims all warranties for
products that are purchased from sellers other than authorized retailers or distributors, including
the warranty of merchantability or the warranty of tness for a particular purpose. VENDOR ALSO
DISCLAIMS AND ANY ALL IMPLIED WARRANTIES, INCLUDING WITHOUT LIMITATION THE IMPLIED
WARRANTIES OF MERCHANTABILITY AND FITNESS FOR A PARTICULAR PURPOSE. VENDOR SHALL
NO LIABILITY TO PURCHASER OR ANY THIRD PARTY FOR ANY SPECIAL, INDIRECT, PUNITIVE,
INCIDENTAL, OR CONSEQUENTIAL DAMAGES. Vendor further disclaims any implied or express
warranty of, and assumes no responsibility for, defects in workmanship caused by third parties.
This Limited Warranty gives the purchaser specic legal rights; a purchaser may have other rights
depending upon where he or she lives. Some jurisdictions do not allow the exclusion or limitation
of special, incidental or consequential damages, or limitations on how long a warranty lasts, so
the above exclusion and limitations may not apply to everyone.
Vendor does not authorize any person or company to assume for it any other obligation or liability
in connection with the sale, installation, use, removal, return, or replacement of its equipment, and
no such representations are binding on Vendor.
Blue Rhino Global Sourcing, LLC
104 Cambridge Plaza Drive
Winston-Salem, North Carolina 27104 USA
(800) 762-1142
24 Hour Fax: (336) 659-6743
CustomerService@BlueRhino.com
Page 11

GOLD
CustomerService@BlueRhino.com
Fax las 24 horas: (336) 659-6743
Teléfono (800) 762-1142
Winston-Salem, North Carolina 27104 EE.UU.
104 Cambridge Plaza Drive
Blue Rhino Global Sourcing, LLC
naturaleza no obliga al Fabricante.
remoción, devolución o reemplazo de este equipo y cualquier representación de esta
cualquier otra obligación o responsabilidad relacionada con la venta, instalación, uso,
El Fabricante no autoriza a ninguna persona o compañía para asumir por el Fabricante
que la exclusión y las limitaciones descritas arriba pueden no ser aplicables a usted.
incidentales o consecuenciales ni en cuanto a la duración de una garantía, de manera
jurisdicciones no permiten limitaciones o exclusiones en cuanto a daños especiales,
otros derechos según el lugar donde el comprador o la compradora residan. Ciertas
Limitada le da al comprador derechos legales especícos y el comprador puede tener
no asume responsabilidad por defectos causados por terceras personas. Esta Garantía
INDIRECTOS, PUNITIVOS, INCIDENTALES O CONSECUENCIALES. El Fabricante, además,
EL COMPRADOR O ANTE CUALQUIER TERCERA PERSONA, POR DAÑOS ESPECIALES,
PARTICULAR. ADEMAS, EL FABRICANTE NO ASUME NINGUNA RESPONSABILIDAD, ANTE
GARANTIAS IMPLICITAS DE COMERCIABILIDAD Y ADAPTABILIDAD PARA UN PROPOSITO
NINGUNA O CUALQUIER GARANTIA IMPLICITA INCLUYENDO, SIN LIMITACIONES, LAS
UN (1) AÑO DE GARANTIA EXPRESA, EL FABRICANTE NO SE HACE RESPONSABLE POR
distribuidores o vendedores al detal autorizados. UNA VEZ TERMINADO EL PERIODO DE
ninguna responsabilidad por garantías de productos vendidos por quienes no sean
Esta Garantía Limitada reemplaza cualquier otra garantía. El Fabricante no asume
causados por la intemperie, después de la compra de la unidad.
la unidad, tales como rasguños, abolladuras, descoloridos, oxidaciones y otros daños
este manual del usuario. Además, la Garantía Limitada no cubre daños al terminado de
la realización de mantenimiento normal y rutinario de la unidad, como se prescribe en
mantenimiento o servicio inapropiado, dado por usted o por tercera persona, o falla en
abuso, mal uso, alteración, empleo en usos inapropiados, instalación defectuosa o
Esta Garantía Limitada no cubre fallas o dicultades de operación debidas a accidente,
partes, al comprador original al detal, con costo de transporte o envío prepagados.
los costos de transporte deberán ser prepagados por usted. El Fabricante devolverá las
reemplazará tales partes sin costo alguno. Si usted devuelve las partes defectuosas,
existe un defecto cubierto por esta Garantía Limitada y aprueba el reclamo, el Fabricante
más adelante. Si el Fabricante, después de examinar la pieza devuelta, conrma que
Service Department) del Fabricante, usando la información de contacto que se lista
cualquier pieza, comuníquese con el Departamento de Servicio al Cliente (Customer
a satisfacción razonable del Fabricante, que están defectuosas. Antes de devolver
defectuosas en condiciones de servicio y uso normal y las que un examen indique,
Garantía Limitada estará limitada a la reparación o reemplazo de las piezas que resulten
autorizados. Por lo tanto, usted debe conservar el recibo de venta o la factura. Esta
razonable de la fecha de compra, a ser emitida por vendedor al detal o representante
libres de defectos en material y mano de obra. El Fabricante podrá requerir prueba
de un (1) año a partir de la fecha de compra, todas las piezas de la chimenea estarán
y opera de acuerdo con las instrucciones impresas que la acompañan, y por un período
detal, de esta Chimenea al Aire Libre, y a ninguna otra persona, que si la unidad se arma
Blue Rhino Global Sourcing, LLC (“el Fabricante”) garantiza al comprador original, al
Garantia limitada
www.BlueRhino.com o llamando al 1-800-762-1142.
Sírvase registrar su unidad inmediatamente visitando nuestro sitio de internet
Registro del Producto
Chimenea al aire libre, modelo no. WAF508H
Page 12

6. Limpie los derrames de mezcla usando agua y jabón.
5. Descarte en la basura los sobrantes de mezcla de color, fresca o seca.
4. No use la chimenea al aire libre por 48 horas después de haber retocado la piedra.
(0,5 m2).
2
a la piedra. La cantidad mezclada alcanzará para cubrir aproximadamente 5,4 pies
3. Una vez que el polvo se ha disuelto completamente, aplique con la brocha la mezcla
2. Añádale 60 mL (2,03 onza líquida) de agua en el mismo recipiente.
1. Vierta en un recipiente separado media (1) tapa (2 gramo) del producto en polvo.
Instrucciones para retocar el color
Brocha desechable
Un recipiente pequeño u hoja de aluminio
Herramientas necesarias:
Retoque del color
desengrasante a base de cítricos y un cepillo de nylon para fregar.
2. En superficies donde el detergente o la soda no son suficientes para la limpieza, use un
soda de hornear.
1. Limpie las superficie exteriores con un detergente suave para el lavado de platos o con
automático de limpieza pues esto daña el terminado de la unidad.
NO trate de limpiar ningún componente de esta chimenea al aire libre en un horno
la unidad.
NO use productos para limpieza de hornos o limpiadores abrasivos pues estos dañan
extinguido COMPLETAMENTE.
NO trate de limpiar esta chimenea al aire libre antes de que el fuego se haya
Nota: Después de repetido uso, la superficie de metal puede descolorarse un poco.
funcionamiento seguro y prolongar su vida útil.
Esta chimenea al aire libre debe limpiarse a intervalos regulares para asegurar su
Limpieza
4. Limpie derrames o exceso de pegante usando agua y jabón.
3. No mueva o use la chimenea al aire libre por 48 horas.
un (1) minuto.
2. Sostenga la piedra contra la piedra de encaje o la placa de metal por lo menos por
es pareja y que el grosor del pegante es de aproximadamente 3/32” (2 mm).
1. Aplique el pegante o use la brocha para aplicarlo en la piedra. Verifique que la capa
Instrucciones para la aplicación del pegante
Brocha desechable
Herramienta necesaria:
Reparación de piedra agrietada o desplazada
reparada.
3. Si encuentra que algún componente está dañado, no opere la unidad antes de haberla
para detectar señales de daños u oxidación.
2. Inspeccione la base, campana, parrilla para la leña, puerta y los resguardos para la ceniza
1. Examine todas las piezas para estar seguro de que continúan firmemente instaladas.
COMPLETAMENTE.
No trate de inspeccionar esta chimenea al aire libre antes de que el fuego se haya apagado
su funcionamiento es seguro y prolongar su vida útil.
Esta chimenea al aire libre debe inspeccionarse a intervalos regulares para asegurar que
Inspección
Cuidado y Limpieza
13. NO trate de volver a usar pasta pegante seca agregándole agua.
12. NO ingiera el pegante.
11. NO aspire el polvo.
para evitar que el pegante o el polvo le llegue a los ojos.
10. Debe ponerse gafas antes de abrir las botellas de pegante o de polvo,
hogar al aire libre.
2. NO use agua para extinguir el fuego pues esta práctica es peligrosa y puede dañar su
1. Deje que el fuego se extinga por si mismo.
Apagado
9. Toda reparación debe hacerse en una zona bien ventilada.
8. NO use el pegante en condiciones de alta humedad.
7. NO use pegante a temperaturas más bajas de 32° F (0° C).
4. Cierre la puerta de acceso
mover la ceniza.
3. Si se necesita más leña coloque la leña encima de las brazas. Tenga cuidado de no
hacerlas.
6. Lea TODAS las instrucciones de reparación antes de comenzar a
hasta que el área haya secado.
un flujo adicional de aire.
2. Usando un accesorio de chimenea de mango largo, mueva leños y brazas para permitir
1. Abra cuidadosamente la puerta de acceso.
5. Mantenga los niños y las mascotas alejados del área de reparación
volver a encender o aumentar un fuego que se extingue.
y la chimenea al aire libre se sientan frías al tocarlas.
antes de que el fuego se haya extinguido COMPLETAMENTE, y la piedra
4. NO empiece a reparar cualquier piedra de esta chimenea al aire libre
agua en forma apropiada.
3. Limpie los residuos de pegante con agua y descarte el pegante y el
• No vierta gasolina, kerosén, aceite diesel, líquido para encendedores o alcohol para
• Espere hasta que el fuego se haya convertido en brasa antes de agregar más leña.
atizando el fuego.
• Use siempre guantes de protección o un paño para manejo de ollas cuando esté
Recuerde:
alejados de niños y mascotas.
2. Mantenga los dos ingredientes del pegante (el líquido y el polvo)
que el ingrediente líquido del pegante se seque antes de limpiarlo.
ideal.
Usted puede necesitar mover los leños o agregar leños para obtener un funcionamiento
Cuidado del Fuego
espacio de trabajo, después de haber realizado reparaciones. No deje
1. Limpie cualquier pegante de reparación, en la chimenea y en el
PARA SU SEGURIDAD
ADVERTENCIA
prolongar la vida del producto.
Nota: Si no usa cubierta, guarde esta chimenea al aire libre en una ubicación seca para
3. Guarde la unidad armada en una ubicación alejada de niños y mascotas.
unidad.
2. Cubra el hogar al aire libre con una cubierta durable de vinilo diseñada para acomodar la
suficientemente fría al tacto, remueva la ceniza y descártela de manera apropiada.
1. Una vez que el fuego se haya apagado, las brazas estén frías y la unidad se sienta
COMPLETAMENTE.
NO mueva o guarde esta chimenea al aire libre antes de que el fuego se haya extinguido
Almacenamiento
han quedados prendidos.
5. Cierre las puertas de la unidad una vez que la leña menuda o el material de encendido
4. Use una cerilla para encender la leña menuda o el material para encender el fuego.
(35.5 cm).
3. Coloque encima una capa de leña seca cortada en longitudes no mayores de 14 pulg.
como Fatwood™, en el centro de la rejilla.
2. Coloque una capa de leña menuda seca o un material natural para encender el fuego, tal
cuenco.
1. Verifique que únicamente ha quedado una pequeña cantidad de ceniza en el fondo del
Encendido
aún la muerte.
la falla en seguirlas puede causar daños a la propiedad, serias lesiones y
presentan en la página 1. Siga estas instrucciones completamente pues
y entendido completamente las Importantes Precauciones que se
Antes de usar esta chimenea al aire libre, asegúrese de haber leído
PARA SU SEGURIDAD:
con un producto de limpieza para chimeneas.
4. Remueva la acumulación de creosota de la base, campana y del resguardo de ceniza
3. Enjuague con agua limpia.
8
página
ADVERTENCIA
Instrucciones de Operación
Si necesita ayuda llame al 1.800.762.1142. No devuelva el artículo al lugar de compra.
Page 13

GOLD
Operación antes de operar la unidad.
Felicitaciones. Ha terminado el armado de la unidad. Lea las Instrucciones de
Terminado
30
Paso
Nota: El destornillador Philips no está incluido.
tornillos.
Fije el cañón de la chimenea en la base del cañón de la chimenea usando 8
Arme el cañón de la chimenea.
27
Paso
29
B. Inserte la tapa del cañón de la chimenea dentro del cañón de la chimenea.
A. Coloque la malla del cañón de la chimenea dentro del cañón de la chimenea.
Fije la tapa.
Paso
26
un perno pequeño (B).
Fije en la campana el cañón interno de la chimenea y el anillo de chimenea, usando
Fije el cañón interno de la chimenea.
Paso
28
campana por entre los paneles de la campana.
Fije el conjunto del cañón de la chimenea en los postes de la campana.
Fije el conjunto del cañón de la chimenea.
Paso
Chimenea al aire libre, modelo no. WAF508H
Asegure el conjunto de la campana insertando los elementos de inserción de
Asegure el conjunto de la campana.
25
Paso
Page 14

24
abertura de ojo de cerradura y asegure la parte de arriba usando 2 tuercas (D).
Fije en la campana el panel “A” de la campana, insertando la espiga de abajo en la
Fije el panel de campana izquierdo.
Paso
21
la aberturas de ojo de cerradura y asegure la parte de arriba usando 2 tuercas (D).
Fije en la campana el panel “B” de la campana, insertando las espigas de abajo en
Fije el panel de atrás de la campana.
Paso
23
abertura de ojo de cerradura y asegure la parte de arriba usando 2 tuercas (D).
Fije en la campana el panel “A” de la campana, insertando la espiga de abajo en la
Fije el panel de campana derecho.
Paso
20
Fije en el techo el conjunto de la campana usando 9 tuercas (D).
Fije el conjunto de la campana.
Paso
22
la aberturas de ojo de cerradura y asegure la parte de arriba usando 2 tuercas (D).
Fije en la campana el panel “B” de la campana, insertando las espigas de abajo en
Fije el panel del frente de la campana.
6
página
Paso
Si necesita ayuda llame al 1.800.762.1142. No devuelva el artículo al lugar de compra.
Fije los 4 postes (G).
Fije los postes.
19
Paso
Page 15

GOLD
Nota: El techo se asegurará más adelante.
Nota: Puede ser necesario tener las puertas abiertas para fijar el techo.
Fije el techo sobre los resguardos de chispas.
Fije el techo.
15
Paso
18
pequeños (B).
Fije el tope de la campana en los soportes de la campana usando 6 pernos
Fije el tope de la campana.
Paso
14
Inserte la parrilla de leña en las planchas de base de la cámara.
Inserte la parrilla de leña.
Nota: No apriete demasiado los pernos.
pequeños (B).
Fije los soportes A y B de la campana en la base de la campana, usando 6 pernos
Arme la base de la campana.
17
Paso
Paso
16
Coloque 9 mangas para pernos (F) en los pernos de los resguardos de chispas.
Coloque las mangas para pernos.
Paso
Chimenea al aire libre, modelo no. WAF508H
Inserte en la base las planchas de base de la cámara.
Inserte las planchas de base.
13
Paso
Page 16

Nota: No apriete completamente los pernos todavía.
9
12
asegúrelas con 4 pasadores de horquilla (E).
Introduzca las manijas de cámara en cada una de las placas de base de cámara y
Arme las placas de base.
Paso
frente, usando 4 pernos grandes (C).
Fije en la chimenea y en la base los resguardos de chispas izquierdo y derecho del
Fije los resguardos de chispas del frente.
Paso
B. Apriete completamente todos los pernos de los resguardos de chispas
resguardo de chispas.
del resguardo de chispas, enganchando las puertas en los goznes del frente del
A. Instale las puertas izquierda y derecha del resguardo de chispas en el frente
Instale las puertas.
11
Paso
Nota: No apriete completamente los pernos todavía.
grandes (C).
Fije el resguardo de chispas trasero en la chimenea y en la base usando 5 pernos
Fije el resguardo de chispas trasero.
8
Paso
chispas.
Nota: El hogar quedará asegurado en la base cuando se fijen los resguardos de
Nota No apriete completamente los pernos todavía.
pernos grandes (C).
Fije en la chimenea y en la base los resguardos de chispas laterales usando 4
Fije los resguardos de chispas laterales.
4
página
10
Paso
Si necesita ayuda llame al 1.800.762.1142. No devuelva el artículo al lugar de compra.
B. Coloque el hogar sobre la base.
placa derecha del hogar.
A. Una la placa delantera y la placa trasera del hogar con la placa izquierda y la
Arme el hogar y fije el hogar.
7
Paso
Page 17

GOLD
3
Fije las ménsulas en “L” en los paneles de base “B” usando 4 tuercas (D).
Fije las ménsulas en “L”.
Paso
6
Introduzca los elementos de inserción de base entre los paneles de base.
Inserte los elementos de inserción de base.
Paso
2
Fije el panel de base “B” al marco de base usando 4 tuercas (D).
Fije el panel de base trasero.
Paso
5
tuercas (D).
Fije el panel de base “A” al marco de base y a las ménsulas en “L” usando 5
Fije el panel del lado derecho.
Paso
1
Fije el panel de base “B” al marco de base usando 4 tuercas (D).
Fije el panel de base frontal.
4
tuercas (D).
Fije el panel de base “A” al marco de base y a las ménsulas en “L” usando 5
Fije el panel del lado izquierdo.
Paso
Chimenea al aire libre, modelo no. WAF508H
Paso
• Siga todos los Pasos en el orden indicado para armar debidamente esta unidad.
que ha terminado el Paso, apriete completamente todos los elementos de ferretería.
• Cuando sea del caso, apriete a mano, en un principio, las conexiones de ferretería. Una vez
elementos de ferretería.
• Despeje un área suficientemente grande para disponer todos los componentes y los
en un lugar de piso plano sin aberturas ni hendijas.
• Evite la pérdida de componentes pequeños o elementos de ferretería, armando el producto
Para facilitar el armado:
el número de serie de la unidad, para referencia.
Si necesita ayuda llame, sin cargo, al 1.800.762.1142. Por favor tenga a mano su manual y
NO DEVUELVA EL PRODUCTO AL LUGAR DE COMPRA
Instrucciones de Armado
Page 18

**No se muestra a tamaño real.
E. Pasador de Horquilla** 8
A. Destornillador** 1
Ferretería Adicional Requerida:
Tuerca Hexagonal Niquelada Negra M8
D. Tuerca 39
Botella de retoque del color** 1
Botella de pegante** 1
Llave de Tuercas** 1
Herramientas Incluidas
Perno Niquelado Negro de Cabeza Hexagonal M8x50
C. Perno Grande 13
G. Poste** 4
Perno Niquelado Negro de Cabeza Hexagonal M8x12
B. Perno Pequeño 13
F. Manga de Perno** 9
Tornillo Niquelado Negro de Cabeza de Puente M6x8
A. Tornillo 8
Elementos de Ferretería / Tamaño Real
34
*Viene armado
36. Atizador . . . . . . . . . . . . . . . . . . . . . . 55-05-035
31
36 35
25
32
33
28
29
27
30
26
16
17
24
18
19
21
22
20
23
15
14
13
5
12
8
9 11
7
10
6
4
para facilitar el armado.
muestran mirando desde abajo
Nota: Los componentes se
3
2
1
35. Pala . . . . . . . . . . . . . . . . . . . . . . . . . 55-05-039
34. Ménsula en “L” (4) . . . . . . . . . . . . . . 55-05-001
33. Marco de la Base . . . . . . . . . . . . . . . 55-05-003
32. Panel de Base “B” (2) . . . . . . . . . . . . 55-05-006
31. Panel de Base “A” (2) . . . . . . . . . . . . 55-05-005
30. Placa Delantera del Hogar . . . . . . . . 55-05-032
29. Placa Trasera del Hogar . . . . . . . . . . 55-05-031
28. Elemento de Enganche (3)*. . . . . . . . 55-05-044
27. Placa Izquierda del Hogar . . . . . . . . . 55-05-040
26. Placa Derecha del Hogar . . . . . . . . . 55-05-041
25. Elementos de Inserción de Base (4) . 55-05-004
24. Manija de Puerta*. . . . . . . . . . . . . . . 55-05-015
de Chispas . . . . . . . . . . . . . . . . . . . . 55-05-030
23. Puerta Izquierda de Resguardo
de Chispas . . . . . . . . . . . . . . . . . . . . 55-05-036
22. Puerta Derecha de Resguardo
Frontal Derecho . . . . . . . . . . . . . . . . 55-05-017
21. Resguardo de Chispas
Izquierdo . . . . . . . . . . . . . . . . . . . . . 55-05-016
20. Resguardo de Chispas Frontal
19. Resguardo de Chispas Lateral (2) . . . 55-05-042
18. Resguardo de Chispas Trasero . . . . . 55-05-002
17. Manijas de Cámara (4) . . . . . . . . . . . 55-05-009
16. Placas de Base de Cámara (2) . . . . . 55-05-008
15. Parrilla para Leña . . . . . . . . . . . . . . . 55-05-046
14. Techo . . . . . . . . . . . . . . . . . . . . . . . 55-05-037
13. Base de Campana . . . . . . . . . . . . . . 55-05-021
12. Soportes “B” de Campana (4) . . . . . . 55-05-026
11. Soportes “A” de Campana (2) . . . . . 55-05-025
10. Tapa de Campana. . . . . . . . . . . . . . . 55-05-027
9. Panel B de Campana . . . . . . . . . . . . 55-05-024
8. Panel A de Campana (2) . . . . . . . . . . 55-05-023
Campana (4). . . . . . . . . . . . . . . . . . . 55-05-022
7. Elementos de Inserción de
6. Anillo del Cañón de Chimenea . . . . . 55-05-012
5. Cañón Interno. . . . . . . . . . . . . . . . . . 55-05-028
4. Base del Cañón de Chimenea . . . . . . 55-05-011
3. Cañón de Chimenea . . . . . . . . . . . . . 55-05-010
2. Malla del Cañón de Chimenea . . . . . 55-05-013
1. Tapa . . . . . . . . . . . . . . . . . . . . . . . . . 55-05-045
Diagrama de Explosión
2
página
Si necesita ayuda llame al 1.800.762.1142. No devuelva el artículo al lugar de compra.
Page 19

GOLD
13. NO trate de volver a usar pasta pegante seca agregándole agua.
12. NO ingiera el pegante.
11. NO aspire el polvo.
polvo, para evitar que el pegante o el polvo le llegue a los ojos.
110. Debe ponerse gafas antes de abrir las botellas de pegante o de
9. Toda reparación debe hacerse en una zona bien ventilada.
8. NO use el pegante en condiciones de alta humedad.
7. NO use pegante a temperaturas más bajas de 32° F (0° C).
hacerlas.
6. Lea TODAS las instrucciones de reparación antes de comenzar a
producir daños a la propiedad, lesiones serias y hasta fatales.
42. El no seguir exactamente las instrucciones dadas arriba puede
1.800.762.1142.
fábrica puede ser peligroso. Su uso invalida su garantía. Llame al
Global Sourcing, LLC. El uso de cualquier pieza no autorizada de
41. Use únicamente piezas autorizadas de fábrica de Blue Rhino
reparaciones requeridas o realizar la limpieza necesaria.
o acumulación de creosota. NO opere la unidad antes de hacer las
la unidad por algún tiempo, revise que no haya señales de daños
40. Después de un período de almacenamiento o de haber dejado de usar
completamente de manera regular.
39. Esta chimenea al aire libre debe limpiarse y verificarse
38. Evite respirar el humo del fuego y evite que le llegue a los ojos.
sobre el césped, sobre terrazas de madera o muebles.
37. NO coloque un protector contra chispas o herramientas calientes
encendiendo o usando.
36. NO se apoye sobre la chimenea al aire libre cuando la está
las puertas no cierren correctamente.
35. No recargue de leña la chimenea al aire libre hasta el punto de que
sobrecargado.
al aire libre se nota enrojecida es señal de que la unidad se ha
base, campana o resguardos contra las chispas de esta chimenea
que las llamas se hayan extinguido. AVISO: Si cualquier parte de la
34. NO recargue la chimenea al aire libre. No le agregue leña antes de
modelos con cañón para el humo no ponga leña en el cañón.
Coloque los leños únicamente en la rejilla o bandeja para la leña. En
33. NO coloque leña directamente en el fondo de la chimenea al aire libre.
mover los leños.
32. Use accesorios de chimenea largos y fuertes cuando deba agregar o
las manijas y las ventanas de circulación de aire.
31. Use guantes y almohadillas resistentes al calor cuando deba manejar
completamente enfriado y apagado.
30. NO quite las cenizas o las brazas antes de que se hayan
cenizas y las brazas se hayan completamente enfriado y apagado.
29. NO intente mover o guardar el hogar al aire libre antes de que las
especialmente si hay niños o mascotas presentes.
28. NO deje una la chimenea al aire libre encendida sin vigilancia,
toque las cenizas o las brazas para determinar si están calientes.
almohadilla para las ollas, manoplas, guantes de barbacoa, etc. Nunca
usted tenga puestos elementos de protección tales como guantes o
enfriada completamente para evitar quemaduras, a menos que
calientes. NO toque la chimenea al aire libre hasta que no se haya
27. Cuando la chimenea al aire libre se usa, las superficies estarán
26. Mantenga todos los cables eléctricos lejos de un hogar al aire libre.
hogar al aire libre.
encender carbón o alcohol para encender o volver a encender el
25. NO use gasolina, kerosén, combustibles de diesel, líquidos para
contra chispas.
24. NO utilice la chimenea al aire libre sin haber instalado las defensas
23. NO utilice la chimenea si hace mucho viento.
22. Evite vestir ropa inflamable cuando usa la chimenea al aire libre.
hasta que el área haya secado.
5. Mantenga los niños y las mascotas alejados del área de reparación
y la chimenea al aire libre se sientan frías al tocarlas.
antes de que el fuego se haya extinguido COMPLETAMENTE, y la piedra
4. NO empiece a reparar cualquier piedra de esta chimenea al aire libre
agua en forma apropiada.
3. Limpie los residuos de pegante con agua y descarte el pegante y el
alejados de niños y mascotas.
2. Mantenga los dos ingredientes del pegante (el líquido y el polvo)
ingrediente líquido del pegante se seque antes de limpiarlo.
de trabajo, después de haber realizado reparaciones. No deje que el
1. Limpie cualquier pegante de reparación, en la chimenea y en el espacio
PARA SU SEGURIDAD
ADVERTENCIA
una capa delgada de ceniza en la base para proteger el fondo.
21. Siempre vacíe el hogar al aire libre después de haberla usada. Deje
y terrazas de madera.
adecuada para este propósito. NO use esta unidad sobre plataformas
piedra. Una superficie de asfalto o de pavimento puede que no sea
y niveladas no combustibles tales como las de hormigón, ladrillo o
20. Coloque siempre la chimenea al aire libre sobre superficies firmes
arbustos.
Evite usar la chimenea al aire libre cerca o debajo de árboles y
construcciones combustibles que no estén debidamente protegidas.
19. NO use esta chimenea al aire libre debajo de aleros o cerca de
combustibles, gasolina y cualquier otro vapor o líquido inflamable.
zona para la chimenea al aire libre alejada de materiales
18. NO utilice esta unidad en una atmósfera explosiva. Escoja una
furgones o vehículos de recreo.
17. No use esta chimenea al aire libre cerca de automóviles, camiones,
a 10 pies (3,05 metros) de esta chimenea al aire libre.
16. NO use o guarde un tanque de gas propano líquido en un radio inferior
de esta unidad o de cualquier otro aparato.
15. NO guarde o use gasolina u otros líquidos o vapores inflamables cerca
montada y que todas las piezas estén bien fijadas y apretadas.
14. NO utilice la chimenea al aire libre a menos que esté completamente
13. NO altere esta chimenea al aire libre de ninguna forma.
blandas como pino o cedro pues estas maderas hacen saltar chispas.
madera terciada en la chimenea al aire libre. Evite usar maderas
aglomerada, madera de deriva, basura, hojas, cartón o pedazos de
12. NO queme briquetas de carbón de leña o vegetal, carbón, madera
chimenea al aire libre.
en forma más completa, y que produce menos humo con esta
11. Use siempre leña seca para quemar, que quema a mayor temperatura,
instrucciones de “Encendido” que se encuentran en este manual.
10. No encienda esta chimenea al aire libre sin haber leído las
operar en forma segura esta chimenea al aire libre.
puede afectar la habilidad del usuario para armar debidamente u
9. El uso de bebidas alcohólicas, medicamentos o drogas de farmacia
patios de madera.
puede no ser aceptable para este propósito. NO use la chimenea sobre
no combustible, como de hormigón o piedra. Una superficie de asfalto
8. Use siempre esta chimenea al aire libre sobre un piso firme, nivelado y
que merece cualquier fuego abierto.
7. Al usar esta chimenea al aire libre, observe las mismas precauciones
de Incendios local detalles en cuanto a quemas al aire libre.
incendio aplicables, locales y nacionales. Obtenga de su Departamento
6. Observe siempre y use la unidad cumpliendo todos los códigos de
vehículos de recreo.
5. NO instale o utilice esta chimenea al aire libre en embarcaciones o
4. La chimenea al aire libre NO debe ser usada por los niños.
3. Esta chimenea al aire libre NO ha sido diseñado para uso comercial.
acumularse y provocar la asfixia.
el ambiente. Los gases tóxicos de monóxido de carbono pueden
2. NO use esta chimenea al aire libre para cocinar adentro o calentar
usarse en un edificio, garaje o cualquier otra área cerrada.
1. Esta unidad es para ser usada al aire libre únicamente y NO debe
PARA SU SEGURIDAD:
ADVERTENCIA
Chimenea al aire libre, modelo no. WAF508H
Page 20

GOLD
es una marca registrada de Blue Rhino Global Sourcing, LLC. Todos derechos reservados. WAF508H-OM-103 ES
®
UniFlame
© 2005 Blue Rhino Global Sourcing, LLC. Todos derechos reservados.
1.800.762.1142, www.bluerhino.com
104 Cambridge Plaza Drive, Winston-Salem, NC 27104 EE.UU.
Blue Rhino Global Sourcing, LLC
Fabricado en China para:
Garantia Limitada . . . . . . . . . . . . . . . . . . . . . . . . . . . . . . . . . . . . . . . . . . . . . . . . . . . . . . .9
Registro del producto . . . . . . . . . . . . . . . . . . . . . . . . . . . . . . . . . . . . . . . . . . . . . . . . . . . . 9
consultas.
otra persona, entréguele este manual para futuras
consultas. Si está montando esta unidad para
Conserve estas instrucciones para futuras
fatales.
lesiones personales y hasta accidentes
sus consecuentes daños a la propiedad,
ocasionar un incendio o una explosión, con
3. El no seguir estas instrucciones puede
Retoque del color . . . . . . . . . . . . . . . . . . . . . . . . . . . . . . . . . . . . . . . . . . . . . . . . . . . . .8
Reparación de piedra agrietada o desplazada . . . . . . . . . . . . . . . . . . . . . . . . . . . . . . . 8
Almacenamiento . . . . . . . . . . . . . . . . . . . . . . . . . . . . . . . . . . . . . . . . . . . . . . . . . . . . . . 8
Limpieza . . . . . . . . . . . . . . . . . . . . . . . . . . . . . . . . . . . . . . . . . . . . . . . . . . . . . . . . . . .8
Inspección . . . . . . . . . . . . . . . . . . . . . . . . . . . . . . . . . . . . . . . . . . . . . . . . . . . . . . . . . . 8
Limpieza y cuidado . . . . . . . . . . . . . . . . . . . . . . . . . . . . . . . . . . . . . . . . . . . . . . . . . . . . . . 8
Apagado de la chimenea al aire libre . . . . . . . . . . . . . . . . . . . . . . . . . . . . . . . . . . . . . . 8
Cuidado del fuego . . . . . . . . . . . . . . . . . . . . . . . . . . . . . . . . . . . . . . . . . . . . . . . . . . . . 8
Encendido . . . . . . . . . . . . . . . . . . . . . . . . . . . . . . . . . . . . . . . . . . . . . . . . . . . . . . . . . . 8
Instrucciones de operación . . . . . . . . . . . . . . . . . . . . . . . . . . . . . . . . . . . . . . . . . . . . . . . .8
Instrucciones de armado . . . . . . . . . . . . . . . . . . . . . . . . . . . . . . . . . . . . . . . . . . . . . . . . . 3
Diagrama de Explosión y Elementos de Ferretería . . . . . . . . . . . . . . . . . . . . . . . . . . . . . . 2
Salvaguardias importantes . . . . . . . . . . . . . . . . . . . . . . . . . . . . . . . . . . . . . . . . . . . . . . . . 1
Indice
servicio.
instalarlo, ponerlo en marcha o darle
mantenimiento del equipo antes de
de instalación, funcionamiento y
2. Lea atentamente las instrucciones
propiedad.
puede causar lesiones o daños a la
reparación o mantenimiento inadecuados
1. Una instalación, ajuste, alteración,
PARA SU SEGURIDAD:
ADVERTENCIA
(fuera de cualquier recinto)
Solamente Para Uso En Exteriores
PARA SU SEGURIDAD:
ADVERTENCIA
Modelo No. WAF508H
Chimenea al Aire Libre
MANUAL DEL USUARIO
 Loading...