

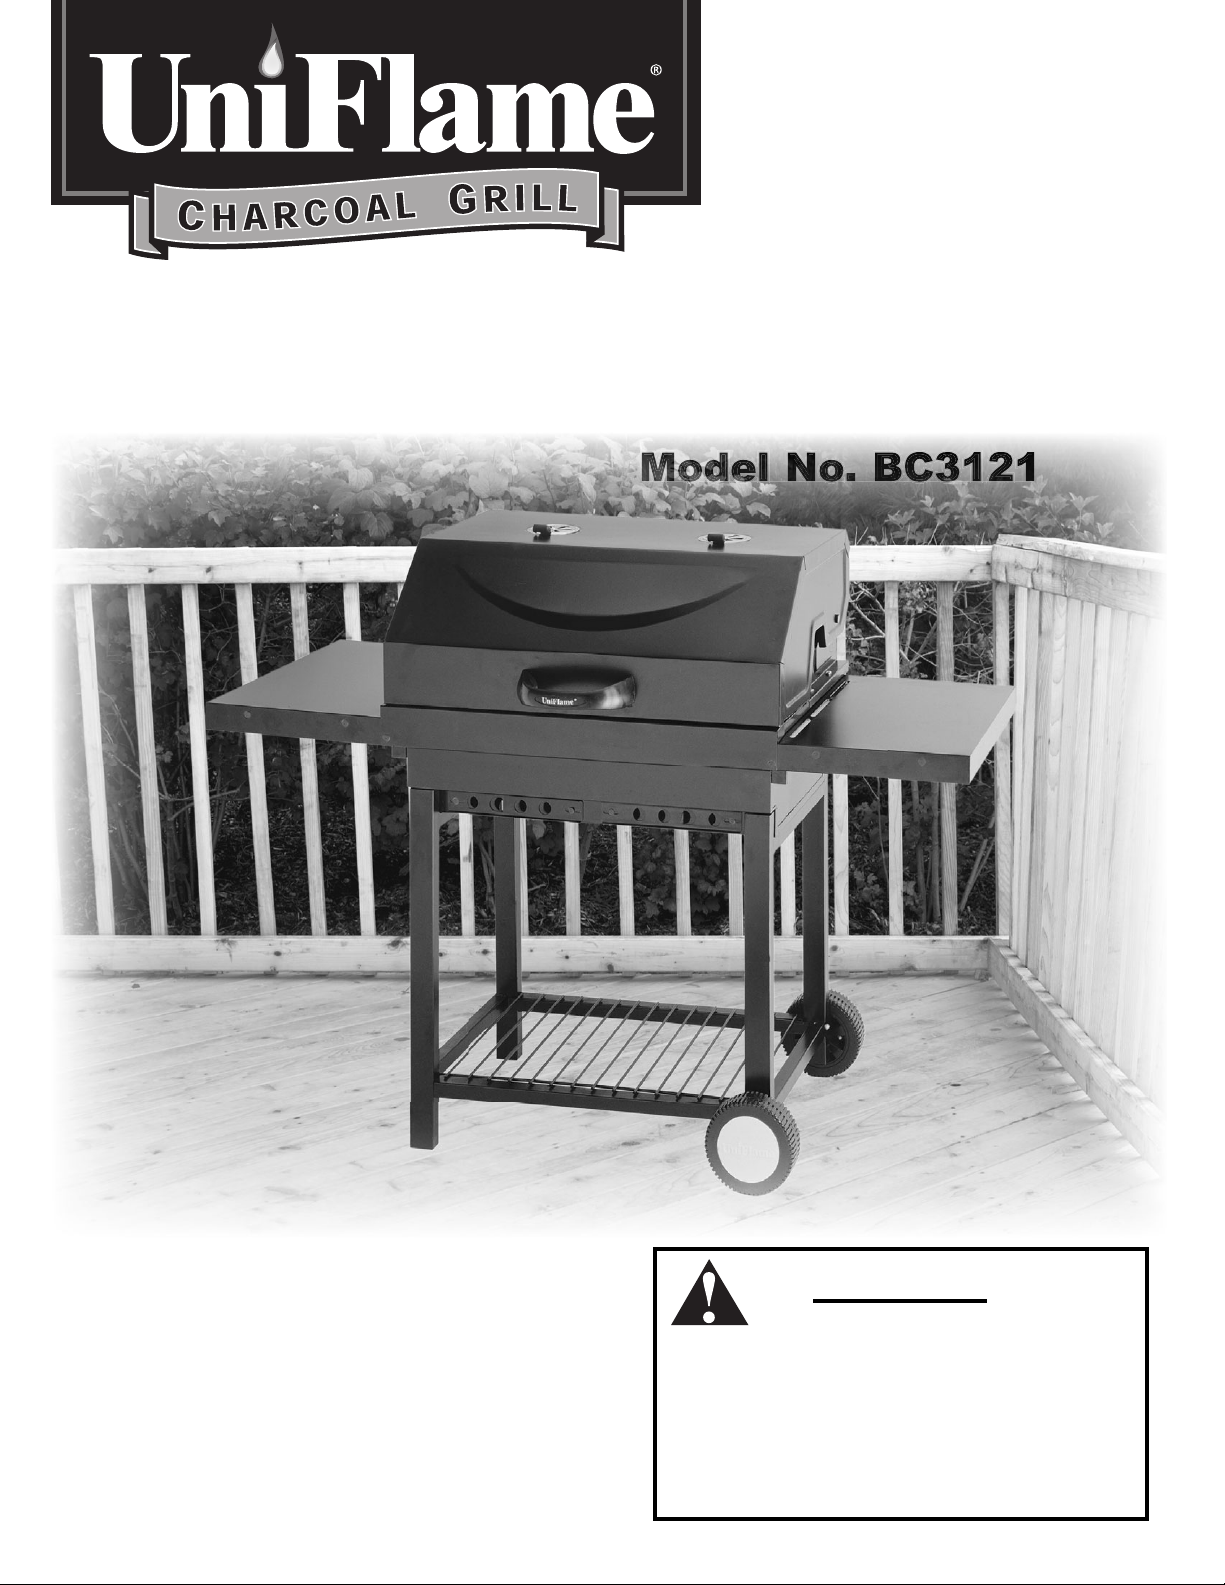
Page 1
Owner’s
Owner’s
Manual
Manual
WARNING
FOR YOUR SAFETY:
For Outdoor Use Only
(outside any enclosure)
Solamente Para Uso En Exteriores
(fuera de cual quier recinto)
Page 2
Contact 1-800-762-1142 for assistance.
Do not return to place of purchase.
WARNING
FOR YOUR SAFETY:
• Do not use gasoline, kerosene,
or alcohol for lighting charcoal
briquettes.
• Always open charcoal grill lid
carefully and slowly as heat and
steam trapped within grill can
severely burn you.
• Always place the charcoal grill on
a hard, level surface far away from
combustibles and children.
• This is not a tabletop grill!
Therefore, do not place this grill on
any type of tabletop surface
• Do not attempt to move the grill
once the charcoal briquettes have
been lit.
DANGER
DO NOT use charcoal
briquettes for indoor
cooking or heating. TOXIC
carbon monoxide fumes
can accumulate and cause
asphyxiation. Live hot
briquettes can crate a fire
hazard. NOT to be used in
or on boats or recreational
vehicles.
• Do not leave a lit grill unattended,
especially around children and pets.
• Do not touch metal parts of grill
until it has completely cooled to
avoid burns. Unless you are wearing
protective gear (Potholders, gloves,
BBQ mittens, hot pads & etc.).
• Do not remove the ashes until all
briquettes are completely and fully
extinguished.
• Do not place charcoal briquettes
directly into bottom of grill. Place
the charcoal only in the charcoal
pan.
• Do not place a hot lid onto grass or
deck, hang the lid on side of grill.
• Keep all electrical cords away from a
hot grill
• Do not use grill in high winds.
• Do not use the grill unless it is
completely assembled and all parts
are securely fastened and tightened.
1
Owner’s manual: model BC3121 outdoor charcoal grill 2/11/03
Page 3

Contact 1-800-762-1142 for assistance.
Do not return to place of purchase.
ADVERTENCIA
PARA SU SEGURIDAD:
• No utilice gasolina, queroseno o alcohol para
encender las briquetas de carbón vegetal.
• Abra siempre la tapa de la parrilla de carbón
vegetal con cuidado y lentamente, ya que el calor
y el vapor atrapados dentro de la parrilla podrían
producirle quemaduras graves.
• Coloque siempre la parrilla de carbón vegetal
sobre una superficie firme y nivelada, alejada de
productos combustibles y de los niños.
• ¡No es una parrilla de sobremesa! Por lo tanto,
no coloque esta parrilla sobre ningún tipo de
superficie de sobremesa
PELIGRO
NO utilice briquetas de
carbón vegetal para cocinar
o calentar en interiores.
Los gases TÓXICOS de
monóxido de carbono
pueden acumularse y
provocar la asfixia. Las
briquetas de carbón vegetal
calientes y encendidas
pueden provocar un
incendio. NO utilizar en
embarcaciones o vehículos
de recreo.
• No intente mover la parrilla una vez haya
encendido las briquetas de carbón vegetal.
• No deje una parrilla encendida sin vigilancia,
especialmente si hay niños o mascotas presentes.
• No toque las piezas metálicas de la parrilla hasta
que ésta se haya enfriado por completo para
evitar quemaduras. A menos que utilice prendas
protectoras (Agarradores, guantes, mitones para
barbacoas, manoplas, etc.).
• No quite las cenizas hasta que todas las briquetas
de carbón vegetal se hayan apagado por completo.
• No coloque las briquetas de carbón vegetal
directamente en la parte inferior de la parrilla.
Coloque el carbón vegetal únicamente en la
bandeja destinada a este uso.
• No coloque una tapa caliente sobre el césped o en
el suelo, cuelgue la tapa en el lateral de la parrilla.
• Mantenga cualquier cable eléctrico lejos de una
parrilla caliente
• No utilice la parrilla si hace mucho viento.
• No utilice la parrilla a menos que esté
completamente montada y que todas las piezas
estén bien fijadas y apretadas.
Owner’s manual: model BC3121 outdoor charcoal grill 2/11/03
2
Page 4

Contact 1-800-762-1142 for assistance.
Do not return to place of purchase.
Table of contents
Important Safeguards . . . . . . . . . . . . . . . . . . . . . . . . . . . . . . . . . . 1
Detailed Parts List and Hardware . . . . . . . . . . . . . . . . . . . . . . . . . 5
Assembly Instructions
Step 1 . . . . . . . . . . . . . . . . . . . . . . . . . . . . . . . . . . . . . . . . . . . . . 8
Step 2 . . . . . . . . . . . . . . . . . . . . . . . . . . . . . . . . . . . . . . . . . . . . 8
Step 3 . . . . . . . . . . . . . . . . . . . . . . . . . . . . . . . . . . . . . . . . . . . . 9
Step 4 . . . . . . . . . . . . . . . . . . . . . . . . . . . . . . . . . . . . . . . . . . . . 9
Step 5 . . . . . . . . . . . . . . . . . . . . . . . . . . . . . . . . . . . . . . . . . . . . 9
Step 6 . . . . . . . . . . . . . . . . . . . . . . . . . . . . . . . . . . . . . . . . . . . 10
Step 7 . . . . . . . . . . . . . . . . . . . . . . . . . . . . . . . . . . . . . . . . . . . 10
Step 8 . . . . . . . . . . . . . . . . . . . . . . . . . . . . . . . . . . . . . . . . . . 10
Step 9 . . . . . . . . . . . . . . . . . . . . . . . . . . . . . . . . . . . . . . . . . . . . 11
Step 10 . . . . . . . . . . . . . . . . . . . . . . . . . . . . . . . . . . . . . . . . . . . 11
Operating Your Grill . . . . . . . . . . . . . . . . . . . . . . . . . . . . . . . . . . 12
Cleaning and Care . . . . . . . . . . . . . . . . . . . . . . . . . . . . . . . . . . 14
Warranty . . . . . . . . . . . . . . . . . . . . . . . . . . . . . . . . . . . . . . . . . . 16
Recipes . . . . . . . . . . . . . . . . . . . . . . . . . . . . . . . . . . . . . . . . . . . 18
Save these instructions for future reference. If you are
assembling this unit for someone else, give this manual
to him or her to save for future reference.
3
Owner’s manual: model BC3121 outdoor charcoal grill 2/11/03
Page 5

Si necesita ayuda llame al 1-800-762-1142
No devuelva el artículo al lugar de compra.
Indice
Advertencias y Precauciones . . . . . . . . . . . . . . . . . . . . . . . . . . . . 2
Lista Detallada de Piezas y Elementos de Ferretería. . . . . . . . . 5
Instrucciones de Montaje
Paso 1 . . . . . . . . . . . . . . . . . . . . . . . . . . . . . . . . . . . . . . . . . . . . 8
Paso 2 . . . . . . . . . . . . . . . . . . . . . . . . . . . . . . . . . . . . . . . . . . . 8
Paso 3 . . . . . . . . . . . . . . . . . . . . . . . . . . . . . . . . . . . . . . . . . . . 9
Paso 4 . . . . . . . . . . . . . . . . . . . . . . . . . . . . . . . . . . . . . . . . . . . 9
Paso 5 . . . . . . . . . . . . . . . . . . . . . . . . . . . . . . . . . . . . . . . . . . . 9
Paso 6 . . . . . . . . . . . . . . . . . . . . . . . . . . . . . . . . . . . . . . . . . . 10
Paso 7 . . . . . . . . . . . . . . . . . . . . . . . . . . . . . . . . . . . . . . . . . . 10
Paso 8 . . . . . . . . . . . . . . . . . . . . . . . . . . . . . . . . . . . . . . . . . . 10
Paso 9 . . . . . . . . . . . . . . . . . . . . . . . . . . . . . . . . . . . . . . . . . . . 11
Paso 10 . . . . . . . . . . . . . . . . . . . . . . . . . . . . . . . . . . . . . . . . . . 11
Funcionamiento de su Parrilla . . . . . . . . . . . . . . . . . . . . . . . . . . 13
Limpieza y Cuidado . . . . . . . . . . . . . . . . . . . . . . . . . . . . . . . . . 15
Garantia . . . . . . . . . . . . . . . . . . . . . . . . . . . . . . . . . . . . . . . . . . . 17
Recetas Premiadas . . . . . . . . . . . . . . . . . . . . . . . . . . . . . . . . . . 19
Conserve estas instrucciones para futuras consultas.
Si está montando esta unidad para otra persona,
entréguele este manual para futuras consultas.
Manual de usuario: parrilla de carbón vegetal para exteriores, modelo BC3121 2/11/03
4
Page 6
Contact 1-800-762-1142 for assistance.
Do not return to place of purchase.
Si necesita ayuda llame al 1-800-762-1142
No devuelva el artículo al lugar de compra.
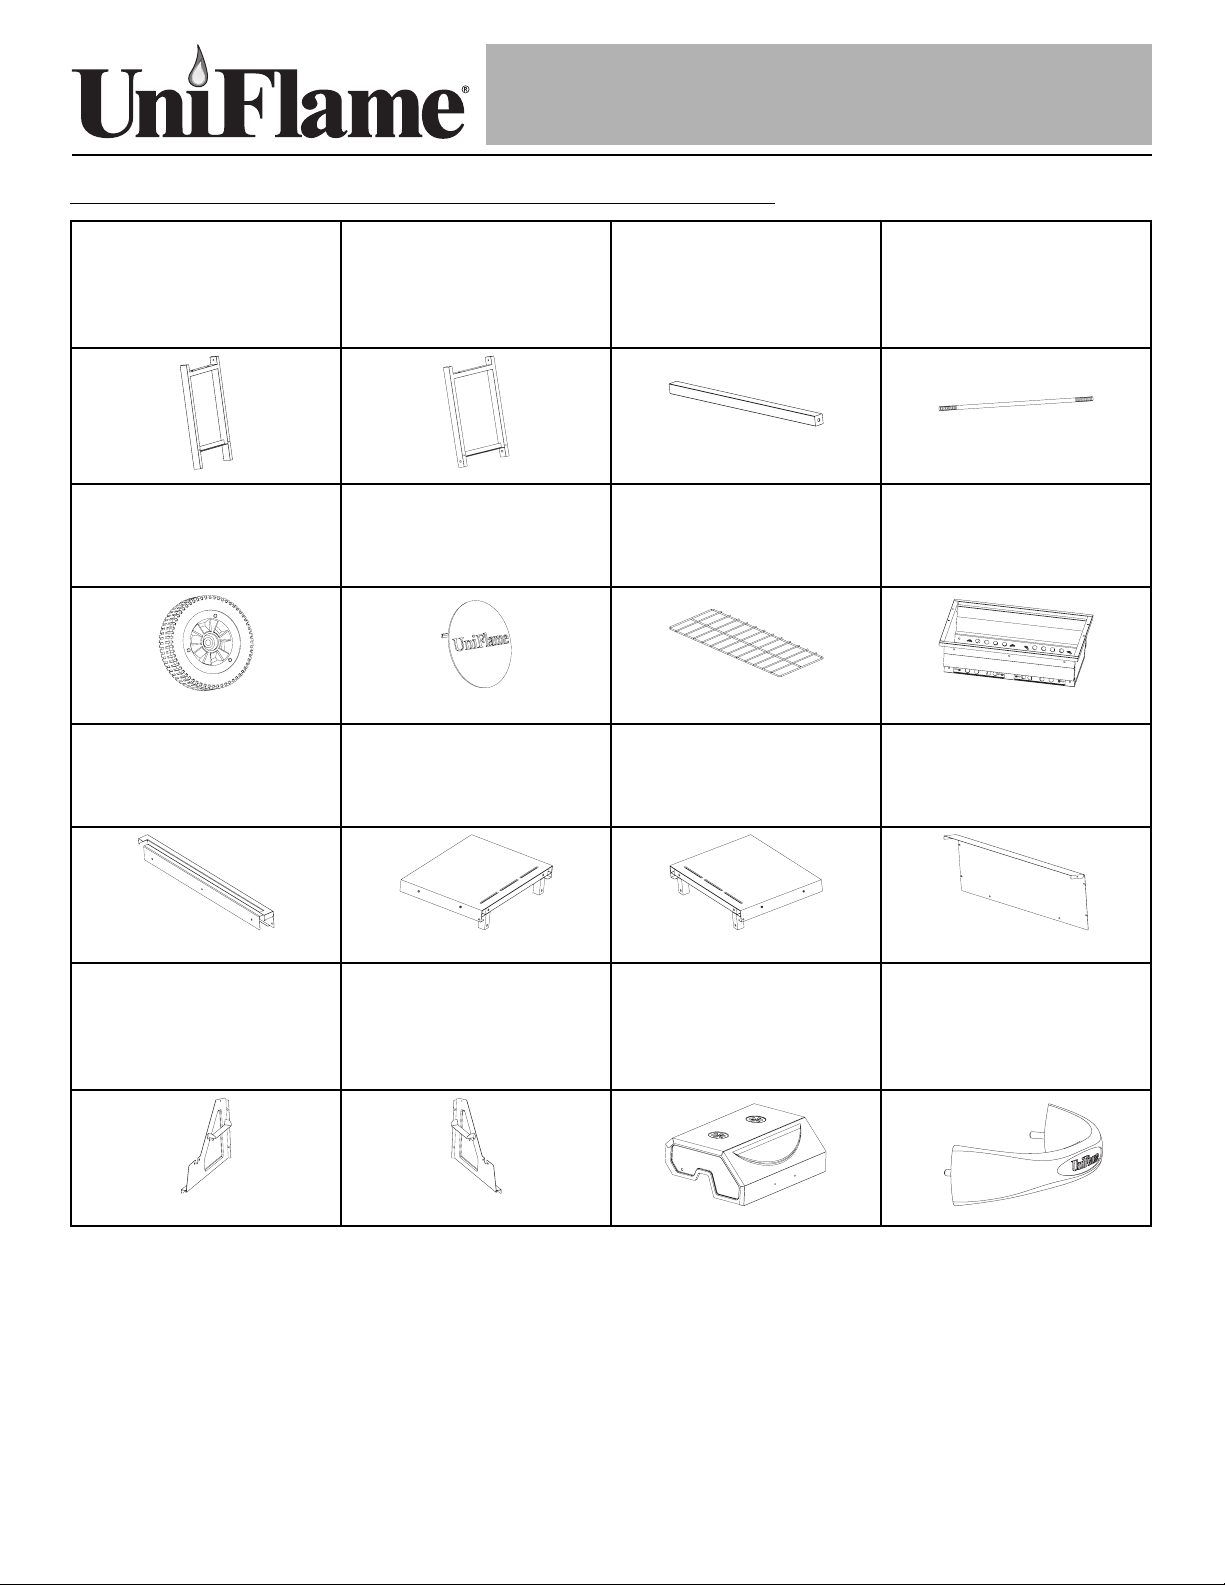
Detailed Parts List / Lista Detallada de Piezas
1. Left Cart Frame . . . 1 pc
Reorder number 55-13-270
1. Armazón izquierdo del
carrito . . . . . . . . . . . . . . (1)
No. de pedido 55-13-270
5. Wheels . . . . . . . . . . 2 pc
Reorder number 55-13-274
5. Ruedas. . . . . . . . . . . (2)
No. de pedido 55-13-274
9. Bottom Baffle . . . . . 1 pc
Reorder number 55-13-278
9. Defl ector de la parte inf.(1)
No. de pedido 55-13-278
2. Right Cart Frame . . 1 pc
Reorder number 55-13-271
2. Armazón derecho del
carrito . . . . . . . . . . . . . . (1)
No. de pedido 55-13-271
6. Wheel Decals. . . . . 2 pc
Reorder number 55-13-275
6. Adhesivos de ruedas (2)
No. de pedido 55-13-275
10. Left Side Shelf . . . 1 pc
Reorder number 55-13-279
10. Estante del lado izq. (1)
No. de pedido 55-13-279
3. Link Beam . . . . . . . 2 pc
Reorder number 55-13-272
3. Barra de unión . . . . . (2)
No. de pedido 55-13-272
7. Bottom Rack . . . . . 1 pc
Reorder number 55-13-276
7. Estante inferior . . . . . (1)
No. de pedido 55-13-276
11. RightSide Shelf . . 1 pc
Reorder number 55-13-280
11. Estante del lado derecho(1)
No. de pedido 55-13-280
4. Wheel Axle . . . . . . . 1 pc
Reorder number 55-13-273
4. Eje de las ruedas . . . (1)
No. de pedido 55-13-273
8. Bottom Body . . . . . 1 pc
Reorder number 55-13-277
8. Cuerpo inferior . . . . . (1)
No. de pedido 55-13-277
12. Back Panel . . . . . . 1 pc
Reorder number 55-13-281
12. Panel posterior . . . . (1)
No. de pedido 55-13-281
13. Left Support Panel 1 pc
Reorder number 55-13-282
13. Panel de soporte izq.(1)
No. de pedido 55-13-282
5
Owner’s manual: model BC3121 outdoor charcoal grill / Manual de usuario: parrilla de carbón vegetal para exteriores, modelo BC3121 2/11/03
14. Right Support Panel1 pc
Reorder number 55-13-283
14. Panel de soporte
derecho . . . . . . . . . . . . (1)
No. de pedido 55-13-283
15. Top Lid . . . . . . . . . 1 pc
Reorder number 55-13-284
15. Tapa superior . . . . . (1)
No. de pedido 55-13-284
16. Lid Handle . . . . . . 1 pc
Reorder number 55-13-285
16. Manija de la tapa . . (1)
No. de pedido 55-13-285
Page 7
Contact 1-800-762-1142 for assistance.
Do not return to place of purchase.
Si necesita ayuda llame al 1-800-762-1142
No devuelva el artículo al lugar de compra.
17. Lid Air Vent . . . . . 2 pc
Reorder number 55-13-286
17. Entrada de aire de la
tapa . . . . . . . . . . . . . . . . (2)
No. de pedido 55-13-286
21. Warming Rack. . . 1 pc
Reorder number 55-13-290
21. Estante de
calentamiento . . . . . . . . (1)
No. de pedido 55-13-290
18. Charcoal Plate. . . 1 pc
Reorder number 55-13-287
18. Placa para la carbonilla
(1)
No. de pedido 55-13-287
22. Motor Support . . . 1 pcs
Reorder number 55-13-291
22. Soporte del motor . . (1)
No. de pedido 55-13-291
19. Charcoal Grid . . . 2 pc
Reorder number 55-13-288
19. Rejilla para la carbonilla
(2)
No. de pedido 55-13-288
20. Cooking Grid . . . . 2 pc
Reorder number 55-13-289
20. Rejilla de cocinar. . . (2)
No. de pedido 55-13-289
Owner’s manual: model BC3121 outdoor charcoal grill / Manual de usuario: parrilla de carbón vegetal para exteriores, modelo BC3121 2/11/03
6
Page 8
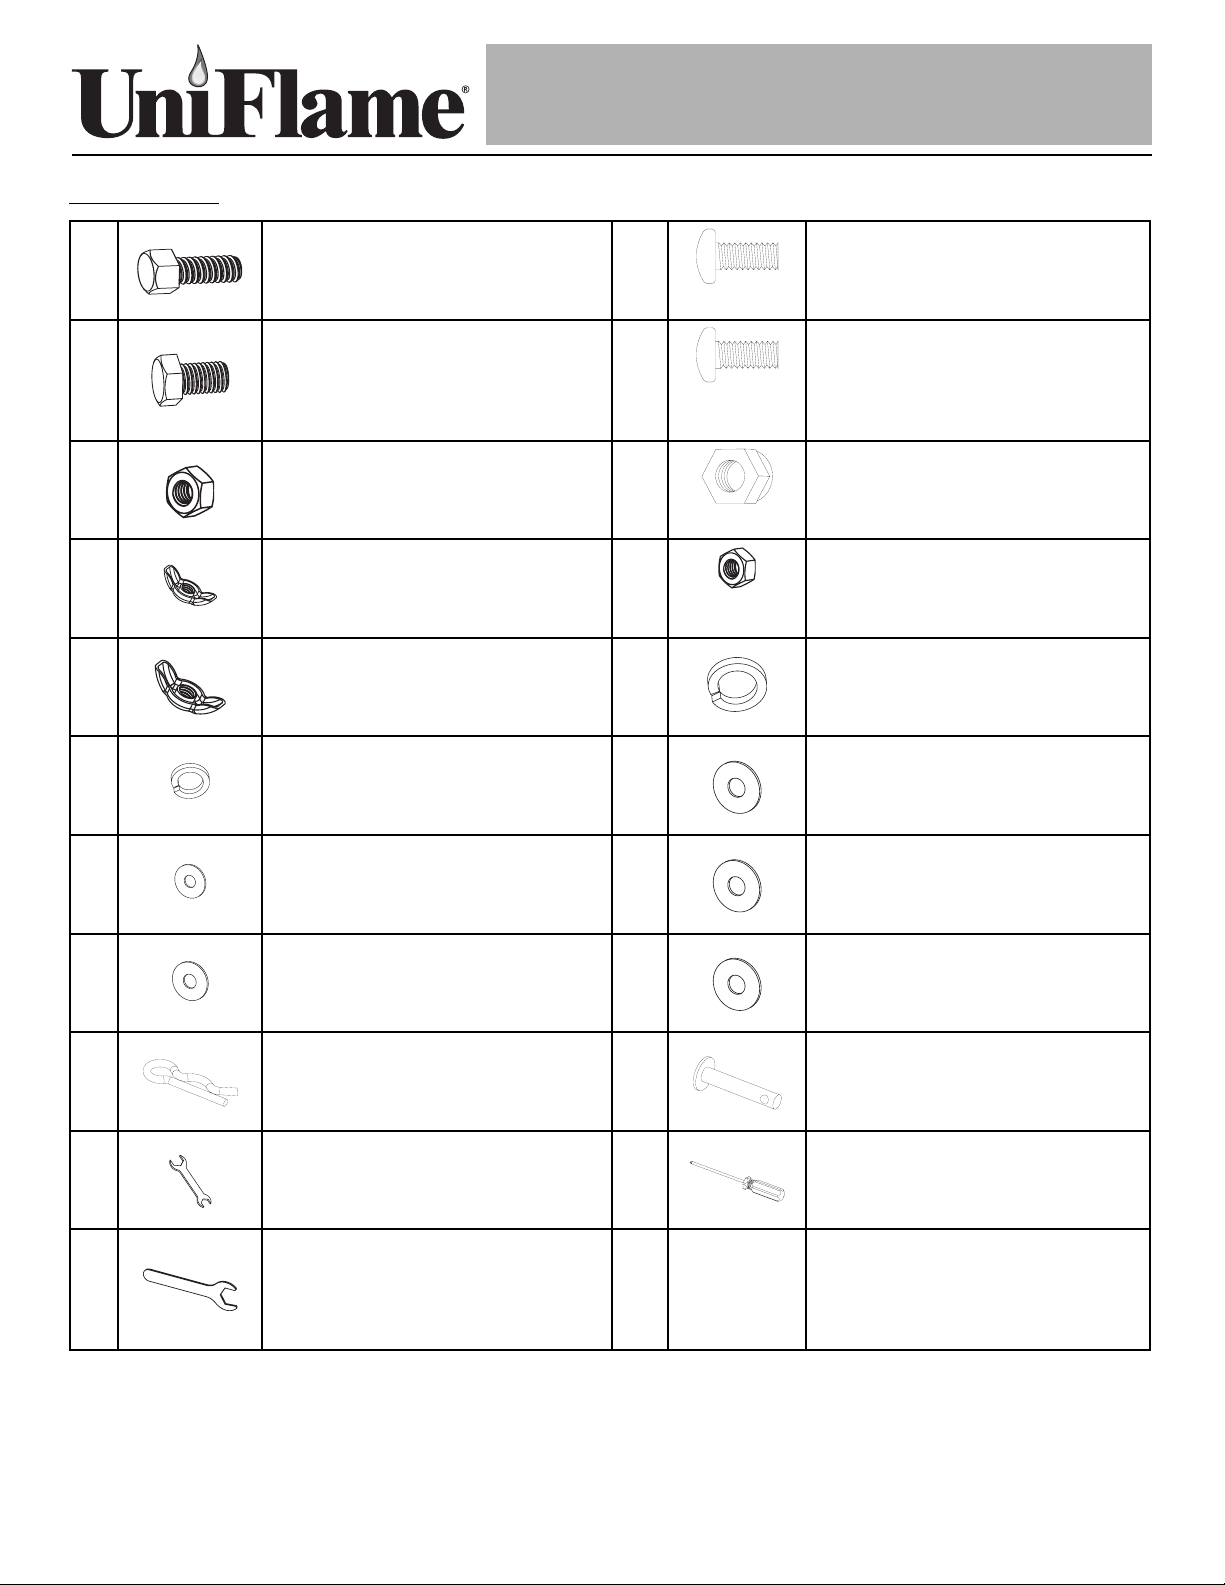
Hardware
Contact 1-800-762-1142 for assistance.
Do not return to place of purchase.
Si necesita ayuda llame al 1-800-762-1142
No devuelva el artículo al lugar de compra.
A
C
E
G
K
M
O
Q
S
U
Frame Bolts 4 pcs.
Reorder number 55-13-313
Tornillos del armazón (4)
No. de pedido 55-13-313
Hex Head Bolt 29 pcs.
Reorder number 55-13-312
Perno principal de
la tuerca hexagonal (29)
No. de pedido 55-13-312
Large Nut 2 pcs.
Reorder number 55-13-296
Tuerca grande (2)
No. de pedido 55-13-296
Small Wing Nuts 2 pcs.
Reorder number 55-13-298
Tuerca de aletas pequeña (2)
No. de pedido 55-13-298
Wing Nuts 2 pcs.
I
Reorder number 55-13-300
Tuerca de aletas (2)
No. de pedido 55-13-300
Small Lock Washers 8 pcs.
Reorder number 55-13-302
Arandela de seguridad pequena (8)
No. de pedido 55-13-302
Small Washers 6 pcs.
Reorder number 55-13-304
Arandelas pequeñas (6)
No. de pedido 55-13-304
Wheel Washers 2 pcs.
Reorder number 55-13-306
Arandelas para ruedas (2)
No. de pedido 55-13-306
Cotter Pins 2 pcs.
Reorder number 55-13-308
Pasador de aletas (2)
No. de pedido 55-13-308
Wrench 2 pcs.
Reorder number 55-13-310
Llave (2)
No. de pedido 55-13-310
10 mm Hex Head Wrench 1 pcs.
Reorder number 55-13-314
llave de la pista de la
tuerca hexagonal de 10 mm (1)
No. de pedido 55-13-314
B
D
F
H
J
L
N
P
R
T
Air Vent Bolts 2 pcs.
Reorder number 55-13-293
Tornillos de la entrada de aire (2)
No. de pedido 55-13-293
Bolts-Back Panel 6 pcs.
Reorder number 55-13-295
Tornillos del panel posterior (6)
No. de pedido 55-13-295
Large Wheel Nuts 2 pcs.
Reorder number 55-13-297
Tuercas grandes para ruedas (2)
No. de pedido 55-13-297
Small Nuts 6 pcs.
Reorder number 55-13-299
Tuercas pequeñas (6)
No. de pedido 55-13-299
Large Lock Washers 26 pcs.
Reorder number 55-13-301
Arandela de seguridad grande (26)
No. de pedido 55-13-301
Large Washers 31 pcs.
Reorder number 55-13-303
Arandelas grandes (31)
No. de pedido 55-13-303
Rubber Spacers 2 pcs.
Reorder number 55-13-305
Arandelas de goma (2)
No. de pedido 55-13-305
Heat Resistant Washer 2 pcs.
Reorder number 55-13-307
Arandelas resistentes al calor (2)
No. de pedido 55-13-307
Pins 2 pcs.
Reorder number 55-13-309
Pasadores (2)
No. de pedido 55-13-309
Screwdriver 1 pcs.
Reorder number 55-13-311
Destornillador (1)
No. de pedido 55-13-311
7
Owner’s manual: model BC3121 outdoor charcoal grill / Manual de usuario: parrilla de carbón vegetal para exteriores, modelo BC3121 2/11/03
Page 9

Contact 1-800-762-1142 for assistance.
Do not return to place of purchase.
Si necesita ayuda llame al 1-800-762-1142
No devuelva el artículo al lugar de compra.
Assembly Instructions
For Best Results
Remove all contents from packaging, and make sure all parts are present before attempting to
assemble! Tighten all bolt connections by hand first, then when the grill is fully assembled, go
back and tighten.
Instrucciones de Montaje
Para Obtener los Mejores Resultados
¡Saque todos los componentes del embalaje y asegúrese de que todas las piezas están presentes
antes de iniciar el montaje! Apriete primero todas las conexiones de tornillos a mano, a continuación,
cuando la parrilla esté completamente montada, acabe de apretar las conexiones.
1
Step 1
Assemble cart frame by attaching two cart frames, (1,2) together
with two link beams (3). Secure using frame bolts (A) as shown
in diagram. Next, insert wheel axle (4) through holes in cart frame
with shorter legs (2). Then attach wheels (5) to axle using rubber
spacers (N), wheel washers (O), and large nuts (F). Then snap
wheel decals (6) into place on wheels. Last place bottom rack (7)
onto assembled frame.
7
2
Paso 1
Monte el armazón del carrito acoplando los dos armazones del carrito
(1, 2) con las dos barras de unión (3). Fije utilizando los tornillos del
armazón (A) tal y como se muestra en el diagrama. A continuación,
inserte el eje de las ruedas (4) a través de los orificios del armazón del
carrito con las patas más cortas (2). A continuación, acople las ruedas
al eje utilizando las espaciadores de goma (N) y arandelas para ruedas
(O) y tuercas grandes (F). A continuación, coloque los adhesivos para
ruedas (6) en su sitio en las ruedas. Por último, coloque el estante
inferior (7) en el armazón montado.
Step 2
Attach bottom body (8) to assembled frame, and secure using hex
bolts (C), large lock washers (J) and large washers (L) as shown.
Start all fasteners and then tighten firmly using wrench (X).
Paso 2
Acople el cuerpo inferior (8) en el armazón montado y pernos de la
tuerca hexagonal (C), arandelas de seguridad grandes (J) y arandelas
grandes (L) tal y como se muestra. Encienda todos los sujetadores y
después apriete firmemente con la llave (X).
3
N
5
O
F
6
C
J
L
C
J
L
A
4
8
Owner’s manual: model BC3121 outdoor charcoal grill / Manual de usuario: parrilla de carbón vegetal para exteriores, modelo BC3121 2/11/03
8
Page 10

Contact 1-800-762-1142 for assistance.
Do not return to place of purchase.
Si necesita ayuda llame al 1-800-762-1142
No devuelva el artículo al lugar de compra.
Step 3
L
C
J
11
Attach left side shelf (10) and right side shelf (11) using bolts (C),
large lock washers (J) and large washers (L) as shown in diagram.
10
Paso 3
Acople el estante del lado izquierdo (10) y el estante del lado derecho
(11) utilizando tornillos (C), arandelas de seguridad grandes (J) y
arandelas grandes (L) tal y como se muestra en el diagrama.
C
L
J
13
L
J
E
22
C
Step 4
Attach left support panel (13) to body using bolts (C) large washers
(L) and large lock washers (J), as shown. Repeat for right support
panel (14). Then attach motor support (22) to right support panel
14
using bolts (C), large washers (L), large lock washers (J), and large
nuts (E).
Paso 4
Acople el panel de soporte izquierdo (13) al cuerpo utilizando tornillos
(C), arandelas grandes (L) y arandelas de seguridad grandes (J)
tal y como se muestra. Repita el proceso para el panel de soporte
derecho (14). A continuación, acople el soporte del motor (22) al panel
de soporte derecho utilizando tornillos (C), arandelas grandes (L),
arandelas de seguridad grandes (J) y tuercas grandes (E).
J
D
M
K
H
C
12
H
L
K
M
D
Step 5
Attach back panel (12) to support panels (13, 14) using bolts (C),
large washers (L) large lock washers (J), back panel bolts (D), small
washers (M), small lock washers (K), and small nuts (H), as shown.
Paso 5
Acople el panel posterior (12) a los paneles de soporte (13, 14)
utilizando tornillos (C), arandelas grandes (L), arandelas de seguridad
grandes (J), los tornillos del panel posterior (D), arandelas pequeñas
(M), arandelas de seguridad pequeñas (K) y tuercas pequeñas (H), tal y
como se muestra.
9
Owner’s manual: model BC3121 outdoor charcoal grill / Manual de usuario: parrilla de carbón vegetal para exteriores, modelo BC3121 2/11/03
Page 11

Contact 1-800-762-1142 for assistance.
Do not return to place of purchase.
Si necesita ayuda llame al 1-800-762-1142
No devuelva el artículo al lugar de compra.
Step 6
Install bottom baffle (9), onto front of unit, and secure using bolts
(C), and large washers (L), as shown.
Paso 6
Instale el deflector de la parte inferior (9) en la parte delantera de la
unidad y fíjelo con tornillos (C) y arandelas grandes (L), tal y como se
muestra.
Step 7
9
L
C
L
C
Attach lid air vents (17) to top lid (15) using air vent bolts (B), small
lock washers (K) and small wing nuts (G). Then attach lid handle
(16) to top lid as shown, using heat resistant washers (P), large
washers (L), large lock washers (J), and wing nuts (I).
Paso 7
Acople las entradas de aire de la tapa (17) a la tapa superior (15),
utilizando tornillos para las entradas de aire (B), arandelas de seguridad
pequeñas (K) y tuercas de aletas pequeñas. A continuación, acople el
asa de la tapa (16) a la tapa superior, tal y como se muestra, utilizando
arandelas resistentes al calor (P), arandelas grandes (L), arandelas de
seguridad grandes (J) y tuercas de aletas (I).
Step 8
Attach top lid (15) to assembled grill frame by resting lid on support
panels, and securing with pins (R) and cotter pins (Q) as shown.
Paso 8
Acople la tapa superior (15) al armazón montado de la parrilla, dejando
caer la tapa sobre los paneles de soporte y fijándola con pasadores (R)
y pasadores de aletas (Q), tal y como se muestra.
B
17
15
I
J
L
K
G
16
P
R
Q
Owner’s manual: model BC3121 outdoor charcoal grill / Manual de usuario: parrilla de carbón vegetal para exteriores, modelo BC3121 2/11/03
10
Page 12

Contact 1-800-762-1142 for assistance.
Do not return to place of purchase.
Si necesita ayuda llame al 1-800-762-1142
No devuelva el artículo al lugar de compra.
19
18
Install charcoal plate (18) and charcoal grids (19) into bottom of grill.
Paso 9
Step 9
Monte la placa para la carbonilla (18) y la rejilla de la carbonilla (19) en la
parte inferior de la parrilla.
21
20
Step 10
Install warming rack (21) into supports in support panels, as
shown. Then insert cooking grids (20) into assembled grill.
Paso 10
Monte el estante de calentamiento (21) en los soportes de los paneles
de soporte, tal y como se muestra. A continuación, inserte la rejilla de
cocinar (20) en la parrilla montada.
11
Final
Owner’s manual: model BC3121 outdoor charcoal grill / Manual de usuario: parrilla de carbón vegetal para exteriores, modelo BC3121 2/11/03
Page 13

Contact 1-800-762-1142 for assistance.
Do not return to place of purchase.
Operating your grill
Lighting your grill
1. Make sure lid and vents all are open.
2. Remove the cooking grid. Pile 2-3 pounds of charcoal in the center of
the charcoal grid, and shape into a pyramid. (See figure 1.)
3. If you are using regular charcoal and intend to use lighter fluid, apply
fluid according to the instructions on the container. Allow lighter fluid
to soak in for approximately 1 minute before carefully lighting. If you
are using an electric fire starter, do not add any lighter fluid, and light
charcoal according to the instructions from the manufacturer of the fire
starter. If you are using instant-light charcoal, do not use any extra
lighting methods, carefully light charcoal.
4. Allow charcoal to burn for approximately 15-20 minutes, or until all coals
are lightly coated in gray ash.
Figure 1:
Pile 2-3 pounds of charcoal in the center of
the charcoal grid to light.
Cooking styles
1. Direct grilling: When the coals have ashed over, using a long-handled
cooking utencil and wearing protective cooking mits, spread the coals
evenly over the charcoal grid. Place the cookoing grid back onto the
grill and arrange food on cooking grid. You can cook food with lid open
or closed. (See figure 2.)
2. Indirect grilling: When the coals have ashed over, using a long-handled
cooking utencil and wearing protective cooking mits, arrange charcoal
in a donut shape, leaving an open space in the center. In the center
opening, put a small drip pan (not included) to catch drippings. Place
food on the cooking grid directly above the drip pan. Cook with lid open
or closed. (See figure 3.)
3. Smoking: soak any fragrant wood chips in water over night so they will
not burn when you put them on the charcoal. After spreading the coals
per the direct cooking method, above, place wood chips on charcoal.
Cook with lid closed and cooking grid, if adjustable, set to it’s highest
(away from coals) setting.
General Helpful Hints for Successful Charcoal Cooking
1. Store your charcoal in a dry place. If storing outside, seal charcoal in a
waterproof container.
2. When removing lid during cooking, if your lid is not hinged, lift to one
side instead of straight up. As lifting straight up will create a vacuum
within the grill sucking up the ash into the food.
Figure 2:
To cook directly, spread the coals evenly
over the charcoal grid after they ash over.
When cleaning your grill DO NOT use abrasive cleaners, for it will damage
the parts of this product. Clean all grids and pans with mild detergent.
Rinse clean with water. Remove all ash and dispose properly.
Owner’s manual: model BC3121 outdoor charcoal grill 2/11/03
Figure 3:
To cook indirectly, put a small drip pan in the
center of the grill, surrounded by charcoal,
and place meat cirectly above the drip pan.
12
Page 14

Figura 1:
Apile 0,9 a 1,3 kg. de carbón vegetal en
el centro de la rejilla para carbón para
encenderlo.
Si necesita ayuda llame al 1-800-762-1142
No devuelva el artículo al lugar de compra.
Funcionamiento de su Parrilla
Encendido de su parrilla
1. Asegúrese que la tapa y las aberturas de ventilación están abiertas.
2. Desmonte la rejilla de cocinarr. Apile 0,9 a 1,3 kg. de carbón vegetal en el
centro de la rejilla para carbón y colóquelo en forma de pirámide. (Véase la
figura 1)
3. Si utiliza carbón vegetal normal y quiere usar líquido encendedor, aplique
el líquido según las instrucciones que aparezcan en su envase. Deje que
el líquido encendedor empape el carbón durante aproximadamente 1 min.
antes de encender con cuidado. Si utiliza un encendedor eléctrico, no añada
líquido encendedor y encienda el carbón vegetal según las instrucciones del
fabricante del encendedor eléctrico. Si utiliza carbón vegetal de encendido
rápido, no utilice ningún método extra de encendido y encienda el carbón
con cuidado.
4. Deje que el carbón vegetal arda durante aproximadamente 15-20 minutos,
o hasta que los trozos de carbón estén ligeramente cubiertos por una capa
de ceniza gris.
Estilos de cocina
Figura 2:
Para cocinar directamente, esparza los
fragmentos de carbón de forma uniforme
sobre la rejilla para carbón una vez estén
recubiertos de ceniza.
Figura 3:
Para cocinar de forma indirecta, coloque un
pequeño recipiente para gotas en el centro
de la parrilla, rodeado por carbón vegetal,
y coloque la carne directamente sobre el
recipiente para gotas.
1. Parrilla directa: Una vez los fragmentos de carbón están cubiertos por ceniza,
utilizando un utensilio de cocina de mango largo y manoplas protectoras
de cocina, esparza los fragmentos de carbón sobre la rejilla para carbón.
Coloque de nuevo la rejilla de cocinar sobre la parrilla y disponga la comida
sobre ella. Puede cocinar la comida con la tapa abierta o cerrada. (Véase la
figura 2)
2. Parrilla indirecta: Una vez los que los fragmentos de carbón están
recubiertos por ceniza, utilizando un utensilio de cocina de mango largo
y manoplas protectoras de cocina, disponga el carbón vegetal en forma
de anillo, dejando un espacio libre en el centro. En ese espacio central,
coloque un recipiente para gotas (no incluido) para recoger las gotas de
líquido que caigan.
Coloque la comida en la rejilla de cocinar directamente sobre el recipiente
para gotas. Cocine con la tapa abierta o cerrada (Véase la figura 3).
3. Ahumado: empape en agua astillas de madera aromática durante to da
la noche, de manera que no ardan cuando las coloque sobre el carbón
vegetal encendido. Tras esparcir los fragmentos de carbón tal y como se
señalaba en el método de cocina directa, coloque las astillas de madera
sobre el carbón vegetal endendido.
Cocine con la tapa cerrada y con la rejilla de cocinar, en el caso de que sea
ajustable, en la posición más alta (alejada del carbón).
Consejos útiles generales a la hora de cocinar
con carbón vegetal
1. Almacene el carbón vegetal en un lugar seco. Si lo almacena en el
exterior, conserve el carbón en un contenedor estanco.
2. Cuando quite la tapa durante el proceso de cocinado, si su tapa no tiene
bisagras, elévela de un único lado, en lugar de toda de golpe. Al levantarla
de golpe se creará un vacío dentro de la parrilla, haciendo que la comida
quede envuelta en ceniza.
Cuando limpie su parrilla, NO utilice productos de limpieza abrasivos, ya
que éstos dañarían las piezas del producto. Limpie todas las rejillas y
bandejas con detergente suave. Enjuague con agua. Quite toda la ceniza y
elimínela de forma adecuada.
13
Manual de usuario: parrilla de carbón vegetal para exteriores, modelo BC3121 2/11/03
Page 15

Contact 1-800-762-1142 for assistance.
Do not return to place of purchase.
Cleaning and care
Burning-off the grill after every use (approx. 15 minutes) will keep
excessive food residue from building up.
Recommended cleaning materials
Mild dishwashing liquid detergent Hot water
Nylon cleaning pad Wire brush
Paper clip Putty knife/scraper
Compressed air
DO NOT use cleaners that contain acid, mineral spirits or xylene.
Outside surfaces
The porcelain finish of the grill lid has a glass-like composition that should
be handled with care not to chip. Use mild dishwashing detergent or
baking soda and hot water solution. Non abrasive scouring powder can be
used on stubborn stains, then rinse with water.
If the inside surface of the grill lid has the appearance of peeling paint,
baked on grease buildup has turned to carbon and is flaking off. Clean
thoroughly with strong solution of detergent and hot water. Rinse with
water and allow to completely dry. NEVER USE OVEN CLEANER.
Interior of grill bottom
Remove residue using brush, scraper and/or cleaning pad, then wash with
dishwashing detergent and hot water solution. Rinse with water and let
thoroughly dry.
Plastic surfaces
Wash with a soft cloth and dishwashing detergent and hot water solution.
Rinse with water. Do not use abrasive cleaners, degreasers or a
concentrated grill cleaner on plastic parts.
Cooking Grid
Use mild dishwashing detergent and hot water solution. Non abrasive
scouring powder can be used on stubborn stains, then rinse with water.
Heat Plate
The porcelain finish has a glass-like composition that should be handled
with care not to chip. Clean residue with wire brush and wash with soapy
water, then rinse with water.
Drip pan
Periodically empty the grease pane and clean with dishwashing detergent
and hot water solution.
Owner’s manual: model BC3121 outdoor charcoal grill 2/11/03
14
Page 16

Si necesita ayuda llame al 1-800-762-1142
No devuelva el artículo al lugar de compra.
Limpieza y Cuidado
Si deja quemar la parrilla después de cada uso (aprox. unos 15 minutos),
evitará que se acumulen restos de comida en la misma.
Productos de limpieza recomendados
Lavaplatos líquido suave Agua caliente
Manopla de limpieza de nylon Un cepillo de alambre
Un clip de papel Espátula/rascador
Aire comprimido
NO utilice productos de limpieza que contengan ácido, alcoholes minerales
o xyleno.
Superficies exteriores
El acabado en porcelana de la tapa de la parrilla tiene una composición
similar al vidrio, que debe tratarse con cuidado para que no se astille.
Utilice un producto lavaplatos o una solución de bicarbonato sódico y
agua caliente. Puede utilizarse un limpiador en polvo no abrasivo para las
manchas resistentes, a continuación, enjuague con agua.
Si la superficie interior de la tapa de la parrilla da la impresión de estar
perdiendo la capa de pintura, la acumulación de grasa se ha convertido
en carbón y se está desmenuzando. Limpie a conciencia con una
solución fuerte de detergente y agua caliente. Enjuague con agua y
deje que se seque por completo. NO UTILICE NUNCA PRODUCTOS
LIMPIAHORNOS.
Interior de la parte inferior de la parrilla
Elimine cualquier residuo utilizando el cepillo, el rascador y/o la manopla
de limpieza, a continuación, lave con una solución de producto lavaplatos
y agua caliente. Enjuague con agua y deje secar por completo.
Superficies plásticas
Lave con un trapo suave y con una solución de producto lavaplatos y agua
caliente.
Enjuague con agua. No utilice productos de limpieza abrasivos,
desengrasantes o productos concentrados para la limpieza de parrillas
sobre las piezas de plástico.
15
Manual de usuario: parrilla de carbón vegetal para exteriores, modelo BC3121 2/11/03
Page 17

Contact 1-800-762-1142 for assistance.
Do not return to place of purchase.
1 YEAR LIMITED WARRANTY
Blue Rhino Global Sourcing warrants to the original retail purchaser of this grill that if it is
assembled and operated in accordance with the printed instructions accompanying it then
for a period of one (l) year from the date of purchase. All parts shall be free from defects in
material and workmanship. Blue Rhino Global Sourcing may require reasonable proof of your
date of purchase. Therefore, you should retain your sales slip or invoice.
This Limited Warranty shall be limited to the repair or replacement of parts, which prove
defective under normal use and service and which on examination, shall indicate, to Blue
Rhino Global Sourcing’s satisfaction, they are defective. Before returning any parts, contact
Blue Rhino Global Sourcing’s Customer Service Department. If Blue Rhino Global Sourcing
confirms the defect and approves the claim, Blue Rhino Global Sourcing will elect to replace
such parts without charge. If you are required to return defective parts, transportation
charges must be prepaid. Blue Rhino Global Sourcing will return parts to the purchaser,
freight or postage prepaid.
This Limited Warranty does not cover any failures or operating difficulties due to accident,
abuse, misuse, alteration, misapplication, improper installation or improper maintenance
or service, or failure to perform normal and routine maintenance, as set out in this owners
manual. There are no other express warrants except as set forth herein and any applicable
implied warranties of merchantability and fitness are limited in duration to the period of
coverage of this express written Limited Warranty. Some states do not allow limitation on
how long an implied warranty lasts, so this limitation may not apply to you.
Blue Rhino Global Sourcing is not liable for any special, indirect or consequential damages.
Some states do not allow the exclusion or limitation of incidental or consequential damages,
so this limitation or exclusion may not apply to you.
Blue Rhino Global Sourcing does not authorize any person or company to assume for it any
other obligation or liability in connection with the sale, installation, use, removal, return, or
replacement of its equipment, and no such representations are binding on Blue Rhino Global
Sourcing.
Blue Rhino Global Sourcing
104 Cambridge Plaza Drive
Winston-Salem, North Carolina 27104,USA
(800) 762-1142
24 Hour Fax: (336) 659-6743
CustomerService@BlueRhino.com
Owner’s manual: model BC3121 outdoor charcoal grill 2/11/03
16
Page 18

Si necesita ayuda llame al 1-800-762-1142
No devuelva el artículo al lugar de compra.
GARANTIA LIMITADA DE UN AÑO
Blue Rhino Global Sourcing garantiza al comprador original, al detal, de esta unidad que si
ésta se arma y opera de acuerdo con las instrucciones impresas que la acompañan y por
un período de un año a partir de la fecha de compra. Todas las piezas estarán libres de
defectos en material y mano de obra. Blue Rhino Global Sourcing podrá requerir prueba
razonable de la fecha de compra. Por lo tanto, usted debe conservar el recibo de venta o la
factura.
Esta Garantía Limitada estará limitada a la reparación o reemplazo de las piezas que
resulten defectuosas en condiciones de servicio y uso normal y las que un examen indique,
a satisfacción de Blue Rhino Global Sourcing, que están defectuosas. Antes de devolver
cualquier pieza, comuníquese con el Departamento de Servicio al Cliente de Blue Rhino
Global Sourcing. Si Blue Rhino Global Sourcing confirma el defecto y aprueba el reclamo,
Blue Rhino Global Sourcing decidirá reemplazar tales partes sin costo alguno. Si se le pide
que devuelva las partes defectuosas, los costos de transporte deberán ser prepagados.
Blue Rhino Global Sourcing devolverá las partes al cliente con costo de transporte o envío
prepagados.
Esta Garantía Limitada no cubre fallas o dificultades de operación debidas a accidente,
abuso, mal uso, alteración, empleo en usos inapropiados, instalación defectuosa o
mantenimiento o servicio inapropiado o falla en la realización de mantenimiento normal y
rutinario como se prescribe en este manual del usuario. No existen otras garantías expresas
excepto las aquí descritas y cualquier garantía implícita de comerciabilidad y aptitud están
limitadas en duración al período cubierto expresamente en esta garantía escrita. Ciertos
estados no permiten limitaciones en cuanto a la duración de una garantía implícita, de
manera que esta limitación puede no ser aplicable a usted.
Blue Rhino Global Sourcing no asume responsabilidad por daños especiales, indirectos
o consecuenciales. Algunos estados no permiten la exclusión o limitación de daños
incidentales o consecuenciales, de manera que esta limitación o exclusión puede no ser
aplicable a usted.
Blue Rhino Global Sourcing no autoriza a ninguna persona o compañía para asumir por
Blue Rhino Global Sourcing cualquier otra obligación a responsabilidad relacionada con
la venta, instalación, uso, remoción, devolución o reemplazo de este equipo y cualquier
representación de esta naturaleza no obliga a Blue Rhino Global Sourcing.
Blue Rhino Global Sourcing
104 Cambride Plaza Drive
Winston-Salem, North Carolina 27104, EE.UU.
Teléfono (800)-762-1142
Fax las 24 horas: (336) 659-6743
CustomerService@BlueRhino.com
17
Manual de usuario: parrilla de carbón vegetal para exteriores, modelo BC3121 2/11/03
Page 19

Contact 1-800-762-1142 for assistance.
Do not return to place of purchase.
Award-Winning Barbecue Recipes
Never-fail barbecue sauce
Ingredients:
1/4 cup finely chopped onion
2 tablespoons butter or margarine
1/4 cup brown sugar, firmly packed
1 tablespoon Worcestershire Sauce
1/4 teaspoon hot pepper sauce
1 clove garlic, finely chopped
1 cup catsup
1/4 cup lemon juice
1 teaspoon prepared mustard
Prepare:
Cook onion and garlic in margarine until tender. Add remaining
ingredients and bring to a boil. Simmer uncovered 15 to 20 minutes.
Refrigerate leftovers after using.
Mamma’s Marinated Chicken
Ingredients:
1/4 cup Dijon mustard
2 tablespoons fresh lemon juice
1 1/2 teaspoons Worcestershire Sauce
1/2 teaspoon dried tarragon
1/4 teaspoon freshly ground black pepper
4 boneless skinless chicken breast halves
Prepare:
Combine ingredients, mixing well. Marinade chicken for several hours.
Grill uncovered, over medium heat, for 10 to 15 minutes or to taste.
Barbecued Honey Steak
Ingredients:
5 pounds beef sirloin steak
2 tablespoons red pepper -- crushed
1 teaspoon black pepper
2 garlic cloves -- crushed
1 large onion
1 cup honey
Prepare:
Combine all ingredients and marinate steak for 7-8 hours. Remove meat
from marinade and grill over very high heat. Heat leftover marinade and
pour over grilled steak to serve.
Owner’s manual: model BC3121 outdoor charcoal grill 2/11/03
18
Page 20

Si necesita ayuda llame al 1-800-762-1142
No devuelva el artículo al lugar de compra.
Recetas Premiadas para Barbacoa
Salsa barbacoa que nunca falla
Ingredientes:
1/4 de taza de cebolla cortada muy fina
2 cucharadas soperas de mantequilla o margarina
1/4 de taza de azúcar moreno apretado
1 cucharada sopera de Salsa Worcestershire
1/4 de cucharada de salsa de pimiento picante
1 diente de ajo cortado muy fino
1 taza de ketchup
1/4 de taza de jugo de limón
1 cucharada de mostaza preparada
Preparación:
Cocine la cebolla y el ajo en margarina hasta que queden tiernos. Añada
el resto de ingredientes y deje que vuelva a romper el hervor. Hierva a
fuego lento sin tapar durante 15 ó 20 minutos.
Después de su uso, guarde lo que sobre en la nevera.
Pollo adobado de la Mamma
Ingredientes:
1/4 de taza de mostaza de Dijon
2 cucharadas soperas de jugo de limón fresco
Una cucharada y media de Salsa Worcestershire
Media cucharada de estragón seco
1/4 de cucharada de pimienta negra fresca
4 mitades de pechuga de pollo deshuesada y sin piel
Preparación:
Mezcle bien los ingredientes. Adobe el pollo durante varias horas.
Cocine con la parrilla sin tapar, a medio fuego, durante 10 ó 15 minutos,
o a su gusto.
Bistec con Miel a la Barbacoa
Ingredientes:
2 ½ kg. de bistec de solomillo de ternera
2 cucharadas soperas de pimentón molido
1 cucharadita de pimienta negra
2 dientes de ajo molido
1 cebolla grande
1 taza de miel
19
Preparación:
Mezcle bien todos los ingredientes y adobe el bistec durante 7-8 horas.
Quite el adobo de la carne y cocine en la parrilla a temperatura muy alta.
Caliente los restos de adobo y viértalo sobre el bistec antes de servirlo.
Manual de usuario: parrilla de carbón vegetal para exteriores, modelo BC3121 2/11/03
Page 21

Contact 1-800-762-1142 for assistance.
Do not return to place of purchase.
Spicy Grilled Trout
Ingredients:
1/4 cup lemon or lime juice
2 tablespoons melted butter
2 tablespoons vegetable oil
2 tablespoons chopped parsley
1 tablespoon hot sauce
1/2 teaspoon ground ginger
1/2 teaspoon salt
4 brook trout -- about 1 pound each
Prepare:
Combine lemon juice, margarine, oil, parsley, sesame seeds, hot sauce,
ginger and salt. Mix well. Pierce skin of fish in several places. Roll fish
in juice mixture to coat inside and out. Cover. Refrigerate 30 minutes to 1
hour, turning occasionally. Remove fish from marinade. Place fish on grill;
brush fish with marinade while grilling. Cook over high heat for 5 minutes.
Turn; brush with marinade, cook 5 minutes longer. Fish is done when it
flakes easily with fork – Cook to taste.
Grilled Veggies
Ingredients:
3/4 cup olive oil
1/4 cup red wine vinegar
1 teaspoon fresh rosemary
1 teaspoon fresh thyme leaves
1 teaspoon fresh basil; chopped
1 teaspoon fresh oregano; chopped
1 tablespoon minced garlic
1/2 teaspoon salt
1/2 teaspoon ground black pepper
2 pound ssorted vegetables, chopped or whole, according to taste.
Prepare
Combine all ingredients in a small bowl. Marinade vegetables with sauce,
and cover and refrigerate for 2 hrs. Grill vegetables over medium heat until
tender, brushing them with marinade while they cook. Cooking times will
vary according to the vegetables chosen.
Owner’s manual: model BC3121 outdoor charcoal grill 2/11/03
20
Page 22

Si necesita ayuda llame al 1-800-762-1142
No devuelva el artículo al lugar de compra.
Trucha Asada a la parilla Picante
Ingredientes:
1/4 de taza de jugo de limón o de lima
2 cucharadas soperas de mantequilla derretida
2 cucharadas soperas de aceite vegetal
2 cucharadas soperas de perejil troceado
1 cucharada sopera de salsa picante
Media cucharada de jengibre del terreno
Media cucharada de sal
4 truchas de arroyo, de medio kilogramo cada una
Preparación:
Mezcle el jugo de limón, la margarina, el aceite, el perejil, las semillas de
sésamo, la salsa picante, el jengibre y la sal. Mezcle bien. Corte la piel
del pescado en varios sitios. Ruede el pescado en la mezcla con jugo
para cubrir la parte interior y exterior. Cúbralo. Métalo en la nevera de 30
minutos a 1 hora, girando de vez en cuando. Quite el adobo del pescado.
Coloque el pescado sobre la parrilla, vierta el adobo sobre el pescado
mientras lo cocina. Cocine a temperatura alta durante 5 minutos.
Gírelo, vierta más adobo, cocine durante 5 minutos más. El pescado está
acabado cuando puede retirarse la piel fácilmente con el tenedor. Cocina
hasta que quede a su gusto.
Verduras a la Parrilla
Ingredientes:
3/4 de taza de aceite de oliva
1/4 de taza de vinagre de vino rojo
1 cucharada de romero fresco
1 cucharada de hojas de tomillo fresco
1 cucharada de albahaca fresca cortada
1 cucharada de orégano fresco cortado
1 cucharada sopera de ajo molido
Media cucharada de sal
1/2 de cucharada de pimienta negra molida
1 kg. de verduras variadas, cortadas o enteras, según gustos.
Preparación:
Mezcle todos los ingredientes en un cuenco pequeño. Adobe las verduras
con salsa, cúbralas y métalas en la nevera durante 2 horas. Cocine las
verduras en la parrilla a fuego medio hasta que queden tiernas, vierta el
adobo sobre ellas mientras las cocina. El tiempo de cocinado variará según
las verduras escogidas.
21
Manual de usuario: parrilla de carbón vegetal para exteriores, modelo BC3121 2/11/03
Page 23

Contact 1-800-762-1142 for assistance.
Do not return to place of purchase.
Owner’s manual: model BC3121 outdoor charcoal grill 2/11/03
22
Page 24

A wholly owned subsidiary of Blue Rhino Corporation (NASDAQ-RINO)
Blue Rhino Global Sourcing
104 Cambridge Plaza Drive, Winston-Salem, NC 27104 USA
1.800.762.1142, www.bluerhino.com
© 2003 CPD Associates, All Rights Reserved
Made in China
BC3121-OM-200
 Loading...