

Page 1

Owners Manual
Manuel d’utilisation
Model No. / Modèle Nº
92000
WARNING
FOR YOUR SAFETY
For Outdoor Use Only
(Outside any enclosure)
AVERTISSEMENT
POUR VOTRE SÉCURITÉ:
À utiliser uniquement à
l’extérieur
(hors de tout espace clos)
U.S. Patent Number: D455,204;
All Other Foreign Patents May
Apply.
Les ETATS-UNIS Font breveter
Le Nombre :D455,204 ; Tous
Autres Brevets Étrangers
Peuvent S’appliquer.
WARNING
FOR YOUR SAFETY
Improper installation,
adjustment, alteration,
service or maintenance
can cause injury or property
damage. Read the installation,
operation and maintenance
instructions thoroughly before
installing or servicing this
equipment.
AVERTISSEMENT
POUR VOTRE SÉCURITÉ:
Tout mauvais réglage ainsi que
toute installation, modication,
ou maintenance incorrecte
risque de provoquer des
blessures ou des dégâts
matériels. Lire complètement
les instructions concernant
l’installation, le fonctionnement
et l’entretien avant d’installer ou
de procéder à la maintenance de
cet appareil.
Page 2

®
Contact 1-800-762-1142 for assistance.
®
Do not return to place of purchase.
WARNING
FOR YOUR SAFETY
If you smell gas -
1. Shut off gas to appliance.
2. Extinguish any open ame.
3. If odor continues, contact
your gas supplies or re
department
WARNING
FOR YOUR SAFETY
1. Gas leaks may cause a re or
explosion which can cause
serious bodily injury or death,
or damage to property.
2. You must follow all leak
checking procedures as
outlined in step 6 before
operating this unit.
WARNING
California Proposition 65:
Chemicals know to the state of
California to cause cancer, birth
defects, or other reproductive
harm are created by the
combustion of propane.
WARNING
FOR YOUR SAFETY
Do not store or use gasoline
or other ammable vapors or
liquids in the vicinity of this or
any other appliance.
3. Never use an open ame to
check for leaks.
DANGER
CARBON MONOXIDE HAZARD
• This appliance can produce carbon
monoxide which has no odor.
• Using it in an enclosed space can kill you.
• Never use this appliance in an enclosed
space such as a camper, tent, car or
home.
1 Owner’s manual: model 92000 portable outdoor heater 12/3/03
Page 3

®
Contact 1-800-762-1142 for assistance.
Do not return to place of purchase.
Table of Contents
Safety First! . . . . . . . . . . . . . . . . . . . . . . . . . . . . . . . . . . . . . . . . . . . . . . . . . . . . 3
Assembly Instructions
Hardware & Component Listing . . . . . . . . . . . . . . . . . . . . . . . . . . . . . . . . . . 5
General Components & Features . . . . . . . . . . . . . . . . . . . . . . . . . . . . . . . . 6
Additional Requirements . . . . . . . . . . . . . . . . . . . . . . . . . . . . . . . . . . . . . . . 6
Step 1 Attach Emitter Screen . . . . . . . . . . . . . . . . . . . . . . . . . . . . . . . 6
Step 2 Attach Top Wire Guard . . . . . . . . . . . . . . . . . . . . . . . . . . . . . . 7
Step 3 Attach Dome to Emitter . . . . . . . . . . . . . . . . . . . . . . . . . . . . . . . 7
Step 4 Attach Dome Cap . . . . . . . . . . . . . . . . . . . . . . . . . . . . . . . . . . . 7
Step 5 Gas Hook Up . . . . . . . . . . . . . . . . . . . . . . . . . . . . . . . . . . . . . . . 8
Step 6 Check for Leaks . . . . . . . . . . . . . . . . . . . . . . . . . . . . . . . . . . . . 9
Step 7 Install Access Panel . . . . . . . . . . . . . . . . . . . . . . . . . . . . . . . . . . 9
Step 8 Securing Tank . . . . . . . . . . . . . . . . . . . . . . . . . . . . . . . . . . . . . 10
Operation
Before Turning Gas Supply ON . . . . . . . . . . . . . . . . . . . . . . . . . . . . . . . . . 11
Before Lighting . . . . . . . . . . . . . . . . . . . . . . . . . . . . . . . . . . . . . . . . . . . . . . 11
Lighting . . . . . . . . . . . . . . . . . . . . . . . . . . . . . . . . . . . . . . . . . . . . . . . . . . . . 11
Re-Lighting . . . . . . . . . . . . . . . . . . . . . . . . . . . . . . . . . . . . . . . . . . . . . . . . 12
Shutdown . . . . . . . . . . . . . . . . . . . . . . . . . . . . . . . . . . . . . . . . . . . . . . . . . 12
Operation Checklist . . . . . . . . . . . . . . . . . . . . . . . . . . . . . . . . . . . . . . . . . . . . . 13
Troubleshooting . . . . . . . . . . . . . . . . . . . . . . . . . . . . . . . . . . . . . . . . . . . . . . . . 14
Maintenance . . . . . . . . . . . . . . . . . . . . . . . . . . . . . . . . . . . . . . . . . . . . . . . . . . 15
Storage . . . . . . . . . . . . . . . . . . . . . . . . . . . . . . . . . . . . . . . . . . . . . . . . . . . . . . 16
Service . . . . . . . . . . . . . . . . . . . . . . . . . . . . . . . . . . . . . . . . . . . . . . . . . . . . . . 16
Warranty . . . . . . . . . . . . . . . . . . . . . . . . . . . . . . . . . . . . . . . . . . . . . . . . . . . . . 17
Specifications . . . . . . . . . . . . . . . . . . . . . . . . . . . . . . . . . . . . . . . . . . . . . . . . . 18
The use and installation of this product must conform to local codes.
In absence of local codes, use the National Fuel and Gas Code, ANSI Z223.1/
NFPA 54, Storage and Handling of Liquefied Petroleum Gases, ANSI/NFPA 58 or
CSA B149.1, Natural Gas and Propane Installation Code.
Save these instructions
for future reference. If you
are assembling this unit for
someone else, give this
manual to him or her to
save for future reference.
2Owner’s manual: model 92000 portable outdoor heater 12/3/03
Page 4

®
®
Before you do anything else,
read and understand all
precautions in Safety First!
WARNING
FOR YOUR SAFETY
• Purchaser assumes all risk in
the assembly and operation
of this unit. Failure to follow
this manual’s warnings and
instructions can result in
severe personal injury, death
or property damage.
• Combustion of propane
creates carbon monoxide,
which, when used in enclosed
areas, can kill you.
• Dome is extremely hot to
the touch during operation.
Never touch the dome while
the heater is operating.
Wait for unit to cool down
(approximately 45 minutes)
after use.
• Do not use in an explosive
atmosphere. Keep heater
away from areas where
ammable liquids, gasoline,
vapors, or explosives are
stored or used.
Contact 1-800-762-1142 for assistance.
Do not return to place of purchase.
Safety First!
Read and become familiar with this entire manual, especially the following
precautions.
If you are unsure of anything in these instructions, STOP and contact
1-800-762-1142 for assistance.
Caution: This appliance is for outdoor use only (outside any
enclosure). Always make sure there is fresh air ventilation.
• Instructions to the effect that this appliance shall be used only outdoors in
a well-ventilated space and shall not be used in a building, garage or any
other enclosed area.
• Always maintain at least 36” clearance (top) and 24” clearance (side)
from combustible materials.
• Always place heater on a hard and level surface.
• Do not use if the wind velocity is greater than 10 miles per hour.
• Unit will operate at reduced efficiency below 40ºF (5ºC).
• Keep sprinklers and other water sources away from burner and controls.
• Always use extreme caution when near heater. Alert both children
and adults to the hazards of high temperatures, especially to avoid
burns or clothing catching fire.
• Young children and pets should be carefully supervised when they
are in the area of heater.
• Do not hang clothing or other flammable materials either on or near
heater.
• Any guard or other protective device removed for servicing the
heater must be replaced prior to operating the heater.
• Certain materials or items, when stored under heater, will be subjected to
radiant heat and could be seriously damaged.
• Do not alter heater in any manner.
• The pressure regulator and hose assembly supplied with the appliance
must be used and replacements must be those specified by the
manufacturer.
• Inspect heater before each use. If a damaged part is detected, do not
operate until an original equipment replacement part has been properly
installed. Use of unauthorized parts will void warranty and create an
unsafe condition.
• Do not attempt to use this appliance without a functional factory-supplied
gas regulator in place. If regulator becomes damaged, use only a factorysupplied replacement.
• Prior to operating heater, replace any guards or protective devices
removed for servicing.
• During operation, do not touch burner assembly. The surface of heater’s
emitter can reach temperatures approaching 1600ºF.
• After shutdown, do not touch burner assembly until heater has cooled
(approximately 45 minutes after use).
Notice: This product should not be used with any fuel other than liquid
propane. Use of other fuels will detract from heaters performance and will
void your warranty.
3 Owner’s manual: model 92000 portable outdoor heater 12/3/03
Page 5

®
Contact 1-800-762-1142 for assistance.
Do not return to place of purchase.
Caution: Liquid propane (LP) gas is flammable and hazardous if
handled improperly. Become aware of the characteristics before
using any LP product.
• LP Characteristics – Flammable, explosive under pressure, heavier than
air - settles in pools in low areas.
• In its natural state, propane has no odor. For your safety, an odorant is
added that smells like rotten cabbage.
• Contact with LP can cause freeze burns to skin.
• This heater is shipped from the factory for LP gas use only.
• Use only Department of Transportation (DOT) approved “20 lb.” LP gas
cylinders (same as those commonly used on gas grills) with Acme / Type
1 / QCC safety valves. These valves can be quickly identified because
they have external and internal threads.
• Never use an LP cylinder with a damaged body, valve, collar, or footring.
• Dented or rusted LP cylinders may be hazardous and should be checked
by your LP gas supplier.
• The cylinder supply system must be arranged for vapor withdrawl.
• The cylinder used must include a collar to protect the cylinder valve.
• When heater is not in use, turn LP cylinder OFF.
• Always perform a leak test on gas connections whenever a cylinder
is connected. Never use a flame to test for leaks. Do not smoke while
performing a leak test.
Caution: It is essential to keep the heater’s valve compartment,
burners, and circulating air passages clean.
• Spiders and insects can create a dangerous condition that may damage
heater or make it unsafe. Keep burner area clean of all spiders, webs, or
insects.
• Inspect heater before each use.
• Have heater inspected annually and repairs should be made by a
qualified service person.
• More frequent cleaning may be required as necessary. It is imperative
that control compartment, burners and circulating air passageways of the
heater be kept clean.
• Check heater immediately if any of the following conditions exist:
• The smell of gas in conjunction with extreme yellow tipping of burner
flames.
• Heater does not reach proper temperature.
Note: At temperatures less than 40ºF, heat output will be reduced.
• Heater’s glow is excessively uneven
• Burner makes popping noises during use.
Note: A slight pop is normal when burner is extinguished.
• Carbon deposits may create a fire hazard. Keep dome and emitter clean
at all times.
• Do not clean heater with combustible or corrosive cleaners. Use warm,
soapy water.
• Do not paint engine, engine access panel or dome.
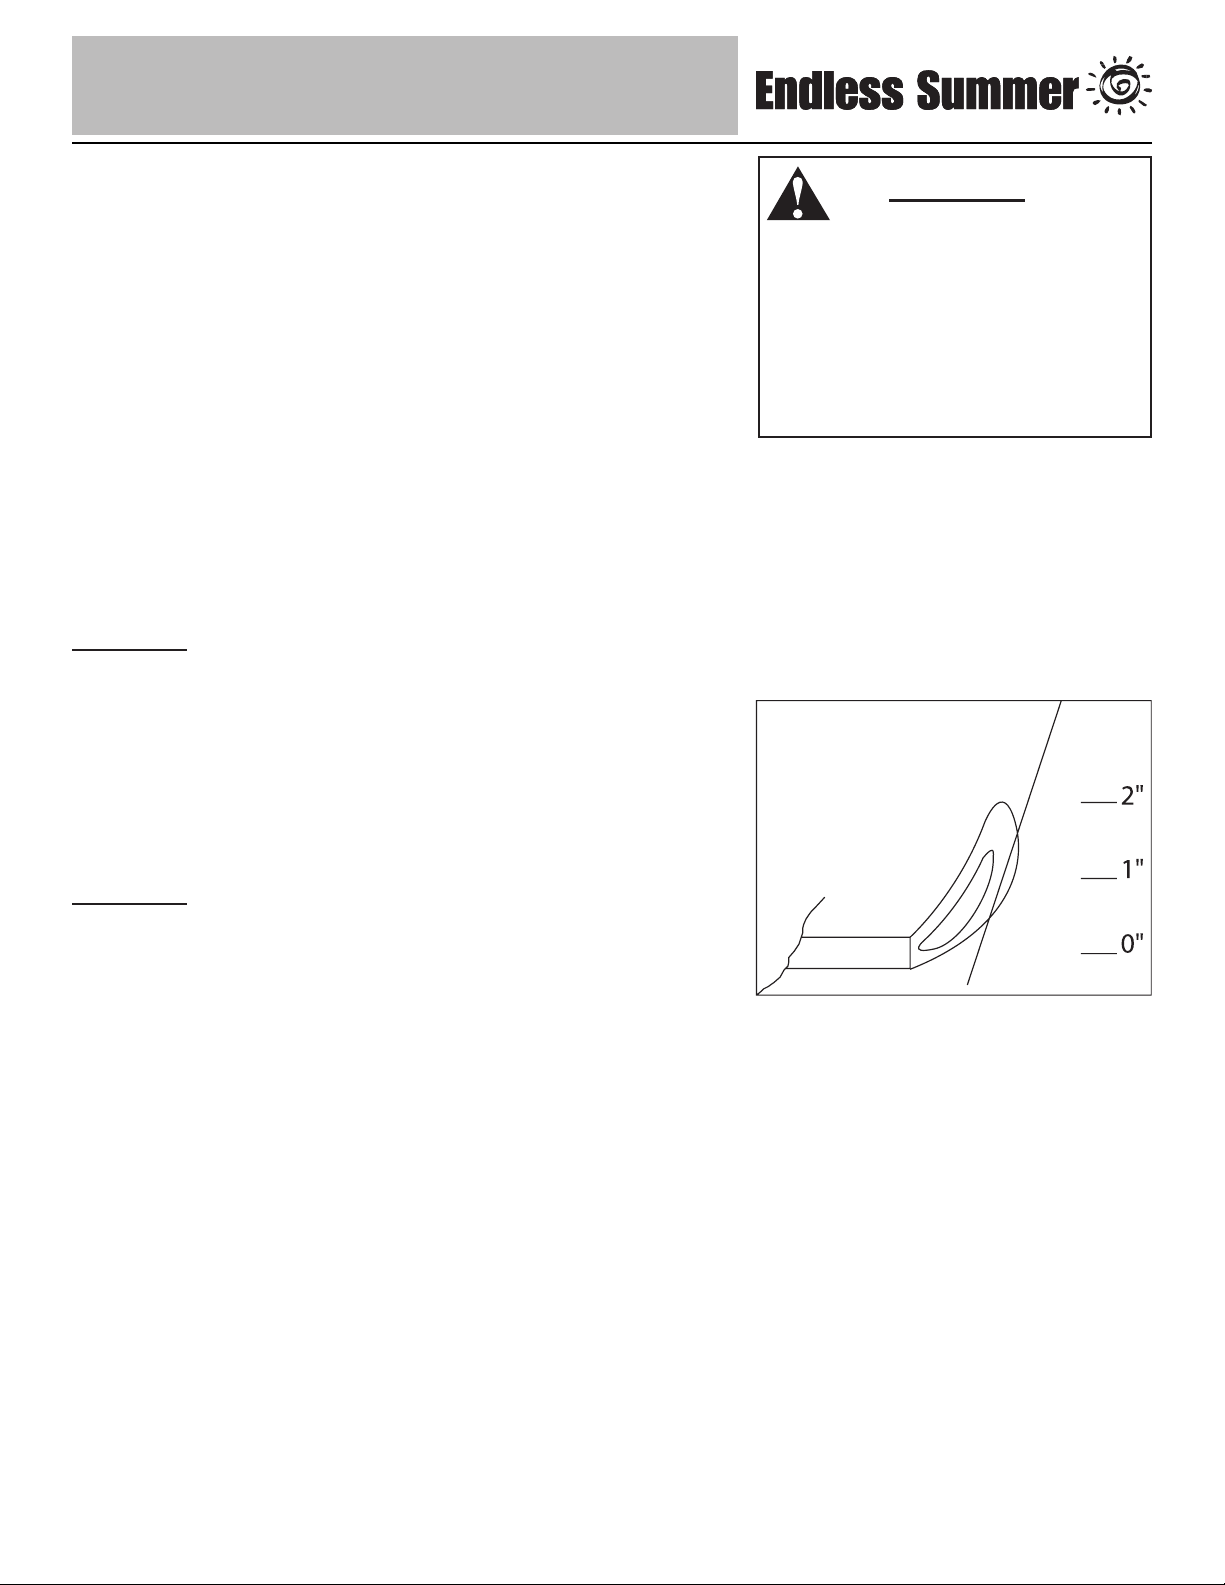
“20 lb.” LP Cylinder
Valve
18”-19”
Collar
Body
Foot
FOR YOUR SAFETY:
Beware of Spiders
Spiders or small insects can
get into the burner tube or other
openings of your heater, and
spin webs or build nests. These
obstructions can lead to gas ow
problems. It is important to make
frequent inspections of these
areas and clean them when
necessary.
Before operating your heater for
the rst time, be sure to check
for obstructions that may have
occurred during shipment.
Need a cylinder or gas?
Try Blue Rhino cylinder exchange service.
It’s easy, fast, safe, and available at tens
of thousands of conveniently located retail
outlets nationwide. You can purchase a
new full cylinder or exchange your empty
for a precision filled one.
For your nearest Blue Rhino retailer visit
www.bluerhino.com.
4Owner’s manual: model 92000 portable outdoor heater 12/3/03
Page 6

®
Contact 1-800-762-1142 for assistance.
®
Do not return to place of purchase.
Components
Part Re-order
Name Number
Finial . . . . . . . . . .56-01-001
Dome Cap . . . . . .56-01-002
Dome . . . . . . . . . .56-01-003
Top Wire Guard . .56-01-004
Emitter Assembly .56-01-005
Bottom Wire Guard56-01-006
ODS (Oxygen Depletion
Shutdown Sensor) 56-01-007
Hardware
Used in
Picture Qty Description Step(s)
4 Medium Screw 1
12-24 x 5/16” Stainless
Steel Philips Head Screw
56-01-045
3 Nut 3
1/4-20 Stainless Steel
Hex Nut
56-01-046
Post . . . . . . . . . . .56-01-008
Shroud Cover . . .56-01-013
Nozzle . . . . . . . . .56-01-017
Valve . . . . . . . . . .56-01-018
Control Tilt Switch 56-01-019
Control Knob . . . .56-01-020
Regulator . . . . . . .56-01-021
Housing . . . . . . . .56-01-025
Access Panel . . . . 56-01-031
Base . . . . . . . . . .56-01-038
Extension Hose . .56-01-043
5 Owner’s manual: model 92000 portable outdoor heater 12/3/03
Page 7

®
Contact 1-800-762-1142 for assistance.
Do not return to place of purchase.
Assembly Instructions
General Components & Features
Familiarize yourself with all components before proceeding. Refer to page 5 for hardware and components, and page 18
for specifications.
Do NOT attempt assembly unless all components are available. If you believe a component is missing or damaged,
contact 1-800-762-1142 for assistance.
Note: All hardware is mounted on a cardboard pack and numbered to match their assembly step.
Additional Requirements
The following items are not included, but are necessary for the proper assembly of your heater. Do NOT attempt to
assemble without proper tools. A hex (Allen) wrench is necessary and is included in the parts bag.
(1) - 7/16” Wrench
(1) - #2 Phillips Head Screwdriver
(1) - Leak Detection Solution (Instructions on how to make solution are included in Step 6)
(1) - 20 lb.(4-5 gallon) precision filled LP Gas Grill Cylinder
Note: You must follow all steps to properly assemble heater.
Step 1 – Attach Emitter Screen
Line up 4 holes on bottom of Emitter Screen with corresponding holes in
Emitter Bottom, and insert (4) Medium Screws in holes until tight.
Qty 4
6Owner’s manual: model 92000 portable outdoor heater 12/3/03
Page 8

®
Contact 1-800-762-1142 for assistance.
®
Do not return to place of purchase.
Step 2–Attach Top Wire Guard
Line up 4 prongs on Wire Guard Bottom with 4 holes on Emitter Bottom,
and Insert.
Note: It may be necessary to adjust the prongs slightly to line them up
with the holes.
Step 3–Attach Dome to Emitter
Line up three studs in Emitter with holes in Dome. Slide Dome carefully
over studs, clamping Top Wire Guard securely in place.
Note: It may be necessary to adjust prongs of the Top Wire Guard slightly
to provide a secure fit.
Install (3) Nuts on studs and tighten with 7/16” wrench.
Do not over tighten.
Qty 3
Step 4–Attach Dome Cap
Lay Dome Cap on dome covering 3 Nuts and line up center holes.
Insert threaded end of Finial through cap and screw into center of dome
until secure.
7 Owner’s manual: model 92000 portable outdoor heater 12/3/03
Page 9

®
Contact 1-800-762-1142 for assistance.
Do not return to place of purchase.
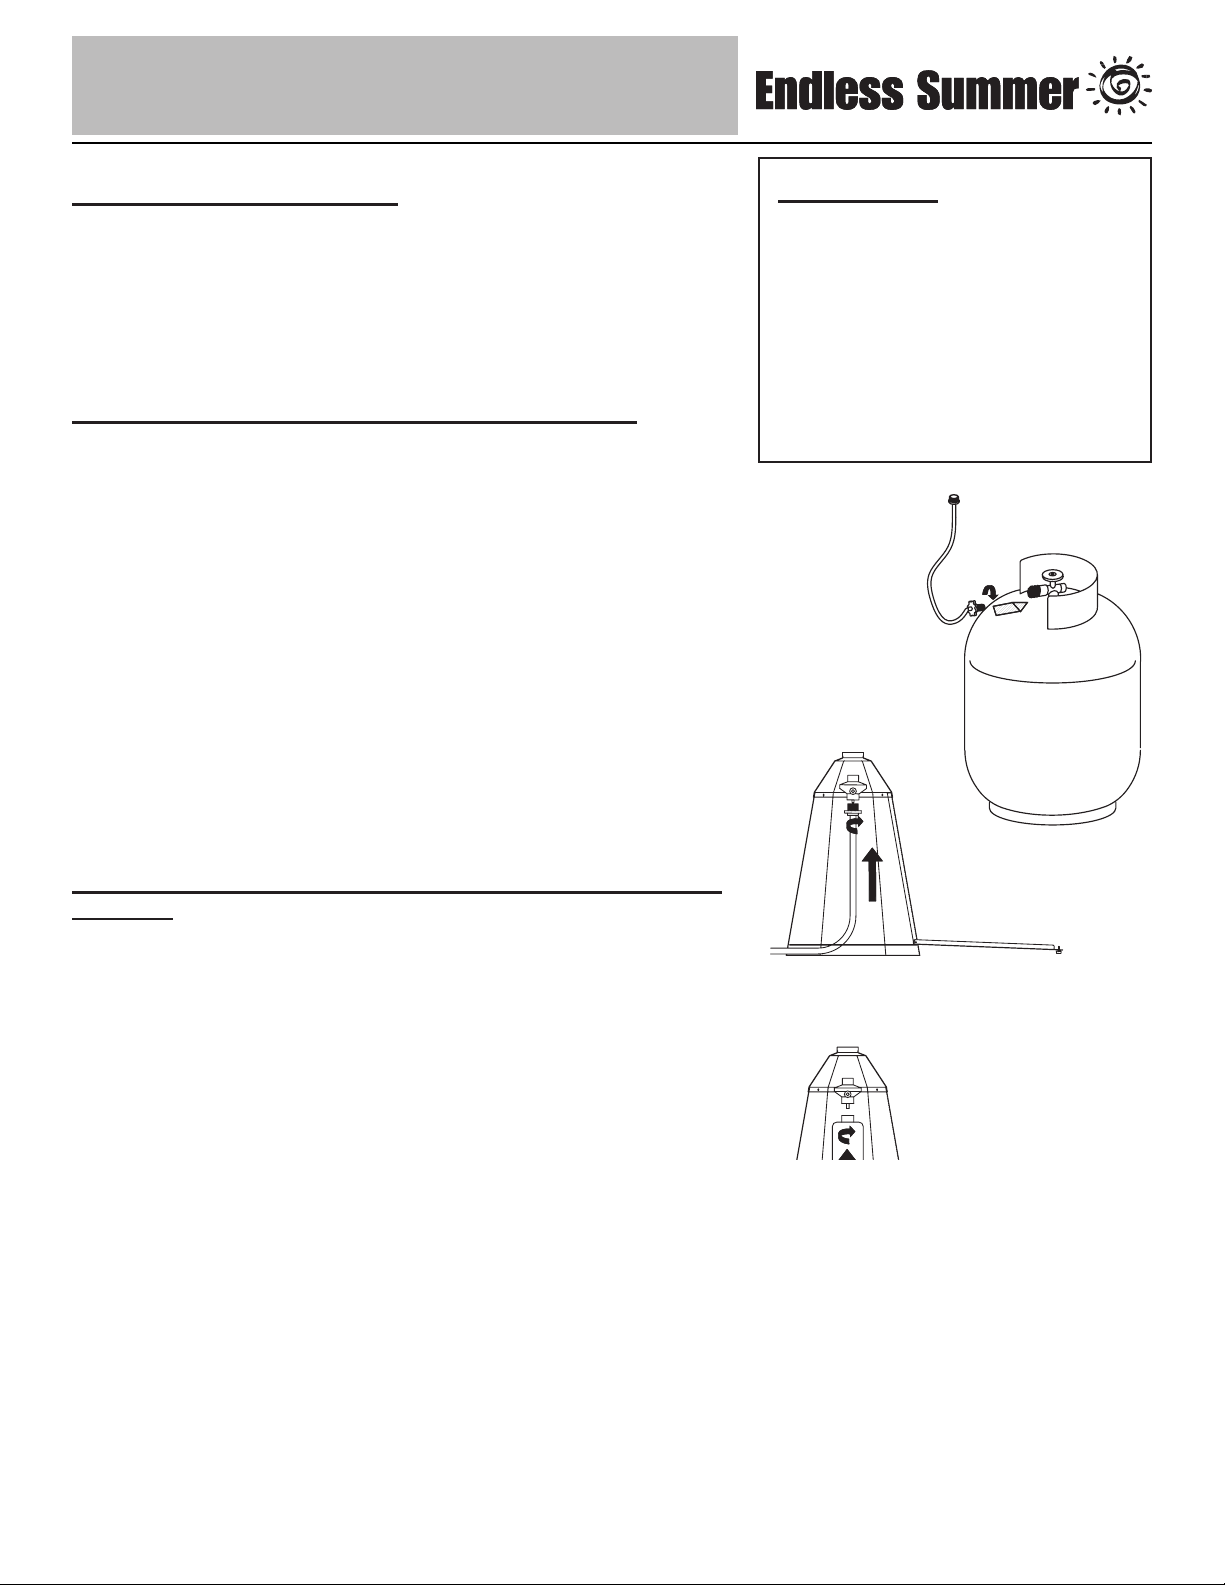
Step 5 – Gas Hook-up
Note: For best results, use heater with a 20 lb. cylinder.
The pressure regulator and hose assembly supplied with the appliance
must be used and replacements must be those specified by the
manufacturer.
To connect 20 lb. Cylinder
Slip end of flexible gas line with brass fitting through center hole of Base
and up to threaded portion of regulator.
Line up threads on fitting with those on regulator and rotate clockwise
until snug. HAND TIGHTEN ONLY. DO NOT USE ANY HAND TOOLS
TO MAKE THIS CONNECTION. Be careful not to cross threads when
screwing in FITTING.
Note: if heater uses center clamp, hose can be routed through opening in
base and table.
Set heater on base, making sure that flexible gas line is routed through
small slot in base.
Attach gas line to cylinder by turning black plastic knob counter clockwise
into cylinder valve until tight.
Note: Be careful not to kink flexible gas line.
Caution
Before you attempt to use a
propane cylinder, understand
all cylinder and propane
related precautions in Section
#1 – “Safety First.”
When using the gas extension hose always locate the hose out of
pathways where people may trip over it or in areas where the hose may
be subject to accidental damage.
To connect 14.1 oz or 16.4 oz cylinder
Only cylinders marked “propane” may be used.
Note: Some 1-lb cylinders may form frost when near empty.
Line up threads on canister with those on regulator, insert and rotate
canister clockwise until they fit snugly together. HAND TIGHTEN ONLY.
Be careful not to cross threads when screwing in canister.
8Owner’s manual: model 92000 portable outdoor heater 12/3/03
Page 10

®
®
Caution
Your Endless Summer Portable
Heater has been checked at all
factory connections for leaks.
Recheck all connections, as
movement in shipping can
loosen connections. Check
for leaks even if your unit was
assembled for you at the store.
Contact 1-800-762-1142 for assistance.
Do not return to place of purchase.
Step 6 – Check for Leaks
To check for leaks:
Make 1-2 oz. of leak solution by mixing one part liquid dishwashing soap
and 3 parts water.
Spoon several drops (or use squirt bottle) of the solution onto the
regulator/canister connections.
Inspect the connections and look for bubbles
If NO bubbles appear, the connection is safe.
If bubbles appear, there is a leak:
Loosen and re-tighten this connection.
Re-check for a leak.
If you continue to see bubbles after several attempts, disconnect
propane source and contact 1-800-762-1142.
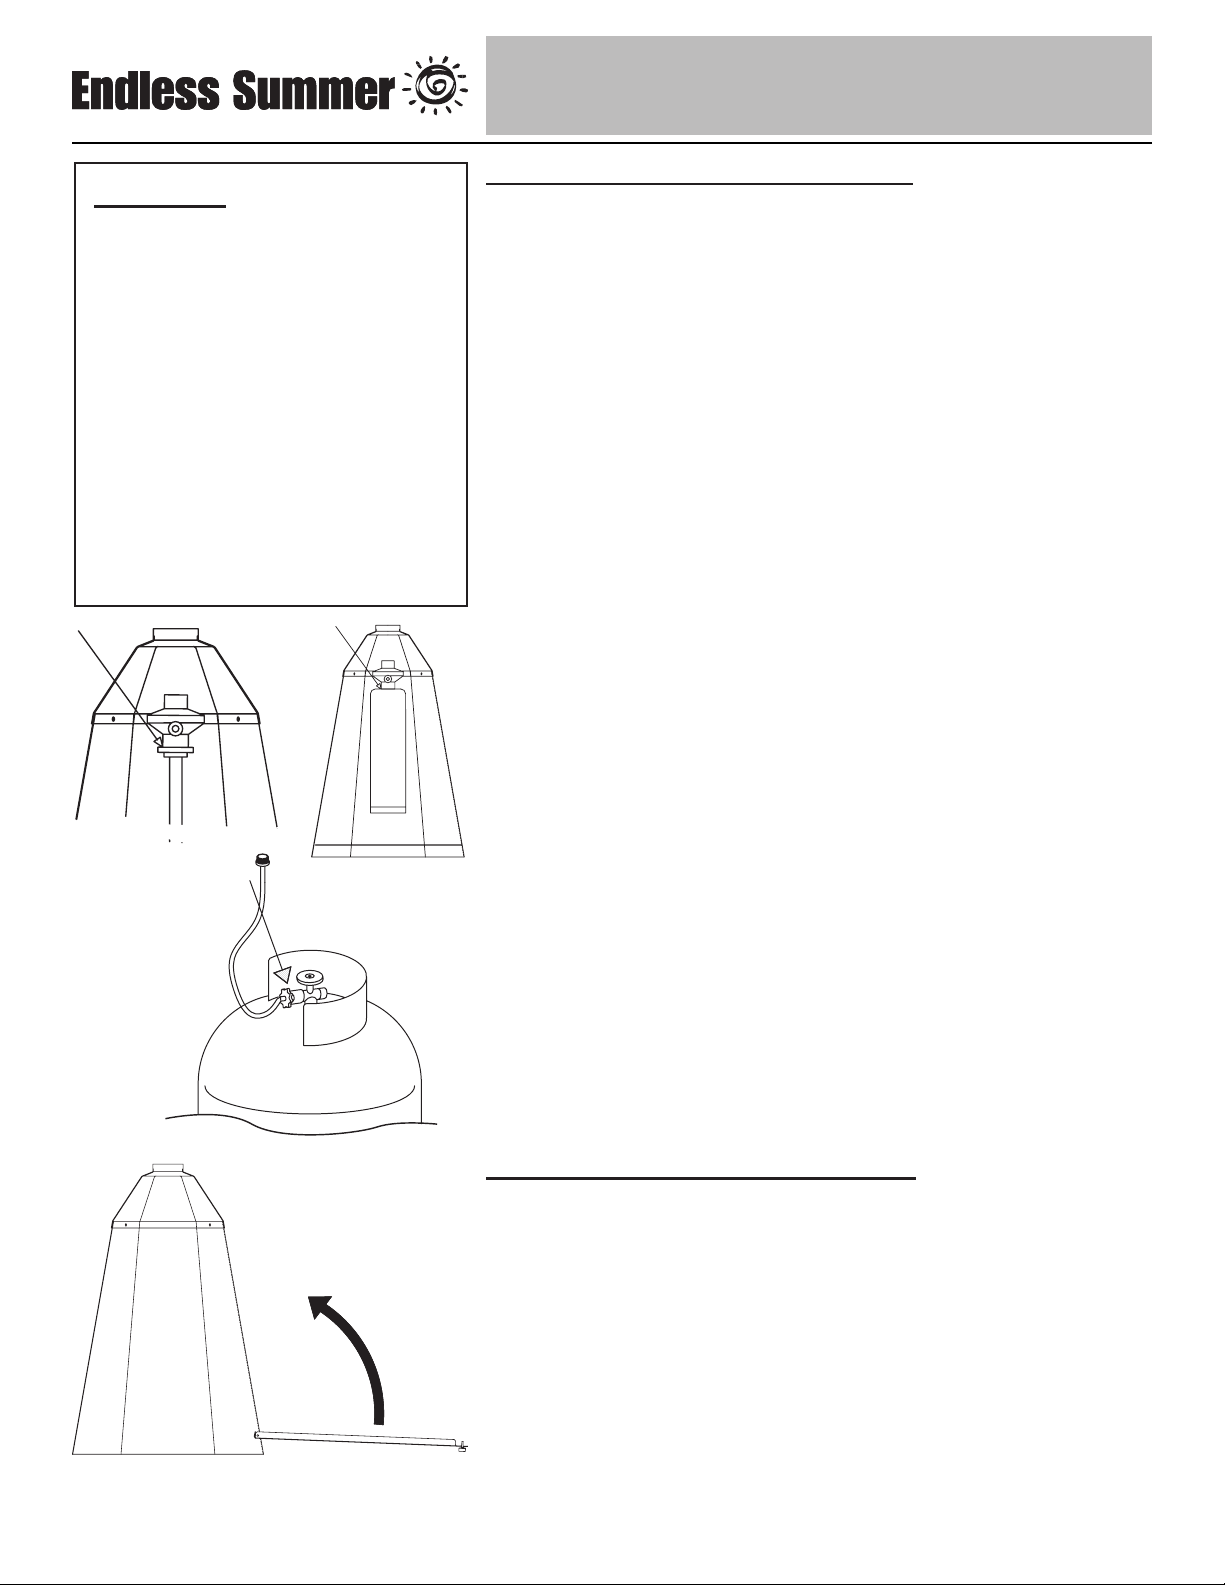
Step 7 – Install Access Panel
Rotate door up to closed position and tighten thumb screw
9 Owner’s manual: model 92000 portable outdoor heater 12/3/03
Page 11

®
Contact 1-800-762-1142 for assistance.
Do not return to place of purchase.
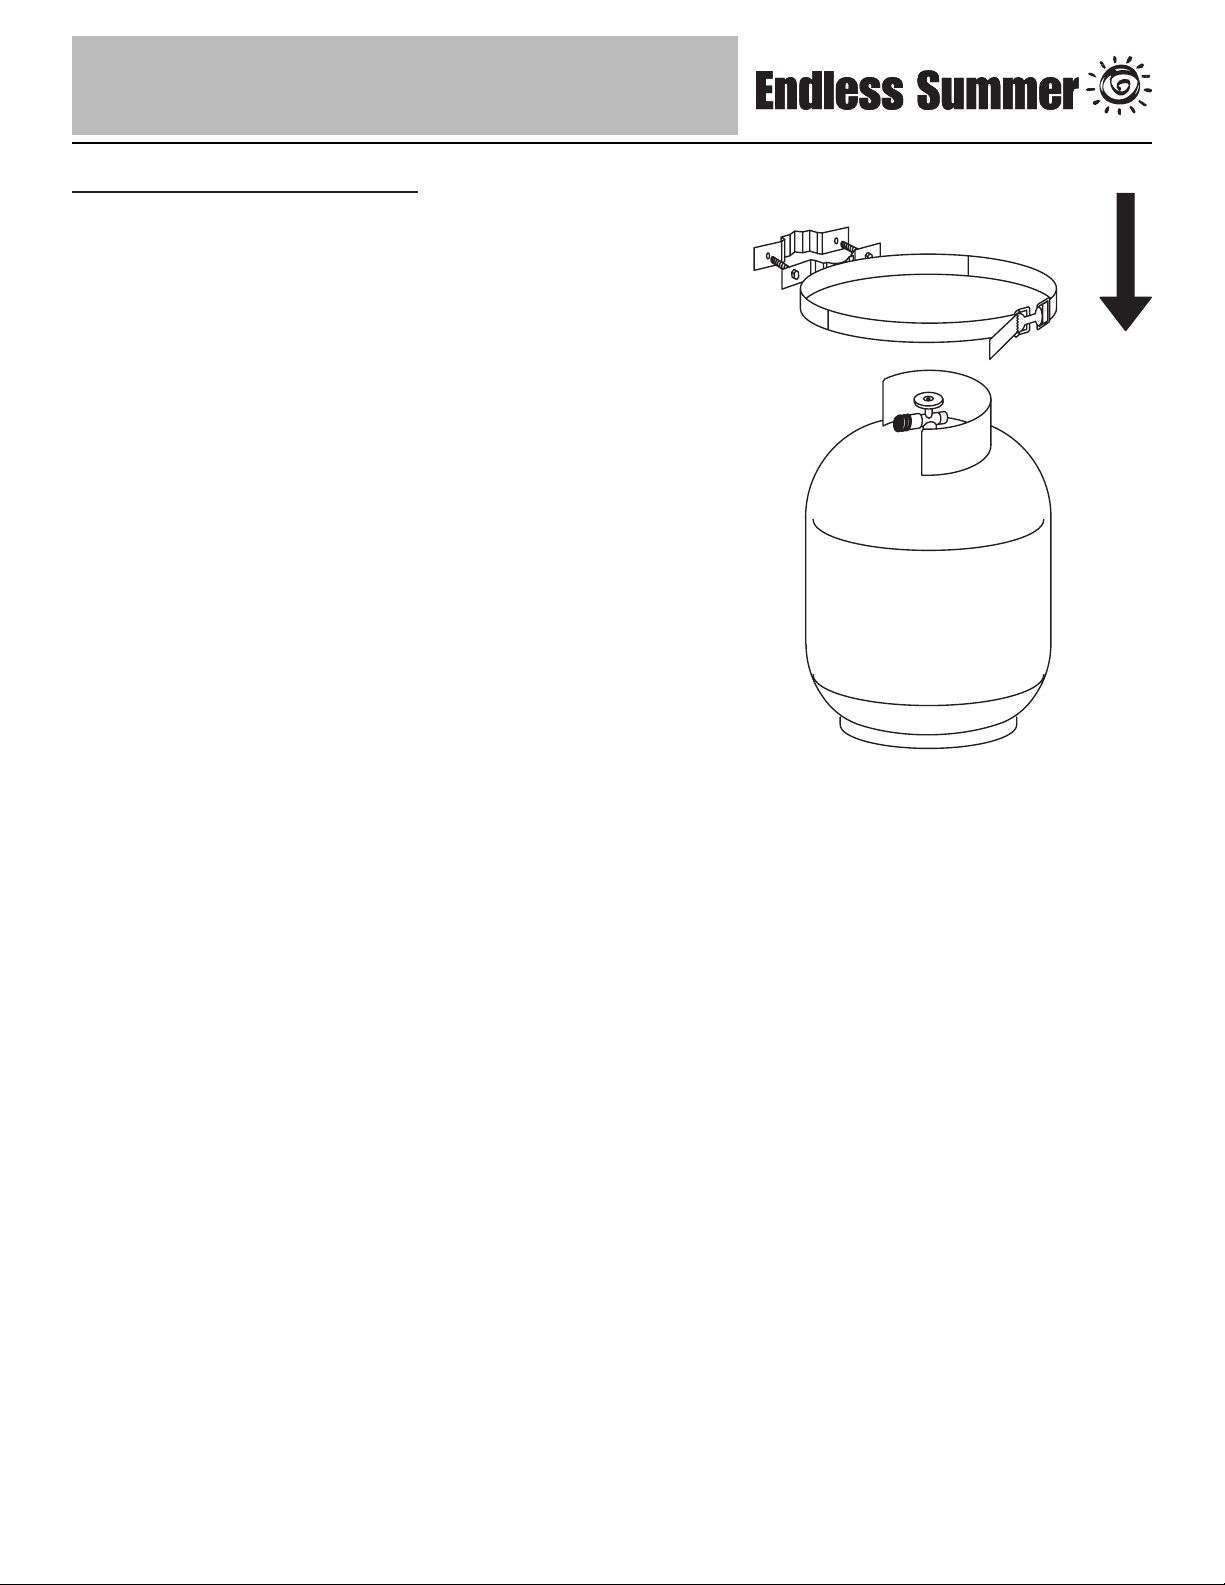
Step 8 – Securing the Tank
Mount your 20 lb. cylinder to a sturdy object such as a table or post
within 3 to 4 feet of your heater when in use, this will prevent movement
or tipping of the cylinder during operation.
The clamp on the cylinder ring will attach to any round pole from 1” to
2” in diameter, or a square post from 1” to 2” square. It will also adapt to
various other shapes up to 2” wide.
Determine where to locate your 20 lb. cylinder. Be sure that it is within
2” what you are mounting it to.
Place the bracket halves around the object and insert the 2” bolts
through the open holes in one bracket and into the matching threaded
holes in the second bracket. Position bracket within 6” of the middle of
the cylinder. Finger tighten bolts.
Slide the 20 lb. cylinder into the curved portion of the bracket, making
sure strapping ends are not between cylinder and bracket. Enclose
cylinder in strap and securely tighten strap in buckle.
Using a 7/16” wrench, tighten the 2” bolts until they are secure. DO
NOT OVER TIGHTEN.
In some cases you may wish to secure your cylinder to a larger object
or a wall. It is possible to mount the bracket attached to the straps to
these surfaces by drilling matching holes and using screws and nuts or
lag screws (not provided) to secure your cylinder.
Note: Once you have read “safety first” and successfully completed
Steps 1 – 8, you are ready to begin operating your heater.
10Owner’s manual: model 92000 portable outdoor heater 12/3/03
Page 12

®
®
WARNING
FOR YOUR SAFETY
• Do NOT attempt to operate
heater until you have
read and understand all
precautions in Section 1
“Safety First.” Failure to
do so can result in serious
personal injury, death, or
property damage.
• If at any time you are unable
to light burner and smell
gas, wait 5 minutes to allow
gas to dissipate before
attempting to light heater.
• Do NOT touch emitter or
dome or move heater for at
least 45 minutes after use.
Contact 1-800-762-1142 for assistance.
Do not return to place of purchase.
Operation
Before Turning Gas Supply ON
Your heater was designed and approved for OUTDOOR USE ONLY. DO
NOT use it inside a building, garage, or any other enclosed area.
Make sure surrounding areas are free of combustible materials, gasoline,
and other flammable vapors or liquids.
Ensure that there is no obstruction to air ventilation.
Be sure all gas connections are tight and there are no leaks.
Be sure the access panel is clear of debris.
Be sure any component removed during assembly or servicing is
replaced and fastened prior to starting.
Before Lighting
Heater should be thoroughly inspected before each use, and by a
qualified service person at least annually.
If relighting a hot heater, always wait at least 5 minutes for gas to
dissipate.
ON
HIGH
ON
HIGH
LOW
LOW
OFF
OFF
Lighting
1. Turn Gas Control Knob to OFF position.
2. Push in Control Knob and rotate to “ON” position. This will activate the
built-in ignitor and light the burner. If necessary, keep depressing and
rotating Knob until burner lights.
3. Once burner is lit, hold Control Knob in for at least 30 seconds and
release.
4. If burner does not stay lit, wait 5 minutes and repeat steps 2 and 3.
5. If ignitor does not light burner, use a lit match positioned against the
bottom of emitter screen at burner location.
6. Once burner is lit, rotate Knob to desired heating level.
If you experience any ignition problem, turn off the heater and gas
supply, and consult “Troubleshooting” on page 14.
11 Owner’s manual: model 92000 portable outdoor heater 12/3/03
Page 13
®
Contact 1-800-762-1142 for assistance.
Do not return to place of purchase.
Caution: Avoid inhaling fumes emitted from the heater’s first use.
Smoke and odor from the burning of oils used in manufacturing will
appear. Both smoke and odor will dissipate after approximately 30
minutes. The heater should NOT produce thick black smoke.
Note: The burner may be noisy when initially turned on. To eliminate
excessive noise from the burner, turn the Control Knob to the LOW
position. Then, turn the knob to the level of heat desired.
When heater is ON:
Emitter screen will become bright red due to intense heat. The color is
more visible at night.
Burner will display tongues of blue flame. These flames should not be
yellow or produce thick black smoke, indicating an obstruction of airflow
through the burners.
If yellow flame is detected, turn off heater and gas supply and consult
“Troubleshooting” on page 14.
Re-lighting
WARNING
FOR YOUR SAFETY
Be careful when attempting
to manually ignite this heater.
Holding in the control know for
more than 10 seconds before
igniting the gas will cause a
ball of ame upon ignition.
Note: For your safety, Control Knob cannot be turned ON without first
depressing Control Knob in OFF position and then rotating to ON.
1. Turn Gas Control Knob to OFF.
2. Wait at least 5 minutes to let gas dissipate before attempting to relight
burner.
3. Repeat the “Lighting” Steps 2 and 3 on prior page.
Shut Down
1. Rotate Gas Control Knob to OFF position. Normally, burner will make
a slight popping sound when extinguished.
2. Turn off gas at bottle/cylinder.
3. Remove access panel.
4. Unscrew gas line from regulator.
5. Close access panel.
Note: After use, some discoloration of the emitter screen is normal.
12Owner’s manual: model 92000 portable outdoor heater 12/3/03
Page 14

®
Contact 1-800-762-1142 for assistance.
®
Do not return to place of purchase.
Operation Checklist
For a safe and pleasurable heating experience, perform this check before
each use.
Before Operating
q I am familiar with entire owner’s manual and understand all precautions
noted in “Safety First”.
q All components are properly assembled, intact and operable.
q No alterations have been made.
q All gas connections are secure and do not leak.
q Wind velocity is below 10 mph.
q Outdoor temperature is greater than 40 degrees F.
q Heater is outdoors (outside any enclosure).
q There is adequate fresh air ventilation.
q Heater is away from gasoline or other flammable liquids or vapors.
q Heater is away from windows, air intake openings, sprinklers and other
water sources.
q Heater is at least 36” (top) and 24” (side) from combustible materials.
q Heater is on a hard and level surface.
q There are no signs of spider or insect nests.
q All burner passages are clear.
q All air circulation passages are clear.
q Children, pets, clothing, flammable materials and items that can be
damaged from radiant heat are away from the heater.
q Children and adults in the area have been alerted to the high
temperature hazards: especially burns and clothing fires.
q Children and adults in the area have been warned not to touch heater
near engine during operation and until unit has cooled.
After Operation
q Gas control is in OFF position.
q Gas tank valve is OFF
q Disconnect Gas line.
q Heater is upright in a secure location.
13 Owner’s manual: model 92000 portable outdoor heater 12/3/03
Page 15

®
Contact 1-800-762-1142 for assistance.
Do not return to place of purchase.
Troubleshooting
If the problem is: And this condition exists: Then do this
Burner won’t light Gas pressure is low
Blockage in burner openings
Blockage in venturi tube
Blockage in gas line
Control knob is not in ON position
Burner won’t stay lit Bad thermocouple
Corrosion at thermocouple
Burner flame not touching
thermocouple
Burner flame is low
Note: Heater operates at reduced
efficiency below 40ºF (5ºC)
Emitter glows uneven Gas pressure is low
Carbon build-up Base is not on a level surface
Thick black smoke Blockage in burner Remove blockage and clean burner
Gas pressure is low
Outdoor temperature is less than 40ºF
and tank is less than 1/4 full
Control knob fully ON
Heater not level
Burner tilted
Heater is level
Dirt or film on reflector and emitter
Replace bottle/cylinder or canister
Clear blockage
Clean venturi
Check gas line for blockage
Turn control knob to ON
Replace ODS
Clean contact
Contact certified technican
Turn Control Knob OFF and replace
bottle/cylinder or canister
Use a full bottle/cylinder or canister
Check burner and all openings for
blockage
Replace bottle/cylinder or canister
Level heater
Straighten burner
Place heater on a level surface
Clean burner
Clean reflector and emitter
inside and outside
14Owner’s manual: model 92000 portable outdoor heater 12/3/03
Page 16
®
®
WARNING
FOR YOUR SAFETY
• Do NOT touch or move
heater for at least 45 minutes
after use.
• Dome is hot to the touch.
• Allow dome to cool before
touching.
Contact 1-800-762-1142 for assistance.
Do not return to place of purchase.
Maintenance
To enjoy years of outstanding performance from your heater, make sure
you perform the following maintenance activities on a regular basis:
Keep exterior surfaces clean.
Use warm soapy water for cleaning. Never use flammable or corrosive
cleaning agents.
While cleaning your unit, be sure to keep the area around the burner
and pilot assembly dry at all times. Do not submerge the control valve
assembly. If the gas control is submerged in water, do NOT use it. It
must be replaced.
Air flow must be unobstructed. Keep controls, burner, and circulating air
passageways clean. Signs of possible blockage include:
Gas odor with extreme yellow tipping of flame.
Heater does NOT reach the desired temperature.
Heater glow is excessively uneven.
Heater makes popping noises.
Spiders and insects can nest in burner or orifices. This dangerous
condition can damage heater and render it unsafe for use. Clean burner
holes by using a heavy-duty pipe cleaner. Compressed air may help
clear away smaller particles.
Carbon deposits may create a fire hazard. Clean dome and emitter with
warm soapy water if any carbon deposits develop.
Note: In a salt-air environment (such as near an ocean), corrosion occurs
more quickly than normal. Frequently check for corroded areas and repair
them promptly.
TIP:
Use high-quality automobile wax to help maintain the appearance of
your heater. Apply to exterior surfaces from the pole down. Do not
apply to emitter screen or domes.
15 Owner’s manual: model 92000 portable outdoor heater 12/3/03
Page 17

®
Contact 1-800-762-1142 for assistance.
Do not return to place of purchase.
Storage
Between uses:
Turn Control Knob OFF.
Disconnect LP source.
Store heater upright in an area sheltered from direct contact with
inclement weather (such as rain, sleet, hail, snow, dust and debris).
If desired, cover heater to protect exterior surfaces and to help prevent
build up in air passages.
Note: Wait until heater is cool before covering.
During periods of extended inactivity or when transporting:
Turn Control Knob OFF.
Disconnect LP source and move to a secure, well-ventilated location
outdoors.
Store heater upright in an area sheltered from direct contact with
inclement weather (such as rain, sleet, hail, snow, dust and debris).
If desired, cover heater to protect exterior surfaces and to help prevent
build up in air passages.
WARNING
FOR YOUR SAFETY
Never attempt to rell disposable
canister. Relling may cause
explosion. To discard, contact
local refuse hauler or recycle
center.
Do not puncture or incinerate.
Never leave LP cannister exposed to direct sunlight or excessive heat.
Note: Wait until heater is cool before covering.
Service
To learn how to service and procure parts for worn out, defective or
damaged components contact 1-800-762-1142 for assistance or e-mail
CustomerService@BlueRhino.com. Please supply model number and
serial ID number for best service support. These numbers can be found on
a label on the rear of the Valve Housing.
Caution: Use only original equipment replacement parts. Use of
unauthorized parts or modification of parts will void warranty and
create an unsafe condition.
Caution: Always allow heater to cool before attempting service.
16Owner’s manual: model 92000 portable outdoor heater 12/3/03
Page 18

®
Contact 1-800-762-1142 for assistance.
®
Do not return to place of purchase.
Limited Warranty
Blue Rhino Global Sourcing, LLC (“Vendor”) warrants to the original retail purchaser of this heater,
and to no other person, that if this heater is assembled and operated in accordance with the printed
instructions accompanying it, then for a period of two (2) years from the date of purchase, all parts in
such heater shall be free from defects in material and workmanship. Vendor may require reasonable
proof of your date of purchase from an authorized retailer or distributor. Therefore, you should
retain your sales slip or invoice. This Limited Warranty shall be limited to the repair or replacement
of parts, which prove defective under normal use and service and which Vendor shall determine in
its reasonable discretion upon examination to be defective. Before returning any parts, you should
contact Vendor’s Customer Service Department using the contact information listed below. If Vendor
confirms, after examination, a defect covered by this Limited Warranty in any returned part, and if
Vendor approves the claim, Vendor will replace such defective part without charge. If you return
defective parts, transportation charges must be prepaid by you. Vendor will return replacement parts
to the original retail purchaser, freight or postage prepaid.
This Limited Warranty does not cover any failures or operating difficulties due to accident, abuse,
misuse, alteration, misapplication, improper installation or improper maintenance or service by you or
any third party, failure to perform normal and routine maintenance on the heater, shipping damage,
normal adjustment to burner, damage or repairs related to insects, birds, or animals of any kind, and
damage due to weather conditions as set out in this owner’s manual. In addition, the Limited Warranty
does not cover damage to the finish, such as scratches, dents, discoloration, rust or other weather
damage, after purchase.
This Limited Warranty is in lieu of all other express warranties. Vendor disclaims all warranties for
products that are purchased from sellers other than authorized retailers or distributors. AFTER THE
PERIOD OF THE TWO (2)-YEARS EXPRESS WARRANTY, VENDOR DISCLAIMS ANY AND ALL
IMPLIED WARRANTIES, INCLUDING WITHOUT LIMITATION THE IMPLIED WARRANTIES OF
MERCHANTABILITY AND FITNESS FOR A PARTICULAR PURPOSE. FURTHER, VENDOR SHALL
HAVE NO LIABILITY WHATSOEVER TO PURCHASER OR ANY THIRD PARTY FOR ANY SPECIAL,
INDIRECT, PUNITIVE, INCIDENTAL, OR CONSEQUENTIAL DAMAGES. Vendor assumes no
responsibility for any defects caused by third parties. This Limited Warranty gives the purchaser
specific legal rights; a purchaser may have other rights depending upon where he or she lives.
Some jurisdictions do not allow the exclusion or limitation of special, incidental or consequential
damages, or limitations on how long a warranty lasts, so the above exclusion and limitations may not
apply to you.
Vendor does not authorize any person or company to assume for it any other obligation or liability in
connection with the sale, installation, use, removal, return, or replacement of its equipment, and no
such representations are binding on Vendor.
Blue Rhino Global Sourcing, LLC
104 Cambridge Plaza Drive
Winston-Salem, North Carolina 27104 USA
(800) 762-1142
24 Hour Fax: (336) 659-6743
CustomerService@BlueRhino.com
17 Owner’s manual: model 92000 portable outdoor heater 12/3/03
Page 19

®
Contact 1-800-762-1142 for assistance.
Do not return to place of purchase.
Specifications
Certifications:
CSA International Requirement 5.90
Canadian National Standard CAN1-2.23-M82
Rating:
Maximum 11,000 BTU/hr. input
Heat Range:
Up to 10 foot diameter
Fuel:
Liquid Propane Gas (LP)
Cylinder Size:
Nominal 20 lb / 5 Gallon
OR
14.1 oz. (400 grams)
16.4 oz. (465 grams)
Inlet gas supply pressure:
Maximum – 150 PSI
Minimum – 5 PSI
Manifold Pressure:
11.00 in. W.C.
Supply Pressure:
0.41 psig (11.00 in. W.C.)
Engine:
IPP E8
Safety Features:
Oxygen Depletion Sensor (ODS) shutdown system
100% Burner shut-off
Tilt Switch
Manufacturer:
Blue Rhino Global Sourcing, LLC
Made In:
China
18Owner’s manual: model 92000 portable outdoor heater 12/3/03
Page 20

®
Pour toute assistance appeler le 1-800-762-1142
®
Ne pas retourner cet appareil au point de vente.
AVERTISSEMENT
POUR VOTRE SECURITE:
En cas d’odeur de gaz -
1. Fermez le robinet de gaz
alimentant l’appareil.
2. Éteignez toute amme.
3. Si l’odeur persiste, contactez
votre fournisseur de gaz ou les
pompiers.
AVERTISSEMENT
POUR VOTRE SECURITE:
1. Toute fuite de gaz risque
de provoquer un incendie ou
une explosion et entraîner des
dégâts matériels, des blessures
graves voire mortelles.
AVERTISSEMENT
Proposition 65 de Californie:
L’État de la Californie reconnait
que la combustion du propane
produit des émanations et
des résidus chimiques qui
provoquent le cancer, des
malformations congénitales
et sont nocifs pour le système
reproductif.
AVERTISSEMENT
POUR VOTRE SECURITE:
Ne pas utiliser ni stocker
d’essence ou de liquides et
autres vapeurs inammables à
proximité de cet appareil ou de
tout autre appareil.
2. Respectez toutes les
consignes de l’étape 6 avant
d’utiliser l’appareil.
3. Ne jamais utiliser de amme
nue an de détecter une fuite.
DANGER
DANGER DE MONOXYDE DE CARBONE
• Cet appareil risque de produire du monoxyde
de carbone inodore.
• Vous risquez une mort certaine à utiliser cet
appareil dans un abri clos ou fermé.
• Ne jamais utiliser cet appareil dans un endroit
fermé tel qu’une caravane, maison mobile,
tente, voiture ou à l’intérieur d’une maison.
1 Manuel d’utilisation et instructions de montage: chauffage extérieur portatif, modèle 920000 12/3/03
Page 21

®
Pour toute assistance appeler le 1-800-762-1142
Ne pas retourner cet appareil au point de vente.
Table des matières
La sécurité avant tout! . . . . . . . . . . . . . . . . . . . . . . . . . . . . . . . . . . . . . . . . . . . . 3
Instructions de montage
Quincaillerie et liste des pièces . . . . . . . . . . . . . . . . . . . . . . . . . . . . . . . . . . . 5
Pièces et caractéristiques générales . . . . . . . . . . . . . . . . . . . . . . . . . . . . . 6
Accessoires supplémentaires . . . . . . . . . . . . . . . . . . . . . . . . . . . . . . . . . . . 6
Étape 1 Fixer la grille de l’émetteur . . . . . . . . . . . . . . . . . . . . . . . . . . . . . . 6
Étape 2 Fixer le dispositif de protection en fil métallique . . . . . . . . . . . . . . 7
Étape 3 Fixer le dôme à l’émetteur . . . . . . . . . . . . . . . . . . . . . . . . . . . . . . 7
Étape 4 Fixer le chapeau du dôme . . . . . . . . . . . . . . . . . . . . . . . . . . . . . . 7
Étape 5 Raccordement du gaz . . . . . . . . . . . . . . . . . . . . . . . . . . . . . . . . . 8
Étape 6 Rechercher une fuite potentielle . . . . . . . . . . . . . . . . . . . . . . . . . 9
Étape 7 Installation du panneau d’accès . . . . . . . . . . . . . . . . . . . . . . . . . . 9
Étape 8 Fixer la bouteille de gaz . . . . . . . . . . . . . . . . . . . . . . . . . . . . . . . 10
Fonctionnement
Avant d’ouvrir le robinet de gaz (ON) . . . . . . . . . . . . . . . . . . . . . . . . . . . . . 11
Avant d’allumer l’appareil . . . . . . . . . . . . . . . . . . . . . . . . . . . . . . . . . . . . . . 11
Allumer l’appareil . . . . . . . . . . . . . . . . . . . . . . . . . . . . . . . . . . . . . . . . . . . . . 11
Rallumer l’appareil . . . . . . . . . . . . . . . . . . . . . . . . . . . . . . . . . . . . . . . . . . 12
Éteindre l’appareil . . . . . . . . . . . . . . . . . . . . . . . . . . . . . . . . . . . . . . . . . . . 12
Liste de vérifications à effectuer avant la mise en marche . . . . . . . . . . . . . . . 13
Guide de dépannage . . . . . . . . . . . . . . . . . . . . . . . . . . . . . . . . . . . . . . . . . . . . 14
Entretien . . . . . . . . . . . . . . . . . . . . . . . . . . . . . . . . . . . . . . . . . . . . . . . . . . . . . 15
Remisage . . . . . . . . . . . . . . . . . . . . . . . . . . . . . . . . . . . . . . . . . . . . . . . . . . . . 16
Service après-vente . . . . . . . . . . . . . . . . . . . . . . . . . . . . . . . . . . . . . . . . . . . . 16
Garantie . . . . . . . . . . . . . . . . . . . . . . . . . . . . . . . . . . . . . . . . . . . . . . . . . . . . . . 17
Caractéristiques techniques . . . . . . . . . . . . . . . . . . . . . . . . . . . . . . . . . . . . . . 18
L’utilisation et l’installation de ce produit doivent se conformer aux codes locaux.
En l’absence des codes locaux, employez le code national de carburant et de
gaz, la norme ANSI Z223.1/NFPA 54, le stockage et la manipulation des gaz de
petrole liquifies, ANSI/NFPA 58 ou CSA B149.1, gaz naturel et code d’installation
de propane.
Conserve estas instrucciones
para futuras consultas. Si está
montando esta unidad para
otra persona, entréguele este
manual para futuras consultas.
2Manuel d’utilisation et instructions de montage: chauffage extérieur portatif, modèle 920000 12/3/03
Page 22

®
®
Avant de faire quoi que ce soit,
veuillez lire et comprendre toutes les
consignes de la section “La sécurité
avant tout!”
ADVERTENCIA
PARA SU SEGURIDAD
• L’acheteur assume tous les
risques lors de l’assemblage
et de l’utilisation de cet
appareil. Le non-respect
des instructions et des
consignes de sécurité de ce
manuel risque de provoquer
des blessures graves voir la
mort ou des dégâts matériels.
• La combustion du propane
produit de l’oxyde de carbone
qui risque d’être mortelle
si vous utilisez cet appareil
dans un endroit fermé.
• Le dôme est extrêmement
chaud lorsque l’appareil
fonctionne. Ne touchez
jamais le dôme lorsque
l’appareil est allumé. Attendez
que l’appareil refroidisse
(environ 45 minutes) après
l’avoir éteint.
• Ne pas utiliser l’appareil dans
une atmosphère explosive.
Conservez l’appareil à l’écart
de toute zone où des liquides
inammables ou de l’essence
sont remisés ou stockés et où
des vapeurs ou émanations
explosives sont présentes.
Pour toute assistance appeler le 1-800-762-1142
Ne pas retourner cet appareil au point de vente.
La sécurité avant tout!
Lisez et familiarisez-vous avec ce manuel et surtout les précautions
suivantes. Si vous avez des questions concernant ces instructions,
ARRÊTEZ et composez le 1-800-762-1142 pour toute assistance.
Attention: Cet appareil est sensé être utilisé à l’extérieur uniquement
(hors de tout espace clos). Assurez-vous qu’il y a toujours
suffisamment d’air pour la ventilation de l’appareil.
• Veillez à ce qu’il y ait toujours un espace d’au moins 91 cm entre
l’appareil et toute matière combustible.
• Veillez à ce que l’appareil soit toujours placé sur une surface dure et
plane.
• Ne pas utiliser l’appareil si la vitesse du vent dépasse 16 km/h.
• Si la température descend en dessous de 40ºF (5ºC), l’appareil
fonctionnera à un rendement moindre.
• Conservez les arroseurs d’eau et autres sources d’eau à l’écart des
brûleurs et des commandes.
• Lorsque vous utilisez le tuyau de rallonge, veillez à le placer à un endroit
où il ne gènera pas le passage des gens et où ces derniers peuvent
trébucher dessus. Veillez à ce qu’il ne puisse être accidentellement
endommagé.
• Faites preuve d’une extrême précaution lorsque vous êtes à
proximité de l’appareil. Indiquez aux enfants et aux adultes les
dangers existants en raison des hautes températures afin d’éviter
qu’ils ne se brûlent ou que leurs vêtements ne prennent feu.
• Ne laissez jamais les enfants et les animaux domestiques sans
surveillance lorsque ces derniers sont à proximité de l’appareil.
• Ne pendez pas de vêtements ou d’autres matières inflammables sur
l’appareil ou à proximité de ce dernier.
• Tout cache ou dispositif de protection ayant été retiré afin de
procéder à une réparation ou à l’entretien de l’appareil, doit être
remis en place avant de mettre en marche l’appareil.
• Certains matériaux ou articles risquent d’être sérieusement endommagés
en raison de la chaleur rayonnante si ces derniers sont placés sous
l’appareil.
• Ne modifiez en aucune façon l’appareil.
• Vérifiez le radiateur extérieur et son tuyau de rallonge à chaque fois
avant d’utiliser l’appareil. Si vous détectez une pièce endommagée,
n’utilisez pas l’appareil avant d’installer une pièce d’origine. L’utilisation
de toute pièce non approuvée par le fabricant annulera la garantie et
présentera un danger.
• Ne tentez pas d’utiliser l’appareil sans un régulateur de gaz en état de
fonctionnement et ayant été monté à l’usine. Si le régulateur s’avère
endommagé, utilisez uniquement un régulateur de rechange fourni par
l’usine.
• Ne touchez pas les pièces du brûleur lorsque l’appareil fonctionne. La
surface de l’émetteur de chaleur peut atteindre 1600ºF (870ºC).
• Après avoir éteint l’appareil, ne touchez pas le brûleur jusqu’à ce que
l’appareil se soit refroidi (attendre environ 45 minutes).
Avis: Cet appareil ne doit pas être utilisé avec un carburant autre que du
propane liquide. Le non-respect de cette consigne nuira au rendement de
l’appareil et annulera la garantie.
Attention: Le propane liquide (LP) est un gaz inflammable et
dangereux si ce dernier n’est pas manipulé correctement. Soyez
conscient des dangers avant d’utiliser tout appareil fonctionnant au
propane.
3 Manuel d’utilisation et instructions de montage: chauffage extérieur portatif, modèle 920000 12/3/03
Page 23

®
Pour toute assistance appeler le 1-800-762-1142
Ne pas retourner cet appareil au point de vente.
• Caractéristiques du propane: le propane est un gaz inflammable qui
risque d’exploser sous pression. C’est un gaz plus lourd que l’air présent
en gisements.
• À l’état naturel, le propane est inodore. Pour votre sécurité, un odorisant
ayant l’odeur de choux avariés est ajouté.
• Tout contact avec la peau risque d’entraîner des brûlures.
• Cet appareil est expédié de l’usine afin d’être utilisé avec du propane
uniquement.
• Utilisez uniquement des bouteilles de gaz de 20 lb (9 kg) homologuées
par le DOT (Ministère des Transports) (il s’agit des mêmes bouteilles
que celles utilisées pour les grils à gaz) avec soupape de sécurité QCC
Acme/Type 1. Ces soupapes sont faciles à identifier car elles possèdent
un filetage interne et externe.
• N’utilisez jamais une bouteille de propane si le corps, le robinet de
commande, le col ou le socle est endommagé.
• Lorsque vous utilisez une bonbonne de gaz de 20 lb. (9 kg), le système
d’alimentation de la bonbonne doit être prévu afin de permettre la sortie
des vapeurs et des émanations.
• Lorsque vous utilisez une bonbonne de gaz de 20 lb. (9 kg), cette
dernière doit être équipée d’un collier de protection afin de protéger la
valve de la bonbonne.
• Lorsque vous n’utilisez pas l’appareil, fermez le robinet de gaz de la
bouteille (OFF)
• Veillez à toujours effectuer un test afin de rechercher toute fuite
potentielle au niveau des raccords de gaz (voir Étapes 6 et 7). N’utilisez
jamais de flamme nue afin de rechercher une fuite. Ne fumez jamais
lorsque vous effectuez le test.
Attention: Il est primordial que le compartiment du robinet de
commande de l’appareil, les brûleurs et les passages par où l’air
circule demeurent propres.
• Les araignées et les insectes risquent de provoquer des conditions
dangereuses et de nuire au bon fonctionnement de l’appareil. Veillez à
ce que la zone du brûleur demeure propre et sans toiles d’araignées ou
insectes.
• Vérifiez l’appareil avant chaque utilisation.
• Faites inspecter le radiateur extérieur une fois par an et veillez à ce
que toute réparation soit effectuée par un réparateur qualifié.
• Vérifiez immédiatement l’appareil dans les cas suivants:
• Vous sentez une odeur de gaz et les crêtes des flammes sont
extrêmement jaunes.
• L’appareil n’atteint pas la température adéquate. Remarque:
l’appareil fonctionnera à un rendement moindre à une
température inférieure à 40ºF (5ºC).
• La lueur de chauffage n’est pas du tout uniforme.
• Le brûleur fait du bruit lorsqu’il fonctionne. Remarque: il est normal que le
brûleur émette un léger bruit lors de son extinction.
• Des résidus de carbone risquent de provoquer un incendie. Veillez à ce
que le dôme et l’émetteur demeurent toujours propres.
• Ne nettoyez pas l’appareil avec un nettoyant combustible ou corrosif.
Utilisez de l’eau tiède savonneuse.
• Ne peignez aucune partie de cet appareil.
Remarque: Si vous utilisez une bouteille de gaz de 20 lb (9 kg), il est
nécessaire d’utiliser l’adaptateur spécial pour tuyaux fourni pour ce
raccord. Cet adaptateur est fourni avec une prise POL au niveau de
l’embout de raccordement de la bouteille.
Bonbonne de gaz de 9 kg
Valve
45-48cm
Collier
Corps
Socle
POUR VOTRE SÉCURITÉ:
Attention aux araignées
Les araignées et autres insectes
peuvent s’introduire dans la
tubulure du brûleur et les autres
orices de l’appareil et pendre
leurs toiles et y fabriquer leurs
nids. Ces obstacles risquent de
provoquer des problèmes au
niveau de l’alimentation du gaz.
Vériez fréquemment ces endroits
et nettoyez-les si nécessaire.
Avant d’utiliser l’appareil pour la
première fois, vériez qu’aucun
obstacle de ce genre n’est apparu
lors du transport.
Vous avez besoin d’une
bonbonne de gaz?
Essayez le service de bonbonnes de
rechange Blue Rhino. C’est un service
facile, rapide, sans danger et présent
dans des dizaines de milliers de points
de vente partout dans le pays. Achetez
une bonbonne neuve ou échangez votre
bonbonne vide contre une bonbonne déjà
remplie.
Pour le point de vente le plus proche
consultez www.bluerhino.com.
4Manuel d’utilisation et instructions de montage: chauffage extérieur portatif, modèle 920000 12/3/03
Page 24

®
Pour toute assistance appeler le 1-800-762-1142
®
Ne pas retourner cet appareil au point de vente.
Pièces
Nom de
partie Référence
Fleuron . . . . . . . .12-34-567
Chapeau du dôme 12-34-567
Dispositif de protection
supérieur . . . . . . .12-34-567
Dispositif de protection
supérieur . . . . 12-34-567
Émetteur . . . . . . .12-34-567
Dispositif de protection
inférieur . . . . . . . .12-34-567
Détecteur d’épuisement
d’oxygène (ODS) avec arrêt
automatique . . . . . 12-34-567
Quincaillerie
Used in
Picture Qty Description Step(s)
4 Vis moyenne 1
12-34-567
3 Écrou 3
12-34-567
Pôle . . . . . . . . . . .12-34-567
Couvercle du carénage
12-34-567
Thermocouple . . .12-34-567
Partie inférieure du dispositif
ODS . . . . . . . . . . . 12-45-567
Buse . . . . . . . . . .12-34-567
Valve . . . . . . . . . .12-34-567
Interrupteur de contrôle
d’inclinaison . . . . .12-34-567
Bouton de contrôle du
régulateur . . . . . .12-34-567
Régulateur . . . . . .12-34-567
Carénage de protection
12-34-567
5 Manuel d’utilisation et instructions de montage: chauffage extérieur portatif, modèle 920000 12/3/03
Page 25

®
Pour toute assistance appeler le 1-800-762-1142
Ne pas retourner cet appareil au point de vente.
Instructions de montage
Pièces et caractéristiques générales
Familiarisez-vous avec toutes les pièces avant de commencer. Reportez-vous à la page 5 pour la nomenclature, les
pièces et leurs caractéristiques.
NE PAS tenter de monter l’appareil si vous n’avez pas toutes les pièces. Si vous pensez que des pièces sont manquantes
ou endommagées, appelez le 1-800-762-1142.
Accessoires supplémentaires
Les articles suivants ne sont pas fournis mais sont nécessaires afin de monter l’appareil. NE PAS tenter de monter
l’appareil sans outils adéquats.
(1) - Clé de 7/16 po. (11 mm)
(1) - Tournevis cruciforme Phillips #2
(1) - Solution pour détection de fuite (voir instructions pour préparer la solution à l’étape 6)
(1) - Bouteille de gaz (propane) de 20 livres (9 kg) (11,3 à 15 litres) pour gril
Remarque: Suivez toutes les étapes afin de monter correctement l’appareil..
Étape 1: Fixer la grille de l’émetteur
Alignez les 4 trous au fond de la grille de l’émetteur en les faisant
correspondre aux trous du fond de l’émetteur et introduisez (4) vis de
taille moyenne dans les trous.
x 4
6Manuel d’utilisation et instructions de montage: chauffage extérieur portatif, modèle 920000 12/3/03
Page 26

®
Pour toute assistance appeler le 1-800-762-1142
®
Ne pas retourner cet appareil au point de vente.
Étape 2: Fixer le dispositif de protection en fil métallique
Alignez les 4 broches du fond du dispositif de protection avec les 4 trous
du fond de l’émetteur puis introduisez le dispositif.
Remarque: Il sera peut être nécessaire de régler légèrement les broches
afin de les aligner avec les trous.
Étape 3: Fixer le dôme à l’émetteur
Alignez les trois tiges de l’émetteur avec les trous du dôme. Glissez le
dôme avec précaution sur les tiges, en fixant le dispositif de protection
en fil métallique.
Remarque: Il sera peut être nécessaire de régler légèrement les broches
du dispositif de protection afin de les fixer correctement.
Montez (3) écrous sur les tiges et serrez-les à l’aide d’une clé de 7/16
po. (11 mm). Ne pas trop serrer.
x 3
Step 4: Fixer le chapeau du dôme
Lay Dome Cap on dome covering 3 Nuts and line up center holes.
Insert threaded end of Finial through cap and screw into center of dome
until secure.
7 Manuel d’utilisation et instructions de montage: chauffage extérieur portatif, modèle 920000 12/3/03
Page 27
®
Pour toute assistance appeler le 1-800-762-1142
Ne pas retourner cet appareil au point de vente.
Étape 5: Raccordement du gaz
Remarque: Pour un résultat optimal, utilisez une bouteille de 20 livres (9
kg) avec l’appareil de chauffage.
Attention: Avant d’utiliser la bouteille de propane, il est
indispensable de comprendre toutes les consignes de sécurité de
la section 1 - “La sécurité avant tout!”
Pour raccorder une bouteille de gaz de 20 livres (9 kg)
Glissez le bout du tuyau de gaz souple comportant la pièce de raccord
en cuivre dans le trou central du socle de l’appareil puis vers le haut
jusqu’au filetage du régulateur.
Alignez le filetage de la pièce de raccord du tuyau avec le filetage du
régulateur et tournez dans le sens des aiguilles d’une montre afin de
serrer. SERREZ UNIQUEMENT À LA MAIN. N’UTILISEZ PAS D’OUTILS
AFIN D’EFFECTUER CE RACCORD. VEILLEZ À NE PAS FAUSSER LE
FILETAGE LORSQUE VOUS VISSEZ.
Placez l’appareil sur son socle en veillant à ce que le tuyau de gaz
souple passe par la petite fente du socle.
Raccordez le tuyau de gaz à la bouteille en tournant le robinet noir en
plastique dans le sens inverse à celui des aiguilles d’une montre jusqu’à
ce qu’il soit serré.
Precaución:
Antes de tratar de usar
un cilindro de propano,
familiarícese completamente
con todas las precauciones
relacionadas con el cilindro y
el propano, que encuentra en
la Sección #1 - “La Seguridad,
lo Primero”
Remarque: Veillez à ne pas plier le tuyau souple de gaz.
Pour raccorder une bouteille de gaz de 14.1 oz (400 g) ou 16.4
oz (465 g)
Remarque: Du gel risque de se former sur certaines bouteilles de 1 lb.
(453 g) lorsqu’elles sont presque vides.
Alignez le filetage de la bouteille avec celui du régulateur, introduisez et
tournez la bouteille dans le sens des aiguilles d’une montre jusqu’à ce
qu’ils s’encastrent l’un dans l’autre. SERREZ UNIQUEMENT À LA MAIN.
VEILLEZ À NE PAS FAUSSER LE FILETAGE LORSQUE VOUS VISSEZ
LE CONTENANT.
8Manuel d’utilisation et instructions de montage: chauffage extérieur portatif, modèle 920000 12/3/03
Page 28
®
®
Attention:
Le Chauffage Extérieur
Portable Endless Summer
a été vérié en usine an de
s’assurer que les raccords
ne présentent aucune fuite.
Vériez à nouveau tous les
raccords car il est possible
qu’ils se soient desserrés
lors du transport. Vériez que
l’appareil ne présente aucune
fuite même si ce dernier a
été assemblé pour vous au
magasin.
Pour toute assistance appeler le 1-800-762-1142
Ne pas retourner cet appareil au point de vente.
Étape 6: Rechercher une fuite potentielle
Pour détecter une fuite:
Préparez une solution de 29 à 59 ml destinée à détecter les fuites en
mélangeant un volume de détergent à vaisselle et 3 volumes d’eau.
À l’aide d’une cuillère (ou d’une gourde), versez quelques gouttes de la
solution sur le raccord du régulateur et de la bouteille.
Vérifiez si des bulles apparaissent au niveau des raccords.
Si les raccords NE présentent PAS de bulles, le raccord est étanche.
Si des bulles apparaissent, vous venez de découvrir une fuite :
Desserrez puis serrez à nouveau le raccord.
Vérifiez à nouveau le raccord.
Si des bulles persistent après plusieurs tentatives, composez le
1-800-762-1142.
Étape 7: Installation du panneau d’accès
Tournez la porte vers le haut afin de la fermer et serrez la vis à la main..
9 Manuel d’utilisation et instructions de montage: chauffage extérieur portatif, modèle 920000 12/3/03
Page 29
®
Pour toute assistance appeler le 1-800-762-1142
Ne pas retourner cet appareil au point de vente.
Étape 8: Fixer la bouteille de gaz
Fixez votre bouteille de gaz de 20 lb (9 kg) à un objet robuste tel qu’une
table ou un poteau situé entre 90 cm et 1,2 mètres de l’appareil lorsqu’il
fonctionne. Vous éviterez ainsi que la bouteille ne bouge ni se renverse
pendant le fonctionnement de l’appareil.
La bride du collier de serrage de la bouteille peut se fixer à un poteau
circulaire ou carré de 2,5 à 5 cm de diamètre.
Il peut également s’adapter à d’autres formes pouvant mesurer jusqu’à
5 cm de largeur.
Déterminez où vous comptez installer la bouteille de gaz de 9 kg.
Assurez-vous qu’elle se trouve bien au maximum à 5 cm de l’objet
auquel vous comptez l’attacher.
Placez les deux moitiés de l’étrier de fixation autour de l’objet et
introduisez les boulons de 5 cm dans les trous de l’étrier et dans les
trous filetés correspondant de l’autre moitié de l’étrier. Placez l’étrier à
moins de 15 cm du centre de la bouteille de gaz. Serrez les boulons à
la main.
Glissez la bouteille de gaz de 9 kg dans la partie incurvée de l’étrier
en veillant à ce que les bouts de sangles ne se trouvent pas entre la
bouteille et l’étrier. Serrez la sangle autour de la bouteille et serrant la
sangle dans la boucle.
À l’aide d’une clé de 11 mm, serrez les boulons de 5 cm jusqu’à ce
qu’ils soient correctement fixés. NE PAS TROP SERRER.
Dans certains cas, il est souhaitable de fixer la bouteille de gaz à un
objet plus large ou à un mur. Il est possible de fixer l’étrier avec les
sangles à ces surfaces en perçant des trous identiques et en utilisant
des vis et des écrous ou des grandes vis (non fournis) afin de fixer la
bouteille.
Remarque: Après avoir lu la section “La sécurité avant tout!” et effectué
les étapes 1 à 8, vous pouvez à présent utiliser l’appareil de chauffage.
10Manuel d’utilisation et instructions de montage: chauffage extérieur portatif, modèle 920000 12/3/03
Page 30

®
®
AVERTISSEMENTS
POUR VOTRE SÉCURITÉ:
• NE PAS tenter d’utiliser
l’appareil avant de lire et
comprendre toutes les
consignes de sécurité de la
section 1 - “La sécurité avant
tout!” Le non-respect de cette
consigne risque d’entraîner
des dommages matériels, des
blessures graves voir la mort.
• Si vous n’arrivez pas à
allumer l’appareil et si vous
sentez une odeur de gaz,
attendez 5 minutes an que le
gaz se dissipe avant de tenter
de rallumer l’appareil.
• NE PAS toucher l’émetteur,
le dôme ni tenter de déplacer
l’appareil avant d’attendre au
moins 45 minutes après avoir
éteint l’appareil.
Pour toute assistance appeler le 1-800-762-1142
Ne pas retourner cet appareil au point de vente.
Fonctionnement
Avant d’ouvrir le robinet de gaz (ON)
Votre appareil a été conçu et approuvé afin d’être UTILISÉ À
L’EXTÉRIEUR UNIQUEMENT. NE PAS utiliser l’appareil à l’intérieur d’un
immeuble, garage ou tout autre espace fermé.
Assurez-vous que le périmètre autour de l’appareil est dépourvu de
matières combustibles, d’essence et d’autres liquides présentant des
vapeurs ou émanations inflammables.
Assurez-vous que rien ne gène la ventilation.
Assurez-vous que tous les raccords de gaz sont serrés et ne présentent
aucune fuite (voir l’étape 5).
Assurez-vous que le panneau d’accès ne comporte pas de débris.
Assurez-vous que toutes les pièces ayant été retirées lors de
l’assemblage ou de l’entretien ont été replacées et fixées avant d’utiliser
l’appareil.
Avant d’allumer l’appareil
Inspectez complètement l’appareil avant chaque utilisation et faites en
sorte qu’un réparateur agréé inspecte l’appareil une fois par an.
Si vous devez rallumer un appareil déjà chaud, attendez au moins 5
minutes afin que le gaz se dissipe.
Allumer l’appareil
ON
HIGH
ON
HIGH
LOW
LOW
OFF
OFF
1. Fermez l’arrivée de gaz en réglant le bouton de commande sur “OFF”.
2. Poussez le bouton de commande et tournez-le sur “ON”. Vous
allumerez ainsi le brûleur. Si nécessaire, continuez à maintenir
le bouton de commande et à le tourner jusqu’à ce que le brûleur
s’allume.
3. Après avoir allumé le brûleur, maintenez le bouton de commande
enfoncé pendant au moins 30 secondes puis relâchez-le.
4. Si le brûleur ne demeure pas allumé, attendez 5 minutes et reprenez
les étapes 2 et 3.
5. Après avoir allumé le brûleur, tournez le bouton de commande
jusqu’au réglage de chauffage désiré.
6. Replacez le panneau de commande.
En cas de problème lors de l’allumage, éteignez l’appareil et fermez
l’arrivée de gaz et consultez le “Guide de dépannage” de la page 12.
11 Manuel d’utilisation et instructions de montage: chauffage extérieur portatif, modèle 920000 12/3/03
Page 31

®
Pour toute assistance appeler le 1-800-762-1142
Ne pas retourner cet appareil au point de vente.
Attention: Évitez de respirer les vapeurs et émanations de l’appareil
lors de sa première utilisation. La fumée et l’odeur provoquées par
l’huile dissiperont après environ 30 minutes. L’appareil NE devrait
PAS produire de fumée noire.
Note: Le brûleur risque d’être bruyant lorsque vous l’allumez pour la
première fois. Pour éviter tout bruit excessif du brûleur, réglez le bouton de
commande sur la position de “LOW” (Bas). Ensuite, réglez le bouton sur le
niveau de chaleur désiré.
Lorsque l’appareil est allumé (ON):
La grille de l’émetteur deviendra rouge vif en raison de l’intensité de la
chaleur. La couleur est plus visible la nuit.
Des flammes bleues et jaunes apparaîtront au niveau du brûleur. Ces
flammes ne devraient pas être jaunes ni produire de fumée noire. En
présence de fumée épaisse noire, le flux d’air à l’intérieur de la tubulure
des brûleurs est bloqué. La flamme devrait être bleue avec des crêtes
jaunes.
Si les flammes sont excessivement jaunes, éteignez l’appareil et
consultez le Guide de Dépannage de la page 14.
AVERTISSEMENTS
POUR VOTRE SÉCURITÉ:
Faites preuve de précaution
lorsque vous tentez d’allumer
manuellement ce radiateur
extérieur. Si vous maintenez le
bouton pressé pendant plus de
10 secondes avant d’allumer le
gaz, cela provoquera une boule
de feu lors de l’allumage.
Rallumer l’appareil
Note: Pour votre sécurité, le bouton de commande ne peut être placé
sur “ON” (marche) sans tout d’abord maintenir enfoncé le bouton de
commande sur la position “OFF” (arrêt) et ensuite le tourner sur “ON”.
1. Réglez le robinet de gaz sur “OFF” (arrêt).
2. Attendez 5 minutes afin que le gaz se dissipe avant de rallumer la
veilleuse.
3. Reprenez les étapes 2 et 3 de la section “Allumer l’appareil” de la
page précédente.
Éteindre l’appareil
1 Fermez l’arrivée de gaz en réglant le bouton de commande sur “OFF”.
Normalement, le brûleur émettra un léger bruit lors de son extinction.
2. Fermez le robinet de gaz de la bouteille.
3. Retirez le panneau d’accès.
4. Dévissez le tuyau de gaz du régulateur.
5. Fermez le panneau d’accès.
Remarque: Après utilisation, la grille de l’émetteur risque d’être un peu
décolorée
12Manuel d’utilisation et instructions de montage: chauffage extérieur portatif, modèle 920000 12/3/03
Page 32

®
Pour toute assistance appeler le 1-800-762-1142
®
Ne pas retourner cet appareil au point de vente.
Vérifications à effectuer avant toute utilisation
Pour votre sécurité et votre bien-être, veillez à toujours effectuer les
vérifications suivantes à chaque fois avant d’utiliser le système de
chauffage:
Avant d’allumer l’appareil
q Je me suis familiarisé avec le manuel d’exploitation et je comprends
toutes les consignes de sécurité de la section “La sécurité avant tout!
q Toutes les pièces sont intactes et ont toutes été montées correctement.
q Aucune modification n’a été effectuée.
q Les conduites de gaz sont toutes fixées et ne présentent aucune fuite.
q La vitesse du vent est inférieure à 16 km/h
q La température extérieure est supérieure à 40ºF (5ºC).
q L’appareil est installé à l’extérieur (hors de tout édifice).
q La ventilation est bonne.
q L’appareil est loin de tout carburant, liquide et autres sources de
vapeurs inflammables.
q L’appareil est loin de fenêtres, bouches d’air, arroseurs automatiques et
autres sources d’eau.
q L’appareil se trouve au minimum à 91 cm de toute matière combustible.
q L’appareil se trouve sur une surface dure et à niveau.
q Il n’y a aucune trace de toiles d’araignées ou de nids d’insectes.
q Toutes les ouvertures des brûleurs sont propres.
q Tous les passages par où l’air circule sont propres.
q Les enfants, les animaux domestiques, les vêtements, les matières
inflammables et autres articles risquant d’être endommagés par la
chaleur rayonnante sont tous loin de l’appareil.
q Les enfants et les adultes à proximité savent que l’appareil génère des
températures élevées et risquent de se brûler ou de voir leurs vêtements
prendre feu.
q Les enfants et les adultes à proximité savent qu’ils ne faut pas toucher
l’appareil pendant qu’il fonctionne et qu’il faut attendre qu’il ait refroidi
pour le toucher.
Après toute utilisation
q La commande de gaz est fermée (“OFF“).
q La valve de la bonbonne de gaz est fermée (“OFF“).
q Débranchez le tuyau de gaz.
q L’appareil a été est remisé debout à l’abri.
13 Manuel d’utilisation et instructions de montage: chauffage extérieur portatif, modèle 920000 12/3/03
Page 33

®
Pour toute assistance appeler le 1-800-762-1142
Ne pas retourner cet appareil au point de vente.
Guide de dépannage
Dans le cas suivant: Problème: Pour corriger le problème
La veilleuse ne s’allume pas
REMARQUE: L’appareil fonctionne à un
rendement moindre en dessous de 40ºF (5ºC).
La veilleuse ne demeure pas
allumée.
Le brûleur ne s’allume pas La pression de gaz est trop basse.
La flamme du brûleur est basse La pression de gaz est trop basse.
La lueur de l’émetteur n’est pas
uniforme.
Remarque: La partie inférieure de 2,5 cm de
l’émetteur NE présente PAS de lueur.
Accumulation de carbone. Saleté ou film sur réflecteur et
Fumée épaisse noire. Le brûleur est bouché. Retirez l’obstacle et nettoyez l’intérieur
La valve de la bonbonne de gaz est
fermée.
Orifice ou tube de la veilleuse bouché.
Il y a de l’air dans la conduite de gaz.
La pression du gaz est basse même
avec le robinet de gaz complètement
ouvert
L’allumeur ne fonctionne pas.
Accumulation de saleté autour de la
veilleuse.
Le raccord entre la valve du gaz et la
veilleuse est desserré.
Le thermocouple est défectueux.
L’orifice est bouché.
Le bouton de commande n’est pas
sur ON.
La température extérieure est
inférieure à 40ºF (5ºC) et le réservoir
n’est plein qu’au 1/4 de sa capacité.
Le tuyau d’alimentation de gaz est plié
ou tordu.
Le bouton de commande est
complètement ouvert (ON).
La pression du gaz est trop basse.
Le socle n’est pas sur une surface à
niveau.
L’appareil est à niveau.
émetteur.
Ouvrez la valve.
Nettoyez/ remplacez l’orifice ou le tube
de la veilleuse.
Ouvrez et purgez la conduite de gaz
(maintenir le bouton de commande
enfoncé) pendant 1 à 2 minutes ou
jusqu’à ce que vous sentiez une odeur
de gaz
Réglez la valve de la bonbonne sur
“OFF” et remplacez la bonbonne
Utilisez une allumette pour allumer la
veilleuse. Procurez-vous un nouvel
allumeur et remplacez-le.
Nettoyez la saleté autour de la
veilleuse.
Serrez le raccord et déterminez si ce
dernier présente une fuite.
Remplacez le ODS.
Réglez la valve de la bonbonne sur
“OFF” et remplacez la bonbonne.
Débouchez l’orifice.
Réglez le bouton de commande
sur “ON”.
Fermez la valve (OFF) et remplacez la
bonbonne
Utilisez une bonbonne neuve.
Dépliez le tuyau.
Vérifiez que le brûleur et les orifices
ne sont pas bouchés.
Fermez la valve de la bonbonne (OFF)
et remplacez la bonbonne.
Placez l’appareil de chauffage sur une
surface à niveau.
Nettoyez le brûleur.
Nettoyez le réflecteur et l’émetteur.
et l’extérieur du brûleur.
14Manuel d’utilisation et instructions de montage: chauffage extérieur portatif, modèle 920000 12/3/03
Page 34

®
®
AVERTISSEMENT
Pour toute assistance appeler le 1-800-762-1142
Ne pas retourner cet appareil au point de vente.
Entretien
POUR VOTRE SECURITE:
• NE PAS toucher ni déplacer
l’appareil pendant au moins 45
minutes après l’avoir éteint.
• Le dôme est chaud au
toucher.
• Laisser le dôme refroidir
avant de le toucher.
Afin que votre système de chauffage puisse fonctionner à plein rendement
pendant de longues années, procédez régulièrement à l’entretien de
l’appareil:
Veillez à ce que les surfaces extérieures demeurent propres.
Utilisez de l’eau savonneuse tiède pour nettoyer. N’utilisez jamais des
produits de nettoyage inflammables ou corrosifs.
Lorsque vous nettoyez l’appareil, assurez-vous que la zone autour du
brûleur et de la veilleuse demeure toujours sèche. Si la commande
de gaz est submergée dans de l’eau, NE PAS l’utiliser. Elle devra être
remplacée.
Rien ne doit gêner le flux d’air. Veillez à ce que les commandes, le
brûleur, et les ouvertures permettant la circulation de l’air demeurent
propres. Les indices permettant de déterminer qu’il existe un obstacle
sont les suivants:
Il existe une odeur de gaz et la crête de la flamme est extrêmement
jaune.
L’appareil n’atteint PAS la température désirée.
La lueur de l’appareil n’est pas du tout uniforme.
L’appareil émet des bruits.
Les araignées et les insectes peuvent s’introduire dans le brûleur et
les orifices de l’appareil. Ces obstacles risquent de provoquer des
problèmes et de présenter un danger lors de l’utilisation de l’appareil.
Nettoyez les ouvertures du brûleur en utilisant un débourre-pipe. Il est
possible d’utiliser de l’air comprimé afin de déloger les petites particules.
Les résidus de carbone risquent de provoquer un incendie. Nettoyez le
dôme et le moteur avec de l’eau tiède savonneuse pour nettoyer des
résidus de carbone.
Remarque: dans une atmosphère saline (à proximité de la mer), les traces
de rouille apparaissent plus vite qu’à la normale. Vérifiez régulièrement
que l’appareil ne présente pas de points de rouille et réparez-les
rapidement si nécessaire.
CONSEIL:
Utilisez un lustrant automobile afin que l’appareil de chauffage
conserve son brillant. Appliquez le produit sur les surfaces extérieures
du montant (pôle) vers le bas. N’appliquez pas de produit de lustrage
sur la grille de l’émetteur ni sur le dôme.
15 Manuel d’utilisation et instructions de montage: chauffage extérieur portatif, modèle 920000 12/3/03
Page 35

®
Pour toute assistance appeler le 1-800-762-1142
Ne pas retourner cet appareil au point de vente.
Rangement
Entre chaque utilisation:
Réglez le bouton de commande sur “OFF” (arrêt).
Débranchez la bonbonne de gaz.
Remisez l’appareil en le plaçant debout à l’abri des intempéries (la pluie,
la pluie verglaçante, la grêle, la neige, la poussière et autres débris).
Si vous le souhaitez, recouvrez l’appareil afin de protéger les surfaces
extérieures.
Remarque: attendez que l’appareil ait refroidi avant de le couvrir.
Si vous ne comptez pas utiliser l’appareil pendant une longue
période ou lors de son transport:
Réglez le bouton de commande sur “OFF” (arrêt).
Débranchez la bonbonne de propane et placez-la à l’extérieur dans un
endroit bien aéré.
Remisez l’appareil en le plaçant debout à l’abri des intempéries (la pluie,
la pluie verglaçante, la grêle, la neige, la poussière et autres débris).
Si vous le souhaitez, recouvrez l’appareil afin de protéger les surfaces
AVERTISSEMENT
POUR VOTRE SÉCURITÉ
Ne tentez jamais de remplir
une bouteille de gaz jetable.
Vous risquez de provoquer
une explosion. Pour éliminez
la bouteille, contactez le centre
d’évacuation et d’élimination
des ordures et des déchets le
plus proche ou votre centre de
recyclage.
Ne pas perforer ni incinérer.
extérieures.
Ne laissez jamais une bouteille de propane en plein soleil ou en contact
direct avec une chaleur excessive.
Remarque: attendez que l’appareil ait refroidi avant de le couvrir.
Service après-vente
Pour toute assistance afin de vous procurer des pièces de rechange
ou afin de pouvoir réparer des pièces endommagées ou défectueuses,
composez le 1-800-762-1142 ou contactez notre service à la clientèle par
courrier électronique à CustomerService@BlueRhino.com. Veuillez fournir
le numéro du modèle et son numéro de série. Ces numéros se trouvent sur
la plaque signalétique à l’intérieur de l’appareil.
Attention: Utilisez uniquement des pièces de rechange d’origine.
Le non-respect de cette consigne ainsi que toute modification
des pièces risque d’annuler la garantie et de créer des conditions
dangereuses.
Attention: Laissez l’appareil refroidir avant de procéder à son
entretien ou à sa réparation.
16Manuel d’utilisation et instructions de montage: chauffage extérieur portatif, modèle 920000 12/3/03
Page 36

®
Pour toute assistance appeler le 1-800-762-1142
®
Ne pas retourner cet appareil au point de vente.
GARANTIE LIMITÉE
La société Blue Rhino Sourcing, LLC (« le fabricant ») garantit ce système/appareil de chauffage
au premier acheteur et à aucune autre personne, contre tout vice de fabrication et matériau de
fabrication défectueux pendant deux (2) an à partir de la date d’achat si l’appareil est monté et
utilisé conformément aux instructions imprimées fournies. Le fabricant vous demandera sans doute
une preuve raisonnable d’achat, veuillez donc conserver votre facture ou votre reçu. Cette garantie
limitée se limitera à la réparation ou au remplacement de pièces ayant été déterminées défectueuses
par le fabricant lors de conditions d’utilisation et d’entretien normales. Avant de renvoyer une pièce,
contactez le service à la clientèle du fabricant (Customer Service Department) à l’adresse ci-dessous.
Si le fabricant confirme le défaut de fabrication comme étant couvert par la garantie et approuve
la réclammation, ce dernier remplacera gratuitement les dites pièces. Si vous devez renvoyer des
pièces défectueuses, les pièces devront être expédiées port-payé. Le fabricant s’engage à renvoyer
les pièces à l’acheteur initial port-payé
Cette garantie limitée ne couvre pas les pannes et dysfonctionnements survenant suite à tout
accident, mauvais usage, entretien incorrect de ce système/appareil de chauffage, ou toute
modification, mauvaise installation ou négligence. Cette garantie limitée ne couvre pas non plus
les dommages survenant lors du transport, le réglage normal du brûleur, ni les dommages ou les
réparations liées aux insectes, oiseaux ou animaux quels qu’ils soient ni les dommages liés aux
conditions météorologiques comme il a été établi dans ce manuel. De plus, cette garantie limitée
ne couvre pas le fini, à savoir les rayures, les bosses, les traces de décoloration, de rouille ou les
dommages résultant des intempéries après achat de l’appareil.
Cette garantie remplace toute autre garantie expresse et il n’existe aucune autre garantie expresse à
l’exception de la couverture indiquée ici. Le fabricant désavoue toute garantie couvrant des produits
ayant été achetés auprès de revendeurs autres que les revendeurs et distributeurs agréés. APRÈS
DEUX (2) AN, À SAVOIR LA DURÉE DE LA COUVERTURE DE LA GARANTIE EXPRESSE, LE
FABRICANT DÉSAVOUE ET DÉCLINE TOUTE GARANTIE IMPLICITE Y COMPRIS TOUTE
garantie de commerciabilité et d’adaptation à un usage particulier. DE PLUS, LE FABRICANT NE
POURRA ÊTRE TENU responsAble PAR L’ACHETEUR OU UN TIERS POUR TOUS DÉGÂTS ET
DOMMAGES PARTICULIERS, INDIRECTS, PUNITIFS OU CONSÉCUTIFS. Le fabricant décline
toute responsabilité en cas de panne ou dysfonctionnement résultant d’une modification ou altération
effectuée par un tiers. Cette garantie limitée octroye des droits juridiques spécifiques à l’acheteur
et il est possible que ce dernier en possèdent d’autres selon sa localité. Certaines jurisdictions ne
permettent pas l’exclusion ni la limitation de dommages consécutifs ou accessoires et ces limitations
peuvent ne pas vous être applicables.Le fabricant ne permet en aucun cas à une personne ou à une
société de s’attribuer les responsabilités et les obligations liées à la vente, l’installation, l’utilisation,
la dépose ou le remplacement de cet appareil, et aucune de ces représentations n’engage la
responsabilité du fabricant.
Blue Rhino Global Sourcing, LLC
104 Cambridge Plaza Drive
Winston-Salem, North Carolina 27104, États-Unis
Téléphone (800) 762-1142
Télécopie 24h par jour: (336) 659-6743
CustomerService@BlueRhino.com
17 Manuel d’utilisation et instructions de montage: chauffage extérieur portatif, modèle 920000 12/3/03
Page 37

®
Pour toute assistance appeler le 1-800-762-1142
Ne pas retourner cet appareil au point de vente.
Caractéristiques techniques
Certifications
Certification internationale ACNOR (CSA 5.90)
Norme CAN 1-2.23-M82 (Canadian National Standard)
Puissance:
Débit calorifique maximum: 11,000 BTU/heure
Périmètre chauffé:
Jusqu’à 6 mètres de diamètre.
Carburant:
Propane liquide (gaz LP)
Type de bonbonne:
20 lbs / 5 galons (9 kg / 18,9 litres)
OU
14.1 oz. (400 grammes)
16.4 oz. (465 grammes)
Pression du gaz d’alimentation:
Maximum – 150 PSI
Minimum – 5 PSI
Pression: collecteur et tubulure:
11 po. (279 mm) CE.
Pression d’alimentation:
0.41 psig (11.00 po./27,9 cm dans CE)
Moteur:
IPP E8
Dispositif de sécurité:
Extinction à 100% des brûleurs
Contacteur d’arrêt en cas d’inclinaison
Fabricant:
Blue Rhino Global Sourcing, LLC
Lieu de fabrication:
Chine
18Manuel d’utilisation et instructions de montage: chauffage extérieur portatif, modèle 920000 12/3/03
Page 38

®
Pour toute assistance appeler le 1-800-762-1142
®
Ne pas retourner cet appareil au point de vente.
19 Manuel d’utilisation et instructions de montage: chauffage extérieur portatif, modèle 920000 12/3/03
Page 39

®
Pour toute assistance appeler le 1-800-762-1142
Ne pas retourner cet appareil au point de vente.
20Manuel d’utilisation et instructions de montage: chauffage extérieur portatif, modèle 920000 12/3/03
Page 40

A wholly owned subsidiary of Blue Rhino Corporation (NASDAQ-RINO)
Blue Rhino Global Sourcing, LLC
104 Cambridge Plaza Drive, Winston-Salem, NC 27104 USA
1.800.762.1142, www.bluerhino.com
© 2003 CPD Associates, All Rights Reserved
Made in China
Une filiale appartenant en propriété exclusive à Blue Rhino Corporation
Blue Rhino Global Sourcing, LLC
(NASDAQ-RINO)
104 Cambridge Plaza Drive, Winston-Salem, NC 27104 ETATS-UNIS
1.800.762.1142, www.bluerhino.com
© 2003 CPD Associates, Tous droits réservés
Fabriqué en Chine
92000-OM-102 EF
 Loading...