

Page 1
BLUE INK
TECHNOLOGY
Electronic
Logging Device
User Manual
Page 2

TABLE OF CONTENTS
Getting Started
Co-Driver Login . . . . . . . . . . . . . . . . . . . . . . . 22
ELD Mandate Overview . . . . . . . . . . . . . . . . . . . . 3 Swapping Users . . . . . . . . . . . . . . . . . . 22
Installing the App on Your Device . . . . . . . . . . . . 4 Drive Time Swapping . . . . . . . . . . . . . . 23
Setting Up a New Account . . . . . . . . . . . . . . . . . . 5 Instructions for Samsung Devices . . . . . . . . . 24
Installing the BIT ELD Adapter . . . . . . . . . . . . . . . 6 How-To Videos . . . . . . . . . . . . . . . . . . . . . . . 25
Connecting the App to the BIT ELD Adapter . . . . 7
Using the Web Portal
BIT ELD Adapter Health Status . . . . . . . . . . . . . . 8
Using the App
Website Overview . . . . . . . . . . . . . . . . . . . . . 26
Web Portal Login . . . . . . . . . . . . . . . . . . . . . . 27
The Home Screen . . . . . . . . . . . . . . . . . . . . . . . . 9 Fleet Management System Overview 28
Unresolved Issues . . . . . . . . . . . . . . . . . . . . . 9 My Team . . . . . . . . . . . . . . . . . . . . . . . . . . . . 29
Current Load Out . . . . . . . . . . . . . . . . . . . . . 9 Logs . . . . . . . . . . . . . . . . . . . . . . . . . . . . . . . 30
Notifications and Suggested Changes . . . . . 10 Viewing Logs . . . . . . . . . . . . . . . . . . . . 30
Navigating the App . . . . . . . . . . . . . . . . . . . . . . . . 11 Editing Logs . . . . . . . . . . . . . . . . . . . . . 32
Available Hours . . . . . . . . . . . . . . . . . . . . . . . . . . 12 Assets . . . . . . . . . . . . . . . . . . . . . . . . . . . . . . 33
Hours of Service . . . . . . . . . . . . . . . . . . . . . . . . . . 13 DVIR . . . . . . . . . . . . . . . . . . . . . . . . . . . . . . . 34
Adding a Record of Duty Status . . . . . . . . . . 14 Fuel . . . . . . . . . . . . . . . . . . . . . . . . . . . . . . . . 35
Editing a Record of Duty Status . . . . . . . . . . 14 My Account . . . . . . . . . . . . . . . . . . . . . . . . . . 36
Automatic Duty Status Changes . . . . . . . . . . 15 Profile Information . . . . . . . . . . . . . . . . 36
Duty Status and Logging Out . . . . . . . . . . . . 15 Change Password . . . . . . . . . . . . . . . . 36
Fuel Receipts . . . . . . . . . . . . . . . . . . . . . . . . . . . . 16 Account Emails . . . . . . . . . . . . . . . . . . . 36
Daily Vehicle Inspection (DVIR) . . . . . . . . . . . . . . 17 Driver Information . . . . . . . . . . . . . . . . . 36
Roadside Inspection . . . . . . . . . . . . . . . . . . . . . . . 18 My Roles . . . . . . . . . . . . . . . . . . . . . . . 36
Settings . . . . . . . . . . . . . . . . . . . . . . . . . . . . . . . . . 19 Manage API Keys . . . . . . . . . . . . . . . . . 36
General Settings . . . . . . . . . . . . . . . . . . . . . . 19 Payment History . . . . . . . . . . . . . . . . . . 36
ELD Adapter Settings . . . . . . . . . . . . . . . . . . 20 Specifications and Requirements . . . . . . . . . 37
Preferred Device . . . . . . . . . . . . . . . . . 20 United States FCC . . . . . . . . . . . . . . . . . . . . 37
Light Settings . . . . . . . . . . . . . . . . . . . . 20 Industry Canada . . . . . . . . . . . . . . . . . . . . . . 37
Use Alternate J1708 Address . . . . . . . . 21 Society of Automotive Engineers . . . . . . . . . 38
Scan for Other BIT ELD Adapters . . . . 21 Bluetooth . . . . . . . . . . . . . . . . . . . . . . . . . . . . 38
Carrier Information . . . . . . . . . . . . . . . . . . . . 21 App Requirements . . . . . . . . . . . . . . . . . . . . 38
Driver Information . . . . . . . . . . . . . . . . . . . . . 21 Legal . . . . . . . . . . . . . . . . . . . . . . . . . . . . . . . 38
The BIT Support Team is here to help.
304.840.0142
Watch our BIT Training Series Videos! Tap the throughout this manual.
2
Page 3

ELD Mandate Overview
It is important to know that electronic logging
devices (ELDs) do not fully automate driver
logs, but are a tool to simplify the process
of data collection for a driver’s logs. For
example, you still have to manually set your
duty statuses to “Off Duty,” “Sleeper Berth,”
and so on. You also have to manually certify
your records.
The BIT ELD adapter allows your vehicle to
communicate with the Blue Ink Tech app over
a wireless connection. To support compliance
with the FMCSA’s ELD mandate, it automates
the collection of the following data items:
1. Vehicle Identication Number (VIN)
2. Odometer mileage
3. Engine hours
4. Engine on/off status
5. Vehicle in-motion status
When the vehicle’s wheel speed exceeds five
miles per hour, a duty status of “Driving” will
be automatically recorded. If the vehicle is no
longer in motion, the BIT ELD adapter will
automatically record a duty status change to
“On Duty Not Driving” after 6 minutes if the
driver does not manually change their duty
status.
When the BIT ELD adapter detects that the
vehicle is in motion, the time must be
recorded as either driving, personal use of the
commercial vehicle, or a yard move. The time
when the vehicle is in motion cannot be
shortened or changed to a non-moving status
such as Off Duty, Sleeper Berth, or On Duty
Not Driving. This is all part of the ELD
mandate. The BIT ELD adapter does not
store a driver’s speed.
Your records are collected and stored on your
These are the only data items from the
vehicle’s database that are used to support
compliance with the ELD mandate.
The VIN is used to automatically associate
your records with a specific vehicle. If you
move your BIT ELD adapter to a different
vehicle, it will automatically read the new VIN
and use the new VIN in your logs. The
odometer and engine hour readings are used
to automatically ll in elds in your driver logs.
The engine on/off status and vehicle in-motion
status are used as triggers to automatically
record events. A record will be automatically
added to the BIT ELD adapter's logs when the
engine is turned on or turned off. This does not
cause a change of duty status, but will show as
smartphone or tablet with the Blue Ink Tech
app. However, the BIT ELD adapter has
internal memory to store events when not
connected to the Blue Ink Tech app. These
records will be associated with the
“Unidentified Driver” account and will be
visible to all drivers of that vehicle on the
Home screen of the Blue Ink Tech app.
More details are presented in the following
sections.
a BIT ELD adapter-recorded event in your
driver logs.
3
Page 4
Installing the Blue Ink Tech App on your Phone or Tablet
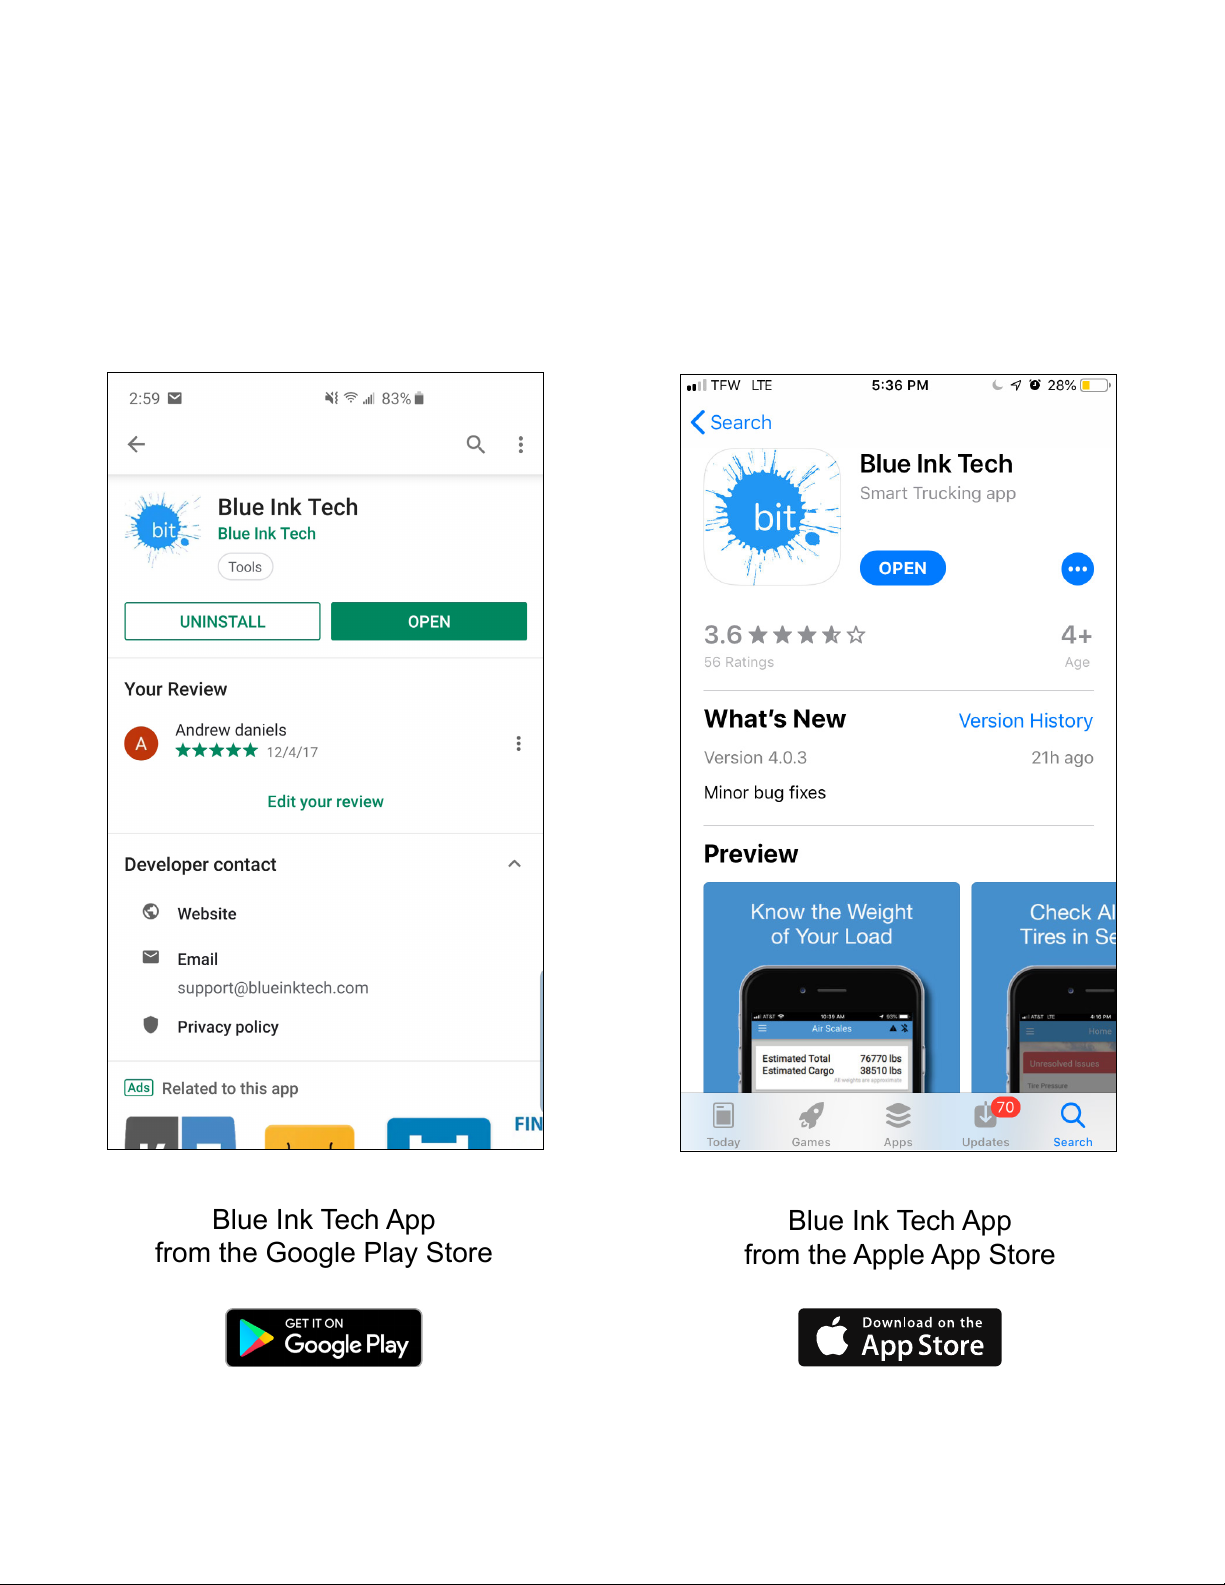
The Blue Ink Tech app is available from the
Apple App Store and the Google Play Store.
Using your Apple or Android device, go the
app store and search for “Blue Ink Tech.”
Depending on your mobile device, the app
will look like one of the screens below.
Blue Ink Tech App
from the Google Play Store
Blue Ink Tech App
from the Apple App Store
4
Page 5
Setting Up a New Account
After downloading and opening the Blue Ink
Tech app you will receive pop-up messages to
set permissions for the app to use your
location and camera, and for the app to send
notifications. For the app to function properly
you need to select “Allow” or “Yes” for all of
these messages.
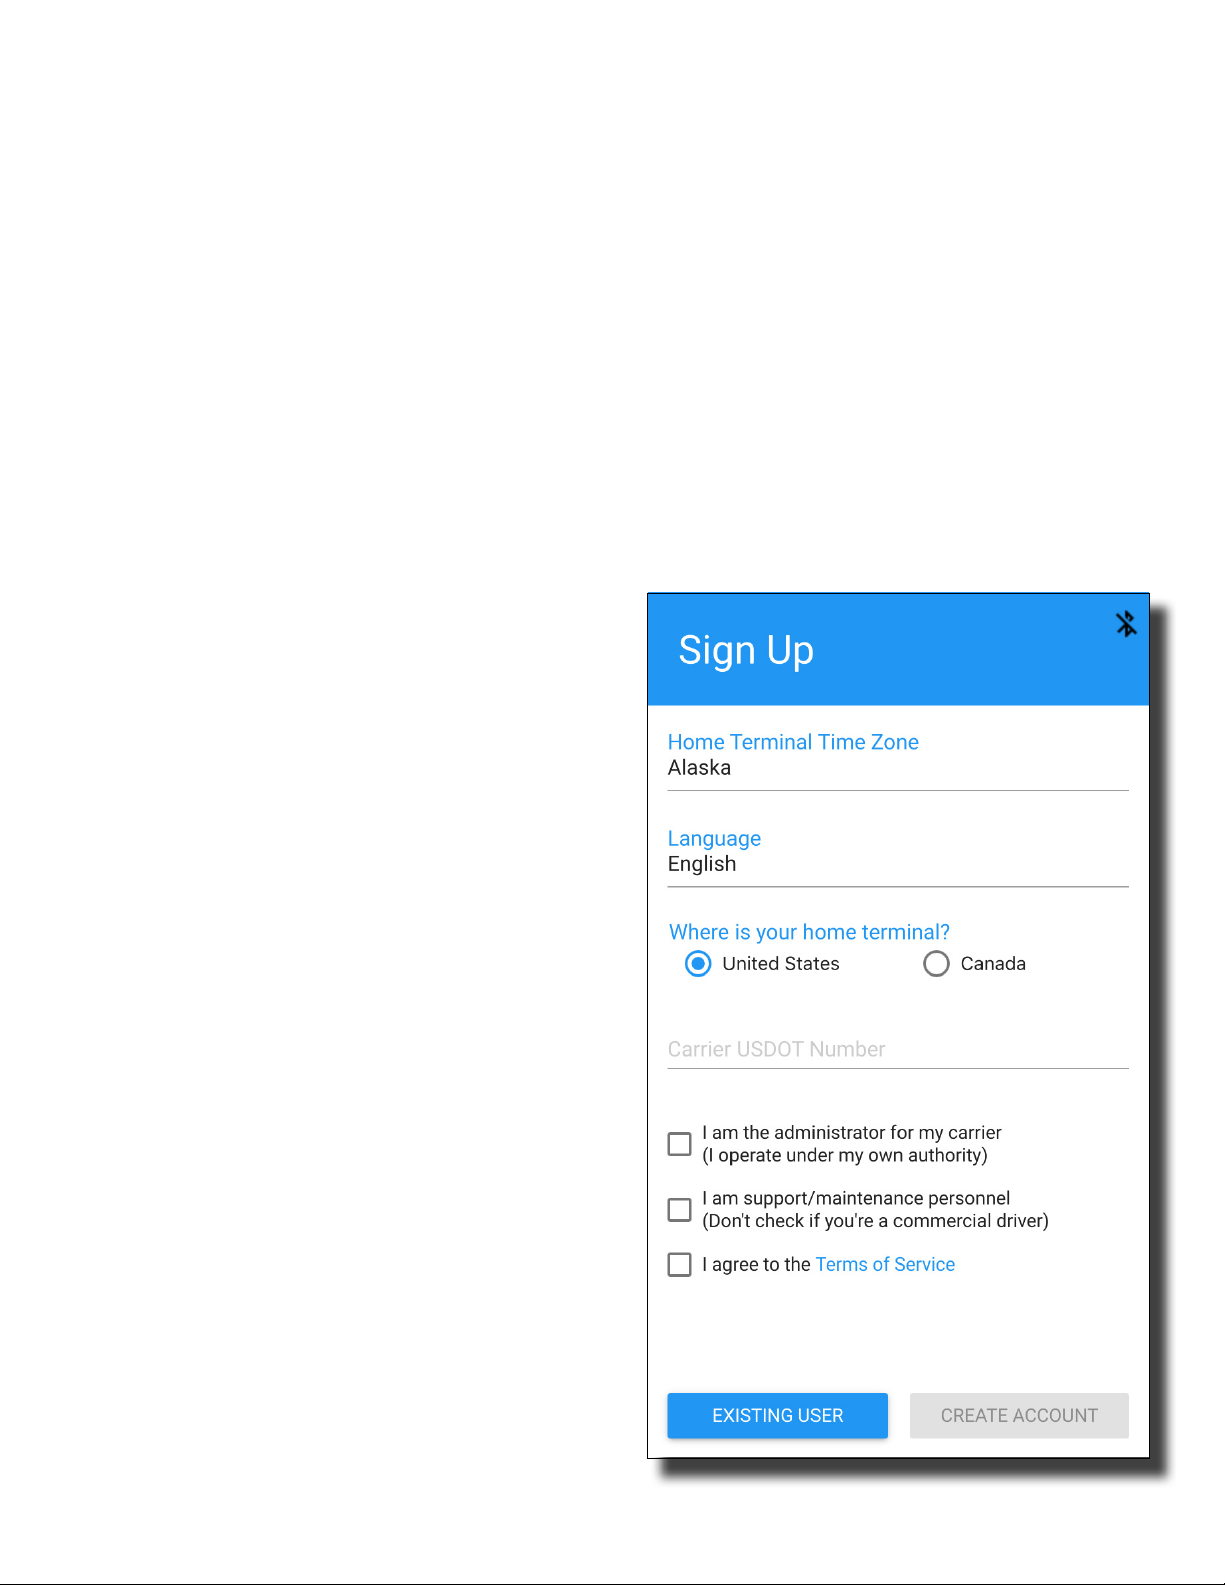
The “Sign Up” page will open automatically
the first time you open the app. If this page
does not automatically come up, select
"Create Account". If you already have a BIT
account, tap the blue “Existing User” button at
the bottom of the screen to enter your user
name and password.
If you are a new user you will need to ll in
all elds before tapping Continue. The next
page allows you to select your home terminal
time zone, language (English/Spanish), and
home terminal (United States or Canada) and
enter your carrier’s DOT number.
to
checkboxes to configure your role with
also
your carrier
.
There are
Check the "I agree to the Terms of Service"
checkbox. Once you have finished checking
boxes, tap Create Account to complete your
account setup.
When you sign up for your account, the
administrator for your carrier will be notified
and can accept you to the carrier's team. Once
accepted, you will have access to all of that
carrier’s eet of vehicles and trailers and can
select from those units for the day's work.
Carrier settings cannot be changed on the app
but must be changed on the Blue Ink Tech
website (see My Account on page 36).
● Check the “I am the administrator for my
carrier” checkbox if you need administrative
privileges to set permissions or view logs for
drivers under the carrier’s account.
An administrator can view logs, inspection
reports, and activity for all drivers under the
carrier’s account. An administrator will also
have to approve new users in their carrier’s
account and set driver permissions for
personal use of vehicles and yard moves.
● Check the “I am support/maintenance
personnel” checkbox if you are not a
commercial driver or an administrator.
This is typically used for dispatchers,
maintenance personnel, users who do
on-site refueling, or other users who are not
commercial drivers. Logs are not recorded
for this type of account.
5
Page 6
Installing the BIT ELD Adapter
Identifying the correct BIT ELD adapter
for your vehicle
Locate your vehicle’s diagnostic port in one of
these three places on your vehicle:
1. Under the steering wheel or
under the dashboard
2. On the left side of the kick panel
3. Behind the driver's seat
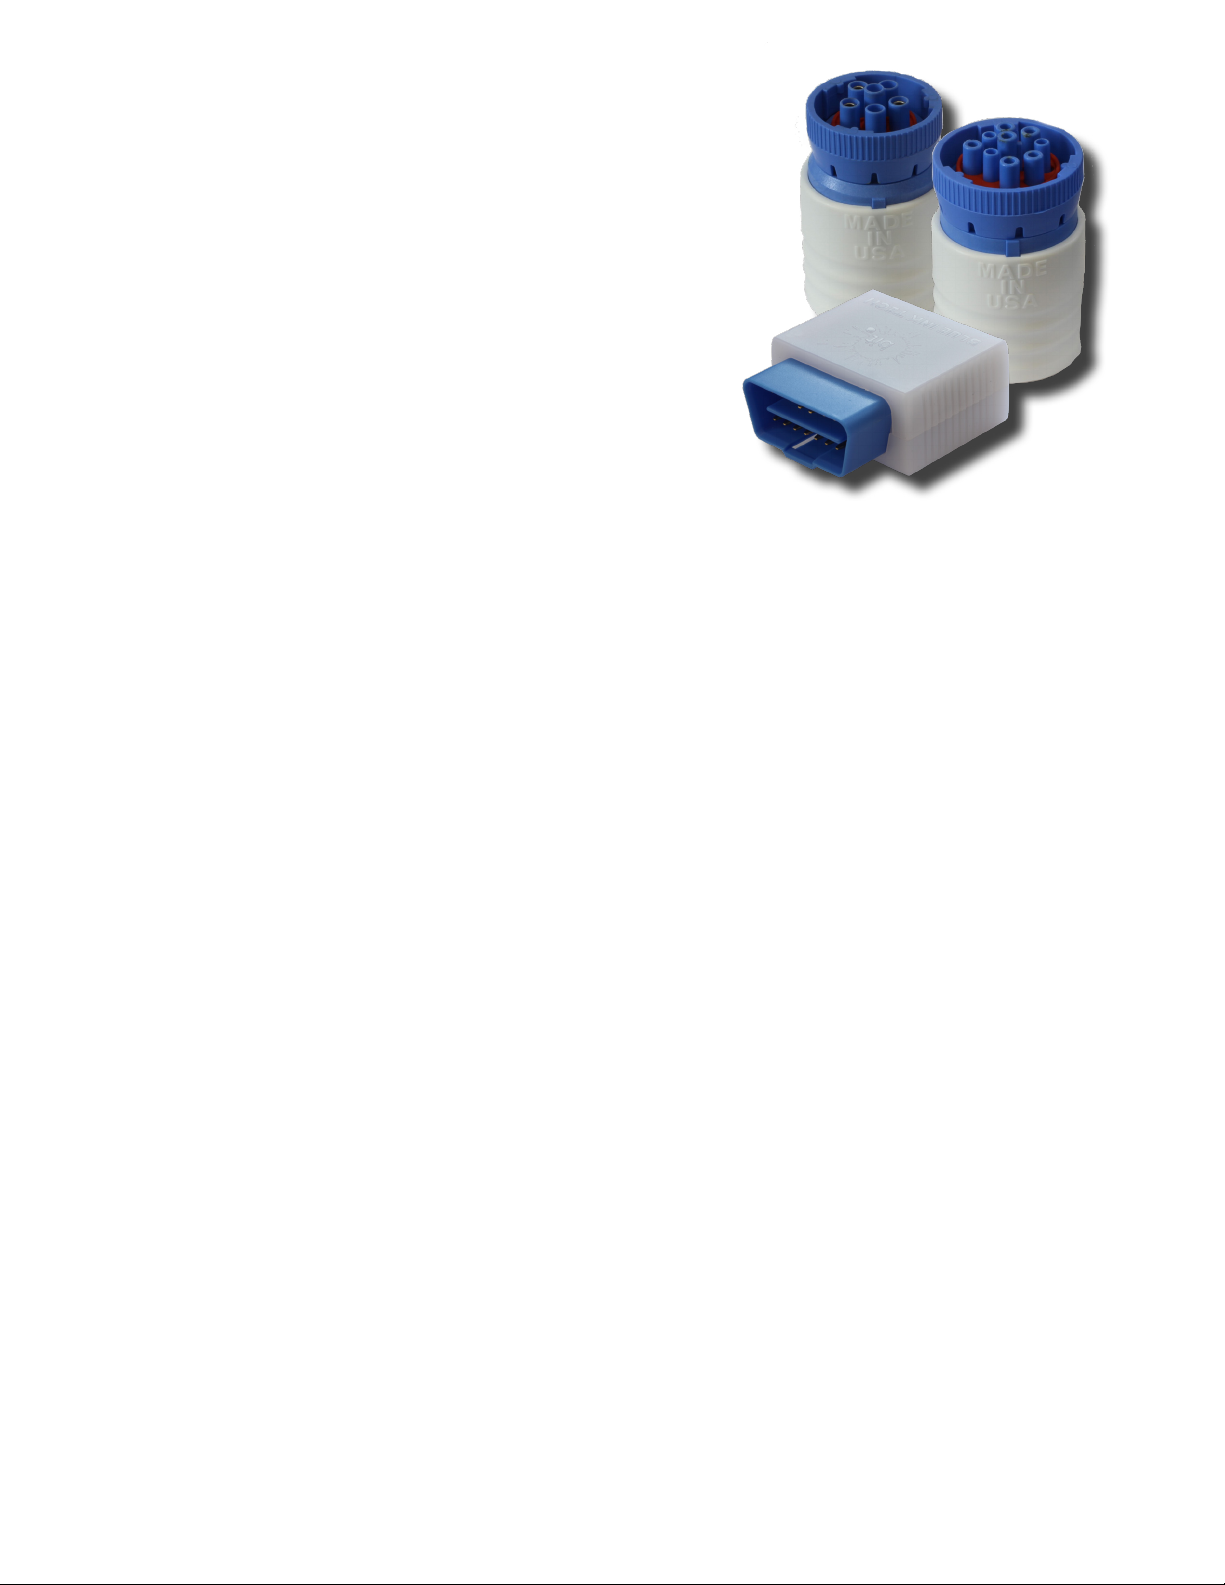
Your device should plug in to one of three
ports, depending on the make and model of
your vehicle. There should be a 6-pin, a 9-pin
or an OBD-II connection to your vehicle’s
diagnostic port.
● Have your vehicle's engine running.
Communication to your diagnostic port may
If your port is in the way or hard to reach, or if
you need to connect two devices at one time,
Blue Ink Tech offers a variety of splitter and
adapter cables on our Purchase page at
blueinktech.com/cart.
The 6-pin and 9-pin adapters are for heavyduty commercial vehicles (Class 7 & 8). The
9-pin BIT ELD adapter is compatible with both
J1939-I and J1939-II ports, meaning it will
auto-detect the communication speed on the
vehicle data bus and automatically congure
itself. The OBD-II BIT ELD adapter is for
medium duty vehicles (Class 3-6). The three
devices work similarly to collect data from your
vehicle and transmit it to your phone or tablet
with the Blue Ink Tech app.
Important things to do before you
install your BIT ELD adapter:
● Install the Blue Ink Tech app on the
smartphone or tablet you wish to use for
your logs. The app can be downloaded from
the Apple App Store or Google Play store
be disabled even with the ignition turned on.
Installation and Initial Testing
Plug in the BIT ELD adapter to your vehicle’s
diagnostic port. For 6-pin and 9-pin BIT ELD
adapters, turn the locking ring clockwise to
secure it to the vehicle’s diagnostic port.
When the BIT ELD adapter receives power it
will go through a light sequence:
● White and then off: the adapter is in the
boot-loader stage, during which a new
firmware update can be installed through
the micro-USB port on the front face of the
adapter
● Red-White-Blue: the adapter is starting its
normal operations and running internal tests
● Faint Blue: the device has passed its self-
tests and is waiting for a smartphone or
tablet to make a wireless connection
● Turn off all Bluetooth-capable devices,
including the smartphone or tablet with the
Blue Ink Tech app installed, until the BIT ELD
adapter nishes its rst testing sequence and
the light has turned blue.
This rst installation may take more than
ten minutes. Once this sequence is complete,
you can turn on your smartphone or tablet to
connect the Blue Ink Tech app to your BIT
ELD adapter.
6
Page 7
Connecting the App to the BIT ELD Adapter
Once the BIT ELD adapter has completed its
installation sequence and the LED light is blue,
you can log into the Blue Ink Tech app to
connect to the BIT ELD adapter.
The Blue Ink Tech app will automatically search
for powered BIT ELD adapters within its
wireless range and prompt you to connect to a
device. If multiple BIT ELD adapters are found
within range, the app will let you choose the
device to which you want to connect.
BIT ELD adapters in range will be listed by the
vehicle in which they are installed. If the vehicle
has already been added to your carrier's eet it
will be listed by a descriptive name. Vehicles
new to your carrier's leet will be listed by VIN
number. If you connect to a new vehicle, the
app will prompt you to assign a descriptive
name.
wrong BIT ELD adapter, you can scan again
for BIT ELD adapters in range to reconnect to
the correct ELD (see ELD Adapter Settings on
page 20).
The irst time the app connects to the BIT ELD
adapter can take several minutes because the
app and BIT ELD adapter are exchanging
encryption keys for their communication. When
you re-connect to the BIT ELD adapter, the
connection will take much less time because
the encryption keys will be reused. Set the BIT
ELD adapter as your Preferred Device to
further reduce connection time (see Settings:
Preferred Device on page 20).
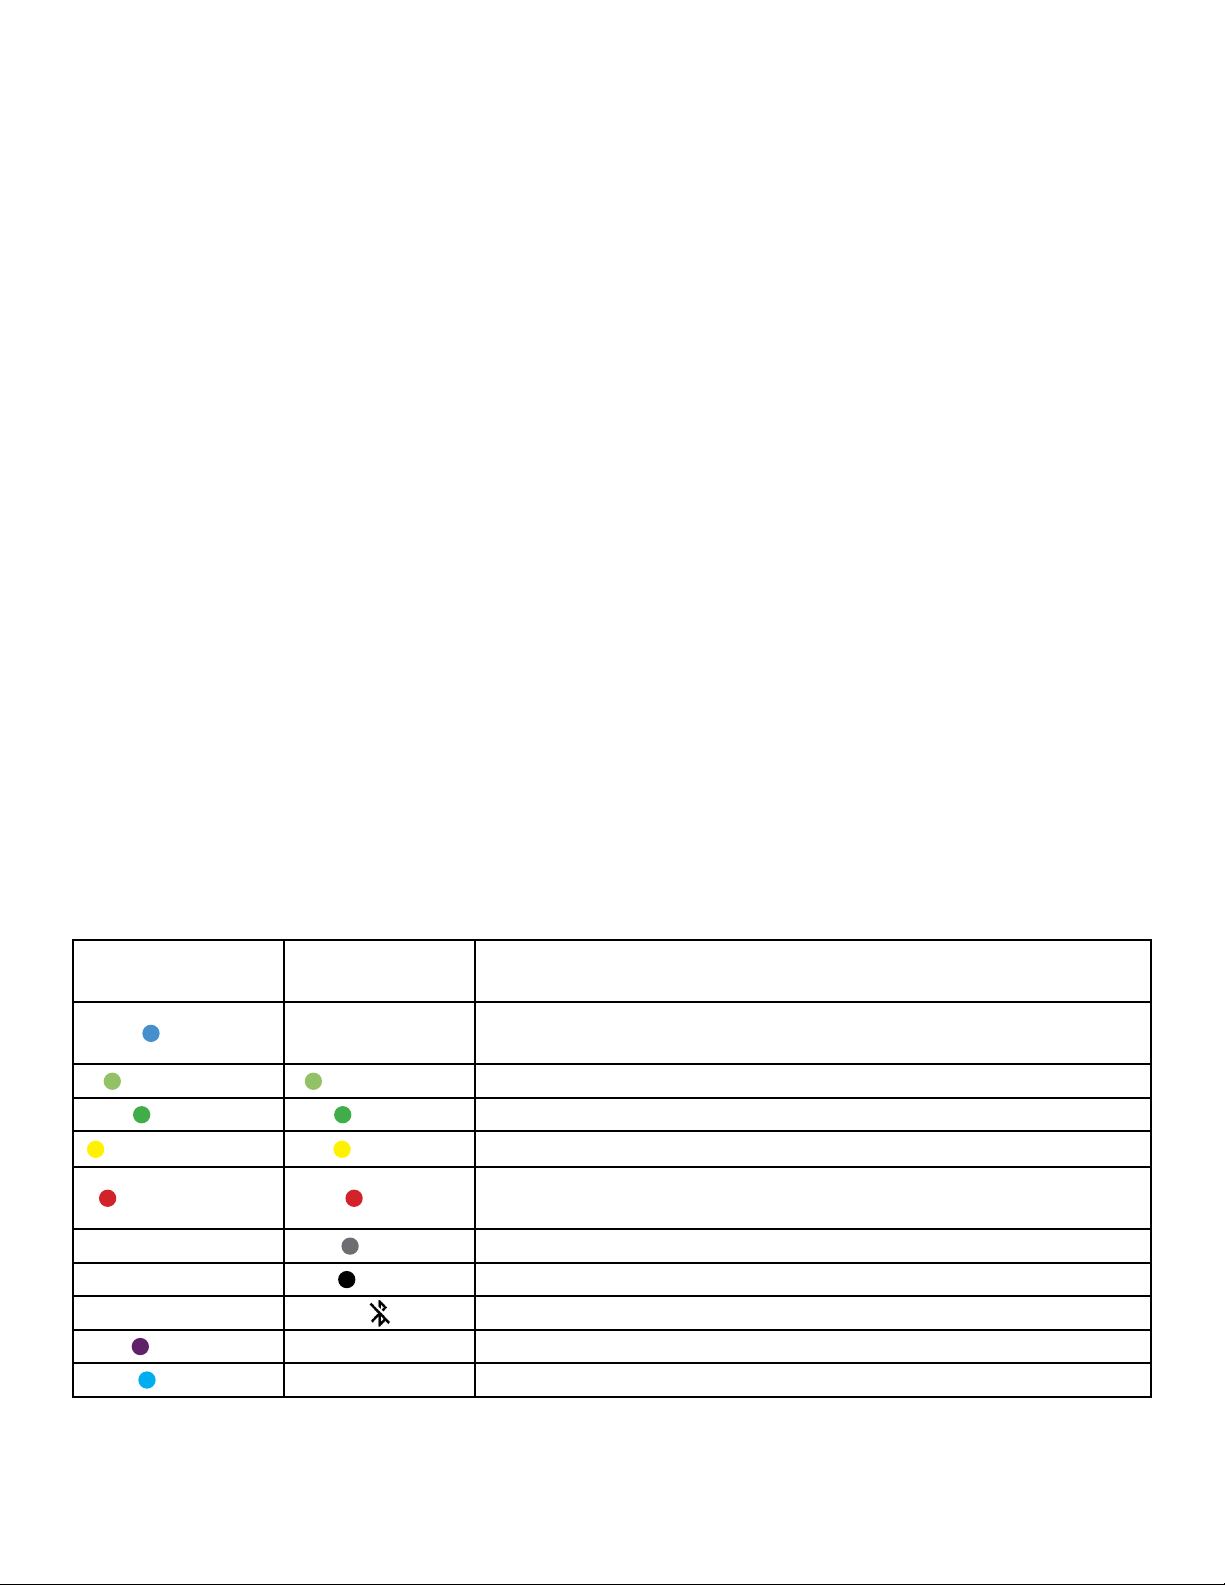
The light on the BIT ELD adapter and the
indicator circle in the top-right corner of the app
display connection status. See the chart below
for the meaning of each color.
To check that you are connected to the correct
BIT ELD adapters and vehicle, you can nd the
VIN number of the vehicle under “ELD Adapter"
Settings. If you accidentally connect to the
BIT ELD Adapter
Blue
Light Green Light Green The BIT ELD adapter is connecting to the Blue Ink Tech app
Green Green The BIT ELD adapter is connected to the Blue Ink Tech app
Blinking Yellow Yellow The engine is on, but the driver has not logged in
Blinking Red Red
Purple The BIT ELD adapter has unidentied driver records
Cyan BIT ELD adapter needs to be unplugged and plugged back in
Blue Ink Tech
App
The BIT ELD adapter is ready to connect to the
Blue Ink Tech app
The vehicle is moving, but the BIT ELD adapter is not
connected to the
Gray The Blue Ink Tech app is searching for BIT ELD adapters
Black The Blue Ink Tech app did not nd any BIT ELD adapters
Bluetooth has been disabled on the smartphone/tablet
app
Meaning
By default, the light on the BIT ELD adapter will turn off 60 seconds after a status change.
7
Page 8
BIT ELD Adapter Health Status
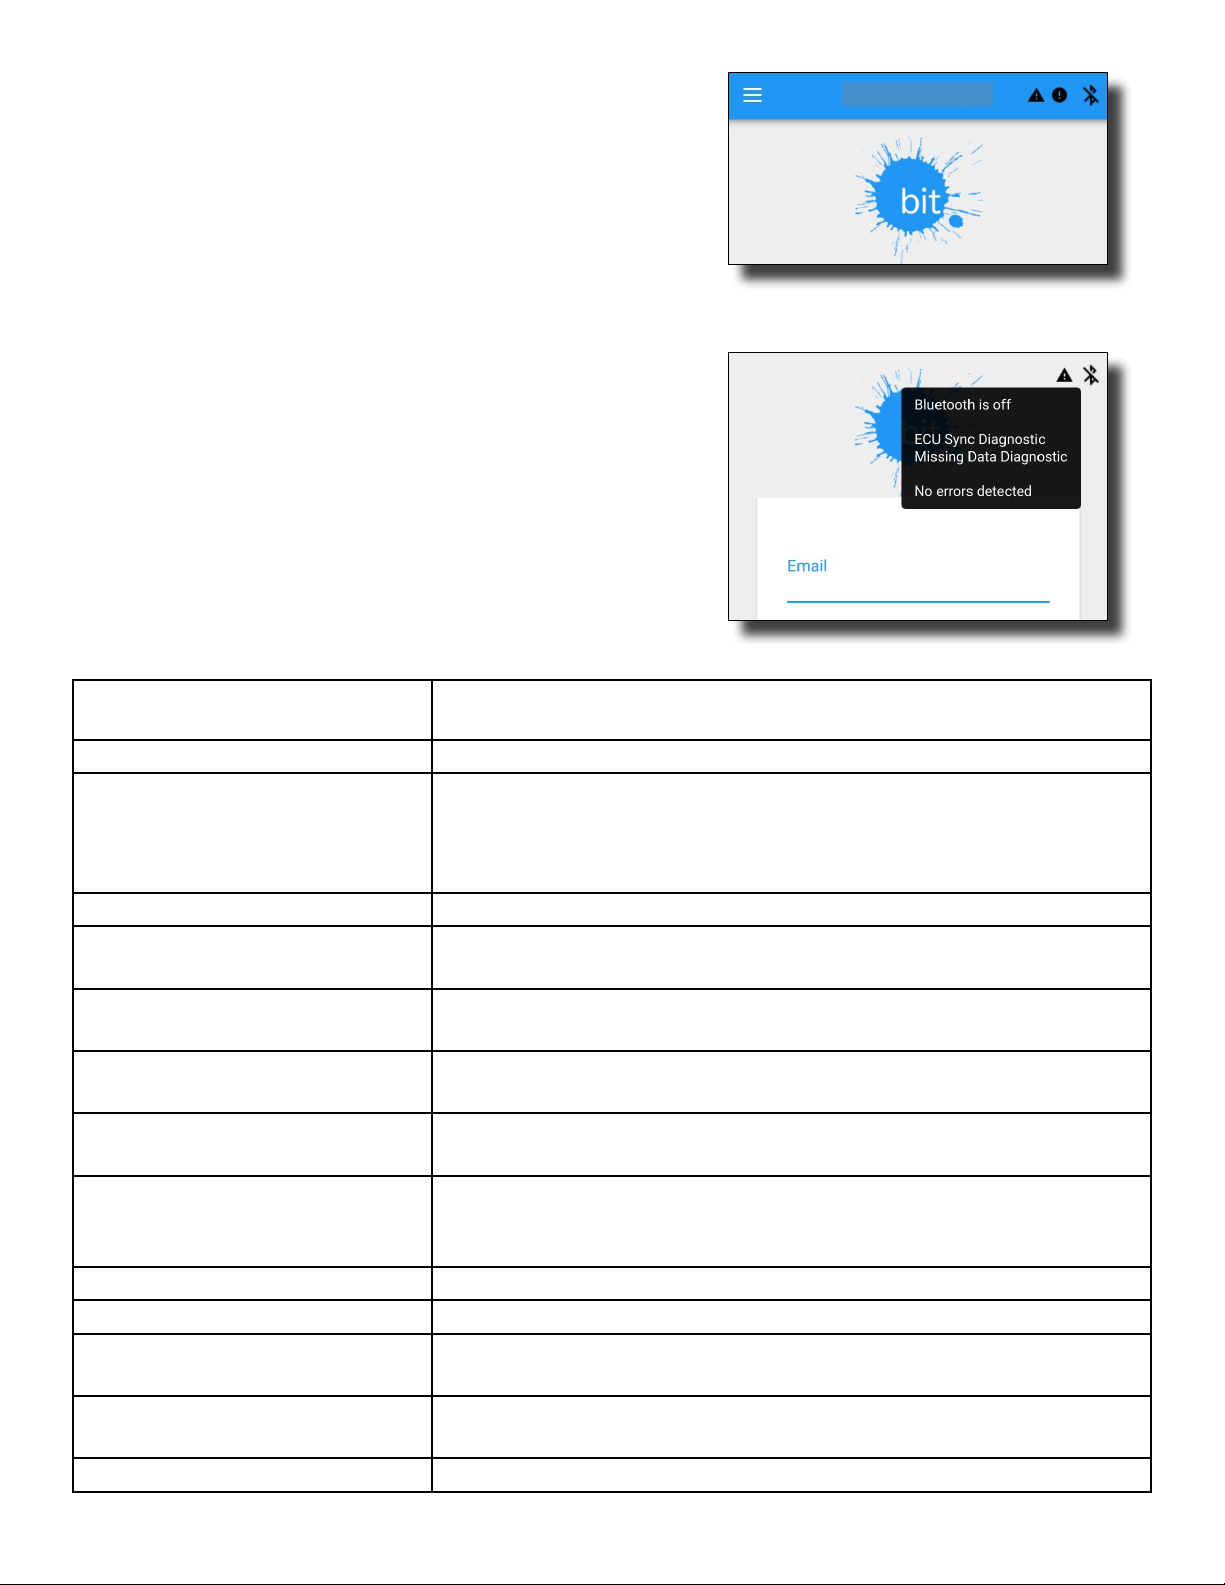
The BIT ELD and Blue Ink Tech app constantly
monitor health status and provide an indication
when warnings or errors are active.
When a diagnostic warning is present, a triangle
with an “!” will be present in the top-right corner
of every screen. When a malfunction is active, a
circle with an “!” will be present.
Tap these icons to see a list of active diagnostic
warnings and malfunctions. The table below
summarizes the meaning of each diagnostic
warning and malfunction, but more details about
the specific conditions that trigger these
messages can be found in the ELD mandate.
Message Meaning
Data Recording Malfunction The ELD ran out of available storage space for events.
Failed tests to ensure the ELD is able to transfer logs during
Data Transfer Diagnostic
Data Transfer Malfunction There was an error while transferring data four times in a row.
ELD Disconnected
Engine Synchronization
Diagnostic
Engine Synchronization
Malfunction
GPS Compliance Diagnostic
GPS Compliance Malfunction
Missing Data Diagnostic Required elds for an event were not entered.
Power Diagnostic The ELD was not fully powered in under 1 minute.
Power Malfunction
Timing Compliance Malfunction
Unidentied Driver Diagnostic The vehicle has drive time that is not associated with a driver.
a roadside inspection. This can also be triggered if there is an
error while sending data from the app to the website, such as an
incomplete upload, validation check error, or similar issue.
The ELD detected a gap in the vehicle's odometer readings
or the vehicle's engine hour reading.
The ELD was unable to communicate with the vehicle within
5 seconds of needing information from the vehicle's database.
The ELD was unable to communicate with the vehicle
for more than 30 minutes during a 24-hour period.
The ELD was unable to acquire a valid position
within 5 miles of the vehicle's movement.
The ELD was unable to acquire a valid position within 5 miles of
the vehicle's movement and these events cumulatively represent
more than 60 minutes over a 24-hour period.
The ELD missed 30 minutes or more of driving time due
to not being powered.
The ELD detected that its clock was inaccurate by
10 minutes or more.
8
Page 9
The Home Screen
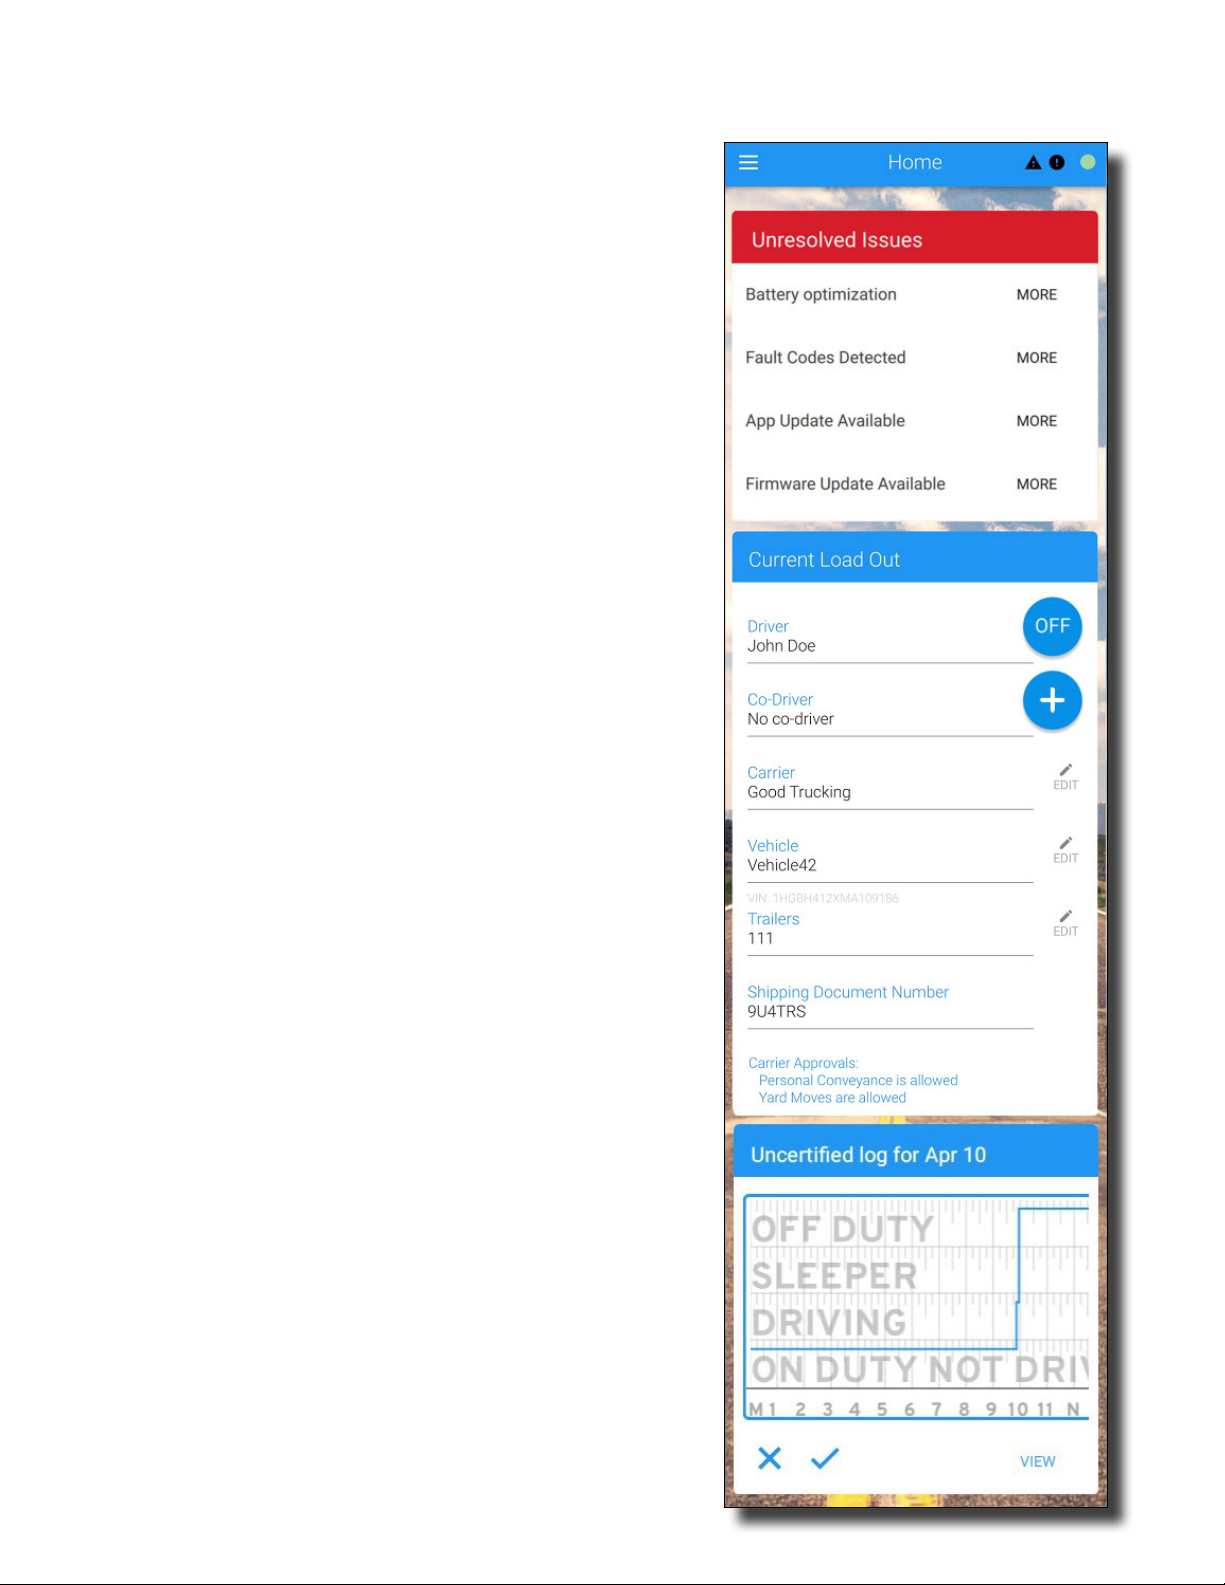
The Home screen shows basic information
about your current load, as well as any issues
with the app and logs that require your
attention. You will have to swipe up on the
screen to see all of the information.
Unresolved Issues
At the top of the Home screen you may see
alerts from your BIT ELD adapter or other BIT
sensors, a setting on your phone or tablet that
needs to be changed, or a message if you
haven't updated to the latest version of the
Blue Ink Tech app or BIT ELD firmware.
Tap “MORE” to see details about any of these
issues.
Current Load Out
At the top of the home screen, below any
unresolved issues, the Current Load Out
displays the following:
our current duty status in a blue circle at the
● Y
top-right
● Your name in the driver field
● Name of a co-driver who will be listed on
your records (see Co-Driver Login on pg 21)
● Name of the carrier with whom you are
sharing data
● Vehicle being used for the day's work
●
Up to three trailers being used
●
Shipping document number from your
● Settings that your carrier has set for your
account, including personal use of the
vehicle, yard moves, and ELD exemptions
simultaneously
records
If you drive for multiple carriers, tap the “EDIT”
icon to the right of the “Carrier” field to choose
the carrier associated with your current load.
You cannot join or leave carriers from the
Ink Tech app
blueinktech.com
settings (see My Account on page 36).
. Log in to the web portal at
to change your carrier
Blue
9
Page 10
The Home Screen (continued)
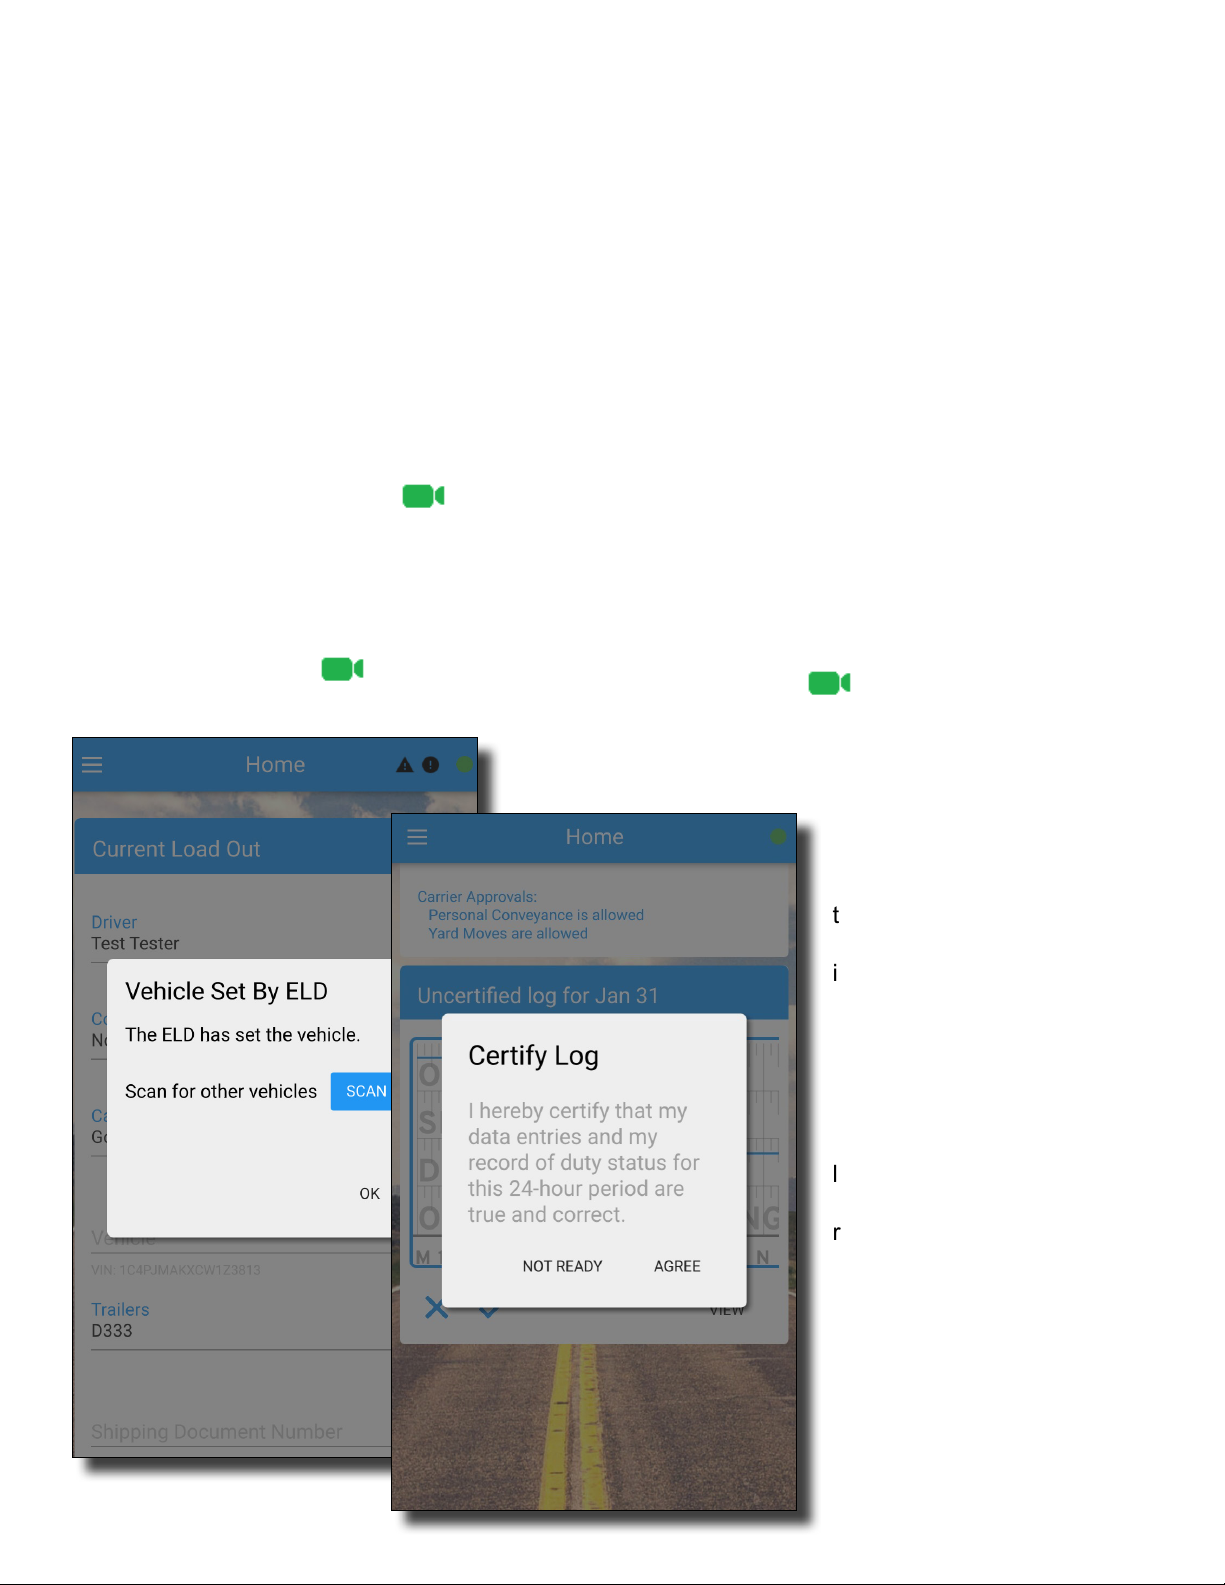
If your app is connected to a BIT ELD adapter,
the ELD will set the vehicle listed in your
Current Load Out. If the vehicle listed on your
screen is not the vehicle you are driving, tap the
“EDIT” icon to scan for other BIT ELD adapters
in range.
If your app is not connected to a BIT ELD
adapter, tapping the “EDIT” icon will open a list
of all the registered vehicles in your carrier's
fleet. Y
your Current Load Out. Tap “Add New Truck” to
add a new vehicle to the eet.
You can select up to three trailers at one time
for your Current Load Out. Tap the “EDIT” icon
to select any registered trailers from your
carrier's fleet. Tap “Add New Trailer” to add a
new trailer to the eet.
ou can select any of these vehicles for
Notications and Suggested Changes
Any uncertied logs, unidentied driver logs,
or suggested log changes will be shown below
the Current Load Out. You may have to swipe
up on the screen to see all of the data for these
notifications.
Tap “VIEW” to see the data in more detail on
the “Hours of Service” screen. Tap the checkmark to accept the changes or certify that
record. Tap “X” to dismiss the notification and
see the next one. Notifications are displayed in
chronological order, so you will see the oldest
record first.
Approving uncertied logs will prompt you to
certify your logs for the day displayed. Any
changes made later will require you to recertify
that day's log.
Unidentied driver logs
are records of drive time
automatically recorded by the
BIT ELD adapter when no
driver was connected via the
Blue Ink Tech app to claim
the drive time. Accepting
unidentified drive time will
insert the displayed duty
status changes into your log.
Suggested log changes are
edits made by your carrier
administrator or by your
co-driver that will affect your
logs. Accepting the changes
will update your existing
records with the suggested
edits. You can also reject
suggested log changes to
keep your existing records.
10
Page 11
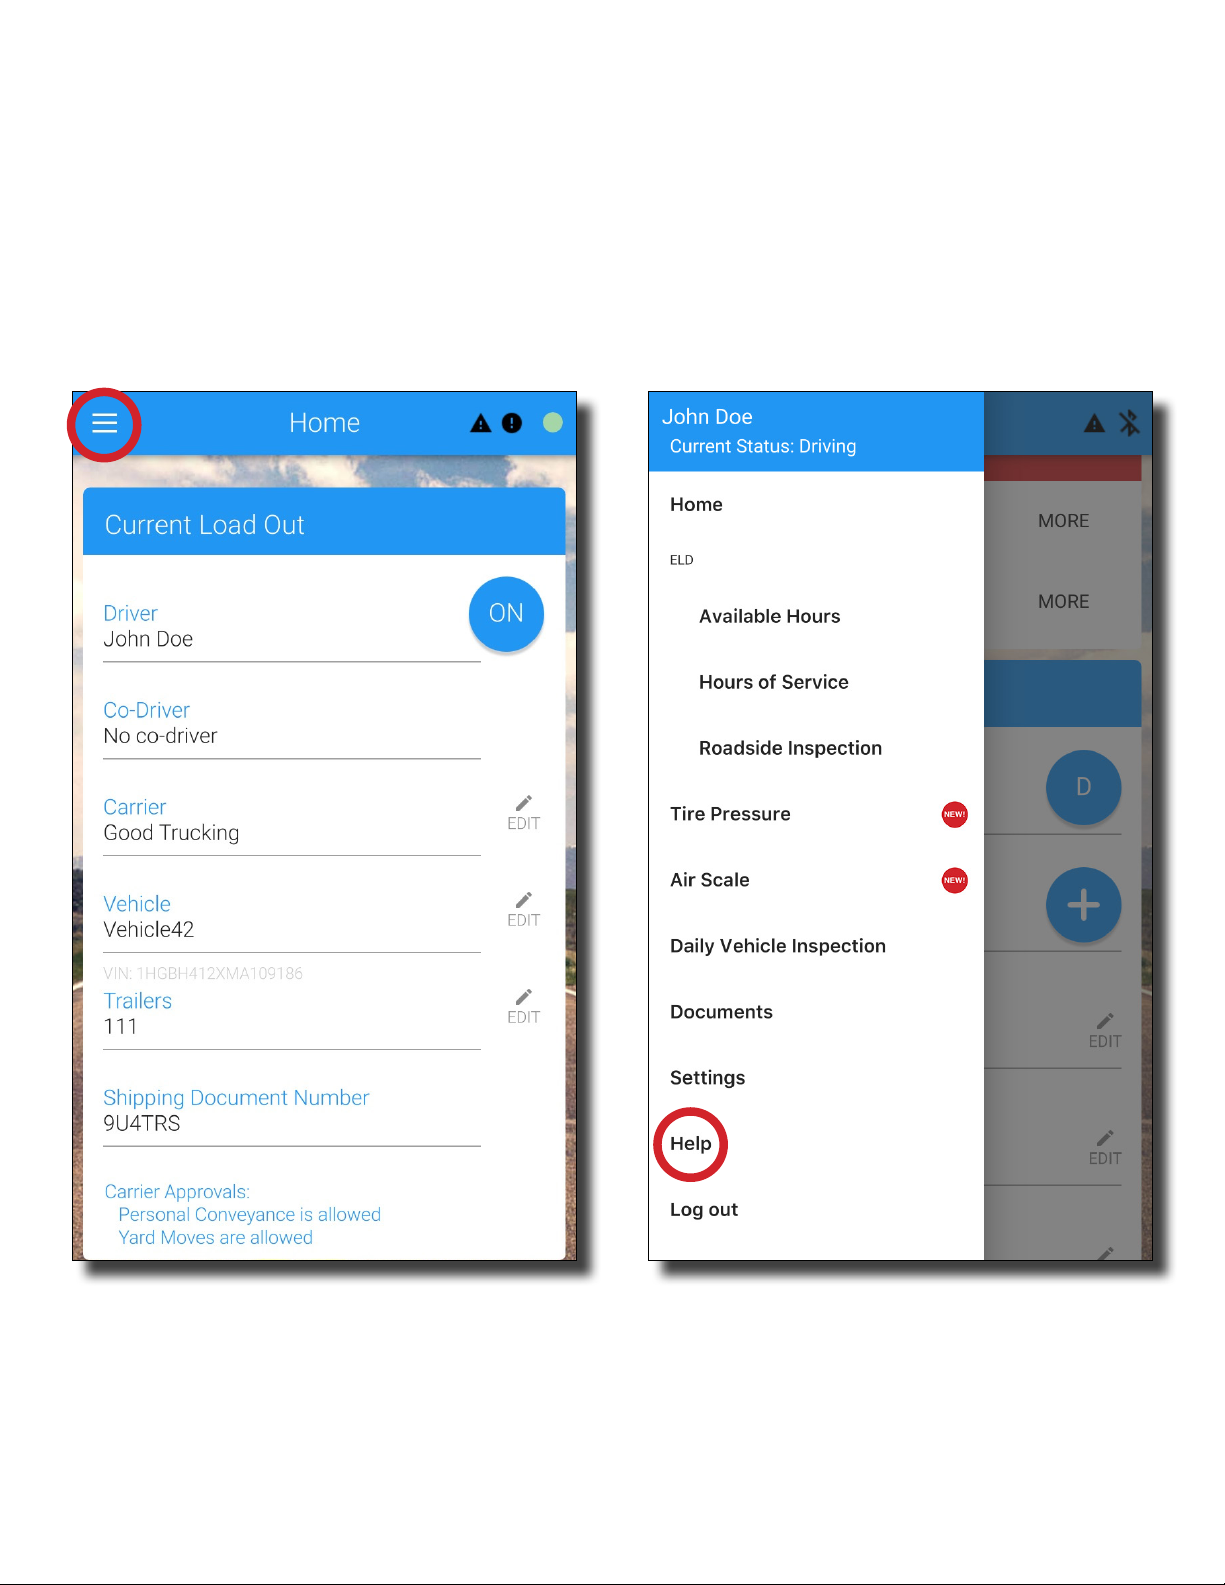
Navigating the App
The main menu is represented by three
stacked lines in the top-left corner of the
app (circled in red in the image below).
Tap the menu icon to navigate to different
features in the app. Each of these
features will be explained in more detail in
the following sections.
Tap help (circled in red in the menu below) to
find the phone number or support email links
at the bottom of the screen to contact the Blue
Ink Tech Support Team with any questions or
issues.
11
Page 12
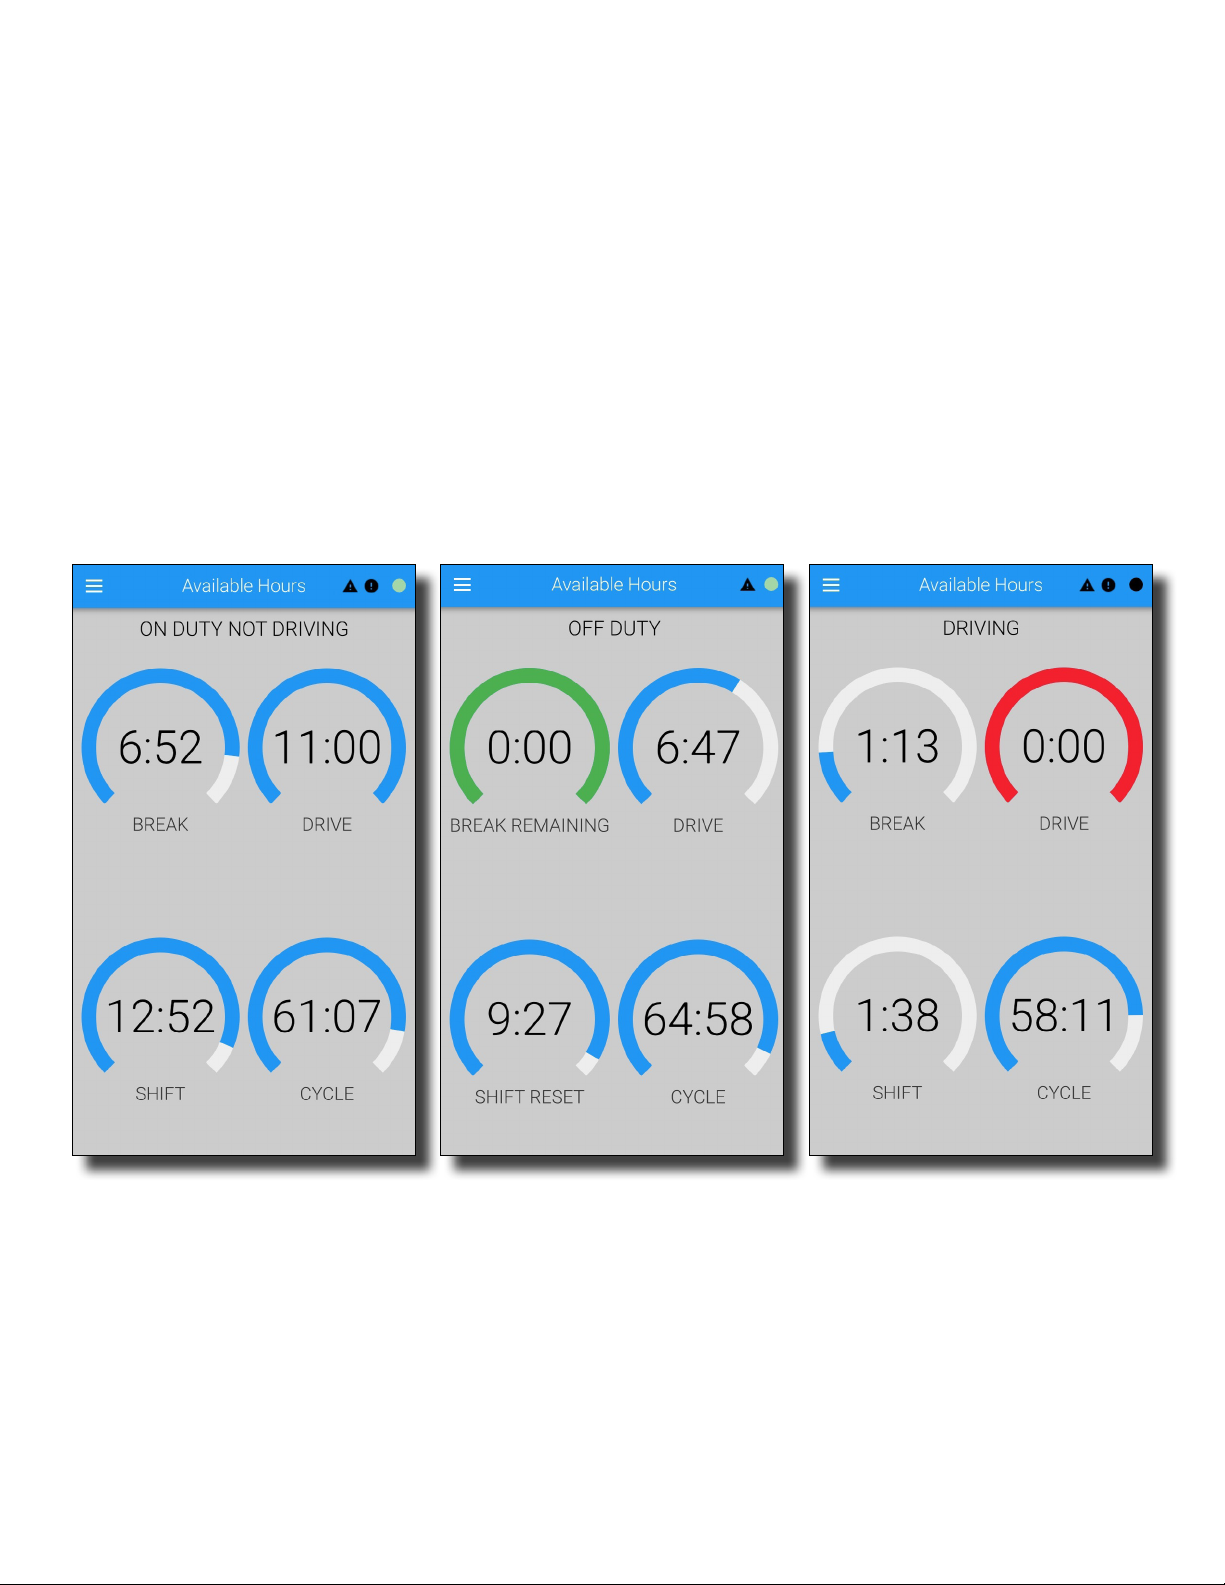
Available Hours
The Available Hours page shows how many
hours are left until certain events could
potentially place the driver in violation. The
following timers are displayed:
BREAK - Time remaining until a 30-minute
break is required
DRIVE - Time remaining of your driving hours
SHIFT - Time remaining of your work shift
CYCLE - Time remaining of your weekly cycle
If you are taking your 30-minute break the
screen will switch to show “BREAK
REMAINING.”
If you have run out of drive time, shift time, or
cycle time those progress bars will show red.
If you are running the Blue Ink Tech app in
the background while driving but are not
actively looking at the display, the app will
send a notification when you have 15
minutes remaining on any of the timers.
Do not try to navigate the Blue Ink Tech App while driving.
The “Available Hours” page is automatically displayed when the vehicle
is in motion. The only menu options available while the vehicle
is in motion are “Available Hours” and “Co-Driver Login.”
12
Page 13
Hours of Service
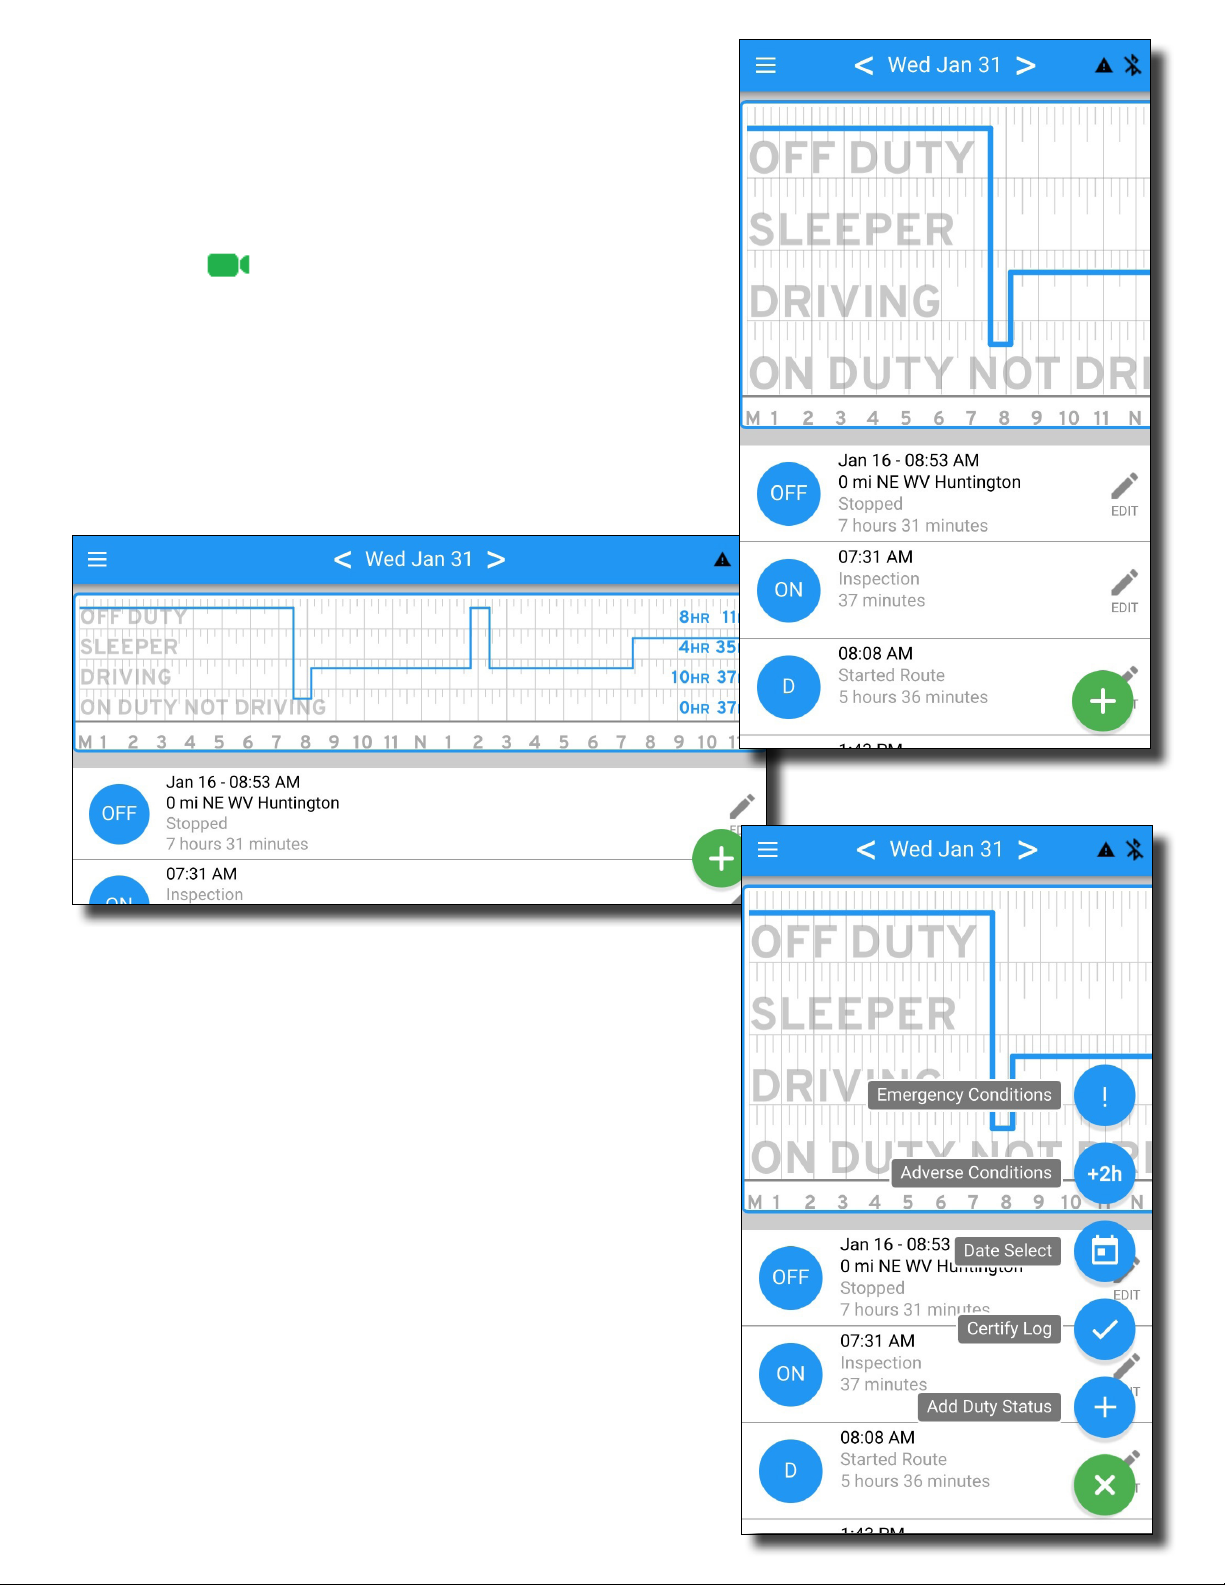
Driving logs for the current day and the past
seven days can be viewed under Hours of
Service. As a driver you have the ability to add,
delete, and make edits to your records of duty
status.
If your screen is in portrait conguration, you
will only see half of the day’s events in the
chart at the top of the page. Swipe the chart left
to see the other half of the day's events. If you
rotate your screen to landscape orientation,
you will be able to see the entire chart.
Landscape View
The list at the bottom of the screen shows all
of your duty statuses for the selected day.
Tapping a status record will highlight it on the
log above so you can easily check and edit
your logs.
Tap the green “+” button at the bottom-right to
open a menu of options. This will allow you to
add a new duty status, certify your logs for the
selected day, change the day you’re viewing,
or claim adverse or emergency driving
conditions.
Portrait View
13
Page 14
Hours of Service (continued)
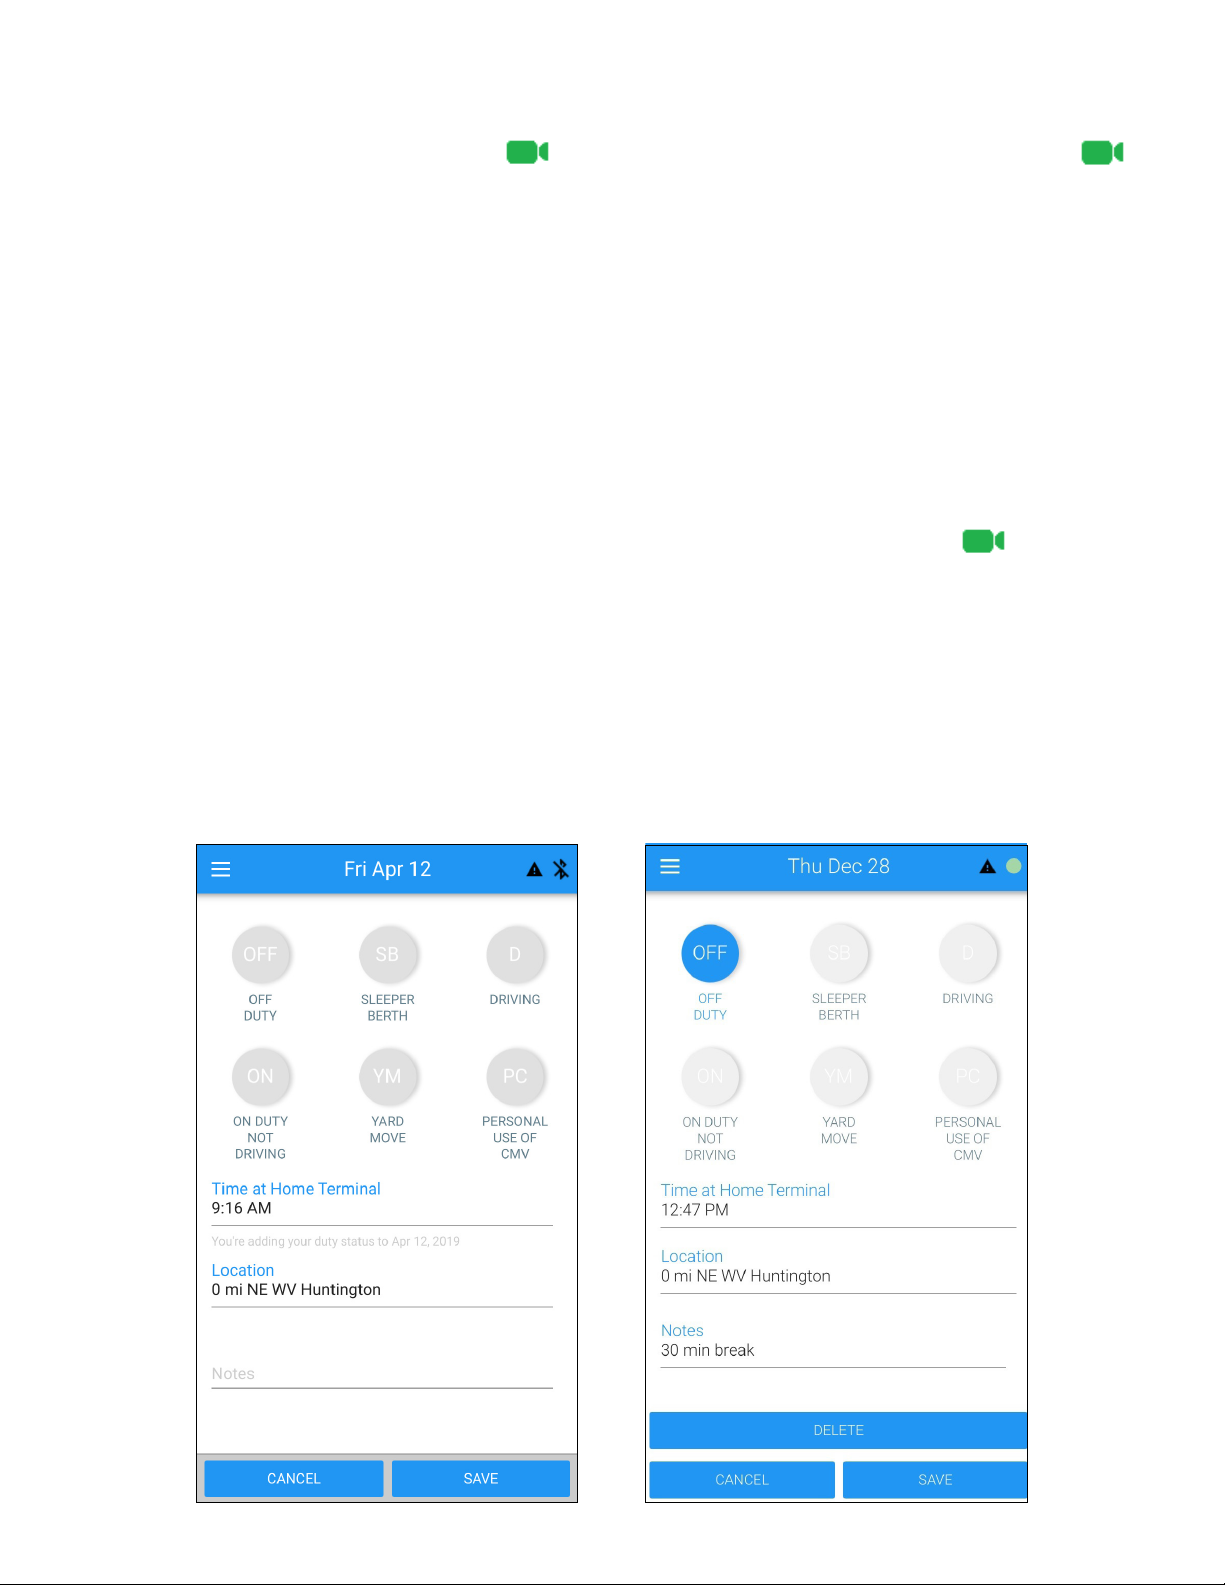
Adding a Record of Duty Status
To add a duty status tap the green “+” button
and select “Add Duty Status.” This will open the
menu shown to the left.
Tap the duty status you want to enter and add
any relevant notes. The time and location will
be automatically lled out with the current time
and location.
Tap in the “Time at Home Terminal” eld to
change the time. This will allow you to insert a
duty status at a previous time. You may insert
a duty status at any time as long as it does not
conict with automatically recorded Drive Time.
You can also quickly set your duty status by
tapping the blue circle in the Current Load Out
section on the Home page.
Editing a Record of Duty Status
To edit a duty status, tap the “EDIT” icon to the
right of the duty status listed on the Hours of
Service screen. This will bring up the detail
screen where you can adjust the time, select a
different duty status, and modify your notes.
All edits to duty status require a note of at
least four characters. Y
be marked as inactive and the new record with
your changes will be marked as active.
You can also delete a duty status, which will
mark that record as inactive.
FMCSA Mandate Requirement: If the BIT
ELD adapter detected the vehicle as inmotion, then a change of status to a nondriving status will NOT be allowed. You will
NOT be able to add a non-driving status in the
middle of a period of time detected as inmotion. Messages will alert you if these
conditions occur.
our previous record will
14
Page 15

Hours of Service (continued)
Automatic Duty Status Changes
If the BIT ELD adapter detects vehicle
movement over 5 MPH and if your current duty
status is not set to “Driving” the app will
automatically set your status to driving. This is
feature required by the FMCSA ELD
a
Mandate.
If the BIT ELD adapter detects that the vehicle
has stopped for 5 minutes and your duty status
is still set to “Driving” the app will prompt you to
see if you are still driving. If you select “No”
you will be taken to the “Add Duty Status”
screen to change your duty status. If there is
no response from you within one minute, the
app will automatically change your duty status
to “On Duty Not Driving.”
To help maximize your available drive time, the
6 minutes of non-motion time will be taken off
the “Driving” duty status and added to the “On
Duty Not Driving” duty status.
Duty Status and Logging Out
It is important to know that when you close or
log out of the Blue Ink Tech app you will remain
in the last set duty status. If you are set to an
in-motion status such as “Driving,” “Personal
Conveyance,” or “Yard Move,” your available
hours will be incorrect the next time you log
into the app. Y
status to your logs and set the start time to
when you stopped your last duty status.
To help prevent this from happening, the Blue
Ink Tech app will send a notification if the app
is closed and you are set to an in-motion or on
duty status.
ou will have to add a new duty
The Blue Ink Tech app will only change your
duty status from “Driving” to "On Duty Not
Driving" after the 6-minute interval described
above. If you turn off your vehicle or
disconnect from the BIT ELD adapter by
moving outside of Bluetooth range before the
6-minute interval, you will remain set to
“Driving.”
15
Page 16
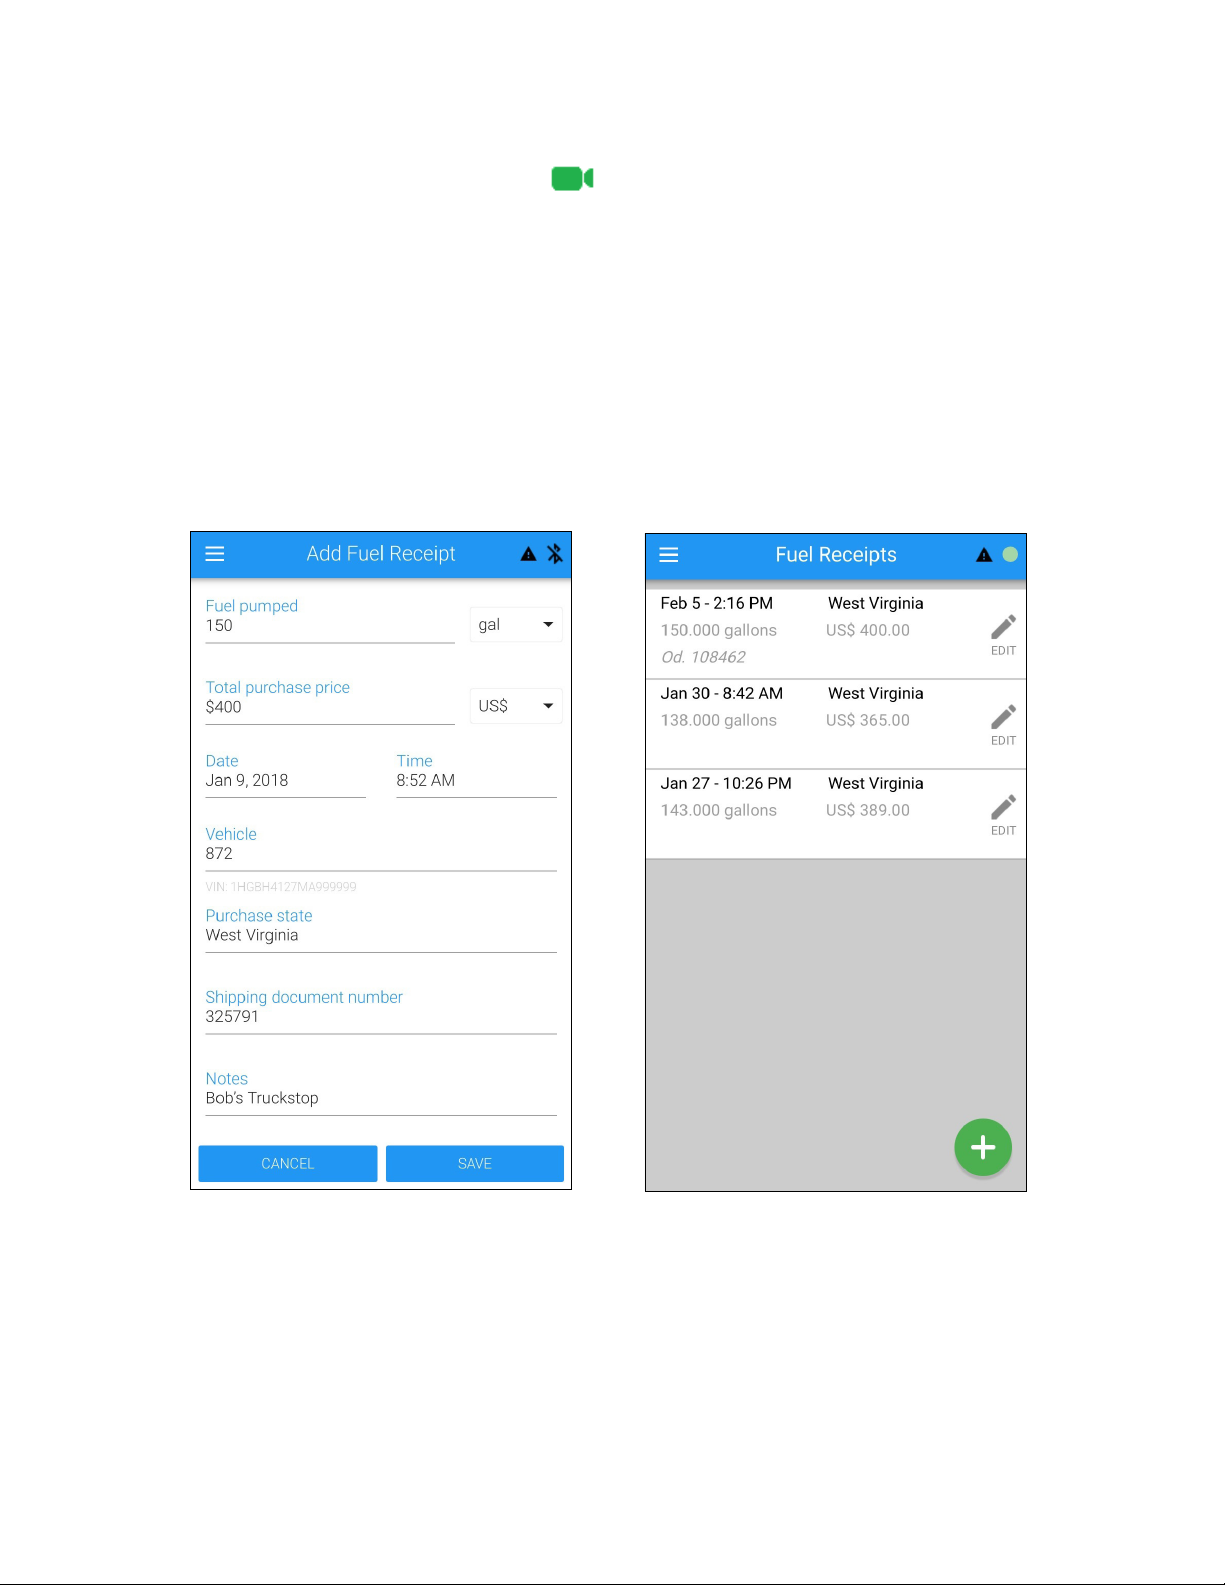
Fuel Receipts
You can keep track of your fuel purchases on
the Documents screen from the main menu.
The Date, Time, Vehicle, and Purchase State
will be automatically lled in by the Blue Ink
Tech app. You may enter the amount of fuel
pumped, the purchase price, any shipping
document numbers, and any relevant notes.
The Fuel Pumped can be entered in gallons or
liters. The Total Purchase Price can be entered
in US or Canadian dollars.
When you are inished entering purchase
information, tap “SAVE” at the bottom of the
screen. This will make your fuel receipt
available to your carrier's administrator on the
Blue Ink Tech website.
To add another fuel receipt tap the green “+” at
the bottom of the screen.
To edit or delete an existing fuel receipt tap the
“EDIT” icon to the right of the receipt entry.
Fuel Receipts can be used in collaboration with the IFTA subscription
offered by Blue Ink Tech to manage your in-state miles.
16
Page 17
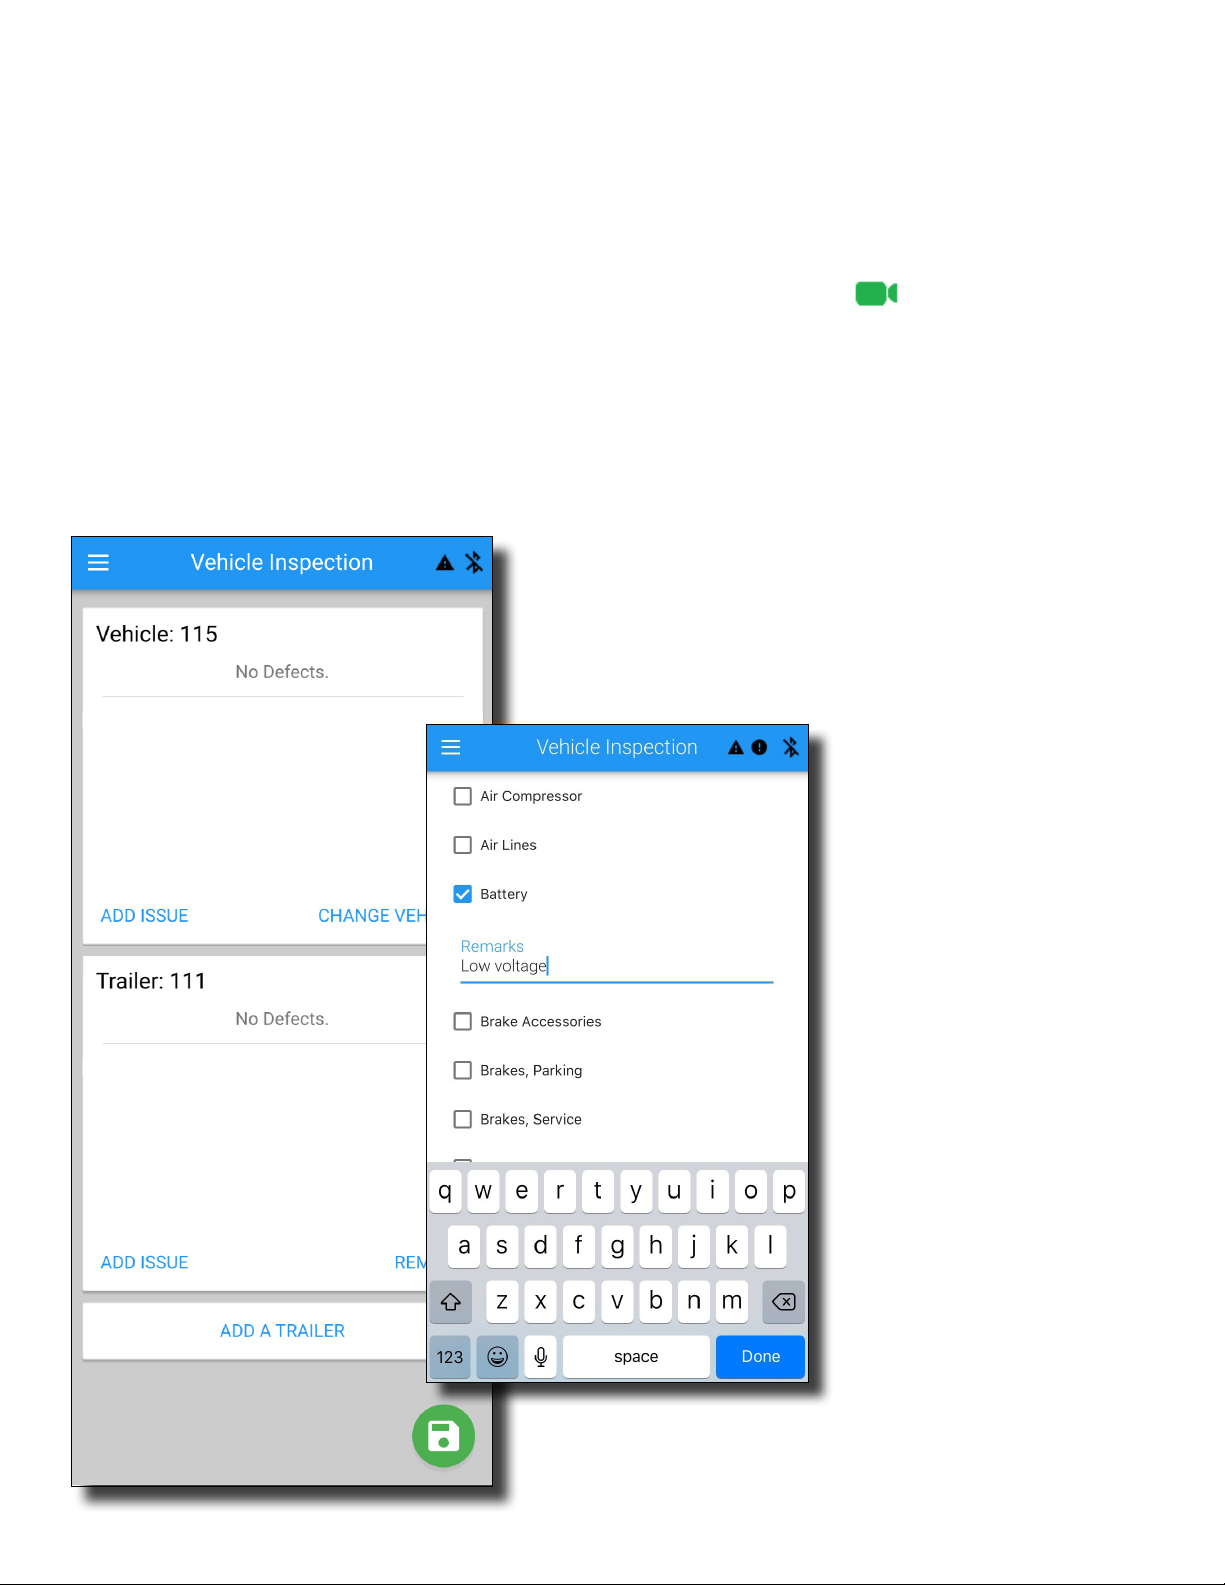
Daily Vehicle Inspection (DVIR)
The Vehicle Inspection screen lets you note any
issues or areas of concern found during pre-trip
and post-trip inspections, and lets you share that
information with your carrier on the web portal at
blueinktech.com.
The Vehicle and Trailer(s) from your Current
Load Out are automatically displayed on the
Vehicle Inspection screen. Tap “Change Vehicle”
to select any of your carrier's other registered
Vehicles. Tap “Select a Trailer” to select up to
three (3) of your carrier's other registered Trailers.
To note any issues, tap “Add Issue.” This will
bring up a checklist of possible issue areas.
Check the box for the area of concern and add
specic notes about the issue in the “Remarks”
eld. Tap “Done” to return to the Vehicle
Inspection screen.
When your inspection report is complete, tap
the green disk icon at the bottom right of the
screen to save it. A screen will pop up that
says your DVIR was successfully saved. Tap
okay to con irm. Saving will make your
inspection report available to your carrier's
administrator on the Blue Ink Tech web portal
when your data is synced.
17
Page 18
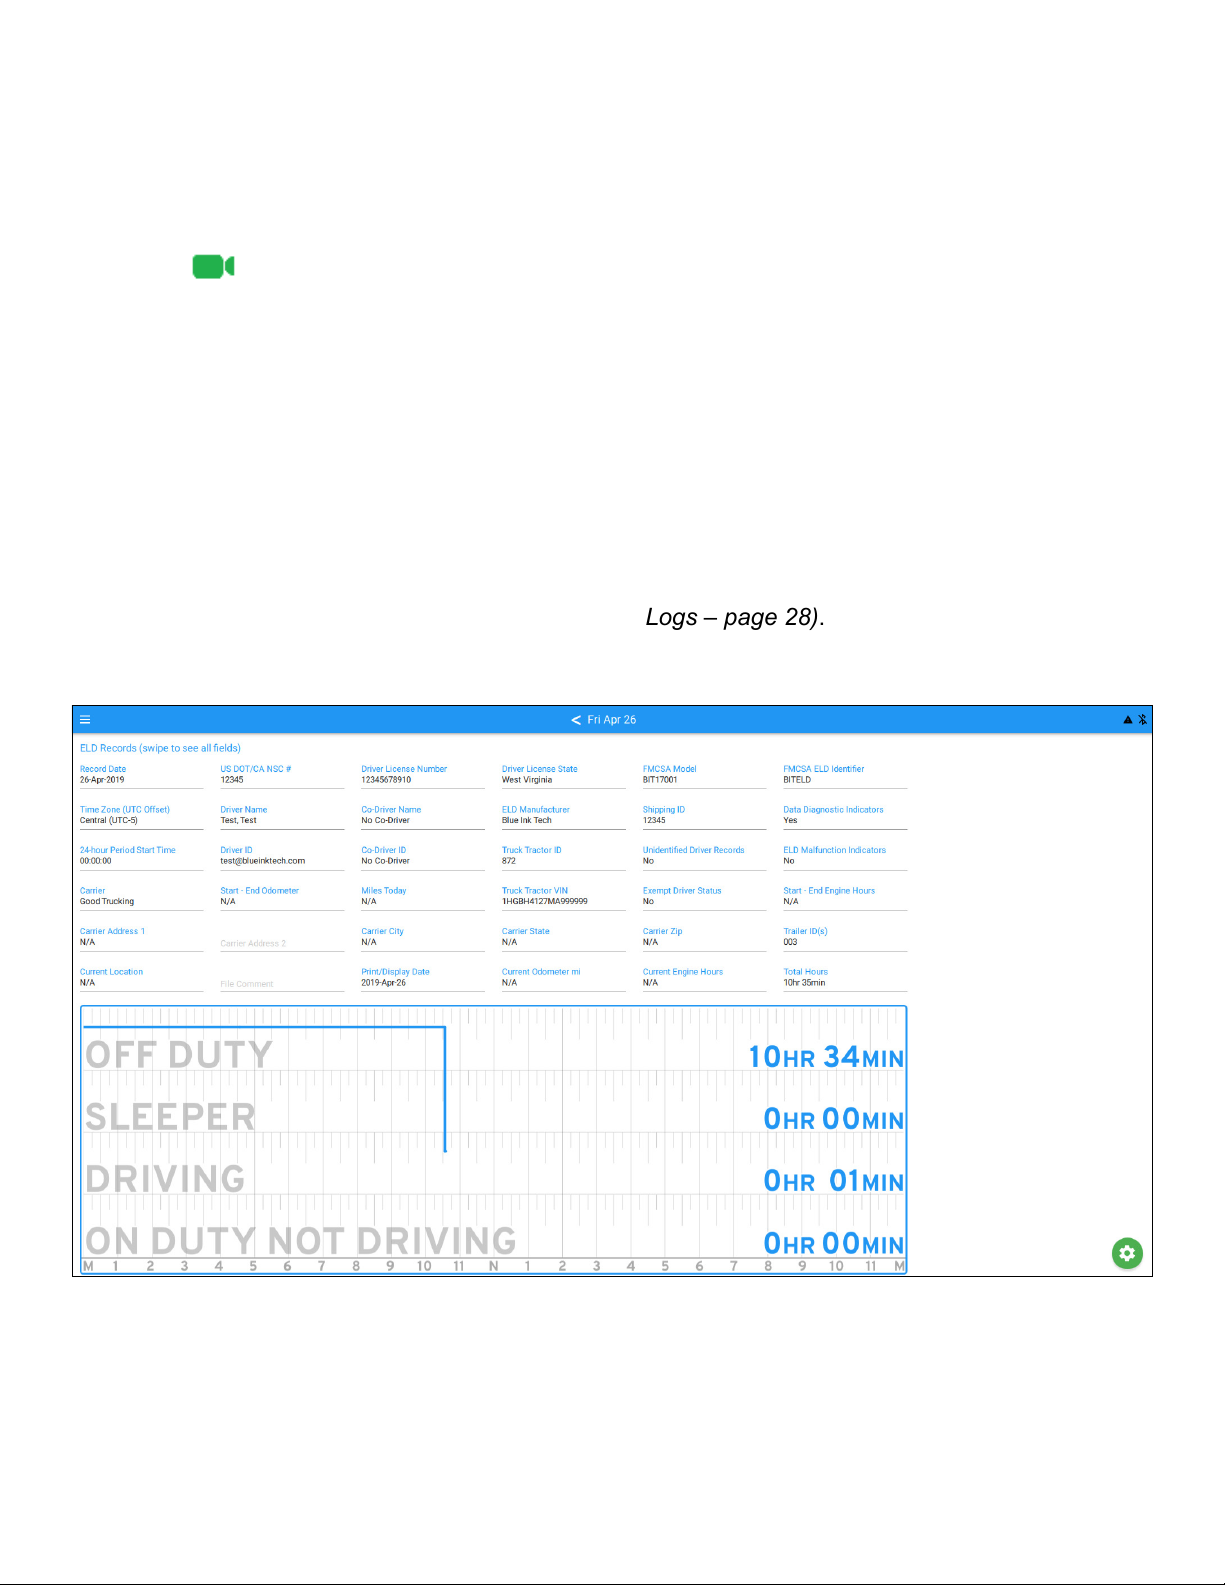
Roadside Inspection
This screen shows all of the information
necessary in the event of a roadside safety
inspection. You will need to swipe the page
from left to right to see all of the information
displayed.
Tap the green gear icon in the lower-right
corner of the screen for a menu of options.
Tap “Date Select” to select which day's log you
wish to view. Depending on your cycle rule,
logs for the past 8 to 14 days can be viewed in
the app.
Tap “Toggle Unidentified Driver Logs” to see
any unidentified logs recorded by the BIT ELD
adapter.
Tap “Send Records to DOT Web Server” or
“Email Records to DOT” if the DOT of
requests a copy of your logs. The ofcer
should give you a routing number to enter in
the comment eld. Your logs will be sent in the
comma-separated-variable format required by
the FMCSA ELD mandate.
The Blue Ink Tech app can only email records
to the predetermined DOT email address. If
you want to send logs elsewhere, you can
create a PDF report on blueinktech.com (see
Logs – page 28).
cer
18
Page 19
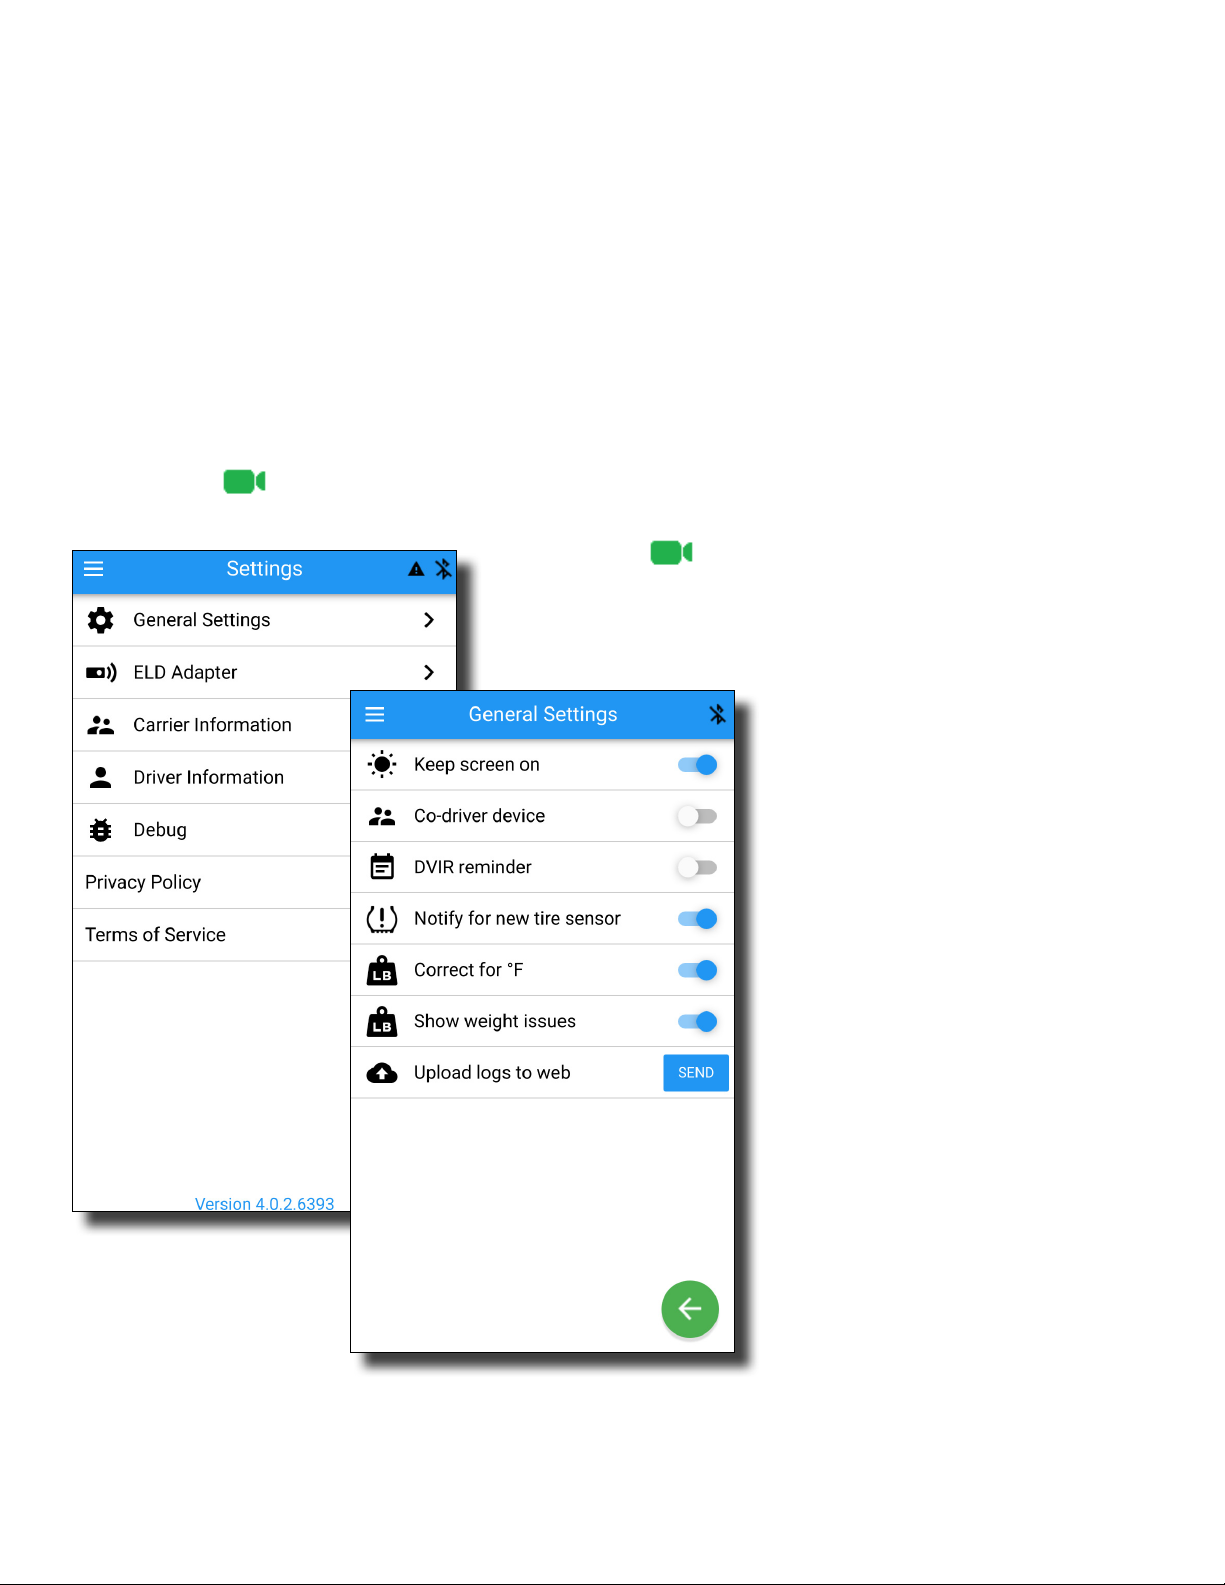
Settings
Under Settings you can view and edit
information for the Blue Ink Tech app, your BIT
ELD adapter hardware, and your driver
account information. The current version
number of the app installed on your phone or
tablet can be found at the bottom of the screen.
General Settings
Enable “Keep screen on” for the Blue Ink Tech
app to keep your phone or tablet display on at
all times so you can see your Available Hours
while driving.
The "Keep screen on" function is especially
important for Apple devices running iOS 12.1
or older. These older software versions will
disconnect the BIT ELD adapter from the Blue
Ink Tech app when the the phone or tablet
goes to sleep, or when the app is put in the
background.
our data is automatically synced with the web
Y
portal at blueinktech.com when you log into
or out of the app. To manually sync your data
at any time, tap “Send” next to “Upload logs to
web" in General Settings. You must use cellular
data or be connected to Wi-Fi for data to sync.
19
Page 20
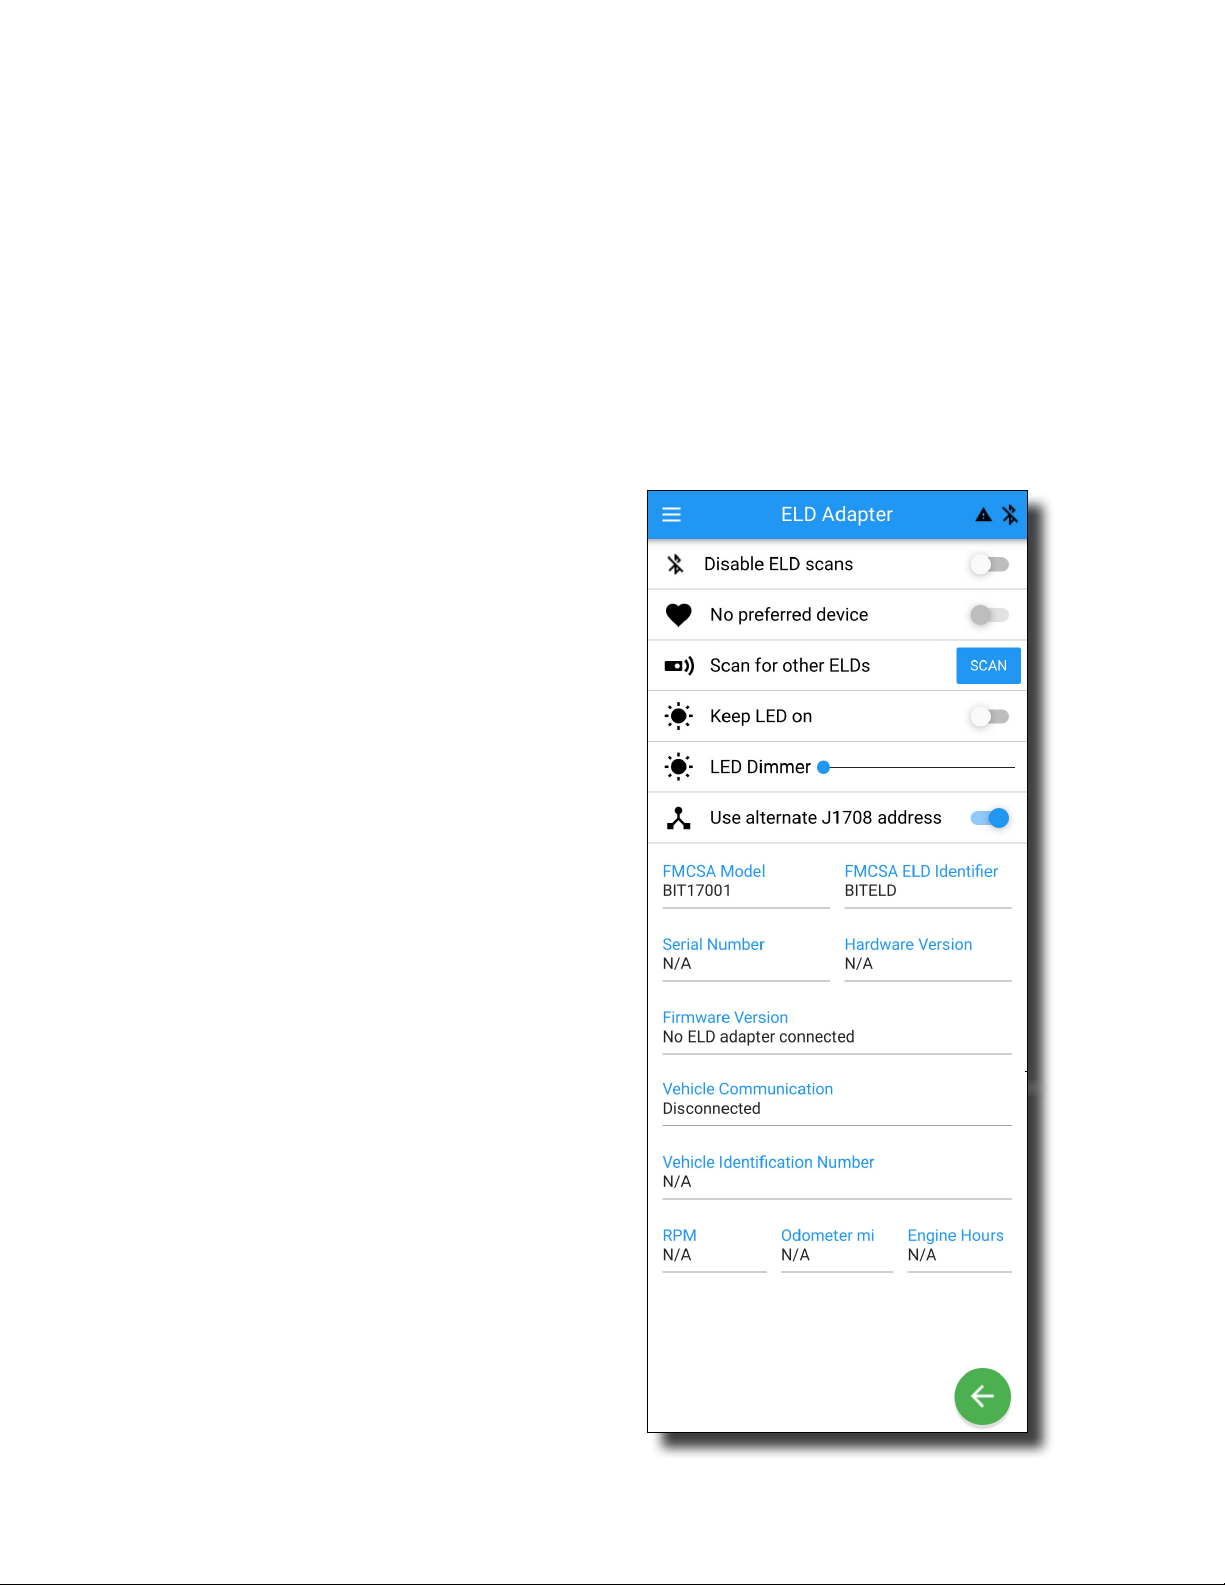
Settings (continued)
ELD Adapter Settings
Most of the data items on this screen are
based on information sent from the BIT ELD
adapter to which your app is connected.
Preferred Device
You can set the currently connected BIT ELD
adapter as your Preferred Device, which will
reduce the time it takes the app to connect to
that ELD for future use. This eliminates the
need for your phone or tablet to make a full
sweep of wireless frequencies before the
connection process starts.
Note that once a Preferred Device has been
set, the app will only connect to that device.
If you use multiple ELDs you should not set
a Preferred Device.
To change your Preferred Device, toggle to
the off position. Once you are connected to a
new BIT ELD adapter you can set it as your
new Preferred Device if desired.
Use Alternate J1708 Address
There are two addresses that can be used
by diagnostic devices to communicate with
your vehicle. If you are using a splitter to
plug more than one device into your
diagnostic port, communication could be
corrupted when both devices are using the
same address. If you experience
communication errors, toggle “Use
alternate J1708 address” to switch the BIT
ELD adapter to the other address.
Scan for Other BIT ELD Adapters
If there are multiple BIT ELD adapters in
range of your phone or tablet, the app will
connect to the nearest BIT ELD adapter. You
can check that you are connected to the
correct device by the vehicle listed in your
ELD Adapter Settings or your Current Load
Out on the Home page.
If you need to reconnect to the correct
vehicle's BIT ELD adapter, tap “SCAN” next
to “Scan for other ELDs.”
Light Settings
You can adjust your BIT ELD adapter light
settings to keep the LED on or off. In the
default off setting, the light on the BIT ELD
adapter will go off after 60 seconds of being
in the same status condition.
You can use the LED Dimmer to adjust the
brightness of the ELD's light for daytime or
nighttime driving.
20
Page 21
Settings (continued)
Carrier Information
The Carrier Information screen lists your
current Carrier and DOT Number. You can
select current carriers on the "Current Load
Out" screen, but in order to join a new carrier it
must be added on the Blue Ink Tech website.
Log in to www.blueinktech.com with the same
email and password you use to log in to the
app. Go to the “My Account” page to join or
leave carriers. As a driver, you will have
access to all logs recorded under your account
even if you are no longer driving for a particular
carrier (see My Account on pg 34).
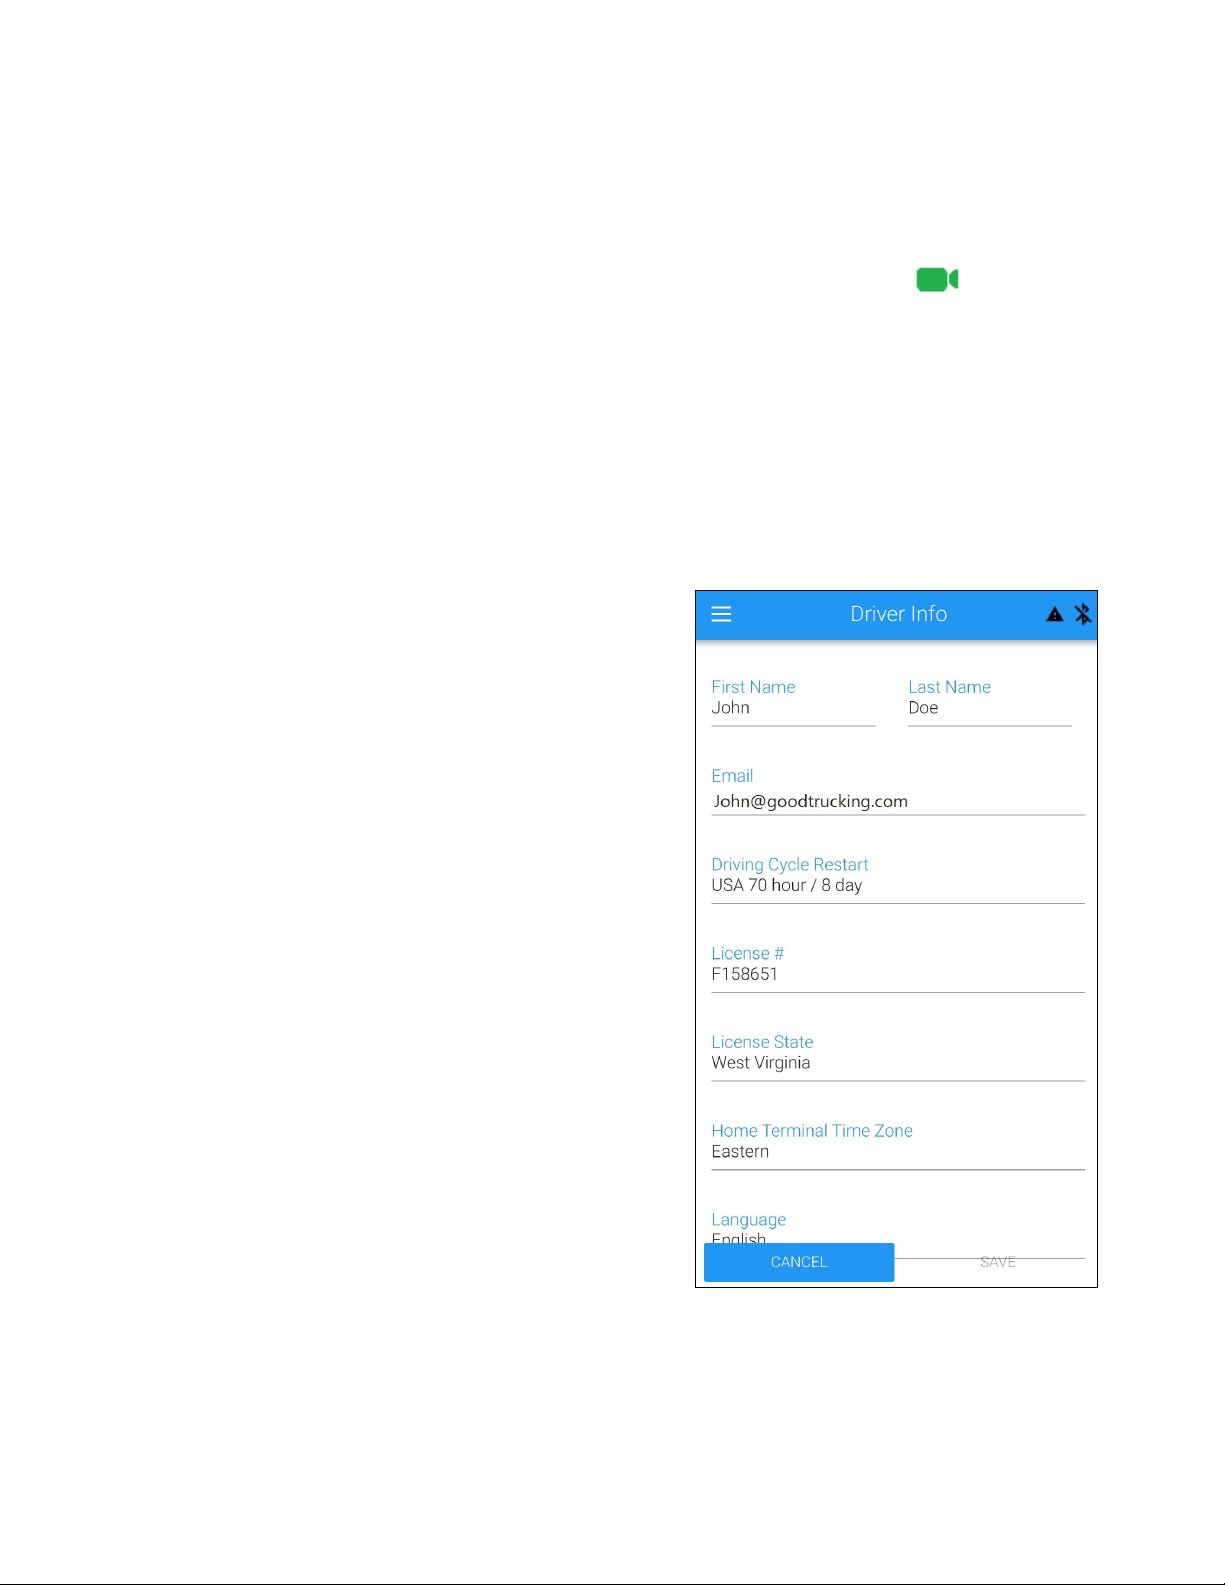
Driver Information
This screen shows your current information.
You can edit your driving cycle, commercial
driver's license information, time zone, and
language on this screen.
Before your logs and reports can be shared
with a carrier, your commercial driver's license
number needs to be entered on this page
saved while your device is connected to the
internet.
and
21
Page 22
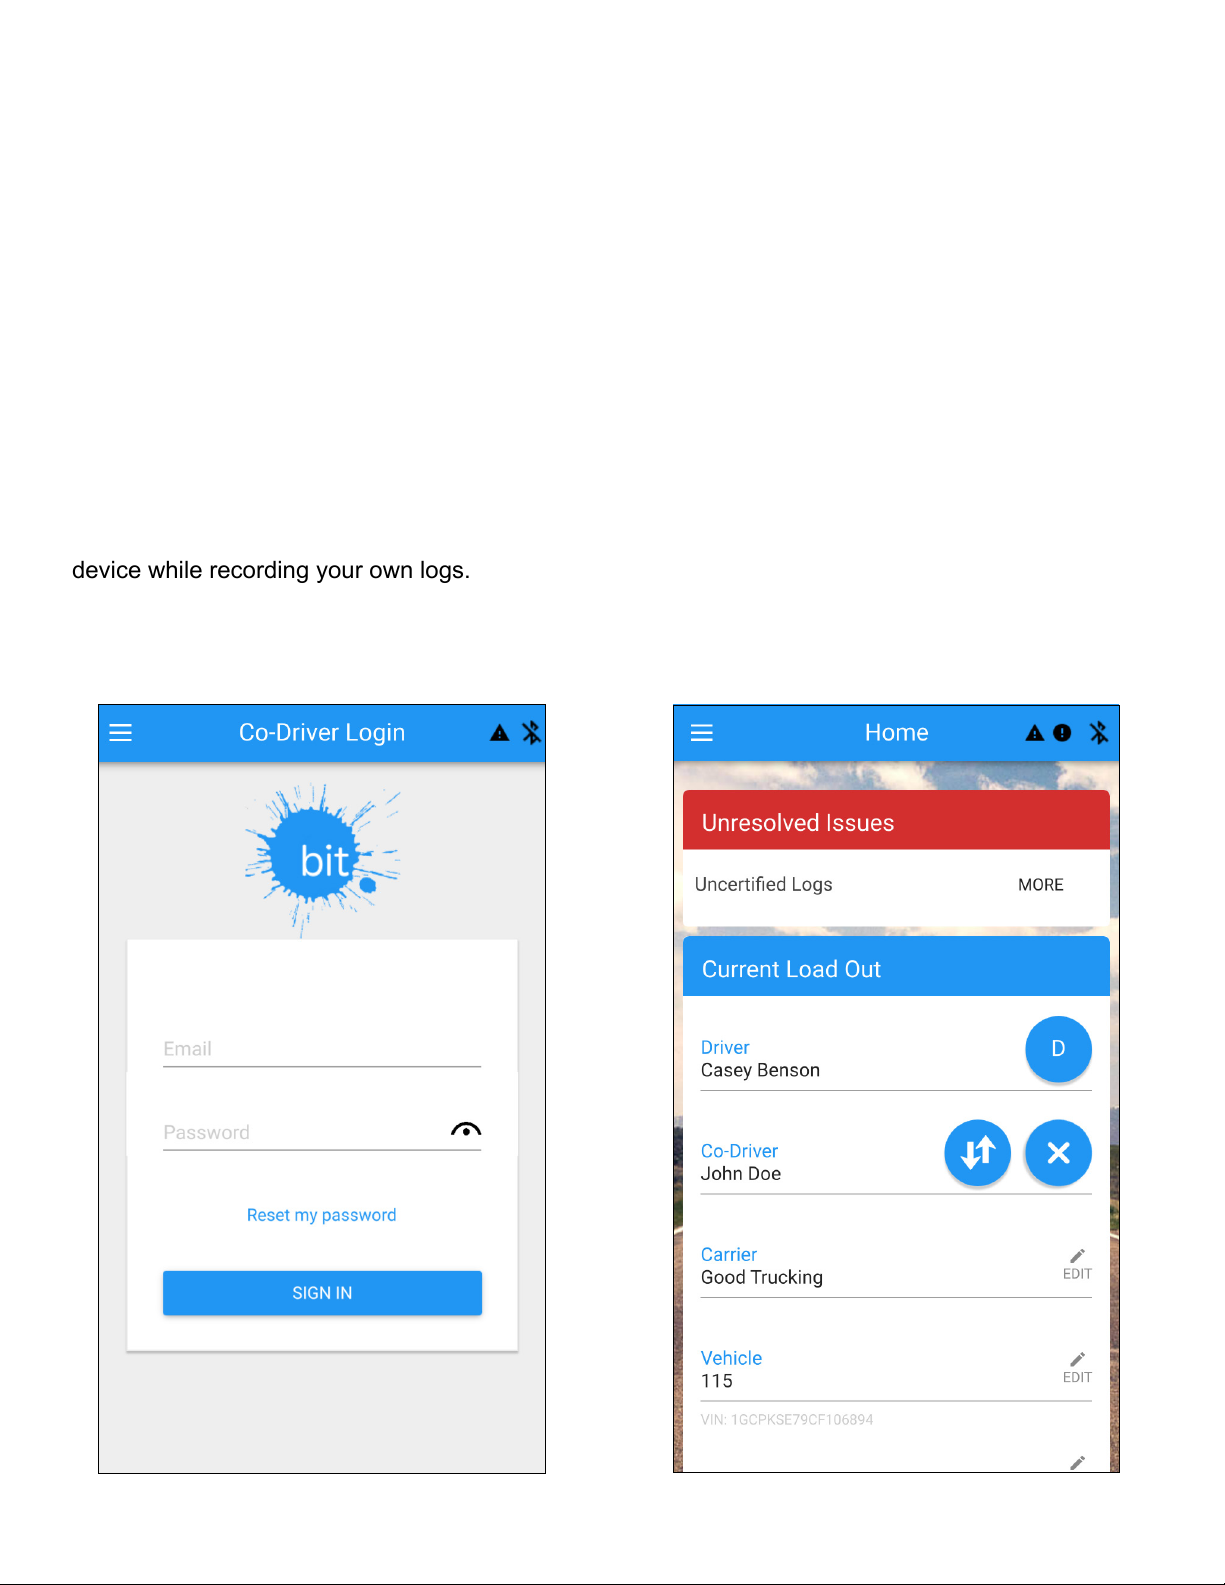
Co-Driver Login
When a job requires two drivers to operate as
a team, both drivers need to be
logged in to the Blue Ink Tech app prior to
driving.
From the current load out screen, tap the plus
sign beside "Co-Driver" and have your codriver log in with their own email and
password.
simultaneously
Swapping Users
Once the co-driver has logged in, the home
screen will give the option to swap users. This
allows you and your co-driver to share one
device while recording your own logs.
Tap the circle with the up and down arrows to
make your co-driver the active user in the app
with access to their own account and logs.
They can set and change their duty status,
view available hours, and change settings
while you are operating the vehicle.
Tap the circle with the arrows again to swap
users and access your own account data.
Each swap requires the new active user to re-
enter their password.
Swapping users in the app does not reassign
duty status. The current driver will have to stop
the vehicle and change their duty status to a
non-driving status before the co-driver can
begin their drive time.
22
Page 23
Co-Driver Login (continued)
Team drivers can still use separate devices to
log in and record data, but both drivers
should log in as co-driver on their teammate's
device to allow drive time swapping later.
Only the user who is driving should connect
to the BIT ELD adapter. The user who is not
driving should set their non-driving status and
then enable the "Co-driver device" feature in
the "General Settings" menu. Toggle this
setting to the on position to prevent your
phone or tablet from scanning for BIT ELD
Adapters or trying to connect to your
preferred device.
When your team shift is done, tap the X on
the Home screen to remove the co-driver
from your app.
Alternatively, the user who is not driving can
set their non-driving status and then close the
Blue Ink Tech app completely or turn off their
Bluetooth connectivity to prevent drive time
being incorrectly logged under their account.
Drive Time Swapping
Drive time accidentally logged under the
wrong driver can be swapped if there was a
co-driver logged in during that drive time.
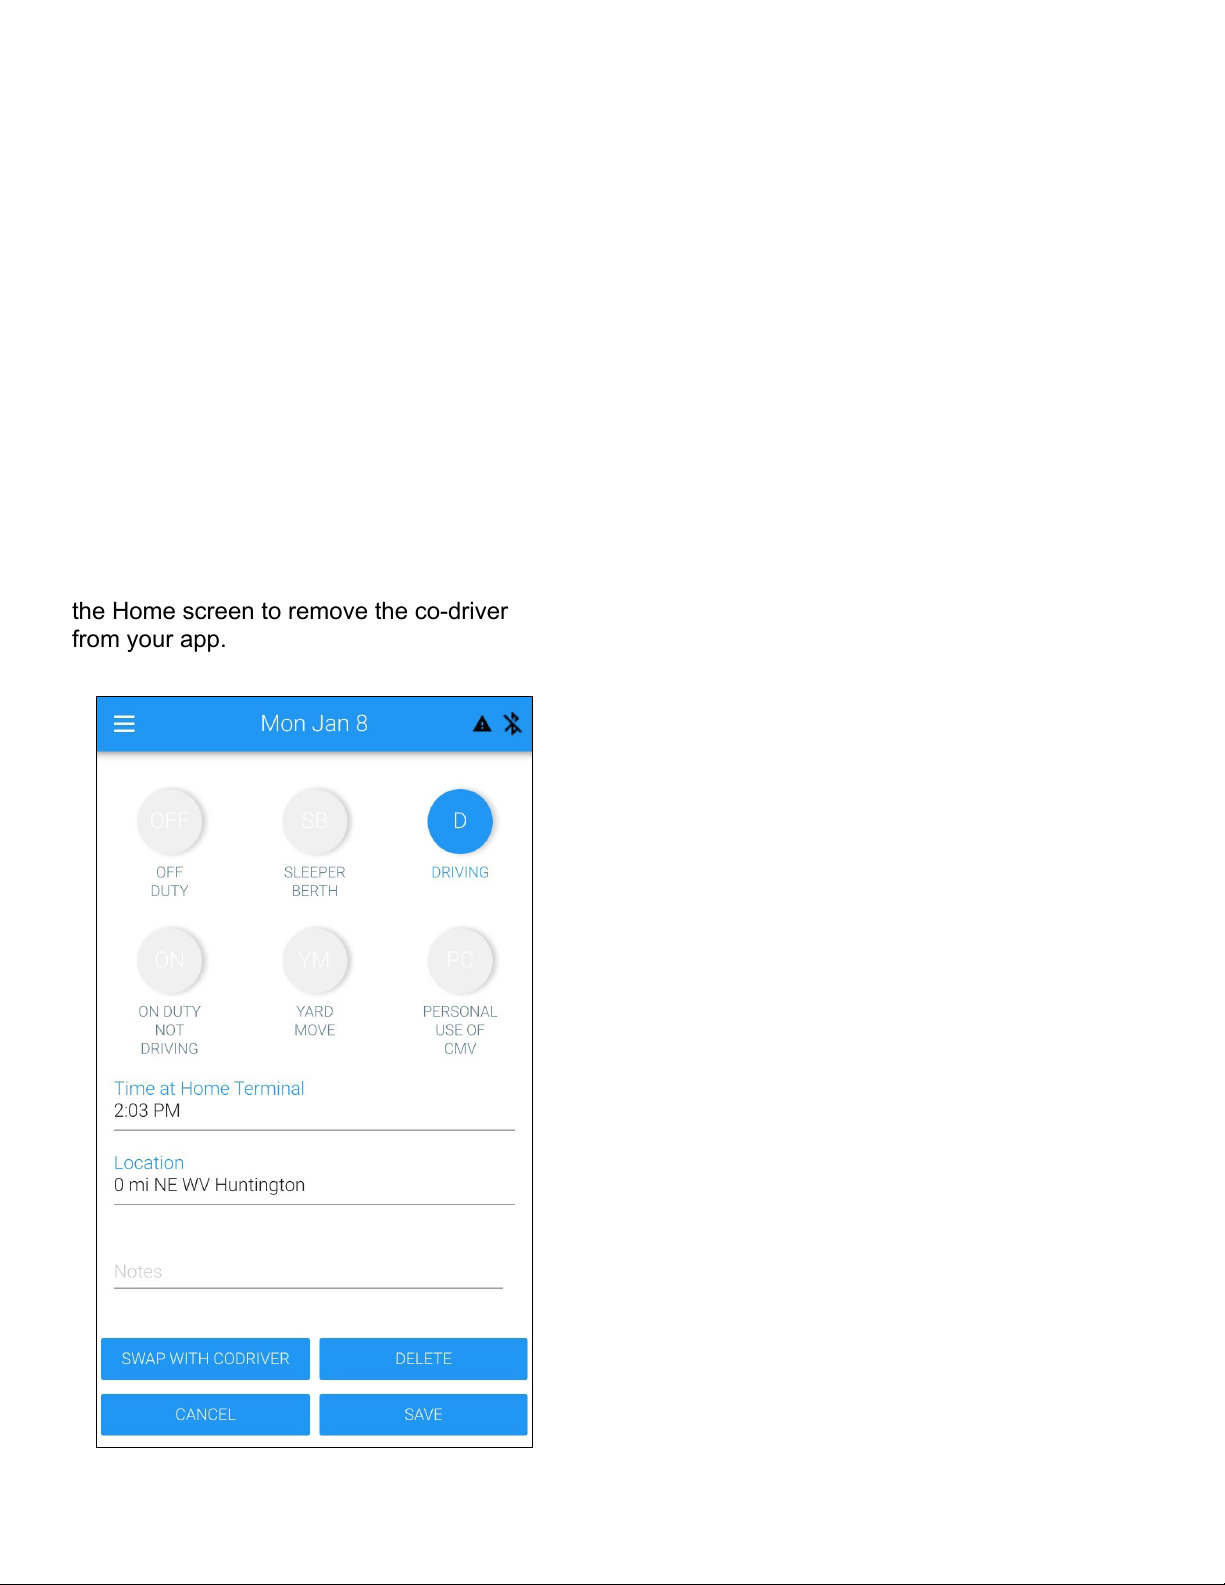
On the “Hours of Service” screen, select the
duty status that was incorrectly logged and
tap the EDIT icon to bring up the event details
screen. Tap “Swap With Co-driver.”
The duty status will show on the co-driver's
Home screen as a Suggested Log Change,
and will not be swapped until they accept the
change.
The “Swap With Co-driver” option will only be
available for driving duty statuses that were
recorded while a co-driver was logged in.
You will not be able to add a co-driver for
previously entered records, so make sure
your co-driver is logged into your device
prior to driving.
23
Page 24
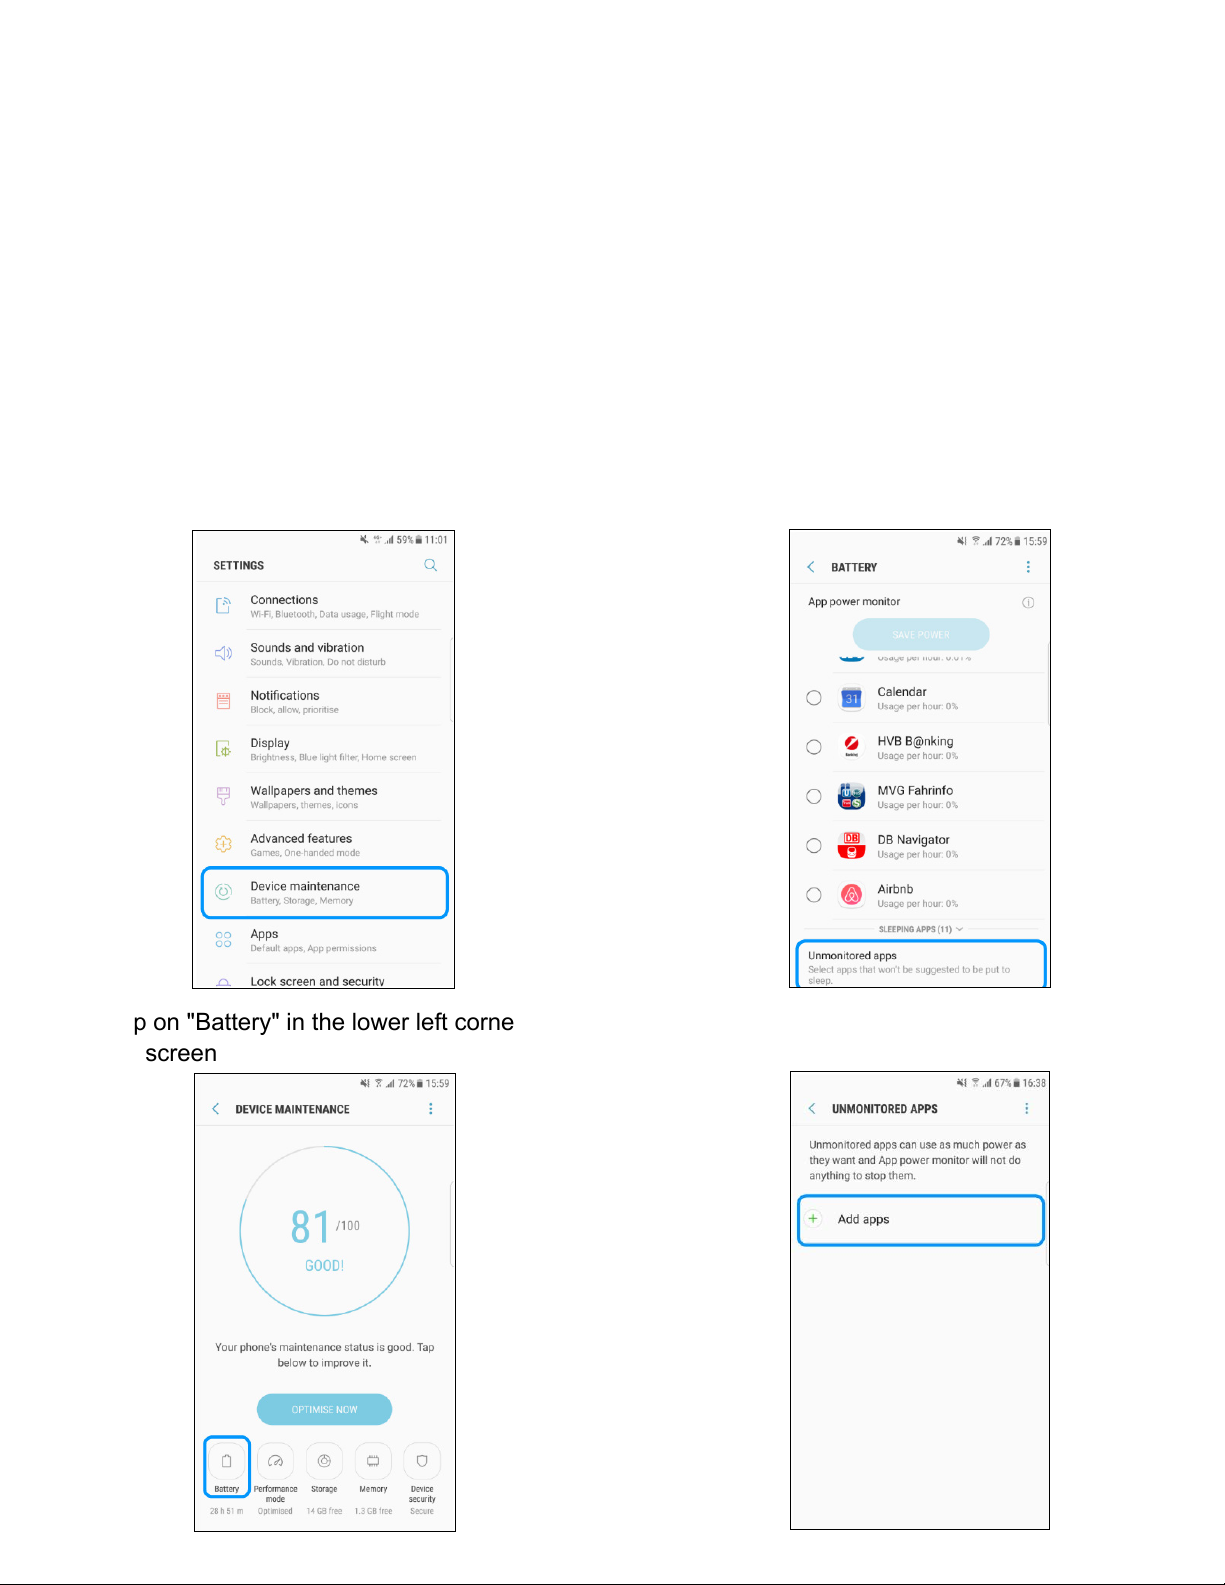
Instructions for Samsung
Phones and Tablets
Newer Samsung Galaxy phones and tablets
(model S8 and later) have a feature called App
Power Monitor. It determines which apps are
draining the battery and puts them to sleep. If
the Blue Ink Tech app is put to sleep, it will no
longer be able to connect to the BIT ELD
Adapter to gather data for your Hours of
Service logs.
1. On your Samsung phone or tablet, open the
Settings menu
2. Tap on "Device maintenance"
To prevent your Samsung Galaxy device from
putting the BIT ELD App to sleep, you must
add it to the list of apps for which the App
Power Monitor feature is disabled.
4. Scroll down to the "Unmonitored apps"
section of the "App power monitor" section
3. Tap on "Battery" in the lower left corner of
the screen
5. Tap on the "Add apps" button and select
the Blue Ink Tech app
24
Page 25
How-To Videos
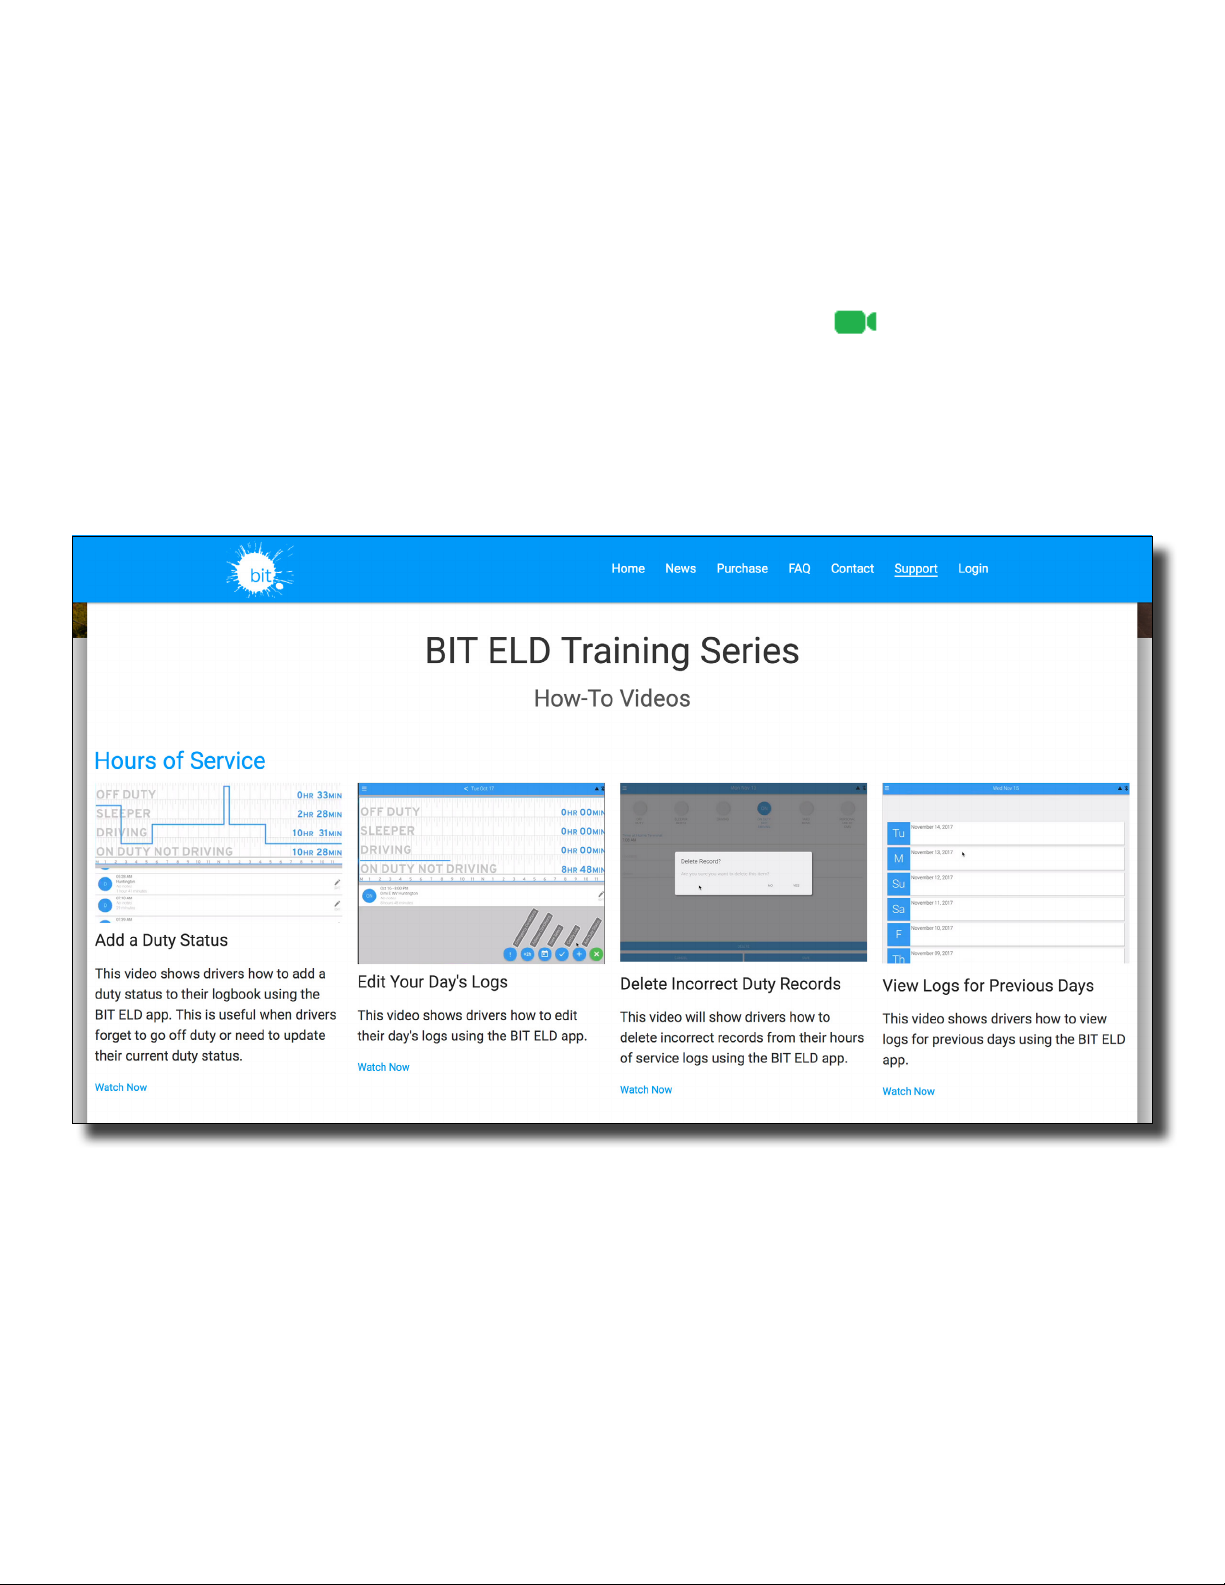
The Blue Ink Tech Training Series offers
detailed videos to guide BIT ELD users
through the app and web portal features.
Tap on a listed topic to see a short, step-bystep video narrated by one of our Support
Team members.
The Training Series can also be found on the
Support page at blueinktech.com/support
and the Blue Ink Tech Y
ouTube® channel
.
Subscribe to our YouTube®
updates and notification of new videos.
You will see the green camera icon next to any
topic in this manual that has an associated
BIT Training Series video. Click the camera to
watch the video.
channel to receive
25
Page 26
Website Overview
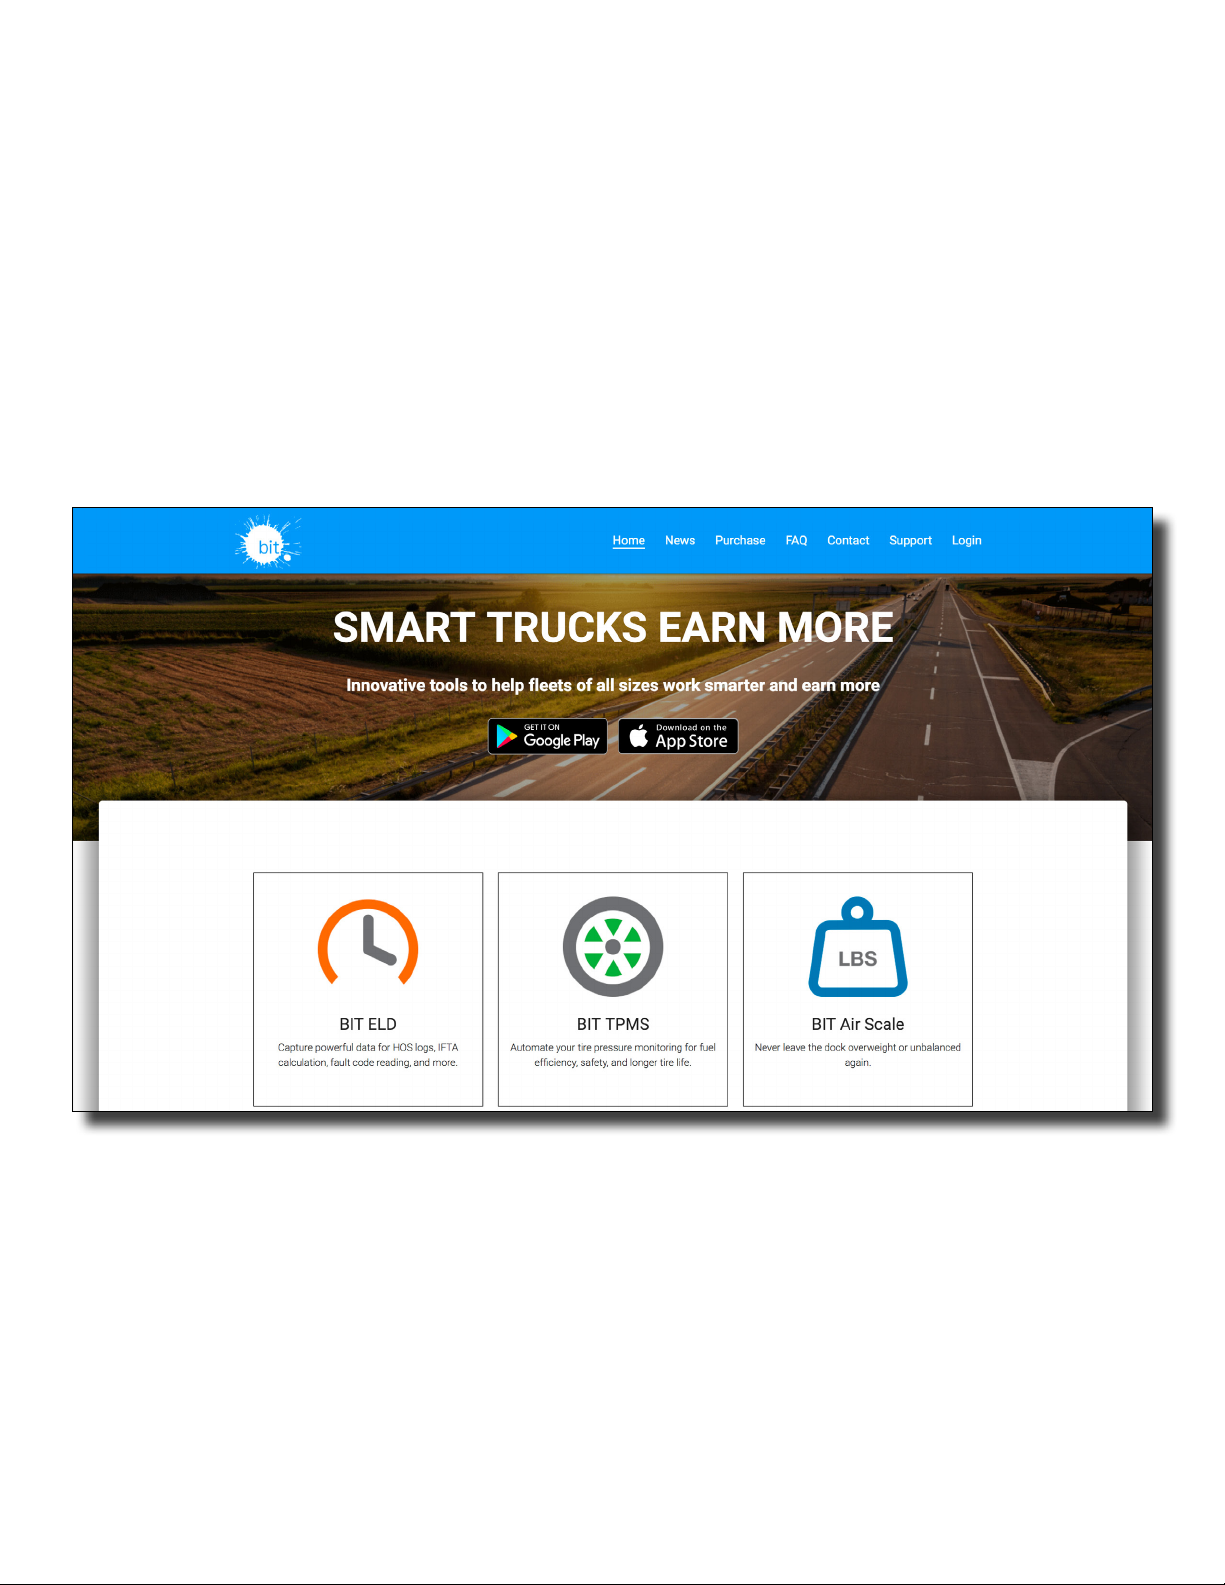
The Blue Ink Tech website address is
www.blueinktech.com.
ou can purchase additional BIT ELD adapters
Y
and accessory cables on the Purchase page.
You can also find information about our Air
Scale and TPMS systems.
Contact our Sales or Support team with
questions on the Contact page.
Watch how-to videos from the BIT ELD
Adapter Training Series or download the
latest version of the BIT ELD Adapter User
Manual on the Support page.
Log into the web portal Fleet Management
System on the Login page.
26
Page 27
Web Portal Login
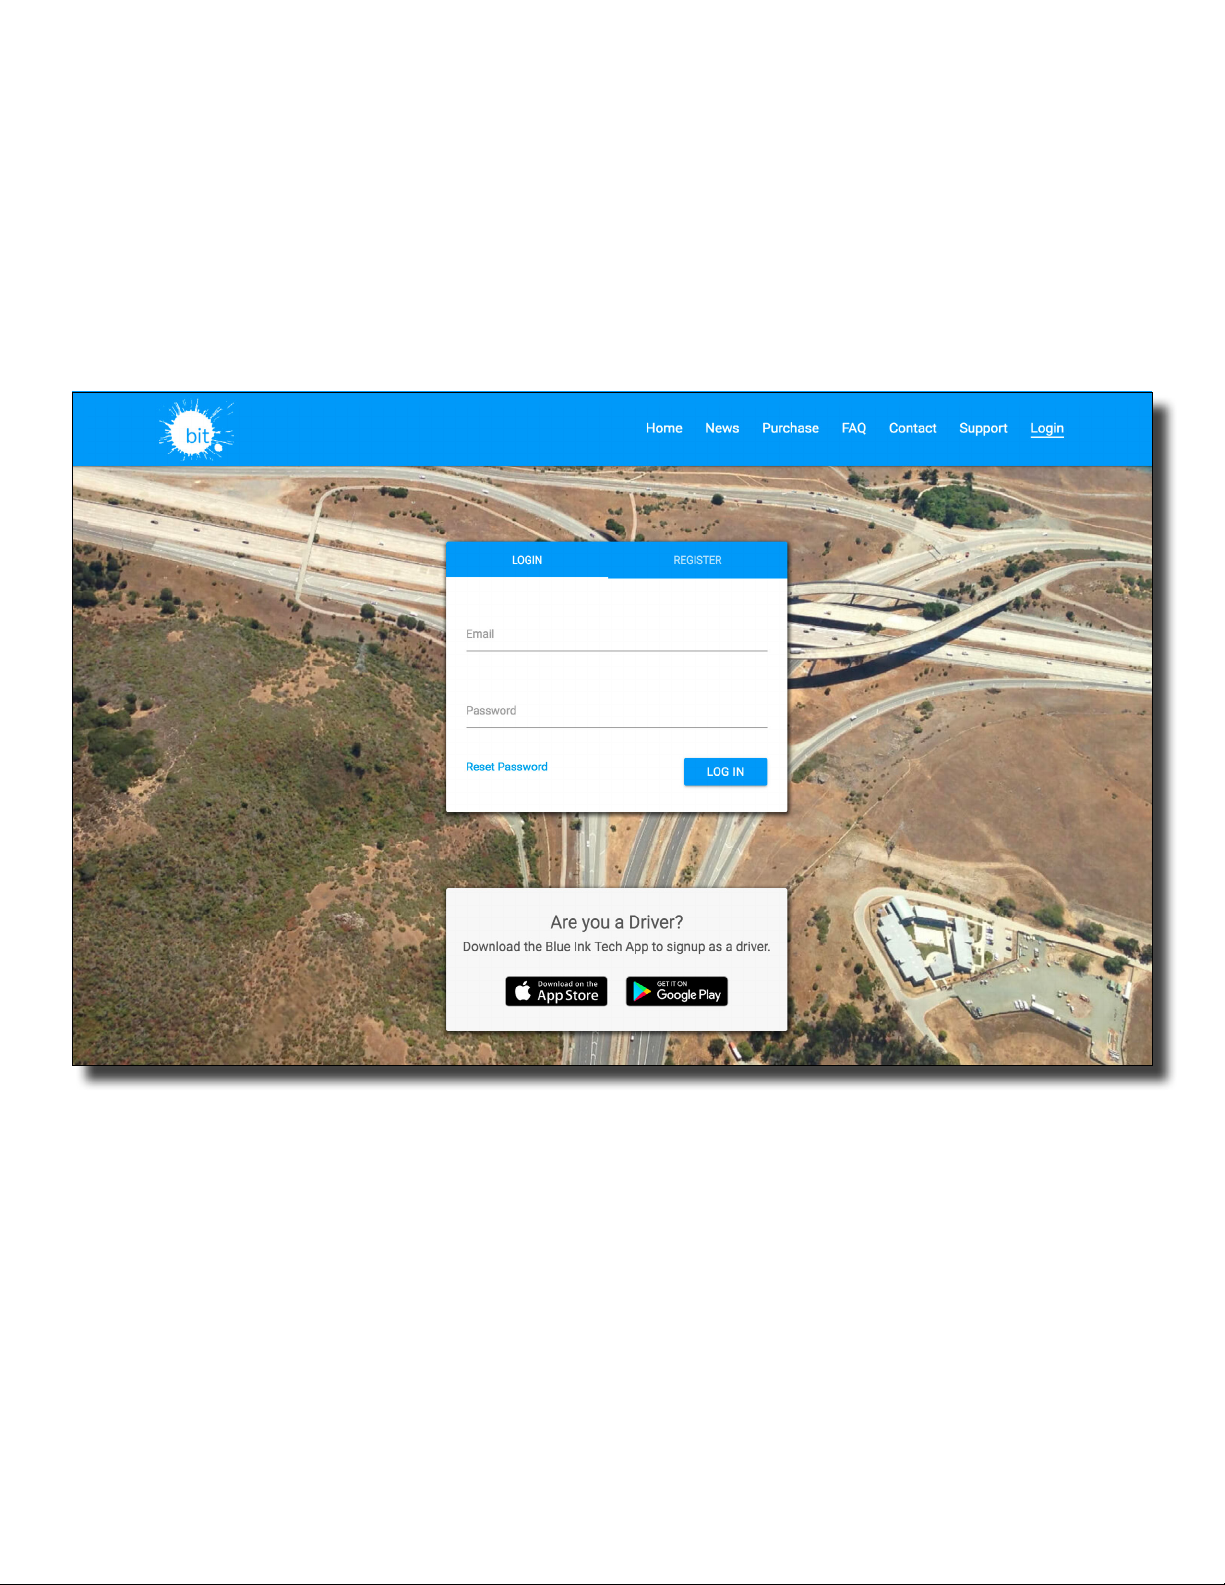
After clicking “Login” you should see the signin page below.
Type your email address and password to sign
in. Use the same user name and password for
the Blue Ink Tech app and the BIT web portal.
If you have forgotten your password, you
can request a password reset by clicking
“Reset Password.”
If you need to create a new account, click
the “REGISTER” tab.
27
Page 28
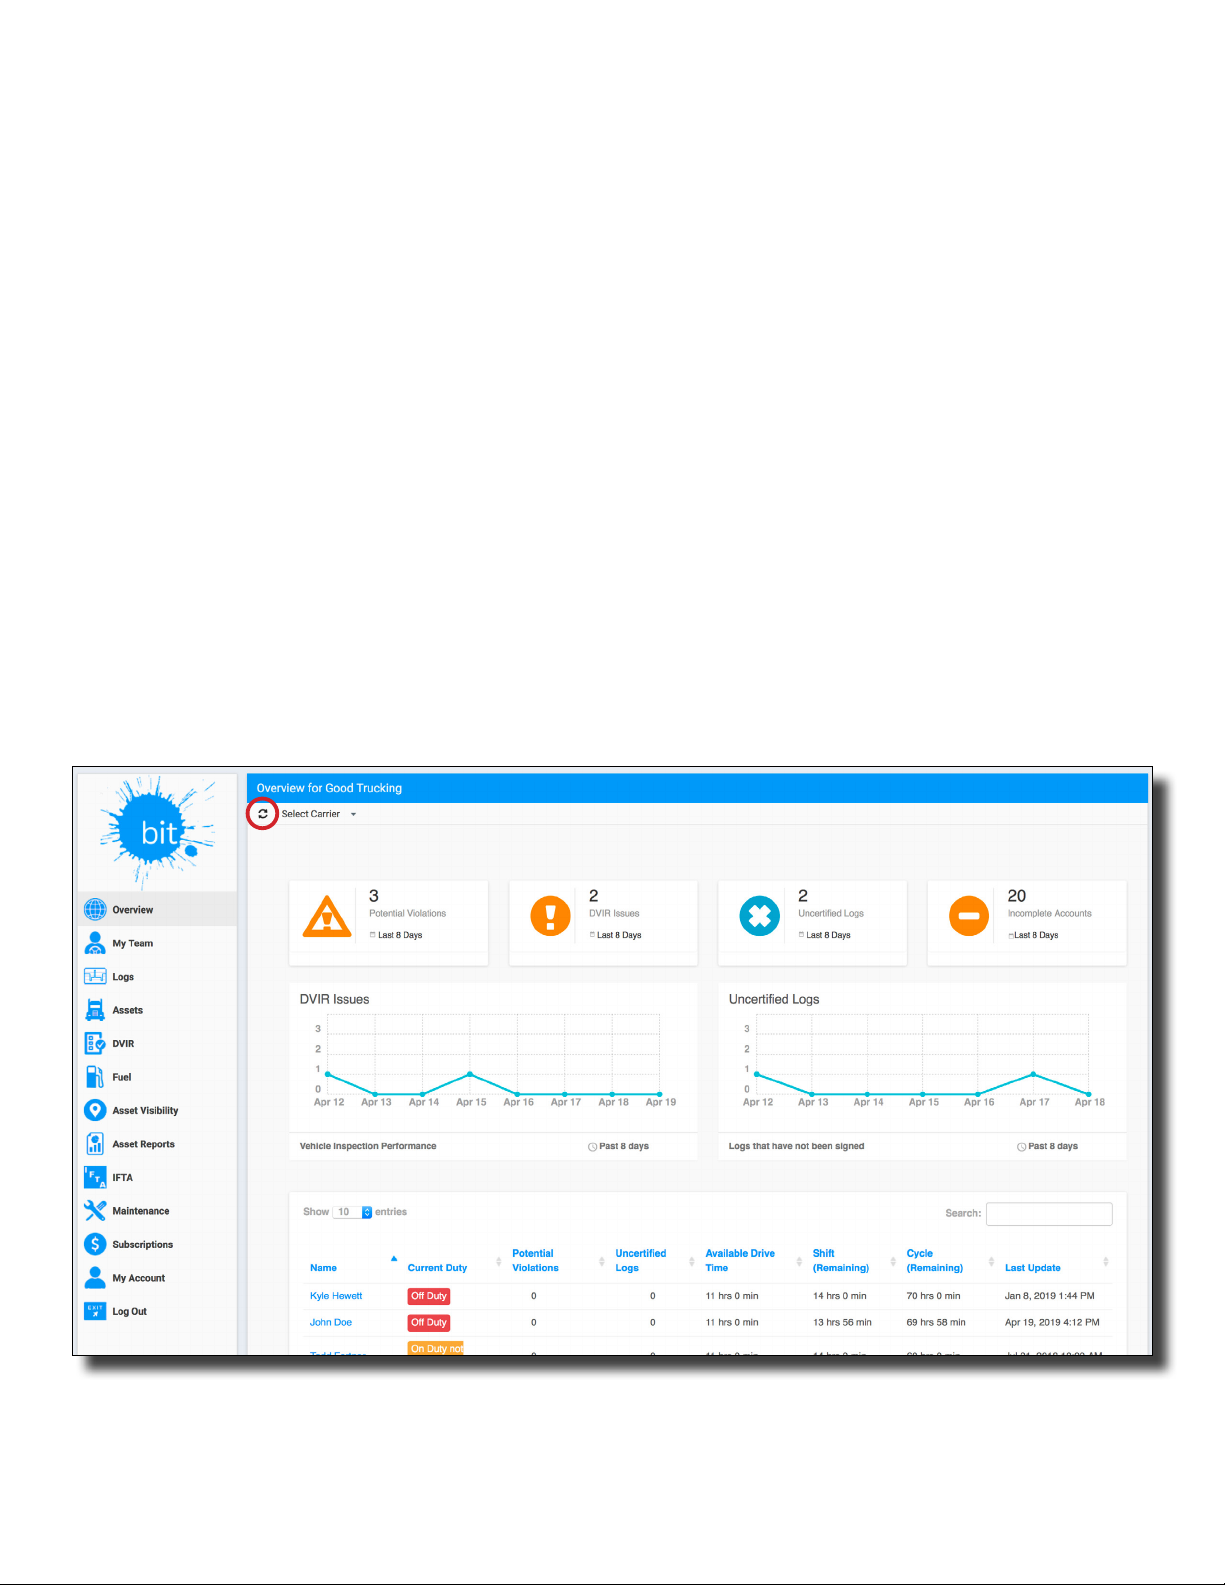
Fleet Management System Overview
If you are the administrator for a carrier, you
will see the Overview Page after you log in.
The navigation bar on the left side of the page
allows you to use the different features of the
Fleet Management System.
If you are an administrator for multiple carriers,
you can use the “Select Carrier” drop down on
the menu bar to see data for a single carrier, or
aggregate data for all carriers.
The Overview page allows you to quickly see
issues associated with driver logs for the
current day and the past seven days. Potential
hours of service violations, DVIR issues,
uncertied logs, and driver accounts that have
incomplete information are shown in boxes at
the top of the page.
Click on the box to see a list of the drivers
or vehicles with that issue. Clicking on the
driver or vehicle in the list will take you to that
record to view the details. Historical trends are
graphed for DVIR issues and Uncertified Logs.
You can see a list of your team’s drivers at the
bottom of the page, including their last
available duty status; potential violations;
uncertied logs; the remaining time they have
for driving, being on-duty, and weekly cycle;
and the time the last update was received.
This page is not updated in real time. It is
updated automatically based on periodic data
feeds from your drivers running the Blue Ink
Tech app. Refreshing your page by clicking
the circling arrows at the top of the page
(circled in red in the image below) will
show the most recent data.
28
Page 29
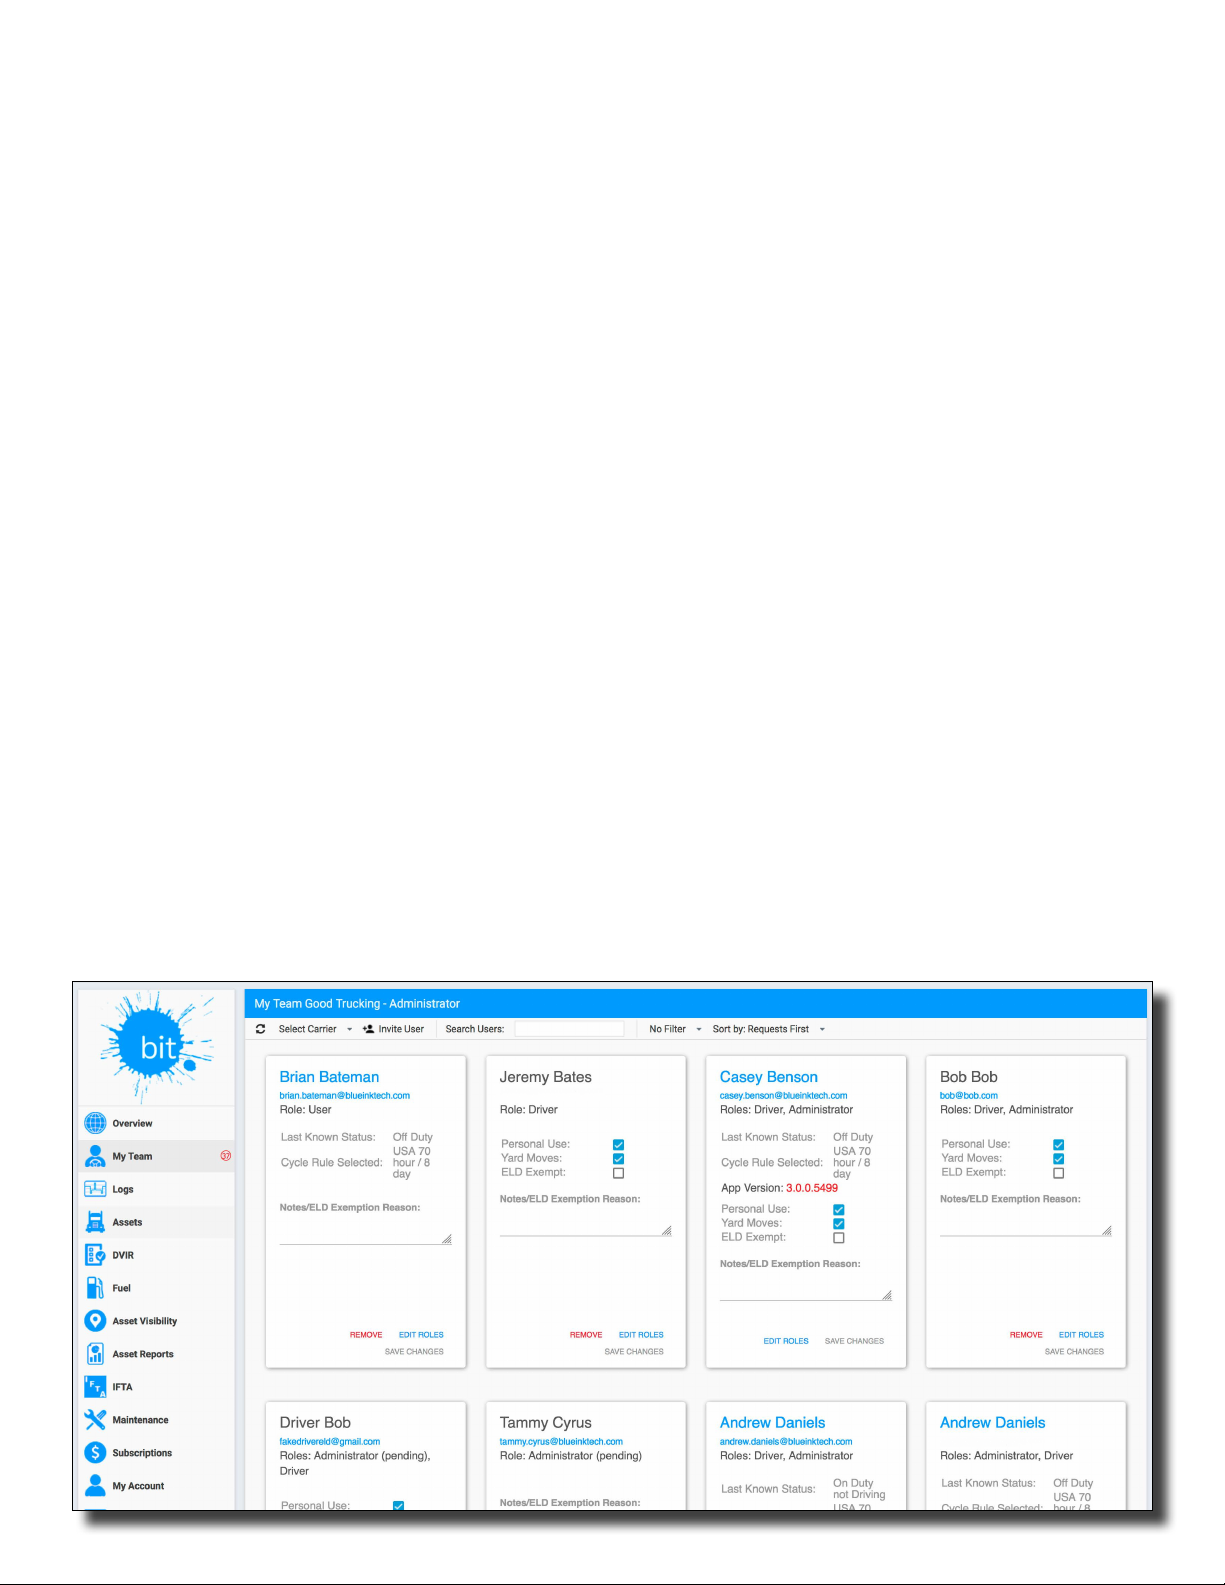
My Team
This page shows all of the people on your
team. You can add or remove users, change
their role within the team, and set driver
permissions.
As a carrier administrator you can invite people
to create an account and share their driver logs
with you by clicking the “Invite User” button.
ou will be able to choose the role (or roles)
Y
this user should have for your company:
● Driver – creates Hours of Service logs but
does not have administrative privileges, which
means they cannot see data for other drivers
● User – does not create Hours of Service logs,
but can see data for all of a carrier’s drivers
(This is typically for dispatchers and office
personnel who need access to records for the
whole fleet)
● Administrator – can see data for the whole
fleet and invite and approve accounts
New user accounts are in a pending status until
an administrator accepts them to the team. The
number of pending users will be shown in a
red circle next to “My Team” on the navigation
menu. Sort your team by “Requests First”
at the top of the page to bring pending user
cards to the top of the page to easily accept or
reject them.
Change user roles at any time by clicking
“EDIT ROLES” at the bottom of the user card.
Remove a user from your team by clicking
“REMOVE” at the bottom of the user card. This
user will no longer show on the My Team page,
but you can view their previously recorded logs
on the Logs page.
User cards for Drivers will have check boxes
to set permissions and exemptions. You can
enable or disable a driver from selecting
Personal Use of the Commercial Motor Vehicle
(PC) and Yard Moves (YM) as a duty status
on the Blue Ink Tech app. You can also set a
driver as ELD Exempt, which will prompt you
to provide a reason why this driver is exempt.
Only drivers who have app data that has
synced will show the last duty status, their
current app version, and their Cycle Rule
Selected.
29
adaniels
@goodtrucking.com
Page 30
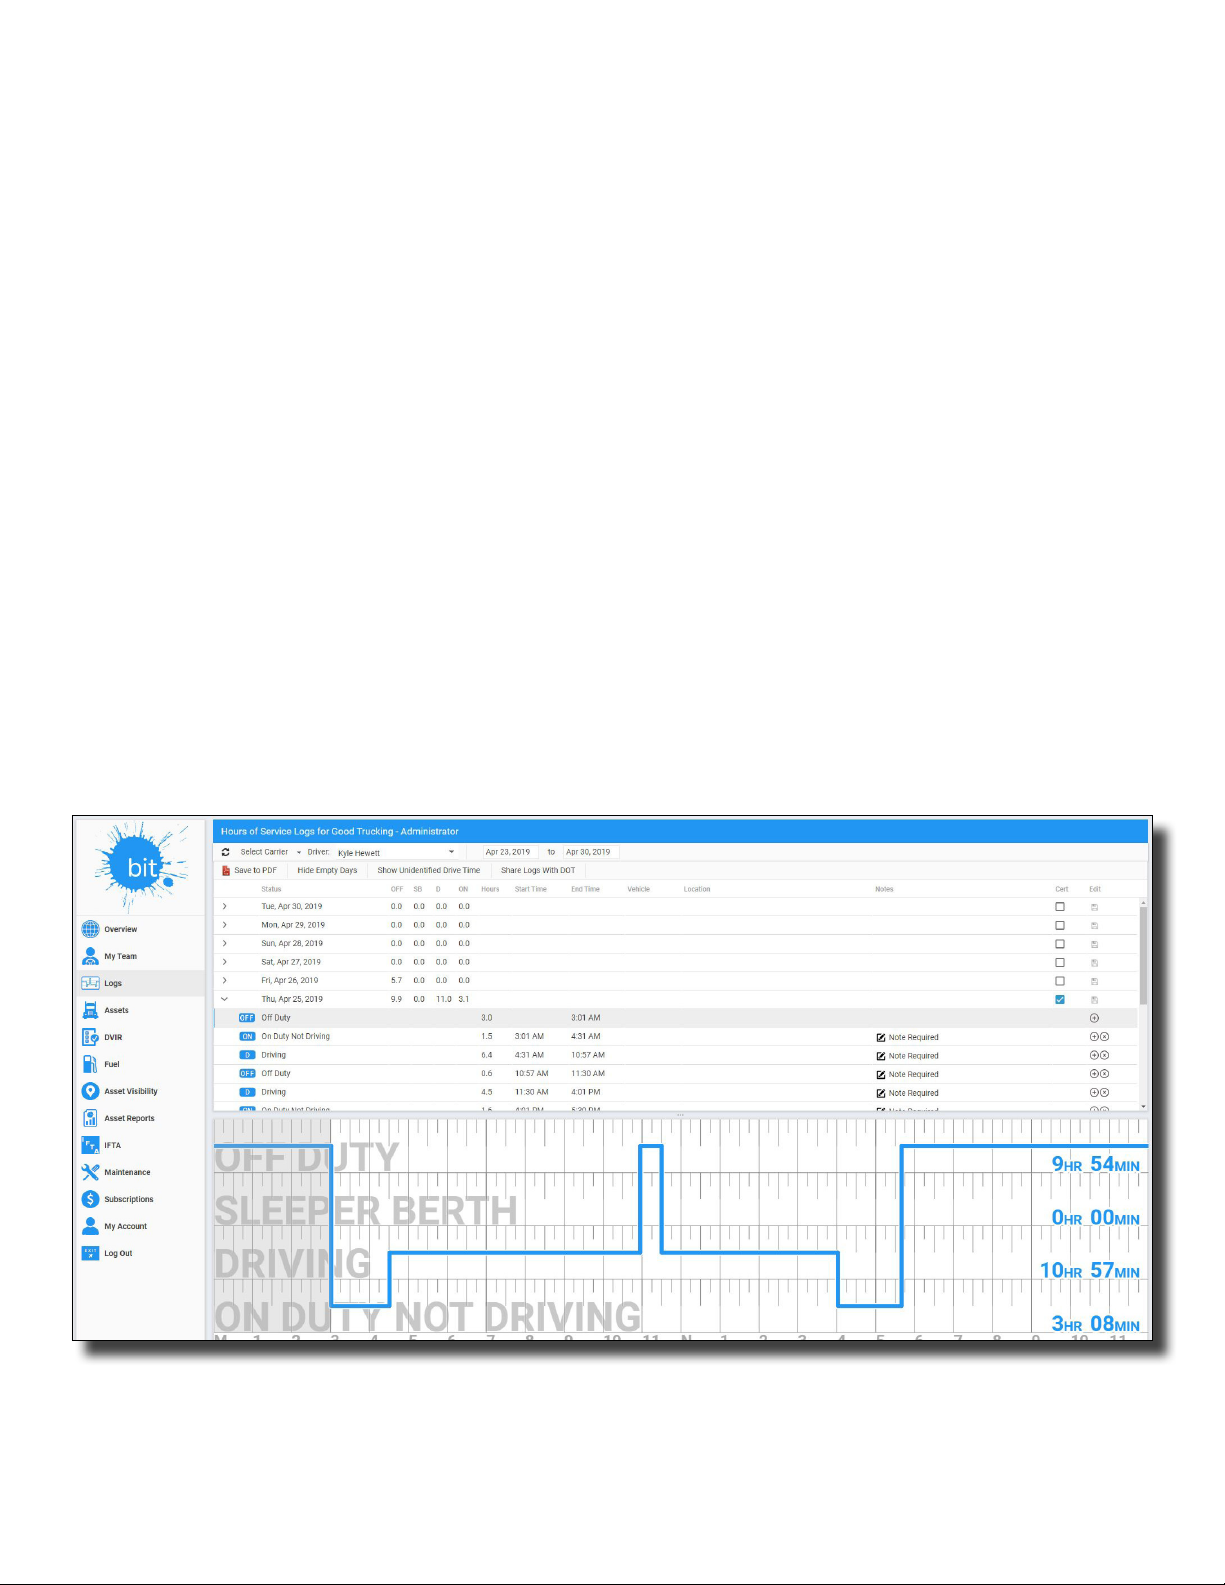
Logs
This page shows the daily driver logs for your
team. The top of the page has a menu bar and
a table to show the data. The bottom of the
page has a log graph.
Viewing Logs
Use the menu bar to select the carrier, driver,
and date range of the logs you wish to view.
Drivers who leave your carrier will be marked
as “INACTIVE” in the driver selection menu,
but you will still be able to view the logs they
shared with your carrier.
“Save to PDF” allows you to create a detailed
copy of each day's log in your selected date
range that can be printed or saved to your
computer.
“Hide Empty Days” removes dates with no
recorded driving activities.
“Show Unidenti
when a BIT ELD Adapter recorded a vehicle
as in-motion but no driver was connected via
the Blue Ink Tech app to claim the drive time.
You can assign the unidentied time to a driver,
which will show on their Blue Ink Tech app
Home screen as a suggested log that they will
have to accept or reject to certify their logs.
“Share Logs With DOT” allows you to generate
a FMCSA ELD Mandate-compliant driver report
in case of an audit or inquiry. You can select a
date range and add comments to your report,
as well as choose whether to send it to the
DOT email address or to the FMCSA web
server (Web Services).
ed Drive Time” will show time
30
Page 31
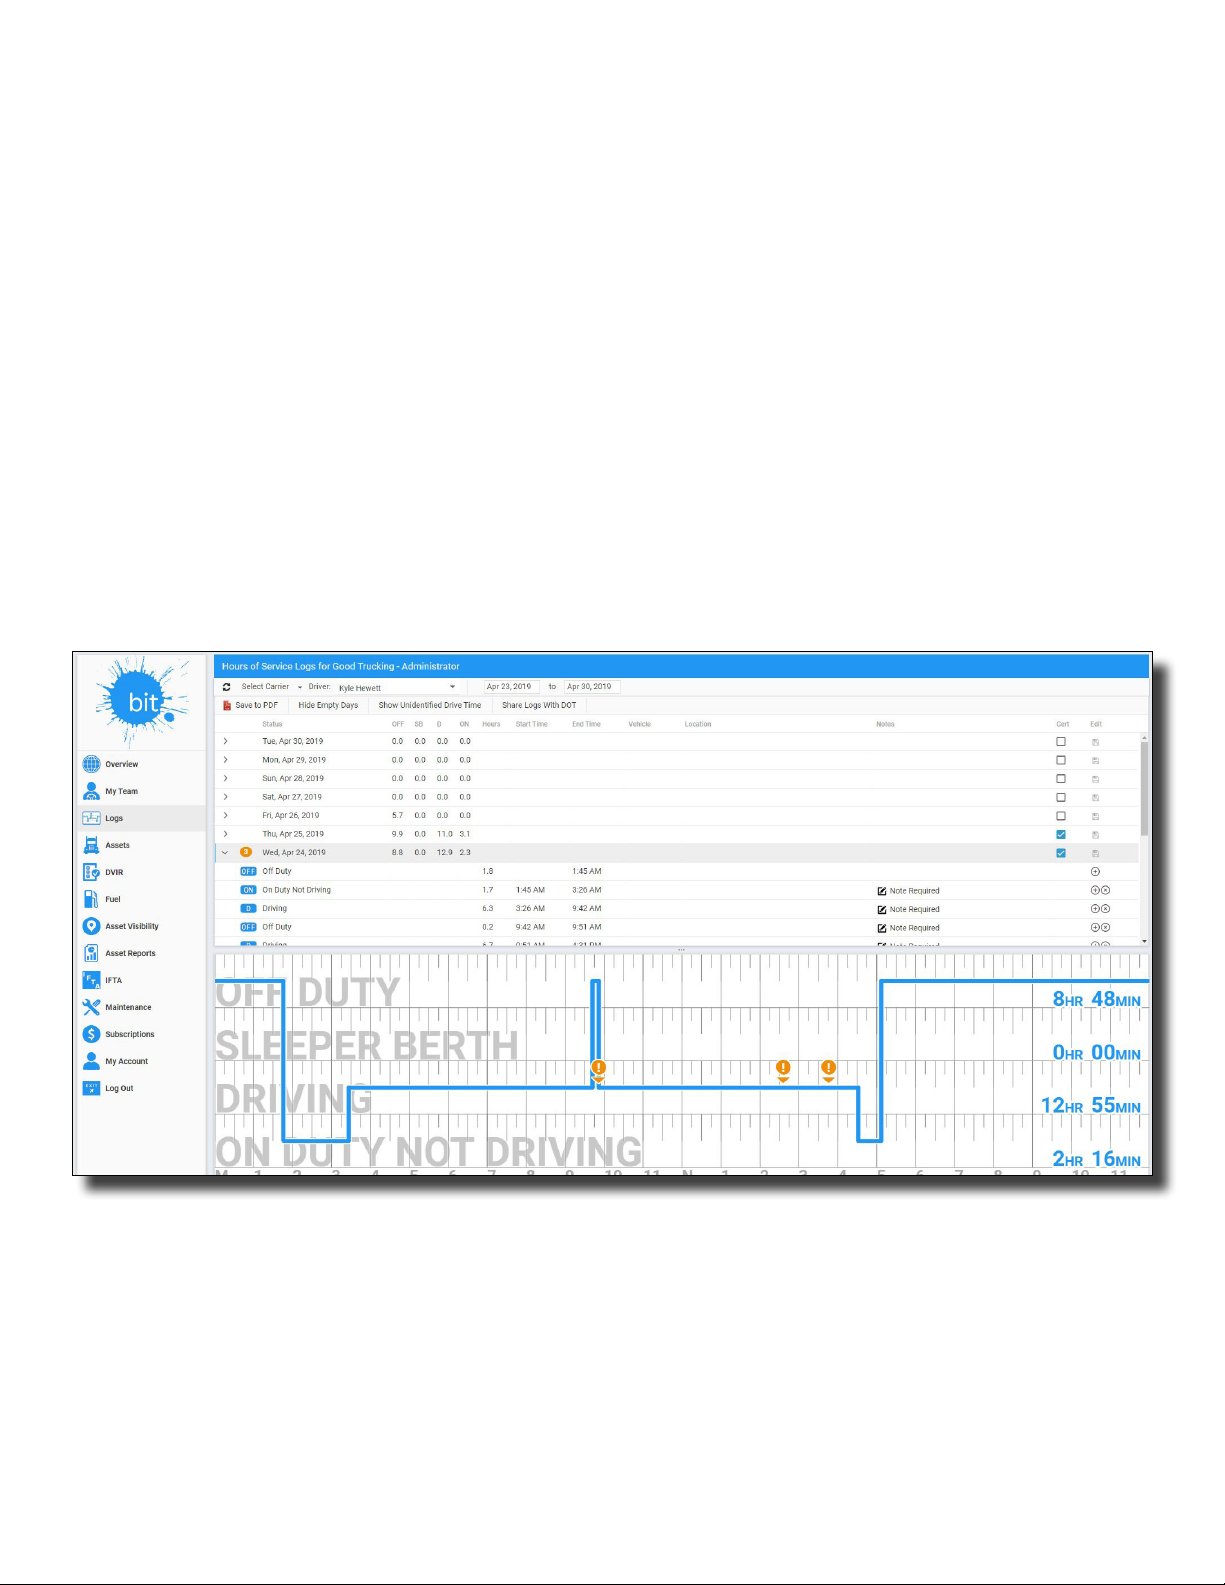
Logs (continued)
The unexpanded view of the table shows any
potential violations in orange, the total hours
logged in each type of duty status, and whether
the driver has certied the log.
In the example below you can see that there
are three potential violations, and the driver
has only certied two of the logs displayed.
To see the details of a log, click on the
expansion arrow in the far left column. The
expanded view will show each duty status
event with total hours, start and end time, the
vehicle used, location, and any notes entered
by the driver.
The selected log's events will also show on the
graph at the bottom of the page. Placing your
mouse over a duty status on the graph will
highlight the corresponding row in the table.
An orange circle with an “!” is used to depict
potential violations on the graph.
Details will be shown in a popup when your
mouse is placed over the circle. In the example
below, you can see that the second “!”
represents the driver going over their
maximum daily driving hours.
31
Page 32

Logs (continued)
Editing Logs
If you are a driver editing your own logs, you
can save your changes and certify your logs by
checking the box in the “Cert” column and
choosing “Agree” in the certify popup box.
If you are an administrator making edits to
another driver's logs, the original records will
appear as a gray line on the graph and the
suggested changes will appear as a blue line. If
the driver accepts the edit, the gray line will
disappear. If the driver rejects the edit, the
suggested changes will disappear and the
original records will change back to blue. To
accept the edit, the driver needs to recertify
their log for that day.
You can use the table or graph to edit driver
logs.
To edit a record of duty status using the table,
click on the day you wish to edit to see the
expanded view. Double-click on duty status to
change it. Double-click on the start or end time
of a duty status to adjust the time. Any changes
to logs require a note of at least 4 characters.
You can add or edit a note by double clicking on
the pencil. Also, be sure to click the save button
to the far right after making any changes to your
duty status.
To edit a record of duty status using the
graph, select the duty you wish to edit and
place your mouse over the blue line. Click on
the horizontal line and drag it up or down to
change the duty status. Click on the vertical
line and drag it left or right to adjust the time
when you switched from one duty status to
another. You will still be required to add a
note of at least four (4) characters in the table.
Click the disk icon in the “Edit” column to save
your changes. Any unsaved changes will be
lost when you leave the “Logs” page.
FMCSA Mandate Requirement: If the BIT
ELD Adapter detected the vehicle as in-
motion, then a change of status to a nondriving status will NOT be allowed. You will
NOT be able to add a non-driving status in
the middle of a period of time detected as in-
motion. Messages will alert you if these
conditions occur.
To add a record of duty status, click the circle
with a “+” in the “Edit” column of the table.
Double click the duty status, times, and notes
fields to fill in the correct data.
To delete a record of duty status, click the circle
with an “X” in the “Edit” column of the table.
Automatically recorded driving events cannot
be deleted.
32
Page 33
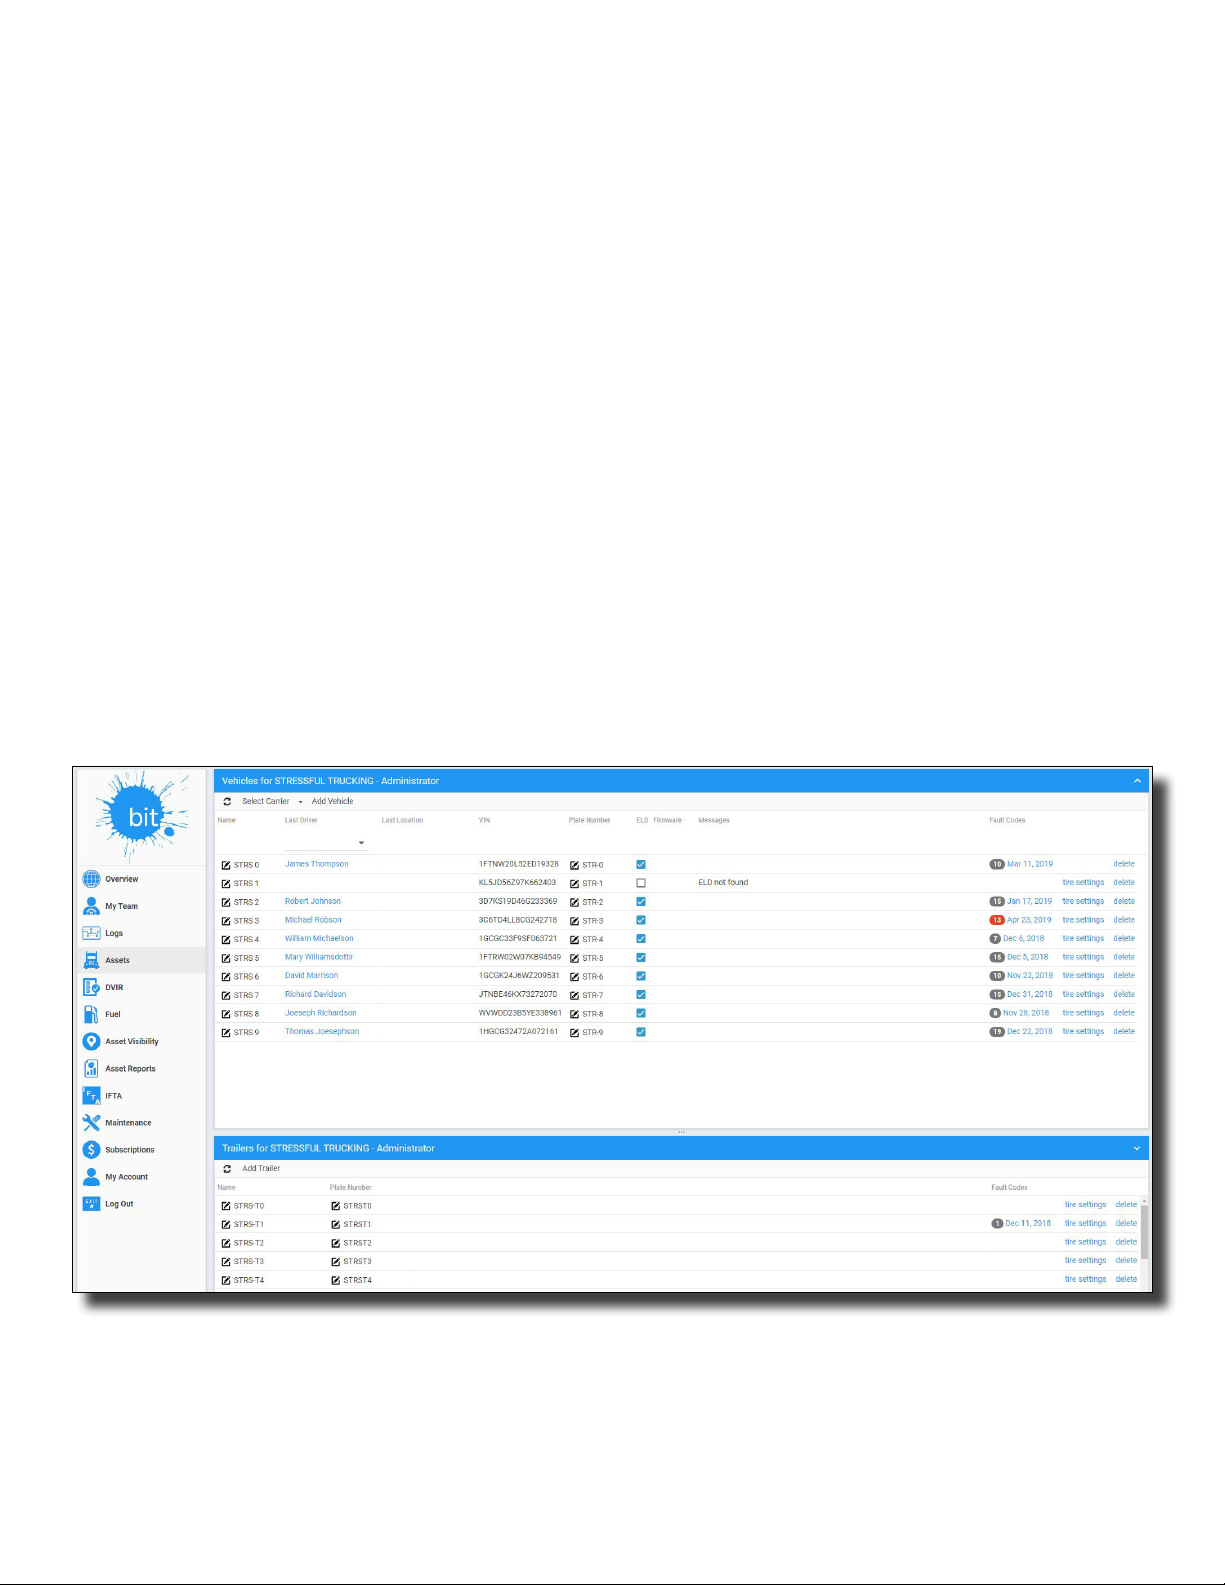
Assets
This page shows the vehicles and trailers in
your eet. Vehicles and trailers registered here
will be available for your drivers to select for
their Current Load Out and DVIRs.
To add a vehicle to your fleet click “Add
Vehicle” at the top under the menu bar. Enter
the name of your vehicle, the VIN number,
license plate number (optional), and then click
“Submit.”
The Vehicles table shows the last driver and
last location for each vehicle. The “ELD”
column will show a blue checked box if you
have recorded data for that vehicle.
To add a trailer to your eet, click “Add Trailer.”
Enter the name of your trailer and license plate
number (optional), then click
“Submit.”
You can edit the name of any vehicle or trailer
by double-clicking the current name in the
table.
You can remove any vehicle or trailer from
your fleet by clicking “delete” at the far right of
the selected row.
You can also see fault code readings and
TPMS data associated with your vehicles on
this page. Double click the date to see the data
readings for that day.
33
Page 34
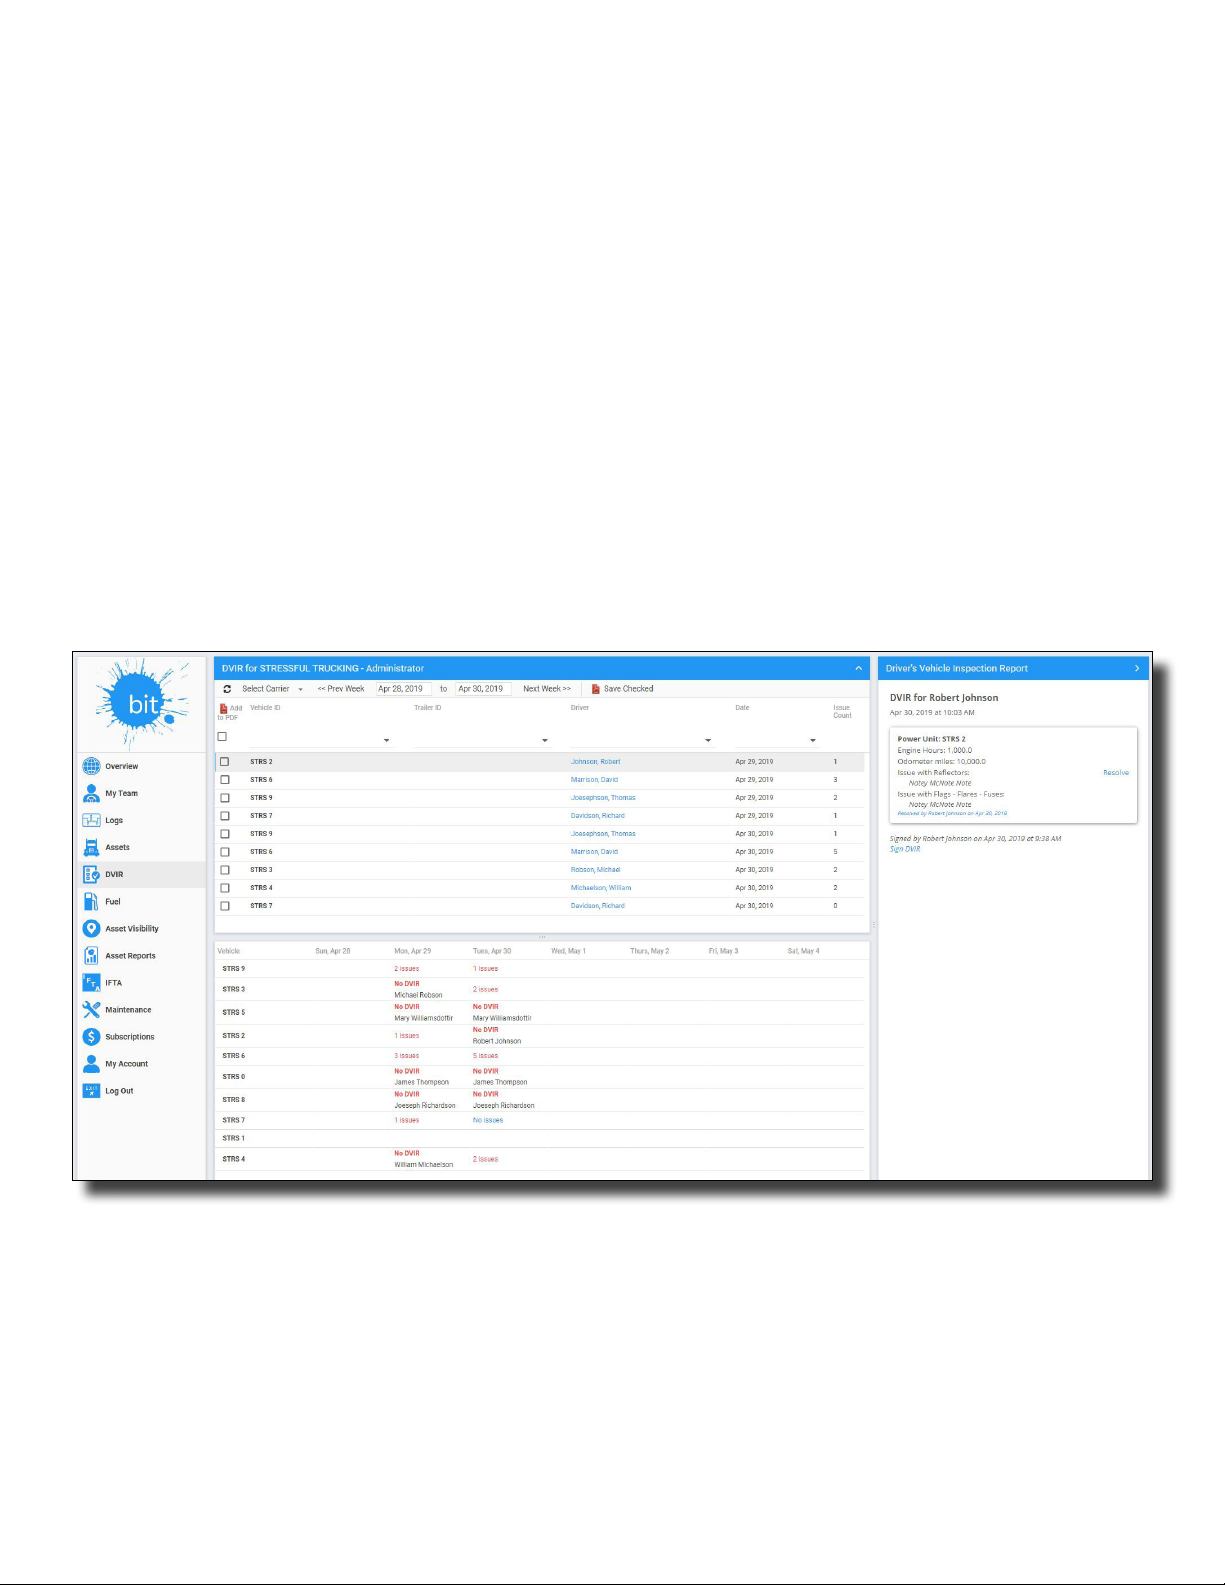
DVIR
This page shows the daily vehicle inspection
reports your drivers submit from the Blue Ink
Tech app.
ou can select the carrier and date range on
Y
the menu bar at the top of the page.
The table in the center of the page shows
the inspection reports submitted during your
selected date range. The table shows the
vehicle and trailer(s) that were inspected, the
driver, the date of inspection, and the number
of issues reported. You can lter the table by
the “Vehicle ID” or the “Driver” to easily nd a
report that requires action.
Click any report in the table to view the details
on the right side of the page. Each issue area
will be listed separately with the driver's notes
shown in italics.
Click “Resolve” at the far right of the issue box
to close any issues that have been addressed
or do not require any action. You can edit or
add to the driver's notes before closing the
issue. Resolved issues will not show in the
Issue Count column of the report table or the
DVIR Issues box on the Overview page.
34
Page 35
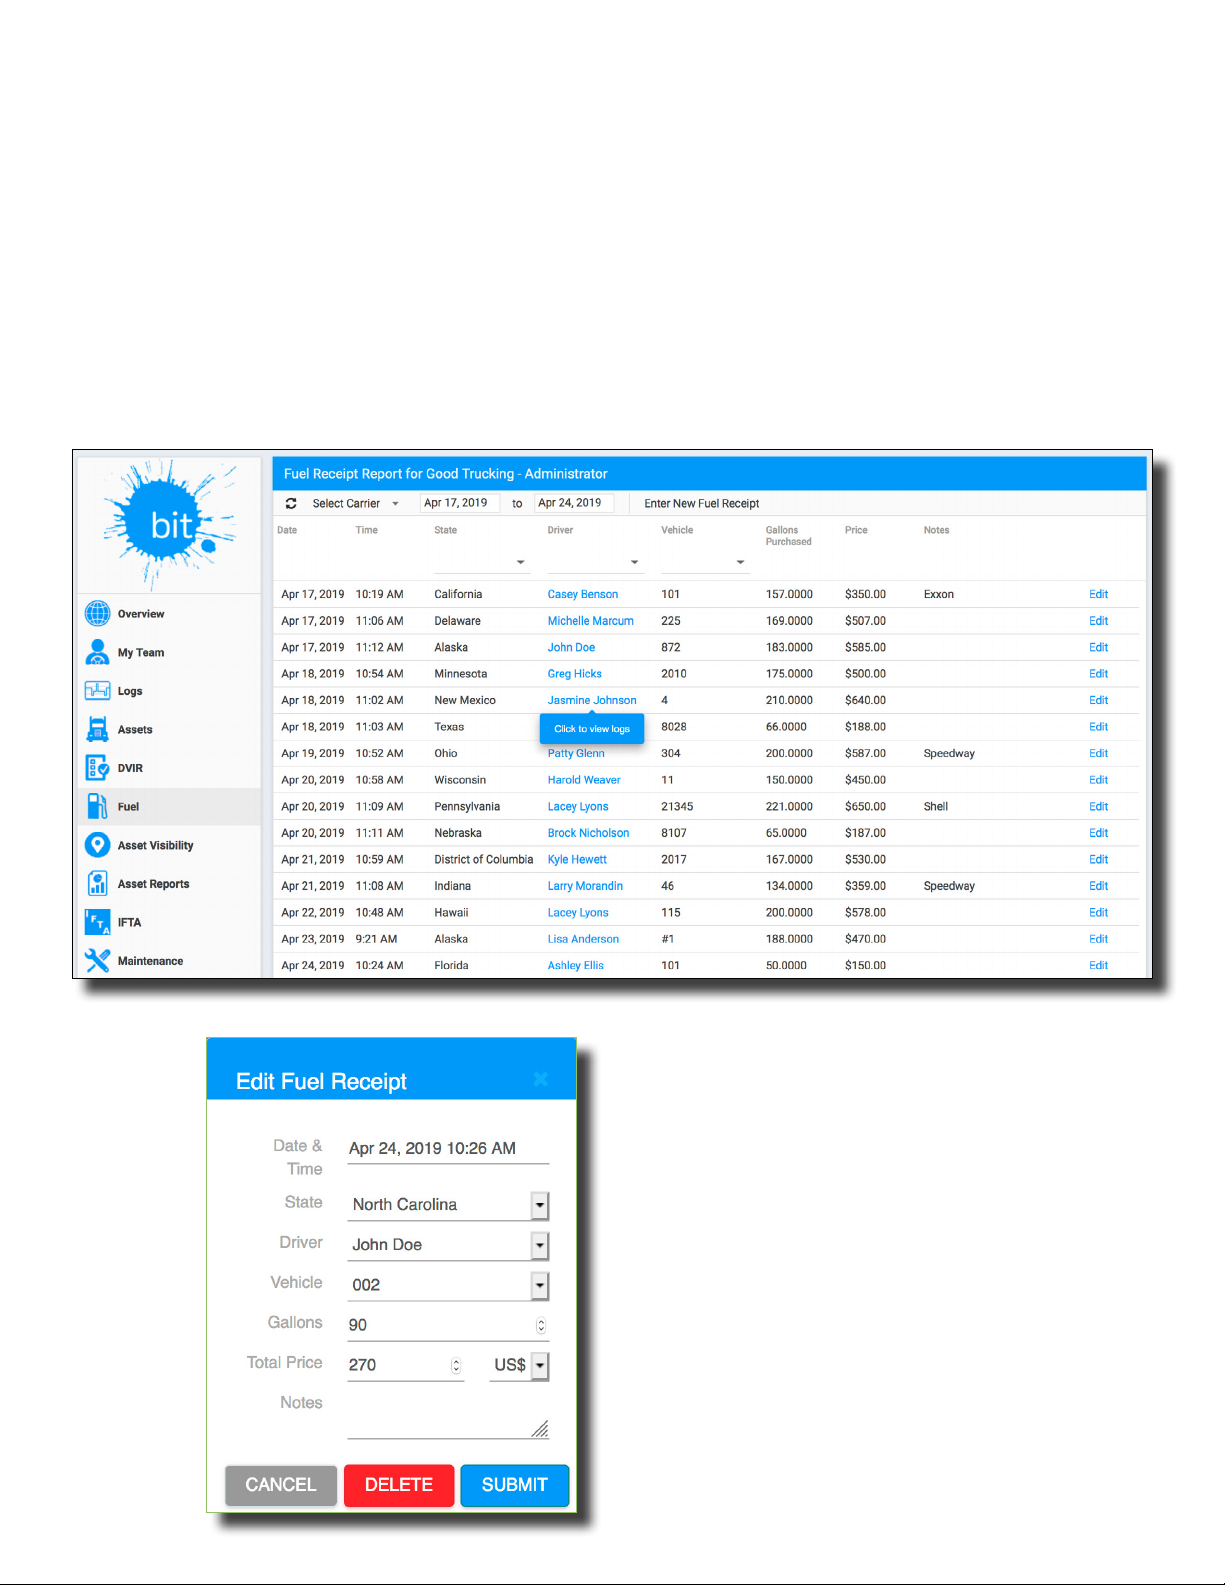
Fuel
The Fuel page shows fuel receipts submitted
by your drivers using the Blue Ink Tech app.
You can also add fuel receipts directly by
clicking “Enter New Fuel Receipt” on the
menu bar.
Carrier and date range can be selected on the
menu bar.
The fuel receipt table shows the date and time
the receipt was submitted, the state where fuel
was purchased, the driver, vehicle, gallons
purchased, total purchase price, and any notes
entered by the driver. You can lter the table by
state, driver, or vehicle.
To edit or delete a fuel receipt, click “Edit” at
the far right of the selected row.
The “Edit Fuel Receipt” box will open for you to
make changes or add missing information.
Fuel Receipts can be used in collaboration with
the IFTA subscription offered by Blue Ink Tech
to manage your in-state miles.
35
Page 36
My Account
You can configure your account settings on the
My Account page. Any changes you make on
this page will carry over to the Blue Ink Tech
app.
Prole Information/Change Password
In these sections you can view and edit your
name and time zone and set a new password
for your BIT account. The new password will
be used for the Blue Ink Tech app as well.
Account Emails
Emails associated with your account are listed
in this section. You can have multiple email
addresses. Check the “Send To” box next to
each email address you want to receive alerts
and notications about your account. You can
delete email addresses you no longer want
to use. Be sure to click the “Save Changes”
button or your changes will be lost when you
leave the My Account page.
My Roles
This section lists your carrier accounts. If you
have multiple roles within your carrier, each
role account will be shown separately.
Click “Request to Join a Carrier” on the menu
bar to add a new carrier to your account. You
will stay in pending status, and cannot share
logs with the new carrier, until an administrator
accepts you to their team.
Click “Leave Carrier” if you no longer wish to
share logs with a carrier. Logs you recorded
with that carrier will still be available on your
Logs page and the carrier's Logs page.
Manage API Keys
In this section you can generate API keys to
view or modify data about your fleet. You can
learn more about this at
www.blueinktech.com/api_docs.php.
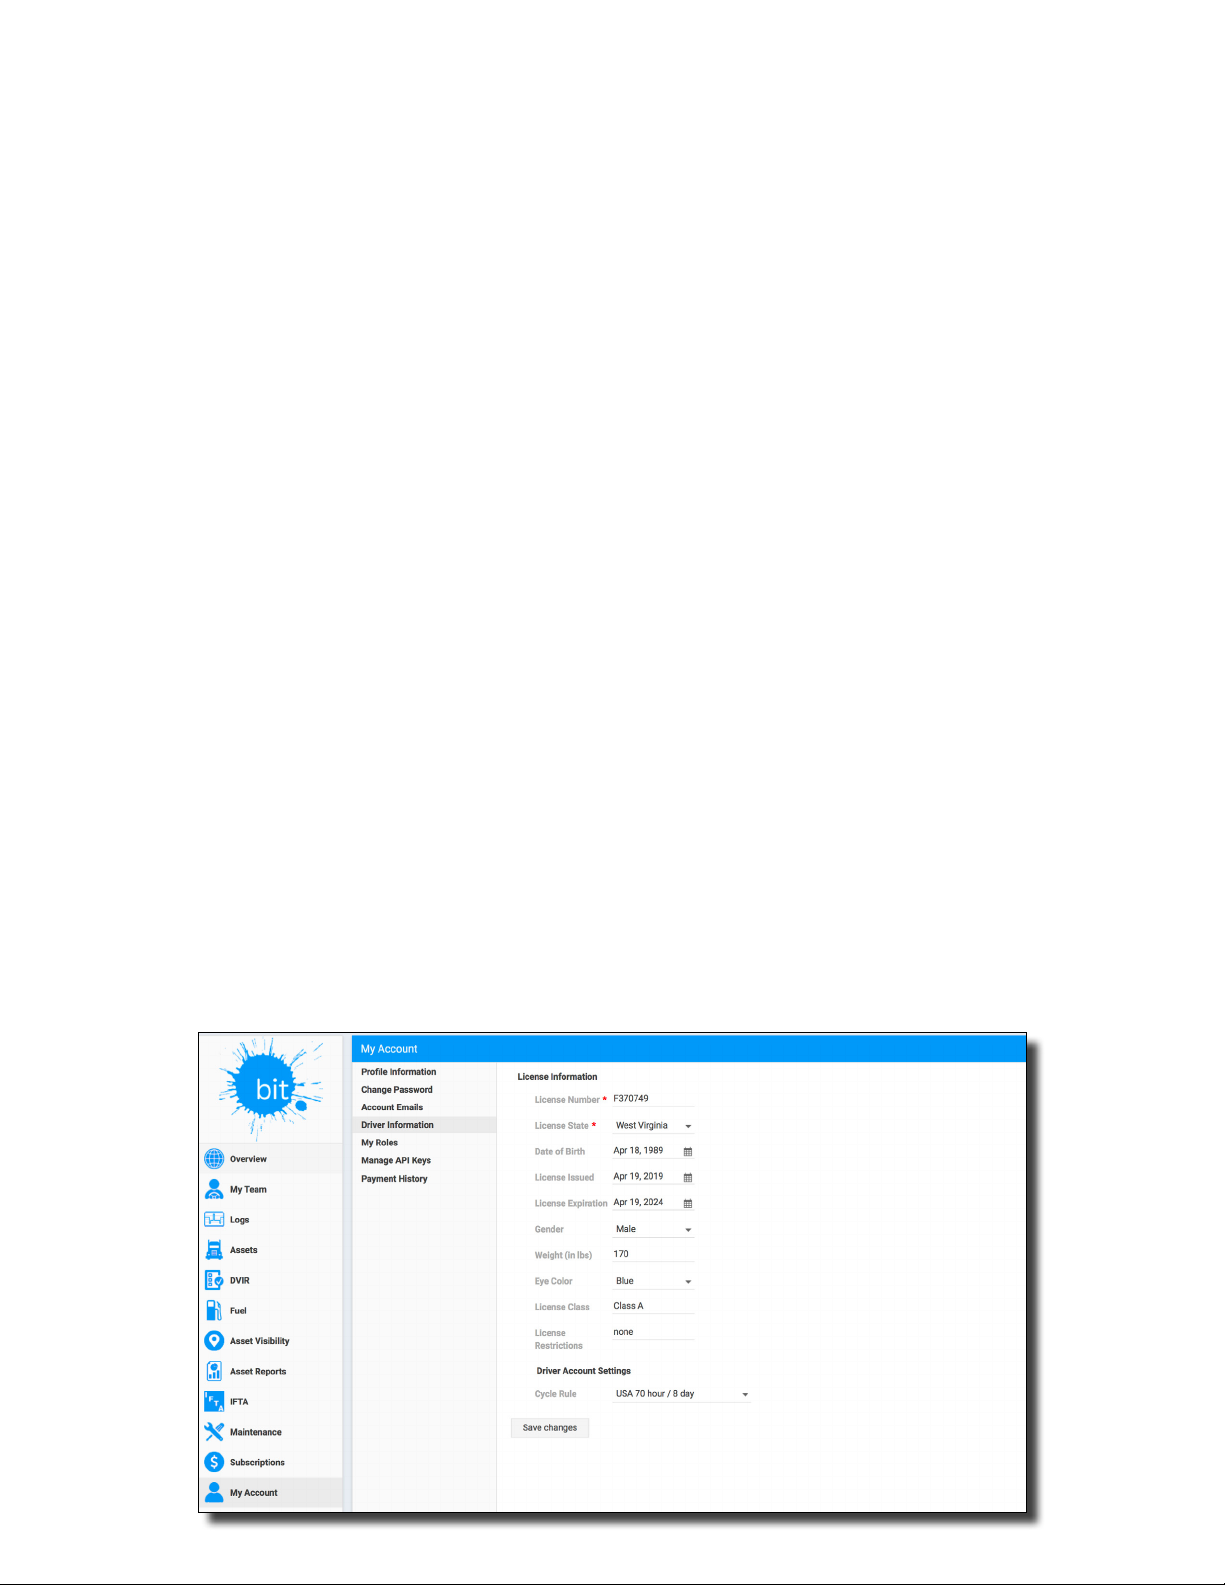
Driver Information
In this section you can view and edit your
license information and your Cycle Rule
selection. Drivers must enter a license number
and the issuing state before they can share
logs with a carrier.
Payment History
This section allows you to see the payment
history of your carrier. You can download a
PDF copy of your receipts and see more
details by checking the boxes and clicking
"Save Checked Receipts."
36
Page 37

BIT ELD Adapter Adapter Specications and Requirements
FCC – United States Federal
Communications Commission
This device complies with Part 15 of the
FCC Rules. Operation is subject to the
following two conditions:
1. This device may not cause harmful
interference, and
2. This device must accept any interference
received, including interference that may
cause undesirable operation.
Any Changes or modications not expressly
approved could void the user's authority to
operate the equipment.
This equipment complies with FCC radiation
exposure limits set forth for an uncontrolled
environment.
This Equipment must be exclusively utilized in
a transportation vehicle.
Contains transmitter module FCC ID:
QOQBGM111
IC – Industry Canada
This radio transmitter has been approved by
Industry Canada to operate with the embedded
chip antenna. Other antenna types are strictly
prohibited for use with this device.
This device complies with Industry Canada's
license-exempt RSS standards. Operation is
subject to the following two conditions:
1. This device may not cause interference, and
2. This device must accept any interference,
including interference that may cause
undesired operation of the device.
Exception from routine SAR evaluation limits
are given in RSS-102 Issue 5.
Contains transmitter module IC:
5123A-BGM111
Cet émetteur radio (IC : 5123A-BGM111) a
reçu l'approbation d'Industrie Canada pour une
exploitation avec l'antenne puce incorporée. Il
est strictement interdit d'utiliser d'autres types
d'antenne avec cet appareil.
Le présent appareil est conforme aux CNR
d’Industrie Canada applicables aux appareils
radio exempts de licence. L’exploitation est
autorisée aux deux conditions suivantes:
1. L’appareil ne doit pas produire de
brouillage; et
2. L’appareil doit accepter tout brouillage
radioélectrique subi, même si le brouillage
est susceptible de provoquer un
fonctionnement non désiré de l’appareil.
Les limites applicables à l'exemption de
l'évauation courante du DAS sont énoncées
dans le CNR 102, 5e édition.
Contient le module émetteur IC:
5123A-BGM111
37
Page 38

BIT ELD Adapter Adapter Specications and Requirements (continued)
SAE – Society of
Automotive Engineers
Blue Ink Tech is registered with the Society of
Automotive Engineers and has been assigned
manufacturer code 738 for identifying its
devices communicating on a vehicle’s
diagnostic bus.
Blue Ink Tech’s 9-pin BIT ELD adapter
conforms to J1939/16: it autodetects the
communication speed of the vehicle’s
diagnostic port and congures itself
automatically. It works with Type I and Type II
vehicles that communicate at 250 kbaud or 500
kbaud. The 9-pin adapters support the J1939
communication protocol.
Blue Ink Tech’s ELD adapters support the
J1708 and J1587 standards.
Bluetooth
Blue Ink Tech’s ELD adapters are Bluetooth
quali
ed with declaration ID D030732.
App Requirements
The Blue Ink Tech app runs on Android and
Apple devices.
Your device must support Bluetooth 4.0 (also
known as Bluetooth Smart and Bluetooth Low
Energy) to communicate with the ELD adapter.
Your device must be able to communicate
over the Internet during a roadside safety
inspection. This is because the safety ofcial
may request that you send your logs to them
electronically while at roadside. This will be
possible if your device has cellular capabilities
and an active data plan or if you have a
wireless hotspot device that will allow your
device to communicate over the Internet while
stopped for a roadside inspection. A device
that only supports a Wi-Fi connection with no
means of communicating over the Internet
while stopped for a roadside inspection will not
be acceptable.
Legal
Please check our website (www.blueinktech.
com) for our current Terms of Service and
Privacy Policy.
38
Page 39

Blue Ink Technology
© 2019
 Loading...