

Page 1

BLE113 DEVELOPMENT KIT
QUICK START
Thursday, 14 March 2013
Version 1.5
Page 2

Bluegiga Technologies Oy
Copyright © 2000-2013 Bluegiga Technologies
Bluegiga Technologies reserves the right to alter the hardware, software, and/or specifications detailed herein
at any time without notice, and does not make any commitment to update the information contained herein.
Bluegiga Technologies assumes no responsibility for any errors which may appear in this manual. Bluegiga
Technologies' products are not authorized for use as critical components in life support devices or systems.
Bluegiga Access Server, Access Point, APx4, AX4, BSM, iWRAP, BGScript and WRAP THOR are trademarks
of Bluegiga Technologies.
The Bluetooth trademark and logo are registered trademarks and are owned by the Bluetooth SIG, Inc.
ARM and ARM9 are trademarks of ARM Ltd.
Linux is a trademark of Linus Torvalds.
All other trademarks listed herein belong to their respective owners.
Page 3

Bluegiga Technologies Oy
TABLE OF CONTENTS
1 Introduction ....................................................................................................................................................4
2 What is BLE113 Bluetooth Smart Module .....................................................................................................4
2.1 Key features ..........................................................................................................................................4
3 BLE113 Development Kit contents ................................................................................................................5
4 Getting started with BLE113 ..........................................................................................................................6
4.1 Development overview .........................................................................................................................6
4.2 Preparations .........................................................................................................................................7
4.3 Using the DKBLE113 for the first time ..................................................................................................7
5 Bluegiga Bluetooth Smart Tools ....................................................................................................................9
6 Bluetooth Smart Documentation ................................................................................................................ 10
7 Contact Information .................................................................................................................................... 11
Page 4

Bluegiga Technologies Oy
Page 4 of 11
1 Introduction
This document is a getting started guide for the Bluegiga BLE113 development kit. The guide instructs you
how to set up the BLE113 development kit, power it up and access the BLE113 using the BLEGUI software.
2 What is BLE113 Bluetooth Smart Module
BLE113 is a Bluetooth smart module targeted for small and low power sensors and accessories. It integrates
all features required for a Bluetooth smart application: Bluetooth radio, software stack and GATT based
profiles. BLE113 Bluetooth smart module can also host end user applications, which means no external micro
controller is required in size or price constrained devices. BLE113 Bluetooth smart module also has flexible
hardware interfaces to connect to different peripherals and sensors. BLE113 Bluetooth smart module can be
powered directly from a standard 3V coin cell battery or pair of AAA batteries. In lowest power sleep mode it
consumes only 500nA and will wake up in few hundred microseconds.
2.1 Key features
Bluetooth v.4.0, single mode compliant
Supports master and slave modes
Up to 8 simultanous connections
Integrated Bluetooth Smart stack
GAP, GATT, L2CAP and SMP
Bluetooth Smart profiles
Radio performance
Transmit power : +0 dBm to -23 dBm
Receiver sensitivity: up to -93 dBm
Ultra low current consumption
Transmit: 18.2 mA (0 dBm)
Transmit: 14.3 mA (0 dBm with DC/DC)
Receive: 14.3 mA
Sleep mode 3: 0.4uA
Flexible peripheral interfaces
UART or SPI
I2C
PWM, GPIO
12-bit ADC
Host interfaces
UART
Programmable 8051 processor for stand-alone operation
Simple Bluegiga BGScriptTM scripting language for quick application development
Bluegiga Profile ToolkitTM allowing the quick development of GATT based profiles
Free Software Development Kit
Bluetooth, CE, FCC, IC, Japan and South-Korea qualified
Page 5
Bluegiga Technologies Oy
Page 5 of 11
3 BLE113 Development Kit contents
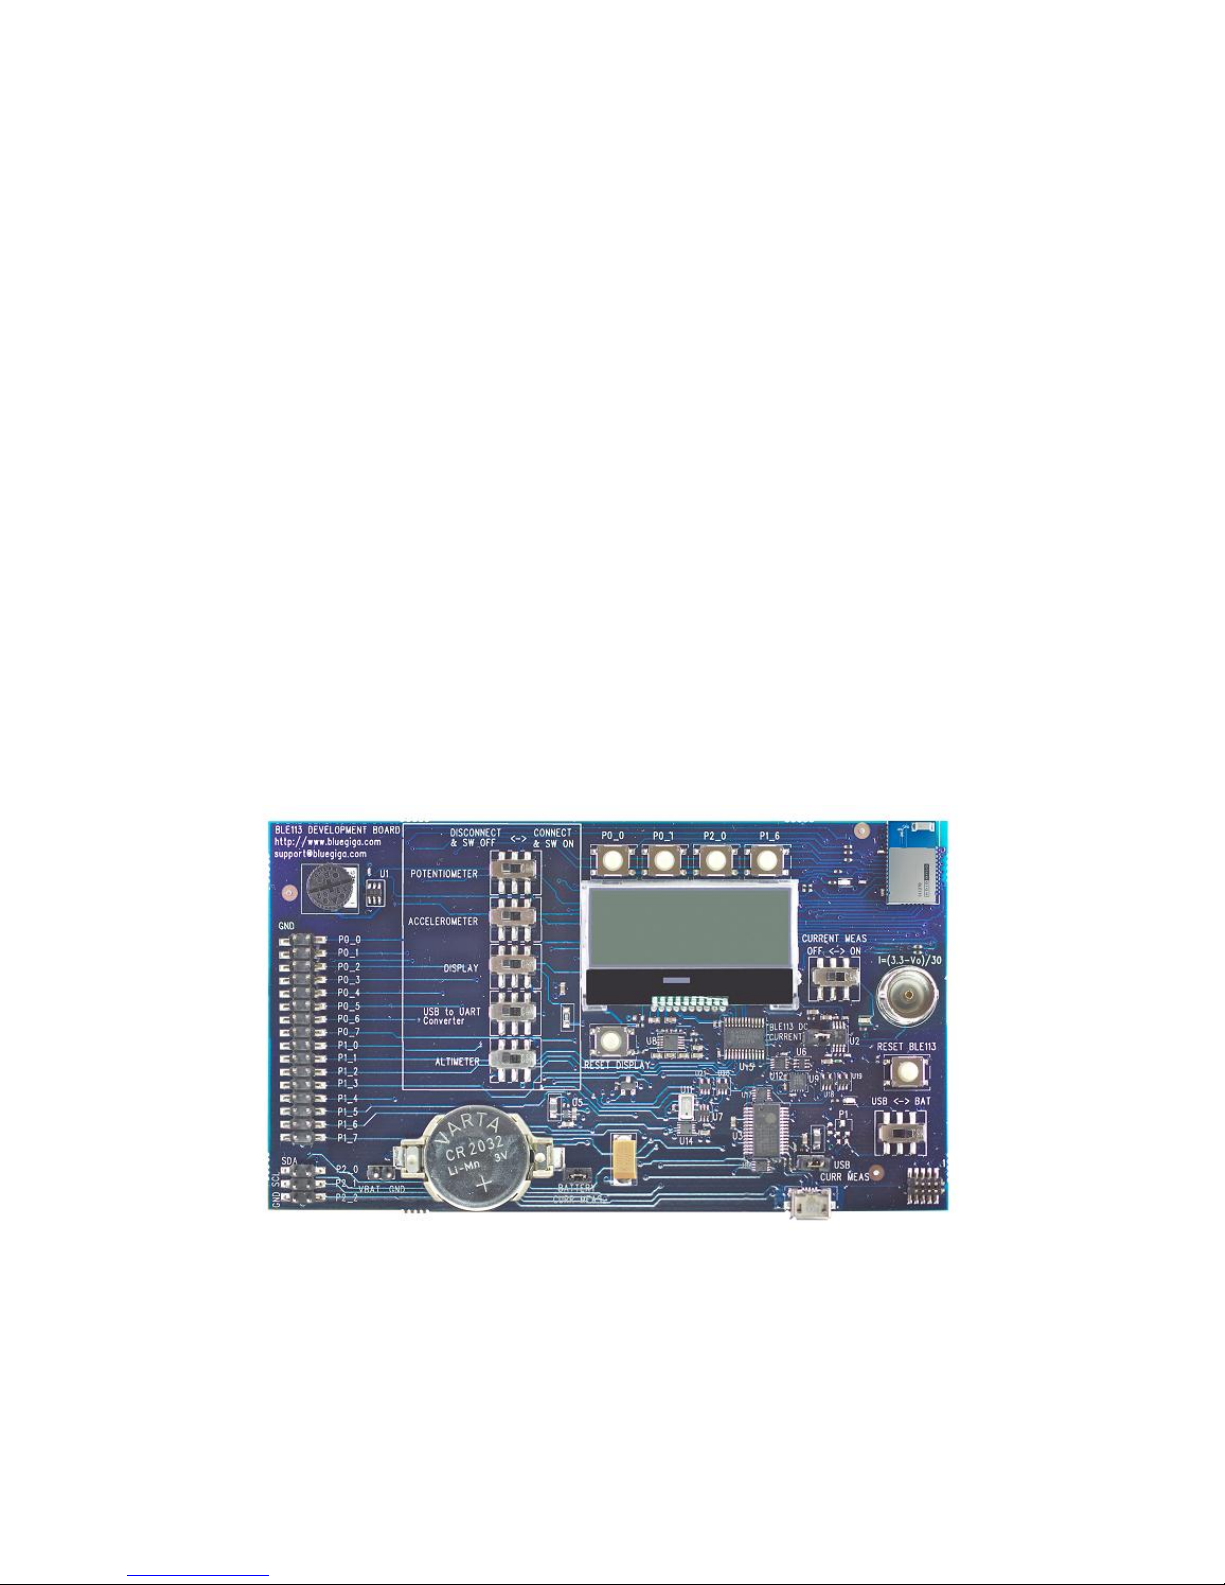
The BLE113 development kit is a ready-to-use hardware development platform for the Bluegiga BLE113
Bluetooth Smart module. The development kit consists of a single BLE113 development board, programming
cables, two BLE113 modules and a BLED112 USB dongle.
DKBLE113 development kit contents
1 x Bluegiga BLE113 development board containing
o BLE113 Bluetooth Smart module
o Display
o Accelerometer (Freescale MMA8451QT)
o Altimeter (Freescale MPL3115A2)
o Potentiometer
o USB to UART bridge and micro USB connector
o CR2032 battery holder
o DC/DC converter (Texas Instruments TPS62730)
o Debug interface
o IO headers
2 x BLE113 Bluetooth Smart modules
1 x BLED112 USB dongle
1 x USB cable
1 x CR2032 battery
1 x Firmware programming cable (CC Debugger)
Documentation
Figure 1: BLE113 development board
Page 6
Bluegiga Technologies Oy
Page 6 of 11
4 Getting started with BLE113
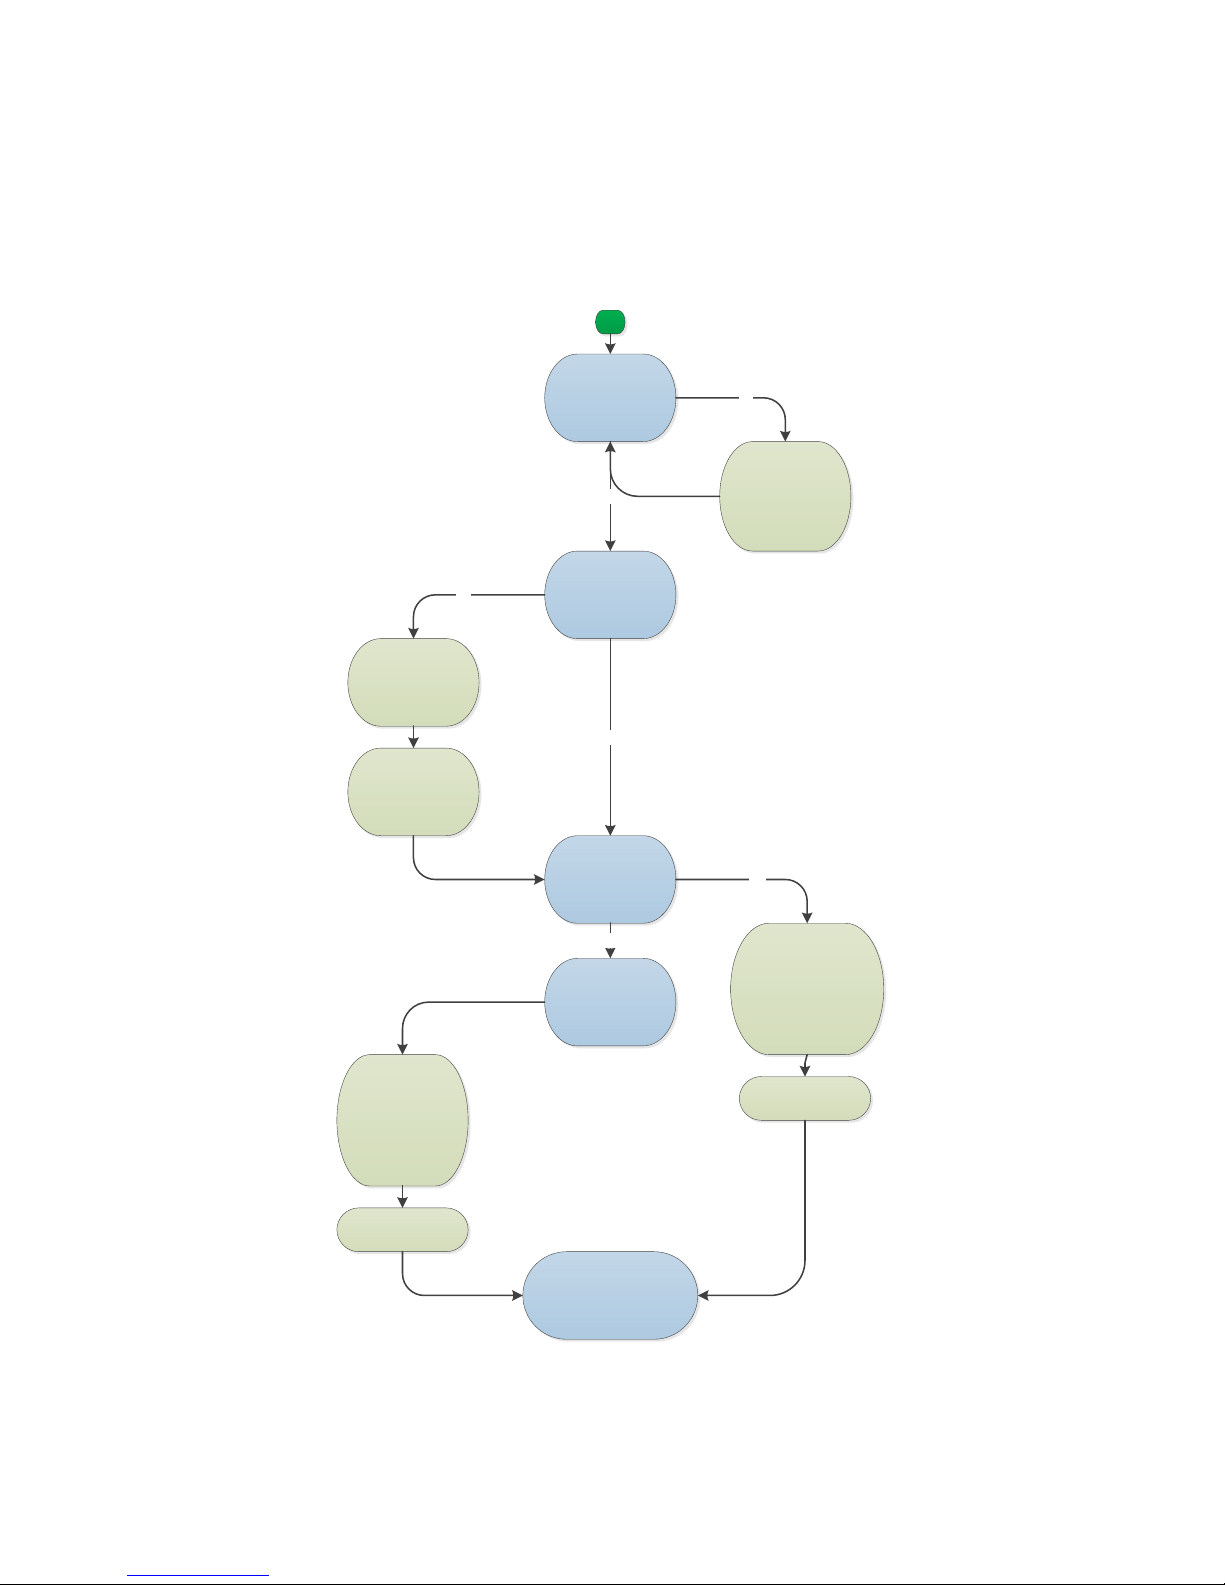
4.1 Development overview
Are you familiar with
Bluetooth 4.0?
Read:
- Bluetooth low energy
technology presentation
- Visit Bluetooth SIG’s
Bluetooth low energy
pages
No
Are you familiar with
Bluegiga’s Bluetooth 4.0
products?
Yes
Read:
- BLE112, BLE113 &
BLED112 presentations
- BLE112 & BLE113 data
sheet
No
Making a stand-alone
application without a
separate host?
Yes
Try:
- DKBLE112/DKBLE113
example applications
together with BLEGUI
software
Read:
- Sensor application notes
(f.ex HR sensor )
- BGScript developer guide
- Profile Toolkit developer
guide
- Bluetooth low energy API
documentation
Yes
Try:
- Sensor application
examples
Implement & test application
(Help: [email protected])
Making an application
with host?
No
Read:
- Collector application
notes application notes
- BGLib documentation
- Profile Toolkit
developer guide
- Bluetooth low energy
API documentation
Try:
- BGLib example
applications
Figure 2: Development path
Page 7

Bluegiga Technologies Oy
Page 7 of 11
4.2 Preparations
1. Log in to Bluegiga Tech Forum at: http://techforum.bluegiga.com
a. If you do not have an account yet, you can create one at
http://techforum.bluegiga.com/create_account
2. Download all BLE113 documentation, Bluetooth Smart SDK and software tools
4.3 Using the DKBLE113 for the first time
Step 1: Power on the BLE113 development board
If powering the BLE113 development board via USB:
1. Make sure the display switch on the BLE113 development board is turned ON
2. Check the USB CURR MEAS jumper is in place.
3. Make sure the power switch is in USB position
4. Connect the BLE113 development board using the supplied micro USB cable to a PC
5. Check that he green power led turns on
If powering the BLE113 development board with a CR2032 battery:
1. Make sure the display switch on the BLE113 development board is turned ON
2. Make sure the USB to UART converter switch is turned OFF
3. Check the BATTERY CURR MEAS jumper is in place.
4. Make sure the power switch is in BAT position
Note:
If the factory default configuration the BLE113 development kit has a pre-programmed firmware that will start
Bluetooth low energy advertisement and display information on the display. Also the UART interface is
disabled by default.
Note:
If CR2032 battery is connected to the BLE113 development board and the power switch is turned to the USB
mode a led will turn on, which will slowly drain the CR2032. It’s recommended the CR2032 is fully removed or
the BATTERY CURR MEAS jumper disconnected.
Step 2: Connect BLED112 USB dongle to a PC and install driver
1. Connect the BLED112 USB dongle to a Windows PC.
2. Windows will recognize the BLED112 USB dongle and prompt for a driver.
3. The USB driver is in the Bluetooth Smart SDK’s windrv folder.
4. Once the driver has been installed, the BLED112 USB dongle should appear as a virtual COM port in
Windows device manager.
Page 8
Bluegiga Technologies Oy
Page 8 of 11
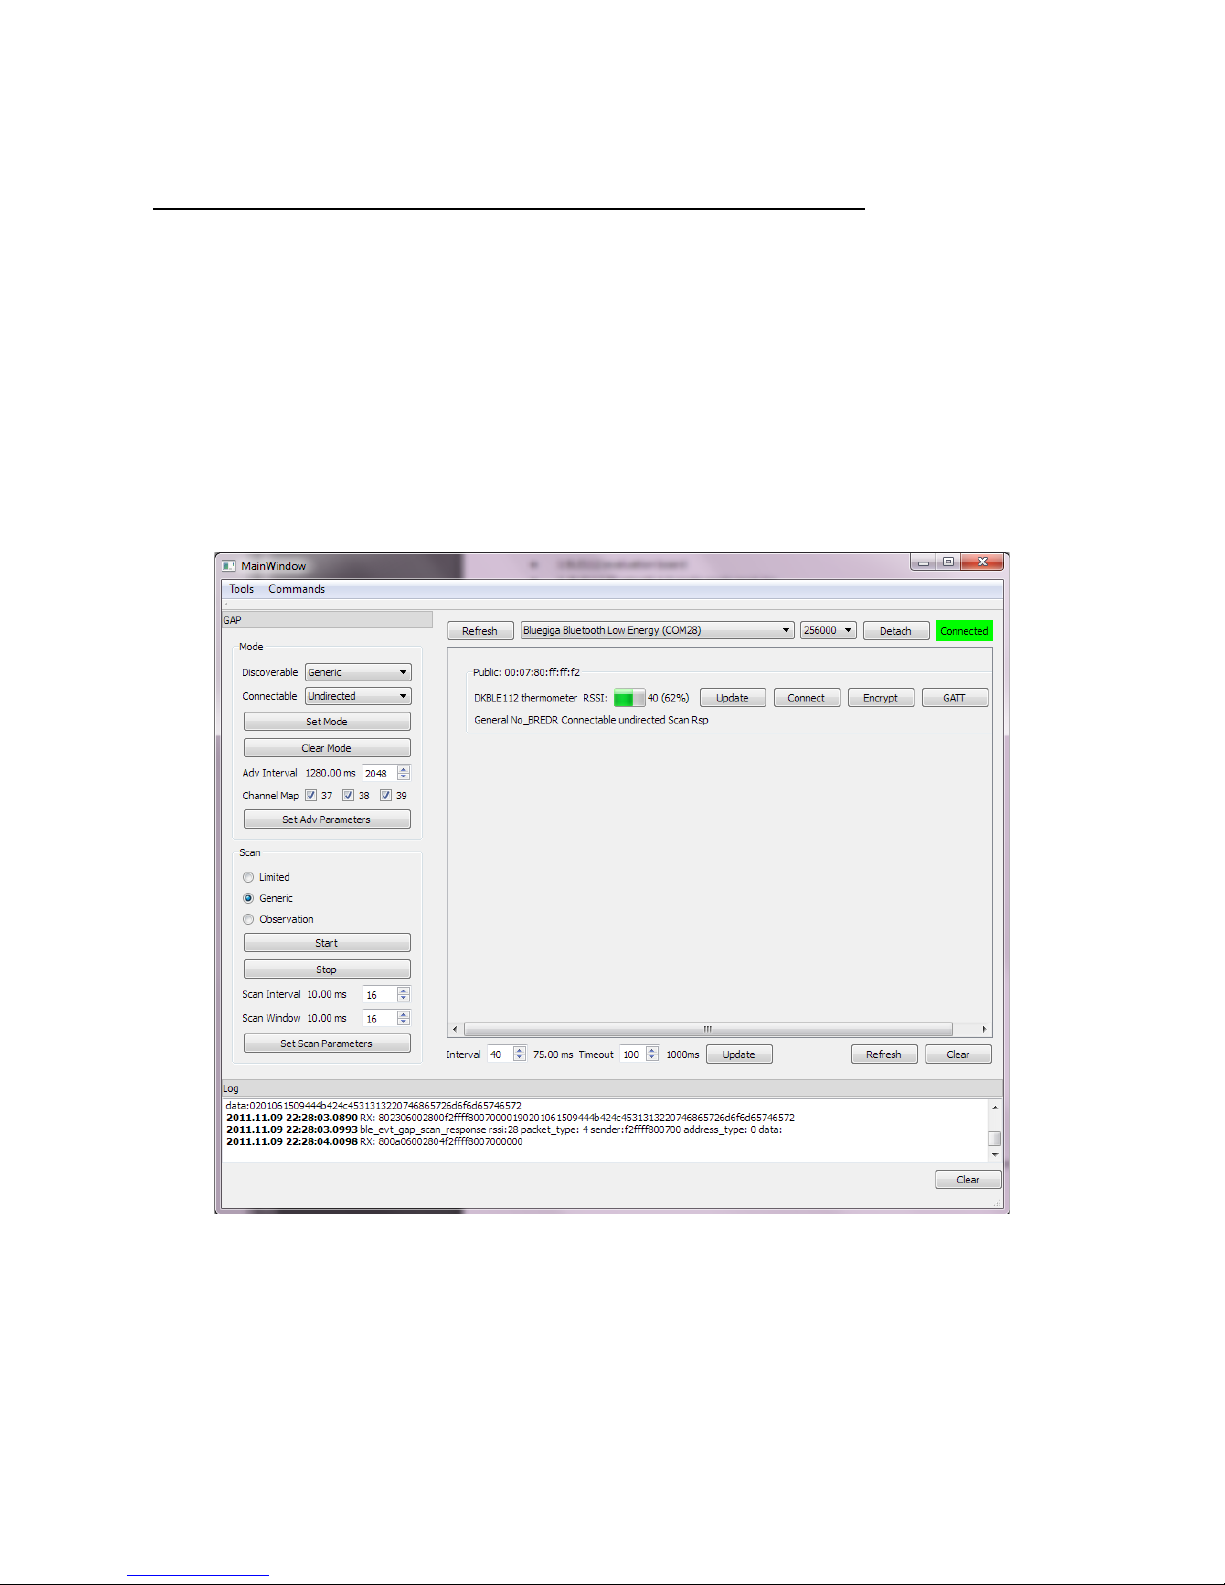
Step 3: Start BLEGUI software and discover the BLE113 development kit
1 When the BLE113 development board is powered the display will show the following text: “DKBLE113”
“Temp. : <temperature in Celsius>oC
2 The sample firmware also starts Bluetooth low energy advertisements.
3 To discover the BLE113 development board, start the BLEGUI application included in the bin folder of
the Bluetooth Smart SDK.
4 In BLEGUI application, select the Bluegiga Bluetooth Low Energy COM port and press Attach. Make
sure the status changes to Connected.
5 Start Generic scan operation and you start to receive Advertisement packets in the BLEGUI application.
6 Read Health Thermometer Profile application note to learn more about the demo.
Figure 3: Discovering DKBLE113
Page 9

Bluegiga Technologies Oy
Page 9 of 11
5 Bluegiga Bluetooth Smart Tools
BLEGUI: This application can be used to control BLE112, BLE113 or BLED112 over UART or USB.
BLEGUI is a terminal like program that sends the BGAPI command to the Bluetooth Smart module
and parses the responses. It's a useful tool to get familiar with the products and try out Bluetooth low
energy applications.
BLE Update: This tool can be used to compile and install Bluetooth Smart SDK projects into Bluegiga
Bluetooth Smart products using the CC debugger programming cable.
iOS reference application: The iOS reference application implements the Heart Rate Collector and
Cable Replacement (CR) collector profiles for Apple’s Bluetooth 4.0 compatible iOS devices and is
available as a source code.
BGBuild: BGBuild application compiles the hardware configuration file, GATT database, BGScript
and the Bluetooth Smart stack into a single binary image (.hex), which can be installed into BLE112,
BLE113 or BLED112 hardware.
DFUTool: DFUTool can be used to update the firmware of BLE112, BLE113 or BLED112 using USB
DFU protocol.
Thermometer-demo: Thermometer demo is a Windows command line application, which implements
Thermometer collector using BGLib. It can scan Bluetooth 4.0 single-mode devices, and read
temperature values from them.
Collector demo: Collector demo implements a simple Windows HR collector application, which
scans, connects and reads HR and Battery status values from a HR sensor
Page 10

Bluegiga Technologies Oy
Page 10 of 11
6 Bluetooth Smart Documentation
Bluetooth low energy - getting started : This document, describes the very basics
of Bluetooth Smart technology and related Bluegiga Bluetooth Smart products
BGScript developer guide: Describes the BGScript scripting language, its features and
limitations. Contains also a lot of practical BGScript examples.
Profile developer toolkit developer guide: Describes the basics of Bluetooth Smart profile
development, as well the features and syntax of hardware and GATT XML files. Contains also
practical examples.
Bluetooth Smart stack API reference: This document contains the BGAPI, BGLib and BGScript
API. Describes the available commands, responses, events and their parameters. API reference
document also explains the basics of Bluetooth low energy technology.
BLEGUI User Guide: The document describes how the BLEGUI application works and how to use it
Application notes: Various application notes describe specific use cases like for example Heart Rate
Sensor or Health Thermometer collector and walk through the necessary development steps required
to implement those.
Page 11

Bluegiga Technologies Oy
Page 11 of 11
7 Contact Information
Technical support: [email protected]
http://techforum.bluegiga.com
WWW: www.bluegiga.com
www.bluegiga.hk
Head Office / Finland:
Phone: +358-9-4355 060
Fax: +358-9-4355 0660
Sinikalliontie 5A
02630 ESPOO
FINLAND
Postal address / Finland:
P.O. BOX 120
02631 ESPOO
FINLAND
Sales Office / USA:
Phone: +1 770 291 2181
Fax: +1 770 291 2183
Bluegiga Technologies, Inc.
3235 Satellite Boulevard, Building 400, Suite 300
Duluth, GA, 30096, USA
Sales Office / Hong-Kong:
Phone: +852 3972 2186
Bluegiga Technologies Ltd.
Unit 10-18
32/F, Tower 1, Millennium City 1
388 Kwun Tong Road
Kwun Tong, Kowloon
Hong Kong
 Loading...