

Bluefin BFMS1223PR-01, BFMS24BA-01O, BFMS09PL-02I, BFMS18PL-02I, BFMSMZ224PL-01 Remote User Guide
...Page 1

REMOTE CONTROLLER
OWNER’S MANUAL
IMPORTANT NOTE:
Thank you for purchasing our air conditioner. Please read this manual carefully
before operating your new air conditioning unit and make sure to save this manual
for future reference.
Page 2

Table of Contents
Remote Controller Specifications
......................................................02
Handling the Remote Controller ....................................................03
Buttons and Functions ...................................................................04
Remote Screen Indicators ..............................................................08
How to Use Basic Functions ..........................................................09
How to Use Advanced Functions ..................................................11
01
Page 3
Remote Controller Specifications
My Mode
Swing
Mode
On/Off
Fan
Sleep
AUTO
COOL
DRY
HEAT
FAN
HIGH
MED
LOW
SET TEMPERATURE
RG10A(D2S)/BGEF, RG10A(D2S)/BGEFU1,RG10A1(D2S)/BGEF,
RG10A2(D2S)/BGEFU1, RG10A2(D2S)/BGCEFU1, RG10A2(D2S)/BGCEF,
RG10A10(D2S)/BGEF, RG10B(D2)/BGEF, RG10B1(D2)/BGEF,
RG10B2(D2)/BGCEF,RG10B10(D2)/BGEF,RG10B10(D2)/BGCEF,
RG10Y1(D2)/BGEF,RG10Y2(D2S)/BGEF
3.0V( Dry batteries R03/LR03×2)
8m
-5°C~60°C(23°F~140°F)
NOTE: For units labeled RG10Y1 (D2)/BGEF,RG10Y2(D2S)/BGEF: If the unit is turned off while
set to COOL, AUTO or DRY mode with the set temperature less than 24°C, the set temperature
will be automatically set to 24°C when you turn on the unit again. If the unit is turned off under
HEAT mode with the set temperature more than 24°C, the set temperature will be automatically
set to 24°C when you turn on the unit again.
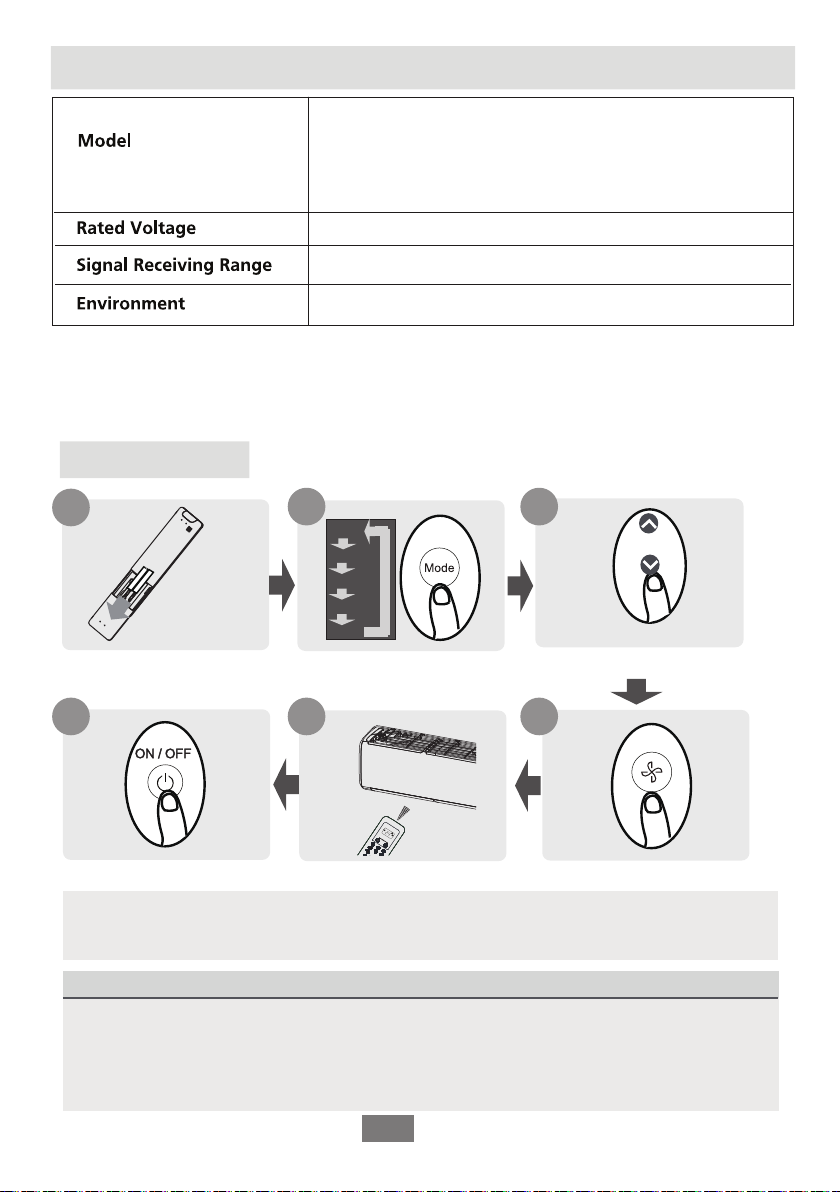
Quick Start Guide
1
FIT BATTERIES
6
PRESS POWER BUTTON
2
AUTO
COOL
DRY
HEAT
FAN
SELECT MODE
5 4
POINT REMOTE TOWARD UNIT
3
SELECT TEMPERATURE
SELECT FAN SPEED
NOT SURE WHAT A FUNCTION DOES?
Refer to the How to Use Basic Functions and How to Use Advanced Functions sections
of this manual for a detailed description of how to use your air conditioner.
SPECIAL NOTE
• Button designs on your unit may differ slightly from the examples shown.
If the indoor unit does not have a particular function, pressing that function’s button on
•
the remote control will have no effect.
When there are discrepancies between “Remote controller Manual” and “USER’S
•
MANUAL” on function description, follow the instructions outlined in the "USER'S MANUAL"
02
Page 4
Handling the Remote Controller
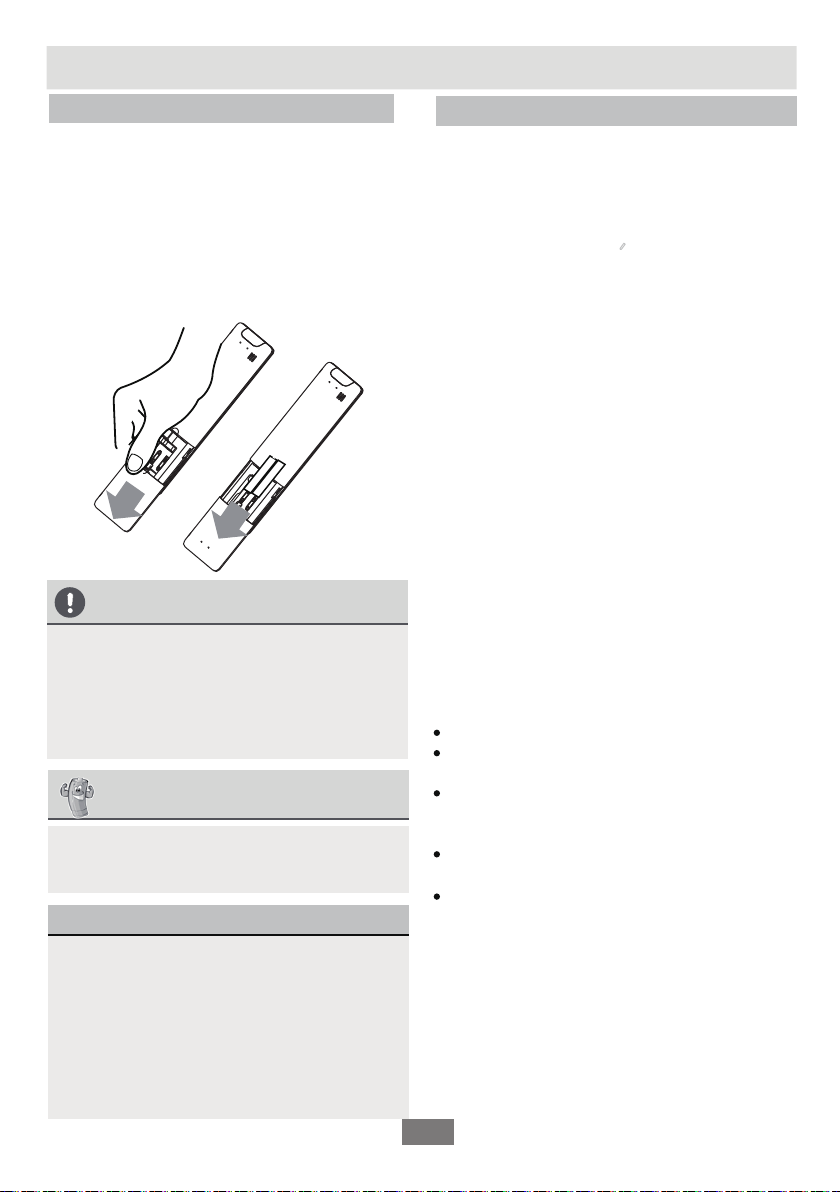
Inserting and Replacing Batteries
Your air conditioning unit may come with two
batteries. Put the batteries in the remote control
before use.
1.
Slide the back cover from the remote control
downward, exposing the battery compartment.
2.
Insert the batteries, paying attention to match
up the (+) and (-) ends of the batteries with
the symbols inside the battery compartment.
3.
Slide the battery cover back into place.
BATTERY NOTES
For optimum product performance:
•
Do not mix old and new batteries, or
batteries of different types.
Do not leave batteries in the remote control
•
if you don’t plan on using the device for more
than 2 months.
BATTERY DISPOSAL
Do not dispose of batteries as unsorted
municipal waste. Refer to local laws for proper
disposal of batteries.
TIPS FOR USING REMOTE CONTROL
• The remote control must be used within 8 meters
of the unit.
• The unit will beep when remote signal is received.
• Direct sunlight, curtains, and other obstructions
can interfere with the infrared signal receiver.
• If the remote isn't going to be used for a period
of over 2 months, remove the batteries to
prevent leakage.
NOTES FOR USING REMOTE CONTROL
This device complies with the local national
regulations.
In Canada, it should comply with
•
CAN ICES-3(B)/NMB-3(B).
In USA, this device complies with part 15 of the
•
FCC Rules. Operation is subject to the following
two conditions:
(1) This device may not cause harmful interference,
and
(2) this device must accept any interference
received, including interference that may
cause undesired operation.
This equipment has been tested and found to
comply with the limits for a Class B digital device,
pursuant to part 15 of the FCC Rules. These limits
are designed to provide reasonable protection
against harmful interference in a residential
installation. This equipment generates, uses and
can radiate radio frequency energy and, if not
installed and used in accordance with the
instructions, may cause harmful interference to
radio communications. However, there is no
guarantee that interference will not occur in a
particular installation. If this equipment does cause
harmful interference to radio or television reception,
which can be determined by turning the equipment
off and on, the user is encouraged to try to correct
the interference by one or more of the following
measures:
Reorient or relocate the receiving antenna.
Increase the separation between the equipment
and receiver.
Connect the equipment into an outlet on a circuit
different from that to which the receiver is
connected.
Consult the dealer or an experienced radio/TV
technician for help.
Changes or modifications not approved by the
party responsible for compliance could void
user’s authority to operate the equipment. v
03
Page 5
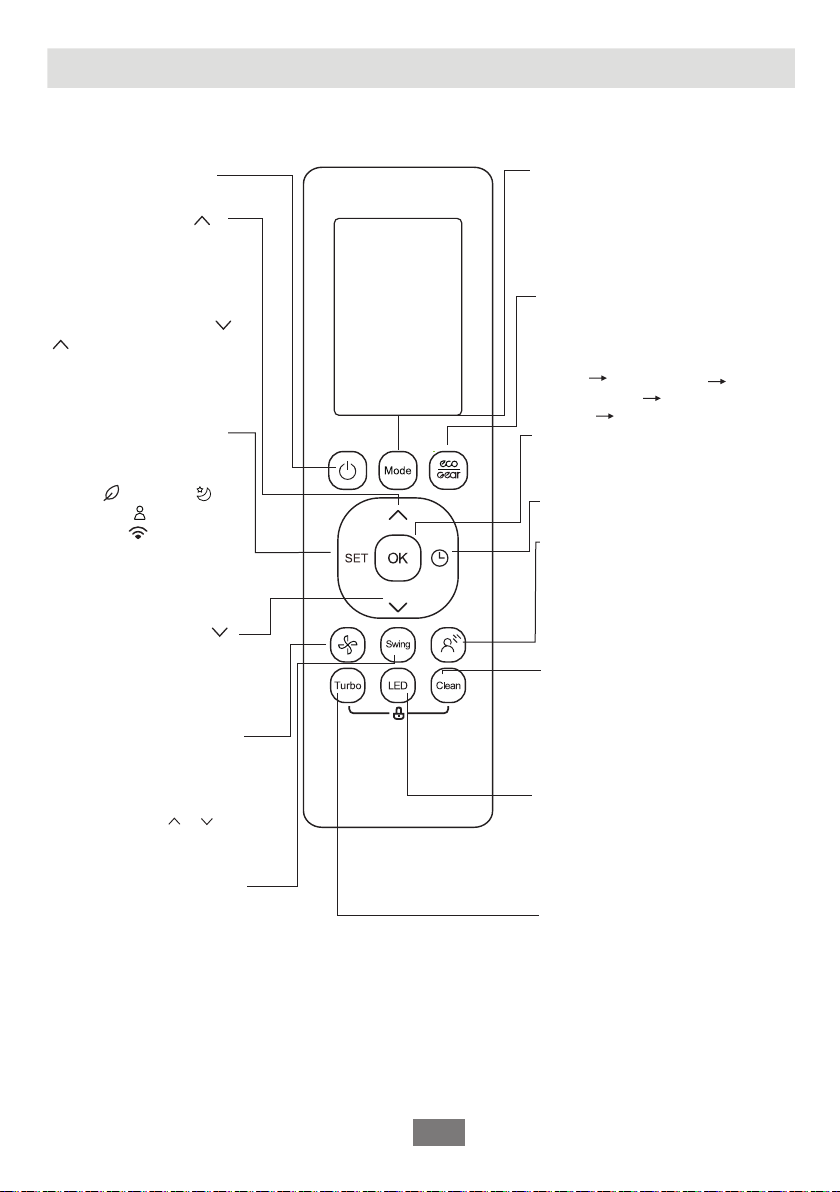
Buttons and Functions
Before you begin using your new air conditioner, make sure to familiarize yourself with its remote
control. The following is a brief introduction to the remote control itself. For instructions on how to
operate your air conditioner, refer to the How to Use Basic Functions
Turns the unit on or off.
ON/OFF
TEMP
Increases temperate in
1°C (1°F) increments.
Max. temperature is
30°C (86°F).
NOTE: Press together &
buttons at the same time
for 3 seconds will alternate
the temperature display
between the °C & °F.
GEAR(50%)
SET
Scrolls through operation
functions as follows:
Fresh( ) Sleep( )
Follow Me( )
AP mode( ) Fresh...
The selected symbol will
flash on the display area,
press the OK button to
confirm.
TEMP
Decreases temperature
in 1°C (1°F) increments
Min. temperature is
16°C (60°F).
FAN SPEED
Selects fan speeds in the
following order:
Press the TEMP or button
to increase/decrease the fan
speed in 1% increments.
AU
20%
60% 40% 80% 100%.
SWING
Starts and stops the horizontal
louver movement. Hold down
for 2 seconds to initiate vertical
louver auto swing feature.
section of this manual.
MODE
Scrolls through operation modes
as follows:
DRY
AUTO COOL
HEAT FAN
NOTE: HEAT mode is not supported
by the cooling only appliance.
ECO/GEAR
Press this button to enter the
energy efficient mode in a
sequence of following:
ECO GEAR(75%)
Previous setting
mode ECO
......
OK
Used to confirm the selected
functions
TIMER
Sets timer to turn unit on or off
BREEZE AWAY
This feature activates indirect
airflow for a more natural,
breeze-like effect
NOTE: This feature is available
under cool, Fan and Dry mode only
CLEAN
Used to start and stop the Self
Clean or Active Clean function.
(Model dependent, please refer
to the USER’S OPERATION &
INSTALLATION MANUAL).
LED
Turns indoor unit’s LED display
and air conditioner buzzer on and
off (model dependent), which
creates a comfortable and quiet
environment.
Turbo
Enables unit to reach preset
temperature in shortest
possible time
RG10A2(D2S)/BGEFU1,RG10Y2(D2S)/BGEF
Model:
RG10A10(D2S)/BGEF(20-28 C/68-82 F)
O
O
RG10A(D2S)/BGEF & RG10A(D2S)/BGEFU1(Fresh feature is not available)
RG10A2(D2S)/BGCEFU1 & RG10A2(D2S)/BGCEF
(Cooling only models, AUTO mode and HEAT mode are not available)
04
Page 6
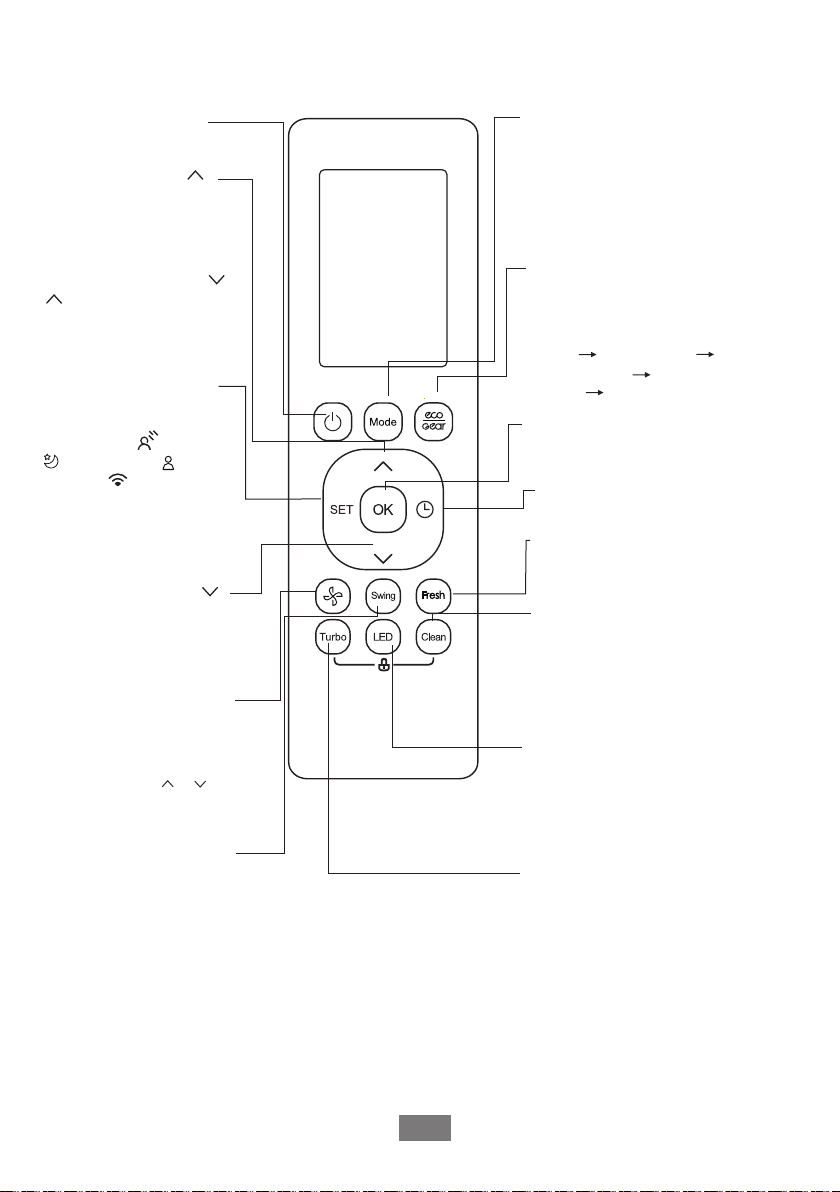
Turns the unit on or off.
ON/OFF
TEMP
Increases temperate in
1°C (1°F) increments.
Max. temperature is
30°C (86°F).
NOTE: Press together &
buttons at the same time
for 3 seconds will alternate
the temperature display
between the °C & °F.
SET
Scrolls through operation
functions as follows:
Breeze Away( ) Sleep
( )
Follow Me( )
AP mode( ) Breeze
Away ...
The selected symbol will
flash on the display area,
press OK button to confirm.
TEMP
Decreases temperature
in 1°C (1°F) increments
Min. temperature is
16°C (60°F).
FAN SPEED
Selects fan speeds in the
following order:
Press the TEMP or button
to increase/decrease the fan
speed in 1% increments.
AU
20%
60% 40% 80% 100%.
SWING
Starts and stops the horizontal
louver movement. Hold down
for 2 seconds to initiate vertical
louver auto swing feature.
MODE
Scrolls through operation modes
as follows:
HEAT FAN
DRY
AUTO COOL
NOTE: HEAT mode is not
supported by the cooling only
appliance.
ECO/GEAR
Press this button to enter the
energy efficient mode in a
sequence of following:
ECO GEAR(75%)
GEAR(50%)
mode ECO
OK
Used to confirm the selected
functions
TIMER
Sets timer to turn unit on or off
Previous setting
......
FRESH
Used to start and stop the
Fresh feature.
CLEAN
Used to start and stop the Self
Clean or Active Clean function.
(Model dependent, please refer
to the USER’S OPERATION &
INSTALLATION MANUAL).
LED
Turns indoor unit’s LED display
and air conditioner buzzer on and
off (model dependent), which
creates a comfortable and quiet
environment.
Turbo
Enables unit to reach pr
temperature in shortest
possible time
Model: RG10A1(D2S)/BGEF
05
Page 7
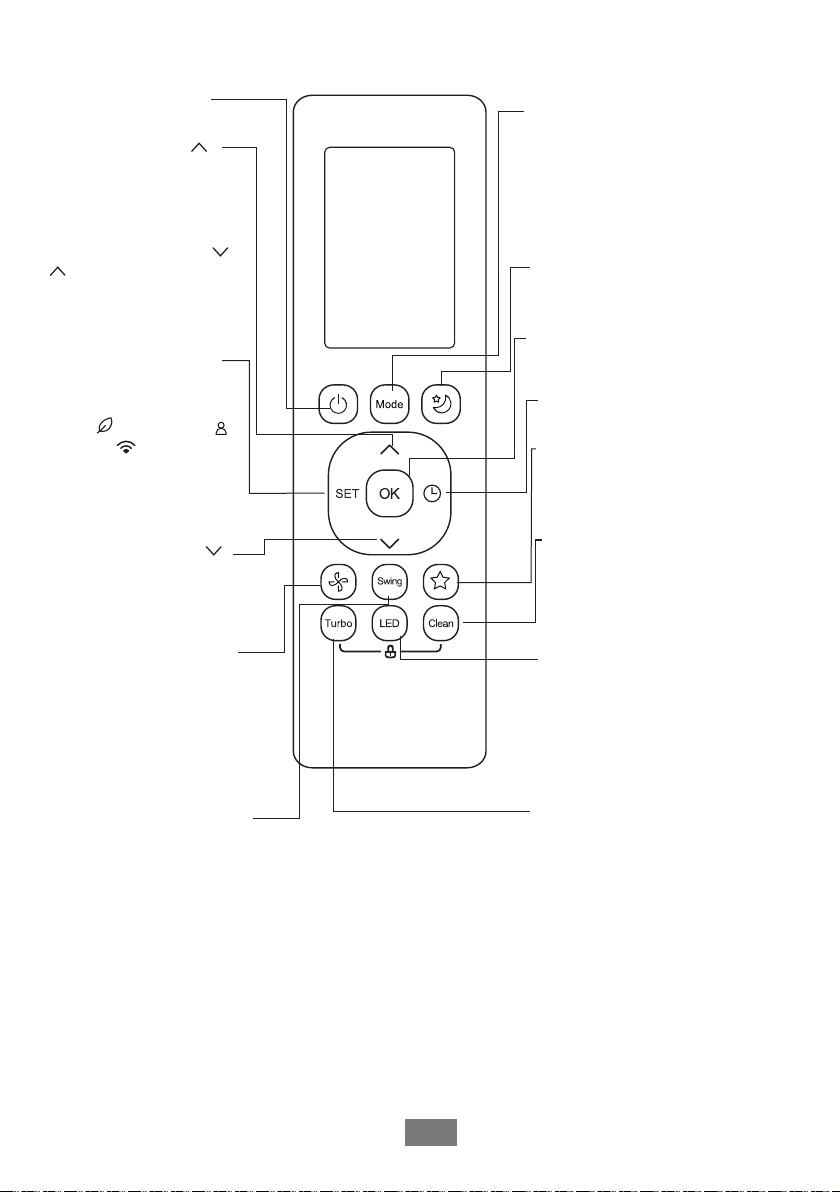
Turns the unit on or off.
ON/OFF
TEMP
Increases temperate in
1°C (1°F) increments.
Max. temperature is
30°C (86°F).
NOTE: Press together &
buttons at the same time
for 3 seconds will alternate
the temperature display
between the °C & °F.
SET
Scrolls through operation
functions as follows:
Fresh( )
AP mode( ) Fresh ....
The selected symbol will
flash on the display area,
press the OK button to
confirm.
Follow Me( )
TEMP
Decreases temperature
in 1°C (1°F) increments
Min. temperature is
16°C (60°F).
FAN SPEED
Selects fan speeds in the
following order:
AUTO LOW MED HIGH
NOTE: Holding this button
down for 2 seconds will activate
Silence feature.
SWING
Starts and stops the horizontal
louver movement. Hold down
for 2 seconds to initiate vertical
louver auto swing feature(some units).
MODE
Scrolls through operation modes
as follows:
DRY
AUTO COOL
HEAT FAN
NOTE: HEAT mode is not
supported by the cooling only
appliance.
SLEEP
Saves energy during sleeping
hours.
OK
Used to confirm the selected
functions
TIMER
Sets timer to turn unit on or off.
SHORTCUT
Used to restore the current
settings or resume previous
settings.
CLEAN
Used to start and stop the Self
Clean or Active Clean function.
(Model dependent, please refer
to the USER’S OPERATION &
INSTALLATION MANUAL).
LED
Turns indoor unit’s LED display
and air conditioner buzzer on and
off (model dependent), which
creates a comfortable and quiet
environment.
Turbo
Enables unit to reach preset
temperature in shortest
possible time
RG10B(D2)/BGEF(Fresh feature is not available)
Model:
RG10B10(D2)/BGEF & RG10B10(D2)/BGCEF(20-28 C/68-82 F)
O
O
RG10B2(D2)/BGCEF & RG10B10(D2)/BGCEF (Cooling only model,
AUTO mode and HEAT mode are not available )
RG10Y1(D2)/BGEF
06
Page 8
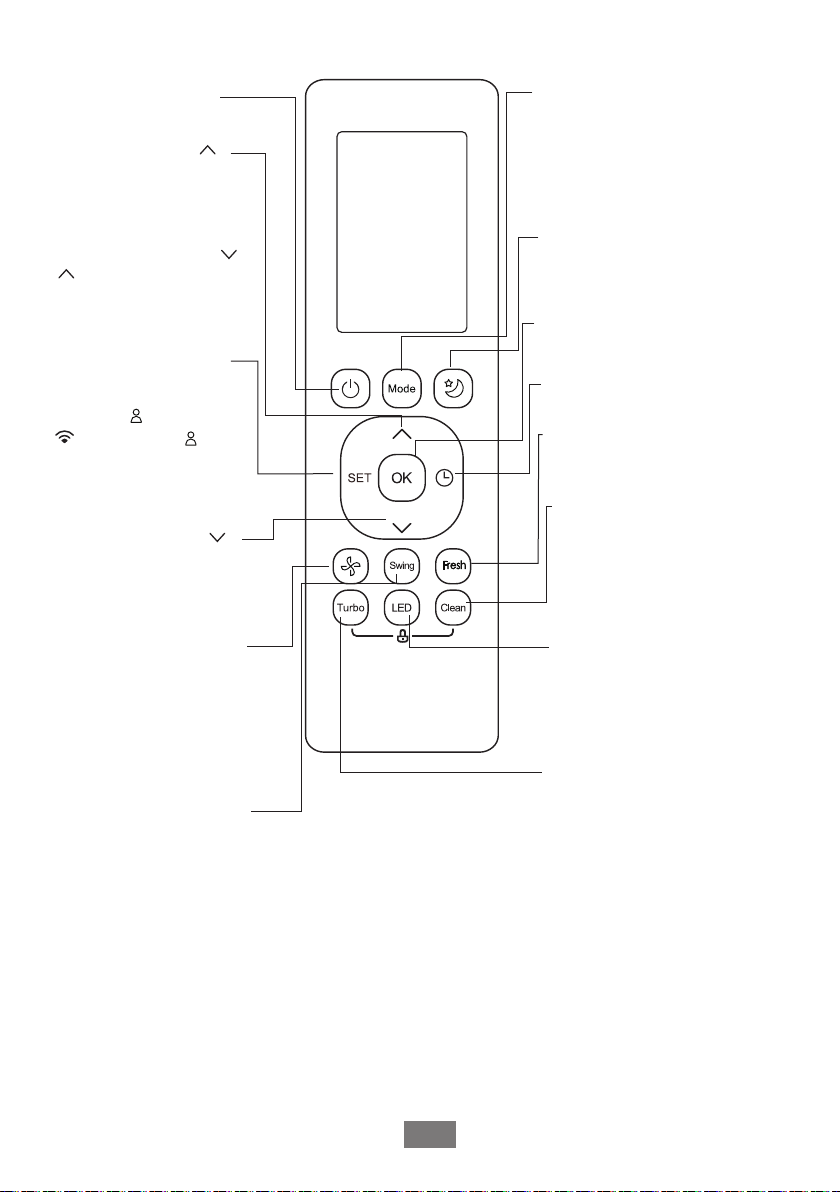
Turns the unit on or off.
ON/OFF
TEMP
Increases temperate in
1°C (1°F) increments.
Max. temperature is
30°C (86°F).
NOTE: Press together &
buttons at the same time
for 3 seconds will alternate
the temperature display
between the °C & °F.
SET
Scrolls through operation
functions as follows:
Follow Me( ) AP mode
( )
The selected symbol will
flash on the display area,
press OK button to confirm.
Follow Me( )...
TEMP
Decreases temperature
in 1°C (1°F) increments
Min. temperature is
16°C (60°F).
FAN SPEED
Selects fan speeds in the
following order:
AUTO LOW MED HIGH
NOTE: Holding this button
down for 2 seconds will
activate Silence feature.
SWING
Starts and stops the horizontal
louver movement. Hold down
for 2 seconds to initiate vertical
louver auto swing feature(some units).
MODE
Scrolls through operation modes
as follows:
HEAT FAN
DRY
AUTO COOL
NOTE: HEAT mode is not
supported by the cooling only
appliance.
SLEEP
Saves energy during sleeping
hours.
OK
Used to confirm the selected
functions
TIMER
Sets timer to turn unit on or off
FRESH
Used to start and stop the air
fresh feature.
CLEAN
Used to start and stop the Self
Clean or Active Clean function.
(Model dependent, please refer
to the USER’S OPERATION &
INSTALLATION MANUAL).
LED
Turns indoor unit’s LED display
and air conditioner buzzer on and
off (model dependent), which
creates a comfortable and quiet
environment.
TURBO
Enables unit to reach preset
temperature in shortest
possible time
Model: RG10B1(D2)/BGEF
07
Page 9
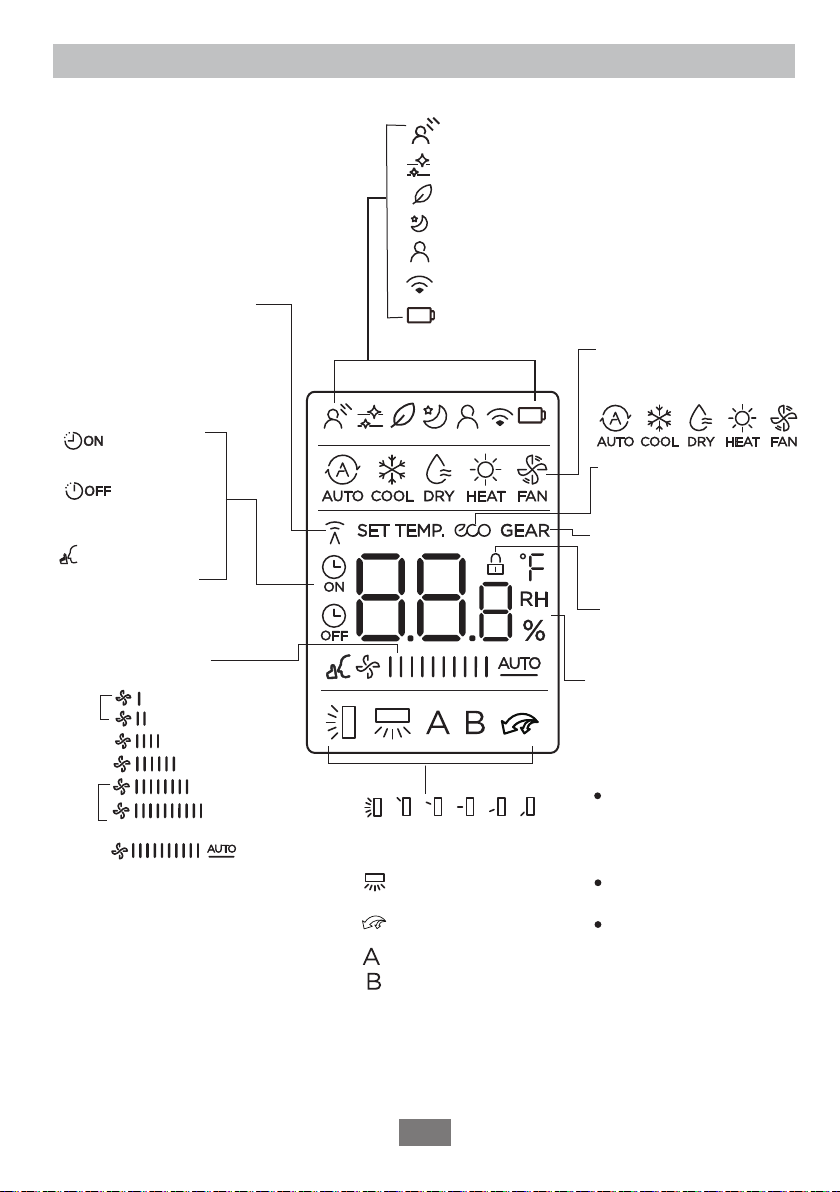
Remote Screen Indicators
Information are displayed when the remote controller is power up.
Breeze Away display(some units)
Active clean feature display
Fresh feature display
Sleep mode display
Follow me feature display
Wireless control feature display(some units)
Transmission Indicator
Lights up when remote
sends signal to indoor
unit
Low battery detection display(If flashes)
MODE display
Displays the current
including:
mode,
TIMER ON display
TIMER OFF display
Silence feature
display
FAN SPEED display
Displays selected fan speed:
1%
Silence
LOW
MED
HIGH
AUTO
This fan speed can not be
adjusted in AUTO or DRY
mode.
[ ]
Note:
*
Not all the models can display
the fan speed values between
AU-100%.
Note:
The indicators displayed in the above figure are for illustrative purposes only. During normal
operation, only active functions and relevant information will be displayed.
*
2%-20%
21%-40%
41%-60%
61%-80%
81%-100%
*
*
*
*
*
Horizontal louver
swing display
Vertical louver auto
swing display
TURBO mode display
Not available for
this unit
ECO display
Displays when ECO
feature is activated
GEAR display
Displays when GEAR
feature is activated
LOCK display
Displays when LOCK feature
is activated.
Temperature/Timer/Fan speed
display
Displays the set temperature
by default, or fan speed or
timer setting when using
TIMER ON/OFF functions.
Temperature range:
o
16-30 C / /60-86 F
(20-28 C/68-82 F)
(Model dependent)
Timer setting range:
0-24 hours
Fan speed setting range:
AU -100%
This display is blank when
operating in FAN mode.
o
o
o
08
Page 10
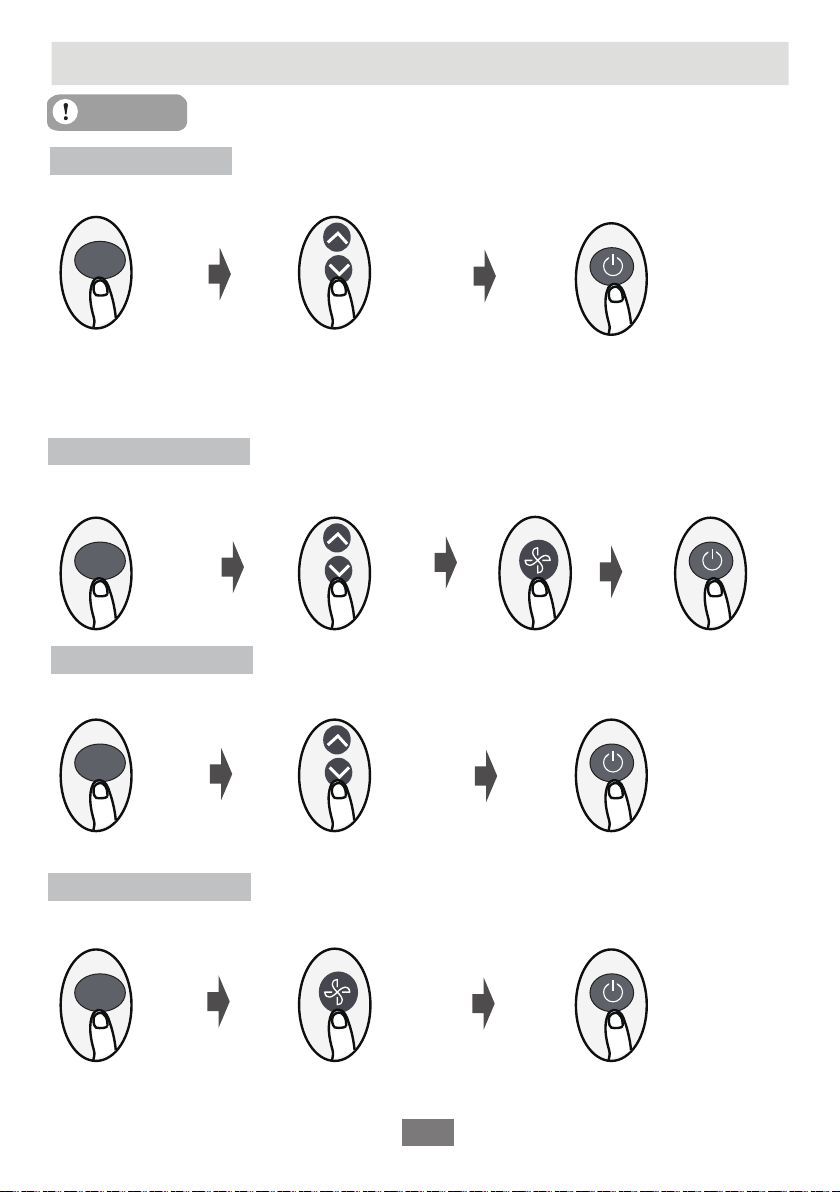
How to Use Basic Functions
ATTENTION
Before operation, please ensure the unit is plugged in and power is available.
AUTO Mode
Select AUTO mode Set your desired temperature
MODE
NOTE:
1. In AUTO mode,
the set temperature.
2. In AUTO mode, fan speed cannot be set.
the unit will automatically select the COOL, FAN, or HEAT function based on
COOL or HEAT Mode
Select COOL/HEAT mode
Set the temperature
MODE
DRY Mode
Turn on the air conditioner
Set the fan speed
Turn on the air
conditioner
Select DRY mode Set your desired temperature Turn on the air conditioner
MODE
NOTE: In DRY mode, fan speed is automatically controlled and cannot be manually set.
FAN Mode
Select FAN mode Turn on the air conditioner
Set the fan speed
MODE
NOTE: In FAN mode, you can’t set the temperature. As a result the temperature won't be
displayed on the remote's screen
09
Page 11
Setting the TIMER
ON/OFF
M
ODE
F
AN
SHORT
CUT
TIMER ON
TIMER OF
TEMP
S
L
E
EP
ON/OFF
M
ODE
F
AN
SHORT
CU
T
TI
M
E
R
O
N
TIMER OF
TEMP
S
L
E
EP
ON/O
FF
MODE
F
AN
SHOR
T
CUT
TI
M
E
R
O
N
TIMER OF
TEM
P
S
L
E
EP
ON/OFF
M
ODE
F
AN
SHORT
CUT
TIMER ON
TIMER OF
TEMP
S
L
E
EP
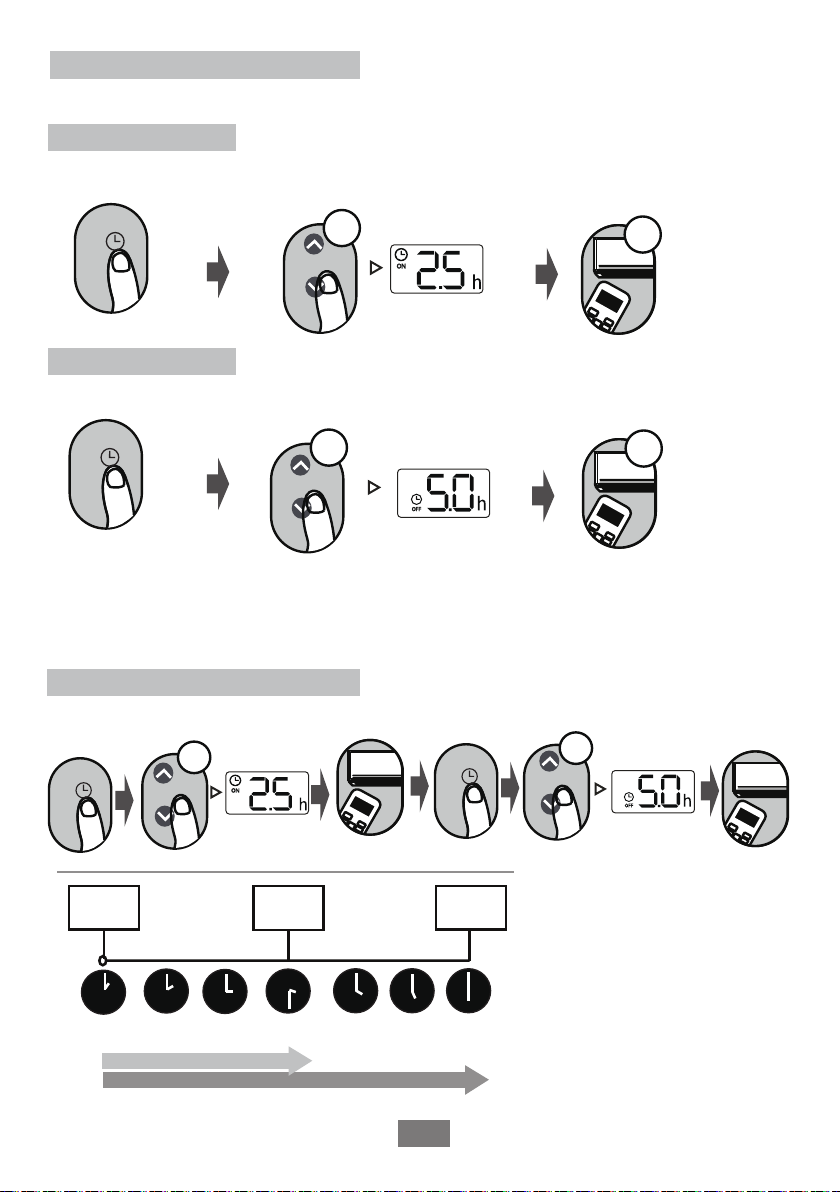
TIMER ON/OFF - Set the amount of time after which the unit will automatically turn on/off.
TIMER ON setting
Press TIMER button to initiate
the ON time sequence.
TIMER
TIMER OFF setting
Press TIMER button to initiate
the OFF time sequence.
TIMER
NOTE:
1. When setting the TIMER ON or TIMER OFF, the time will increase in 30 minute increments up to 10
hours. After 10 hours and up to 24, it will increase in 1 hour increments. (For example, press 5 times to
get 2.5h, and press 10 times to get 5h,) The timer will revert to 0.0 after 24.
2. Cancel either function by setting its timer to 0.0h.
Press Temp. up or down button
to set the desired time to turn on
the unit.
x5
Press Temp. up or down button
to set the desired time to turn off
the unit.
x10
Point remote to unit and wait 1
second. The timer will turn on.
1sec
Point remote to unit and wait 1
second. The timer will turn off.
1sec
TIMER ON & OFF setting(example)
Keep in mind that the time periods you set for both functions refer to hours after the current time.
xn
xn
TIMER
Timer starts
xn
Unit turns
ON
TIMER
Unit turns
OFF
Example: If current timer is 1:00PM,
to set the timer as above steps, the
unit will turn on 2.5h later (3:30PM)
Current
time 1PM
2:00PM 3:00PM
2.5 hours later
5 hours later
3:30PM
4PM 5PM
6PM
and turn off at 6:00PM.
10
Page 12
How to Use Advanced Functions
Swing function
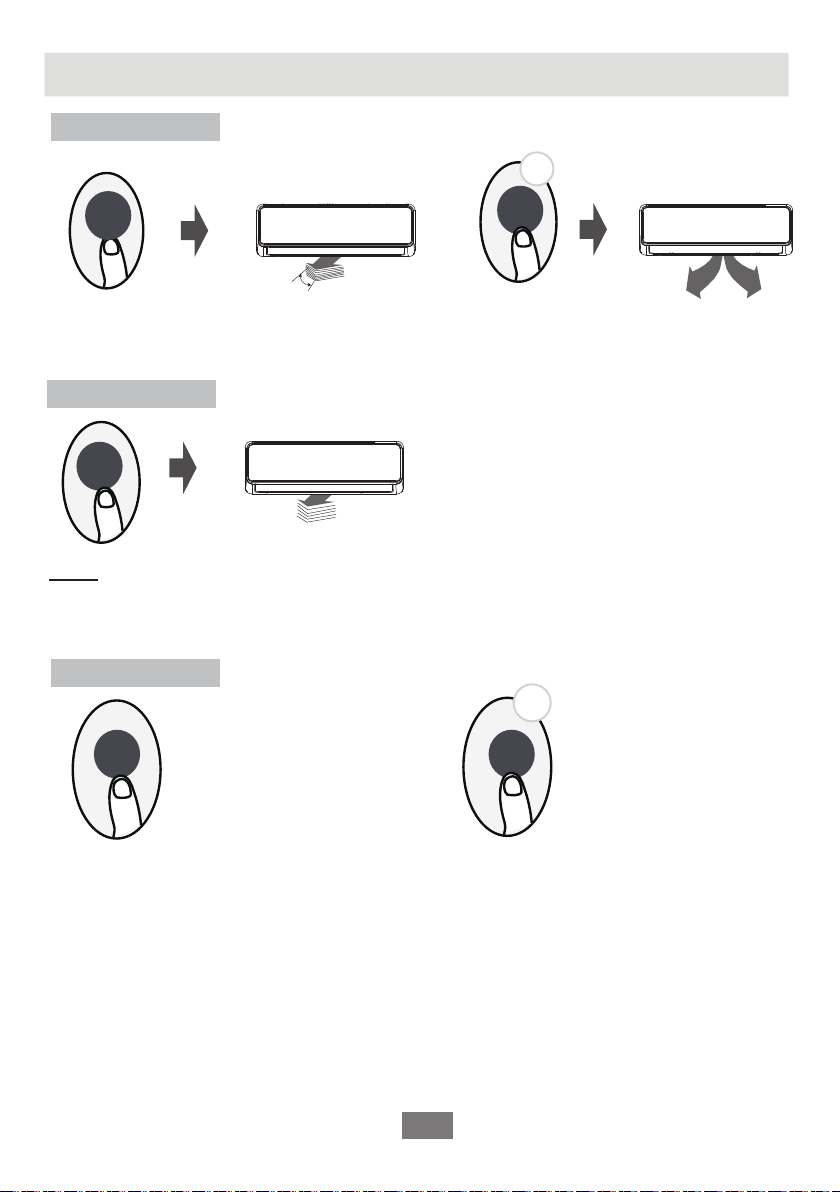
Press Swing button
2s
Swing
The horizontal louver will swing up and down
automatically when pressing Swing button.
Press the swing button again to make it stop.
Swing
Hold the swing button for more than 2 seconds
to activate the vertical louver swing function.
(Model dependent)
Airflow direction
You can set five different airflow directions by
continuing to press the swing button. The
Swing
NOTE: When the unit is off, press and hold MODE and SWING buttons together for one second.
the louver will open to an angle convenient for cleaning. Press and hold MODE and SWING
buttons together for one second to reset the louver (Model dependent).
louver can be move at a certain range each
time you press the button.
until the direction you prefer is eached.
Press the button
LED DISPLAY
5s
LED LED
Press LED button Hold this button more than
5 seconds (some units)
Press this button to turn the display on
the indoor unit on and off.
Hold the button for 5 seconds to display the
actual room temperature. Hold the button for 5
seconds again to revert to displaying the set
temperature.
11
Page 13
ECO/GEAR function
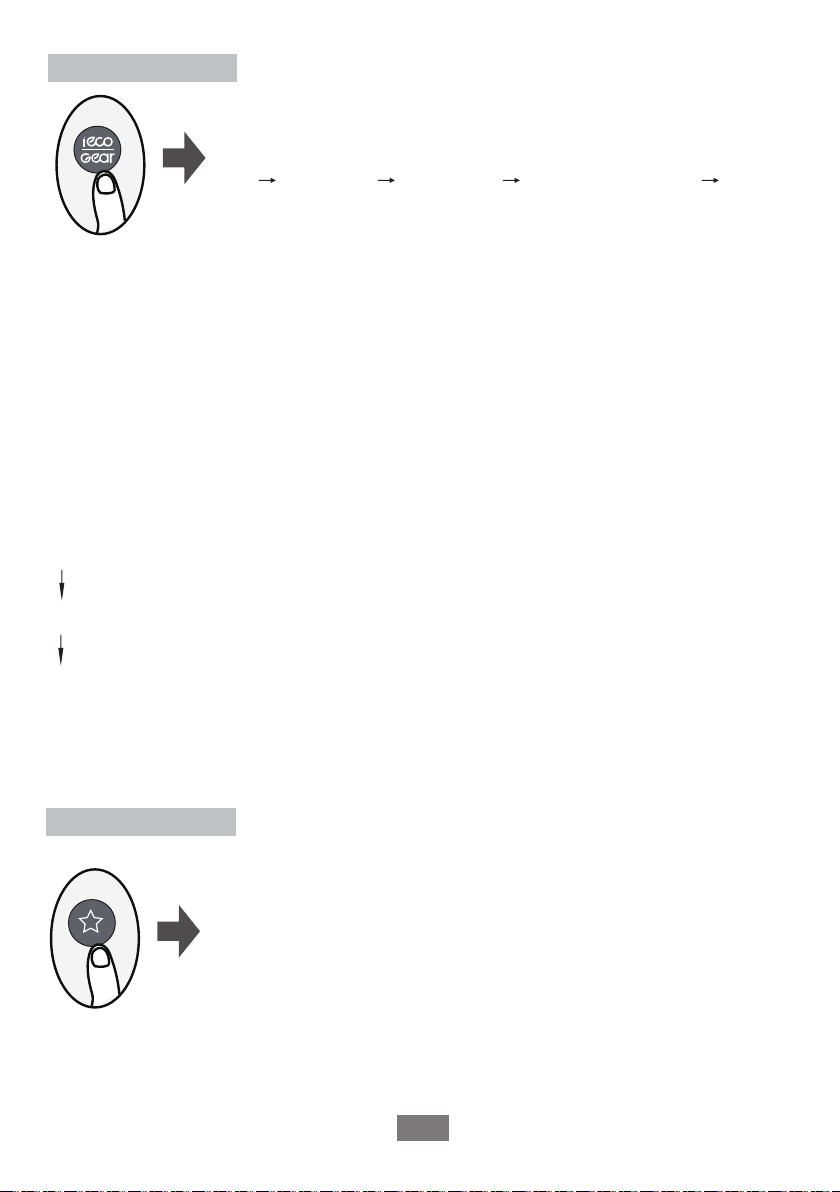
Press this button to enter the energy efficient mode in a sequence of
following:
ECO GEAR(75%) GEAR(50%) Previous setting mode ECO......
Note:This function is only available under COOL mode.
ECO operation:
While in cooling mode, press this button to automatically set the temperature to 24°C / 75°F, and
the fan speed to Auto to save energy (only when the set temperature is less than 24°C / 75°F). If
the set temperature is above 24°C / 75°F, press the ECO button to change the fan speed to Auto.
The set temperature will remain the same.
NOTE:
Pressing the ECO/GEAR button, modifying the mode or adjusting the set temperature to less
than 24°C / 75°F will stop ECO operation. While in ECO mode, the set temperature should be
24°C / 75°F or higher. If your desired temperature is below 24°C / 75°F, you may need to turn off
ECO mode by pressing the button again.
GEAR operation:
Press the ECO/GEAR button to enter the GEAR operation as following:
75%(up to 75% electrial energy consumption)
50%(up to 50% electrial energy consumption)
Previous setting mode.
In GEAR mode, the display on the remote controller will alternate between electical
energy consumption and set temperature.
SHORTCUT function
Press SHORTCUT button(some units)
Push this button when remote controller is on to revert to the system's
previous settings including operating mode, setting temperature, fan speed
level and sleep feature (if activated).
Hold the button for more than 2 seconds to automatically restore the
current operation settings including operating mode, setting temperature,
fan speed level and sleep feature (if activated ).
12
Page 14
Silence function
2s
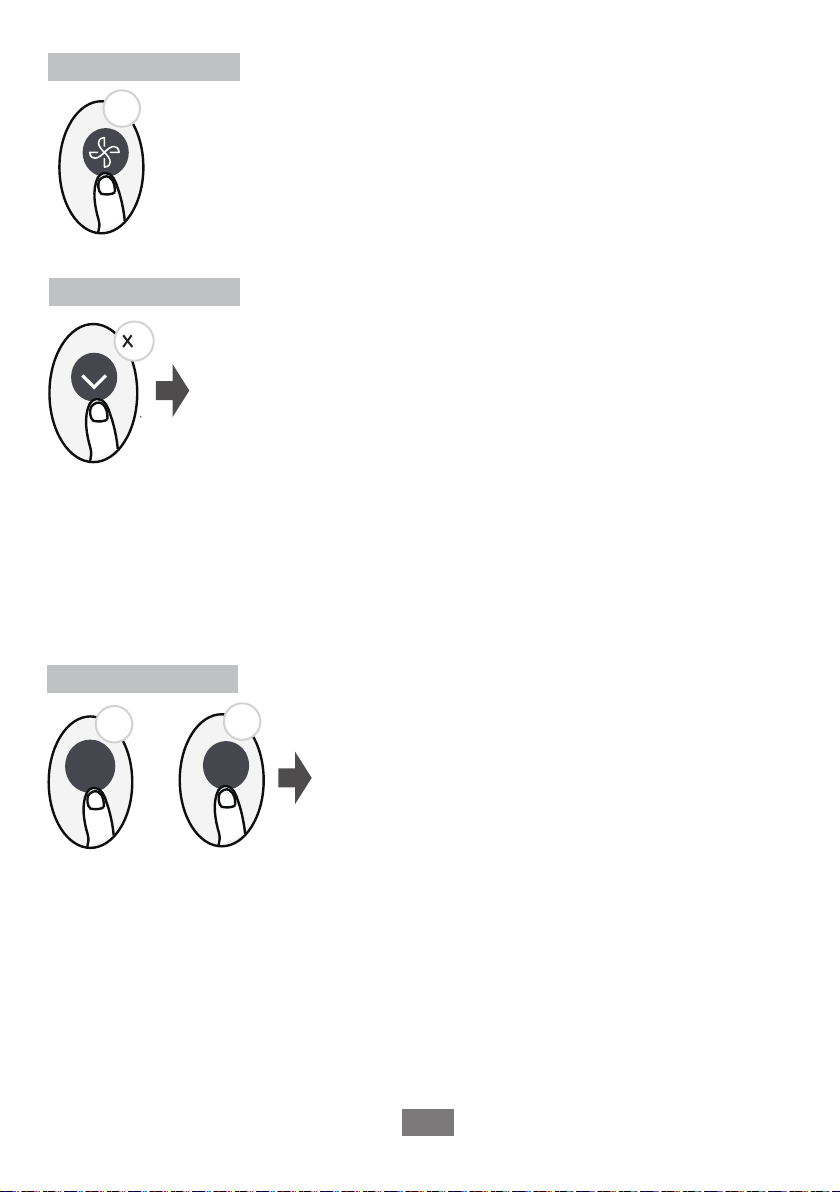
FP function
2
Note: This function is for heat pump air conditioner only.
Press this button 2 times during one second under HEAT Mode and setting temperature of
16
°
C / 60°F or 20°C / 6°F(for models of RG10A10(D2S)/BGEF, RG10B10(D2)/BGEF and
RG10B10(D2)/BGCEF) to activate FP function.
Press On/Off, Sleep, Mode, Fan and Temp. button while operating will cancel this function.
LOCK function
Hold Fan button for more than 2 seconds to activate/disable Silence
function (some units).
Because the compressor operates at a lower frequency while in silent mode, you
may notice reduced heating or cooling capacity. Press ON/OFF, Mode, Sleep,
Turbo or Clean button while operating will cancel silence function.
The unit will operate at high fan speed (while
compressor on) with temperature automatically
°
set to 8
C / 46°F.
Clean
5s
+
Turbo
5s
Press and hold the Clean and Turbo buttons at the same
time for more than 5 seconds to activate the lock function.
After locking the remote, the buttons will not respond to
input until the lock function is disabled by pressing and
holding Clean and Turbo again for 2 seconds.
13
Page 15
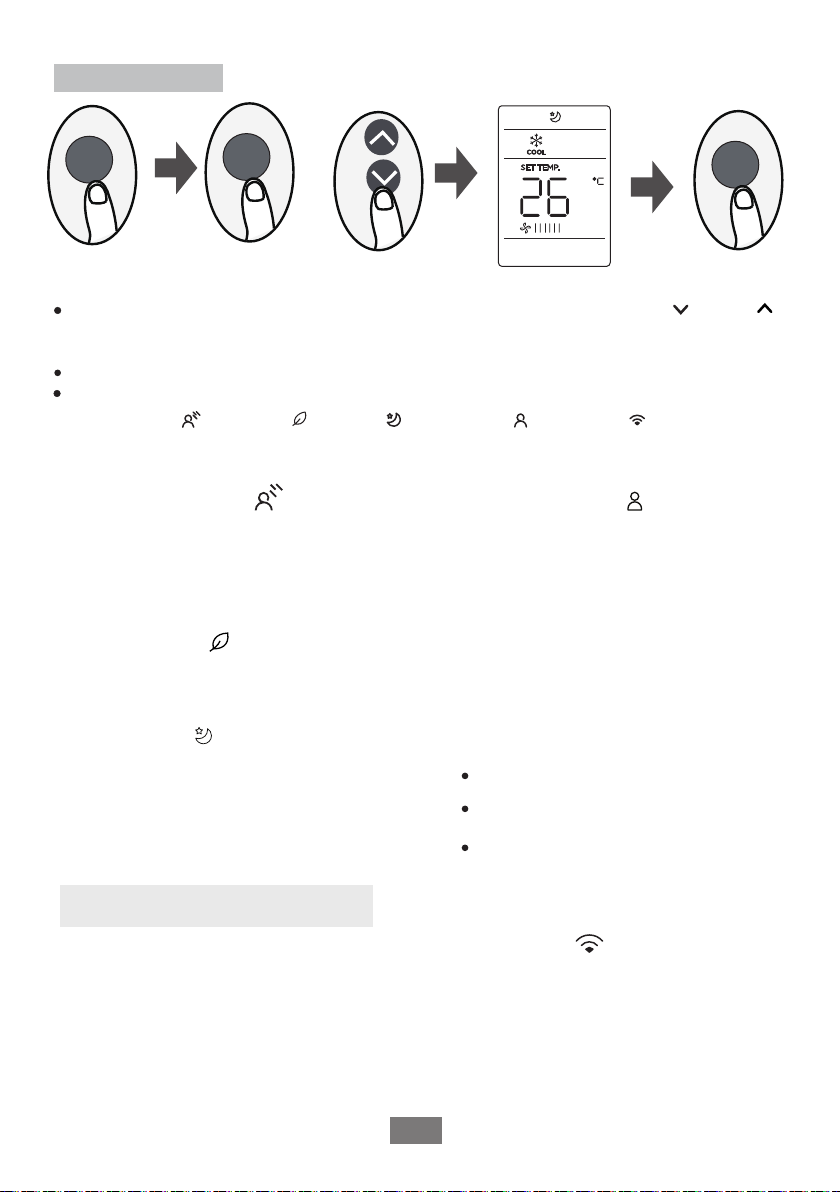
SET function
SET
Press the SET button to enter the function setting, then press SET button or TEMP or TEMP
button to select the desired function. The selected symbol will flash on the display area. Press the
OK button to confirm.
To cancel the selected function, just perform the same procedures as above.
Press the SET button to scroll through operation functions as follows:
Breeze Away ( ) Fresh ( ) Sleep( ) Follow Me( ) AP mode( )
[ ]: If your remote controller has Breeze Away button, Fresh button or Sleep button, you cannot
*
use the SET button to select the Breeze Away, Fresh or Sleep feature.
Breeze Away function ( ) (some units) :
This feature activates indirect airflow to create a
more natural, breeze-like effect.
NOTE: This feature is available under cool,
Fan and Dry mode only.
FRESH function ( ) (some units) :
When the FRESH function is initiated,
ion generator is energized and will help to
purify the air in the room.
Sleep function ( ) :
The SLEEP function is used to decrease
energy use while you sleep (and don t need
the same temperature settings to stay
comfortable). This function can only be
activated via remote control.
For the detail, see sleep operation in
,,
USER S MANUAL.
Note:
* *
,
The SLEEP function is not available
in FAN or DRY mode.
SET
,,
,,
or
OK
the
,
,,
Follow me function ( ):
The FOLLOW ME function enables the remote
control to measure the temperature at its
current location and send this information to
the air conditioner in 3 minute intervals. When
using AUTO, COOL or HEAT modes,
measuring ambient temperature from the
remote control(instead of from the indoor
unit itself) will enable the air conditioner to
optimize the temperature around you and
ensure maximum comfort.
NOTE: Press and hold Turbo button for
seven seconds to start/stop memory
feature of Follow Me function.
If the memory feature is activated, “ON”
displays for 3 seconds on the screen.
If the memory feature is stopped, “OFF”
displays for 3 seconds on the screen.
While the memory feature is activated,
press the ON/OFF button. Switching modes
or power failure will not cancel the Follow
me function.
AP function ( )(some units) :
Choose AP mode for wireless network
configuration. For some units you may
need to press the LED button seven times
in 10 seconds to enter AP mode.
14
Page 16

The design and specifications are subject to change without prior
notice for product improvement. Consult with the sales agency or
manufacturer for details.
CR2756-RG10(D2S)
16117000A37345
2021.05.08
 Loading...