

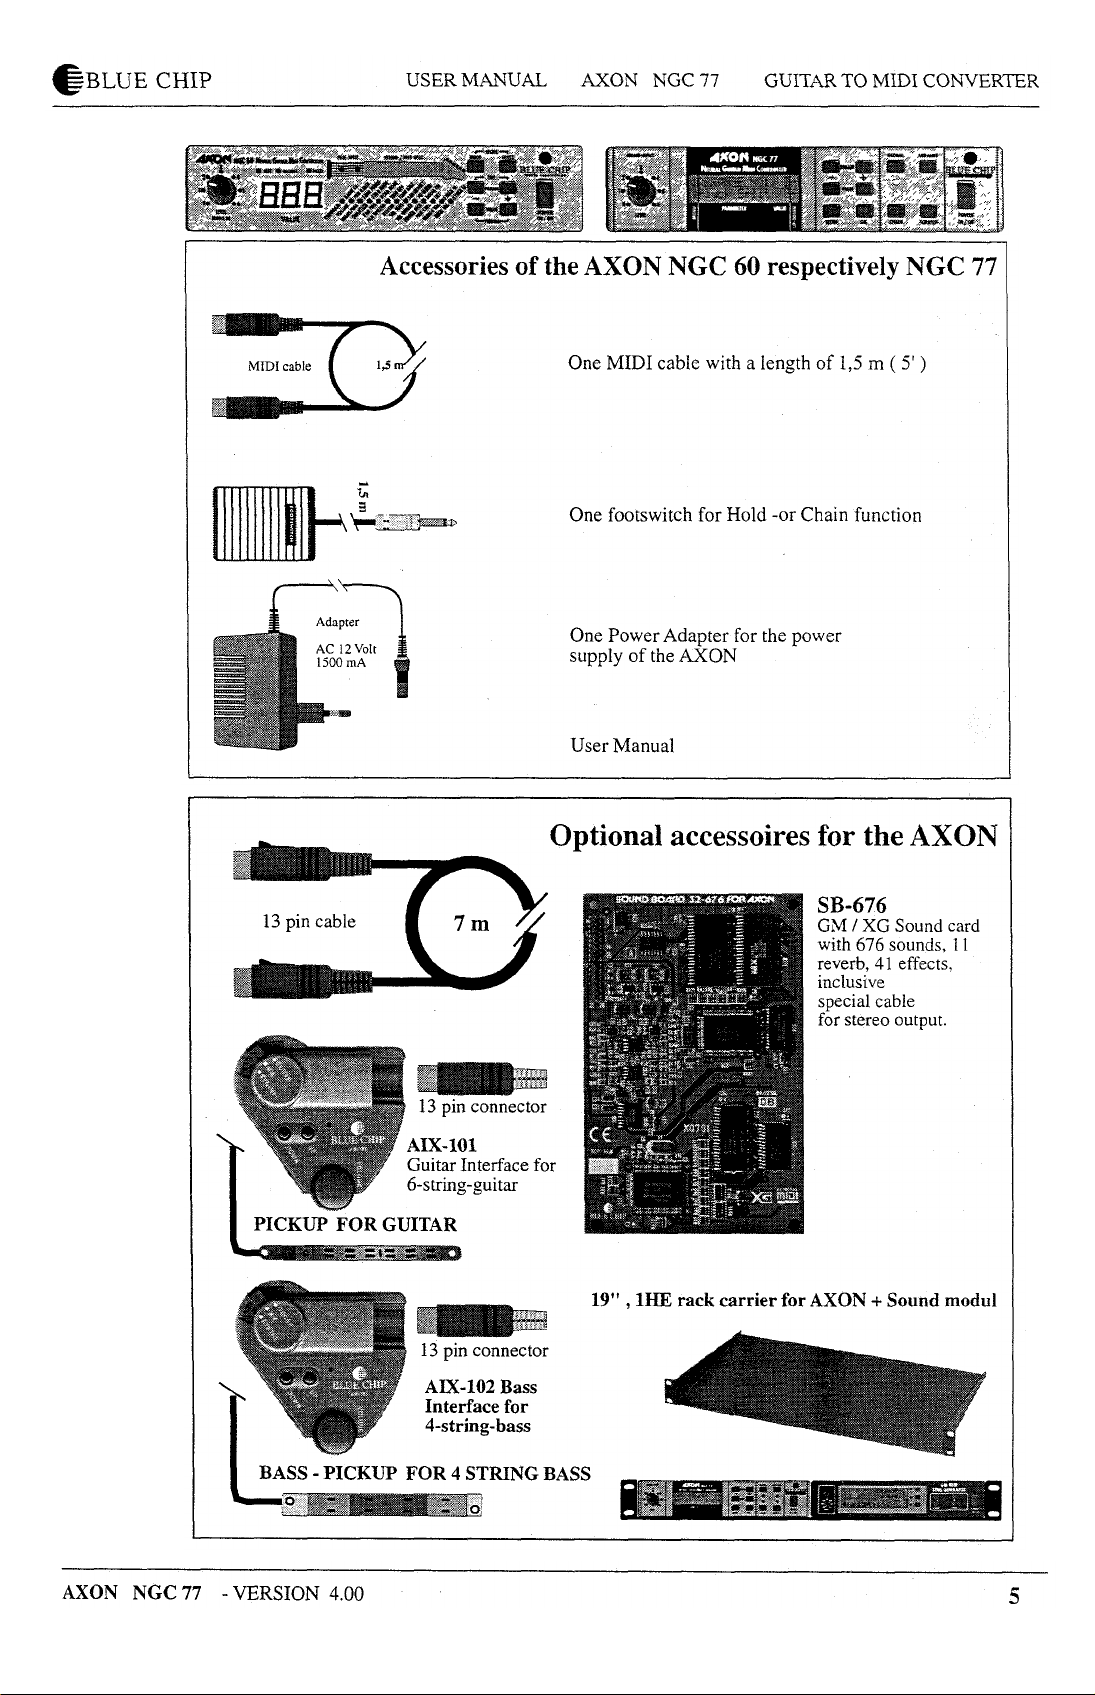
TABLE OF CONTENTS
Features of the AXON ............................................................................................................... 8
How to use the Hold Pedal........................................................................................................ 9
How to use the Mono Input....................................................................................................... 9
How to use the optional sound module ................................................................................... 10
First settings............................................................................................................................. 10
How to install the guitar interface and the pickups ................................................................. 10
How to connect your MIDI equipment.................................................................................... 10
How to mount an AXON in a 19 " rack.................................................................................. 11
AUDIO OUTPUT of the optional sound module................................................................... 11
Reloading the default settings.................................................................................................. 11
Display usage........................................................................................................................... 11
Global Parameter..................................................................................................................... 12
BASIC CHAN................................................................................................................ 12
PBEND RANGE............................................................................................................ 12
SEND PBDRG............................................................................................................... 13
NOTE OFF L ................................................................................................................. 13
LOCAL MODE.............................................................................................................. 13
VU METER ................................................................................................................... 14
TUNE BASE.................................................................................................................. 14
TUNING AID ................................................................................................................ 14
GUITAR NO .................................................................................................................. 15
Sensitivity....................................................................................................................... 15
GUITAR NUMBER/ NAME ......................................................................................... 15
COPY SCRATCH.......................................................................................................... 15
COPY ARRANGE......................................................................................................... 16
COPY SEGMENT ......................................................................................................... 16
COPY CHAIN ............................................................................................................... 16
SEND SCRATCH .......................................................................................................... 17
SEND ARRANGE ......................................................................................................... 17
SEND ALL..................................................................................................................... 17
REC. SCRATCH............................................................................................................ 17
REC. ARRANGE........................................................................................................... 17
RECALL...................................................................................................................... 17
ADC MONITOR............................................................................................................ 17
How to store Scratch versus Arrange data............................................................................... 18
Scratch Mode........................................................................................................................... 18
STRG MODE................................................................................................................. 19
HOLD MODE................................................................................................................ 19
EDTSEGM.................................................................................................................... 20
SCRATCH NAME......................................................................................................... 20
Arrange Mode.......................................................................................................................... 20
STRG SPLIT.................................................................................................................. 21
FRET SPLIT .................................................................................................................. 22
PICK SPLIT 1 and 2 ...................................................................................................... 22
EDT SEGM....................................................................................................................
ARRANGE NAME....................................................................................................... 23
Segmentparameter................................................................................................................... 24
PROGRAM.................................................................................................................... 24
VOLUME....................................................................................................................... 24
TRANSPOSE................................................................................................................. 24
QUANTIZE.................................................................................................................... 24
PAN POS........................................................................................................................ 25
PAN SPREAD................................................................................................................ 25
REVERB ........................................................................................................................ 26
FINGR PICK.................................................................................................................. 26
VLCTY SENS................................................................................................................ 26
VLCTY OFFS................................................................................................................ 26
TRIGGER LEV.............................................................................................................. 26
PICK CTRL ................................................................................................................... 28
PI POSITION ................................................................................................................ 28
PI VALUE...................................................................................................................... 28
P2 POSITION ................................................................................................................ 28
P2 VALUE...................................................................................................................... 28
Chain Mode ............................................................................................................................. 29
Step................................................................................................................................. 29
Mode .............................................................................................................................. 29
TYPE and VALUE ......................................................................................................... 30
Appendices .............................................................................................................................. 31
MIDI channel/ string assignment................................................................................... 31
How to change a preset via MIDI IN ............................................................................. 31
Troubleshooting ............................................................................................................. 32
Specifications ................................................................................................................. 36
SYSTEM EXCLUSIVE IMPLEMENTATION............................................................. 37
MIDI IMPLEMENTATION........................................................................................... 38
GENERAL MIDI (GM) tables....................................................................................... 39
GENERAL MIDI Sound Set Groupings........................................................................ 39
GENERAL MIDI Sound Set.......................................................................................... 39
GENERAL MIDI Percussion Set................................................................................... 40
GENERAL MIDI controller table.................................................................................. 41
23
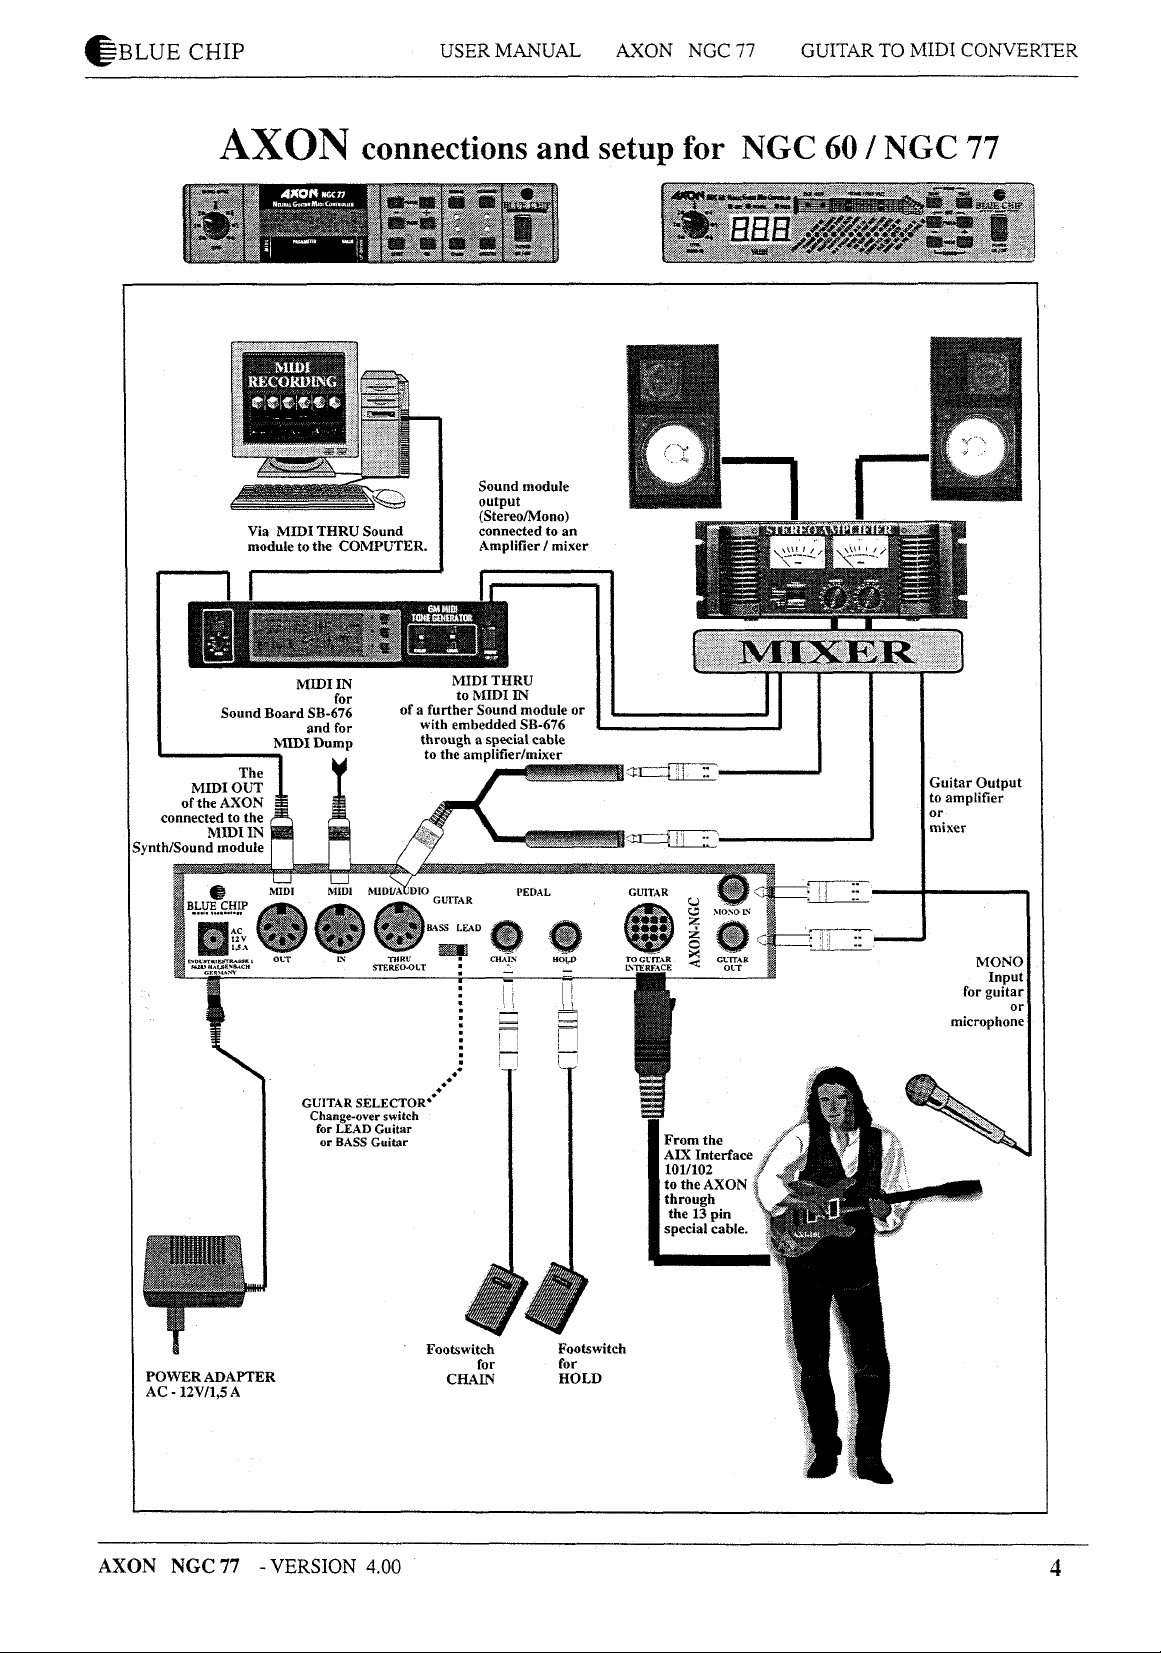
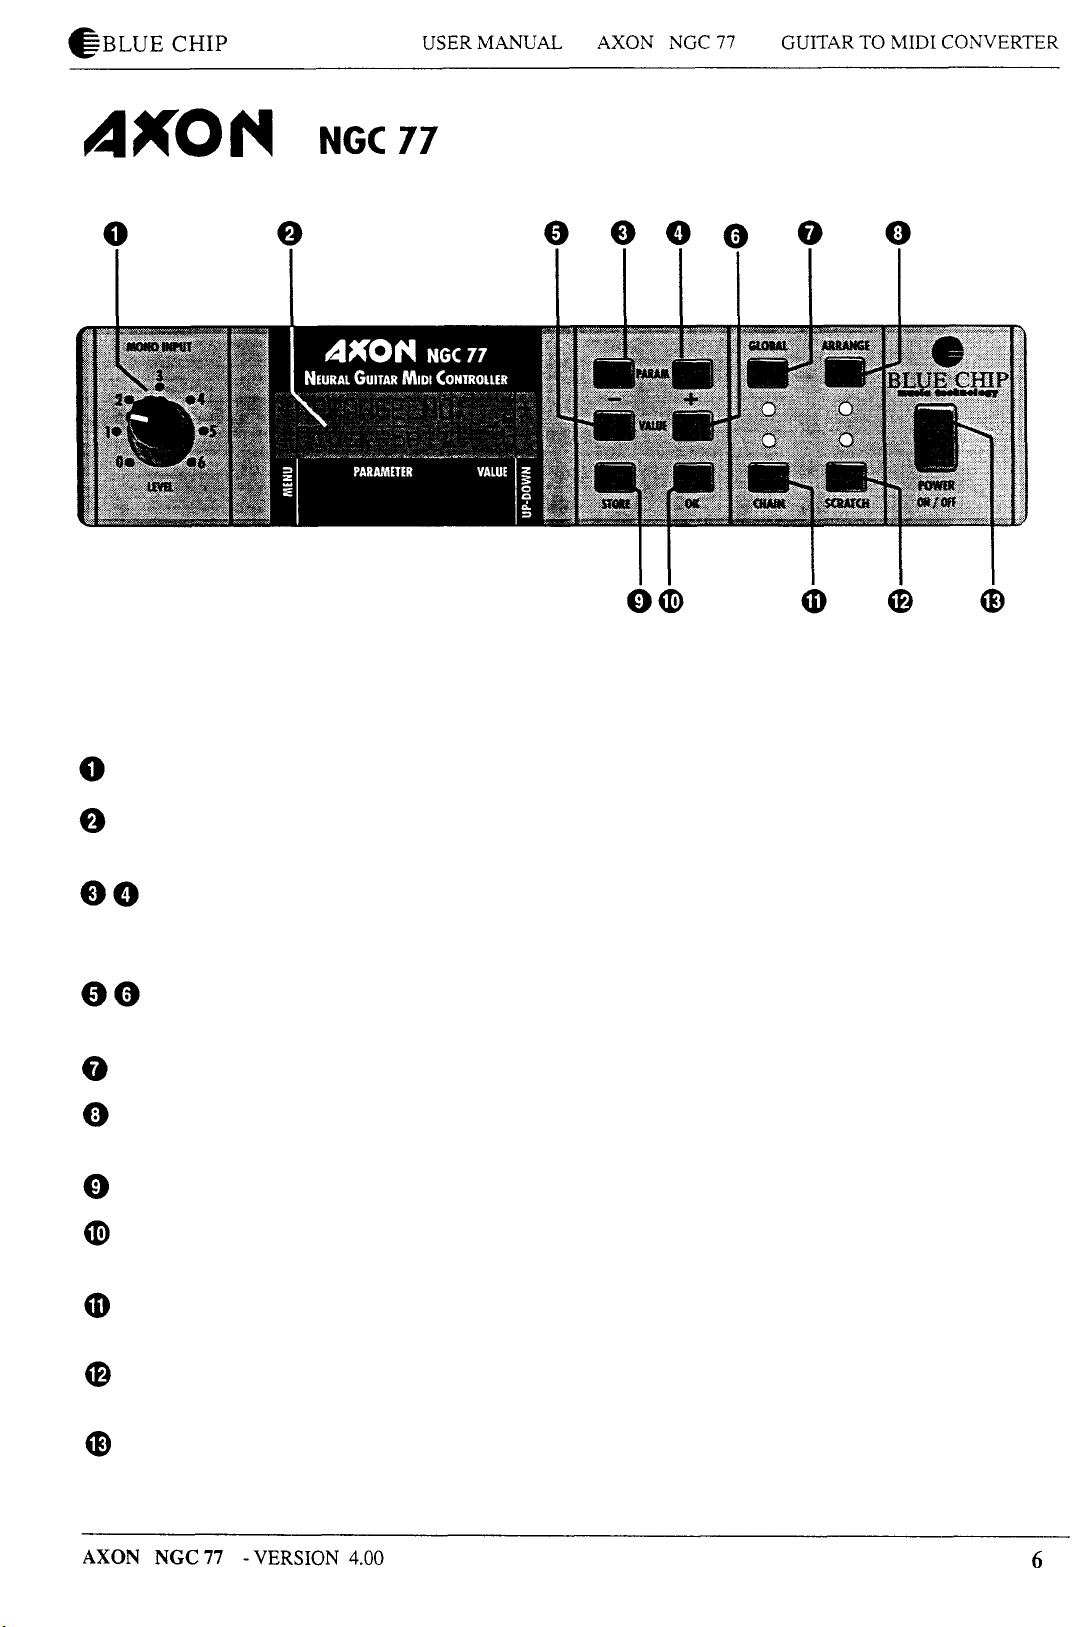
FRONT PANEL
Level of the MONO input
The LCD-Display is rich in contrast and shows the current presets as well as the different
parameters.
Parameter selection; the + button moves the cursor to the next, the - button moves the cursor
to the previous parameter.
The Value + , - buttons are used either to select Sratch, Arrange or Chain presets, or to edit
the parameter values.
Access to GLOBAL parameters.
Switches the AXON to the ARRANGE mode with access to 64 different ARRANGE presets
as well as the possibility to edit them.
The STORE button is used for saving and copying.
The OK button serves to confirm the text at the display, to leave and call up submenus as well
as to confirm the saving and copying.
Change to the CHAIN mode in order to call up a pre-programmed preset series with the chain
footswitch. The chain parameters are also edited in this mode.
Change to the SCRATCH mode. 128 different SCRATCH presets are available. Moreover
access to arrangement possibilities.
Power ON/ OFF switch.
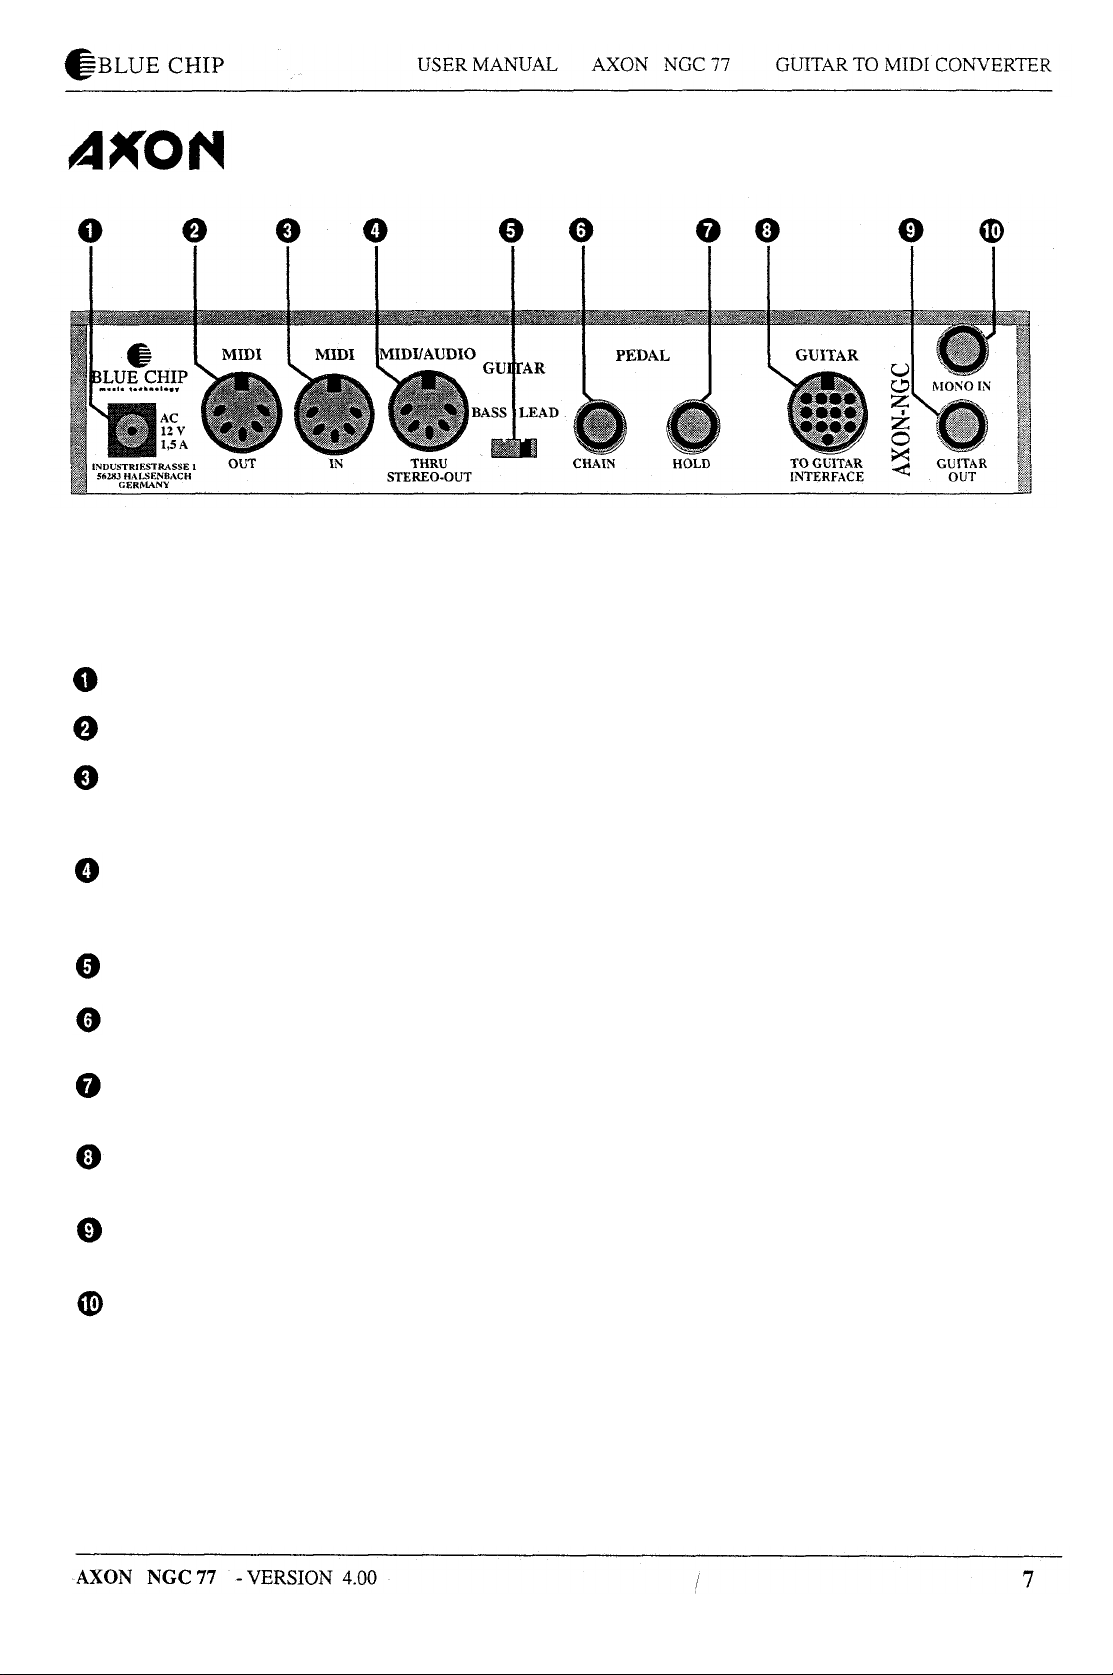
Back Panel
Input for power adapter 12 V, 1500 mA, AC.
MIDI OUT jack. The AXON sends out its MIDI data at this jack.
MIDI IN jack. The AXON receives program change commands as well as system exclusive
data via this jack. System exclusive data can also be sent to the optional sound board SB-676
which is sold by BLUE CHIP, too.
MIDI THRU jack. All data arrive via MIDI IN and are transmitted further through this jack.
At the unused pins of this jack, the stereo audio signals of the Sound board are available. For
that purpose, use the special cable which is included with the Sound board.
Before turning on the AXON, this switch has to be set to BASS or LEAD guitar.
CHAIN footswitchjack. It enables you to activate pre-programmed preset series at the NGC
77 respectively presets at the NGC 60 with an optional footswitch.
HOLD footswitchjack. The footswitch belongs to the delivery of the AXON and can be used
for different functions of the hold mode which can be programmed.
INTERFACE jack. Please connect the 13 pin cable of your guitar or bass interface to this
input.
GUITAR OUT jack. The pickup signals of your guitar can be unchanged transmitted from this
jack.
MONO IN jack. It enables you to connect monophonic signals with line or microphone level.
Features of the AXON
Your AXON is fitted with a novel method of pitch recognition
working so quickly and safely that you can use your AXON also
with a bass guitar. At present, no comparable device offers you
this feature.
The AXON is unique because it recognizes the pick position of
each string, and the AXON offers you new possibilities to
control your MIDI instrument.
Your AXON is able to reduce the MIDI output data stream as far
as possible to a minimum. According to the setting of the preset
parameter, further reliefs are the result. At previous devices,
Pitch Bend data load the MIDI interface strongly.
If you did not work with a comparable device before, you will
get to know some terms which are perhaps new for you.
Therefore, we would like to explain here the extraordinary
possibilities you can use with your AXON.
The most interesting and the most extraordinary features of your
AXON are undoubtedly the different split possibilities.
You can set a string split in order to divide the six strings of your
guitar into two parts. In each part, your MIDI instrument could
give out another sound. For that purpose, you will fix a split
point - in this case a string number - in order to set the border
between the two parts.
Assign a fret split in order to divide the neck of your guitar into
two parts.
Think of an accord accompaniment which you play in lowpitched registers with an optional sound. Then you change to a
solo which is played in higher notes with another sound. In this
case, the split point is a fret number.
You get an impressive play by the possibility of pick splitting.
Two split points can be defined to split the pick range between
the pickup and the neck into three pick regions. An individual
sound can be assigned to each of these regions.
AXON NGC 77 - VERSION 4.00
At each of the three split possibilities, you can additionally use
the pick control function. You can change the value of each
MIDI controller with the pick position. Keyboard players often
use a modulation wheel in order to produce vibrato or filter
effects. With the pick control function you have the same
possibilities, only by changing the pick position.

How to use the Hold Pedal
The Hold Pedal can be used to play an additional, third sound of
your MIDI instrument. In this case, the current split becomes
temporarily ineffective and you can use another sound. All notes
which sound while releasing the pedal will sound until the next
pressure on the Hold Pedal. Play a chord by depressed Hold
Pedal. Without muting the chord, you release the Hold Pedal
now and the Hold sound will be locked. You can play again with
the current preset to your chord accompaniment. After pressing
once more, you can play a new chord, the old one will be
replaced by a new one. Or you simply turn off the chord while
pressing once the Hold Pedal shortly without playing at that
time.
Additionally, the pick control function can be used as well for
the Hold sound.
After pressing the Hold Pedal, you can also send a preprogrammed MIDI controller to the MIDI instrument. This
could be the controller No. 64 (Sustain), the controller No. 65
(Portamento) or even the controller No. 93 (Chorus).
After pressing the Hold Pedal you are moreover able to freeze
the already played tones in order to play only on your guitar.
Then, all other MIDI sounds are suppressed. You can also realize
a bypass function in order to hear temporarily your guitar sound
alone.
How to use the Mono Input
All instruments with pickups can be directly connected by a jack
cable to the MONO input of your AXON. At the front of the
AXON is the potentiometer which helps you to set the
sensitivity of the MONO input. Please consider that not all
features of the AXON are available when using the MONO
input. The extremely fast pitch recognition is inactive. In this
case you work with a pitch recognition which is a little bit
slower. But it is comparable to devices which were already
offered by competitors. String Split, Pick Split and the Pick
Control function are no longer available.
The Fret Split depends now on the pitch because your AXON
does not know anything about your frets. Think of a violin or
think of instruments which you have to connect by a
microphone. There are no limits to your imagination but you can
not foresee the results in each case. We had already achieved
good results using guitar and bass.
AXON NGC 77 - VERSION 4.00

How to use the optional sound module
If your AXON is fitted by an embedded sound module, 128
GENERAL MIDI SOUNDS in excellent quality will
immediately be available for you. Additionally, the sound
module has an installed reverb as well as a chorus effect which
can be called up by the AXON. Combined with a sequencer or
similar devices you have access to 480 sounds. Furthermore, 11
different drumkits are available. The complete effect range
consists of 11 reverb types, 11 chorus types as well as 42
variation programmes. Please take details from the enclosed
description of the sound module.
If you use a sequencer program, please connect the MIDI OUT
of your AXON to the MIDI IN of your computer, and the MIDI
IN of your AXON to the MIDI OUT of the computer. In this
case the GLOBAL parameter "LOCAL" on the AXON has to be
LOCAL ON.
First settings
How to install the guitar interface and the pickups
For that purpose, please read the installation instruction of your
guitar interface.
How to connect your MIDI equipment
Please connect the MIDI OUT of your AXON to the MIDI IN of
your MIDI instrument. For that purpose, use a commercial 5 pin
DIN cable (MIDI cable).
If you use a sequencer program, please connect the MIDI OUT
of your AXON to the MIDI IN of your computer, and the MIDI
OUT of the computer to the MIDI IN of the sound module. Your
synthesizer should be polyphonical (minimum 7 voices) and has
to handle up to six or seven MIDI channels. Please adjust your
synthesizer so, that it receives channels 1 to 7. (The channels 1-6
are for each string of your guitar and the channel 7 is for the
HOLD PEDAL function). After you connected your synthesizer
with the AXON, please switch on the synthesizer first and wait
until it had initialized before starting the AXON. After turning
on the AXON, it sends the most important information to the
synthesizer in order to make the configuration as easy and quick
as possible. Not all synthesizers accept these information.
Therefore, you should definitely check the Pitch Bend range at
your synthesizer.

How to mount an AXON in a 19 " rack
You can mount your AXON in a 19" rack by using the optional
installation frame. In order to fix, use only the original screws. If
you prefer another form of mounting, remove first the rubber
foot from the bottom of the AXON. Please use only screws of
the type M3 to fix the 19" rack with the bottom of the AXON
and take care that the screws do not reach longer than 4 mm into
the AXON. Longer screws can damage the inside of the device.
AUDIO OUTPUT of the optional sound module
The AUDIO OUTPUT is realized by the unused pins of the
MIDI THRU socket. For that purpose, take the special cable
which is included with your AXON.
Reloading the default settings
Keep the SCRATCH key pressed while turning on the AXON.
For a short time you will see "ALL DATA INITIALIZED" in the
display. Beware that all previous presets that you made will be
lost in this case. If necessary, store your data with a Sysex
Dump.
Display usage
The possibilities offered by the AXON require a large number of
parameters, that can be programmed according to your wishes.
In order to get accustomed quickly to the usage of the AXON
here you will find some general information about the preset
structure.
Each
of
the
four
MODEs (GLOBAL, SCRATCH . ARRANGE
and CHAIN) consists of several parameters which can be called
up in the display by pressing the + or - parameter keys. A single
+ sign on the right edge of the display shows that you are in the
uppermost
line of the parameter
list.
A single - sign
characterizes the end of a parameter list. Please use the - key in
order to get to the previous parameter. A +/- sign shows that you
are somewhere within the list; the + and - keys help you to go
up or to go down in the menu.
Some parameters include submenus with further parameters.
You recognize a reference to a submenu by an arrow pointing to
the bottom. It is positioned on the left edge of the display. Press
the OK key to change to the submenu. In the submenu, you can
move again with the +- keys. There could be an arrow on the left
edge of the display pointing at the top. It signalizes that you can
press the OK key in order to leave the submenu, and return back
to the point where the submenu was called up.

Global Parameter
If you use your AXON for the first time you have to check the
settings of some global parameter in correspondence to your
MIDI instrument:
Please check the basic MIDI channel and tune your guitar with
the embedded tuning aid of your AXON. If you are in a hurry
and if you would like to play immediately with your AXON, read
the explanations in the sections BASIC CH and tuning of the
guitar. You must ensure that the connected MIDI instrument
receives Pitch Bend Range information, otherwise you set this
value at your MIDI instrument on 12. Then you leap over all
further parameters for the present and you can test the factory
presets.
In order to change one of the GLOBAL parameter, switch your
AXON into the GLOBAL mode. Please press first the GLOBAL
key. If the GLOBAL LED lights, your AXON is in the GLOBAL
mode. With the +- keys, you move the blinking cursor in the line
in which the desired parameter is shown. Please change the
shown value with the +- keys. If you are satisfied with the
setting, leave the GLOBAL mode and change again to the
SCRATCH, ARRANGE or CHAIN mode by pressing the
corresponding key. You see the current mode on the appropriate
LED.
BASIC CHAN
Basic MIDI channel 1-10
Your AXON needs maximal seven successive MIDI channels in
order to control a connected MIDI tone generator. One channel is
necessary for each string and an additional channel is required if
you would like to use the special function of the Hold Pedal.
With the basic MIDI channel you assign the first of seven
channels which will be used by your AXON. All further channels
follow implicitly.
PBEND RANGE
Pitchbend Range OFF/I...24
Since your connected MIDI instrument should convert the pitch
changes of your guitar correctly, you have to set the Pitch Bend
Range of your MIDI instrument to the same value as this one on
the AXON. The value shows the maximum number of semitone
steps that can be converted with Pitch Bend information, without
triggering a new note on your MIDI instrument. If your MIDI
instrument allows, this value should be set to at least 12. For bass
guitars it is especially recommended to set it even higher, to 24.
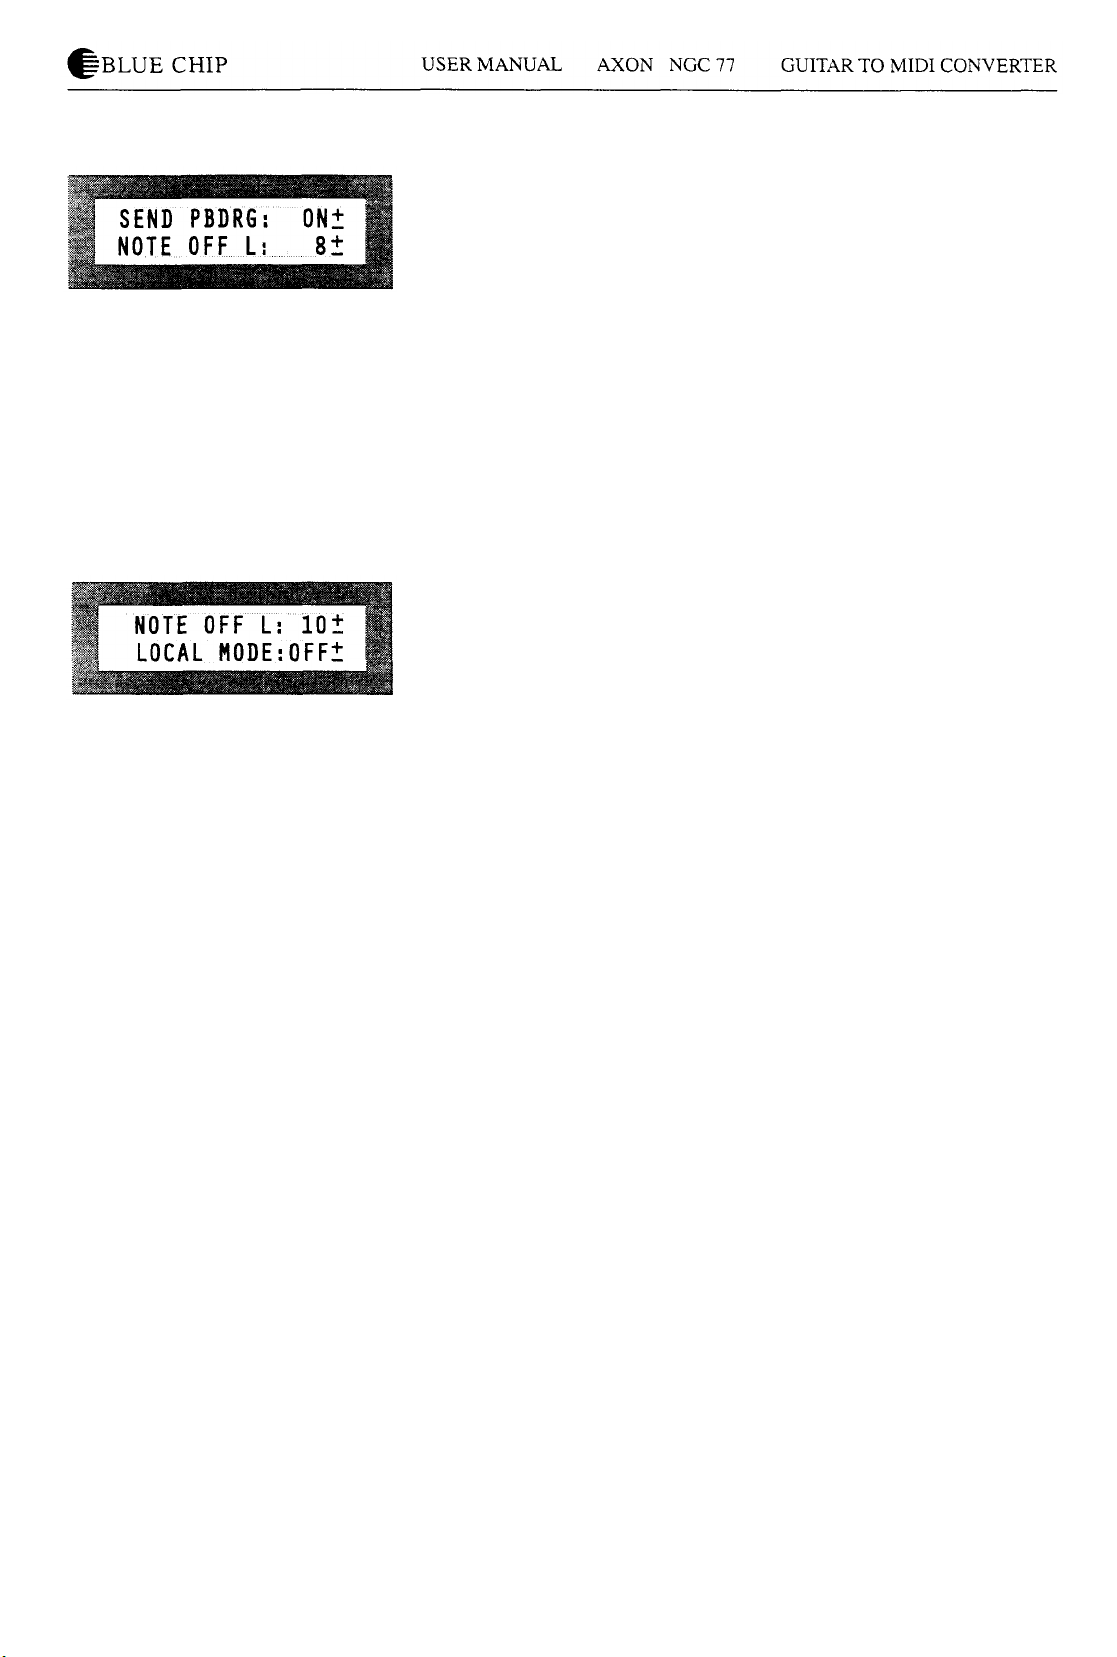
SEND PBDRG
Send Pitchbend Range ON/OFF
This parameter has to be ON if your MIDI instrument stores
Pitch Bend Range in each preset separately. In this case the
AXON sends the Pitch Bend Range information after each
program change immediately again. This is necessary by most
KORG synthesizers, and probably by some other manufacturers.
If your MIDI instruments store Pitch Bend Range globally, just
like the AXON itself, this parameter should be OFF. If your are
not familiar with your MIDI instrument, you should set this
parameter to ON. Then your AXON will possibly give out some
unnecessary MIDI data but you will hardly notice it.
NOTE OFF L
Note off limit 10...30
This level sets the point on the decay envelope where the NOTE
OFF event will be sent. The higher the setting, the shorter the
note will be; the lower the setting, the longer the note will be
sustained.
LOCAL MODE
Local Mode : ON/OFF
OFF:
The MIDI data that are received by your AXON are directly
transferred to the embedded sound module. Programm change
commands do not influence your AXON. Naturally, you can
keep changing the presets of your AXON with the buttons.
Concerning the receive, your AXON is now like a GM-expander.
This function addresses especially to persons who work with a
sequencer: All MIDI data, the AXON generates during play, are
exclusively given out via MIDI OUT. The sequencer will send
data through its MIDI OUT. Please connect the MIDI OUT of
your sequencer to the MIDI IN of your AXON in order to direct
it to your embedded sound module. The AUDIO OUT signals
are transferred via the non-used pins of the MIDI THRU of your
AXON. For that purpose, use the special cable included
with
your AXON.
ON:
If you don't use a sequencer, you should set this parameter to
ON. Your AXON controls now the embedded sound module and
programme change commands influence your AXON.
Additionally, the general MIDI sound name is shown while
editing the segment parameters. Of course, your AXON keep
sending data via MIDI OUT. Then, you can connect futher MIDI
instruments to the MIDI OUT. If you do not have an embedded
sound module, you should set LOCAL on ON in order to
benefit from preset changes via MIDI IN.
VU METER
Level Meter ON/OFF
When strings are played, the display shows 6 small VU-Meters
for six strings. The normal display appears again when the decay
reaches -40dB. This function can be suppressed by turning the
VU-Meter OFF (key).
TUNE BASE
Tune Base -99...+99
Your AXON generates MIDI sounds relating to a tune base of
440 Hz plus a deviation which is set by this parameter. If your
musicians play instruments which can only be tuned with great
effort (for example a piano), it is better, you fit your AXON to
this situation. We recommend the following procedures if the
tune base deviates from 440 Hz: You tune first the open A string
carefully by ear on the basis of the instrument (for example a
piano). Then, press the OK button. At the display, the following
text appears: "PICK THE OPEN A STRING". While playing
now the open A string, your AXON analyses the coming
vibration and sets itself the Tune Base Parameter at the correct
value. Naturally, you can change the value also with the +buttons, if you know exactly the value. Then you tune the
remaining strings of your guitar with the embedded tuning aid of
your AXON. If you play alone, you should set the tune base on
the value 0.
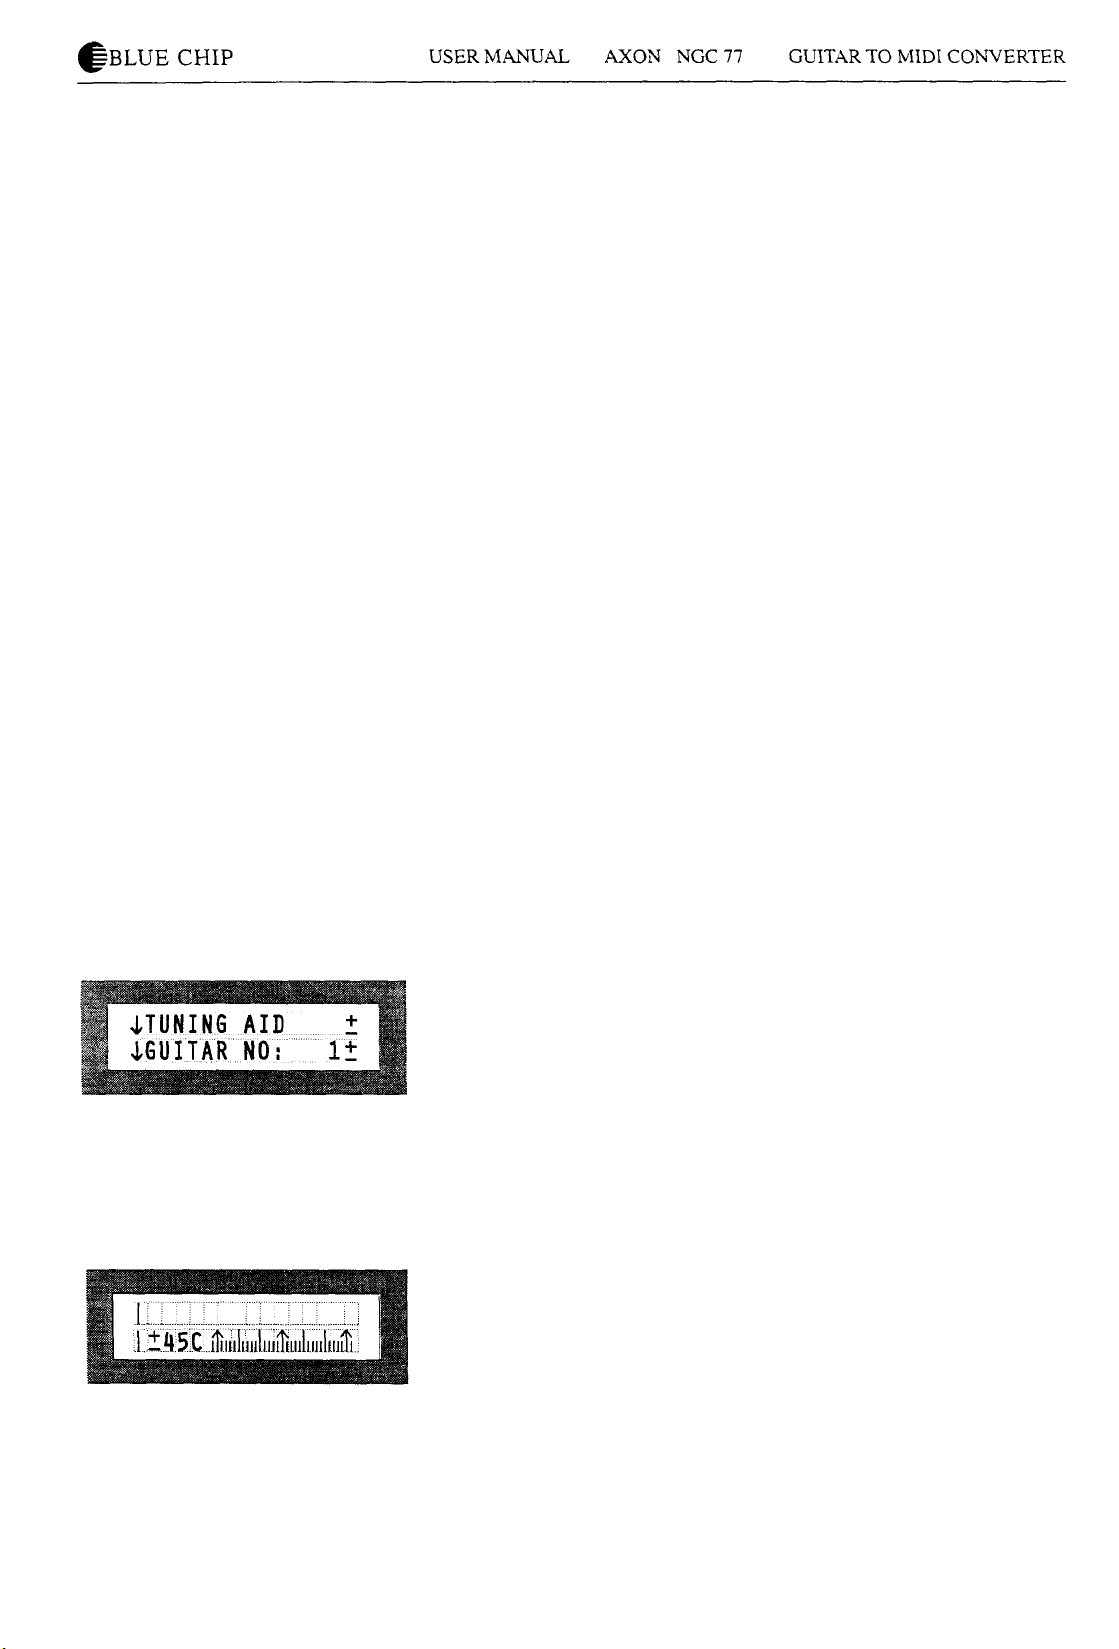
TUNING AID
How to call up the tuning aid
It is important that your guitar is tuned within a certain pitch
tolerance, so that the AXON can properly interpret MIDI pitch
values. Press OK. You will see a display similar to a chromatic
guitar tuner. Tune each string so that the pointer is above the
middle arrow. The left arrow of the tuning scale marks a
deviation of -45 cent (0,45 of a semitone), the right arrow
deviates +45 cents from the current tune base. If the Tune Base
Parameter is on 0, the middle arrow corresponds to a tuning
calibration of 440 Hz. If the Tune Base Parameter is set for +50
for example, the middle arrow correspond to a pitch that is a
quarter step higher than 440 Hz. Note: Tuning aid is a feature
that will allow to tune your guitar to the AXON quickly and
simply, whereas Tune Base allows you to tune the AXON to
your guitar.
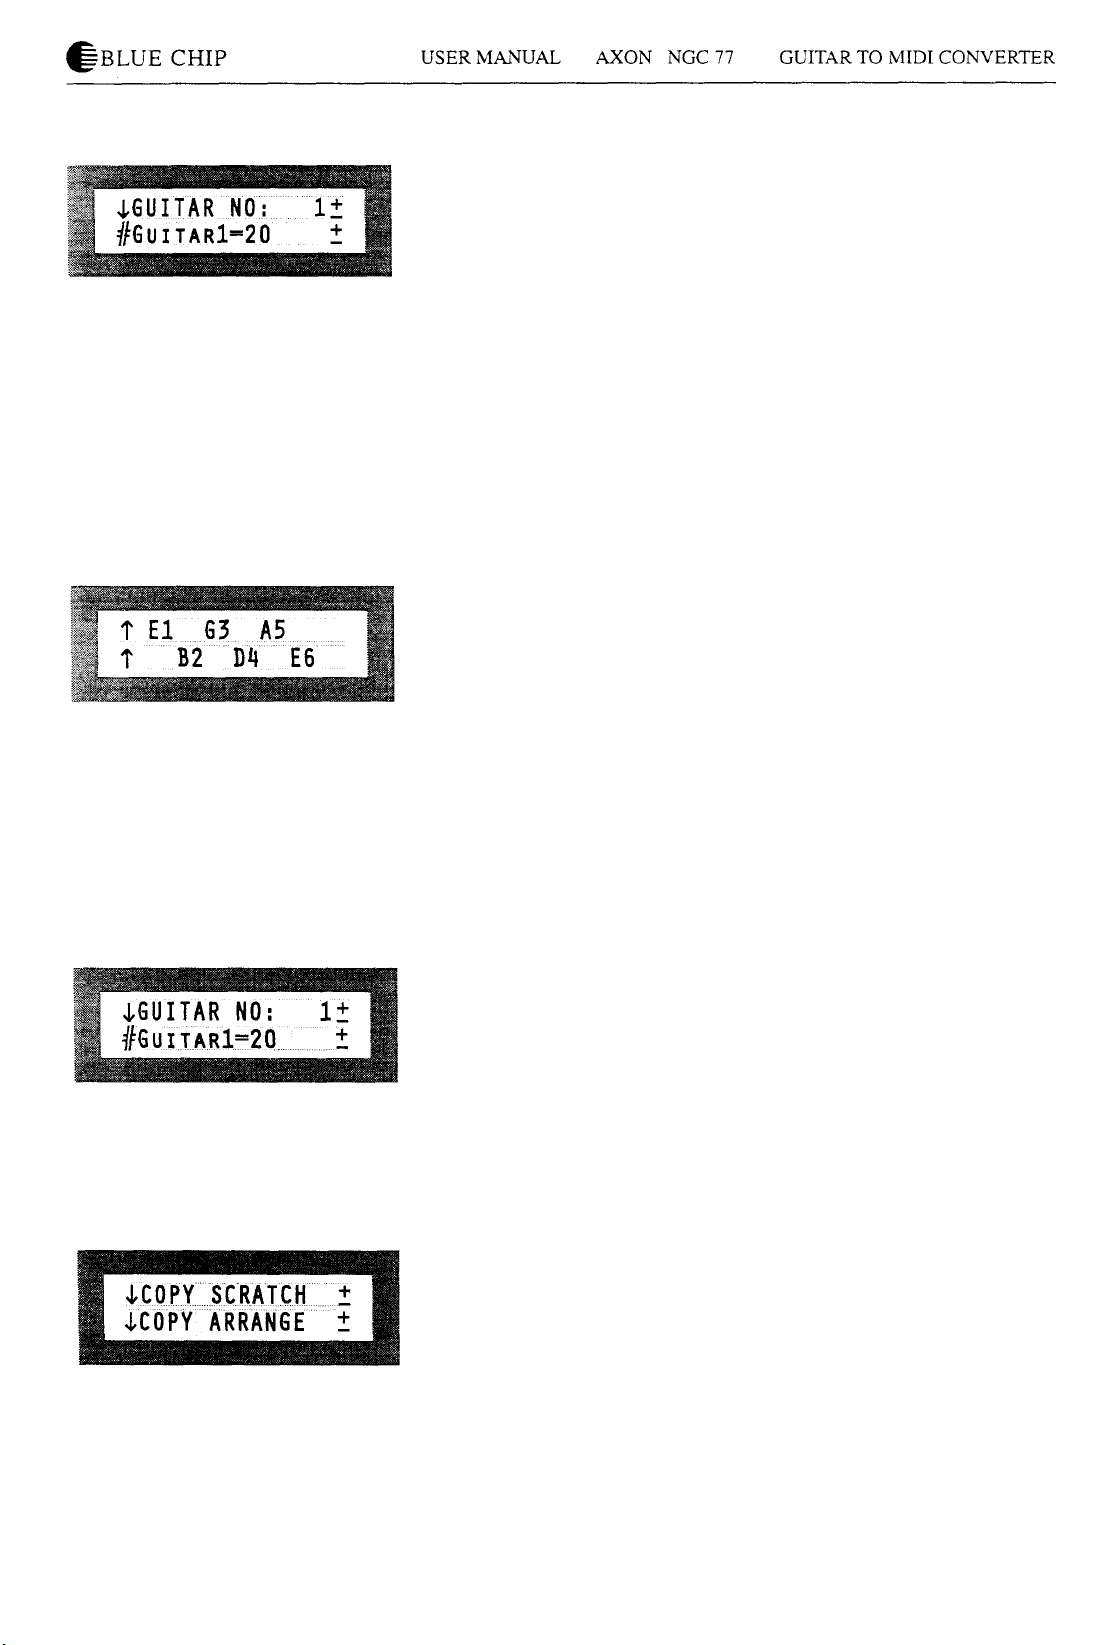
GUITAR NO
The AXON allows you to set preferences for up to four different
totally separate guitars or bass guitars. If for example, you
change guitars during a concert, you don't have to change all the
sensitivity settings for that instrument, you merely change to the
appropriate guitar number (name) in your AXON.
Sensitivity
The AXON converts audio signals into digital information. They
are very sensitive to overloading. But you shouldn't drive your
AXON too low. Your AXON helps you to set the sensitivity
optimally. Press the OK button. The string names are now shown
at the display. Play on your guitar and use all strings. You should
play all strings loudly, even at least 8 times. Later on those
strings are faded out on the display that are already adjusted. If
your AXON adopted the optimal setting for all strings, the
following text appears on the display:
ALL ADJUSTED
PRESS OK.
You can call up this function as often as you like, perhaps in
order to increase the sensitivity later. For that purpose, you
repeat the above mentioned procedure, but you play less
powerful on your guitar. Your AXON will then increase the
sensitivity. Please consider that you can overload your AXON
later by playing loudly which can lead to faulty MIDI data.
GUITAR NUMBER/ NAME
Please scroll your cursor with the +/- parameter buttons to the
line which indicates the guitar name. Press the OK button, the
cursor flashes now over the first letter. Change the letter with the
+/- value buttons. While pressing either the + or the - parameter
buttons you reach the next or the previous column. Program the
desired name letter by letter into your AXON and leave the
menu with the OK button.
COPY SCRATCH
How to copy a scratch preset
Press the OK button and scroll your cursor with the +/parameter keys in the line "SOURCE SCR:". Set with the +/-
value buttons the desired scratch preset you would like to copy.
Change with the +/- parameter buttons to the line "DEST.SCR:"
and set with the +/- value buttons the target preset to which you
want to copy. Then scroll the cursor with the + parameter button
in the line displaying the following text "COPY: OK" and press
the OK button in order to start copying. If you decide you don't

want to complete the copy, move the cursor to another line, and
press OK. This will return you to the main Global Menu page.
COPY ARRANGE
How to copy Arrange Presets
Press the OK button and move the cursor with the +- parameter
keys in the line "SOURCE ARR:". Set your desired Arrange
Preset with the +- value keys. Change with the +- parameter
buttons to the line "DEST. ARR:" and assign here the desired
target preset with the +- value keys as well. Then position the
cursor with the + parameter key to the line displaying the text
"COPY: OK" and press the OK button in order to start copying.
If you decide you don't want to complete the copy, move the
cursor to another line, and press OK. This will return you to the
main Global Menu page.
COPY SEGMENT
How to copy segment parameters
Press the OK button and move the cursor with the +- parameter
keys in the line "SOURCE SGM:". Set the segment with the +value buttons which you would like to copy. Change to the line
"DEST. SGM:" with the +/- parameter keys and assign here the
desired target segment with the +/- value buttons, too. Then set
the cursor with the + parameter key to the line displaying the
text "COPY: OK." and press the OK button in order to start
copying. You can abort the function by moving the cursor in
another line and hitting the OK key: Then you are again at the
global menu page.
COPY CHAIN
How to copy a chain preset
Press the OK button and move the cursor to the line "SOURCE
CHN:" with the +/- parameter keys. Set the preset which you
would like to copy with the +/- value buttons. Change to the line
"DEST. CHN:" with the +/- parameter keys and assign here the
desired target preset with the +/- value buttons, too. Then set the
cursor with the + parameter key to the line with the text "COPY:
OK." and press the OK button in order to start copying. You can
abort the function by moving the cursor in another line and
hitting the OK key: Then you are again at the global menu page.

^BLUE
CHIP
USER
MANUAL AXON
SEND SCRATCH
How to send a Scratch preset (as a system-exclusive-message =
sysex)
Please set the Scratch number you would like to send with the
+/- value buttons. Position the cursor in the line "SEND:" with
the +/- parameter keys and hit OK. You can abort the function
by moving the cursor in another line and pressing the OK
button. Then you are again at the global menu page.
SEND ARRANGE
How to send an Arrange preset (as a system exclusive message =
sysex)
The procedure is identical to sending Scratch Presets. Please
look at the section SEND SCRATCH.
SEND ALL
NGC
77
GUITAR
TO
MIDI
CONVERTER
How to send SCRATCH/ARRANGE and CHAIN Preset data
Press the OK button in order to transfer the settings of all presets
which are now system exclusive data.
REC. SCRATCH
How to receive a Scratch preset (as a system exclusive message
= sysex)
Use the +/- keys to set the number of the Scratch Preset that will
be overwritten by the received data. Move the cursor to the line
"RECEIVE:" with the parameter buttons and hit OK. You can
abort the function while scrolling the cursor in another line and
pressing the OK key. Then you are again at the global menu
page.
REC. ARRANGE
How to receive an Arrange preset (as a system exclusive
message = sysex). The procedure is identical to receiving
Scratch Presets. Please look at the section REC. SCRATCH.
REC. ALL
How to receive SCRATCH / ARRANGE and CHAIN Preset
data. Press the OK button in order to receive all presets.
ADC MONITOR
ADC display
It shows the values of the AD converter in hexadecimal notation.
This function is only for error diagnostic.

^BLUE
CHIP
USER MANUAL
How to store Scratch versus Arrange data
All changes made on the actual preset don't destroy the original
preset data. In order to store the Scratch/ Arrange parameter
permanently after a change in a preset, please press the store
button. The display line shown here indicates the current preset
number, the line at the bottom presents the corresponding preset
name. You can choose an optional preset number with the +/value buttons, the preset name will be actualized analogously.
Hit the OK button in order to store the preset data at the
indicated cursor place. Except of the +/- value buttons each other
key aborts the procedure and prevents from overwriting data
erroneously. In any case, the display returns to the previous
position.
Scratch Mode
Scratch presets I... 128
The SCRATCH Mode includes presets which can simply be
programmed but without the possibility to split. The pick control
function as well as the different possibilities of the Hold Pedal
are available without limitations. Press the Scratch button in
order to activate the Scratch mode. You call up the different
Scratch presets with the +/- value buttons. For that purpose, you
can also use the UP/ DOWN keys of your guitar interface. They
have always the same effect as the corresponding +/- value
button. In order to change the Scratch preset scroll the cursor
with the +/- parameter keys to the line displaying the following
text: "SCRATCH NO:" and press the OK button. In this manner,
you come to the main menu of the current Scratch preset. There
are three parameters: STRG MODE, HOLD MODE as well as
EDT SEGM.
AXON
NGC 77 GUITAR TO
MIDI
CONVERTER

^BLUE
CHIP
USER MANUAL
STRG MODE
String mode (separate/common)
SEPARATE
A separate MIDI channel is assigned to each string in the
following order:
El: Basic MIDI channel
B2: Basic MIDI channel+1
G3: Basic MIDI channel+2
D4: Basic MIDI channel+3
A5: Basic MIDI channel+4
E6: Basic MIDI channel+5
This setting allows the greatest flexibility. In the Arrange Mode,
this mode is active and cannot be changed, in the Scratch Mode
you can freely choose this parameter.
COMMON
In the Common Mode, all strings of your guitar are assigned
only to the basis channel. In order to avoid conflicts with still
sounding notes of the same channel, no Pitch Bend Information
is sent in this mode, if more than one note is played. By this way
solo playing is possible although with restrictions. If your MIDI
instrument can only receive at one MIDI channel, you should
use this mode.
If your sequencer does not allow to record on 6 MIDI channels
at the same time you have to use this mode as well.
AXON
NGC 77 GUITAR TO MIDI CONVERTER
HOLD MODE
Hold mode (common/ separate/ sustain/ controller)
While pressing the Hold Pedal, you can access to four different
functions:" Common, separate, sustain and controller".
COMMON
While pressing the Hold Pedal, no other MIDI data are sent. A
previous chord will be kept frozen on your MIDI instrument as
long as you keep the pedal down. Herewith, you realize also a
bypass function, i.e. as long as you press the Hold Pedal in this
mode, your AXON doesn't give out further MIDI data.
SEPARATE
A further MIDI channel is available.
In the Common String Mode it is the basis channel +2, in the
Separate Mode it is the basis channel +7.
You can for example underlay a solo with an optional
accompaniment. For that purpose, you play a chord while
pressing the Hold Pedal and releasing it then. You can now play
again with your AXON and at an additional channel the already
played chord sounds. If you press the Hold Pedal again, all
notes are turned off and you can play a new chord again.
SUSTAIN
While pressing the Hold Pedal, the controller 64 (Sustain) with a

^BLUE
CHIP
USER MANUAL
maximum value of 127 (7Fh) is given out. Play notes on your
guitar. Every note you play as long as you have the Pedal
pressed will be sustained, much like the sustain pedal on a
piano. Leaving the pedal releases the sustained notes. The same
controller (64) is given out again, but with the value 0. All
played notes will sound then normally.
CONTROLLER: (0...127)
It is possible to call up one of the 128 MIDI controller. While
pressing the Hold Pedal, the selected controller is given out with
the maximum value 127 (7Fh). As you release the Hold Pedal
again, the controller will be sent out value 0. Appropriate
controllers are Sustain (64), Portamento (65) or for example
Chorus (93). In the appendix, you can find a detailed list of all
MIDI controllers.
EDT SEGM
Here you can choose one of the two segment pages: NORMAL
or HOLD.
Normal (NORM)
This submenu contains segment parameters which are set for the
current Scratch preset (timbre, volume, transposing ...)
Hold (HOLD)
In this submenu you assign the sound parameter which you
would like to use while pressing the Hold Pedal in SEPARATE
Hold Mode.
Scroll the cursor with the +/- parameter buttons to the current
segment and call up the desired segment by using the +/- value
keys and hit the OK button. From this submenu you return to
the previous position with the OK key.
AXON
NGC 77 GUITAR TO
MIDI
CONVERTER
SCRATCH NAME
In order to rename a Scratch preset, move the cursor to the line
with the current name and hit OK. Now the cursor flashes over
the first letter. Change this letter with the +/- value buttons. You
reach the next/ previous column with the +/- parameter keys.
Please enter your desired name and leave this menu with the OK
button.
Arrange Mode
Arrange presets I... 64
In contrast to the Scratch presets you can access to different
split possibilities within the Arrange presets. These splits can
also be combined.
Press first the Arrange button to select Arrange mode. Using the
+/- value keys, you can choose one of the 64 possible Arrange
presets. For this purpose you can also use the UP/DOWN

buttons of your guitar interface just like by Scratch presets.
To edit the Arrange parameter, move the cursor with the +/-
parameter keys to the line with the text "ARRANGE_NO:" and
press the OK button. This brings you to the main page of the
current arrange preset. Here you will see six parameters:
HOLD MODE
STRG SPLIT
FRET SPLIT
PICK SPLIT1
PICK SPLIT2
EDT SEG
The first parameter, the Hold mode is identical with the
corresponding parameters in the Scratch mode.
STRG SPLIT
(OFF/1-5)
You can divide the six strings on your guitar into two different
groups, each group playing a particular synth sound. The numbers
correspond to the string numbers, the high E-string being string
number 1. For example, if you set the string split to 2, then strings 1
and 2 will play one sound and strings 3-6 will play another.
Please set this parameter to OFF, if you would not like to use the
string split function.

FRET SPLIT
(OFF/0...23)
You can also divide the fretboard of your guitar into two groups
of frets so that when you play within one of these groups of
frets, regardless of what strings you play, you will hear one
synth sound. If you then move to a position outside of this group
of frets, you will hear another sound. You can set a fret split
from 0 to 23. For example, if you set your Fret Split to 4, as long
as you play between frets 1 and 3 including fret 3, you will hear
the first sound (which you assigned before in the segment
SnFlPn). If you play a note using fret 4 or above, you will hear
the second sound (which you fixed before in the segment
SnF2Pn). If you do not want to split the fretboard, set this
parameter to the value OFF.
PICK SPLIT 1 and 2
(OFF/I...99)
The pick area (the area of your guitar typically used for picking),
between the bridge and the highest fret, can be divided into 3
parts. To do this, two split points have to be determined. The
entire pick area is divided into 99 units, numbered 1.. .99. 1 is
the bridge and 99 is the neck position. Pick Split 1 and 2 are
these two points. For example, you can divide your pick area
into 3 roughly equally sized parts by setting Pick Split 1 to 33
and Pick Split 2 to 66. When you pick in the area closest to the
bridge, regardless of what string you pick, you will hear one
sound. If you move your picking into the center of your pick
area (between the two pick split points), you will hear a second
sound. If you move your picking further forward near the frets,
you will hear a third synth sound.
Please set the corresponding parameter to OFF, if you don't
want to use one of the pick split functions.

EDT SEGM
The three types of splits are combined and superimposed upon
each other to give you a synthesis of up to 12 different combinations of splits. Within these combinations, depending on where
your split points are, the possibilities are innumerable.
• How to call up the segments:
Move the cursor to the current segment with the +/- parameter
keys and change the display by using the +/- value buttons to your
desired split combination. Press the OK key in order to get into
the corresponding submenu containing the segment parameters.
S1F1P1 (String 1, Fret 1, Pick 1)
S1F1P2 (String 1, Fret 1, Pick 2)
S1F1P3 (String 1, Fret 1, Pick 3)
S1F2P1 (String 1, Fret 2, Pick 1)
S1F2P2 (String 1, Fret 2, Pick 2)
S1F2P3 (String 1, Fret 2, Pick 3)
S2F1P1 (String 2. Fret 1, Pick 1)
S2F1P2 (String 2, Fret 1, Pick 2)
S2F1P3 (String 2, Fret 1, Pick 3)
S2F2P1 (String 2, Fret 2, Pick 1)
S2F2P2 (String 2, Fret 2, Pick 2)
S2F2P3 (String 2, Fret 2, Pick 3)
as well as
• Hold (HOLD)
This segment allows you to set the parameters for the sound you
hear when you have the HOLD pedal depressed in SEPARATE -
Hold mode.
In most cases, you will only want to use one kind of split at
a time, for example, a fret split, but probably not more than
one simultaneously. You will then need to simply find the
segment where the "F" (for "fret") is 1 and 2, and "S" and
"P" are 1 (S1F1P1 and S1F2P1). If you want to use a string
split but no other splits, find the segment where the "S" (for
"string") is 1 and 2, and the "F" and "P" are 1 (S1F1P1 and
S2F1P1).
Only those segments can be found which are used for the
current split combination. All other segments are skipped.
Please ensure that the corresponding split is not set to
OFF.
ARRANGE NAME
In order to rename an arrange preset, move the cursor to
the line with the current name and hit OK. Now the cursor
flashes over the first letter. Change this letter with the +/- value
buttons. You reach the next/ previous column with the +/-
parameter keys. Please enter your desired name and leave this
menu with the OK button.

Segmentparameter
The basic element of your AXON is a segment, both in the
Scratch mode and in the Arrange mode. A segment is a package of
Midi information which are assigned to a sound in your synth. The
segment includes not only the patch numbers of the sound, but
also important information to convert your guitar signal into MIDI
information that comprehends the synth.
PROGRAM
Program number (AI 1...D88 and AI...A128, B1...B 128).
The AXON can use the timbres of the MIDI banks 0 and 1 in your
synth. There are two current systems to number timbres in
synthesizers:
1. MIDI-Bank 0: Al 1-A88, Bl 1-B88; MIDI-Bank 1: Cl 1-C88,
Dl 1-D88 (for example Korg i3)
2. MIDI-Bank 0: A1-A128; MIDI-Bank 1: B1-B128 (for
exampleYamaha)
If you edit a Patch number (sound) within a segment in your
AXON, you will see both numbering systems at the display
simoultaneously in one line. In case of setting the Global
Parameter LOCAL to ON, the GENERAL MIDI standard -sound
names will be indicated.
VOLUME
Volume (O... 127)
Perhaps the preset volume of your MIDI instrument is too low (or
too loud). This parameter allows you to increase/ decrease the
volume of your sound. Should the volume be too high for you, it
is possible to decrease the volume of your MIDI instrument with
the volume controller of your interface. For this reason you should
set the value of this parameter as high as possible. A later increase
with the volume controller of your interface is not possible.
TRANSPOSE
Transposing in semitones (-36...+36).
This parameter allows you to trigger notes at your MIDI
instrument which you can't reach with your guitar.
QUANTIZE
How to quantize pitches: Setting possibilities OFF/ON/AUTO
You determine by this parameter if pitch changes within a set
Pitch Bend Range should be converted with continous or step by
step (quantized) Pitchbend.

OFF:
All Pitch changes ( for example pulling strings, hammer on's or
other playing techniques) are converted as exactly as possible
(see also Global Parameter: Pitch bend range).
ON:
Each pitch change won't be converted with Pitch Bend until the
next semitone is reached; then another Pitch bend value gives
out the new pitch. Pulling strings continuously and other playing
techniques won't be interpreted as expected. This setting is
advantageous while playing chords exclusively, since
insignificant pitch changes resulting from varying the string
pressure have no influence any more. Especially organ and piano
tones would then sound very unnatural.
AUTO:
By this setting you make use of the unique possibility of the
AXON, to recognize your intention how to play. The pitch
quantization is switched on or off depending on the situation.
Chords are now exactly played (without Pitch bend), whereas
the pitch quantization is for example turned off again for a solo
with pulling string, hammer on's and similar playing techniques.
PAN POS
Panorama Position (OFF, L15..MID ...R15)
This parameter allows you to displace the sound of your MIDI
instrument at the stereo panorama. The values LI ... LI 5 mean
that the current sound is more shifted to the left channel, the
values Rl ... R 15 move the sound more to the right channel.
The value MID corresponds to the mid position. OFF expresses
that your AXON won't send this controller (controller #10) to
your MIDI instrument. If your MIDI instrument has no
panorama function, set this parameter to OFF.
PAN SPREAD
Panorama spread (-15...+15)
By using the parameter PAN POS, you assign the stereo position
for all 6 strings. In order to avoid that all 6 strings are at the
same stereo position, you can use this parameter to spread the
single strings around the panorama position. Set the PAN POS
value for example to MID (to the MID position). Play on your
guitar and vary the PAN SPRD value.
Please consider that your MIDI instrument has to interpret
panorama information. For that purpose, read the user manual of
your MIDI instrument.

REVERB
Reverb portion of a sound (MIDI controller 91) : OFF/I.. 128
If your MIDI instrument is fitted with an embedded Reverb, this
parameter allows you to decide about the Reverb portion of your
used sound. This parameter must set to OFF, if your MIDI
instrument does not have an installed Reverb. Your AXON won't
transfer this controller via MIDI. The Reverb portion of the
optional sound module will be controlled with this parameter,
too.
FINGR PICK
Finger picking : OFF/ON
This parameter switches on/ off several internal parameter,
which can be used for the finger picking technique at your
AXON. In this case, the pick split and the pick control function
aren't available any more. Please ensure that you hadn't used a
pick split in the current Scratch or Arrange preset. Also the pick
controller must be turned off (OFF).
VLCTY SENS
Velocity sensitivity (0...127)
You can restrict the dynamic response at your MIDI instrument
by reducing the value of this parameter. If the value is 0, all
played notes are given out of your AXON with the same velocity
value, independently of your dynamics. You get the greatest
dynamic response at the value of 127.
VLCTY OFFS
Velocity offset (-63...+63)
If the dynamics of your AXON is reduced by the Velocity
Sensitivity parameter, the generated velocity values could be too
high/ too low.. This parameter allows you to increase/ decrease
the velocity value again. (See illustration on the next page).
TRIGGER LEV
Trigger Level (0...9)
You assign by this parameter the weakest picking level that
causes a NOTE ON event to be sent. A low value means that a
weak picking triggers a tone; a high value means that a strong
picking is required.

S=Sensitivity
0=0ffset
MIDI VELOCITY VALUES BY DIFFERENT SETTINGS OF
VELOCITY SENSITIVITY AND VELOCITY OFFSET

PICK CTRL
Pick Controller (OFF, 0...127)
As mentioned above, your AXON has the unique possibility to
recognize the picking position. You can assign this picking
position to one of several MIDI controllers. Set the value for
example to 1 and you can simulate the modulation wheel of a
keyboard by the picking position. There are MIDI controllers
which are worth while. For that purpose, look at the user manual
of your MIDI instrument. Interesting controllers are for example
1 (mod wheel), 7 (volume) or 10 (panorama). By using the
following parameters you limit the picking position and
determine values which are appropriate for the used controller.
PI POSITION
Pick Position 1: 0...99
This parameter indicates the picking position from which the
pick value 1 changes continously its value to the pick value 2.
PI VALUE
Pick Value 1: MIDI controller value
As long as the picking position is below Pick position 1, this
value is triggered to the corresponding MIDI controller. If the
picking position is above pick position 1, the controller value
changes continously to the controller value which is determined
as Pick value 2.
P2 POSITION
Pick Position 2: 0...99
This parameter indicates the picking position to which the
controller value will continously change.
P2VALUE
Pick Value 2: MIDI controller value
As long as the picking position is below Pick position 2, this
value is triggered to the corresponding MIDI controller. If the
picking position is above pick position 2, the controller value
changes continously to the controller value which is determined
as Pick value 1.

Chain Mode
Presets (I...64)
In live performance you will often want to change from one
scratch or arrange preset to another. You can do this very easily
by creating chains of presets in chain mode.You have the option
of creating up to 64 different chains with up to 32 scratch and/
or arrange presets (=steps) in each chain.
The chain presets or the single steps in a chain can be cycled
through by using the UP/DOWN keys on your guitar interface
whereas a footswitch can only move through the single steps of
a chain. It is plugged into the chain jack on the back panel of
yourAXON (clicking the footswitch once = forward moving;
double-click the footswitch = backward moving).
In order to create or change a chain you press the chain button
and use the +/- value keys. After hitting the OK button you can
start programming. You have four parameters to edit a chain
preset:
Step
(1...32)
Within a chain you set the step you want to edit. By using the +/keys you assign the step number which you would like to
change.
Please consider that the UP/ DOWN keys on your guitar
interface will not allow you to go past a LOOP point. In order to
do that use the +/- value buttons at your AXON.
Mode
(EDIT, INSERT, DELETE)
In most cases you will want to use the Edit mode whenever you
create a new chain or edit an existing one.
If you want to insert a step in the chain, select the number of the
step, at which point you want to insert a step. Selecting INSERT
and pressing OK will copy the present step to the very next step
and move all the following steps up by one number. You can
then edit the inserted step using EDIT.
Similarly, if you want to delete a step in the chain, set the
MODE: to DELETE and select the number of the step you want
to delete and press OK. The following steps in the chain will be
copied to their previous steps and their step numbers will be
reduced by one.
Please consider that you cannot leave here the submenu by
pressing the OK button since it is used to confirm the input. In
order to leave the submenu, change to another line by means of
the +/- parameter keys and press then the OK button.

TYPE and VALUE
A chain element can be one of six different types: a scratch
preset, a patch change for MIDI bank A, a patch change for
MIDI bank B, an arrange preset, a loop, an end of chain element.
To define a chain step using a scratch preset, you need to select
the SCRATCH option in the MODE parameter and then the
number of the scratch preset in the VALUE parameter.
Often you will want to change only a patch within a scratch
preset but maintain all the other segment information. To do this,
create a step and select PROG A or PROG B in the MODE
parameter immediately after the step in which the scratch preset
appears. Then set the VALUE to the number of the patch you
want to play. When you come to this step in the chain, only
patch change information will be sent to the synth and everything else will stay unaffected. This way you don't have to
create a completely different scratch preset if you only want to
change a sound.
There may be a situation in which you will want to repeat several steps in a chain. Use the LOOP element in the MODE
parameter to do this. Then set the value of the loop for the
number of steps backward in the chain to which it will jump
when you come to the loop element in the chain. For example, if
you create a LOOP at step number 5 in the chain, and set it's
value to 3, when you reach step 5, it will activate step 2. You will
then be able to cycle through steps 2, 3 and 4. Upon reaching
step 5, you will be sent back to step 2 again. Looping is infinite
and will continue until you change the chain number or exit.
In order to avoid confusion it is recommended that you include
an END element as the very last step of your chain. The value
parameter here is set for 1 and cannot be changed because it is
irrelevant.

Appendices
MIDI channel/ string assignment
You can connect to your AXON bass guitars with 4, 5 and 6
strings provideded that a corresponding HEX-Pickup exists. The
string assignment relating to the BASIC CHAN is:
MIDI channel Offset
0
1
2
3
4
5
Guitar with 6 strings
El
B2
G3
D4
A5
E6
MIDI channel Offset
0
1
2
3
4
5
MIDI channel Offset
0
1
2
3
4
5
MIDI channel Offset
0
1
2
3
4
5
Bass guitar with 4 strings
—
G2
D3
A4
E5
—
Bass guitar with 5 strings
—
G2
D3
A4
E5
B6
Bass guitar with 6 strings
Cl
G2
D3
A4
E5
B6
How to change a preset via MIDI IN
Your AXON is able to use received program change commands
to select between different presets. In the SCRATCH,
ARRANGE or GLOBAL mode you call up the presets of your
AXON by bank selection and program change commands
corresponding to the following table.

1..
34.
1..
1..
64
64
128
Bank 0, program 0..63 :
Bank 0, program 64.. 127 :
Bank 1, program 0..127 :
You change within the CHA
Bank 0, program 0..63 :
ARRANGE Presets
SCRATCH Presets
SCRATCH Presets
JN mode by using:
CHAIN Presets !..(
Troubleshooting
•Question When I play the guitar, the Axon reacts with level
meter response, but the synth does not play.
Area: Synth/Axon setup
Solutions: Make sure MIDI cables are correctly connected:
MIDI OUT on your Axon, MIDI IN on your synth. MIDI channel number should be properly set on both machines. The synth
should be in Multi-timbral mode. Audio OUT cables from your
synth to the amp may not be correctly connected or may be
defective. The Synth Volume control on your guitar interface
may be turned down. The Selector switch on your guitar interface could be set to Guitar.
Question : When I pick a string, I hear the right note, but hammer-ons and pull-offs and/or bending strings do not work.
Area: Discrepancy in pitchbend settings between Axon and
synth
Solution: Make sure the pitchbend range values within the synth
correspond to your settings in the Axon.
Question : When I play the guitar, the notes I hear are wrong,
partly or completely.
Area: Intonation discrepancy.
Solutions: Make sure you tune your guitar to the Axon by using
the Tuning Aid feature in Global mode. Tune the Axon to your
guitar by using the Tune Base feature in Global mode. Your
Axon may be set to transpose pitches in a segment page. This
should be turned off. Your synth could be out of tune or set to
transpose. This should be turned off.
Question : When I play my guitar, I hear synth sounds but no
audio guitar signal.
Area: The Audio chain is broken
Solutions: Make sure the selector switch on your guitar interface
is set to "Mix" or "Guitar". Make sure the audio connection
cable between your guitar and guitar interface is properly con-
nected. Make sure the audio controls on your guitar are turned
up. Make sure an audio cable is connected from the Axon's
"Audio Out" jack on the rear panel and is properly connected to
your amp.

Question : There is an irritating dynamic difference between
notes.
Area: Velocity mapping problems
Solutions'. The velocity sensitivity settings in the Axon for a
given sound should match the synth patch. Experiment with
decreasing the velocity sensitivity parameter in the segment
page and eventually adding small amounts of velocity offset.
Question : One (or more) of the strings sounds too weak/too
loud in comparison to the others.
Area: String sensitivity adjustment
Solution: Try adjusting the string sensitivity of the problematic
string in the Global menu under "GUITAR_NO:"

AXON-NGC 77
Internal Structure


Specifications
Display
2-lines
16-character LCD
Connectors (rear panel)
Guitar IN Connector (GK)
Guitar Audio OUT (1/4")
Hold Pedal (1/4")
Chain Pedal (1/4")
MIDI connectors (IN, OUT, THRU)
AC IN
Power Supply
12V AC (AC adaptor included)
1000 mA
Dimensions
Depth: 21.5cm
Width: 22 cm
Height: 4.4 cm (1 rack unit)
Weight
1.5kg
Accessories
User's Manual
AC Adaptor
MIDI Cable
Foot switch (pedal)
Optional Accessories (sold separately)
AIX 101 Interface with hex pickup for guitar
AIX 102 Interface with hex pickup for bass guitar
13 pin cable from the interface to the AXON
extra foot switch (pedal)

SYSTEM EXCLUSIVE IMPLEMENTATION
Received:
l.DUMP:
0:
FOH
1:OOH
2: 20H
3: 2DH
4:
OBH
5:x
6:y
7:d
8: lengthO 9: length 1 -
10:length211:D[0].L -
12: D[0].H -
...D[N-1].L ...D[N-1].H ...CHS— ...F7H— -
SYSTEM EXCLUSIVE
header for 3 byte manufacturer' s ID
1 st byte of manufacturer' s ID
2nd byte of manufacturer's ID
AXON model ID
device number (not evaluated)
y= 1 :ALL, y=2:SCRATCH, y=3:ARRANGE
d=0: dump coming; d= 1: dump requested
lowest 7 bits of length
middle 7 bits of length
highest 7 bits of length
low nibble of first byte
high nibble of first byte
low nibble of last byte
high nibble of last byte
checksum (modulo 128)
end of exclusive
2. BULK DUMP REQUEST:
0:
FOH
1:OOH
2: 20H
3: 2DH
4:
OBH
5:x
6: 1
7: 1
... F7H— -
Transmitted:
l.DUMP:
SYSTEM EXCLUSIVE
header for 3 byte manufacturer's ID
1st byte of manufacturer's ID
2nd byte of manufacturer's ID
AXON model ID
device number (not evaluated)
bulk dump (ALL)
bulk dump requested
end of exclusive
Same as Dump Received.

MIDI IMPLEMENTATION
AXON MIDI Implementation Chart
Function...
Basic Default
Channel Channel
Default
Mode Messages
Altered
Note
Number True Voice
Velocity Note On
Note Off
After Key's
Touch Ch's
Pitch Bender
7
10
Control 64
32
Transmitted
1-10
1-
10
Mode 3,4
X
X
0-
127
X
09n v=l-127
08n v=10
X
X
0
0
0
0
0
Recognized
X
X
X
X
X
X
X
X
X
X
X
X
X
Remarks
Volume
Panorama
Hold 1
Bank 0,1
Change 121
100,38,101,6
0-127
Prog.
Change True #
System Exclusive
System :Song Pos
:Song Sel
Common :Tune
System : Clock
Real Time : Commands
Aux :Local On/Off
Mes- :A11 Notes Off
sages :Active Sence
:Reset
Notes
0
0
0
0
0
0
X
X
X
X
X
X
X
X
X
0
0
X
X
X
X
X
X
X
X
X
Reset Controllers
Pitch Bend Range
Assignable Pick
Position Controller
0-
127
Mode 1
Mode 3
: OMNI
: OMNIONOFF,
, POLY
POLY
Mode
Mode24:
: OMNION, MONO
OMNI OFF, MONO
:
Yes
0
X
:
No

=BLUE
CHIP
USER
GENERAL MIDI (GM) tables
(Source : MIDI 1.0 Detailed Specification 4.2 )
GENERAL MIDI Sound Set Groupings
(all channels except 10)
Pros ^Instrument Group
1-8 Piano
9-16 Chromatic Percussion
17-240rgan
25-32Guitar
33-40Bass
41-48Strings
49-56Ensemble
57-64Brass
Prog#
65-72
73-80
81-88
89-96
97-104
105-112
113-120
121-128
Instrument Group
Reed
Pipe
Synth Lead
Synth Pad
Synth Effects
Ethnic
Percussive
Sound Effects
GENERAL MIDI Sound Set
MANUAL
AXON
NGC 77 GUITAR
TO
MIDI
CONVERTER
(MIDI Program Numbers 1
Pros # Instrument
1. Acoustic Grand Piano
2. Bright Acoustic Piano
3. Electric Grand Piano
4. Honkey-tonk Piano
5 Electric Piano 1
6. Electric Piano 2
7. Harpsichord
8. Clavi
9. Celesta
lO.Glockenspiel
11.Music Box
12.
Vibraphone
13.Marimba
14.Xylophone
15.Tubular Bells
16.Dulcimer
17, Drawbar Organ
18.Percussive Organ
19.Rock Organ
20.Church Organ
21. Reed Organ
22.Accordion
23.Harmonica
24.Tango Accordion
25.Acoustic Guitar (nylon)
26.Acoustic Guitar (steel)
27.Electric Guitar (jazz)
28.Electric Guitar (clean)
29.Electric Guitar (mute)
30. Overdriven Guitar
31.Distortion Guitar
32.Guitar harmonics
- 128; all channels except
Prog # Instrument
33. Acoustic Bass
34. Electric Bass (finger)
35. Electric Bass (pick)
36. Fretless Bass
37. Slap Bass I
38. Slap Bass 2
39. Synth Bass 1
40. Synth Bass 2
41. Violin
42. Viola
43. Cello
44. Contrabass
45. Tremolo Strings
46. Pizzicato Strings
47. Orchestral Harp
48. Timpani
49. String Ensemble 1
50. String Ensemble 2
51. Synth Strings 1
52. Synth Strings 2
53. Choir Aahs
54. Voice Oohs
55. Synth Voice
56. Orchestra Hit
57. Trumpet
58. Trombone
59. Tuba
60. Muted Trumpet
61. French Horn
62. Brass Section
63. Synth Brass 1
64. Synth Brass 2
10)
Pros # Instrument
65. Soprano Sax
66. Alto Sax
67. Tenor Sax
68. Baritone Sax
69. Oboe
70. English Horn
71. Basson
72. Clarine
73. Piccolo
74. Flute
75. Recorder
76. Pan Flute
77. Blown Bottle
78. Shakuhachi
79. Whistle
80. Ocarina
81. Lead 1 (square)
82. Lead 2 (sawtooth)
83. Lead 3 (calliope)
84. Lead 4 (chiff)
85. Lead 5 (charang)
86. Lead 6 (voice)
87. Lead 7 (fifths)
88. Lead 8 (bass+lead)
89. Pad 1 (new age)
90. Pad 2 (warm)
91.Pad3(polysynth)
92. Pad 4 (choir)
93. Pad 5 (bowed)
94. Pad 6 (metallic)
95. Pad 7 (halo)
96. Pad 8 (sweep)
Proe # Instrument
97. FX 1 (rain)
98. FX 2 (soundtrack)
99. FX 3 (crystal)
100. FX 4 (atmosphere)
101.FX 5 (brightness)
102. FX 6 (goblins)
103. FX 7 (echoes)
104. FX 8 (sci-fi)
105. Sitar
106. Banjo
107. Shamisen
108. Koto
109. Kalimba
110. Bag Pipe
111. Fiddle
112. Shanai
113. Tinkle Bell
114. Apogo
115. Steel Drums
116. Woodblock
117. Taiko Drum
118. Melodic Tom
119. Synth Drum
120. Reverse Cymbal
121. Guitar Fret Noise
122. Breath Noise
123. Seashore
124. Bird Tweet
125. Telephone Ring
126. Helicopter
127. Applause
128. Gunshot

GENERAL MIDI Percussion Set
(Channel 10)
MIDI Key Drum Sound
35
Acoustic Bass Drum
36
Bass Drum 1
37
Side Stick
38
Acoustic Snare
39
Hand Clap
40
Electric Snare
Low Floor Tom
41
42
Close Hi Hat
High Floor Tom
43
44
Pedal Hi Hat
45
Low Tom
46
Open Hi Hat
47
Low Mid Tom
48
Hi Mid Tom
49
Crash Cymbal 1
50
High Tom
MIDI Key Drum Sound
Ride Cymbal 1
51
52
Chinese Cymbal
53
Ride Bell
54
Tambourine
55
Splash Cymbal
56
Cowbell
57
Crash Cymbol 2
58
Vibraslap
59
Ride Cymbal 2
60
Hi Bongo
Low Bongo
61
62
Mute Hi Conga
Open Hi Conga
63
64
Low Conga
65
High Timbale
66
Low Timbale
MIDI Key Drum Sound
High Agogo
67
Low Agogo
68
Cabasa
69
70
Maracas
Short Whistle
71
72
Long Whistle
73
Short Guiro
74
Long Guiro
75
Claves
76
Hi Wood Block
Low Wood Block
77
Mute Cuica
78
Open Cuica
79
80
Mute Triangle
Open Triangle
81

GENERAL MIDI controller table
Controller numberController function
Dezimal
Hex
0
1
2
3
4
5
6
7
8
9
10
11
12
13
14-15
16-19
20-31
32-63
64
65
66
67
68
69
70
71
72
73
74
75-79
80-83
84
85-90
91
92
93
94
95
96
97
98
99
100
101
102-119
120-127
00H
01H
02H
03H
04H
05H
06H
07H
08H
09H
0AH
0BH
0CH
0DH
0E - 0FH
10-13H
14-1FH
20-3FH
40H
41H
42H
43H
44H
45H
46H
47H
48H
49H
4AH
4BH-4FH
50-53H
54H
55-5AH
5BH
5CH
5DH
5EH
5FH
60H
61H
62H
63H
64H'
65H
66-77H
78-7FH
Bank Select
Modulation wheel or lever
Breath Controller
Undefined
Foot Controller
Portamento time
Data entry MSB
Channel Volume(formerly Main Volume)
Balance
Undefined
Pan
Expression Controller
Effect Control 1
Effect Control 2
Undefined
General Purpose Controllers (#'s 1-4)
Undefined
LSB for values 0-31
Damper Pedal (sustain)
Portamento On/Off
Sostenuto
Soft pedal
Legato Footswitch (vv = 00-3FH:Normal, 40-7FH=Legatto)
Hold 2
Sound Controller 1 (default: Sound Variation)
Sound Controller 2 (default: Timbre / Harmonic Intensity)
Sound Controller 3 (default: Release Time)
Sound Controller 4 (default: Attack Time)
Sound Controller 5 (default: Brightness)
Sound Controller 6-10 (no defaults)
General Purpose Controllers (#'s 5-8)
Portamento Control
Undefined
Effects 1 Depth (formerly External Effects Depth)
Effects 1 Depth (formerly Tremolo Depth)
Effects 1 Depth (formerly Chorus Depth)
Effects 1 Depth (formerly Celeste (Detune) Depth)
Effects 1 Depth (formerly Phaser Depth)
Data increment
Data decrement
Non - Registered Parameter Number LSB
Non - Registered Parameter Number MSB
Registered Parameter Number LSB
Registered Parameter Number MSB
Undefined
Reserved for Channel Mode Messages

PROGRAM
0-177
VOLUME
0..127
TRANSPOSE
06-.36
QUANTIZE
ON/OFF/AUTO
PAN POS
aiBll5..MIDRI5
PAN SPREAD
•15.0-.13
REVERB
0-.1Z7
FINGR PICK
ON/OFF
VEL SENS
0-127
VE OFFS
«3-ifi3
TRIG LEV
OS
PICK CNTRL
OFTO..127
P1
POS
0-99
P1
VAL
0..127
P2POS
o.a
P2VAL
OJ27
NORM
26
127
0
AUTO
MID
2
63
OFF
110
10
0
OFF
70
0
20
127
HOLD
85
127
0
AUTO
R6
0
63
OFF
127
10
1
OFF
70
0
20
127
PROGRAM
0.127
VOLUME
0-127
TRANSPOSE
'36.+36
QUANTIZE
ON/OFFIAUTO
PAN
POS
OflFfLls-MID R15
PAN SPREAD
•15-0.»15
REVERB
0..127
FINGR PICK
ON/OFF
VEL SENS
0-1Z7
VE OFFS
•s-as
TRIG LEV
0-9
PICK CNTRL
OFFfO.,127
P1 POS
0.39
P1
VAL
o-w
P2POS
aaa
P2VAL
OJ27
NORM
74
127
0
OFF
MID
2
63
OFF
107
10
1
OFF
70
0
30
100
HOLD
--
--
--
-"
-"
--
--
--
--
-"
--
--
--

PROGRAM
0-127
VOLUME
0.127
TRANSPOSE
<36.-3
QUANTIZE
OWOFF/AUTO
PAN
POS
OflRlS-WO
.R15
PAN SPREAD
•1SJ.-15
REVERB
0..127
FINGR PICK
ONfOFF
VEL SENS
0-1 27
VE OFFS
«i~S!
TRIG LEV
0.5
PICK CNTRL
OFTO..127
P1
POS
us
P1
VAL
0.127
P2POS
0.39
P2VAL
0-127
NORM
1
127
0
ON
MID
4
63
OFF
120
10
0
OFF
70
0
30
100
HOLD
2
127
0
AUTO
MID
5
63
OFF
127
10
1
OFF
70
0
30
100
PROGRAM
0-127
VOLUME
0-127
TRANSPOSE
•X.-X
QUANTIZE
ON/OFF/AUTO
PAN POS
OIIBU5-MID
.R15
PAN SPREAD
•15-0-»15
REVERB
0..127
FINGR PICK
OWOFF
VEL SENS
0.127
VE OFFS
•63-S
TRIG LEV
0-9
PICK CNTRL
OFFiD..127
P1
POS
O.S6
P1
VAL
0-127
P2POS
O.S9
P2VAL
0-127
NORM
50
127
0
AUTO
MID
15
63
OFF
80
20
1
OFF
70
55
30
70
HOLD
2
127
0
AUTO
MID
5
63
OFF
127
10
1
OFF
70
0
30
100

PROGRAM
0-1?7
VOLUME
0.127
TRANSPOSE
;i6-»36
QUANTIZE
ON/OFF/AUTO
PAN POS
OlfRl.lS-MID.RlS
PAN SPREAD
-15-0-*15
REVERB
OJ27
FINGR PICK
ON/OFF
VEL SENS
0..127
VE OFFS
•6M3
TRIG LEV
0.9
PICK CNTRL
OFB0..127
PI
POS
as
P1
VAL
0..127
P2POS
aa
P2VAL
0-127
NORM
20
127
0
AUTO
MID
4
63
OFF
60
0
0
1
70
0
30
100
HOLD
27
127
0
AUTO
MID
5
63
OFF
127
10
4
1
70
100
30
10
PROGRAM
0.127
VOLUME
0-127
TRANSPOSE
^B.*36
QUANTIZE
ON/OFF/AUTO
PAN POS
0(IBU5..HD.R15
PAN SPREAD
•15-0-.15
REVERB
0..127
FINGR PICK
ON/OFF
VEL SENS
0-127
VE OFFS
•fii-a
TRIG LEV
0-9
PICK CNTRL
OFFB..127
P1
POS
as
P1
VAL
0-127
P2POS
use
P2VAL
0..127
NORM
66
127
0
ON
MID
4
63
OFF
100
10
1
1
70
0
30
60
HOLD
2
127
0
AUTO
MID
5
63
OFF
127
10
1
OFF
70
0
30
100

PROGRAM
0-127
VOLUME
0-127
TRANSPOSE
•3EL.36
QUANTIZE
ON/OFF/AUTO
PAN POS
Off/LIS-MlO.RlS
PAN SPREAD
•15..0..*15
REVERB
0-127
FINGR PICK
ON/OFF
VEL SENS
0-127
VE OFFS
•63-^3
TRIG LEV
0-9
PICK CNTRL
OPR0..127
P1
POS
a»
P1
VAL
0.127
P2POS
aa
P2VAL
0.127
NORM
86
127
0
AUTO
OFF
0
63
OFF
127
0
1
10
70
0
30
127
HOLD
100
127
0
AUTO
MID
5
63
OFF
127
10
1
1
70
0
30
100
PROGRAM
0-127
VOLUME
0-127
TRANSPOSE
,B.<36
QUANTIZE
ON/OFF/AUTO
PAN
POS
CHR1.15-MIO.ai5
PAN SPREAD
•15-0-.I5
REVERB
0-127
FINGR PICK
ON/OFF
VEL
SENS
0.127
VE OFFS
o^s
TRIG LEV
0-9
PICK CNTRL
OFR0..127
P1
POS
0,39
P1
VAL
0-127
P2POS
059
P2VAL
0-127
NORM
26
127
0
AUTO
MID
4
63
OFF
107
15
1
OFF
70
0
30
100
HOLD
53
97
0
AUTO
MID
5
63
OFF
80
0
1
OFF
70
0
30
100

PROGRAM
0-127
VOLUME
0-127
TRANSPOSE
W--X
QUANTIZE
ON/OFFfAUTO
PAN
POS
OHR1.15..HO.H15
PAN SPREAD
•15..0..15
REVERB
0..127
FINGR PICK
ON/OFF
VEL SENS
0..127
VE OFFS
«)-6i
TRIG LEV
0-9
PICK CNTRL
OFP10..127
PI
POS
0..99
P1
VAL
0-127
P2POS
o.a
P2VAL
0-127
NORM
HOLD
PROGRAM
0-127
VOLUME
0.127
TRANSPOSE
a-t36
QUANTIZE
ON/OFFrtUTO
PAN
POS
011Ffl.l5-MID.R15
PAN SPREAD
•15-0-»15
REVERB
0..127
FINGR PICK
ON/OFF
VEL SENS
0-127
VE OFFS
•6i-63
TRIG LEV
0-9
PICK CNTRL
OFFKU27
P1
POS
0.^8
P1
VAL
0-127
P2POS
na
P2VAL
0.127
NORM
HOLD

PROGRAM
0-127
VOLUME
0,127
TRANSPOSE
•a6.t36
QUANTIZE
ON/OFFfAUTO
PAN POS
0«F(ll5..MIO.R15
PAN SPREAD
I5.j0..ll5
REVERB
0-127
FINGR PICK
ON/OFF
VEL SENS
0-127
VE OFFS
fii-«6i
TRIG LEV
0-9
PICK CNTRL
OFFB..127
P1
POS
O..SB
P) VAL
0-127
P2POS
O.S9
P2VAL
0-127
S1F1P1
27
107
0
AUTO
MID
4
63
OFF
127
0
1
OFF
70
0
30
127
S1F1P2
--
--
--
--
--
--
--
--
--
--
--
--
--
--
--
--
S1F1P3
--
--
--
--
--
--
--
-"
--
--
--
--
-"
--
S1F2P1
--
--
--
--
--
--
--
--
--
--
--
--
--
--
--
--
S1F2P2
--
--
--
--
--
--
--
--
--
--
--
--
--
--
--
--
S1F2P3
--
--
-"
--
--
--
--
--
--
--
--
--
--
--
--
S2F1P1
33
127
-12
AUTO
MID
4
63
OFF
127
0
5
OFF
7D
0
30
100
S2F1P2
--
--
--
--
--
--
--
--
--
--
--
--
--
--
--
--
S2F1P3
--
--
--
--
--
--
--
--
--
--
--
--
--
--
--
-
S2F2P1
--
--
--
--
--
--
--
--
--
--
--
--
--
--
--
--
S2F2P2
--
--
--
--
"
--
--
--
--
-"
--
--
--
--
--
S2F2P3
--
--
--
--
--
--
--
--
--
--
--
--
--
--
--
--
HOLD
2
127
0
AUTO
MID
4
63
OFF
127
0
1
OFF
70
0
30
100

ARRANGE
No.:
#2
Fret
Split+HD____________________________________________________________________
Description : the lower 9 frets will sound with a trumpet sound, the upper ones will sound with a choir sound,
the hold pedal can be used to access a string orchestra.
PROGRAM
0-127
VOLUME
0..1Z7
TRANSPOSE
•36-t36
QUANTIZE
ON/OFRAUTO
PAN
POS
OHBl.l5JlllO.H15
PAN SPREAD
15-0-.*15
REVERB
0-127
FINGR PICK
ON/OFF
VEL SENS
OJ27
VE OFFS
«i-<a
TRIG LEV
us
PICK CNTRL
OFFB..127
PI
POS
as
P1
VAL
0-127
P2POS
Q.S9
P2VAL
0-127
S1F1P1
57
127
0
AUTO
MID
4
63
OFF
127
0
1
OFF
70
0
30
127
S1F1P2
&t
127
0
AUTO
MID
4
63
OFF
127
0
1
OFF
70
0
30
100
S1F1P3
--
--
--
--
--
--
--
--
--
--
--
--
--
--
--
--
S1F2P1
--
--
--
--
--
--
--
--
--
--
--
--
--
--
--
--
S1F2P2
--
--
--
--
--
--
--
--
--
--
--
--
--
--
--
--
S1F2P3
--
--
--
--
--
--
--
--
--
--
--
--
--
--
--
--
S2F1P1
--
--
--
--
-"
--
--
--
--
--
--
--
--
--
--
S2F1P2
--
--
--
--
--
--
--
--
--
--
--
--
--
--
--
--
S2F1P3
--
--
--
--
--
--
--
--
--
--
--
--
--
--
--
-
S2F2P1
--
--
--
--
--
--
--
--
--
--
--
--
--
--
--
--
S2F2P2
--
--
--
--
--
--
--
--
..
--
--
--
--
--
--
--
S2F2P3
--
--
--
--
--
--
--
--
--
--
--
--
--
--
--
--
HOLD
52
127
0
AUTO
MID
4
63
OFF
47
-4Q
1
OFF
70
0
30
100

PROGRAM
0-127
VOLUME
o-ia
TRANSPOSE
•3B.438
QUANTIZE
OWOFFIAUTO
PAN
POS
OlFdIS-MIO.RlS
PAN SPREAD
1S-0..*15
REVERB
0-127
FINGR PICK
ON/OFF
VEL SENS
O-liT
VE OFFS
O-iffl
TRIG LEV
0-3
PICK CNTRL
OFF0..127
PI
POS
ose
PI
VAL
0-127
P2POS
[196
P2VAL
O..W
S1F1P1
30
90
0
AUTO
R12
2
63
OFF
127
0
1
OFF
70
0
30
127
S1F1P2
28
127
0
AUTO
MID
2
63
OFF
127
0
3
OFF
70
0
30
100
S1F1P3
25
127
0
AUTO
L12
2
63
OFF
127
0
3
OFF
70
0
30
100
S1F2P1
--
--
--
--
--
--
•-
--
--
--
--
--
--
--
--
--
S1F2P2
--
--
--
--
--
--
--
--
--
--
--
--
--
--
--
--
S1F2P3
--
--
--
--
--
--
--
--
--
--
--
--
--
--
--
--
S2F1P1
--
--
--
--
--
--
--
--
--
--
--
--
--
--
--
--
S2F1P2
--
--
--
--
--
--
--
--
--
--
--
--
--
--
--
--
S2F1P3
--
--
--
--
--
--
--
--
--
--
--
--
--
--
--
-
S2F2P1
--
--
--
--
--
--
--
--
--
-"
--
--
--
--
--
S2F2P2
--
--
--
--
--
--
--
--
--
--
--
--
--
--
--
--
S2F2P3
--
--
--
--
--
--
--
--
--
--
--
--
--
--
--
--
HOLD
2
127
0
AUTO
MID
4
63
OFF
127
0
1
OFF
70
0
30
100

PROGRAM
0-127
VOLUME
0-127
TRANSPOSE
<&»36
QUANTIZE
ON/OFF/AUTO
PAN POS
0«F<L15..MIOfllS
PAN SPREAD
15-0..tl5
REVERB
0-127
FINGR PICK
OMIOFF
VEL SENS
0.127
VE OFFS
6)-|6)
TRIG LEV
0.3
PICK CNTRL
OFF0..127
PI
POS
0.9B
PI
VAL
0..127
P2POS
0,39
P2VAL
0-127
S1F1P1
26
127
0
AUTO
L12
2
63
OFF
127
0
3
OFF
70
0
30
127
S1F1P2
17
127
0
AUTO
MID
4
63
OFF
127
0
3
OFF
70
0
30
100
S1F1P3
2
127
0
AUTO
MID
4
63
OFF
127
0
1
OFF
7D
0
30
100
S1F2P1
100
127
0
AUTO
R12
2
63
OFF
127
0
3
OFF
TO
0
30
100
S1F2P2
64
127
0
AUTO
L12
2
63
OFF
127
0
3
OFF
70
0
30
100
S1F2P3
2
127
0
AUTO
MID
4
63
OFF
127
0
1
OFF
7D
0
30
100
S2F1P1
36
127
0
AUTO
MID
4
63
OFF
127
0
3
OFF
70
0
30
100
S2F1P2
38
127
0
AUTO
R12
2
63
OFF
127
0
3
OFF
7D
0
30
100
S2F1P3
2
127
0
AUTO
MID
4
63
OFF
127
0
1
OFF
70
0
30
100
S2F2P1
63
127
0
AUTO
L12
2
63
OFF
127
0
3
OFF
70
0
30
100
S2F2P2
27
127
0
AUTO
MID
4
63
OFF
127
0
3
OFF
7D
0
30
100
S2F2P3
2
127
0
AUTO
MID
4
63
OFF
127
0
1
OFF
7D
0
30
100
HOLD
2
127
0
AUTO
MID
4
63
OFF
127
0
1
OFF
70
0
30
100

PROGRAM
0.127
VOLUME
0-127
TRANSPOSE
36L*36
QUANTIZE
ON/OFRAUTO
PAN POS
CHRU5..MIO.R15
PAN SPREAD
15-0..<15
REVERB
0-127
FINGR PICK
ON/OFF
VEL SENS
0-127
VE OFFS
Wi63
TRIG LEV
O.i
PICK CNTRL
OFF/0..127
P1
POS
0-99
P1
VAL
0.127
P2POS
0-9B
P2VAL
0-127
S1F1P1
30
70
0
AUTO
R1
8
63
OFF
127
0
1
OFF
70
0
30
127
S1F1P2
29
127
0
AUTO
F12
-7
63
OFF
127
0
1
OFF
70
0
30
100
S1F1P3
29
127
0
AUTO
MID
4
63
OFF
127
0
1
OFF
70
0
30
127
S1F2P1
--
--
--
--
--
--
--
--
--
--
--
--
--
--
--
--
S1F2P2
--
--
--
--
--
--
--
--
--
--
--
--
--
--
--
--
S1F2P3
--
--
--
--
--
--
--
--
--
--
--
--
--
--
--
--
S2F1P1
3
110
-12
ON
R2
0
63
OFF
127
0
1
OFF
70
0
30
127
S2F1P2
35
77
-12
ON
R1
0
63
OFF
127
0
1
OFF
70
0
30
127
S2F1P3
38
110
-12
ON
L1
0
63
OFF
127
0
1
OFF
70
0
30
127
S2F2P1
-
-
-
-
-
-
-
--
-
--
-
--
-
-
--
-
S2F2P2
-
--
-
-
-
-
-
--
-
-
--
-
--
-
--
-
S2F2P3
-
-
--
-
-
-
-
-
-
-
-
-
-
-
-
-
HOLD
26
110
0
AUTO
MID
0
63
OFF
127
0
1
OFF
70
0
30
127

PROGRAM
0-127
VOLUME
0-127
TRANSPOSE
•aitS
QUANTIZE
OWOFRAUTO
PAN
POS
OHB1.15..MID.R15
PAN SPREAD
i5.n.»is
REVERB
OJ27
FINGR PICK
ON/OFF
VEL
SENS
0-127
VE OFFS
•6>-t6i
TRIG LEV
0.3
PICK CNTRL
OFF0..127
P1 POS
0-S8
PI
VAL
0.127
P2POS
O-SB
P2VAL
0.127
S1F1P1
S1F1P2
S1F1P3
S1F2P1
S1F2P2
S1F2P3
S2F1P1 S2F1P2
S2F1P3
S2F2P1
S2F2P2
S2F2P3
HOLD
 Loading...