

UPDOWN
DRAWBAR SETTING
16' 8'
4'
2' 1'
VOLUME
PRESETS - EDIT FUNCTION
EDIT
MAIN REVERB EFFECTS
STORE
1 '
3
5
/
1 '
1
3
/
2 '
2
3
/
5 '
1
3
/
V
irtual
T
one
W
heel
O
rgan
BLUE CHIP
User‘s Manual
Version 5.0

GENERAL PRECAUTIONS
NOTE:
- Keep your instrument out of high humidity.
- Use ONLY the included powersupply.
- Use only the correct house current.
- Avoid physical trauma and impact.
- Disconnect the power immediatly if problems arise.
- Read the user‘s manual before using the instrument.
- Avoid high temperatures and direct sunlight.
Check to make sure your house voltage matches the rating printed on the powersupply.
Avoid high temperatures such as near a power amplifier.
Avoid using your instrument in conditions of high humidity. If you bring it in from the cold
outdoors, wait until it has reached room temperature before powering it up. Otherwise damage
can be caused by condensation. Do not spill liquids such as coffee on your instrument.
OPERATING PRECAUTIONS
If repair becomes necessary, allow repair only by qualified service technicians.
When you unplug your instrument from the wall, always pull it out by the plug and NOT by the
cable.
Don‘t plug your instrument into a socket that is already being used by something that could cause
problems; eg. electric motors, lighting dimmers, etc. Do not use the instrument near devices that
are known to cause problems; eg. Televisions, cellular phones, florescent lighting.
If liquid or any object should get into the instrument, pull the power plug immediately and let it
be checked by a qualified service technnician before you try to use it again.
This instrument carries the CE Logo and meets the standards of the European Union.
2

Table of Contents
GENERAL PRECAUTIONS .............................................................................................................. 2
OPERATING PRECAUTIONS .......................................................................................................... 2
Characteristics of the Baby b. .............................................................................................................. 5
Front Panel...........................................................................................................................................6
Rear Panel ............................................................................................................................................ 7
Setting Up and Powering Up ...............................................................................................................8
Connecting the Baby b. to a Keyboard ................................................................................................ 8
Connecting the Baby b. to an 88-key MIDI Master Keyboard ......................................................... 10
Connecting the Baby b. to 2 MIDI Keyboards with a MIDI MERGE box ....................................... 12
Connecting the Baby b. to an Organ.................................................................................................. 14
Connecting the Baby b. to a MIDI Master Keyboard and Sequencer ............................................... 16
Sound Features of the Baby b. ........................................................................................................... 18
B3 Sound ........................................................................................................................................... 18
WERSI Sound ................................................................................................................................... 18
The Front Panel of the Baby b. .......................................................................................................... 20
MAIN VOLUME Control ................................................................................................................. 20
REVERB Control .............................................................................................................................. 20
EFFECTS Control ............................................................................................................................. 20
VALUE UP/DOWN Buttons ............................................................................................................. 20
DEMO PLAY .................................................................................................................................... 21
Presets ................................................................................................................................................ 21
Selector for Upper, Lower and Pedal ................................................................................................ 22
STORE PRESETS ............................................................................................................................. 22
Functions using MIDI Non-Registered Parameters........................................................................... 23
Select the different OrganS................................................................................................................ 23
ROTOR ON - Off ..............................................................................................................................23
ROTOR SPEED slow/Fast ................................................................................................................ 23
PERCUSSION On - Off ...................................................................................................................24
HarmonicS of the Percussion ............................................................................................................ 24
Percussion: MonophonIC or PolyphonIC ........................................................................................ 24
Lenght of The Percussion......................................................................................................... 24
PERCUSSION ROUTING ...................................................................................................... 24
Sustain or Delay ....................................................................................................................... 25
Select KEYCLICK ................................................................................................................... 25
Select REVERB ....................................................................................................................... 25
VIBRATO On - Off.................................................................................................................. 26
Select VIBRATO SPEED......................................................................................................... 26
Select VIBRATO TYPE ........................................................................................................... 26
OVERDRIVE-EFFECT ........................................................................................................... 26
Changing Sound Settings .................................................................................................................. 27
Start of Programming ............................................................................................................... 27
Changing Rotor Speed ............................................................................................................. 27
Changing Rotor settings ................................................................................................. 27
Setting the Length of Percussion .................................................................................... 27
Setting Sustain Length .................................................................................................... 27
Keyclick Settings ............................................................................................................ 27
3

Vibrato Settings .............................................................................................................. 28
Percussion Settings ......................................................................................................... 28
STORE functions in Flash rom...........................................................................................
.................................................................................................................................... 28
EDIT Button ................................................................................................................... 29
Global Parameters........................................................................................................... 29
Select MIDI Channel for Upper ..................................................................................... 29
Select MIDI Channel for Lower ..................................................................................... 29
SELECT MIDI CHANNEL for Pedal ........................................................................... 30
Pitchbend Range ............................................................................................................. 30
Receive Control Change Commands .............................................................................. 30
Transmit Control Change Commands ............................................................................ 30
Receiving Program Change Commands ......................................................................... 30
Send Program Change Commands ................................................................................. 31
Split Point on one MIDI Channel ................................................................................... 31
Split Point for the Lower Manual ................................................................................... 31
MIDI Merge Functions ................................................................................................... 31
Reset Factory Presets ...................................................................................................... 32
SEND MIDI DUMP ....................................................................................................... 32
The DRAWBARS ........................................................................................................... 33
Drawbar Settings ............................................................................................................ 34
Drawbar Settings for Solo Register ................................................................................ 35
Drawbar Settings for Percussion .................................................................................... 36
Factory Presets No. 1-3 .................................................................................................. 37
Factory Presets No. 4-6 .................................................................................................. 38
Factory Presets No. 7-9 .................................................................................................. 39
Factory Presets No. 10-12 .............................................................................................. 40
Factory Presets No. 13-15 .............................................................................................. 41
Factory Presets No. 16-18 .............................................................................................. 42
Factory Presets No. 19-21 .............................................................................................. 43
Factory Presets No. 22-24 .............................................................................................. 44
Factory Presets No. 25-27 .............................................................................................. 45
Factory Presets No. 28-30 .............................................................................................. 46
Factory Presets No. 31-32 .............................................................................................. 47
Presets ............................................................................................................................. 48
Connecting the Baby b. to a PC for MIDI Dumps; Saving Presets ................................ 49
SOFTWARE UPDATE ................................................................................................... 51
Sending the Internal Operating System Software to a PC or to another Baby b. ........... 51
Switch Function using Non-Registered .......................................................................... 53
Parameters ......................................................................................................................53
Sound Programming using MIDI ................................................................................... 54
Program Maps for Cubase .............................................................................................. 55
Mixermap Upper ...................................................................................................................... 55
Mixermap Lower / Bass ...........................................................................................................56
Mixermap Program .................................................................................................................. 56
4
VOLUME
PRESETS - EDIT FUNCTION
DRAWBAR SETTING
BLUE CHIP
V
MAIN REVERB EFFECTS
UPDOWN
STORE
irtual ToneWheel Organ
EDIT
1
/
16' 8'
5 '
3
3
2
/
4'
2 '
2'
3
1 '
1
/
/
1'
1 '
5
3
CHARACTERISTICS OF THE Baby b.
Congratulations on your purchase of the new Baby b. MIDI drawbar module! You can drive your Baby
b. with any MIDI instrument and thereby have access to the legendary drawbar organ sounds of the
60‘s, 70‘s and 80‘s. We have invested much time and energy in simulating as exactly as possible the
trend-setting sounds of the famous electromagnetic HAMMOND B3 and the electronic WERSI organs.
Not only did we analyse in finest detail of the sounds of these organs, but have sought the advice of
professional musicians in the development of the Baby b..
The drawbar section of the Baby b. affords complete access to the nine classical organ registers in feet
(16‘, 8‘, 5 1/3‘, 4‘, 2 2/3‘, 2‘, 1 1/3‘, 1‘.) The number of sound variations is endless.
Registers are divided into three multitimbral manuals (UPPER, LOWER, PEDAL), and can be
independantly programmed and saved. Using a MIDI capable pedal bank and a split capable MIDI
keyboard, or even two separate keyboards, you can play all three manuals simultaneously.
Your Baby b. is equipped with all the standard effects available in the original instruments as well as
numerous reverb programs that are easily accessed.
The programmable KEYCLICK function simulates the attack noise of a typical tone wheel organ.
The two-level Rotor rotor simulates exactly the complexities of a Rotor cabinet. The acceleration and
deceleration of both sets of rotating speakers have been taken into consideration in the simulation.
Other typical organ effect features such as percussion, phase-vibrato and distortion serve to enhance
sound variation possibilities for even the most ambitious organist.
All the registers and parameters of the Baby b. can be saved in 99 presets which can be accessed easily
at any time.
You can use the DUMP function to transfer and back up all your saved presets and data using MIDI.
5
FRONT PANEL
VOLUME
PRESETS - EDIT FUNCTION
BLUE CHIP
V
UPDOWN
MAIN REVERBEFFECTS
STORE
1122334455667
EDIT
7
irtual ToneWheel Organ
16' 8'
1. GENERAL:Volume setting for the entire instrument..
5 '
1
/
3
DRAWBAR SETTING
2
/
4'
2 '
2'
3
8
8
1 '
3
1
/
/
1'
1 '
5
3
2. REVERB:controls the reverb intensity of the presently selected reverb program.
3. EFFECTS: controls the intensity of the percussion effect.
4. DOWN: to reduce the presently selected value or presently selected preset by one.
5. UP: to increase the presently selected value or presently selected preset by one.
6. KEYBOARD SELECT: allows the selection of the appropriate manual to which to apply drawbar
settings. STORE: After editing, the newly changed values can be saved using the STORE button.
7. EDIT: switches to edit mode, allowing access to various programmable parameters.
8. Harmonic Sliders
6
OUTPUT
REAR PANEL
POWER
ROTOR
POWER
INPUT
MIDI
V
irtual ToneWheel Organ
Stereo / Mono
Audio Output
SLOW/FAST
FOOTSWITCH
ON/OFF
MIDI
Input
Keyboard
Computer
Sequenzer
MIDI
Thru
OUTIN THRUR/MONO L/STEREO AC-15V/1A
MIDI
Output
Computer
Sequenzer
7

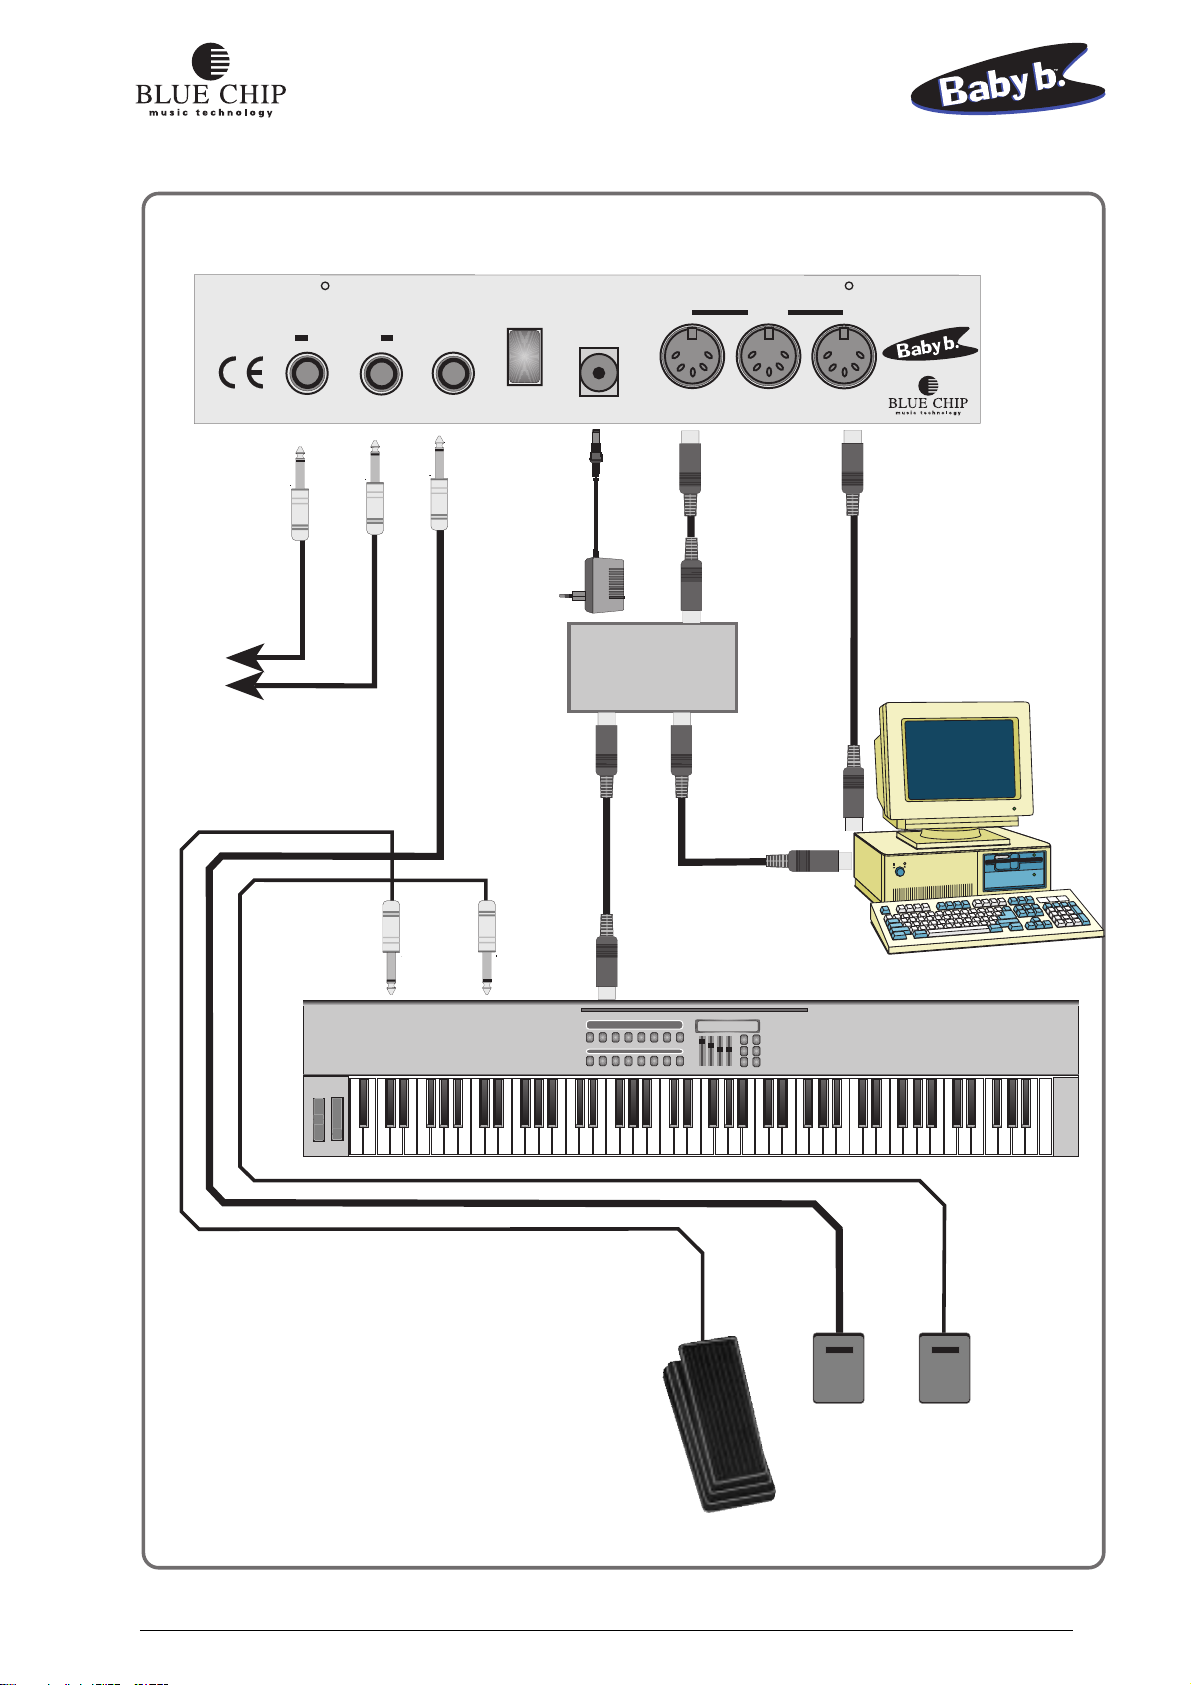
SETTING UP AND POWERING UP
Before you can use your Baby b. it will be necessary to connect it to your MIDI equipment. Make sure
you have the cables connected properly in order to avoid error functions:
CONNECTING THE Baby b. TO A KEYBOARD
1) Connect both AUDIO OUT jacks on the Baby b. with your amplifier using two (MONO) quarter
inch cables. If you not be sending a stereo signal, use just the LEFT/MONO output jack on the Baby
b.. For an optimal Rotor sound you should connect your Baby b. in stereo.
2) Connect the MIDI out jack on your keyboard with the MAIN-IN jack on the Baby b.. Use a standard
5-connector MIDI cable. .
3) Connect the quarter inch cable of a volume pedal to the SWELL PEDAL jack, if you will be using
one. If you have a foot switch, connect it to the ROTOR slow/fast quarter inch input jack.
Note: If your MIDI master keyboard allows for connecting volume pedals or switch pedals to it, you
can connect your pedals to it instead if you desire.
5) Connect the included power supply to the POWER-IN jack of the Baby b. and plug it into your
power source. Turn on the power switch on your Baby b. as well as your MIDI and amplifier
equipment. Play some keys on your MIDI keyboard to make sure the connetions are functional.
6) If you want to use the Upper and Lower manuals of the Baby b. at the same time, you will need to
set your master keyboard to allow for an appropriate split. If you‘re not sure how to do this, see the
user‘s manual of your master keyboard or your dealer. Normally your Baby b. uses MIDI channel
1 for the upper manual, MIDI channel 2 for the lower manual, and MIDI channel 3 for the pedal
bank. It could be necessary for you to change these channel assignments in your Baby b.. See „EDIT
Key/Global Parameters.“
NOTICE! The Baby b. has a special function to allow adapting to a keyboard. Using a program change
command the Baby b. can be turned on or off per channel. See the directions in the section „Receiving
Program Change Commands“ .
8
OUTPUT
ROTOR
POWER
POWER
INPUT
MIDI
Virtual T oneWheel Organ
SLOW/FAST
FOOTSWITCH
ON/OFF
Keyboard
STEREO-INPUT
MIDI OUT
OUTIN THRUR/MONO L/STEREO AC-15V/1A
Swell Pedal
Keyboard
UPPER
LOWER
PEDAL
CONTROLS
RHYTHME
STRINGS
MIDI
PIANO
SPECIALS 150
GUITAR
SWING
CHANNEL 1
Keyboard
9

CONNECTING THE Baby b. TO AN 88-KEY MIDI MASTER KEYBOARD
1) Connect both AUDIO OUT jacks on the Baby b. with your amplifier using two (MONO) quarter
inch cables. If you not be sending a stereo signal, use just the LEFT/MONO output jack on the
Baby b.. For an optimal Rotor sound you should connect your Baby b. in stereo.
2) Connect the MIDI out jack on your keyboard with the MAIN IN jack on the Baby b.. Use a
standard 5-connector MIDI cable.
3) If you will be using a MIDI capable bass pedal bank, connect its MIDI out jack with the PEDAL-IN jack of the Baby b.. Plug in the powersupply for the pedal bank.
4) Connect the quarter inch cable of a volume pedal to the SWELL PEDAL jack, if you will be
using one. If you have one, or even better, two foot switch pedals, connect them to the PEDAL1 and PEDAL-2 quarter inch input jacks. If you only have one pedal, you need to decide whether
you would rather use it to control Rotor rotor speed (PEDAL-1) or sustain effect (PEDAL-2).
Note: If one of your MIDI master keyboards allows for connecting volume pedals or switch pedals
to it, you can connect your pedals to it instead if you desire.
5) Connect the included power supply to the POWER-IN jack of the Baby b. and plug it into your
power source. Turn on the power switch on your Baby b. as well as your MIDI and amplifier
equipment. Play some keys on your MIDI keyboard to make sure the connetions are functional.
6) If you want to use both the upper and lower manuals of your Baby b., you will need make the
appropriate split settings in your Master keyboard. Set the MIDI OUT channel of the keyboard
you will using for the upper manual to MIDI channel 1 and the channel for the keyboard you
will be using for the lower manual to channel 2. If you‘re not sure how to do this, see the user‘s
manual of your master keyboard or your dealer. Normally your Baby b. uses MIDI channel 1
for the upper manual, MIDI channel 2 for the lower manual, and MIDI channel 3 for the pedal
bank. It could be necessary for you to change these channel assignments in your Baby b.. See
„EDIT Key/Global Parameters.“
10
OUTPUT
ROTOR
POWER
POWER
INPUT
MIDI
V
irtual ToneWheel Organ
Audio to
Mixer/Amplifier
STEREO
MOD.
PITCH
MIDI
Master
Keyboard 88 Keys
SLOW/FAST
ON/OFF
OUTIN THRUR/MONO L/STEREO AC-15V/1A
MIDI OUT
CHANNEL 1
MIDI
PIANO
LOWER
PEDAL
SPECIALS 150
GUITAR
Rotor
Slow/Fast
Swell Pedal
FOOTSWITCH
11

CONNECTING THE Baby b. TO 2 MIDI KEYBOARDS WITH A MIDI MERGE BOX
1) Connect both AUDIO OUT jacks on the Baby b. with your amplifier using two (MONO) quarter
inch cables. If you not be sending a stereo signal, use just the LEFT/MONO output jack on the
Baby b.. For an optimal Rotor sound you should connect your Baby b. in stereo.
2) Connect the MIDI out jack on both keyboards with the MIDI IN jacks on the (optional) MIDI
MERGE box. From the MIDI OUT jack on the merge box, connect to the MAIN-IN jack on the
Baby b.. Use 3 standard 5-connector MIDI cables.
3) If you will be using a MIDI capable bass pedal bank, connect its MIDI out jack with the PEDAL-IN jack of the Baby b.. Plug in the powersupply for the pedal bank.
4) Connect the quarter inch cable of a volume pedal to the SWELL PEDAL jack, if you will be
using one. If you have one, or even better, two foot switch pedals, connect them to the PEDAL1 and PEDAL-2 quarter inch input jacks. If you only have one pedal, you need to decide whether
you would rather use it to control Rotor rotor speed (PEDAL-1) or sustain effect (PEDAL-2).
Note: If one of your MIDI master keyboards allows for connecting volume pedals or switch pedals
to it, you can connect your pedals to it instead if you desire.
5) Connect the included power supply to the POWER-IN jack of the Baby b. and plug it into your
power source. Turn on the power switch on your Baby b. as well as your MIDI and amplifier
equipment. Play some keys on your MIDI keyboard to make sure the connetions are functional.
6) Set the MIDI OUT channel of the keyboard you will using for the upper manual to MIDI channel
1 and the channel for the keyboard you will be using for the lower manual to channel 2. If you‘re
not sure how to do this, see the user‘s manual of your master keyboard or your dealer. Normally
your Baby b. uses MIDI channel 1 for the upper manual, MIDI channel 2 for the lower manual,
and MIDI channel 3 for the pedal bank. It could be necessary for you to change these channel
assignments in your Baby b.. See „EDIT Key/Global Parameters.“
12
OUTPUT
ROTOR
POWER
POWER
INPUT
MIDI
V
irtual ToneWheel Organ
Audio to
Mixer
Amplifier
STEREO
Slow/Fast
Rotor
PITCH
MIDI
Master
Keyboard
MOD.
FOOTSWITCH
SLOW/FAST
MIDI OUT
ON/OFF
LOWER
PEDAL
OUTIN THRUR/MONO L/STEREO AC-15V/1A
MIDI
OUT
MIDI
MERGE
MIDI
IN
MIDI
IN
CHANNEL 1
MIDI
PIANO
SPECIALS 150
GUITAR
PITCH
MIDI
Master
Keyboard
MOD.
MIDI OUT
CHANNEL 1
MIDI
PIANO
LOWER
PEDAL
SPECIALS 150
GUITAR
13

CONNECTING THE Baby b. TO AN ORGAN
1) Connect both AUDIO OUT jacks on the Baby b. with your amplifier using two (MONO) quarter
inch cables. If you not be sending a stereo signal, use just the LEFT/MONO output jack on the Baby
b.. For an optimal Rotor sound you should connect your Baby b. in stereo.
2) Connect the MIDI out jack on your organ with the MAIN-IN jack on the Baby b.. Use a standard
5-connector MIDI cable.
3) Normally your organ will have a volume pedal, bass pedal bank and foot switch built in. You can
use these controllers globally to control both the organ and the Baby b..
4) Connect the included power supply to the POWER-IN jack of the Baby b. and plug it into your
power source. Turn on the power switch on your Baby b. as well as your MIDI and amplifier
equipment. Play some keys on your MIDI keyboard to make sure the connetions are functional.
5) Normally your Baby b. uses MIDI channel 1 for the upper manual, MIDI channel 2 for the lower
manual, and MIDI channel 3 for the pedal bank. It could be necessary for you to change these channel
assignments in your Baby b.. See „EDIT Key/Global Parameters.“
NOTICE! The Baby b. has a special function to allow adapting to a keyboard. Using a program change
command the Baby b. can be turned on or off per channel. See the directions in the section „Receiving
Program Change Commands“ on page 38.
14
OUTPUT
ROTOR
POWER
POWER
INPUT
MIDI
V
irtual ToneWheel Organ
SLOW/FAST
Audio Input
Instrument
STEREO
ON/OFF
OUTIN THRUR/MONO L/STEREO AC-15V/1A
MIDI OUT
15

CONNECTING THE Baby b. TO A MIDI MASTER KEYBOARD AND SEQUENCER
1) Connect both AUDIO OUT jacks on the Baby b. with your amplifier using two (MONO) quarter
inch cables. If you not be sending a stereo signal, use just the LEFT/MONO output jack on the
Baby b.. For an optimal Rotor sound you should connect your Baby b. in stereo.
2) Connect the MIDI out jacks on your keyboard and sequencer with the MIDI IN jacks on a MERGE
BOX. Connect the MIDI OUT jack on the merge box with the MAIN-IN jack on the Baby b..
Use 4 standard 5-connector MIDI cables.
3) If you will be using a MIDI capable bass pedal bank, connect its MIDI out jack with the PEDAL-IN jack of the Baby b.. Plug in the power supply for the pedal bank.
4) Connect the quarter inch cable of a volume pedal to the SWELL PEDAL jack, if you will be
using one. If you have one, or even better, two foot switch pedals, connect them to the PEDAL1 and PEDAL-2 quarter inch input jacks. If you only have one pedal, you need to decide whether
you would rather use it to control Rotor rotor speed (PEDAL-1) or sustain effect (PEDAL-2).
5) Connect the included power supply to the POWER-IN jack of the Baby b. and plug it into your
power source. Turn on the power switch on your Baby b. as well as your MIDI and amplifier
equipment. Play some keys on your MIDI keyboard to make sure the connetions are functional.
6) If you want to use the Upper and Lower manuals of the Baby b. at the same time, you will need
to set your master keyboard to allow for an appropriate split. If you‘re not sure how to do this,
see the user‘s manual of your master keyboard or your dealer. Normally your Baby b. uses MIDI
channel 1 for the upper manual, MIDI channel 2 for the lower manual, and MIDI channel 3 for
the pedal bank. It could be necessary for you to change these channel assignments in your Baby
b.. See „EDIT Key/Global Parameters.“
16
OUTPUT
ROTOR
POWER
POWER
INPUT
MIDI
V
irtual ToneWheel Organ
Audio to
Mixer
STEREO
SLOW/FAST
ON/OFF
OUTIN THRUR/MONO L/STEREO AC-15V/1A
Adapter
OUT
MIDI MERGE
IN
MIDI IN
MIDI OUT
MIDI OUT
MIDI
Master
Keyboard 88 Keys
MOD.
PITCH
Swell Pedal
CHANNEL 1
MIDI
PIANO
LOWER
PEDAL
SPECIALS 150
GUITAR
FOOTSWITCHFOOTSWITCH
Rotor
Slow/Fast
Sustain
Pedal
17

Sound Features of the Baby b.
B3 SOUND
For the last 40 years and still today the HAMMOND B3 organ has been a preference for musicians.
Because of the legendary drawbar system, the B3 is still one of the most sought-after instruments. Some
of the features of the B3 are:
1. Drawbar balance of the individual foot registers.
2. The „dirty effect“ of the sine generation.
3. Key click (the characteristic click noise upon pressing or releasing keys).
4. Repitition of the foot registers starting with 2‘.
These characteristics make possible the legendary B3 sound that reaches the quality standard of professional musician when used with a ROTOR cabinet (an amplified speaker system with rotating horns
and woofers). The following is a list of features of the ROTOR cabinet:
1. The full effect of two speed vibrato.
2. The varying acceleration and decceleration of the rotating horns and woofers.
3. The presence effect of the horns and the pressure effect of the woofers in low and midrange.
4. Combination of ROTOR with phase-vibrato.
The combination of all the above features give the B3 it‘s characteristic and much-loved sound.
All of these characteristics have been recreated in perfect detail in the Baby b.. During it‘s development,
it was tested in a professional studio under the scrutinizing ear of professional musicians and compared
again and again to a „real“ HAMMOND B3 until the result was perfected.
WERSI SOUND
The same attention to detail and perfection was implemented in the creation of the WERSI organ sound,
so that the Baby b. is equipped with both of the best-known drawbar organ systems.
In order to serve the creative needs of every user, some of the sound effects and variations are
implemented in such a way as to give the musician total control of the effect, and others are automatically
set when switching from B3 mode to WERSI mode. When the Baby b. is switched from B3 mode to
WERSI mode, the following characteristics are changed:
1. The repitition in the foot registers above 2‘ is different, especially in the upper two octaves.
2. The balance in foot registers is different, which influences the sound drastically.
3. The B3‘s keyclick is switched to the „WERSI Patsch“.
4. The „Dirty effect“ in sine generation of the B3 is not applicable in WERSI mode.
18

The ROTOR features remain unchanged between the two modes.
You can choose a different organ for each manual. If you use ROTOR, its effect will be the same in
both manuals and modes with the exception of the pedal manual because it is a global effect.
Other global effects (effects common to the entire instrument) are reverb and the variants of the phasevibrato. MIDI data that is received on the PEDAL IN port are automatically mapped to the bass manual.
In other words, all MIDI channel numbers received here are replaced with the channel number you
choose globally for the bass manual (PEDAL).
We have preprogrammed presets for you with the intent of assisting you in creating your own Organ
Setups. Have fun with your new Baby b..
The two best-known drawbar organs worldwide:
The Hammond B3/H100
and the Wersi Spectra/Helios
as well as the legendary ROTOR
all in one instrument: the new Baby b..
HAMMOND B3 with Leslie
Hammond and Suzuki are tragemarks of
Suzuki Musical Instruments in Japan.
WERSI CD-Organ DX 700
19

The Front Panel of the Baby b.
MAIN VOLUME CONTROL
VOLUME
The MAIN VOLUME control sets the overall volume of your Baby b.. The level set
here is also the maximum level that can be reached when using a volume pedal (when
the pedal is pressed all the way).
FECT
MAIN REVERB EF
Note: When MIDI controller #11 (EXPRESSION) data is received via MIDI IN on the channel set for
Upper, the overall volume of the Baby b. is affected. However, when MIDI controller #7 (VOLUME)
data is received, this affects ONLY the channel to which it is assigned (UPPER, LOWER oder PEDAL).
REVERB CONTROL
VOLUME
The Reverb Control sets the intensity of the presently selected reverb program. To
guarantee the proper mix between dry signal and reverb, reverb intensity can also be
controlled using an external swell pedal. The level that is set using this control will
be the maximum amount of reverb when the swell pedal is fully depressed.
FECT
MAIN REVERB EF
Note: The setting of this control will affect all three manuals (UPPER, LOWER & PEDAL). MIDI
Controller #91 (REVERB SEND LEVEL) data can also be sent to the upper manual MIDI channel to
change this value. The resulting setting will then affect all three manuals.
EFFECTS CONTROL
VOLUME
This control sets the level of the percussion effect. Percussion Effect and the available
variants will be discussed later in the section „PERCUSSION Button“.
MAIN REVERB EFFECT
Note: The setting of this control will affect all three manuals (UPPER, LOWER & PEDAL). MIDI
Controller #16 (EFFECT POT) data can also be sent to the upper manual MIDI channel to change this
value. The resulting setting will then affect all three manuals.
VALUE UP/DOWN BUTTONS
PRESETS - EDIT FUNCTION
UPDOWN
STORE
Some of the parameters of your Baby b. require you to input a particular value. Using
these buttons you can change the presently selected presets in the display. The value
is raised by pressing the UP button and lowered by pressing the DOWN button. If
you hold one of these buttons down, after a moment, the values will increase/decrease
in increments.
EDIT
20

DEMO PLAY
PRESETS - EDIT FUNCTION
Your Baby b. contains demo-sequences which will give you an overview of the
various features and sound characteristics of the module:
UPDOWN
EDIT
STORE
1) Press the EDIT button. In the display appears an abbreviation, assuring you that you are now in
DEMO PLAY mode.
2) The demo-sequences are numbered starting with 0 upward. This number is shown in the display
after the abbreviation „dE“. An „A“ in this position means that ALL demo-sequences are selected
for play. Use the VALUE UP/DOWN buttons to select individual sequence numbers. The UP button
selects the next sequence in the series and the DOWN button the previous one. To start play of the
selected sequence(s), press the MODE button. During playback of a sequence, you have access to
all the play functions of your Baby b.. This means for example, that you can use the drawbars to
change the timbre of the playback sounds.
3) To stop playback, press the EDIT button and then the MODE button. If you want to hear another
sequence, repeat step 2. Otherwise you can leave DEMO PLAY mode by pressing the EDIT button.
Note: MIDI data generated in DEMO PLAY will NOT be sent to the MIDI out port. MIDI data input
to the Baby b. during DEMO PLAY will only be received on the MIDI MAIN IN port.
Presets
PRESETS - EDIT FUNCTION
UPDOWN
STORE
As easy as cycling through the available presets, the availability of many practical variations and drawbar
settings, as well as effects, gives the organist ample opportunity to express himself. The Baby b.
registers and saves every change in settings you make within a preset. These changes remain in effect
as long as the preset remains active. Using the STORE function, you can save your changes permanently
or copy them to another preset number.
A "preset" is a programmed group of settings that are used often and can be recalled;
eg: the position of drawbars and other settings. Your Baby b. is equipped with 99
freely programmable presets. They are preprogrammed for you at the factory with
stardardized settings. You can cycle through them using the VALUE UP/DOWN
EDIT
buttons. You see the presently selected preset (p1…P99) in your display.
21

Selector for Upper, Lower and Pedal
As already mentioned your Baby b. is equipped with 3 multitimbral manuals that each have their own
registers. Using an external bass pedal bank and two MIDI keyboards (or one split-capable keyboard),
it is possible to play all three manuals simultaneously. Pressing the KEYBOARD button cycles you
through the various manuals, activating them for editing (UPPER, LOWER, PEDAL). For each manual
you can change drawbar settings. One of the three LED's in the display shows you which manual is
presently active.
PRESETS - EDIT FUNCTION
UPPER MANUAL (Upp)
The upper manual is the one that is normally used for solo registers. In the default
setting is this manual the active one.
UPDOWN
EDIT
STORE
LOWER MANUAL (Lo)
The lower manual is used for normal playing with an accompaniment register.
PEDAL (Ped)
The pedal or bass manual allows accompaniment using a bass instrument or pedal
bank.
STORE PRESETS
PRESETS - EDIT FUNCTION
UPDOWN
STORE
Changing drawbar settings will only remain in effect as long as the present preset is
active.
You can use the STORE button to save your changes, so that the next time you activate
EDIT
the present preset, your settings will be as they were the last time you saved them
using this button:
1) Press the EDIT button.
2) Next press the STORE button.
2) If you do not want to overwrite the presently saved values, use the VALUE UP/DOWN buttons to
select a free preset position.
3) Use the STORE button again to confirm your save. If you change your mind, press the EDIT button.
The preset will not be overwritten. You will see „nUP“ in the display indicated that the preset was
„not updated.“Press the EDIT button again to return to Preset Mode.
Note: Using the STORE button overwrites the selected preset. From now on your Baby b. will select
this preset as the active one.
22

FUNCTIONS USING MIDI NON-REGISTERED PARAMETERS
These functions apply to the different sound functions of the Baby b.. You can use the function on
each of the three midi channels. After you have set these functions, you can use the store function, to
store a preset.
You can also use this function with the CUBASE Mixermap. Please refer to chapter "Program Maps
for Cubase" in this manual.
SELECT THE DIFFERENT ORGANS
Drawbar B3/WERSI B0 63 02 62 07 26 XX XX = 0,2 0=B3, 2=WERSI
Drawbar Main/Variat B0 63 02 62 08 26 XX XX = 0,1 0=Main, 1=Variat
Use this Function to switch total parameter sets between 4 complete and complex drawbar organ systems:
Ham d B3 => B3 and the MAIN
Simulates the electromagnetic "Hammond B3" organ. Selected from the palatte of offerings by Laurens
Hammond, the B3 was first introduced in 1955. The B3, with its "dirty" sound has become a legend
among jazz musicians and rock artists alike.
Hammond B3 => B3 and the VARIATION
Simulates the electromagnetic "HAMMOND H100" organ.
WERSI Spectra/Atlantis => WERSI and the MAIN
The sound of the modern electronic WERSI entertainer organ. Developed by the german Franz family, the
WERSI organ has acclaimed appreciation because of it's crystal clear sound by artists in all areas of music.
The most famous representative of the WERSI organ series is the "one-man-orchestra" Franz Lambert.
WERSI Helios/Galaxis => WERSI and the VARIATION
This Organ was developed in the 70th and one of the famous WERSI organs.The most famous
representative of this WERSI organ series was Klaus Wunderlich.
ROTOR ON - OFF
MIDI Data: B0 63 02 62 01 26 XX XX = 0,1 0=Off, 1=On (Only for upper channel)
This button turns the ROTOR effect on and off. ROTOR is a simulation of the special amplifier cabinet
with mechanically rotating speakers, that was invented in the days of Tone-Wheel organs by Donald
Rotor. The rotating speakers resulted in a doppler effect, creating a complex waveform of frequency
and phase vibrati.
ROTOR SPEED SLOW/FAST
MIDI Data: B0 63 02 62 02 26 XX XX = 0,1 0=Slow, 1=Fast
Use this button to adjust the rotation speed (in a virtual sense) of the rotating speakers. Two speeds are
available. You can also user the footswitch to change the speed of the rotor. The "SLOW" setting gives
you a cathedral-like, swinging effect. The "FAST" setting results in a vibrato-like sound. If you change
the speed while holding a note or chord on your keyboard, your Baby b. simulates the actual slowing
or accelleration of the rotating speakers, a very complicated process electronically.
Note: You will only hear ROTOR when the "ROTOR ON" function is on.
23

PERCUSSION ON - OFF
MIDI DATA: B0 63 02 62 0A 26 XX XX = 0,4 0=Off, 4=On
The effect percussion affects the attack phase of the envelope curve of your organ sound. When you
press a key, a synthesized attack can be added, amplified and varied. A good organist will recognize
many different percussion variations. Your Baby b. offers you two preprogrammed percussion variants
as well as one freely programmable variant for selection. Using this MIDI Data, you can turn on or off
the percussion effect that is set in the "HARMONIC" function for the selected manual.
HARMONICS OF THE PERCUSSION
MIDI DATA: B0 63 02 62 0B 26 XX XX = 0..2 0=2nd, 1=3rd, 2=User
Here you set the percussion variant of the presently selected preset. The preprogrammed variants are
"2nd" and "3rd" here. The setting "USER" allows you to program your own variant. To program a userdefined percussion variation, you can use the MIDI Controllers 52 to 60.
PERCUSSION: MONOPHONIC OR POLYPHONIC
MIDI DATA: B0 63 02 62 0C 26 XX XX = 0,1 0=Poly, 1= Mono (onyl for Upper Channel)
Use this function to switch your Baby b. to polyphonic percussion mode. The presently selected
percussion variant is now globally in effect for all manuals.
LENGHT OF THE PERCUSSION
MIDI DATA:B0 63 02 62 0D 26 XX XX = 0..2 0=Shrt, 1=Med, 2=Lng
With this function you set the decay time for the percussion effect for each of the three MIDI channels.
There are three settings: SHORT, MED, LONG.
SHORT: Percussion effect sounds only for a short time.
MED: Percussion effect decays at a medium rate.
LONG: The amount of time before the end of the percussion effect is long.
Note: You will only hear the percussion effect when the PERCUSSION function is active.
PERCUSSION ROUTING
MIDI DATA: B0 63 02 62 03 26 XX XX = 0..2 0=Direct 1=Vibrato 2=Rotor
Using the PERCUSSION ROUTING you can send the percussion through three possible effects:
DIRECT: Percussion is directly returned without any effect.
VIB: Percussion is sent through Vibrato effect before it is returned.
ROTOR: Percussion is sent through ROTOR before being output. In order
for this to happen, the ROTOR effect must be active.
24

SUSTAIN OR DELAY
MIDI DATA: B0 63 02 62 0E 26 XX XX = 0..2 0=Delay 1=Sustain 2=Both
The ENVELOPE function allows you access to the various programmable segments of the three MIDI
Channels drawbar envelope curve. The following are the possible settings:
DEFAULT: Attack, sustain and delay relationships are normal.
DELAY: The attack (amount of time after pressing a key until the level
of the tone has reached its loudest) is longer; somewhat like the
time it takes a pipe organ pipe to reach its full resonance.
SUSTAIN: This is the amount of time that a note sounds after a key has
been released; somewhat like the sustain pedal of a piano allows
the string to continue vibrating long after its key has been
released.
DELAY and SUSTAIN: Both the attack time (DELAY) and the decay time
(SUSTAIN) can be lengthened.
SELECT KEYCLICK
MIDI DATA:B0 63 02 62 0F 26 XX XX = 0..3 0=Off, 1=Soft, 2=Med, 3=Loud
Typical of electromagnetic organs such as the HAMMOND B3 is the characteristic key click noise
that was an unintentional result of dirty key switch contacts and the not totally synchronized switching
of the sinus foot register.
What was for the makers of these organs an unwanted sound, found favor among musicians who included
the "keyclick" as part of what a good organ sound should have, and it became a "feature."
Using the KEYCLICK function, you can simulate this "feature" for the presently active manual.
Repeated pressing of the button gives you access to four possible settings:
DEFAULT: No keyclick for the drawbar register is added.
SOFT: A soft, subtle keyclick is simulated for the drawbar register.
MED: For the drawbar register of the presently active manual a medium
loud keyclick is heard.
LOUD: For the drawbar register of the presently active manual a loud
keyclick is heard.
SELECT REVERB
MIDI DATA: B0 63 02 62 10 26 XX XX = 0..5 Reverb progr. 1..6
Use this function to select the available reverb programs. There are presently six to choose from.
If you want to save a reverb program within the present preset, use the STORE button.(see: "STORE
button")
25

VIBRATO ON - OFF
MIDI DATA: B0 63 02 62 04 26 XX XX = 0,1 0=Off, 1=On
This function turns on or off one of the three available phase vibrato effect types for the drawbar section.
Your Baby b. offers you a choice of three vibrato variations: CHORUS, NORMAL, CELESTE. The
orginal signal is modulated with a phase shifted waveform to give a delay or frequency-cancellation
effect. This function turns on or off the presently selected vibrato type.
SELECT VIBRATO SPEED
MIDI DATA: B0 63 02 62 05 26 XX XX = 0,1 0=Slow, 1=Fast
Use this function to toggle through the two available vibrato speeds.
SLOW: slow phase vibrato… a rotating wave-like effect.
Note: You will only hear vibrato if the VIBRATO function is on.
SELECT VIBRATO TYPE
MIDI DATA: B0 63 02 62 06 26 XX XX = 0..2 0=Normal, 1=Chorus, 2=Celeste
There are three available alternative vibrato types. Pressing the VIBRATO TYPE button cycles through
CHORUS, NORMAL, CELESTE.
OVERDRIVE-EFFECT
MIDI DATA: Modulation Wheel
Overdrive effect came into being by overdriving the old tube amplifiers of the ROTOR cabinet. Rock
bands in the early 70's such as Deep Purple (John Lord) brought this effect popularity.
Use the modulation wheel on your controller keyboard to simulate this overdrive. The further you turn
the wheel, the more distortion will be applied to the signal.
Be sure to check the position of your modulation wheel (or VCF control) in order to avoid
unwanted distortion.
Note: Overdrive applies to all three (UPPER, LOWER, PEDAL) manuals. MIDI Controller #1, when
received at the MIDI IN port on the MIDI channel of the UPPER MANUAL, will apply to all manuals.
26

Changing Sound Settings
The following settings remain even after turning the Baby b. off
You can make changes to your sounds remotely over MIDI and save them in the permanent memory
of your Baby b.. In order to do this, you must send the appropriate sysex message (see table below).
Otherwise these parameters cannot be changed.
Note: In order to save the changes to the permanent memory of the Baby b., you will need to send the
„STORE“ command. Otherwise, when you turn your Baby b. off, all your changes will be lost. When
you have used the STORE button, you can then only use the function „Reset to Factory Presets“.
START OF PROGRAMMING
Start Program F0 00 20 2D 40 7E F7
Use this System Exclusive data to start the program of all the following functions.
CHANGING ROTOR SPEED
Rotor speed SLOW B0 63 08 62 64 26 XX XX = 0..7F Factory preset: 56
Leslie speed FAST B0 63 08 62 65 26 XX XX = 0..7F Factory preset: 35
The two speeds, „SLOW“ and „FAST“ can be individually set to your own taste.
CHANGING ROTOR SETTINGS
Rotor Bass Level B0 63 08 62 44 26 XX XX = 0..7F
Rotor Horn Level B0 63 08 62 45 26 XX XX = 0..7F
Rotor angle Bass B0 63 08 62 42 26 XX XX = 0..7F
Rotor angle Horn B0 63 08 62 43 26 XX XX = 0..7F
Rotor radius Bass B0 63 08 62 3C 26 XX XX = 0..7F
Rotor radius Horn B0 63 08 62 3D 26 XX XX = 0..7F
SETTING THE LENGTH OF PERCUSSION
Percussion Short B0 63 08 62 55 26 XX XX = 0..7F Factory preset: 49
Percussion Medium B0 63 08 62 56 26 XX XX = 0..7F Factory preset: 54
Percussion Long B0 63 08 62 57 26 XX XX = 0..7F Factory preset: 66
The three values for percussion length, SHORT, MEDIUM, LONG have been preset for you, but can
be changed according to your personal taste.
SETTING SUSTAIN LENGTH
Sustain Time B0 63 08 62 58 26 XX XX = 0..7F Factory preset: 5A
Using the SUSTAIN button, you can set the sustain length for each manual separately according to
your personal taste.
KEYCLICK SETTINGS
B3 Clic Level B0 63 08 62 09 26 XX XX = 0..7F
WERSI Clic Level B0 63 08 62 08 26 XX XX = 0..7F
27

VIBRATO SETTINGS
Vibrato Depth B0 63 08 62 6F 26 XX XX = 0..7F
Vibrato Speed B0 63 08 62 6E 26 XX XX = 0..7F
Vibrato Dry / Wet B0 63 08 62 36 26 XX XX = 0..7F
PERCUSSION SETTINGS
Percussion direct B0 63 08 62 28 26 XX XX = 0..7F
Percussion to Vibrato B0 63 08 62 29 26 XX XX = 0..7F
Percussion to Leslie B0 63 08 62 2A 26 XX XX = 0..7F
STORE FUNCTIONS IN FLASH ROM
STORE in Flash rom B0 63 08 62 04 26 XX XX = 01
28

EDIT BUTTON
Using the EDIT button brings you to the edit mode of your Baby b.. Here you can set a series of global
parameters that control the MIDI system. In addition you have the option of saving all your present
preset settings over MIDI (Bulk Dump) or loading previously saved settings.
1) Press the EDIT button.
2) Use the VALUE UP/DOWN buttons to cycle through the available parameters in order to get to
the one you want to change. The display shows you appropriate abbreviations for the active
parameters. (A description of the available parameters follows shortly.)
3) Press the EDIT button again to see the value of the present parameter or function.
4) Use the VALUE UP/DOWN buttons to change the value according to your desire.
5) Press the EDIT button again and the new value or function is saved and you are returned to the
starting point.
GLOBAL PARAMETERS
Pressing the EDIT button allows you access to the following parameters and their respective values:
SELECT MIDI CHANNEL FOR UPPER
(MIDI Channel assignment for the upper manual: OFF, 1 ... 16)
PRESETS - EDIT FUNCTION
Use this parameter to set the MIDI channel used to play the upper manual of your
Baby b.. This channel should be the same as the channel you have assigned in your
MIDI controller keyboard or the split you want to play the upper manual. The default
value is channel #1. If you want to use another channel, set it here. The setting „OFF“
UPDOWN
EDIT
STORE
turns the entire manual off. If you are using equipment that is capable of playing more
than one MIDI channel at a time (eg: more than one keyboard or pedal bank, splitcapable keyboard), make sure you have a separate channel set for each manual.
Notice: Even using a keyboard without a split point set, you can still
use the areas UPPER and LOWER. See the section called „Split point on one MIDI channel“
SELECT MIDI CHANNEL FOR LOWER
(MIDI Channel assignment for the lower rmanual: OFF, 1 ... 16)
PRESETS - EDIT FUNCTION
Use this parameter to set the MIDI channel used to play the lower manual of your
Baby b.. This channel should be the same as the channel you have assigned in your
MIDI controller keyboard or the split you want to play the lower manual. The default
value is channel #2. If you want to use another channel, set it here. The setting „OFF“
UPDOWN
EDIT
STORE
turns the entire manual off. If your MIDI keyboard can only play one channel, make
sure this manual is set to „OFF“. If you are using equipment that is capable of playing
more than one MIDI channel at a time (eg: more than one keyboard or pedal bank,
split-capable keyboard), make sure you have a separate channel set for each manual.
29

SELECT MIDI CHANNEL FOR PEDAL
PRESETS - EDIT FUNCTION
(MIDI Channel assignment for the Bass pedal bank: OFF, 1 ... 16)
If you have access to a MIDI-capable foot pedal bank, you can set the channel here
to be used for the pedal manual of your Baby b.. The default value is channel #3. If
you want to use another channel, set it here. The setting „OFF“ turns the entire manual
UPDOWN
EDIT
STORE
off. If your MIDI keyboard can only play one channel, make sure this manual is set
to „OFF“. If you are using equipment that is capable of playing more than one MIDI
channel at a time (eg: more than one keyboard or pedal bank, split-capable keyboard),
make sure you have a separate channel set for each manual.
PITCHBEND RANGE
PRESETS - EDIT FUNCTION
(The range limits for pitchbend information: 1 ... 12)
Here is where you set the maximum number of half steps that the pitch of a note can
be bent using a controller from your MIDI keyboard. The increments are half steps
and the maximum range is twelve; one octave. The default value is 12 and should be
UPDOWN
EDIT
STORE
set to match the value set for pitchbend range in your MIDI controller keyboard.
RECEIVE CONTROL CHANGE COMMANDS
PRESETS - EDIT FUNCTION
(Settings: OFF or ON)
Using this parameter you can determine whether or not incoming control change
information will be processed. Control change commands contain special information
about elements that relate to control-oriented functions such as Volume level
UPDOWN
EDIT
STORE
(Controller #7), or drawbar settings (Controller #20 up to 29). Your Baby b. is also
capable of sending MIDI data, especially data relating to the drawbar system, and
because of this, it might be necessary for incoming controller information to be
squelched. In this case, set this command to „OFF“.
TRANSMIT CONTROL CHANGE COMMANDS
PRESETS - EDIT FUNCTION
(Settings: OFF or ON)
If necessary, setting this function to "OFF" prohibits sending control change data from
the Baby b. to external MIDI devices (eg: drawbar movements, pedal confirmation).
UPDOWN
EDIT
STORE
RECEIVING PROGRAM CHANGE COMMANDS
PRESETS - EDIT FUNCTION
(Settings: OFF, ALL, 1 to 128)
The Baby b. can react differently to incoming program change information.
UPDOWN
EDIT
STORE
Setting OFF
No Program Change information is processed.
Setting ALL
Program Change information will be received on the MIDI channel selected under UPPER (factory
preset 1) and presets 1 to 99 can be selected.
Setting 1 to 128
30

When a program change command is set between 1 and 128, the Baby b. will only play when the set
value is received. The advantage of this is that you can choose a particular key on your keyboard or
organ to turn on and off all three of the Baby b.‘s MIDI channels UPPER, LOWER, PEDAL
individually. Any other program change information received will not be processed or reacted to by
the manual in question.
Example:
Many keyboard have the option of switching the function of their different sound key off. This key can
be effectively used to control your Baby b.. Set your Baby b. to receive the appropriate program change
number. Now the Baby b. will only play when you press the appropriate sound key on your keyboard.
If you select another instrument on your keyboard, the Baby b. will automatically stop playing. The
manuals of your Baby b., UPPER, LOWER, PEDAL can be set individually.
SEND PROGRAM CHANGE COMMANDS
(Settings: OFF or ON)
PRESETS - EDIT FUNCTION
In the same way as in the previous parameter, you can sqelch the transmission of
Program Change information by setting this function to "OFF" so that changing a
preset using the VALUE UP/DOWN buttons, only affects the Baby b. internally.
UPDOWN
STORE
No Program Change data is sent to the MIDI OUT port.
EDIT
SPLIT POINT ON ONE MIDI CHANNEL
Setting: ALL or 1 to 84
PRESETS - EDIT FUNCTION
If the keyboard connected to your Baby b. has no split point, your Baby b. can have
it’s own split point.
UPDOWN
EDIT
ALL: The MIDI channel set in the area UPPER is played by the upper manual without a split point.
STORE
1 to 84: Enter the split point as MIDI key number. The MIDI channel set in the area UPPER will play
the upper manual of the Baby b. up to the MIDI key number, and after that the lower manual will be
played.
SPLIT POINT FOR THE LOWER MANUAL
Setting: ALL or 1 to 84
PRESETS - EDIT FUNCTION
With this function the lower manual can be set to play only above the split point.
The advantage is that you can play chords with your left hand on your controller
keyboard without worrying about bass notes coming from the Baby b..
UPDOWN
EDIT
ALL: The lower manual is completely on.
STORE
1 to 84: 1 to 84: Enter the split point as MIDI key number.
The MIDI channel set in the area LOWER will play the upper manual of the Baby b. up to the MIDI
key number.
31

MIDI MERGE FUNCTIONS
PRESETS - EDIT FUNCTION
The Baby b. is equipped with an internal MIDI Merge function which combines
incoming MIDI information from both MIDI IN ports and sends the total MIDI
information to the MIDI OUT port.
UPDOWN
EDIT
STORE
Example: You’re playing on your organ with your upper manual and your pedal
manual and you want to record your piece into a sequencer. If this parameter is set
to ON, all MIDI information from your keyboard including all the information
generated by your Baby b. sent out the MIDI OUT port and to a sequencer.
OFF: MIDI Merge is turned off.
ON: MIDI Merge is turned on. All incoming data on both the MAIN IN and MIDI PEDAL IN as well
as all Baby b. data (eg: drawbar movements, rotor speed control) will be combined and sent to the
MIDI OUT port. But the Baby b. will not play the incoming events.
RESET FACTORY PRESETS
PRESETS - EDIT FUNCTION
If you have altered sound data and want to get back to the factory preset
sounds, use this function. Also included in this function are rotor speed
settings, Sustain settings, percussion length or vibrato settings.
UPDOWN
EDIT
STORE
SEND MIDI DUMP
This function allows you to send a MIDI dump containing all the important parameter
settings and presets of your Baby b.. The "SYSEX Send Enable" parameter must be
set to "ON" in order to do this. Press the EDIT button to begin the bulk dump. The
progress will be shown in the display.
32

THE DRAWBARS
Using the drawbars, you can adjust the volume level of the 9 classical octave foot registers (16’, 8’, 5
1/3’, 4’, 2 2/3’, 2’, 1 3/5’,1 1/3’, 1’). This is the heart of your organ sound.
Because the timbre of all natural instruments is a synthesis of different strength overtones in the overtone
series, the drawbar organ with its fully variable sine wave drawbars is capable of imitating closely all
natural instruments. In the years of composer Johann Sebastian Bach, the organ was called "König der
Instrumente" (King of all instruments) for this reason. It is of course impossible to reproduce natural
sounds exactly using the drawbar system. The organ maintains in own personal characteristic timbre,
which gives it its identity. It is nevertheless the forefather of the modern synthesizer, which can replicate
in detail the timbre of natural instruments.
All of your drawbar settings for all of the foot registers can be saved permanently within the presently
selected preset using the "STORE" button. (see: "STORE" button.) When you change presets, the
drawbar settings of the last saved version are active. You can of course save your registrations separately
for each of the three manuals.
Note: The drawbars are also used for setting the timbre of user-defined percussion. (see: HARMONIC
Button.)
8
7
6
5
4
3
2
1
16
8
7
6
5
4
3
2
1
5 1/3
8
7
6
5
4
3
2
1
8
8
7
6
5
4
3
2
1
4
8
7
6
5
4
3
2
1
2 2/3
8
7
6
5
4
3
2
1
2
8
7
6
5
4
3
2
1
1 3/5
8
7
6
5
4
3
2
1
1 1/3
8
7
6
5
4
3
2
1
1
33

DRAWBAR SETTINGS
7
16
16
8
8
7
6
5
4
5 1/3
3
2
1
8
7
6
5
4
3
2
1
8
7
7
6
6
5
5
4
4
3
2
1
8
8
8
7
7
6
6
5
5
4
4
3
3
2
2
1
1
2 2/3
3
2
1
4
8
7
6
5
4
3
2
1
8
7
6
5
4
3
2
1
1 3/5
1 1/3
2
1 1/3 11 3/522 2/3
8
7
6
5
4
3
2
1
All the full-numbered drawbars pulled with Leslie
or Vibrato give a full, direct drawbar organ sound.
Full Tibia / Flutes
1
Horns / Dark
This setting is especially interesting when used with
a 2nd or 3rd percussion and Leslie or Vibrato. This
is a favorite of jazz musicians using a short
percussion setting and a loud keyclick, whereas
5 1/3
4
8
entertainer organists would use typically a long
percussion and a soft keyclick.
16
16
8
5
4
7
3
6
2
5
1
4
3
2
1
1 1/3
1 3/522 2/348
5 1/3
6
5
4
3
2
1
This broad setting of drawbars when used with
Open Drawbar Setting
Leslie or Vibrato gives a pleasant sound for many
musical styles.
1
8
8
7
6
5
4
3
2
1
8
5
4
3
2
1
7
7
6
6
5
5
4
4
3
3
2
2
1
1
8
5
4
3
2
1
6
5
7
4
6
5
3
2
4
3
2
1
1
8
7
7
6
5
6
4
5
4
3
2
3
2
1
1
Drawbar Setting "Full"
mixed sound
This setting is effective in both entertainment and
5 1/3
2 2/3
4
8
1 3/5
2
1 1/3
1
sacred music as "Plemun/Tutti." Use Vibrato and/or
Leslie as desired.
34

DRAWBAR SETTINGS FOR SOLO REGISTER
8
7
6
5
5 1/316
4
3
2
1
8
7
6
5
4
4
3
2
1
8
7
6
5
4
11 3/52
3
2
1
Clarinet
Drawbar Setting
The setting sounds similar to a clarinet or, in
combination with a soft attack, like a "Gedackt
Register" on a pipe organ.
8
8
7
6
5
5 1/316
4
3
2
1
2 2/3
8
8
8
7
6
5
4
3
2
1
7
7
6
6
5
5
4
4
3
3
2
2
1
1
1 1/3
2
5
7
4
6
5
4
3
2
1
1
3
2
1
Trumpet
Bright Setting
1
Trumpet Timbre built on the 8' Register
1 1/3
1 3/5
2 2/3
4
8
2
You can also use this setting for percussion. On the
old Hammond H100, this setting was called "guitar".
Klaus Wunderlich has used this percussion setting
for many many H100 recording projects.
16
16
8
8
7
6
5
4
3
2
1
5 1/3
8
7
6
5
4
5 1/3
3
2
1
7
7
6
5
6
4
5
4
3
2
3
2
1
1
1 1/3 11 3/522 2/34
Dark, horn-like drawbar setting that can be
effectively used with or without vibrato.
Horn Setting
8
2
6
5
4
3
2
4
1
2 2/3
8
1
7
6
5
4
3
2
1
1 1/3 11 3/5
Theater Organ Sound
Flute
This setting, when used with vibrato, reminds one
of the typical old theater organ sound. Add delay
8
2
to this setting to round out the sound and to complete
its fullness.
35

DRAWBAR SETTINGS FOR PERCUSSION
8
8
7
7
7
6
5
4
85 1/316
3
2
1
7
6
5
4
3
2
1
1 1/3 1
Stacato with short percussion played in "PolyMode" gives this setting a xylophone-like sound.
22 2/3
Xylophone Percussion
Often used by Franz Lambert in his "Zirkus Renz".
4
8
7
6
5
4
485 1/316
3
2
1
1 3/5
1 3/52
1 1/3
8
7
6
5
4
3
2
1
Trumpet-like setting based on the 8' Register.
Bright Bell-like
Percussion
This same setting can be used as a percussion setting.
On the old Hammond H100, this setting was referred
2 2/3
1
to as "guitar". Klause Wunderlich, in has many
recordings using the H100, often used this setting
for percussion.
8
6
7
5
6
4
5
3
4
5 1/316
2
1
2 2/3
3
2
1
8
7
6
5
4
3
2
1
1 3/5
1 1/3
6
5
4
3
2
1
Bell-like
Percussion
Full, bell-like percussion setting. An especially
pleasant melody sound when used with a horn-
8
4
8
6
7
5
6
4
5
3
5 1/316
4
2
3
1
2
1
8
2 2/3
4
2
8
7
6
7
6
5
4
3
2
1
5
6
4
5
4
3
2
3
2
1
1
1 1/3
1 3/5
2
1
5
4
4
3
2
3
2
1
1
1
setting and a long percussion decay. Effective in
all music styles.
Guitar-like
Percussion
On the old Hammond H100, this setting was referred
to as "guitar". Klause Wunderlich, in has many
recordings using the H100, often used this setting
for percussion.
36

FACTORY PRESETS NO. 1-3
Drawbar B3 "Straight" ,
Vibrato
PRESET
No.
Group Function Group Function Group Function
Percussion On
Time Short
Envelope Delay Envelope Delay Envelope Delay
Keyclick Soft
Reverb Program
Rotor On Rotor On Rotor On
Percussion Direct
1
2nd
3rd 3rd 3rd
User
Polyphone
Medium
Sustain
Medium
Slow Slow Slow
Fast
Vibrato Vibrato Vibrato
Rotor Rotor Rotor
xx
xxx
xxx
x
x
x
3
x
xxx
Drawbar B3 "mellow",
Percussion , Vibrato
PRESET
No.
x
x
x
Percussion On
2nd
User
Polyphone
Time Short
Medium
Sustain
Keyclick Soft
Medium
Reverb Program
Fast
Percussion Direct
2
Drawbar B3 "mellow" ,
xx
xx
x
xx
xx
x
x
x
x
3
x
xxx
Percussion via Rotor
PRESET
Percussion On
Keyclick Soft
Reverb Program
Percussion Direct
No.
2nd
User
Polyphone
Time Short
Medium
Sustain
Medium
Fast
3
xx
xx
x
xx
xx
x
x
x
x
3
x
x
xxx
Drawbar Vibrato
Phase-Vibrato Slow Phase-Vibrato Slow Phase-Vibrato Slow
Fast
Chorus Chorus Chorus
Normal Normal Normal
Celeste
DB Sound SelectB3
Wersi Wersi Wersi
Main
Variation
DB Registration 16'
5 1/3'
8'
4'
2 2/3' 2 2/3' 2 2/3'
2'
1 1/3' 1 1/3' 1 1/3'
1 3/5' 1 3/5' 1 3/5'
1'
xx
x
x
xxx
xx
x
88
6
878
85
84
8
Drawbar Vibrato
Fast
Celeste
DB Sound SelectB3
Main
Variation
DB Registration 16'
5 1/3'
8'
4'
2'
1' 1'
xx
x
x
xxx
DB Sound SelectB3
xx
x
88
DB Registration 16'
86
778
65
4
Drawbar Vibrato
Fast
Celeste
Main
Variation
5 1/3'
8'
4'
2'
x
x
x
xxx
xx
x
88
86
878
85
4
37

FACTORY PRESETS NO. 4-6
Drawbar B3 "open , 16,
Drawbar B3 "Straight ",
Rotor slow
PRESET
No.
Group Function Group Function Group Function
Percussion On Percussion On Percussion On
4
2nd
3rd 3rd 3rd
User
Polyphone
xx
xxx
Drawbar B3 "Straight ",
Rotor fast
PRESET
No.
x
5
2nd
User
Polyphone
5/13, 1'" , Vibrato fast,
PRESET
xx
x
xxx
Rotor fast
No.
6
2nd
User
Polyphone
x
xx
x
xxx
Time Short
Medium
Envelope Delay Envelope Delay EnvelopeDelay
Sustain
Keyclick Soft
Medium
Reverb Program
Rotor On
Slow
Fast Fast
Percussion Direct
Vibrato Vibrato Vibrato
Rotor Rotor Rotor
Drawbar Vibrato Drawbar Vibrato Drawbar Vibrato
Phase-Vibrato Slow
Fast Fast
Chorus Chorus Chorus
Normal
Celeste Celeste Celeste
xxx
xx
x
x
x
3
x
x
xxx
x
Phase-Vibrato Slow Phase-Vibrato Slow
x
Time Short
Medium
Sustain
Keyclick Soft
Medium
Reverb Program
Rotor On
Slow Slow
Percussion Direct
Normal
xxx
xx
x
x
x
3
x
x
xxx
x
x
Time Short
Keyclick Soft
Reverb Program
Rotor On
Percussion Direct
Medium
Sustain
Medium
Fast
Fast
Normal
xxx
xx
x
x
x
3
x
x
xxx
xx
x
x
DB Sound SelectB3
DB Registration 16'
38
xxx
Wersi Wersi Wersi
Main
Variation
xx
88
5 1/3'
8'
4'
2 2/3' 2 2/3' 2 2/3'
2'
1 1/3' 1 1/3' 1 1/3'
1 3/5' 1 3/5' 1 3/5'
1' 1'
878
5
84
DB Sound SelectB3
x
DB Registration 16'
6
Main
Variation
5 1/3'
8'
4'
2'
xxx
xx
88
878
85
84
8
DB Sound SelectB3
x
DB Registration 16'
6
Main
Variation
5 1/3'
8'
4'
2'
1'
xxx
xx
x
88
56
78
5
4
8

FACTORY PRESETS NO. 7-9
Drawbar B3 "mellow" with
"Guitar" Percussion ,
Vibrato
PRESET
No.
Group Function Group Function Group Function
Percussion On
Time Short
Envelope Delay EnvelopeDelay Envelope Delay
Keyclick Soft
Reverb Program
Rotor On Rotor On
7
xx
2nd
3rd 3rd
User
Polyphone
Medium
Sustain
Medium Medium Medium
Slow Slow
Fast
x
xx
xxx
xxx
xx
xx
3
x
Drawbar B3 "mellow" with
3rd Percussion, Rotor Slow
PRESET
No.
Percussion On
Time Short
x
Keyclick Soft
Reverb Program
8
2nd
User
Polyphone
Medium
Sustain
Fast Fast
xx
x
x
xxx
xxx
xx
xx
3
x
x
Drawbar B3 "mellow" with
2nd Percussion, Vibrato
PRESET
x
x
Chorus
No.
Percussion On
2nd
3rd
User
Polyphone
Time Short
Medium
Sustain
Keyclick Soft
Reverb Program
Rotor On
Slow
9
xx
xx
x
xxx
x
x
x
3
x
Percussion Direct
Vibrato Vibrato Vibrato
Rotor Rotor
Drawbar Vibrato
Phase-Vibrato Slow Phase-Vibrato Slow
Fast
Chorus Chorus Chorus
Normal Normal Normal
Celeste
DB Sound SelectB3
Wersi Wersi Wersi
Main
Variation
DB Registration 16'
5 1/3'
8'
4'
2 2/3' 2 2/3' 2 2/3'
2'
1 1/3' 1 1/3' 1 1/3'
1 3/5' 1 3/5' 1 3/5'
1' 1' 1'
xxx
xx
x
x
xxx
xx
x
88
86
778
75
4
Percussion Direct
Drawbar Vibrato
DB Sound SelectB3
DB Registration 16'
xx
x
xx
x
Fast Fast
Celeste
x
xxx
Main
Variation
x
xx
88
5 1/3'
8'
4'
2'
86
878
85
4
Percussion Direct
Rotor
Drawbar Vibrato
Phase-Vibrato Slow
Celeste
DB Sound SelectB3
Main
Variation
DB Registration 16'
5 1/3'
8'
4'
2'
xxx
xx
x
x
xxx
xx
x
88
86
878
85
4
39

FACTORY PRESETS NO. 10-12
Drawbar B3 "mellow", 2nd
Percussion, Vibrato
Chorus, Rotor Slow
PRESET
No.
10
Group Function Group Function Group Function
Percussion On
2nd
3rd 3rd 3rd
User
Polyphone Polyphone Polyphone
Time Short
Medium
Envelope Delay Envelope Delay Envelope Delay
Sustain Sustain Sustain
Keyclick Soft
Medium
Reverb Program
Rotor On
Slow
Fast Fast
xx
xx
xxx
xx
x
3
x
x
Drawbar B3 "mellow", 2nd
Percussion, Vibrato
Chorus, Rotor Fast
PRESET
No.
11
Percussion On
2nd
x
x
Keyclick Soft
User
Time Short
Medium
Medium
Reverb Program
Rotor On
Slow Slow
Drawbar B3 "mellow", 2nd
Percussion, Vibrato Chorus
PRESET
xx
xx
x
xxx
x
xx
x
3
x
x
Slow, Rotor Slow
No.
12
Percussion On
2nd
User
Time Short
Medium
Keyclick Soft
Medium
Reverb Program
Rotor On
Fast
xx
xx
x
xxx
x
xx
x
3
x
x
Percussion Direct
Vibrato Vibrato Vibrato
Rotor
Drawbar Vibrato
Phase-Vibrato Slow Phase-Vibrato Slow Phase-Vibrato Slow
Fast
Chorus
Normal Normal
Celeste Celeste Celeste
DB Sound SelectB3
Wersi Wersi Wersi
Main
Variation
DB Registration 16'
5 1/3'
8'
4'
2 2/3' 2 2/3' 2 2/3'
2'
1 1/3' 1 1/3' 1 1/3'
1 3/5' 1 3/5' 1 3/5'
1' 1' 1'
xx
x
xx
x
x
xxx
xx
x
88
86
778
75
4
Percussion Direct
Rotor
Drawbar Vibrato
Fast
Chorus Chorus
DB Sound SelectB3
Main
Variation
DB Registration 16'
5 1/3'
8'
4'
2'
xx
x
xx
x
x
xxx
xx
x
88
86
878
85
4
Percussion Direct
Drawbar Vibrato
DB Sound SelectB3
DB Registration 16'
Rotor
Fast
Normal
Main
Variation
5 1/3'
8'
4'
2'
xx
x
xx
x
x
xxx
xx
x
88
86
878
85
4
40

FACTORY PRESETS NO. 13-15
Drawbar B3 Variation
Drawbar B3 "open", Rotor
Fast
PRESET
No.
13
Group Function Group Function Group Function
Percussion On
2nd
3rd 3rd 3rd
User
Polyphone Polyphone Polyphone
Time Short
Medium
Envelope Delay Envelope Delay Envelope Delay
Sustain Sustain Sustain
Keyclick Soft
Medium
Reverb Program
Rotor On
Slow Slow
Fast
xx
xxx
xx
x
3
x
x
"Straight", Rotor Slow,
Keyclick Loud
PRESET
No.
14
x
x
x
Percussion On Percussion On
2nd
User
Time Short
Medium
Keyclick Soft
Medium
Reverb Program
Rotor On
Fast Fast
xx
x
xxx
x
xx
x
3
x
x
Drawbar B3 Variation
"Straight", Rotor Fast,
PRESET
Keyclick Loud
No.
15
2nd
User
Time Short
Medium
Keyclick Soft
Medium
Reverb Program
Rotor On
Slow
xxx
xxx
x
x
3
x
x
Percussion Direct
Vibrato Vibrato Vibrato
Rotor
Drawbar Vibrato
Phase-Vibrato Slow
Fast Fast Fast
Chorus Chorus Chorus
Normal Normal
Celeste
DB Sound SelectB3
Wersi Wersi Wersi
Main
Variation
DB Registration 16'
5 1/3'
8'
4'
2 2/3' 2 2/3' 2 2/3'
2'
1 1/3' 1 1/3'
1 3/5' 1 3/5'
1'
xx
x
x
x
Phase-Vibrato Slow
x
xxx
DB Sound SelectB3
xx
x
88
DB Registration 16'
56
78
5
4
4
Percussion Direct
Rotor
Drawbar Vibrato
Celeste Celeste
Main
Variation
5 1/3'
8'
4'
2'
1'
xx
x
x
x
Phase-Vibrato Slow
x
xxx
DB Sound SelectB3
xx
x
88
DB Registration 16'
6
878
85
84
2
3
8
Percussion Direct
Rotor
Drawbar Vibrato
Normal
Main
Variation
5 1/3'
8'
4'
2'
1 1/3'
1 3/5'
1'
xx
x
x
x
x
x
xx
x
xx
88
6
878
85
84
2
3
8
41

FACTORY PRESETS NO. 16-18
Drawbar B3 "Mellow",
Vibrato, Rotor Fast,
Keyclick Loud
PRESET
No.
16
Group Function Group Function Group Function
Percussion On Percussion On Percussion On
2nd
3rd 3rd 3rd
User User User
Polyphone Polyphone Polyphone
xxx
WERSI Drawbar
"Straight", Vibrato
PRESET
No.
17
2nd
WERSI Drawbar "Medium"
, Vibrato, 2nd Percussion
PRESET
No.
xxx
18
2nd
x
xxx
Time Short
Medium Medium Medium
Envelope Delay Envelope Delay Envelope Delay
Sustain Sustain Sustain
Keyclick Soft
Medium
Reverb Program
Rotor On
Slow Slow Slow
Fast
Percussion Direct
Vibrato Vibrato Vibrato
Rotor
Drawbar Vibrato
Phase-Vibrato Slow Phase-Vibrato Slow Phase-Vibrato Slow
Fast
Chorus Chorus Chorus
Normal Normal Normal
Celeste
DB Sound SelectB3
Wersi
Main
Variation
xxx
x
x
3
x
x
xx
x
xx
x
x
x
DB Sound SelectB3 DB Sound SelectB3
xx
xx
x
Time Short
Keyclick Soft
Medium
Reverb Program
Rotor On Rotor On
Fast
Percussion Direct
Rotor
Drawbar Vibrato
Fast
Celeste
Wersi
Main
Variation
xxx
x
x
3
x
xx
x
xx
x
x
xxx
xx
x
Time Short
Keyclick Soft
Reverb Program
Percussion Direct
Drawbar Vibrato
Medium
Fast
Rotor
Fast
Celeste
Wersi
Main
Variation
xxx
x
x
3
x
xxx
xx
x
x
xxx
xx
x
DB Registration 16'
42
88
5 1/3'
8'
4'
2 2/3' 2 2/3' 2 2/3'
2'
1 1/3' 1 1/3' 1 1/3'
1 3/5' 1 3/5' 1 3/5'
1' 1'
56
378
85
4
DB Registration 16'
5 1/3'
8'
4'
2'
88
878
85
84
8
DB Registration 16'
6
5 1/3'
8'
4'
2'
1'
88
86
878
55
4

FACTORY PRESETS NO. 19-21
WERSI Drawbar "Mellow"
, Vibrato, 3rd Percussion
PRESET
No.
19
Group Function Group Function Group Function
Percussion On
2nd
3rd
User User
Polyphone Polyphone Polyphone
x
xx
x
WERSI Drawbar
"Mellow", Vibrato, User
Percussion bright
PRESET
No.
20
Percussion On
2nd
3rd 3rd
x
xx
x
WERSI Drawbar "Straight
bright", Vibrato
PRESET
No.
21
Percussion On
2nd
User
xx
x
Time Short
Medium
Envelope Delay Envelope Delay Envelope Delay
Sustain Sustain Sustain
Keyclick Soft Keyclick Soft Keyclick Soft
Medium
Reverb Program
Rotor On Rotor On Rotor On
Slow Slow Slow
Fast
Percussion Direct
Vibrato Vibrato Vibrato
Rotor Rotor Rotor
Drawbar Vibrato
Phase-Vibrato Slow Phase-Vibrato Slow Phase-Vibrato Slow
Fast
Chorus Chorus Chorus
Normal Normal Normal
Celeste
DB Sound SelectB3 DB Sound SelectB3 DB Sound SelectB3
Wersi
Main
Variation
xxx
x
x
3
x
xxx
xx
x
x
xxx
xx
x
Time Short
Medium
Medium
Reverb Program
Fast
Percussion Direct
Drawbar Vibrato
Fast
Celeste
Wersi
Main
Variation
xxx
x
x
3
x
xxx
xx
x
x
xxx
x
xx
Time Short
Medium
Medium
Reverb Program
Fast
Percussion Direct
Drawbar Vibrato
Fast
Celeste
Wersi
Main
Variation
xxx
x
x
3
x
xxx
xx
x
x
xxx
x
xx
DB Registration 16'
5 1/3'
8'
4'
2 2/3' 2 2/3' 2 2/3'
2'
1 1/3' 1 1/3' 1 1/3'
1 3/5' 1 3/5' 1 3/5'
1' 1' 1'
88
DB Registration 16'
86
878
75
4
5 1/3'
8'
4'
2'
88
DB Registration 16'
86
878
65
4
5 1/3'
8'
4'
2'
88
6
78
5
4
4
6
8
43

FACTORY PRESETS NO. 22-24
WERSI Drawbar Variation
WERSI Drawbar Variation
"Straight bright", Vibrato,
Rotor Fast
PRESET
No.
22
Group Function Group Function Group Function
Percussion On Percussion On Percussion On
2nd
3rd 3rd 3rd
User
Polyphone Polyphone Polyphone
xx
x
WERSI Drawbar Variation
"Straight bright", Vibrato,
Rotor Slow
PRESET
No.
23
2nd
User
xx
x
"mellow", Vibrato, User
Percussion Guitar, Rotor
PRESET
No.
Fast
24
2nd
User
x
xx
x
Time Short
Medium
Envelope Delay Envelope Delay Envelope Delay
Sustain Sustain Sustain
Keyclick Soft Keyclick Soft Keyclick Soft
Medium
Reverb Program
Rotor On
Slow Slow Slow
Fast
Percussion Direct
Vibrato Vibrato Vibrato
Rotor Rotor Rotor
Drawbar Vibrato
Phase-Vibrato Slow Phase-Vibrato Slow
Fast
Chorus Chorus Chorus
Normal Normal Normal
Celeste
DB Sound SelectB3 DB Sound SelectB3 DB Sound SelectB3
Wersi
Main
Variation
xxx
x
x
3
x
x
xxx
xx
x
x
xxx
x
xx
Time Short
Medium
Medium
Reverb Program
Rotor On
Fast
Percussion Direct
Drawbar Vibrato
Fast Fast
Celeste
Wersi
Main
Variation
xxx
x
x
3
x
x
xxx
xx
x
x
xxx
x
xx
Time Short
Reverb Program
Rotor On
Percussion Direct
Drawbar Vibrato
Phase-Vibrato Slow
Medium
Medium
Fast
Celeste
Wersi
Main
Variation
xxx
x
x
3
x
x
xxx
xx
x
x
xxx
xx
x
DB Registration 16'
44
88
5 1/3'
8'
4'
2 2/3' 2 2/3' 2 2/3'
2'
1 1/3'
1 3/5'
1'
46
78
5
4
4
6
8
DB Registration 16'
5 1/3'
8'
4'
2'
1 1/3'
1 3/5'
1'
88
46
78
5
4
3
6
8
DB Registration 16'
5 1/3'
8'
4'
2'
1 1/3'
1 3/5'
1'
88
86
878
45
4

FACTORY PRESETS NO. 25-27
WERSI Drawbar "Church"
Flute piano
PRESET
No.
25
Group Function Group Function Group Function
Percussion On Percussion On Percussion On
2nd
3rd 3rd 3rd
User User
Polyphone Polyphone Polyphone
Time Short
Medium
Envelope Delay
Sustain Sustain Sustain
Keyclick Soft Keyclick Soft Keyclick Soft
Medium Medium Medium
Reverb Program
Rotor On
Slow
Fast Fast Fast
Percussion Direct
Vibrato Vibrato Vibrato
Rotor Rotor Rotor
xxx
xxx
xx
xxx
3
x
x
xxx
WERSI Drawbar "Church"
Flutes mezzo forte
PRESET
No.
26
2nd
Time Short
Medium
Envelope Delay
Reverb Program
Rotor On
Slow
Percussion Direct
xx
x
xxx
x
xxx
3
x
x
xxx
WERSI Drawbar "Church"
PRESET
Envelope Delay
Percussion Direct
Plenum
No.
27
2nd
User
Time Short
Medium
Reverb Program
Rotor On
Slow
xx
x
xxx
x
xxx
3
x
x
xxx
Drawbar Vibrato
Phase-Vibrato Slow
Fast Fast Fast
Chorus
Normal Normal Normal
Celeste Celeste Celeste
DB Sound SelectB3 DB Sound SelectB3 DB Sound SelectB3
Wersi
Main
Variation
DB Registration 16'
5 1/3'
8'
4'
2 2/3' 2 2/3' 2 2/3'
2'
1 1/3' 1 1/3' 1 1/3'
1 3/5' 1 3/5' 1 3/5'
1' 1'
x
x
x
xxx
xx
x
88
6
778
65
4
Drawbar Vibrato
Phase-Vibrato Slow
Chorus
Wersi
Main
Variation
DB Registration 16'
5 1/3'
8'
4'
2'
x
x
x
xxx
xx
x
88
6
878
85
84
8
Drawbar Vibrato
Phase-Vibrato Slow
Chorus
Wersi
Main
Variation
DB Registration 16'
5 1/3'
8'
4'
2'
1'
x
x
xxx
xx
x
88
36
878
85
4
84
3
4
8
45

FACTORY PRESETS NO. 28-30
WERSI Drawbar Variation,
WERSI Drawbar
Variation"Church" Tutti
PRESET
No.
28
Group Function Group Function Group Function
Percussion On Percussion On
2nd
3rd 3rd 3rd
User
Polyphone Polyphone Polyphone
Time Short
Medium
Envelope Delay
Sustain Sustain
xx
x
xxx
x
xxx
WERSI Drawbar Variation,
Sustain, User Percussion
Sustain, Vibrato Slow
PRESET
No.
29
2nd
User
Time Short
Medium
Envelope Delay Envelope Delay
x
xx
xxx
xx
xx
PRESET
x
bright, Rotor Slow
Percussion On
No.
30
2nd
User
Time Short
Medium
Sustain
xx
x
xx
xxx
xxx
xx
xx
Keyclick Soft Keyclick Soft Keyclick Soft
Medium Medium Medium
Reverb Program
Rotor On
Slow
Fast Fast Fast
Percussion Direct
Vibrato Vibrato Vibrato
Rotor Rotor Rotor
Drawbar Vibrato Drawbar Vibrato
Phase-Vibrato Slow
Fast Fast Fast
Chorus
Normal Normal Normal
Celeste Celeste Celeste
DB Sound SelectB3 DB Sound SelectB3 DB Sound SelectB3
Wersi
Main Main Main
Variation
DB Registration 16'
5 1/3'
8'
4'
2 2/3'
2'
1 1/3'
1 3/5'
1'
3
x
x
xxx
x
x
xxx
xxx
88
86
878
85
8
84
8
8
8
Reverb Program
Rotor On Rotor On
Slow
Percussion Direct
Phase-Vibrato Slow
Chorus
Wersi
Variation
DB Registration 16'
5 1/3'
8'
4'
2 2/3' 2 2/3'
2'
1 1/3' 1 1/3'
1 3/5' 1 3/5'
1' 1'
3
x
xxx
xx
x
Phase-Vibrato Slow
x
xxx
xxx
88
DB Registration 16'
6
878
5
44
Reverb Program
Percussion Direct
Drawbar Vibrato
Slow
Chorus
Wersi
Variation
5 1/3'
8'
4'
2'
3
x
x
xxx
x
x
x
xxx
x
xx
88
6
878
65
3
4
46

FACTORY PRESETS NO. 31-32
x
WERSI Drawbar Variation,
Sustain, User Percussion
bright, Vibrato Fast, Rotor
Slow
PRESET
No.
31
Group Function Group Function Group Function
Percussion On
2nd
3rd 3rd 3rd
User
Polyphone
Time Short
Medium
Envelope Delay Envelope Delay Envelope Delay
Sustain
x
xx
x
xxx
xxx
xx
xx
WERSI Drawbar Variation, Sustain , 2nd Percussion,
Vibrato Fast, Rotor Fast
PRESET
No.
Percussion On
Time Short
32
x
2nd
User User
Polyphone
Medium
Sustain
xxx
xxx
xxx
xx
xx
PRESET
No.
Percussion On
2nd
Polyphone
Time Short
Medium
Sustain
Keyclick Soft Keyclick Soft Keyclick Soft
Medium Medium Medium
Reverb Program
Rotor On
Slow
Fast Fast
Percussion Direct
Vibrato Vibrato Vibrato
Rotor Rotor Rotor
Drawbar Vibrato
Phase-Vibrato Slow Phase-Vibrato Slow Phase-Vibrato Slow
Fast
Chorus Chorus Chorus
Normal
Celeste Celeste
DB Sound SelectB3 DB Sound SelectB3 DB Sound SelectB3
Wersi
Main
Variation
DB Registration 16'
5 1/3'
8'
4'
2 2/3' 2 2/3' 2 2/3'
2'
1 1/3' 1 1/3' 1 1/3'
1 3/5' 1 3/5' 1 3/5'
1' 1'
3
x
x
xxx
xx
x
x
xxx
x
xx
88
DB Registration 16'
76
378
5
4
Reverb Program
Rotor On
Slow Slow
Percussion Direct
Drawbar Vibrato
Fast
Normal Normal
Wersi
Main
Variation
5 1/3'
8'
4'
2'
3
x
x
xxx
xx
x
x
xxx
x
xx
88
6
378
5
4
7
Reverb Program
Rotor On
Fast
Percussion Direct
Drawbar Vibrato
Fast
Celeste
Wersi
Main
Variation
DB Registration 16'
5 1/3'
8'
4'
2'
1'
47

PRESETS
PRESET
No.
Group Function Group Function Group Function
Percussion On Percussion On Percussion On
2nd 2nd 2nd
3rd 3rd 3rd
User User User
Polyphone Polyphone Polyphone
Time Short Time Short Time Short
Medium Medium Medium
Envelope Delay Envelope Delay Envelope Delay
Sustain Sustain Sustain
Keyclick Soft Keyclick Soft Keyclick Soft
Medium Medium Medium
Reverb Program Reverb Program Reverb Program
Rotor On Rotor On Rotor On
Slow Slow Slow
Fast Fast Fast
Percussion Direct Percussion Direct Percussion Direct
Vibrato Vibrato Vibrato
Rotor Rotor Rotor
PRESET
No.
PRESET
No.
Drawbar Vibrato Drawbar Vibrato Drawbar Vibrato
Phase-Vibrato Slow Phase-Vibrato Slow Phase-Vibrato Slow
Fast Fast Fast
Chorus Chorus Chorus
Normal Normal Normal
Celeste Celeste Celeste
DB Sound SelectB3 DB Sound SelectB3 DB Sound SelectB3
Wersi Wersi Wersi
Main Main Main
Variation Variation Variation
DB Registration 16' DB Registration 16' DB Registration 16'
5 1/3' 5 1/3' 5 1/3'
8' 8' 8'
4' 4' 4'
2 2/3' 2 2/3' 2 2/3'
2' 2' 2'
1 1/3' 1 1/3' 1 1/3'
1 3/5' 1 3/5' 1 3/5'
1' 1' 1'
48

CONNECTING THE Baby b. TO A PC FOR MIDI DUMPS; SAVING PRESETS
1) Connect the MIDI OUT jack of your Baby b. with the MIDI IN jack on
your PC (or Sequencer hardware). Connect the MIDI OUT jack of your
PC with the MAIN IN jack on the Baby b..
2) Connect the included powersupply to the POWER IN jack on the Baby
b.. Power up both PC and Baby b.. If you are using a PC with MIDI
software, load the appropriate software on the PC.
PROGRAM / VALUE
VALUE
DOWN
➤
EDIT
STORE
UP
PRESET
➤
FUNCTION
TRANSP.
MODE
SAVING PRESETS
PRESET
3) Press the EDIT button and then the VALUE UP button until the display
shows „bul“ for BULK. Set your MIDI software to receive system
exclusive MIDI data.
4) Press the EDIT button to begin the transfer. You can monitor the transfer
progress in the Baby b.‘s display. Save the data received in your MIDI
software to a data medium (hard drive, diskette, etc.)
LOADING PRESETS
Load your MIDI software containing the presaved Baby b. BULK DUMP.
Use the appropriate commands in your software to begin sending the data
to the Baby b.. You can monitor the transfer progress in the Baby b.‘s
display. Do not press any buttons on the Baby b. during the transfer.
49

VOLUME
MAIN REVERB EFFECTS
PRESETS - EDIT FUNCTION
UPDOWN
EDIT
STORE
OUTPUT
BLUE CHIP
V
irtual ToneWheel Organ
POWER
ROTOR
1
/
16' 8'
5 '
3
POWER
INPUT
DRAWBAR SETTING
2
/
4'
2'
2 '
3
MIDI
3
/
1 '
5
1
/
1'
1 '
3
V
irtual ToneWheel Organ
SLOW/FAST
ON/OFF
MIDI IN
OUTIN THRUR/MONO L/STEREO AC-15V/1A
Adapter
MIDI OUT
50

SOFTWARE UPDATE WITH A PC
Your Baby b. is equipped with the special feature of being able to update its own operating system via
MIDI. In this way it is possible for you to install the latest system software updates including newly
added functions and features without having to open the case and install chip or cards. Contact your
dealer to obtain system software updates.
In order to update your system software, you will need a PC with MIDI sequencer software. If you
don´t own the appropriate equipment, perhaps your dealer will update the software for you if you take
the Baby b. in. Or perhaps you can borrow the equipment from a friend.
1. Connect your Baby b. and PC/software as described in the section "Connecting the Baby b. to a
PC for MIDI Dumps".
2. Start your MIDI software and load the Baby b. MIDI DUMP file containing the system software
update.
3. Begin the transfer by using the appropriate system exclusivesend command in your MIDI software.
When the tranfer is finished "End" appears in the display.
4. Turn your Baby b. off and back on. The new system software is now in operation.
If an error occurs during the transfer, "ErP" appears in the display. Set your MIDI software (songpointer)
to begin the transfer, and reinitiate the transfer.
SENDING THE INTERNAL OPERATING SYSTEM SOFTWARE TO A PC OR TO ANOTHER Baby b.
Using the MIDI OUT port you can send the Operating System software to a PC or to another Baby b..
The operating system is 250 kb.
1. Press the EDIT button on the baby b. with the new software and then the DOWN button until in
the display appears „rod“.
2. Press and hold STORE, EDIT and MODE buttons on the baby b. with the old software and while
holding them, power up your baby b.. In the display appears the software version and the message
"LOD".
3. Use the EDIT button on the baby b. with the new software to begin the transmission. When the
transmission is finished, you will see „END“ in the display of the other baby b..
51

MIDI IMPLEMENTATION
Software Version 5.0
Transmit Receive Hinweise
Basic Channel
Default Channel
Default
Mode Messages
Altered
Note
Number True Voice
Velocity Note ON
Note OFF
After Key´s
Touch Ch´s
Pitch Bender
Control
Change
1, 2, 3
1 - 16
Poly
X
X
X
O
O
X
X
O
1,2, 3
1 - 16
Poly
X
X
1 - 128
O
O
X
X
O
Memorized
Memorized
- 1 Distortion
3 8 3 8 Data Entry MSB
- 7 Volume
11 11 Expr. Pedal (nur auf Upper Channel)
16 16 Percussion Volume
3/5
3/5
, 1
, 1
1/3
1/3
1/3
1/3
, 1
, 8,
, 1
, 8,
20 bis 29 20 bis 29 Drawbars 16, 8, 5
2/3
4 , 2
, 2, 1
52 bis 60 52 bis 60 Percus. 16, 8, 5
2/3
4 , 2
, 2, 1
64 64 Sustain
65 65 Leslie slow/fast
91 91 Reverb Volume (nurUpper Chan.)
98, 99 98,99 Non-Registered Parameter
(Siehe Liste nächste Seite)
100,101 RPN (Pitch Bend Sensiv.)
123 All Notes Off
52
Program
Change True#
System Exclusive
System :Song Pos
:Song Sel
Common :Tune
System :Clock
Real Time:Commands
Aux :Local ON/OFF
Mes- :All Notes Off
sages :Active Sense
:Reset all Cntr.
Notes
O (1-99) O (1-99)
O
X
X
X
O
O
X
O
X
X
O
X
X
O
O
O
X
O
X
X
Preset Dump
o : Yes
X : No

SWITCH FUNCTION USING NON-REGISTERED
PARAMETERS
These functions apply to the buttons and switches on the OX7. They can be sent and received when
the appropriate function in the program menu is set to „ON“.
Funktion MIDI Data Range Notes
Reverb Typ B0 63 02 62 10 26 XX XX = 0..5 Reverb progr. 1..6
Rotor ON / OFF B0 63 02 62 01 26 XX XX = 0,1 0=Off, 1=On
Rotor SLOW / FAST B0 63 02 62 02 26 XX XX = 0,1 0=Slow, 1=Fast
Vibrato ON / OFF B0 63 02 62 04 26 XX XX = 0,1 0=Off, 1=On
Vibrato SLOW / FAST B0 63 02 62 05 26 XX XX = 0,1 0=Slow, 1=Fast
Vibrato/Chorus/CelesteB0 63 02 62 26 26 XX XX = 0..2 0=Vib, 1=Chor, 2=Cele
Percussion ON / OFF B0 63 02 62 0A 26 XX XX = 0,4 0=Off, 4=On
Harmic 2nd/3rd/User B0 63 02 62 0B 26 XX XX = 0..2 0=2nd, 1=3rd, 2=User
Percus. Mode B0 63 02 62 0C 26 XX XX = 0,1 0=Poly, 1= Mono
Percus. Short/Med/LongB0 63 02 62 0D 26 XX XX = 0..2 0=Shrt, 1=Med, 2=Lng
Percus. Dir/Vib/RotorB0 63 02 62 03 26 XX XX = 0..2 0=Dir. 1=Vib, 2=Les
Envelp Del/Sust/Both B0 63 02 62 0E 26 XX XX = 0..2 0=Del, 1=Sust, 2=Both
Click Off/Soft/Med/LoudB0 63 02 62 0F 26 XX XX = 0..3 0=Off, 1=Soft, 2=Med, 3=Loud
Drawbar B3/WERSI B0 63 02 62 07 26 XX XX = 0,2 0=B3, 2=WERSI
Drawbar Main/Variat B0 63 02 62 08 26 XX XX = 0,1 0=Main, 1=Variat
53

SOUND PROGRAMMING USING MIDI
You can make changes to your sounds remotely over MIDI and save them in the permanent memory
of your Baby b.. In order to do this, you must send the appropriate sysex message (see table below).
Otherwise these parameters cannot be changed.
Note: In order to save the changes to the permanent memory of the Baby b., you will need to send the
„STORE“ command. Otherwise, when you turn your Baby b. off, all your changes will be lost.
Function MIDI Data Range Notes
Start Programming F0 00 20 2D 40 7E F7
Leslie speed SLOW Controller 99 => 08 / Controller 98 => 100 / Controller 38 => XX = 0..7F
Leslie speed FAST Controller 99 => 08 / Controller 98 => 101 / Controller 38 => XX = 0..7F
Leslie Bass Level B0 63 08 62 44 26 XX XX = 0..7F
Leslie Horn Level B0 63 08 62 45 26 XX XX = 0..7F
Leslie angle Bass B0 63 08 62 42 26 XX XX = 0..7F
Leslie angle Horn B0 63 08 62 43 26 XX XX = 0..7F
Leslie radius Bass B0 63 08 62 3C 26 XX XX = 0..7F
Leslie radius Horn B0 63 08 62 3D 26 XX XX = 0..7F
Percussion direct B0 63 08 62 28 26 XX XX = 0..7F
Percussion to VibratoB0 63 08 62 29 26 XX XX = 0..7F
Percussion to Leslie B0 63 08 62 2A 26 XX XX = 0..7F
Percussion Short B0 63 08 62 55 26 XX XX = 0..7F
Percussion Medium B0 63 08 62 56 26 XX XX = 0..7F
Percussion Long B0 63 08 62 57 26 XX XX = 0..7F
B3 Clic Level B0 63 08 62 09 26 XX XX = 0..7F
WERSI Clic Level B0 63 08 62 08 26 XX XX = 0..7F
Vibrato Depth B0 63 08 62 6F 26 XX XX = 0..7F
Vibrato Speed B0 63 08 62 6E 26 XX XX = 0..7F
Vibrato Dry / Wet B0 63 08 62 36 26 XX XX = 0..7F
Sustain Time B0 63 08 62 58 26 XX XX = 0..7F
STORE in Flash rom B0 63 08 62 04 26 XX XX = 01

Program Maps for Cubase
Most modern sequencers are equipped with a feature that allows for editing information input from a
diversity of tone generators. Usually there are graphically oriented tools such as sliders, potentiometers,
and switchboards available that can be freely programmed to meet your personal needs for editing. To
make this easier for you, we have created a mixer map template for Steinberg’s Sequencer, CUBASE,
which is available in versions for MAC, ATARI and PC.
In the sub-directery "Mixer Maps" you will find three sub directories for "PC", "MAC" and "ATARI"
computers.
Upper/Main
Settings for the Upper Manual (MIDI Channel 1) as well as general settings.
Lower/Bass
Settings for the Lower Manual and Bass Pedal.
Baby b. Program
Here you can change the settings for the Rotor ans Phase Vibrator and memorize them in the Baby b..
Furthermore it is possible to change the length of the sustain and percussion as well as routing settings.
Before you commence with programming, press the STARTbutton once in the mixer map. If you wish
to memorize the settings in the Baby b., press the STORE button in the mixer map.
For further help concerning the operation of the mixer maps please refer to your CUBASE operation
manual.
MIXERMAP UPPER

MIXERMAP LOWER / BASS
MIXERMAP PROGRAM
56

57

Manufacturer:
Distribution:
Industriestrasse 1
56283 Halsenbach
GERMANY
Phone: +49 (0)6747 - 8903
Fax: +49 (0)6747 - 8914
E-Mail: info@blue-chip-music.net
MUSIC INDUSTRIES CORP.
99 Tulip Ave, 101 Florapark
N. Y. 11D1
Phone: (516) 352-4110
Fax: (516) 352-(516) 352-0754
E-Mail:mio@musicindistries.com
 Loading...