

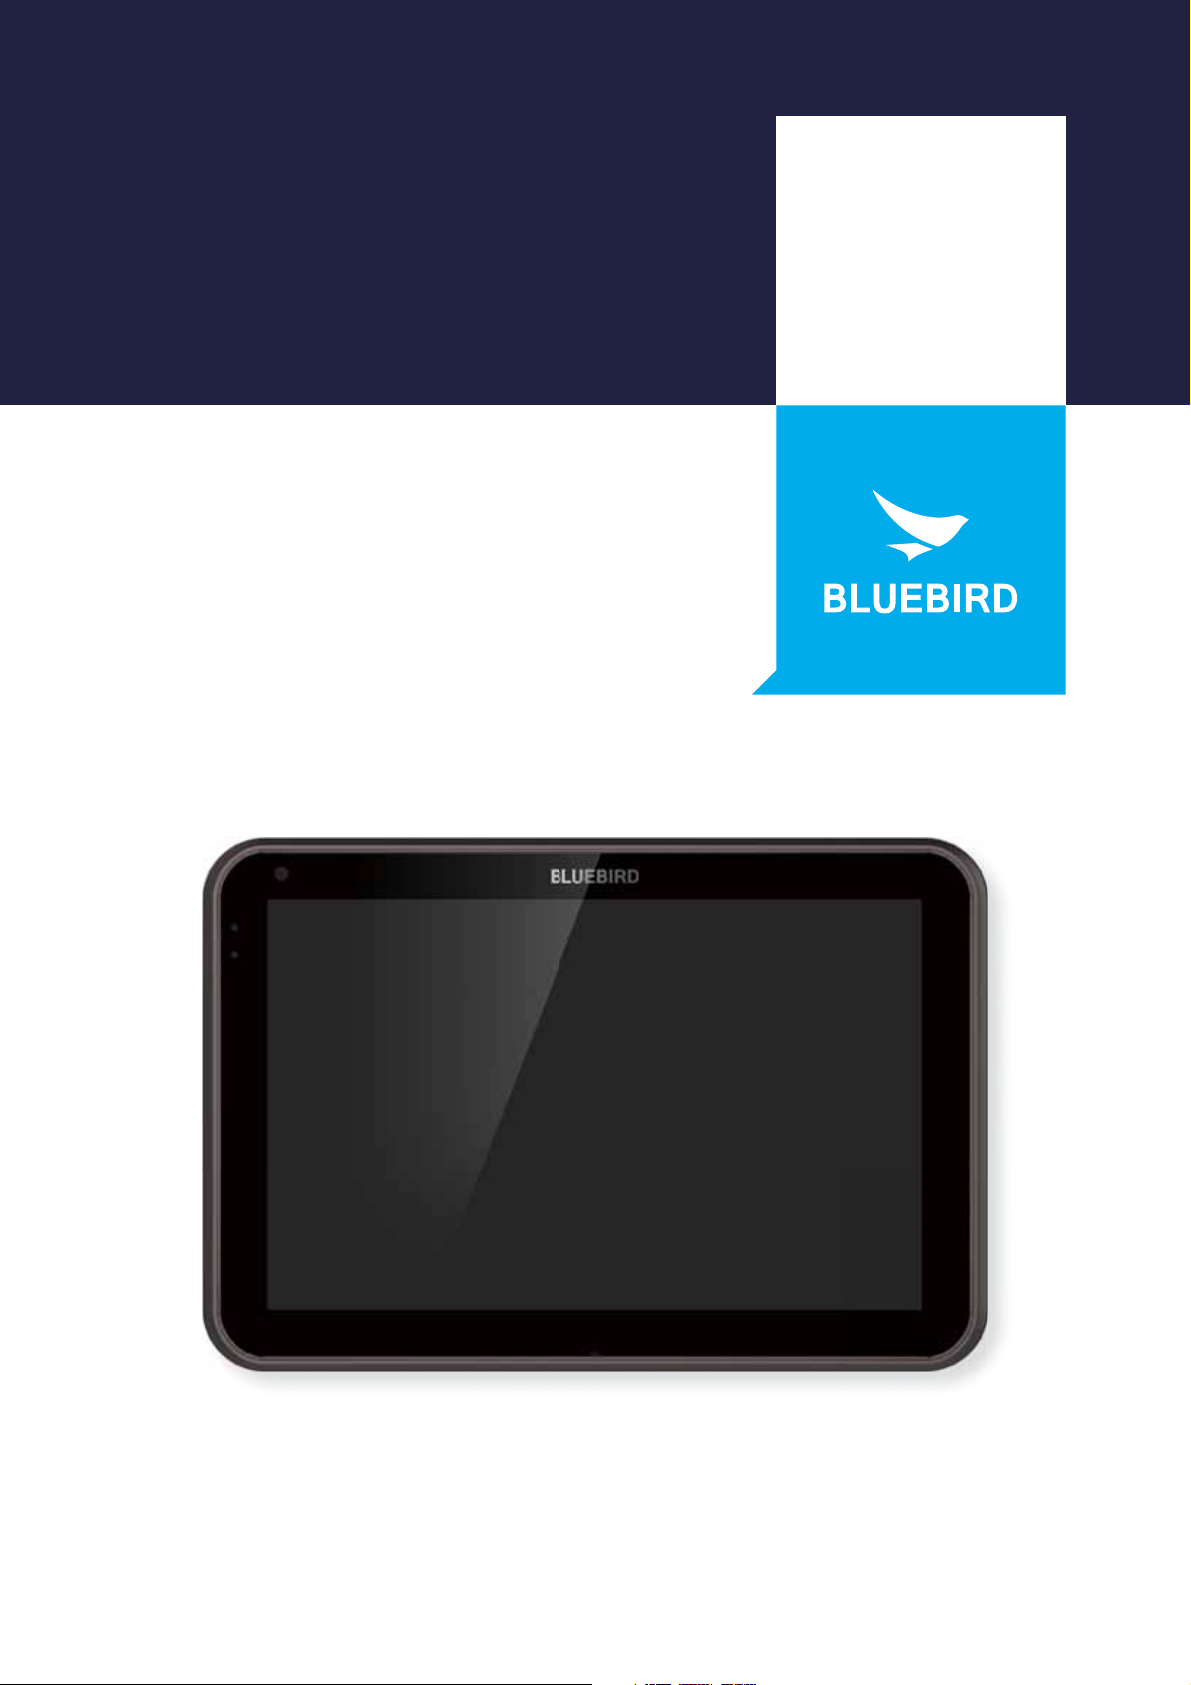
PREMIUM ENTERPRISE TABLET
USER
RT100
Manual

This user manual is protected by copyright.
The radio equipment can’t be used for life saving services because there is possibility to have radio
interference and failure. This product’s partial functions might have problems from the environment, user
program, and other machines. This product’s program is legally protected. Illegal copying, transmitting, or
erasing of the program is prohibited. This user manual has been created by the Bluebird Inc. We have done
our best not to create typos, editing errors, and leaving out any information.
Please understand if there are any inconveniences.
Registered Trademark
BLUEBIRD is an emerging global brand, striving to lead the market in performance and mobility. Their
products represent reliability, innovation, and innovative technology. Pidion is a registered trademark from
the global brand of Bluebird Inc. and is copyright protected.
User’s guidance
Device type User’s guidance
Class B Device
(Household Information & Communication)
Type registration
This device has qualified the electromagnetic wave suitable
registration and can be used as a household device at a
resi-dential area as well as any other areas.
This wireless device may cause propagation interference,
and so, it cannot be used for life-saving services.
*Please read warnings and cautious before use.

Contents
1 Safety Precautions
1.1 Symbols ............................................................................................................................................. 01
1.2 Device ................................................................................................................................................ 01
1.3 Environment ....................................................................................................................................... 01
2 Product Overview
2.1 Package Components ....................................................................................................................... 02
2.2 Cradle Set (Optional).......................................................................................................................... 02
2.3 Device Front ....................................................................................................................................... 03
2.4 Device Back ....................................................................................................................................... 04
2.5 Cradle Front (Optional)....................................................................................................................... 05
2.6 Cradle Bottom (Optional) ................................................................................................................... 05
3 Getting Started
3.1 Inserting a USIM Card ....................................................................................................................... 06
3.2 Charging the Device .......................................................................................................................... 08
3.3 Turning On the Device ....................................................................................................................... 10
3.4 Using Touch Gestures ........................................................................................................................ 11
3.5 Starting the Device for the First Time (Windows) .............................................................................. 12
4 Windows 8.1 Tutorials
4.1 Start Screen ....................................................................................................................................... 13
4.2 Desktop.............................................................................................................................................. 13
4.3 Charms Menu .................................................................................................................................... 14
4.4 Switching between the Start screen and desktop ............................................................................15
4.5 Apps Screen ...................................................................................................................................... 15
4.6 Switching Between Apps ................................................................................................................... 16
4.7 Viewing Two Apps at Once ................................................................................................................ 17
4.8 Closing Active Apps........................................................................................................................... 18
4.9 Turning Off the Device ....................................................................................................................... 18
5 Connecting to Networks (Windows)
5.1 Connecting to a Wi-Fi Network ......................................................................................................... 19
5.2 Connecting to a Mobile Network ....................................................................................................... 19
5.3 Sharing a Mobile Connection ............................................................................................................ 20
5.4 Disconnecting from a Network .......................................................................................................... 20
6 Connecting to Networks (Android)
6.1 Connecting to a Wi-Fi Network ......................................................................................................... 21
6.2 Connecting to a Mobile Network ....................................................................................................... 21
6.3 Sharing a Mobile Connection ............................................................................................................ 21

Contents
7 Connecting to External Devices
7.1 Connecting to a Bluetooth Device (Windows) ................................................................................... 22
7.2 Connecting to External Devices (Android) ......................................................................................... 22
7.3 Connecting to USB Devices .............................................................................................................. 23
8 Customizing the Device (Windows)
8.1 Configuring the Start Screen ............................................................................................................. 24
8.2 Changing Your Account Picture ......................................................................................................... 27
8.3 Personalizing the Lock Screen .......................................................................................................... 27
8.4 Setting the Date and Time ................................................................................................................. 28
8.5 Booting to the Desktop ...................................................................................................................... 28
8.6 Assigning Function Buttons ............................................................................................................... 28
8.7 Using Quick Settings ......................................................................................................................... 29
9 Customizing the Device (Android)
9.1 Customizing Your Home Screen ........................................................................................................ 31
9.2 Using Your Device with Ease ............................................................................................................. 31
10 Using the Card Slots
10.1 Inserting a USIM card ...................................................................................................................... 33
10.2 Removing a USIM Card ................................................................................................................... 33
10.3 Inserting a MicroSD card ................................................................................................................. 34
10.4 Removing a MicroSD Card .............................................................................................................. 35
10.5 Accessing Data on MicroSD Cards ................................................................................................. 35
11 Using the Camera (Windows)
11.1 Installing the Camera App ............................................................................................................... 36
11.2 Opening the Camera App ................................................................................................................ 36
11.3 Taking Pictures ................................................................................................................................. 37
11.4 Recording Video .............................................................................................................................. 37
11.5 Viewing Photos ................................................................................................................................ 38
11.6 Viewing Videos ................................................................................................................................. 38
12 Using the Camera (Android)
12.1 Taking Photos .................................................................................................................................. 39
12.2 Recording Videos ............................................................................................................................. 39
13 Maintenance and Troubleshooting
13.1 Cleaning the Touchscreen ............................................................................................................... 40
13.2 Extending the Battery Life ............................................................................................................... 40
13.3 Troubleshooting ............................................................................................................................... 41
13.4 Updating Windows .......................................................................................................................... 42
13.5 Backing Up Windows ...................................................................................................................... 43
13.6 Recovering Windows ....................................................................................................................... 44

Contents
14 Help and Support
14.1 Preparing for Service ....................................................................................................................... 45
14.2 Bluebird Customer Service .............................................................................................................. 45
14.3 Conditions for After-sales Service ................................................................................................... 46
14.4 Charged Service .............................................................................................................................. 46
Appendix A Specifications
Appendix B Accessories
Appendix C Safety and Regulatory Compliance
Appendix D Warranty Information

1 Safety Precautions
1.1 Symbols
This manual uses the following symbols to indicate hazards and additional information.
Symbol Name Description
Caution
Note
Indicates a potential hazard that could result in a minor injury or damage
to the device.
Indicates additional information that can help you get the most out of the
device.
1.2 Device
• Do not submerge the device in water or expose it to damp conditions.
Doing so may damage the device and void the warranty.
There is a label in the device that changes color when wet. You cannot receive warranty service
if this label has changed color.
• Do not press the power button when the device is wet. Doing so may result in an electric shock.
• Do not touch the power adapter or cord with wet hands. Doing so may result in an electric shock.
• Do not attempt to repair, remodel, or disassemble the device. Doing so voids the warranty on the device.
• Do not attempt to dry the device using a heater, microwave, or other tool.
Doing so may cause the device to explode or malfunction.
• Do not paint the device. Doing so may damage the screen or the exterior of the device.
• Do not expose the device to severe impacts or vibrations. Doing so may damage the device.
• Do not use this device around products that sustain life. Doing so may result in failure of these products
due to electromagnetic interference.
1.3 Environment
• Do not use the device while driving or operating heavy machinery.
Doing so may result in death or serious injury.
• Do not use the device in dusty locations. Doing so may damage the device.
• Do not use the device in hot locations. Doing so may damage the device.
• Do not use the device in moist locations. Doing so may damage the device and void the warranty.
• Do not use the device in locations with combustible goods. Doing so may result in an explosion.
01
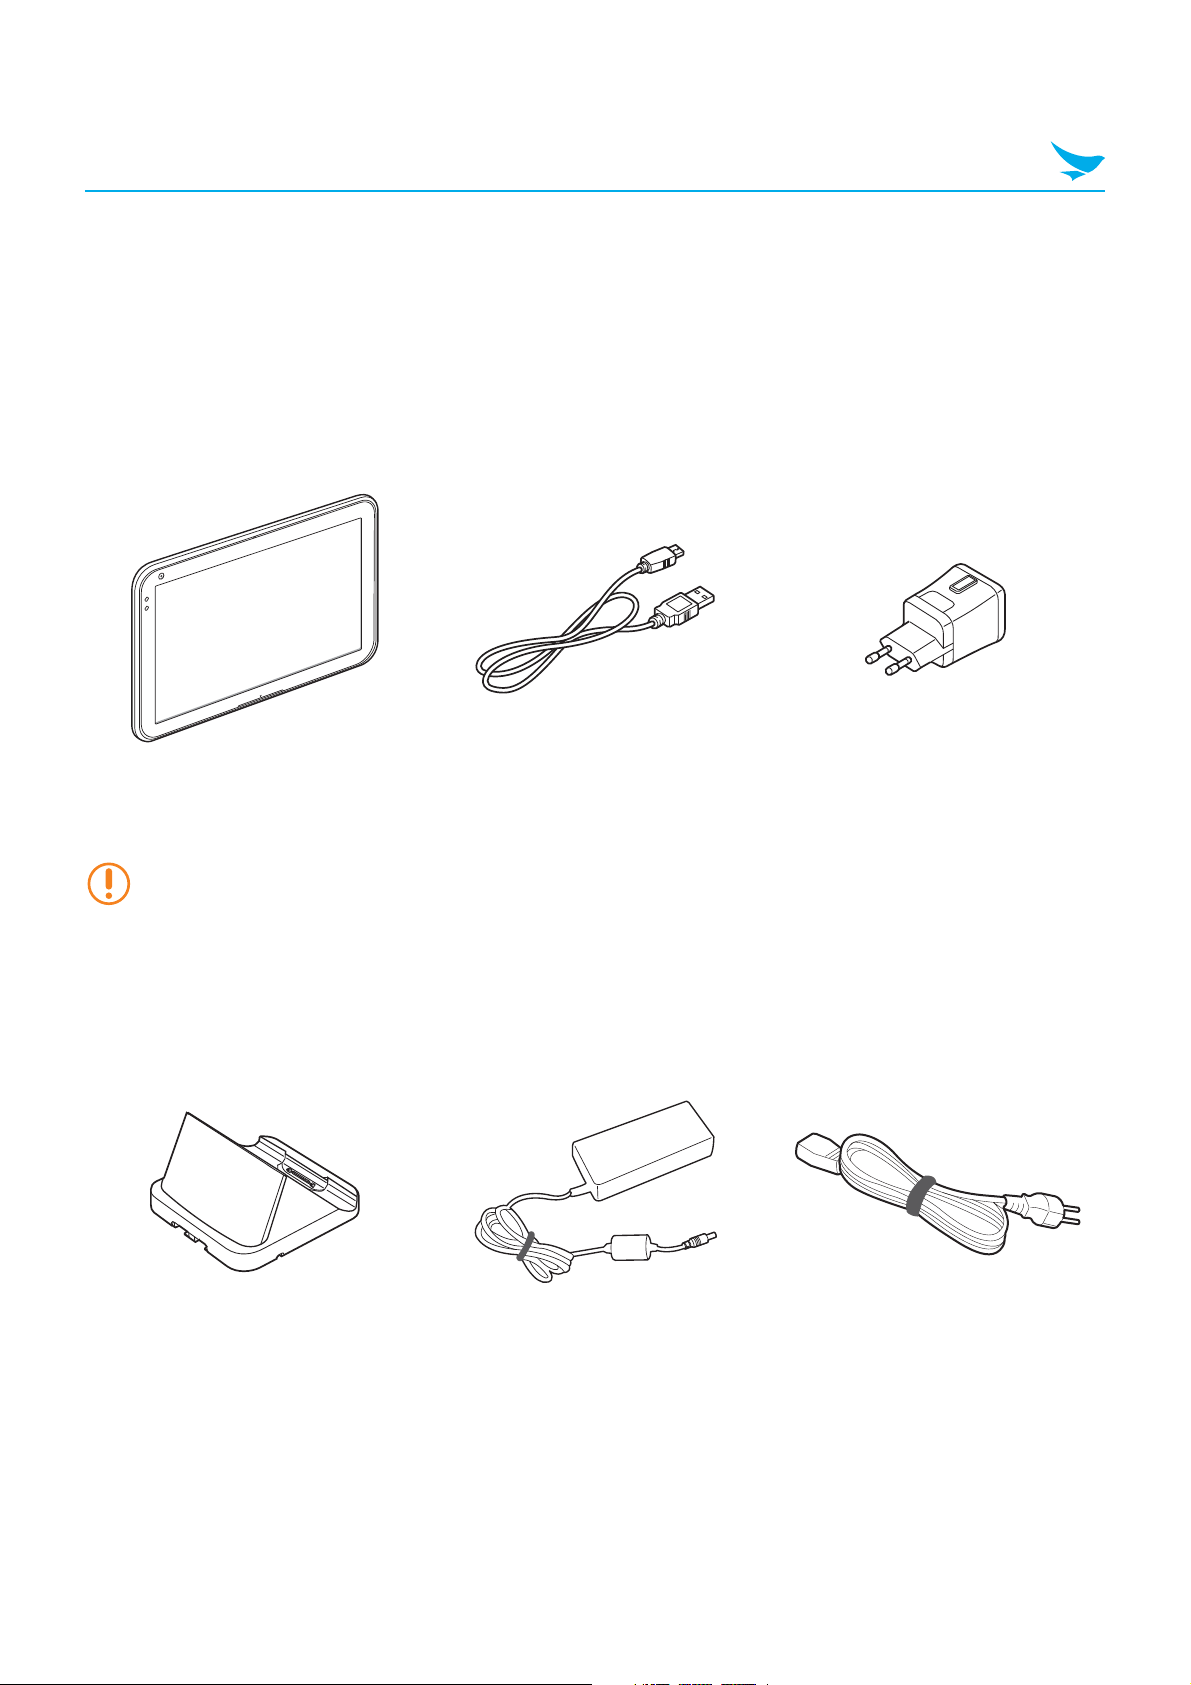
2 Product Overview
This chapter explains the components included with the tablet package system and provides an overview of
the tablet.
2.1 Package Components
The device includes the following components. If any of these components are missing, please contact the
retailer who sold you the device.
RT100 tablet Micro USB cable Power adapter
The images in this manual may not reflect the color and shape of the actual device. These illustrations
are intended for descriptive purposes only.
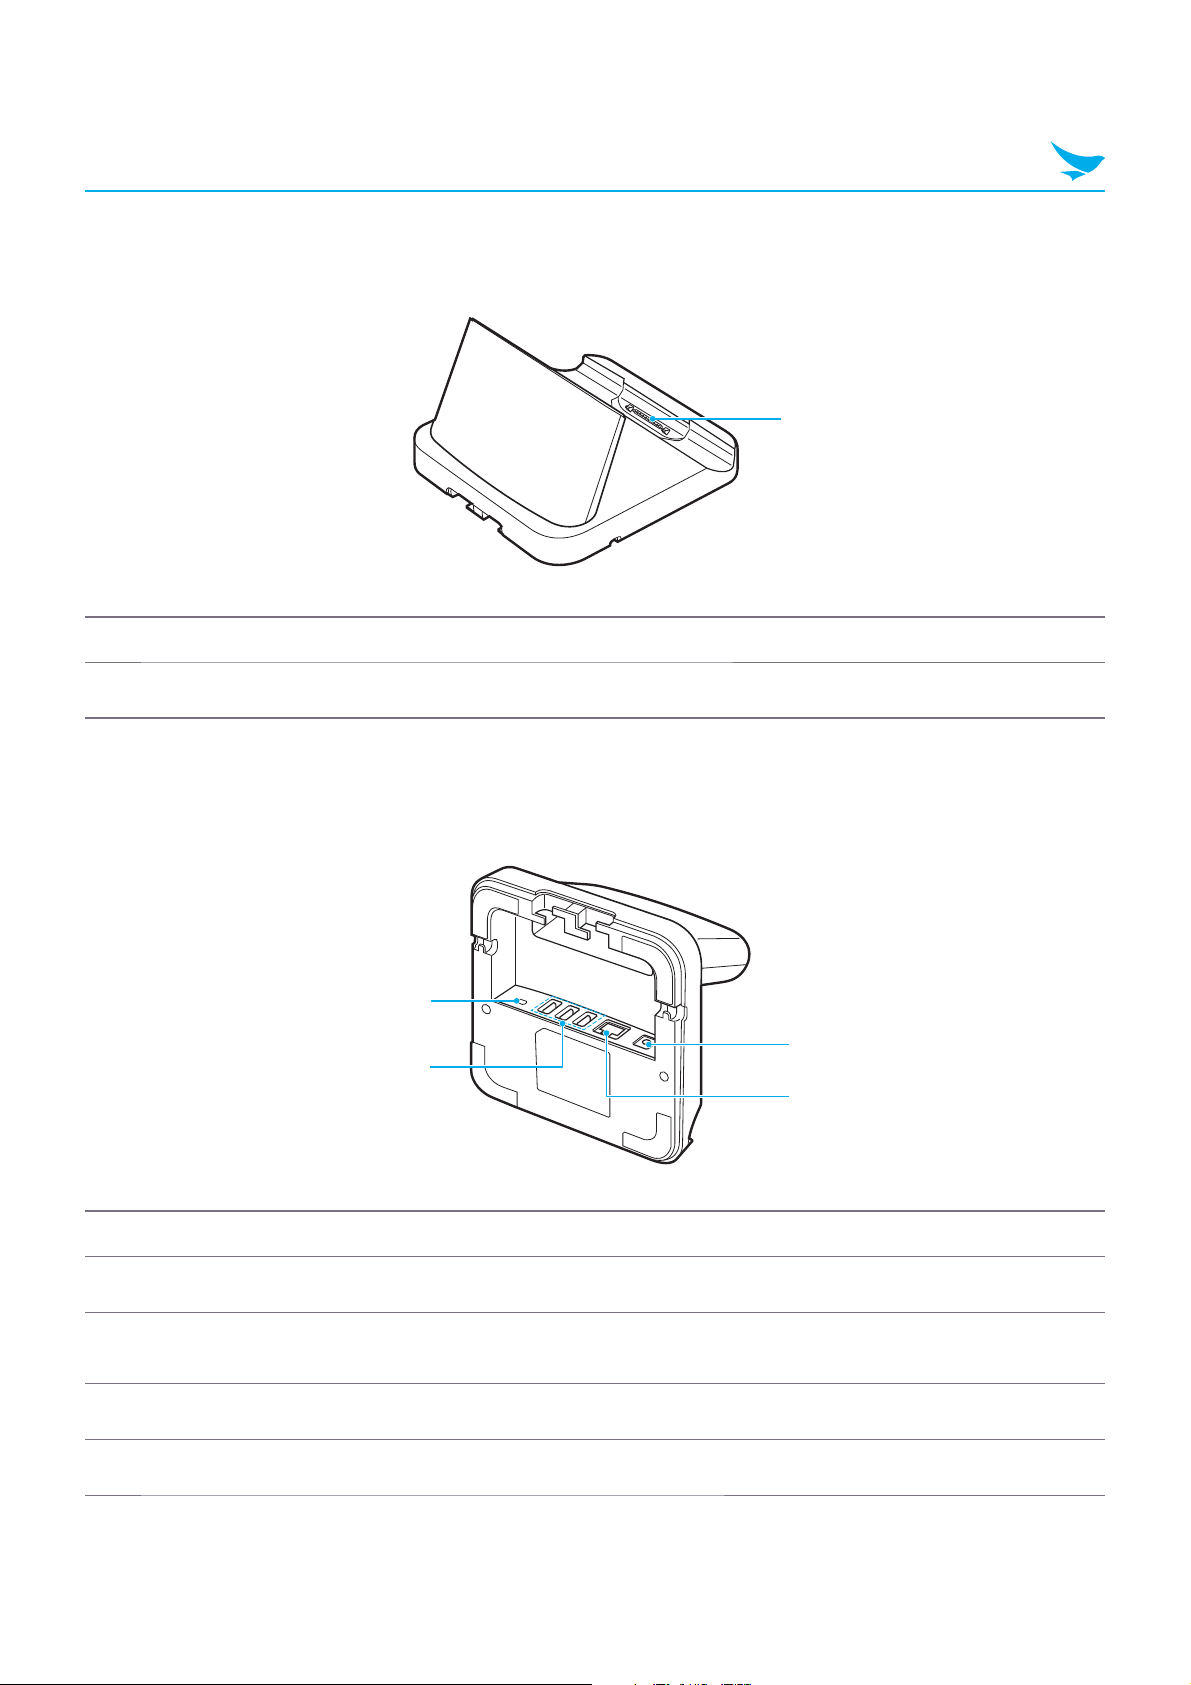
2.2 Cradle Set (Optional)
Cradle Power adapter AC power cord
02
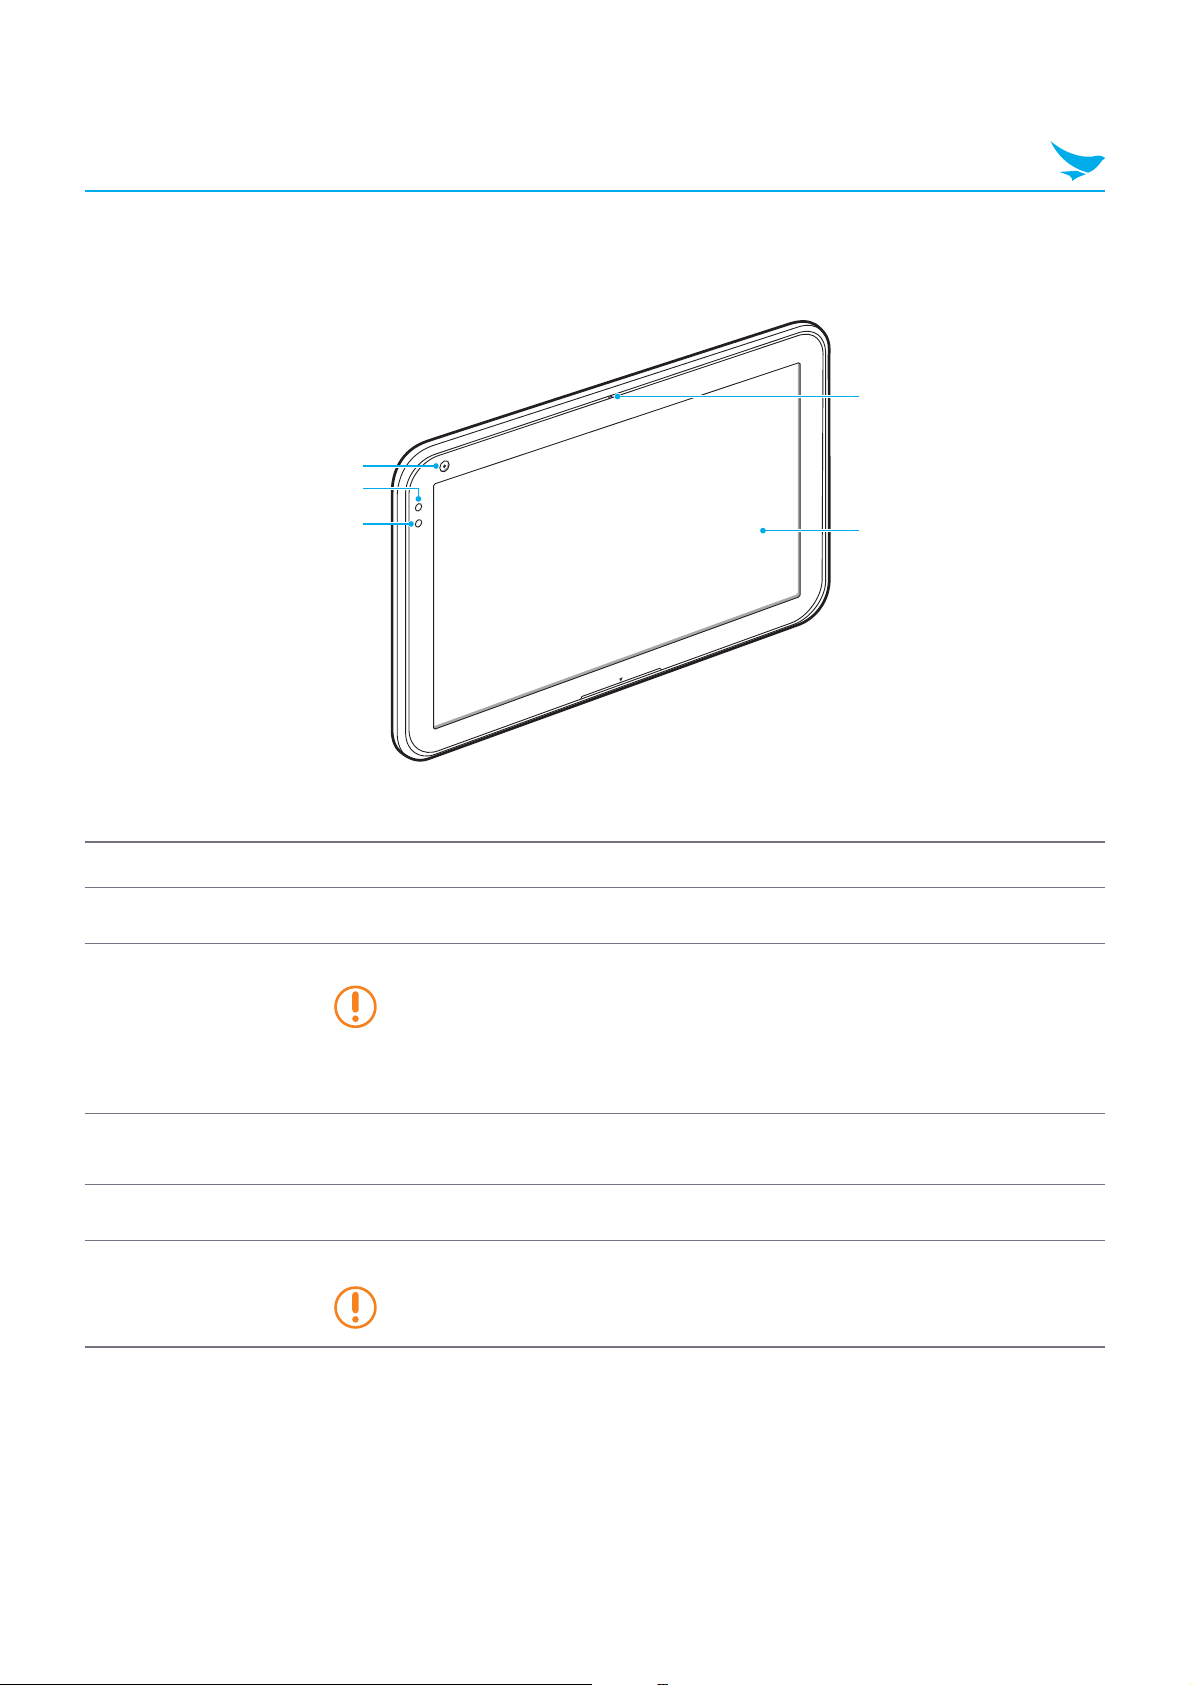
2 Product Overview
2.3 Device Front
1
2
4
3
No. Name Description
1
Front camera Captures pictures and video (2.0 megapixels).
Indicates the status of the battery.
• The battery LED turns red when the battery is charging.
2
Battery LED
• The battery LED turns white when the battery is fully charged.
• The battery LED blinks red and white alternately at 1 second intervals
when the battery has a problem, such as it being too hot or too cold.
5
3
Light sensor
4
Microphone Captures sound for video conferencing, voice recording, and speech recognition.
5
Screen
Detects the ambient light to automatically adjust the brightness of the screen and
the exposure of the camera.
Displays programs and acts as a multi-touch interface.
The default resolution is 1280 × 800.
03
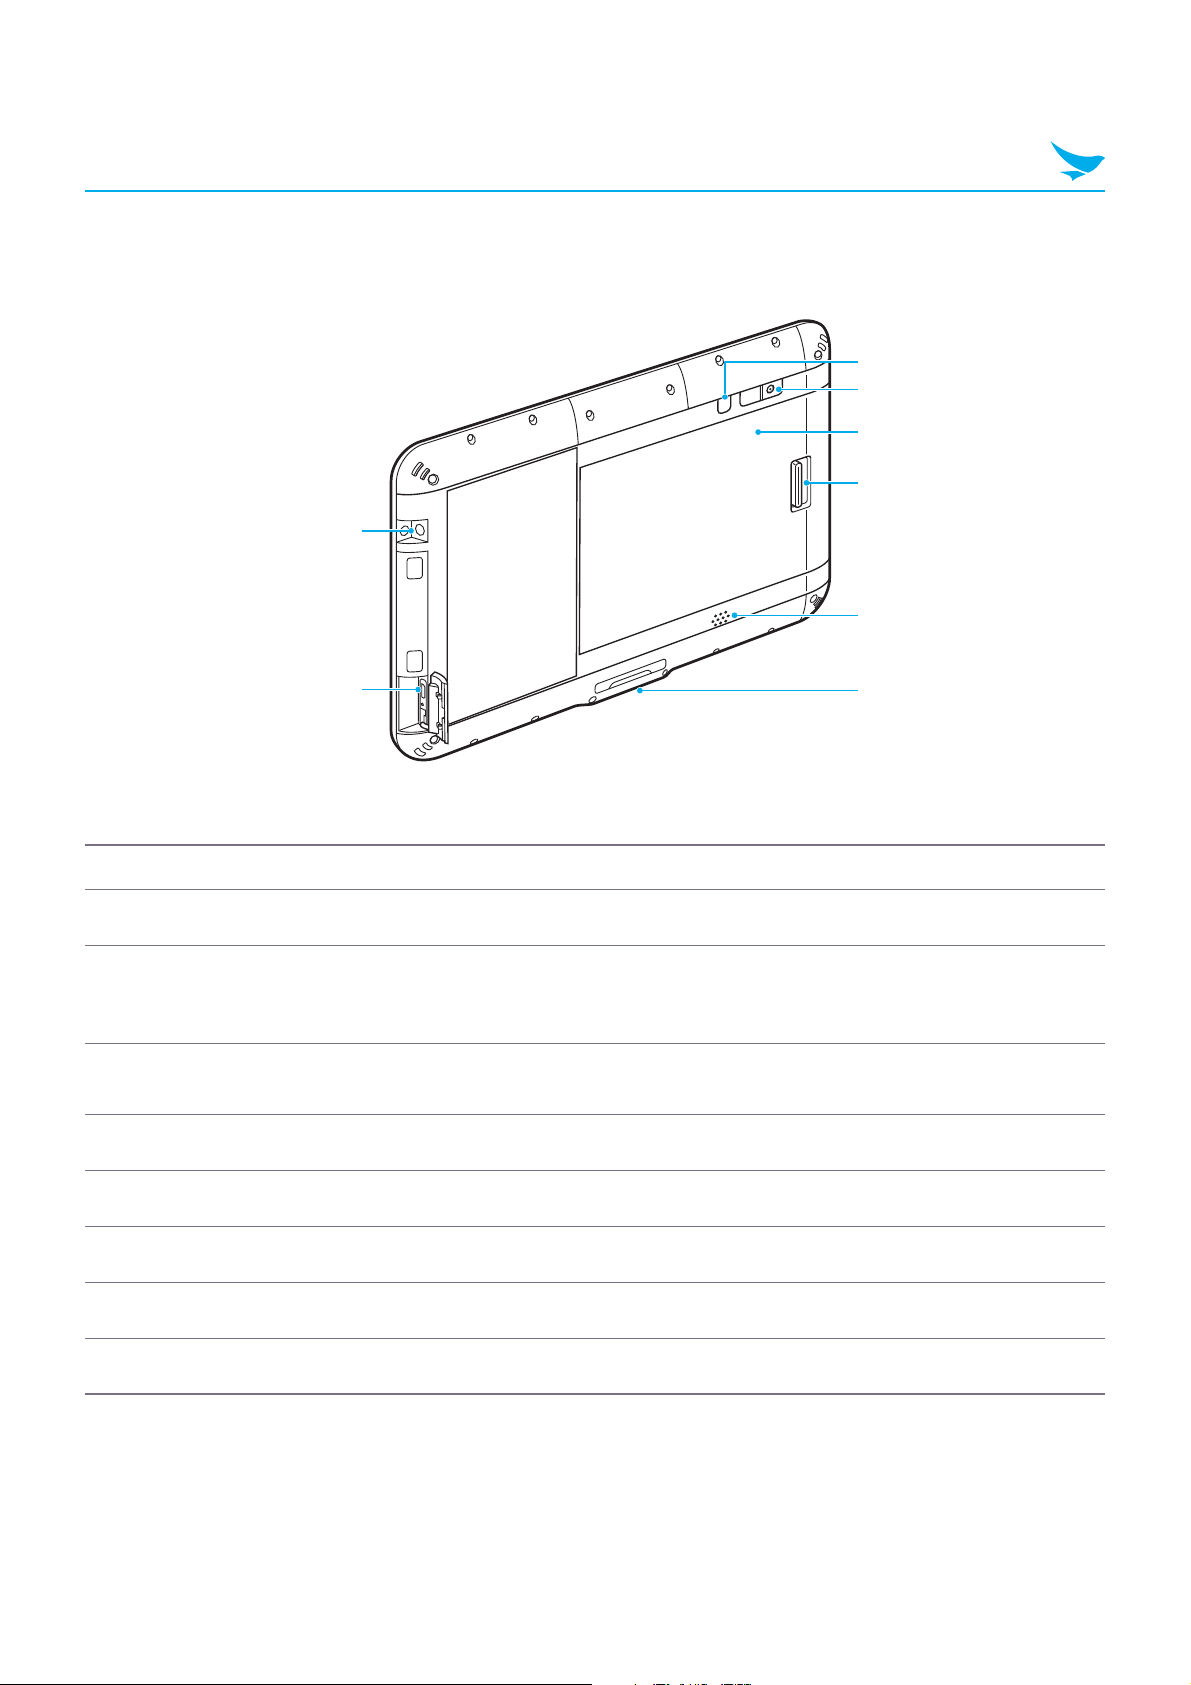
2 Product Overview
2.4 Device Back
1
3
4
5
6
7
2
No. Name Description
1
Audio jack Connects to the 3.5 mm adapter on headphones or computer speakers.
Connects to the power adapter to charge the device.
2
USB port
3
Power button
4
Rear camera Captures photos and video (5 megapixels).
5
Battery area 6000 mAh, inner part of the device.
6
Lock button Locks the device. You must log in to continue using the device after locking it.
Connects to USB devices, such as memory sticks, keyboards, and external
hard drives.
Turns on the device.
For more information, see 3.3 Turning On the Device on page 10.
8
7
Speaker Emits sound.
8
Cradle connector Connects the device to a cradle (optional).
04
2 Product Overview
2.5 Cradle Front (Optional)
No. Name Description
1
Connector Connects the cradle to a device.
1
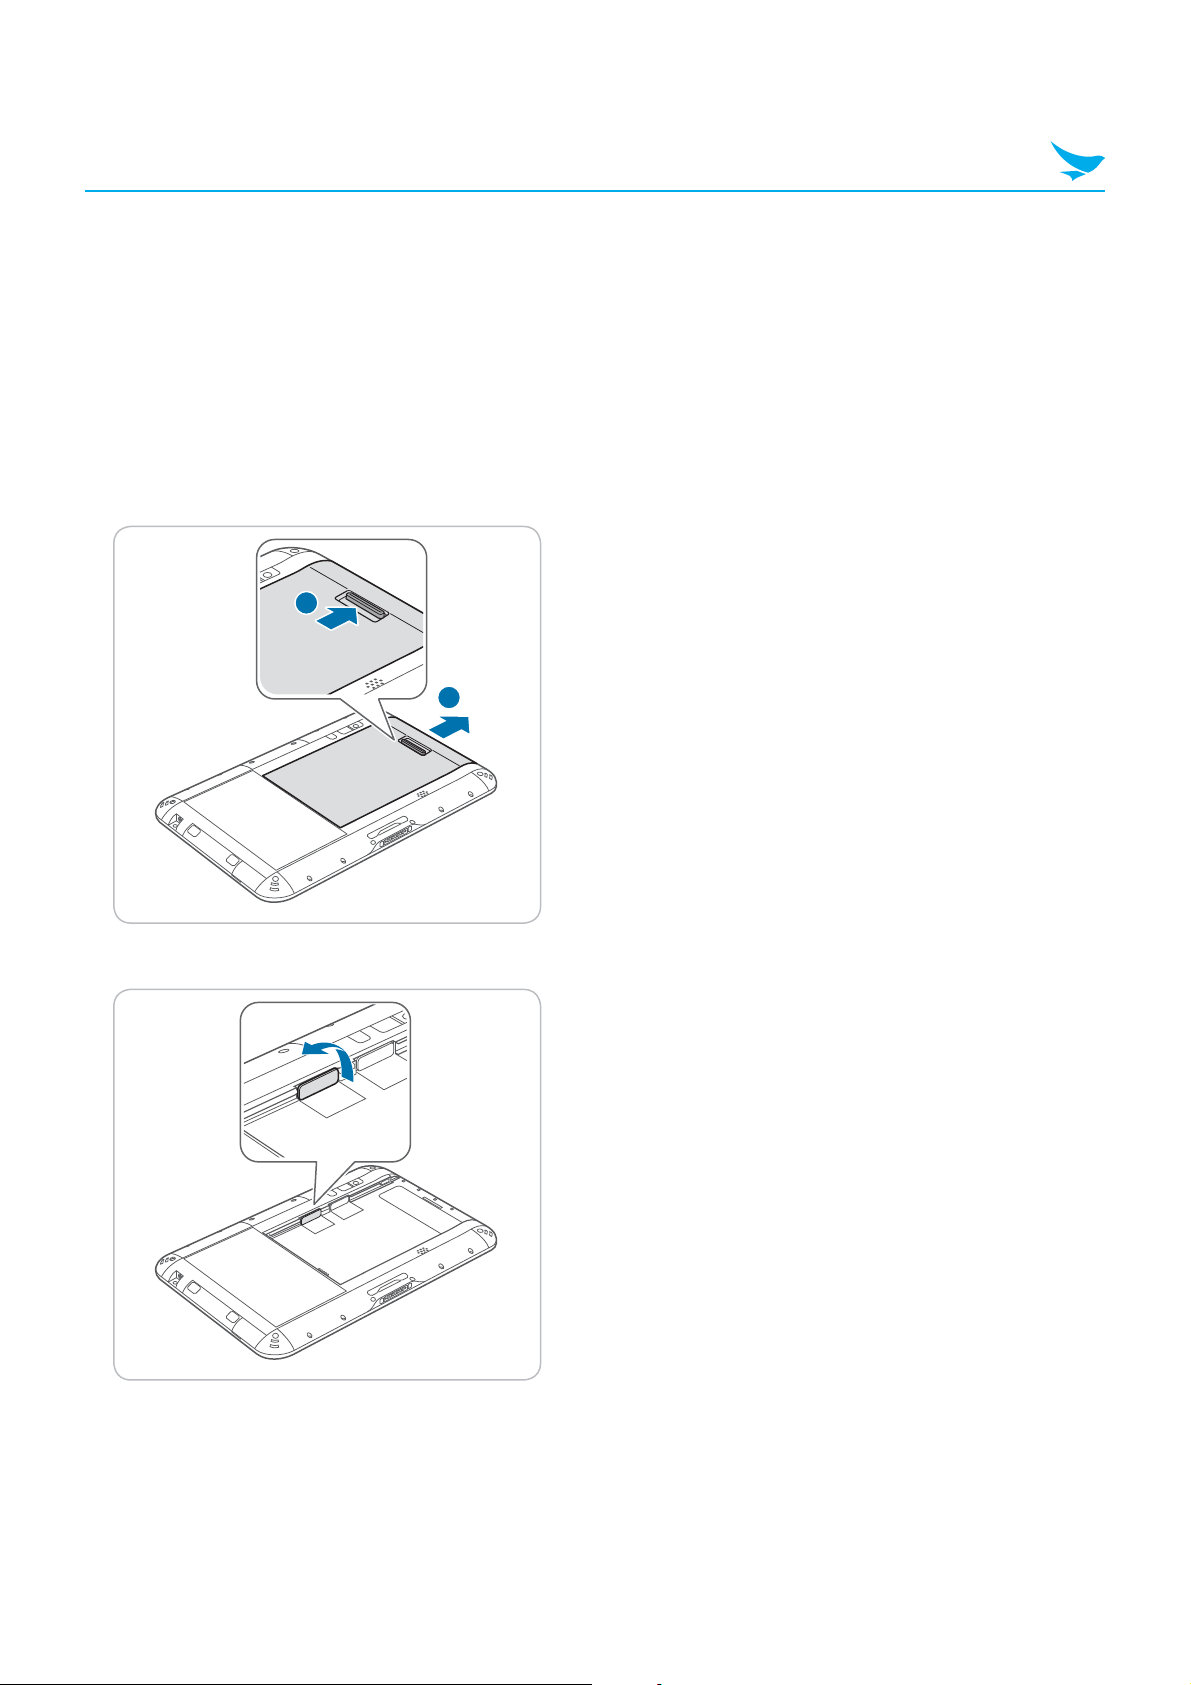
2.6 Cradle Bottom (Optional)
1
2
No. Name Description
1
DC OUT port Connects another power source.
2
USB port
Connects to USB devices, such as memory sticks, keyboards, and external
hard drives.
3
4
3
DC IN port Connects a power cable.
4
Ethernet port Connects an ethernet cable.
05
3 Getting Started
1
This chapter explains the basics of how to use the device, including how to charge the device, and turn it on
or off. Subsequent chapters teach you how to navigate Windows or Android and customize the device, but
the information in this chapter will help you start the device for the first time and configure basic settings.
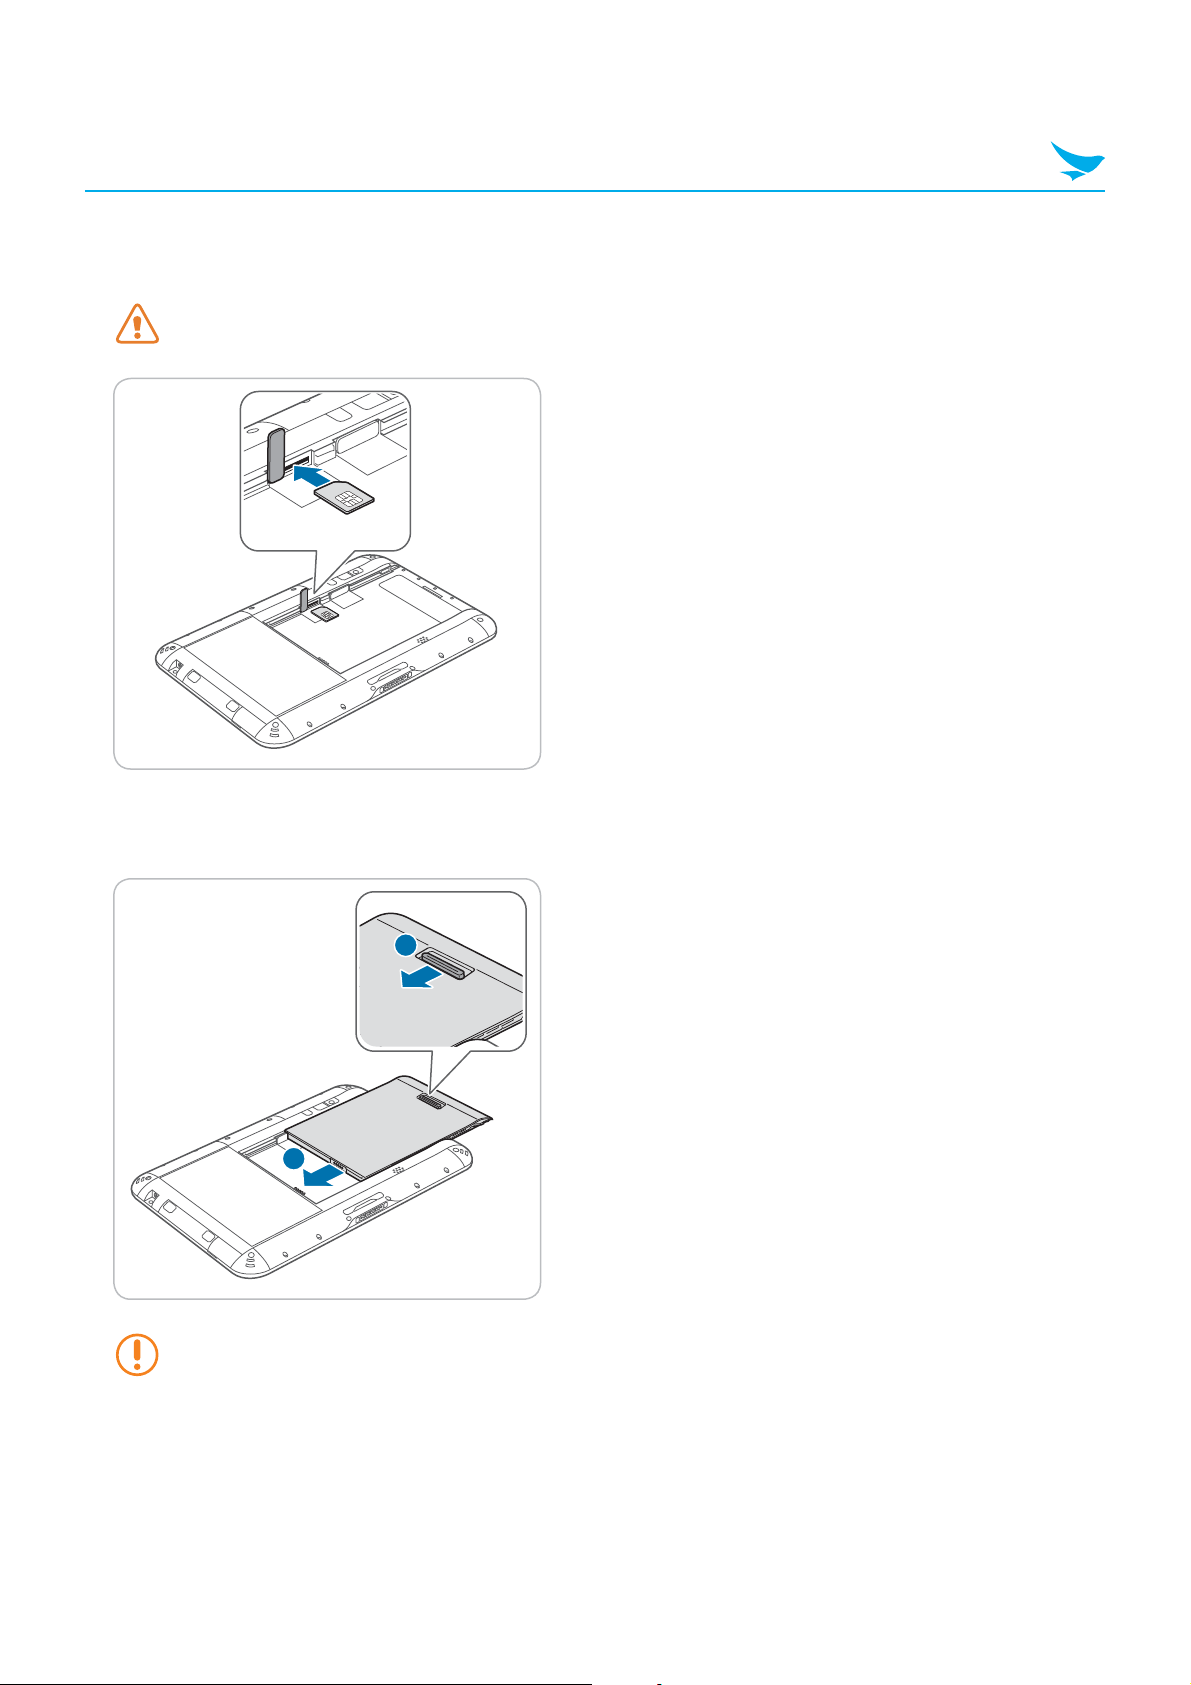
3.1 Inserting a USIM Card
USIM cards allow the device to connect to mobile networks.
Unlock the battery lock and remove the battery.
1
2
Open the cover to the USIM card slot on the left.
2
06
3 Safety Precautions
2
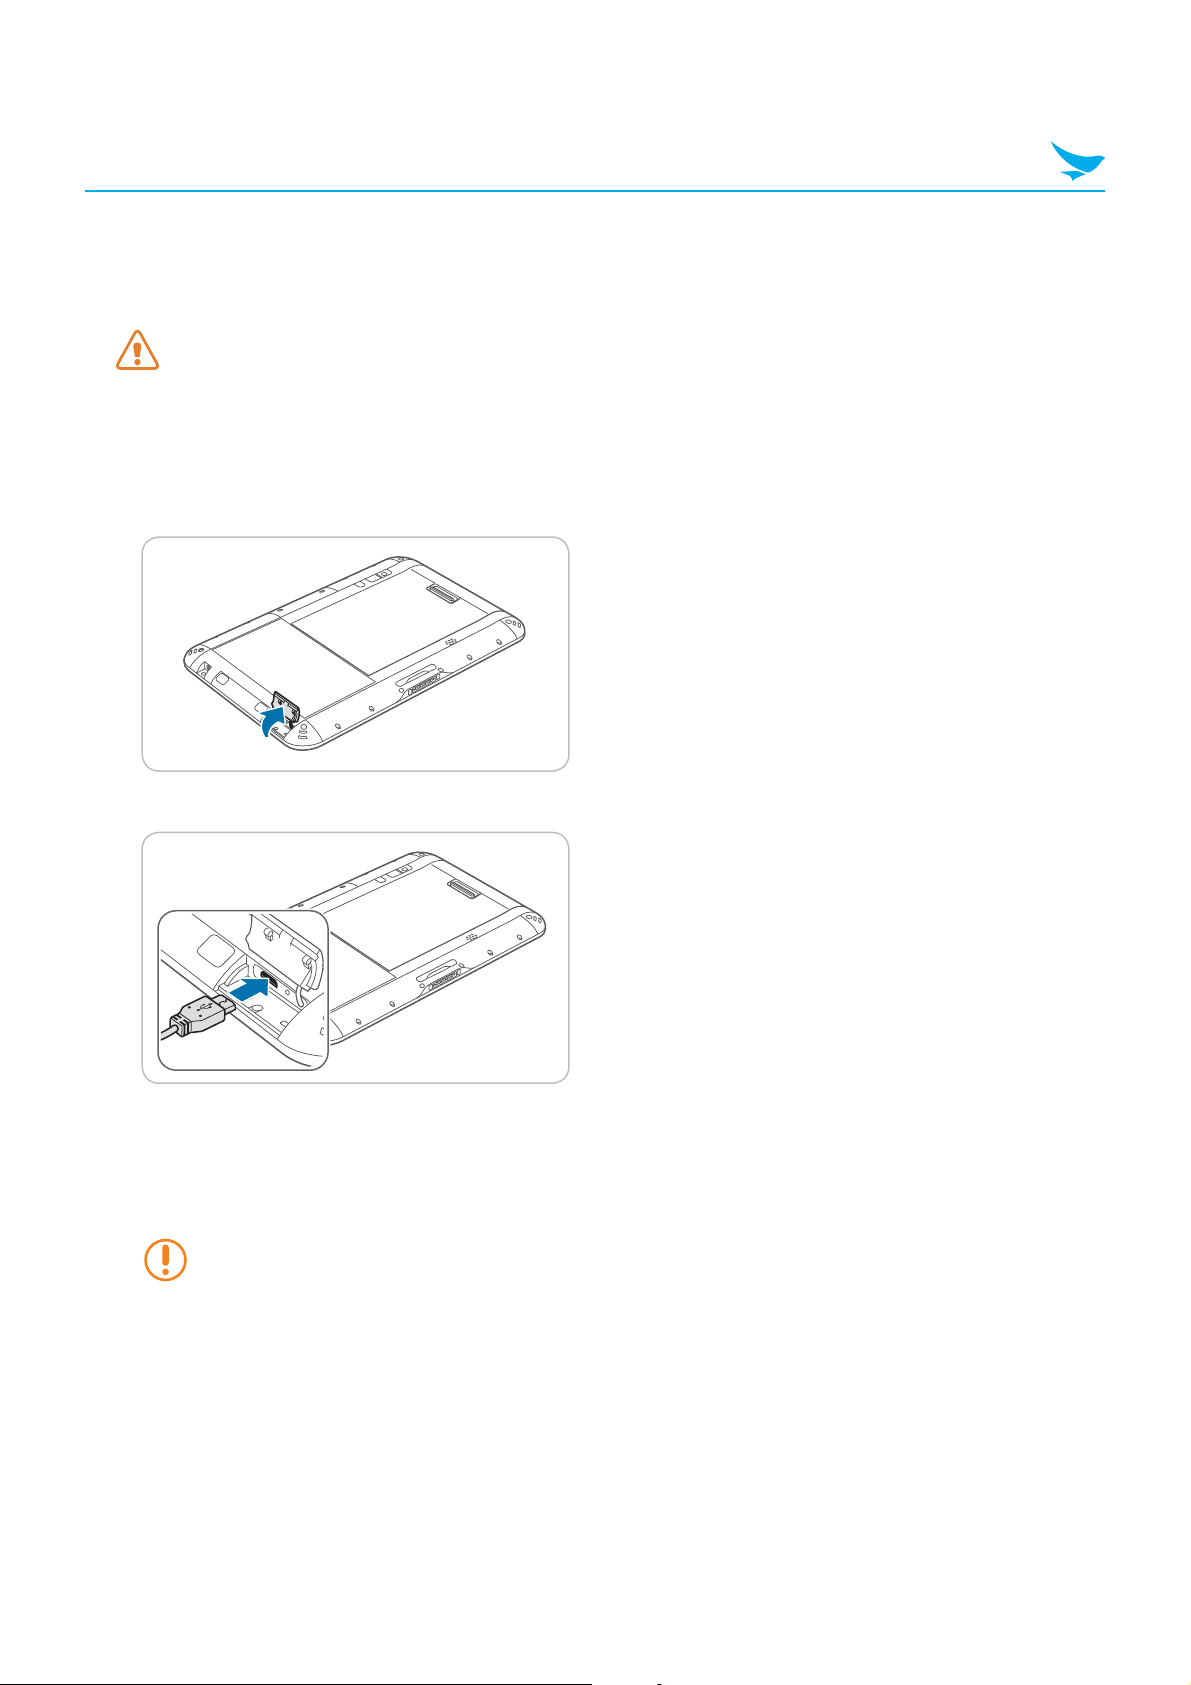
Insert the USIM card into the slot until you hear a click.
3
• Make sure that the gold-colored contacts are facing up.
Do not insert the USIM card into an incorrect slot. Check the shape and orientation of the slot to
ensure that it is designed for a USIM card.
Close the cover of the USIM card slot.
4
Replace the battery and lock the battery lock.
5
1
To remove the USIM card, see 10.2 Removing a USIM Card on page 33.
07
3 Safety Precautions
3.2 Charging the Device
The device charges when connected to the power adapter or resting in the cradle (optional).
• Do not attempt to charge the device with anything other than the adapter it shipped with.
• Charge the device fully before using it for the first time. Failure to do so may decrease the life of
the battery.
To Charge with the USB Cable
Open the cover on the right side of the device.
1
Plug the USB cable into the port.
2
• The battery LED turns red when the battery is charging.
• The battery LED turns white when the battery is fully charged.
• The battery LED blinks red and white alternately at 1 second intervals when the battery has a
problem, such as it being too hot or too cold
Continuing to charge the device when the battery is full will not damage the battery.
Connect the USB cable to the power adapter.
3
Plug the adapter into an outlet.
4
After the battery is fully charged, unplug the USB cable, and then replace the cover.
5
08

3 Safety Precautions
To Charge with the Cradle (Optional)
Install the device into the cradle.
1
Connect the power adapter into the DC IN port of the cradle.
2
Connect the AC power cord into the adapter and an outlet.
3
3
1
2
09
3 Safety Precautions
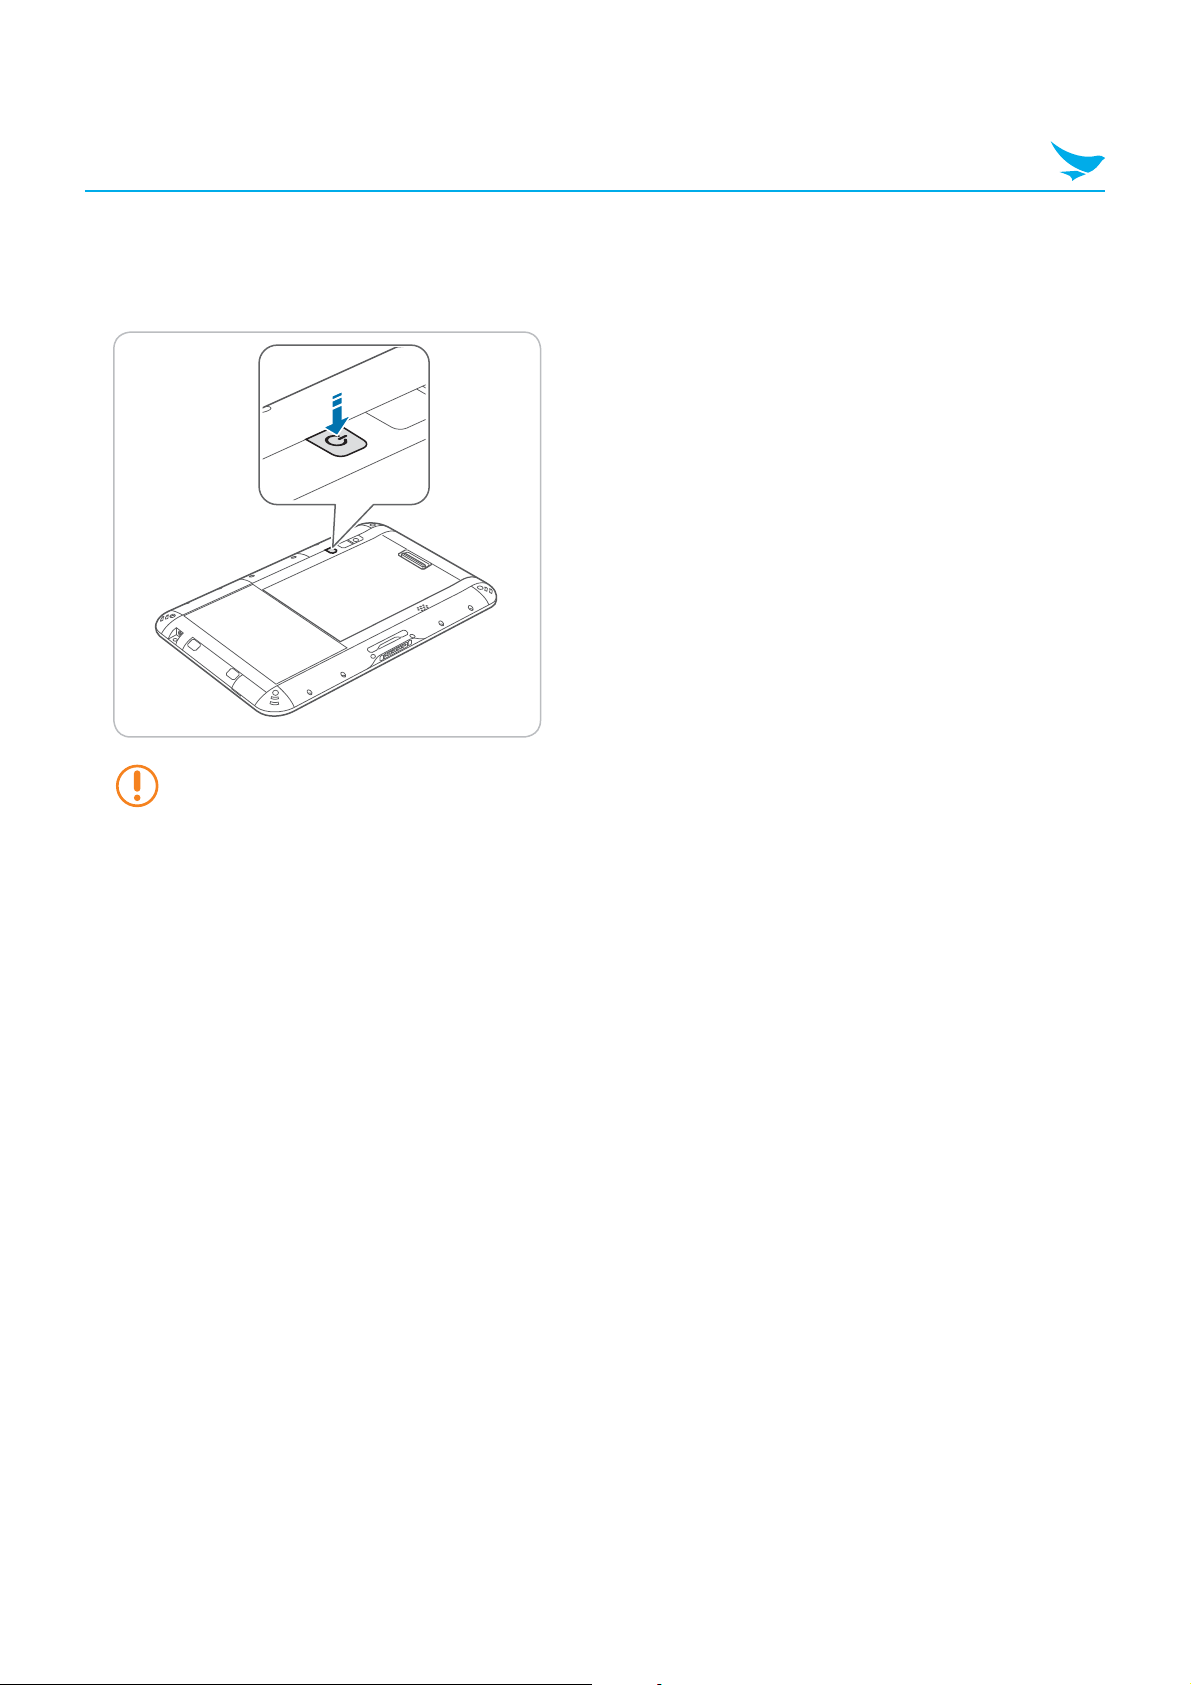
3.3 Turning On the Device
Press and hold the power button on the back of the device to turn on the device.
To turn off the device, see 4.9 Turning Off the Device on page 18.
The power button is also used:
• To turn off the screen without turning off the device.
To turn the screen back on, press the power button again.
• To turn off the device manually by pressing and holding the power button for about five seconds.
10

3 Safety Precautions
3.4 Using Touch Gestures
Touch gestures allow you to interact with Windows or Android and the applications installed on the device.
Gesture Name Description
Ta p
Zoom
Press and hold
Lightly touch an item to launch apps, interact with buttons,
and select options.
Touch two points on the screen and move your fingers
together to zoom out or move them apart to zoom in.
Continue touching an item to open context menus and
display other options.
Swipe
Drag Move your finger across the screen to move apps and pages.
Flick your finger across the screen to switch between apps
and display additional menus.
11

3 Safety Precautions
3.5 Starting the Device for the First Time (Windows)
When you start the device for the first time, you are prompted to create a user account and configure basic
settings.
To configure Windows upon initial startup, follow these steps:
When the Region and language screen appears, select the desired Country or region, App language,
1
Keyboard layout, and Time zone, and then tap Next.
On the Product key screen, type the Windows product key that came with the device or tap Skip to
2
perform this step later.
Read and consider the license terms, and then tap I accept if you agree to the terms.
3
When the Personalize screen appears, select a color theme and name for the device, and then tap Next.
4
The PC name cannot contain spaces.
On the Get online screen, tap an available Wi-Fi or mobile network or tap Skip this step to perform this
5
step later.
On the Settings screen, tap Use express settings to use the default Windows settings or tap Customize
6
to manually configure Windows settings.
On the Your account screen, type a User name, Password, and Password hint.
7
When the device restarts and the lock screen appears, swipe up on the screen.
8
Tap your profile name, and then type in your password to start Windows.
9
12

4 Windows 8.1 Tutorials
Windows 8.1 includes features optimized for touch screens, such as the new Start screen, Charms menu,
and gestures for switching and closing apps. The next few sections will teach you about these features and
help you feel comfortable in this new environment.
4.1 Start Screen
The Start screen provides easy access to the apps and information most important to you. From the Start
screen, you can see your calendar, email, and favorite websites, search for apps or content on the web, or
log in and out of the device.
You can customize the Start screen by re-sizing the tile or adding a new tile. For more information, see
Configuring the 8.1 Configuring the Start Screen on page 24.
4.2 Desktop
The desktop provides a familiar experience to those who have used previous versions of Windows. It is also
where you will use certain apps, such as the File Explorer and Office applications.
If you want to boot directly into the desktop, see 8.5 Booting to the Desktop on page 28.
13

4 Windows 8.1 Tutorials
4.3 Charms Menu
The Charms menu provides quick access to frequently used functions from any screen.
The functions in the Charms menu may differ based on the current app.
To open the Charms menu, follow these steps:
Swipe in from the right edge of the screen.
1
Search
Share
Start
Devices
Settings
14

4 Windows 8.1 Tutorials
Tap the desired charm:
2
Icon Name Function
Search Finds things on the device or the web.
Share Shares files, photos, or links from the current app.
Start Opens the Start screen or desktop.
Devices Allows you to play, print, or project from peripheral devices.
Settings
From apps: Changes the settings for the current app.
From the Start screen and desktop: Changes Windows settings.
4.4 Switching between the Start screen and desktop
Swipe in from the right edge of the screen.
1
In the Charms menu, tap Start.
2
4.5 Apps Screen
The Apps screen displays all of the applications installed on the device. The apps that you use most
frequently appear on the left side of the Apps screen. The other apps are grouped by publisher.
15

4 Windows 8.1 Tutorials
To show all of the apps installed on the device, follow these steps:
Place your finger in the center of the Start screen and swipe upwards.
1
On the Apps screen, swipe to the left or right to show more apps.
2
You can swipe up from the bottom of the screen to display the context menu. The context menu
allows you to pin apps to the Start screen or taskbar, uninstall apps, run apps as an administrator,
or open app locations.
4.6 Switching Between Apps
Drag your finger inwards from the left edge of the screen.
1
Drag the app to the center of the screen, and release the app thumbnail.
2
You can swipe in repeatedly from the left side of the screen to quickly cycle through all open apps.
16

4 Windows 8.1 Tutorials
4.7 Viewing Two Apps at Once
To display two apps at the same time:
From any app, drag your finger inwards from the left edge of the screen.
1
When the second app appears, drag it to the left or right side of the screen.
2
Release the app.
3
You can press and drag the dividing line in the center to resize the apps.
17

4 Windows 8.1 Tutorials
4.8 Closing Active Apps
From the app, slide your finger downwards from the top edge of the screen.
1
When the app snaps to the bottom of the screen, release it.
2
If the app appears in the window, tap the close button in the top right corner of the window.
4.9 Turning Off the Device
In the top right corner of the Charms screen, tap the button.
1
Tap Shut Down.
2
If the device is not responding, press and hold the power button on the top left edge of the device
for about five seconds to turn off the device manually.
18

5 Connecting to Networks (Windows)
The device can connect to Wi-Fi and mobile wireless networks. The device can connect to Wi-Fi networks
right out of the box, but you will need to insert a USIM card to connect to mobile networks. Connecting to
and using mobile networks may incur charges from your mobile carrier.
You can also use Bluetooth to connect peripheral devices, such as keyboards and cell phones, to this
device. In order to connect a Bluetooth device to this device, you must enable Bluetooth on both devices.
5.1 Connecting to a Wi-Fi Network
Swipe in from the right edge of the screen.
1
In the Charms menu, tap Settings.
2
In the Settings sidebar, tap the icon.
3
Tap the Wi-Fi toggle to enable Wi-Fi connections.
4
When the list of Wi-Fi networks appears, tap an available network.
5
Tap Connect.
6
Type in the password to connect to the network.
7
After you connect to a Wi-Fi network, the device will automatically connect to that network whenever
it is within range.
5.2 Connecting to a Mobile Network
Insert a USIM card (10.1 Inserting a USIM card on page 33).
1
Swipe in from the right edge of the screen.
2
In the Charms menu, tap Settings.
3
In the Settings menu, tap .
4
In the Networks menu, under Mobile Networks, verify the connection status.
5
19

5 Connecting to Networks (Windows)
5.3 Sharing a Mobile Connection
To share a connection to a mobile network with other devices, follow these steps:
Swipe in from the right edge of the screen.
1
In the Charms menu, tap Settings.
2
In the Settings menu, tap Change PC settings.
3
In the PC settings menu, tap Network.
4
Under Mobile broadband, tap the name of the network to share.
5
Under Share this connection, tap the toggle switch to turn on network sharing.
6
Specify the name of the network and the password.
7
On the other device, locate the network and enter the password to log in.
8
5.4 Disconnecting from a Network
Swipe in from the right edge of the screen.
1
In the Charms menu, tap Settings.
2
In the Settings sidebar, tap the icon.
3
Tap the Wi-Fi network with the Connected status, and then tap Disconnect.
4
20

6 Connecting to Networks (Android)
6.1 Connecting to a Wi-Fi Network
Connecting to a Wi-Fi network is an easy way of accessing the Internet. When you are out, you can connect
to Wi-Fi networks in public places, such as libraries or coffee shops.
1
On the Home screen, tap > .
Make sure switch the Wi-Fi to ON.
2
Tap the network you want to join.
3
If necessary, enter the password for the network and tap Connect.
4
To close the connection, switch the Wi-Fi to OFF.
Your device periodically checks for and notifies you of available connections. The notification appears
briefly at the top of the screen.
6.2 Connecting to a Mobile Network
Insert a USIM card (3.1 Inserting a USIM Card on page 06).
6.3 Sharing a Mobile Connection
1
On the Home screen, tap > .
Tap More… > Tethering & portable hotspot.
2
Tap the Bluetooth tethering checkbox to share the data connection with other devices via Bluetooth.
3
21

7 Connecting to External Devices
7.1 Connecting to a Bluetooth Device (Windows)
Swipe in from the right edge of the screen.
1
In the Charms menu, tap Settings.
2
At the bottom of the Settings sidebar, tap Change PC settings.
3
In the PC Settings menu, tap PC and devices.
4
In the PC and devices menu, tap Bluetooth.
5
Tap the Bluetooth toggle to enable Bluetooth.
6
Tap the device that you want to pair with.
7
• If the desired device does not appear in this list, then confirm that Bluetooth is enabled in the Settings
menu of that device
Tap Pair.
8
Follow the instructions on the screen to finish pairing the device.
9
After you pair a Bluetooth-enabled device, the tablet will automatically pair with that device whenever
it is within range and Bluetooth is enabled.
7.2 Connecting to External Devices (Android)
1
On the Home screen, tap > .
Make sure switch the Bluetooth to ON.
2
• Make sure the devices you want to pair with have Bluetooth enabled.
• You may need to start the pairing process from the headset. For details, see your headset user
guide.
On the Bluetooth device list, tap the device you want to pair with.
3
Type or confirm the PIN, and tap PAIR, if required.
4
• The passcode, which you can create, must be entered on both devices. The PIN in some devices
is fixed. For details, see the user guide of the other device.
• A PIN is only used when you connect to something for the first time.
When your device has paired with other devices via Bluetooth, your devices will automatically pair in the
future when in range.
22

7 Connecting to External Devices
7.3 Connecting to USB Devices
Open the cover on the right side of the device.
1
Plug the USB cable into the port.
2
Before you connect a USB device, make sure that the connector is oriented correctly and that it can
physically fit into the port.
When the notification appears, the device is ready to use.
3
The USB port supports USB 2.0 and 3.0 devices, such as mice, keyboards, and portable hard disks.
However, the USB device may not function properly if it requires a current of more than 0.9 A.
23

8 Customizing the Device (Windows)
After learning how to navigate Windows and getting a feel for the device, you will probably want to
customize its style and functionality. You can customize the Start screen, lock screen, and function buttons
easily by following the instructions in this section.
8.1 Configuring the Start Screen
The Start screen is where it all begins, so you should add your own flair to make it your own. In this section,
you’ll learn how to change the background and color scheme of Windows, add, delete, and resize tiles, and
arrange the Start screen to suit your preferences.
Changing the Background
To change the background of the Start screen:
Swipe in from the right edge of the screen
1
In the Charms menu, tap Settings.
2
In the Settings menu, tap Personalize.
3
Tap the desired background, Background color, and Accent color.
4
24

8 Customizing the Device (Windows)
Adding Tiles
Tiles allow you to add your favorite apps, websites, and contacts directly to the Start screen.
Place your finger in the center of the Start screen and swipe upwards.
1
On the Apps screen, press and hold an app until the context menu appears at the bottom of the screen
2
To add multiple apps at the same time, tap the desired apps while the context menu is open.
In the context menu, tap Pin to Start.
3
Removing Tiles
On the Start screen, press and hold an app until the context menu appears at the bottom of the screen.
1
Tap the tiles that you wish to delete.
2
In the context menu, tap Unpin from Start.
3
25

8 Customizing the Device (Windows)
Resizing Tiles
On the Start screen, press and hold the app until the context menu appears at the bottom of the
1
screen.
In the context menu, tap Resize.
2
Tap the desired size.
3
Grouping Tiles
You can group tiles based on function, frequency of use, or even personal preference. Once grouped, the
tiles will remain together until moved to another group or removed from the Start screen.
On the Start screen, press and hold an app until the context menu appears at the bottom of the screen.
1
Drag the app to the desired group or drag the app to a blank area of the screen to create a new group.
2
26

8 Customizing the Device (Windows)
Release the app.
3
After grouping all of the desired apps, tap the Name group textbox above the group to name the group.
4
8.2 Changing Your Account Picture
To change the picture associated with your Microsoft account, follow these steps:
Swipe in from the right edge of the screen.
1
In the Charms menu, tap Settings.
2
In the Settings menu, tap Change PC settings.
3
In the PC Settings menu, tap Accounts.
4
In the Accounts menu, tap Your account.
5
Choose a photo source:
6
• Tap Browse to use a photo stored on the device.
• Tap Camera to take a new photo using the camera on the device.
8.3 Personalizing the Lock Screen
Swipe in from the right edge of the screen.
1
In the Charms menu, tap Settings.
2
In the Settings menu, tap Change PC settings.
3
In the PC settings menu, tap PC and devices.
4
In the PC and devices menu, tap Lock screen.
5
Change options that you want to personalize.
6
27

8 Customizing the Device (Windows)
8.4 Setting the Date and Time
Swipe in from the right edge of the screen.
1
In the Charms menu, tap Settings.
2
In the Settings menu, tap Change PC settings.
3
In the PC Settings menu, tap Time and language.
4
In the Date and time menu, tap Change to set the date and time.
5
8.5 Booting to the Desktop
To boot to the desktop instead of the Start screen, follow these steps:
Swipe in from the right edge of the screen.
1
In the Charms menu, tap Search.
2
In the Search box, type Taskbar.
3
In the search results, tap Taskbar and Navigation.
4
In the Taskbar and Navigation properties window, on the Navigation tab, select When I sign in or close
5
all apps on a screen, go to the desktop instead of Start.
Tap OK.
6
8.6 Assigning Function Buttons
Function buttons allow you to access frequently used keys and apps quickly without having to open the
virtual keyboard or Charms menu.
To assign a key or action to a function button, follow these steps:
Tap in the tray. If the icon does not appear in the tray, tap to see more programs running in the
1
tray.
28

8 Customizing the Device (Windows)
In the menu that appears in the bottom right corner of the screen, tap FN.
2
In the Type dropdown menu, select None, Key event, or Run app.
3
• None: The function button does nothing.
• Key event: The function button performs the same function as the associated key.
• Run app: The function button opens the specified app.
In the Key select dropdown menu, select a key.
4
• Select Etc… to specify a key in the Key code field.
• If you selected Run app as the Type, then specify the file path to the app.
Tap Apply to apply the changes.
5
8.7 Using Quick Settings
Quick settings allow you to enable or disable device features directly from the desktop.
To enable or disable a quick setting feature:
Tap in the tray. If the icon does not appear in the tray, tap to see more programs running in the
1
tray.
In the menu that appears in the bottom right corner of the screen, tap .
2
29

8 Customizing the Device (Windows)
Tap an icon to enable or disable that feature.
3
A white icon indicates that the feature is enabled.
A dark blue icon indicates that the feature is disabled.
Icon Feature Description
Accelerometer Measures the acceleration of the device along the x, y, and z axes.
Ambient Light
Compass Detects the direction that the device is facing.
Gyroscope Measures the rate of rotation of the device along the x, y, and z axes.
GPS Detects the location of the device.
NFC Allows the tablet to share information using near field communication (NFC).
Bluetooth Allows the device to connect to Bluetooth devices.
Wi-Fi
Changes the brightness of the screen based on the light in the usage
environment.
Detects available Wi-Fi networks and automatically connects to saved
Wi-Fi networks.
WWAN
Autorotation Rotates the screen based on the orientation of the device.
Detects available wireless wide area networks (WWAN) and automatically
connects to saved WWANs.
30

9 Customizing the Device (Android)
9.1 Customizing Your Home Screen
You can customize the Home screen by adding shortcuts and widgets.
Adding Shortcuts or Widgets
Shortcuts added on the Home screen allows you to access and launch apps or activate a feature quickly
and easily. Widgets appear as on-screen apps.
On the Home screen, tap
tab. Locate an app or widget, and tap and hold the item until the Home screen appears. Position the item
on the screen and release.
The same shortcuts or widgets can be added to any of the available screens.
to view your all apps under the APPS tab or all widgets under the WIDGETS
Arranging Shortcuts or Widgets
Tap and hold the shortcut icon or widget you want to move. Drag the shortcut icon or widget to a new
location. To place the item on a different page, drag it to the edge of the screen.
Removing Shortcuts or Widgets
Tap and hold an shortcut icon or widget. Drag it to X Remove at the top of the screen. When the item
turns red, release it.
9.2 Using Your Device with Ease
Make it easier to see, hear, and use the device with its built-in accessibility features.
On the Apps screen, tap
and more to fit your individual needs.
> Accessibility and make the text size bigger, delay the touch and hold time,
Quick Actions
Access the most frequently used settings quickly with quick action, turning them on or off in an instance.
31

9 Customizing the Device (Android)
Drag down from the top right of the screen at any time from any app and tap a quick action button to
1
turn it on or off.
Drag up from the bottom of the screen or tap the Back button .
2
Setting Date and Time
The date and time are automatically set based on the network you are connected to.
To set the date and time manually
On the Apps screen, tap > Date & time, then disable Automatic date & time. If you turn off this option,
the options for setting date and time will be activated.
To set the date and time automatically
On the Apps screen, tap > Date & time, then enable Automatic date & time.
To set the date and time format
On the Apps screen, tap > Date & time, then turn Use 24-hour format on or off.
Setting the Keyboard and Language
On the Apps screen, tap > Language & input to change the language and the keyboard you use.
Adjusting the Screen Brightness
1
On the Apps screen, tap > Display > Brightness.
Tap and move the slider to adjust the screen brightness.
2
32

10 Using the Card Slots
This chapter explains how to insert cards into the device.
10.1 Inserting a USIM card
See 3.1 Inserting a USIM Card on page 06.
10.2 Removing a USIM Card
Unlock the battery lock and remove the battery.
1
Open the cover to the USIM card slot on the left.
2
Press the USIM card into the slot to release it.
3
Pull the USIM card to remove it.
4
Close the cover of the USIM card slot.
5
Replace the battery and lock the battery lock.
6
33

10 Using the Card Slots
10.3 Inserting a MicroSD card
MicroSD cards increase the storage capacity of the device.
Unlock the battery lock and remove the battery.
1
Open the cover to the microSD card slot on the right.
2
Insert the microSD card into the slot until you hear it click.
3
• Make sure that the gold-colored contacts are facing up.
Do not insert the microSD card into an incorrect slot. Check the shape and orientation of the slot to
ensure that it is designed for a microSD card.
Close the cover of the microSD card slot.
4
Replace the battery and lock the battery lock.
5
34

10 Using the Card Slots
10.4 Removing a MicroSD Card
Unlock the battery lock and remove the battery.
1
Open the cover to the microSD card slot on the right.
2
Press the microSD card into the slot to release it.
3
Pull the microSD card to remove it.
4
Close the cover of the microSD card slot.
5
Replace the battery and lock the battery lock.
6
10.5 Accessing Data on MicroSD Cards
Insert the microSD card into the device (see 10.3 Inserting a MicroSD card on page 34).
1
Swipe in from the right edge of the screen.
2
In the Charms menu, tap Search.
3
In the Search box, type File Explorer.
4
In the search results, tap File Explorer.
5
In the pane on the left, tap This PC.
6
Under Devices and drives, tap the microSD card drive.
7
35

11 Using the Camera (Windows)
The Bluebird Camera app allows you to capture photos and record videos using either of the cameras on
the device. After capturing photos or recording videos, you can then view the photos or videos stored on
the device.
11.1 Installing the Camera App
Swipe upward on the Start screen to display the list of apps.
1
Tap Camera App Install to open the link to the Windows Store.
2
Tap Install to install the app.
3
• When you tap the Install button, you must enter your ID (email address) and password if you
haven't logged in to your Microsoft account.
• The device must be connected to a network in order to install the Camera app.
11.2 Opening the Camera App
Swipe upward on the Start screen to see the list of apps.
1
Tap Bluebird Camera to open the app.
2
36

11 Using the Camera (Windows)
11.3 Taking Pictures
Ensure that the icon appears in the top right corner of the screen. If the appears instead, tap the icon
to switch to photo mode.
Tap the Capture button to take the picture.
• Tap the resolution button in the lower right corner of the screen to change the resolution of the image.
• Tap
• Tap
to reverse the image horizontally.
to switch between the front and rear cameras on the device.
11.4 Recording Video
Ensure that appears in the top right corner of the screen. If appears instead, tap the icon to switch to
video mode.
Tap StartRecord to start recording the video.
1
Tap StopRecord to stop recording the video and save it on the device.
2
• Tap the resolution button in the lower right corner of the screen to change the resolution of the video.
• Tap
• Tap
to reverse the video image horizontally.
to switch between the front and rear cameras on the device.
37

11 Using the Camera (Windows)
11.5 Viewing Photos
To view photos taken using the cameras on the device, follow these steps:
1
In the Charms menu, tap Search.
In the Search box, type File Explorer.
2
3
In the search results, tap File Explorer.
On the left side of the File Explorer, under This PC, tap the Pictures folder.
4
Double tap a photo in the folder to view it.
5
11.6 Viewing Videos
To view videos recorded using the cameras on the device, follow these steps:
1
In the Charms menu, tap Search .
In the Search box, type File Explorer.
2
3
n the search results, tap File Explorer.
On the left side of the File Explorer, under This PC, tap the Videos folder.
4
Double tap a video in the folder to view it.
5
38

12 Using the Camera (Android)
Use this app to take photos or record videos.
On the Apps screen, tap Camera.
• If a micro SD card is installed, the photos and videos will be saved on the internal storage.
• The first time you open the Camera app, you will be prompted to add location tags to your photos
and display the information.
12.1 Taking Photos
1
On the Apps screen, tap Camera and make sure that camera mode is set to .
Aim the camera at the object and adjust the image. To zoom in or out, spread or pinch two fingers on the
2
screen.
3
Tap to take a photo.
Your device automatically focuses on the object and saves the photo in Gallery.
To view the photos taken, swipe the screen from the right edge.
4
12.2 Recording Videos
On the Apps screen, tap Camera.
1
2
Tap > to switch to video mode in the viewfinder.
Aim the camera at the object and adjust the image. To zoom in or out, spread or pinch two fingers on the
3
screen.
4
Tap to record a video.
5
Tap to stop recording.
Your device automatically focuses on the object and saves the video in Gallery.
To view the recorded videos, swipe the screen from the right edge.
6
39

13 Maintenance and Troubleshooting
Despite its robust design, the device still requires a small amount of maintenance to continue operating
optimally. Regular maintenance involves cleaning the touchscreen and ensuring the optimal battery life for
the device. However, if you run into major problems with the device, then you may want to try the steps
described in the Troubleshooting and Recovering Windows sections.
13.1 Cleaning the Touchscreen
During normal use, the touchscreen collects dust from the environment and grease from fingertips.
Dampen a lint-free cloth with water.
1
Do not use window cleaners or other chemical cleaners on the touchscreen.
Doing so may damage the finish on the screen.
Wipe the entire screen in small circles.
2
Use a dry portion of the cloth to dry the screen.
3
13.2 Extending the Battery Life
The battery in the device provides all day power. However, certain settings and apps can quickly drain the
battery.
To improve the battery life of the device, observe the following practices:
• Always charge the battery fully.
• Mute unnecessary sounds and vibrations, such as those related to keystrokes.
• Use headphones rather than the built in speaker.
• Exit the Camera app when you have finished taking photos.
• Turn off the Bluetooth and Wi-Fi networks when not in use.
To configure the power settings on the Windows device, follow these steps:
Swipe in from the right edge of the screen.
1
In the Charms menu, tap Settings.
2
In the Settings menu, tap Change PC settings.
3
In the PC Settings menu, tap PC and devices.
4
In the PC and devices menu, tap Power and sleep.
5
Configure the screen and sleep times for the device.
6
40

13 Maintenance and Troubleshooting
To decrease the length of the screen time-out and lower the screen brightness on the Android device, follow
these steps:
1
On the Home screen, tap > .
Tap Display.
2
Tap Brightness to adjust the brightness level or Sleep to set a shorter duration.
3
13.3 Troubleshooting
Attempt the following remedies before contacting the service center.
Issue Remedy
The device got wet.
The device won’t power on. Reset the device.
The battery won’t charge.
The battery drains very quickly.
• Allow the device to dry for at least 24 hours before you power on
the device.
• If the device does not power on, then contact your local service center.
• Ensure that the power adapter is properly connected to the device
and an outlet.
• Clean the charging terminals with a dry rag.
• If the device still doesn’t charge, then contact your local service
center for support.
• Check the Bluetooth, Wi-Fi, and brightness settings of the device.
• If the battery drains quickly regardless of the power options, then
contact your local service center for support.
41

13 Maintenance and Troubleshooting
13.4 Updating Windows
Unless you specify otherwise, Windows automatically downloads and installs updates when they become
available. However, you may need to manually update Windows when you start the device for the first time
or if Windows is not updating correctly.
To manually update Windows:
Plug in the device.
1
Do not unplug the device during the update process.
Doing so may result in lost or damaged data.
Swipe in from the right edge of the screen.
2
In the Charms menu, tap Settings.
3
In the Settings menu, tap Change PC settings.
4
In the PC Settings menu, tap Update and recovery.
5
In the Update and recovery menu, tap Windows Update.
6
Tap Check now.
7
When Windows finishes searching for updates, tap View details.
8
In the list of updates, select all of the updates that you want to apply, and then tap Install.
9
You may need to provide an administrator password to install the updates.
If prompted, enter your password to continue the installation process.
After the updates are installed, restart the device.
10
42

13 Maintenance and Troubleshooting
13.5 Backing Up Windows
Backing up the device creates a system image, which contains Windows as well as the applications, system
settings, and files on the device. You can use this system image to recover the contents of the computer if a
critical error occurs on the device.
1
On the Apps screen, tap AOMEI OneKey.
When AOMEI OneKey Recovery loads, tap OneKey System Backup.
2
On the System Backup screen, specify where to create the backup image.
3
• Select Backup system to AOMEI OneKey Recovery Partition to store the backup image on the
device.
• Select Backup system to other location to store the backup image on an external hard drive or
network drive.
On the Select Partition screen, highlight the partition on which to create the recovery partition, and then
4
click Next.
On the Preview and Confirm screen, examine the proposed changes to the partition allocations, and then
5
click Start Backup.
When the dialog window appears to warn you that some operations require the computer to restart, tap
6
Yes .
When the system restarts and the Choose an operating system screen appears, tap Windows 8.1 to
7
start Windows normally or tap Enter into AOMEI OneKey Recovery to recover the backup version.
43

13 Maintenance and Troubleshooting
13.6 Recovering Windows
Recovering Windows allows you to revert to a backup system image created using AOMEI OneKey. The
backup image contains Windows as well as the applications, system settings, and files in the device when
the backup was made. You may need to recover Windows if a critical error occurs on the device.
1
On the Apps screen, tap AOMEI OneKey.
You can also tap Enter into AOMEI OneKey Recovery on the boot menu to access AOMEI OneKey.
When AOMEI OneKey Recovery loads, tap OneKey System Recovery.
2
On the Restore and Confirm screen, highlight the partition on which to install the backup image, and then
3
tap Start Restore.
During recovery, the partition is formatted make room for the backup image. All data stored on the
highlighted partition will be lost.
When the dialog window appears to warn you that system recovery requires the computer to reboot, tap
4
Yes .
When the system restarts and the Choose an operating system screen appears, tap Windows 8.1 to
5
start the backup version of Windows or tap Enter into AOMEI OneKey Recovery to recover the backup
version again.
To restore the OS to its original state, press the reset button of the device using a small thin
pointed piece like a pin. When the OS is restored to its original state, the drivers provided by
Bluebird are not installed.
44

14 Help and Support
Bluebird is committed to ensuring that you get the most out of the device. If you encounter any problems
while using the device, then please use the following methods to contact us for service and support.
14.1 Preparing for Service
You are responsible for backing up any important information or data before bringing the device for
servicing. The repair process may require formatting or replacing the hard disk drive in the device,
resulting in the loss of all data stored on the device.
14.2 Bluebird Customer Service
Customers Service Center
Telephone: +82-70-7730-8000
Fax: +82-2-548-0870
Email: RMA@bluebird.co.kr
Address: Customer Service Center
B-704, SSang-young IT Twintower
442-5 Sangdaewon-dong, Joongwon-gu,
Seongnam-si, Gyeonggi-do,
Republic of Korea
Operating Hours
Monday to Friday: 9:30 am – 6:30 pm (GMT +9 hours)
The center is closed on Saturdays, Sundays, and national holidays.
45

14 Help and Support
14.3 Conditions for After-sales Service
You must adhere to the following conditions in order to receive after-sales service:
• You must deliver the product to the service center through mail, a delivery service, or in person.
• You must enclose the device in protective packaging before delivering it to the service center. We
recommend packaging the product in the box it came in.
• Bluebird is not responsible for any damage or loss that may occur during delivery, and such damage will
not be repaired under warranty.
• If you purchased the device from anyone other than an authorized reseller, then you must register the
device before you can receive after-sales service.
• You must include a receipt or other evidence of the purchase when submitting the product for aftersales service.
• All service requests must include your name, telephone number, address, and a description of the symptoms.
• The label must not be damaged.
14.4 Charged Service
You must pay for service in the following cases:
• Damage due to misuse of the product, including the following:
– Use of programs that could affect the hardware or core software in the device, such as programs to
over-clock hardware components, force inputs into the system, or user-created software.
– Loss of a required password or pin number.
– Careless use of the product, such as dropping the device or submerging it in water.
– Repair by the customer or an unauthorized technician.
• Damage due to natural causes, such as flooding, lightning, or fire.
• Exhaustion of the lifespan of a component, such as the battery or antenna.
• Bluebird will repair a component free of charge if that component receives the same damage
within 60 days of being repaired.
• Bluebird will exchange or provide after-sales service to repair damage that occurs to the device
within 10 days of the purchase date. However, you may not return the device for a refund.
46

Appendix A Specifications
Physical Characteristics
Dimensions (W x H x D) 262 x 178 x 14.6 mm (10 x 6.8 x 0.57 inch)
Weight 810 g (1.78 Ib)
Display 10.1"(1280x800) IPS, 10 point multi-touch, Direct Bonding, Gorilla Glass
Storage 16 GB eMMC / 32 GB eMMC (Optional)
Keypad
Battery 6000 mAh, 3.8 V
Expansion Slot Micro SDXC up to 64 GB
SIM / SAM Slots 1 SIM slot, 1 SAM slot (additional SAM slot available via Smart plug)
Audio Mono, ear-jack (4pin for mic, Water Proof)
Cameras Front: 2 megapixel fixed focus
Interfaces Docking Connector (8 pin), 1 USB host
GPS S-GPS, A-GPS, Glonass, BeiDou
Sensors G-Sensor, Light
Power Management
Volume Up/Down, Power
Virtual
Rear: 5 megapixel auto focus
Charging Status LED
For USB Charge 5 V, Cradle charge 12 V for fast charging
Performance Characteristics
CPU Quad Core 1.83 GHz
OS
Memory 1 GB / 2 GB (Optional)
Windows Embedded 8.1 Industry Pro, Windows 10 IoT Enterprise, or
Android 4.4
47

Appendix A Specifications
User Environment
Durability
Operating Temp. -10°C to 60°C (14°F to 140°F)
Storage Temp. -20°C to 65°C (-4°F to 149°F)
Humidity 90% non-condensing
ESD ± 8 kv Air, ± 4 kv Contact
Drop:
- Multiple 1.2 m (4 ft.) drops per MIL-STD-810G without the rugged plug
- Multiple 1.5 m (5 ft.) drops per MIL-STD-810G with the rugged plug
Sealing: IP65
Wireless
WWAN
WLAN 802.11 a/b/g/n (2.4 G and 5 G) with support for the following security
GSM/GPRS/EDGE 850/900/1800/1900MHz
WCDMA/HSDPA/HSUPA/HSPA+ 850/900/1700/1900/2100MHz
measures: WPA, WPA2, 802.1X, WEP, AES-CCMP, and TKIP
WPAN Bluetooth v4.0 LE
48

Appendix B Accessories
Smart Plugs
• Type 1: MSR
• Type 2: Barcode scanner (2D imager with a laser aimer), IC card reader, 1 SAM slot, and a spin
handstrap
• Type 3: A spin handstrap
Cradles
• One Slot Cradle: Charging only
• One Slot Ethernet Cradle: Charging port, 3 USB 2.0 ports, 1 Ethernet port, 1 DC-in
A power adapter (80001144) and a country-specific AC power cord (80001133 ~ 80001140) are
required to use the charging feature.
Vehicle accessories
• Vehicle charger
• Vehicle mount
Carrying Handles
• Square Handle (Landscape): Attaches to the top of the device.
• Square Handle (Portrait): Attaches to the left side of the device.
Other Accessories
• Rugged Plug (1.5M)
• Shoulder Strap
• Blue Pen
• Soft Plastic Screen Guard (Anti-Finger Print Coated, Sunlight Readability Enhanced)
• Soft Plastic Screen Guard (Scratch-Proof High Glossy)
Use only the adapter listed below.
Manufacturer: Borasen Fuyuang Electronic Co.,Ltd
Model: FY1206000
Input: 100-240 V, 50-60 Hz
Output: 12V/6A.
49

Appendix C Safety and Regulatory Compliance
FCC compliance information
This device complies with Part 15 of the FCC`s Rules. Operation is subject to the following two Conditions:
• This device may not cause harmful interference, and
• This device must accept ant interference received, including interference that may cause undesirable
operation.
This device complies with part 15 of the FCC Rules. Operation is subject to the condition that this device
does not cause harmful interference.
End users cannot modify this transmitter device. Any Unauthorized modification could void the user’s
authority to operate this device.
This device was tested for typical body-worn operations with the back of the handset kept 0.39 inches (1cm)
between the user’s body and the back of the handset.
To comply with FCC RF exposure requirements, the handset must be kept 0.39 inches (1cm) from the body
without any reference to a particular side or edge.
Any beltclips, holsters, and similar accessories containing metallic components may not be used.
Body-worn accessories that cannot maintain 0.39 inches (1cm) separation distance between the user's
body and the handset, and have not been tested for typical body-worn operations may not comply with
FCC RF exposure limits and should be avoided.
Part 15.105 (B)
This equipment has been tested and found to comply with the limits for a Class B digital device, pursuant
to part 15 of the FCC Rules. These limits are designed to provide reasonable protection against harmful
interference in a residential installation. This equipment generates, uses and can radiate radio frequency
energy and, if not installed and used in accordance with the instructions, may cause harmful interference
to radio communications, However, there is no guarantee that interference will not occur in a particular
installation. If this equipment does cause harmful interference to radio or television reception, which can be
determined by turning the equipment off and on, the user is encouraged to try to correct the interference by
one or more of the following measures:
• Reorient or relocate the receiving antenna.
• Increase the separation between the equipment and receiver.
• Connect the equipment into an outlet on a circuit different from that to which the receiver is connected.
• Consult the dealer or an experienced radio/TV technician for help.
Modifications not expressly approved by the manufacturer could void the user’s authority to operate the
equipment under FCC rules.
50

Appendix C Safety and Regulatory Compliance
IEC 60417-6044
Do not listen to sound at high volume for long periods. It may cause hearing damage. Also,
only use compatible receiver, headphones, or earpieces with your device.
CE
Hereby, Bluebird Inc. declares that this RFR900 is in compliance with the essential requirements and other
relevant provisions of directive 1999/5/EC.
To comply with CE RF exposure requirements, the handset must be kept 0.59 inches (1.5cm) from the body
without any reference to a particular side or edge.
Any beltclips, holsters, and similar accessories containing metallic components may not be used.
Body-worn accessories that cannot maintain 0.59 inches (1.5cm) separation distance between the user's
body and the handset, and have not been tested for typical body-worn operations may not comply with CE
RF exposure limits and should be avoided.
European Union (EU) Waste of Electrical and Electronic Equipment
(WEEE) directive
According to the European Union’s WEEE directive, this symbol means that products
sold into EU countries must dispose electrical device and/or its battery separately from
household waste. Disposing of the device separately will help conserve resources and
energy and contribute to human health and environment protection.
Customers or end-users in EU countries should contact their local equipment supplier
representative or service centre for information about the waste collection system in their
country.
51

Appendix D Warranty Information
Certificate
Product Name
Model Name RT100
Date of Purchase
Serial Number
Purchase Location
Warranty Term 1 year from date of purchase
Warranty Terms
Bluebird Inc. (hereinafter referred to as Bluebird) provides warranty service for its products in compliance
with the relevant regulations and the terms of the warranty.
Upon receiving notification of a defect in a product covered by the warranty terms, Bluebird will repair or
replace the defective product according to its waranty policy.
If the defective product covered by the warranty cannot be repaired or replaced, Bluebird shall refund the
purchasing price within a period designated after the date that the defect notice is received.
Bluebird assumes no responsibility for repairing, replacing, or refunding a product until it receives the
defective product from the customer. All replacement products shall be equal to the original product in
terms of performance.
The Bluebird warranty is valid only in countries in which Bluebird distributes its products. (An additional
contract is necessary for additional service, such as field service.)
Bluebird products may contain recycled components or materials that are equal to new components or
materials in terms of performance.
This warranty applies to software products only when the programming commands are not executed.
Bluebird does not guarantee interruption-free or error-free performance.
If the customer loses the receipt or warranty certificate, then the warranty period will be 3 months after the
date of manufacture indicated by the serial number.
Bluebird shall service only those accessories that appear on the sales list of the service center. Any repair or
replacement of accessories that do not appear on the sales list will be at the customer’s expense.
52

&(5)5DGLDWLRQ([SRVXUH6WDWHPHQW
&DXWLRQ7KLVHTXLSPHQWFRPSOLHVZLWK(XURSHDQ5)UDGLDWLRQH[SRVXUHOLPLWVIRU6$5
6SHFLILF$EVRUSWLRQ5DWH7KLVWUDQVPLWWHUPXVWQRWEHFRORFDWHGRURSHUDWLQJLQ
FRQMXQFWLRQZLWKDQ\RWKHUDQWHQQDRUWUDQVPLWWHU
BLUEBIRD CUSTOMER SERVICE
Operating Hours Customers Service Center
Monday to Friday 9:30 A.M. - 6:30 P.M.
(GMT Time: +9 Hours)
The center is closed on Saturdays,
Sundays, and national holidays.
Bluebird constantly strives to bring utmost satisfaction to all our customers.
B 703, SSang-young IT twintower,
442-5 Sangdaewon-dong, Joongwon-gu,
Seongnam-si, Gyeonggi-do, Republic of Korea
 Loading...