


1
Features:
▪ Multifunction remote control – with Track Fwd/Back/Pause/Play feature.
▪ Range up to 25 meters
▪ No interference or delays – audio latency 18ms (max)
▪ RF Band 2.4GHz/Sample Rate 48KHz
▪ Built in Receiver with Transmitter supplied
▪ Plug & play – no software required
▪ Faux leather covered cabinets with stitching detail
WS90t
2
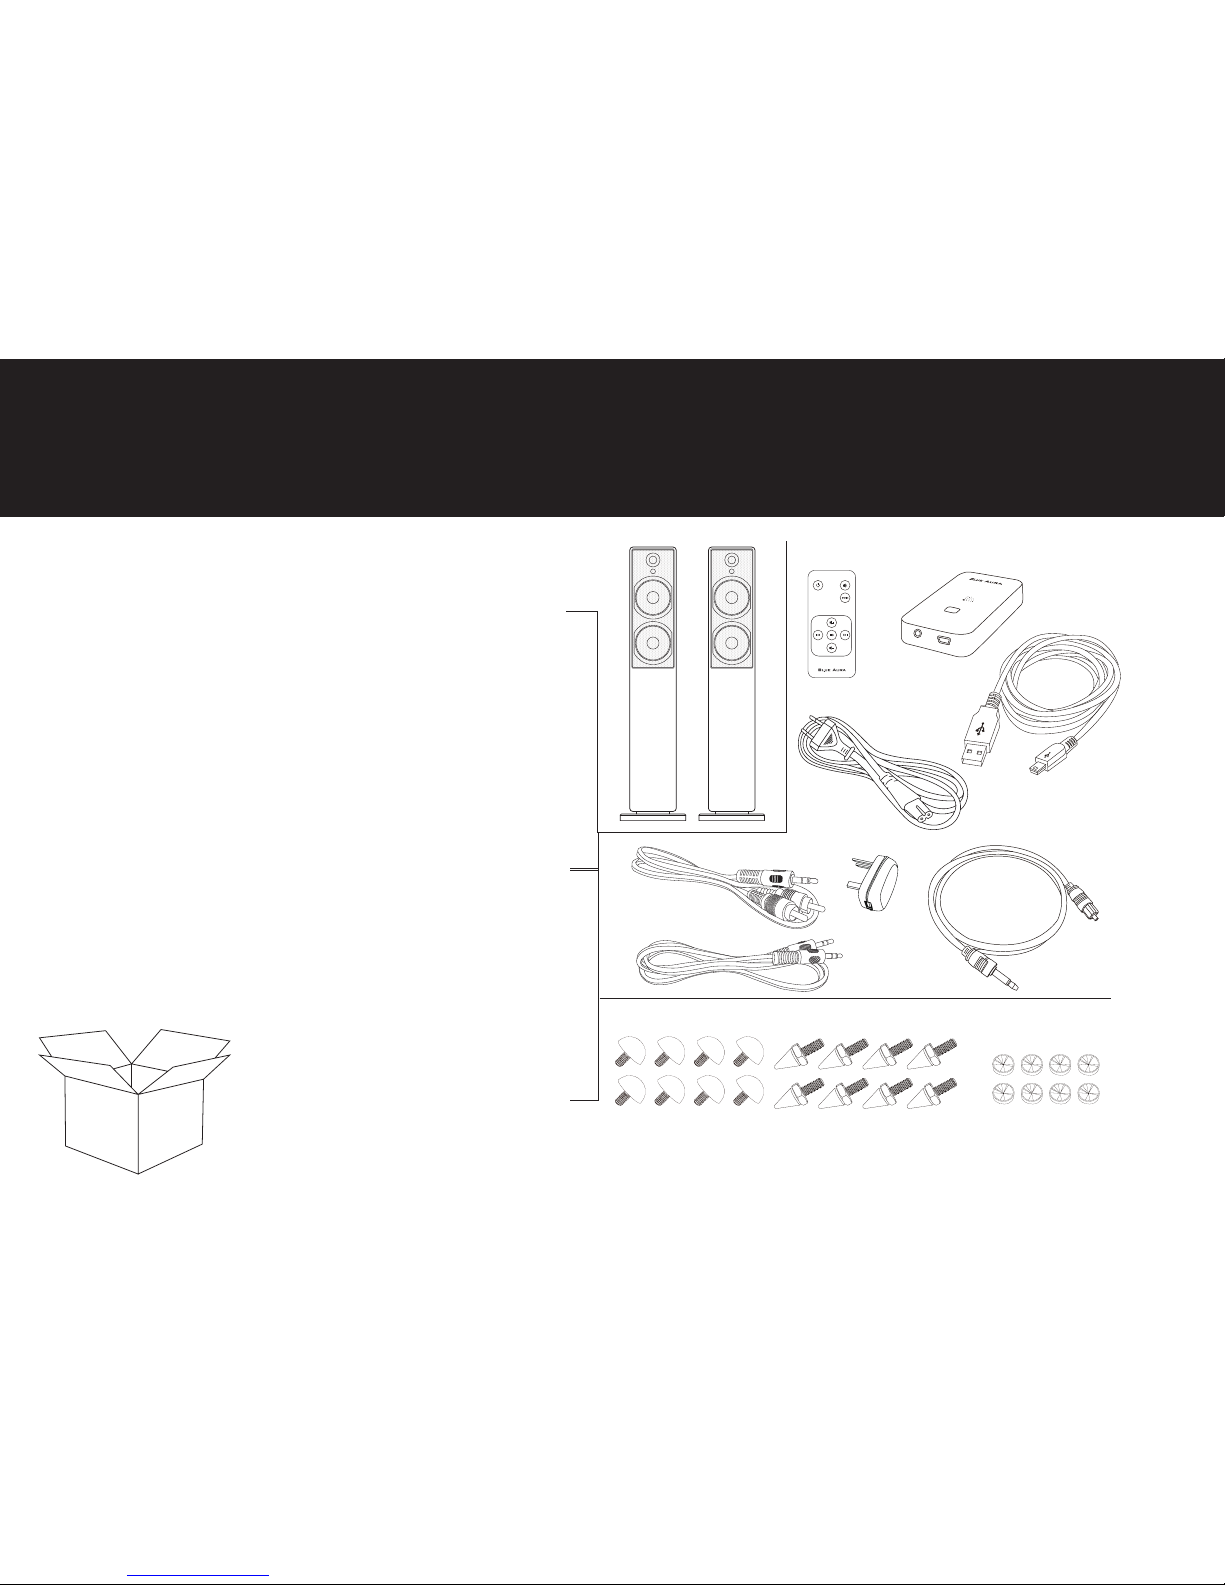
What's in the box?
?
2 x Power Cable
1 x Transmitter
1 x 3.5 – 3.5 Audio Cable
1 x USB – USB Mini Cable
1 x Optical – 3.5 Cable
1 x USB Adapter
1 x Remote Control
1 x 3.5-RCA Cable
Box A.
Box B.
Box C.
2 x Floor-Stand Speakers
2 x Base
8 x M6 Bolt (Pozi)
8 x Spike
8 x Rubber Ended Spike
8 x Spike Foot

3
WS90t
Operating Instructions
Thank you for choosing Blue Aura
The agship product of the Blue Aura Performance Series,
WS90t
has been developed using the latest advances in wireless
technology, the operating frequency (2.4GHz) is not prone to interference from other wireless devices and the effective
signal range is 25 metres. Both loudspeakers are tted with active ampliers equipped with high quality audio components
aiding delivery of the audio signal. Equipped with two paper cone drive units and a soft dome high frequency unit, the
WS90t
delivers a commanding acoustic performance making a statement, both in sound and style.
To gain maximum performance from your
WS90t
loudspeakers please take time to read this operating guide.
System setup is straight forward, however if you are having any problems please contact us at support@blueaura.co.uk or
visit the Q&A section of our website.

4
This symbol indicates a safety warning
This symbol indicates an advisory warning
Once connected to the mains supply, never attempt to remove drive units or rear amplier panels. Do not use these
loudspeakers if defective and if for any reason they are found to be defective, unplug from the mains supply.
Only use the supplied power cables and USB power adapter and replace immediately if damaged.
Should you have any problems please contact your Blue Aura Distributor.
www.blueaura.co.uk/contacts
The loudspeakers are covered with a soft faux leather material. Please take care when unpacking the speakers to
avoid scratching or indenting the material.
Before installing this product please read all of the instructions.
The amplier inside the loudspeaker have built in thermal and short circuit protection.If an amplier is driven beyond
its power output capabilities it will produce distorted sound which may damage your loudspeakers. Make sure
you do not leave your loudspeakers unattended when playing and reduce the volume at the rst sign of audible
distortion.We recommend that you keep all packing until you are completely satised with your purchase.
The mesh grilles on your
WS90t
loudspeakers have been designed to provide acoustic clarity and no signicant
sound improvement will be gained by removing them.

5
Getting Started
Tools required
A B C D Ex 8 x 8 x 8 x 8
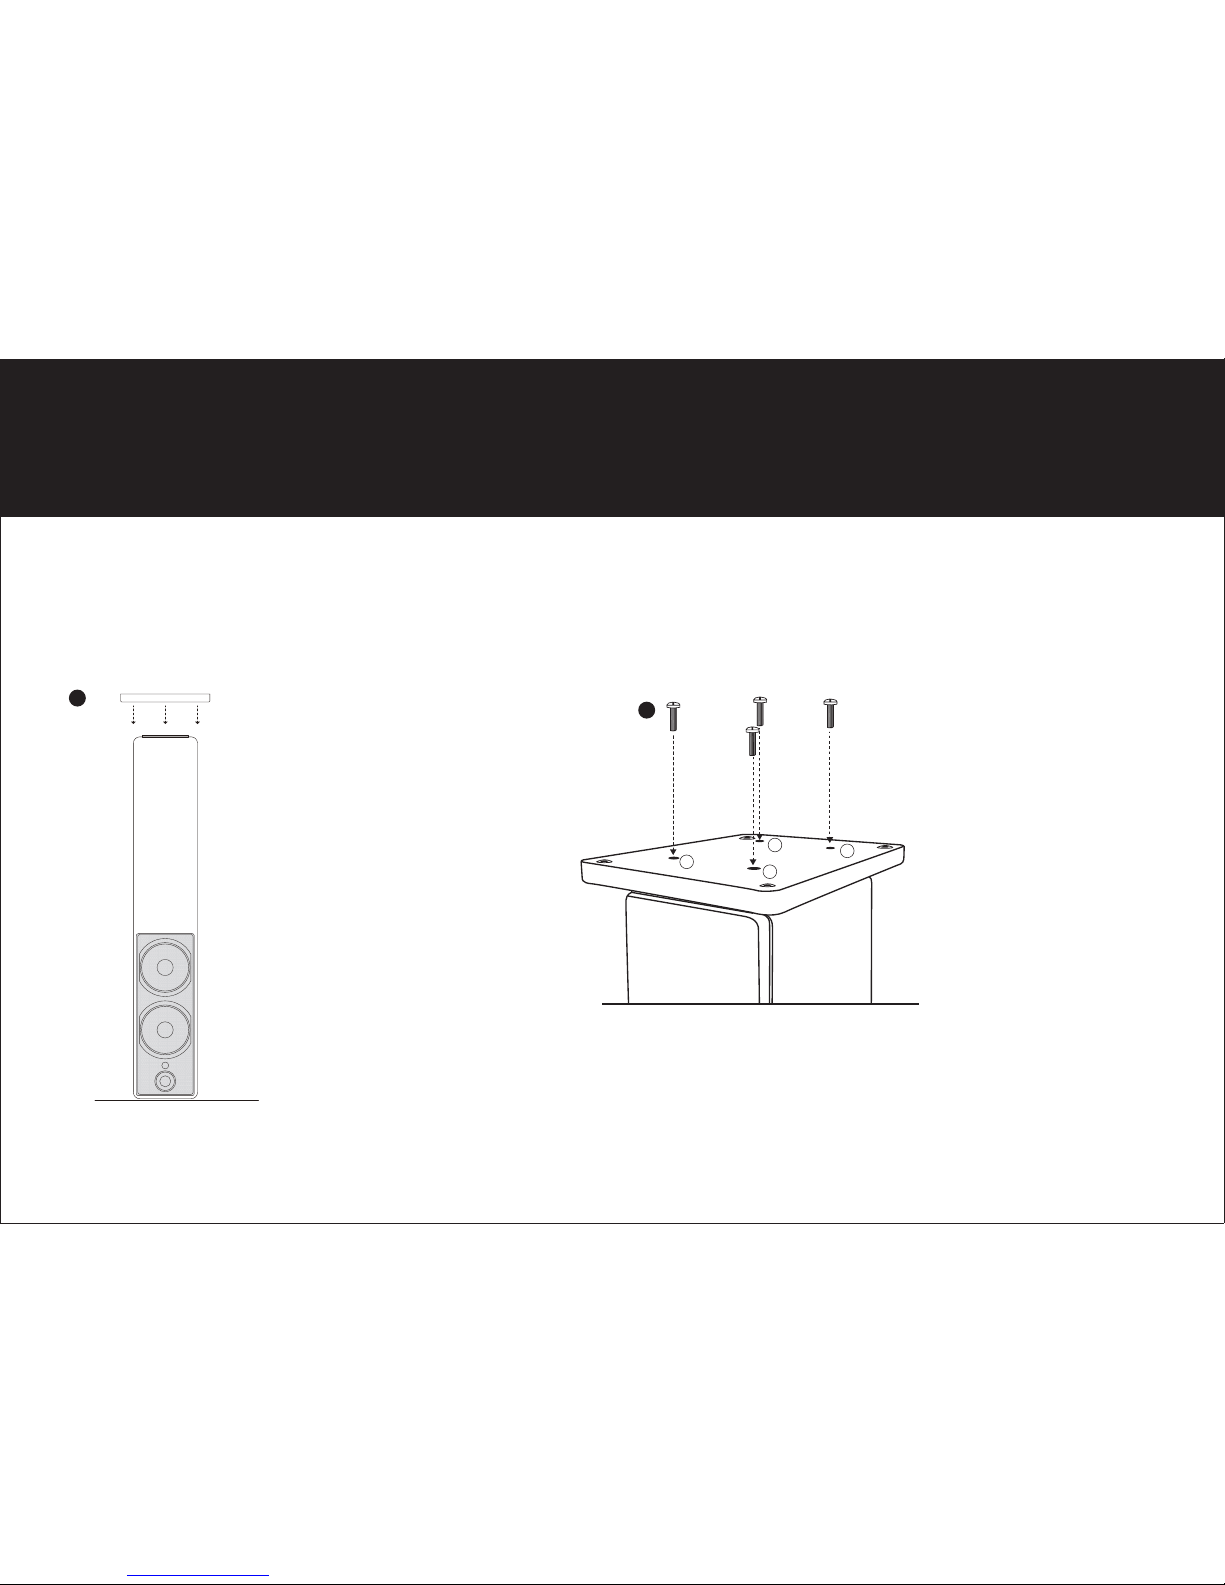
Unpacking your loudspeakers and attaching the plinth.
WS90t
is supplied with a plinth which must be attached to ensure loudspeaker stability.
10KG
Parts supplied
6
Align the screw holes
and fit four M6 pozi
head screws.
To ensure a rigid
and stable fit, secure
screws 1 and 4
followed by 2 and 3
2.
A
1
2
4
3
E
Before unpacking, ensure a
clean soft but stable surface
is available to place the
loudspeaker on its top to allow
the plinth to be tted.
Carefully remove the
loudspeaker from the carton
and place on its top to allow
access to the base of the
cabinet.
Carefully unpack the plinth
and place on the base of the
cabinet.
1.
Floor

7
ENSURE SPIKES DO NOT PENETRATE CABLES
Fit the desired feet, spikes for carpets
or rubber feet where flooring is to be
protected.
If using Spikes – Insert the spikes and loosely
fit lock nuts. Once upright, ensure the
loudspeaker is stable.
Adjust spikes where necessary to ensure
loudspeaker is level, and then fully tighten
lock nuts.
Spike support cups are available to use
where Spikes are preferred but flooring is
to be protected.
3.
B
D
Why use spikes?
Some low frequency energy is dissipated when a loudspeaker
is placed on a soft surface, i.e. carpets. This effect can be
minimised by using Spikes to help couple the loudspeaker to the
oor.
Spikes help to minimize overall vibration of the loudspeaker by
reducing the amount of sound energy between the loudspeaker
and the oor

8
Loudspeaker placement
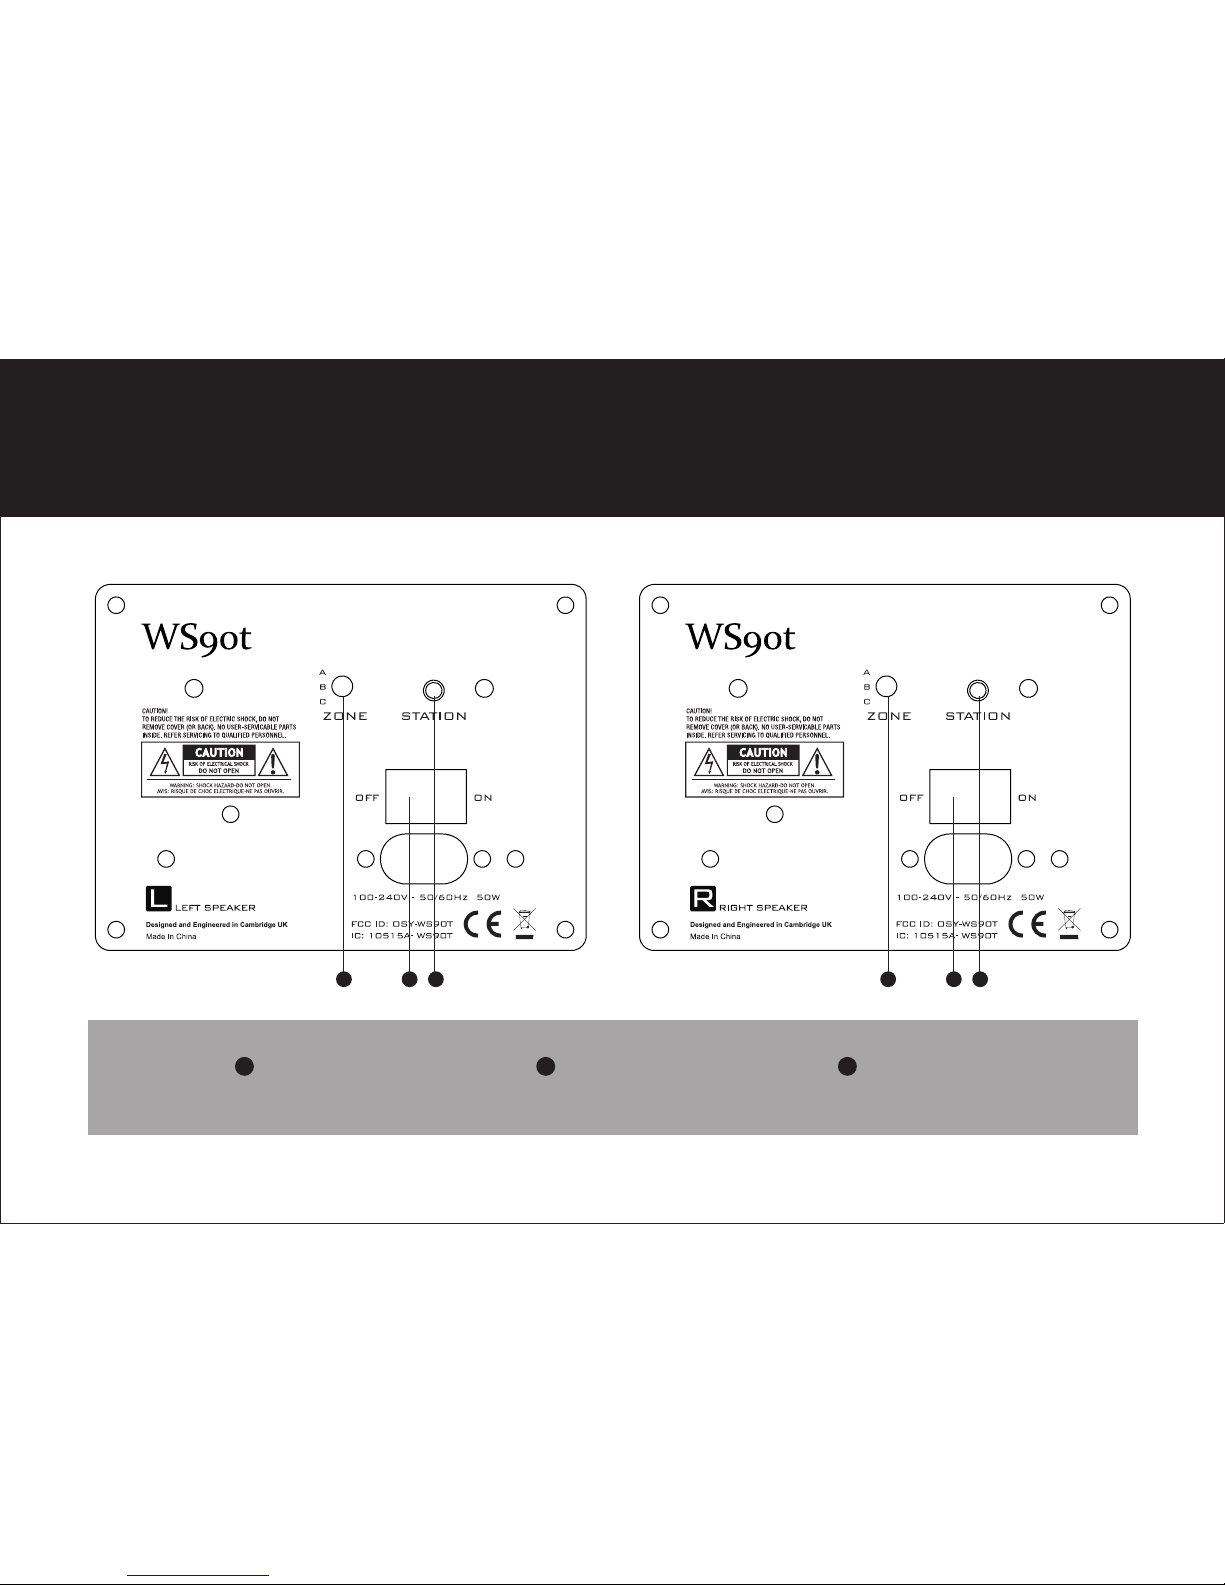
Left and Right loudspeakers can be identied by looking at the amplier panel on the rear of each cabinet. Place the
loudspeakers in your preferred position but within reach of wall sockets. With the wall socket in the OFF position connect the
power lead to the loudspeaker using only the supplied power cables. Once connected, the mains switch can be turned to
the ON position.
What is the ideal position for my
WS90t
loudspeakers?
Placing each
WS90t
at least 300mm from the back wall will reduce reections and improve accuracy and detail. Each
loudspeaker should be the same distance from where you are seated. Ideally the loudspeakers and the listening position
should form an equilateral triangle. Depending on room layout, some “toeing in” may improve stereo imagery and staging
by reducing reections from side walls.
The listening postion and
the loudspeakers should
form an equilateral triangle.
Depending on room layout,
some "toeing in" may
improve stereo imagery.

9
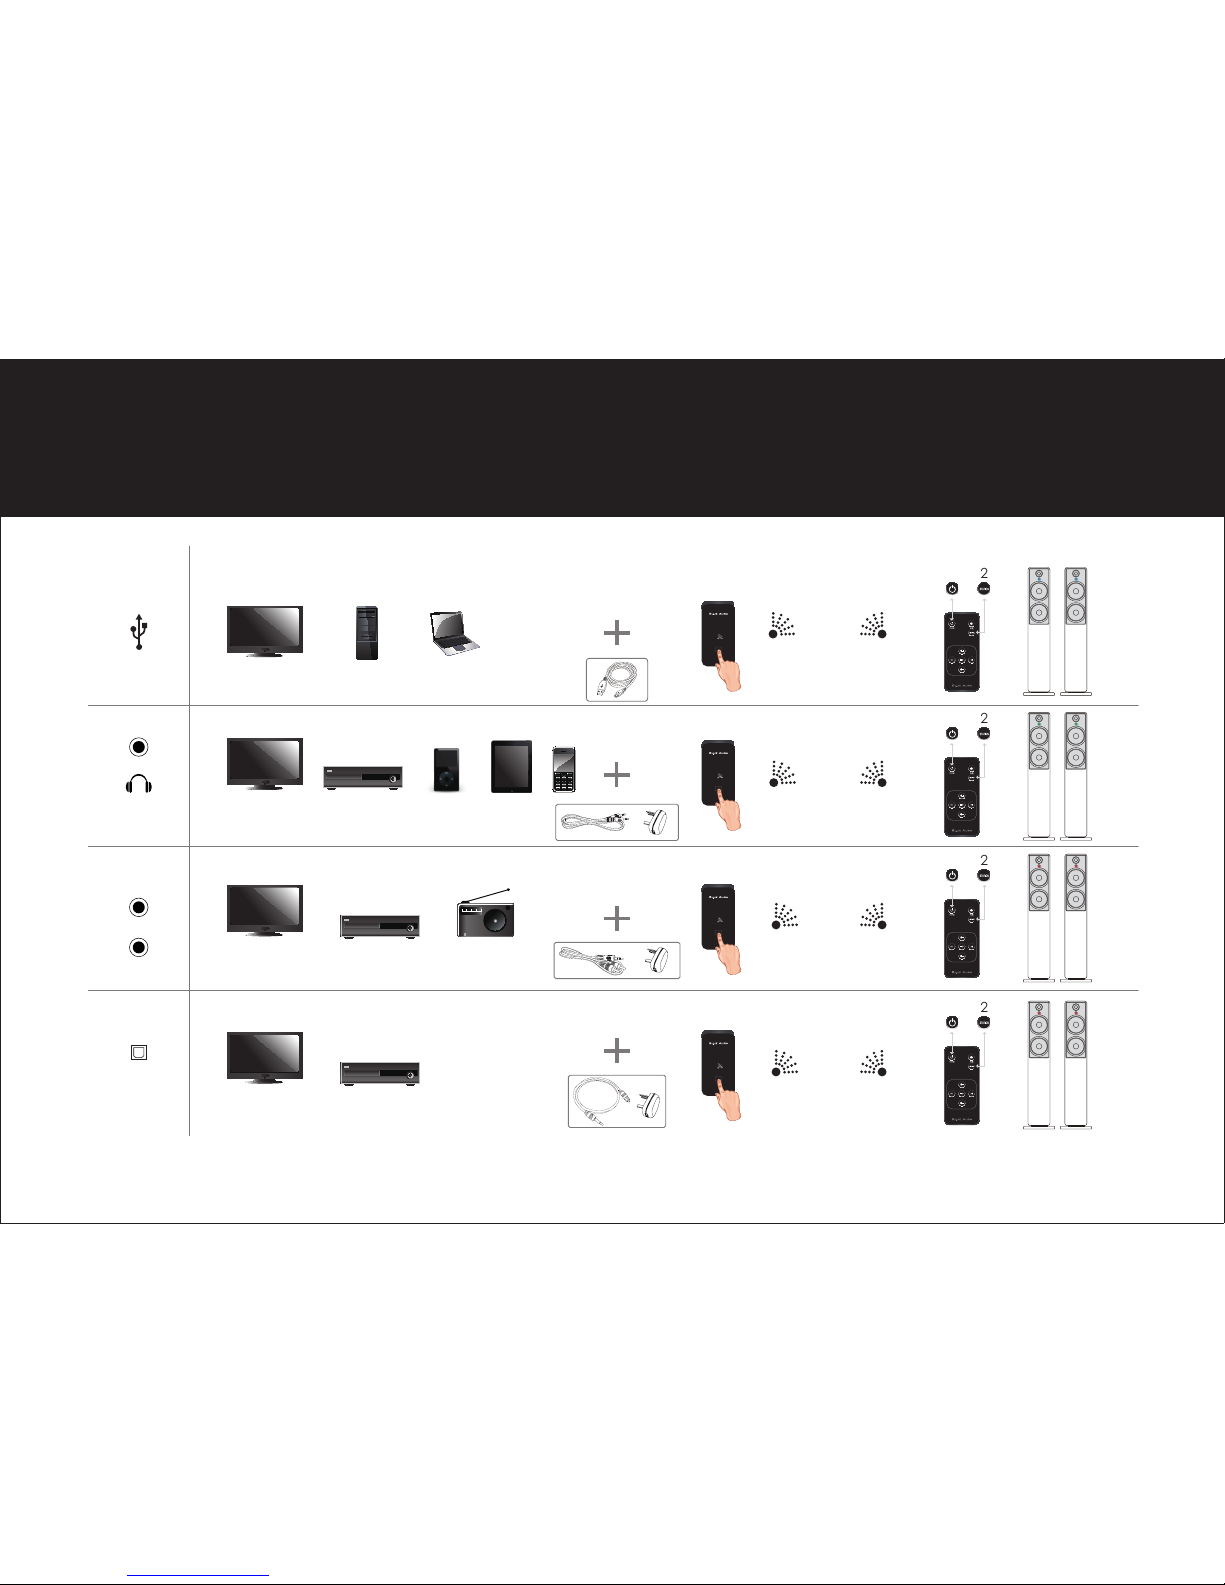
To use your speakers with a PC or MAC
To use your speakers with other devices (RCA connection)
The transmitter needs to be powered; by using the USB connector on a PC for example, power is provided.
To use the transmitter with equipment that does not have a USB socket the mains adapter is required.
Connect the USB connector from the transmitter to the USB socket on the supplied mains adapter.
Using the “line out” cable provided, plug the red and white plugs (RCA) into your device with line out, e.g. CD player or TV,
connect the other end of the cable (mini jack) to the transmitter.
Plug the adapter into to a convenient wall socket and turn on.
Push the button in the centre of the transmitter to select a free zone.
Using the remote control press the “station” button” to nd the signal from the new source equipment.
Wireless Connection Methods
MAC set-up
1.Insert the USB connector from the
transmitter to a free USB socket on your
MAC.
2.Go to System Preferences and under
Hardware choose Sound.
3.Click Output in Menu and choose USB
headset.
PC set-up
1.Insert the USB connector from the transmitter to a free USB socket on your PC or
laptop.
2.Wait until the software has been installed, usually a conrmation beep or
message window alert.
If the above instructions do not work you may need to do the following.
Click Start button on PC, go to the Control Panel, and choose Sound & Sound
Devices
Under Playback of Audio; Default unit choose USB headset.
If you are still having problems please contact support@blueaura.co.uk.

10
To use your speakers with MP3 devices (headphone out)
Plug one end of the supplied 3.5mm mini jack lead into the transmitter and the other end into the headphone socket on your device.
Plug the USB connector from the transmitter into the mains adapter and plug the mains adapter into a convenient wall socket and turn on.
Push the button in the centre of the transmitter to select a free zone.
Using the remote control press the “station” button” to nd the signal from the new source equipment.
Using the Optical Connection
For source devices with optical connections the supplied Optical – 3.5mm plug can be used. Insert the Optical (TOSlink) plug into the
optical socket on your source device and the other end into the 3.5 socket on the transmitter. Plug the USB connector from the transmitter
into the supplied mains adapter and plug the the mains adapter into a convenient wall socket, and turn on. Push the button in the
transmitter to select a free zone. Using the remote control press the STATION button to nd the signal from the new source equipment. The
LED colour on both loudspeakers should be the same as the LED on the transmitter.
….WIRELESS SOUND FROM MULTIPLE DEVICES
By adding more transmitters (optional), the audio network can by separated into 3 house codes allowing multiple devices to be used to
play music through your
WS90t
speakers.
….ADD MORE
WS90t
SPEAKERS TO THE AUDIO NETWORK
Limitless numbers of
WS90t
speakers can be added to your system within wireless range of the transmitter. You can add more speakers to
one room, or add speakers in several rooms.
What are the benets of using the optical cable? Using the Optical connection method provides a pure digital audio signal, no
line loss or ground interference.
11
Transmitter Receiver
R
L
1 2
1 2
1 2
1 2

12
Remote Control
POWER ON/OFF
MUTE
VOL+
VOL-
STATION
PLAY / PAUSE
BACK FWD
13
STATIONPOWER ZONE
1
1
12
2
23
3
3
Rear Panel

14
Wireless Status
Before turning on your
WS90t
loudspeakers, locate the ZONE setting switch on the rear of each loudspeaker and set to A
The system has three channels: Blue (default) Red and Green. The loudspeakers and Transmitter are connected wirelessly when they are
both operating on the same channel, Blue, Red or Green.
Transmitter
Connect the Transmitter to your source device
Transmitter mode - LED ashing
Loudspeakers
Turn on both Left and Right loudspeakers with the switch located on the back of each loudspeaker. The LEDs will ash
for 6 seconds and the loudspeakers will go into standby. Using the remote control, press the POWER ON button and the
loudspeakers will come out of standby and automatically search for the signal from the transmitter, once found it will
lock and sound will be heard. If the loudspeaker is already using the same channel as the transmitter, sound will be heard
instantly.
▪ Loudspeaker LEDS will automatically turn off 10secs after last command.
▪ Volume memory. When the loudspeaker is brought out of Standby, the volume will be at the same level as last set.
▪ Channel memory. When the loudspeaker is brought out of standby the channel will be the same as last set.
▪ To return the loudspeaker to default mode, press and hold the STATION button on the rear of each loudspeaker for 8
seconds. Default channel is Blue, Default volume is 40 on a scale of 1 – 70

15
Multi-Zone
More
WS90t
loudspeakers can be added to the network and up to three Zones can be set allowing independent control of
Volume level and Channel selection.
The Zone selector switch is on the rear of the loudspeaker. Select A, B or C to set a pair of speakers to a particular Zone.
Example 1 Front room 1 pair Zone A
Bedroom 1 pair Zone B
Music room 1 pair Zone C
Each zone can now be independently controlled using the same
remote control.
Example 2 Front Room 2 pairs, 1 pair Zone A, and 1 pair Zone B
Each zone can now be independently controlled using the same
remote control.
....or set both to the same zone to control simultaneously
Example 3 Front room Right loudspeaker Zone A
Left loudspeaker Zone B
This will allow the volume setting for Left and Right loudspeakers to be
set independently in situations where listening position is not central.
STATION CODE BLUE

16
Track Selection
This function can only be used when the Transmitter is connected to PC/Mac/Laptop using USB When the transmitter is
connected to a PC/Mac/Laptop by USB, the following commands can be sent to the installed media player (Windows and
Mac operating systems) using the remote control. Play/Pause/Back/FWD
(User experience may depend on the performance capabilities of source equipment)

17
Important Safety Instructions
This symbol indicates that there are important operating and maintenance instructions in the literature
accompanying this unit.
This symbol indicates that dangerous voltage constituting a risk of electric shock is present within this unit.
This equipment is a Class II or double insulated electrical appliance. It has been designed in such a way that it
does not require a safety connection to electrical earth.
Correct disposal of this product:
This marking indicates that this product should not be disposed of with other household wastes throughout the
EU. To prevent possible harm to the environment or human health from uncontrolled waste disposal, recycle
it responsibly to promote the sustainable reuse of material resources. To return your used device, please use
the return and collection systems or contact the retailer where the product was purchased. They can take this
product for environmentally safe recycling.
The loudspeaker is covered with a soft faux leather material. Please take care when unpacking the
loudspeaker to avoid scratching or indenting the material.

18
01. Read these instructions.
02. Keep these instructions.
03. Heed all warnings.
04. Follow all instructions.
05. Do not use apparatus near water.
06. Clean only with a dry cloth.
07. Do not block any ventilation openings. Install in accordance with the manufacturer’s instructions.
08. Do not install near any heat sources such as radiators, heat registers, stoves, or other apparatus (including ampliers)
that produce heat.
09. Protect the power cord from being walked on or pinched particularly at plugs, convenience receptacles, and the point
where they exit from the apparatus.
10. Only use attachments/accessories specied by the manufacturer.
11. Unplug this apparatus during lightning storms or when unused for long periods of time.
12. Refer all servicing to qualied service personnel. Servicing is required when the apparatus has been damaged in any
way, such as power-supply cord or plug is damaged, liquid has been spilled or objects have fallen into the apparatus,
the apparatus has been exposed to rain or moisture, does not operate normally, or has been dropped.
13. Damage Requiring Service
Unplug the apparatus from the wall outlet and refer servicing to qualified service personnel under the following
conditions:
A. When the power-supply cord or plug is damaged,
B. If liquid has been spilled, or objects have fallen into the apparatus,

19
C. If the apparatus has been exposed to rain or water,
D. If the apparatus does not operate normally by following the operating instructions. Adjust only those controls that
are covered by the operating instructions as an improper adjustment of other controls may result in damage and will
often require extensive work by a qualied technician to restore the apparatus to its normal operation.
E. If the apparatus has been dropped or damaged in any way, and.
F. When the apparatus exhibits a distinct change in performance this indicates a need for service.
14. Object and Liquid Entry.
Never push objects of any kind into the apparatus through openings as they may touch dangerous voltage points or
short-out parts that could result in a re or electric shock. The apparatus shall not be exposed to dripping or splashing
and no objects lled with liquids, such as vases shall be placed on the apparatus. Don’t put candles or other burning
objects on top of this unit.
15 Always consider the environmental issues and follow local regulations when disposing of batteries.
16. If you install the apparatus in a built-in installation, such as a bookcase or rack, ensure that there is adequate ventilation.
Leave 20 cm (8”) of free space at the top and sides and 10cm (4”) at the rear. The rear edge of the shelf or board
above the apparatus shall be set 10 cm (4”) away from the rear panel or wall, creating a ue-like gap for warm air to
escape.
17. The power cord for this apparatus is intended for indoor use only.
Designed, engineered and supported in the UK
www.blueaura.co.uk

20
This device complies with Part 15 of the FCC Rules. Operation is subject to the following two conditions: (1) this
device may not cause harmful interference, and (2) this device must accept any interference received, including
interference that may cause undesired operation.
Changes or modifications not expressly approved by the party responsible for compliance could void the user's
authority to operate the equipment.
This equipment has been tested and found to comply with the limits for a Class B digital device, pursuant to part
15 of the FCC Rules. These limits are designed to provide reasonable protection against harmful interference in a
residential installation. This equipment generates uses and can radiate radio frequency energy and, if not installed
and used in accordance with the instructions, may cause harmful interference to radio communications. However,
there is no guarantee that interference will not occur in a particular installation. If this equipment does cause harmful
interference to radio or television reception, which can be determined by turning the equipment off and on, the user
is encouraged to try to correct the interference by one or more of the following measures:
—Reorient or relocate the receiving antenna.
—Increase the separation between the equipment and receiver.
—Connect the equipment into an outlet on a circuit different from that to which the receiver is connected.
—Consult the dealer or an experienced radio/TV technician for help.
The transmitter of this device has been designed to operate with the attached antennas, and having a maximum
gain of 1.5dBi. Antennas not identical as that or having a gain greater than 1.5dBi are strictly prohibited for use with
this device. The required antenna impedance is 50 ohms. To reduce potential radio interference to other users, the
antenna type and its gain should be so chosen that the equivalent isotropically radiated power (e.i.r.p.) is not more
than that permitted for successful communication
FCC Compliance

21
To satisfy FCC RF exposure requirements, a separation distance of 20 cm or more should be maintained between the
antenna of this device and persons during device operation.
To ensure compliance, operations at closer than this distance is not recommended.
Les antennes installées doivent être situées de facon à ce que la population ne puisse y être exposée à
une distance de moin de 20 cm. Installer les antennes de facon à ce que le personnel ne puisse
approcher à 20 cm ou moins de la position centrale de l’ antenne.
La FCC des États-Unis stipule que cet appareil doit être en tout temps éloigné d’au moins 20 cm des
personnes pendant son functionnement.
Under Industry Canada regulations, this radio transmitter may only operate using an antenna of a type and
maximum (or lesser) gain approved for the transmitter by Industry Canada. To reduce potential radio interference to
other users, the antenna type and its gain should be so chosen that the equivalent isotropically radiated power (e.i.r.p.)
is not more than that necessary for successful communication.
Conformément à la réglementation d'Industrie Canada, le présent émetteur radio peut
fonctionner avec une antenne d'un type et d'un gain maximal (ou inférieur) approuvé pour l'émetteur par Industrie
Canada. Dans le but de réduire les risques de brouillage radioélectrique à l'intention des autres utilisateurs, il faut
choisir le type d'antenne et son gain de sorte que la puissance isotrope rayonnée équivalente (p.i.r.e.) ne dépasse
pas l'intensité nécessaire à l'établissement d'une communication satisfaisante.
FCC RF Exposure Requirements (MPE)

22
This entitles you to have the unit repaired free of charge, during the rst two years after purchase, at any authorised
Blue Aura distributor provided that it was originally purchased from an authorised Blue Aura dealer or distributor. The
manufacturer can take no responsibility for defects arising from accident, misuse, abuse, wear and tear, neglect or
through unauthorised adjustment and/or repair, neither can they accept responsibility for damage or
loss occurring during transit to or from the person claiming under the guarantee.
The warranty covers:
Parts and labour costs for two years from the purchase date. After two years you must pay for both parts and labour
costs, the warranty does not cover transportation costs at any time.
Claims under guarantee
This equipment should be packed in the original packing and returned to the dealer from whom it was purchased,
or failing this, directly to the Blue Aura distributor in the country of residence.It should be sent carriage prepaid by
a reputable carrier. No responsibility can be accepted for the unit whilst in transit to the dealer or distributor and
customers are therefore advised to insure the unit against loss or damage whilst in transit.
For further details contact Blue Aura at:
Blue Aura Customer Support, 01480 477738 or email support@blueaura.co.uk.
If your Blue Aura dealer is unable to answer any query regarding this or any other Blue Aura product please contact
Blue Aura Customer Support at the above address and we will do our best to help you.
Please register your new product at http://www.blueaura.co.uk/register
Blue Aura Worldwide Guarantee

23
EC DECLARATION OF CONFORMITY
This product conforms with the following EEC Directives, their
supporting Statutory Instruments and relevant Standards, where
applicable as follows:
EC Council Directive on electromagnetic compatibility 2004/108/EC,
Applicable standards with amendments:
EN5013:2001 + A1:2003 + A2:2006
EN55020:2007
EN 55022
EN 55024
IEC 60950-1:2005
EN61000-3-2:2006 + A1:2009 + A2:2009
EN61000-3-3:2008
EC Low Voltage Directive 2006/95/EEC,
Applicable standard with amendments: EN60065:2002 + A1:2006 +
A11:2008 + A2:2012
EN 300 328: Electromagnetic compatiblitity and Radio spectrum
Matters (ERM); Wideband Transmission systems: Data transmission
equipment operating in the 2.4 GHz ISM band and using spread
spectrum modulation techniques; Harmonized EN covering essential
requirements under article 3.2 of the R&TTE Directive.
Stage 1 of annex II of Commission regulation (ErP) EC no. 1275/2008
Amplier
High Frequency Unit
Low Frequency Unit
Frequency Range
Dimensions H x W x D
Features
45W Class D
1” Soft Dome
4.5” Paper Cone
36-22000Hz
859 x 147 x 204 mm
▪ Multifunction remote control – with Track
Fwd/Back/Pause/Play feature.
▪ Range up to 25 meters
▪ No interference or delays – audio latency
18ns (max)
▪ RF Band 2.4GHz/5.2GHz /5.8GHz Sample
Rate 48KHz
▪ Built in Receiver with Transmitter supplied
▪ Plug & play – no software required
▪ Faux leather covered cabinets with
stitching detail
Specications and features subject to change without notice E&OE
WS90tmanv.01
 Loading...