

Page 1

Air purifier /
by Blueair
by Blueair
Luftreiniger /
Purificador de aire /
Purificateur d’air /
Oczyszczacz powietrza
User Manual / Benutzerhandbuch /
Manual de usuario /
Guide d’utilisation /
Instrukcja obsługi
Blue
1
PURE 221
Page 2

Blue
PURE 221
English User Manual
Model: Pure221
English User Manual 04 -17
Deutsche
Manual de usuario en español 35 - 49
Guide d’utilisation
Polska instrukcja obsługi 67 - 81
SAFETY 04
SYSTEM OVERVIEW 06
WHAT´S IN THE BOX 08
USAGE 09
SETUP 10
ON/OFF AND OPERATING SPEEDS 11
FILTERS 12
CARE AND MAINTENANCE 16
2 3
SPECIFICATIONS 17
Benutzerhandbuch 19 - 33
en français 51 - 65
Page 3
SAFET YSAFET Y
General safety instructions
Remember, the Pure 221 air purifier unit is an electrical appliance.
Please read these safety instructions carefully before use and take the
necessary precautions to reduce the risk of fire, electric shock or injury.
The Pure 221 warranty applies only if the unit is used according to
these instructions.
WARNING: Indicates a hazardous situation that, if not
avoided, could result in death or serious injury.
CAUTION: Indicates a hazardous situation that, if not
avoided, could result in minor or moderate injury.
General
WARNING:
To avoid hazardous conditions, only the manufacturer, a service center authorized by Blueair or similarly qualified persons
shall replace the power cord, if damaged.
CAUTIONS:
Use the grounded power cable provided with your
Pure 221 to plug directly into an appropriate, grounded electrical outlet. (Refer to the rating label on your unit).
Do not alter the plug in any way.
Remember to always disconnect the power supply before
servicing the unit.
Do not use the unit if the power cable or plug is damaged or
malfunctions in any manner.
Keep the power cable away from heated surfaces.
Do not sit on, stand or climb onto the unit or use the
unit either as a table or for storage.
Do not place any objects on top of the unit, block air
outlets or intakes,or allow foreign objects to enter
the unit as this may cause an electric shock or
damage the unit.
Intended Use
CAUTIONS:
Supervise children to ensure that they do not play with
the appliance.
This appliance is not intended for use by persons
(including children) with reduced physical, sensory or
mental capabilities, or lack of experience and knowledge,
unless they have been given supervision or instruction
concerning use of the appliance by a person responsible
for their safety.
4 5
Page 4

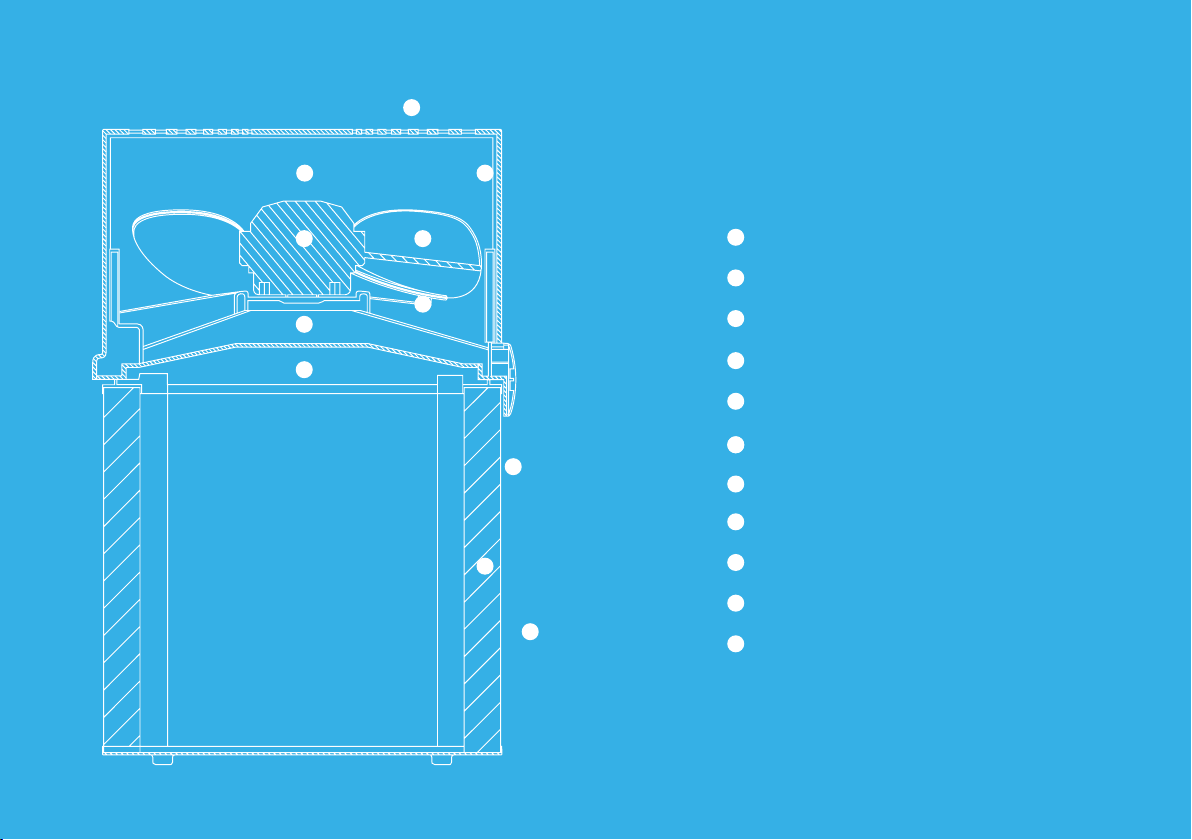
SYSTEM OVERVIEW
SYSTEM OVERVIEW
1
2 3
45
6
7
8
Blueprint
1
Air outlet
2
Ion chamber (Air stream optimizer)
3
Inner wall
Fan
4
Motor
5
Fan base
6
9
10
11
Protective grill
7
8
Release button for filter
9
External metal frame (optional fabric pre-filter)
10
Particle filter or Particle + Carbon filter
11
Air inlet 360°
6
7
Page 5
WHAT'S IN THE BOX USAGE
4 ins
10 cm
Air purifier unit package
The air purifier unit Particle or Particle +
Carbon filter
Options
A Particle filter or Particle + Carbon filter.
A fabric pre-filter
Choice of color for the fabric pre-filter.
Optional fabric prefilter.
A fabric pre-filter
captures larger
particles and
increases the lifetime
of the main filter.
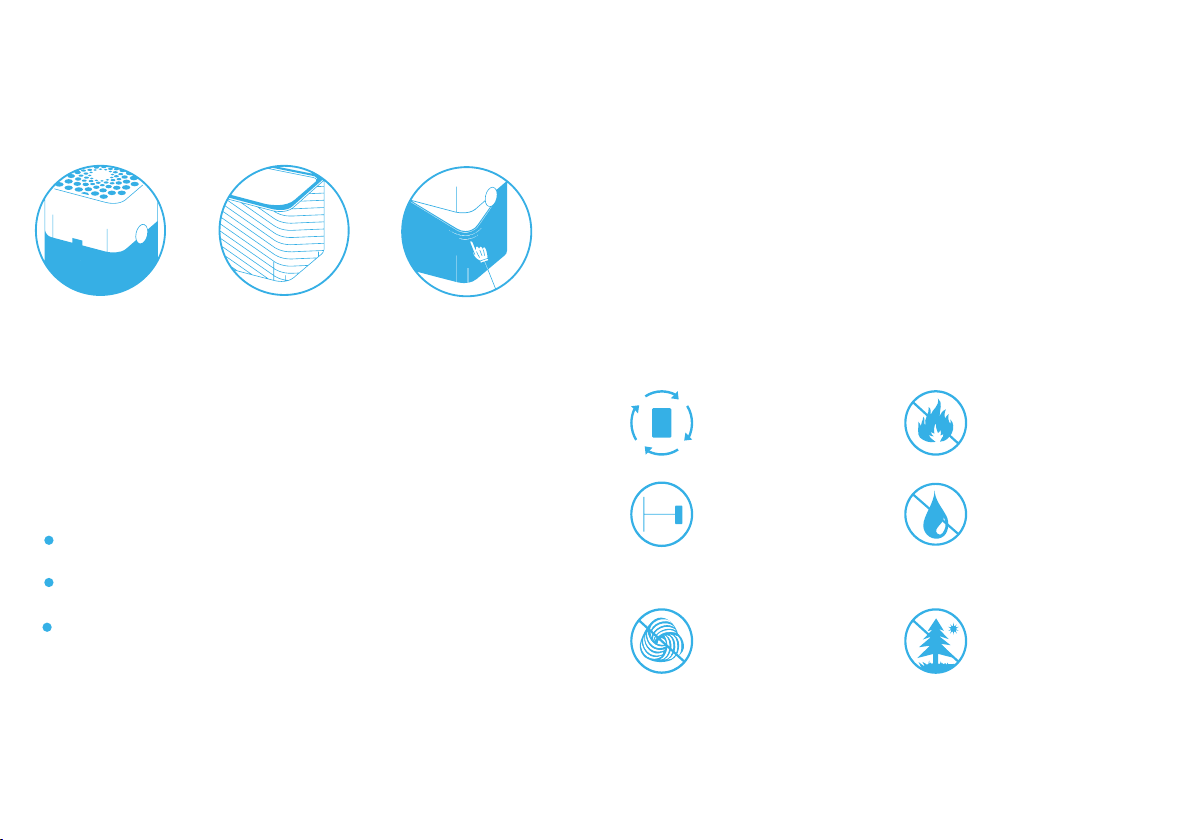
Placement
Place the unit in an upright position on the floor in your room. Be sure
to place the unit where it won’t be knocked over by any person or pet
in the household.
Using the unit in your bedroom?:
After 7 seconds the light automatically dims to 10% of the full effect.
Placing the unit:
Place the unit in a
location where air can
circulate freely in, out
and around the unit.
Do not place the unit
closer than 10 cm (4”)
from another object.
Do not place the unit
directly on or against
soft furnishings such as
bedding or linen.
Do not place the unit
near sources of heat,
such as radiators,
fireplaces or ovens.
Do not place the unit
near wet areas, such as
bathrooms or laundry
rooms where it may
come into contact with
water.
Do not place the unit
outdoors.
8 9
Page 6
SET UP ON/OFF AND OPERATING SPEEDS
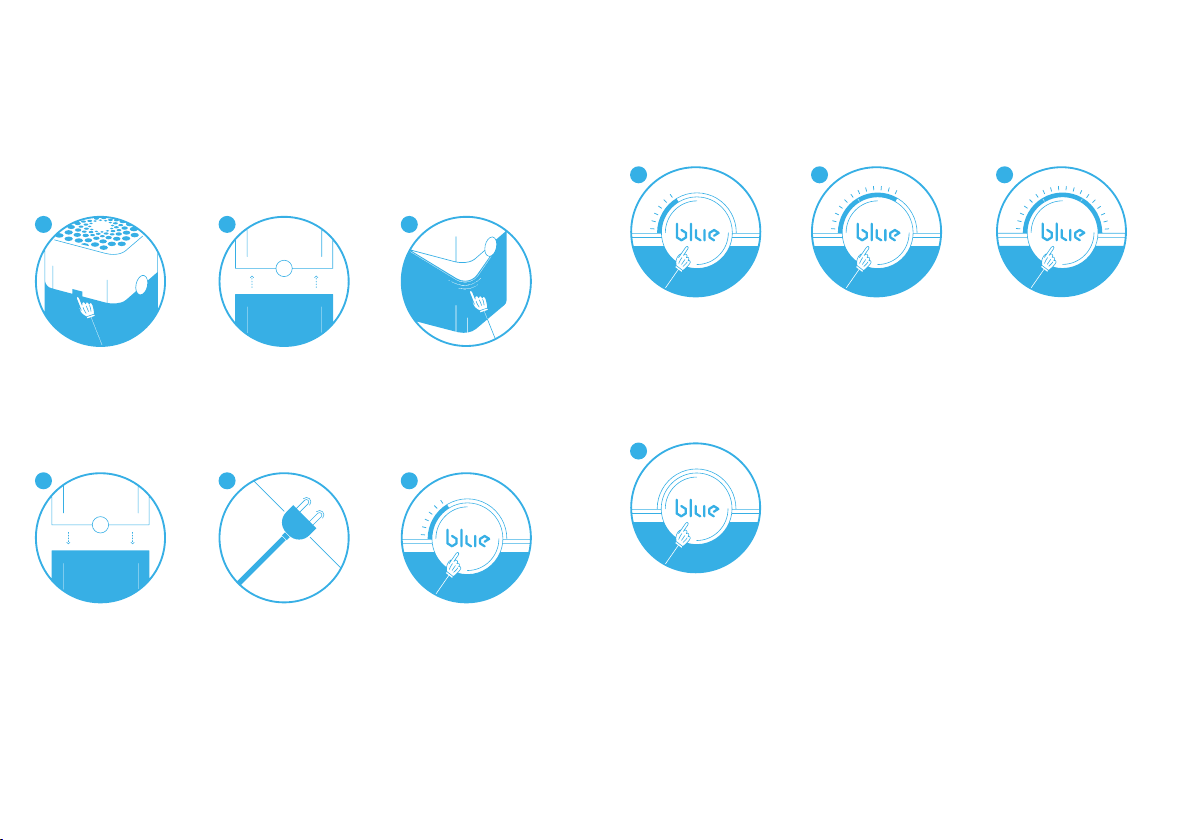
Getting started
If the optional pre-filter is used refer to steps 1 to 5. Otherwise refer to
steps 5 and 6.
1
Gently press the
buttons on both
sides of the unit
simultaneously.
4
Next, reposition the
top of the unit onto
the bottom and make
sure it clicks into
place.
2
Remove the top
portion
of the unit.
5
Plug in the unit.
3
Then attach the fabric
pre-filter. To ensure
a smooth fit, pull it
carefully over the
metal frame.
6
Press the button to turn
the unit on. The unit
automatically sets itself
to the recommended
energy-efficient
operating speed.
When the indicator light
glows white your unit is
working properly.
On/off and speed control
1
On/Low
Press once to turn
the unit on and set it
to the recommended
energy-efficient
speed.
4
Off
Press a fourth time to
turn the unit off.
2 3
Medium
Press twice to set to
medium speed.
High
Press three times to
set to high speed.
Moreover, the unit has an Autostart feature.
This means that the unit will automatically
restart at the set speed if a power failure
occurs, the unit is unplugged or a power
switch timer is used.
10 11
Page 7

FILT ERS FILT ERS
Filters
General information:
The unit is delivered with two fabric pre-filters and either a Particle
filter or Particle + Carbon filter. These filters remove the following
pollutants:
Particle filters remove:
DustPM2.5* Pollen Pet dander
Mold
Particle + Carbon filters remove all the above pollutants, plus:
*Particle matter smaller than 2.5 microns
Dust mites Bacteria
SmokeVOC
Chemicals
Cooking odors
Button control functions
1 2 3
Change filter
indicator
When the indicator
turns yellow (after 5
months of operation),
it’s time to order a
new filter.
You can change the filter before the indicator light turns red, i.e. when
it first turns yellow. In this case, just reset the unit after changing the
filter and use for another 6 months. (see "Change the main filter")
Change filter
When the indicator
light turns red (after
1 extra month of
operation), you
should change the
main filter.
Reset the filter alert
Press the button for
three seconds to
reset the filter alert.
IMPORTANT!
Use only genuine Blueair filters to ensure proper function of your
unit and to qualify for full warranty coverage.
12 13
Page 8

FILT ERS
FILT ERS
Vacuum or wash the pre-filter
Occasionally vacuum the exterior of the fabric pre-filter to remove dust.
Change the main filter
When the indicator light turns red, it’s time to change the main filter.
Before removing the fabric pre-filter, turn off and unplug the unit. Before changing the main filter, turn off and unplug the unit.
1
Gently pull and
detach the
pre-filter from
the lower half
of the unit.
2 3 4
Wash the prefilter on a gentle,
low temperature
cycle in the
washing
machine.
Before replacing the
fabric pre-filter,
gently press the
release buttons
on both sides of
Lift off the top
of the unit.
1
Gently press the
release buttons on
both sides of the unit
until you hear a click.
2
Lift off the top of the
unit.
3
Remove the old main
filter from the unit.
Unfold the new main
filter and insert into
the unit.
the unit until you
5
Re-fit the fabric
pre-filter over the
bottom part of the
unit.
hear a click.
6
Replace the top of
the unit, pressing
firmly until you hear
a click.
7
Plug in the unit.
8
To restart the unit
press the button for
three seconds, and
4
Firmly press the top
of the unit down onto
the new main filter
until you hear a click.
5
Plug in the unit.
6
To restart the unit
press the button for
three seconds, and
then release it.
This lets the unit
know that you have
changed the main
filter. The indicator
light flashes 3 times
and then changes
from red to white.
then release it.
14 15
Page 9

CARE AND MAINTENANCE
SPECIFICAT IO NS
General care
Take good care of your unit to ensure that it delivers optimal
performance.
Vacuum the pre-filter occasionally to remove dust, or wash it
on a gentle, low temperature cycle in the washing machine.
Change the main filter every six months, depending on the
operating conditions.
When the unit is open to change the filter, vacuum any dust
that may have accumulated inside the unit.
Occasionally wipe the top of the unit with a dry dust cloth.
16 17
Specifications1
Room size: 50m² (540 sq. ft.)
Clean Air Delivery Smoke Dust Pollen
Rate (CADR) cfm 350 350 350
m3/h 590 590 590
Filter replacement indicator Yes
On/Off timer No
Speeds 1-2-3-off
Dimensions Height: 522 mm (20.5 in)
Width: 330 mm (13 in)
Depth: 330 mm (13 in)
Weight: 7 kg (15 lbs)
Airflow rate 230 - 620 m3/h (135 - 365 cfm)
Air exchange
Power usage4 30 - 61 W
Noise level 31 - 56 dB(A)
Average filter service life six months
Warranty Local regulations
Blue is available in different colors for the Pure 221 air purifier unit. The colored
fabric works as a pre-filter.
1
Certified ratings as stated are based on U.S. version models (120VAC, 60Hz)
with Blue Particle Filter. Ratings may be affected by use of other Blue filter
models.
²Air changes per hour are calculated on the recommended room size, assuming
8-foot (2.4-m) ceilings.For smaller rooms, the air changes per hour will increase.
Depending on air quality in the area of use, the recommended six-month filter
lifetime may be longer.
⁴The available electrical power voltage and frequency af fects the
power consumption of the unit. the power consumption might therefore be
different from the stated value.
2
5 per hour (50 m2or 540 sq.ft.room)
3
Page 10

Blue
PURE 221
Deutsche
Modell: Pure221
SICHERHEIT 20
SYSTEMÜBERSICHT 22
LIEFERUMFANG 24
VERWENDUNG 25
EINRICHTUNG 26
EIN/AUS UND BETRIEBSGESCHWINDIGKEITEN 27
FILTER 2 8
PFLEGE UND WARTUNG 32
TECHNISCHE DATEN 33
18 19
Benutzerhandbuch
Page 11
SICHERHEIT
SICHERHEIT
Sicherheitsbestimmungen
Bei den Luftreinigern Pure 221 handelt es sich um Elektrogeräte.
Bitte lesen Sie die Sicherheitshinweise vor Inbetriebnahme durch
und treffen Sie die notwendigen Vorkehrungen, um Brandgefahr,
elektrischen Schlag oder Verletzungen zu vermeiden. Die
eingeschränkte Pure 221 -Garantie gilt nur, wenn das Gerät
entsprechend dieser Anweisungen verwendet wird.
WARNUNG: Weist auf eine gefährliche Situation hin, die bei
Fortbestehen zum Tod oder zu schweren Verletzungen führen kann.
ACHTUNG: Weist auf eine gefährliche Situation hin, die die
bei Fortbestehen zu leichten oder mittelschweren Verletzungen führen kann.
Allgemeine Hinweise
WARNUNG: Aus Sicherheitsgründen ist ein beschädigtes
Netzkabel vom Hersteller, einer Servicestelle oder einer entsprechenden Fachkraft zu ersetzen.
ACHTUNG:
Schließen Sie Ihr Pure 221 mit dem im Lieferumfang enthaltenen Netzkabel direkt an einer ordnungsgemäß geerdeten Steckdose an (siehe das Typenschild auf dem Gerät).
Nehmen Sie keinerlei Änderungen am Netzstecker vor.
Das Gerät muss vor Wartungsarbeiten stets vom Netz
getrennt werden.
Das Gerät darf nicht verwendet werden, wenn das Netzkabel
oder der Stecker beschädigt sind oder Fehlfunktionen
aufweisen.
Das Kabel von heißen Oberflächen fernhalten.
Nicht auf das Gerät setzen, stellen oder klettern und das
Gerät nicht als Tisch oder Ablage verwenden.
Es dürfen keine Gegenstände auf das Gerät gelegt, die
Belüftungsschlitze nicht verdeckt und keine Fremdkörper
in das Gerät eingeführt werden, da dies zu einem Stromschlag oder einer Beschädigung des Geräts führen kann.
Vorgesehener Zweck
ACHTUNG:
Kinder müssen beaufsichtigt werden, damit sie nicht mit
dem Gerät spielen.
Dieses Gerät ist nicht bestimmt für die Verwendung durch
Personen (wie z. B. Kindern) mit eingeschränkten physischen, sensorischen oder geistigen Fähigkeiten bzw.
denen es an Erfahrung und Wissen mangelt, es sei denn,
dass diese Personen angemessen beaufsichtigt werden
oder eine entsprechende Einweisung in die Benutzung des
Gerätes durch eine für ihre Sicherheit zuständige Person
erhalten
20 21
Page 12
SYSTEMÜBERSICHT
SYSTEMÜBERSICHT
1
2 3
45
6
7
8
Technische Zeichnung
1
Luftaustritt
2
Ionenkammer
3
Innenwand (Luftströmungsoptimierer)
4
Lüfter
Motor
5
Lüfterfuß
6
9
10
11
Schutzgitter
7
8
Entriegelungstaste für Filter
9
Äußerer Metallrahmen (optionaler Gewebevorfilter)
10
Partikelfilter oder Kombinationsfilter
11
360°-Lufteinlass
22
22 23
23
Page 13

LIEFERUMFANG VERWENDUNG
4 ins
10 cm
Luftreiniger box
Der Luftreiniger
Option
Eine Kombination aus Aktivkohlefilter und Partikelfilter.
Ein Gewebevorfilter
Farb- und Designauswahl für den Gewebevorfilter.
Partikelfilter oder
Partikel- und
Kohlenstofffilter
Optionaler
Gewebevorfilter:
Ein Gewebevorfilter
fängt größere Partikel
auf und erhöht die
Nutzungsdauer des
Hauptfilters.
Aufstellung
Stellen Sie den Pure 221 in Ihrem Raum aufrecht auf den Boden. Achten
Sie darauf, das Gerät so zu platzieren, dass es nicht von einer Person
oder einem Haustier umgeworfen werden kann.
Blue im Schlafzimmer verwenden?
Keine Sorge, nach 7 Sekunden wird das Licht automatisch auf 10 %
herunter gedimmt.
Aufstellort:
Geeignet zur Aufstellung: an einem Ort, wo
die Luft ungehindert angesogen und abgegeben und frei zirkulieren
kann
Ungeeignet zur Aufstellung: in einem Abstand
von weniger als 10 cm
von einem anderen Gegenstand.
Ungeeignet zur Aufstellung direkt auf oder an
Heimtextilien wie Bettwäsche oder Vorhänge.
Ungeeignet zur Aufstellung: in der Nähe von
Wärmequellen, z. B. Radiatoren, Herd oder
Ofen.
Ungeeignet zur Aufstellung: in der Nähe
von Nassbereichen, z.
B. Badezimmer oder
Waschküche, wo das
Gerät mit Wasser in
Kontakt kommen kann.
Ungeeignet zur Aufstellung: Außenbere-
iche.
24 25
Page 14

EINRICHTUNG
EIN/AUS UND BETRIEBSGESCHWINDIGKEITEN
Vorbereitung
Wenn der optionale Vorfilter verwendet wird, führen Sie die Schritte 1
bis 5 aus. Andernfalls führen Sie die Schritte 5 und 6 aus.
1
Drücken Sie vorsichtig auf die
beiden seitlichen
Tasten am Gerät.
4
Als nächstes setzen
Sie den
oberen Teil des Gerätes zurück auf den
Boden, und achten
Sie darauf, dass er
einrastet.
26 27
2 3
Entfernen Sie den
oberen
Teil des Gerätes.
5
6
Stecken Sie den Netzstecker in die Steckdose.
Drücken Sie zum Einschalten des Geräts auf die
Taste. Das Gerät stellt sich
automatisch auf die empfohlene, energieeffiziente
Betriebsgeschwindigkeit
ein.
Wenn die Kontrollleuchte
weiß leuchtet, arbeitet Ihr
Gerät einwandfrei.
Bringen Sie den
Stoff-Vorfilter an.
Um einen guten Sitz
sicherzustellen, über
den Metallrahmen
.
Ein/Aus und Geschwindigkeitsregelung
1
Ein/Niedrig
Einmal berühren, um
das Gerät einzuschalten und auf die
empfohlene
energieeffiziente
Geschwindigkeit
einzustellen.
4
Aus
Nochmals berühren,
um das Gerät
auszuschalten.
2 3
Mittel
Für mittlere
Geschwindigkeit
zwei Mal berühren.
Darüber hinaus hat das Gerät eine AutostartFunktion. Das bedeutet, dass es sich
automatisch wieder mit der eingestellten
Geschwindigkeit einschaltet, wenn der Strom
ausfällt, der Netzstecker aus der Steckdose
gezogen oder eine Netz-Zeitschaltuhr
verwendet wird.
Hoch
Für eine hohe
Geschwindigkeit drei
Mal berühren.
Page 15

FILT ER
FILT ER
Filter
Allgemeine Informationen
Im Lieferumfang des Geräts sind Gewebsvorfilter und entweder ein
Partikelfilter oder ein Partikel- und Kohlenstofffilter enthalten. Diese
Filter entfernen die folgenden Verschmutzungen:
Partikelfilter entfernen Folgendes:
StaubPM2.5* Pollen Haustierpartikel
Schimmel
Partikel und Kohlenstofffilter entfernen alle obigen Verschmutzungen
plus:
organische Ver-
bindungen)
* Feinstpartikel kleiner als 2,5 µm
Hausstaub-
milben
TabakrauchVOC (flüchtige
Bakterien
Chemikalien Kochgerüche
Tasten-Steuerfunktionen
1 2 3
Anzeige für
Filterwechsel
Wenn die Anzeige
gelb leuchtet (nach 5
Monaten Betrieb), ist
es Zeit, einen neuen
Filter zu bestellen.
Sie können den Filter wechseln, bevor die Anzeige rot leuchtet, d. h.
wenn sie gelb leuchtet. Setzen Sie das Gerät in diesem Fall nach dem
Filterwechsel zurück und verwenden Sie es wieder 6 Monate. (siehe
„Hauptfilter wechseln)
Filter wechseln
Wenn die Anzeige
rot leuchtet
(nach 1 weiteren
Monat), sollten
Sie den Hauptfilter
austauschen.
Filteralarm
bestätigen
Drücken Sie die
Taste drei Sekunden
lang, um den
Filteralarm zu
bestätigen.
WICHTIG! Verwenden Sie nur Originallter der Marke Blueair, um die
Funktion des Geräts zu gewährleisten und den vollen Garantieumfang
zu erhalten.
28 29
Page 16

FILT ER
FILT ER
Vorfilter absaugen oder waschen
Reinigen Sie gelegentlich die Außenseite des Stoff-Vorfilters mit einem
Staubsauger, um Staub zu entfernen.
Bevor Sie den Gewebevorfilter abnehmen, schalten Sie das Gerät aus
und ziehen Sie den Netzstecker aus der Steckdose.
1 2 3 4
Zum Entfernen
des Vorfilters
ziehen Sie daran
und lösen
Sie ihn vorsichtig vom unteren
Teil des Gerätes.
5 6
Waschen Sie den
Vorfilter im
Schonwaschgang
bei niedriger
Temperatur in der
Waschmaschine
mit.
Drücken Sie vor
dem Austausch
des Stoff-Vorfilters vorsichtig
die Entriegelungstasten auf
beiden Seiten
des Gerätes, bis
Sie ein Klicken
Nehmen Sie den
oberen Teil
des Gerätes ab.
Hauptfilter wechseln
Wenn die Kontrollleuchte rot leuchtet, ist es an der Zeit, den
Hauptfilter zu wechseln.
Schalten Sie das Gerät aus und ziehen Sie den Netzstecker aus der
Steckdose, bevor Sie den Hauptfilter wechseln.
1
Drücken Sie vorsichtig die Entriegelungstasten auf
beiden Seiten des
Gerätes, bis Sie ein
Klicken hören.
6
2
Nehmen Sie den
oberen
Teil des Gerätes ab.
4
Nehmen Sie den
alten Hauptfilter vom
Gerät ab.
Falten Sie den neuen
Filter auseinander
und setzen Sie ihn
ein.
7
Stecken Sie den Netzstecker in die Steckdose.
zu hören.
7
Stecken Sie den Netzstecker in
8
die Steckdose.
8
Ziehen Sie den
Stoff-Vorfilter über den
unteren Teil des
Gerätes und
positionieren Sie
die Gewebemarkierungen in den
oberen Ecken.
30 31
Bringen Sie
den oberen
Teil des
Gerätes wieder
an und drücken
Sie fest darauf,
bis Sie ein Klicken hören.
Um das Gerät neu zu starten,
drücken Sie die Taste drei
Sekunden lang und lassen Sie sie
dann los.
Drücken Sie den
oberen Teil des
Geräts auf den
neuen Hauptfilter,
bis er einrastet.
Um das Gerät neu
zu starten, drücken
Sie die Taste drei
Sekunden lang und
lassen Sie sie dann
los.
Auf diese Weise
weiß das Gerät, dass
Sie den Hauptfilter
gewechselt haben.
Die Kontrollleuchte
blinkt drei Mal
und wechselt
anschließend von rot
nach weiß.
Page 17

PFLEGE UND WARTUNG
TECHNISCHE DATEN
Allgemeine Pflege
Achten Sie auf eine gute Pflege Ihres Geräts, um eine optimale Geräteleistung sicherzustellen.
Saugen Sie den Vorfilter von Zeit zu Zeit ab, um Staub zu entfernen, oder waschen Sie ihn bei niedriger Temperatur in einem
sanften Waschgang in der Waschmaschine.
Je nach Einsatzbedingungen sollte der Hauptfilter alle sechs
Monate ausgetauscht werden.
Wenn das Gerät für den Austausch des Filters geöffnet ist, saugen Sie den angesammelten Staub aus dem Gerät.
Reinigen Sie die Oberseite des Gerätes gelegentlich mit einem
trockenen Staubtuch.
32 33
Technische Daten1
Raumgröße: 50m² (540 sq. ft.)
Luftreinigungskapazität
(CADR-Wert)
m3/h 590 590 590
Filterwechselanzeige
Ein-/Aus-Timer Nein
Geschwindigkeiten 1-2-3-aus
Abmessungen Höhe: 522 mm (20.5 in)
Breite: 330 mm (13 in)
Tiefe: 330 mm (13 in)
Gewicht 7 kg (15 lbs)
Luftdurchsatz
Luftaustausch2
540 sq.ft.raum)
Leistungsaufnahme
Geräuschpegel
Durchschnittliche sechs Monat3
Filternutzungsdauer
Garantie
Das Modell Pure 221 von Blue ist in verschiedenen Farben erhältlich. Das farbige
Gewebe dient als Vorfilter.
1
Die angegebenen zertifizierten Leistungsangaben basieren auf US-Modellen (120 VAC,
60 Hz) mit Partikelfilter. Leistungsdaten können durch Verwendung anderer Filtermodelle
beeinflusst werden.
Die Luftumwälzung pro Stunde wird entsprechend der empfohlenen Raumgröße bere-
²
chnet, wobei von 2,4 m hohen Decken ausgegangen wird. Bei kleineren Räumen erhöht
sich die Luftumwälzung pro Stunde.
Abhängig von der Luftqualität im Einsatzbereich variiert die Filterlebensdauer.
4
Die vorhandene elektrische Spannung und Frequenz beeinflussen den Stromver-
brauch des Geräts. Der Stromverbrauch kann daher vom angegebenen Wert abweichen.
cfm 350 350 350
230 - 620 m3/h (135 - 365 cfm)
Rauch Staub Pollen
Ja
5 Mal pro Stunde (50 m2oder
4
30 - 61 W
31 - 56 dB(A)
Örtliche Vorschriften
Page 18

Blue
PURE 221
Manual de usuario en español
Modelo: Pure221
SEGURIDAD 36
DESCRIPCIÓN GENERAL DEL SISTEMA 38
CONTENIDOS DE LA CAJA 40
USO 41
CONFIG URACIÓN 42
ENCENDIDO/APAGADO Y VELOCIDADES DE OPERACIÓN 43
FILTROS 4 4
CUIDADO Y MANTENIMIENTO 48
ESPECIFICACIONES 49
34 35
Page 19

SEGURIDAD
SEGURIDAD
Información de seguridad
Los purificadores de aire Pure 221 son dispositivos eléctricos. Lea las
instrucciones de seguridad antes de usar la unidad, y tome las precauciones necesarias para reducir el riesgo de incendios, descargas
eléctricas o lesiones. La garantía limitada de Pure 221 se aplica solo si
la unidad se usa de acuerdo con estas instrucciones.
ADVERTENCIA:
Indica una situación peligrosa que, si no se evita, puede
provocar lesiones graves o fatales.
PRECAUCIÓN: Indica una situación peligrosa que, si no se evita, puede provocar lesiones menores o moderadas.
Información general
ADVERTENCIA:
Para evitar situaciones peligrosas, un cable de alimentación
dañado siempre debe ser reemplazado por el fabricante, el
agente de servicio o una persona con cualificaciones similares.
PRECAUCIÓN:
Utilice el cable de alimentación con descarga a tierra incluido
con la unidad Pure 221 para una conexión directa en una toma
eléctrica con descarga a tierra adecuada (consulte la etiqueta
de clasificación en la unidad).
No altere de ningún modo el enchufe.
Recuerde siempre desconectar la fuente de alimentación
antes de realizar tareas de servicio en la unidad.
No use la unidad si el cable de alimentación o el enchufe es-
tán dañados, si funciona mal o si presenta daños de cualquier
tipo.
36 37
Uso previsto
Mantenga el cable lejos de superficies calefaccionadas.
No se siente ni se pare sobre la unidad. No la use como
escalón, ni como mesa, ni como dispositivo de almacenamiento.
No apoye ningún objeto sobre la unidad, no bloquee las
entradas ni las salidas de aire, ni permita que objetos
extraños se introduzcan en la unidad, ya que pueden provocar descargas eléctricas o daños en la unidad.
PRECAUCIÓN:
Supervise a los niños/as para asegurarse de que no jueguen con el dispositivo.
Esta unidad no está pensada para que la usen personas
(entre ellos niños/as) con capacidades físicas, sensoriales
o mentales disminuidas, o falta de experiencia y conocimiento, excepto de manera supervisada o con capacitación
acerca del uso del dispositivo por parte de una persona responsable por su seguridad.
Page 20

DESCRIPCIÓN GENERAL DEL SISTEMA
DESCRIPCIÓN GENERAL DEL SISTEMA
1
2 3
45
6
7
8
Plano
1
Salida de aire
2
Cámara de iones (optimizador del flujo de aire)
3
Pared interna
4
Ventilador
Motor
5
Base del ventilador
6
9
10
11
Parrilla protector
7
8
Botón de liberación del filtro
9
Bastidor metálico externo (prefiltro de tela opcional)
10
Filtro de partículas o filtro combinado
11
Entrada de aire de 360°
38 39
38 39
Page 21

CONTENIDOS DE LA CAJAA CAJA
4 ins
10 cm
USO
Paquete de unidad de
purificador de aire
Unidad de purificador
de aire
Opción
Una combinación de filtro decarbono activo y filtro de partículas.
Un prefiltro de tela
Opción de colores y diseño para el prefiltro de tela.
Filtro de partículas o
filtro de partículas y
carbono
Prefiltro de tela
opcional:
Un prefiltro de tela
captura las partículas
más grandes y
aumenta la vida útil
del filtro principal.
Ubicación de la unidad
Coloque la unidad en una posición vertical sobre el piso del ambiente.
Asegúrese de colocar la unidad en un lugar donde ningún animal de la
casa pueda derribarla.
¿Usa la unidad en su habitación?
No se preocupe. Después de 7 segundos, la luz se vuelve más tenue
hasta alcanzar al 10% del brillo completo.
Ubicación de la unidad
Coloque la unidad en
una ubicación donde
el aire pueda circular
(ingresar, egresar y
transitar) libremente por
la unidad.
No coloque la unidad a
una distancia menor de
4” (10 cm) de otro objeto .
No coloque la unidad directamente o sobre accesorios blandos, como
colchones o ropa de
.
cama
No coloque la unidad
cerca de fuentes de calor, como radiadores,
chimeneas u hornos.
No coloque la unidad
cerca de áreas húmedas, como baños o
cuartos de lavado,
donde pueda entrar en
contacto con agua.
No coloque la unidad en
exteriores.
40 41
Page 22

CONFIGURACIÓN
ENCENDIDO/APAGADO Y VELOCIDADES DE OPERACIÓN
Para comenzar
Si se utiliza el prefiltro opcional, siga los pasos 1 a 5. De lo contrario,
siga los pasos 5 y 6.
1
Presione suavemente
los botones ubicados
a ambos lados de la
unidad.
4 5
A continuación, vuelva a colocar la parte
superior de la unidad
en la parte inferior
y asegúrese de que
se trabe en su lugar
(escuchará un clic).
42 43
2
Quite la porción superior de la unidad.
Conecte la unidad.
3
Para garantizar un
calce exacto, tire
con cuidado para
retirarlo del bastidor
metálico .
6
Presione el botón para
encender la unidad. La
unidad se configurará
automáticamente con la
velocidad de operación
que tenga la mayor
eficiencia energética.
Cuando la luz del
indicador se enciende de
color blanco, significa
que la unidad funciona
correctamente.
Encendido/apagado y control
de velocidad
1
Encendido/Baja
Presione una vez para
encender la unidad y
configurarla en la velocidad recomendada
con mayor eficiencia
energética.
4
Apagado
Presione una vez más
para apagar la unidad.
2 3
Media
Presione dos veces
para configurar la
velocidad media.
Además, la unidad posee una función de
encendido automático. Esto significa que la
unidad se reiniciará automáticamente a la
velocidad configurada si se produce un fallo
de alimentación, se desconecta la unidad o
se utiliza un temporizador del interruptor de
alimentación.
Alta
Presione tres veces
para configurar la
velocidad alta.
Page 23

FILT R O S
FILT R O S
Filtros
Información general:
La unidad se entrega con dos prefiltros de tela y un filtro de partículas
o un filtro de partículas y carbono. Estos filtros eliminan los siguientes
contaminantes:
Los filtros de partículas eliminan
PolvoPM2.5* Polen Caspa de
Moho
Los filtros de partículas y carbono eliminan todos los contaminantes
mencionados y también los siguientes:
orgánicos voláti-
les (VOC, por sus
siglas en inglés)
Ácaros Bacterias
HumoCompuestos
Sustancias
químicas
animales
Olores pro-
ducidos al
cocinar
Funciones de control de los botones
1 2 3
Indicador de cambio
de filtro
Cuando la luz se
enciende de color
amarillo (luego
de 5 meses de
funcionamiento), es
momento de solicitar
un filtro nuevo
Puede cambiar el filtro antes de que la luz del indicador se encienda
de color rojo (por ejemplo, la primera vez que se enciende de color
amarillo). En este caso, solo debe reiniciar la unidad después de
cambiar el filtro y usarla por otros 6 meses. (consulte "Cambiar el filtro
principal")
Cambiar filtro
Cuando la luz
del indicador se
enciende de color
rojo (luego de 1 mes
más), es momento
de cambiar el filtro
principal.
Reconocer alerta de
filtro
Presione el botón
durante tres
segundos para
reconocer el alerta
de filtro.
* Materia de partículas menor a 2,5 micrones
¡IMPORTANTE! Use solo filtros Blueair originales para garantizar
el funcionamiento adecuado de la unida y para poder acceder a
la cobertura total de la garantía.
44 45
Page 24

FILT R O S
FILT R O S
Aspire o lave el prefiltro
Periódicamente, aspire el exterior del prefiltro de tela para eliminar el
polvo.
Antes de quitar el prefiltro de tela, apague y desconecte la unidad.
1 2
Tire
suavemente
del prefiltro
para separarlo
del fondo de la
unidad.
5 6
Vuelva a ajustar
el prefiltro de
tela sobre la
porción inferior
de la unidad, con
las marcas de
la tela ubicadas
en las esquinas
superiores.
Lave el prefiltro
en un lavarropas con un
ciclo suave de
baja temperatura.
Para volver a
colocar la parte
superior de la
unidad, presiónela con firmeza
hasta escuchar
un clic.
3
Antes de reemplazar el prefiltro
de tela, presione
4
Levante la
parte superior
de la unidad.
suavemente los
botones de liberación ubicados
a ambos lados de
la unidad hasta
escuchar un clic.
7
Conecte la unidad.
8
Para reiniciar la unidad, presione
el botón durante tres segundos y
luego suéltelo.
Cambie el filtro principal
Cuando la luz del indicador se encienda de color rojo, es momento de
cambiar el filtro principal.
Antes de cambiar el filtro principal, apague y desconecte la unidad.
1
Presione suavemente los botones de
liberación ubicados a
ambos lados de la unidad hasta escuchar
un clic.
6 7
Presione con firmeza
la parte superior
de la unidad hacia
abajo sobre el nuevo
filtro principal hasta
escuchar un clic.
2
Levante la parte
superior de la unidad.
Conecte la unidad.
8
Para reiniciar la
unidad, presione el
botón durante tres
segundos y luego
suéltelo.
4
Retire el antiguo
filtro principal de la
unidad.
Desembale el nuevo
filtro principal e
insértelo en la
unidad.
De esta manera se le
comunica a la unidad
que se ha cambiado
el filtro principal.
La luz del indicador
parpadeará 3 veces
y, a continuación,
pasará de color rojo a
color blanco.
46 47
Page 25

CUIDADO Y MANTENIMIENTO
ESPECIFICACIONES
Cuidados generales
Mantenga adecuadamente la unidad para garantizar que su rendimiento sea óptimo.
Aspire el prefiltro periódicamente para eliminar el polvo; también puede lavarlo en un lavarropas con un ciclo suave de baja
temperatura.
Cambie el filtro principal cada seis meses, según las condiciones
de operación.
Al abrir la unidad para cambiar el filtro principal, asegúrese de aspirar el polvo que pueda haberse acumulado dentro de la unidad.
Aspire periódicamente la parte interna y externa del filtro principal para eliminar el polvo.
Especificaciones1
Tamaño del ambiente 50m² (540 pies cuadrados)
Velocidad de producción
de aire limpio (CADR)
m
Indicador de reemplazo del filtro
Temporizador de encendido/ No
apagado
Velocidades 1-2-3Dimensiones Altura: 522 mm (20.5 pulgadas)
Ancho: 330 mm (13 pulgadas)
Profundidad: 330 mm (13 pulgadas)
Peso: 7 kg (15 lbs)
Velocidad del flujo de aire
Renovación de aire2
50 m² o 540 pies cuadrados)
Consumo de energía
Nivel de ruido
Vida útil promedio del filtro
Garantia
Blue está disponible en diferentes colores para el modelo Pure 221. La tela de color actúa como
prefiltro.
1
Los valores nominales certificados se basan en los modelos para la versión estadounidense (120 V CA, 60Hz) con el filtro de partículas Blue.Los valores nominales pueden
verse afectados por el uso de otros modelos de filtros
²
La renovación de aire por hora se calcula según las dimensiones recomendadas para el
ambiente, considerando cielos rasos de 8 pies (2,4 m). En el caso de habitaciones más
pequeñas, la renovación de aire por hora aumenta.
Según la calidad del aire en el lugar de uso, la vida útil del filtro puede variar.
4
La frecuencia y el voltaje de energía eléctrica disponibles afectan el consumo de
energía de la unidad. Por lo tanto, el consumo de energía puede ser distinto al valor
indicado.
31 - 56 dB(A)
cfm 350 350 350
230 - 620 m3/h (135 - 365 cfm)
4
30 - 61 vatios
Humo Polvo
3
/h 590 680 590 590
Si
apagado
5 veces por hora (ambiente de
seis meses
Regulaciones locales
Polen
3
48 49
Page 26

Blue
PURE 221
Guide d’utilisation
Modèle
: Pure221
SÉCURITÉ 52
APERÇU DU SYSTÈME 54
CONTENU DE LA BOÎTE 56
PLACEMENT 57
CONFIGURATION 58
MARCHE/ARRÊT ET VITESSES DE FONCTIONNEMENT 59
FILTRE S 6 0
SOIN ET ENTRETIEN 64
50 51
SPÉCIFICATIONS 65
en français
Page 27

SÉCURITÉ
SÉCURITÉ
Consignes de sécurité
Le purificateur d’air Pure 221 est un appareil électrique. Veuillez lire les
consignes de sécurité avant toute utilisation et prenez les précautions
nécessaires afin de réduire tout risque d’incendie, d’électrocution ou
de blessures. La garantie limitée Pure 221 s’applique uniquement si
l’appareil est utilisé selon ces instructions.
ATTENTION: Indique une situation dangereuse qui, si elle
n’est pas évitée, pourrait entraîner la mort ou de blessures
graves.
PRUDENCE: Indique une situation dangereuse qui, si elle
n’est pas évitée, pourrait entraîner de blessures légères ou
modérées.
Informations générales
ATTENTION: Afin d’éviter tout danger, le remplacement des
cordons d’alimentation endommagés doit toujours être effectué par le fabricant, un réparateur ou une personne qualifiée.
PRUDENCE:
Utilisez le câble d’alimentation mis à la terre fourni avec
votre unité Pure 221 pour la brancher directement sur une
prise électrique appropriée (reportez-vous à l’étiquette
d’évaluation de votre appareil).
Ne modifiez pas la fiche de quelque façon que ce soit.
Débranchez toujours l’alimentation de l’appareil avant d’ef-
fectuer l’entretien.
N’utilisez pas le produit avec un cordon ou une prise
endommagé(e), ou si le produit ne fonctionne pas correctement, fait l’objet d’une chute ou est endommagé de
quelque façon que ce soit.
Garder le cordon à l’écart de toutes surfaces chauffées.
Ne vous asseyez pas, ne vous tenez pas debout et ne
montez pas sur l’appareil. Ne l’utilisez pas non plus
comme table ou comme entreposage.
Ne laissez pas d’objets étrangers pénétrer dans la ventilation ou l’orifice d’aération, car cela pourrait provoquer
une électrocution ou un endommagement du purificateur
d’air. Ne bloquez pas les entrées ou les sorties d’air.
Utilisation prévue
PRUDENCE:
Surveillez les enfants pour vous assurer qu'ils ne jouent
pas avec l'appareil.
Cet appareil n’est pas destiné à être utilisé par des personnes (y compris des enfants) ayant des handicaps
physiques, sensoriels ou mentaux, ou un manque d’expérience et de connaissances, à moins qu’ils ne soient
sous surveillance ou qu’ils n’aient été informés de la
manière d’utiliser l’appareil par une personne responsable de leur sécurité.
52 53
Page 28

APERÇU DU SYSTÈME
APERÇU DU SYSTÈME
1
2 3
45
6
7
8
Schéma directeur
1
Sortie d’air
2
Chambre d’ionisation
3
Paroi interne (Optimiseur du flux d’air)
4
Ventilateur
Moteur
5
Base du ventilateur
6
9
10
11
Grille protectrice
7
8
Bouton d’ouverture pour le filtre
9
Cadre métallique externe (pré-filtre en tissu optionnel)
10
Particules ou filtre à particules et de carbone
11
Entrée d’air à 360°
54 55
54 55
Page 29

CONTENU DE LA BOÎTE
4 ins
10 cm
PLACEMENT
Emballage appareil purificateur
d’air
Appareil purificateur
d’air
Option
Filtre à charbon actif et filtre à particules combinés
Un pré-filtre en tissu
Choix de couleur et de conception pour le pré-filtre en tissu
Particules ou filtre
à particules et de
carbone
Pré-filtre en tissu
optionnel:
Un pré-filtre en tissu
retient les particules
les plus grosses,
augmentant ainsi
la durée de vie de
l’appareil.
Placement
Placez l’appareil en position droite sur le sol dans votre pièce. Assurezvous de placer l'appareil dans un endroit où il ne peut pas être renversé
par quelqu'un ou un animal domestique dans votre foyer.
Vous utilisez l’appareil dans votre chambre ?
Ne vous inquiétez pas, après 7 secondes la lumière diminue
automatiquement à 10% de l'effet plein.
Placer l’appareil
Placez l’appareil dans
un endroit où l’air peut
circuler librement à l’intérieur et à l’extérieur
de l’appareil ainsi que
tout autour.
Ne placez pas l’appareil
à moins de 10 cm d’autres objets.
Ne placez pas l’appareil
directement sur ou contre des textiles d’ameublement tels que la
literie ou le linge de
maison.
Ne placez pas l’appareil
près de sources de
chaleur telles que les
radiateurs, les
cheminées ou les fours.
Ne placez pas l’appareil près de zones humides, telles que les
salles de bains ou les
buanderies, où il peut
entrer en contact avec
de l’eau.
Ne placez pas l’appareil à l’extérieur.
56 57
Page 30

CONFIGURATION
MARCHE/ARRÊT ET VITESSES DE FONCTIONNEMENT
Démarrage
Si vous utilisez le pré-filtre optionnel, consultez les étapes 1 à 5.
Sinon, consultez les étapes 5 et 6.
1
Appuyez légèrement
sur les boutons situés
de chaque côté de
l’appareil.
4
Replacez ensuite
le couvercle de
l’appareil sur le bas
et assurez-vous de le
faire cliquer pour le
mettre en place.
58 59
2
Retirez la portion supérieure de l’appareil.
5
Branchez l'appareil.
3
Pour assurer un
ajustement en
douceur, tirez avec
précaution sur le
cadre métallique
6
Appuyez sur le bouton
pour allumer l'appareil.
L’appareil se règle automatiquement sur la
vitesse recommandée
de fonctionnement à
faible consommation
électrique.
Quand le voyant est
blanc, l'appareil fonctionne correctement.
Marche/Arrêt et contrôle de la
vitesse
1 2 3
Marche/Faible
Appuyez une
seule fois pour
allumer l'appareil
et réglez le en
vitesse d'économie
d'énergie.
4
Arrêt
Appuyez à nouveau
pour éteindre
l'appareil.
Moyen
Appuyez deux fois
pour régler la vitesse
moyenne.
En outre, l’appareil dispose d'une fonction
Autostart. Cela signifie que l’appareil
redémarre automatiquement à la vitesse
réglée en cas de panne de courant, de
débranchement de l'appareil ou de l'utilisation
d'un interrupteur à minuterie.
Élevé
Appuyez trois fois
pour le régler à
vitesse haute.
Page 31

FILT R ES
FILT R ES
Filtres
Informations générales
L'appareil est livré avec deux pré-filtres en tissu et soit un filtre à particules ou un filtre à particules et de carbone. Ces filtres éliminent les
polluants suivants :
Les filtres à particules nettoient :
la poussièreles PM2.5* le pollen les poils
les moisis-
sures
Les filtres à particules et de carbone suppriment tous les polluants
ci-dessus, plus :
*Particules inférieures à 2,5 microns
les acariens
détriticoles
la fuméeles COV
les bactéries
les produits
chimiques
d’animaux
les odeurs de
cuisine
Fonctions de commandes à bouton
1 2 3
Changement de
l'indicateur filtre
Quand le voyant
s'allume en jaune
(après 5 mois de
fonctionnement), il est
temps de commander
un nouveau filtre.
Vous pouvez changer le filtre avant que le voyant ne devienne rouge,
à savoir lorsqu'il devient d'abord jaune. Dans ce cas, il suffit de
réinitialiser l'appareil après avoir changé le filtre et utilisez le pendant
6 mois supplémentaires. (voir "Changement du filtre principal")
Changement du filtre
Lorsque le voyant
devient rouge
(après 1 mois
supplémentaire),
vous devez changer
le filtre principal.
Validation de l'alerte
de filtre
Appuyez sur le
bouton pendant trois
secondes pour valider
l'alerte du filtre.
IMPORTANT !
Utilisez uniquement les filtres Blueair afin de garantir un
fonctionnement correct de votre appareil ainsi que pour être éligible à une couverture complète par la garantie.
60 61
Page 32

FILT R ES
FILT R ES
Aspirez ou nettoyez le pré-filtre
Aspirez de temps à autre l’extérieur du pré-filtre en tissu afin de retirer
la poussière.
Débranchez l’appareil avant de retirer le pré-filtre en tissu.
1
Retirez doucement le pré-filtre
et détachez-le
du fond de
l’appareil pour le
2
Nettoyez le préfiltre avec un
cycle de lavage
délicat à basse
température.
retirer.
5 6
Reposez le préfiltre en tissu sur
la partie inférieure de l’appareil en plaçant
les marques en
tissu dans les
Replacez le
couercle de
l’appareil en
appuyant fermement jusqu’à ce
que vous enten-
diez un clic.
coins supérieurs.
62 63
3 4
Avant de
replacer le préfiltre en tissu,
Soulevez le
couvercle de
l’appareil.
appuyez doucement sur les
boutons d’ouverture situés
de chaque côté
de l’appareil
jusqu’à ce que
vous entendiez
un clic.
7
Branchez l'appareil.
8
Pour redémarrerz l'appareil,
appuyez sur le bouton pour pendant
trois secondes puis relâchez-le.
Changement du filtre principal
Quand le voyant indicateur est rouge, il est temps de changer le filtre
principal.
Débranchez l’appareil avant de changer le filtre principal.
1
Appuyez doucement
sur les boutons
d’ouverture situés
de chaque côté de
l’appareil jusqu’à ce
que vous entendiez
un clic.
6
Appuyez fermement
le couvercle de
l'appareil sur le
nouveau filtre
principal jusqu'à ce
que vous entendiez
un clic.
2
Soulevez le couvercle de l’appareil.
7
Branchez l'appareil.
8
Pour redémarrerz
l'appareil, appuyez
sur le bouton pour
pendant trois
secondes puis
relâchez-le.
4
Retirez l’ancien
filtre principal de
l'appareil.
Dépliez le nouveau
filtre principal et
insérez-le dans
l’appareil.
Cette action informe
l’appareil que vous
avez changé le filtre
principal. Le voyant
indicateur clignote
trois fois, puis passe
du rouge au blanc.
Page 33

SOIN ET ENTRETIEN
SPÉCIFICAT IO NS
Soins généraux
Prenez grand soin de votre appareil pour vous assurer de sa performance optimale.
Aspirez le pré-filtre de temps à autre pour retirer la poussière
ou nettoyez-le avec un cycle délicat à basse température dans
votre machine à laver.
Changez le filtre principal tous les six mois, selon les conditions de fonctionnement.
Lorsque vous ouvrez l’appareil pour changer le filtre, aspirez
toute la poussière accumulée à l’intérieur.
Essuyez de temps en temps le dessus de l’appareil avec un
chiffon à poussière sec.
64 65
Spécifications1
Taille de la pièce 50m² (540 pieds carrés)
Taux d’approvisionnement
en air propre (CADR)
m
Voyant de remplacement du filtre Oui
Minuteur marche/arrêt Non
Vitesses 1-2-3-
Dimensions Hauteur: 522 mm (20.5 po)
Largeur: 330 mm (13 po)
Profondeur: 330 mm (13 po)
Poids: 7 kg (15 lbs)
Débit d’air
Changement de l’air2
Consommation électrique
Niveau sonore
Durée de vie moyenne du filtre
Garantie
Blue est disponible en différents coloris pour le modèle coloré sert de pré-filtre.
1
Les certifications concernent les versions américaines des modèles (120 VAC, 60
Hz) avec filtre à particules Blue. Ces certifications peuvent être affectées par l’utilisation d’autres modèles de filtre.
²
Le nombre de changements d’air par heure est calculé en fonction des dimensions
recommandées pour la pièce, en supposant une hauteur de plafond de 2,4 m (8 pieds).
Pour les pièces de plus petites dimensions, le nombre de changements d’air par heure
va augmenter.
Selon la qualité de l’air dans la zone d’utilisation, la durée de vie du filtre varie.
4
La tension et la fréquence électriques disponibles ont une incidence sur la
consommation énergétique de l’appareil. La consommation énergétique peut donc
être différente de la valeur indiquée.
230 - 620 m3/h (135 - 365 cfm)
31 - 56 dB(A)
cfm 350 350 350
4
30 - 61 W
Fumée Poussière
3
/h 590 680 590 590
ARRÊT
5 par heure (50 m2ou 540 pieds carrés)
six mois
3
Règles de garantie locales
Pollen
Page 34

Blue
PURE 221
Polska instrukcja obsługi
Modelu: Pure221
BEZPIECZEŃSTWO 68
PRZEGLĄD SYSTEMU 70
ZAWARTOŚĆ OPAKOWANIA 72
UŻYCIE 73
KO NFIG U R ACJA 74
WŁĄCZANIE/WYŁĄCZANIE I STEROWANIE SZYBKOŚCIĄ 75
FILTRY 7 6
UTRZYMANIE I KONSERWACJA 80
66 67
SPECYFIKACJE 81
Page 35

BEZPIECZEŃSTWO
BEZPIECZEŃSTWO
Ogólne instrukcje dotyczące
bezpieczeństwa
Oczyszczacze powietrza Pure 221 to urządzenia elektryczne. Zaleca
się przeczytać instrukcję bezpiecznego użytkowania i zastosować
niezbędne środki ostrożności, aby zmniejszyć ryzyko pożaru, porażenia prądem lub obrażeń ciała. Ograniczona gwarancja Pure 221 jest
ważna wyłącznie pod warunkiem, że urządzenie jest użytkowane
zgodnie z instrukcjami.
OSTRZEŻENIE: oznacza niebezpieczną sytuację, która, jeśli
nastąpi, może doprowadzić do śmierci lub poważnych obrażeń.
UWAGA: oznacza niebezpieczną sytuację, która, jeśli nastąpi,
może doprowadzić do łagodnych lub umiarkowanych obrażeń.
Ogólne
OSTRZEŻENIE: W celu uniknięcia niebezpieczeństwa uszkodzony przewód zasilający powinien zostać wymieniony
wyłącznie przez producenta, centrum serwisowe autoryzowane przez Blueair lub osoby o podobnych kwalifikacjach.
UWAGA:
Należy podłączyć uziemiony przewód zasilający dostarczony wraz z urządzeniem Pure 221 bezpośrednio do
odpowiedniego, uziemionego gniazda elektrycznego. (Patrz
tabliczka znamionowa na urządzeniu).
Nie wolno modyfikować w jakikolwiek sposób wtyczki.
Zawsze przed rozpoczęciem serwisu urządzenia odłączyć
zasilanie.
Nie używać urządzenia w przypadku uszkodzenia przewodu zasilającego lub wtyczki, w przypadku usterek lub
uszkodzeń innego rodzaju.
Przewód utrzymywać z dala od gorących powierzchni.
Nie siadać na urządzeniu, nie stawać na nim ani nie
wspinać się na nie, nie używać jako stolika lub miejsca do
przechowywania.
Nie kłaść żadnych obiektów na urządzeniu, nie blokować
wlotów ani wylotów powietrza, nie dopuszczać, aby jakiekolwiek przedmioty dostały się do wnętrza urządzenia,
ponieważ mogą one spowodować porażenie prądem lub
uszkodzić urządzenie.
Przeznaczenie urządzenia
UWAGA:
Nie wolno pozwalać dzieciom bawić się urządzeniem.
Urządzenie nie jest przeznaczone do użytkowania przez osoby
(w tym dzieci) o ograniczonej sprawności fizycznej, czuciowej
lub umysłowej, bez doświadczenia i wiedzy, chyba że będą
one nadzorowane lub zostaną poinstruowane na temat
korzystania z tego urządzenia przez osobę odpowiedzialną za
ich bezpieczeństwo.
68 69
Page 36

PRZEGLĄD SYSTEMU
PRZEGLĄD SYSTEMU
1
2 3
45
6
7
8
Schemat budowy
Wylot powietrza
1
Komora jonowa (optymalizator strumienia powietrza)
2
Ściana wewnętrzna
3
4
Wentylator
Silnik
5
6
9
10
11
Podstawa wentylatora
Kratka ochronna
7
8
Przycisk zwalniania filtru
9
Zewnętrzna rama metalowa (opcjonalny filtr wstępny z
tkaniny)
10
Filtr cząstek lub filtr cząstek i filtr węglowy
11
Wlot powietrza 360°
70
70 71
71
Page 37

ZAWARTOŚĆ OPAKOWANIA
4 ins
10 cm
UŻYCIE
W pakiecie oczyszczacz
powietrza
Umiejscowienie urządzenia
Umieść urządzenie w pozycji pionowej na podłodze w pomieszczeniu.
Urządzenie powinno stać w miejscu, w którym nie będzie potrącane
przez żadnego domownika ani zwierzę domowe.
Czy używasz urządzenia w sypialni?
Nie martw się, po 7 sekundach światło zostanie automatycznie
przygaszone do 10% pełnej jasności.
Oczyszczacz
powietrza
Filtr cząstek lub
filtr cząstek i filtr
węglowy.
Opcja
Kombinacja filtru z węglem aktywnym i filtru cząsteczek.
Wstępny filtr z tkaniny.
Wybór koloru i wzornictwa filtru wstępnego z tkaniny.
72 73
Opcjonalny filtr
wstępny z tkaniny:
Filtr wstępny z
tkaniny wychwytuje
większe cząsteczki
i wydłuża okres
eksploatacji filtru
głównego.
Placing the unit:
Urządzenie należy umieścić w miejscu
zapewniającym
przepływ powietrza do i
z urządzenia oraz wokół
niego.
Nie należy umieszczać
urządzenia w odległości
mniejszej niż 10 cm od
innego obiektu.
Nie należy umieszczać
urządzenia bezpośrednio na miękkich elementach wyposażenia,
takich jak pościel lub
bielizna pościelowa ani
naprzeciw nich.
Nie należy umieszczać
urządzenia w pobliżu
źródeł ciepła, takich jak
kaloryfery, kominki lub
piece.
Nie należy umieszczać
urządzenia w pobliżu
pomieszczeń mokrych,
takich jak łazienki czy
pralnie, gdzie istnieje
ryzyko kontaktu z
wodą.
Nie należy umieszczać
urządzenia na zewnątrz.
Page 38

KONFIGU RACJA WŁĄCZANIE/WYŁĄCZANIE I STEROWANIE
SZYBKOŚCIĄ
Wprowadzenie
W przypadku korzystania z filtru wstępnego z tkaniny patrz kroki od 1
Włączanie/wyłączanie i
sterowanie szybkością
do 5. W przeciwnym razie patrz kroki 5 i 6.
1
Delikatnie naciśnij
przyciski po obu
stronach urządzenia.
2
Zdejmij górną część
urządzenia.
3
Następnie zamocuj
filtr wstępny
z tkaniny. Aby
zapewnić gładkie
dopasowanie,
przeciągnij ostrożnie
1
Włącz/Niska
Naciśnij raz, aby
włączyć urządzenie
i ustawić szybkość
zalecaną ze względu
na zużycie energii.
2
Średnia
Naciśnij dwukrotnie,
aby ustawić średnią
szybkość.
3
Wysoka
Naciśnij trzy razy,
aby ustawić wysoką
szybkość.
przez rama metalowa.
4 5
6
4
Ponadto urządzenie ma funkcję autostartu.
To oznacza, że urządzenie zatrzymane w
razie awarii zasilania, odłączenia od sieci
elektrycznej lub użycia wyłącznika z timerem,
automatycznie uruchomi się ponownie z
ustawioną szybkością po przywróceniu
zasilania.
Następnie załóż
górną część
urządzenia na dół, aż
usłyszysz wyraźne
kliknięcie.
Podłącz urządzenie
do prądu.
Naciśnij przycisk, aby
włączyć urządzenie.
Urządzenie
automatycznie ustawi
zalecaną szybkość
Wyłącz
Naciśnij jeszcze
raz, aby wyłączyć
urządzenie.
w celu optymalizacji
zużycia energii.
Kiedy kontrolka świeci
na biało, urządzenie
74 75
pracuje poprawnie.
Page 39

FILT R Y
FILT R Y
Filtry
Informacje ogólne
Urządzenie jest dostarczane z dwoma filtrami wstępnymi z tkaniny
oraz filtrem cząstek albo filtrem cząstek i filtrem węglowym. Te filtry
usuwają następujące zanieczyszczenia:
Filtry cząsteczek pochłaniają:
(cząstki stałe)
Pleśń
Filtry cząstek i węglowy pochłaniają wszystkie powyższe zanieczyszczenia, a ponadto:
ki organiczne
*Pył zawieszony o średnicy mniejszej niż 2,5 mikrona
KurzPM2.5*
Roztocza Bakterie
DymLotne związ-
Pył Łupież
Substancje
chemiczne
zwierzęcy
Zapachy
kuchenne
Funkcje przycisków
1 2 3
Wskaźnik wymiany
filtru
Kiedy wskaźnik
zmieni kolor na żółty
(po 5 miesiącach
eksploatacji), należy
zamówić nowy filtr.
Możesz wymienić filtr zanim wskaźnik zmieni kolor na czerwony, to
jest wtedy, kiedy najpierw zmieni kolor na żółty. W takim przypadku
wystarczy zresetować urządzenie po wymianie filtru i używać go przez
kolejne 6 miesięcy. (patrz „Wymiana filtru głównego”)
Wymiana filtru
Kiedy wskaźnik zmieni
kolor na czerwony (po
upływie dodatkowego
miesiąca), należy
wymienić filtr główny.
Potwierdzenie
alertu filtru
Naciskaj przycisk
przez trzy sekundy,
aby potwierdzić
alert filtru.
WAŻNE!
Należy używać wyłącznie oryginalnych filtrów Blueair, aby
zapewnić prawidłowe działanie urządzenia i nie utracić pełnego
zakresu gwarancji.
76 77
Page 40

FILT R Y
FILT R Y
Odkurzanie lub mycie filtru wstępnego
Od czasu do czasu odkurz zewnętrzną stronę filtru wstępnego z
tkaniny, aby pozbyć się kurzu.
Przed wyjęciem filtru wstępnego z tkaniny wyłącz urządzenie i odłącz je
od prądu.
1 2 3
Delikatnie
wyciągnij filtr
wstępny z
dolnej części
urządzenia i
odłącz go.
5
Ponownie
umieść filtr
wstępny z
tkaniny w
dolnej części
urządzenia.
Wypierz filtr
wstępny w
pralce, uż ywając
programu
o niskiej
temperaturze.
6
Załóż górną
część
urządzenia,
naciskając
ją mocno, aż
usłyszysz
kliknięcie.
Przed wymianą
filtru wstępnego
z tkaniny
delikatnie
naciśnij
przyciski po
obu stronach
urządzenia,
aż usłyszysz
kliknięcie.
7
Podłącz urządzenie do prądu.
8
Aby zrestartować urządzenie,
przytrzymaj wciśnięty przycisk
przez trzy sekundy, a następnie
zwolnij go.
4
Podnieś
górną część
urządzenia.
Wymiana filtru głównego
Kiedy światło wskaźnika zmieni kolor na czerwony, należy wymienić
filtr główny.
Przed wymianą filtru głównego wyłącz urządzenie i odłącz je od prądu.
3
Delikatnie naciskaj
przyciski po obu
stronach urządzenia,
aż usłyszysz
kliknięcie.
6 7
Zdecydowanie
dociśnij górę
urządzenia w dół
na nowy filtr, aż
usłyszysz kliknięcie.
4
Podnieś górną część
urządzenia.
Podłącz urządzenie do prądu.
8
Aby zrestartować
urządzenie,
przytrzymaj
wciśnięty przycisk
przez trzy sekundy, a
następnie zwolnij go.
4
Wyjmij stary filtr
główny z urządzenia.
Rozłóż nowy filtr
główny i włóż go do
urządzenia.
To będzie sygnał dla
urządzenia, że filtr
został wymieniony.
Kontrolka mignie trzy
razy, a następnie
zmieni kolor z
czerwonego na biały.
78 79
Page 41

UTRZYMANIE I KONSERWACJA
SPECYFIK ACJE
Ogólne utrzymanie
Warto dbać o urządzenie, aby zapewnić jego działanie z optymalną
wydajnością.
Od czasu do czasu można odkurzyć filtr wstępny w celu
usunięcia kurzu, lub wyprać go w pralce, używając programu o
niskiej temperaturze.
Wymieniaj filtr główny co sześć miesięcy, zależnie od warunków
pracy.
Kiedy urządzenie jest otwarte w celu wymiany filtru, odkurz jego
wnętrze, aby usunąć kurz, który mógł się tam zgromadzić.
Od czasu do czasu przetrzyj górę urządzenia suchą ściereczką
do kurzu.
80 81
Dane techniczne1
Wielkość pomieszczenia: 50m² (540 sq. ft.)
Tempo dostawy świeżego Dym Kurz Pyl
powietrza cfm 350 350 350
m3/h 590 590 590
Wskaźnik wymiany filtru: Tak
Timer Włącz/Wyłącz: Nie
Szybkości: 1-2-3-wył.
Wymiary: Wysokość: 522 mm (20.5 in)
Szerokość: 330 mm (13 in)
Głębokość: 330 mm (13 in)
Waga: 7 kg (15 lbs)
Szybkość przepływu powietrza 230 - 620 m3/h (135 - 365 cfm)
Wymiana powietrza
Zużycie energii 4 30 - 61 W
Poziom hałasu 31 - 56 dB(A)
Średni okres eksploatacji filtru six months
Gwarancja Przepisy lokalne
Model Pure 221 urządzenia Blue jest dostępny w różnych kolorach. Barwna tkanina działa jako filtr wstępny.
1
Podane certyfikowane wartości nominalne są oparte na amerykańskich modelach wersji (120 V AC, 60 Hz) z filtrem cząsteczek Blue. Użycie innych modeli
filtrów Blue może wpłynąć na wartości.
²Liczba wymian powietrza na godzinę została obliczona dla pomieszczenia o
zalecanej wielkości, przy założeniu, że sufit znajduje się na wysokości 2,4 m. W
mniejszych pomieszczeniach liczba wymian powietrza będzie większa.
Zależnie od jakości powietrza w danym miejscu zalecany sześciomiesięczny
okres eksploatacji filtru można wydłużyć.
⁴Dostępne napięcie elektryczne i częstotliwość napięcia wpływa na poziom zużycia energii przez urządzenie. Dlatego też rzeczywiste zużycie energii może różnić
się od podanej wartości.
2
5 na godzinę (pomieszczenie 50 m2)
3
Page 42

82 83
Page 43

www.blueair.com
by Blueair
www.blueair.com/contact-us
Blueair AB
Karlavägen 108
115 26 Stockholm
Sweden
Tel: +46 8 679 45 0 0
Blueair India Pvt. Ltd.
Embassy of Sweden
Nyaya Marg, Chanakyapuri
New Dehli - 110021
Tel: +91 11 4606 7121
Toll free info n umber: 18008 331188
84
102652_PURE_221_Foldable_EU_US_UM_REV00
Blueai r AB Middle East
Jafza O ne
Offi ce No. AB1503
Jebel A li Free Zone
P.O. Box No. 263947
Dubai
+971 (4)8821244
Blueair Inc.
Suite 19 00
100 N LaSalle Street
Chicago, IL 60602
Tel: +1 888 258 3247
Blueair (Shanghai) Trading
Co. Ltd.
Rm 1005 City Gateway
No. 398 North Caoxi Road
Xuhui Distr, Shanghai
Tel: +86 21 6091 0981
 Loading...