

Page 1

BAC-200D USER GUIDE
FCC Statement This device complies with Part 15 of the FCC Rules.
Operation is subject to the following two conditions: (1) this device may not
cause harmful interference, and (2) this device must accept any interference
received, including interference that may cause undesired operation. Changes
or modifications not expressly approved by the party responsible for
compliance could void the user's authority to operate the equipment.
LIMITED LIABILITY
Manufacturers, importers and sellers will not take responsibility for the accident injury or
the damage caused by incorrect operation.
This handbook contains the existing functions of the product. More functions or updated
technology will be added in the future. Please understand that all of these changes will be
no need to inform you.
SAFE DRIVING
Using mobile phone while driving may distract the driver's attention, thereby increasing the
possibility of accidents.
To use the mobile phone while driving, please try to reduce the talking time, no record and
no read. Before answering the call, please observe the surrounding environment, such as
bad weather (storms, fog, etc.). While traffic peak, baby in car or difficulties in vehicle,
please leave the road and park the car before calling or answering the phone. Please
remember that answering the phone is not the most important, safety is the most important!
Please abide the local law.
Page 2

TABLE OF CONTENT
Overview
Installation
Turning on and off
Pairing
Voice dialing
Last number redialing
Answering and ending a call
Rejecting a call
Answer waiting call
Adjusting the volume
Display mode selecting
Switching conversation between phone and Carkit
Charging
1
Page 3
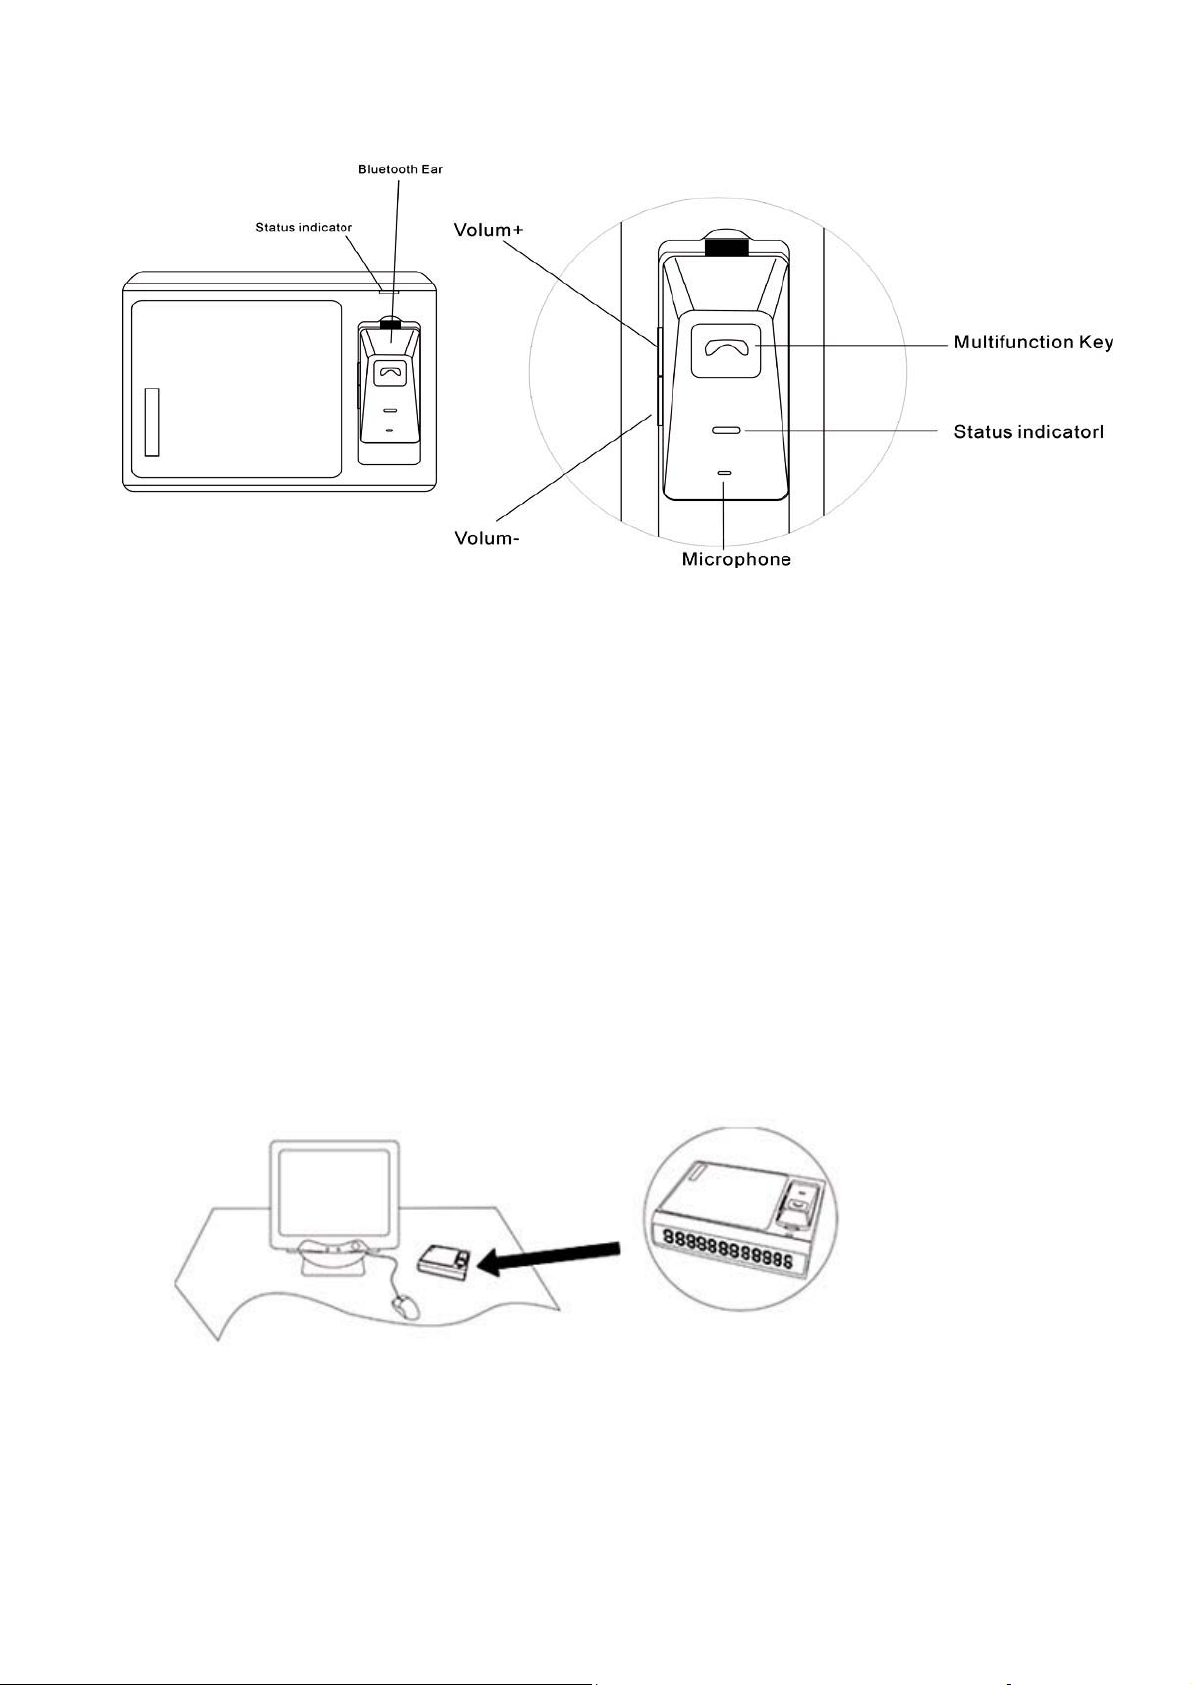
OVERVIEW
1. Bluetooth Earpiece:Independent Bluetooth Earpiece. Take it up to use as a general
Bluetooth earpiece. Put it back, the host becomes a carkit.
2. Multifunction Key:press this key to: answer a call; end a call; voice dialing; last number
redialing; reject a call; call waiting etc. (details as bellow)
3. Microphone: voice transmitter.
4. Status indicator: indicate the device’s status on calls, pairing etc. (details as below).
5. Volume -:decrease volume and switch display mode.
6. Volume +:increase the volume.
7. Charging indicator: Red indicator is on during charging and Green indicator is on after
charged.
8. LED display panel:display caller ID and information prompt.
9. Volume adjusting (host): control the volume of the device.
10. DC jack: use the provided charger to charge the device.
11. Clip: the device can be installed on the sun visor by the clip.
2
Page 4
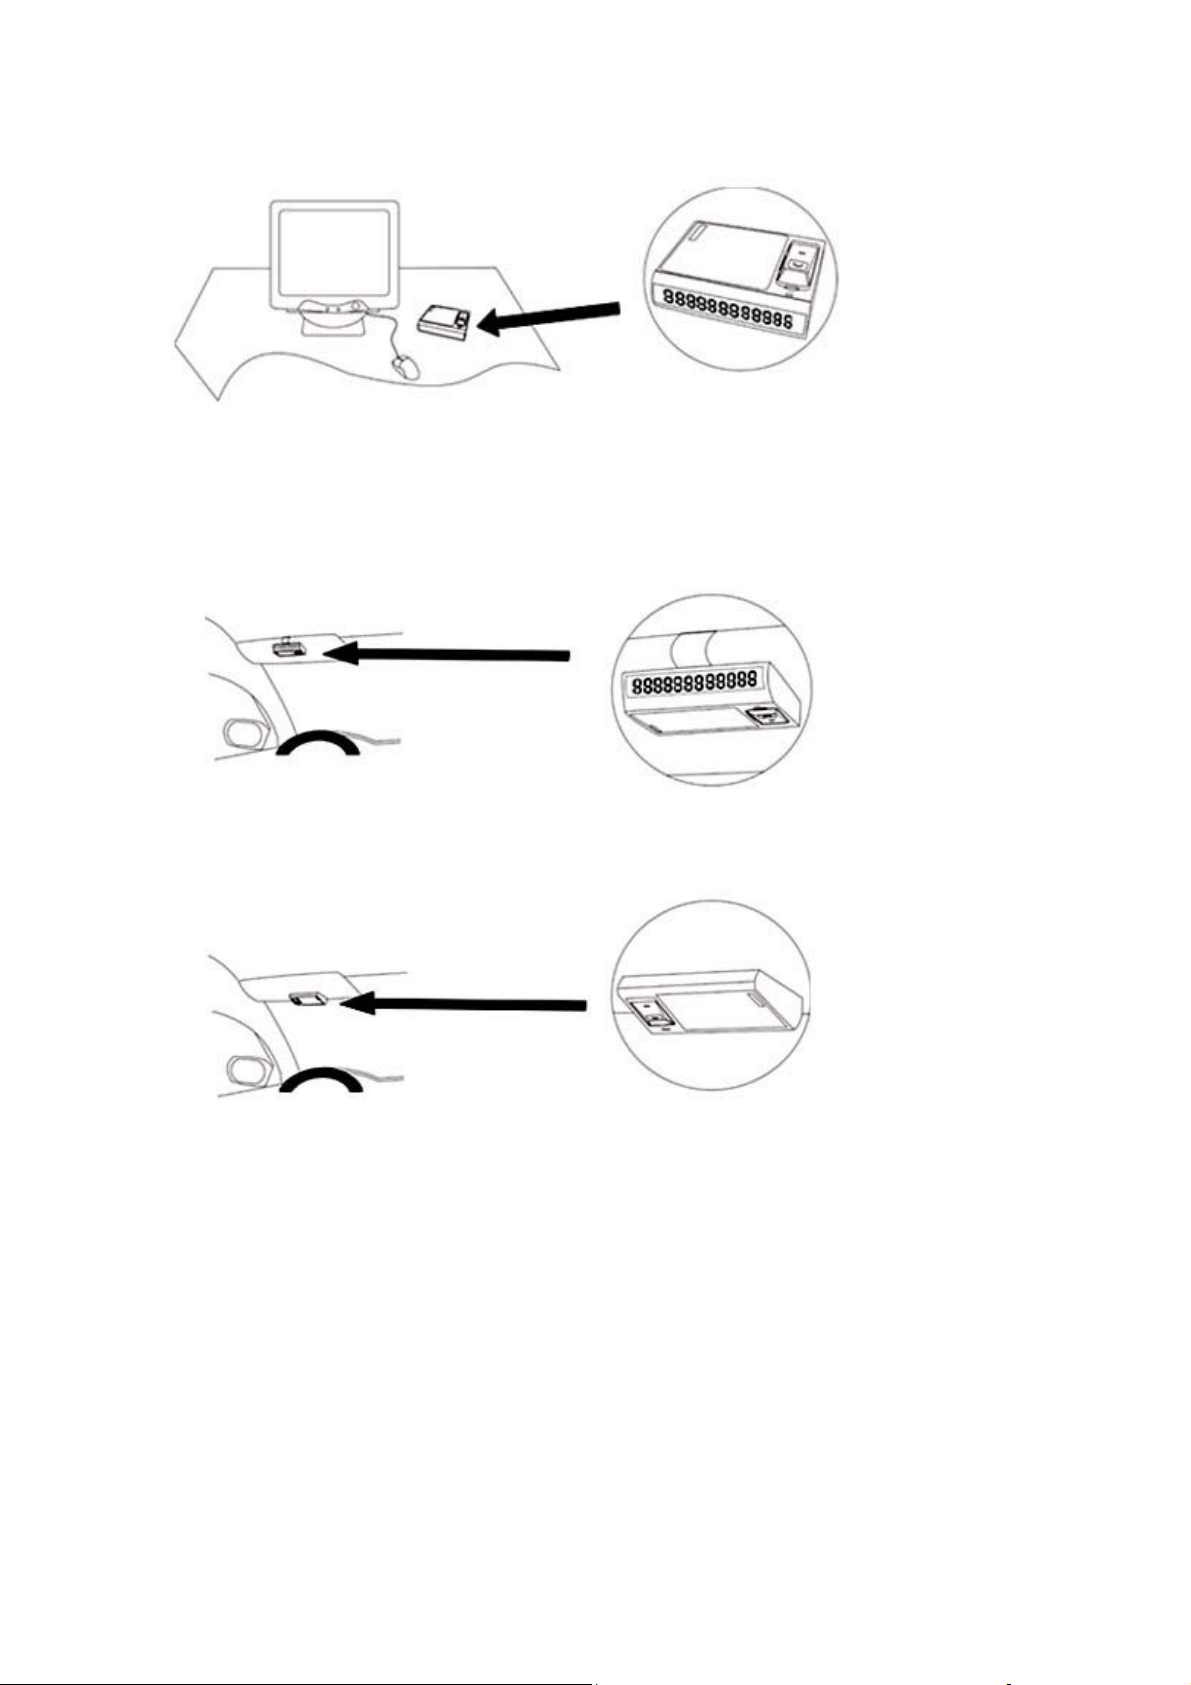
Installation:
① The device can be placed on the table.
② Clip the device on the sun visor by the clip.
③ Display panel towards to the rearview mirror
Turning on and off
Press multifunction key and hold for 6 seconds. The display panel displays 8888 8888 8888
with a Do Da confirmation beep. The blue LED starts to flash. The device can automatically
connect to the last used mobile after powering on.
Press multifunction key and hold for 8 seconds. The RED indicator flashes for 4 times and the
display panel displays OFF with a Da Do confirmation beep indicating the device is off.
3
Page 5
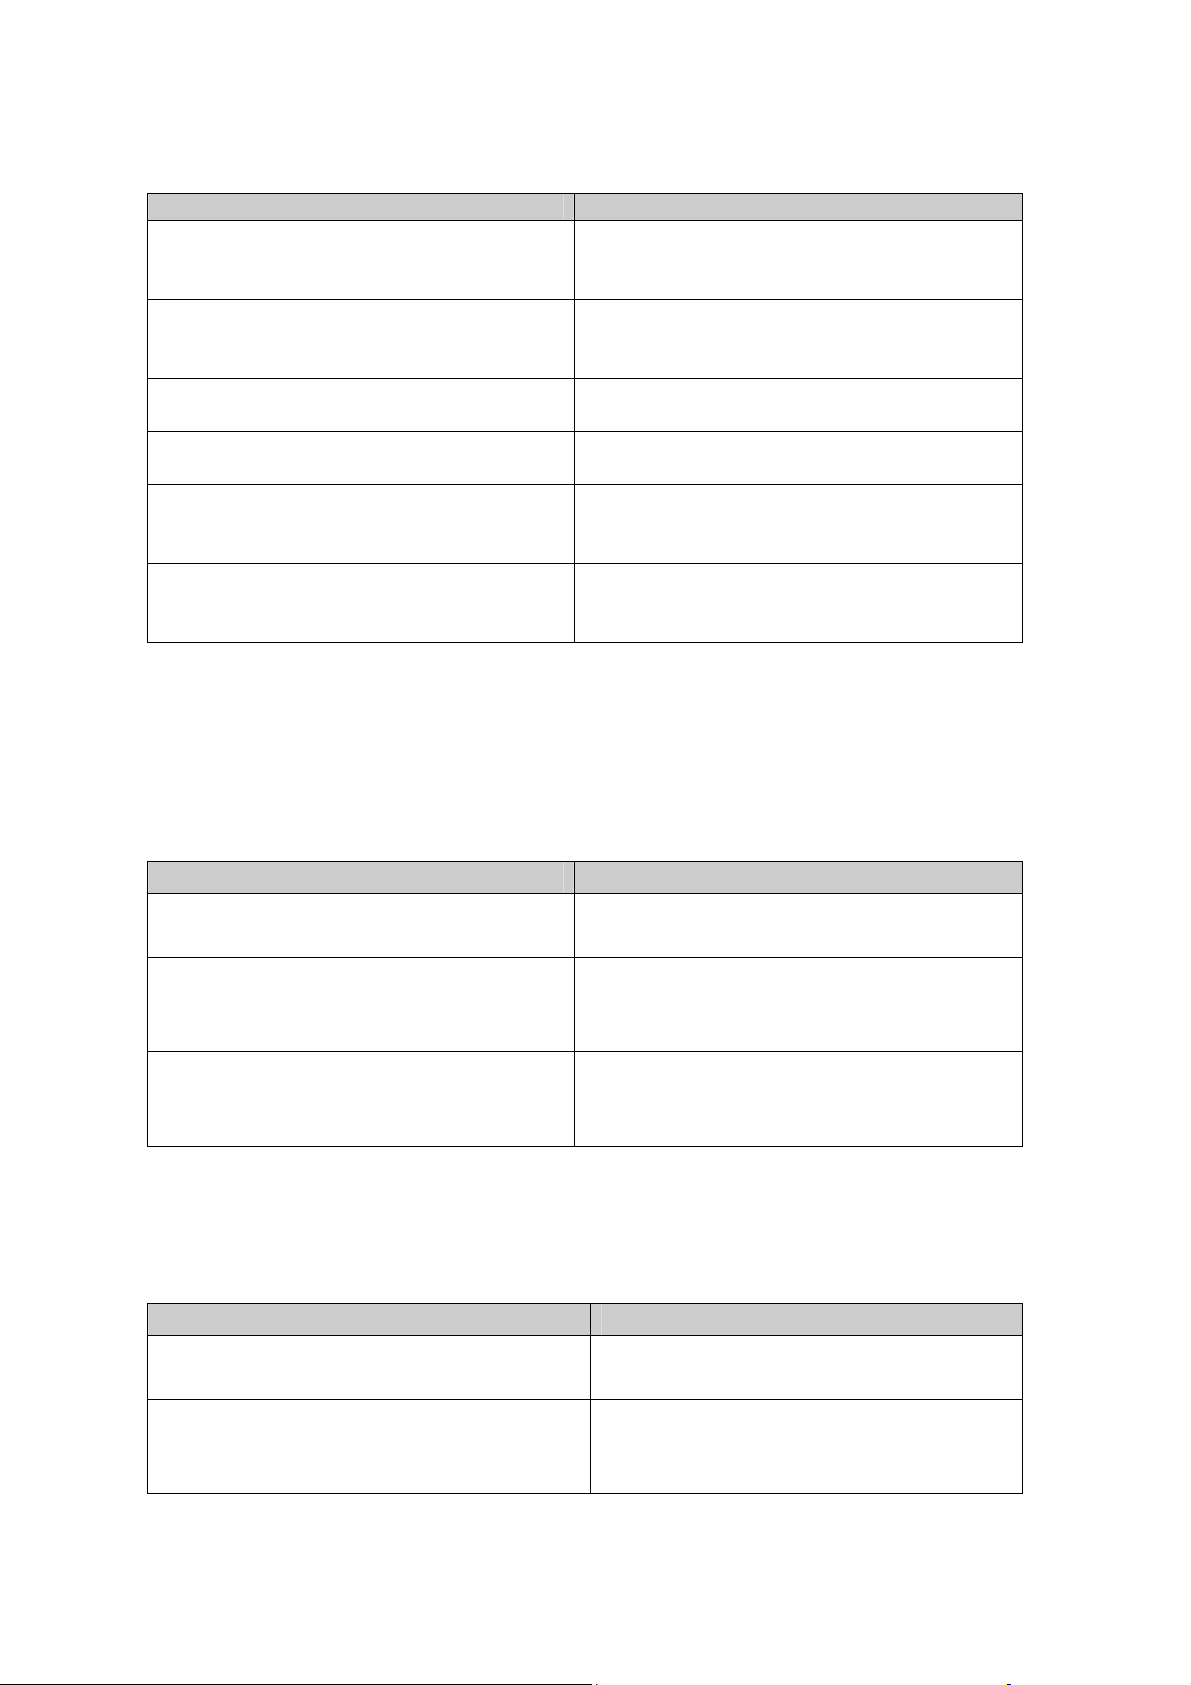
Pairing
Before using the device, you must pair the device with mobile phone firstly.
Step STATE/RESULT
1、 Press multifunction key and long hold
until RED and BLUE indicator flashes
alternately.
2、Activate your mobile phone bluetooth
function. (Refer to the mobile phone’s User
Guide for details).
3、Select BAC-200D from the list on the
mobile phone.
4、Enter the password “0000” to confirm the
pairing process.
5、Pairing is now completed and the device
can automatically connect to mobile.
(such as Nokia)
6、Pairing is now complete and the device
cannot automatically connect to mobile.
(Such as Siemens)
Note: After pairing, some mobile phones are still not in connection to the device until an
incoming or outgoing call is made. In this case, although you can still make the call, the caller
ID may not be displayed on the mirror and the blue LED flashes every 5 seconds.
Blue and RED indicator flashes alternately.
A list of enabled devices in range will show.
Pair the device.
The device displays PAIRrEd.
The device displays CONNECtED and Blue
LED flashes every 5 seconds.
As above.
Voice Dialing
Step Status/Result
1 、 Make sure that the device has
established connection with your mobile.
2、Press multifunction key once
3、Bring out the pre-recorded voice tag.
Note: This function depends on the mobile phone. Some mobile phones don’t support this
function. Please refer to the User Guide of your mobile phone. Ensure a voice tag has stored in
the mobile phone before using this function.
Blue LED flashes every 5 seconds.
Blue LED flashes every 5 seconds.
The mirror displays VOICEdIAL.
The device sends voice dialing prompt.
Blue LED flashes every 5 seconds.
The device repeats the voice tag.
The number will be dialed.
Last Number Redialing
Step Status/Result
1、Make sure that the device has established
connection with your mobile phone.
2、Press multifunction key twice quickly
Note: This function depends on the feature of the mobile phone. Please refer to the User
Guide of the mobile phone.
4
Blue LED flashes every 5 seconds.
Blue LED flashes every 5 seconds.
The mirror displays rEdIAL.
The device will dial out the last number.
Page 6
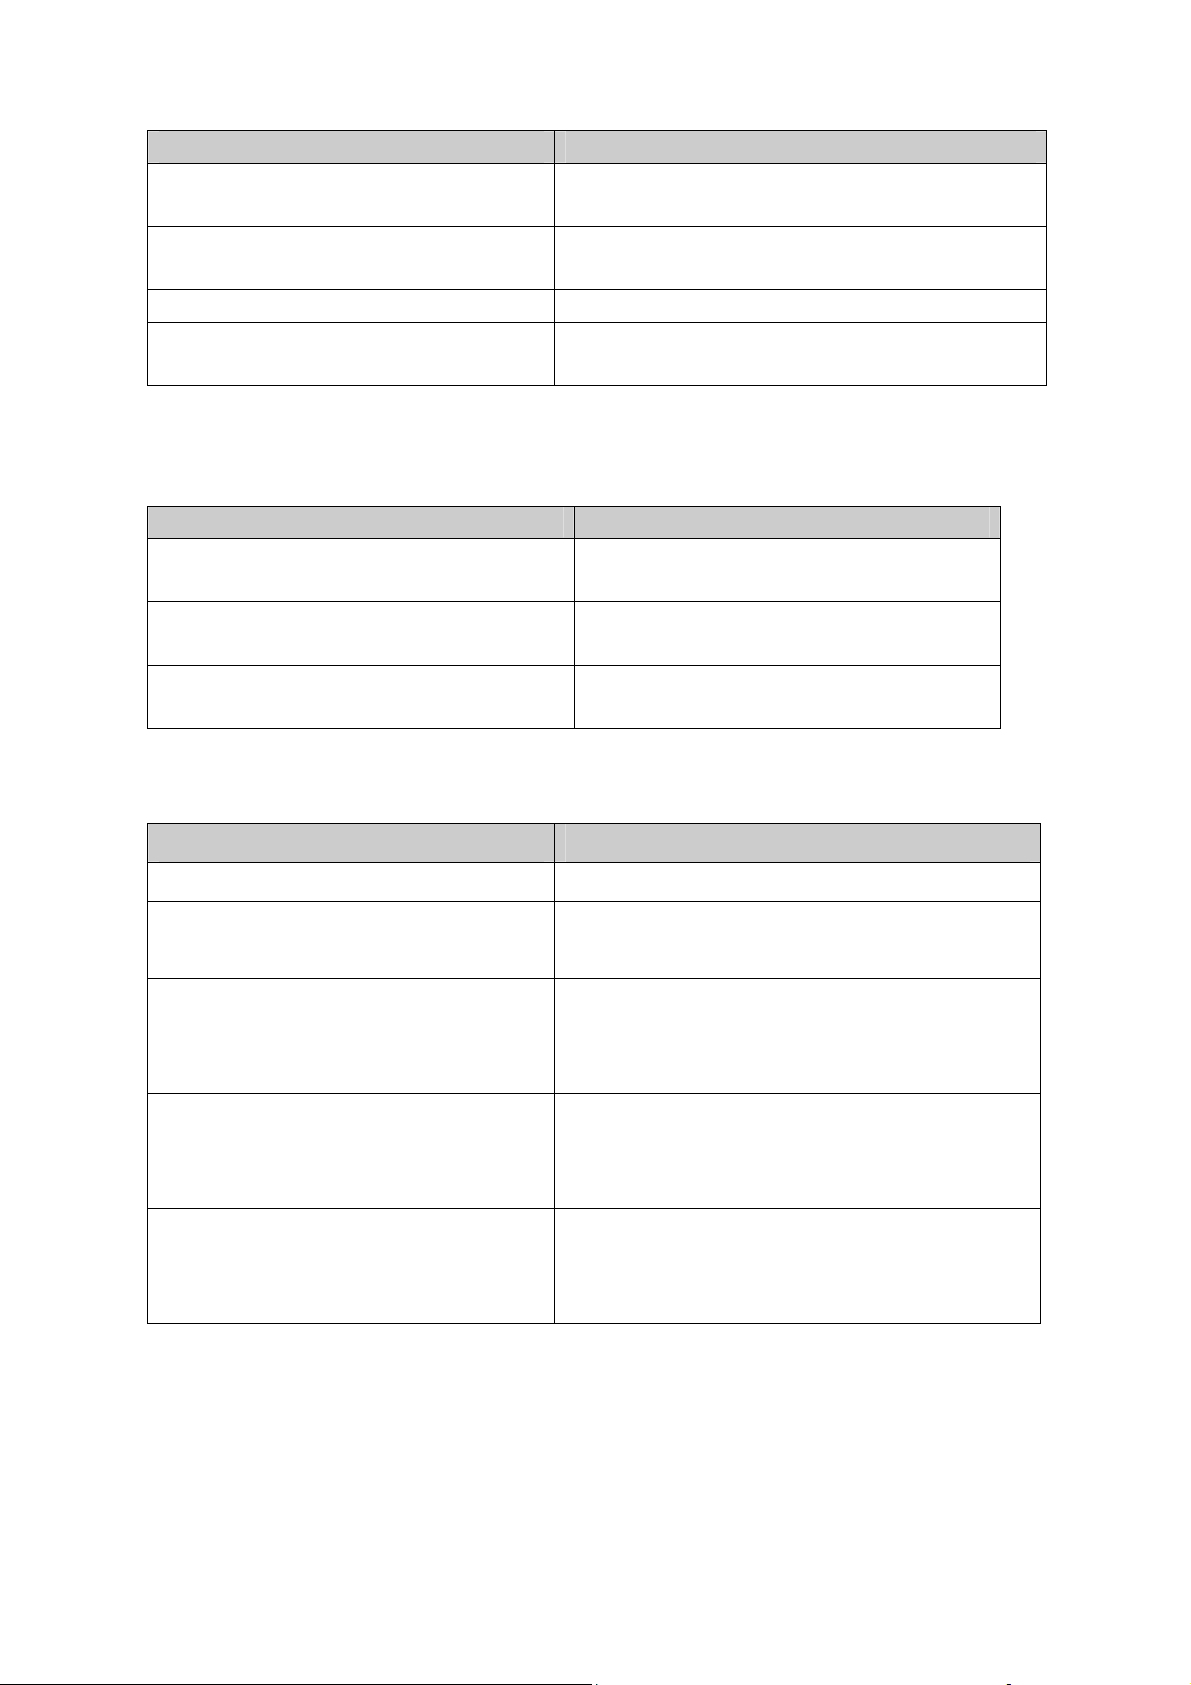
Answering and Ending a Call
Step Status/Result
1 、 Make sure that the device has
established connection with your mobile.
2、Incoming call
3、Press multifunction key once
4、Press multifunction key again during
conversation.
Blue LED flashes every 5 seconds.
Blue LED flashes every 5 seconds.
The mirror displays Caller ID and rings.
Blue LED flashes for 3 seconds every 3 seconds.
Blue LED flashes every 5 seconds.
The mirror displays HAN9UP.
Rejecting a Call
Step Status/Result
1 、 Make sure that the device has
established connection with your mobile.
2、Incoming call
3、Press multifunction key twice quickly
Answering Waiting Call
Blue LED flashes every 5 seconds.
Blue LED flashes every 5 seconds.
The mirror displays Caller ID and rings.
Blue LED is on.
The mirror displays rEJECt.
Step Status/Result
1、A call is active(A) Blue LED is on.
2、The second call comes(B) Blue LED is on.
The mirror displays the second caller ID and rings.
3、Press multifunction key and hold for 3
seconds
4、Press multifunction key and hold for 3
seconds again
5、Press multifunction key once quickly Blue LED is on.
Note: Call waiting service may not be available on all networks. Contact your network operator
for more information.
Blue LED is on.
The mirror displays ACCEPt
Answering the second call and A call is held.
Blue LED is on.
The mirror displays ACCEPt
Switch between the two calls.
The mirror displays REStORE.
To terminate a call and restore the other call.
5
Page 7
V olume Adjusting
1. Adjust the volume of the bluetooth earpiece
Press VOLUME+ to increase the volume, and press VOLUME- to decrease the volume.
2.Adjust the volume of the host
Turn the volume knob to change the volume.
Display mode selecting
Press VOLUME- and hold for 3 seconds, the red indicator flashes once.
“NORMAL” displayed on the display panel indicates NORMAL display is restored.
“MIRROR” displayed on the display panel and the red indicator flashing twice indicates
MIRROR display is set, so that you shall put the display panel towards the rearview mirror.
“SUNVISOR” displayed on the display panel and the red indicator flashing three times
indicates SUNVISOR display is set, so that the device must be clipped to the sun visor.
This function can be stored in memory, and won’t disappear after powering off.
Switch between the three kinds of display mode is available by pressing VOLUME- key and
hold.
Switching Conversation Between Phone and Carkit
Step State/Result
1、Press multifunction key and hold for 3
seconds during conversation
2、Press multifunction key once
The device displays trANSFEr.
Blue LED starts to flash.
Switch the voice from the device to mobile.
The device displays CONNECtEd.
Blue LED is on.
Switch the voice from mobile to the device.
Charging
While standing-by or during the conversation, the device displays “LO” and beeps to indicate
that battery need charging. Please use the provided charger to charge the device. The red
LED is on during charging. After charged, the red LED is off and green LED is on. Full charging
period is about 3 hours (depending on the capacity of the battery).
Step
1, Plug the charger into DC socket on the device.
2, Plug the other end into the cigarette light socket in the car.
3, Red LED is on during charging
4, Green LED is on after charged
6
 Loading...