

Page 1
Open Plan Desk
DESIGNED IN 2020
ASSEMBLY NOTES | REV 00
NEED A HAND?
844.425.8368 for assistance.
@BLUDOT
We design all our pieces in our Minneapolis studio. Follow
along on Instagram for some sneak peeks into the process.
Page 2
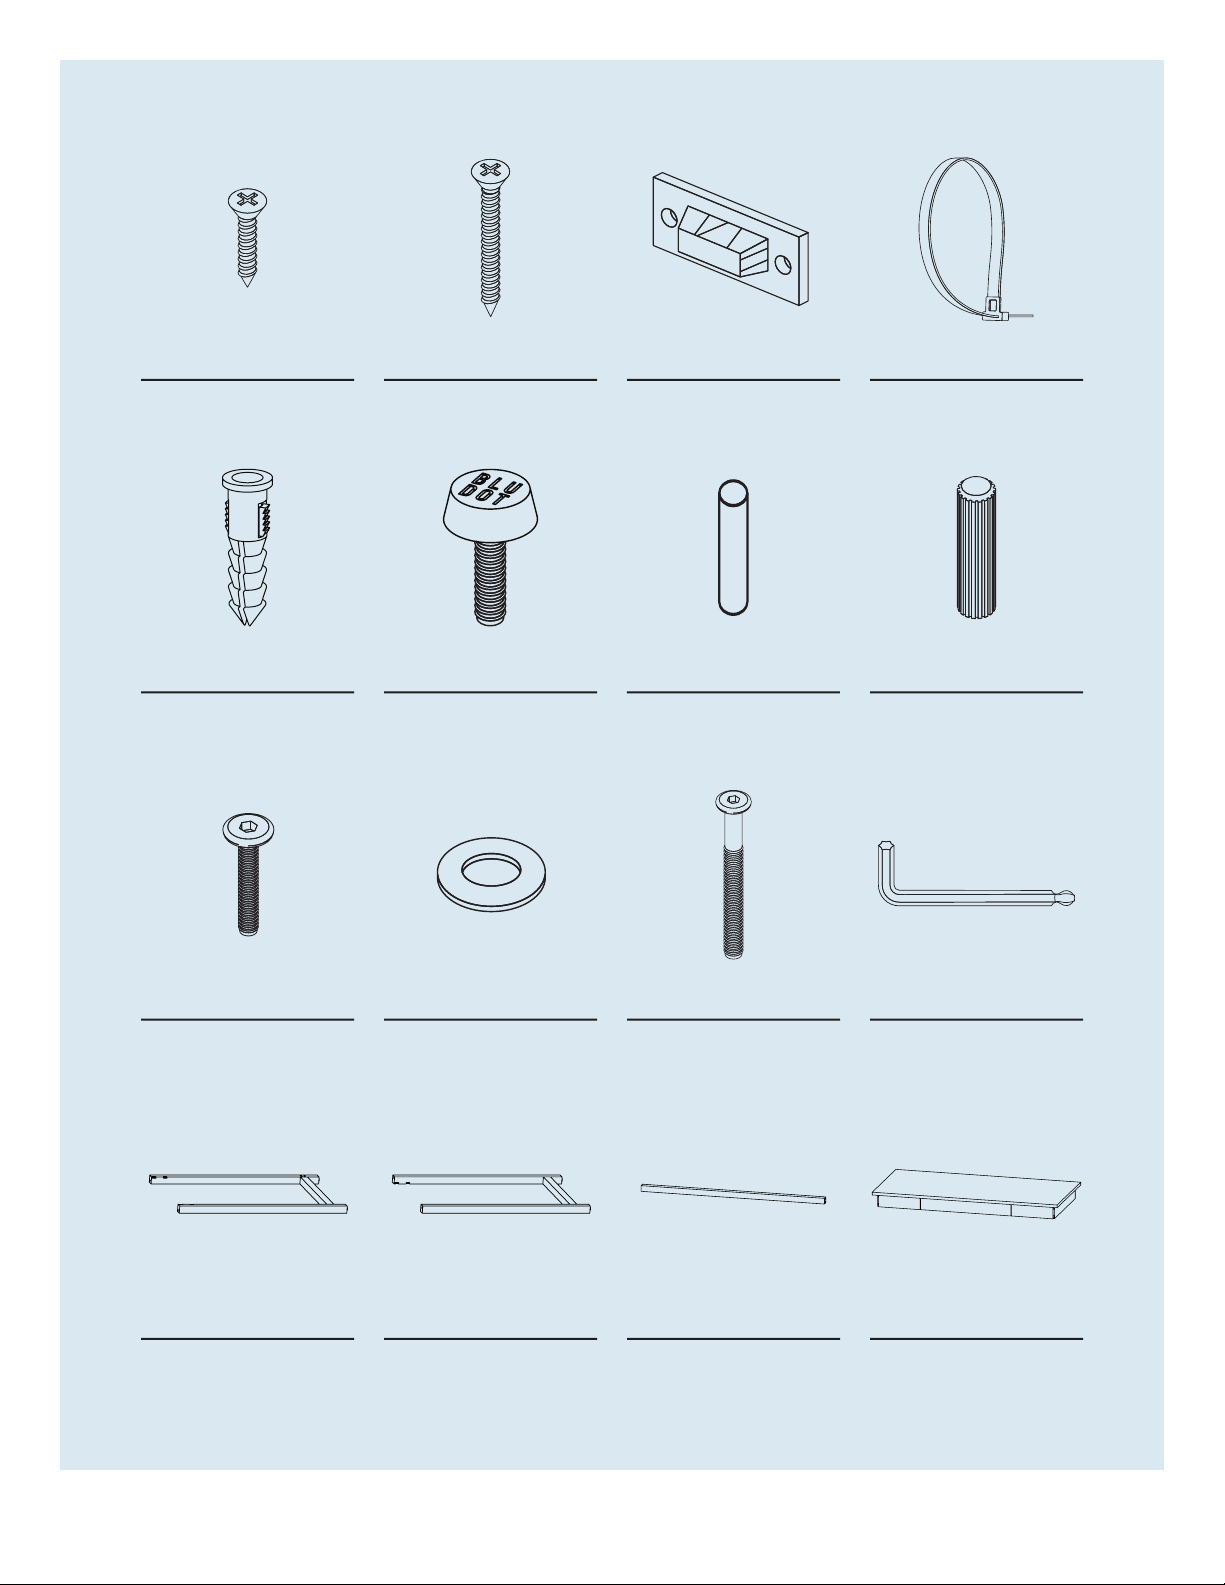
8041
An�-�p Bracket
8042
An�-�p Strap
Parts & HardwareParts & Hardware
QTY
Pt. 1217
QTY QTY QTY
Pt. 8054 Pt. 8053 Pt. 5013
2
QTY
Pt. 1218
2 4 4
QTY
2
QTY
QTY
2
Pt. 8041
4
Pt. 4022
1
Pt. 8042
QTY
QTY
Pt. 1613
Left Side Frame
2
QTY
Pt. 3002
1
QTY
Right Side Frame
2
QTY
Pt. 1690
1
QTY
Stretcher
QTY
8
Pt. 9016
QTY
1
Desk Top
1
1
1 | 844.425.8368 OPEN PLAN DESK
Page 3
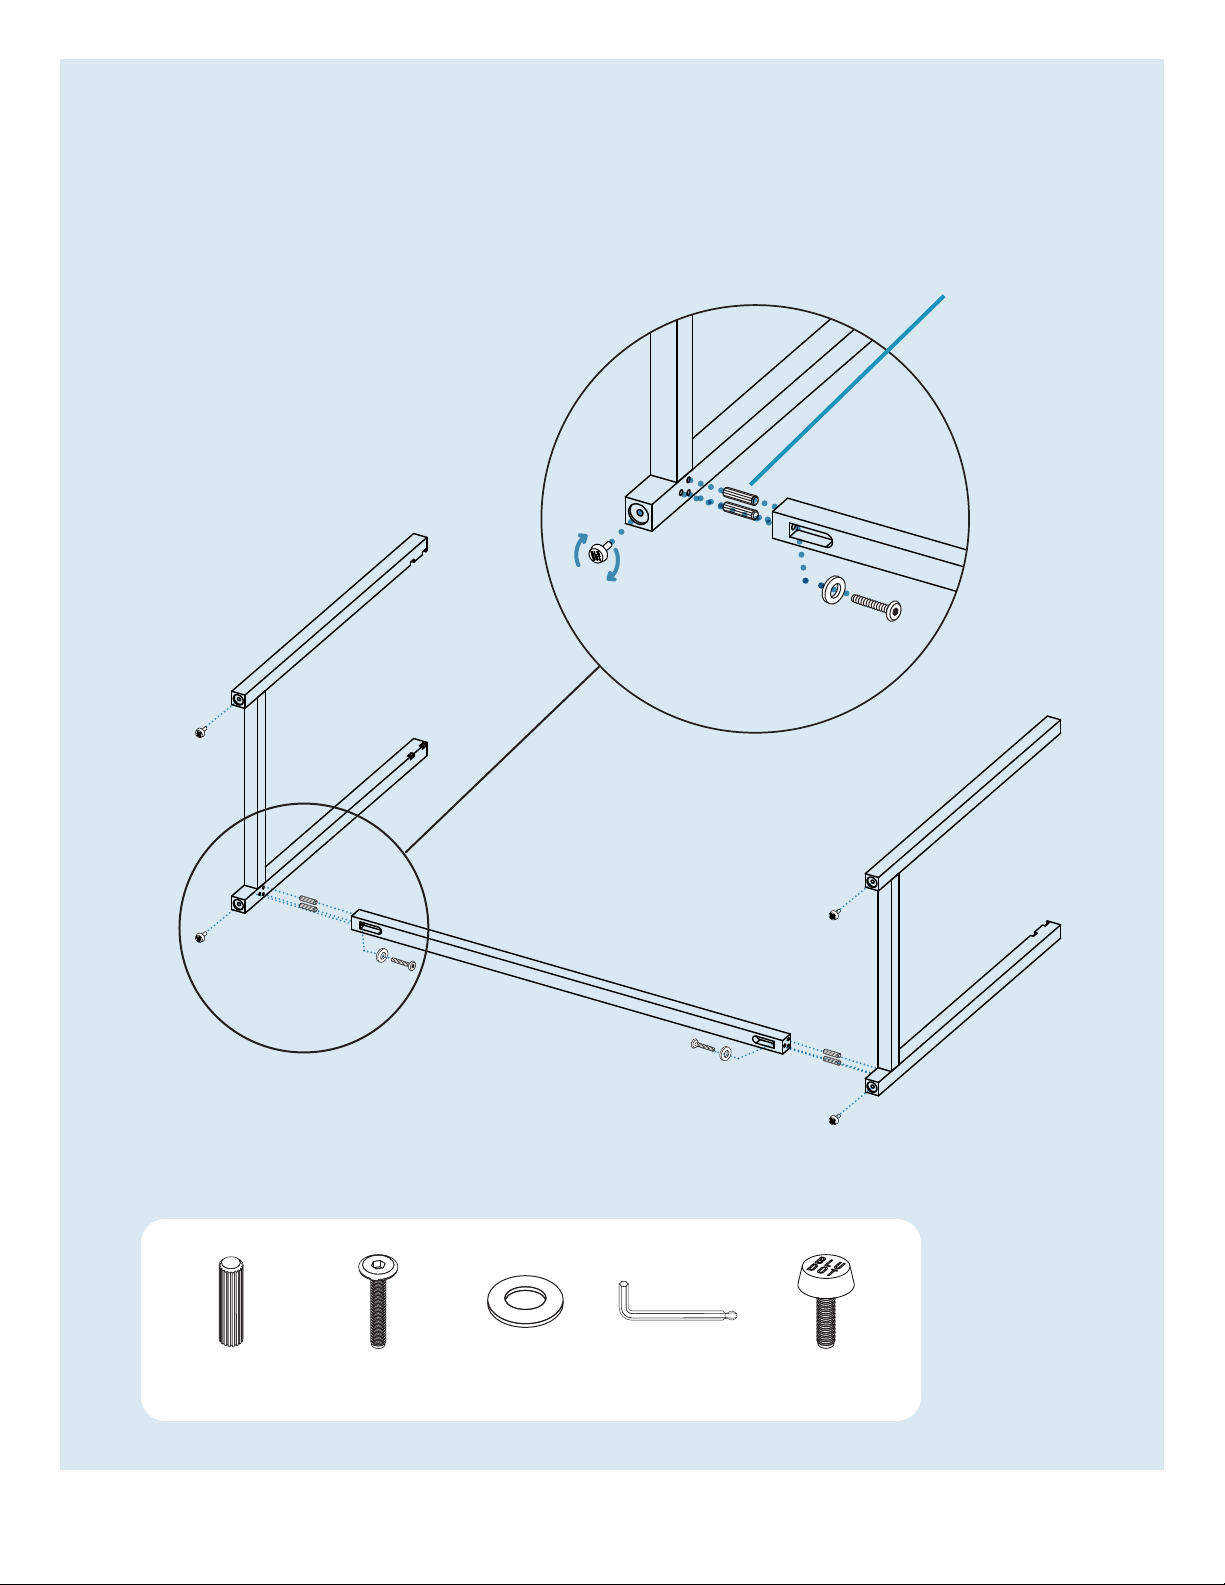
Step 01
ATTACH STRETCHER TO SIDE FRAMES.
Assemble the desk on soft surface.
Assemble stretcher to side frames using the provided
hardware as shown. Do not fully tighten bolts.
Thread adjustable glides into place as shown.
Pt. 5013
Wooden
Dowel
PT. 5013 x 4 PT. 1613 x 2 PT. 3002 x 2 PT. 9016 x 1 PT. 4022 x 4
[email protected] | 2ASSEMBLY NOTES
Page 4
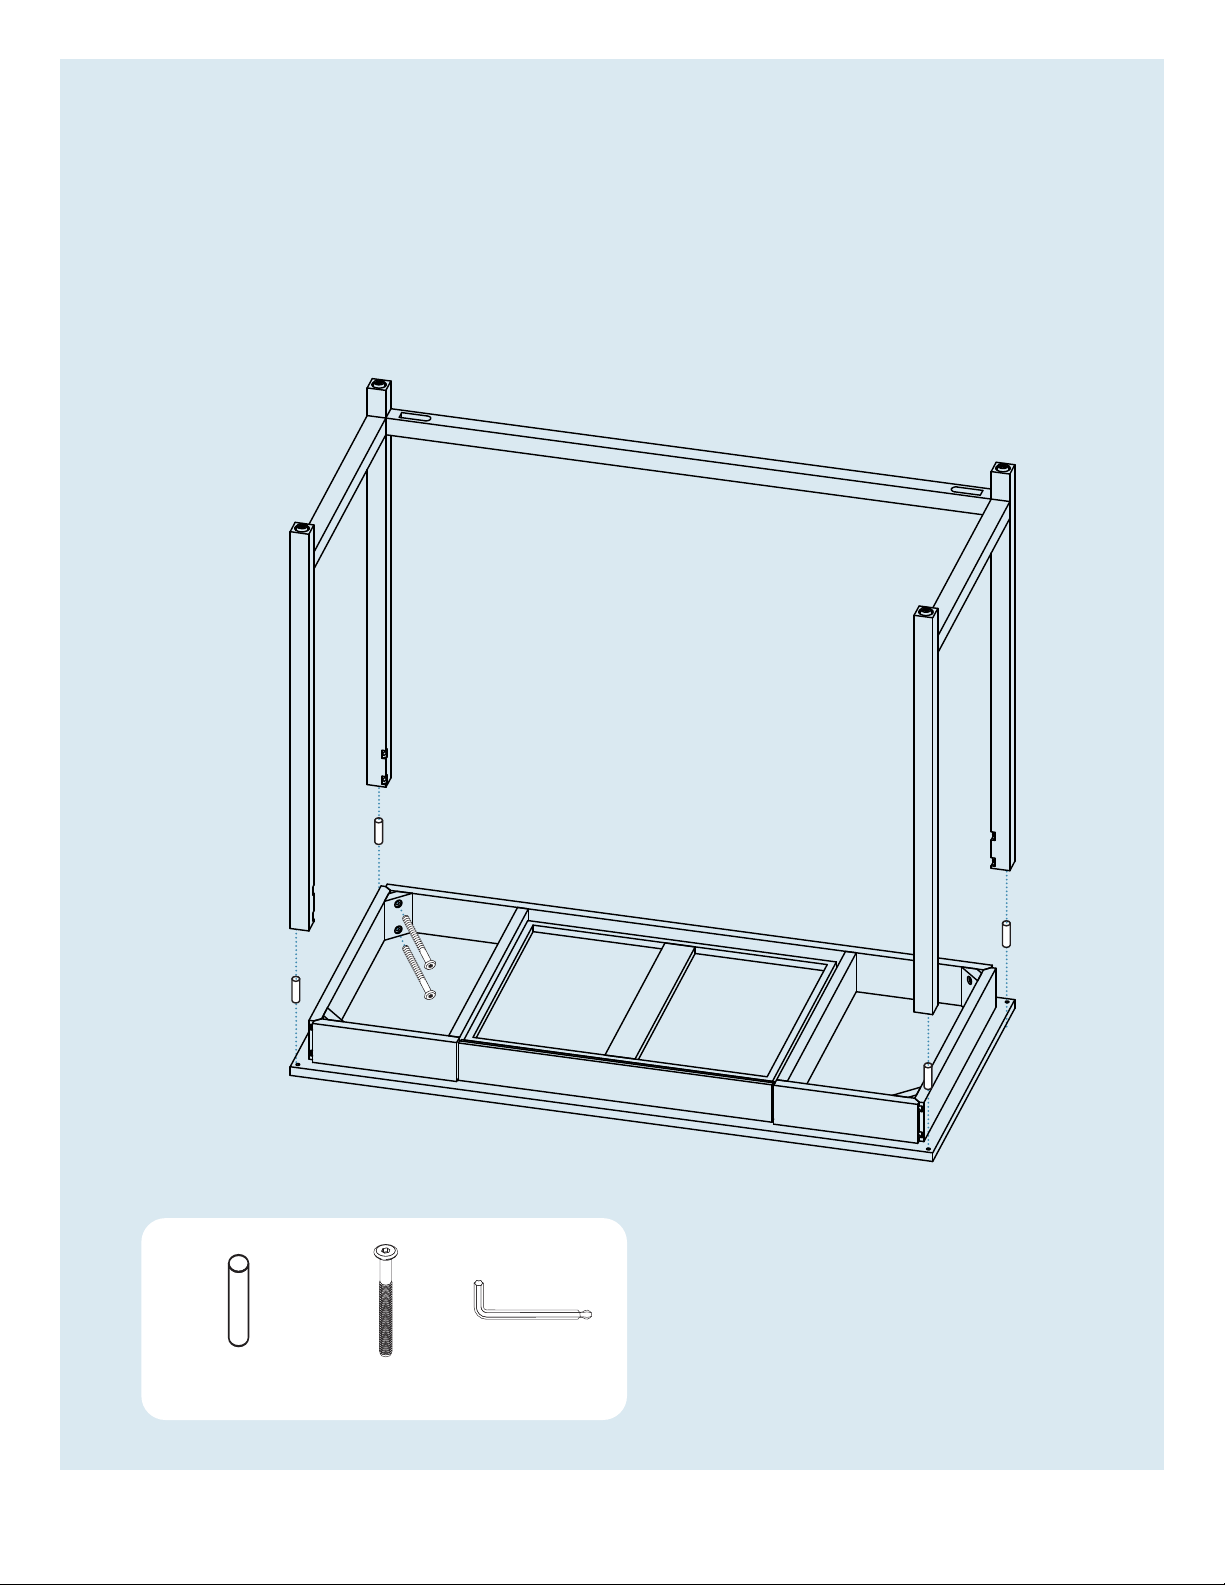
Step 02
ATTACH DESK TOP.
Attach the side frames to the desk top using the provided
hardware as shown. Tighten bolts in the stretcher and all four
corners before use.
PT. 8053 x 4 PT. 1690 x 8 PT. 9016 x 1
3 | 844.425.8368 OPEN PLAN DESK
Page 5
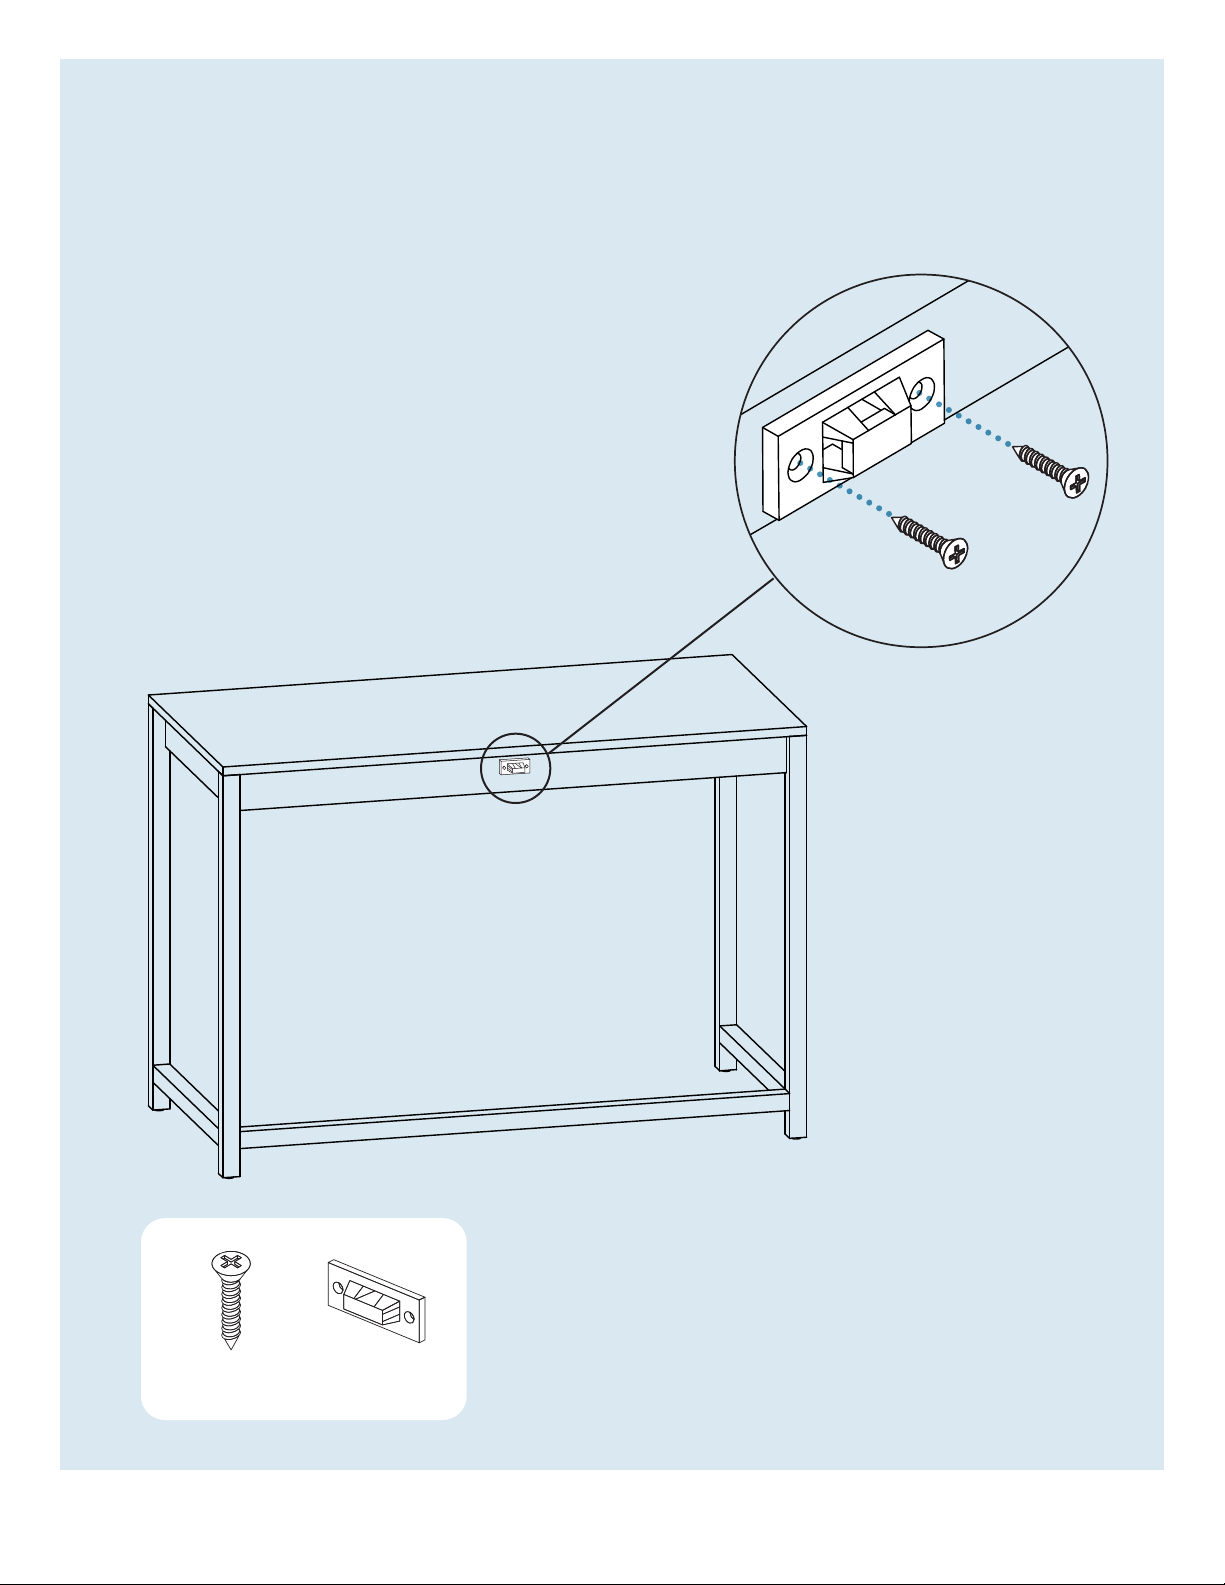
8041
An�-�p Bracket
Step 03
ATTACH ANTI-TIP BRACKET TO DESK.
Brackets must be installed to the back rail of the desk.
In order to prevent damage, it is recommended that
3/32” pilot holes be drilled prior to installation.
Note: Ensure that the depth of the pilot hole does not
exceed 1/2”. A deeper pilot hole may be visible on the
opposite side.
PT. 1217 x 2
PT. 8041 x 1
[email protected] | 4ASSEMBLY NOTES
Page 6
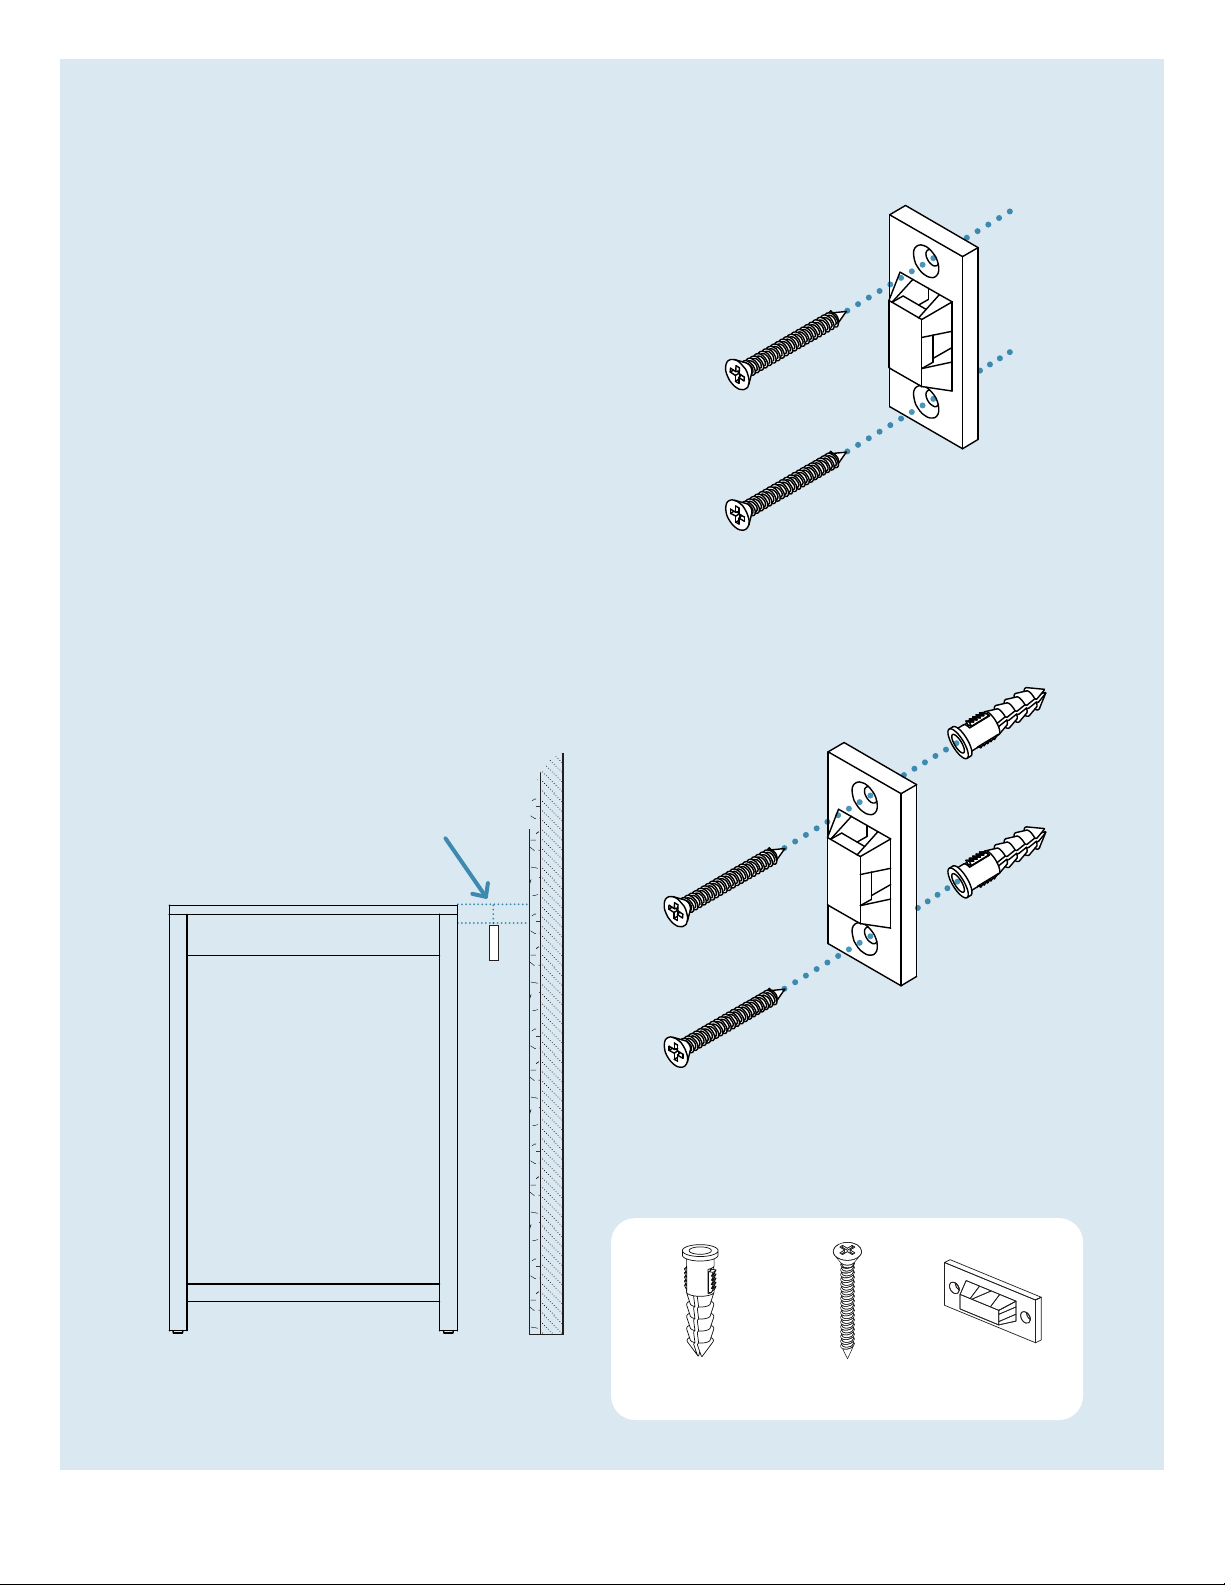
8041
An�-�p Bracket
Step 04
ATTACH ANTI-TIP BRACKET TO WALL.
Wall anchors and fasteners are included for installation
into drywall. Please consult your local hardware
professional to determine the hardware best suited for
your wall type.
If the mounting locations are positioned on a stud, the
installation of wall anchors may be skipped. Instead,
drill 7/64” pilot holes in the marked positions and install
anti-tip bracket with provided hardware as shown.
If the mounting locations are not positioned on a stud,
drill 15/64” holes into the marked locations and press
wall anchors into the drilled holes and install anti-tip
bracket with provided hardware as shown.
wall
OR
1” lower than
desk top
wall
PT. 1218 x 2PT. 8054 x 2
5 | 844.425.8368 OPEN PLAN DESK
PT. 8041 x 1
Page 7
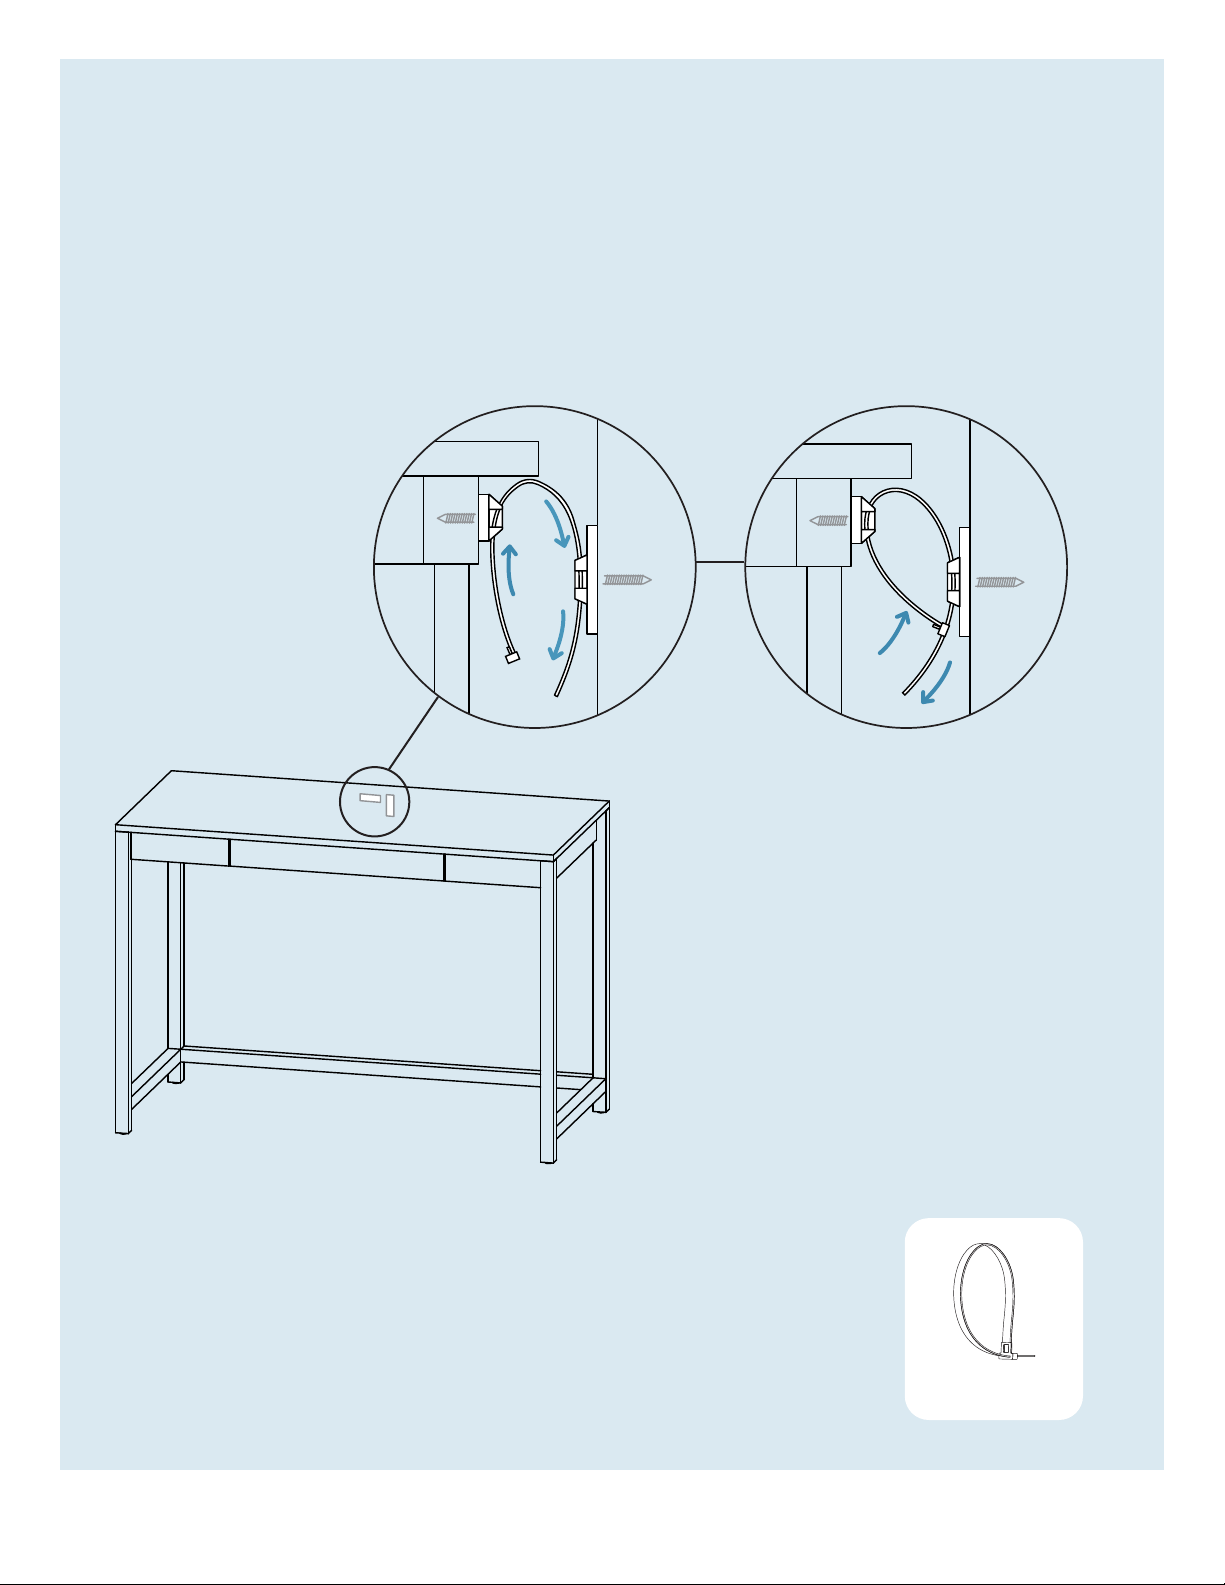
8042
An�-�p Strap
Step 05
SECURE DESK.
Install and tighten wall strap prior to using the product.
Ensure the desk is level prior to use.
PT. 8042 x 1
[email protected] | 6ASSEMBLY NOTES
Page 8

Additional Information
CLEAN
Clean with a slightly damp, soft cloth. To remove dirt and fingerprints, use quality cleaners formulated for
wood furniture. Wipe completely dry with a soft cloth in the direction of the wood grain.
BLU DOT DESIGN & MANUFACTURING, INC. DESIGNED IN MINNEAPOLIS, MN
 Loading...