

Page 1

Contents
Mobile Phone View .......................................................................... 2
Calls ................................................................................................. 4
Contacts ........................................................................................... 6
Messaging ........................................................................................ 8
Email ................................................................................................ 9
Connected with Data ...................................................................... 11
Wi-Fi ............................................................................................... 12
Browser .......................................................................................... 12
Bluetooth ........................................................................................ 14
Camera and video .......................................................................... 15
Using the Gallery............................................................................ 17
Enjoying Music ............................................................................... 18
FM Radio ........................................................................................ 19
Using the Calendar ........................................................................ 20
Using the Alarm .............................................................................. 21
Audio Recorder .............................................................................. 22
The Calculator ................................................................................ 22
Setting Your Mobile Phone ............................................................ 23
1
Page 2
Mob
i
n
s
e
m
e
p
2
4
6
8
f
f
h
n
e
Pho
le Phone
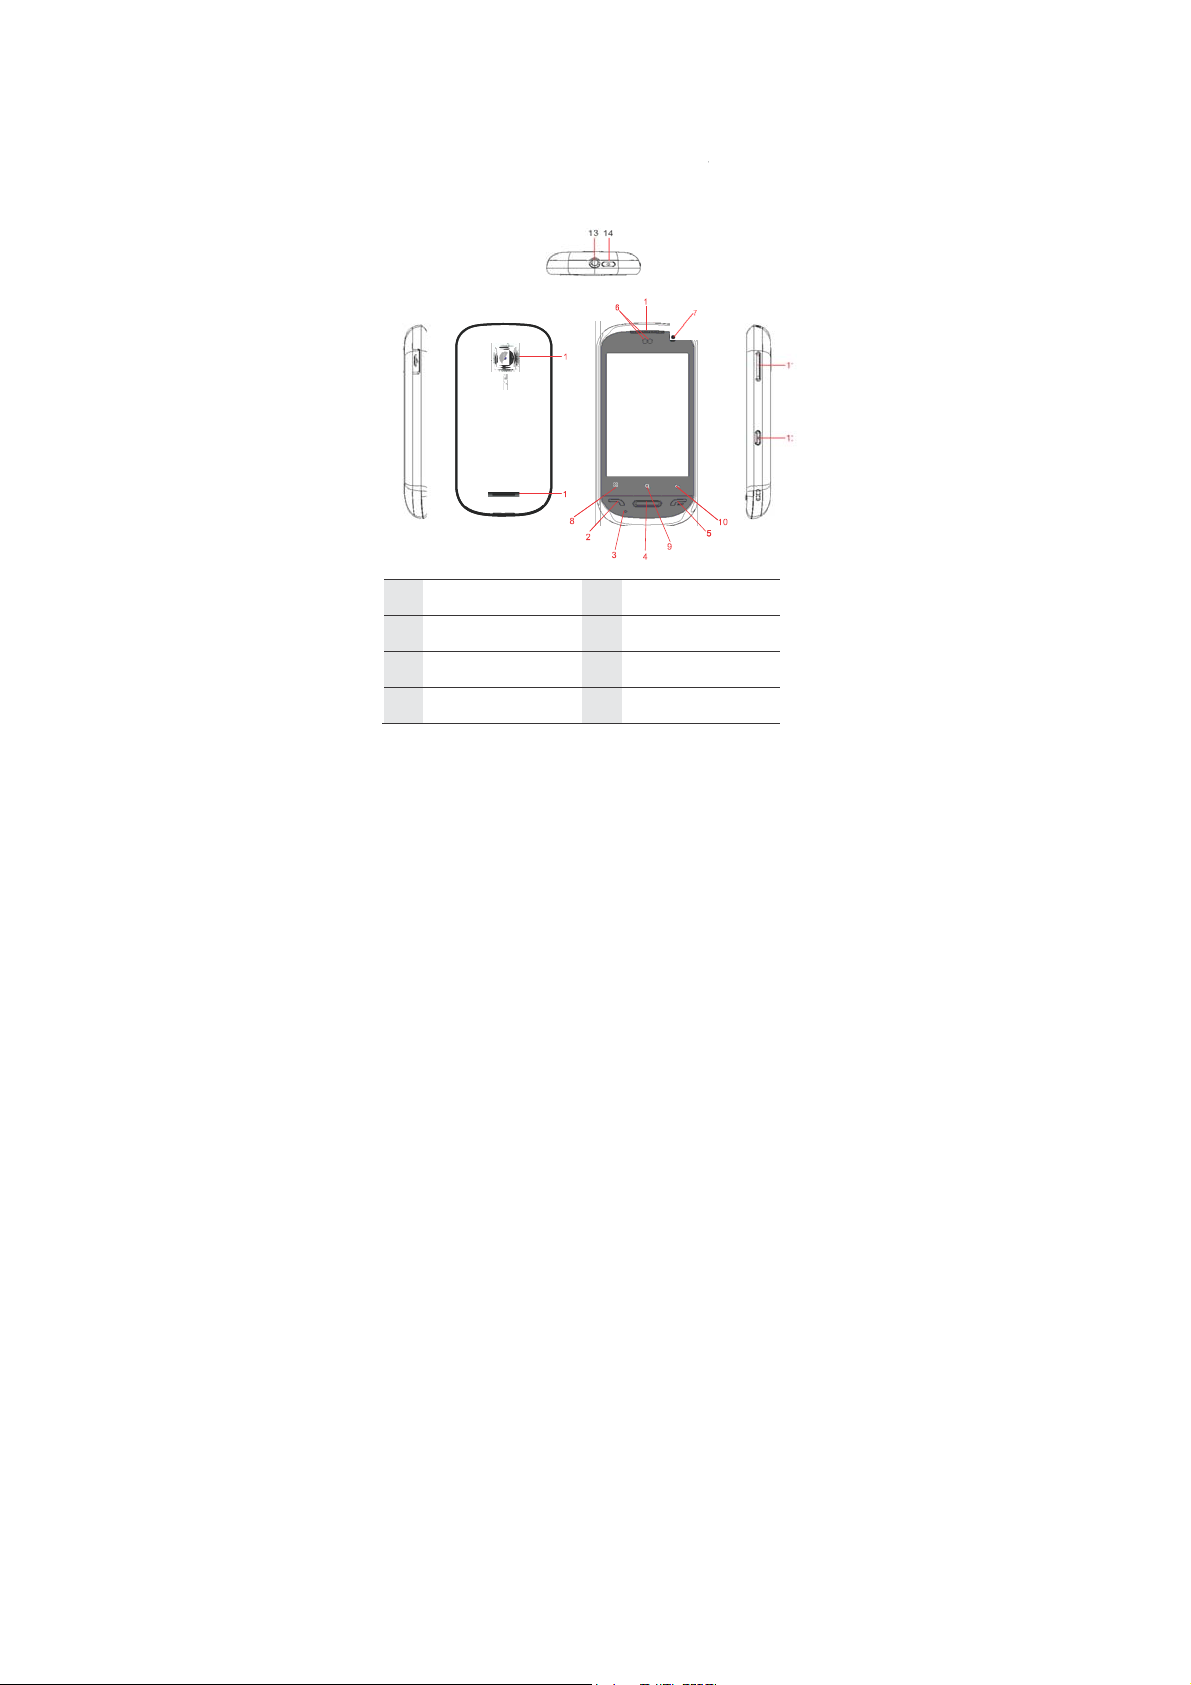
e at a Glance
Note:
All the pictu
actual appe
you purcha
View
res in this guid
arance and dis
e.
are for your re
lay depend on
erence only. T
the mobile pho
e
ne
1 Earpiec
3 Mic
5 End key
7 Front Ca
5
6
Send key
Home key
era
Proximity s
Menu key
nsors
2
Page 3
9
Search key 10 Back key
11 Volume control keys 12 Capture key
13
Headset jack
15 Camera
Key functions at your fingertips
Power key
Send key
MENU
key
Back key
End key
Press to turn on your mobile phone.
Press and hold to open the Phone
options menu.
Pres s t o l o ck the screen when your
mobile phone is on.
Press to go to the Call log screen.
Press to open the menu on an active
screen.
Press to return to the previous screen.
Press to exit any application you are
running.
Press to end a call.
Power key
14
16 Speaker
3
Page 4

Using a microSD Card
Installing the microSD Card
1. Remove the battery cover.
2. Insert the microSD card as shown in the diagram.
Note:
When inserting the microSD card, make sure that the gold
contacts face towards the front of the phone.
Using the microSD Card as USB Mass Storage
To
transfer all your favorite music and pictures from your PC
onto your mobile phone’s microSD card, set the microSD
card as USB mass storage.
The USB cable should be the shielded with cores.
Calls
To
place a phone call, you can dial a number or touch a
number in your contacts list, on a Web page, or from a
document that contains a phone number. When you are on a
call, you can either answer incoming calls or send them to
your voicemail box. Y ou can also set up conference calls with
4
Page 5

several participants.
Note:
Your phone is Dual-SIM , Dual-Standby. When you are in a
call using one SIM card, the other SIM card is out of service
and you cannot use it to receive other calls.
Make a Call
To
make a call, you can use the Phone
number from Contacts or Call Log.
Making a Call with the Dialer
1. Touch the Phone icon on Home screen or the Phone
application in the Launcher or on the Home screen. If you
are already working with Contacts or Call Log, touch the
Dialer tab.
2. T ouch the appropriate numeric keys to enter the phone
number.
3. T ouch SIM1 or SIM 2 to initiate the call.
During a call, flick up the Show dial pad tab to enter other
Making a Call from Contacts
Making a Call from Call log
numbers on the dial pad.
1. T ouch >Contacts to display the contact list.
2. In the list, touch the contact you want to call.
3. T ouch Call and then select SIM1 or SIM 2 to dial the
1. T ouch > Phone > Call Log to display the call log.
>
If you are already working with Dialer or Call Log, touch
the Contacts tab.
phone number.
>
If you are already working with Contacts or Dialer, touch
the Call Log tab.
application,
or select a
5
Page 6

2. T ouch the contact you want to call.
Answering an Incoming Call
When you receive a phone call, the incoming call scree
opens with the caller ID and any additional information about
the caller that you have entered in Contacts.
Drag down or press t
Ending a Call
During a call, press End call to hang up.
Rejecting an Incoming Call
Drag up or press to decline the call.
Using Call log
The Call log contains a list of calls that you have dialed,
received, or missed. You can
recently called number or add an incoming number to your
contact list.
Adding an entry to Contacts
1. T ouch >Contacts> Call log to display the call log.
2. T ouch and hold the entry you want to add.
3. T ouch Add to contacts in the options menu.
4. T ouch Save as new or scroll through the contact list and
touch an existing contact name.
o
answer the call.
us
e the call log to quickly find a
Contacts
The Contacts application enables you to save and manage
information such as phone numbers and addresses of your
contacts. After you save the contact information on your
6
Page 7

mobile phone, it gives you an easy access to the people with
whom you want to communicate.
Adding a Contact
1. In the contacts list, press , and then touch New
contact.
2. Select Phone or SIM card you want to save the contact to.
3. Enter the contact's name, and then add any detailed
information such as phone number or address.
4. When you are finished, touch Save to save the contact
information.
From the Contacts or Favorites tab, you can quickly call or
send a text (SMS) or multimedia message (MMS) to a
Contact’s
view a list of all the ways you can communicate with that
contact. This section describes how to communicate with a
contact when you view your contacts list.
Connecting Through Quick Contact for Android
1. T ouch the contact's picture or picture frame (if you have
2. T ouch the icon for the way you want to
Communicating with a Contact
1. In the contacts list, touch the contact that you want to
2. In the contact's details
Deleting a Contact
1. In the contacts list, touch and hold the contact that you
default phone
not assigned a picture to the contact) to open Quick
Contact for Android.
the contact.
communicate.
to send message or make a call.
want to delete, and then touch Delete contact in the
number. You can
screen,
touch
Message
also open details to
communicate
with
or Ca ll Log
7
Page 8

options menu.
2. T ouch OK to confirm that you want to delete the contact.
Messaging
The Messaging application allows you to exchange text
messages (SMS) and multimedia messages (MMS) with
anyone using an SMS-or-MMS-capable phone. With the
Email application you can read and send emails.
Opening Messaging
Touch on the Home screen.
Touch ->Message.
Creating and Sending a Text Message
1. Touch
2. Enter a phone
3. T ouch the composition text box to start entering your
4. Once you are done, select Sim1 or Sim2.
The message list opens, and your name appears in the list,
followed by the message you just sent.
the window. As you view and send additional messages, a
message thread is created.
>
Message
contact from Contacts.
As you enter the phone
appear
. You can touch a suggested recipient or continue
entering the phone number.
message.
If you press while composing a message, it is saved as a
draft in your message list. Touch the message to resume
composing it.
, touch the icon on the top left.
number
in the To field, or touch + to select a
number
, matching contacts
Responses
appear in
8
Page 9

Creating and Sending a Multimedia Message
1. T ouch >
2. Enter a phone
contact from Contacts.
3. T ouch the composition text box to start entering your
message.
4. Press to display the options panel, touch Add subject
to add the message subject. Your mobile phone is now in
multimedia message mode.
5. T ouch the icon to the right of the composition text box,
you can add a
6. When the message is ready to be sent, select Sim1 or
Opening and Viewing a Multimedia Message
Replying to a Message
Customizing the Message Settings
Sim2 to send.
1. In the message list, touch the message thread to open it.
2. T ouch the multimedia message to view the message.
3. Flick up or down to view the previous or next slide.
1. In the message list, touch a text or multimedia message
thread to open it.
2. T ouch the text box to compose your message, and then
select Sim1 or Sim2 to send .
In the message list, press , and then touch Settings to
customize the message settings.
Message
picture, music, or
, touch
number
in the To field, or touch + to select a
the icon on the top left.
video file.
Email
Y our mobile phone puts email at your fingertips, too. Using
your Email application, you can add versions of Y ahoo!, AOL,
and other popular email services to your phone. These types
of email accounts are known as POP3 or IMAP.
9
Page 10

Adding an Email Account
When using the Email application for the first time, you must
configure your email account. The Email setup wizard helps
you set up your account for many popular email systems, so
you can read and work with the same email that you do on a
computer in a web browser, or with another email
application.
Viewing an Email Message
1. T ouch > Email.
2. T o customize your email settings, answer the onscreen
prompts, and then touch Next. Or touch Manual setup if
you want to set the mail server yourself.
3. Enter the name for your account and the name you want
other people to see when they receive an email from you.
4. T ouch Done.
1. On the accounts screen, touch the email account you want
to use.
2. Access a
want to view.
Creating and Sending an Email Message
When creating mails, select mail > creating mails.
Enter the address(recipient)、 theme and contents. Press
MENU you could ‘append’、‘Add Cc/Bcc’, select send or
discarded.
Replying to an Email Message
1. On the accounts screen, touch the email account you want
to use.
folder
, and then touch the message that you
10
Page 11

2. T ouch the email message you want to view and reply to.
3. T ouch Reply or Reply all to reply to the email message.
Deleting an Email Account
1. On the accounts screen, touch and hold the email account
you want to delete.
2. T ouch Remove account.
3. T ouch OK.
Connected with Data
Y our mobile phone will be automatically configured to use
your wireless service provider’s GPRS/3G/EDGE service (if
available) when you turn on the phone for the first time. Note
that the SIM card must be inserted.
Checking the Network Connection
1. T ouch > Settings.
2. T ouch Wireless & networks > Mobile networks.
3. Select SIM1or SIM2.Touch Network Mode to check the
network connection.
Turning on the Data Service
1. T ouch > Settings.
2. T ouch Wireless & networks > Mobile networks.
3. Select SIM1or SIM2.T ouch the Data enabled check box
to turn on the data connection.
11
Page 12

Wi-Fi
Wi-Fi gives you wireless access to broadband Internet
access. To use Wi-Fi on your mobile phone, you need to
have an access to wireless access points (hotspots).
Obstacles that block the Wi-Fi signal will reduce its strength.
Turning On Wi-Fi
1. T ouch > Settings.
2. T ouch Wireless & networks, and then select the Wi-Fi
check box to turn on Wi-Fi.
Connecting to a Wireless Network
1. After turning on Wi-Fi, touch > Settings.
2. T ouch Wireless & networks > Wi-Fi settings. Y ou will
see a list of detected Wi-Fi networks in the Wi-Fi
networks section.
3. Touch a Wi-Fi network to connect to it.
Browser
Y our mobile phone comes with a browser. You can use
Browser to access and browse the Internet.
Opening a Web Page
1. In a browser
screen.
2. Use the keyboard to enter the web page address.
3. As you enter the address, matching web page addresses
will appear on the screen. If you see the address you want,
touch it and go directly to that web page or when you
complete entering the address of the web page you want,
window,
touch the URL field at the top of the
12
Page 13

Setting a Home Page
3. Enter the address of the desired home page, and then touch OK.
Managing Bookmarks
Adding a Bookmark
Opening a Bookmark
Customizing the Browser Settings
touch the icon to the right to open the web page.
window,
1. In a browser
2. T ouch More > Settings > Set home page.
Y ou can store as many
mobile phone.
1. In a browser screen, go to the web page you want to save
as a bookmark.
2. Press , and then touch Bookmarks > Add. The add
bookmark screen opens.
3. Edit the bookmark name as needed and then touch OK.
1. In a browser window, press , and then touch
Bookmarks.
On the Bookmarks screen, touch the History tab to view
the pages you have visited. Or touch the Most visited tab
to view the pages you have visited most frequently.
2. T ouch the bookmark of the website you want to open.
Customize the browser to suit your browsing style. Use
Browser to set page content, privacy, and security
preferences. In the browser screen, press , and then
touch More > Settings.
press .
bookma
rks as you want on your
13
Page 14

Bluetooth
Y our mobile phone has Bluetooth, which allows you to create
a wireless connection with other Bluetooth devices so you
can share files with your friends, talk hands-free with a
Bluetooth headset, or even transfer photos on your phone to
your PC.
If you are using Bluetooth, remember to stay within 10
meters (33 feet) of other Bluetooth devices. Be aware that
obstacles like walls or other electronic equipment may
interfere with your Bluetooth connection.
Turning On Bluetooth
1. T ouch > Settings.
2. T ouch Wireless & networks, and then select the
Bluetooth check box to turn on Bluetooth. When
Bluetooth is turned on, the Bluetooth icon appears in the
notification bar.
3. T ouch Bluetooth settings, and then select the
Discoverable to make your mobile phone visible to other
Bluetooth devices.
Pairing and Connecting a Bluetooth Device
Before you use Bluetooth, you need to pair your mobile
phone with another Bluetooth device as follows:
1. Ensure that the Bluetooth function on your mobile phone is
enabled.
2. T ouch > Settings > Wireless & networks >
Bluetooth settings . Your mobile phone will scan for
Bluetooth devices in range (or touch Scan for devices to
scan for Bluetooth devices).
3. T ouch the device you want to pair with your mobile phone.
14
Page 15

4. Enter the pairing password to complete the connection.
Disconnecting or Unpairing a Bluetooth Device
1. T ouch > Settings > Wireless & networks >
Bluetooth settings . 2. Navigate to the Bluetooth devices
section, and then touch and hold the connected device.
You can also just touch a connected device to disconnect
3. T ouch Disconnect or Unpair to disconnect the
it.
Camera and video
The camera is a combination of camera and camcor der that
you can use to shoot and share pictures and videos.
Opening Your Camera
Taking a Photo
Viewing Your Photos
•Touch > Camera to open the camera. The camera
opens in landscape mode, ready to take a picture or shoot
a video.
•Press on the picture capture screen to close
the camera.
1. Open your camera and switch to the camera mode.
2. If necessary, open the settings panel to change the
camera settings. The preview changes as you change the
settings.
3. Compose your photo within the photo capture screen.
4. T ouch and hold to take your photo.
The photo you just took is displayed for a moment. Y ou can
take another photo or preview your photos.
1. A fter taking a photo, a thumbnail of the photo you have just
taken is shown in the bottom right corner of the Capture
Touch
screen.
the thumbnail to view it.
device.
15
Page 16

2. T ouch the onscreen button to do any of the following:
•Touch Delete to delete the
•Touch Share to send the photo in a message or post it
online.
•Touch More > Set as to set the photo as a wallpaper or
a contact icon.
3. If you want to view more photos, touch the screen,
and then flick right or left.
Shooting a Video
1. Open the camera, and then switch to camcorder mode.
2. If necessary, open the settings panel to change
the camcorder settings.
3. Frame the scene which you want to start your video.
4. T ouch to start recording a video. The camcorder
starts shooting the video.
5. Touch to stop shooting. Y ou can shoot another
video or preview your videos.
Viewing Your Videos
After recording a video, a thumbnail of the video you
have just recorded is shown in the bottom right corner of
the Capture screen. T ouch the t humbnail to view it.
photo.
16
Page 17

Using the Gallery
Your Gallery application can automatically search for
pictures and videos on the microSD card.
sort photos and videos into folders, view and edit pictures,
watch videos, and set a picture as wallpaper or as a photo
for a contact.
Opening the Gallery
Touch > Gallery to open the view er.
The Gallery
by storage location and stores these files in folders. Touch a
folder to view the pictures or videos inside.
Viewing a Picture
1. In the Gallery, touch the folder that contains the pictures
you want to view.
2. T ouch the picture to view it in full-screen mode. When
viewing a picture in full-screen mode, flick the picture left
or right to view the previous or next picture.
3. T ouch the screen.
Then the zoom panel appears. You can zoom in or zoom
out on the picture.
Rotating a Picture
1. When viewing a pictur e, press t
operations panel.
2. T ouch More.
3. Select either Rotate Left or Rotate Right. The picture is
saved with the new orientation.
Cropping a Picture
1. When viewing a picture, press to display the more
operations panel, and then touch Crop.
2. Use the cropping tool to select the portion of the picture to
application categorizes
Use
Gallery to
your pictures and videos
o
display the
17
Page 18

crop.
Drag from the inside of the cropping tool to move it.
Drag an edge of the cropping tool to resize the image.
Drag a corner of the cropping tool to resize the image
without changing the length to width ratio.
3. T ouch Save to save the cropped
discard the changes.
Enjoying Music
You can download music files to your PC or insert a CD and
copy the files to your microSD card so you can listen to music
on your mobile phone.
Copying Music to the microSD Card
Opening the Media Library
Connect
1.
mount the microSD card.
2. On the PC, navigate to the USB drive and open it.
3. Create a folder in the root directory of the microSD card
(for example, Music).
4. Copy the music from your computer to the folder you have
created.
5. After copying music, unmount or eject the drive as
required by your
the mobile phone.
6. Disconnect the mobile phone from the PC.
Touch > Music to display the media library.
The Music application organizes your music files by stora ge
location. It contains four tabs: Artists, Albums, Songs and
the phone to your computer with a USB cable and
PC’s
operating system to safely remove
picture. Touch
Discard to
18
Page 19

Playlists.
Playing Music
Adding Music to a Playlist
1. T ouch a category on the music library screen.
2. T ouch the song you want to play.
1. T ouch a category on the music library screen.
2. In the list that appears, use the Navigator key to select the
song you want to add to the playlist.
3. T ouch and hold the song, and then touch Add to playlist
in the options menu.
Playing a Playlist
1. T ouch the Playlists tab on the music library screen.
2. T ouch and hold the playlist you want to play.
3. T ouch Play to play the playlist.
FM Radio
FM Radio lets you listen to FM radio stations on your mobile
phone. Since FM Radio uses the provided wired stereo
headset as the antenna, connect the headset first to the
audio jack of your phone before you open the application.
Opening the FM Radio
1. T ouch > FM Radio to open the application.
2. The FM Radio will automatically scans for available FM
channels, saves them as presets, and plays the first FM
channel found.
Tuning the FM Radio
Open the FM Radio application, and then press to do the
following:
19
Page 20

•Touch Panel Color, then select the color you want.
•Touch Auto Search to scan automatically for available FM
channels.
Using the Calendar
Use Calendar to create and manage events, meetings, and
appointments. Depending on your synchronization settings,
the calendar on your phone stays in synchronization with
Customizing the Calendar Settings
your calendar on the web.
Opening the Calendar
Touch > Calendar to open the application.
Creating an Event
1. On any calendar view, touch .Then touch More >New
event to open the Event details screen.
2. Enter the event name on the keyboard.
3. Enter the location of the event and the description.
4. If you have more than one
where you want to save the event.
5. Enter email addresses to invite guests to the event.
6. Set the time of your event reminder in Reminders, and
then specify in Repetition whether the event recurs and
its frequency of recurrence.
7. Touch Save.
On any calendar view, touch . Then touch More >
Settings.
Hide declined events: Select to hide events for which you
have declined invitations.
Set alerts &
notifications: T ouch to set event reminders to
calendar
, select the calendar
20
Page 21

alert you, send you a notification, or turn off event
notifications on your mobile phone.
Select ringtone: T ouch to select the ringtone to sound
when you receive an event reminder.
Vibrate: Select to vibrate the mobile phone when you
receive an event notification.
Default reminder time: Touch to select the default time
before an event for event reminders to occur.
Using the Alarm
Y ou can set a new alarm or modify an existing alarm.
Opening the Alarm
Touch > Clock > Alarm to use your mobile phone alarm.
Adding an Alarm
1. On the alarm list screen, touch + on left to add an alarm.
2. Set the alarm, and then touch Save.
Setting an Alarm
1. On the alarm list screen, touch one of the alarms on the
screen.
2. On the time display area, slide up or down to set the time of
the alarm.
3. T ouch Ringtone to select a ringtone for the alarm.
4. Select the Vibrate check box to have the phone vibrate, in
addition to playing the ringtone.
5. T ouch Repeat to set the days when you want the alarm to
sound.
6. T ouch Label to enter a name for the alarm.
7. T ouch Save.
21
Page 22

Audio Recorder
Audio Recorder is useful for quickly recording thoughts.
Y ou can also record your voice and set it as a ringtone.
Starting a Recording
1. T ouch > Audio Recorder to open the application.
2. T ouch the start button to start recording.
3. Record your desired message.
4. T ouch the stop button to stop recording.
Setting a Voice Clip as a Ringtone
1. On the sound recorder screen, touch and t hen touch
Settings
2. Select the location where you have saved the recordings.
3. Select a voice clip, and then touch the bottom left
icon,select Set as ringtone.
.
The Calculator
Use the calculator to solve simple
its advanced operators to solve more complex equations.
Opening the Calculator
Touch > Calculator to open the application.
Switching to the Advanced panel
On the Calculator screen, flick th e screen to the right or left
to switch between Advanced panel and Basic panel.
arithmetic problems
or use
22
Page 23

Setting Your Mobile Phone
In standby mode, touch Menu key/Launcher icon -> Settings.
1. Wireless & Networks
To configure and manage connections to networks and devices by
using Wlan, Btooth,
Mobile networks, including Airplane mode. when Airplane mode is
checked,
all wireless connections are disabled.
2. Call Settings
To configure phone call settings, such as Call forwarding, Fixed
Dialing Numbers,
Voice Call Auto Answer, and other special features offered by your
carrier.
3. Sound
To configure how and at what volume the phone rings, vibrates, or
alerts you in
other ways when you receive a call, a notification, or an alarm sounds.
4. Display
To configure brightness, turn on or off auto rotate screen, configure ‐
some window
animations are shown, or adjust the delay time before the screen
automatically turns off.
5. Dual Sim Settings
Touch Disable data connection to configure data connection, and set
the default data network: SIM1/SIM2.
6. Location & security
To set your preferences for using and sharing your location when you
search for information and use location aware applications, such as ‐
Maps. You can also configure
settings that help secure your phone and its data.
7. Application
To view details about the applications installed on your phone, to
manage their data,to force them to stop if they misbehave, and to set
whether you want to permit
installation of applications that you obtained from websites or through
email.
8. Accounts & sync
23
Page 24

To add, remove, and manage your accounts. You also use these
settings to control how and whether applications send, receive, and
sync data on their own schedules,
and whether applications can synchronize user data automatically.
9. Privacy
To manage your personal data, such as erase all data on phone.
10. SD card & phone storage
To monitor the used and available space on your phone’s internal
storage and on
your phone’s SD card. You can also unmount or erase your SD card.
11. Language & keyboard
To select the language for the text on your phone and for configuring
the onscreen keyboard, including words that you’ve added to its
dictionary.
12. Accessibility
To configure any accessibility plug ins you have installed on your ‐
phone.
13. Date & time
To set your preferences on how dates are displayed. You can also use
these settings to set your own time and time zone, rather than
obtaining the current time from the mobile network.
14. About phone
About Phone includes information about your phone, such as Status,
Battery use, Legal information, Version information, etc.
24
Page 25

FCC Regulations:
This mobile phone complies with part 15 of the FCC Rules.
Operation is subject to the following two conditions: (1) This device
may not cause harmful interference, and (2) this device must accept
any interference received, including interference that may cause
undesired operation.
This mobile phone has been tested and found to comply with the
limits for a Class B digital device, pursuant to Part 15 of the FCC
Rules. These limits are designed to provide reasonable protection
against harmful interference in a residential installation. This
equipment generates, uses and can radiated radio frequency energy
and, if not installed and used in accordance with the instructions, may
cause harmful interference to radio communications. However, there
is no guarantee that interference will not occur in a particular
installation If this equipment does cause harmful interference to radio
or television reception, which can be determined by turning the
equipment off and on, the user is encouraged to try to correct the
interference by one or more of the following measures:
-Reorient or relocate the receiving antenna.
-Increase the separation between the equipment and receiver.
-Connect the equipment into an outlet on a circuit different from that to
which the receiver is connected.
-Consult the dealer or an experienced radio/TV technician for help.
Changes or modifications not expressly approved by the party
responsible for compliance could void the user‘s authority to operate
the equipment.
The antenna(s) used for this transmitter must not be co-located or
operating in conjunction with any other antenna or transmitter.
RF Exposure Information (SAR)
This mobile phone meets the government’s requirements for exposure
to radio waves.
This phone is designed and manufactured not to exceed the emission
limits for exposure to radio frequency (RF) energy set by the Federal
Communications Commission of the U.S. Government.
The exposure standard for wireless mobile phones employs a unit of
measurement known as the Specific Absorption Rate, or SAR. The
SAR limit set by the FCC is 1.6W/kg. *Tests for SAR are conducted
using standard operating positions accepted by the FCC with the
25
Page 26

phone transmitting at its highest certified power level in all tested
frequency bands. Although the SAR is determined at the highest
certified power level, the actual SAR level of the phone while operating
can be well below the maximum value. This is because the phone is
designed to operate at multiple power levels so as to use only the
poser required to reach the network. In general, the closer you are to
a wireless base station antenna, the lower the power output.
The highest SAR value for the model phone as reported to the FCC
when tested for use at the ear is 0.748 W/kg and when worn on the
body, as described in this user guide, is 0.994 W/kg (Body-worn
measurements differ among phone models, depending upon available
accessories and FCC requirements.)
While there may be differences between the SAR levels of various
phones and at various positions, they all meet the government
requirement.
The FCC has granted an Equipment Authorization for this model
phone with all reported SAR levels evaluated as in compliance with
the FCC RF exposure guidelines. SAR information on this model
phone is on file with the FCC and can be found under the Display
Grant section of www.fcc.gov/oet/ea/fccid after searching on FCC ID:
YHLBLURAVE.
For body worn operation, this phone has been tested and meets the
FCC RF exposure guidelines for use with an accessory that contains
no metal and the positions the handset a minimum of 1 cm from the
body. Use of other accessories may not ensure compliance with
FCC RF exposure guidelines. If you do not use a body-worn
accessory and are not holding the phone at the ear, position the
handset a minimum of 1 cm from your body when the phone is
switched on.
26
 Loading...