

Page 1

User Guide
Magic
User Guide
Page 1 of 61
Page 2

User Guide
Table of Contents
1 Safety ................................................................................................. 10
Safety precautions ................................................................................................. 10
2 Your phone ..................................................................................... 13
Phone overview ..................................................................................................... 13
3 Installation and Charging.............................................................. 14
Install the SIM card ................................................................................................ 14
Install the microSD card ........................................................................................ 14
Install the battery ................................................................................................... 14
Charge the battery ................................................................................................. 15
4 Getting Started ............................................................................... 16
Page 2 of 61
Page 3

User Guide
Turn phone on/off .................................................................................................. 16
Set up screen lock ................................................................................................. 16
Home screen .......................................................................................................... 17
Monitor your phone’s status ................................................................................. 17
Open and switch applications .............................................................................. 19
PIN and PUK .......................................................................................................... 20
5 Calls ................................................................................................. 21
Make a call ............................................................................................................. 21
In-call options ......................................................................................................... 21
Answer and reject a call ........................................................................................ 21
Manage multiple calls ........................................................................................... 22
Work with the call log ............................................................................................ 23
Dial by voice ........................................................................................................... 23
Page 3 of 61
Page 4

User Guide
6 Text Entry ........................................................................................ 24
Use the onscreen keyboard ................................................................................. 24
Edit text ................................................................................................................... 25
7 Messaging....................................................................................... 27
Create and send a text message ......................................................................... 27
Create and send a multimedia message ............................................................ 27
Change messaging settings ................................................................................. 27
8 Connecting to networks and devices.......................................... 28
Connect to mobile networks ................................................................................. 28
Connect to Wi-Fi networks ................................................................................... 29
Connect to Bluetooth devices .............................................................................. 30
Connect to computer via USB .............................................................................. 31
Share your phone’s mobile data connection ...................................................... 33
Page 4 of 61
Page 5

User Guide
Set up dial-up modem connection ....................................................................... 34
9 Email ................................................................................................ 36
Add and edit email accounts ................................................................................ 36
Compose and send email ..................................................................................... 37
Read and respond to a message......................................................................... 37
10 Browser ........................................................................................... 38
Browser options ..................................................................................................... 38
Connect .................................................................................................................. 38
Download files........................................................................................................ 39
Change browser settings ...................................................................................... 39
11 Contacts .......................................................................................... 40
Create a contact .................................................................................................... 40
Page 5 of 61
Page 6

User Guide
Search for a contact .............................................................................................. 40
Import, export and share contacts ....................................................................... 40
Call, text and edit contacts ................................................................................... 41
Delete contacts ...................................................................................................... 42
Accounts & Sync settings ..................................................................................... 42
Display options ...................................................................................................... 43
12 Settings ........................................................................................... 44
Wireless & networks .............................................................................................. 44
Call settings ............................................................................................................ 44
Sound settings ....................................................................................................... 44
Display settings ...................................................................................................... 44
Location & security settings .................................................................................. 45
Application settings ............................................................................................... 45
Page 6 of 61
Page 7

User Guide
Account & sync settings ........................................................................................ 45
Privacy settings ...................................................................................................... 45
SD card & phone storage settings ....................................................................... 45
Language & keyboard settings ............................................................................ 46
Voice input & output settings ................................................................................ 46
Accessibility settings ............................................................................................. 46
Date & time settings .............................................................................................. 46
About phone ........................................................................................................... 46
13 Music ............................................................................................... 47
Music player ........................................................................................................... 47
Use a song as a ringtone ...................................................................................... 47
14 Camera & Camcorder .................................................................... 48
To take a picture .................................................................................................... 48
Page 7 of 61
Page 8

User Guide
To shoot a video .................................................................................................... 48
Camera & camcorder settings ............................................................................. 49
15 Gallery ............................................................................................. 50
View your pictures/videos ..................................................................................... 50
Share a picture ...................................................................................................... 50
Set picture as contact icon/wallpaper .................................................................. 50
Play videos ............................................................................................................. 50
16 Tools & Applications ..................................................................... 51
Search .................................................................................................................... 51
Calculator ............................................................................................................... 51
Calendar ................................................................................................................. 52
Clock ....................................................................................................................... 53
FM Radio ................................................................................................................ 53
Page 8 of 61
Page 9

User Guide
Sound Recorder..................................................................................................... 53
SIM Toolkit .............................................................................................................. 53
17 Taking Care of your Device .......................................................... 54
Page 9 of 61
Page 10
User Guide
1
1
SSaaffeettyy
SSaaffeettyy pprreeccaauuttiioonnss
Please read through the following
briefings carefully, and act in
accordance with these rules, so as
to prevent causing any danger or
violating any law.
Safe driving
1) Do not use the phone while
driving. When you have to use the
phone, please use the personal
hands-free kit.
2) Please put the phone safely in
the phone stand. Do not put it
onto any passenger seats or any
places from which it may fall down
in case of vehicular collision or
emergency braking.
Turn OFF during a flight: Flight is
influenced by interference caused
by the phone. It is illegal to use a
phone on the airplane. Please turn
off your phone during a flight.
Turn OFF the phone when within
an area where blasting takes place:
Be sure to strictly observe the
related laws and statutes by
Page 10 of 61
Page 11
User Guide
turning off the phone when you
are within, or in the vicinity of, an
area where blasting takes place.
Turn OFF the phone when any
dangerous goods are in vicinity:
Please turn off your phone when
you are close to a gas station or in
the vicinity of any places where
fuel and chemical preparations, or
any other dangerous goods are
stored.
In hospital: Please obey the
related rules or bylaws of the
hospital when using your phone in
a hospital. Be sure to turn off your
phone when near any medical
Page 11 of 61
equipment. Your use of any
wireless transmission equipment,
inclusive of the phone, will
interfere with any medical
equipment that is not protected
fully, and other electronic
equipment items, too. Should you
have any questions in this regard,
please consult a related physician
or medical equipment supplier.
Interference: Each and every
phone’s performance may be
affected due to radio interference.
Professional service: The phone
must be installed or repaired by no
other personnel than professionals.
Page 12
User Guide
You are likely to suffer a huge risk
when you install or repair this
phone by yourself, which also goes
against the warranty rules.
Fittings and battery: You shall use
the fittings and battery
acknowledged by the phone
manufacturer only. Using
unauthorized accessories may
tamper the warranty of the device.
Emergency call: You may enter a
telephone number (112, etc.) to
ask for emergency help after
making sure that the phone has
been turned on and is in the
service status. Press the Send Key
Page 12 of 61
to call out.
Page 13
User Guide
2
2
YYoouurr pphhoonnee
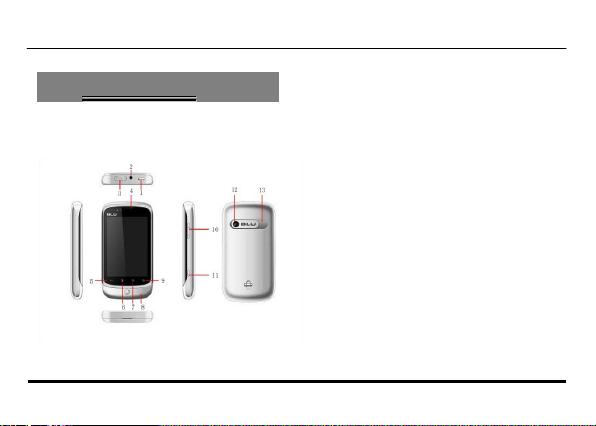
PPhhoonnee oovveerrvviieeww
1. Power key: switch on or off the
phone
2. Headset port
3. USB port
4. Earpiece
5. Back key
6. Menu key
7. Search key
8. Microphone
9. Back to the Home screen
10.Volume key
11.Camera key
12.Camera
13.Speaker
Page 13 of 61
Page 14
User Guide
3
3
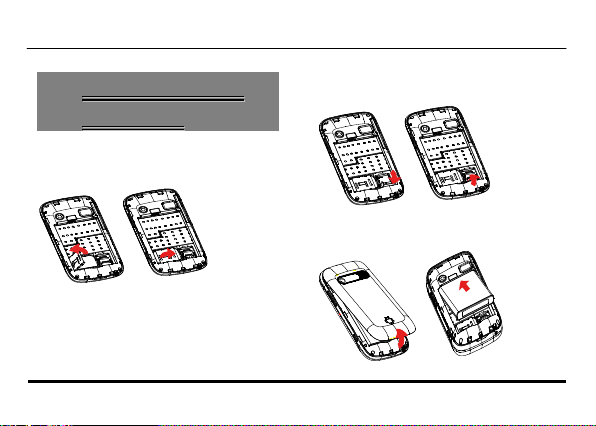
IInnssttaallllaattiioonn aanndd
CChhaarrggiinngg
IInnssttaallll tthhee SSIIMM ccaarrdd
IInnssttaallll tthhee mmiiccrrooSSDD ccaarrdd
IInnssttaallll tthhee bbaatttteerryy
Page 14 of 61
Page 15
User Guide
Warning:Risk of explosion if battery
replaced by an incorrect type.
Dispose of used batteries according to
the instructions.
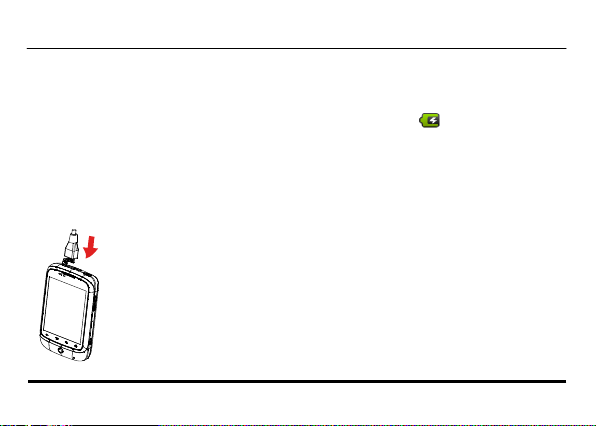
CChhaarrggee tthhee bbaatttteerryy
1. Connect the charger to the charger
jack on the phone.
Page 15 of 61
2. Connect the charger to a power
socket. The charging starts, with the
charging icon displayed in an
animated state.
Note : If the battery power is
exhausted when you charge the
battery, the charging icon might
appear on the screen a few minutes
later when charger is connected to the
power socket.
3. When the charging icon becomes
static, indicating that the battery is full,
disconnect the charger from the
power socket.
4. Disconnect charger from the phone.
Page 16

User Guide
4
4
GGeettttiinngg SSttaarrtteedd
TTuurrnn pphhoonnee oonn//ooffff
To turn on your phone, press and hold
the Power key (on top of the phone).
To turn off your phone, press and hold
the Power key, then touch Power off
on the screen.
SSeett uupp ssccrreeeenn lloocckk
Select > Settings > Location &
security > Set up screen lock. You can
choose None, Pattern, PIN, or
Page 16 of 61
Password to set up screen lock.
Use Pattern to set up screen lock
If you touch Pattern, you’re guided to
create a pattern you must draw to
unlock the screen. You can press
Menu for Help at any time.
Use PIN/Password to set up screen
lock
If you touch PIN or Password, you’re
prompted to set a numeric PIN or a
password you must enter to unlock
your screen.
Note: The next time you turn on your
phone or wake up the screen, you
Page 17

User Guide
must draw your unlock pattern or to
enter your PIN or password to unlock
the screen.
HHoommee ssccrreeeenn
To view other parts of the Home
screen
Slide your finger left or right across the
Home screen, or touch & hold the
small dots on the lower left or right of
the screen to view thumbnails of the
Home screen and its extensions.
To add to Home screen
Press Menu key and touch Add, or you
Page 17 of 61
can touch and hold the home screen
until the options appear.
To move or delete from Home screen
Touch and hold the application until
you feel a vibration, then drag it to
another place or panel, or the trash
can on bottom of the screen.
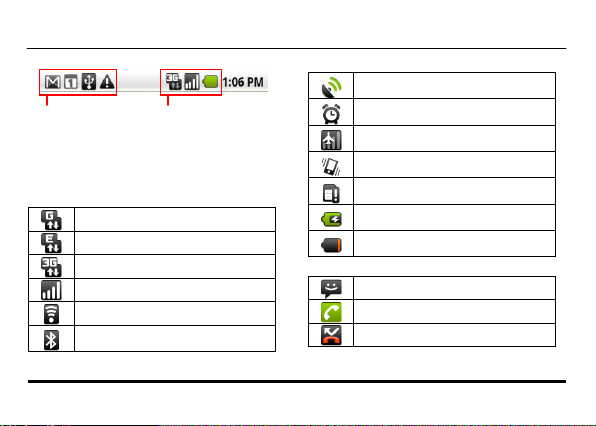
MMoonniittoorr yyoouurr pphhoonnee’’ss ssttaattuuss
At the top of the screen, icons on the
left notify you about new messages or
events (flick the bar down for details).
Icons on the right tell you about phone
status.
Page 18
User Guide
GPRS in use
EDGE in use
3G in use
Signal strength
Wi-Fi connected
Bluetooth is on
Receiving data form GPS
Alarm is set
Airplane mode
Vibrate mode
No SIM card installed
Battery is charging
Battery is very low
New message
Call in progress
Missed call
Notification icons Status icons
Tip: To see today’s date, touch and
hold the status Indicators. To open the
notification panel, drag the Status bar
down from the top of the screen.
Status icons:
Notification icons
Page 18 of 61
Page 19

User Guide
Song is playing
Downloading data
Upcoming event
3 notifications not displayed
System update available
OOppeenn aanndd sswwiittcchh aapppplliiccaattiioonnss
To open and close the launcher
1. On Home screen, touch to
open the launcher.
You can slide the Launcher up or down
to bring more icons into view. You can
add an application icon to the Home
screen by touching & holding it on the
Launcher until it vibrates and then
dragging it to a location on the Home
screen.
2. Touch the Home icon on the
Launcher or the Home key to close the
Launcher.
To open an application
Touch an application's icon on the
Launcher.
To switch to a recently used
application
Press & hold the Home key, a small
window opens, with icons of
Page 19 of 61
Page 20

User Guide
applications that you’ve used recently.
PPIINN aanndd PPUUKK
The personal identification number
(PIN) protects your SIM card from
unauthorized use. The PIN unblocking
key (PUK) is used to unlock the
blocked PIN. Both the PIN and the PUK
are provided with the SIM card. For
details, contact your service provider.
If you enter wrong PINs thrice
consecutively, the phone prompts you
to enter the PUK.
If you enter wrong PUKs ten times
consecutively, the SIM card becomes
Page 20 of 61
permanently invalid. In this case,
contact your service provider for a
new SIM card.
Note: If you enter right PUKs, it will
enter to idle directly, and the PIN
password will be reset to 1234
automatically.
Page 21

User Guide
5
5
MMaakkee aa ccaallll
1. Touch the Phone icon on Home
screen or tap > Phone to access the
dial pad.
2. Enter the phone number.
If you enter a wrong number, touch
to erase digits one by one. To
erase the entire number, touch & hold
.
3. To make an international call, tap
the 0 key till + appears on the screen.
CCaallllss
Page 21 of 61
Then enter the country or region code,
area code, and phone number in
sequence.
4. Tap to dial the number.
IInn--ccaallll ooppttiioonnss
During a call:
To mute a call, touch Mute.
To use the speakerphone, touch
Speaker.
To end a call, touch .
AAnnsswweerr aanndd rreejjeecctt aa ccaallll
When there is an incoming call, you
Page 22

User Guide
can drag the green phone icon to the
right to answer the call or drag the red
phone icon to the left to reject the
call.
Tip: To silence the ringer before
answering the call, press the Volume
key.
MMaannaaggee mmuullttiippllee ccaallllss
To switch between current calls
If you accept a new call when you’re
already on a call:
To answer the other call, drag the
Answer icon right;
To switch between calls, touch the
Page 22 of 61
Swap icon ;
To merge the calls into a conference
call, touch Merge calls.
To set up a conference call
1. Place a call to the first participant.
2. When you’re connected, touch Add
call.
3. Place the next call, using the Phone
tab, the Call log, or your contacts.
4. When you’re connected, touch
Merge calls.
Note: Contact your wireless service
provider to learn whether they
support conference calls and how
many participants you can include.
Page 23

User Guide
WWoorrkk wwiitthh tthhee ccaallll lloogg
The Call log is a list of all the calls
you’ve placed, received, or missed.
Touch > Phone > Call log to open
the call log.
To clear the call log, press Menu
key and touch Clear call log.
To clear one entry, touch and hold
this entry, then touch Remove from
call log in the menu that opens.
Touch the green phone icon at
the right of the entry to dial.
Page 23 of 61
DDiiaall bbyy vvooiiccee
To open the voice dialer
Touch Voice Dialer in the Launcher.
The Voice Dialer opens, listening for
your spoken instructions, and
displaying some hints for how to use
it.
To call
Say “Call” followed by the name of the
contact, or say “Dial” followed by a
number.
Page 24

User Guide
6
6
TTeexxtt EEnnttrryy
UUssee tthhee oonnssccrreeeenn kkeeyybbooaarrdd
To enter text, symbols, numbers
Use the Delete key to erase
characters to the left of the cursor. To
erase the entire text, touch & hold
.
Touch once to capitalize the
next letter you type. Touch & hold for
all caps.
Press the Symbols key to
Page 24 of 61
switch to the numbers and symbols
keyboard. Press the Alt key on the
symbols keyboard to view additional
symbols.
Touch & hold a vowel or the C, N, or
S key to open a small window where
you can touch an accented vowel or
other alternate letter.
Touch & hold the Period key (.) to
open a small window with a set of
common symbols.
Touch & hold a number or symbol
key to open a window of additional
symbols.
Slide your finger smoothly up from
Page 25

User Guide
the main keyboard to open an
extension keyboard, with numbers
and symbols.
To change the keyboard orientation
Turn the phone sideways or upright.
Note: To use the function, press
Settings > Display, and check
Auto-rotate screen.
EEddiitt tteexxtt
To select text
1. Touch to move the cursor to the
beginning or end of the text to select.
2. Touch & hold the text field till a
Page 25 of 61
menu opens with options.
3. Touch Select text.
4. Touch to move the cursor to the
end or beginning of the text to select.
Selected text is highlighted in orange.
To cut or copy text
1. Touch & hold the selected text.
2. Touch Cut or Copy in the menu that
opens
To paste text
1. Copy the text to paste.
2. Move the cursor in text field to the
location where you want to paste the
text.
Page 26

User Guide
3. Touch & hold the text field.
4. Touch Paste in the menu that
opens.
Page 26 of 61
Page 27

User Guide
7
7
MMeessssaaggiinngg
CCrreeaattee aanndd sseenndd aa tteexxtt mmeessssaaggee
1. In standby mode, select >
Messaging > New message.
2. Enter the contents and the phone
number.
3. Tap Send.
CCrreeaattee aanndd sseenndd aa mmuullttiimmeeddiiaa
mmeessssaaggee
1. In standby mode, select >
Messaging > New message.
Page 27 of 61
2. Tap Menu key > Attach.
3. Tap Menu key > Add subject.
4. Input the phone number.
5. Tap Send MMS.
CChhaannggee mmeessssaaggiinngg sseettttiinnggss
Open the Messaging window, press
Menu key, and touch Settings.
You can choose to change Storage
settings, Text message (SMS) settings,
Multimedia message (MMS) settings
and Notification settings.
Page 28

User Guide
8
8
CCoonnnneeccttiinngg ttoo
nneettwwoorrkkss aanndd
ddeevviicceess
Home > Menu > Settings > W ireless &
networks. You can set your connection
in Wireless & networks list.
CCoonnnneecctt ttoo mmoobbiillee nneettwwoorrkkss
To enable data access
1. In Wireless & networks list, touch
Mobile networks.
2. Check Data enabled.
Page 28 of 61
To determine what network you’re
using
1. Touch Wireless & networks >
Mobile networks.
2. Touch GSM/UMTS Options >
Access Point Names.
3. Choose a wireless service provider
in the list.
To disable data when roaming
1. Touch Wireless & networks >
Mobile networks.
2. Uncheck Data roaming.
Note: With Data roaming unchecked,
you can still transmit data with a Wi-Fi
Connection.
Page 29

User Guide
To limit your data connection to 2G
networks
1. Touch Wireless & networks >
Mobile networks.
2. Touch GSM/UMTS Options.
3. Check Use only 2G networks.
CCoonnnneecctt ttoo WWii--FFii nneettwwoorrkkss
To turn Wi-Fi on and connect to a
Wi-Fi network
1. In Wireless & networks list, touch
Wi-Fi settings.
2. Check Wi-Fi to turn it on.
3. Available Wi-Fi networks are
displayed on screen.
Page 29 of 61
4. Touch a network to connect to it.
Note: If the network is secured, you’re
prompted to enter a password or
other credentials. (Ask your network
administrator for details.)
To receive notifications when open
networks are in range
1. In Wi-Fi settings list, check Wi-Fi to
turn it on.
2. Check Network notification. You
will receive notifications in the Status
bar when your phone detects an open
Wi-Fi network.
Page 30

User Guide
To add a Wi-Fi network
1. In Wi-Fi settings list, check Wi-Fi to
turn it on.
2. Touch Add Wi-Fi network.
3. Enter all required information.
4. Touch Save.
To forget a Wi-Fi network
You can make the phone forget about
the details of a Wi-Fi network that you
have added before.
1. In Wi-Fi settings list, check Wi-Fi to
turn it on.
2. Touch & hold the name of the
network.
3. Touch Forget network in the dialog
Page 30 of 61
that opens.
CCoonnnneecctt ttoo BBlluueettooootthh ddeevviicceess
To turn Bluetooth on and change your
Bluetooth name
1. In Wireless & networks list, touch
Bluetooth settings.
2. Check Bluetooth to turn it on.
3. Touch Device name, enter a name,
then touch OK.
To pair with a Bluetooth device
1. In Bluetooth settings list, check
Bluetooth to turn it on.
2. Touch Scan for devices.
Page 31

User Guide
3. Touch a device in the list to pair
with.
4. If necessary, touch OK, or enter the
device passkey (like 0000) to connect
to the device. When the device is
connected, the Bluetooth indicator
appears in the status bar.
To unpair a Bluetooth device
1. Touch & hold the device the phone
has paired or connected with.
2. Touch Unpair or Disconnect &
unpair in the menu that opens.
Page 31 of 61
CCoonnnneecctt ttoo ccoommppuutteerr vviiaa UUSSBB
The first time you use a USB
connection, your computer may
indicate that drivers are being installed.
Follow any prompts you see to
complete the installation. This may
take a few minutes.
To connect your phone to a computer
via USB
1. Connect your phone to a computer
with a USB cable.
2. Flick down the status bar to open
the Notifications panel, touch USB
connected.
Page 32

User Guide
3. Touch Turn on USB storage in the
screen that opens.
Your phone’s SD card is mounted as a
drive on your computer. You can now
copy files to and from the SD card.
To disconnect your phone from the
computer
1. Unmount the SD card on your
computer.
2. Open the Notifications panel and
touch Turn off USB storage.
3. Touch Turn off USB storage in the
screen that opens.
Warning: Carefully follow your
computer’s instructions to unmount
Page 32 of 61
the SD card and disconnect USB
devices correctly, to avoid losing
information on the card.
To safely remove the SD card from
your phone
You can safely remove the SD card
from your phone any time the phone
is turned off.
To format a SD card
1. Touch Home > Menu > Settings >
SD card & phone storage.
2. If necessary, touch Unmount SD
card.
3. Touch Format SD card, in the
Page 33

User Guide
screen that opens, touch Format SD
card. You will lose all data on the card.
SShhaarree yyoouurr pphhoonnee’’ss mmoobbiillee ddaattaa
ccoonnnneeccttiioonn
The first time you use a USB
connection, your computer may
indicate that drivers are being installed.
Follow any prompts you see to
complete the installation. This may
take a few minutes.
To share your phone’s data
connection via USB
1. Connect your phone to a computer
Page 33 of 61
with a USB cable.
2. Touch Wireless & networks >
Tethering & portable hotspot.
3. Check USB tethering. An ongoing
notification is added to the Status
bar.
4. Uncheck USB tethering to stop
sharing your data connection. Or just
disconnect the USB cable.
Note: You can’t share your phone’s
data connection and SD card via USB
at the same time.
Page 34

User Guide
To share your phone’s data
connection as a portable Wi-Fi
hotspot
1. Touch Wireless & networks >
Tethering & portable hotspot.
2. Check Portable Wi-Fi hotspot. An
ongoing notification is added to
the Status bar.
3. Uncheck Portable W i-Fi hotspot to
stop connection.
To rename or secure your portable
hotspot
1. Touch Wireless & networks >
Tethering & portable hotspot.
Page 34 of 61
2. Check Portable Wi-Fi hotspot.
3. Touch Portable Wi-Fi hotspot
settings > Configure Wi-FI hotspot.
You can change the network SSID
(name) that other computers see
when scanning for Wi-Fi networks.
You can also touch the Security menu
to configure the network with Wi-Fi
Protected Access 2 (WPA2) security,
with a preshared key (PSK).
4. Touch Save.
SSeett uupp ddiiaall--uupp mmooddeemm
ccoonnnneeccttiioonn
1. Connect your phone with SIM card
Page 35

User Guide
to a computer with a USB cable.
Note: The first time you use a USB
connection, your computer may
indicate that drivers are being
installed.
2. In your computer, choose Network
Neighborhood > View Network
Connections > Create a new
connection.
3. In the pop-up dialog box, select
Next > Connected to the Internet >
Set up my connection manually >
Dial-up modem connection.
4. Enter the name of an ISP , enter the
phone number *99***1#, and select
Next > Next > Done.
Page 35 of 61
5. Back to View Network Connections,
double click the established
connection icon, and select Dial.
Page 36

User Guide
9
9
AAdddd aanndd eeddiitt eemmaaiill aaccccoouunnttss
To add the first email account
1. Touch Email in the Launcher.
2. In the Setup Email screen, enter
your email address and password (the
same as on your computer).
3. Choose Next or Manual setup. For
account details, contact the account
provider.
4. Set the account name and your
name as a sender.
5. Touch Done.
EEmmaaiill
Page 36 of 61
To add another email account
1. Open the Accounts screen.
2. Press Menu key and touch Add
account.
3. Go steps just as adding the first
email account.
To edit an email account
Touch & hold the account whose
settings you want to change. In the
menu that opens, touch Account
settings.
You can also open the settings for an
account while you’re viewing its inbox,
by pressing Menu key and touching
Account settings.
Page 37

User Guide
CCoommppoossee aanndd sseenndd eemmaaiill
1. In the folder or message list, press
Menu key and touch Compose.
2. Address the message.
3. Press Menu key and touch Add
Cc/Bcc to address a copy or blind copy
of the message.
4. Enter a subject for the message.
5. Enter the text of the message.
6. Press Menu key and touch Add
attachment to send an attachment
with the message.
7. Touch Send.
Tip: Touch Discard to abandon a
message, including any saved drafts.
Page 37 of 61
RReeaadd aanndd rreessppoonndd ttoo aa mmeessssaaggee
While reading a message, press Menu
key and touch Reply, Reply all or
Forward to respond to a message.
You can also press Reply, Reply all in
the bottom of the screen to respond
to a message.
Page 38

User Guide
0
110
BBrroowwsseerr
Touch the Browser icon on Home
screen or Browser in the Launcher.
BBrroowwsseerr ooppttiioonnss
Touch Menu key in Browser:
New window: Opens a new
window.
Exit: Exits the current page and
returns to idle.
Bookmarks: Shows a list of your
bookmarks. Touch Add on screen to
add the current page to your list.
Page 38 of 61
Windows: Your open windows are
displayed.
Refresh: Reloads the current page.
More: Shows browser options, like
Forward, Add bookmark, Find on page,
Select text, Page info, Share page,
Downloads, and Settings.
CCoonnnneecctt
To use a wireless network, touch
Menu key > Settings > W ireless &
networks. You can choose W i-Fi, VPN,
Mobile networks, etc.
Note: Your service provider may
charge to surf the Web or download
Page 39

User Guide
data.
DDoowwnnllooaadd ffiilleess
To allow downloading apps from web
or email
1. On the Home screen, touch Menu
key > Settings > Applications.
2. Check Unknown sources.
3. Touch OK in the dialog, to confirm
you want to allow installation of
non-Market applications.
To manage your downloads
To view files or applications you
have downloaded, press Browser >
Page 39 of 61
Menu key > More > Downloads.
To cancel a download, in the
Downloads list, touch & hold an item
in the list and in the menu that opens,
touch Cancel download.
To clear your download history,
touch Browser > Menu key > More >
Downloads > Menu key > Clear list.
CChhaannggee bbrroowwsseerr sseettttiinnggss
Browser > Menu key > More >
Settings. You can choose to change Page
content settings, Privacy settings,
Security settings and Advanced settings.
Page 40

User Guide
1
111
CCoonnttaaccttss
Touch Contacts in the Launcher.
CCrreeaattee aa ccoonnttaacctt
1. In standby mode, select >
Contacts > Menu key > New contact.
2. Choose Phone or SIM Contact, the
place you want to save your contact in.
3. Enter the related information.
4. Tap Done.
5. The information will be saved
automatically.
Page 40 of 61
SSeeaarrcchh ffoorr aa ccoonnttaacctt
In standby mode, select >
Contacts > Menu key > Search, or
touch Contacts > Search key, then
enter the contact name or the first
letter of the name.
IImmppoorrtt,, eexxppoorrtt aanndd sshhaarree
ccoonnttaaccttss
Select > Contacts > Menu key >
Import/Export, you can choose
Import from SIM card, Import from
SD card, Export to SD card or Share
visible contacts.
Page 41

User Guide
To import contacts from SIM card
If you choose Import from SIM card, a
list of the contacts on the SIM appears.
Touch & hold a contact and touch
Import in the menu that opens. Or
press Menu and touch Import all.
To import contacts from SD card
If you have more than one vCard file
on the SD card, touch the option:
Import one vCard file, Import
multiple vCard files, or Import all
vCard files.
To export contacts to SD card
If you choose Export to SD card, touch
Page 41 of 61
OK to confirm.
Contacts creates a vCard file on your
SD card. The file contains all of your
contacts.
To share a contact
1. Open the contact you want to
share.
2. Press Menu > Share.
3. Touch via Bluetooth or Email.
CCaallll,, tteexxtt aanndd eeddiitt ccoonnttaaccttss
For Call, Send message, Edit, View
contact, Delete contact or other
options, touch and hold the contact.
Page 42

User Guide
DDeelleettee ccoonnttaaccttss
To delete all contacts
In standby mode, press Menu >
settings > Applications > Manage
applications > All, in the list, touch
Contacts Storage > Clear data.
Or touch Contacts > Menu > Delete >
Menu > Select all > Menu > Delete.
To delete multiple contacts
1. Touch Contacts > Menu > Delete.
2. Mark the contacts you want to
delete.
3. Touch Menu > Delete.
Page 42 of 61
To delete a single contact
Touch and hold the contact, in the
menu that opens, touch Delete
contact.
AAccccoouunnttss && SSyynncc sseettttiinnggss
Touch Contacts > Menu key >
Accounts to enter accounts & sync
settings.
To sync, send, and receive data at
any time, check Background data.
To sync data automatically, check
Auto-sync.
To manage accounts, add account
first.
Page 43

User Guide
To remove account, touch that
account first, then touch Remove
account in the account.
DDiissppllaayy ooppttiioonnss
Contacts > Menu > Display options.
Only contacts with phones: check
to only display contacts that have
phone numbers.
Display SIM contacts : check to
display contacts in SIM card.
Sort list by: choose First name or
Last name.
V iew contact names as: F irst name
first or Last name first.
Page 43 of 61
Page 44

User Guide
2
112
SSeettttiinnggss
In standby mode, select >
Settings, or press Menu key >
Settings.
WWiirreelleessss && nneettwwoorrkkss
Through Wireless & Network settings
you can configure and manage
connections to networks and devices
by using W i-Fi, Bluetooth, Mobile
networks, etc.
Page 44 of 61
CCaallll sseettttiinnggss
Use Call settings to configure phone
call settings, such as Call forwarding,
Call waiting and other special features
offered by your carrier.
SSoouunndd sseettttiinnggss
You could configure Volume, Phone
ringtone, V ibrate and some other
sound settings.
DDiissppllaayy sseettttiinnggss
Use Display settings to configure
brightness and other screen settings.
Page 45

User Guide
LLooccaattiioonn && sseeccuurriittyy sseettttiinnggss
You can choose which way to see
location in applications: Use wireless
networks or Use GPS satellites. You
can also configure settings that help
secure your phone and its data.
AApppplliiccaattiioonn sseettttiinnggss
Use Application settings to view and
edit details about the applications
installed on your phone.
AAccccoouunntt && ssyynncc sseettttiinnggss
Use the Accounts & Sync settings to
Page 45 of 61
manage your accounts and data sync.
For more details, see “Accounts &
sync settings” on page 42 and “Add
and edit email accounts” on page 36.
PPrriivvaaccyy sseettttiinnggss
You can use the Privacy settings to
manage your personal information.
You can use Factory data reset to
erase all data on phone.
SSDD ccaarrdd && pphhoonnee ssttoorraaggee sseettttiinnggss
Use the SD Card & Phone Storage
settings to monitor the space on your
Page 46

User Guide
phone and on your SD card.
LLaanngguuaaggee && kkeeyybbooaarrdd sseettttiinnggss
Language & Keyboard settings can
help to select the language on your
phone and configure the onscreen
keyboard.
VVooiiccee iinnppuutt && oouuttppuutt sseettttiinnggss
Use this settings to configure the voice
input feature, and the text –to-speech
synthesizer.
Page 46 of 61
AAcccceessssiibbiilliittyy sseettttiinnggss
See, hear, speak, feel, and use.
Accessibility features are there for
everyone, helping make things easier.
DDaattee && ttiimmee sseettttiinnggss
Use this setting to set your
preferences for how dates are
displayed.
AAbboouutt pphhoonnee
Here includes information about your
phone, such as system updates, status,
battery use, etc.
Page 47

User Guide
3
113
Your phone can play many types of
files: AAC, AMR, MP3, E-AAC+(Audio
only), AAC+, OGG and MIDI.
Touch Music in the Launcher.
MMuussiicc ppllaayyeerr
Touch a song to listen to it.
/ : pause/resume playback.
: skip to the next track.
: skip to the previous track. If
music plays more than 1s, it will skip
to the beginning of the current song.
MMuussiicc
Page 47 of 61
: open the current playlist.
: play the current playlist in shuffle
mode.
: toggle repeat mode.
Volume key: control playback volume.
Tip: While viewing a list of tracks, tap
Menu key, you can select Play all,
Party shuffle and Shuffle all.
UUssee aa ssoonngg aass aa rriinnggttoonnee
Touch & hold a song in a library list. In
the menu that opens, touch Use as
phone ringtone.
You can also use a song as a ringtone
from menu of the playing screen.
Page 48

User Guide
Touch to preview
your pictures or
videos in Gallery.
Drag up to shoot
videos; Drag down
to take photos.
Touch settings to change them.
4
114
CCaammeerraa &&
CCaammccoorrddeerr
Camera is a combination camera and
camcorder that you use to shoot and
share pictures and videos.
Pictures and videos are stored on the
phone’s SD card, so you must install
one to use Camera.
TToo ttaakkee aa ppiiccttuurree
1. Touch > Camera. Or press the
Camera key on right side of your
phone.
2. Adjust your camera settings.
3. Touch Shutter icon on screen
or press the Camera key.
4. Touch the thumbnail to view, share,
and work with your pictures in Gallery.
TToo sshhoooott aa vviiddeeoo
1. Touch > Camcorder.
2. Adjust your camcorder settings.
Page 48 of 61
Page 49

User Guide
3. Touch to start shooting and
touch to stop shooting.
4. Touch the thumbnail to view, share,
and work with your videos in Gallery.
CCaammeerraa && ccaammccoorrddeerr sseettttiinnggss
Both are displayed on right of the
screen.
Camera:
Settings/Store location/White
balance/1×Zoom:
Camcorder:
Settings/White balance/Video quality
Page 49 of 61
Page 50

User Guide
5
115
GGaalllleerryy
VViieeww yyoouurr ppiiccttuurreess//vviiddeeooss
1. Touch Gallery in the Launcher, then
touch a picture or video in an album.
2. Return to the main Gallery screen
at any time by touching its icon at the
top left of the screen.
SShhaarree aa ppiiccttuurree
1. Touch a picture in an album to view
it.
2. Touch Menu key > Share.
Page 50 of 61
SSeett ppiiccttuurree aass ccoonnttaacctt
iiccoonn//wwaallllppaappeerr
1. Touch a picture in an album to view
it.
2. Touch Menu key > More > Set as.
3. You can choose Contact icon or
Wallpaper.
PPllaayy vviiddeeooss
1.Touch a video in an album to play.
2.Touch the screen to view the
playback control panel.
Note: Your phone supports video
formats of MPEG4, H.263, H.264.
Page 51

User Guide
Touch to change the
target of your search.
6
116
TToooollss &&
AApppplliiccaattiioonnss
SSeeaarrcchh
In standby mode, touch Menu key >
Search, or touch Search in the
launcher.
To target where you want to search
Touch the icon at the left of the search
box to change the target of your
search.
To change what you can target
From Search screen, press Menu key >
Search settings > Searchable items.
Check the applications whose
information you want to be able to
search.
CCaallccuullaattoorr
Your calculator has two views: basic
and advanced.
Page 51 of 61
Page 52

User Guide
To change your views, touch Menu
key > Advanced panel or Basic panel.
You can also drag the basic screen to
the left to open the advanced screen.
CCaalleennddaarr
You are asked to add an Exchange
account first. For account details,
contact the account provider.
Your calendar will work as follows.
To visualize & sync your calendar
events
On the Calendar screen, press Menu
key > More > Calendars, touch your
Page 52 of 61
account name until “synced, visible”
shows up.
To change your calendar view
On the Calendar screen, press Menu
key and touch Agenda, Day, Week, or
Month.
To manage calendar events
To add calendar events, touch
Menu key > More > New event.
To edit an event, touch and hold it,
then touch Edit event.
To go to today, touch Menu key >
Today.
Page 53

User Guide
Touch to add an alarm.
Touch to turn an alarm on or off.
Touch to open a screen where
you can set the alarm’s time
and other attributes.
Touch to return to the main
Clock screen.
CClloocckk
To set alarms
Touch Clock in the launcher, then
touch Alarm .
To change alarm settings
On Alarm screen, touch Menu >
Settings.
FFMM RRaaddiioo
You are asked to plug in a headset to
use FM Radio.
SSoouunndd RReeccoorrddeerr
Touch Sound Recorder in the launcher.
To start recording, touch .
To end recording, touch .
SSIIMM TToooollkkiitt
The function depends on the SIM card.
Page 53 of 61
Page 54

User Guide
7
117
TTaakkiinngg CCaarree ooff yyoouurr DDeevviiccee
Your device is a product of superior design and craftsmanship and should be
handled with care: The following suggestions will help you protect your phone:
Always keep the small parts of the phone away from children.
Keep the device dry. Precipitation, humidity, and all types of liquids or moisture
can contain minerals that will rust electronic circuits. If your device does get wet,
remove the battery, and allow the device to dry completely before replacing it.
Do not use or store the device in dusty, dirty areas. Its moving parts and
electronic components can be damaged.
Do not store the device in high or cold temperature. High temperatures can
shorten the life of electronic devices and damage batteries.
Page 54 of 61
Page 55

User Guide
Do not attempt to open the device other than as instructed in this guide.
Do not drop, knock, or shake the device. Rough handling can break internal
circuit boards and fine mechanics.
Do not use harsh chemicals, cleaning solvents, or strong detergents to clean the
device. Only use a soft, clean, dry cloth to clean the surface of the device.
Do not paint the device. Paint can clog the moving parts and prevent proper
operation.
Use chargers indoors.
Page 55 of 61
Page 56

User Guide
Additional Warning
FCC Regulations:
This mobile phone complies with part 15 of the FCC Rules. Operation is subject to
the following two conditions: (1) This device may not cause harmful interference,
and (2) this device must accept any interference received, including interference
that may cause undesired operation.
This mobile phone has been tested and found to comply with the limits for a
Class B digital device, pursuant to Part 15 of the FCC Rules. These limits are
designed to provide reasonable protection against harmful interference in a
residential installation. This equipment generates uses and can radiate radio
frequency energy and, if not installed and used in accordance with the instructions,
Page 56 of 61
Page 57

User Guide
may cause harmful interference to radio communications. However, there is no
guarantee that interference will not occur in a particular installation If this
equipment does cause harmful interference to radio or television reception, which
can be determined by turning the equipment off and on, the user is encouraged to
try to correct the interference by one or more of the following measures:
-Reorient or relocate the receiving antenna.
-Increase the separation between the equipment and receiver.
-Connect the equipment into an outlet on a circuit different from that to which
the receiver is connected.
-Consult the dealer or an experienced radio/TV technician for help.
Page 57 of 61
Page 58

User Guide
Changes or modifications not expressly approved by the party responsible for
compliance could void the user‘s authority to operate the equipment.
The antenna(s) used for this transmitter must not be co-located or operating in
conjunction with any other antenna or transmitter.
Page 58 of 61
Page 59

User Guide
RF Exposure Information (SAR)
This mobile phone meets the government’s requirements for exposure to radio waves.
This phone is designed and manufactured not to exceed the e mission limits for exposure to
radio frequency (RF) energy set by the Federal Communications Commission of the U.S.
Government.
The exposure standard for wireless mobile phones employs a unit of measurement known as
the Specific Absorption Rate, or SAR. The SAR limit set by the FCC is 1.6W/kg. *Tests for SAR
are conducted using standard operating positions accepted by the FCC with the phone
transmitting at its highest certified power level in all tested frequency bands. Although the
SAR is determined at the highest certi fied power level, the actual SAR level of the phone while
operating can be well below the maximum value. This is because the phone is designed to
Page 59 of 61
Page 60

User Guide
operate at multiple power levels so as to use only the poser required to reach the network. In
general, the closer you are to a wireless base station antenna, the lower the power output.
The highest SAR value for the model phone as reported to the FCC when tested for use at the
ear is 1.16 W/kg and when worn on the body, as described in this user guide, is 1.03 W/kg
(Body-worn measurements differ among phone models, depending upon available accessories
and FCC requirements.)
While there may be differences between the SAR levels of various phones and at various
positions, they all meet the government requirement.
The FCC has granted an Equipment Authorization for this model phone with all reported SAR
levels evaluated as in compliance with the FCC RF exposure guidelines. SAR information on
Page 60 of 61
Page 61

User Guide
this model phone is on file with the FCC and can be found under the Display Grant section of
www.fcc.gov/oet/ea/fccid after searching on FCC ID: YHLBLUMAGIC.
For body worn operation, this phone has been tested and meets the FCC RF exposure
guidelines for use with an accessory that contains no metal and the positions the handset a
minimum of 1 cm from the body. Use of other accessories may not ensure compliance with
FCC RF exposure guidelines. If you do no t use a body-worn accessor y and are not holding the
phone at the ear, position the handset a minimum of 1 cm from your body when the phone is
switched on.
Page 61 of 61
 Loading...