

Page 1

User Manual
G80
User Manual
All rights are reser ved. No part of this document
may be reproduced with out permission.
Page 2

User Manual
While all efforts have be en made to ensure the accuracy
of all the contents in this manual, we assume no liab ility
for errors or omissions or statements of any kind in this
manual, whether such errors or omiss ions or statements
resulting from negli gence, accidents, or any other cause.
The contents of this manual are subject to change
without notice.
Protect our environment! We strive to produce products i n
compliance with global environmental standards. Ple ase
consult your local a uthorities for proper disposal .
Note: User Manual is just to guide the user about t he
functionality of the phone. It is not a certif icate of technology.
Some functions m ay vary due to modifications and upgrade of
software, or due to p rinting mistake.
“It is advisable to ch arge battery to 100% before sta rt using
phone for better battery life”
Page 3

User Manual
SP642
1
1- Welcome ............................................................... 5
1.1. Exciting Featur es ............................................... 5
2- Phone Layout ........................................................ 7
2.1. Keys and Parts ................................................... 7
2.2. Icons and Ind icators ........................................... 7
3- Getting Started ...................................................... 8
3.1. Insert SIM card ................................................... 8
3.3. Unlock the Pho ne ............................................... 9
3.4. Using the Touch screen .................................... 10
3.5. Using the Phon e’s Buttons ................................11
3.6. Context Menus ..................................................11
3.7. Options menus ................................................. 12
3.8. Menu Icons ....................................................... 12
Page 4

User Manual
SP642
2
4-Placing and Recei ving Calls ................................ 12
4.1. Make a Call ...................................................... 12
4.2. Disable Phone Calls (Airplane mod e) .............. 13
4.3. Disable SIM c ard .............................................. 13
5-The Home Screen ................................................ 13
5.1. Open and Close t he Launcher ......................... 14
5.2. Switch to Rece ntly Used Application ................ 15
5.3. Customize Home Screen ................................. 15
6-Connect to the In ternet ........................................ 16
6.1. To configure your Internet: ............................... 16
6.2. Access Internet via W i-Fi .................................. 16
7-Managing Notificat ions ......................................... 17
7.1. Open the Not ifications Panel ............................ 17
Page 5

User Manual
SP642
3
7.2. Respond to Not ifications .................................. 17
7.3. Close Notific ations Panel ................................. 17
8-Messaging ............................................................ 17
8.1. Message enviro nment & Settings .................... 18
8.2. Using the Onscr een Keyboard ......................... 18
8.3. Create and Sen d Multimedia Messag e ............ 20
8.4. Operation on a message: ................................. 20
9-Multimedia ............................................................ 21
9.1. Camera ............................................................ 21
9.2. Photos .............................................................. 22
9.3. Share an image ................................................ 22
9.4. Music ................................................................ 22
9.5. FM Radio .......................................................... 23
Page 6

User Manual
SP642
4
9.6. Record Sounds ................................................ 23
9.7. Make Screenshot ............................................. 23
9.8. New features of the volume contr ol .................. 24
10-Connect to Networks a nd Devices ..................... 24
10.1. Connect to PC ................................................ 24
10.2. Connect to I nternet ......................................... 26
10.3. Connect to W i-Fi Networks ............................ 26
10.4. Pair with Bl uetooth Devices ........................... 26
10.5. Connect to In ternet via your Pho ne ................ 26
10.6. Install Secur e Certificate from SD Card ......... 26
11-Download Applications ....................................... 27
12-Phone Settings ................................................... 28
13- Health and Safety Information .......................... 28
Page 7

User Manual
SP642
5
1- WELCOME
Congratulations on your purchase of the BLU mobile phone.
Your phone provides many functions which are practical for
daily use, such as a hands-free loudspeaker, camera, MP3 player,
internet and much more.
You can read the manual to understand how to use G60
Mobile phone and experience the well -established functions
and simple operation metho d. Please use the original accessory
in order to achieve the best use of effects. Use of non-o riginal
components may lead to damage caused to the machinery, in
which case BLU shall not b e responsible. BLU Warranty
Certificate enclosed at the end.
1.1. Exciting Feature s
▪ Android P
▪ 6.088“ HD+ inch Screen
▪ Cameras (8M+13M &2M)
▪ External Memory (Expandable up to 128 GB)
▪ Dual SIM
▪ Multimedia player
▪ Gravity sensor
▪ Wi-Fi
▪ GPS
▪ Battery 4000mAh
Page 8
User Manual
SP642
6
▪ For your safety
Read this simple guideline. Avoiding them may be dangerous or
illegal. Read the compl ete user manual for fu rther information.
Do not switch your phone on wh en the use of wireless device s is
prohibited or when the wireless device may cause interference or
danger.
Do not use your phon e while driving.
Follow relevant rules or regulations in hospitals and health care facilities.
Switch your phone off n ear medical devices.
Switch your phone off in an aircraft. The radio signal from it may cause
interference in signals of the aircraft.
Switch your phone off near high-precision electronic dev ices . It may
affe ct t he p erfo rman ce of these devices.
Do not attempt to disassemble your phone or its accessories. Only
qualified personnel may service or repair the phone.
Do not place your phone and its acces sories in containers with strong
electromagnetic field .
Do not place magnetic storage media near your phone. Radiation from
the phone may erase the information stored on them.
Do not put your phone in a high-temperature place or use it in a place with
flammable gas such a s a petrol pumps.
Keep your pho ne an d it s acc ess orie s away fro m chi ldre n. Do not
allow children to use your phone without guidanc e.
Respect other’s pri vacy and legal rights when us ing your phone.
Page 9
User Manual
SP642
7
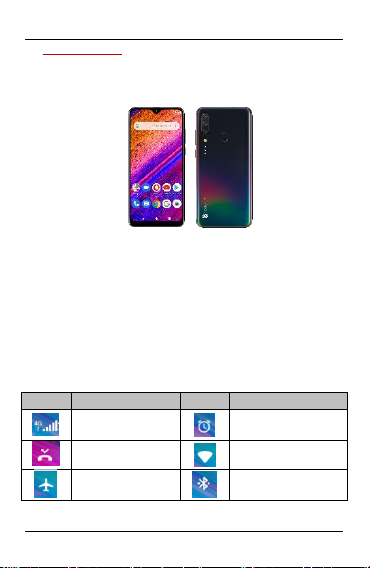
2- PHONE LAYOUT
2.1. Keys and Parts
1. USB Jack
2. Earphone Jack
3. Receiver
4. Front Camera
5. Front Flash
6. Screen
7. Menu Key
8. Home Key
9. Back Key
10. Volume Key
11. Power Key
12. Rear Flash
13. Rear Camera
14. Speaker
15. Finger print
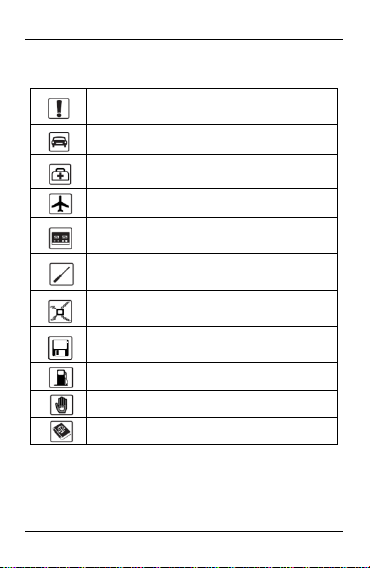
2.2. Icons and In dicators
Icons
Indicators
Icons
Indicators
Signal strength
indicator
Alarm has been set
New missed calls
Wi-Fi is activated
Airplane mode is
activated
Bluetooth is on
Page 10

User Manual
SP642
8
The headphone
is being used
Battery charging
symbol
New received
message
3- GETTING STARTED
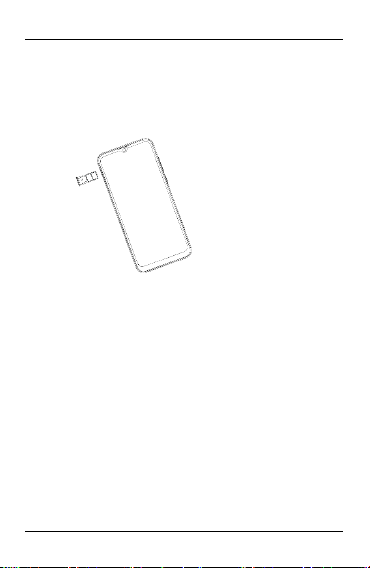
3.1. Insert SIM card
SP642 is a Dual SIM mobile phone allowing you to use the
facility of two netwo rks. Both sim have micro slot.
To insert SIM card(s):
▪ Turn off the phone and use the ejector pin to remove the card
slot.
▪ Insert the SIM card correctly in the card slot(s). (see below fig)
Insert SIM card caref ully!
▪ Finally inserted into th e card slot.
▪ 3.2. Insert Memory card
Page 11
User Manual
SP642
9
SP642 allo ws you to expand external memory with a micro SD
card, up to 64 GB.
▪ Turn off the phone and use the ejector pin to remove the card
slot.
Insert the memo ry card into the slot.
▪ Finally inserted into th e card slot.
Use on ly compatible memo ry cards. Incomp atible memory
cards may dam age the card or t he device will corrupt the data
stored in the card.
3.3. Unlock the Phone
You may need to provide PIN, Password, Fingerprint or draw a
pattern to unlock your p hone.
To unlock the screen:
▪ Press the power key to wake up the phone.
▪ Hold and drag th e unlock icon to upside to unlock.
Page 12
User Manual
SP642
10
You may be required to unlock your phone base d on the unlock
method in settings.
To set the unlock method:
▪ On the main men u, touch Settings > Security & Location.
▪ Touch set up screen lock.
▪ Choose the type of locking as desired. You can set your screen
lock on the basis of pattern, PIN, Password, Fingerprint or none.
3.4. Using the Touch screen
You can use the touch screen in the following ways:
▪ Touch: Acts on items on the screen, such as application and
settings icons, to type letters and symbols using the onscreen
keyboard, or to press ons creen buttons.
▪ Touch and hold: Touch and hold an item on th e screen until
an action occurs.
▪ Drag: Touch and hold an item and move your finger on the
screen until you reach the target position.
Page 13

User Manual
SP642
11
▪ Swipe or sli de: Quickly slide your finger across the surface of
the screen , (without drag ging an item). For example, s lide the
screen up or down t o scroll a list,
▪ Pinch: In some applications (Such as Browser, and Gallery)
you can zoom in and out by placing two fingers on the screen at
once and pinching them together (to zoom out) or spreading
them apart (to zoom in).
▪ Rotate the screen: On most screens, the orientation of the
screen changes as you rotate it. You can turn this feature ON
and OFF.
3.5. Using the P hone’s Buttons
The phone’s button s offer a lot of functions and shortcuts.
Button
Press
Menu: This is used for recent applicati on
Home: returns to Hom e screen.
Back: Returns to the main screen.
The phone provi des you with C ontext menus and Options
menus for accessin g the features in an intuitive way.
3.6. Context Menus
You can open context men u by touchin g or key. Not
all screens have context menus. Examples of context menu from
Contacts and call environment.
Page 14

User Manual
SP642
12
3.7. Options menu s
When you touch and hold some items on a screen, an Options
menu opens.
3.8. Menu Icons
You have t he following menu icons to easily let you access its
important features:
Opens the dialer
Opens messages
Opens the browser
4-PLACING AND RECEI VING CALLS
You can dial a phon e number or to uch a number in your
contacts. You can also place f rom the call log o r contacts.
4.1. Make a Call
▪ Tap the icon on main menu or the home screen to dial
Page 15

User Manual
SP642
13
the desired number.
▪ Touch th e icon on main menu or the home s creen to
make a call from contact, g roups or favorites.
▪ To dial an international number, touch and hold the 0 key to
enter the Plus (+) symbol, and then enter the international
country prefix, followed by the phone number
▪ To uch the icon to call with SIM 1 or SI M 2.
▪ Press the Volume Up/ Down keys to adjust the call volume.
▪ You can access Call Log s, Contacts from the dialer screen.
▪ While during a call, touch the icon to end a call.
4.2. Disable Pho ne Calls (Airplane mode)
Some location s like airplanes may require you to turn off your
mobile, Wi-Fi, and Bluetooth wirel ess connections.
▪ Touch the drop down from the t op to open the status bar..
▪ Touch the Airp lane mode.
4.3. Disable SI M card
If you want to close t he SIM card, go to:
Settings—Network & internet
> SIM cards.
> turn off SIM1/ SIM2
5-THE HOME SCREE N
When you sign in, the home screen opens.
The Home screen is your starting point to access all the features
on your phone.
Page 16

User Manual
SP642
14
5.1. Open and Cl ose the Launcher
The phone is dire ctly on the main menu after booting.
Touch an icon to launch the
Corresponding application.
The status bar shows the time,
signal strength, b attery status, and
notification.
Touch and hold to move or
remove an icon o r a widget.
Page 17

User Manual
SP642
15
You have access to all applications installed on your device and
their widgets when available.
Touch an application to open an d launch it.
To add an application shortcut to another location, press and
hold it until it ente rs the desired location. Place it and release
your finger.
Slide the Launch er left or right to bring more icons into view.
As soon as you in stall a new application, it comes in t his list.
Widgets come when you lon g press on the home screen. Y You
can touch WIDGETS d irectly.
You cannot launch widget like an application; you can only place
it on desktop screen .
Press and hold it until it enters Home screen. Place it and
release your finger. A context m enu opens to configure the
widget or resize it, naturally, it depends on the widget.
5.2. Switch to Recently Used Application
▪ Press the icon for open recently used application.
▪ Touch an icon to o pen its application. Or press to return
to the current appli cation.
5.3. Customize Home Screen
You can add applications , shortcuts, widgets, and other items
to any part of the Home screen or change the wallpaper.
Widgets:
▪ Long press on ho me screen for widgets.
▪ Drag a widget to a home screen: Touch and hold the widget’s
icon, slide your finger where you want to place it, and lift your
finger.
▪ You may be asked to make further choices before the widget
activates. If there isn’t room where you dropped it, the widget
won’t get added to t he Home Screen.
Wallpapers: Wallpapers are images from Gallery, still images
included with the system. They take the place of the default
background for your Ho me Screen.
Page 18

User Manual
SP642
16
Touch and hold anywhere on a desktop Home screen that’s not
occupied. A list of options appears.
▪ Touch the following wallpaper source:
o Device fold ers: Choose from pictures that you’ve taken with
camera or downloaded to your device.
▪ To set wallpaper, touch right option then select Set wallpaper.
Folders: You can very easily regroup desktop icons in a folder
on screen to save spac e and access more applications.
▪ Touch and hold any icon on de sktop screen to move it.
▪ Go on another icon and release to create a folder containing
both icons.
▪ Then add as many i cons as folder can hold , give it a name,
move it where you want.
You have all the tools to customize your Phone.
6-CONNECT TO THE INT ERNET
6.1. To configure your Internet:
▪ Go to Settings > Network & internet > Data usage >Turn on
‘Mobile data’
▪ By default, your network provide r sends the Access Point
Name settings via SMS, or it comes automatically with your SIM
card. You may need to in stall these settings. After this, you can
choose from the listed access point names. If the acces s point
names are not listed by default, please contact your network
provider for the same .
▪ To add any operator Access point Name, go to settings >
Network & internet > Mob ile networ k > Advanced> Access
point Names>add.
▪ After you have selected or configured the access point name,
go to Settings > Network & internet > Data usage to en able
Internet connection.
6.2. Access Internet via Wi-Fi
To browse the Internet via Wi-Fi:
▪ Go to Settings> N etwork & internet and then tap Wi-Fi.
▪ Next, select the Wi-Fi connection listed under Wi-Fi networks.
Page 19

User Manual
SP642
17
7-MANAGING NOTIFICATIONS
Notification icons inform you of new messages and events .
When you receive a n otification, its icon appears in the status
bar, along with a summary.
7.1. Open the No tifications Panel
Drag the status bar down from the top of the screen as shown
below:
The Notifications panel displays your network provide r name
and a list of your current notifications.
7.2. Respond to Noti fications
Open the notification panel and touch a notification to respond
to it. What happen s next depends on the notification .
7.3. Close Notif ications Panel
Drag the tab at the bottom of the Notifications panel to the top
of the screen. Or just press the back button. The panel also
closes when you tou ch a notification to respond to it.
8-MESSAGING
Page 20

User Manual
SP642
18
8.1. Message envi ronment & Settings
You can use Messa ges to exchange text me ssages and
multimedia messages with your fri ends.
The messages settings allow you to set SMS/MMS
notifications, vibrate, message tones, delivery reports and
many others.
Take a tour and explore messages settings, you’ll find
interesting things.
8.2. Using the O nscreen Keyboard
Some applications display the keyboard by default. In others,
you touch a text field where you want to enter text, to open the
keyboard.
Touch to compose a new text
or multimedia message.
Page 21

User Manual
SP642
19
Touch once to capitalize t he next letter you
type. Touch and hold or double tap for
Caps Lock.
Secondary cha racters panel (special,
symbols, numbers )
Write your message here. After typing,
press icon to c lose the keyboard.
Touch and hold the text field to open a
menu and to cop y/cut texts.
Recipient zone: wr ite the name, press right
icon to enter n umbers or press below
frequents or all contacts to access con tacts
list
Page 22

User Manual
SP642
20
8.3. Create and S end Multimedia Message
A Message becomes an MMS if you send it to an email address,
or add multimedi a file(s).
▪ Touch compose new message.
▪ Enter or select a mobile phone number.
▪ Touch the composition text box and write your mess age.
▪ Touch Attach to attach various types of f iles.
▪ Send the MMS.
8.4. Operation on a message:
▪ Open the messa ge thread containing the message you want
to operate.
Touch and hold this message u ntil menu ba r comes above.
Make your choice:
▪ To share the message.
▪ To forward a message.
▪ To copy the message.
▪ To view the message details .
This is to erase characters
Page 23

User Manual
SP642
21
▪ To delete the message.
9-MULTIMEDIA
9.1. Camera
Your came ra’s pictures and video s are stored in both the SD
card and device. You can copy pictures and videos from both
the SD card and dev ice to a PC and vice versa.
Press to take photo
Press to record video
Page 24

User Manual
SP642
22
9.2. Photos
You can use the Photos to view pictures, play videos and share
files.
▪ Touch the Photos icon in the main menu.
▪ Touch an album to open and view its contents.
▪ Touch a picture or a video in an album to view it.
9.3. Share an image
▪ Open the main Photos window.
▪ Check or uncheck the image you want to share.
▪ Touch the icon at the bottom of screen to share via
Bluetooth, Email ,etc.
▪ You can share via email, Blu etooth, and so on.
9.4. Music
You can easily transfer your favorite music from you r PC to the
SD card and experi ence a whole world of interesting and
melodious music.
Press the phone’s volume up/down keys on the right side of the
Click on settings icon for
more functions
Page 25

User Manual
SP642
23
mobile phone to ad just the volume.
9.5. FM Radio
You can listen to your favorite FM channels using the inbuilt FM
receiver of your phone and a corded earphone (the wire is used
as antenna).
▪ Record sound
▪ Search FM stations
▪ Enable speaker
Press the phone’s volume up/down keys on the right side of the
mobile phone to adjust the volume.
9.6. Record Sounds
▪ Touch the Sound Recorder in th e main menu.
▪ Tap to start recording a voice clip. “Recording” ap pears
when it is recording a voice clip.
▪ Tap to stop and save the recording.
9.7. Make Screenshot
Press and hold for 1 second both Volume Down and Power
buttons togethe r. Or also you can long press Power Key to get
Screenshot functio n
Tap to make screenshot
Page 26

User Manual
SP642
24
9.8. New features of the volume control
Android P uses th e vertical volume interface, which users can
pop up by short press the volume button. It is very convenient
to switch the Audio Profiles and adju st the volume.
10-CONNECT TO NETWORKS AND DEVICE S
Your phone can connect to a variety of networks and devices,
including Wi-Fi, GPRS, Bluetooth, devices, such as headsets. You
can also transfer files to/from your PC through the data cable.
10.1. Connect to PC
You can connect your phone to PC via following options:
Connect the phone to your PC with the help of USB cable.
“Charging this device via USB" notification wil l be shown.
Touch the notification, to change and connect to other mode s.
Tap to switch audio prof ile mode
Slide up or down t o adjust volume
Tap t o access all volume
settings
Page 27

User Manual
SP642
25
Charge only : Phone will only charged when select charge only
mode.
Media device(MTP):This feature will let you manage files on
phone and computer at the same time .
Camera(PTP):Let you transfer photos using camera software
and manage pictures on computers.
MIDI:Let you u se the OTG cable to connect to the MIDI
keyboard.
USB virtual drive:PC can ident ify the phone ,and t he “CDROM”contains “ADB”,”Drivers” will shows on t he PC.
Page 28

User Manual
SP642
26
10.2. Connect to I nternet
Refer to section 6 for detail s.
10.3. Connect to W i-Fi Networks
Refer to Section 6 for details.
10.4. Pair with Bluetooth Devices
▪ Go to Settings > Conn ected devices> Co nnection
Preference>Bluetooth.
▪ If Bluetoot h is off, check Bluetooth to turn it on. Your phone
scans and displays th e Bluetooth devices in range.
▪ If th e device you want to pair with is not in the list, make it
discoverable.
▪ Your phone will remain scanned until it is discoverabl e by
other devices.
▪ Touch the ID of the other device in the list Settings to pair
them. If you are prompted to for a password, enter any
password on one device and enter the same password you
entered in th e other device to be paired , If the pairing is
successful, your ph one gets connected to the device.
10.5. Connect to I nternet via your Phone
You can browse the Internet on your PC using your mobile
phone. To do this:
▪ Connect your mo bile phone to your PC via the US B cable.
▪ Go to Settings> Network & Internet>More >Hotsp ot &
tethering > USB Tethering.
A prompt for installation will appear on your PC. Proceed as
suggested.
May be you need to manually install the drivers in PC.
10.6. Install Secur e Certificate from SD Card
If your VPN or Wi-Fi Network relies on secure certificates, you
must obtain the c ertificates and store them in your phone’s
storage, before you can configure access to those VPN or Wi-Fi
networks on your phon e.
You may need to download the certificates from a web site.
Page 29

User Manual
SP642
27
▪ Copy the certificate from your computer to the root of the SD
card.
▪ Touch Settings> Security & Lo cation.
▪ Touch Install from SD card under Credential Storage.
▪ Touch the file name of the certi ficate to install. Only the
names of certificates that you have not already installed on your
phone are displayed.
▪ If prompted, enter the certificate’s password and touch OK.
▪ Enter a name for the certificate and touch OK.
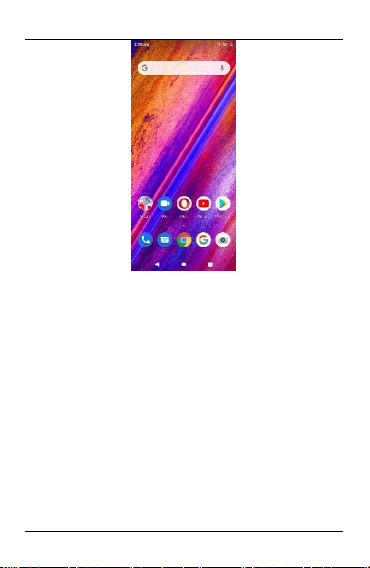
11-DOWNLOAD APPLICATIONS
The phone has a default configuration which includes some
applications. Discover all others apps b y using play store. You
will be able to connect with mobile d ata or Wi-Fi for example,
and by signing in the application with just an e mail.
This is what it lo oks like:
Page 30

User Manual
SP642
28
12-PHONE SETTINGS
You can go to Settings to customize you r phone’s preferences
and behavior in a variety of ways:
Network&inter
net
Let’s you mana ge WIFI,mobile,data usage ,hotspot,etc.
Connected
devices
Let’s you manage Bluetooth to communicat e with other
Bluetooth devic es,or choose USB con nection mode.
Apps &
notifications
Let’s you view all applications downlo aded or on SD
card and manage all running application s in devices.
Smart controls
The intelligent b ody feeling.user can custo mize the
function they n eed.
Battery
Let’s you check the battery level ,statu s and manage
battery usage.
Sound
Let’s you config ure how and at what volum e the phone
rings, vibrates etc .
Display
Let’s you confi gure brightness and oth er screen
settings.
Storage
Let’s you see a nd manage available spa ce on your
phone and on your SD card.
Scheduled
power on/off
Let’s you set t he automatic power on ti me or shutdown
time.
Accounts
Let’s you add, remove and manage your Google and
other supporte d accounts.
Security &
Location
Let’s you protec t personal information, like a djust your
phone's lock, set SIM card lock etc. An d set the location
related settings.
Navigation bar
Let’s you choo se which navigation bu ttons you like.
Google
Here list google services&preferences.
Accessibility
Enable your insta lled accessibility ap plications and
adjust related sett ings.
System
View information about your phone, such as signal
strength, status an d phone information.
13- HEALTH AND SAFETY INFORMATION
Certification Information (RoHS)
Page 31

User Manual
SP642
29
We at BLU take our social responsibility ser iously and are
committed to the cause of saving our environm ent; it is in
keeping with the se commitments that we are proud to state
that BLU phones are RoHS complaint.
Certification Information (SAR)
Your phone is designed not to exceed the limits of emission of
radio waves recommended by international guidelines. These
guidelines include safety margins designed to assure the
protection of all p ersons, regardless of age and health.
SAR (sp ecific absorption rate) is th e unit of body-absorbed RF
quantity when the phone is in use. SAR value is ascertained
according to the highest RF level generated during laboratory
tests.
The true SAR level during phone usage will be far lower than
this level.
The SAR value of the phone may change depending on factors
such as how close you are to a network tower, use of
accessories and other enhancements.
The SAR value may differ depending on nat ional reporting,
testing requirements an d the network band.
SAR Recommendations
Use a wirele ss hands-free system (headphone, headset) with a
low power Bluetooth emitter.
Please keep your calls short and use SMS whenever more
convenient. This advice applies especial ly to children,
adolescents and pre gnant women.
Prefer to use your cell p hone when the signal quality is good.
People h aving active medical implants should preferably keep
the cell phone at least 15 cm away from t he implant.
Maintain a preferable distance of 15 cm from the device.
Safe Driving
Do not use the phone while driving. When you have to use the
phone, please us e the personal hands-free kit.
Page 32

User Manual
SP642
30
Please do not put th e phone onto any passenger seat or any
place from which it may fall down in case of vehicul ar collision
or emergency braking.
During Flight
Flight is influenced by interference caused by the phone. It is
illegal to use a phone on the airplane. Please turn off your
phone or switch to flight mode durin g a flight.
In Hospitals
Your Phon e’s radio waves may interfere with the funct ioning
medical devices. Consult a physician or the manufacturer of the
medical device to determine whether they are adeq uately
shielded from externa l Radio Frequency. Switch off your device
when regulations in struct you to do so.
Do not carry the wireless device in the upper po cket.
Turn off the ph one if there is any reas on to suspect that
interference is taking place.
Unsafe Areas
Please turn off your phone when you are close to a gas station
or in the vicinity of any place where fuel and chemical
preparations, or any oth er dangerous goods are stored.
Taking Care of Your Device
Your device is a produc t of superio r design and craftsman ship
and should be handled with care: The following suggestions will
help you protect your phone:
Keep the device dry. If your device gets wet, remove the battery
without turning on t he device, wipe it with a dry cloth and take
it to the servi ce center.
Do not store the device in high or cold temperature. High / cold
temperature can s horten the life of electronic devices and
damage batteries.
Do not use or store the device in dusty, dirty areas. Its moving
parts and electronic components can be damaged.
Do not attempt to open th e device other than as instructed in
Page 33

User Manual
SP642
31
this guide. Repairin g the phone by yourself other than our
authorized service agents/centers goes against the warranty
rules.
Do not drop, knock, or shake the device. Rough handling can
break internal circuit boards and fine mechanics.
Do not u se harsh chemicals, cleaning solvents, or strong
detergents to clean the device. Only use a soft, clean , dry cloth
to clean the surface of the device.
Do not store your device near magnetic fields or allo w your
device to come in co ntact with magnetic fie lds for extended
period of time.
Battery Recommendations
Please put the battery in a well-vent ilated place out of direct
sunlight. Charge the battery at room temperature range.
If the time span of the battery after charging becomes much
shorter than usual, the battery life is at an e nd. Replace the
battery with a new battery of th e same make and specification.
Do not discard the battery with household trash. Please dispose
of used battery accordin g to your local environmental laws and
guidelines.
Use manufacturer approved b atteries, chargers, accessorie s
and supplies. We will not be responsible for user’s safety when
using unapproved batterie s or accessories.
“It is advisable to charge battery to 100% before start using
phone for better battery life”
Recycle Your Phone
Page 34

User Manual
SP642
32
The WEEE logo (shown at the left) appears on the
product (battery, handset, and charger) to indicate
that this p roduct must not be disposed off or
dumped with your other household wastes. You
are liab le to dispo se of all your ele ctronic or
electrical waste equipment by relocating over to the specified
collection point for recycling of such h azardous waste.
Collection and proper recovery of your electronic waste
equipment’s at the time of d isposal will a llow us to h elp
preserve the environment. Recycling of the electronic waste
equipment will ensure safety of human health and environment.
Do’s and Don’t s for disposal e-waste
Do’s:
Ensure that an Auth orized Person repairs your G60 products.
Call Our Local Authorized Collection Centers to Dispose G60
products.
Always drop your used electronic products, batteries or any
accessories thereof after the end of th eir life at nearest
Authorized Collecti on Point or Collection Center.
Separate the packaging material ac cording to responsible waste
disposal option s and sorting for recycling.
Always remove the battery from the product, when you do not
intend to use the p roduct anymore it in future.
Don’ts:
Do not Dismantle your G60 roduct on your own
Do n ot give your e-waste to KabbadiWala / Scrap Dealer/ Rag
Pickers.
Do not dispose -off the e-waste in landfills.
Never dump E-waste in garbage bins.
Page 35

User Manual
SP642
33
Do not dispose of your product at municipal waste bins or rooms.
Do not throw used batteries into househo ld waste.
Consequences of improper handl ing and disposal of E-Waste
Improper disposal of waste prevent s natural resources from
being re-used.
Some waste contains hazardous che micals and if not disposed
of properly may release toxins into the soil and water, and also
releases greenhouse gases into the e nvironment
If e-waste is not properly dispo sed of, it can threat to the health
and well -being of hu mans and an imals and it also has adverse
effect on the environment.
Placing of batteries or devices on or in heating devices, such as
microwave, ovens, stoves, or radiators and improper disposal of
batteries may lead to expl osion.
If the battery terminals are in contact with metal objects, it may
cause a fire.
Disclaimers
The colors and specifications shown/ mentioned in the user
manual may differ from the actual product. Images shown are
for repre sentation purpose only. Othe r product lo gos and
company names mentioned herein may be trademarks or trade
names of their res pective owners.
The content of this manual may vary from the actual content
displayed in the mobile phone. In such a case, the later shall
govern.
We keep the right to make m odifications to any of the content
in this use r guide without public announcement or p rior
notification.
For devices with external power supplies, plug socket should be
Page 36

User Manual
SP642
34
placed in short distance and easily accessible.
Using the wrong type batter y replacement there is a danger of
explosion, be sure to fol low the instructions disposal of used
batteries.
Copyrights
All rights reserved. Reproduct ion, t ransfer,
distribution or sto rage of part or a ll of the
contents in this document in any form without
the prior written per mission of is strictly
prohibited.
To prevent possible heari ng damage, do not listen at high
volume levels of lon g periods.
To use the device only with the earphones included, never
change the earphon es included for another one.
FCC REGULATIONS
This mobile phone complies with part 15 of the FCC Rules.
Operation is subject to the followin g two conditions: (1) This
device may n ot cause harmful interference, and (2 ) this device
must accept any interference received, including interference
that may cause undesired operation.
This mo bile phone h as been tested and found to comply with
the limits for a C lass B digital device, pursuant to Part 15 of the
FCC Rules. These limi ts are designed to provide reasonable
protection against harmful interference in a residential
installation. This equip ment generates, uses and can radi ated
radio frequency energy and, if not installed and used in
accordance with the instructions, may cau se harmful
interference to radio communications. However, there is no
guarantee th at interference will not occur in a particular
installation if this equipment does cause harmful interference
Page 37

User Manual
SP642
35
to radio or television reception, which can be determined by
turning the equipment off and on, the u ser is encouraged to try
to correct the interference b y one or more of the following
measures:
-Reorient or relocate the receiving antenna.
-Increase the separation between the eq uipment and receiver.
-Connect the equipment into an outlet on a circuit different
from that to which the receiver is conne cted.
-Consult the dealer or an experienced radio/TV technician for
help.
Changes or modifications n ot expressly approved by the party
responsible for compli ance could void the user’s authority to
operate the equipment.
The antenna(s) used for this transmitter must not be co-lo cated
or operating in conjunction with any other antenna or
transmitter.
RF EXPOSURE INFO RMATION (SAR)
This mobile phon e meets the government’s requirements for
exposure to radio waves.
This phone is design ed and manufactured not to exceed the
emission limit s for exposure to radio frequency (RF) energy set
by the Federal Communications Commissio n of the U.S.
Government.
The exposure standard for wireless mobile phones employs a
unit of measurement known as the Spe cific Absorption Rate, or
SAR. The SAR limit set by t he FCC is 1.6W/kg. Tests for SAR are
conducted using standard operating positions accepted by the
FCC with the phone transmitting at its highest certified power
level in all tested frequency bands. Although the SAR is
determined at the h ighest certified power level, the actual SAR
Page 38

User Manual
SP642
36
level of th e phone while operating can be well below the
maximum value. Th is is because the phone is designed to
operate at multiple power levels so as to use only the power
required to reach the networ k. In general, the closer you are to
a wireless base statio n antenna, the lower the power outpu t.
The highest SAR value for th e model phone as reported to the
FCC when tested for use at the ear is 0.95W/kg and when worn
on the body, as described in this user guide, is 0.82W/kg (Body worn measurements differ among phon e models, depending
upon available acces sories and FCC requirements.)
While there may be differences between the SAR leve ls of
various phones and at vario us positions, they all me et the
government requirement.
The FCC has granted an Equipment Authorization for this model
phone with all reported SAR levels evaluated as in compliance
with the FCC RF exposure guidelines. SAR infor mation on this
model phone is on file with the FCC and can be found under the
Display Grant section of www.fcc.gov/oet/ea/fccid after
searching on FCC ID : YHLBLUG80
For body worn operation, this phone has been tested and meets
the FCC RF exposure guidelines for use with an accessory that
contains no metal and the positions the handset a minimum of
1.0cm from the body. Use of other accessories may not
ensure compliance with FCC RF exposure guidelines. If you do
not use a body-worn accessor y and are not holding the phone
at the ear, position the handset a minimum of 1.0 cm from your
body when the ph one is switched on.
 Loading...