

Page 1
IL2707
Conveyor Toasters Installation Instructions
These symbols are intended to alert the
user to the presence of important operating
and maintenance instructions in the manual
accompanying the appliance.
Go to:
www.star-mfg.com/scripts/manuals.aspx
to obtain this units installation & operations
manual, warranty & other documents.
NOTICE
Using any part other than genuine Holman factory supplied parts
relieves the manufacturer of all liability.
Holman reserves the right to change specications and product
design without notice. Such revisions do not entitle the buyer to
corresponding changes, improvements, additions or replacements
for previously purchased equipment.
Due to periodic changes in designs, methods, procedures, policies
and regulations, the specications contained in this sheet are subject
to change without notice. While Holman Manufacturing exercises
good faith efforts to provide information that is accurate, we are
not responsible for errors or omissions in information provided
or conclusions reached as a result of using the specications.
By using the information provided, the user assumes all risks in
connection with such use.
CAUTION
This equipment is designed and sold for commercial use only by
personnel trained and experienced in its operation and is not sold
for consumer use in and around the home nor for use directly by
the general public in food service locations.
Before using your new equipment, read and understand all the
instructions & labels associated with the unit prior to putting it into
operation. Make sure all people associated with its use understand
the units operation & safety before they use the unit.
All shipping containers should be checked for freight damage both
visible and concealed. This unit has been tested and carefully
packaged to insure delivery of your unit in perfect condition.
If equipment is received in damaged condition, either apparent or
concealed, a claim must be made with the delivering carrier.
Concealed damage or loss - if damage or loss is not apparent until
after equipment is unpacked, a request for inspection of concealed
damage must be made with carrier within 15 days. Be certain to
retain all contents plus external and internal packaging materials
for inspection. The carrier will make an inspection and will supply
necessary claim forms.
GENERAL SAFETY INFORMATION
MODEL
IRCS2-SBW, IRCS2-NW
Conveyor Toasters
Electronic Controls
GENERAL INSTALLATION INFORMATION
The unit was shipped fully assembled and ready to plug into a
standard outlet specied for its voltage and amp draw. If improper
electrical supply is determined, contact a qualied electrician prior
to using the unit. Removal and replacement of the power cord
and plug will void the warranty. For assistance, contact your local
authorized service agent for service or required maintenance.
Level unit using the adjustable feet under the unit (approximately
1/2" adjustment).
Before using the unit for the rst time, wipe down the exterior with
a damp cloth.
Allow enough space around the toaster for adequate ventilation.
Do not operate the unit without the crumb tray properly positioned.
Overheating and poor toasting may occur. Read all labels on the
unit and follow their instructions.
MAINTENANCE AND REPAIRS
Contact the factory, a service representative or a local
service company for service or required maintenance.
Go to www.star-mfg.com/scripts/manuals.aspx to nd a service
agent near you. Replacement cord sets must be purchased from
Star Manufacturing International, Inc. or our authorized agents.
Should you need any assistance regarding the operation or
maintenance of any Holman equipment; write, phone, fax or
e-mail our service department. In all correspondence mention
the model number and the serial number of your unit, along with
the voltage.
Business Hours: 8 am to 4:30 p.m. Central Standard Time
Telephone: (877) 242-0270
Fax: (314) 781-2714
E-mail: Parts@star-mfg.com
Service@star-mfg.com
Warranty@star-mfg.com
Website: www.star-mfg.com
Mailing Address: Star International Holdings Inc., Company
10 Sunnen Drive
St. Louis, MO 63143
U.S.A.
2M-Z18529, Rev. A 8/22/2014
Page 2
ELECTRICAL CONNECTION
Before making any electrical connection to this unit,
check that the power supply is adequate for the voltage,
amperage and requirements stated on the rating plate.
A wiring diagram is included in the Installation &
Operations manual, which can be downloaded at
www.star-mfg.com/scripts/manuals.aspx.
Disconnect the unit from the power source before installing or
removing any parts.
Be absolutely sure that the ground connection for the receptacle is
properly wired. Do not connect equipment to power without proper
ground connections. Improper grounding may result in personal
injury or fatality.
DO NOT CUT OR REMOVE THIS PLUG OR
WARNING
WARNING
CAUTION
WARNING
WARNING
WARNING
1. Space: 16”x24”x18”
2. Electricity: 208/240 Volts,
1. Space: 10” x 29” x 17.5”
2. Electricity: 208/240 Volts,
GROUNDING PRONG FROM THE PLUG.
CONNECT/PLUG UNIT INTO DEDICATED
A.C. LINE ONLY SPECIFIED ON THE DATA
PLATE OF THE UNIT.
CERTAIN SURFACES ARE EXTREMELY HOT
DURING OPERATION AND CARE SHOULD
BE TAKEN WHILE USING THIS UNIT.
DO NOT IMMERSE OR LET THE UNIT STAND
IN WATER.
DO NOT HOSE DOWN THE UNIT OR THE
TABLE/COUNTER IF THE UNIT IS ON THE
TABLE/COUNTER.
KEEP AWAY FROM RUNNING WATER.
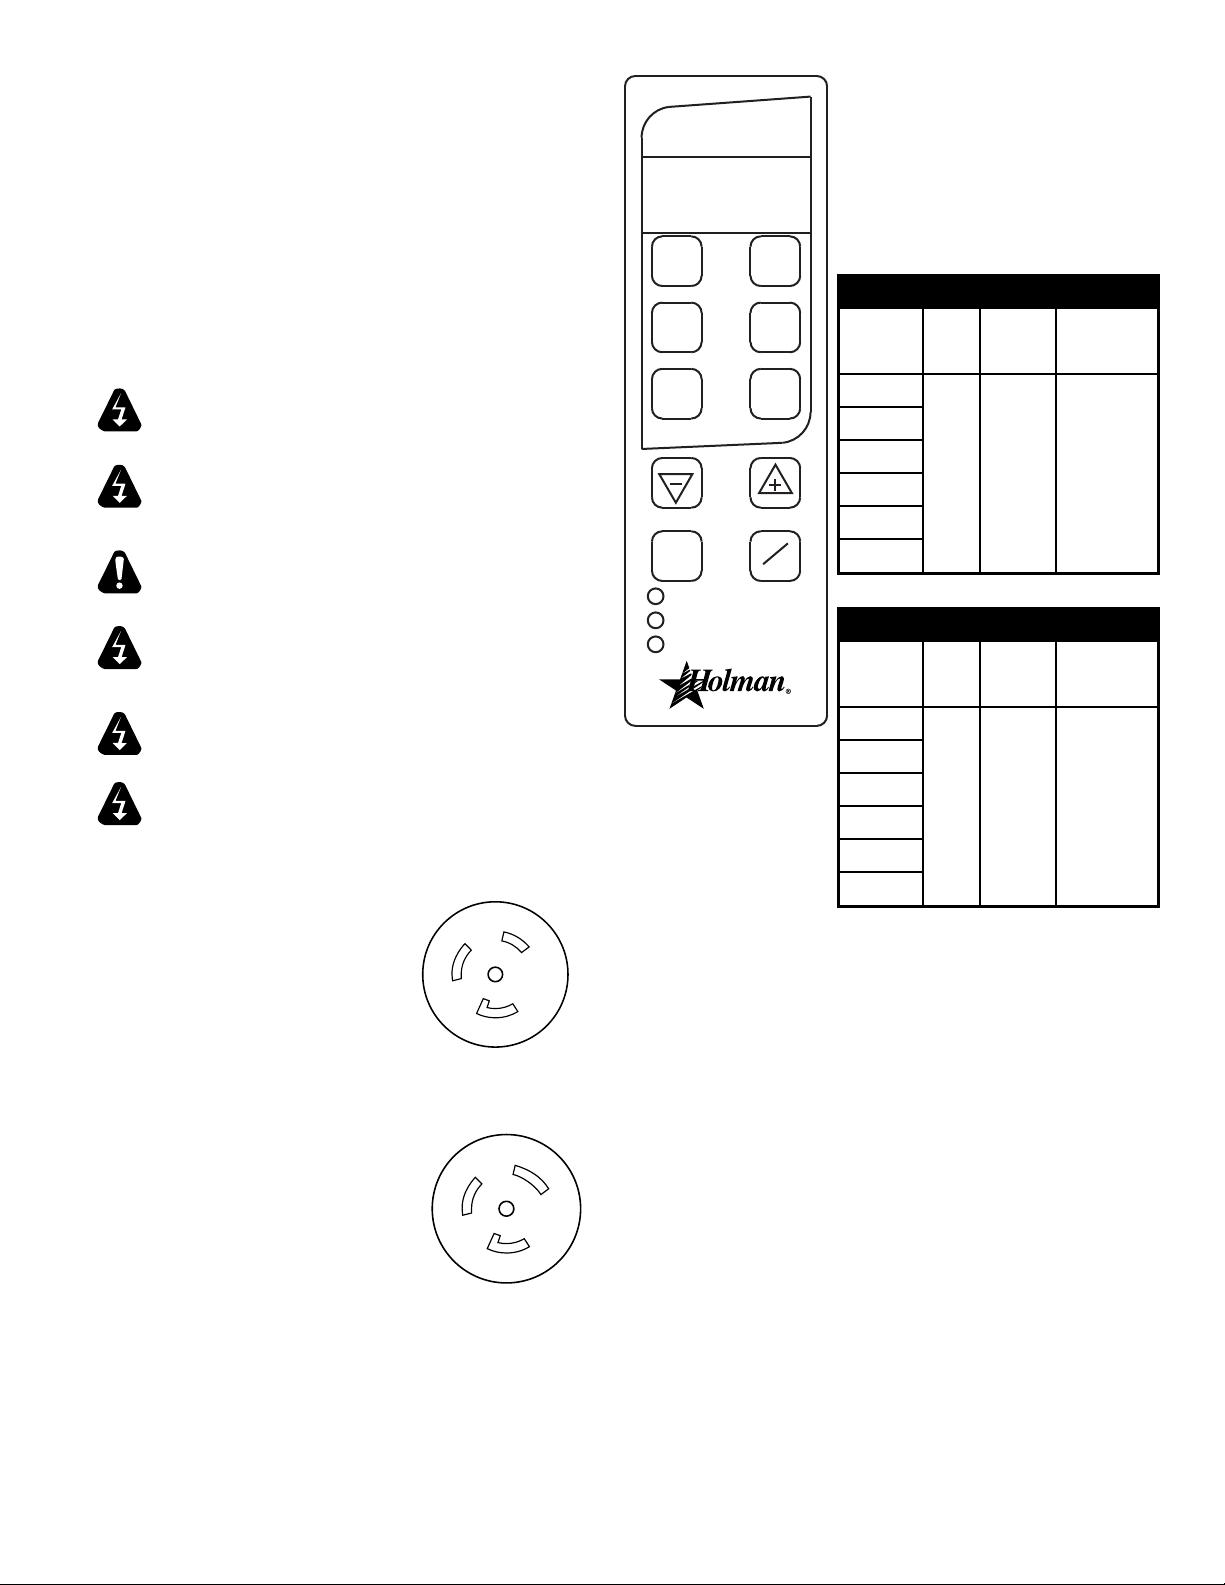
IRCS2-SBW INSTALLATION REQUIREMENTS
(width x depth x height)
30 Amps, NEMA 6-30R
Recepticale
NEMA L6-30R
IRCS2-NW INSTALLATION REQUIREMENTS
(width x depth x height)
12 Amps, NEMA 6-20R
Recepticale
ELECTRONIC
RADIANT-IMPINGEMENT SYSTEM
The Holman IRCS conveyor toaster
comes with pre-programmed factory
default settings for ALL MENU
BUTTONS.
T1 T2
Factory default settings are as follow:
IRCS2-SBW DEFAULT SETTINGS
T3 T4
T5 T6
Menu
Buttons
T1
Top
Heat
Bottom
Heat
Conveyor
Speed
T2
T3
T4
3.2 4.3 1
T5
SAVER
TOP HEAT
BOTTOM HEAT
CONVEYOR SPEED
ON
OFF
T6
IRCS2-NW DEFAULT SETTINGS
IL2711
Menu
Buttons
T1
Top
Heat
Bottom
Heat
Conveyor
Speed
T2
T3
T4
4.0 5.4 1
T5
T6
POWER SAVER SWITCH
There are three Power Saver modes:
ON: Unit is in pre-programmed power saving setting.
OFF: Power Saver mode is turned off.
AUTO ON: Power Saver turns on when there has been no activity
for a programmed length of time.
The operator may adjust the level of power reduction for the saver
mode. (Note: conveyor may move slowly when in saver mode.)
Two buttons (+) and (-) are used when increasing or decreasing the
value of each programmable setting.
A red LED light located at the lower portion of the control panel label
will indicate if the value for top heat, bottom heat or conveyor speed
is being adjusted.
NEMA L6-20R
NOTE: Ensure to clean the toaster properly before
using it for the rst time. Refer to the Cleaning
Procedure document for cleaning instructions.
Page 3

CERTAIN SURFACES ARE EXTREMELY HOT
DURING OPERATION AND CARE SHOULD
CAUTION
BE TAKEN WHILE USING THIS UNIT.
START UP
When the toaster has been plugged into a suitable outlet and power
supply, the word OFF will be displayed on the L.E.D. read out.
A. Press the ON/OFF button once to turn on the toaster. The
toaster will now enter into pre-heat and “PREHT” will be
displayed (the elements will begin to glow but the conveyor
and fan motor will not turn on).
B. After one minute, the fan motor will turn on and the conveyor
will begin turning at the previously saved setting (for initial start
up, the drive motor will operate at the factory default setting).
C. After 14 minutes, the display will show the last used program
selection i.e. (for initial startup, CROIS, MUFFIN, will be the
last program selected).
DAILY OPERATION
Check the power cord to insure that it is plugged into a proper outlet.
Press the ON/OFF button once to turn the toaster on.
Press the button a second time to turn the toaster off.
NOTE: When the toaster is turned off, the fan and conveyor motors
will continue to run for ve minutes. The words COOL and DOWN
will be alternately displayed during that time. After ve minutes, the
word OFF will be displayed until the ON/OFF button is pressed again.
Once the toaster has been pre-heated, the menu buttons can be
pressed to change to T1, T2, T3, T4, T5, T6
OPERATING HINTS AND SAFETY
IMPORTANT: If “HIGH TEMP” shows on the display
1. Turn off the toaster and allow it to fully cool down.
2. Inspect the fan inlet on the bottom of the toaster
and remove anyting blocking the cooling fan inlet.
3. Press the red high temperaure limit reset button on
the back of the toaster. (Note: There is one reset
on each side). (Note: the toaster must be fully cool
in order for the limit switch to reset).
4. Turn on the toaster and check for proper operation.
5. If cleaning the cooling fan inlet does not correct
the problem, contact the factory or an authorized
service agency for required maintenance.
Disconnect power to the unit with the ON/OFF button at the end of
each day of operation.
Do not leave the unit in operation without an attendant.
Do not leave the unit at high temperature when not in use or during idle
periods. This will cause food particles and grease lm to carbonize.
The cooling fan will continue to run until the toaster has completely
cooled. If the toaster MUST be moved after using, allow the cooling
fan to turn OFF before unplugging.
PROGRAMMING
A. CONVEYOR SPEED (temporary setting)
The conveyor speed is programmable with a range from 1 to 99 with
1 being the slowest and 99 being the fastest. Each menu item can
have independent conveyor speed settings.
B. PROGRAMMING VALUES FOR MENU ITEMS
To make a program change to the top & bottom elements, or conveyor
speed, you must rst be in the menu item you want changed.
Example: to change the programmed conveyor speed for croissants,
the display must read CROIS. To change the programmed conveyor
speed for MUFFIN, the display must read MUFFIN and so on for
each menu item.
1) Select the menu item you want to change i.e. T1, T2, T3, T4,
T5 or T6.
2) Press and hold both ( + ) AND ( - ) buttons for 3 seconds until
the display goes blank, release the buttons and the display
will show three characters for the menu item elected and the
last two characters for the current value setting, i.e. T1, T2,
T3, T4, T5 of T6. The red L.E.D. light for upper front element
at the bottom of the label will ash.
3) Press the ( + ) or ( - ) buttons to increase or decrease the
setting for the upper element.
4) Press the button for the menu button again and the red L.E.D.
for the up lower element will ash.
5) Press the ( + ) or ( - ) buttons to increase or decrease the
setting for the lower element.
6) Press the button for the menu button again and the red L.E.D.
for the conveyor speed will ash.
7) Press the ( + ) or ( - ) buttons to increase or decrease the
setting for the conveyor speed.
8) To skip one feature setting with out making any changes,
press the menu item button one time and the red L.E.D. light
for the next item will now ash.
9) To change the POWER SAVER values press the SAVER
button or to save your new setting(s), and exit the program
mode press the menu button.
10) The last two characters in the display will show MN for
minutes.
11) The rst three characters will be numerical to represent the
time setting.
12) When set to “OFF” the Saver button will be disabled during
operation. The PowerSaver can be set to “OFF” or using the
( + ) or ( - ) set the time from 15 to 480 minutes.
13) Press the SAVER button to change the power reduction using
the ( + ) or ( - ) buttons to increase or decrease the setting.
14) Press the POWER SAVER button to save changes and to
exit.
Page 4

CLEANING
STAR INTERNATIONAL HOLDINGS INC. COMPANY
Preventive maintenance for your Holman toaster consists of the
following recommended cleaning procedures. To keep your toaster
in its top operating condition, these steps should be performed on a
daily or weekly basis as required.
Supplies
KAY® QSR Oven Cleaner
KAY® QSR Heavy Duty Multi-Purpose Sink Detergent
(dispensed use solution)
KAY® Sink Sanitizer (use solution prepared at the sink)
No Scratch Pad
Red Cloth
Daily Procedure:
1. Turn toaster off, conveyor will continue to run until cooled
down (approx. 5-10 minutes)
2. Immediately spray the oven cleaner onto the No Scratch
Pad and scrub the conveyor chain while it is still warm and
moving.
NOTE: DO NOT SPRAY directly onto the conveyor
belt or into the cooking chamber. Overspray onto the
heating elements can damage or shorten the life of the
elements.
3. Wash the No Scratch pad at the 3 compartment sink and then
soak with Multi-Purpose Sink Detergent. Ring the pad out so
that it is only damp and continue to scrub the conveyor belt
while it’s still moving.
4. Rinse the No Scratch pad at the 3 compartment sink to remove
all detergent and then soak with clean warm water. Ring
the pad out so that it is only damp and continue to scrub the
conveyor belt while it still moving.
5. Wipe the conveyor belt with a clean red cloth dampened with
sanitizer solution while it is still moving. Allow to air dry.
6. Rinse the No Scratch pad at the 3 compartment sink and then
soak with clean warm water. Ring the pad out so that it is only
damp and wipe exterior areas of the toaster.
7. Remove interior crumb tray and bottom catch tray and take
to the three compartment sink. Spray the pieces with oven
cleaner and allow to sit on the drain board for a minimum of
ve minutes.
8. Wash, Rinse and Sanitize removable pieces and allow to air
dry before sliding the trays back into the unit.
9. Unit is now ready to turn ON for warm up and use.
OPERATION PROCEDURES
Used to toast croissants and english mufns
To Turn unit ON
1. Ensure toaster is plugged in
2. Press ON/OFF burron on each control panel.
Screen will display “PREHT” for 15 minutes.
DO NOT toast any product while the screen
displays “PREHT”
3. Select the desired menu button.
4. Toast product in corresponding belt.
To Turn unit OFF
1. Ensure there is no product in the toasting chamber
2. Press ON/OFF button on each control panel.
Screen will shufe “COOL” and “DOWN” for 10
minutes.
NOTE: belts will continue to move for the duration of
the cool-down time. Use this time to clean the toaster.
ROUTINELY CHECK
Entering Programming Mode
NOTE: Ensure the toaster is ON
NOTE: Changes to the same product must be repeated
for each belt.
1. Select product
2. Press and hold up and down arrows at the same
time. You will enter programming mode.
3. Use the up and down arrows to select the desired
top heat.
4. Press product button on control
5. Use the up and down arrows to select desired
bottom heat.
6. Press product button on control
7. Usse the top and down arrows to select desired
conveyor speed
8. Press product button on control 2-3 times until you
exit programming mode.
NOTE: Changes in belt speed will be made immediately.
Changes in top/bottom heat will take time to adjust
depending on the specics of the change
DO NOT IMMERSE THE UNIT IN WATER OR LET
WARNING
THE UNIT STAND IN WATER.
DO NOT USE A NON-STICK SPRAY ON THE
CONVEYOR BELT, IT WILL CAUSE A STICKY
CAUTION
BUILD-UP AND INCREASE STICKING.
DO NOT HOSE DOWN THE UNIT OR THE
WARNING
TABLE/COUNTER IF THE UNIT IS ON THE
TABLE/COUNTER.
KEEP AWAY FROM RUNNING WATER.
WARNING
Star - Holman - Lang - Wells - Bloomeld - Toastmaster
10 Sunnen Drive, St. Louis, MO 63143 U.S.A.
(314) 678-6303
www.star-mfg.com
Page 5

Page 6

1
13 12
10
11
2
8
9
6
7
ACCESSORY
3
4
5
36
38
37
39
35
46
45
47
41
42
44
43
40
30
31
32
33
34
23 24
16
25
26
17
27
18
28
14
19
21
15
20
29
21
22
2M-Z18529: Split Conveyor Toaster, IRCS2-SBW
MODEL: IRCS2-SBW:
Split Electronic Conveyor Toaster
SK2776 Rev. - 5/03/14
Page 7

Model: IRCS2-SBW Split Conveyor Toaster
Fig No Part Number Qty Description
1 HC-120334 1 BODY WRAP ASSY IRCS-2-SB
2 HC-Z17531 2 PADDLE HOLDER
3 HC-120333 1 PADDLE (ACCESSORY)
4 HC-Z17540 1 BACK PANEL
5 2U-Z17519 1 BLOWER-IMPINGEMENT
6 HC-Z17546 1 COVER-REAR DUCT
7 HC-Z17547 1 REAR PLENUM
8 HC-120341 1 TOP BAFFLE ASSY IRCS2-SB
9 HC-Z17541 1 COVER-TOP INSULATION
10 HC-Z17542 1 PLENUM-IMPINGEMENT
11 HC-Z17544 1 COVER PLATE-BEARING ACCES
2N-Z16981
12
2N-Z17528 ELEMENT,240V,1400W
2N-Z16982
13
2N-Z17529 ELEMENT, 240V, 100W
14 2E-Z17515 1 USB BOARD
15 2K-Y6764 1 BUSHING - STRAIN RELIEF
16 2E-200566 2 SWITCH, RESET, 0796
17 2K-8043 2 BUSHING HEYCO SB-875-10
18 HC-120342 2 BEARING ASSEMBLY-GRAPHITE
19 2A-Z17509 2 DRIVE SHAFT
20 HA-112263 2 BEARING ASSY PTFE/BRONZE
21 2P-200648 4 SPROCKET, 25B32 X 5/16
22 HC-Z18527 2 BRACKET CONV SHAFT
23 2K-Z6183 2 BUSHING 1.125
24 2E-200574 1 SWITCH,FAN, CERAMIC,
25 HG-402144 1 FAN SWITCH BRACKET (-T)
2U-Z9657
26
2U-Z9658 DRIVE MOTOR, LEFT
HC-Z17468-1
27
HC-Z17468-2 BRACKET-SPEED SENSOR RT
28 2E-Z17514 2 SPEED SENSOR
29 2P-Z18528 2 CHAIN
30 2R-200709 4 LEG 1 INCH CHROME PLASTIC
31 2E-Z17513 2 POWER BOARD
32 2U-Z17520 1 MUFFIN FAN 130CFM
33 HC-Z17511 1 PLATE-FAN MOUNT
34 2R-200562 1 FAN GUARD
35 HC-120336 1 PULL OUT TRAY ASSY IRCS-2
36 2R-200787 1 QCS 1&2 CRUMB TRAY GUARD
2M-Z18529: Split Conveyor Toaster, IRCS2-SBW
37 HC-120335 1 CRUMB TRAY ASSY IRCS-2-SB
38 HC-120338 1 RT IMPINGEMENT PANEL ASSY
39 HC-120339 1 LEFT IMPINGEMENT PANEL
40 2A-Z16807 2 IDLER ASSEMBLY R2N
ELEMENT,208V,1400W
2
ELEMENT 208V,1000W
2
DRIVE MOTOR, RIGHT
1
BRACKET-SPEED SENSOR LT
1
Model: IRCS2-SBW Split Conveyor Toaster
Fig No Part Number Qty Description
41 2P-200700 4 BEARING-PTFE SPRING LOAD
42 2P-200736 4 2 INCH BEARING SPRING
43 2E-Z5681 2 FUSEHOLDER, CLASS G
44 2E-200596 4 15 AMP FUSE, TYPE G
45 2M-Z17510 2 LABEL-CONTROL PANEL
46 HC-Z18355 2 CONTROL BOARD
47 2B-Z16768 86 BELTING 4.75W 27x0.050
NI 2E-Z17441 1 CORDSET L6-30P 12/3 84IN
NI 2E-Z17516 2 USB CABLE
August 22, 2014, Rev. A
Page 8

1
2
11
3
39
38
41
40
16
42
43
44
30
31
4
9
8
7
6
5
12
13
14
29
28
27
26
23
15
10
16
17
24
18
19
20
21
36
37
MODEL: IRCS2-NW:
Impingment Electronic Conveyor Toaster
25
32
33
34
35
SK2805, REV. - 8/21/14
Page 9

Model: IRCS2-NW Inpingment Conveyor Toaster
Fig No. Part Number Qty Description Application
1 HC-120356 1 ENCLOSURE ASSEMBLY
2 HC-120358 1 BAFFLE-AIR FLOW
3 HC-Z18634 1 PLENUM
4 HC-Z18633 1 PLENUM TOP
5 2E-Z17515 1 USB BOARD
6 2E-Z17786 1 CONDUIT CLAMP 1 1/2
7 2E-Z17522 1 CAPACITOR
8 2E-Z4358 1 RELAY 230V
9 HC-120355 1 FAN DUCT ASSY.
10 2U-Z17519 1 BLOWER-IMPINGEMENT
11 HC-Z18636 1 BACK PANEL IRCS2-ND
12 2E-200566 1 SWITCH, RESET, 0796
13 2K-8043 1 BUSHING HEYCO SB-875-10
14 2K-Z6183 1 BUSHING 1.125
15 2A-Z16808 1 DRIVE ASSEMBLY R2N
16 HA-112261 2 BEARING ASSY, 5/16 TEFLON
17 2P-200648 2 SPROCKET, 25B32 X 5/16
18 2P-Z18950 1 CHAIN #25 92 LINKS 23”
19 HC-Z17468-2 1 BRACKET-SPEED SENSOR RT
20 2E-Z17514 1 SPEED SENSOR
21 2C-200004 16 SCREW 6-32X5/16 THP SS
23 2U-Z9657 1 MOTOR AC 11 RPM CW
24 2C-08-07-0207 26 NUT 10-24 HEX STL NP
2N-Z16982
25
2N-Z17529 ELEMENT 240V 1000W 240V
2N-Z16981
26
2N-Z17528 ELEMENT 240V, 1400W 240V
27 2C-Z2594 2 NUT 6-32 HEX W STL NP
28 HG-402144 1 FAN SWITCH BRACKET (-T)
29 2E-200574 1 SWITCH,FAN, CERAMIC,
30 2E-Z17513 1 POWER BOARD, IRCS W/REV
31 2R-200709 4 LEG 1 INCH CHROME PLASTC
32 2U-200577 1 MOTOR, FAN 240V, HI-OUTPU
33 HC-Z17511 1 PLATE-FAN MOUNT
34 2R-200562 1 FAN GUARD
35 2C-08-07-0117 4 SCREW 10-24X3/4 FZA
36 HC-Z18954 1 CONTROL PRGM IRCS2-NW
37 2M-201813 1 LABEL, QCSE
38 HC-Z16937 1 BURN GUARD FAB’D R2N
39 HC-Z18637 1 RACK, TOAST SLIDE
40 PS-Z16768-43 1 COMPLETE BELT ASSY IRCS2
41 2P-200700 2 BEARING-PTFE SPRING LOAD
43 2A-Z16807 1 IDLER ASSEMBLY R2N
ELEMENT 208V,1000W 208V
1
ELEMENT 208V,1400W 208V
1
Model: IRCS2-NW Inpingment Conveyor Toaster
Fig No. Part Number Qty Description Application
43 HA-Z9743 2 SPRING RETAINER (2)
44 HC-Z16924 1
NI 2M-Z18721 1 LABEL - WIRING
NI 2K-Y3240 1 BUSHING, STRAIN RELIEF
NI 2E-Z18952 1 CORD SET L6-20 14/3 6FT
NI 2B-Z18956 1 LOAD UP 5” EURO WIRE
SHAFT ACCESS COVER
PLATE
August 22, 2014, Rev. A
Page 10

WIRING DIAGRAM IRCS2-SBW
FS
5
4
HB1 HT1
11
15A
OT
13
12
120V
240V
240V
120V
35
IF
CF
L1 F1 M1
BLK
10
BLUE (240V)
CM
4
12
OT2 L2 M2 F2 OT1 HB2 HT2
WHT (208V)
FS FAN SWITCH (TSTAT)
OT OVER TEMP (TSTAT)
IF IMPINGEMENT FAN
CF COOLING FAN
M MOTOR CAPACITOR
CM CONVEYOR MOTOR
RR REVERSING RELAY
3
2
1
OT
12
13
OT2 L2 M2 F2 OT1 HB2 HT2
BLUE (240V)
WHT (208V)
11
L1 F1 M1
BLK
CM
120V
240V
240V
120V
GND
HB1 HT1
11
10
15A
WHT BLK
2M-Z17918
Page 11

HB1 HT1
WIRING DIAGRAM IRCS2-NW
OT
13
12
120V
240V
240V
120V
L1 F1 M1
12
OT2 L2 M2 F2 OT1 HB2 HT2
35
IF
CF
2M-Z18721
BLK
WHT (208V)
11
10
BLUE (240V)
FS FAN SWITCH (TSTAT)
OT OVER TEMP (TSTAT)
IF IMPINGEMENT FAN
CF COOLING FAN
CM CONVEYOR MOTOR
CM
FS
4
3
2
1
GND
Page 12

 Loading...