

Page 1
SunCana
Model: H701A
Modèles: H701A
Modelo: H701A
®
Page 2

Thank-you for purchasing the SunCana Pod Brewing System. Our
product is designed to last for years and is perfect for people who demand
high performance and style for their kitchen coffee brewer. Our Pod Brewer
delivers you unsacrificed quality and great tasting coffee or tea every time.
Our patent-pending brewing system technology allows you to select your
own favorite coffee or tea strength.
For more information, please visit our website:
http://singleservebrewer.com
or Email to: info@singleservebrewer.com
KEEP THIS BOOKLET FOR FUTURE REFERENCE
Page 3

SunCana
TABLE OF CONTENTS
General Description....................................................................................4
Contents Of Box Include............................................................................4
Important Safeguards.................................................................................5
General Information...................................................................................6
Special Feature.............................................................................................6
Preparing The Brewer For Use - Prime Your Brewer........................7
Brew Your First Cup Of Coffee.................................................................8
Stop Brewing Process.................................................................................8
My Cup Set Up - Calibration......................................................................9
Cleaning & Maintenance............................................................................9
Periodic Cleaning / Descaling.................................................................10
Troubleshooting..........................................................................................11
Warranty & Customer Service................................................................12
IMPORTANT alerts you to important operating and service instructions.
WARNING alerts you to warning operating and service instructions.
NOTE alerts you to common note operating and service instructions.
English
Page 4
4
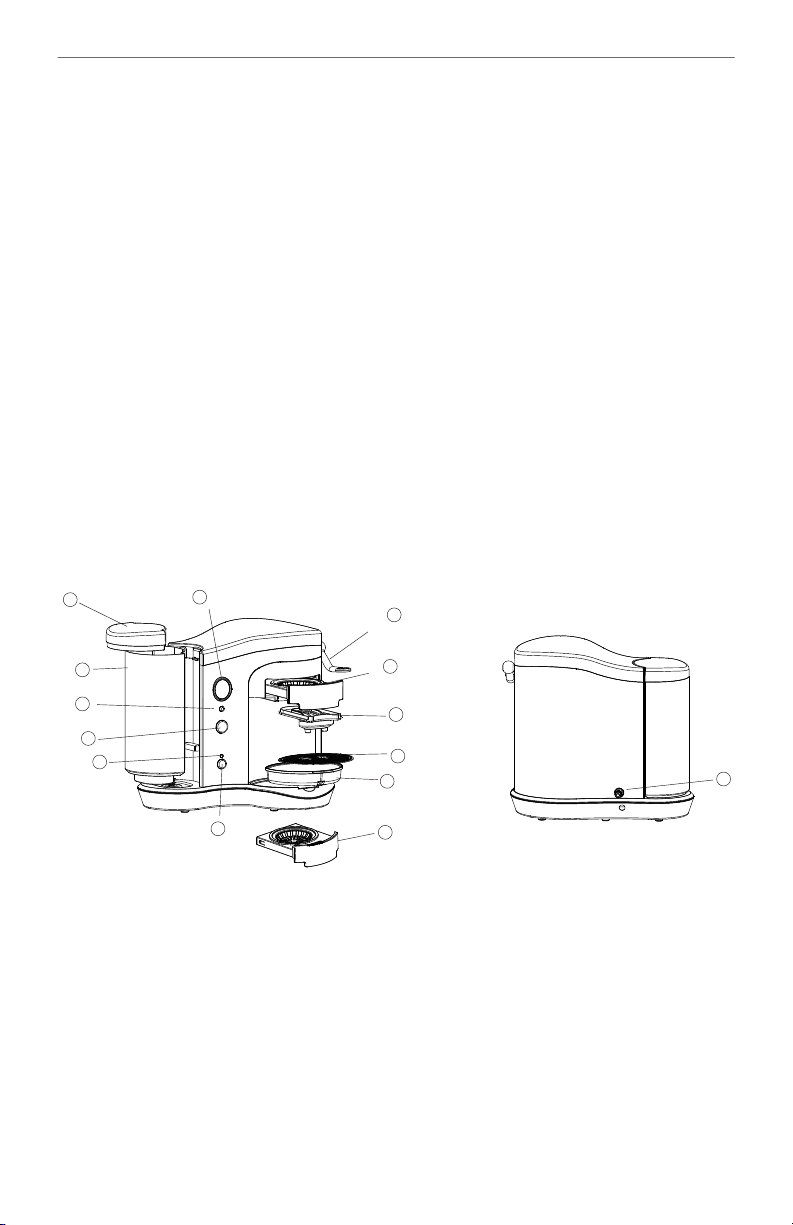
General Description
1. Reservoir lid
2.Reservoir
3.LCD display
4.Volume setting button
5.Brew button
6.LED indicator
7.Power button
8.Handle
9.Pod holder
10.Flavoured Pod holder (Optional)
11.Spout
12.Cup tray
13.Drip tray
14.Water inlet ( 701B
H model)
SunCana
1
2
4
5
6
3
7
Contents Of Box Include
1 pod brewer unit
1 pod holder(8-10g)
Quick start guide
Operation manual
8
9
11
12
13
10
14
English
Page 5

SunCana
Important Safeguards
Follow these basic safety precautions when using electrical appliances to
reduce the risk of fire, electric shock, and/or personal injury.
This appliance must be properly installed and located in accordance with
these instructions before it is used.
Do not touch hot surfaces. Use the handle or knob.
Do not use brewer for other than its intended use.
Do not place cord, plug, or brewer in water or any other liquid.
Do not place on or near a hot gas or electric burner, or in a heated oven.
Do not use outdoors.
Close supervision is necessary when any appliance is used by or near
children.
Do not insert or remove pod holder while brewing. Press BREW button to
stop or cancel a brew cycle.
A canceled brew cycle is not held in memory. The next brew cycle will
dispense full volume based on volume setting.
Do not place brewer in a sink or near other water source. Remove reservoir
and fill separately.
Use only cool water in this appliance! Use filtered water or purified water
or bottled water in high calcium content or hard water conditions.
Do not put any other liquids or foods in the water tank.
Do not operate the brewer without water.
Do not fill water reservoir above maximum level indicated.
For best operation, plug the appliance into its own electrical outlet on a
dedicated circuit to prevent flickering of lights, blowing out fuses or
tripping a circuit breaker.
Do not let the cord hang over the edge of the table or counter, or touch hot
surfaces.
Before unplugging the appliance, please turn power off.
Unplug from outlet when not in use for extended periods of time and
before cleaning. Allow to cool before putting on or taking off parts, before
cleaning, and before storing the appliance.
Do not operate brewer with a damaged cord or plug or after the appliance
malfunctions or is damaged in any manner. Contact SunCana Customer
Service to arrange for replacement or repair.
The use of an accessory not evaluated for use with this brewer may cause
5
English
Page 6

6
injuries and is not authorized.
Make sure the handle is pressed down to lock the pod properly.
Always use a mug or bowl that is larger than the brew volume selected.
Also be sure that a cup or mug is centered under coffee spout during the
brew cycle to reduce risk of injury or property damage.
Keep hands away if container overflows. Wait until brew finishes, let liquid
cool, then lower volume setting or use a larger mug.
Do not use torn pods or use ground coffee in pod holder.
Do not use this appliance at altitudes higher than 6800feet/2200m above
sea level.
Make sure the size of the pod is suitable for the pod holder before
brewing. Using the wrong size pods will cause permanent damage to the
brewer.
Do not expose the brewer to temperatures below 32ºF (0ºC). This will
cause permanent damage to the boiler and other components.
SunCana
General Information
This brewer has a short cord to reduce the hazards of becoming entangled
in or tripping over a longer cord. An extension cord may be used if the
rating is equal to or greater than the rating of the brewer. Use an extension
cord rated 15 amperes or greater. Care must be taken to arrange extension
cord so that it does not hang over the edge of counter top or table top.
Where it can be pulled on by children or tripped over unintentionally.
Operating the brewer and another appliance at the same electrical circuit
could cause an electrical overload, which would blow the fuse or trip the
circuit breaker.
This brewer has a polarized plug as an added safety feature. To reduce the
risk if electric shock, this plug is intended to fit into a polarized outlet. If
the plug can't fit, contact a qualified electrician. Do not attempt to modify
the plug in any way.
Special Features
Quick one button preset for 5 different serving sizes
You can choose the serving sizes from 5 oz to 12 oz, please make sure you
have a proper size cup.
Water sensor for water reservoir supply
English
Page 7

SunCana
The LCD will display 'CHECK WATER LEVEL' when there is not enough
water.
Works with regular tea bags without strings
Make sure the edge of tea bags tucked inside the pod holder.
LCD display
Flavor extraction brewing system
My Cup Set up - Calibration
This function allows you to set up your favorite volume for a cup of coffee.
Temperature Set up
This function allows you to adjust temperature upon different area for
altitude.
Energy Saving Mode
The brewer will automatic shut the power off after no operation for 30
min.
Preparing The Brewer For Use - Prime Your Brewer
This procedure is only required prior to initial use.
IMPORTANT: You cannot use your brewer until it has been
primed for its first use. DO NOT turn on the brewer when you
prime it.
Place a cup or mug on the cup tray.
Remove the water reservoir by gently lifting outward at an angle.
Rinse the reservoir, and fill with purified water or bottled water to the
MAX indicator line. (use filter water where high calcium content
exits)
Replace the reservoir on the left side of the brewer. Make sure it fits
securely in place.
Lock the handle.
Plug in a 15AMP socket with ground.
The red LED light will turn on. DO NOT press the 'POWER' button.
Press and hold down both 'VOLUME' and 'BREW' buttons for over 3
seconds to activate auto prime. Water will begin to flow through the unit
and out brew spout into your cup or mug. This process will take
approximately 50 seconds. If there is no water flow repeat the
above step until the water comes out. You might cancel the priming
process with 'POWER' button pressed.
English
7
Page 8

8
When the water stops flowing into the cup, pour it out into the sink.
You've primed your brewer - now you're ready to use your brewer!
NOTE: For the best-tasting cup of coffee or tea, use bottled or filtered
water.
SunCana
Brew Your First Cup Of Coffee
Fill your water reservoir with water, make sure the water reservoir and lid
are securely in place; If there is not enough water in the reservoir, the LCD
will flash 'CHECK WATER LEVEL' until you add more.
Press the 'POWER' button to turn on the brewer.
It will take about 2 minutes after you turn on the brewer to heat the water.
The LCD display will indicate 'READY' when it is ready to start brewing.
Place a cup or mug on the cup tray.
Lift the handle, pull out the pod holder and place a pod into the pod
holder.
IMPORTANT: Center pod in holder and gently presses the pod
completely into holder cavity.
WARNING: Use only 1 pod per use. Stacking 2 pods together will
cause permanent damage when locking the handle of the brewer.
Push the pod holder all the way into cavity and lock the handle.
WARNING: You should feel a click when the pod holder locked in
place.
Choose from 5oz to 12oz by pressing 'VOLUME' button.
Press and release the 'BREW' button to begin brewing.
NOTE: To stop the brewing, press the 'BREW' button.
When brewing has stopped, release the handle and pull out the pod
holder.
Dispose of the used pod. Do Not Touch Hot Pod!
WARNING: Beverage is extremely hot.
Stop Brewing Process
If you need to stop brewing once it has started, two ways can stop the brew
process:
Press the 'BREW' button, the flow of coffee or tea will stop, the LCD screen
will stay ON, the LED indicator will stay 'RED' or 'GREEN'.
Press the 'POWER' button, the flow of coffee or tea will stop, the LCD
English
Page 9

SunCana
screen will shut off, the LED indicator will stay 'RED'.
NOTE: After an interrupted brew, your next brew defaults to initial brew
cycle. New coffee or tea pod should be replaced again for the regular coffee
or tea strength.
My Cup Set Up - Calibration
The volume might be slightly different when using different sizes or different
types of coffee pods. This function allows you to set up your favorite volume
for a cup of coffee. Please follow the below steps:
Fill the reservoir with pure water or hook up the brewer to filtered water
line.
Plug in the power source. DO NOT Turn on the power (standby mode).
Put a measuring cup on the cup tray.
Put a new coffee pod in pod holder and lock the handle.
Press & hold 'BREW' button then press 'POWER' button for 3 seconds to
activate My Cup program. LCD will display the volume size (XX oz) .
Press the 'VOLUME' button to choose the size of the cup (XX oz).
When LCD displays READY or power indicator shows on 'GREEN'(in
blinking mode), within 15 seconds, press the 'BREW' button and the coffee
will start flowing into the cup.
When the volume of the coffee has reached your ideal volume, press the
'BREW' button again to stop the flow. This volume will be automatically
saved for its size(XX oz).
Repeat the above step 6-8 to set up other My Cup sizes (XX oz) if
preferred.
TURN OFF the power if you are done with calibrations. (Power will be
automatically off in 15 seconds without any operations.)
NOTE: Press & Hold 'VOLUME' button then press 'POWER' button for 3
seconds to reset to manufacture default.
9
Cleaning & Maintenance
We recommend cleaning your brewer regularly using the following tips:
DO NOT place the brewer in the water or other liquids. The stainless steel
panel and other external components should be cleaned regularly with a
damp cloth. Please take precaution with strong chemicals as they may
damage or discolor your brewer, and always follow manufacture's
English
Page 10

10
SunCana
directions.
Do not use steel wool to wipe your stainless steel; it will scratch the
surface. Never clean with bleach as it will discolor product. Avoid contact
with salts and acids- these will also discolor your product if left on for a
long period of time.
The drip tray and cup tray should be periodically inspected and rinsed
clean.
Clean the sprout, pull out the sprout with two hands; Rinse well the metal
screen and sprout, snap the metal screen back to the seat, then slide the
sprout back.
The pod trays are dishwasher safe. Use the top rack of the dishwasher only.
Use cold water to rinse the water reservoir. Make sure the float inside the
water reservoir not been thrown out. If the float is accidentally thrown out,
make sure to put it back properly (the side with an arrow towards to you).
LCD will show 'CHECK WATER LEVEL' if the float is not put back properly.
Periodic Cleaning / Descaling
Recommended at Least Once a Month and it must be descaled once every 3
months.
Periodically, you should clean and descale the brewer to clean any mineral
deposits that may have accumulated due to impurities in the water source. If
these deposits are not removed, they can impair the operation of the brewer
and reduce the product life.
There are several products available specifically for descaling. We
recommend using URNEX® Activated Descaler or JavaClean2 Cleaner and
Descaler. (White vinegar can be used to descale if a descaling product is not
available).
Fill the reservoir with descaling product as described by the
manufacturer's directions, or 1 quart (32oz.) of white vinegar. Do not add
powder mix directly to the reservoir. Descaling product must be mixed
into a solution before it is added to the reservoir.
Place an empty pod holder into the brewer. Be sure the handle is pressed
down to the 'LOCK' position, and set the 'VOLUME' to 12oz.
Place an empty container or bowl on the drip tray that will hold at least
14oz. of liquid. Turn off the 'POWER' button, press and hold down both
'VOLUME' and 'BREW' buttons at the same time for over 3 seconds. Water
English
Page 11
SunCana
will immediately begin to flow through the unit into your cup or mug. This
activates Prime Cycle.
Once the cycle has finished, empty the container and set it back onto the
drip tray. Leave the solution according to their manufactory's directions.
For vinegar, allow the solution to sit for at least two, but no more than four
hours.
Once the cycle has finished, empty the remaining solution or vinegar from
the reservoir. Remove the Pod Holder; clean reservoir and pod holder
thoroughly using a mild detergent, then rinse.
Fill the reservoir to the maximum line with fresh clean cold water and
place the pod holder back into the brewer.
Repeat step 3 at least two more times to remove the solution from the
reservoir.
Clean the pod holder with a mild detergent and rinse thoroughly.
Troubleshooting
How to fix itWhat's wrong
11
The brewer will not
brew when used for
the first time
Coffee dripping from
the side of pod holder
LCD shows off
LCD indicates ‘CHECK
WATER LEVEL’
LCD indicates ‘CHECK
POD’
The brewer must be primed for use before the first
brew.
Refer to preparing the brewer for use - prime your
brewer instructions.
The pod is misplaced in the pod holder.
Stop the brewing by pressing 'BREW' again, check the
pod, make sure the thicker side down.
Make sure it is plugged in securely.
Check the circuit breaker if necessary.
Press the 'POWER' button.
Refill the water reservoir. (H701A model)
Check the shut-off valve. (H701B model)
The direction of the float is not right when it is
accidentally taken out and put back.
Handle is not in 'LOCK' position.
The size of the pod is not right.
English
Page 12

12
SunCana
How to fix itWhat's wrong
LCD indicates ‘E’ Failed to Prime the brewer. Refer to preparing the
brewer for use - prime your brewer.
Temperature Sensor failed, Call service center.
Warranty & Customer Service
SunCana Coffee Brewer Limited 1 Year Warranty.
This Limited Warranty includes 1 year labour and parts for the defects in
material and workmanship existing at the time of manufacture and
appearing from the date of original purchase of the coffee maker.
This coffee brewer has been manufactured to strict specifications and has
been designed for use with SunCana authorized accessories or replacement
parts. These warranties exclude any defects or damages caused by
accessories, replacement parts or repair service other than those
authorized by SunCana. SunCana will not pay for warranty service
performed by a non-authorized repair service and will not reimburse
unauthorized repair service.
This Warranty does not cover claims resulting from misuse, neglect,
alteration, improper installation or operation, improper maintenance or
repair, damage or casualty.
Coverage under this warranty is conditioned on you (1) providing us with
prompt notice of any condition for which you seek warranty coverage, (2)
providing us with proof of the price and date of your purchase, (3)
returning the unit at customers expense (in the original box) if requested
to a SunCana Authorized Service Representative for inspection or repair,
(4) obtaining our prior authorization for any repair of the unit, and (5)
having any repair work performed only by a SunCana Authorized Service
Representative.
NOTE: No other warranty, written or oral, is authorized by SunCana.
This warranty gives you specific legal rights, and you may also have other
rights which vary from state to state. Some states do not allow the exclusion
or limitation of incidental or consequential damages, so the above exclusion
and limitations may not apply to you.
English
Page 13

SunCana
IMPORTANT: If your appliance does not work or you have
additional questions or concerns, please contact SunCana
Customer Support or send Email to:
info@singleservebrewer.com
13
English
Page 14

SunCana
TABLE DES MATIÈRES
Eléments de l'appareil
..............................................................................15
Contenu de la boîte....................................................................................15
Précautions importantes.........................................................................16
Renseignements généraux.......................................................................17
Caractéristiques particulières................................................................18
Cafetière À Remplissage Manuel..........................................................18
Préparation de votre première tasse de café......................................19
Arrêt de la machine pendant l'infusion
...............................................20
Ajustement - Calibration pour ma tasse..............................................20
Nettoyage et entretien
...............................................................................21
Nettoyage/détartrage périodique..........................................................22
En cas de panne..........................................................................................23
Garantie et service au client...................................................................23
Français
Page 15

SunCana
Eléments de l'appareil
1. Couvercle du réservoir
2.Réservoir
3.Ecran ACL
4.Sélecteur de volume
5.Bouton de percolation brew
6.Voyant DEL
7.Interrupteur Marche / Arrêt
8.Poignée
9.Porte-dosette
10.Porte-dosette pour café aromatisé (option)
11.Tuyau verseur
12.Porte-tasse
13.Attrape-gouttes
14.Arrivée d'eau (Modèle H701B)
15
1
2
4
5
6
3
7
Contenu de la boîte
1 Cafetière à dosettes
1 porte-dosettes
Un guide de démarrage
Un manuel de l'utilisateur
8
9
11
12
13
10
14
Français
Page 16

16
SunCana
Précautions importantes
Le respect de ces mesures de précaution lorsgue l'on utilise un appareil
ménager électrique, réduit le risque d'incendie, de choc électrique
et/ou d'accident.
Cet appareil doit être correctement installé et placé selons les indications
de ce manuel, avant son utilisation.
Ne pas toucher les surfaces chaudes. Utiliser les poignées ou les boutons.
Ne pas utiliser la cafetière pour une fonction autre que celle pour laquelle
elle a été conçue.
Ne pas immerger le cordon électrique, la fiche, ou l'appareil dans l'eau ou
dans tout autre liquide.
Ne pas placer l'appareil sur ou près d'un brûleur à gas allumé ou d'une
plaque électrique chaude, ou dans un four chaud.
Ne pas utiliser à l'extérieur.
Il est nécessaire d'exercer une étroite surveillance quand n'importe quel
appareil ménager est utilisé par ou près des enfants.
Ne pas insérer le porte-dosette ou le retirer quand l'appareil fonctionne.
Appuyer sur le bouton BREW pour arrêter ou annuler l'infusion.
Le cycle d’infusion annulé n'est pas gardé en mémoire. Le cycle suivant
produira le volume total sélectionné à ce moment-là.
Ne pas immerger la cafetière dans l'évier ou dans tout autre contenant
d'eau. Il faut enlever le réservoir de la machine pour le remplir d'eau.
N'utiliser que de l'eau froide dans le réservoir de cette machine! Utilisez de
l'eau filtrée ou purifiée ou de l'eau en bouteille en cas d'eau calcaire ou
fortement minéralisée.
Ne placer ni autres liquides, ni aliments dans le réservoir à eau.
Ne pas utiliser la cafetière si le réservoir est vide.
Ne pas remplir le réservoir d'eau au-delà du niveau maximum indiqué.
Pour un meilleur fonctionnement de l'appareil, brancher la cafetière sur sa
propre prise de courant ou sur un circuit réservé, pour éviter de faire
papilloter les lampes , sauter les fusibles ou de déclencher un disjoncteur.
Ne pas laisser pendre le cordon électrique du bord d'une table ou d'un
comptoir, ni le mettre en contact avec une surface chaude.
Débrancher l'appareil quand il n'est pas utilisé pendant un certain temps
et avant de le nettoyer. Laisser refroidir la cafetière avant de la démonter,
de la nettoyer ou de la ranger.
Mettre l'interrupteur à l'arrêt avant de débrancher l'appareil.
Français
Page 17

SunCana
17
Ne pas utiliser la cafetière si le cordon électrique ou la fiche sont
endommagés, ou en cas de fonctionnement défectueux ou d'avarie
quelconque. Contacter le Service après-vente de Newtech pour
remplacement ou réparation de l'appareil.
L'emploi d'accessoires non recommandés pour cet appareil est tout à fait
déconseillé et peut causer des accidents.
S'assurer que la poignée est bien enclenchée pour maintenir la dosette en
place.
Toujours utiliser une tasse ou un bol plus large que le volume de liquide
sélectionné. S'assurer aussi que le récipient est bien centré sous le tuyau
verseur pendant le cycle de percolation afin de réduire les risques
d'accidents ou de dégâts matériels.
Si le contenant déborde, attendre la fin du cycle de percolation et laisser se
refroidir le liquide avant de toucher la tasse. Puis, sélectionner un volume
de liquide moins important ou utiliser une tasse plus large.
Ne pas déposer de dosettes déchirées ou de café moulu dans le porte-
dosette.
Ne pas utiliser cet appareil à des altitudes supérieures à 6800 pieds / 2200
m au-dessus du niveau de la mer.
Vérifier que la taille de la dosette correspond au porte-dosette avant de
mettre la cafetière en marche, sinon l'appareil risque d'être
irréversiblement endommagé.
Ne pas exposer la cafetière à des températures inférieures à 32 ºF (0ºC)
pour éviter d'endommager l'élément chauffant et les autres pièces de
l'appareil.
Renseignements généraux
Cet appareil est muni d'un cordon électrique court afin d'éviter que
quelqu'un s'empêtre ou trébuche sur un cordon trop long. Un cordon de
rallonge peut être utilisé si sa capacité électrique égale ou excède celle de
l'appareil. Utiliser une rallonge de 15 ampères ou plus. La rallonge ne doit
pas pendre du comptoir ou de la table afin d'éviter que les enfants tirent
dessus ou que quelqu'un trébuche. L'utilisation de la cafetière et d'un
autre appareil ménager sur le même circuit électrique peut causer une
surcharge qui fera sauter les plombs ou déclenchera un disjoncteur.
Cette cafetière est munie d'une fiche polarisée avec retour à la terre pour
Français
Page 18

18
réduire les risques de chocs électriques. Cette fiche ne peut être insérée
que dans une prise adéquate. Si la fiche ne convient pas à la prise, il faut
consulter un électricien qualifié. Ne jamais essayer de modifier la fiche
vous-même.
SunCana
Caractéristiques particulières
Bouton préréglé pour sélectionner 5 format
Il vous est possible de choisir la quantité de café désirée, entre 5 et 12 oz;
veuillez vous assurer d'utiliser une tasse de dimension convenable.
Jauge à réserve d'eau
Quand il n'y a pas assez d'eau dans la cafetière, CHECK WATER LEVEL va
apparaître sur l'écran ACL.
Deux porte-dosette différents
Pour éviter le mélange des saveurs de café, thé ou café aromatisé.
Ecran ACL
Système d'infusion à saveur optimale
Ajustement - Calibration pour ma tasse
Cette fonction vous permet d'ajuster le volume selon vos besoins.
Temperature Set up
This function allows you to adjust temperature upon different area for
altitude.
Dispositif économiseur d'énergie
L'appareil va s'éteindre automatiquement après 30 minutes s'il n'est pas
utilisé et le voyant DEL clignotera.
(option)
Cafetière À Remplissage Manuel
Avant la première utilisation uniquement
ATTENTION: Vous ne pouvez pas utiliser votre cafetière avant de
l'avoir préparée pour la première infusion. NE PAS appuyer sur
l'interrupteur de mise en marche pendant le processus.
Placer une tasse ou un bol sur le porte-tasse.
Détacher le réservoir d'eau en le soulevant délicatement en diagonale par
rapport à l'appareil.
Rincer le réservoir et le remplir d'eau purifiée ou d'eau en bouteille
jusqu'au niveau MAX . (Utiliser de l'eau filtrée en cas d'eau à forte
teneur en calcaire)
Français
Page 19

SunCana
Remettre le réservoir sur son socle à gauche de l'appareil en s'assurant
qu'il est bien ajusté.
Enclencher la poignée.
Brancher la cafetière dans une prise de 15 AMP avec mise à la terre.
Le voyant lumineux rouge va s'allumer. NE PAS appuyer sur le bouton de
mise en marche POWER.
Appuyer immédiatement et simultanément sur les boutons VOLUME et
BREW et les maintenir enfoncés pendant plus de 3 secondes afin de
mettre en marche le processus automatique de préparation. L'eau va tout
de suite passer à travers l'appareil et sortir par le tuyau verseur dans la
tasse ou le bol. Ce processus va durer environ 50 secondes. Si l'eau ne
sort pas, répéter l'étape précédente jusqu'à ce qu'elle
commence à s'écouler. Vous pouvez annuler ce processus de
préparation en appuyant sur le bouton de mise en marche POWER.
ImmediatelyJeter à l'évier l'eau qui a coulé dans la tasse.
Votre cafetière est maintenant prête à l'emploi!
REMARQUE: Pour un café ou un thé encore meilleur, utiliser de l'eau en
bouteille ou de l'eau filtrée.
19
Préparation de votre première tasse de café
Remplir le réservoir d'eau. Vous assurer que le réservoir et son couvercle
sont bien en place. S'il n'y a pas assez d'eau dans le réservoir, CHECK
WATER LEVEL va apparaître sur l'écran ACL jusqu'à ce que le problème
soit rectifié.
Appuyer sur le bouton POWER pour mettre la cafetière en marche.
L'eau arrive à bonne température environ une minute après la mise en
marche de l'appareil. READY va apparaître sur l'écran ACL quand
l'appareil est prêt à fonctionner.
Mettre une tasse ou un bol sur le porte-tasse.
Soulever la poignée et tirer le porte-dosette vers vous. Placer une dosette
dans le porte-dosette.
ATTENTION: Bien centrer la dosette et la pousser doucement
dans la cavité.
MISE EN GARDE: N'utiliser qu'une seule dosette à la fois.
L'empilage de 2 dosettes risque d'endommager irréversiblement
l'appareil quand la poignée sera enclenchée.
Français
Page 20

20
Pousser le tiroir porte-dosette à fond et enclencher la poignée.
MISE EN GARDE: On devrait percevoir un clic quand le portedosette est convenablement verrouillé.
Choisir le quantité désirée entre 5 et 12 oz en appuyant sur le sélecteur de
VOLUME.
Appuyer puis relacher le bouton BREW pour commencer l'infusion.
REMARQUE: Appuyer de nouveau sur le bouton BREW pour arrêter le
cycle d'infusion.
VQuand l'infusion est terminée, déverrouiller la poignée et tirer le porte-
dosette vers vous.
Jeter la dosette utilisée sans la toucher car elle est brûlante!
Attention: le breuvage est très chaud.
SunCana
Arrêt de la machine pendant l'infusion
Il y a deux manières d'arrêter le processus d'infusion déjà commencé.
Appuyer sur le bouton BREW; le café ou le thé va cesser de s'écouler de la
cafetière; l'écran ACL va afficher ON; le voyant restera vert ou rouge.
Appuyer sur l'interrupteur POWER pour arrêter l'appareil; le café ou le thé
va cesser de s'écouler de la cafetière; l'écran ACL va s'éteindre; le voyant
restera rouge.
REMARQUE: Après interruption du processus d'infusion, la cafetière
revient au début du cycle d'infusion à la prochaine utilisation; il faut donc
utiliser une nouvelle dosette pour obtenir un café ou un thé de force
normale.
Ajustement - Calibration pour ma tasse
Le volume peut varier selon la pression de l'arrivée d'eau et le type (marque)
de dosette utilisé. Cette fonction vous permet d'ajuster le volume selon vos
besoins. Suivre les instructions suivantes:
Remplir le réservoir manuellement ou raccorder la cafetière à une
alimentation d'eau filtrée.
Brancher au réseau électrique, NE PAS mettre en marche (garder en mode
d'attente).
Mettre en place une tasse à mesuré.
Placer une nouvelle dosette dans le support à infusion.
Appuyer et maintenir simultanément les deux boutons BREW et POWER
Français
Page 21

SunCana
21
pendant 3 secondes pour activer le programme My Cup. L'écran va afficher
le format (XX oz) et HEATING / READY.
Appuyer sur le bouton VOLUME pour choisir le format de tasse (XX oz).
Lorsque READY apparait à l'écran ou que l'indicateur POWER clignote
vert, appuyez sur le bouton BREW et le café coulera dans la tasse pour
environ 15 secondes.
Lorsque le volume requis sera atteint, appuyer le bouton BREW pour
arrêter le cycle. Le volume sera automatiquement sauvegardé pour ce
format (XX oz).
Répéter les étapes 7 à 10 ci-dessus pour ajuster les autres formats si
nécessaire.
METTRE HORS TENSION si vous avez terminé les ajustements (Après 15
secondes sans activités, la cafetière éteindra automatiquement.)
REMARQUE: Pour revenir au ajustement d'usine, appuyer simultanément
et maintenir enfoncer pendant 3 secondes le bouton VOLUME et POWER.
Nettoyage et entretien
Nous vous recommandons de nettoyer régulièrement votre cafetière en
observant les précautions suivantes:
NE PAS immerger l'appareil dans l'eau ou dans tout autre liquide. Le
revêtement en acier inoxydable et les autres parties externes devraient être
nettoyées régulièrement avec un chiffon humide. Les produits d'entretien
abrasifs peuvent endommager ou décolorer la cafetière, veuillez toujours
respecter les directives du fabricant.
Ne pas récurer les surfaces inox avec un tampon en laine d'acier
l'egratiguerait. Ne pas utiliser d'agent de blanchiment qui va décolorer
l'appareil. Eviter tout contact prolongé avec les sels et les acides qui vont
aussi décolorer la cafetière.
L'attrape-gouttes et le porte-tasse devraient être vérifiés et rincés de temps
en temps. Ils peuvent aussi aller au lave-vaisselle, uniquement dans le
panier du dessus. Pour enlever l'attrape-gouttes et le porte-tasse, il suffit
de les tirer vers vous, en les gardant à niveau pour éviter les
débordements.
Les porte-dosettes peuvent aussi aller au lave-vaisselle, uniquement dans
le panier du haut.
Français
Page 22

22
SunCana
Utiliser de l'eau froide pour rincer le réservoir bleu. Prendre soin à ne pas
jeter le flotteur qui se trouve dans le réservoir. Si le flotteur est sorti
accidentellement du réservoir, le remettre convenablement en place (le
côté marqué d'une flèche tourné vers vous). Si le flotteur n'est pas
correctement placé, CHECK WATER LEVEL va apparaître sur le panneau
ACL.
Nettoyage/détartrage périodique
Recommandé au moins une fois par mois. L'appareil doit absolument être
détartré tous les 3 mois.
Il faut nettoyer et détartrer régulièrement votre cafetière pour enlever tous
les dépôts minéraux accumulés à cause de la dureté de l'eau. Si ces dépôts
ne sont pas exlerés, ils peuvent nuire au bon fonctionnement de l'appareil et
en réduire le cycle de vie. Plusieurs produits de détartrage existent sur le
marché. Nous recommandons l'emploi du détartreur actif URNEX® ou du
nettoyant et détartreur JavaClean2. (Il est aussi possible d'utiliser du
vinaigre blanc).
Remplir le réservoir avec le produit de détartrage selon les directives du
fabricant ou avec 1 pinte (32 oz) de vinaigre blanc. Ne pas verser de
poudre directement dans le réservoir ; la poudre doit être diluée en
solution avant de la verser dans le réservoir.
Mettre un porte-dosette vide dans l'appareil, vous assurer que la poignée
est baissée en position de verrouillage puis choisir le volume 12 oz.
Placer un contenant vide d'une capacité minimum de 14 oz sur l'attrape-
gouttes. Mettre l'interrupteur en position arrêt, appuyer simultanément
sur les boutons VOLUME et BREW et les maintenir enfoncés pendant plus
de 3 secondes afin de mettre en marche le cycle automatique de
préparation. L'eau va tout de suite commencer à couler à travers la
machine dans votre contenant.
Le cycle terminé, vider le contenant et le replacer sur l'attrape-gouttes.
Laisser agir le produit selon les directives du fabricant. Laisser le vinaigre
agir pendant deux heures au moins mais pas plus de quatre heures.
Le cycle terminé, vider le vinaigre ou la solution restant dans le réservoir.
Enlever le porte-dosette ; nettoyer à fond le réservoir et le porte-dosette à
l'aide d'un détergent doux, puis rincer.
Remplir le réservoir jusqu'à la limite maximum avec de l'eau propre et
Français
Page 23

SunCana
froide et replacer le porte-dosette dans l'appareil.
Répéter l'opération 3 au moins encore deux fois pour enlever toute
trace de solution du réservoir.
Nettoyer le porte-dosette avec un détergent doux et rincer à fond.
En cas de panne
SolutionProblème
23
La cafetière ne
fonctionne pas dès sa
première utilisation
Le voyant DEL ne
s'allume pas
L'écran ACL est
éteint (OFF)
L'écran ACL indique
‘CHECK WATER
LEVEL’
L'écran ACL indique
‘CHECK POD’
L'écran ACL indique
‘E’
La cafetière doit être préparée avant sa première
utilisation.
Les directives de préparation de la cafetière se
trouvent.
Vous assurer que la cafetière est bien branchée.
Il est peut être nécessaire de vérifier le disjoncteur.
Vous assurer que la cafetière est bien branchée.
Il est peut être nécessaire de vérifier le disjoncteur.
Appuyer sur l'interrupteur de mise en marche
POWER.
Remplir le réservoir d'eau (Modèle H701A).
Vérifier la soupape de fermeture (Modèle H701B).
Le flotteur qui était tombé n'a pas été remis
correctement en place.
La poignée n'est pas enclenchée.
La taille de la dosette ne convient pas.
La cafetière n'a pas été bien préparée avant son
emploi.
La jauge thermique est en panne, appeler le Service à
la clientèle.
Garantie et service au client
Garantie limitée à 1 an de la cafetière SunCana.
Cette garantie limitée couvre les vices de matières et de fabrication
existant au moment de la production de l'appareil et mis en évidence dans
l'année qui suit la date d'achat de la cafetière par l'utilisateur original.
Français
Page 24

24
SunCana
Cette cafetière est fabriquée selon des normes rigoureuses et est conçue
pour être utilisée avec des pièces de rechange ou des accessoires autorisés
par SunCana. Cette garantie est invalide en cas de défectuosité ou de
dommages causés par des accessoires ou des pièces de rechange non
autorisés ou par une tentative de réparation effectuée par des centres de
service après-vente non agréés par SunCana. SunCana n'est pas
responsable du paiement de la garantie en cas de réparations effectuées
par des centres de service après-vente non agréés et ne couvrira pas les
frais des réparations effectuées par des centres de service non agréés.
Cette garantie est invalide si l'appareil est endommagé par suite d'usage
impropre, de manque d'entretien, de modification, d'installation ou
d'utilisation incorrecte, de mauvais entretien ou de réparation fautive,
d'abus ou d'accident.
Cette garantie est octroyée aux conditions suivantes: (1) Nous donner le
plus rapidement possible la raison pour laquelle vous demandez le
remboursement prévu par la garantie, (2) Nous fournir la facture et la
preuve de la date d'achat original, (3) Expédier l'appareil à vos frais (dans
son emballage d'origine), et à notre demande, à un centre de service aprèsvente agréé pour vérification ou réparation, (4) Obtenir notre autorisation
avant que n'importe quelle réparation soit entreprise, et (5) Ne faire
réparer l'appareil que dans un centre de service après-vente agréé par
SunCana.
REMARQUE: Aucune autre garantie, écrite ou orale, n'est reconnue par
SunCana.
Cette garantie vous donne des droits légaux précis, et vous pouvez également
avoir d'autres droits qui varient d'une province à l'autre. Certaines
provinces n'autorisent pas l'exclusion ou la limitation des dommages
accessoires ou indirects, il est donc possible que l'exclusion et la limitation
susmentionnées ne s'appliquent pas à vous.
ATTENTION: Si cet appareil ne fonctionne pas ou si vous avez
d'autres questions, veuillez appeler, sans frais, le Service à la
clientèle de SunCana ou envoyez un courriel à:
info@singleservebrewer.com
Français
Page 25

SunCana
TABLA DE CONTENIDO
Descripciones Generales
.........................................................................26
Contenido de la caja Incluir....................................................................26
Importantes medidas de seguridad......................................................27
Información General................................................................................28
Características Especiales.......................................................................29
Prepare para su uso - Principie su cafetera........................................29
Prepare su primera taza de café............................................................30
Detener el proceso de preparación
.......................................................31
Posicionar la taza - Calibración..............................................................31
Limpieza y Mantenimiento.....................................................................32
Limpieza Periódica/Descalcificación...................................................32
Preguntas Frecuentes...............................................................................33
Garantía y Servicio al Cliente.................................................................34
IMPORTANTE Lo alerta de operaciones importantes e instrucciones de
servicio.
ADVERTENCIAS Lo alerta de advertencias operacionales e instrucciones
de servicio.
NOTA Lo alerta de avisos regulares de operación e instrucciones de servicio.
Español
Page 26

26
Descripciones Generales
1.
Tapa el tanque de agua
2.
Tanque
3.Pantalla LCD
4.Botón para selección del volumen
5.Botón “BREW” para “PREPARAR”
6.Indicador de LED
7.Botón “POWER” para “ENCENDIDO”
8.Palanca
9.Sostenedor de la almohadilla
10.Bandeja para la tasa o pocillo
11.Ranura
12.Bandeja de goteo
13.Entrada del agua
SunCana
1
2
4
5
6
3
7
10
Contenido de la caja Incluir
1 vaina de la unidad cervecera
Sostenedor de la almohadilla
1 (8-10g)
Guía de inicio rápido
Manual de manejo
8
9
11
12
13
14
Español
Page 27

SunCana
27
Importantes medidas de seguridad
Al utilizar aparatos eléctricos, por favor siga las siguientes precauciones
básicas de seguridad para reducir el riesgo de fuego, electrocución y lesiones
personales.
Este aparato debe estar instalado y localizado correctamente en
concordancia con estas instrucciones antes de su uso.
No toque las superficies calientes. Utilice la palanca o manecilla.
Utilice esta máquina solo para el propósito con que se fabrico.
No sumerja el cordón, enchufe o este aparato en agua u otro líquido.
No coloque la maquina encima o cerca de una estufa eléctrica o de gas o en
un horno caliente.
No utilice esta máquina afuera o al aire libre.
Es necesario mantener cierta vigilancia cuando los niños usan este aparato
o cuando se encuentran cerca de él.
No remueva el sostenedor de la almohadilla mientras que el café se esta
preparando. Presione el botón que dice BREW para parar o cancelar el
ciclo de preparación.
El ciclo de preparación que se ha cancelado no queda en la memoria. El
próximo ciclo dispensara el volumen deseado dependiendo de la
configuración en la cual se haya programado.
No coloque esta máquina debajo de un lavaplatos o cerca de cualquier
fuente de agua. Remueva el tanque y llénelo de agua.
Use solo agua fría en esta máquina. También se recomienda utilizar agua
filtrada, purificada o embotellada en condiciones donde el agua sea alta en
calcio y minerales.
No coloque comida u otros líquidos en el tanque de agua.
No ponga a funcionar este aparato sin agua.
No llene el tanque de agua sobre el nivel de cantidad de agua indicada.
Para un mejor funcionamiento, conecte esta máquina dentro de su propio
enchufe eléctrico, con el fin de prevenir un corto circuito.
No deje que el cordón cuelgue del borde de la mesa o mostrador, ni que
toque superficies calientes.
Por favor apague la maquina antes de desconectarla.
Desconecte la maquina del toma corriente cuando no esté en uso por
largos periodos de tiempo y antes de limpiarla. Permita que se enfríe antes
y después de quitarle cualquier parte, antes de limpiar, y antes de
Español
Page 28

28
SunCana
guardarse.
No use este aparato cuando el cordón o la clavija estén dañados o después
de que el aparato deje de funcionar o cuando este dañada de cualquier
modo. Contacte el servicio al cliente de SunCana para reparar o
reemplazar la maquina.
No se autoriza la utilización de cualquier otro accesorio que no haya sido
evaluado para el uso con esta máquina ya que puede causar lesiones
personales.
Asegúrese que presione la palanca hacia abajo apropiadamente para el
asegure de la almohadilla.
Siempre utilice una taza o pocillo más grande que el volumen de
preparación seleccionado. Asegúrese de que la taza se encuentre centrada
debajo de las aberturas durante el ciclo de preparación para reducir el
riesgo de alguna lesión personal o cualquier daño de pertenencias.
Mantenga sus manos alejadas si la taza se rebosa. Espere hasta que el ciclo
termine, deje que el líquido se enfríe y después disminuya la opción para el
volumen o utilice una taza más grande.
No utilice almohadillas que estén rasgadas ni utilice café molido en el
sostenedor de la almohadilla.
No use este aparato en altitudes mayores a 6800 pies o 2200 metros sobre
el nivel del mar.
Asegúrese que el tamaño de la almohadilla sea apropiada para el
sostenedor antes de el proceso de preparación. El usar la almohadilla con
el tamaño incorrecto podría causar el daño permanente a este aparato.
No exponga este aparato a temperaturas debajo de los 32 grados
Fahrenheit o cero grados Celsius. Esto podría causar el daño permanente
al calentador y otros componentes.
Información General
Esta cafetera tiene un cordón corto para reducir peligros de enredarse o
caerse por causa de la longitud del cordón. Un cordón de extensión puede
ser usado si el grado es igual o más grande al grado de la cafetera. Use un
cordón de extensión de 15 amperios o más. Se debe tener cuidado de no
dejar que el cordón cuelgue del borde de la mesa, para prevenir que los
niños se caigan o que estos lo jalen por equivocación. El operar esta
cafetera y cualquier otro aparato en el mismo circuito de electricidad
Español
Page 29

SunCana
puede causar una sobrecarga eléctrica, la cual podrían causar que los
fusiles se fundan y un posible disparo en los cortes del circuito.
El enchufe polarizado es una característica de seguridad de la cafetera.
Para prevenir el riesgo de una descarga eléctrica, este enchufe está
diseñado para entrar en un tomacorriente polarizado. Si el enchufe no
cabe, contacte a un electricista calificado. No intente modificar el enchufe
de ninguna forma o manera.
Características Especiales
Fácil botón para seleccionar 5 diversos tamaños de porción.
Usted puede seleccionar el tamaño de la porción que desea desde 5oz a
12oz, por favor asegúrese que tenga una taza o pocillo con el tamaño
apropiado.
Sensor de agua en el surtidor del tanque.
La pantalla LCD mostrara “Chequear nivel del agua” cuando no haya
suficiente agua.
Funciona con bolsitas de té regulares sin tira.
Asegúrese que la bolsita de té sea colocada uniformemente dentro del
sostenedor de la almohadilla.
Pantalla LCD
Sistema para la extracción del sabor
Sistema para calibrar Mi proporción de taza
Esta función permite fijar su volumen favorito en una taza de café.
Fijador de Temperatura
Esta función le permite adecuar la temperatura dependiendo de la altitud
sobre diversa área.
Modalidad para el ahorro de energía
La cafetera se apagara automáticamente después de no ser utilizada por 30
minutos.
29
Prepare para su uso - Principie su cafetera
Este procedimiento es requerido únicamente cuando se va a iniciar la
cafetera por primera vez.
IMPORTANTE: No se puede utilizar la cafetera antes de que se
haya iniciado para su primer uso. NO PRENDA la cafetera cuando
la este iniciando.
Español
Page 30

30
SunCana
Coloque una taza o pocillo sobre la bandeja de goteo.
Remueva el tanque de agua levantándolo suavemente en cierto
ángulo hacia afuera.
Enjuague el tanque y llénelo con agua purificada o agua embotellada
hasta la línea indicadora MAX.(Use agua filtrada cuando
existan altos volúmenes de calcio)
Coloque de nuevo el tanque en el lado izquierdo de la cafetera.
Cerciore que quede bien asegurada.
Asegure la palanca. Preaparando la maquina por primera vez
inicie la cafetera.
Conecte a un tomacorriente de 15AMP.
La luz roja se encenderá. NO presione el botón que dice “POWER”.
Presione y sostenga los botones que dicen “VOLUME” y “BREW” por
un poco más de tres segundos para activar el iniciado automático. El
agua empezara a fluir a través de la unidad y hacia las aberturas para
pasar a su tasa o pocillo. Este proceso tomará aproximadamente unos
50 segundos. Si no hay un fluido de agua, repita el paso
anterior hasta que el agua salga por las aberturas. Usted
puede cancelar el proceso de iniciación presionando el botón de
“POWER”.
Cuando el agua pare de fluir en la taza o pocillo, bote el agua en el
lavaplatos.Usted ha iniciado su cafetera ahora usted puede utilizarla
Usted ha iniciado su cafetera - ahora usted puede utilizarla.
NOTA:Para una deliciosa taza de café o té, utilice agua embotellada o
filtrada.
Prepare su primera taza de café
Llene el tanque de agua. Asegúrese que el tanque encaje dentro de la
unidad y cierre la tapa. Si no hay suficiente agua en el tanque, la
pantalla LCD mostrara “CHECK WATER LEVELS” chequear los
niveles del agua, hasta que usted añada mas.
Presiona el botón “POWER” para prender la cafetera.
Tomara aproximadamente 2 minutos después de que usted prenda la
cafetera para calentar el agua. La pantalla LCD le indicara “READY”
cuando esté lista para empezar a preparar.
Coloque su tasa o pocillo sobre la bandeja de goteo.
Suba la palanca, saque el sostenedor y coloque la almohadilla dentro
del sostenedor.
IMPORTANTE: Centre la almohadilla de café y suavemente
presiónela dentro de la cavidad del sostenedor.
ADVERTENCIA: Use solo una almohadilla de café por cada
uso. El colocar dos almohadillas a la vez puede ocasionar un
daño permanente a la cafetera al tratar de cerrar la palanca.
Empuje el sostenedor hasta el fondo de la cavidad y cierre la palanca
hacia abajo.
ADVERTENCIA: Usted debe de sentir un clic cuando el
sostenedor de la almohadilla encaje en su lugar.
Español
Page 31

SunCana
Escoja desde las 5oz hasta las 12oz y presione el botón que dice
“VOLUME” volumen.
Presione rápidamente el botón “BREW” para empezar la
preparación.
NOTA: Para parar el ciclo de preparación presione el botón “BREW”.
Cuando el ciclo de preparación se detenga, levante la palanca y saque
el sostenedor de la almohadilla.
Arroje la almohadilla de café a la basura. No toque la almohadilla,
está caliente.
Precaución: La bebida está extremadamente caliente.
31
Detener el proceso de preparación
Si usted necesita parar el ciclo de preparación que ya ha empezado, hay
dos formas de detenerlo.
Presione el botón “BREW”, el flujo de agua o té se detendrán, la
pantalla LCD seguirá prendida y el indicador de LED permanecerá
“ROJO” O “VERDE”.
Presione el botón “POWER”, el flujo de agua o té se detendrán, la
pantalla LCD se apagara, el indicador de LED permanecerá “ROJO”.
NOTA: Después de interrumpir un ciclo de preparación, el próximo
ciclo será un nuevo ciclo inicial. Una nueva almohadilla de café o té
deberá ser reemplazada para lograr una taza de igual fuerza y sabor.
Posicionar la taza - Calibración
El volumen puede ser un poco diferente cuando se utilicen diferentes
tamaños de almohadillas o dependiendo de los diferentes tipos de café.
Esta función le permite calibrar el volumen favorito de café de acuerdo
a su gusto. Por favor siga los siguientes pasos.
Llene el tanque con agua pura o instale una línea de agua filtrada a la
cafetera.
Conecte la cafetera al tomacorriente. NO PRENDA la cafetera.
Coloque una taza medidora sobre la bandeja de goteo.
Coloque una almohadilla nueva en el sostenedor.
Presione y sostenga el botón “BREW” y después presione el botón
“BREW” por 3 segundos para activar el programa MY TASA. La
pantalla LCD mostrara el tamaño del volumen seleccionado (XX oz).
Presione el botón “VOLUMEN” para escoger el tamaño de la tasa
(XX oz).
Cuando la pantalla LCD indique “READY” o el indicador de LED este
en “VERDE” (titilando), dentro de unos segundos, presione el botón
“BREW” y el café empezara a fluir en su tasa.
Cuando el volumen del café haya alcanzado su volumen deseado,
presione el botón “BREW” nuevamente para detener el fluido. Este
volumen será salvado automáticamente por su tamaño (XX oz).
Repita los pasos 6-8 para calibrar MY TASA en otros tamaños (XX oz)
si así se prefiere.
APAGUE la cafetera si ha terminado con la calibración. (La maquina
Español
Page 32

32
se apagara automáticamente en unos 15 segundos sin ninguna
operación)
NOTA: Presione y sostenga el botón de “VOLUME” y después presione
el botón “BREW” por 3 segundos para readaptar a la forma original de
fabricación.
SunCana
Limpieza y Mantenimiento
Nosotros recomendamos la limpieza de su cafetera regularmente
utilizando las siguientes recomendaciones:
NO Coloque la cafetera en el agua u otros líquidos. El panel de acero
inoxidable y otros componentes externos deberían ser limpiados
regularmente con una toalla húmeda. Por tome precaución al usar
químicos fuertes, pues estos pueden dañar o decolorar la cafetera y
siempre siga las instrucciones del fabricante.
No utilice una esponjilla para limpiar las partes de acero inoxidable
ya que pueden rayar la superficie. Nunca limpie con blanqueador, ya
que esta puede decolorar el producto. Evite el contacto con sales y
ácidos-estos pueden desteñir el producto si se dejan por un periodo
de tiempo largo.
La bandeja de goteo y su superficie deben ser revisados
periódicamente y se deben enjuagar regularmente. Para remover esta
bandeja de goteo, simplemente levántela pero al mismo tiempo se
debe tener nivelada para prevenir que el agua allí depositada se
derrame. La bandeja de goteo y la bandeja que sostiene la taza o
pocillo pueden ser puestos en un lavaplatos automático. Asegúrese de
utilizar únicamente el estante superior del lavaplatos automático
para colocar las dos bandejas.
Utilice solo agua fría para enjuagar el tanque. Asegúrese que la parte
flotante del tanque no sea arrojada al enjuagarse. Si este flotador se
arroja accidentalmente, asegúrese de colocarlo correctamente dentro
del tanque (el lado que tiene una flecha colóquela hacia el lado suyo).
La pantalla LCD mostrara “CHECK WATER LEVEL” si el flotador no
es colocado en la forma apropiada
Limpieza Periódica/Descalcificación
Recomendada al menos una vez al mes y la descalcificación una vez
cada 3 meses.
Periódicamente, usted debería limpiar y descalcificar la cafetera para
limpiar depósitos minerales que se pudieron haber acumulado a causa
de impurificaciones en la fuente de agua. Si estos depósitos no son
removidos, ellos pueden deteriorar la operación de la cafetera y reducir
la vida del producto.
Existen diferentes productos disponibles específicamente para
descalcificar. Nosotros recomendamos usar URNEX®
Descalcificadora Activado o JavaClean2 Limpiador y Descalcificadora.
(Vinagre blanco puede ser utilizado para descalcificar si un producto
para descalcificar no es disponible).
Español
Page 33

SunCana
33
Llene el tanque con el producto para descalcificar como lo explican
las indicaciones del fabricador, o 1 cuarto (32oz). De vinagre blanco.
No añada mezcla en polvo directamente en el tanque. El producto
para descalcificar debe de ser mezclado en una solución antes de ser
añadido al tanque.
Coloque el sostenedor vacío dentro de la cafetera. Cerciórese de que
la palanca este presionada hacia abajo en la posición “LOCK” y sitúe
el volumen a 12oz.
Coloque un contenedor vacio sobre la bandeja de goteo que pueda
sostener hasta 14oz de líquido. Apague el botón de “POWER”,
presione y sostenga ambos botones de “VOLUME” y de “BREW” al
mismo tiempo por un poco más de 3 segundos. El agua comenzara
inmediatamente a fluir a través de la unidad hacia dentro del
contenedor vacio. Esto activa el ciclo de iniciado.
Una vez que el ciclo haya terminado, vacíe el contenedor y colóquelo
de nuevo sobre la bandeja de goteo. Deje la solución de acuerdo a las
direcciones del fabricante. Para el vinagre, deje que la solución se
asiente por lo menos dos, pero no más de cuatro horas.
Una vez que el ciclo termine, vacíe el resto de la solución o vinagre del
tanque. Remueva el sostenedor de la almohadilla; limpie el tanque y
el sostenedor completamente usando un detergente suave y después
enjuague.
Llene el tanque con agua fría limpia hasta la línea máxima y después
coloque el sostenedor de la almohadilla dentro de la cafetera.
Repita el paso 3 al menos dos o más veces para remover la solución
del tanque.
Limpie el sostenedor con un detergente suave y enjuague
completamente.
Preguntas Frecuentes
La cafetera no quiere
preparar café al usarla
la primera vez
El indicador LED está
apagado
La cafetera debe de haber sido iniciada antes de la
primera preparación.
Refiérase a la parte del manual: prepare para su uso-
principie su cafetera.
Asegúrese que el aparato esté conectado de manera
segura.
Chequear el circuito de electricidad.
Como arreglarlaQue está pasando
Español
Page 34

34
SunCana
Como arreglarlaQue está pasando
La pantalla LCD está
apagada
La pantalla LCD
indica “CHECK
WATER LEVELS”
La pantalla LCD
indica “CHECK POD”
La pantalla LCD
indica “E”
Agua/Café se
desborda por los
lados del sostenedor
de la almohadilla
Asegúrese que el aparato esté conectado de manera
segura.
Chequear el circuito de electricidad si es necesario.
Presione el botón “POWER”.
Llene el tanque de agua. (Modelo H701A).
Chequear la válvula de shut-off. (Modelo H701B).
La dirección del flotador no es correcta cuando fue
removida y puesta de nuevo accidentalmente.
La palanca no está en la position “LOCK”.
El tamaño de la almohadilla no es correcta.
Fallo al iniciar la cafetera. Refiérase a la parte del
manual: prepare para su uso - principie su cafetera.
El sensor de la cafetera ha fallado, llame al servicio al
cliente.
Presione el botón “BREW” para detener la
preparación, saque el sostenedor y asegúrese que la
almohadilla haya sido colocada correctamente; la
almohadilla debe de ser ubicada con la parte más
gruesa hacia abajo y bien situada en la mitad del
sostenedor.
Garantía y Servicio al Cliente
La cafetera SunCana 1 año de garantía limitada.
Esta garantía limitada incluye 1 año de repuestos y labor por defectos
en el material y en la mano de obra que existan en el momento de la
fabricación y que aparezcan desde la fecha de la compra original de la
cafetera.
Esta cafetera ha sido fabricada bajo estrictas especificaciones y ha
sido diseñada para el uso con accesorios autorizados por SunCana o
partes de repuesto. Estas garantías excluyen cualquier defecto o
daños causados por aquellos accesorios, repuestos o reparamientos
otros que los autorizados por SunCana. SunCana no pagara por
ningún servicio de garantía realizado por cualquier centro de
reparación no autorizado y tampoco reembolsara por ningún servicio
de reparación no autorizado.
Español
Page 35

SunCana
35
Esta garantía no cubre reclamos resultados de un mal uso,
negligencia, alteración, mal instalación u operación, mantenimiento
o reparo incorrecto, daño o casualidades.
Cubrimiento de esta garantía está condicionada en que usted 1) nos
provea con información temprana de cualquier condición por la que
usted busca cubrimiento de garantía, 2) nos proporcione prueba de la
fecha y precio en el que la compra fue efectuada, 3) devuelva la
unidad y que sea responsable por gastos de manejo y envío(en la caja
original) si es solicitado por un representante al cliente autorizado
por SunCana para una inspección o reparo,4) obtenga una
autorización previa para cualquier reparo de la unidad, y 5) haya
tenido cualquier mano de obra realizado por un representante
autorizado por SunCana.
NOTA: Ninguna otra garantía, oral o escrita, es autorizada por
SunCana.
Esta garantía le da derechos específicos, y usted también puede
obtener otros derechos el cual varían de estado a estado. Algunos
estados no permiten la exclusión o limitación de daños consecuentes o
incidentales, entonces dicha exclusión o limitación puede que no
aplique en su caso.
IMPORTANTE: Si su aparato no funciona o si tiene preguntas
adicionales o inquietudes, por favor comuníquese con el
servicio el cliente de SunCana o envíenos un correo
electrónico a info@singleservebrewer.com
Español
Page 36

SunCana
®
LIS TED
COFFE E POD BRE WER
3TJ U
Recycled paper
Papier recyclé
Papel reciclado
Printed in PRC
 Loading...