

Page 1
OWNER'S MANUAL
2
ERIK CIRCLE, P.O.Box
280
Form No.
70447
Rev. B
M602
082300
cps
INTEGRITY®
Coffee
Brewing System
602
OPERATING INSTRUCTIONS
MAINTENANCE INSTRUCTIONS
and
PARTS LIST
DOMESTIC MODEL NOS.
9010
9013
9011
9016
9012
9017
Verdi, Nevada 89439
telephone (888) 492-2782
fax (888) 492-2783
www.wellsbloomfield.com
Page 2

LIMITED WARRANTY STATEMENT
All electrical equipment manufactured by BLOOMFIELD INDUSTRIES is warranted against defects in materials and workmanship for a period
of one year from the date of original installation or eighteen (18) months from the date of shipment from our factory, whichever comes first, and
is for the benefit of the original purchaser, except that:
a. airpots carry a 30 day parts warranty only.
b. dispensers; i.e., tea and coffee carry a 90 days parts warranty only, excludes decanters.
THIS WARRANTY IS THE COMPLETEAND ONLY WARRANTY, EXPRESSED OR IMPLIED IN LAW OR IN FACT, INCLUDING BUT NOT
LIMITED TO, WARRANTIES OF MERCHANTABILITY OR FITNESS FOR ANY PARTICULAR PURPOSE, AND/OR FOR DIRECT,
INDIRECT OR CONSEQUENTIAL DAMAGES IN CONNECTION WITH BLOOMFIELD INDUSTRIES PRODUCTS.
This warranty is void if it is determined that upon inspection by an Authorized Service Agency that the equipment has bee modified, misused,
misapplied, improperly installed, or damaged in transit or by fire, flood or act of God.
It also does not apply if the serial nameplate has been removed or service is performed by unauthorized personnel. The prices charged by
Bloomfield Industries for its products are based upon the limitations in this warranty. Seller's obligation under this warranty is limited to the
repair of defects without charge by a Bloomfield Industries Authorized Service Agency or one of its sub-service agencies. This service will be
provided on customer's premises for non-portable models. Portable models (a device with a cord and plug) must be taken or shipped to the
closest Authorized Service Agency, transportation charges prepaid for services.
In addition to restriction contained in this warranty, specific limitations are shown below (Additional Warranty Exclusions).
Bloomfield Industries Authorized Service Agendes are located in principal cities. This warranty is valid in the United States and void elsewhere.
Please consult your classified telephone directory, your food service equipment dealer or for information and other details concerning warranty
write to:
Service Parts Department, Bloomfield Industries, P.O. Box 280 Verdi, NV 89439 Phone: (888) 492-2782 Fax: (888) 492-2783
SERVICE POLICY AND PROCEDURE GUIDE
ADDITIONAL WARRANTY EXCLUSIONS
1. Resetting the safety thermostats, circuit breakers or overload protectors unless warranted conditions are the cause.
2. All problems due to operation at voltage other than specified on equipment nameplates are not covered under warranty. Conversion to
correct voltage must be the customer's responsibility.
3. All problems due to electrical connections not made in accordance with electrical code requirement and wiring diagrams supplied with
the equipment are not covered under warranty.
4. Replacement of items subject to normal wear, to include such items as knobs and light bulbs. Normal maintenance functions including
adjustments of thermostats, and replacement of indicating lights are not covered under warranty.
5. Failure to fill the brewer with water prior to applying electrical power will damage the unit and is not covered under warranty. Also, all
problems due to inadequate water supply, such as fluctuating, high or low water pressure, etc. are not covered by warranty.
6. All problems due to mineral/calcium deposits, or contamination from chlorides/chlorines. De-liming is considered a preventative
maintenance function and not covered by warranty.
7. Full use, care and maintenance instructions are supplied with each machine. Those miscellaneous adjustments noted are customer
responsibility. Proper attention will prolong the life of the machine.
8. Travel mileage is limited to sixty (60) miles from an authorized Service Agency or one of its sub-agencies. Portable equipment (units with
a plug and cord) must be taken or shipped freight prepaid to an Authorized Service Agency for warranty service.
9. All labor shall be performed during normal working hours. Overtime premium will be charged to customer.
10. All genuine Bloomfield replacement parts are warranted for ninety (90) days from date of purchase on non-warranty equipment. Any use
of non-genuine Bloomfield parts completely voids any warranty.
11. Installation, labor, and job check-outs are not considered warranty.
12. Charges incurred by delays, waiting time or operating restrictions that hinder the service technician's ability to perform service are not
covered by warranty. This includes institutional and correctional facilities.
SHIPPING DAMAGE CLAIM PROCEDURE
NOTE: For your protection, please note that equipment in this shipment was carefully inspected and packaged by skilled personnel prior to
leaving the factory. Upon acceptance of this shipment, the transportation company assumes full responsibility for its safe delivery.
IF SHIPMENT ARRIVES DAMAGED:
1. VISIBLE LOSS OR DAMAGE: Be certain that any visible loss or damage is noted on the freight bill or express receipt, and that the
note of loss or damage is signed by the delivery person.
2. FILE CLAIM FOR DAMAGE IMMEDIATELY: Regardless of the extent of damage.
3. CONCEALED LOSS OR DAMAGE: If damage is unnoticed until the merchandise is opened, notify the transportation company o
carrier immediately, and file a "CONCEALED DAMAGE" claim with them. This should be done within fifteen (15) days from the date
the delivery was made to you. Be sure to retain the container for inspection.
Wells manufacturing cannot assume liability for damage or loss incurred in transit. We will, however, at your request, supply you with the
necessary documents to support your claim.
xi
Page 3

TABLE OF CONTENTS
Warranty
Inside Cover
Specifications
1
Features and Operating Controls
Old Style Solenoid
2
New Style Solenoid
4
Installation Instructions
6
Servicing Instructions
Temperature Adjustment
8
Timing Adjustment
8
Water Flow Diagram
9
Trouble Shooting
10
Wiring Diagrams
11
Exploded Views/ Parts Lists
Electrical Components
12
Hot Water Tank Assembly
13
Internal Plumbing Components
14
9016
Automatic, Plumbed
-
In, 3 Warmer
n/a YES
115/230V/1800W
Brewing Coffee 7
Cabinet & Related Components 15
SPECIFICATIONS
MODEL CONFIGURATION PLUG FAUCET VOLT/WATTAGE
9010 Automatic, Plumbed-In, 3 Warmer NEMA5-20P YES 120V/2300W
9011 Automatic, Plumbed-In, 3 Warmer NEMA5-20P NO 120V/2300W
9012 Automatic, Plumbed-In, 3 Warmer NEMA5-15P YES 120V/1800W
9013 Automatic, Plumbed-In, 3 Warmer NEMA5-15P NO 120V/1800W
9017 Automatic, Plumbed-In, 3 Warmer n/a NO 115/230V/1800W
In this manual, brewers manufactured prior to April, 2000 will be identified as "old-style solenoid". Such brewers were
manufactured with a metal-bodied solenoid.
Brewers manufactured from April, 2000 will be identified as "new style solenoid". Such brewers are manufactured
with a nylon-bodied solenoid having either: a single controlled outlet; or, a single controlled outlet and a straight -thru
(bypass) outlet.
Unless otherwise noted, all drawings and procedures in this manual refer to brewers with the new style solenoid.
1
Page 4
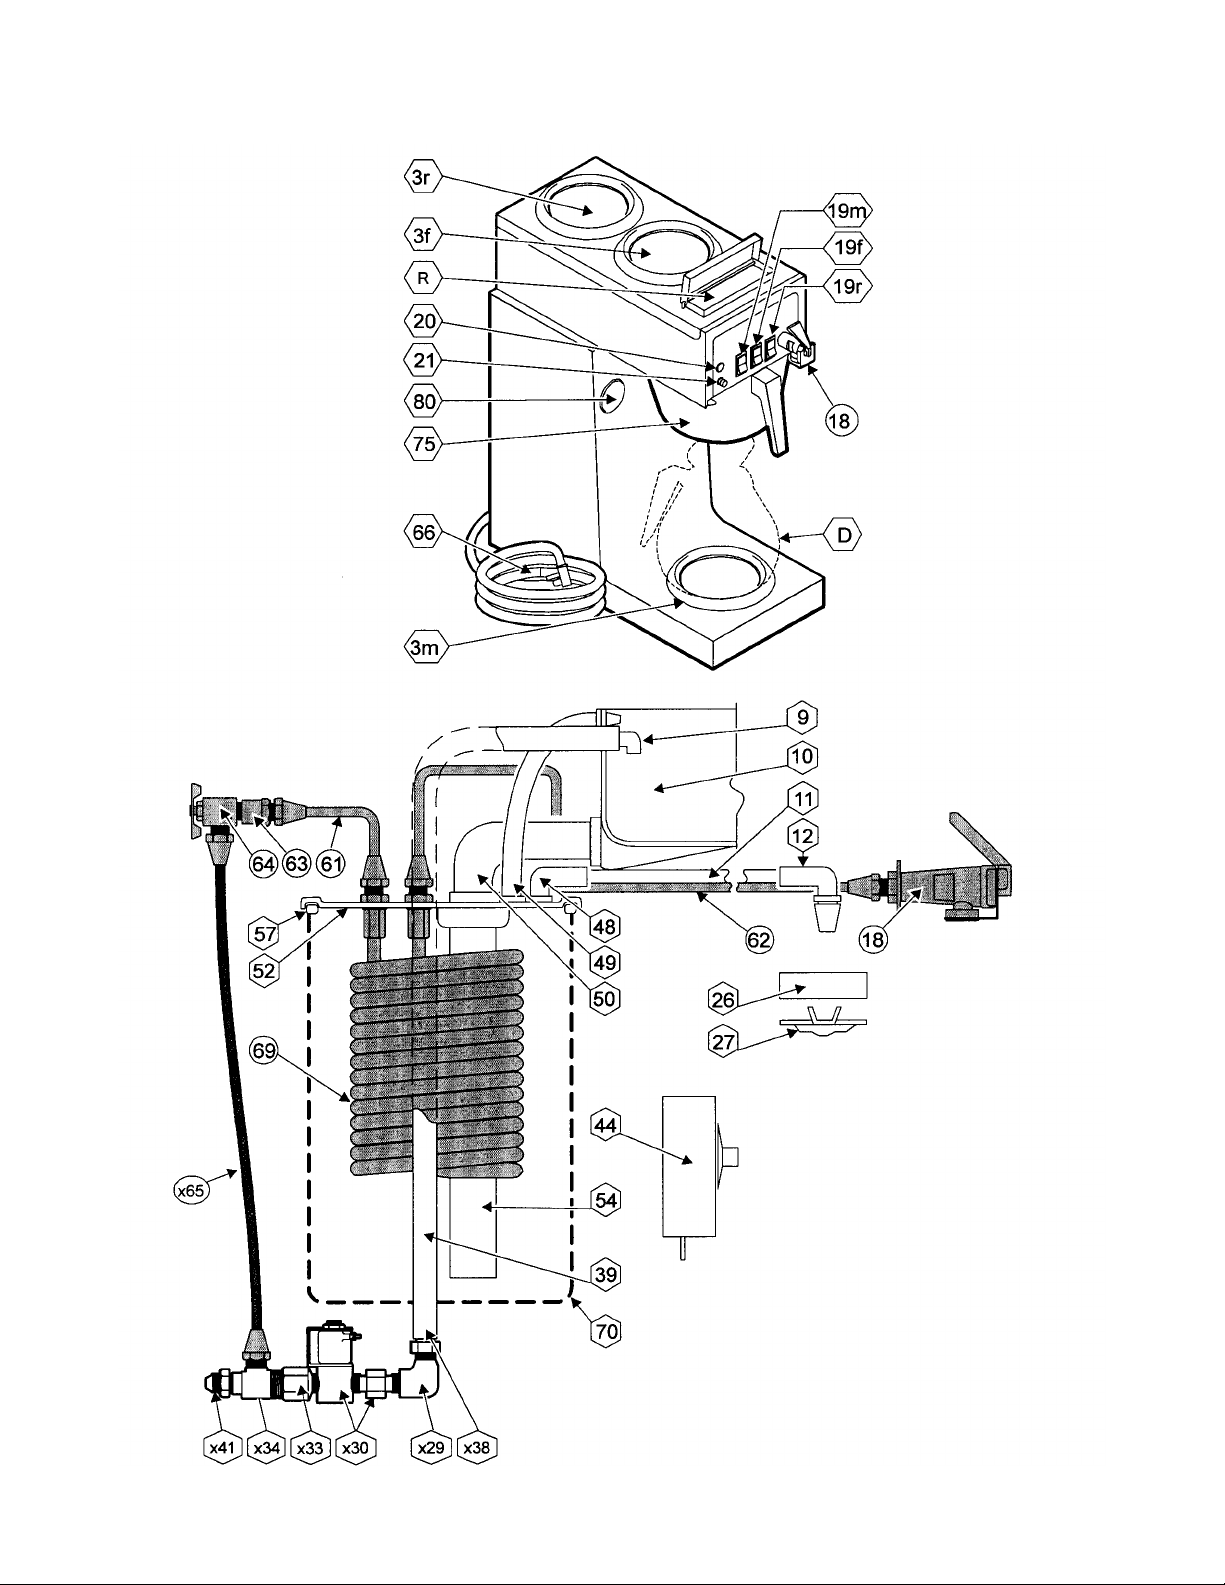
WATER SYSTEM (Old Style Solenoid,
manufactured prior to April, 2000)
2
Page 5
3. WARMER COVER PLATE 48. OUTLET ELBOW
3m. Main Warmer 49. VENT TUBE
3f. Top Front Warmer 50. WATER INLET ELBOW
3r. Top Rear Warmer 51. HI-LIMIT THERMOSTAT
7. HOLD DOWN STRAP 52. TANK COVER
9. ELBOW, VENT LINE 54. WATER INLET TUBE
10. BASIN PAN 56. HEATING ELEMENT
11. WATER OUTLET TUBE 57. TANK LID GASKET
12. SPRAYER ELBOW 61. FAUCET FORMED INLET TUBE
18. FAUCET ASSEMBLY 62. FAUCET FORMED OUTLET TUBE
19. WARMER ON/OFF SWITCH 63. ADAPTER
19m. Main Warmer 64. FAUCET NEEDLE VALVE
19f. Top Front Warmer x6
19r. Top Rear Warmer 66. CORD & CAP ASSEMBLY
20. INDICATOR LIGHT 69. FAUCET HOT WATER COIL
21. START SWITCH - BREW 70. TANK BODY
26. SPRAY HEAD GASKET 75. BREW CHAMBER
27. SPRAY DISK 77. BASIN COVER ASSEMBLY
x29. ELBOW 80. TIMER ACCESS BUTTON PLUG
x30. SOLENOID VALVE W/ FLOW CONTROL
x33. REDUCER C. DECANTER (NOT PROVIDED, SHOWN FOR
x34. TEE
x38. ADAPTER R. RESERVOIR ACCESS (COLD WATER POURED
39. WATER INLET HOSE
x41. INLET FITTING
44. TIMER, 2-MIN. x = Brewers manufactured prior to April, 2000
47. THERMOSTAT
3
FAUCET SUPPLY BRAIDED HOSE
LOCATION ONLY)
IN HERE FOR POUR-OVER FUNCTION)
Page 6
OPERATING FEATURES AND CONTROLS NEW -
WATER SYSTEM
STYLE SOLENOID
4
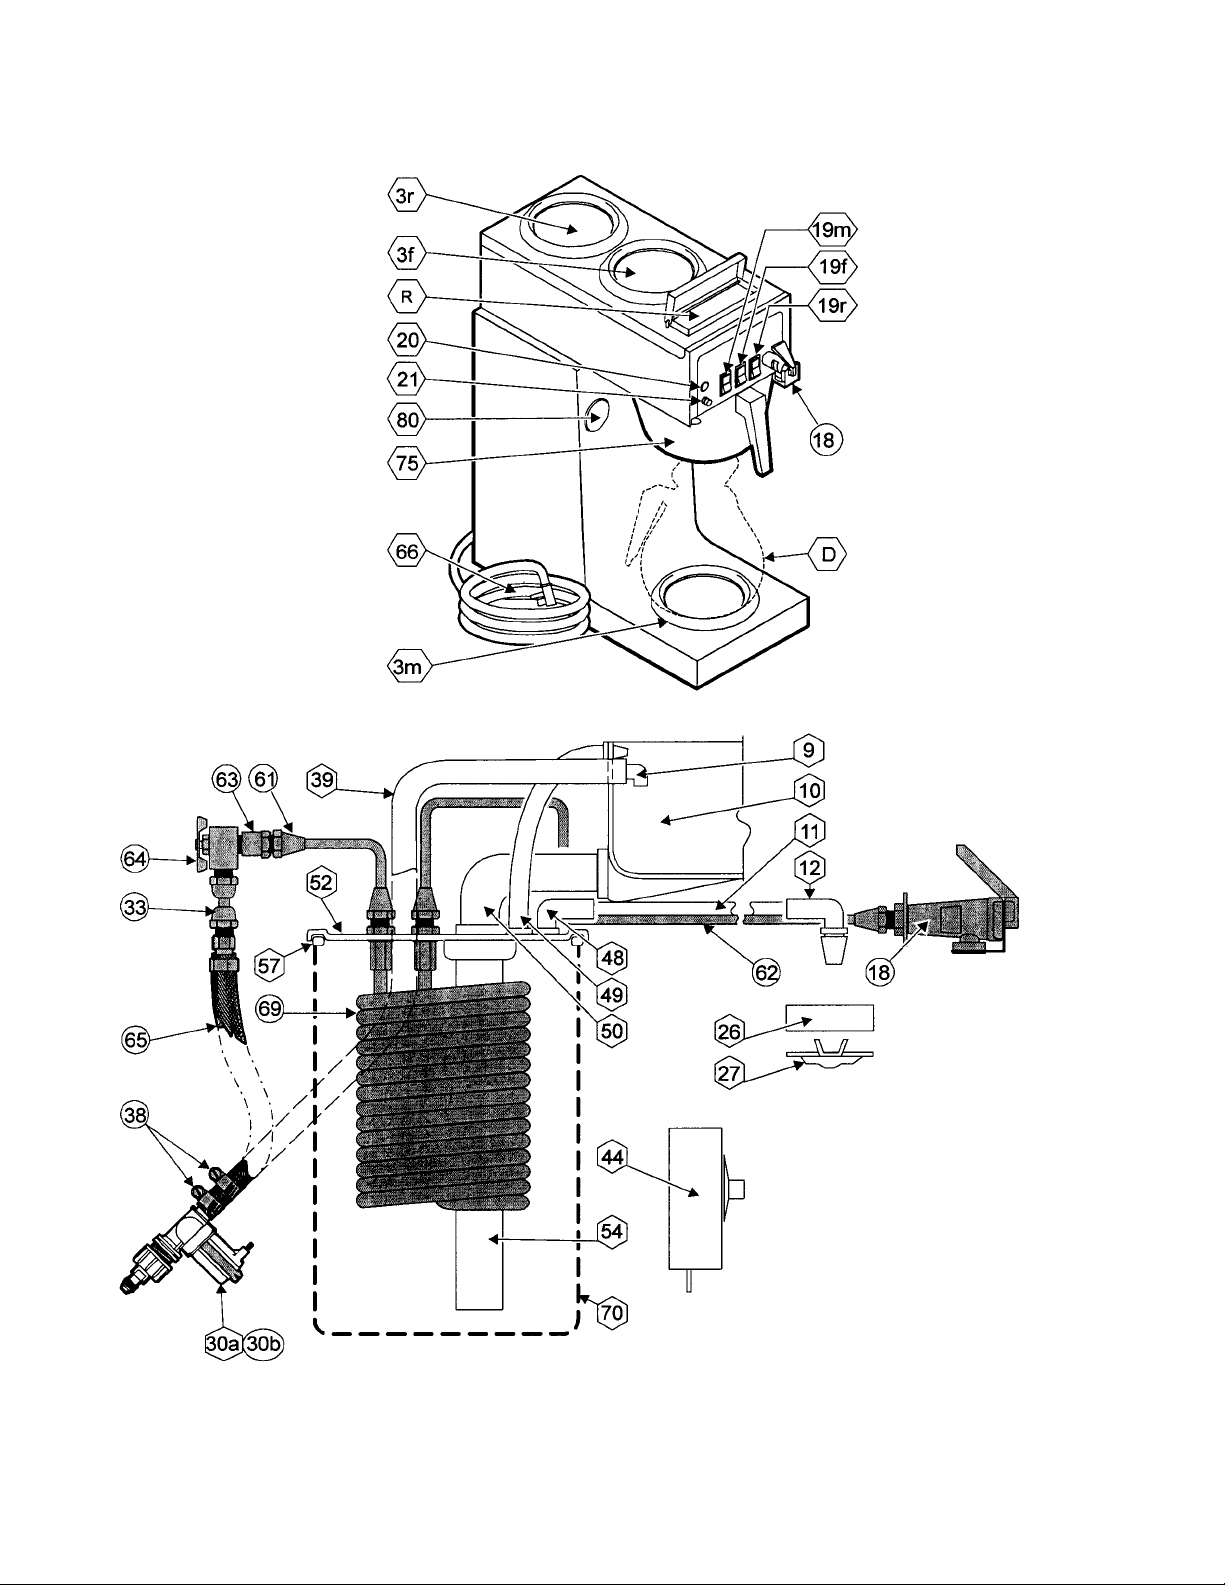
(New Style Solenoid,
Manufactured April, 2000 and later)
Page 7

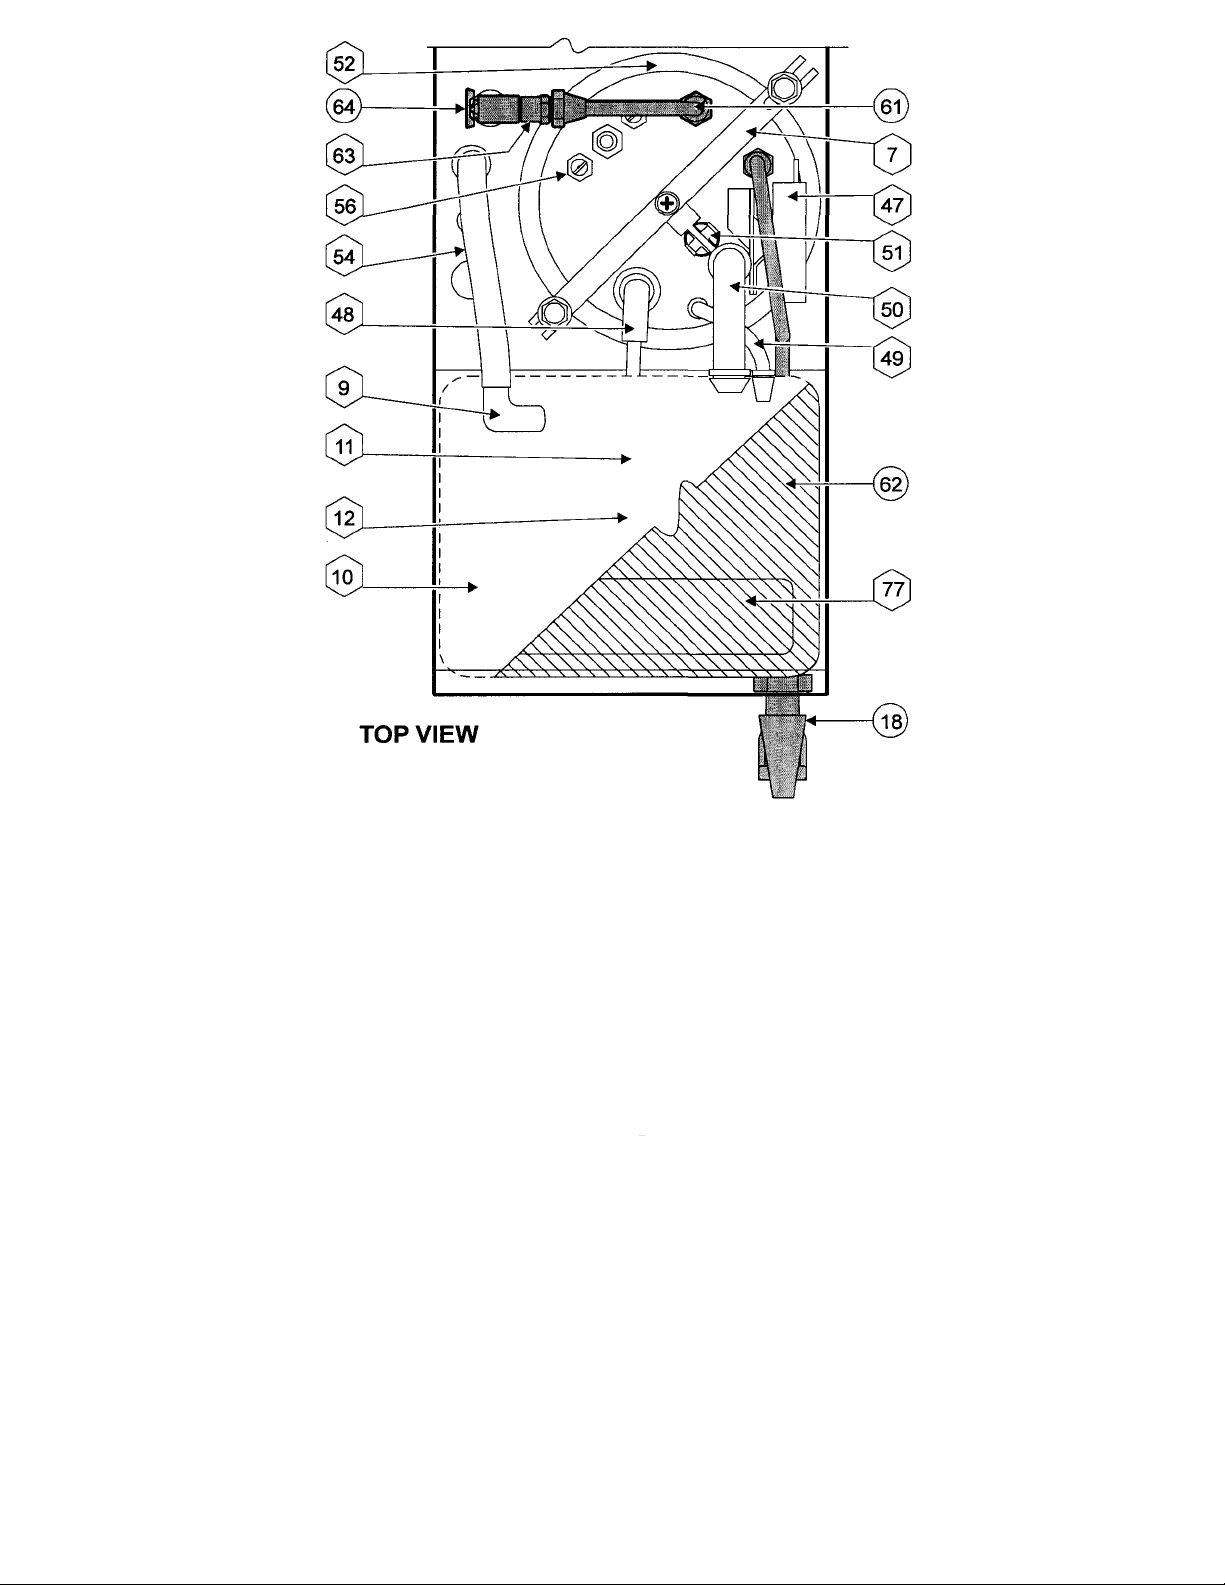
7. HOLD DOWN STRAP
52. TANK COVER
10. BASIN PAN
56. HEATING ELEMENT
20. INDICATOR LIGHT
69. FAUCET HOT WATER COIL
R.
TOP VIEW
3. WARMER COVER PLATE
3m. Main Warmer
3f. Top Front Warmer 50. WATER INLET ELBOW
3r. Top Rear Warmer
9. ELBOW, VENT LINE 54. WATER INLET TUBE
48.
49.
51.
OUTLET ELBOW
VENT TUBE
HI-LIMIT THERMOSTAT
11. WATER OUTLET TUBE
12. SPRAYER ELBOW
18. FAUCET ASSEMBLY
19. WARMER ON/OFF SWITCH
19m. Main Warmer
19f. Top Front Warmer 65. FAUCET BRAIDED HOSE ASSEMBLY
19r. Top Rear Warmer
21. START SWITCH - BREW
26. SPRAY HEAD GASKET
27. SPRAY DISK
30. SOLENOID VALVE W/ STRAINER
33. V4" x y4" FLARE SWIVEL
38. HOSE CLAMP C. DECANTER (NOT PROVIDED, SHOWN FOR
44. TIMER, 2-MIN.
47. THERMOSTAT
57.
61.
62.
63.
64.
66.
70.
75.
77.
80.
5
TANK LID GASKET
FAUCET FORMED INLET TUBE
FAUCET FORMED OUTLET TUBE
ADAPTER
FAUCET NEEDLE VALVE
CORD & CAP ASSEMBLY
TANK BODY
BREW CHAMBER
BASIN COVER ASSEMBLY
TIMER ACCESS BUTTON PLUG
LOCATION ONLY)
RESERVOIR ACCESS (COLD WATER POURED
IN HERE FOR POUR-OVER FUNCTION)
Page 8
INSTALLATION INSTRUCTIONS
IMPORTANT: Water line connections must conform to
IMPORTANT: Brewer must be installed on a water line
IMPORTANT: Flush water line before connecting to
NOTE: NSF requests a provision be made in the water
IMPORTANT: DO NOT PLUG INTRGRITY®
IMPORTANT: DO NOT PLUG INTEGRITY® INTO
AN ELECTRICAL OUTLET OR ENERGIZE
THE BREWER UNTIL THREE FULL DECANTERS
OF WATER HAVE BEEN POURED INTO THE
BREWER, AND UNTIL ALL INSTRUCTIONS HAVE
BEEN READ AND FOLLOWED.
A. ALL INTEGRITY® MODELS
all applicable codes and ordinances.
with water pressure between 20 p.s.i. and 90 p.s.i.
If water pressure varies greatly or exceeds 90 p.s.i.
flowing pressure, a pressure regulator must be
installed.
brewer. Brewer must be connected to cold water line.
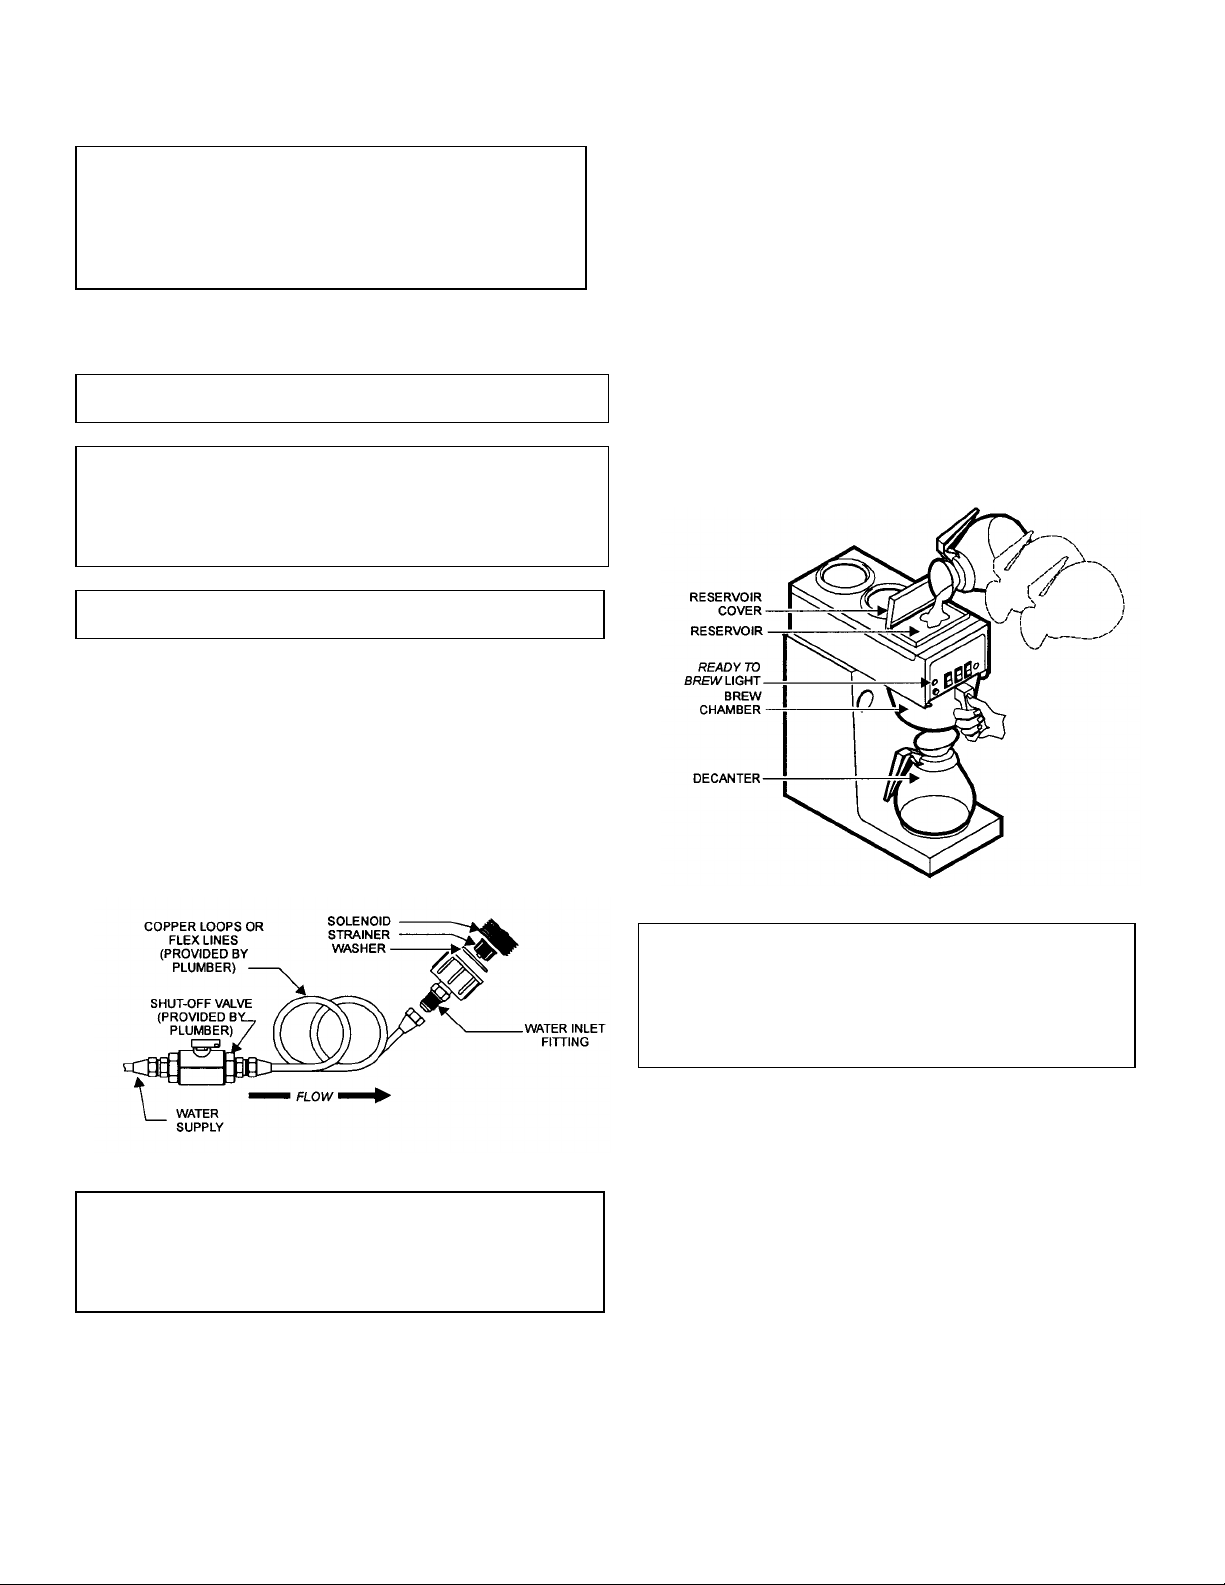
1. INTEGRITY® brewers are supplied with an inlet
water strainer in the (new style) solenoid.
2. For installation, use 1/4" copper tubing and
appropriate 1/4" flare fittings.
3. A shut -off valve must be provided by plumber and
installed in the water supply line before water line
strainer. In order to minimize water line restriction, a
1/4-turn ball valve is recommended.
4. After water line has been flushed and
connected to brewer, open shut -off valve.
5. Slide empty brew chamber in place under spray
head and place empty decanter under brew
chamber.
6. Open reservoir cover and pour three (3) full
decanters of cold water into reservoir. Water
will start flowing during the third decanter
(second decanter on brewers equipped with
faucet), indicating that the water tank contains
the required amount of water. After water stops
flowing, remove and empty decanter. Place
empty decanter under brew chamber. Close
reservoir cover.
supply line for flexibility. This is necessary to allow for
moving the brewer for cleaning underneath, etc. A
double-coiled length of copper tubing or a 1/4" flex
line in the supply line would comply with this request.
INTO AN ELECTRICAL OUTLET OR ENERGIZE
THE BREWER UNTIL THREE FULL DECANTERS
OF WATER HAVE BEEN POURED INTO THE
BREWER, AND UNTIL ALL INSTRUCTIONS HAVE
BEEN READ AND FOLLOWED.
B. INTEGRITY® MODELS 9010, 9011, 9012 & 9013
1. After filling, plug electric cord into 120 volt outlet
capable of carrying:
20 amps / 2300 watts (Models 9010 & 9011)
15 amps /1800 watts (Models 9012 & 9013)
2. Brewer initial heating time will be approximately
12-18 minutes. READY TO BREW light will light
when water has reached proper brewing
temperature.
6
Page 9

C. INTEGRITY ©MODELS
9016 & 9017
IMPORTANT: For power supply, use #12 AWG wire
4.
Once connections have been completed
NOTE: If stronger or weaker coffee is desired, use
suitable for 75°C. Use copper wire only.
reinstall access panel.
D. INTEGRITY® MODELS 9010, 9012 & 9016
IMPORTANT: DO NOT PLUG INTRGRITY®
INTO AN ELECTRICAL OUTLET OR ENERGIZE
THE BREWER UNTIL THREE FULL DECANTERS
OF WATER HAVE BEEN POURED INTO THE
BREWER, AND UNTILALL INSTRUCTIONS HAVE
BEEN READ AND FOLLOWED.
1. Power cord, conduit and fittings must be
provided by electrician.
2. Remove upper front panel.
3. Connect to 240 volt or 208 volt, single phase
with a separate neutral, 60 Hz. Service must be
capable of 20 amps / 3800 watts.
4. Reinstall all panels when hookup is complete.
1. Open faucet and flow approximately 1 quart of water
into an appropriate container. This is necessary to
purge any air from the faucet hot water coil.
E. ALL INTEGRITY® MODELS
1. Place an empty decanter under brew chamber.
Press BREW button. Hot water will start to flow
immediately, indicating that the system is fully
primed and ready for operation. When water stops
flowing, empty the decanter.
2. Place an empty decanter under brew chamber.
Press BREW button. When water stops flowing you
should have a full decanter (60 oz.) A water control
valve and factory pre-set timer control the amount
of water delivered during each brew cycle. If the
amount of water is other than a full decanter,
proceed to TIMER ADJUSTMENT, pg 8.
3. When READY TO BREW light comes on, brewer is
read to begin brewing coffee. See BREWING
COFFEE below.
BREWING COFFEE
1. Remove brew chamber from under spray head and
place one (1) Bloomfield paper filter into brew
chamber. Add a measured amount of your choice of
fine grind coffee. Gently shake brew chamber to level
coffee bed.
either more or less coffee until desired strength of
coffee is achieved, or consult your local roaster for
different grinds and/or flavors.
2. Place empty decanter under brew chamber.
IMPORTANT: Always make certain there is an
empty decanter under brew chamber before starting
brew cycle.
3. Automatic operation; press BREW button.
Pour-Over operation; Pour one full decanter of cold
water into reservoir. Close reservoir cover.
4. Hot water will start spraying ove r coffee grounds in
brew chamber and freshly brewed coffee will begin
to fill decanter. When coffee stops flowing, fresh
coffee is complete.
5. When dripping stops, remove brew chamber from
brewer. Discard filter and used grounds. Rinse
brew chamber under a faucet.
CAUTION: BURN HAZARD
Brew chamber and contents will be hot.
6. When READY TO BREW tight turns on, brewer will be
ready for another brew cycle.
7. INTEGRITY® brewers are equipped with electric
warmers to keep your coffee warm. Each warmer is
activated by a switch with indicator which glow when
the switch is ON.
IMPORTANT:
Warmers should be turned OFF when not in use.
DO NOT leave an empty decanter on a warmer
when it is ON.
DO NOT leave cof fee on a warmer unattended,
such as overnight.
7
Page 10

SERVICING INSTRUCTIONS
IMPORTANT:
Water pressure must be bet
ween
IMPORTANT:
Before setting assembly into tank,
NOTE:
Optimum brewing temperature is 195°F
IMPORTANT:
When mounting thermostat, be sure
1. Front Panels:
a. Remove warmer plate by turning counter-
clockwise until it unscrews.
b. Remove screws from two retaining clips
under wanner plate.
c. Lift off panels as a unit.
2. Top Panel (All Models):
a. Remove two screws from rear of top panel.
b. Lift rear of panel, remove to rear.
c. Lift out splash guard/basin pan cover.
B. TEMPERATURE ADJUSTMENT
1. Unplug power cord or turn circuit breaker OFF.
2. Remove top panel.
C. TIMER ADJUSTMENT
The amount of water dispensed automatically during a
brew cycle is controlled by the timer.
20 p.s.i and 90 p.s.i. flowing pressure. If water
pressure exceeds this value, or if water pressure
varies greatly, a pressure regulator must be installed
in the water supply line.
1. Place empty decanter under brew chamber.
Press BREW button. Brewer should dispense
one 60 oz. decanter of water. To adjust amount:
2. Remove brew chamber and button plug.
3. Adjust knob on timer; clockwise increases time.
4. Run several cycles to check amount of water
delivered. Replace button plug.
D. REMOVE TANK LID ASSEMBLY
1. Unplug brewer or turn circuit breaker OFF. Turn
OFF water supply. Remove top panel and splash
guard.
2. Pull vent tube and inlet elbow out of basin pan.
3. Pull water inlet tube out of basin pan.
4. Remove basin pan.
5. On models with faucet, disconnect inlet pipe at
faucet shut -off valve and outlet tube at faucet.
6. Disconnect all wiring from thermostat, hi-limit,
heating element and upper warmer.
7. Loosen center screw on tank hold-down bracket.
8. Remove hold-down bracket by sliding short
slotted end off of locking stud and lifting it off.
9. Remove cover assembly by lifting it straight up.
10. Reassemble in reverse order.
3. Pull vent tube out of tank lid and insert dial-type
thermometer of known accuracy in vent hole.
4. Place empty decanter under brew chamber.
Energize brewer and pour one decanter of cold
water into reservoir. When READY TO BREW
light comes on, read temperature displayed on
thermometer.
5. Adjust thermostat by turning shaft; clockwise
increases temperature.
(90°C). Thermostat should be adjusted so that
temperature does not exceed 203°F (95°C).
make sure tank lid gasket is properly seat ed on
flange of lid. DO NOT OVER-TIGHTEN.
E. REPLACE THERMOSTAT
1. Unplug brewer or turn circuit breaker OFF. Turn
OFF water supply. Remove top panel.
2. Disconnect all wiring from thermostat only.
3. Loosen and free jam nut from pass-thru fitting
securing temperature sensing bulb.
4. Remove two screws holding thermostat to
bracket. Lift out thermostat, sensing bulb and
thermostat gasket.
5. Reassemble in reverse order.
a new seal washer is placed below the fitting on the
capillary line. Push sensing bulb thru tank lid until
fitting seats. Tighten capillary lock nut only enough
to ensure no water leakage. Excessive tightening is
not necessary.
8
Page 11

F. REPLACE HEATING ELEMENT
1. Remove tank lid assembly per section D.
2. Remove two hex nuts holding element to cover.
Pull element from mounting holes.
3. Reassemble in reverse order.
IMPORTANT: When replacing heating elements,
also replace seal gaskets.
G. REPLACE READY LIGHT, WARMER SWITCH or
BREW BUTTON.
1. Unplug power cord or turn circuit breaker OFF.
2. Using Switch Removal Tool (p/n 83209) or a thin
screwdriver, pry light or switch from mounting
hole. Disconnect leads.
3. Reassemble in reverse order.
H. REPLACE OLD STYLE SOLENOID
1. Unplug power cord or turn circuit breaker OFF.
2. Turn OFF and disconnect water supply.
3. Remove water connection and hex nut holding
inlet fitting into back of brewer.
4. Remove two screws holding access door in
place. Remove access door.
5. On faucet models, remove flare connection from
"tee" inlet fitting.
6. Push solenoid forward slightly and lift to release it
from bracket. Carefully pull solenoid out thru
access hole.
7. Remove wiring and rubber tubing from solenoid.
8. Remove fittings from old solenoid and transfer to
new solenoid.
9. If necessary, replace flow control at this time. 10.
Reassemble in reverse order.
I. REPLACE NEW STYLE SOLENOID
1. Unplug power cord or turn circuit breaker OFF.
2. Turn OFF and disconnect water supply.
3. Remove two screws holding solenoid door in
place. Remove access door. Remove solenoid.
4. Remove hose(s) from solenoid. Remove wiring
from solenoid.
5. Reassemble in reverse order.
J. REPLACE TIMER ASSEMBLY
1. Unplug power cord or turn circuit breaker OFF.
2. Remove front panel. Remove knob and three
screws holding timer to bracket. Disconnect
wiring to timer.
3. Reassemble in reverse order.
4. Adjust timer per Section B.
K. REPLACE WARMER ELEMENT
1. Unplug power cord or turn circuit breaker OFF.
2. Turn warmer plate counter-clockwise until it
unscrews from bracket.
3. Lift element off bracket. Disconnect leads.
4. Reassemble in reverse order.
L. CLEAN SPRAY HEAD
1. Remove brew chamber.
2. Rotate spray disk out of spray head by pushing
up and rotating it out of locking grooves.
3. Clean off lime build-up and wipe oil from both
sides of spray disk. Make sure all holes in spray
disk are fully open.
4. Clean entire area over brew chamber with a
damp cloth.
5. Replace spray disk, being sure spray head
gasket is in place INSIDE cup. Spray disk tabs
must be in the UP position. Rotate spray disk
fully into locking grooves.
A. POUR-OVER OPERATION
Pouring any amount of cold water into basin pan
through reservoir access forces an identical
amount of hot water out of tank and thru spray
head into brew chamber.
B. AUTOMATIC OPERATION
Pressing BREW button energizes solenoid valve,
allowing water to flow into basin pan and then into
hot water tank. Length of time solenoid is open is
controlled by timer.
C. FAUCET OPERATION
Faucet water coil is submerged in hot water tank
and draws heat from brew water. Water going to
water coil is not controlled by solenoid valve.
Faucet is at supply water pressure any time faucet
shut-off valve is OPEN.
WATER FLOW
9
Page 12

TROUBLE SHOOTING
ALL MODELS
I. BREWER WILL NOT HEAT WATER
1. Check if the cord is plugged into electric outlet.
Check for blown fuse or open circuit breaker.
2. Damaged cord/plug: Check cord for breaks and
cuts.
3. Loose wires: Remove top panel and check for
loose connections.
4. Temperature control thermostat set too low. Adjust
for 195°F±5°F.
5. Defective temperature control thermostat:
Resistance reading across thermostat terminals
(unit unplugged) should be 00. Replace
thermostat if defective.
6. Defective Hi-Limit thermostat: Resistance reading
across hi-limit terminals (unit unplugged) should
be 00. Replace hi-limit if defective.
7. Defective Heating element: Resistance reading
across element terminals (unit unplugged,
element at room temperature) should be:
Models 9010 & 9011 7.20.
Models 9012 & 9013 14.40
Models 9016 & 9017 16.50
Replace element if defective.
II. LOW OR HIGH WATER TEMPERATURE
1. Temperature control thermostat defective or out of-adjustment. Adjust or replace thermostat.
2. Excessive lime deposit on tank heating element
or temperature sensing bulb:
Remove tank lid assembly from brewer. Use a
commercially available de-liming solution to
remove lime build-up. DO NOT RUN CLEANING
SOLUTION THRU BREWER.
V. WEAK COFFEE:
1. Insufficient amount of coffee grounds being
used: Add fine grind coffee until desired taste is
achieved.
2. Water temperature too low: Water temperature
at brew head should be 195°F. Adjust as
necessary.
3. Wrong paper filter being used: Use only
genuine BLOOMFIELD filter paper.
4. Paper filter not centered in brew chamber, or
coffee grounds not level in filter paper: Center
filter paper and level bed of grounds.
5. Wrong grind of coffee being used: Used fine
grind coffee.
6. Check that spray disk and gasket are properly
in place.
VI. COFFEE TOO STRONG:
1. Too much coffee being used: Reduce amount
of coffee used until desired taste is achieved.
2. More than one (1) filter paper being used:
Make sure only a single paper is placed in the
brew chamber.
VII. NO WATER FLOW WHEN BREW BUTTON
PRESSED
1. Insufficient amount of water in the system. Be
sure three full decanters of cold water are
added to system prior to start -up.
2. Water turned off to machine: Open water valve.
3. Water strainer plugged: Disassemble and clean
strainer.
4. Low water supply pressure: Unit requires a
minimum of 20 p.s.i. for operation.
5. Brewer is unplugged, or circuit breaker open.
III. WARMER DOES NOT HEAT
1. Check if warmer switch is ON.
2. Check if the cord is plugged into electric outlet.
Check for blown fuse or open circuit breaker.
3. Damaged cord/plug: Check cord for breaks and
cuts.
4. Loose wires: Pry warmer switches out of brewer
(unit unplugged) and check for loose
connections.
5. Defective warmer switch: Replace switch
6. Defective warmer element: Replace element.
IV. READY light does not glow when water reaches
brew temperature.
1. Loose wires: Pry READY light out of brewer (unit
unplugged) and check for loose connections.
2. Defective READY light: Replace light.
VIII. NO WATER FLOW AT FAUCET
1. Water turned off to machine: open water shut off valve.
2. Faucet shut -off valve closed: Open valve.
IX. EXCESSIVE WATER FLOW AT FAUCET
1. Faucet shut -off valve open too far. This is a
needle valve to control flow. Throttle valve as
required for desired flow.
X. CONTINUOUS DRIP AT BREW HEAD
1. Leaking solenoid. Turn faucet shut -off valve
OFF. If drip does not stop, replace solenoid.
2. Ruptured water coil. Turn faucet shut -off valve
OFF. If drip stops, replace coil.
10
Page 13
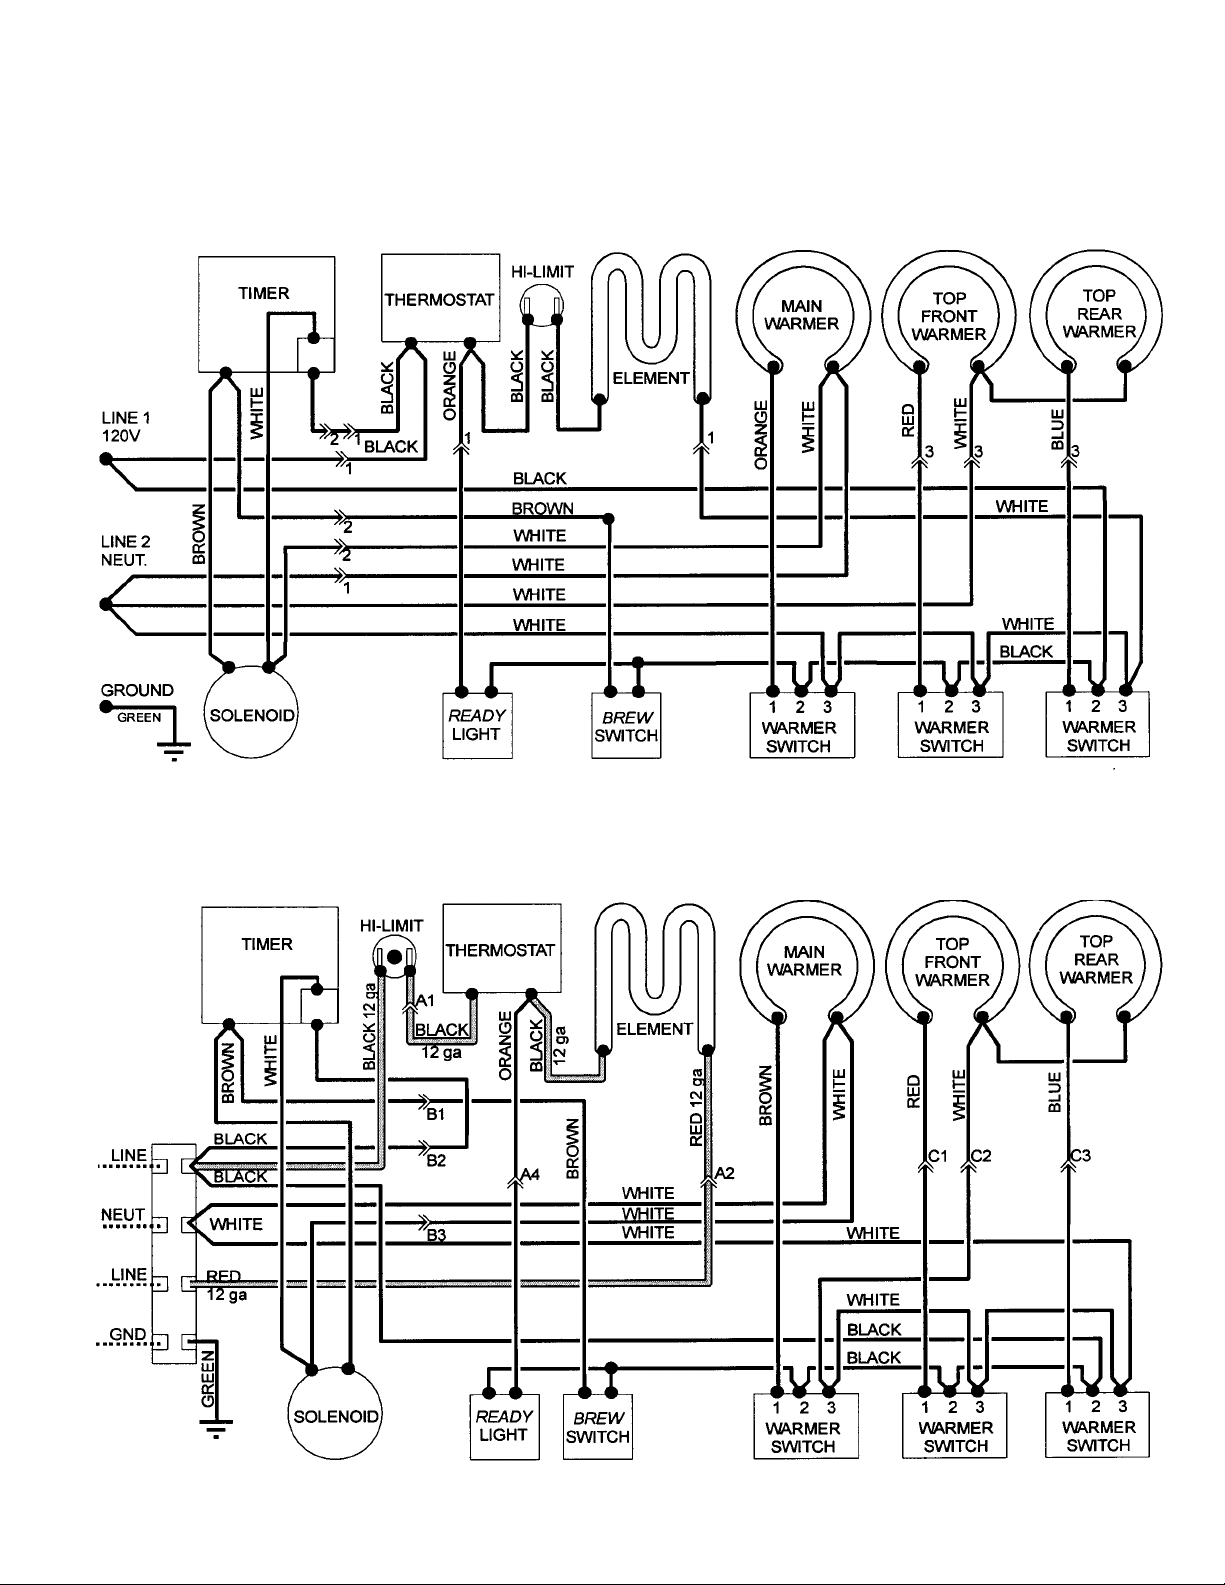
WIRING DIAGRAMS
A. MODEL NUMBER 9010, 9011, 9012 & 9013
B. MODEL NUMBER 9016 & 9017
11
Page 14

PARTS BREAKDOWN / EXPLODED VIEWS
ITEM PART NO.
DESCRIPTION
USED ON
2
8572-18 Warmer Element, 120V 100W
All
20 8718-31 READY TO BREW Indicator Light
All 21 8572-24 BREW Switch, push
-
button
All 30a 83493
Solenoid Va
lve, Single
9011, 9013 & 9017
x30 8541-120 Solenoid Valve (Old Style)
All 43
Timer & Solenoid Bracket (new style)
All x43 9012-22 Timer & Solenoid Bracket (old style)
All
47 8512-51 Thermostat
All 51a 8043-83 Hi-Limit Thermostat
9010, 9011,9012 & 9013
51b 8552-50 Hi-Limit Thermostat, Manual Reset
9016 & 9017
56
8549-1 Heating Element, 120V 2000W
9010& 9011
8043-14 Heating Element, 120V 1500W
9012 &
9013
8716-1 Heating Element, 240V 3500W
9016 & 9017
66 8710-1 Cord & Cap Assembly, NEMA 5
-
20P 9010& 9011
6407-15 Cord & Cap Assembly, NEMA
5-15P
9012 & 9013
83
8552-18 Terminal Block, 4P
9016 & 9017
8541-120CS
Coil Assembly (item x30
-1)
8541-120K Solenoid Repair Kit (includes items x30
-
2 Spring,
x30-3 Plunger
&
x30-4 Seal Ring)
8541-120JS
Solenoid Repair Kit (includes items
x30-2
Spring,
x30-3
Plunger
&
x30-4
Seal Ring
plus x30t Service Wrench)
8541-120KS
Solenoid Repair Kit (includes items
x30-2
Spring,
x30-3
Plunger, x305d Seal Ring
&
x30-5 Flow Control plus
x30t
Service Wrench)
8541-120F Flow Control (item
x30-5
includes
x30-6 Retainer
Ring & x30-7 Flow Control Washer)
8541-120R Flow Control Washer Retaining Ring (item
x30-6) 8541-120FW
Flow Control Washer (item
x30-7)
19 6710-23 Warmer ON/OFF Switch All
30b 84291 Solenoid Valve, w/bypass 9010, 9012 & 9016
44 8718-1 Timer, 2 Minute w/dial & knob All
58 35-210 Strain Relief 9010,9011, 9012 & 9013
B. OLD STYLE SOLENOID REPAIR KITS
8541-120-WS Service Wrench (item x30t)
x = Brewers manufactured prior to April, 2000.
12
Page 15

C. HOT WATER TANK ASSEMBLY
ITEM PART NO. DESCRIPTION USED ON
7 8043-5 Hold Down Strap All
8 8043-47 Screw, 10-32 x 1" phillips head All
13 8043-506 Acorn Nut, 8-32 All
47 8512-51 Thermostat All
47a 3-100 Screw, 6-32 x Y*1 round head All
47b 5212-41 Seal Washer All
48 8043-11 Outlet Elbow All
49 8043-15 Vent Tube All
50 8043-8 Inlet Elbow All
51 8043-83 Hi-Limit Thermostat 9010, 9011,9012 & 9013
8552-50 Mi-Limit Thermostat, Manual Reset 9016 & 9017
52 8514-68 Tank Cover, Plate Only 9010,9012 & 9016
8512-45 Tank Cover, Plate Only 9011, 9013 & 9017
53 8543-73 Screw, 4-40 X VA" pan head All
54 8043-24 Water Inlet Tube All
55 8543-74 Hex Nut, 4-40 All
56 8549-1 Heating Element, 120V2000W 9010& 9011
8043-14 Heating Element, 120V 1500W 9012 & 9013
8716-1 Heating Element, 240V 3500W 9016 & 9017
57 8043-12 Tank Cover Gasket All
59 8043-28 Hex Nut, V2-20 All
60 8512-41 Seal Washer All
67 8941-21 Lock Nut, 7-16-20 x 1/*" thick, brass 9010, 9012 & 9016
68 8043-30 Gasket 9010, 9012 & 9016
69 8540-6 Hot Water Coil Assembly 9010, 9012 & 9016
70 8043-10 Water Tank All
70a 80625 Hi-Limit Thermostat Bracket 9016,9017
13
Page 16

ITEM PART NO.
DESCRIPTION
USED ON
9
8540-30 Elbow
All 10 8541-21 Basin Pan
All 11 8043-26 Water Outlet Tube
All 12 8043-13 Sprayer Elbow
All 15 82680
Hex Lock Nut
9010,9012 & 9016
16
8551-100B 7/16"
Lock Washer
9010,90128. 9016
17
82681
Washer
9010
, 9012 & 9016
18 82556 Faucet Assembly 9010,9012 & 9016
26 8543-42 Spray Head Gasket
All 27 82727
Spray Disk
All 27a 8543-45 Spray Head Retainer
All x29 8541-48A Elbow
1/4"
Male Flare x
1/4"
FPT (old style)
All x30 8541-120 Solenoid Valve (old style)
All 30a 83439
Solenoid Valve, Single (new style)
9011, 9013 & 9017
30b 84291
Solenoid Valve w/ Bypass (new style)
9010, 9012 & 9016
33
8514-88 Flare Swivel
1/4" x 1/4" 9010, 9012 & 9016
x33 8706-102 Adapter Fitting (old style)
All x34 8551-35 Coil In
let "Tee" Fitting (old style)
9010, 9012 & 9016
38
84460
Hose Clamp
9010,9012 & 9016
x38 8941-20 Adapter Fitting (old style)
All
39
8541-46 Water Inlet Tube
All
49 8043-15 Vent Tube
All 61 8540-4 Formed Inlet Tube Assembly
9010, 9012 & 9016
62
8540-3 Faucet Outlet Tube Assembly
9010,9012 & 9016
63
8551-30 1/4"
Male Flare x
1/8"
FPT 9010, 9012 & 9016
64
8514-26 Needle Valve (Faucet Shut
-
Off) 9010,90128. 9016
x65 8572-20 Braided Hose A
ssembly (old style)
9010,90128.9016
65
84461
Braided Hose Assembly (new style)
9010,90128,9016
82575
Seat Cup (item 18c)
84870
Aerator Repair Kit (Includes
18e 0-
Ring
& 18fAerator
Disk)
x = Brewers manufactured prior to April,
2000
.
x41 8541-93 Inlet Fitting, Straight (old style) 9077,9013 & 9017
FAUCET REPAIR KITS
82573 Handle (item 18a)
82576 Faucet Repair Kit (Includes 18a Handle, 18c Seat Cup, 18d Spring, 18h Stem,
82682 Retainer Clip (item 18b)
84804 Aerator Replacement Kit (Includes 18e 0-Ring, 18fAerator Disk & 18gAerator Cap
18j Pin& 18k Bonnet
14
Page 17

3 8700
-
16 Warmer Plate Cover
All
10 8541
-
21 Basi
n Pan
All
22
23
24 9012
-
6 Panel, Lower Front
All
26
27
28
31 9012
-
23 Bottom Plate Sub
-
Assembly
All 35 8033
-
56 Rubber Foot
All
75
76
77
B. CABINET
&
RELATED COMPONENTS
ITEM PART NO. DESCRIPTION USED ON
1 8543-52 Screw, 8-32 phillips head All
4 8543-46
5 8543-49 Hinge Wire, Cover All
6 8543-23
14 8543-69 Heyco Bushing All
18p 8810-12
7506-30
8543-80
25 9012-7 Panel, Upper Front All
25a 8706-75
8543-42
8543-44
27a 8543-45
9012-11
9016-17
36 8033-55 Leg, Adjustable All
x45 8572-34
45a 84412
45b 84413
8707-6
9012-10
9012-26
100 POF Filter Paper, Coffee (cs 1000) All
Reservoir Cover
Tinnerman Nut, #8
Button Plug
Screw 8-32x 3/8" thread cutting
Clip, Mounting
2" Button Plug
Gasket, Spray Head
Spray Disk
Retainer, Spray Disk
Body & Base Assembly
Body & Base Assembly
Door, Solenoid Access (Old Style)
Door, Solenoid Access (New Style)
Bracket, Solenoid (New Style)
Brew Chamber, Black
Basin Cover Sub-Assembly
Splash Guard Assembly
All
All
9011, 9013 & 9017
All
All
All
All
All
All
9010,9011, 9012 & 9013
9016 & 9017
All
All
All
All
All
All
x = Brewers manufactured prior to April, 2000
15
 Loading...