

Page 1

Ceramic built-in hobs
keramisch Einbau-Kochfelder
MKL 5460 X
Instructions Manuals
GB NL FR DE DK
Gebrauchsanleitung
Page 2

Page 3
INSTRUCTIONS FOR USE
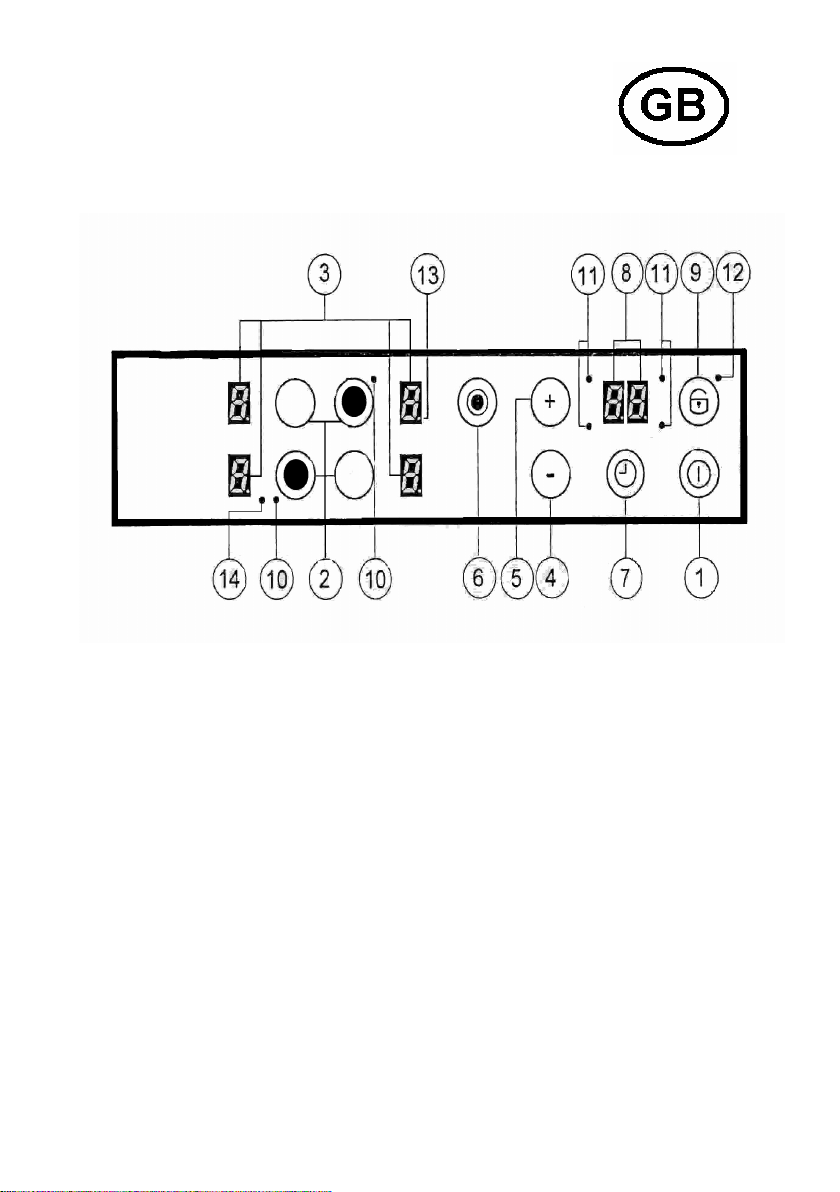
1. Start button (OFF/ON control)
2. Cooking zone selection buttons (ON/OFF)
3. Cooking zone display
4. MINUS button
5. PLUS button
6. Extended zone (ON/OFF) button
7. Timer zone button
8. Timer Display
9. Lock button
10. Indicator light for extended zone
11. Indicator light for selecting timer for cooking zones
12. Key-Lock (ON/OFF) Indicator light function
13. Lit decimal display for power setting: unlit display for cooking zone setting: blocked
cooking zone
14. Indicator light for triple circuit extended zone
1
Page 4

2
Page 5

MANUAL FOR TOUCH CONTROL
BLOMBERG 90 X 33 CERAMIC GLASS HOB
WARNINGS
Read these instructions for use carefully. This is the only way to use the hob correctly and safely.
Keep the assembly instructions, the instructions for use and the technical data sheet for the
appliance in a safe place.
Check the hob immediately after unpacking it. If any damage has been caused during transport, do
not connect the appliance.
IMPORTANT FOR INSTALLATION
Connections must only be made by authorized and qualified personnel. If there is any damage
due to incorrect connections, any type of guarantee will no longer be valid.
The electrical system must be equipped with an appropriate earth connection system.
FOR COOKING
This appliance has been specifically designed for domestic use. The hob must only be used for
preparing food dishes.
Food residues, particularly oil or boiling oil catch fire. FIRE HAZARD!!! When oil or fat is
heated, it is necessary to remain in the immediate vicinity. If oil catches fire, never use water.
Immediately cover with a plate or lid. Switch off the cooking zone. Leave the pan to cool on the
cooking zone.
Do not touch cooking zones that are overheated. BURN HAZARD!!! Keep out of children’s reach.
The afterheat indicator warns if zones are overheated.
Never place inflammable objects on the hob. FIRE HAZARD!!!
If there is a drawer under the hob, it is advisable not to keep inflammable objects or spray cans in it.
FIRE HAZARD!!!
The power supply cable for electrical appliances must never touch hot cooking zones. Cable
insulation and the hob might get damaged.
The cooking zone and pan bottom must always be dry.
If there are breaks, cracks or splits in the ceramic glass, there is a risk of short-circuiting.
Immediately switch off the appliance. Contact the technical assistance service.
If the cooking zone overheats but the display does not work, switch off the cooking zone. BURN
HAZARD!!! Contact the technical assistance service.
If the hob switches off by itself and it cannot be used, it is necessary to disconnect it immediately
from the electrical system and contact the technical assistance service.
3
Page 6

Any repair operations carried out incorrectly are a high risk. Risk of electric shocks!!! Repairs
must only be carried out by qualified and specialized technical personnel.
Rough surfaces on pans and frying pans scratch ceramic glass. Check pans.
Avoid cooking with empty pans, especially if it is an enamelled or aluminium pan. Pan bottoms and
ceramic glass could be damaged.
For special pans, follow the manufacturer’s instructions.
Never place hot pans or frying pans on the control panel, on the display area or the frame. This
might cause damage!!!
Salt, sugar and sand scratch ceramic glass. Do not use the hob as a work surface or for placing
anything.
Hard or pointed objects accidentally falling on the hob may cause damage. Do not place these
objects on the hob.
Sugar and other food with high sugar content will damage the hob. Any spilt food must be removed
immediately with a scraper for glass. Warning!!! The scraper for glass has a sharp blade.
(OPTIONAL)
If placed on hot cooking zones, aluminium foil and plastic containers will melt. The protective film
used in the kitchen is not suitable for this hob.
The following damage will not affect the correct functioning or the stability of the ceramic glass.
• The formation of gelatinous residues due to melted sugar or food with a high sugar content.
• Scratches due to salt, sugar or sand grains or rough pan bottoms.
• Metal colour from pan use or after using unsuitable detergents.
• Opaque decoration after using unsuitable detergents.
Only use warm water with an alkaline product. Do not use corrosive or abrasive products, as they
might cause the formation of opaque areas.
4
Page 7

On/off for Touch control
After ignition, the touch control requires about 1 second before it is ready to operate. After
resetting, all displays and indicator lights flash for about 1 second. After this, all displays and
indicator lights switch off and the touch control is in the stand-by position.
The touch control can be switched on by pressing the power button. The display for the cooking
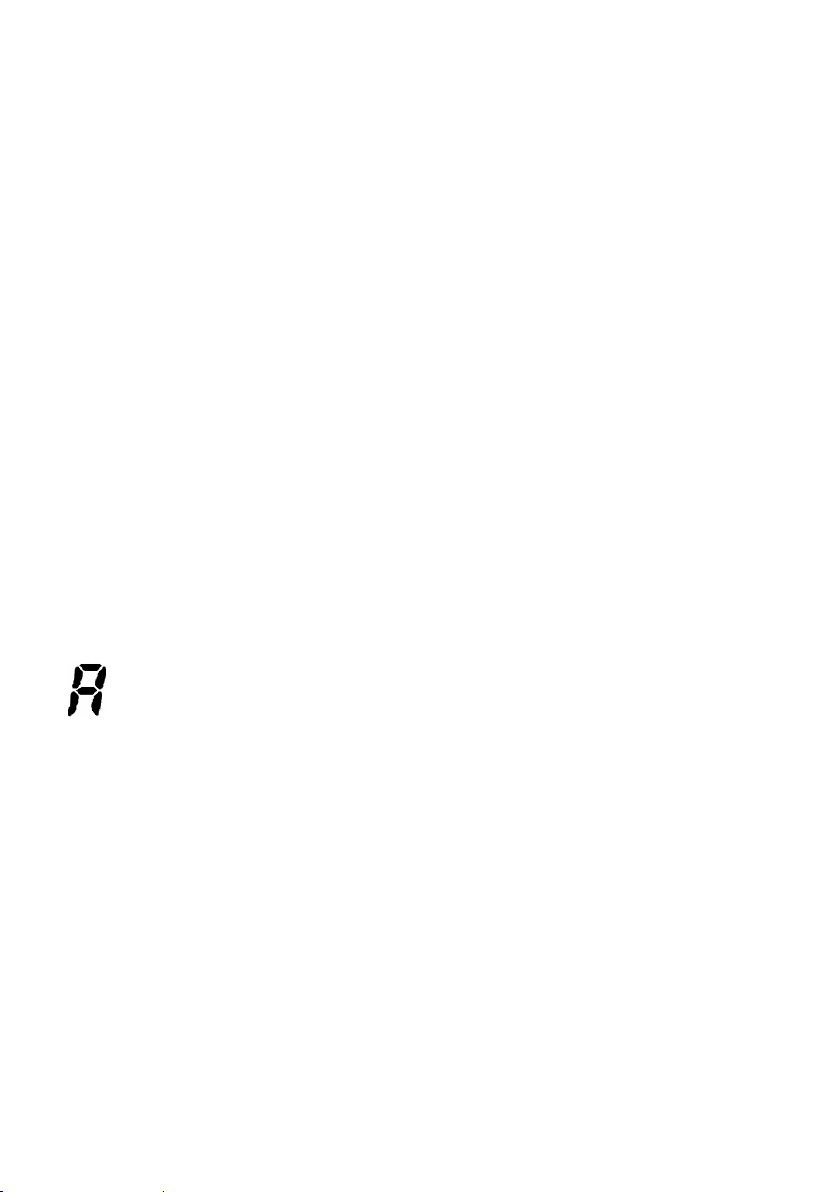
zones shows “0”. If a cooking zone is “burning hot”, the display shows “H”, instead of “0”. The
decimal point, at the bottom right of all cooking zone displays, flashes at intervals of a second to
indicate that at that moment no cooking zone has been selected.
After being switched on, the touch control stays active for 20 seconds. If a cooking zone or the
timer is not selected, the touch control returns to stand-by.
The touch control switches on only when the power button is activated. Pressing the power button
at the same time as other buttons will have no effect and the touch control will stay on stand-by.
The touch control can be switched off at any time by pressing the power button. This applies even if
the control has been blocked with a child safety lock. The power button should always be the first to
be switched off.
Automatic switching off
Once it is switched on, the touch control automatically switches off after 20 seconds of inactivity.
After selecting a cooking zone without setting the power level, the time for automatic switching off
is 10 seconds. After this, the cooking zone is deselected, and 10 seconds later, the touch control
switches off.
Switching a cooking zone on/off
When the touch control is on, the cooking zone can be selected by pressing the select button (the
PLUS touch control for the related cooking zone): A lit decimal point on the display of a cooking
zone indicates selection. If the zone is ”burning hot”, an “H” will appear on the display of the
corresponding hotplate. Pressing the (+) button again, it is possible to select a power level and the
cooking zone starts to heat up. After selecting, it is necessary to release the (+) button for 0.3
seconds before being able to select the power using the same button.
After selecting the cooking zone, the power level can be selected pressing down the PLUS button,
starting at level 1 it is increased by one unit every 0.4 seconds. When it reaches level 9, it is not
possible to select higher levels.
If the cooking zone is selected using the (-) button, the starting level is “9” (maximum level). If the
button is pressed down, the active level decreases by one unit every 0.4 seconds. When level 0 is
reached, it is not possible to decrease further. The setting can only be changed by activating the (-)
button or (+) button again.
5
Page 8
Switching off a cooking zone
Select the zone to be switched off using the (+) selection button. The selection is shown by the
decimal point on the display of the related zone. By pressing the (+) button and (-) button at the
same time, the power level is set at 0. Alternatively, the (-) button can be used to reduce the power
level to 0.
All cooking zones are at the “0” power level, the decimal points on the display flash. If a cooking
zone is “burning hot”, an “H” will appear, instead of an “0”
Switching off all cooking zones
All cooking zones can be switched off immediately, at any moment, by pressing the power button.
When on stand-by, an “H” appears for all cooking zones that are “burning hot”. All the other
displays will switch off.
The power level
The power of the cooking zone can be set to 9 levels, indicated by the symbols “1” to “9”, using an
indicator light display with seven sect ions.
The automatic heating function (by selecting)
When the automatic heating function has been activated, the power of the cooking zone
reaches 100% for an established heating time, which depends on the selected power level.
At the end of this heating time, the touch control returns to the pre-selected power level.
Starting the automatic heating process:
• The touch control is on and a cooking zone is selected.
• When power level 9 has been reached, automatic heating is activated by pressing the PLUS
button again.
• The required power level is selected by pressing the PLUS and MINUS buttons; the chosen
level appears on the display.
• Three seconds after pressing these buttons (power level selection) and 16 seconds after the
activation of the automatic heating function, the symbol “A” (which indicates a power
increase) appears on the display instead of the selected power level.
• If a lower level is selected using the MINUS button, after the “A” has appeared on the
display, the automatic heating function will be interrupted.
6
Page 9

• Using the PLUS button, it is possible to select a higher power level, in this case the automatic
heating time will be adapted to the selected setting.
• When the heating time has ended, the previously selected power level will appear on the
display.
The afterheat indicator
This warns the user that the ceramic glass is at a dangerous temperature if there should be contact
with the entire area above the cooking zone. The temperature is established by following a
mathematical model and if there is any afterheat, “H” appears on the corresponding display with
seven sections.
Heating and cooling are calculated according to:
• The selected power level (from “0” to “9”)
• The relay activation time.
After switching off the cooking zone, “H” appears on the corresponding display until the cooking
zone temperature drops below the critical level.
The automatic switch off function (Operating time limit)
According to the power level, each cooking zone is switched off after a pre-established maximum
time, if no operations are carried out.
Each operation on the cooking zone (using the PLUS and MINUS buttons or the double circuit of
the zone, if present) restores the maximum operating time for the cooking zone to its initial value.
• When the control is activated, the ON/OFF button has priority over all other buttons, therefore
the control can be switched off at any moment even if for multiple or continuous activation of
buttons.
• On stand-by mode, continuous activation of buttons will have no effect, however, before the
electronic control can be switched on again, it needs to recognise that no button has been
activated.
7
Page 10
The lock button for this device (block)
Using the “lock” button, complete control can be blocked (device), to prevent accidental actions.
If you do not de-activate the lock button before switching off the control, it will still be activated
when the control is switched on again.
It is not possible to activate other buttons before de-activating the lock button. The only button that
can be activated is the start button.
Safety stop
If one or more cooking zones accidentally stay on without control, after a certain time the control
card is automatically switched off (see table).
Power level
Operating time limit
in hours
1-2 6
3-4 5
5 4
6-9 1.5
Multiple circuit stop
Using the TouchLite control, it is possible, depending on model type, to control hotplates with a
double or triple circuit.
When a radiant multiple hotplate is activated, all circuits start at the same time. If you wish to
switch on the innermost circuit only, the outer circuits can be switched off using the appropriate
button.
If the multiple-circuit button is activated, the outermost circuits of the activated cooking zone can
be deactivated at any moment. An activated outer circuit has a special supplementary indicator
light. Activating the multiple-circuit button again, activates the outer circuits again and the relevant
indicator lights light up.
8
Page 11

Triple circuit operation:
If the element to be controlled is a triple-circuit radiant hotplate, the following applies:
• Pressing the multiple-circuit button for the first time switches off the outermost circuit and the
indicator light at the top of the display.
• Pressing the multiple-circuit button a second time switches off the median circuit and the
indicator light at the bottom of the display.
• Pressing this button a third time, switches on the median circuit again. Further pressing adds
the third circuit and its related indicator light.
The Acoustic signal (buzzer)
The following activity is indicated by a buzzer during use:
• A short sound for normal button pressing.
The Timer function
The timer function is the following:
• The Timer is autonomous for 1.99 min.: there is a sound signal when this time is up. This
function is only available when the hob is not in use.
The Autonomous Timer
• If the touch control is off, the autonomous timer can be used by pressing the timer button.
The display indicates “00”. By pressing the start button, the touch control returns to the
stand-by mode and the timer is switched off.
• The values can be altered (0-99 min.) increasing by one minute using any PLUS button from
0 to 99 and the MINUS button from 99 to 0.
• Continuously pressing the PLUS or MINUS buttons will greatly increase the variation speed
until a maximum value, without sound signals.
• If the PLUS (or MINUS) button is released, the increase (decrease) speed will start again
from the initial value.
9
Page 12

• The timer can be set by pressing down the PLUS or MINUS buttons or by pressing down
further (with sound signal).
After the timer has been set, countdown begins. When time is up, a sound signal is given off and the
display flashes.
The sound signal will stop:
• Automatically after 2 minutes.
• By pressing any button.
The display stops flashing and switches off.
Switching off / altering the timer
• The timer can be altered or switched off at any moment by pressing the PLUS and MINUS
buttons (with sound signal). The timer switches off and clears the time to “0” by pressing the
MINUS button or by pressing the PLUS and MINUS buttons at the same time, which directly
clears the timer to “0” before switching off.
• If the touch control is switched on (using the power button), the autonomous timer switches
off.
Setting the timer for the cooking zones
It is possible to set a separate timer for each cooking zone by switching on the touch control.
• By selecting the cooking zone using the zone selection button, setting the power level and
then pressing the timer button, it is possible to set a countdown to switch off the cooking
zone.
The number of indicator lights positioned around the timer display corresponds to the number
of cooking zones to indicate which zones have been activated by the timer.
• When the timer is selected, its display flashes, and the indicator lights around the display
lights up. If a cooking zone is selected, the timer indicator lights switches off and the display
no longer flashes.
• When altering the selection of a cooking zone, the timer display indicates the timer value
corresponding to the newly selected cooking zone. The timers set for each cooking zone
remain activated.
• Other timer functions are the same as for the autonomous timer. The PLUS button must be
pressed to increase the value of the corresponding cooking zone.
10
Page 13
• Time up is indicated by an acoustic signal and by “00” on the display, the cooking zone
indicator light for the timer flashes. The cooking zone is switched off, and “H” appears if the
zone is “burning hot”, otherwise a “dash” appears on the cooking zone display.
The sound signal and flashing on the display are interrupted:
• Automatically after 2 minutes.
• By pressing one of the buttons.
The timer display switches off.
• The basic functions are the same as the ones described for the autonomous timer.
Pan recognition function (with dedicated electronics only)
The touch control does not contain pan recognition sensors.
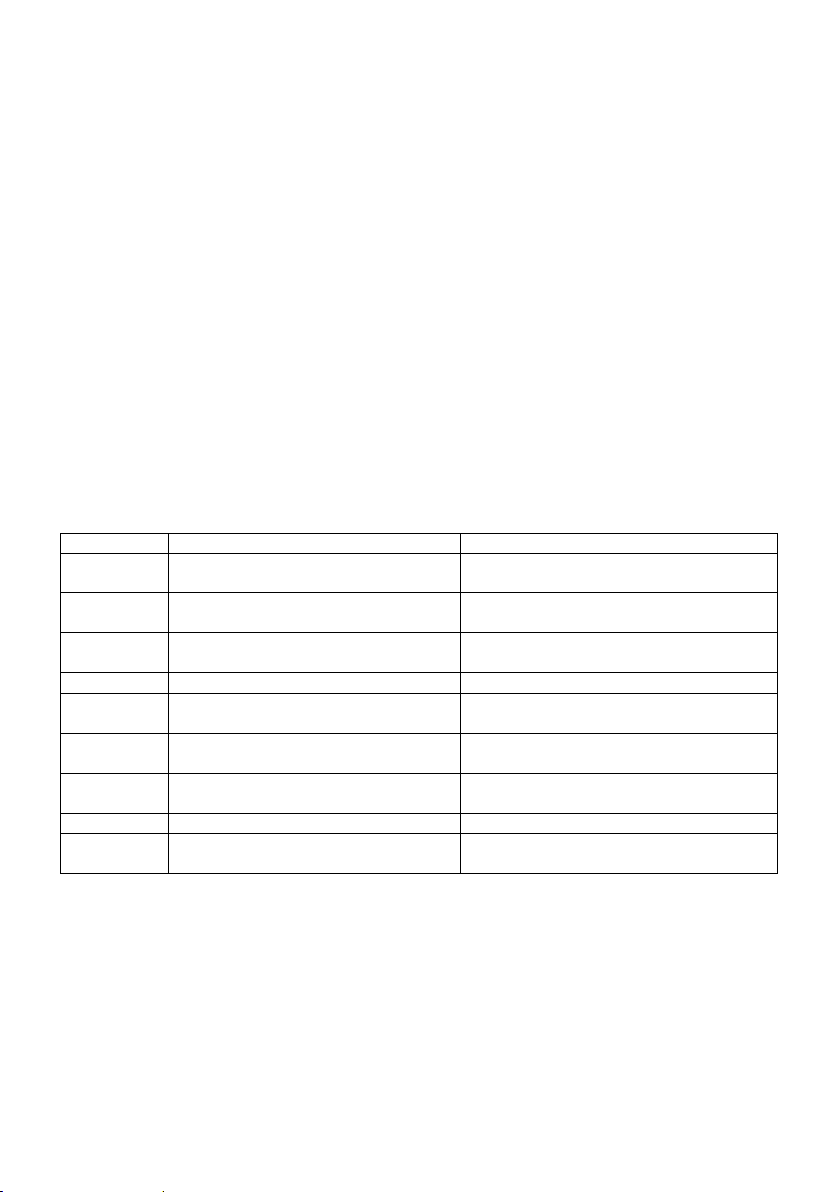
Table:
Display Possible causes Countermeasures
Er12 Short-circuit in the 5V or earthed
control relay
Replace the control
Er16 Short-circuit or disconnected pan
sensor or power supply
Remove the causes (customer service)
Er22 Short-circuit or disconnection in the
pressure button area
Replace the control
Er25 Control incorrectly connected Connect to correct mains voltage
Er26 Short-circuit in the relay tension
control
Replace the control
Continuous
sound
Water on the glass above the control
card
Clean
“H“ flashes Hot pan on the control card; faulty
radiant hotplate seal
Wait until the control card returns to the
normal temperature
Faulty component Replace the control
Er33 Water on the glass above the control
card
Clean
WARNING
Before any operation:
Disconnect the hob from the electrical mains.
Make sure that the hob is cold.
Do not try to repair the hob on your own, contact a qualified service centre.
11
Page 14
N.B. THE MATERIAL AND GLUES USED FOR THE KITCHEN UNIT
MUST RESIST A TEMPERATURE OF min. 100°C.
12
Page 15
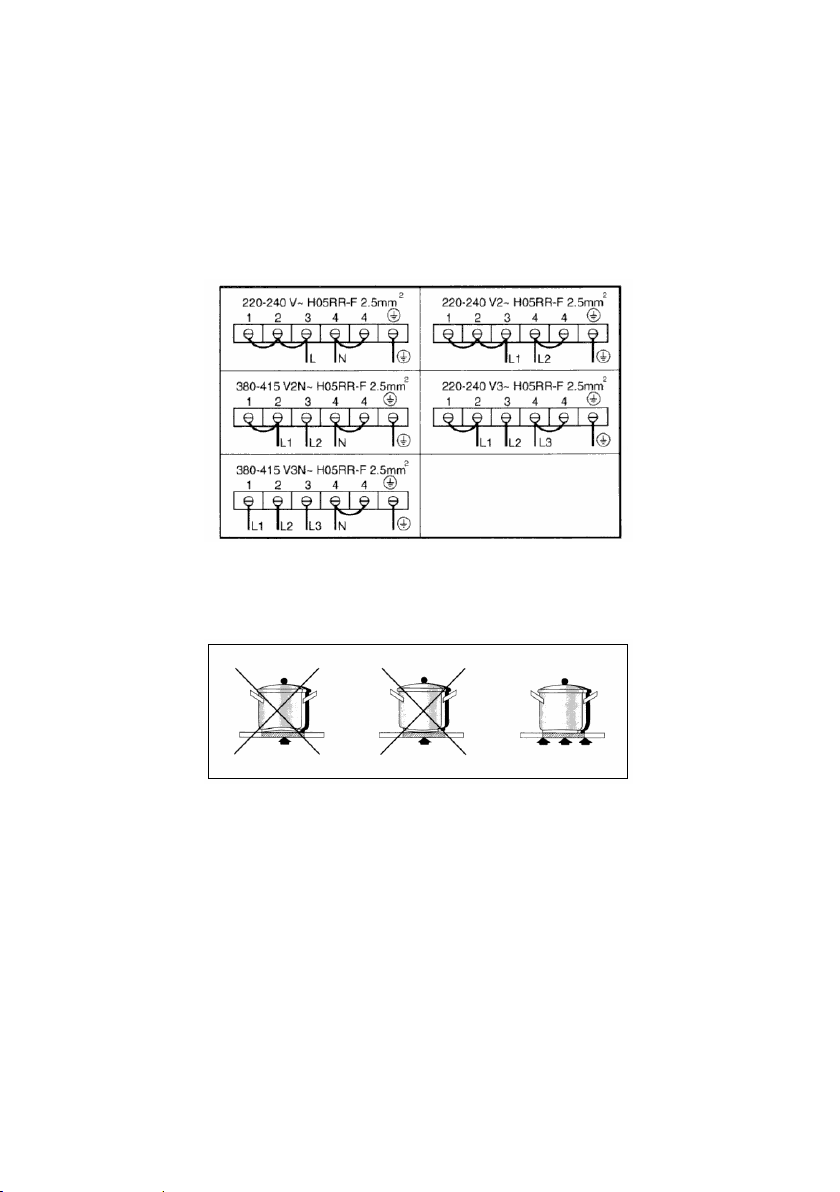
CONNECTIONS
TO ELECTRICAL
SYSTEM
CORRECT
PAN
POSITIONING
13
Page 16
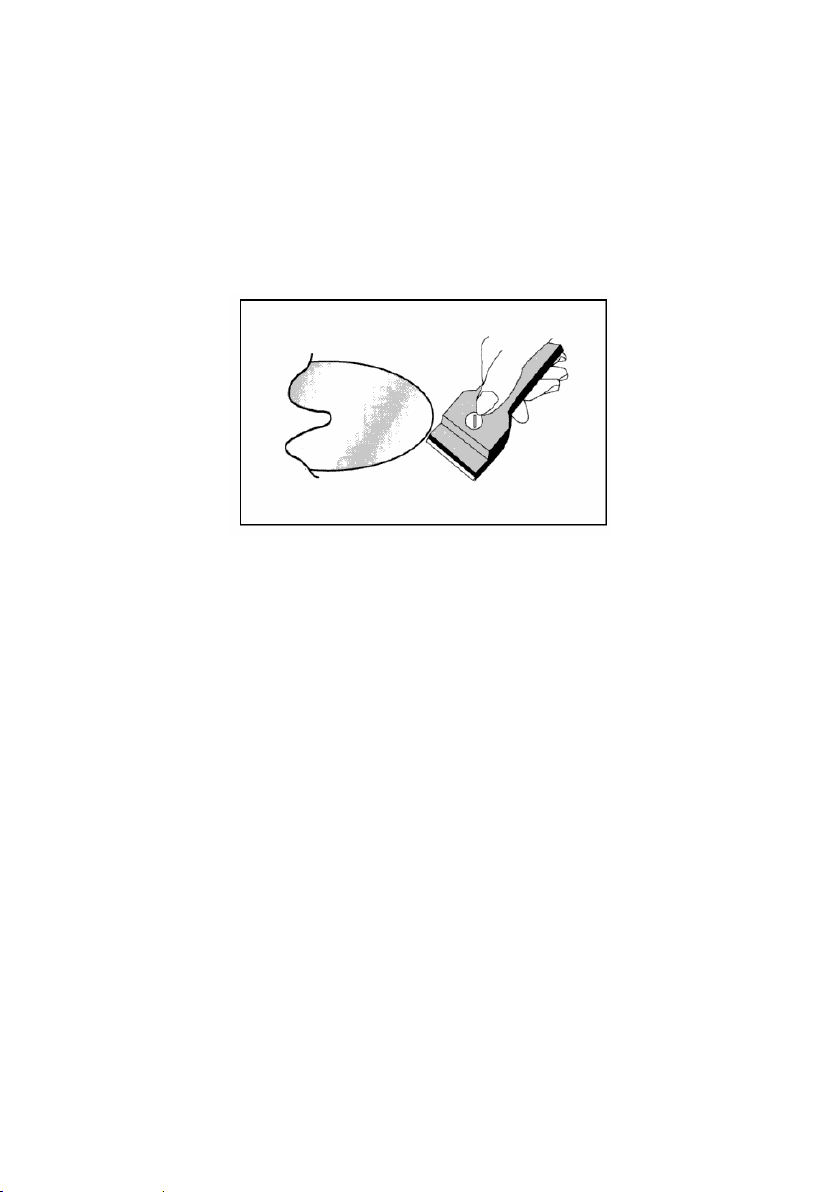
OPTIONAL
14
Page 17
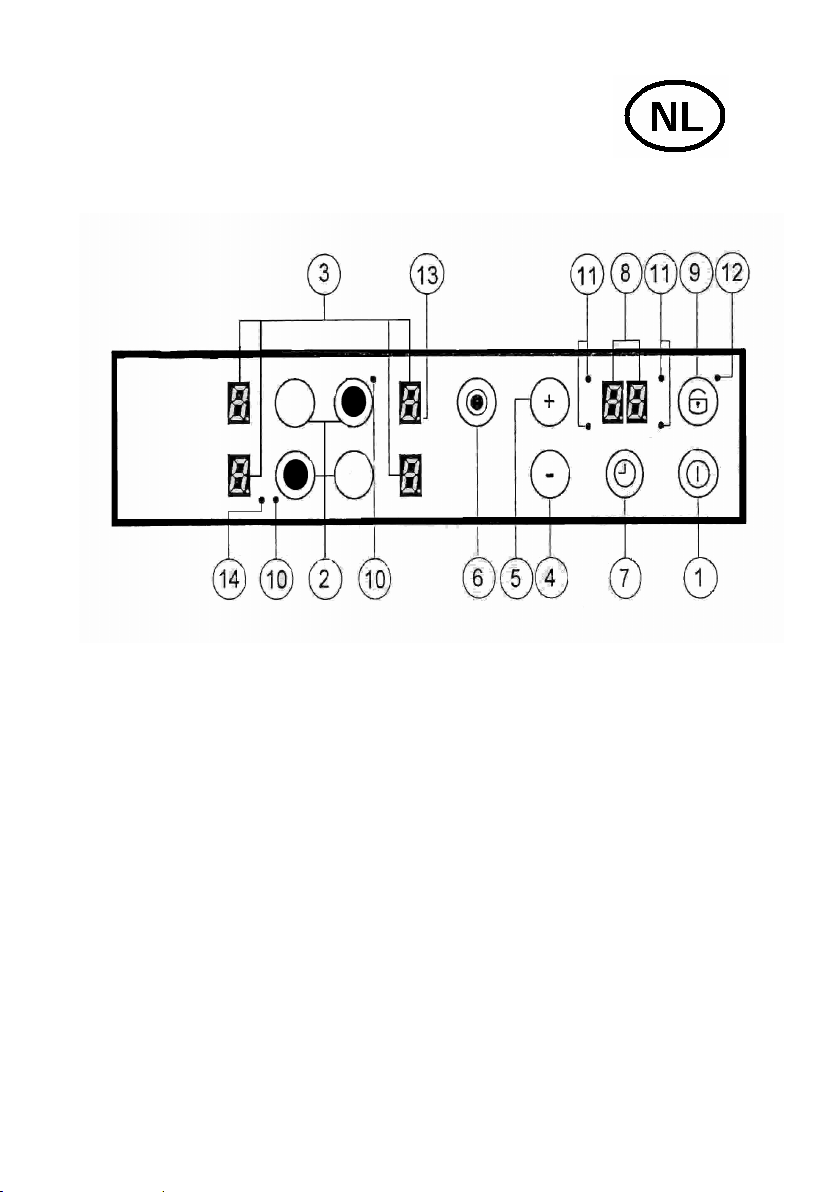
GEBRUIKSAANWIJZINGEN
1. Starttoets (UIT/AAN)
2. Keuzetoetsen kookzone (AAN/UIT)
3. Kookzonedisplay
4. Afnametoets
5. Toenametoets
6. Uitgebreide zone (AAN/UIT)
7. Timertoets
8. Timerdisplay
9. Vergrendeltoets
10. Controlelampje uitgebreide kookzone
11. Controlelampje timer kookzones
12. Vergrendeling (AAN/UIT) controlelampje functie
13. Verlicht decimaal display voor de spanning: geen verlicht display voor kookzone:
vergrendelde kookzone
14. Controlelampje voor kookzone met drievoudig circuit
15 16
Page 18

Page 19

HANDLEIDING BIJ DE TIPTOETSBEDIENINGEN
BLOMBERG 90 X 33 KOOKPLAAT IN KERAMISCH GLAS
WAARSCHUWINGEN
Lees deze gebruiksaanwijzingen aandachtig. Alleen als u de gebruiksaanwijzingen goed kent, kunt
u de kookplaat veilig en op de juiste manier gebruiken.
Bewaar de montage-instructies, de gebruiksaanwijzingen en het blad met de technische gegevens op
een veilige plaats.
Controleer de kookplaat meteen nadat u deze hebt uitgepakt. Als u transportschade vaststelt, mag u
de kookplaat niet aansluiten of gebruiken.
BELANGRIJK VOOR DE INSTALLATIE
Laat de kookplaat alleen aansluiten door een deskundige en erkende monteur. De garantie
vervalt onmiddellijk in geval van schade die veroorzaakt is door verkeerde aansluitingen.
De elektriciteitsleiding moet deugdelijk geaard zijn.
KOKEN
Dit apparaat is uitsluitend bedoeld voor huishoudelijk gebruik. De kookplaat mag alleen worden
gebruikt om gerechten te bereiden.
Voedselresten en in het bijzonder olie of hete olie, vatten vlam. GEVAAR VOOR VUUR!!! Als u
olie of vet verhit, dient u in de onmiddellijke nabijheid van de kookplaat te blijven. Gebruik nooit
water om brandende olie te blussen. Bedek de brandende olie onmiddellijk met een bord of een
deksel. Zet het kookvuur uit. Laat de pan op de kookplaat staan om af te koelen.
Raak geen kookplaatgedeeltes aan die nog heet zijn. GEVAAR VOOR VERBRANDEN!!! Houd
kinderen uit de buurt van de kookplaat. Op de bedieningen wordt gesignaleerd of kookzones heet
zijn.
Zet nooit ontvlambare voorwerpen op de kookplaat. GEVAAR VOOR VUUR!!!
Als er een lade onder de kookplaat zit, laat daar dan geen ontvlambare voorwerpen of sproeibussen
in zitten. GEVAAR VOOR VUUR!!!
Het stroomsnoer voor de elektrische gedeelten mag nooit hete kookzones raken. De kabelisolatie en
de kookplaat zelf kunnen door aanraking beschadigd raken.
De kookzone en de panbodem moeten altijd droog zijn.
Als er barsten, breuken of kloofjes in het keramisch glas zitten, loopt u kans op kortsluiting. Zet
onmiddellijk de kookplaat uit. Neem contact op met de technische service.
Als de kookzone heet wordt en het bijbehorende display werkt niet, zet u deze kookzone
onmiddellijk uit. GEVAAR VOOR VERBRANDEN!!! Neem contact op met de technische
service.
17
Page 20

Als de kookplaat zelf uitvalt en niet meer kan worden gebruikt, dient u onmiddellijk de stroom uit te
zetten (stekker uit het stopcontact) en contact op te nemen met de technische service.
Verkeerde reparaties kunnen bijzonder gevaarlijk zijn. Gevaar voor elektrische schokken!!! Laat
de kookplaat alleen door een deskundige en erkende elektricien repareren.
Ruwe oppervlakken op pannen en bakpannen kunnen krassen veroorzaken op het keramiekglas.
Controleer de pannen.
Laat nooit een lege pan op de hete kookplaat staan, in het bijzonder geen emaillen of aluminium
pannen. U kunt hiermee de panbodem en het keramisch glas van de kookplaat beschadigen.
Leef voor speciale pannen de aanwijzingen van de fabrikant na.
Zet nooit een hete pan of bakpannen op de tiptoetsbedieningen, het display of het frame. U kunt
hiermee schade veroorzaken!!!
Zout, suiker en zand maken krassen op keramiekglas. Zet geen vreemde voorwerpen op de
kookplaat en gebruik deze niet om op te werken.
Harde of scherpe voorwerpen die op de kookplaat vallen, kunnen deze beschadigen. Zet of leg
dergelijke voorwerpen niet op de kookplaat.
Suiker en ander voedsel met een hoog suikergehalte kunnen de kookplaat beschadigen. Verwijder
voedselresten altijd meteen met een glasschraper. Waarschuwing!!! Aan de glasschraper zit een
scherpe kant. (OPTIONAL)
Als u aluminium of plastic bakjes op de hete kookplaat zet, kunnen deze smelten. Ook transparante
keukenfolie is niet geschikt voor deze kookplaat.
De hierna vernoemde schade beïnvloedt de werking of de stabiliteit van het keramisch glas niet.
• Gelatineachtige resten van gesmolten suiker of andere resten met een hoog suikergehalte.
• Krassen door zout, suiker of zandkorrels of ruwe panbodems.
• Metaalresten van pannen met slijtage of verkeerde reinigingsmiddelen.
• Door verkeerde reinigingsmiddelen dof geworden delen.
Gebruik alleen warm water met een alkaline product. Gebruik geen bijtende of schurende producten
die delen van de kookplaat dof kunnen laten worden.
18
Page 21

Tiptoetsbediening aan/uit
Als u de kookplaat aanzet, hebben de tiptoetsbedieningen nog 1 seconde nodig. Als u de
bedieningen reset, zullen alle displays en lampjes 1 seconde lang knipperen. Hierna gaan alle
displays en lampjes uit en staan de tiptoetsbedieningen in stand-by.
U kunt de tiptoetsbediening nu aanzetten met de aan/uit knop. Op het display voor de kookzones
staat “0”. Als een kookzone heet wordt, verschijnt op het display de letter “H” in plaats van de “0”.
Het decimale display onderaan op alle kookzonedisplays knippert met een interval van 1 seconde
om te signaleren dat op dat ogenblik geen enkele kookzone is gekozen.
Als de tiptoetsbediening is aangezet, blijft deze 20 seconden lang actief. Als hierna geen enkele
kookzone of timer wordt geselecteerd, gaat de tiptoetsbediening in stand-by staan.
De tiptoetsbediening gaat alleen weer aan met de aan- en uittoets. Als u de aan- en uittoets samen
met andere knoppen indrukt, zal er niets gebeuren en blijft de tiptoetsbediening in stand-by staan.
U kunt de tiptoetsbediening op elk moment uitzetten met de aan- en uittoets. Dit werkt ook als de
tiptoetsbediening vergrendeld is met de kindervergrendeling. Zet altijd eerst de aan- en uittoets uit.
Automatisch uitzetten
Als de tiptoetsbediening aan staat, gaat deze automatisch na 20 seconden uit als de bedieningen niet
worden gebruikt. Als u een kookzone kiest en het vermogen niet instelt, wordt uw handeling 10
seconden geannuleerd. Hierna wordt ook de kookzone geannuleerd en 10 seconden later gaan de
tiptoetsbedieningen uit.
Een kookzone uit- en inschakelen
Als de tiptoetsbediening aan staat, kunt u een kookzone kiezen met de keuzetoets (de plustoets voor
de desbetreffende kookzone): Het decimale display licht van de gekozen kookplaat licht op. Als de
kookzone heet wordt, verschijnt op het display de letter “H”. Als u de (+) toets weer indrukt, kunt
het vermogen instellen en begint de kookzone op te warmen. Als u een ander vermogen in wenst te
stellen met dezelfde knop, dient u de (+) toets eerst 0.3 seconden los te laten.
Als u een kookzone gekozen hebt, stelt u de temperatuur in met de plustoets die bij 1 begint en om
de 0,4 seconden met 1 eenheid toeneemt. Hoger dan 9 kunt u niet instellen.
Als u de kookzone kiest met de (-) knop, is het startcijfer “9” (het maximum). Als u deze knop
indrukt, neemt het cijfer om de 0.4 seconden af. Lager dan 0 kunt u niet instellen. U kunt alleen
opnieuw instellen met dezelfde (-) of (+) knop.
19
Page 22
Een kookzone uitschakelen
Kies de kookzone die u wenst uit te schakelen met de (+) toets. Het decimaal display van de
gekozen kookplaat licht op. Als u de (+) en (-) toetsen tegelijkertijd indrukt, wordt het cijfer op 0
gezet. In het andere geval gebruikt u de (-) knop om de kookplaat op 0 te zetten.
Als alle kookzones op “0” staan, zullen de decimale punten op het display knipperen. Als een
kookzone heet is, verschijnt op het display de letter “H” in plaats van de “0”.
Alle kookzones uitschakelen
Alle kookzones kunnen op elk ogenblik allemaal tegelijkertijd worden uitgezet met de aan- en
uittoets. Als de kookplaat op stand-by staat, verschijnt de letter “H” voor alle kookzones die nog
heet zijn. Alle andere displays gaan uit.
Vermogensniveau
Het vermogen van de kookzones is onderverdeeld in 9 niveaus die gesignaleerd worden met de
cijfers van “1” tot “9” en een displaylampje met zeven onderverdelingen.
Automatisch heet laten worden (geprogrammeerd)
Als u de functie “automatisch heet laten worden” kiest en inschakelt, bereikt de kookzone
zijn 100%-hitte na een geprogrammeerde tijd die afhangt van het geselecteerde vermogen.
Na afloop van de verhittingstijd gaan de tiptoetsbedieningen weer op het vorige gekozen
vermogen staan.
Een automatische verhitting starten:
• De tiptoetsbedieningen staan aan en een kookzone is gekozen.
• Als de kookplaat niveau 9 bereikt, wordt de automatisch verhitting geactiveerd door de
plusknop weer in te drukken.
• U kiest het gewenste vermogen met de plus- en mintoetsen; het gekozen niveau verschijnt op
het scherm.
• Drie seconden nadat u deze toetsen hebt ingedrukt (om het vermogen te kiezen) en 16
seconden nadat de automatische verhitting is ingeschakeld, verschijnt het symbool “A” (om
een toename van het vermogen te signaleren) op het display in plaats van het geselecteerde
vermogen.
• Als u een lager vermogen kiest met de mintoets nadat de “A” op het display is verschenen, zal
de automatische verhitting onderbroken worden.
20
Page 23

• Met de (+)toets kiest u een hoger vermogen. In dit geval wordt de tijd voor de automatische
verhitting automatisch aangepast aan het hogere vermogen.
• Als de verhittingstijd ten einde is, verschijnt het tevoren gekozen vermogen op het display.
Waarschuwing voor hitte
Deze waarschuwt de gebruiker ervoor dat het glas een gevaarlijke temperatuur heeft bereikt voor
aanraking in de hele zone boven de kookzone. De toegestane temperatuur is bepaald volgens een
mathematisch model en zodra deze temperatuur “hoog” is, verschijnt de “H” op het bijbehorende
display met zeven indelingen.
Verhitten en afkoelen worden hangen af van:
• Het gekozen vermogensniveau (van “0” tot “9”)
• De schakeltijd van het relais.
Nadat u de kookzone hebt uitgezet, verschijnt een “H” op het bijbehorende display totdat de
zonetemperatuur onder het kritische niveau daalt.
De automatische uitschakelfunctie (werktijdlimiet)
Voor elk vermogensniveau wordt de kookzone uitgezet na een geprogrammeerde maximum tijd als
de kookplaat niet wordt gebruikt.
Elke handeling die de kookzone betreft (met de plus- en mintoetsen of het dubbele circuit in de
zone zelf, indien aanwezig) reset de maximum werktijd voor de kookzone en zet deze op de
beginwaarde.
• Als de tiptoetsbedieningen worden aangezet, heeft de uit- en aantoets voorrang op alle andere.
U kunt de bedieningen dus op elk moment uitzetten, ook als u een of meerdere toetsen
ingedrukt hebt.
• In de stand-by zal het continu indrukken van toetsen geen effect hebben. De tiptoetsbediening
werkt echter pas weer als het “herkend” heeft dat geen enkele toets ingedrukt werd.
21
Page 24

Vergrendeltoets (blokkering)
Met de vergrendeltoets (“lock”) kunt u de hele tiptoetsbediening (en dus het apparaat) blokkeren en
dus ongewild inschakelen voorkomen.
Als u deze vergrendeltoets niet uitzet voordat u de bedieningen helemaal uitzet, zal deze nog steeds
aan staan als u de tiptoetsbediening weer aanzet.
U kunt geen andere toetsen gebruiken als u de vergrendeling niet eerst uitzet. De enige toets die u
met een vergrendelde tiptoetsbediening wel kunt gebruiken, is de starttoets.
Veiligheidsstop
Als meerdere zones toevallig tegelijkertijd aanstaan zonder controle, zal de controlekaart na een
bepaalde tijd automatisch aangaan (zie tabel).
Vermogen
Werktijdlimiet
in uren
1-2 6
3-4 5
5 4
6-9 1.5
Stop voor meerdere circuits
Met de TouchLitebedieningen kunt u, afhankelijk van het model, kookplaten met een dubbel of
drievoudig circuit bedienen.
Als een kookzone met meerdere circuits wordt gekozen, starten alle circuits tegelijkertijd. Als u
wenst over te schakelen op alleen het binnenste circuit, kunt u de buitenste uitzetten met de
bijbehorende toets.
Als u de multiple-circuittoets indrukt, kunt u de buitenste circuits op elk gewenst ogenblik uitzetten.
Een ingeschakeld buitencircuit heeft een speciaal extra controlelampje. Als u de multiplecircuittoets opnieuw indrukt, schakelt u de buitenste circuits weer in en brandt het bijbehorende
controlelampje.
22
Page 25

Drievoudige circuits:
Als de kookzone een drievoudig circuit heeft, gaat u als volgt te werk:
• Druk een eerste keer de multiple-circuittoets in om het buitenste circuit en het controlelampje
bovenaan op het display uit te schakelen.
• Druk een tweede keer de multiple-circuittoets in om het middelste circuit en het
controlelampje bovenaan op het display uit te schakelen.
• Als u de toets een derde keer indrukt, zet u het middelste circuit weer aan. Als u nu nogmaals
de toets indrukt, gaat het derde circuit en het bijbehorende lampje aan.
Akoestisch signaal (zoemer)
Tijdens het gebruik hoort u de zoemer voor de volgende handelingen:
• Een korte toon telkens als u een toets indrukt.
De timer
De timer werkt als volgt:
• De timer werkt autonoom voor een tijdspanne van 1.99 min.: als de tijd verstrijkt, hoort u een
signaal. Deze functie is alleen beschikbaar als de kookplaat niet in gebruik is.
De autonome timer
• Als de tiptoetsbediening uit staat, kunt u de autonome timer gebruiken door de timertoets in
te drukken. OP het display staat “00”. Als u de starttoets indrukt, gaat de toetsenbediening
weer in stand-by staan en wordt de timer uitgeschakeld.
• U kunt de tijd wijzigen (van 0tot 99 min.) en per één minuut verhogen met de plustoets van 0
tot 99 of verminderen met de mintoets van 99 tot 0.
• Als u continu de min- of plustoets blijft indrukken, wijzigt u de minuten snel en zonder
geluidsignalen.
• Als u de min- of plustoets loslaat, stopt de toename (of afname)snelheid en wordt de snelheid
weer dezelfde als in het begin.
23
Page 26

• U stelt de timer in met de plus- of mintoetsen of door elke toets afzonderlijk in te drukken
(met een geluidsignaal).
Als de timer ingesteld is, begint het aftellen. Als de tijd verstrijkt, hoort u een signaal en knippert
het display.
Het geluidsignaal stopt in de volgende gevallen:
• Automatisch na 2 minuten.
• Als u een willekeurige toets indrukt.
Het display stopt met knipperen en wordt uitgeschakeld.
De timer wijzigen of uitzetten.
• U kunt de timer op elk willekeurig ogenblik wijzigen of uitzetten met de plus- of mintoetsen
(en een geluidssignaal). De timer gaat uit en de tijd wordt op “0” gezet door de mintoets in te
blijven drukken of door de min- en plustoetsen tegelijkertijd in te drukken, wat de timer
meteen op “0” zet voordat deze definitief wordt uitgeschakeld.
• Als u de tiptoetsbediening aanzet met de aan- en uittoets, schakelt de autonome timer uit.
Een timer instellen voor een kookzone
U kunt een afzonderlijke timer voor elke kookzone instellen. U zet hiervoor de tiptoetsbediening
aan.
• U kiest een kookzone met de keuzetoets, stelt het vermogensniveau in en drukt dan op de
timertoets. U stelt hiermee een tijdspanne in waarna de kookzone automatisch uitgezet wordt.
Het aantal controlelampjes rondom het timerdisplay signaleert het aantal kookzones waarvoor
een timer ingeschakeld is.
• Zodra u een timer kiest, begint het bijbehorende display te knipperen en het lampje naast het
display gaat aan. Als u een kookzone kiest, gaat het timerlichtje uit en houdt het display op
met knipperen.
• Als u een andere kookzone kiest, verschijnt op het display van de timer de tijd die bij deze
laatste kookzone hoort. De timers van de andere kookzones blijven ingeschakeld.
• De andere timerfuncties zijn dezelfde als die van de autonome timer. U gebruikt de plustoets
voor een langere kooktijd.
• Als de tijd verstreken is, hoort u een geluidsignaal en staat het cijfer “00” op het display;, het
lampje van de kookzonetimer knippert. De kookzone wordt uitgeschakeld, een “H” verschijnt
op het bijbehorende display als deze zone nog heet is en in het andere geval verschijnt een
streepje op het display.
24
Page 27

Het geluidsignaal en het knipperen op het display worden onderbroken:
• Automatisch na 2 minuten.
• Als een van de toetsen wordt ingedrukt.
Het timerdisplay wordt uitgeschakeld.
• De basisfuncties zijn dezelfde als die van de autonome timer.
Panherkenning (alleen met voorbehouden elektronica)
De elektronische toetsenbediening bevat geen panherkenningssensoren.
Tabel:
Display Mogelijke oorzaken Oplossing
Er12 Kortsluiting in de 5V of geaarde
bedieningsrelais
De bedieningskaart vervangen
Er16 Kortsluiting of losgeraakte pansensor
of stroomsnoer
Oorzaken verwijderen (klantendienst)
Er22 Kortsluiting of losgeraakte draden in
de druktoetsen
De bedieningskaart vervangen
Er25 Bedieningskaart verkeerd
aangesloten
Goed aansluiten (correcte spanning)
Er26 Kortsluiting in het
spanningcontrolerelais
De bedieningskaart vervangen
Continu
geluid
Water op het glas boven de
elektronische bedieningskaart
Reinigen
“H“ knippert Hete pan op de elektronische
bedieningskaart; slechte dichting van
de straalplaat
Wacht totdat de bedieningskaart
afgekoeld is.
Defect component De bedieningskaart vervangen
Er33 Water op het glas boven de
elektronische bedieningskaart
Reinigen
WAARSCHUWING
Voordat u aan onderhoud begint:
Schakel de stroom naar de kookplaat uit.
Controleer of de kookplaat koud is.
Probeer de kookplaat niet zelf te repareren. Neem contact op met een erkend
servicecentrum.
25
Page 28

Opm.: ALLE MATERIALEN EN LIJMEN DIE VOOR DEZE KOOKPLAAT
WORDEN GEBRUIKT, DIENEN BESTAND TE ZIJN TEGEN EEN
TEMPERATUUR VAN min. 100°C.
26
Page 29

AANSLUITING
OP DE ELEKTRICITEIT
GOED
GEPLAATSTE PAN
27
Page 30

OPTIONAL
28
Page 31

MANUEL D’UTILISATION
1. Touche de mise en marche (OFF/ON)
2. Touches de sélection de la zone de cuisson (ON/OFF)
3. Affichages de la zone de cuisson
4. Touche MOINS
5. Touche PLUS
6. Touche de zone étendue (ON/OFF)
7. Touche de minuterie des zones
8. Affichage de la minuterie
9. Touche de verrouillage
10. Témoin lumineux de zone étendue
11. Témoin lumineux de sélection de la minuterie des zones de cuisson
12. Témoin lumineux de la fonction de verrouillage (ON/OFF)
13. Affichage décimal pour le réglage de la puissance allumé:
14. Affichage décimal pour le réglage de la puissance éteint: zone de cuisson bloquée
15. Lampe témoin de zone étendue triple circuit
29
Page 32

30
Page 33

MODE D’EMPLOI DE LA COMMANDE SENSITIVE
TABLE DE CUISSON VITROCÉRAMIQUE BLOMBERG 90 X 33
AVERTISSEMENTS
Lire attentivement ces instructions. C’est le seul moyen d’utiliser cette cuisinière correctement et en
toute sécurité.
Conservez les instructions de montage, le manuel d’utilisation et les feuilles de données techniques
de l’appareil en lieu sûr.
Vérifiez l’état la table de cuisson immédiatement après l’avoir déballée. Si des dommages ont été
causés durant le transport, ne branchez pas l’appareil.
REMARQUES IMPORTANTES RELATIVES À L’INSTALLATION
Les branchements ne doivent être effectués que par du personnel autorisé et qualifié. En cas
de dommages provoqués du fait de mauvais branchements, tout type de garantie perdra sa
validité.
L’installation électrique doit être équipée d’un dispositif de mise à la terre approprié.
LA CUISSON
Cet appareil a été spécifiquement conçu pour un usage domestique. Il ne doit être utilisée que pour
préparer de la nourriture.
Les résidus d'aliments, surtout l'huile ou l'huile bouillante prennent feu. DANGER D’INCENDIE
!!!!! Restez impérativement à proximité immédiate de la table de cuisson lorsque vous faites
chauffer de l’huile ou de la graisse. N’utilisez jamais d’eau si de l’huile prend feu. Couvrir
immédiatement avec une assiette ou un couvercle et éteignez la zone de cuisson. Laissez la
casserole refroidir sur la zone de cuisson.
Ne touchez pas aux zones de cuisson qui ont surchauffé. DANGER DE BRÛLURE !!! Maintenir
hors de la portée des enfants. L’indicateur de surchauffe prévient lorsque les zones de cuisson sont
en surchauffe.
Ne placez jamais d'objets inflammables sur la table de cuisson. DANGER D’INCENDIE !!!!!
S’il y a un placard sous la table de cuisson, il est conseillé de ne pas y conserver d'objets
inflammables ni d’atomiseurs. DANGER D’INCENDIE !!!!!
Les cordons d’alimentation d’appareils ménagers ne doivent jamais toucher les zones de cuisson
chaudes. L’isolation du câble et la table de cuisson pourraient être endommagés.
La table de cuisson et le fond de la poêle doivent toujours être secs.
Toute cassure, brèche ou fêlure de la vitrocéramique pourrait donner lieu à des courts-circuits.
Éteignez immédiatement la zone de cuisson. Contactez le service d’assistance technique.
31
Page 34

Si la zone de cuisson surchauffe sans que l’affichage ne fonctionne, éteignez la zone de cuisson.
DANGER DE BRÛLURE !!! Contactez le service d’assistance technique.
Si la table de cuisson s’éteint toute seule et ne peut plus être utilisée, débranchez-la immédiatement
de l’installation électrique et contactez le service d’assistance technique.
Toute réparation mal faite est très risquée. Risque d’électrocutions !!! Les réparations ne doivent
être effectuées que par du personnel technique qualifié et spécialisé.
Les surfaces rugueuses des casseroles et poêles à frire rayent la vitrocéramique. Vérifiez l’état des
casseroles.
Évitez de faire chauffer des casseroles vides, surtout si elles sont en émail ou en aluminium. Tant
les fonds que la vitrocéramique pourraient se trouver abîmés.
Au niveau des casseroles spécifiques, suivre les instruction du fabriquant.
Ne placez jamais de casseroles ni de poêles à frire chaudes sur le tableau de commande, l’affichage
ou le cadre. Cela pourrait provoquer des dommages !!
Le sel, le sucre et le sable rayent la vitrocéramique. N'utilisez pas la table de cuisson comme plan de
travail ni pour y poser quelque chose.
Des objets durs ou pointus qui tombent accidentellement sur la table de cuisson risquent de
l’endommager. Ne placez donc pas ce type d’objets sur la table de cuisson.
Le sucre et autres aliments à forte teneur en sucre abîmeront la table de cuisson. Toute éclaboussure
d'aliment doit être immédiatement enlevée au moyen une raclette. Avertissement !!! La raclette
pour verre est dotée d’une lame affûtée. (EN OPTION)
Le papier aluminium et les récipients en plastique fondent si on les pose sur les zones de cuisson.
Le film protecteur utilisé en cuisine n’est pas adapté à cette table de cuisson.
Les éventuels dégâts suivants n’empêcheront pas le bon fonctionnement ni la stabilité de la
vitrocéramique.
• La formation de résidus gélatineux de sucre ou d’aliments à haute teneur en sucre.
• Les rayures provoquées par du sel, du sucre, des grains de sable ou fonds de casserole
rugueux.
• La couleur métal provoquée par l’utilisation d’une casserole ou de détergents non
appropriés.
• La décoration devenue opaque suite à l’utilisation de détergents non appropriés.
N’utilisez que de l’eau chaude avec un produit alcalin. N’utilisez pas de produits abrasifs ou
corrosifs, faute de quoi des zones opaques risqueraient de se former.
32
Page 35

Commande sensitive de marche/arrêt
Après l’allumage de la table, il faut environ une seconde avant que la commande sensitive ne
fonctionne. Suite à un éventuel réglage, les affichages et témoins lumineux clignotent pendant
environ 1 seconde. Ensuite, ils s'éteignent et la commande sensitive se met en position attente.
La commande sensitive s’allume en appuyant sur la touche d’alimentation. L’affichage des
différentes zones de cuisson est sur « 0 ». Lorsqu’une zone de cuisson est « chaude », un « H »
apparaît à la place du « 0 ». Le point décimal, en bas à droite des affichages de chacune des zones
de cuisson clignote par intervalles d’une seconde, pour indiquer qu’aucune zone de cuisson n’a été
sélectionnée.
Une fois allumée, la commande sensitive reste active pendant 20 secondes. Si aucune zone de
cuisson ou la minuterie n’est sélectionnée, la commande sensitive se remet en position attente.
La commande sensitive ne s’allume que lorsque que la touche d’alimentation est activée. Appuyer
sur la touche d’alimentation en même temps que sur d'autres touches n’a aucun effet, la commande
sensitive reste en position attente.
La commande sensitive peut être éteinte à tout moment en appuyant sur la touche d’alimentation, ce
qui est valable même si la commande a été bloquée au moyen du verrou de sécurité enfant. La
touche d’alimentation doit toujours être éteinte en premier.
Arrêt automatique
Une fois allumée, la commande sensitive s’éteint automatiquement après 20 secondes d’inactivité.
Si une zone de cuisson a été sélectionnée sans que la puissance n’ait été programmée, l’arrêt
automatique aura lieu 10 secondes après. La zone de cuisson est ensuite désélectionnée et encore 10
secondes après, la commande sensitive s’éteint.
Allumage/arrêt d’une zone de cuisson
Lorsque la commande sensitive est allumée, la zone de cuisson peut être sélectionnée en appuyant
sur la touche de sélection (la commande sensitive PLUS de la plaque correspondante): un signe
décimal sur l’affichage de celle-ci indique que la zone de cuisson a été sélectionnée. Si la zone est
« chaude », un « H » apparaîtra au niveau du foyer en question. On peut sélectionner, en appuyant
sur la touche (+), le niveau de puissance, puis la zone de cuisson commence à chauffer. Une fois la
puissance sélectionnée, il faut que la touche (+) soit relâchée pendant 0,3 secondes avant de pouvoir
sélectionner de nouveau la puissance avec la même touche.
Une fois la zone de cuisson sélectionnée, le niveau de puissance peut être sélectionné en appuyant
sur la touche PLUS, il commence au niveau 1, puis augmente par tranche d'une unité toutes les 0,4
secondes. Lorsque la puissance atteint 9, elle est arrivée au maximum.
Si la zone de cuisson est sélectionnée à l’aide de la touche (-), le niveau de puissance débute à « 9 »
(maximum). Si maintient la touche enfoncée, le niveau actif diminue par tranche d’une unité toute
les 0,4 secondes. Lorsque la puissance atteint 0, elle est arrivée au minimum. Le réglage ne peut
être modifié qu’en appuyant de nouveau la touche (-) ou (+).
33
Page 36

Éteindre une zone de cuisson
Sélectionnez la zone à éteindre avec la touche (+). La sélection est indiquée par le signe décimal qui
s’affiche au niveau de la zone de cuisson correspondante. En appuyant simultanément sur (+) et (-),
la puissance se règle sur 0. Sinon, on peut utiliser la touche (-) pour faire descendre le niveau de
puissance à 0.
La puissance de toutes les zones de cuisson est à « 0 », les signes décimaux de l’affichage
clignotent. Si une zone de cuisson est « chaude », un « H » s’affiche à la place de « 0 ».
Éteindre toutes les zones de cuisson
Toutes les zones de cuisson peuvent être éteintes simultanément, à tout moment, en appuyant sur la
touche d’alimentation. En position attente, un « H » s’affiche pour toutes les zones de cuisson
« chaudes ». Tous les autres affichages s’éteindront.
La puissance
La puissance de la zone de cuisson peut être programmée jusqu’à 9, elle est indiquée par les chiffres
de « 1 » à « 9 », par le biais d’un témoin lumineux à 7 sections.
Fonction de chauffe automatique (par sélection)
Lorsque la fonction de chauffe automatique activée, la puissance de chauffe de la zone de cuisson
en question atteint de 100 % pour une durée établie, qui dépend du niveau de puissance sélectionné.
Au terme de cette durée, la commande sensitive revient à la puissance sélectionnée auparavant.
Pour enclencher la fonction de chauffe automatique :
• La commande sensitive doit être allumée et l’une des zones de cuisson sélectionnée.
• Une fois la puissance arrivée 9, la chauffe automatique s’active en appuyant de nouveau sur la
touche PLUS.
• La puissance désirée, sélectionnée en appuyant sur les touches PLUS et MOINS, s’affiche
alors à l’écran.
• Trois secondes après avoir sélectionné la puissance et 16 secondes après avoir activé la
fonction de chauffe automatique, la lettre « A » (qui indique une augmentation de puissance)
apparaît à la place de la puissance sélectionnée.
• Si une puissance moindre est sélectionnée avec la touche MOINS, après que le « A » soit
apparu, la fonction de chauffe automatique sera interrompue.
34
Page 37

• Il est possible, avec la touche PLUS, de sélectionner une puissance supérieure, dans quel cas,
le temps de chauffe automatique sera adapté au réglage ainsi déterminé.
• Une fois le temps de chauffe écoulé, la puissance préalablement sélectionnée s’affichera de
nouveau.
Témoin de chaleur résiduelle
Ce témoin sert à avertir l’utilisateur que la température de la vitrocéramique est encore dangereuse
en cas de contact avec la surface au-dessus de la zone de cuisson. La température est établie selon
un modèle mathématique, en cas de chaleur résiduelle, un « H » apparaît à l’affichage sept sections
correspondant.
La chauffe et le refroidissement sont calculés en fonction de :
• La puissance sélectionnée (de « 0 » à « 9 »)
• La durée d’activation du relais.
Une fois la zone de cuisson éteinte, un « H » apparaît à l’affichage concerné jusqu’à ce que la
température de la zone de cuisson descende en-dessous du niveau critique.
Fonction d’arrêt automatique (limite de durée d’utilisation)
Selon le niveau de puissance, chaque zone de cuisson s’éteint, si aucune opération n’est effectuée,
après une durée maximum pré-établie.
Chaque opération effectuée sur la zone de cuisson (à l’aide des touches PLUS, MOINS ou du
double circuit de la zone, si présent) restaure la durée maximum de fonctionnement de celle-ci à sa
valeur initiale.
• Lorsque la commande est activée, la touche ON/OFF est prioritaire sur toutes les autres, la
commande peut donc être éteinte à tout moment, si l’on active plusieurs fois ou sans arrêt les
touches.
• En mode attente, l'activation ininterrompue des touches n’aura aucun effet, il faudra toutefois,
avant que la commande électronique ne puisse être de nouveau activée, s’assurer qu'aucune
touche n’est encore active.
35
Page 38

Touche de verrouillage (blocage)
La commande de l’appareil peut être bloquée, pour éviter les éventuels actions accidentelles, par le
biais de la touche “lock”.
Si vous ne désactivez pas la touche de verrouillage avant d’éteindre l’appareil, elle restera active
lorsque celui-ci sera de nouveau allumé. Aucune touche ne peut être activée si la touche de
verrouillage n’est pas désactivée auparavant. La seule touche qui fonctionne dans ce cas est la
touche mise en marche.
Arrêt d’urgence
Si l’une ou plusieurs zones de cuisson restent allumées accidentellement sans être commandée,
après un certain temps, la carte de commande s'éteint automatiquement (voir le tableau).
Niveau de
puissance
Limite de durée de
fonctionnement
en heures
1-2 6
3-4 5
5 4
6-9 1,5
Arrêt du circuit multiple
Grâce à la commande TouchLite, il est possible, selon les modèles, de commander des foyers à
circuit double ou triple.
Lorsqu’un foyer multiple radiant est activé, tous les circuits démarrent en même temps. Si vous ne
voulez allumer que le circuit central, vous pouvez éteindre les circuits extérieurs avec la touche
appropriée.
Si la touche de circuit multiple est activée, les circuits extérieurs de la zone de cuisson activée
peuvent être désactivés à tout moment. Un circuit externe activé aura d’un indicateur lumineux
supplémentaire. En activant de nouveau la touche à circuit multiple, on réactive les circuits externes
et les indicateurs lumineux correspondants s’allument.
36
Page 39

Fonctionnement du circuit triple
Si l’élément à commander est un foyer à circuit triple radiant, alors :
• En appuyant sur la touche de circuit mult iple une première fois, le circuit extérieur et le
témoin lumineux en haut de l’écran s’éteignent.
• En appuyant sur cette touche une deuxième fois, le circuit médian et le témoin lumineux en
bas de l’écran s’éteignent.
• En appuyant sur cette touche une troisième fois, le circuit médian s'allume de nouveau. Et en
appuyant encore une fois, on ajoute le troisième circuit et le témoin lumineux correspondant.
L’avertisseur acoustique (sonnerie)
L’avertisseur exécute ce qui suit en cours d’utilisation :
• Il émet un bref bip en appuyant normalement sur une touche.
La fonction minuterie
Descriptif de la fonction minuterie :
• La minuterie est autonome pendant 1,99 min. Un signal sonore avertit lorsque le temps est
écoulé. Cette fonction n'est disponible que si la table de cuisson n'est pas utilisée.
La minuterie autonome
• Si la commande sensitive est éteinte, la minuterie autonome peut être utilisée en appuyant sur
la touche correspondante. L’affichage indique « 00 ». En appuyant sur la touche de mise en
marche, la commande sensitive revient en mode attente et la minuterie d’éteint.
• La durée peut être modifiée (0-99 min.) en augmentant par tranches d’une minute à l’aide de
n’importe quelle touche PLUS de 0 à 99 et MOINS, de 99 à 0.
• En maintenant les touches PLUS ou MOINS enfoncées, la vitesse change beaucoup plus
rapidement pour arriver au maximum et sans signal sonore.
• En relâchant la touche PLUS (ou MOINS), la vitesse d’augmentation (de diminution)
recommencera à sa valeur initiale.
37
Page 40

• La minuterie peut être réglée par le biais des touches PLUS ou MOINS ou en appuyant
encore (avec signal sonore).
Une fois la minuterie réglée, le décompte s’enclenche. Lorsque le temps est écoulé, un signal
sonore retentit et l’affichage clignote.
Le signal sonore s’arrêtera :
• Automatiquement après 2 minutes.
• Si l’on appuie sur une touche quelconque.
L’écran s’arrête de clignoter et s’éteint.
Éteindre / modifier la minut erie
• La minuterie peut être modifiée ou éteinte à tout moment en appuyant sur les touches PLUS et
MOINS (avec signal sonore). La minuterie s'éteint et se remet à « 0 » si l’on appuie sur la
touche MOINS, si l’on appuie sur les touches PLUS et MOINS simultanément, la minuterie
se remet directement sur « 0 » avant de s’éteindre.
• Si la commande sensitive est allumée (avec la touche d'alimentation), la minuterie autonome
s’éteint.
Réglage de la minuterie des zones de cuisson
Il est possible de régler une minuterie différente pour chaque zone de cuisson en allumant la
commande sensitive.
• Pour programmer un temps de minuterie, sélectionner la zone de cuisson avec la touche de
sélection, la puissance, puis appuyer sur la touche de minuterie. Le nombre de témoins
lumineux autour de l’écran de la minuterie correspond au nombre de zones de cuisson et
indique celles qui ont été activées par la minuterie.
• Une fois la minuterie sélectionnée, son affichage clignote, et les témoins lumineux autour de
l’affichage s’allument. Lorsqu’une zone de cuisson est sélectionnée, les témoins lumineux de
la minuterie s’éteignent et l’affichage ne clignote plus.
• En modifiant la sélection de la zone de cuisson, l’affichage de la minuterie indique la valeur
correspondant à la zone de cuisson à peine sélectionnée. La minuterie programmée pour
chaque zone de cuisson reste active.
• Les autres fonctions de minuterie sont les mêmes que celles de la minuterie autonome. La
touche PLUS permet d’augmenter la valeur de la zone de cuisson correspondante.
• La fin du temps programmé est indiqué par un signal acoustique et par « 00 » qui s’affiche, le
témoin lumineux de la zone de cuisson de la minuterie clignote. La zone de cuisson s’éteint et
38
Page 41

un « H » apparaît si la zone est « chaude », sinon un « tiret » apparaît à l’écran de la zone de
cuisson.
Le signal sonore et le clignotement de l’écran s’arrêtent :
• Automatiquement après 2 minutes.
• En appuyant sur l’une des touches.
L’écran de la fonction minuterie s’éteint.
• Les fonctions de base sont les mêmes que celles décrites pour la minuterie autonome.
Fonction de détection (avec un équipement électronique adapté
seulement)
La commande sensitive ne comporte pas de capteur de détection de casserole.
Tableau :
Affichage Causes possibles Mesure
Er12 Court circuit dans le relais de
commande 5V ou à la terre
Remplacer la commande
Er16 Court circuit ou capteur de casserole
ou alimentation électrique
déconnecté
Eliminer la cause (service à la clientèle)
Er22 Court circuit ou découplage au
niveau de la touche pression
Remplacer la commande
Er25 Commande mal branchée Brancher au bon voltage
Er26 Court circuit dans la commande de
tension relais
Remplacer la commande
Son continu Présence d’eau sur le verre au
dessus de la carte de commande
Nettoyer
Un “H“
clignote
Casserole chaude sur la carte de
commande; mauvaise soudure du
foyer radiant.
Attendre que la carte de commande
revienne à température normale.
Composant défectueux Remplacer la commande
Er33 Présence d’eau sur le verre au
dessus de la carte de commande
Nettoyer
AVERTISSEMENT
Avant toute opération: débrancher les conducteurs principaux de la table de
cuisson. Assurez-vous que la table de cuisson est froide.
N’essayez pas de réparer la table de cuisson vous-même, contactez un centre de
service qualifié.
39
Page 42

40
Page 43

N.B. : LES MATÉRAIUX ET COLLES UTILISÉS SUR LE BLOC CUISINE
DOIVENT RÉSISTER À UNE TEMPÉRATURE MINIMUM DE 100°C.
BRANCHEMENTS
À
L’INSTALLATION ÉLECTRIQUE
BON
POSITIONNEMENT
DE LA CASSEROLE
41
Page 44

EN OPTION
42
Page 45

GEBRAUCHSANWEISUNG
1. Starttaste (EIN/AUS-Steuerung)
2. Kochzonen Wahltaste (EIN/AUS)
3. Display Kochzone
4. MINUS-Taste
5. PLUS-Taste
6. Zuschaltbare Kochzone EIN/AUS-Taste
7. Schalter Kochzonentimer
8. Timer-Anzeige
9. Verriegelungstaste
10. Kontrollleuchte zugeschaltete Kochzone
11. Kontrollleuchte Timer der Kochzonen
12. Kontrollleuchte Verriegelung (EIN/AUS)
13.Beleuchtete Dezimalanzeige zur Leistungseinstellung / unbeleuchtete Anzeige zur
Einstellung der Kochzonen / blockierte Kochzone
14. Kontrollleuchte für Dreikreis-Kochzone zugeschaltete Kochzone
43
Page 46

44
Page 47

GEBRAUCHSANWEISUNG TOUCHCONTROL GLASKERAMIK-
KOCHFELD BLOMBERG 90 X 33
ACHTUNG
Lesen Sie diese Gebrauchsanweisung mit Sorgfalt, denn nur so können Sie das Kochfeld sicher und
ordnungsgemäß benutzen.
Bewahren Sie die Montageanleitung, die Gebrauchsanweisung und das technische Datenblatt der
Vorrichtung an einem sicheren Ort auf.
Überprüfen Sie das Kochfeld sofort, nachdem Sie es ausgepackt haben. Falls während des
Transportes Beschädigungen aufgetreten sind, darf das Gerät nicht angeschlossen werden.
WICHTIGE MONTAGEHINWEISE
Der Anschluss des Gerätes darf nur durch einen konzessionierten Fachmann vorgenommen
werden. Im Fall von Schäden, die auf einen fehlerhaft ausgeführten Anschluss
zurückzuführen sind, entfällt der geleistete Garantieanspruch.
Das Elektrosystem muss über einen geeigneten Erdungsleiter verfügen.
SICHERHEIT WÄHREND DER BENUTZUNG
Diese Vorrichtung wurde speziell für den häuslichen Gebrauch entwickelt. Das GlaskeramikKochfeld ist nur für die Zubereitung von Speisen zu verwenden.
Speisereste, besonders Öl bzw. erhitztes Öl, entzünden sich schnell, BRANDGEFAHR! Wenn Sie
Öl oder Fett erhitzen, sollten Sie sich in unmittelbarer Nähe des Kochfeldes aufhalten. Falls Öl
Feuer fangen sollte, zum Löschen kein Wasser benutzen. Bedecken Sie die entsprechende Stelle
sofort mit einem Teller oder einem Topfdeckel. Die Kochzone ausschalten. Lassen Sie den Topf
zum Abkühlen auf der Kochzone stehen.
Berühren Sie keine Kochzonen, die überhitzt sind, VERBRENNUNGSGEFAHR! Lassen Sie
Kinder nicht in Reichweite des Kochfeldes. Die Restwärmeanzeige warnt Sie, wenn Zonen
überhitzt sind.
Stellen Sie nie brennbare Gegenstände auf das Kochfeld, BRANDGEFAHR!
Falls sich eine Schublade unter dem Kochfeld befindet, ist es empfehlenswert, dort keine
brennbaren Gegenstände oder Spraydosen aufzubewahren. BRANDGEFAHR!
Das Stromzufuhrkabel für die elektrische Vorrichtung darf niemals die Kochzonen berühren. Die
Kabelisolierung und das Kochfeld könnten hierdurch beschädigt werden.
Die Kochzone und der Topfschalter muss immer trocken sein.
Falls sich Brüche, Risse oder Splitter im Glaskeramik-Kochfeld befinden, besteht
Kurzschlussgefahr. Schalten Sie in diesem Fall das Gerät sofort aus. Nehmen Sie mit dem
Kundendienst Kontakt auf.
Falls sich eine Kochzone überhitzt, das Display jedoch nicht funktioniert, die Kochzone
ausschalten. BRANDGEFAHR! Nehmen Sie mit dem Kundendienst Kontakt auf.
45
Page 48

Falls sich das Kochfeld von selbst ausschaltet und nicht mehr benutzt werden kann, muss es sofort
vom Elektrosystem abgetrennt werden; anschließend den Kundendienst kontaktieren.
Jede Reparaturtätigkeit, die nicht korrekt ausgeführt wird, kann erhebliche Gefahren hervorrufen,
Elektroschockgefahr! Reparaturen dürfen nur von qualifiziertem Fachpersonal ausgeführt werden.
Raue Böden von Töpfen und Bratpfannen verkratzen die Glaskeramikfläche. Überprüfen Sie die
Töpfe.
Vermeiden Sie es, mit leerem Kochgeschirr zu kochen, besonders wenn es sich um emaillierte
Töpfe bzw. Aluminiumtöpfe handelt. Die Topf-Schalter und die Glaskeramikfläche könnten
beschädigt werden.
Befolgen Sie bei Spezialtöpfen die Anweisungen des Herstellers.
Stellen Sie heiße Töpfe oder Bratpfannen nie auf das Bedienfeld, auf den Display-Bereich oder den
Rahmen, es könnten Beschädigungen entstehen!
Salz, Zucker, und Sand verkratzen die Glaskeramikfläche. Benutzen Sie das Kochfeld nicht als
Arbeits- oder Abstellfläche.
Harte oder spitze Gegenstände, die unbeabsichtigt auf das Kochfeld fallen, können Schäden
hervorrufen. Platzieren Sie diese Gegenstände nicht in der Nähe des Kochfelds.
Zucker und andere Nahrungsmittel mit hohem Zuckergehalt zerstören die Kochfläche.
Übergelaufene oder umgeschüttete Speisen müssen sofort mit einem Reinigungsschaber für
Glasflächen entfernt werden. Achtung! Der Schaber für Glasflächen hat eine scharfe Klinge
(SONDERZUBEHÖR).
Wenn Aluminiumfolie oder Plastikbehälter auf den heißen Kochzonen abgelegt werden, schmelzen
sie. Die in der Küche benutzten Schutzfolien eignen sich nicht für dieses Kochfeld.
Folgende Beschädigungen beeinträchtigen nicht den ordnungsgemäßen Betrieb u/o die Stabilität des
Glaskeramik-Kochfelds:
• Bildung gelatinöser Rückstände aufgrund von geschmolzenem Zucker oder Speisen mit
hohem Zuckergehalt
• Durch Salz, Zucker, Sandkörner oder raue Topfböden hervorgerufene Kratzer
• Metallische Verfärbungen nach Benutzung von Töpfen oder ungeeigneter Reinigungsmittel
• Stumpfes Dekor nach Benutzung ungeeigneter Reinigungsmittel
Nur warmes Wasser mit einem alkalischen Produkt benutzen. Keine Ätz- oder Scheuermittel
einsetzen, die opake Stellen erzeugen könnten.
46
Page 49

Ein-/Ausschalten des TouchControl-Bedienfelds
Nach der Zündung benötigt das Bedienfeld 1 Sekunde, bevor es betriebsbereit ist. Nach einer neuen
Einstellung leuchten alle Displayanzeigen und Kontrollleuchten 1 Sekunde lang auf. Danach
erlöschen alle Anzeigen und Kontrollleuchten und das TouchControl-Bedienfeld befindet sich in
Bereitschaftsmodus (Stand-by).
Das Bedienfeld wird durch Drücken der Ein/Aus-Taste eingeschaltet. Das Display für die
Kochzonen zeigt „0” an. Falls eine Kochzone „glühend heiß“ ist, wird auf dem Display „H” statt
„0” angezeigt. Der Dezimalpunkt (rechts von allen Kochzonenanzeigen) blinkt im Intervall von
einer Sekunde auf und zeigt an, dass zu diesem Zeitpunkt keine Kochzone gewählt wurde.
Nachdem das Bedienfeld eingeschaltet wurde, bleibt es 20 Sekunden aktiv. Wenn keine Kochzone
bzw. der Timer nicht angewählt wird, geht das Bedienfeld in Stand-by über.
Das Bedienfeld schaltet sich nur ein, wenn die Ein/Aus-Taste betätigt wurde. Wird die Ein/AusTaste zusammen mit anderen Tasten gedrückt, hat dies keine Wirkung und das Bedienfeld bleibt in
Bereitschaftsmodus.
Das Bedienfeld kann jederzeit durch Drücken der Ein/Aus-Taste ausgeschaltet werden. Diese
Funktion kann auch angewendet werden, falls das TouchControl-Bedienfeld mit einer
Kindersicherung gesperrt wurde. Die Ein/Aus-Taste sollte immer als erstes ausgeschaltet werden.
Automatikabschaltung
Ist das Bedienfeld eingeschaltet, schaltet es sich nach 20 Sekunden ohne Nutzung automatisch
wieder ab. Nachdem eine Kochzone angewählt wurde, ohne dass die Leistungsstärke eingestellt
wurde, beträgt die Spanne bis zur automatischen Abschaltung 10 Sekunden. Anschließend ist die
Kochzone abgewählt und nach 10 Sekunden schaltet sich das Bedienfeld ab.
Eine Kochzone ein-/abschalten
Wenn das Bedienfeld eingeschaltet ist, kann die Kochzone durch Drücken der Wahltaste (die
PLUS- TouchControl-Taste der entsprechenden Kochzone) angewählt werden: der leuchtende
Dezimalpunkt auf dem Display der Kochzone zeigt die Wahl an. Ist die Zone „glühend heiß“,
erscheint ein „H” auf dem Display des entsprechenden Heizkörpers. Drückt man die (+) Taste
wieder, kann die Leistungsstärke eingestellt werden und die Kochzone beginnt, sich aufzuheizen.
Nach der Auswahl die (+) Taste 0,3 Sekunden loslassen, bevor die Leistungsstärke mit der selben
Taste eingestellt werden kann.
Nachdem die Kochzone angewählt wurde, kann die Leistungsstärke durch Drücken der PLUS-Taste
eingestellt werden; beginnend bei Stufe 1 wird die Leistung in 0,4 Sekunden um je eine Stufe
erhöht. Ist die Stufe 9 erreicht, kann keine höhere Leistungsstärke mehr gewählt werden.
Wird nach der Wahl der Kochzone die (-) Taste benutzt, ist die Startstufe „9” (max.
Leistungsstärke). Durch Drücken der Taste wird die Leistung in 0,4 Sekunden um je eine Stufe
abgesenkt. Ist die Stufe 0 erreicht, kann nicht weiter heruntergeschaltet werden. Die Einstellung
kann nur verändert werden, indem wieder die (-) oder (+) Taste betätigt wird.
47
Page 50

Eine Kochzone abschalten
Die Zone, die abgeschaltet werden soll, auswählen und die (+) Taste drücken. Die Wahl wird vom
Dezimalpunkt auf dem Display der entsprechenden Kochzone angezeigt. Durch gleichzeitiges
Drücken der (+) und (-) Taste wird die Leistungsstärke auf 0 geführt. Alternativ dazu kann die (-)
Taste benutzt werden, um die Leistungsstärke auf 0 zu reduzieren.
Alle Kochzonen befinden sich nun auf der Leistungsstärke „0”, die Dezimalpunkte auf dem Display
leuchten auf. Ist eine Kochzone „glühend heiß“, erscheint statt „0“ das Zeichen „H”.
Alle Kochzonen abschalten
Alle Kochzonen können jederzeit durch Drücken der Ein/Aus-Taste abgeschaltet werden. Befinden
sich die Kochzonen in Bereitschaftsmodus, erscheint ein „H” für alle Kochzonen, die noch
„glühend heiß“ sind (Restwärmeanzeige). Alle anderen Displays schalten sich aus.
Leistungsstufen der Kochzonen
Die Leistung der Kochzonen kann bis zu 9 Stufen eingestellt werden, die durch Zeichen von „1” bis
„9” angezeigt werden; hierzu das Leuchtanzeigendisplay mit sieben Abschnitten benutzen.
Ankochautomatik (Wahlfunktion)
Wenn die Ankochautomatik aktiviert wurde, erreicht die Leistung der Kochzone für einen
festgelegten Ankochzeitraum – abhängig von der gewählten Leistungsstufe - einen Wert von
100%. Bei Beendigung der Ankochzeit geht das TouchControl-Bedienfeld auf die zuvor
gewählte Leistungsstufe zurück.
Zum Starten der Ankochautomatik:
• Das Bedienfeld einschalten und die Kochzone anwählen.
• Bei Erreichung der Leistungsstufe 9 die Ankochautomatik durch erneutes Drücken der PLUS-
Taste aktivieren.
• Die verlangte Leistungsstufe durch Drücken der PLUS- und MINUS-Taste anwählen; die
gewählte Stufe wird auf dem Display angezeigt.
• Drei Sekunden, nachdem diese Tasten gedrückt wurden (Wahl der Leistungsstufe) und 16
Sekunden nach Aktivierung der Ankochautomatik erscheint das Zeichen „A” (zur Anzeige
der Leistungszunahme) statt der gewählten Leistungsstufe auf dem Display.
48
Page 51

• Wurde eine niedrigere Leistungsstufe durch Benutzung der MINUS-Taste gewählt, wird die
Ankochautomatik, nachdem das Zeichen „A” auf dem Display angezeigt wurde,
unterbrochen.
• Durch Betätigung der PLUS-Taste kann eine höhere Leistungsstufe gewählt werden; in
diesem Fall wird die Ankochautomatik den gewählten Einstellungen angepasst.
• Bei Beendigung der Ankochzeit wird die zuvor gewählte Leistungsstufe auf dem Display
angezeigt.
Restwärmeanzeige
Die Restwärmeanzeige warnt den Benutzer, dass das Glaskeramikkochfeld - bei Kontakt mit dem
gesamten Bereich über der Kochzone - eine gefährliche Temperatur aufweist. Die Temperatur wird
unter Befolgung eines mathematischen Modells festgelegt und bei jeder Restwärme erscheint das
Zeichen „H” auf dem entsprechenden Display mit sieben Abschnitten.
Aufheizen und Abkühlen werden berechnet gemäß:
• der gewählten Leistungsstufe (von „0” bis „9”)
• der Verzögerung des Aktivierungszeitpunkts.
Nachdem die Kochzone abgeschaltet wurde, erscheint „H” solange auf dem entsprechenden
Display, bis die Kochzonentemperatur unter den kritischen Wert gefallen ist.
Automatische Abschaltfunktion (Betriebszeitbegrenzung)
In Übereinstimmung mit der Leistungsstufe wird jede Kochzone nach einer zuvor festgelegten
Höchstzeit abgeschaltet, wenn keine Betätigung erfolgt.
Jeder Eingriff an der Kochzone (Betätigung der PLUS- und MINUS-Taste oder der ZweikreisKochzone, falls vorhanden) stellt die maximale Betriebszeit der Kochzone wieder auf ihren
anfänglichen Wert zurück.
• Ist das Bedienfeld aktiviert, hat die EIN/AUS-Taste Priorität über alle anderen Taster, somit
kann das Bedienfeld jederzeit abgeschaltet werden, auch bei mehrfacher oder wiederholter
Betätigung der Tasten.
• Im Bereitschaftsmodus (Stand-by) hat eine wiederholte Betätigung der Tasten keine Wirkung;
allerdings muss das elektronische Bedienfeld, bevor es wieder eingeschaltet werden kann,
„erkennen“, dass keine Taste aktiviert wurde.
49
Page 52

Verriegelungstaste des Geräts (Key-lock)
Durch Betätigung der Verriegelungstaste kann das gesamte Bedienfeld blockiert werden, um eine
unbeabsichtigte Betätigung zu vermeiden.
Falls Sie die Verriegelungstaste nicht deaktivieren, bevor das Bedienfeld ausgeschaltet wird, bleibt
die Taste in Betrieb, wenn das Bedienfeld wieder eingeschaltet wird.
Es ist nicht möglich, andere Tasten zu betätigen, solange die Verriegelungstaste nicht deaktiviert
wurde. Die einzige Taste, die betätigt werden kann, ist die Starttaste.
Sicherheitsabschaltung
Falls eine oder mehrere Kochzonen unbeabsichtigt und ohne Bedienung angeschaltet bleiben, wird
die Bedienfeldkarte nach einer gewissen Zeit automatisch abgeschaltet (siehe Tabelle).
Leistungsstufe
Betriebszeitbegrenzung
in Stunden
1-2 6
3-4 5
5 4
6-9 1.5
Abschalten der Mehrkreiskochzone
Benutzt man das TouchLite-Bedienfeld besteht - abhängig vom Modelltyp - die Möglichkeit,
Kochzonen mit Zwei- oder Dreikreis zu bedienen.
Wenn die Strahlungsheizkörper einer Mehrkreiskochzone aktiviert werden, starten alle Kreise zur
gleichen Zeit. Falls Sie nur die inneren Kreise einschalten möchten, können die anderen Kreise
durch Betätigung der entsprechenden Taste abgeschaltet werden.
Wenn die Mehrkreiskochzone eingeschaltet ist, können die äußeren Kreise der eingeschalteten
Kochzone jederzeit deaktiviert werden. Ein aktivierter Außenkreis hat eine spezielle, zusätzliche
Kontrollleuchte. Durch erneute Betätigung der Mehrkreiskochzonen-Taste wird der äußere Kreis
wieder aktiviert und die entsprechende Kontrollleuchte leuchtet auf.
50
Page 53

Dreikreis-Betrieb:
Handelt es sich bei dem zu bedienenden Teil um einen Dreikreis-Strahlungsheizkörper, gilt
folgendes:
• Drückt man die Mehrkreiskochzonen-Taste das erste Mal, wird der äußere Kreis abgeschaltet
und die Kontrollleuchte am Kopfende des Displays leuchtet auf.
• Drückt man die Mehrkreiskochzonen-Taste das zweite Mal, wird der mittlere Kreis
ausgeschaltet und die Kontrollleuchte am Kopfende des Displays leuchtet auf.
• Drückt man die Taste zum dritten Mal, wird der mittlere Kreis wieder eingeschaltet. Eine
weitere Betätigung fügt den dritten Kreis und die entsprechende Kontrollleuchte wieder
hinzu.
Signalton (Summer)
Folgende Tätigkeiten werden von Summer während des Betriebs angezeigt:
• Ein kurzes Aufsummen bei normaler Betätigung des Schalters.
Timer-Funktion
Der Timer übt folgende Funktion aus:
• Der Timer ist für 1.99 min autonom; bei Beendigung der Zeit erfolgt ein Signalton. Diese
Funktion ist nur verfügbar, wenn das Kochfeld nicht benutzt wird.
Autonomer Timer
• Ist das Bedienfeld eingeschaltet, kann der autonome Timer durch Betätigung der Timer-Taste
genutzt werden. Das Display zeigt „00” an. Drückt man die Starttaste, geht das Bedienfeld in
Bereitschaftsmodus über und die Zeitschaltuhr ist ausgeschaltet.
• Die Timerwerte können folgendermaßen verändert werden (0-99 Min.): durch Betätigung
jeder PLUS-Taste wird der Wert je um eine Minute erhöht (von 0 bis 99), durch die MINUSTaste je um eine Minute abgesenkt (von 99 bis 0).
• Durch anhaltendes Drücken der PLUS- oder MINUS-Taste erfolgt eine Schnellveränderung
bis zu einem Maximumwert, ohne dass ein Signalton ausgestoßen wird.
51
Page 54

• Wird die PLUS-Taste (oder MINUS-Taste) freigegeben, beginnt die Schnellzunahme (Abnahme) wieder beim anfänglichen Wert.
• Der Timer kann eingestellt werden, indem die PLUS- oder MINUS-Taste gedrückt wird bzw.
durch nochmaliges Drücken (ohne Signalton).
Nachdem der Timer eingestellt wurde, beginnt die Zeitkontrolle. Nach Ablauf der eingestellten Zeit
ertönt ein Signalton und das Display leuchtet auf.
Der Signalton erlischt:
• automatisch nach 2 Minuten
• durch Drücken einer beliebigen Taste.
Das Display leuchtet nicht weiter auf und geht aus.
Timer ausschalten/verändern
• Der Timer kann jederzeit verändert oder ausgeschaltet werden, indem die PLUS- und
MINUS-Tasten gedrückt werden (mit Signalton). Der Timer wird ausgeschaltet und die Zeit
gelöscht („0”), wenn die MINUS-Taste gedrückt wird oder die PLUS- und MINUS-Tasten
gleichzeitig gedrückt werden; hierdurch wird die Schaltzeituhr direkt auf „0” zurückgestellt,
bevor sie ausgeht.
• Ist das Bedienfeld eingeschaltet (Betätigung der Ein/Aus-Taste), geht der autonome Timer
aus.
Timer für die Kochzonen einstellen
Es besteht die Möglichkeit, für jede Kochzone einen einzelnen Timer einzustellen, wenn das
Bedienfeld eingeschaltet ist.
• Zum Anwählen der Kochzone die Kochzonen-Wahltaste benutzen, die Leistungsstufe
einstellen und dann die Timer-Taste drücken; nun kann die Zeitkontrolle eingestellt werden,
um die Kochzone nach einer gewissen Zeit auszuschalten.
Die Anzahl von Kontrollleuchten auf dem Display des Timers entspricht der Anzahl der
Kochzonen, um anzuzeigen, welche Kochzonen mit dem Timer aktiviert wurden.
• Wenn der Timer angewählt wurde, leuchtet das Display und die Kontrollleuchten rund um das
Display auf. Wurde eine Kochzone angewählt, geht die Kontrollleuchte des Timers aus und
das Display leuchtet nicht länger auf.
• Wird die Wahl einer Kochzone verändert, zeigt das Display des Timers den Zeitschaltwert
entsprechend der neu gewählten Kochzone an. Die Einstellungen der Zeitschaltuhr für jede
Kochzone bleiben aktiviert.
52
Page 55

• Die anderen Funktionen des Timers entsprechen jenen des autonomen Timers. Es muss die
PLUS-Taste gedrückt werden, um den Wert der entsprechenden Kochzone zu erhöhen.
• Nach Ablauf der Garzeit ertönt ein Signalton, auf dem Display erscheint „00” und die TimerKontrollleuchte der Kochzone leuchtet auf. Die Kochzone wird ausgeschaltet und es erscheint
das Zeichen „H“, wenn die Kochzone noch „glühend heiß“ ist (Restwärmeanzeige);
andernfalls erscheint ein „Gedankenstrich“ auf dem Kochzonendisplay.
Der Signalton und das Aufleuchten auf dem Display erlöschen:
• automatisch nach 2 Minuten
• durch Drücken einer beliebigen Taste.
Das Display des Timers schaltet sich aus.
• Die Basisfunktionen stimmen mit jenen überein, die für den autonomen Timer beschrieben
wurden.
Topferkennungsfunktion (nur mit zugehöriger Elektronik)
Dieses TouchControl-Bedienfeld verfügt nicht über Topferkennungssensoren.
Tabelle:
Display Mögliche Ursache Gegenmaßnahme
Er12 Kurzschluss im 5V-Stromnetz oder
am Steuerrelais
Das Bedienfeld ersetzen
Er16 Kurzschluss oder abgeschalteter
Topfsensor bzw. abgetrennte
Stromversorgung
Die Ursache beseitigen (Kundendienst
kontaktieren)
Er22 Kurzschluss oder abgeschaltete
Tasten
Das Bedienfeld ersetzen
Er25 Bedienfeld nicht ordnungsgemäß
angeschlossen
An die korrekte Netzspannung
anschließen
Er26 Kurzschluss am
Spannungskontrollrelais
Das Bedienfeld ersetzen
Anhaltender
Summton
Wasser auf dem Glas über der
Bedienkarte
Das Glas säubern
„H“ leuchtet
auf
Heißer Topf auf der Bedienkarte;
defekte Dichtung der
Strahlungsheizkörper
Abwarten, bis die Bedienkarte wieder
ihre normale Temperatur hat
Defektes Bauteil Das Bedienfeld ersetzen
Er33 Wasser auf dem Glas über der
Bedienkarte
Das Glas säubern
53
Page 56

ACHTUNG!
Vor jeder Tätigkeit:
Das Kochfeld vom Stromnetz abtrennen.
Sich vergewissern, dass das Kochfeld kalt ist.
Versuchen Sie nicht, das Bedienfeld selbst zu reparieren; nehmen sie mit einem
qualifiziertem Kundendienstcenter Kontakt auf!
54
Page 57

HINWEIS: DAS FÜR DIE EINBAUKÜCHE VERWENDETE MATERIAL
UND DIE LEIME MÜSSEN EINER TEMPERATUR VON MINDESTENS
100°C STANDHALTEN.
ANSCHLÜSSE ELEKTROSYSTEM
KORREKTE POSITIONIERUNG DER TÖPFE
55
Page 58

SONDERZUBEHÖR
56
Page 59

BRUGSVEJLEDNING
1 Startknap (TÆND/SLUK betjening)
2 Knapper til valg af kogezone (TÆND/SLUK)
3 Kogezone display
4 MINUS knap
5 PLUS knap
6 Knap for udvidet zone (TÆND/SLUK)
7 Knap for timerzone
8 Timer display
9 Knap for lås
10 Indikatorlys til udvidet zone
11 Indikatorlys for valg af timer til kogezoner
12 Indikatorlysfunktion for tastelås (TÆND/SLUK)
13 Tændt display med decimaler for indstilling af effekt: ikke-tændt display for indstilling af kogezone: blokeret
kogezone
14 Indikatorlys til udvidet zone i tredje cirkel
57
Page 60

58
Page 61

VEJLEDNING FOR BLOMBERG 90 X 33 KERAMISK KOGEPLADE MED
TOUCHBETJENING
ADVARSLER
Læs denne brugsvejledning grundigt. Det er den eneste måde at anvende kogepladen korrekt og
sikkert på.
Behold monteringsvejledningen, brugsvejledningen og det tekniske data blad for apparatet på et
sikkert sted.
Kontroller kogepladerne umiddelbart efter udpakning. Hvis der er forårsaget skade under
transporten, skal apparatet ikke tilsluttes.
VIGTIGT FOR INSTALLATIONEN
Tilslutningerne må kun udføres af autoriseret og kvalificeret personale. Hvis der sker skade
som følge af forkert tilslutning, vil al form for garanti bortfalde.
Det elektriske system skal udstyres med et ordentligt system til jordforbindelse.
TIL MADLAVNING
Dette apparat er specifikt beregnet til husholdningsbrug. Kogepladen må kun bruges til
tilberedning af madretter.
Madrester, især olie eller kogende olie, kan tænde ild. BRANDFARE!!! Når olie eller fedt varmes
op, skal man forblive i umiddelbar nærhed. Hvis der går ild i olie, må der aldrig bruges vand. Dæk
straks med en plade eller et låg. Sluk for kogezonen. Efterlad panden/gryden til afkøling på
kogezonen.
Rør ikke kogezoner, der er overophedede. BRANDFARE!!! Holdes væk fra børns rækkevidde.
Indikatoren for eftervarme advarer, hvis zonerne er overophedede.
Placer aldrig brændbare genstande på kogepladen. BRANDFARE!!!
Hvis der er en skuffe under kogepladen, anbefales det at undlade at opbevare brændbare genstande
eller spraydåser i den.
BRANDFARE!!!
Strømforsyningskablet til elektriske apparater må aldrig røre varme kogezoner.
Kabelisoleringen og kogepladen kan nemt blive beskadiget.
Kogezonen og bunden af gryden/panden skal altid være tør.
Hvis der er revner, brud eller spalter i det keramiske glas, er der risiko for kortslutning. Sluk
straks for apparatet. Kontakt service for teknisk assistance.
Hvis kogezonen overopheder, men displayet ikke virker, skal kogezonen slukkes.
BRANDFARE!!! Kontakt service for teknisk assistance.
Hvis kogepladen selv slukker og ikke kan bruges, er det nødvendigt straks at frakoble den fra det
elektriske system og kontakte service for teknisk assistance.
59
Page 62

Enhver reparation, der udføres forkert, er en stor risiko. Risiko for elektriske stød!!! Reparationer
må kun foretages af kvalificeret og specialiseret teknisk personale.
Ru overflader på gryder og pander ridser det keramiske glas. Kontroller gryder/pander.
Undgå madlavning med tomme gryder/pander, især hvis det er en emaljeret eller aluminiumsgryde/pande. Grydens/pandens bund og det keramiske glas kan blive beskadiget.
Ved specielle gryder/pander skal du følge producentens instruktioner.
Placer aldrig varme gryder eller pander på kontrolpanelet, på display området eller på rammen.
Dette kan forårsage skade!!!
Salt, sukker og sand ridser keramisk glas. Brug ikke kogepladen som et arbejdsbord eller til at
placere noget på den.
Hårde eller spidse genstande, der ved et uheld vælter på kogepladen, kan forårsage skade. Placer
ikke disse genstande på kogepladen.
Sukker og andre madvarer med højt sukkerindhold vil beskadige kogepladen. Alt spildt mad skal straks
fjernes med en glasskraber. Advarsel!!! Glasskraberen har et skarpt blad.
(TILBEHØR)
Alufolie og plasticbeholdere vil smelte, hvis de placeres på varme kogezoner. Den beskyttelsesfilm,
der bruges i køkkenet, er ikke egnet til denne kogeplade.
Følgende skade vil ikke påvirke en korrekt funktion eller stabiliteten på det keramiske glas.
• Dannelsen af gelatinøse rester som følge af smeltet sukker eller mad med højt sukkerindhold.
• Ridser efter salt-, sukker- eller sandkorn eller ru bunde på gryder eller pander.
• Metalfarve fra gryder/pander eller efter brug af uegnede rengøringsmidler.
• Uigennemsigtig dekoration efter brug af uegnede rengøringsmidler.
Brug kun varmt vand med et alkalisk produkt. Brug ikke ætsende eller slibende produkter, da de kan
forårsage dannelse af uigennemsigtige områder.
Tænd/sluk for touchbetjening
Efter tænding kræver touchkontrollen omkring 1 sekund, før den fungerer. Efter nulstilling
blinker alle display og indikatorlysene i omkring 1 sekund. Herefter slukker alle display og
indikatorlysene, og touchkontrollen er i stand-by position.
Touchkontrollen kan tændes ved at trykke på tænd-sluk-knappen. Displayet for kogezonerne viser
”0”. Hvis en kogezone er “brændende hed”, viser displayet “H” i stedet for “0”. Decimaltegnet
nederst til højre for alle kogezonedisplay blinker i intervaller på et sekund for at vise, at der på det
tidspunkt ikke er valgt nogen kogezone.
60
Page 63

Efter at være blevet tændt, forbliver touchbetjeningen aktiv i 20 sekunder. Hvis der ikke vælges en
kogezone, eller timeren ikke vælges, går touchkontrollen tilbage til stand-by.
Touchkontrollen tænder kun, når tænd-sluk-knappen aktiveres. Det vil ikke have nogen effekt at
trykke på tænd-sluk-knappen samtidig med andre knapper, og tænd-sluk-knappen vil blive på standby.
Touchbetjeningen kan slukkes på ethvert tidspunkt ved at trykke på tænd-sluk-knappen. Dette anvendes,
selvom kontrollen har været blokeret af en børnesikkerhedslås. Tænd-sluk-knappen bør altid være den
første, der slukkes.
Automatisk afbrydelse
Når touchkontrollen er tændt, vil den slukke automatisk efter 20 sekunder uden aktivitet. Når der er
valgt en kogezone uden at indstille effektniveauet, er tiden for automatisk afbrydelse 10 sekunder.
Herefter fravælges kogezonen, og efter 10 sekunder slukker touchkontrollen.
Tænde/slukke for en kogezone
Når touchkontrollen er tændt, kan kogezonen vælges ved at trykke på valgknappen (PLUS
touchbetjeningen for den relaterede kogezone): Et tændt decimaltegn på en kogezones display angiver
et valg. Hvis zonen er “brændende hed”, vil der fremkomme et “H” på displayet for den tilsvarende
kogeplade. Ved at trykke på (+) knappen igen vil det være muligt at vælge et effektniveau, og
kogezonen begynder at varme. Når der er valgt er det nødvendigt at slippe (+) knappen i 0,3 sekunder,
inden effekten kan vælges ved hjælp af den samme knap.
Når kogezonen er valgt, kan effektniveauet vælges ved at trykke ned på PLUS knappen, startende på
niveau 1 og så forøges det med en enhed pr. 0,4 sekund. Når niveau 9 nås, kan der ikke vælges højere
niveauer.
Hvis kogezonen vælges ved hjælp af (-) knappen, er startniveauet “9” (højeste niveau). Hvis knappen
trykkes ned, falder det aktive niveau med en enhed pr. 0,4 sekund. Når niveau 0 er nået, kan det ikke
blive mindre. Indstillingen kan kun ændres ved at aktivere (-) knappen eller (+) knappen igen.
Slukke for en kogezone
Vælg zonen, der skal slukkes, ved hjælp af (+) valgknappen. Valget vises ved decimaltegnet på
displayet for den relaterede zone. Ved på samme tid at trykke på (+) og (-) knappen sættes
effektniveauet på 0. Alternativt kan (-) knappen bruges til at reducere effektniveauet til 0.
Alle kogezoner er på effektniveau “0”, decimaltegnene på displayet blinker. Hvis en kogezone er
“brændende hed”, vil der vises et “H” i stedet for “0”.
61
Page 64

Slukke for alle kogezoner
Alle kogezoner kan altid slukkes straks ved at trykke på tænd-sluk-knappen. På stand-by fremkommer
der et “H” for alle kogezoner, der er “brændende hede”. Alle de andre display vil slukke.
Effektniveau
En kogezones effekt kan sættes til 9 niveauer, hvilket er angivet af symbolerne ”1” til ”9” ved brug af et
indikatorlys med syv afdelinger.
Den automatiske varmefunktion (skal vælges)
Når den automatiske varmefunktion er valgt, når kogezonens effekt 100% for en fastlagt
varmeperiode, hvilket afhænger af det valgte effektniveau. Ved afslutningen af denne
varmeperiode returnerer touchkontrollen til det forvalgte effektniveau.
Start af den automatiske varmeproces:
• Touchkontrollen er tændt, og en kogezone vælges.
• Når effektniveau 9 er nået, aktiveres den automatiske varme ved at trykke på PLUS knappen igen.
• Det ønskede effektniveau vælges ved at trykke på PLUS og MINUS knapperne; det valgte niveau
vises på displayet.
• 3 sekunder efter disse knapper er trykket ned (valg af effektniveau) og 16 sekunder efter aktivering
af den automatiske varmefunktion, fremkommer symbolet ”A” (der angiver en forøgelse af
effekten) på displayet i stedet for det valgte effektniveau.
• Hvis der vælges et lavere niveau ved hjælp af MINUS knappen, efter ”A” er fremkommet på
displayet, vil den automatiske varmefunktion blive afbrudt.
• Ved hjælp af PLUS knappen er det muligt at vælge et højere effektniveau, i dette tilfælde vil den
automatiske varmeperiode blive tilpasset den valgte indstilling.
• Når varmeperioden er afsluttet, vil det tidligere valgte effektniveau fremkomme på displayet.
62
Page 65

Indikatoren for eftervarme
Dette advarer brugeren om, at det keramiske glas har en farlig temperatur, i tilfælde af kontakt med
hele området omkring kogezonen. Temperaturen er oparbejdet ved følgende matematiske model,
og hvis der er nogen eftervarme, fremkommer ”H” på det tilsvarende display med syv afdelinger.
Opvarmning og nedkøling er udregnet i henhold til:
• Det valgte effektniveau (fra ”0” til ”9”)
• Aktiveringstiden for relæ
Når kogezonen er slukket, fremkommer ”H” på det tilsvarende display, indtil kogezonens
temperatur kommer under det kritiske niveau.
Den automatiske sluk-funktion (driftstidsbegrænsning)
Alt efter effektniveau slukkes hver kogezone efter en forud-fastsat maksimum periode, hvis der
ikke udføres nogen funktioner.
Hver funktion på kogezonen (ved hjælp af PLUS og MINUS knapperne eller zonens dobbeltfelt,
hvis det findes) genopretter den maksimale driftstid for kogezonen til dens oprindelige værdi.
• Når betjeningen er aktiveret, rangerer TÆND/SLUK knappen over alle andre knapper, og derfor
kan betjeningen slukkes til enhver tid, selv ved fleraktivering eller kontinuerlig aktivering af
knapper.
• På stand-by har kontinuerlig aktivering af knapper ingen effekt, men inden den elektroniske
betjening kan tændes igen, skal den genkende, at der ikke er aktiveret nogen knapper.
Låsknappen for dette apparat (blokering)
Ved at bruge “lås” knappen kan hele styringen blokeres (apparatet) for at undgå uforsætlige
handlinger. Hvis du ikke deaktiverer lås-knappen, inden du slukker for betjeningen, vil den blive
aktiveret, når der tændes for betjeningen igen. Det er ikke muligt at aktivere andre knapper, inden
låsknappen deaktiveres. Den eneste knap, der kan aktiveres, er startknappen.
63
Page 66

Sikkerhedsstop
Hvis en eller flere kogezoner uforsætligt forbliver tændt uden betjening, slukkes kontrolkortet
automatisk efter en vis tid (se tabel).
Effektniveau Betjeningstidsbegrænsning
i timer
1-2
6
3-4
5
5
4
6-9 1.5
Stop for flere cirkler
Ved hjælp af TouchLite betjeningen er det muligt, afhængigt af modeltype, at betjene kogeplader
med en dobbelt eller tredobbelt cirkel.
Når en flerkogeplade aktiveres, starter alle cirkler på én gang. Hvis du ønsker at skifte til blot den
inderste cirkel, kan de yderste cirkler slukkes ved hjælp af den rigtige knap.
Hvis fler-cirkel knappen aktiveres, kan de yderste cirkler for den aktiverede kogezone deaktiveres
til enhver tid. En aktiveret ydre cirkel har et specielt ekstra indikatorlys. Aktivering af fler-cirkel
knappen igen aktiverer igen de ydre cirkler, og de relevante indikatorlys lyser.
Tredobbeltcirkel funktion:
Hvis elementet, der skal betjenes, er en tredobbeltcirkel kogeplade, fremkommer følgende:
• Når fler-cirkel knappen trykkes på første gang, slukkes den yderste cirkel og indikatorlyset
øverst på displayet.
• Når fler-cirkel knappen trykkes på anden gang, slukkes den midterste cirkel og
indikatorlyset nederst på displayet.
• Når denne knap trykkes på for tredie gang, tændes den midterste cirkel igen. Når der trykkes
yderligere, tilføjes den tredje cirkel og dens relaterede indikatorlys.
64
Page 67

Det akustiske signal (brummer)
Brugen af følgende aktivitet markeres af en brummer:
• En kort lyd for normalt tryk på knappen.
Timerfunktionen
Timerfunktionen er følgende:
• Timeren er selvstyrende i 1,99 min.: der er et lydsignal, når tiden er forbi. Denne funktion
er kun tilgængelig, når kogepladen ikke bruges.
Den selvstyrende timer
• Hvis touchbetjeningen er slukket, kan den selvstyrende timer bruges ved at trykke på
timerknappen. Displayet angiver “00”. Ved at trykke på startknappen returnerer
touchbetjeningen til stand-by, og timeren slukkes.
• Værdierne kan ændres (0-99 min.), idet der øges med et minut ad gangen ved at bruge enhver
PLUS knap fra 0 til 99 og MINUS knappen fra 99 til 0.
• Kontinuerligt at trykke på PLUS eller MINUS knapperne vil forøge forandringen meget op
til en maksimumsværdi uden lydsignaler.
• Hvis PLUS (eller MINUS) knappen slippes, vil den tiltagende (aftagende) hastighed starte
igen fra den oprindelige værdi.
• Timeren kan indstilles ved at trykke PLUS eller MINUS knapperne ned eller ved at trykke
mere ned (med lydsignal).
Når timeren er indstillet, begynder nedtællingen. Når tiden er udløbet, gives der et lydsignal, og
displayet blinker.
Lydsignalet vil stoppe:
• Automatisk efter 2 minutter.
• Ved at trykke på en hvilken som helst knap.
Displayet stopper med at blinke og slukker.
Slukke / ændre timeren.
65
Page 68

• Timeren kan ændres eller slukkes til enhver tid ved at trykke på PLUS og MINUS knapperne
(med lydsignal). Timeren slukker og nulstiller tiden til ”0” ved at trykke på MINUS knappen eller ved
at trykke på PLUS og MINUS knapperne på samme tid, hvilket direkte nulstiller timeren til ”0”, inden
der slukkes.
• Hvis touchbetjeningen tændes (ved brug af tænd-sluk-knappen), slukker den selvstyrende
timer.
Indstilling af timeren for kogezonerne.
Det er muligt at indstille en separat timer for hver kogezone ved at tænde for touchbetjeningen.
• Ved at vælge kogezonen ved brug af zonevalgsknappen og indstille effektniveauet og
derefter trykke på timer knappen, er det muligt at indstille en nedtælling, der skal slukke
for kogezonen.
Antallet af indikatorlys, der er placeret rundt om timerdisplayet, svarer til antallet af
kogezoner for at angive, hvilke zoner der er aktiveret af timeren.
• Når timeren vælges, blinker displayet, og indikatorlysene rundt om displayet lyser. Hvis der
er valgt en kogezone, slukkes indikatorlysene, og displayet blinker ikke mere.
• Når et kogezonevalg ændres, angiver timerdisplayet timerværdien, der svarer til den nyligt
valgte kogezone. Timerne, der er indstillet for hver kogezone, forbliver aktiverede.
• Andre timerfunktioner er de samme som den selvstyrende timer. Der skal trykkes på PLUS
knappen for at forøge værdien for den tilsvarende kogezone.
• Udløbet tid markeres af et akustisk signal og ved “00” på displayet, kogezonens indikatorlys
for timeren blinker. Kogezonen slukkes, og ”H” fremkommer, hvis zonen er ”brændende
hed”, ellers fremkommer der en ”bindestreg” på kogezonens display.
Lydsignalet og blinken på displayet afbrydes.
• Automatisk efter 2 minutter.
• Ved at trykke på en af knapperne.
Timerdisplayet slukker.
• Basisfunktionerne er de samme som de, der er beskrevet for den selvstyrende timer.
66
Page 69

Funktion til genkendelse af gryde/pande (kun med dedikeret elektronik)
Touchbetjeningen indeholder ikke sensorer til genkendelse af gryde/pande.
Tabel:
Display Mulige årsager Modforanstaltninger
Er12 Kortslutning i 5V relæet eller det
jordede kontrolrelæ
Udskift betjeningen
Er16 Kortslutning eller afbrudt
grydesensor eller
strømforsyning
Fjern årsagerne
(kundeservice)
Er22 Kortslutning eller afbrydelse i
trykknap området.
Udskift betjeningen
Er25
Betjening tilsluttet forkert
Tilslut til korrekt
forsyningsspænding
Er26 Kortslutning i
relæspændingsbetjeningen
Udskift betjeningen
Kontinuerlig
lyd
Vand på glasset over
kontrolkortet
Rengør
”H” blinker
Varm gryde på kontrolkortet;
defekt tætning på kogepladen
Vent til kontrolkortet går
tilbage til normal
temperatur
Defekt komponent Udskift betjeningen
Er33 Vand på glasset over
kontrolkortet
Rengør
ADVARSEL Inden nogen betjening:
Afbryd kogepladen fra strømforsyningen.
Sørg for at kogepladen er kold.
Forsøg ikke at reparere kogepladen selv, kontakt et kvalificeret servicecenter.
67
Page 70

N.B. MATERIALERNE OG LIMEN, DER ER BRUGT TIL KØKKENENHEDEN, SKAL KUNNE
MODSTÅ EN TEMPERATUR PÅ MINDST 100°C..
ANBEFALEDE HULLER TIL
KONSOLLER
FORSIDE
68
Page 71

TILSLUTNINGER TIL ELEKTRISK SYSTEM
KORREKT PANDE-/GRYDE
PLACERING
69
Page 72

TILBEHØR
70
Page 73

Page 74

74
Page 75

Page 76

H01A263
 Loading...