

Page 1

Upper basket with variable height setting (some
models)
The upper basket is equipped with a lifting mechanism
which enables you to change the height of the basket
without having to remove it from the dishwasher, even if
it is fully loaded.
The height of the upper basket was set to its lowest
position at the factory. To lift the upper basket to the high
A
A
B
( ) position, hold it on one side and carefully pull it
upwards. To lift the opposite side of the basket, hold it
and pull it upwards in the same manner ( ).
To lower the upper basket, hold the basket lever on one
side and carefully lower the basket without releasing the
B
lever. ( ). Repeat the procedure with the lever on the
opposite side of the basket. Make sure that both levers
catch at the same height.
A
2
3
E
D
C
Rack (depends on the model)
Depending on the size of the glasses and cups, the rack
height setting may be adjusted ( ).
7
How to clean your dishwasher
Cleaning your machine at regular intervals ensures longer
product life and reduces the risk of reccurring problems.
Warning
Always unplug the machine and turn off the water
supply before cleaning.
Use a gentle household cleaner for the outside and
the door seals.
Clean the control panel only with a moist cloth and
clear water.
C D E
Cleaning the filters
A
B
1
Height setting with empty basket
In this model, the height setting of the upper basket may
be changed using the wheels which are mounted at two
different heights.
Release the latches on both the right and left tracks of
the upper basket by pushing them outwards ( ).
C
B
C
Pull out the basket out completely ( ).
Place the basket back into the tracks at the desired height
E
( ).
Push the latches back into the correct position.
D
C
D
Clean the filters and the spray arms regularly. A dirty
machine will have a negative effect on the cleaning results.
1
Main filter
2
Coarse filter
3
Micro filter
1.
Remove the lower basket from the machine.
Turn the coarse filter to the right and pull it out in an
2.
upward direction ( ).
Pull out the main filter ( ).
3.
Press on the two tongues of the coarse filter and
4.
remove the micro filter ( ).
Clean the filters thoroughly under running water. Use
5.
a brush if necessary.
Replace main filter
6.
Replace the micro filter and the coarse filter into the
7.
main filter. Twist it clockwise until it clicks in.
Warning
Do not operate your dishwasher without a filter.
Ensure that your filters are correctly installed
Clean the filters regularly.
A
B
C
E
13
14
Page 2
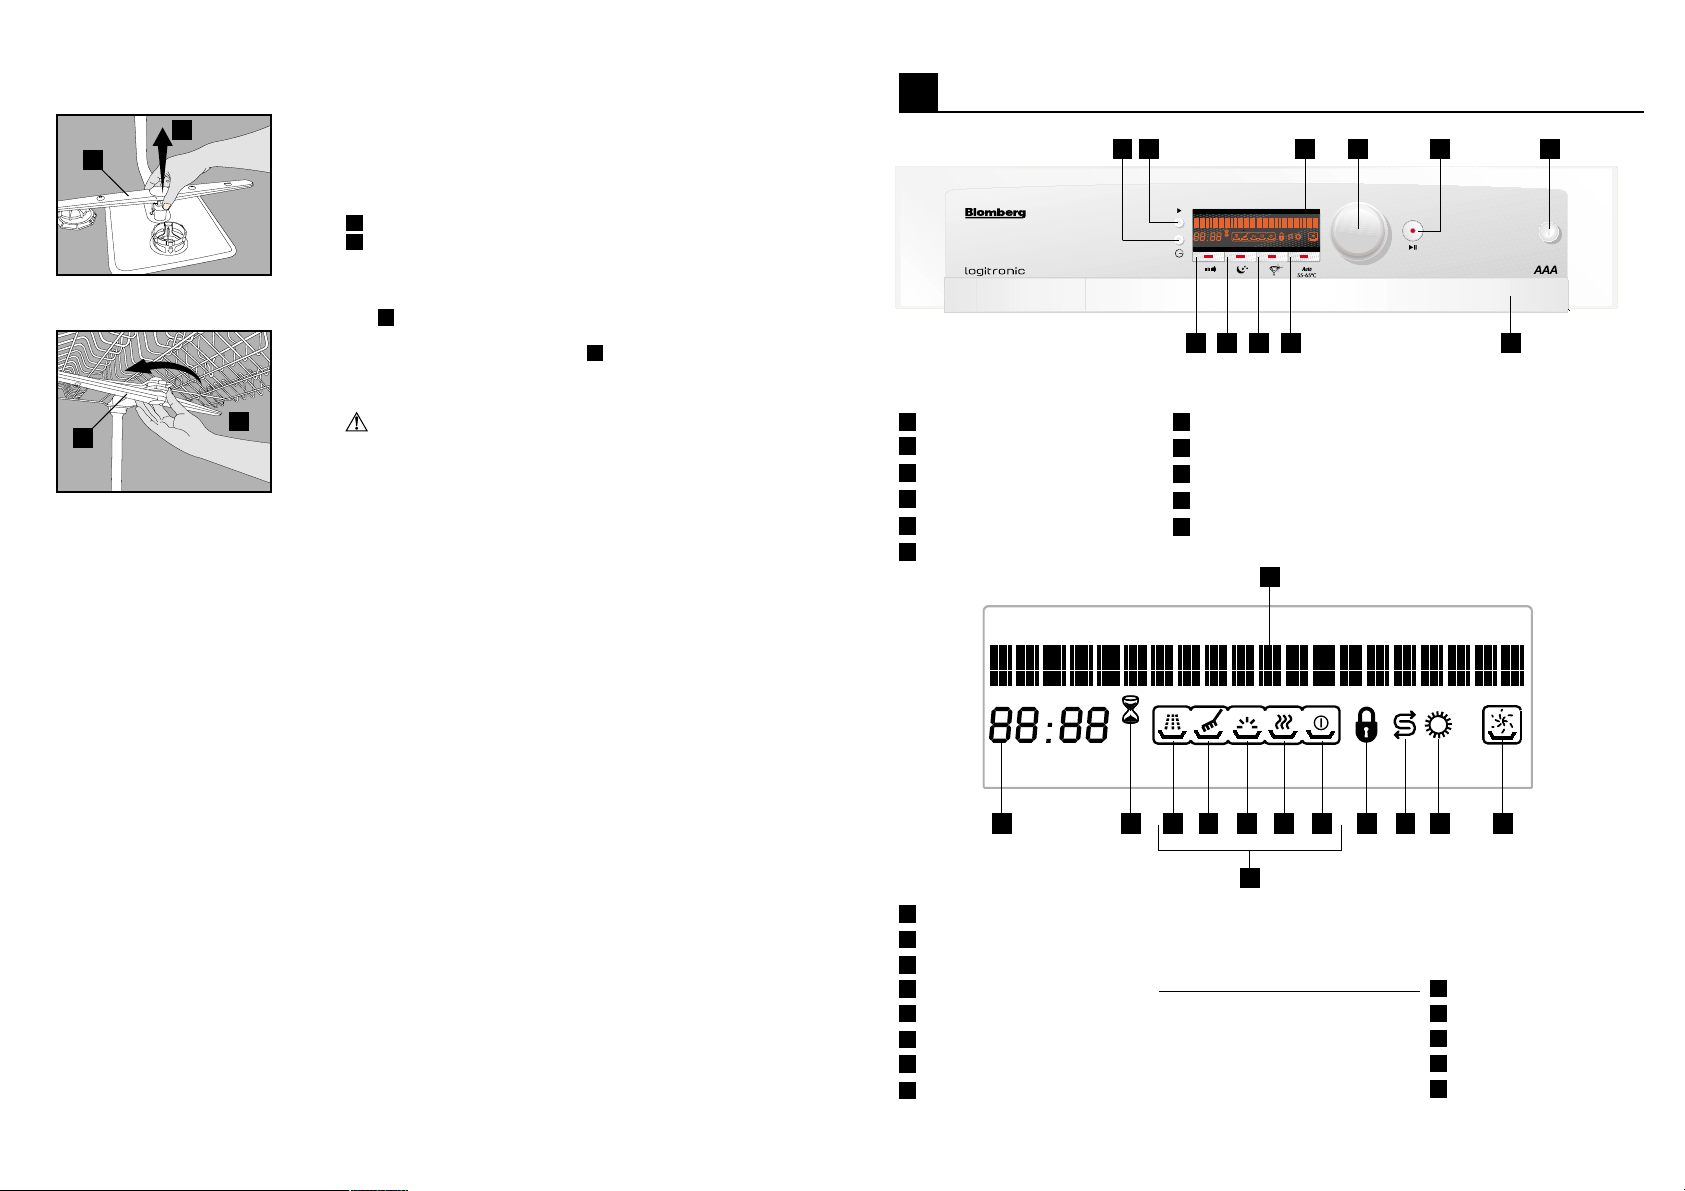
Operating and Setting Your Multifunction Display
8
A
1
B
2
Cleaning the spray arms
Dirt or calcium residue may block the nozzles on the
spray arms. For this reason, regularly check the spray
nozzles.
1
Lower spray arm
2
Upper spray arm
1. Remove the lower basket from the machine.
2. Pull off the lower spray arm in an upward direction
A
( ).
3. Loosen the fastening screw of the upper spray arm
and pull off the spray arm ( ).
4. Clean the spray arms under running water.
5. Replace the spray arms.
Warning
Ensure that the fastening screws are screwed tight.
B
Cleaning the filter inset in the water inlet hose
(depending on the model)
Dirt from deposits in the water pipes is prevented by a
filter in the water inlet hose. Check the filter and the water
inlet from time to time.
1.
Close the water tap and unscrew the water inlet hose.
2.
Take out the filter and clean it under running water.
3.
Replace the cleaned filter.
4.
Fasten the water inlet hose to the water tap again.
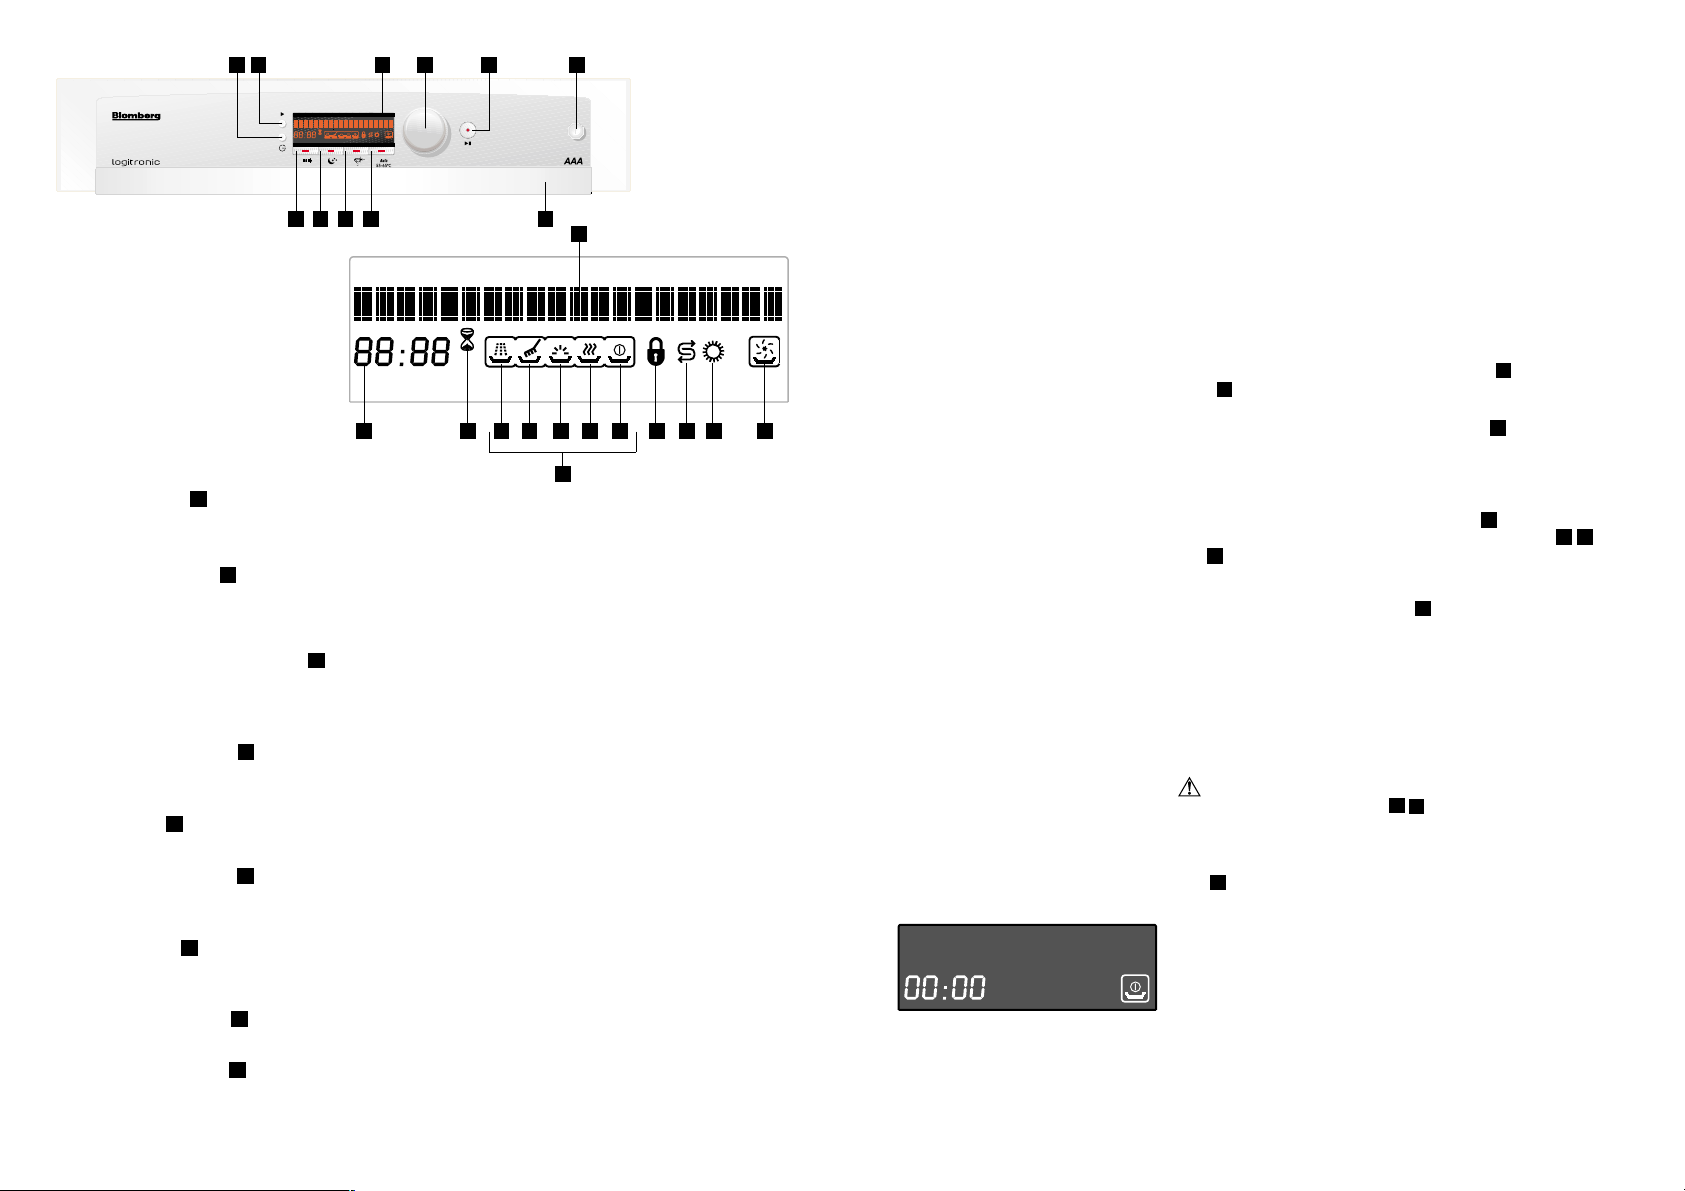
1
On/Off button
2
Start/Stop button
3
Programme selector knob
4
Programme button
5
Time delay button
6
Multifunction display
7
High-speed button
8
Night button
9
Crystal dry button
10
Autosense button
11
Handle
12
12
12345 6
117 8 9 10
15
13 14 a 16
13 14 a 16
12
Text line in display
13
Display of remaining time / time delay
14
Time delay active indicator
15
Progress indicators
16
Child lock indicator
17
Salt indicator
18
Rinse agent indicator
19
Indicator for variable motor performance
(mix wash programme)
15
15
17
17
18 19b c d e
18 19b c d e
a
Pre-wash
b
Wash
c
Rinse
d
Dry
e
End
16
Page 3
12345 6
Using Your Dishwasher
Turn on the water tap and plug in the appliance.
n
Open the door and load the dishwasher. Check that
117 8 9 10
12
n
both the upper and lower sprayer arms can move
freely.
Add the appropriate amount of detergent to the
n
dispenser and close the door.
Use the On/Off button to switch the appliance on.
n
Function buttons
On/Off Button
1
13 14 a 16
15
17
18 19b c d e
Use this button to turn your dishwasher on and off... When switching on the dishwasher, the
last programme selected is shown in the multifunction display.
Start/Stop Button
2
You use this button to start the selected programme. The light on the button will come on.
Use the Start / Stop button to Stop the programme if you would like to open the door while
the dishwasher is running.
Programme Selector Knob
3
Use the programme selector knob to select the desired programme; its name will then be
shown in the multifunction display. The programme selector knob can also be used to set
the desired time delay and setting.
Programme Button
4
Use this button to access the Settings programme and the various menu items belonging
to it.
Time Delay
5
This button allows you to delay the start time of a programme by up to 24 hours.
High-Speed Button
7
This option allows you to shorten the selected programme; the dishwasher then uses higher
water pressure and consumes less energy and water.
Night Button
8
You can use this option to lower the noise level of the selected programme; the appliance
then uses less water pressure. This setting can also be used for more delicate items.
Crystal Dry Button
9
This option allows you to add additional drying for crystal-clear results.
Autosense Button
10
You can use this button to select the autosense programme. This programme adjusts the
cleaning temperature, time, and water and energy consumption to suit the level of soiling.
End
Check the control indicators for salt ( ) and rinse aid
n
18
( ). Refill salt and rinse aid if required.
Use the programme selector knob ( ) to select your
n
17
3
washing programme as shown in the programme table
(see page 25). The programme selector knob can be
turned both clockwise and counter clockwise.
The time remaining on the selected programme is
shown in the multifunction display .
If required, you can use the option buttons ( &
-
9
) to adjust the washing programme to suit your
13
7 8
needs.
Use the Start/Stop button to start the programme.
n
2
Important
Avoid opening the door during the washing process.
This interrupts the washing process, and hot steam
will escape. Close the door to continue the
programme.
When the washing programme has finished, the
n
multifunction display shows End and the
d
corresponding symbol lights up; the remaining
15
time indicator now shows 00:00.
Shut off the appliance by pressing the On/Off button
n
.
1
Close the water tap and unplug the device from
n
!
the mains.
Allow your dishes to cool for 15 minutes with the door
n
open. Unload the dishes, starting with the lower basket.
17
18
Page 4
19
Bio 55°C
Programme selection
After you have switched the appliance on, use the programme
selector knob to select the desired programme according
to the level of soiling, or simply select the autosense program
function . Use the Start/Stop button to start the programme
shown in the multifunction display.
The time remaining on the selected programme is shown in
the multifunction display . The programme duration may
vary according to the room temperature, tap water
temperature, and the amount of dishes. The remaining run
time may therefore adjust itself as the programme runs.
10
3
2
13
Option Buttons
The various wash programs are intended for varying amounts
of soiling and crockery, as well as for different types of
crockery. You can use the option buttons to adapt the
programs to suit different requirements. Doing this can save
you time, money, and electricity. For instance:
Use the High-Speed button to shorten the selected
programme if your dishes are only slightly soiled. Selecting
this option means, for example, that the dishwasher then
uses higher water pressure and consumes approx. 25 %
less water and electricity.
- Use the Night button if you would like to wash your
dishes at night, whether you want to take advantage of
night-time power rates or you simply want to clean dishes
first thing in the morning. This lowers the water pressure
used, producing less noise and consuming less electricity.
You can also use this function if you would like to wash
more fragile items.
The following table shows which options are available for
each programme. If a particular option is not available for
the programme selected, this is indicated in the multifunction
display.
Programme
Pre-wash
Mini 35°C
Delicate 40
Economy 50
Bio 55
°C
Intensive 70
Hygiene+ 70
Mix
Auto 55
°C - 65°C
°C
°C
°C
°C
High-Speed Night Crystal dry
= Not available = Available
7
8
Options Available
ûû û
ûû
ü
üüü
ûû û
üüü
üüü
ûû û
üüü
ûû û
To add an option to the programme:
1. Use the programme selector knob to select a
programme, or use button to select the autosense
10
3
programme.
2. Use the option buttons , and to select the desired
7
9
8
option. The LED indicator for the appropriate button and the
corresponding symbol in the display light up.
3. Use the Start/Stop button to start the programme.
The High-Speed and Night options cannot be selected at
the same time because they cancel each other out. Only
the last selected option is activated. This can be seen on
the buttons LED indicator and by the symbol shown in the
display.
Pressing the option button again cancels the selection and
the respective symbols light goes out.
Time Delay
The Time Delay button allows you to delay the start time of
a programme by up to 24 hours. This is only possible if the
programme has not yet started.
Use the programme selector knob to select the desired
programme or choose the autosense programme .
Press the Time Delay button .The symbol for the activated
time delay , the hourglass, briefly lights up in the
14
multifunction display.
You can now use the programme selector knob to select
the desired time delay which is shown in display . The
programme selector knob can be turned both clockwise and
counter clockwise.
Use the Start/Stop button to activate the time delay. The
2
time remaining and the hourglass are shown in the
multifunction display until the programme begins. Once the
time set has been reached, the selected programme starts
automatically; the display will then show the time remaining
on the programme.
You can still change the time delay once the time
delay function has been activated:
To do this, first press the Start/Stop button . If you do
not do this, the multifunction display will show "Time delay
active" and changes cannot be made. Pressing the
Start/Stop button deactivates the time delay function.
Now press the Time Delay button , then turn the
programme selector knob either counter clockwise or
3
clockwise to shorten or to extend the time delay. Press
the Start/Stop button to reactivate the time delay.
3
5
5
10
3
13
2
20
Page 5

Child Lock
The programme can be locked while the appliance is
running.
Activate the child lock by pressing the programme button
4
and the time delay button simultaneously for approx.
3 seconds. The corresponding symbol will be shown
in the multifunction display.
Repeat the procedure to turn off the child lock. This
locking mechanism is automatically deactivated when
the programme finishes. The symbol light will then go
out.
The lock does not lock the door, but simply prevents
the programme from being changed.
5
16
Changing the Programme
If you wish to change a programme or an option while
the time delay is active or once the programme has
started, press the Start/Stop button . This deactivates
the time delay. You can now use the programme selector
3
knob to select another programme or option. Use the
Start/Stop button to start the new programme. However,
the new programme will continue from the point at which
the previous programme was stopped. Options can be
changed only during active time delay, not while a
programme is running.
2
Programme Progress Display
The multifunction display will show you the stage the
current programme has reached. The status indicators
15
use the symbols - to indicate which programme
stages have already been started and completed. Only
those programme sections which have been completed
are shown.
The selected programme is only completed when the
symbol lights up, the time remaining is shown as
"00:00", and the multifunction display shows "End".
Additionally, the dishwasher plays a 2-minute melody
when the programme is completed (unless you have shut
off this option; Volume = 0). This signal stops when the
door is opened or any button (except the Start/Stop button)
is pressed.
In the case of the Mini 30' programme, the dishes are
dried by their own residual heat and the drying status
indicator does not light up. The programme is finished
only when the indicators described above appear in the
multifunction display.
15
e
a
e
Salt and rinse aid indicators
When the indicators for salt and rinse aid light up,
the respective reservoirs must be refilled.
17
18
Cancelling a Programme
To interrupt a programme or a time delay, press the
Start/Stop button for approx. 5 seconds. The button
indicator begins to blink, and the multifunction display
shows "End programme". Once the cancellation process
has been completed, the display shows "End". If you now
wish to select a new programme or function, it will start
at the beginning and not at the stage in the programme
at which the previous programme was stopped.
Depending on when you stopped the wash programme,
there may still be detergent or rinse aid on the dishes.
21
2
Check end filter
No water !
Call service
Warnings
The dishwasher can display various warnings during the
wash cycle.
Remove the filter and clean it under running water. After
replacing the filter, start the programme again.
1. Check whether the water supply has been cut off.
2. Check whether the water tap is turned on.
3. If the water supply has not been cut off and the water
tap was not accidentally turned off, please call customer
service.
If this indicator is shown on the multifunction display,
please call customer service (the required information is
shown in the warranty documentation).
22
Page 6

Programme (main menu)
Pre-wash
Mini 30' 35°C
Delicate 40°C
Economy 50°C
Bio 55°C
Intensive 70°C
Hygiene+ 70°C
Mix wash
Settings
Settings
Language
Language : German
Menu structure
Languages (sub-menu)
Turkish
Settings (sub-menu)
Language
Water hardness
Volume
Brightness
Contrast
Melody
Factory settings
1
0
1
0
1
Factory settings?
4
4
7
15
3
English
German
French
Italian
Spanish
Danish
Dutch
Swedish
Norwegian
Settings
You can use the Settings programme to select the
language, the water hardness, the signal noise level, the
brightness, the contrast, and the signal melody, or to
reset the dishwasher back to the factory (default) settings.
Calling up the Settings programme:
1. Use the On/Off button to turn the device on.
2. Turn the programme selector knob until Settings is
shown in the multifunction display.
3. To access the programme, press the programme button
4
.
4. To exit the programme, press the time delay button .
When you have reached the Settings menu item:
1. Press the programme selector knob until the desired
menu item (language, water hardness, volume,
brightness, contrast, or melody) is shown.
2. Use the programme button to access the appropriate
sub-menu.
3. In the sub-menu, turn the programme selector knob
3
until the desired setting/selection appears.
4. Press the programme button to confirm this setting.
5. Use the Time Delay button to exit the programme.
1
3
3
4
4
5
You can use the Language programme to select one of
nine languages in addition to German: Turkish, English,
French, Italian, Spanish, Danish, Dutch, Swedish or
Norwegian.
Use the Water Hardness programme to set the
dishwasher to one of four degrees of water hardness
1 very soft, 2 soft, 3 medium and 4 - hard. For
perfect cleaning and drying results, the dishwasher must
be set to the proper water hardness for your location. To
do this, please also read Softening Water (page 6).
Use the Volume programme to select one of five different
sound levels for the signal at the end of the washing
programme: 0 - off, 1 very quiet, 2 - quiet, 3 medium
and 4 - loud.
Use the Brightness programme to set the brightness of
the multifunction display within a range of 1 - 9.
Use the Contrast programme to set the contrast of the
multifunction display within a range of 0-15.
Use the Melody programme to choose one of three
different melodies to signal the end of the washing
programme.
Factory Settings
Use the Factory Settings programme to set the
dishwasher back to its factory settings:
1. Using the programme selector knob , select "Factory
3
Settings" in the Settings sub-menu.
2. To access the programme, press the programme button
.
4
3. Press the programme button to confirm that you
5
want to set all settings back to the factory settings.
4. Press Time Delay to exit the programme.
5
4
The factory settings are:
language = English, water hardness = 3, volume = 3,
brightness = 7, contrast = 5 and melody = 3.
23
24
Page 7

PROGRAMME TABLE
Programme
Programme number
Programme name
Cleaning temperature
Suitable for
Degree of soiling
Detergents
A=25 cm³ / 15 cm³
B=5 cm³
Programme sequence
(without options)
Pre-wash
Mini programme EconomyDelicate programme
12 3
Pre-wash
-
Used dishes
which are to be
washed at a
later time
-
Do not use
washing-up
liquid
Pre-wash
End
Mini
35°C
Dessert
and coffee dishes
with food leftovers
which are not
dried on
Few
A
35
°C wash
Cold rinse
Rinse
Dry
End
Delicate
40
°C
Glasses,
dessert
and coffee dishes
with food leftovers
which are not
dried on
Few
A A+B
Pre-wash
40
°C Wash
Cold rinse
Rinse
Dry
End
4 Reference
Economy
50
°C
Normally dirty
dishes with starchy
food leftovers
which are not
dried-on
medium
Pre-wash
50
°C Wash
Cold rinse
Rinse
Dry
End
Bio programme
**
5
Bio
5
5
°C
Normally-soiled
dishes with
food leftovers
which are not
dried on
medium
A+B A+B
Pre-wash
55°C
Wash
Cold rinse
Rinse
Dry
End
Intensive programme Mix wash programme
67
Intensive Hygiene
7
0
°C
Heavily soiled
dirty dishes with
dried-on food
leftovers
high
45°C
Pre-wash
70°C
Wash
Cold rinse
45
°C
Rinse
Rinse
Dry
End
Hygiene
programme
+
7
0
°C
Dishes with
particularly
stubborn dried-on
food leftovers;
dishes which
need to be
cleaned at
particularly high
temperatures
with an unusual
amount of heat
high
A+B
Prewash
50°C
70°C
Wash
Cold rinse
50°C
Rinse
Rinse
Dry
End
8
Mix wash
7
0
°C
Delicate items,
such as drinking
glasses, in the
top basket; pots
and pans in the lower
basket for more
intensive cleaning
medium
A+B
Prewash
70°C
Wash
Cold rinse
Rinse
Dry
End
Autosense
programme
9
Autosense
55
°C-
6
5
°C
Normally-soiled
dishes with
dried-on food
leftovers
medium to high
A
The programme
sequence is
adjusted to the
amount of soiling
Duration (min)
Water (I)
Energy (kWh)
Options
Wash temperatures (
Duration (min)
Water (I)
Energy (kWh)
The consumption values shown in the table were determined under standard conditions. Differences may therefore occur
under practical conditions.
**
Reference programme for testing institutes
The tests in accordance with EN 50242 must be carried out with a full water softener salt dispenser and a full rinse aid
reservoir, and using the test programme.
15
4
-
--
°C)
-
30
10.4
0.70
Crystal
35-65
41
10.4
0.93
dry
High-
40-60
54
10.2
0.91
73
13.4
0.88
Speed
45-60
85
12.8
0.92
Night
40-65
Crystal
dry
82
13.4
0.98
53°C-60
25
163
9
1.05
°C
High-
55-65
77
10.2
1.20
13.4
1.19
Speed
60-65
122
13.0
1.27
103
Night
High-
Crystal
dry
55-65
70-68 70-68 70-68
109
99
13.4
15.0
1.19
1.65
131
18.8
1.73
speed
159
18.6
2.10
Night
Crystal
136
18.8
1.73
dry
High-
97
15.2
1.62
132
18.6
1.77
Speed
160
17.6
2.00
Night
Crystal
137
18.6
1.77
124
17.8
1.87
--
70-70 70-70 70-70
--
112-160
10.2-19.6
1.18-1.60
dry
26
Page 8

Troubleshooting:
9
What to do if the dishwasher will not run
Check that the mains plug is properly connected.
n
Are all fuses working?
n
Is the water supply fully turned on?
n
Is the dishwasher door closed firmly?
n
Have you pressed the On/Off button?
n
Is the filter on the water intake and dishwasher
n
clogged?
The cleaning results are unsatisfactory
The dishes are not clean
Possible Causes
- Improper loading
- Wrong programme selection
- Sprayer arms are not turning
- Clogged strainers
- Strainers are not placed in their
proper positions
- Sprayer arm nozzles are clogged
- Overloaded baskets
- Detergent Cleaning agent is moist
or clumping
- Too little detergent
Solutions
-
Load the dishwasher as suggested in the directions.
-
Select a programme which washes at a higher temperature
or takes longer.
-
Check that the sprayer arms can move freely.
-
Clean all strainers and filters as described in the manual.
-
Check that all strainers and filters are placed in their proper
positions.
-
Clean the sprayer arms as described in the manual.
-
Clean the sprayer arms as described in the manual.
-
Store detergents in a dry location. Close the lid of the
container carefully.
-
Increase the amount of detergent as per the programme
table.
-
Increase the amount of rinse aid / refill the rinse aid dispenser.
-
Always ensure that you close the detergent dispenser lid
after adding the detergent.
-
Cutlery of this type is not suitable for washing in dishwashers.
27
- Too little rinse aid
- The lid of the detergent dispenser
remained open.
- Using cutlery with a low-quality
coating
28
Page 9

Possible Causes
-
Improper loading
-
Too little rinse aid
-
Dishes are removed too soon
-
Wrong programme selection
-
Using cutlery with a low-quality
coating
The dishes are not drying
Solutions
-
Load the dishwasher as suggested in the directions.
-
Increase the amount of rinse aid / refill the rinse aid dispenser.
-
Do not empty your dishwasher immediately after washing.
Open the door slightly so that the steam can escape. Begin
unloading the dishwasher only once the dishes are barely
warm to the touch. Empty the lower basket first. This prevents
water from dripping off dishes in the upper basket.
-
In short programmes the washing temperature is lower. This
also lowers cleaning performance. Choose a programme
with a longer washing time.
-
Water drainage is more difficult with these items. Cutlery or
dishes of this type are not suitable for washing in the
dishwasher.
- The correct water hardness has
not been selected; too little salt is
being used.
- Salt loss
Possible Causes
- Smell of new appliance
- Strainers are dirty
- Dishes standing in the appliance for
several days without being washed
- Check the values set against the values given by your local
water board.
- Check that the lid of the salt dispenser is firmly closed. Use
the funnel to pour in special salt. Begin the pre-wash
programme immediately after filling up the salt. Once the
programme is complete, check whether the lid has come
loose.
Odour
Solutions
- The smell of a new appliance disappears after a few wash
cycles.
- Clean all strainers and filters as described in the manual
- Remove heavy soiling under running water and run the
pre-wash programme without any detergent every 2 days.
Close the door to prevent odours from developing.
Possible Causes
- Wrong programme selection
- Detergent is moist or clumping
- Using cutlery with a low-quality
coating
Possible Causes
- Too little rinse aid
29
Tea, coffee, or other stains
Solutions
- Select a programme which washes at a higher temperature
or takes longer.
- Bleaches in cleaners lose their efficacy when stored under
unfavourable conditions. Store detergents in a dry location.
Close the lid of the container carefully
- Cleaning of these items is made difficult by their surface
structure. Cutlery or dishes of this type are not suitable for
washing in the dishwasher.
Calcium streaks or a
cloudy appearance
Solutions
- Increase the amount of rinse aid / refill the rinse aid dispenser.
Possible Causes
- Excessive use of detergent when
water hardness is low, cleaning
temperature is too high
Possible Causes
- The lid of the salt dispenser is not
closing properly.
Milky appearance or shiny blue
deposits on glassware
(glass corrosion)
Solutions
- Choose a programme with a low temperature and add a
smaller amount of detergent. Check the values set against
the values provided by your local water board
Rust stains, surface
damage
Solutions
- Salt can destroy metal surfaces and cause rust damage.
- Check that the lid of the salt dispenser is firmly closed. Use
the funnel to pour in special salt. Begin the pre-wash
programme immediately after filling up the salt. Once the
programme has finished, check whether the lid has come
loose.
30
Page 10

- Food leftovers are staying left on
the dishes for too long.
- The device is not properly
grounded.
- Cutlery made of low-grade
stainless steel.
- Crockery with rust stains
- Remove heavy soiling under running water and run the prewash programme without any detergent every 2 days.
- Check that the appliance is grounded properly. Static
electricity may eat holes into metal and cause irreparable
damage.
- Rust on such items cannot be avoided. Cutlery or dishes of
this type are not suitable for washing in the dishwasher.
- Rusty dishes may infect other items. Cutlery or dishes of
this type are not suitable for use in dishwashers.
Possible Causes
- Paling of Decoration on glassware
and porcelain
Paling of Decoration
Solutions
- Glassware, porcelain and cutlery of this type are not suitable
for washing in the dishwasher.
Scratched Dishes
Possible Causes
- Moisture in the detergent
dispenser
- Detergent stays in the dispenser
too long
- The lid of the detergent dispenser
does not open.
- Detergent is moist or clumping
- Sprayer arm nozzles are clogged.
Detergent residue
remains in the dispenser
Solutions
- Ensure that the detergent dispenser is dry before filling it.
- Add the detergent immediately before washing.
- When loading the dishwasher, take care to ensure that you
do not accidentally open the lid.
- Store detergents in a dry location. Close the lid of the
container carefully
- Clean the sprayer arms as described in the manual
Possible Causes
- Items made of aluminium
- The lid of the salt dispenser is not
closing properly.
- The water hardness has not been
correctly selected; too little salt is
being used
- Detergents are being stored under
unfavourable conditions
- Overloaded baskets
Solutions
- Dishes and cutlery of this type are not suitable for washing
in dishwashers.
- Check whether the lid of the salt dispenser is firmly closed.
Use the funnel to pour in special salt. Begin the pre-wash
programme immediately after adding salt. Once the
programme has finished, check whether the lid has come
loose.
- Check the values set against the values provided by your
local water board.
- Detergents should not be stored longer than 2 months.
Store detergents in a dry location. Close the lid of the
container carefully.
- Take care to ensure that individual glasses and dishes do
not touch each other. They may knock against each other
during the washing process, causing scratches.
31
32
Page 11

Possible Causes
- Improper loading
- Overloaded baskets
Possible Causes
- The dishes were pre-washed by
hand with a large amount of
detergent
- Rinse aid has accidentally leaked
into the appliance
- The cover of the rinse aid
dispenser was not closed.
Dishes Break
Solutions
- Load the dishwasher as suggested in the directions.
- Do not overload the dish baskets. Dishes may knock against
each other and break.
Foam
Solutions
- Dishes do not need to be pre-washed. Heavy soiling may
be removed with a dishcloth or under running water.
- If rinse aid has been spilled during refilling, wipe up the
excess using a paper towel or sponge.
- Always take care to ensure that the lid is closed after refilling
the clear rinse aid dispenser.
10
Technical Specifications
Load capacity 12
Permitted water pressure 0,3 10 bar (= 3 100 N/cm²
Electrical connection 230 Volts, 10 Amps
Output 2000 W
Heat output 1800 W
Because we continually strive to improve our products,
we may change our specifications and designs without
prior notice.
This device corresponds to the following EU directives:
73/23/EC Low Voltage Directive
89/336/EC EMV Directive
93/68/EC CE Marking Directive
DIN EN 50242 Electrical dishwasher
11
Directions for Assembly
= 0,01-1,0Mpa)
(see type plate)
for home use
Testing procedures for
practical service conditions
Safety notes for installation
Prior to installing and using your appliance, please check
it for possible transit damage.
If the appliance is damaged, please contact your supplier.
Never install or use a damaged appliance.
The following directions must be followed to connect the
dishwasher properly.
Possible Causes
- Clogged strainers
- Drain hose bent. Relief hose
blocked or bent.
33
Water remains inside the
appliance after the rinse cycle
Solutions
- Clean all strainers and filters as described in the manual
- Ensure that the relief hose is properly installed.
Before operating your dishwasher, please ensure that
the information on the type plate corresponds to the
current and voltage of your power supply.
The appliance may only be connected using a properly
grounded socket. Ensure that the appliance is grounded
according to regulations.
The grounded socket must be easily accessible and
close to the appliance.
Do not use extension cables or multiple adapters, as
this can lead to overheating, which can be a fire hazard.
Hardwiring may only be carried out by a qualified
electrician.
Check the power cable, the water inlet hose and the
drainage hose. Damaged parts may only be replaced
by customer service personnel or by a qualified
electrical service expert.
34
Page 12

Installing Your Dishwasher
Choose a suitable location for your dishwasher. Take
care to ensure that the appliance is stable on a level
surface.
Unevenness in the floor can be equalised by adjusting
the screw feet. When the appliance is standing correctly,
the door can be closed without difficulty.
Water inlet and drainage hoses must be positioned so
that they can move freely without bending or squeezing.
The appliance may not be installed in a room where
the temperature is below 0° Celsius.
3/4
min 10
AQUASAFE+
AQUASAFE+ (some models)
The Aquasafe+ System protects against water damage
which may be caused at the water inlet hose.
Do not immerse the systems valve box into water; it
contains electrical components.
In case of damage, pull out the power supply plug.
Do not shorten or lengthen the hose insert as it contains
electrical cables and components.
Water drainage
3/4
3/4
3/4
min 10
1/2
CH
DK
S
N
SF
Water connection
The dishwasher may be connected to cold and warm
water to a maximum temperature of 60° Celsius.
The dishwasher may not be connected to open warm
water devices or flow-through water heaters.
Permitted water pressure:
Lowest permitted
water pressure:
0.3 bars = 3 N/cm² = 30 kPa
Highest permitted
water pressure:
10 bar = 100N/cm² = 1MPa
Connect water inlet hose
Ensure that the water inlet hose is not bent or squeezed.
Do not install a used hose set.
Use a screw-on hose connector to connect the water
inlet hose to a water tap with a ¾ inch external thread.
If required, use a filter insert to filter deposits from the
pipes.
Check that the connection does not leak.
Important
For safety reasons, turn off the tap after every rinse
process.
When the water pressure is
below1 bar, please contact your
technician.
When the water pressure is above
10 bars, a pressure reduction valve
must be installed (available in trade
supply stores).
21
min 4cm
18
max 110 cm
12cm
min 50 cm
Connecting the drainage hose.
Take care to ensure that the drainage hose is not bent
or squeezed.
Check that the drainage hose is firmly seated.
Extension hoses
If a hose extension is required, a drainage hose of equal
quality must be used.
The maximum length must not exceed 4m. Using a longer
hose will produce poorer cleaning results
Siphon connection
The drainage height must be between 50 and 100 cm
above the floor.
Use hose clamps to fasten the drainage hose to the
siphon.
01020 30 40 50 60 70 80 90 100 110
Electrical connection
Please refer to the type plate for information on current
type, mains voltage, and fuse protection.
The type plate is located on the inside of the door.
The mains plug must be freely accessible after installation.
Power cables and insulated cables must not be accessible
(exposed) after installation.
35
36
Page 13

12
Service
If your appliance ever malfunctions, check the notes
and advice given in the operating manual.
If this does not fix the problem, our customer service
staff are available to assist you.
37
38
 Loading...