

Page 1
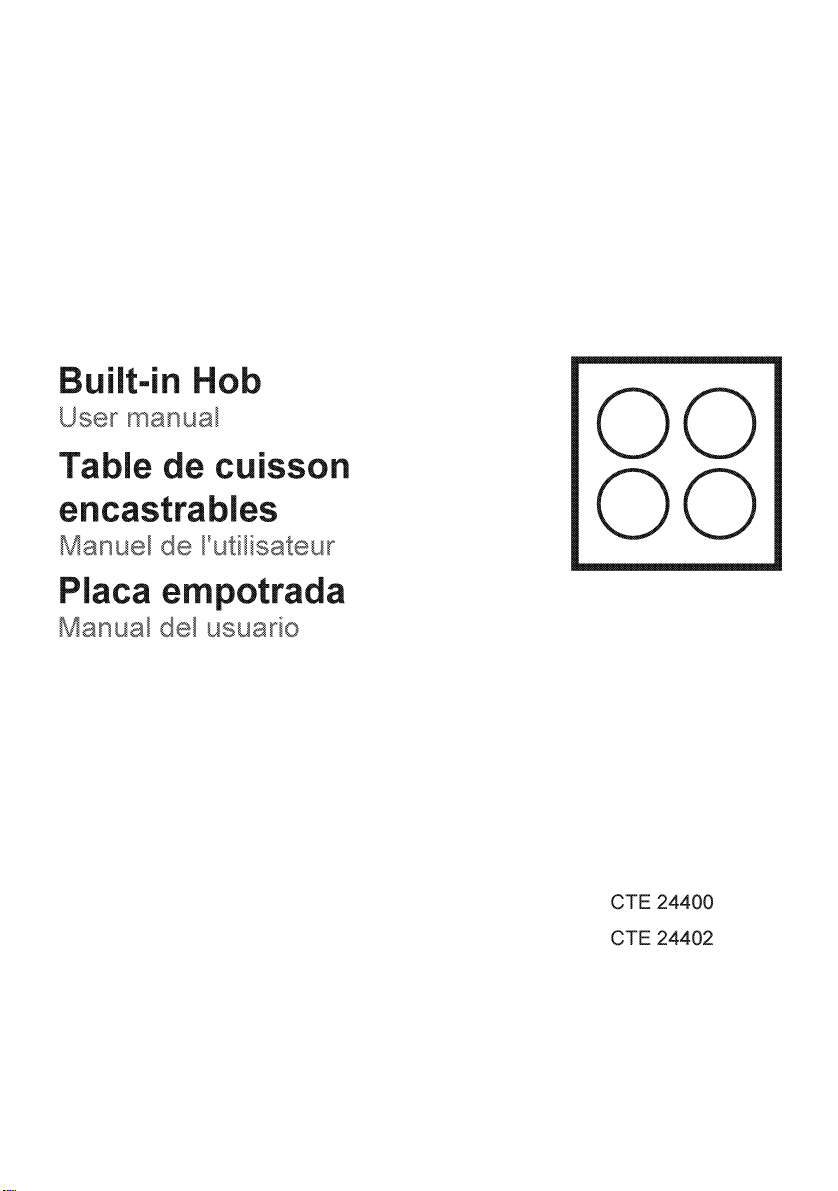
Built-in Hob
User manual
Table de
cuisson
00
encastrables
Manuel de l!utilisateur
Placa empotrada
Manual del usuario
00
CTE 24400
CTE 24402
Page 2
A WARNING:
exactly,
personal injury or death.
This
appliance
outdoor or other
Statement
a fire or explosion may result causing property damage,
is
of
Limited Warranty. If you have any questions, contact the manufacturer.
If
the information
intended for normal household use
non-household uses (including sea or air-going vessels). See the
in
this manual
only.
is
not followed
It
is
not approved for
Do not repair or
in
this manual. Refer
replace any part
all
servicing
of
the appliance unless specifically recommended
to
a factory authorized service center.
Explanation of symbols
Throughout this User Manual the following symbols are used:
m Important information or useful hints about usage.
~
Warning for hazardous situations with regard to life and property.
& Warning for electric shock.
& Warning for risk
~Warning
for hot surfaces.
of
fire.
Page 3
Please read these instructions before
installation or using your appliance!
Dear Customer,
We would like you to obtain best performance with your product that has been
in
manufactured
procedures.
Therefore, we advise you to read through this user
your product and keep it for future reference.
someone
modern facilities and passed through strict quality control
manual carefully before using
If
you hand over the product to
else, deliver the user manual
as
well.
The user manual will help you use the product
00
IMPORTANT:
Save
these
instructions
for
the
local
electrical
in
a fast and safe
inspectors
way.
use.
The instructions will help you to operate the appliance
quickly and safely.
• Upon delivery, please check that the appliance
transport damage,
connect and operate the
Before you connect and start using the appliance, please read this manual and
•
all
enclosed documents. Please note
• Keep
• When you pass on the appliance to another person, please provide
•
all
documents so that you can refer to the information again later on.
Please keep your receipt for any repairs which may be required under warranty.
documents including original date of purchasing. Warranty
is
product
If
you should decide not to use this appliance any longer (or decide to substitute
an
older model), before disposing
inoperative
protection regulations, ensuring
parts be made
old appliances. Remove the door and the warming drawer before disposal to
prevent entrapment.
sold second hand.
in
please contact your point
appliance!
an
appropriate manner
in
harmless, especially
in
particular the safety instructions.
of
it,
it
in
accordance to health and environmental
particular that
in
relation to children who could play with
is
not damaged.
of
sale immediately and
is
recommended that it be made
all
potentially hazardous
If
you note any
is
not valid if the
all
do
not
Page 4
Table of Contents
1
IMPORTANT
_IN_S_T_R_U_C_T_IO_N_S
Basic safety instructions . . . . . . . . . . . . 5
Additional safety information . . . . . . . . . 7
Personal Safety . . . . . . . . . . . . . . . . . . . 8
Safety for children . . . . . . . . . . . . . . . . 1 0
when working with electricity. . . 1 0
Safety
Intended
Disposal
Packaging material . . . . . . . . . . . . . . . 1 0
Future transportation . . . . . . . . . . . . . .
use . . . . . . . . . . . . . . . . . . . . 1 0
. . . . . . . . . . . . . . . . . . . . . . . 1 0
_______
5 General information on cooking
11
4
HOW
Tips for glass ceramic burner/plate . . . 20
How to use burners/plates
Switching the plate on . . . . . . . . . . . . . 22
Switching the
5 MAINTENANCE
General information . . . . . . . . . . . . . . . 23
How to
Cleaning the control panel . . . . . . . . . . 24
TO USE THE HOB 20
......
.........
plate off. . . . . . . . . . . . . 22
AND
clean the burner/plate
CARE23
.......
20
21
23
2 INSTALLATION
----------------
Before installation . . . . . . . . . . . . . . . . 12 Overview . . . . . . . . . . . . . . . . . . . . . . . 25
Installation and connection . . . . . . . . . 12 Technical Data. . . . . . . . . . . . . . . . . . . 26
Important notes to the consumer
Important Notes to the Installer . . . . . . 12
Product Dimensions and Cutout
Requirements · · · · · · · · · · · · · · · · · · · 13 Electrical equipment . . . . . . . . . . . . . . 27
Connection to the mains supply. . . . . . 16
3-Wire branch circuit
4-Wire branch circuit . . . . . . . . . . . . . . 18 for Blomberg
..............
12 6 GENERAL INFORMATION
.....
12 Burners
........................
7 TROUBLESHOOTING 27
17 WARRANTY STATEMENT
25
26
28
3 PREPARATION 19
Tips for saving energy . . . . . . . . . . . . . 19
Initial operation . . . . . . . . . . . . . . . . . . 19
First
cleaning
of
the appliance . . . . . . . 19
Page 5
n IMPORTANT INSTRUCTIONS
}his
se~tion
1nstruct1ons
avoid risk of injury and damage.
All
warranties will become
void if you
instructions.
contains safety
that will help you
do
not follow these
Basic safety instructions
• This appliance can be
used by
from 8 years and above
and persons with reduced
physical, sensory or mental
capabilities
~xperience
1f
they have been given
supervision or instruction
concerning use of the
appliance
understand the hazards
involved.
Children shall
the
user maintenance
be made by
supervision.
Proper installation
• Only connect the product
a grounded outlet/line with
the
as specified
specifications". Have the
grounding
by a
while
or without a transformer.
company shall not be liable
for any problems arising due
to
the product not being
children aged
or lack of
and knowledge
in
a safe way and
not play with
appliance. Cleaning and
shall not
children without
to
voltage and protection
in
the "Technical
installation made
qualified electrician
using the product with
Our
earthed
the
local regulations.
•
If
the power connection
cable for the product
is
damaged,
be
replaced by the
manufacturer, its service
agent or
persons
hazard.
User servicing
• Do not repair or replace any
part of the
specifically
in
the manual.
servicing
to
a qualified technician.
• The appliance must be
installed so that
completely disconnected
from the network. The
separation must be provided
either by a mains
or a switch built into the
fixed
according
regulations.
•
During installation,
maintenance, cleaning and
repair, the unit must
be completely separated
from the power
this
or turn
switch.
• Danger of
store items on the cooking
surfaces. Unattended
electrical installation
purpose pull out the plug
in
accordance with
it
must
similary qualified
in
order
appliance unless
recommended
should be referred
to
1t
off from the mains
fire!
to
avoid a
All
other
it
can be
plug,
constructio~
always
supply. For
Do not
51®>
Page 6
cooking on a hob with fat or
oil can be dangerous and
may
result
to
extinguish a fire with water,
but switch off the
and then cover flame e.g.
with a
•
Do not use steam cleaners
to
clean the appliance as this
may cause
• Electric shock!
is
cracked, switch off the
appliance
possibility of electric shock.
Wear proper
•
Loose-fitting or hanging
garments
be word
appliance.
Storage
• Flammable materials should
not be stored
near surface units.
Do Not Use Water on Grease
Fires
• Smother fire or flame or use
dry
chemical or foam-type
extinguisher
Use
Only Dry Potholders
Moist or damp potholders
•
on hot surfaces may result
burns from steam. Do not let
potholder
elements. Do not use a towel
or other bulky cloth.
Use Proper Pan Size
• This appliance
with one or more surface
units of different size.
utensils
large enough
in
fire. NEVER try
appliance
lid or a fire blanket.
an
electric shock
If
the surface
to
avoid the
apparel
should never
while using the
in
or
on
Appliance
in
an
oven or
touch hot heating
is
equipped
Select
hav-ing flat bottoms
to
cover the
surface unit heating element.
The use of undersized utensils will expose a portion
of the heating
direct contact and may
result
Proper relationship of utensil
to
efficiency.
Never Leave Surface Units
Unattended at High Heat
Settings
• Boil over causes smoking
and greasy
may ignite.
Make
Drip
•
Absence of these pans or
bowls during cooking may
subject wiring or components
. underneath
Protective Liners
• Do not use aluminum foil
line surface unit drip bowls
or oven bottoms, except as
suggested
Improper installation
liners may result
electric shock, or fire.
Glazed Cooking Utensils
• Only
in
glass/ceramic,
earthenware, or other
utensils
rangebreaking due
change
Utensil Handles Should Be
Turned
Over Adjacent Surface Units
in
ignition
burner will also improve
Sure Reflector Pans or
Bowls Are
certain types of glass,
are suitable for
top
in
Inward and Not Extend
element
of
spill-overs that
in
Place
to
damage.
in
the manual.
in
ce-ramic,
service without
to
the sudden
temperature.
61®
to
clothing.
to
of these
a risk of
glazed
Page 7
•
To
reduce the risk of burns,
ignition of
materials,
to
unintentional contact with
the
utensil, the handle of a
utensil should be positioned
so that it
and does not extend over
adjacent surface units.
Do Not Soak Removable
Heating Elements
• Heating elements should
never be immersed
Do not Cook on Broken
Cook-Top
•
If
cook-top should break,
cleaning solutions and
spillovers may penetrate
the broken cooktop and
create a risk of
shock. Contact a qualified
technician immediately.
Clean Cook-Top With Caution
•
If
a wet sponge or cloth
used
cooking area, be
avoid steam burn. Some
cleaners can produce
noxious fumes
hot surface.
flammable
and spillage due
is
turned inward,
in
electric
to
wipe spills on a hot
careful
if
applied
water.
is
to
to
a
Additional safety
information
• Never wash down the
product with water! There
the risk of electric shock!
• Never use the product
when your judgment or
coordination
the use of
drugs.
is
impaired by
alcohol and/or
is
•
Be careful when using
alcoholic drinks
dishes.
at high temperatures and
may cause fire since it can
ignite when
contact with hot surfaces.
• Do not place any flammable
materials close
product as the sides may
become hot during use.
• Keep
clear
• Make sure that the product
function knobs are switched
off after every use.
• Vapour pressure that build
up due
the hob surface or at the
bottom of the pot can cause
the pot
make sure that the oven
surface and bottom of the
pots are
• The instructions for hobs
shall state that the appliance
is
not intended
operated by means of an
external timer or separate
remote-control system.
• Never use when judgment
or coordination
by the use of
drugs.
• Do not operate the appliance
if it
visible damage.
• Do not heat closed food
containers and
Pressure that may
71
®>
Alcohol evaporates
all
ventilation slots
of obstructions.
to
the moisture on
to
move. Therefore,
always
is
defective or shows any
in
your
it
comes into
to
the
dry.
to
be
is
impaired
alcohol and/or
glass jars.
build-
Page 8
up
in
the jar can cause it
burst.
• Keep appliance area clear
and free from combustible
materials, gasoline,
other
• Do not leave empty pots
or pans on
switched on. They might get
damaged.
• Since it may be hot,
leave plastic or aluminum
dishes on the surface of
appliance. These kind of
dishes
keep food either.
• The manufacturer declines
all
persons or damage
property caused by incorrect
or improper use
appliance.
•
Check that
the
off after use.
00
the authorized service for
installation of the appliance
to
procedure, guarantee period
will be started.
flammable vapors.
plates that are
should not be used
liability for injury
all
controls on
appliance are switched
IMPORTANT: call
be used. After this
of
and
to
the
do
to
to
not
Personal Safety
To
reduce the risk of injury
to persons,
a grease fire, observe the
following:
•
Do not place any items
above the
in
the event of
appliance that
children may reach
• The packaging materials will
be dangerous for children.
Keep the packaging
materials away from children.
Please
the packaging according
environmental standards.
• Grease
should be handled carefully.
•
Do not use water on grease
fires.
• Never pick up a flaming pan.
Smother sheet or
to
• Flaming grease outside of
utensil can be extin-guished
with baking soda
available, a multipur-pose
dry chemical or foam type
extinguisher.
• Let fat cool before
attempting
• Wipe up spill over
immediately.
•
If
you are "flaming" liquors
or other spirits under
exhaust, turn the fan off. The
draft
to
•
Never leave the surface
area unattended at high
heat setting.
smoking and greasy
over, which may ignite.
dispose of
is
flammable and
or,
to
handle
could cause the flames
spread out of control.
Boil over cause
CAUTION: Do not allow
aluminum foil, plastic,
or
cloth
with a hot Surface. Do not
allow pans
to
come
to
boil
in
for.
all
parts of
flat tray.
if
it.
an
spill
paper
contact
dry.
to
sl®
Page 9
• Be careful
If
the flames
immediately, evacuate and
call the fire department.
• Always have a working
smoke detector near the
kitchen.
• Leave the hood ventilator on
when
if
there
flames.
Use an extinguisher only if
•
You
know you have a Class
ABC extinguisher, and you
already know
it.
• The fire
contained
it
started.
• The fire department
called.
•
You
can fight the fire with
your back
• Never use water on cooking
fires.
•
In
the event that personal
clothing
and
roll
extinguish flames.
To
reduce the risk of burn
injuries during cooktop use,
observe the following:
• Never use the cooktop
warm or heat a room.
• Children or pets should not
be
left alone or unattended
in
an
are
in
be
allowed
to
prevent burns.
do
not go out
flambeing food only
is
smoke without
how
to
operate
is
small and
in
the area where
is
being
to
an
exit.
catches fire, drop
immediately
area where appliances
use. They should never
to
sit or stand on
to
to
any part of the
CAUTION:Do
items of interest
in
cabinets above a range or
on the backguard of a range;
children climbing on the
range
be seriously injured.
• DO NOT TOUCH SURFACE
UNITS OR AREAS
UNITS. Surface areas
may become hot enough
to
elements may be hot even
though they are dark
During and after use,
not touch or let flammable
materials
elements until they have had
time
When using the cooktop
installed over oven
• Do not touch heating
elements or interior surfaces
of oven. Heating
may be hot even though
they are dark
surfaces of
hot enough
During and after use,
touch, or
flammable materials contact
heating
surfaces of oven
have had sufficient time
cool. Other surfaces of the
appliance may become hot
enough
among these surfaces are
(identification of surfaces
- for
91
®>
to
reach items could
cause burns. Surface
contact heating
to
cool.
elements or interior
to
example, oven vent
appliance.
not store
to
children
NEAR
in
do
elements
in
color. Interior
an
oven become
to
cause burns.
do
let clothing or other
until they
cause burns -
color.
not
to
Page 10
openings and sur-faces near
these openings, oven doors,
and windows of oven doors).
•
To
minimize the possibility of
burns, ignition of
materials
handle of a container should
be turned toward the center
of the cooktop without
extending over any nearby
surface units.
• Use only certain types
of
glass, heatproof
glass ceramic, ceramic,
earthenware, or other
utensils
cooktop use.
and spillage, the
that are suitable for
flammable
glazed
Safety for children
• The packaging materials will
be dangerous for children.
Keep the packaging
materials away from children.
Please
the packaging according
environmental standards.
dispose of
all
parts of
to
Safety when working
with electricity
Defective electric equipment
is
one of the major causes of
house fires.
• Any
•
work
equipment and systems
may
authorized
In
case of any damage,
switch off the
disconnect
supply by removing the fuse
or switching off the circuit
on electric
only be carried out by
qualified persons.
appliance and
it
from the main
breaker.
• Ensure that the fuse rating
correct.
• Do not operate the appliance
barefooted.
• Never touch the appliance
with wet hands or feet.
• Do not soak removable
heating elements. Heating
elements should never be
immersed
in
water.
Intended use
The appliance
domestic use
use
is
not admissible.
This appliance
purposes
used for other purposes.
Never Use Your Appliance for
Warming or Heating the Room
The manufacturer shall not
held liable for any damage
be
caused by improper use or
handling errors.
Service life of your product
1 0 years. Manufacturer shall
provide the required spare parts
for the product
defined during this period.
only.
is
designed
only.
Commercial
is
for cooking
It
must not be
to
perform as
Disposal
Packaging material
& DANGER: Risk
the
(i.e.
10
of suffocation by
packaging materials!
Packing elements
bags, polystyrene foam,
nails, packing straps, etc.)
should not be left around
I®
is
for.
is
plastic
Page 11
within easy reach of children,
as these may cause serious
injuries.
The packaging
transport
materials that are not harmful
the environment. Please dispose
all
of
according
standards. This
the environment.
locks are made from
parts of the packaging
material and
to
environmental
is
beneficial
to
to
Future transportation
Do not carry out cleaning or
maintenance operations on
appliance without having
the
previously disconnected
the
electric power supply.
it
from
m NOTICE: Do not place
other items on the
appliance. The appliance
must be transported upright.
Store the
box
and transport the appliance
in
its original carton. Follow the
guidance marks that are printed
on the carton.
appliance's original
top
of the
00
IMPORTANT:
Verify the general
appearance of your
equipment by identifying
possible damage during the
transportation.
If you do not have the
original carton
Pack the appliance
wrap or thick cardboard
it
and tape
to
prevent damage during
transportation.
securely
in
bubble
in
order
11
I~
Page 12
fJ
INSTALLATION
m IMPORTANT: Save for the
local electrical inspector's use.
of
bottom
cabinet.
Installation and connection
Before installation
The hob
commercial worktop. A safety distance
must be
the kitchen
(values
•
•
•
•
•
•
•
•
•
is
designed for installation
left between the appliance and
walls and furniture. See figure
in
mm).
It
can also be used
position.
750 mm above the hob surface.
(*)
above the cooker, refer to cooker hood
manufacturer' instructions regarding
installation height (min 650 mm)
Remove packaging
transport
Surfaces, synthetic laminates and
adhesives used must be heat resistant
(1
00
The worktop must be
fixed
Cut aperture for the hob
per installation dimensions.
Observe
ordinances.
Write down the
numbers before installing the cook
top. Both numbers are on the box.
serial rating plate located on bottom of
cooktop box.
To
reaching over heated surface units,
cabinet storage space
the surface units
he cabinet storage
the risk can be reduced by
range hood that projects
minimum of
Allow a minimum distance of
If
a cooker hood
locks.
ac
minimum).
horizontally.
all
governing codes and
eliminate the risk
5" (12,7
in
a free standing
is
to be installed
materials and
aligned and
model and serial
of
burns by
located above
should be avoided.
is
to be provided,
em)
in
a
in
worktop
installing a
horizontally a
beyond the
m IMPORTANT:
the appliance next to refrigerators
or freezers. The heat emitted by the
appliance will lead to
energy consumption
appliances.
For installation the appliance must be
•
in
connected
electrical regulations.
accordance with
Important notes to
the consumer
Keep this manual for future reference.
•
If
the information
followed exactly, a fire or explosion
may result
• Do not store or use gasoline or other
flammable vapors and liquids
vicinity
in
personal injury or death.
of
this or any other appliance.
You can be killed or
seriously injured if you
as
don•t IMMEDIATELY follow
instructions.
Important Notes
to the
Read manual before installing the range.
Observe
ordinances.
Be sure to
consumer.
Be sure your range
grounded
If
or service technician.
Installer
all
governing codes and
leave these instructions with the
properly by a qualified installer
an
of
cooling
in
this manual
is
installed and
Do
not install
increased
all
is
in
the
local
not
121®
Page 13
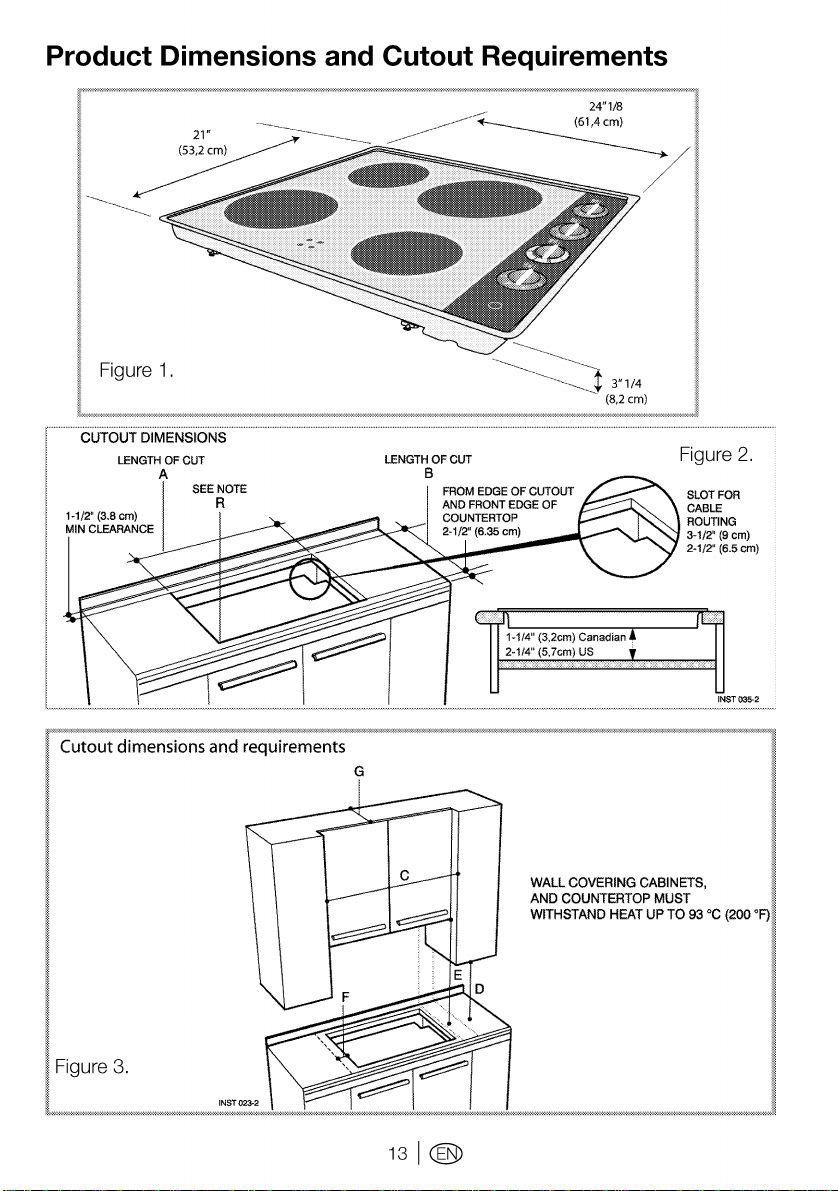
Product Dimensions and Cutout Requirements
24"1/8
~
/
Figure
CUTOUT DIMENSIONS
H/2"
(3.8
MIN
CLEARANCE
LENGTH
em)
A
1.
OF
CUT
SEE
NOTE
R
Cutout dimensions and requirements
G
LENGTH
~3"1/4
OF
CUT
B
e.i<\ll f[>"
1-1/4" (3,2cm)
2-1/4" (5,7cm) US y
WALL COVERING CABINETS,
AND COUNTERTOP MUST
WITH~ANDH~TUPT093~(~·
(8,2cm)
Canadian+
Figure
SLOT
FOR
CABLE
ROUTING
3-1/2' (9
em)
2-112' (6.5 em)
INST035-2
2.
Figure 3.
131~
Page 14
CUTOUT A B
WIDTH
24"-1/8 22"-5/8 19"-1/2 24"-1/8
(61
,4 em) (57,5 em) (49,4 em)
22"-6/8 19"-5/8
(58 em) (49,8 em)
IMPORTANT
Under the cooktop it
partition, spaced at
of
the appliance as shown
is
necessary to install a
least 15 mm. from the bottom
in
figure
3.
(61
c
,4 em)
D E F
18"(45,7
em) min
Height from
countertop note*) from cutout overhead
to
nearest Clearance to side wall cabinets
cabinet on from on the
either side countertop and right
unit to the unit
of
*NOTE
24"
(61
cabinets
flame retardant millboard covered with no less than No.
MSG sheet steel 0.015" (0.04 em) stainless steel,
28
0.024" (0.06 em) aluminum or 0.020" (0.05cm) copper.
24"1/8
platform and bottom
cabinet
24"-1/8 2"
(61
,4 em)
min. (see
unprotected
overhead
surface
em) min. clearance if bottom
is
protected by not less than 1/4" (0.6 em)
(61
,4 em) min. clearance between top
of
unprotected wood or metal
(5
em) 13" (33 em)
min. Depth
Clearenca unprotected
left
of
of
wood or metal
of
cooking
G
of
or
Important Preparation
Suggestions
1 . Chamfer
decorative laminate
damage from chipping.
2.
Radius corners
Insure smooth edges and prevent
corner cracking. Recommend
1/4"or3/8"diameter
corner.
3.
Rough edges, inside corners
have not been rounded and forced
fits can contribute
countertop
This cooktop has been designed with
wide
tolerances of cut-out to cover
possible replacement with other
brands. We recommend to that you
consider the minimum dimension
of cut-.out size
Installation. Some cut out sizes for
possible replacements:
Dim. Inches em
24" 22"
ail
exposed edges
of
cutout and file
to
laminate.
in
the case of
-6/8
X 19"
-5/8
to
prevent
drill
in
cracking
58 X 49,8
of
each
which
new
of
to
the
Cooktop Installation
m IMPORTANT: Excessive
Weight Hazard
Use
two
or more people
cooktop. Failure
other
injury.
to
to
do
so can result
move and install
in
back or
m IMPORTANT: Cut Hazard
Beware of sharp edges. Use the polystyrene
ends when carrying the product. Failure
caution could result
•
Always
in
minor injury or cuts.
consult the countertop
manufacturerfor specific instructions.
• Ensure the countertop
and
level and ensure no structural
is
square
members interfere with space
requirements.
• Prepare the cut -out according
instructions (see cut -out dimensions).
• Make sure the wall coverings,
countertop and cabinets around the
cooktop can withstand heat (up
200
°F
I 93 °C).
to
to
to
use
the
141®
Page 15
1 . Remove packaging materials and
literatUre package from the cooktop
before beginning
Installation Manual from literature
pack and read them carefully before
you begin.
2.
Place a
counter top. Lay the cooktop upside
down onto the protected surface.
3.
In
apply the sealing gasket provided
the package to the edges of base
cover of the
towel
hobs whose edges are framed,
Installation. Remove
or table cloth onto the
appliance from below.
4. Clamp brackets
clamp the cooktop to the countertop.
Tighten screws just enough to
brackets
into cutout. Tighten screws
Connect
housing
* min 20 & max.40 mm
#min.
50 mm
1.
in
Hob
2.
Screw
3.
Fixing clamp
4.
Screw
5.
Worktop
6.
Sealing gasket
7.
Dividing shelf
are
in
place when cooktop
it
to the holes
as
indicated
(small)
(large)
provided to
securely.
in
the lower
in
the figure.
hold
is
put
00
IMPORTANT:Turnthe
4.
Insert the cooktop centered into the thumbscrew until it touches the bottom of
cutout opening. Make sure the front
edge of the counter top
the cooktop. Make
required clearances
is
parallel to
final check that
are
met.
all
m IMPORTANT: Clamping
to different holes
terms of safety since it can damage the
151~
is
not a good practice
in
Page 16
gas and electrical system.
00
IMPORTANT:when
installing the hob above a cupboard, a
shelf
as
in
dividing
installed.
be
oven this
If,
for example, due to the fitting
appliance above a drawer, the underside
of the
covered by a wooden
is
appliance
Connection
the above picture must
If
installing above a built-in
not required
of
is
touchable, it must be
plate.
to
the
the
mains supply
00
IMPORTANT:This
appliance must be properly grounded
to avoid shock hazard!
Our company shall not held responsible
for any damage caused by using the
appliance without grounded receptacle.
This hob must be electrically grounded
in
accordance with local codes,
their absence, with the National Electrical
Code ANSI/NFPA No. 70-latest edition
United States.
Installation should
electrician.
& DANGER:
shock, short circuit or fire by damage
of the main power
The main power supply lead must not be
clamped, bent or trapped or come into
contact with hot parts
If
the main power cable
it
must be replaced by a qualified
electrician.
be made by a Licensed
Riskofelectric
supply!
of
the appliance.
is
or
damaged,
in
in
& DANGER: Disconnect
power before servicing the product.
Failure to do so could result
or
electrical shock.
in
death
161®
• The mains supply data must
correspond to the data specified
plate
of
on the rating
The rating plate
of
housing
•
The appliance mains cable must
correspond to the specifications
and the power consumption; see
Technical specifications.
the appliance.
the appliance.
is
located at the rear
& DANGER: Before starting
any work on the
disconnect the product from the
mains
There
supply.
is
the risk of electric shock!
electrical installation,
m IMPORTANT: Electrical
installation should comply
national and local codes.
This cooktop does not require a
connection.
completely enclosed
cooktop cable through the open-ing
cabinet. Make the
following the appropriate steps for
installation. Your cooktop must be
your
connected to the proper
and frequency
the right.
Connect with copper wire only
If
house has aluminum wiring, follow the
procedure
1 . Connect th aluminum wiring
to the copper wire by using
special connectors designed and
Underwriters Laboratories-listed
for joining copper to
Follow
manufacturer's recommended
procedure.
2.
Aluminum/copper connection
must conform with
industry-accepted wiring practices.
flexible conduit (supplied) 3 feet
The
long
(1
of
the cooktop bottom box should be
If
the cooktop
in
electrical connection
as
specified
below:
the electrical connector
local codes and
00 em) located at the right rear
with
neutral
is
to be
a cabinet, feed the
in
electrical voltage
in
the table on
aluminum.
the
Page 17
connected directly to junction box. Do not
U.L-
or
GSA-
cut the conduit. A
conduit connector must be provided at
each end
the cooktop and at the junction box.)
A time
recommended. Do not ground to a gas
pipe.
or
neutral circuit. Fuse both supply
U2.!lase)
of
the power supply cable
delay fuse or circuit breaker
Do
not have a fuse
lines.
in
listed
(at
is
the grounding
W IMPORTANT: Improper
connection of aluminum house wiring
to the copper
serious
National
Fire
Bat-ter/march
leads can result
problem.
Protection
Park
Association
Quincy,
Massachusetts 02269
A three-wire, single phase, 240 Volt 60
cycle elec-trical
protected to meet Local Codes
No.70) must be provided. Unit must
properly grounded
be
with
local wiring code. The chart below
recommends the minimum circuit
protector and wire size if the
is
the only unit on the circuit.
sizes
of
wire are used, the unit efficiency
will be reduced and a fire hazard may be
created.
wiring and hookup be accomplished by a
competent
Be
sure
It
your
installed
technician.
recommend a qualified
authorized
does
not
If
the
cooktop
enclosed
cable
through
net.
Make
following
system (properly circuit
in
accordance
is
advisable that the electrical
electrician.
and
Ask
appliance
grounded
your
is
properly
by a qualified
dealer
technician
repair
service.
require a neutral
Is
to
In
a cabinet,
the
opening
the
electrical
the
appropriate
This
be
completely
feed
connection
steps
connection.
installation.
in
of
NFPA
appli-ance
If
smaller
to
or
cooktop
the
cooktop
in
the
cabi-
for
a
an
your
the power has been turned off, connect
flexible conduit from the cooktop
the
to the junction box using a U.L.
conduit connector. Figures 13 and 14 and
the instructions provided
the most common way of connecting
the cooktops.
ordinances,
over these instructions.
electrical
codes and ordinances
Your local codes and
of
course, take precedence
Complete
connections according to local
listed
below present
& DANGER: Risk of Electric
Shock,
appliance through a link.
Grounding through the neutral conductor
is
installations (1996 NEG)# mobile
homes#and recreational vehicles, or
in
grounding through the
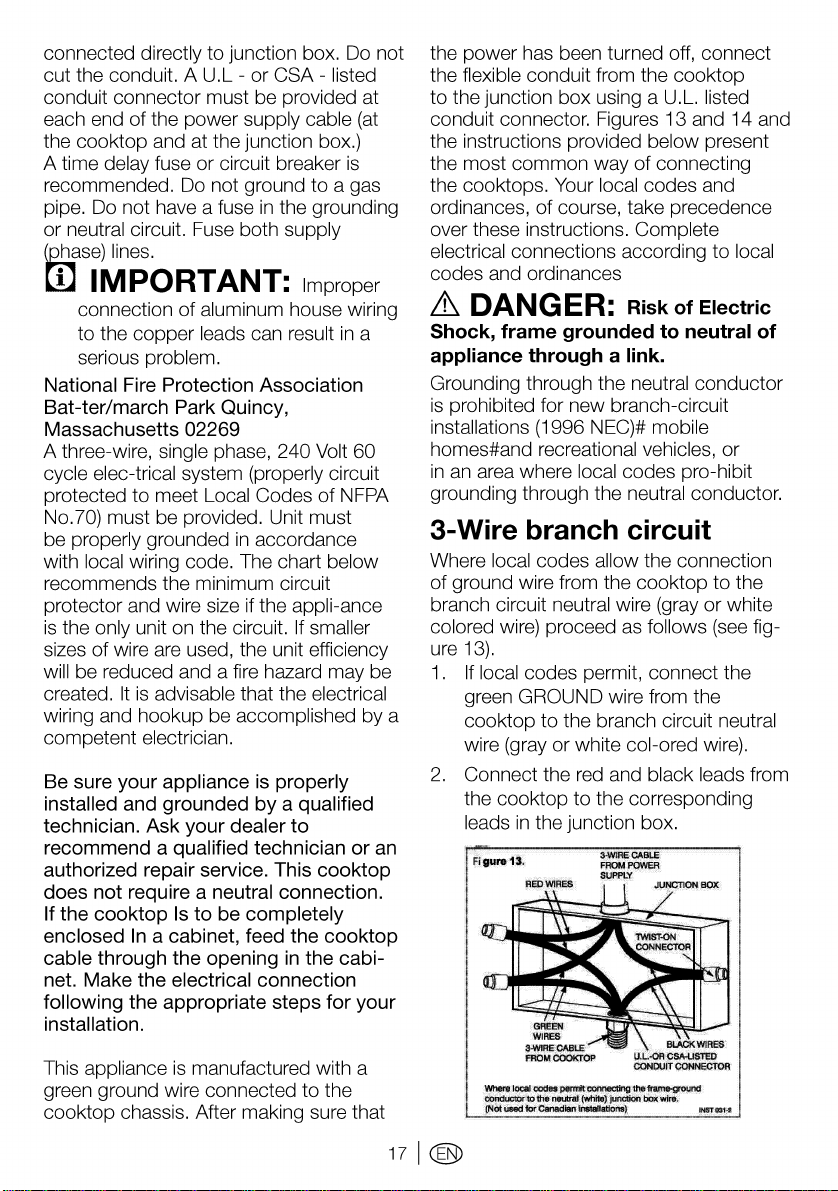
3-Wire branch circuit
Where local codes allow the connection
of
branch circuit
colored wire) proceed as follows (see figure 13).
1 .
2.
frame grounded to neutral of
prohibited for new branch-circuit
an
area where local codes pro-hibit
neutral conductor.
ground wire from the cooktop to the
neutral wire (gray or white
If
local codes permit, connect the
green GROUND wire from the
cooktop to the branch circuit
wire (gray or white col-ored wire).
Connect the red and black leads from
the cooktop to the corresponding
leads
in
the junction box.
neutral
This appliance
green ground wire connected to the
cooktop chassis. After making sure that
is
manufactured with a
171~
Page 18
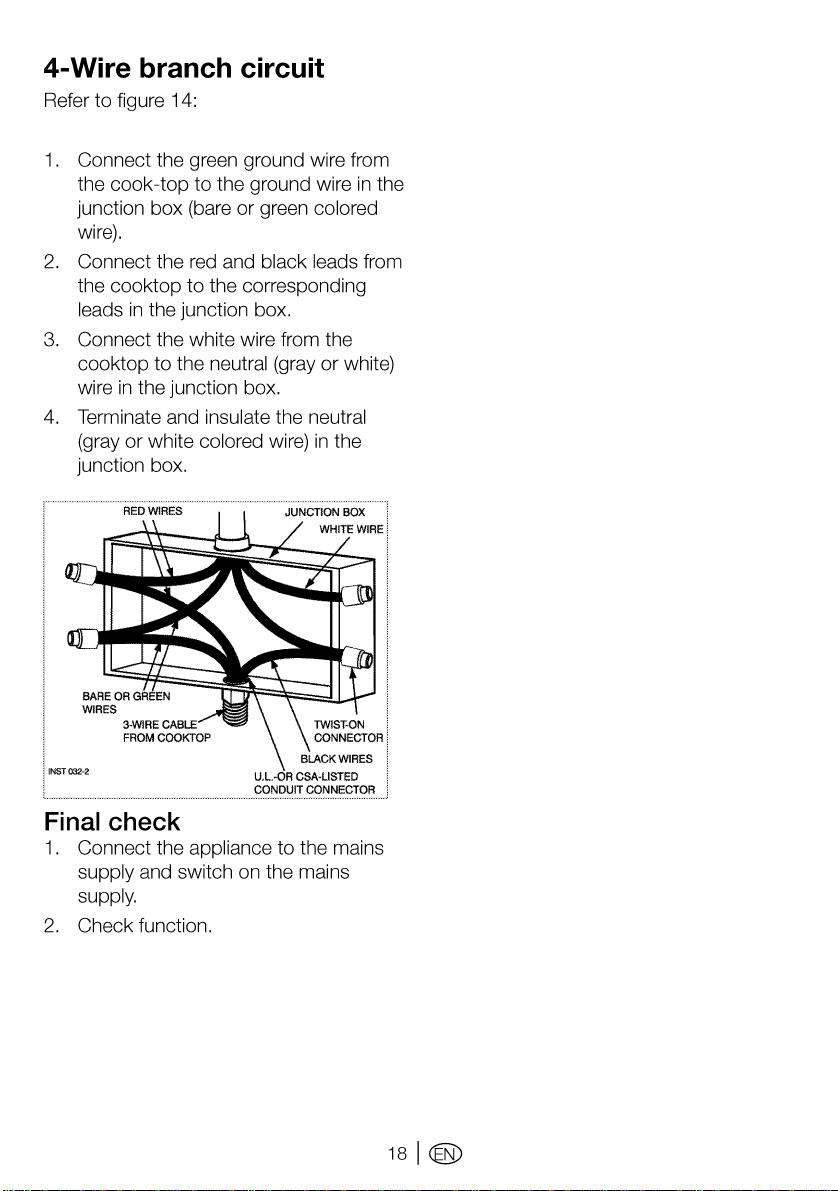
4-Wire branch circuit
Refer to figure 14:
1 . Connect the green ground wire from
the cook-top to the ground wire
junction box (bare or green
wire).
2.
Connect the
red
and black leads from
the cooktop to the corresponding
leads
in
the junction box.
3.
Connect the white wire from the
cooktop to the
wire
in
the junction box.
4.
Terminate and insulate the neutral
neutral (gray or white)
(gray or white colored wire)
junction box.
in
colored
in
the
the
BlACK
INST032-2
U.L..{)R
CONDUIT
WIRES
CSA-USTED
CONNECTOR
Final check
1 . Connect the appliance to the mains
supply and switch on the mains
supply.
2.
Check function.
181®
Page 19
EJ
PREPARATION
Tips for saving energy
The following tips will help you to use
appliance
your
to save energy:
• Defrost frozen dishes before cooking
them.
• Use pots/pans with cover for
cooking.
consumption may increase 4 times.
• Select the burner which
the bottom size
Always select the correct pot size for
your dishes. Larger pots require more
energy.
• Pay attention to use flat bottom pots
when cooking with
Pots with thick bottom
better heat conduction.
obtain energy savings up to
• Vessels
with the cooking zones. Bottom
of the
smaller than the hotplate.
Keep the cooking zones and bottom
•
of the pots
the heat conduction between the
cooking zone and bottom
• For long cookings, turn off the
cooking zone 5 or
the end
obtain energy savings up to
using the
in
an
ecological way and
If
there
is
no cover, energy
is
suitable for
of
the pot to be used.
electric hobs.
will provide a
You
can
1/3.
and pots must be compatible
vessels or pots must not be
clean. Dirt will decrease
of
the pot.
1 0 minutes before
of
cooking time.
residual heat.
You
can
20% by
Initial operation
First cleaning of
the appliance
00
IMPORTANT:when
removing appliance for cleaning and/
or service;
Disconnect
Carefully
outward.
Range
00
get damaged by some detergents or
cleaning materials.
Do not use aggressive detergents,
cleaning powder/cream or any sharp
objects. Be
Some cleaners can produce noxious
fumes if
1 . Remove
2.
Wipe the surfaces
with a damp cloth or sponge and dry
with a
AC power supply.
remove the range by pulling
is
heavy,
use care
NOTICE:The
careful to avoid steam burn.
applied to a hot surface.
all
packaging materials.
cloth.
in
surface might
of
the appliance
handling.
191~
Page 20
IJ
HOW
TO USE THE HOB
General information underneath to damage.
on
cooking Tips for glass ceramic
~
When you heat oil,
unattended.
Never try to extinguish the fire
with water!
immediately cover the pot or pan with a
lid. Switch off the burner/plate if safe to
do so and phone the fire service.
Only use flat bottomed pots or pans.
•
•
•
•
•
•
DANGER: Risk of fire by burner/plate
overheated
Use pans which have sufficient
capacity for the amount of food being
cooked so they don't
cause unnecessary
Do not place lids on the burners.
Always position pans centrally over
the burners. When transferring pans
from one burner to another
the pans do not slide them.
This
appliance
or more surface units
Select utensils having flat
size.
bottoms large enough to cover
the surface unit heating
The use
expose a portion
element to direct contact and may
result
in
relationship
improve efficiency.
also
Never
at high heat settings.
smoking and greasy
may ignite.
Make sure
bowls are
these pans or bowls during cooking
may subject wiring or components
oil!
do
not leave
When
oil
has caught
cleaning.
is
equipped with one
of
undersized utensils will
of
the heating
ignition
leave surface units unattended
of
clothing. Proper
of
utensil to burner will
spillovers that
reflector pans
in
place. Absence
it
fire,
boil over and
always lift
of
different
element.
Boilover causes
or
drip
of
The glass ceramic surface
•
resistant and insensitive to
temperature deviations.
Do not use the
•
plate for keeping objects or
surface.
Do not cook popcorn
aluminum containers on the cooktop.
They
that cannot be removed
Use pot and pans with ground
•
bottoms. Sharp edges cause
scratches on the surface.
Do not use
•
pans.
ceramic surface.
Only certain types
•
ceramic, ceramic earthenware or
other
range-top service without breaking
due to the sudden change
temperature.
Do not cook foods
•
cook-top.
For foods containing sugar
•
form,
soon
to
cool down slightly. Then, while
wearing oven mitts, remove the spills
while
ary
spills are allowed to cool down,
they can adhere to the cook-top and
can cause pitting and permanent
marks.
If
a wet sponge or cloth
•
wipe
careful to avoid steam burn. Some
glass ceramic burner/
could leave aluminum marks
aluminium pots and
Aluminium damages the glass
of
glass, glass/
glazed utensils are suitable for
directly on the
clean up
as
the surface
spills on a hot cooking area, be
all
spills and soils
possible. Allow the cook-top
is
still warm.
is
heat-
large
as
cutting
in
prepackaged
completely.
in
in
any
If
is
used to
as
sug-
201®
Page 21
cleaners can produce noxious fumes
applied to a hot surface. Utensil
if
handles should
not extend over adjacent surface
To
units.
ignition of
spillage due to unintentional contact
with the
utensil should be positioned so that
it
extend over adjacent surface units.
utensil, the handle of a
is
turned inward, and does not
be turned inward and
reduce the risk of burns,
flammable materials, and
Splashes may
damage the
ceramic surface
and can cause
Do not use pots
that have concave
or convex bottoms.
Use pot and
pans with smooth
bottoms. They
ensure a good heat
transfer.
If
the pan
small energy
wasted
& DANGER:
is
too
is
fire.
difficult for children to reach the cooking
pans.
• Ensure handles
accidentally be caught or knocked
do
and
heating zones. Avoid pans that are
unstable and easily tipped. Pans that
are too heavy to move
filled can also be a hazard.
Do not store items of interest to
in
cabinets above a range or on the
backguard of a range.
on the range to reach items could be
seriously injured.
not get hot by adjacent
of
pans cannot
easily when
children
Children climbing
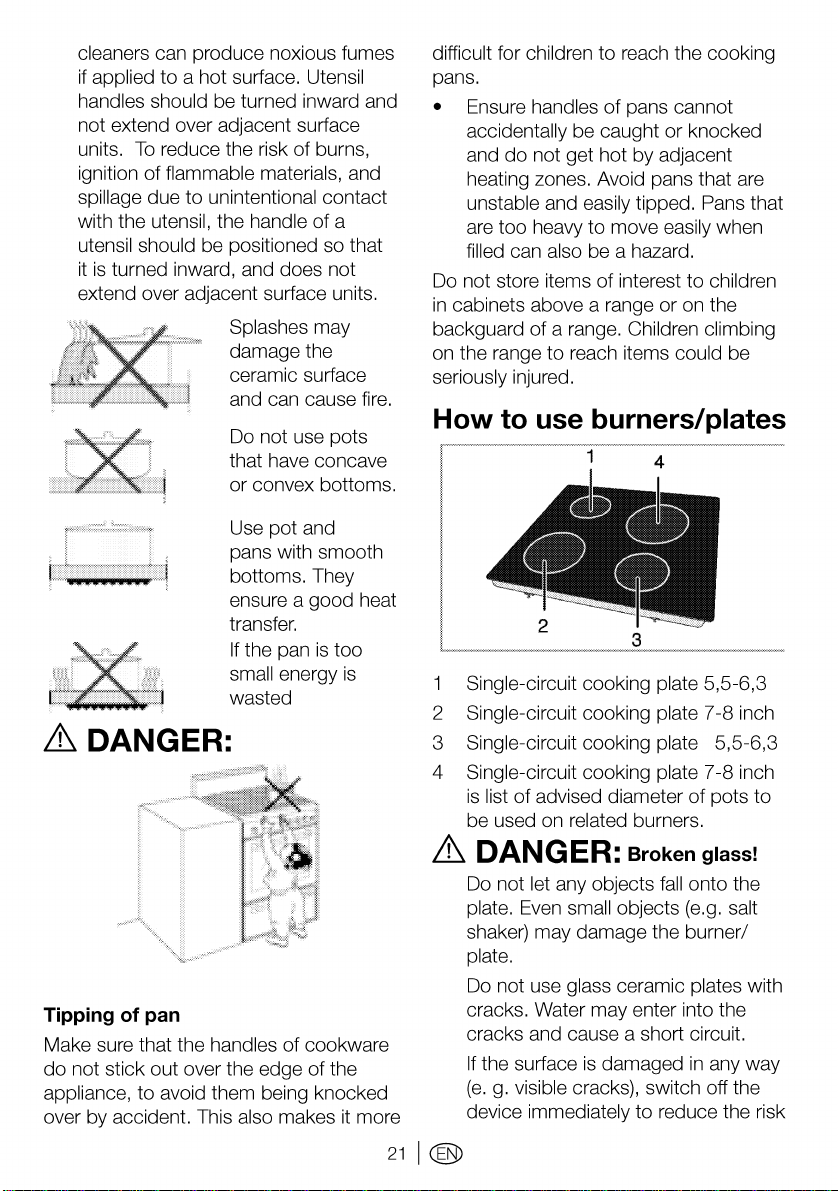
How to use burners/plates
1 4
Single-circuit cooking plate 5,5-6,3
Single-circuit cooking plate 7-8 inch
2
Single-circuit cooking plate 5,5-6,3
3
4
Single-circuit cooking plate 7-8 inch
is
list
of
advised diameter
be used on
related burners.
of
pots to
Tipping
Make sure that the handles of cookware
do not stick out over the edge
appliance, to avoid them being knocked
over by accident. This
of
pan
of
also makes
the
it
more
A DANGER: Broken glass!
Do not let any objects
plate.
Even
small objects (e.g. salt
shaker) may damage the burner/
plate.
Do not use glass ceramic plates with
cracks. Water may enter into the
cracks and cause a short circuit.
If
21
(e.
device
I~
the surface
g.
visible cracks), switch off the
is
damaged
immediately to reduce the risk
fall
onto the
in
any way
Page 22
of
an
electric shock.
If
cooktop should break, cleaning
solutions
penetrate the broken cook-top
and create a risk
Contact a qualified technician
immediately.
The glass ceramic burner/plate
equipped with
residual heat indicator.
residual heat indicator indicates
The
the position of the switched on
and remains illuminated after switching
off. (When the temperature
falls below touchable
indicator
illumination
heat indicator light.
and spillovers may
of
electric shock.
an
operating lamp and a
of
temperature the
light will go
is
off).
Weak flicker
not a problem at residual
is
plate
the plate
OONOTICE:
Quick heating glass-ceramic plates emit
a bright
Do not stare to bright
light when they are switched on.
light.
Switching the plate on
The burner/plate control knobs are used
for operating the
desired cooking power, push down and
turn the
corresponding
Cooking 1 2
level
burner/plate control knobs to the
warming stewing, cooking,
plates.
level.
To
obtain the
3
simmering roasting
Switching the plate off
Turn plate control knob to off position
(top).
221®
Page 23
g MAINTENANCE AND CARE
Always ensure any excess liquid
General information
Service
the
the product
life
of
the product will extend and
possibility of problems will decrease if
is
cleaned at regular intervals.
&. DANGER:
Risk of electric shock!
Switch off the electricity before
cleaning appliance to avoid
electric shock.
£DANGER:
Hot surfaces may cause burns!
Allow the appliance to cool down
clean
before you
it.
an
•
thoroughly wiped off after cleaning
and any spillage
dry.
• Do not use cleaning agents that
contain acid or
stainless or inox surfaces and the
handle. Use a soft cloth with a liquid
detergent (not abrasive) to wipe
those parts
sweep
00
IMPORTANT:
Do not use steam cleaners for
cleaning.
is
immediately wiped
chloride to clean the
clean, paying attention to
in
one direction.
is
& NOTICE:
The surface might get damaged
by some detergents or
materials.
Do not use aggressive detergents,
cleaning powder/cream
objects. Be
burn.
noxious fumes if
surface.
Do not use harsh abrasive
or sharp metal scrapers to clean
the oven door glass since they can
scratch the surface, which may
in
shattering of the glass
Clean
•
each use.
possible to remove cooking residues
more
burning the next time the
used.
special cleaning agents are
No
•
required for
Use warm water with washing
a soft cloth or sponge to clean the
product and wipe it with a dry
careful to avoid steam
Some cleaners can produce
the product thoroughly after
In
this way it will be
easily,
thus avoiding these from
cleaning the product.
cleaning
or
any sharp
applied to a hot
cleaners
appliance
result
liquid,
cloth.
How
to clean the
burner/plate
Ceramic plates
'0-'ipe
the glass ceramic surface using a
p1ece
of
cloth dampened with cold water
in
a manner
agent on
Residues may cause damage on the
glass ceramic surface when using the
hob for the next time.
Dried residues on the
surface
be scraped with hook
or similar tools.
Remove calcium stains (yellow stains) by
small amount of lime remover such
a
vinegar or lemon juice.
suitable commercially available products.
If
the surface
is
cleaning agent on a sponge and wait
until it
surface of the hob with a damp
00
IMPORTANT:
Sugar-based food such
and syrup
as
not to leave any cleaning
it.
Dry with a soft and dry cloth.
glass ceramic
should under no circumstances
blades, steel wool
You
can also use
is
heavily soiled, apply the
is
absorbed well. Then, clean the
as
should immediately be
as
cloth.
custard
231~
Page 24
scraped off without waiting for the
surface to
burner/plate may be permanently
damaged.
Slight color fading may occur on coatings
or other surfaces
affect operation
cool down. Otherwise the
in
time. This will not
of
the product.
Cleaning the control panel
A NOTICE:
Do not remove the control buttons/
knobs to
Control panel
Clean the control panel and knobs with a
damp
clean the control panel.
may get damaged!
cloth and wipe them
dry.
241®
Page 25
rsJ
GENERAL INFORMATION
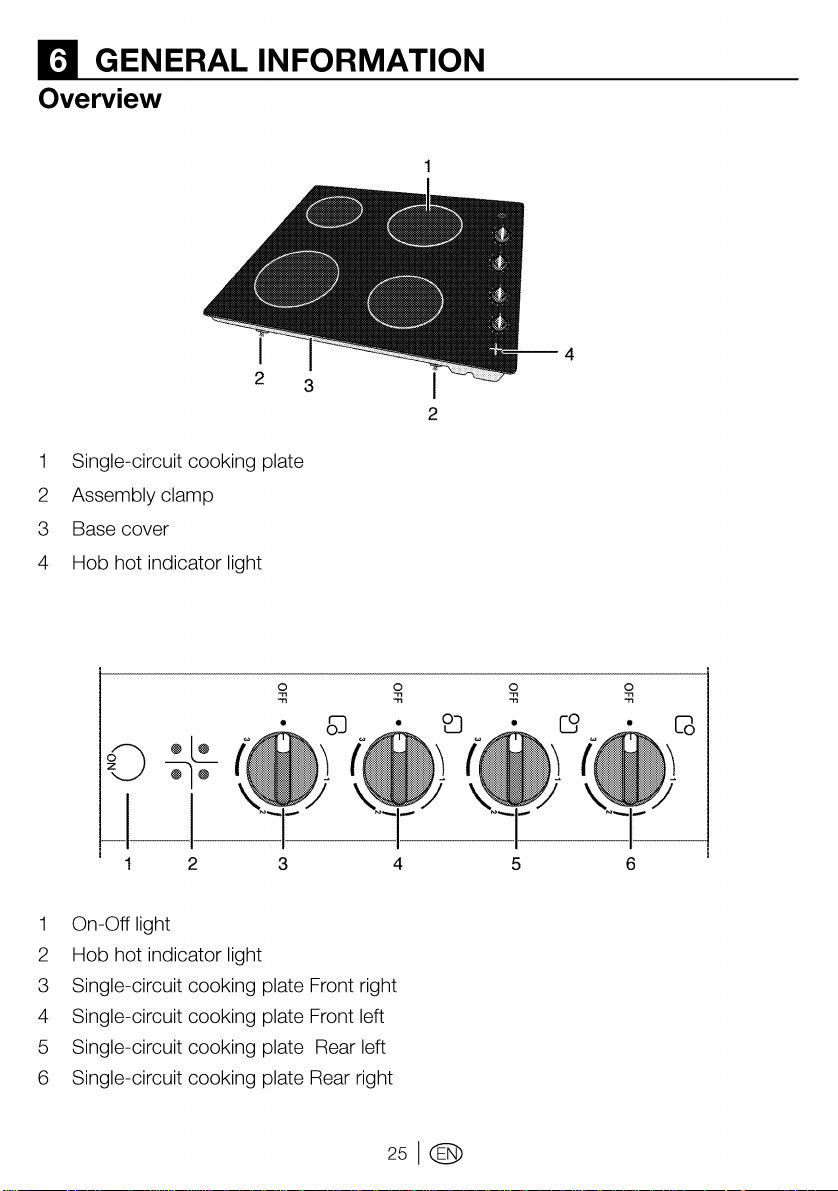
Overview
Single-circuit cooking plate
2 Assembly clamp
3 Base cover
4
2
4 Hob hot indicator
light
0
=H
•
0
z *!•
On-Off light
2 Hob hot indicator light
3 Single-circuit cooking plate Front right
4
Single-circuit cooking plate Front left
5 Single-circuit cooking plate
6 Single-circuit cooking plate
•l!_
(w
2
3
Rear
left
Rear
right
0
=H
4
0
=H
5
0
=H
6
251~
Page 26
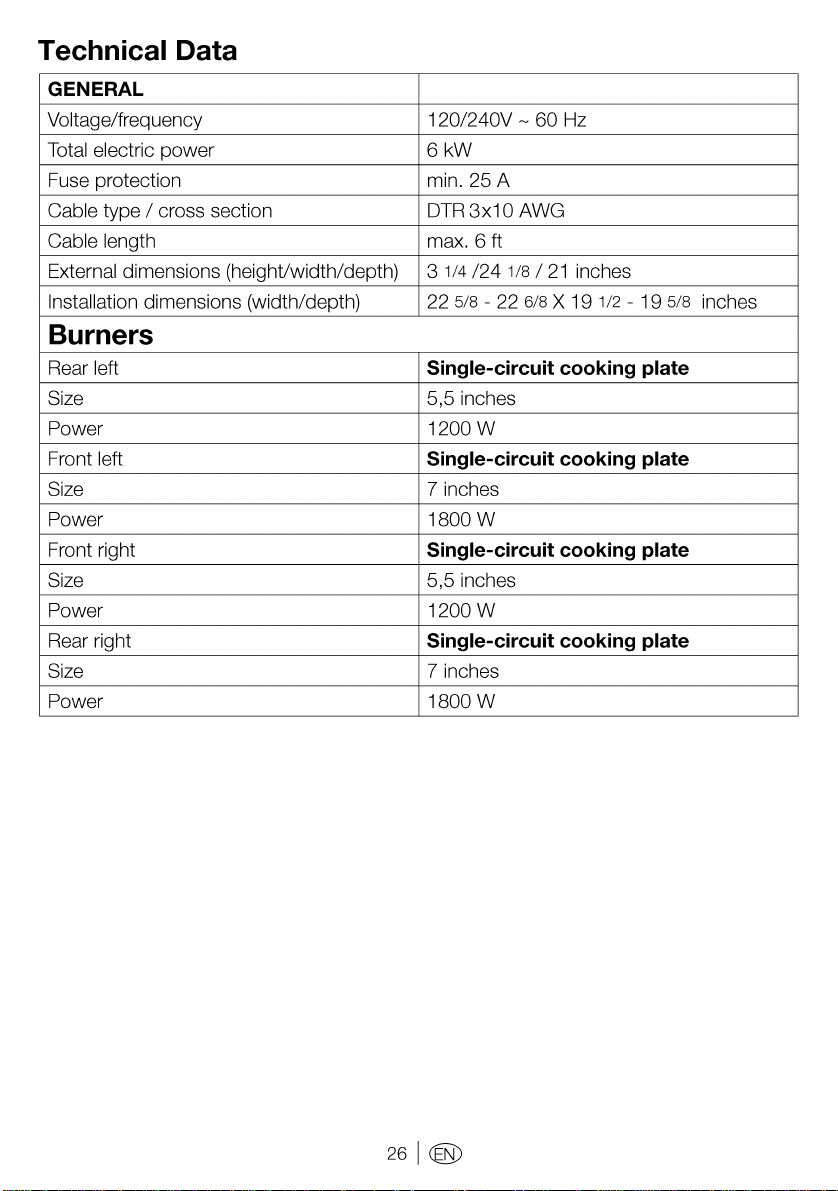
Technical Data
GENERAL
Voltage/frequency
Total
electric power
Fuse protection min.
Cable type I cross section
Cable length max.
External dimensions (height/width/depth)
Installation dimensions (width/depth)
120/240V - 60
6kW
DTR3x10AWG
1/4
3
22
25A
6ft
/24
5/8 - 22 6/8 X 19
1/8 I
Hz
21
inches
112
- 19 5/8
Burners
Rear left
Size
Power
Front left
Size
Power
Front right Single-circuit cooking plate
Size
Power
Rear right Single-circuit cooking plate
Size
Power
Single-circuit
5,5 inches
1200W
Single-circuit
7 inches
1800W
5,5 inches
1200W
7 inches
1800W
cooking plate
cooking plate
inches
261®
Page 27
a TROUBLESHOOTING
.&DANGER:
Risk of electric shock, short
circuit or fire by
repairs!
Repairs on the appliance must be
carried out by
centre.
unprofessional
an
approved service
Normal operating conditions
• Smoke and smell may emit for a
couple of hours during the first
operation.
•
It
is
normal that steam escapes
during operation.
• When the metal parts are heated,
they may expand and cause noise.
Before you call the service, please
check the following points
Electrical equipment
Malfunction/problem Possible cause
The appliance does not The mains fuse
work. has tripped. necessary, replace or reset them.
Appliance's plug can not be
connected
socket.
If
the problem has not been solved:
1 . Separate unit from the mains supply
(deactivate or unscrew fuse).
2.
Call the after-sales service
reseller.
store
to
the grounded
of
your
is
defective or Check fuses
Advice/remedy
in
the fuse box.
Check the
00
IMPORTANT:
Do not attempt to repair the
appliance yourself. There are no
customer service items inside the
appliance.
plug connection.
If
271~
Page 28
g WARRANTY STATEMENT for Blomberg
Cooking Appliances(wall ovens I cooktops)
The warranties provided by
appliances(wall ovens I cooktops) sold
in
the US and Canada. This warranty
To
obtain warranty service, please contact our nearest distributor as listed
state or call 1-800-459-9848. You will need your cooking appliances(wall ovens I cooktops)
model number, serial number, retailer name and address, where purchased and purchase date I
installation date.
Blomberg
in
these statements only apply
to
the original purchaser or homeowner
is
not transferable.
to
Blomberg cooking
by
This warranty gives you specific
to
state
All
commercial setting will void
Service must
warranty is void .
Cosmetic defects must be reported within
1
no cost
2 year *
replace any parts at no cost
the damage or failure of these components. Labor charges are the responsibility of the
consumer
5 year *
repair or replace any circuit boards at no cost
workmanship have caused the damageor
responsibility of the consumer
Lifetime
Disclaimers
authorized service agent
on the use
defects or damage caused
damage cause
than those for which it was designed, misuse, abuse, accident,
maintenance, travel fees, service calls outside normal service hours, unauthorized service work
or work.
state.
warranties stated below are based upon normal houshold use. The use of the product
also be performed
year * limited warranty from date
to
the consumer any defective parts of the cooking appliances(wall ovens I cooktops)
++
limited warranty from date of first installation (Parts only) Blomberg will repair or
++
limited warranty from date of first installation (Parts only) Blomberg will
limited warranty from date
of
warranties and exclusions: Warranty does not cover service costs
of
the cooking appliances(wall ovens I cooktops). The warranty also does not cover
by
use of the cooking appliances(wall ovens I cooktops) for purposes other
legal rights, and you may also have other rights which vary from
all
warranties.
by
an
authorized Blomberg Service Agency otherwise the
1 0 business days from installation
of
first installation Blomberg will repair or replace at
to
the consumer if material defects or workmanship have caused
to
the consumer if material defects or
failure of these components. Labor charges are the
of
first installation *
to
correct installation, electrical problems or educational instruction
by
an act of god (such as storms, floods, fires, mudslides, etc.),
++
(parts only)
by
an
alteration, improper installation,
in
a
This product is
leaving the original manufacturing site. Warranty terms for this Blomberg household appliance
is
not valid if the product
re-packed by an authorized distributor, servicer, a third party
unauthorized person(s).
fully tested and went through official quality assurance inspections before
is
altered, tampered, modifed, additional parts assembled, fixed and
retailer, reseller or by any other
281®
Page 29

TO THE EXTENT PERMITIED BY
EXPRESSED
OF MERCHANTABILITY
UNDERTAKES
QUALITY OF THIS PRODUCT EXCEPT AS OTHERWISE PROVIDED
STATEMENT. BLOMBERG
FIT
FOR ANY PARTICULAR PURPOSE FOR WHICH YOU MAY BE BUYING THIS PRODUCT,
EXCEPT AS OTHERWISE PROVIDED
AND IMPLIED WARRANTIES, INCLUDING THE IMPLIED WARRANTIES
AND FITNESS
NO RESPONSIBILITY
LAW,
THIS WARRANTY
FOR
A PARTICULAR PURPOSE. BLOMBERG
FOR
THE
ASSUMES NO RESPONSIBILITY THAT THE PRODUCT WILL BE
IN
THIS WARRANTY STATEMENT.
IS
IN
LIEU
OF
ALL
IN
THIS WARRANTY
OTHER
Blomberg does not assume any responsibility for incidental
damages include, but are not limited to, loss
capital, cost
parties, and injury
or
consequential damages, so the above limitations
* installation date shall refer
product
++Parts replaced will assume the identity
Other Warranties. This Warranty Statement
No
manufacturer. No
statements
Please keep this warranty card, user manual and your sales slip for future reference.
HOW TO GET SERVICE
Please
or
call our
Agent.
of
any substitute equipment, facilities
to
property. Some states
to
either purchase date
to
the home, whichever is later.
employee
in
addition
contact the Distributor for your State
Toll
Free Number at 1 800 459
of
to
those made
Blomberg
of
profits, loss
or
do
not allow the exclusion
of
the original parts + their original warranty.
is
or
in
this Warranty Statement.
the complete and exclusive warranty from the
any other party is authorized
or
Province as listed on the Distributor Contact List,
9848
for direction
or
consequential damages. Such
of
services, downtime, the claims
or
or
5 business days after delivery
savings or revenue, cost
or
limitation
exclusion may not apply
to
make any warranty
to
an Authorized Blomberg Service
to
v
of
third
of
incidental
you.
of
of
the
29
I®>
Page 30

& AVERTISSEMENT
pas suivie exactement,
causant des dommages a
Ia
mort.
Get
appareil est destine a une utilisation domestique normale seulement.
pas approuve pour
vaisseaux de mer ou des airs). Voir
question, contacter
l'exterieur ou tout autre utilisation non-domestique (incluant les
le
manufacturier.
un
Si
!'information de ce manuel n'est
feu ou une explosion peut en resulter,
Ia
propriete, des blessures personnelles ou
Ia
Declaration
de
Garantie Limitee. Pour toute
II
n'est
Ne pas reparer ou
specifiquement dans ce
service autorise.
remplacer toute piece de l'appareil saud
manuel. Referer tout service a une usine de centre de
si
c'est recommande
Explications des symboles
Les symboles suivants sont utilises dans ce Manuel
de
l'utilisateur:
(!) Information importante ou conseils utiles concernant !'utilisation.
Lt Avertissements concernant des situations dangeureuses a l'egard de
vie ou de
& Avertissement concernant les chocs electriques.
& Avertissement concernant les risques de feu.
~
Avertissement concernant les surfaces chaudes.
Ia
propriete.
Ia
Page 31

Veuillez lire ces instructions avant
11installation ou l•utilisation de votre appareil!
Cher Consommateur,
Nous aimerions que vous obteniez
ete manufacture dans des installations modernes et passe a travers des procedures
strictes de
Toutefois, nous vous demandons
avant
produit
Le
manuel de l'utilisateur vous aidera a utiliser
securitaire.
00
Sauvegarder
controle de
d'utiliser votre produit et gardez-le comme reference future.
Ia
qualite.
a quelqu'un d'autre, donnez-lui
IMPORTANT:
ces
instructions
locaux.
Ia
meilleure performance
de
lire ce manuel
le
manuel de l'utilisateur egalement.
pour
!'utilisation
de
votre produit qui a
de
l'utilisateur soigneusement
Si
vous donnez ce
le
produit d'une maniere rapide et
par
des
inspecteurs
en
electricite
Les inspections vous aideront a faire fonctionner
1•appareil rapidement
• Lars
•
•
• Lorsque vous donnez votre appareil a une autre personne, veuillez
•
de
Ia
livraison, verifier que l'appareil n'est pas endommage.
notez tout dommage de transport,
immediatement et ne connectez pas
Avant que vous ne connectiez et fassiez fonctionner l'appareil, veuillez
manuel et taus les documents inclus. Veuillez prendre note
instructions de
Gardez taus les documents auxquels vous pouvez vous referer encore dans
le
futur. Veuillez garder votre recu pour toutes reparations qui pourraient etre
requises durant
taus
les documents inclus Iars
plus valide
Si
vous decidez
modele plus ancien), avant
rendre inoperant de maniere appropriee en accord avec les reglements
protection environnementaux et sanitaires, en vous assurant en particulier que
toutes
les pieces potentiellement dangeureuses sont devenues inoffensives,
specialement par rapport aux enfants qui pourraient jouer avec les vieux
appareils. Enlever
piegage.
securite.
Ia
garantie.
si
le
produit est vendu
de
ne plus utiliser cet appareil
Ia
porte et
et
securitairement.
Si
vous
veuillez contacter votre point de vente
nine
faites pas fonctionner l'appareil!
en
particulier de ces
lui
de
Ia
date d'achat originale. La garantie n'est
de
seconde main.
(ou
decidez de subsituer
de
disposer de celui-ci,
le
tiroir rechaud avant !'evacuation pour prevenir
il
est recommande
lire
ce
fournir
un
dele
de
le
Page 32

Table des Matieres
1 INSTRUCTIONS
IMPORT ANTES
Instructions de securite
Autres informations concernant
securite
Securite personnelle . . . . . . . . . . . . . . . 9
Securite pour les enfants . . . . . . . . . . . 12
Securite Iars du travail avec l'electricite 12
Utilisation prevue . . . . . . . . . . . . . . . . . 12
Destruction . . . . . . . . . . . . . . . . . . . . . 13
Materiel d'emballage
Transport futur. . . . . . . . . . . . . . . . . . . 13
2 INSTALLATION
----------------------------
Avant !'installation
Installation et connection . . . . . . . . . . 14
Notes importantes au consommateur . 14
Notes importantes a l'installateur
Dimensions du produit et exigences de
decoupage . . . . . . . . . . . . . . . . . . . . .
Connexion a !'alimentation principale
Circuit de derivation 3 fils. . . . . . . . . . .
Circuit de derivation 4 fils. . . . . . . . . . .
.........................
de
base . . . . . . 5
..............
................
Ia
.....
5
13
14 6 INFORMATION GENERALE29
14
15
16
..
19
21
21
4 Comment utiliser Ia plaque 24
Information generale de cuisson . . . . . 24
Trues pour un
ceramique . . . . . . . . . . . . . . . . . . . . . . 24
Comment
8
Allumer
Eteindre
brOieur/plaque en verre
utiliser
le
brOieur/les plaques 26
Ia
plaque. . . . . . . . . . . . . . . . . 26
Ia
plaque . . . . . . . . . . . . . . . . 26
5 ENTRETIEN ET SOIN 27
Information generale . . . . . . . . . . . . . . 27
Comment nettoyer
Nettoyage du panneau
Survol
Donnees techniques . . . . . . . . . . . . . .
BrOieurs.
.........................
. . . . . . . . . . . . . . . . . . . . . . . 30
le
brOieur/la plaque 27
de
contr61e . . . 28
7 DEPANNAGE
Equipement electrique
.............
8 DECLARATION DE
GARANTIE pour Blomberg
29
30
31
31
32
3 PREPARATION
Conseils pour sauver de l'energie
Manipulation initiale . . . . . . . . . . . . . . . 23
Premier nettoyage de
l'appareil..
....
.....
23
23
23
Page 33

n INSTRUCTIONS IMPORTANTES
Cette section contient des
instructions concernant
securite qui vous aideront a
eviter des risques
et des dommages. Toutes
les garanties seront annulees
si
vous ne suivez pas ces
instructions.
de
Ia
blessures
Instructions de
securite de base
• Cet appareil peut etre utilise
par des enfants
et
plus et des personnes
avec des capacites
physiques, sensitives ou
mentales reduites, ou
manque d'experience et de
connaissances
supervisees ou ont
des instructions concernant
!'utilisation de l'appareil
de maniere securitaire et
comprennent
impliques.
Les enfants ne doivent
pas jouer avec
Le
nettoyage et
effectue par
doivent pas
par des enfants sans
supervision.
de
8 ans
un
si
elles sont
regu
les dangers
l'appareil.
I'
entretien
l'utilisateur ne
etre effectues
Installation adequate
• Connecter
uniquement
ligne mise a
Ia
tension et
telles que specifiees
dans les « Specifications
techniques». Faire
effectuer
Ia
mise a
electricien qualifie
utilisez
sans un transformateur.
Notre entreprise ne sera
responsable d
probleme cause par
que
le
m
is a Ia
reglements locaux.
•
Si
le
cable d'alimentation
du produit est endommage,
il
doit etre remplace par
le
fabricant, son agent de
service ou toute personne
egalement qualifiee afin
d'eviter taus dangers.
Entretien par
Ne pas reparer ou remplacer
•
toute piece de l'appare1l ,
sauf
si
specifiquement dans
manuel. Taus les autres
travaux de service devraient
etre referees a un electricien
qualifie.
le
produit
a une sortie/
Ia
terre
av~c
Ia
protection
!'installation de
Ia
terre par
le
produit avec ou
'~ucun
produit n'est pas
terre selon les
l'utilisateur
c'est recommande
si
un
vous
le
le
.
fa1t
Page 34

• L'appareil doit etre installe
de
sorte qu'il puisse etre
deconnecte completement
du reseau. La separation
doit
etre fournie soit par
une fiche secteur ou
un
interrupteur integre a
!'installation electrique fixe,
selon les reglements de
Ia
construction.
• Durant !'installation,
I'
entretien,
Ia
reparation, l'appareil doit
toujours
separe
le
nettoyage et
etre completement
de I
~alimentation
electrique. A cette fin,
de
Ia
debrancher
couper
de
!'alimentation a partir
l'interrupteur secteur.
fiche ou
• Danger d'incendie! Ne pas
ranger des
articles sur les
surfaces de cuisson. Une
cuisson sans
sur une table
avec de
surveillance
de
cuisson
Ia
graisse ou de
l'huile peut etre dangereux
et peut causer un incendie.
Ne
JAMAIS tenter d'eteindre
un incendie avec
de
l'eau,
mais eteindre l'appareil puis
couvrir
exemple
les flammes avec par
un
couvercle ou une
couverture anti-feu.
• Ne pas utiliser
de
nettoyeur
a vapeur pour nettoyer
l'appareil puisque ceci peut
un
causer
•
Choc electrique !
surface est craquee, eteindre
l'appareil pour eviter
de
choc electrique.
choc electrique
Si
Ia
le
risque
Porter des vetements
appropriE~s
• Des vetements amples ou qui
pendent ne devraient jamais
etre partes lorsque vous
utilisez l'appareil.
Entreposage dans
l'appareil
ou
sur
• Les materiaux inflammables
ne doivent pas etre
entreposees dans
le
four ou
pres des surfaces.
Ne pas utiliser d'eau sur les
feu),{
de
graisse.
• Etouffer
en
le
utilisant
chimique sec ou
feu ou
un
extincteur
Ia
flamme
de
type
mousse.
Utiliser seulement des
mitaines seches
• Des mitaines humides ou
mouillees sur les surfaces
chaudes peuvent provoquer
des
brulures provenant de
Ia
vapeur. Ne pas laisser
les
mitaines toucher aux
elements chauffants
chauds. Ne pas
serviette ou d'autres
utiliser une
linges
volumineux.
Page 35

Utiliser Ia bonne grosseur
casserole
Cet appareil est equipe vee
•
une
unite de surface ou
plus
de
differente grandeur.
Choisir des
ont un fond
pour couvrir
de
!'element chauffant.
L'utilisation d'ustensiles
sous-dimensionnes
exposera une partie
!'element chauffant
contact direct et peut faire
enflammer les vetements.
Un
contact approprie entre
l'ustensile et
ameliorera egalement
I'
efficacite.
Ne jamais
de
surface qui ont des
reglages
elevee sans surveillance.
Un
•
S'assurer que les cuvettes
ramasse-gouttes
d'egouttement sont en place.
•
deversement causera de
Ia
fumee et des retombees
graisseuses peuvent
s'enflammer.
L' absence de ces cuvettes
ou
bois durant
peut exposer
les composants qui se
trouvent en-dessous
dommages.
ustensiles qui
plat assez large
Ia
surface
au
le
brOieur
laisser les unites
de
temperature
ou
les bois
Ia
cuisson
le
filage ou
de
de
a des
Revetements protecteurs
• Ne pas utiliser
d'aluminium pour revetir
les bois d'egouttement
de
surface ou
du four, excepte
suggere
Une installation incorrecte
de
ces doublures peuvent
provoquer
electrique ou
Ustensiles
• Seulement certaines sortes
de
verre, verre/ceramique,
ceramique,
autres
appropries dans une gamme
superieure sans
dans
de
ustensiles vitres sont
de
papier
le
fond
lorsque
le
manuel.
un
risque de choc
le
feu.
cuisson vitres
fa'lence ou
qu'ils brisent
a cause d'un changement
subit
Les poignees des
devraient etre tournees vers
l'interieur et ne pas s'etendre
sur
adjacentes.
• Pour reduire les risques
de
materiaux flammables, et
les debordements
un
avec
de
tournee pour etre a l'interieur
et ne pas s'etendre pardessus
adjacentes.
de
temperature.
ustensiles
les unites
brOiures, de feu sur les
contact non-intentionnel
l'ustensile,
l'ustensile devrait etre
de
surface
les unites
dOs
Ia
poignee
de
surface
a
Page 36

Ne pas faire tremper
les elements chauffants
amovibles
Les elements chauffants
•
ne devraient jamais
immerges dans l'eau.
Ne pas cuisiner sur une
surface
•
Si
venait
de nettoyage et des
eclaboussures pourraient
penetrer dans
cuisson brisee et
risque
Contacter
qualifie
Nettoyer
cuisson avec prudence
•
Si
un
nettoyer
sur
chaude, prendre garde afin
d'eviter une
vapeur. Plusieurs nettoyeurs
peuvent produire des fumees
toxiques
sur une surface chaude.
de
cuisson brisee
Ia
surface de cuisson
a casser, des solutions
de
choc electrique.
un
electricien
immediatement.
Ia surface
une eponge hum ide ou
linge est utilise pour
les deversements
Ia
surface
de
brOiure par
lorsqu 'appliques
etre
Ia
surface de
creer
de
cuisson
Autres informations
concernant
• Ne jamais laver
grande eau !
de choc
• Ne jamais utiliser
lorsque votre jugement ou
votre coordination sont
reduits par
d'alcool
Ia securite
le
produit a
II
y a un risque
electrique !
le
!'utilisation
et/ou
de
drogues.
produit
un
Ia
• Soyez vigilants Iars
!'utilisation de boissons
alcooliques dans votre
vaisselle. L'alcool s'evapore
de
a hautes temperatures et
un
peut causer
puisqu'il peut s'enflammer
en
entrant
les surfaces chaudes.
• Ne pas placer aucun
materiau
proximite de l'appareil
puisque les cotes deviennent
chauds pendant
Garder toutes les fentes
•
de
ventilation libres
d 'obstructions.
• S'assurer que les boutons
de
fonction du produit
sont eteints
utilisation.
•
La pression de vapeur qui
s'accumule a cause de
l'humidite sur
de
cuisson ou
casseroles peuvent faire
bouger
faut done s'assurer que
surface de cuisson et
bas des casseroles soient
toujours sees.
• Les instructions pour
Ia
surface de cuisson
enonceront que
n'est pas prevu pour
fonctionner
minuterie externe ou
systeme de commande a
distance separe.
inflammable a
les casseroles.
incendie
en
contact avec
!'utilisation.
apres chaque
Ia
surface
au
bas des
le
l'appareil
a l'aide d'une
d'un
II
Ia
Page 37

• Ne jamais utiliser
jugement ou
sont deficients par
!'utilisation d'alcool et/ou de
drogues.
• Ne pas utiliser l'appareil s'il
est defectueux ou montre
tout dommage
Ne pas cahuffer les
•
contenants de nourriture
fermees et
La pression peut augmenter
dans
un
Garder
•
l'appareil propre et
libre
combustibles, de gazoline, et
autres vapeurs
Ne pas laisser
•
pans vides sur
lorsqu''elles
marche. lis pourraient etre
endommages.
• Parce qu'elle peut etre
chaude, ne pas laisser de
vaisselle de plastique ou
d'aluminium sur
de
de
etre utilisees pour garder
nourriture non plus.
•
Le
toute responsabilite pour des
blessures aux personnes
ou des dommages
propriete causes par
usage impropre ou incorrect
de
le
eclatement.
de
l'appareil. Ces sortes
vaisselle ne devrait pas
manufacturier decline
l'appareil.
les pots
pot
et peut causer
Ia
surface
taus materiaux
lors~ue.le
Ia
coordination
visible.
de
verre.
de
inflammables.
de
plats ou de
les plaques
sont mises
Ia
en
surface
a
Ia
un
Ia
Verifier que taus les
•
controles
eteints
00
IMPORTANT:
Appeler
pour
l'appareil avant qu'il
soit utilise. Apres cette
procedure,
garantie debutera.
de l'appareil sont
apres usage.
le
service autorise
!'installation
Ia
periode de
de
Securite personnelle
Pour reduire le risque des
blessures corporelles, en
cas d'incendie
observer ce qui suit :
• Ne pas placer d'articles
que les enfants pourraient
atteindre au-dessus
l'appareil.
•
Les materiaux d'emballage
peuvent etre dangeureux
pour
les enfants. Garder
les materiaux d'emballage
loin
des enfants. Veuillez
disposer de toutes les
parties
selon les
environnementaux.
• La graisse est inflammable et
devrait
so
• Ne pas utiliser d'eau sur les
feux
• Ne jamais soulever une
casserole enflammee.
Etouffer avec une plaque ou
un
de
etre manipulee avec
in.
de
plateau plat.
de
l'emballage
dispositifs
graisse.
graisse,
de
Page 38

•
De
Ia
graisse enflammee
a l'exterieur
peut etre eteinte avec du
bicarbonate de sou
si
disponible, une poudre
extinctrice
extincteur de type mousse.
• Laisser
avant
manipuler.
Essuyer les debordements
•
immediatement.
•
Si
ou autres spiritueux sous
une evacuation, fermer
ventilateur.
etendre
controle.
•
Ne jamais laisser les unites
de surface qui ant des
reglages de temperature
elevee sans surveillance. Un
deversement causera de
Ia
graisseuses peuvent
s'enflammer.
ATTENTION:
laisser du papier aluminium,
du plastique, du papier ou
du tissu entrer
avec une surface chaude.
Ne pas
s'evaporer a sec.
• Soyez prudent afin
prevenir les brOiures.
flammes
immediatement, quittez
lieux
d'
de
vous flambez des liqueurs
fumee et des retombees
et appelez
incendie.
d'un
ustensile
de
multi-usage ou
Ia
graisse se refroidir
tenter
les flammes hors de
laisser les casseroles
ne s'eteignent pas
de
Ia
Le
tirage pourrait
Nepas
en
contact
de
Si
le
service
ou,
le
les
les
• Toujours avoir un detecteur
de
fumee fonctionnel pres
Ia
cuisine.
• Seulement s'il y a
fumee sans flammes, laisser
un
le
ventilateur
fonctionner
flambez des aliments.
Utilisez
seulement
• Vous savez que vous avez
un
et vous savez comment vous
en
• L'incendie est petit et
confine dans un endroit
a commence.
•
Le
appele.
Vous pouvez combattre
•
l'incendie
tourne vers une sortie.
• Ne jamais utiliser d'eau sur
les feux de cuisson.
•
Si
prennent feu, laissezvous tomber et roulezvous immediatement pour
eteindre
Afin
brGiures Iars
d'une surface
observer ce qui suit :
• Ne jamais utiliser votre
surface de cuisson pour
rechauffer ou chauffer une
piece.
un
extincteur
servir.
service d'incendie est
vas vetements personnels
de
reduire le risque
de
de
Ia
hotte
lorsque vous
extincteur
si
:
de
Classe ABC
en
ayant
les flammes.
de
de
le
!'utilisation
cuisson,
Ia
ou
dos
de
de
il
1o
I®
Page 39

• Les enfants ou les animaux
domestiques ne devraient
pas
etre laisses seuls ou
sans
surveillance dans
endroit ou des appareils sont
en
utilisation. lis ne devraient
jamais avoir
s'asseoir ou de se tenir sur
n' importe
cet
appareil.
Ia
permission de
quelle partie de
ATTENTION:
entreposer des articles
d'
interet pour les enfants
dans
de
de l'appareil; les enfants qui
grimpent sur
aller chercher ces articles
pourraient etre serieusement
blesses.
•
NE
UNITES
LES ZONES PRES DES
UNITES.
peuvent devenir assez
chaudes pour causer des
brOiures. Les elements de
surface peuvent
meme s'ils sont
foncee. Pendant et apres
usage, ne pas toucher
ne laisser des materiaux
inflammables entrer
contact avec les elements
chauffants jusqu'a ce que
ces derniers aient
temps pour refroidir.
les armoires au-dessus
l'appareil ou sur l'arriere
l'appareil pour
PAS
TOUCHER LES
DE SURFACE OU
Ces surfaces
etre chauds
de
un
Nepas
couleur
ni
en
eu
le
Lars
de
!'utilisation
surface
sur
• Ne pas toucher les elements
chauffants ou les surfaces
interieures du four. Les
elements chauffants peuvent
etre chauds meme s'ils
sont
Les surfaces interieures
d'un
chaudes pour causer des
brOiures. Pendant et apres
!'utilisation,
ou
ou autres materiaux
inflammables
avec
ou
du four
ait
de
autres surfaces
peuvent devenir assez
chaudes pour causer des
brOiures - on retrouve parmi
ces surfaces (identification
des surfaces - par
les
ventilation du four et les
surfaces pres
ouvertures,
four, et
partes du four).
de
cuisson
le
four
de
couleur foncee.
four deviennent assez
ne pas toucher,
laisser les vetements
les unites chauffantes
les surfaces interieures
a moins qu'il y
eu
un temps suffisant
refroidissement. Les
ouvertures pour
les partes du
les fenetres des
de
Ia
instalh~e
en
contact
de
l'appareil
exemple,
Ia
de
ces
11
I®
Page 40

• Pour minimiser les
de
possibilites
br91~res,
d I ignition de matenaux
inflammables et
renversements,
d
I un contenant
tournee vers
Ia
surface de cuisson sans
de
Ia
poignee
do
it
le
centre de
etre
sletendre sur les unites de
surface adjacentes.
• Utiliser uniquement
certains types
vitroceramique
de
Ia
chaleur, ceramique,
faYence
ou autres ustensiles
de
verre,
a llepreuve
vitres qui peuvent etre
utilises
sur une surface de
cuisson.
Securite pour les enfants
• Les materiaux dlemballage
peuvent etre dangeureux
les enfants. Garder
pour
les materiaux dlemballage
loin
des enfants. Veuillez
disposer de toutes les
parties
selon les
de
11emballage
dispositifs
environnementaux.
Securite lors du travail
avec 1•e1ectricite
Un equipement electrique
defectueux est une des
causes majeures dlincendies
domicile.
•
tout travail avec
llequipement et
electriques peut etre realise
par des personnes qualifiees
autorisees.
de
l~s
sy~te.m~s
•
En
cas de tout dommage,
eteindre
l1appareil et
deconnecter du controle
principal
fusible ou
en
enlevant
en
eteignant
disjoncteur.
• Vous assurer que
fusible est correcte.
• Ne pas utiliser llappareilles
pieds nus.
• Ne jamais toucher
l1appareil avec les
les pieds humides.
• Ne pas mouiller les elements
chaufffants enlevables.
Les elements chauffants
ne devraient jamais
immerges dans lleau.
Utilisation prevue
Cet appareil est prevu pour un
usage domestique
Une utilisation commerc1ale
nlest pas admissible.
Ce produit est con9u pour
cuisson seulement.
pas etre utilise a d
Ne jamais utiliser votre
appareil pour rechauffer ou
chauffer Ia piece.
Le manufacturier ne peut etre
tenu responsably pour tout
dommage cause par une
utilisation impropre ou des
a
erreurs de
manipulation.
La duree de vie
de
est
10 ans. Le fabricant
devra fournir
rechange requises
produit durant cette
qulil performe tel que decnt.
1
de
les pieces de
le
le
le
Ia
force du
;a
.
ma1ns
ou
etre
seul~ment.
I~
II
ne
d<?lt
autres
finS.
votre produit
POL!r.le
per!oqe
.
af1n
121®
Page 41

Destruction
Materiel d•emballage
& DANGER:
risques de suffocation par
le materiel d•emballage!
Les elements d'emballage
( c.a.d. sacs
mousse
clous,
d'emballage) ne devraient
pas
a
Ia
car
blessures serieuses.
Le
materiel d'emballage et les
serrures de transport sont faits
de
materiaux qui ne sont pas
nuisibles pour l'environnement.
Veuillez disposer
parties de l'emballage selon les
dispositifs environnementaux.
C'est
I'
benefique pour
environnement.
en
polystyrene,
courroies
etre laissees facilement
portee des enfants,
ils
peuvent cuaser des
II
de
plastique,
de
toutes les
y a des
Transport futur
Ne pas executer d'operations
de
nettoyage ou
maintenance sur l'appareil sans
l'avoir auparavant deconnecte
de
!'alimentation electrique.
de
m PRE-AVIS: Ne
placez pas d'autres objets
sur
le
dessus de l'appareil.
L'appareil
transporte a
Entreposez
de
l'appareil et transportez
l'appareil dans son carton
original. Suivre
d'orientation
sur
le
carton.
00
IMPORTANT:
Verifier
de
votre equipement
identifiant tout dommage
possible de ce dernier
pendant
Si
vous n•avez pas le carton
original
Emballer l'appareil dans un
emballage a bulles ou du
carton
securitairement
tout dommage durant
transport.
epais et
doit etre
Ia
verticale.
Ia
bolte originale
l~s
ma~que?
qu1
sont 1mpnmees
I'
apparence generale
en
le
transport.
I'
a~tacher
afln de prevenlr
le
,
, .
131@
Page 42

fJ INSTALLATION
m IMPORTANT: Sauvegarder
pour
utilisation par des inspecteurs en
electricite locaux.
Avant 11installation
La surface de cuisson est conc;ue pour
etre installee dans
commercial.
etre laissee entre l'appareil et les murs et
l'ameublement
(valeurs en mm).
•
Elle
peut aussi etre utilisee en position
autoporteuse. Laisser une distance
minimale
surface
•
(*)
Si
une hotte de cuisine est installee,
consulter les
de
Ia
hotte de cuisine au sujet
hauteur d'installation (min 650 mm)
• Enlever
les
serrures
• Les surfaces,
et
les adhesifs utilises doivent
etre resistants a
minimum).
•
Le
plan
horizontalement.
• Couper une ouverture pour
de cuisson dans
selon les
Observer taus les codes
•
gouvernementaux et
• Ecrire les numeros
serie avant d'installer
cuisson. Les deux numeros sont sur
bolte,
Ia
le
dessous
cuisson.
un
plan de travail
Une distance securitaire doit
de
Ia
cuisine. Voir figure
de
750
mm
au dessus de
de
cuisson.
instructions du fabricant
de
Ia
les
materiaux d'emballage et
de
transport.
les
stratifies synthetiques
Ia
chaleur
de
travail doit etre aligne et fixe
le
plan
dimensions d'installation.
de
plaque
de
de
serie est situee sur
Ia
bolte de
(1
oooc
Ia
surface
de
travail
les ordonnances.
modele et
Ia
surface
Ia
de
de
surface
Ia
de
• Pour eliminer les risques de brOiures
en
passant
les
unites
espaces
situee
devraient
d'entreposage doit
risque peut etre reduit en installant
une hotte de cuisine qui projette
horizontalement
12,7 em
armoires.
Installation
00
IMPORTANT: Ne
pas
installer l'appareil pres des
refrigerateurs ou des
La chaleur emise par l'appareil
entralnera
croissante d'energie des
refrigeration.
• Pour !'installation, l'appareil doit
etre connecte en accord avec
reglements electriques locaux.
les
bras par dessus
de
surface chaudes, les
derangement
au
dessus des unites
etre evites.
un
(5
po) au-dela du bas des
et
une consommation
dans !'armoire
Si
une armoire
etre fournie,
minimum de
connection
congelateurs.
appareils de
Notes importantes
au consommateur
Garder ce manuel pour reference future.
•
Si
!'information de ce manuel n'est
pas suivie exactement,
explosion peut
des
blessures corporelles ou
• Ne pas entreposer
ni
d'autres vapeurs et liquides
inflammables a
Ia
appareil ou tout autre appareil.
en
proximite de cet
un
resulter, causant
ni
utiliser d'essence
de
surface
le
les
feu ou une
Ia
mort.
141
<®
Page 43

Vous pouvez etre tue
ou blesse serieusement
si
vo~;~s
ne suivez pas
IMMEDIATEMENT les
instructions.
Notes importantes
1
a 1
installateur
Lire
le
manuel avant d'installer l'appareil.
Observer tous les codes
gouvernementaux et
Vous assurer de
au consommateur.
Vous assurer que cet
et mis a
installateur qualifie ou
service.
Ia
terre correctement par un
les ordonnances.
laisser ces instructions
appareil est installe
un
technicien de
151@
Page 44

Dimensions du produit
Figure
1.
et
exigences de decoupage
CUTOUT
DIMENSIONS
lENGTH
OF
A
CUT
SEE NOTE
R
Cutout dimensions and requirements
Figure
SLOT
FOR
CABLE
ROUTING
(9
3-1/2"
2-1/2" (6.5
INST0315-2
em)
2.
em)
lENGTH
OF CUT
B
{!l{i'l(lj.__
1-1/4"
2-1/4"
____
(3,2cm)
(5,
7cm)
Canadian
US
.-------'11&
A
'
G
WALL
COVERING
AND
COUNTERTOP
WITHSTAND
CABINETS,
HEAT
MUST
UP
TO
93
•c
(200
•F)
Figure 3.
161
<®
Page 45

LARGEUR
DE~COUPAGE
DU
A B c
D E F G
24"-1/8 22"-5/8 19"-1/2 24"-1/8
(61
,4 em) (57,5 (49,4
em) em) em)
22"-6/8 19"-5/8
(58
em) (49,8
em)
IMPORTANT
En
dessous de
necessaire
d'au mains 15 mm du bas de
qu'illustre
Ia
surface de cuisson,
d'installer une partition espacee
dans
Ia
figure
3.
(61
il
est
l'appareil tel
,4
Suggestions de preparation
importantes
1 . Canneler tous
stratifie decoratif afin d'empecher des
dommages causes par
2.
Arrondir
limer pour assurer des rebords lisses
et empecher
Une perceuse de 1/4 po ou de
de diametre est recommandee dans
chaque coin.
3.
Les rebords et
qui n'ont pas
ete forces peuvent contribuer
craquement du stratifie du dessus de
comptoir.
les
rebords exposes de
l'ecaillage.
les
coins du decoupage et
les
coins de craquer.
les
coins interieurs
ete arrondis et qui ont
3/8
au
45,7 em (18
po)min.
Hauteur
partir du
dessus de Degagement decoupage armoires
comptoir
jusqu'a
I'
armoire
plus pres
cote ou
d'un
de l'autre de
l'unite protegee
* REMARQUE
Degagement min. de
armoires en bois ou en
0,6 em (1/4 po) de carton de retardement de flamme
de
avec une feuille d'acier de pas mains que No. 28 MSG
0,04 em (0,015 po) d'acier inoxydable, ou 0,06 em
(0,024 d'aluminium ou 0,05 em (0,020 po) de cuivre.
Degagement min, de 61,4 em (24 1/8 po) entre
Ia
plateforme de cuisson et
de
metal non protegee
ou de
24"-1/8 5 em
(61
,4
em)
a min. (voir Degagement Profondeur
remarque*)
a partir jusqu'au mur du haut
dessus de
Ia
comptoir gauche
vers
Ia Ia
surface du
haut non
61
em (24 po)
metal est protege par pas mains
(2
po) 33 em
min.
a partir du des
lateral a
droite de
l'unite
si
le
bas de !'armoire de bois
po)
Ia
non
eta
protegees
le
dessous des
le
dessus
Cette surface de cuisson a ete
con~ue
de decoupage pour prevoir
avec de grandes tolerances
un
remplacement possible avec d'autres
marques. Nous vous recommandons
de considerer
Ia dimension minimale
de decoupage en cas d'une nouvelle
installation.
decoupage pour des
po
possibles:
Dim. Pouces em
24" 22"-6/8 X 19"-5/8
Certaines dimensions de
remplacements
58
X 49,8
Installation de Ia surface de
cuisson
(13
171@
Page 46

m
IMPORT
poids excessif
Deplacer et installer
deux personnes
ou
plus. Le non-respect de cette consigne
peut
entralner une blessure au
m
IMPORT
coupure
Faire attention aux rebords coupants. Utiliser
les extremites
le
produit. Le non-respect de cette consigne
entralner une blessure mineure ou des
peut
coupures.
• Toujours consulter
du dessus du comptoir pour des
instructions specifiques.
• S'assurer que
est
s'assurer qu'aucune
charpente n'interfere avec les
exigences d'espace.
• Preparer
instructions (voir
decoupage).
• S'assurer que les revetements de
mur,
armoires autour de
cuisson peuvent
93°C/200°F).
1.
Enlever les materiaux d'emballage
et
de
!'installation. Enlever
d'installation
et
commencer.
2.
Placer une serviette ou une nappe
sur
Ia
surface protegee.
en polystyrene pour deplacer
a angle droit et de niveau et
le
dessus du comptoir et les
Ia
documentation de
cuisson avant
lire
attentivement avant de
le
dessus du comptoir. Deposer
surface de cuisson a l'envers sur
ANT: Risque de
Ia
surface de cuisson a
dos
ANT: Risque de
le
fabricant
le
dessus du comptoir
piece
de
le
decoupage selon des
les dimensions
Ia
surface de
Ia
chaleur Uusqu'a
Ia
surface
de
commencer
le
Manuel
de
Ia
documentation
ou autre.
de
3. Pour les tables
rebords sont encadres, appliquer
le
joint d'etancheite fourni dans
l'emballage sur
base de l'appareil a partir du dessous.
4.
lnserer
dans l'ouverture de decoupage.
S'assurer que
dessus du comptoir est
a
Ia
verification
tous
respectes.
4.
Des supports
Ia
pour
au dessus du comptoir. Serrer
vis suffisamment pour retenir les
supports en place lorsque
de cuisson est
decoupage. Bien serrer les vis.
de
cuisson
les
rebords
Ia
surface de cuisson centres
le
rebord avant du
surface de cuisson. Faire une
finale pour s'assurer que
les degagements requis sont
de
blocage sont fournis
bloquer
Ia
surface
deposes dans
dont
de
parallels
de
cuisson
Ia
surface
Ia
les
le
les
181
<®
Page 47

Connecter aux trous dans
inferieur tel qu'indique dans
* min 20 & max.40 mm
#min.
50 mm
Surface de cuisson
1 .
2.
Vis (petit)
3.
Blocage de fixation
4.
Vis (grand)
5.
Plan de travail
6.
Joint d'etancheite
7.
Tablette de division
00
IMPORTANT:Tournerla
vis jusqu'a ce qu'elle touche
comptoir. Ne serrez pas trap.
le
Vue d'en bas (trous de
bloca e
le
boltier
Ia
figure.
fond du
armoire, une
celle illustres
Si
installe
cela n'est pas requis
Si,
par exemple, a cause d'une
installation de l'appareil
d'un tiroir,
touchable,
plaque
tablette de division telle que
ci
dessus doit etre installee.
au
dessus d'un four encastre
au
dessus
le
dessous de l'appareil est
il
doit etre recouvert par une
en
bois.
Connexion a 1•alimentation
principale
00
IMPORTANT:
appareil doit etre correctement
a terre pour eviter les dangers
mis
d'electrocution!
Notre compagnie ne sera pas tenue
responsable des dommages causes par
l'appareil sans
terre.
Cette surface de cuisson doit
a
Ia
terre conformement avec les codes
locaux, ou
Code National Electrique ANSI/NFPA No.
70-derniere edition des Etats-Unis.
L'installation devrait etre faite par un
electricien certifie .
un
receptable de mise
en
leur absence, avec
cet
en
etre mise
le
m
IMPORT
des trous differents n'est pas
termes de securite puisque
electrique peut etre endommage.
gaz et
m
IMPORT
de cuisson est
ANT: Bloquer sur
ANT:
installee
au
dessus d'une
conseille
le
systeme de
Si
Ia
surface
.&
DANGER: Risques
d'electrocution, court circuit
ou
dommanges par le feu
des dommages a !'alimentation
principale!
L'alimention principale ne doit pas etre
serree ou piegee ou mise
pliee,
contacte avec
l'appareil.
en
Si
!'alimentation principale est
endommagee,
par
un
electricien qualifie.
.&
DANGER: Avant d'effectuer
l'entretien, couper !'alimentation
les
parties chaudes de
elle doit etre remplacee
191@
dOs
a
en
Page 48

electrique. Le non-respect de cette
consigne peut entrainer
Ia mort ou
un
choc electrique.
• Les donnees de !'alimentation
principals
donnees
signaletique
signaletique
baTtier
Le
cable electrique
•
correspondre aux specifications et
a
Ia
Specifications techniques.
doivent correspondre aux
specifiees sur
de
l'appareil. La plaque
est situee au niveau du
arriere
de
consommation d'energie; Voir
Ia
l'appareil.
de
l'appareil doit
plaque
& DANGER: Avant de
commencer tout
!'installation electrique, debranchez
l'appareil de
II
y a
un
risque de choc electrique !
travail sur
Ia
prise d'alimentation.
m IMPORTANT: L'installation
electrique
codes
Cette surface
une connexion neutre.
cuisson doit
dans une armoire, passer
surface
dans !'armoire. Faire
electrique
appropriees pour votre installation. Votre
surface
a
Ia
tension electrique et frequence
appropriees
tableau a droite.
Connecter avec du
seulement
Si
Ia
maison a du cablage en aluminium,
suivre
Ia
1 . Connecter
au
fil
connecteurs speciaux
listes U.L. pour joindre du cuivre
a
I'
aluminium. Suivre
recommandee par
connecteur
doit etre conforms aux
locaux et nationaux.
de
cuisson n'exige pas
Si
Ia
surface de
etre completement enfermee
le
cable
de
cuisson a travers l'ouverture
Ia
connexion
en
suivant
de
cuisson doit etre connectee
tel que specifie dans
procedure ci-dessous :
de cuivre en utilisant des
les
stapes
fil
de cuivre
le
cablage en aluminium
conc,;us
Ia
procedure
le
fabricant du
electrique.
le
de
et
Ia
2.
Une connexion aluminium/cuivre
doit se conformer avec
locaux et les pratiques
acceptees dans l'industrie.
Le
conduit flexible (fourni) de 3 pieds
(1
oo
em)
de long situs a l'arriere droite
de
Ia
bolte inferieure de
cuisson devrait
a
Ia
bolte de jonction. Ne pas couper
conduit.
U.L. ou GSA doit etre fourni a chaque
extremite du cable d'alimentation
niveau
de
niveau
de
ou disjoncteur a delai est recommande.
Ne
reliez pas !'alimentation electrique
a une conduits
fusible dans
ou neutre. Ayez
lignes d'alimentation (phase).
00
IMPORTANT:
mauvaise connexion du cablage
aluminium
de
cuivre peut causer
serieux.
National Fire Protection Association
Bat-ter/march
Massachusetts
Un
systems electrique, triphase, phase
simple, 240 Volt 60 cycle (protege
adequatement pour satisfaire les codes
locaux de NFPA No.70) doit etre fourni.
L'unite doit
Ia
terre selon
Le
tableau ci-dessous recommande
protecteur de circuit et
minimum
sur
le
circuit.
grosseur sont
I'
unite sera reduite et
peut
etre cree.
etre connects directement
Un
connecteur de conduit lists
Ia
surface de cuisson et
Ia
bolte
de
de
gaz. N'ayez pas
le
circuit de mise a
un
fusible pour les deux
de
Ia
maison vers les fils
Park Quincy,
02269
etre correctement mise a
le
code
si
l'appareil est
Si
des fils de plus petite
utilises, l'efficacite de
II
est recommande que
les codes
de
cablage
Ia
surface de
jonction).
Un
Ia
une
un
problems
de
cablage local.
Ia
grosseur de
Ia
seule unite
un
risque d'incendie
le
(au
au
fusible
de
terre
en
le
fil
2o
I<®
Page 49

le
cablage et
soient effectues par un electrician
competent.
Vous
assurer
installe
par
un
a
votre
un
technician
reparation
cuisson
neutre.
etre completement enfermee
armoire,
de
cuisson a travers
!'armoire.
en
suivant
votre
installation.
Get appareil est fabrique avec un
mise
a
de
Ia
surface
assure que
tension, connecter
de
Ia
surface
jonction
conduit
et
les instructions fournies ci-dessous
presentent
connecter
codes et
ant precedence sur ces instructions.
Completer
selon les
le
raccordement electrique
que
votre
et
mis a Ia
electrician
marchand
qualifie
autorise.
n'exige
Si
Ia
surface
appareil
terre
correctement
qualifie.
de recommander
ou
un
Cette
pas
une
connexion
de
cuisson
est
Demander
service
surface
doit
dans
passer
Ia
terre vert connecte au chassis
en
liste U.L. Les Figures 13 et 14
reglements locaux, bien
codes et reglements locaux.
le
cable de
l'ouverture
Faire
Ia
connexion
les
etapes appropriees
de
cuisson. Apres s'etre
!'alimentation est hors
le
conduit flexible
de
cuisson a
utilisant
Ia
les surfaces de cuisson. Vas
les
un
fagon
Ia
connexions electriques
Ia
surface
dans
electrique
fil
Ia
bolte de
connecteur de
plus habituelle de
sur,
de
de
une
pour
de
les
maisons mobiles et les vehicules
recreatifs,
codes locaux interdisent de mettre a
terre par un conducteur neutre.
ou dans un endroit ou les
Ia
Circuit de derivation 3 fils
La ou les codes locaux permettent
connexion du
surface
de derivation
comme suit (voir figure
1 .
Si
les codes locaux
connecter
vert
neutre du circuit de derivation
ou
2.
Connecter
de
Ia
correspondants dans
jonction.
de
cuisson au
de
Ia
blanc).
surface
fil
de
mise a
(fil
gris ou blanc) proceder
le
fil
de MISE A LA TERRE
surface
les
fils rouge et nair
de
Ia
fil
neutre du circuit
13).
le
permettent,
de
cuisson au
cuisson aux fils
Ia
bolte
Ia
terre de
(fil
de
Ia
fil
gris
& DANGER: Risque de choc
electrique, chassis mis a Ia terre vers
le neutre de l'appareil par
Mettre a
est interdit pour
de
Ia
terre par
circuit de derivation (1996
un
de
nouvelles installations
un
lien.
conducteur neutre
NEG)
dans
Circuit de derivation 4 fils
Consulter
1 . Connecter
211@
Ia
vert
de
de
mise a
jonction
Figure 14 :
le
fil
de
Ia
surface
Ia
terre dans
(fil
nu ou vert).
mise a
de
cuisson au
Ia
Ia
terre
fil
bolte de
Page 50

2.
Connecter
de
Ia
correspondants dans
les
fils rouge et nair
surface de cuisson aux fils
Ia
bolte de
jonction.
3.
Connecter
cuisson
dans
4.
Terminer et isoler
blanc) dans
INST032-2
le
fil
blanc de
au
fil
neutre (gris ou blanc)
Ia
bolte de jonction.
le
Ia
bolte de jonction.
Ia
fil
neutre (gris ou
BlACK
U.L-OR
CSA-USTED
CONDUIT CONNECTOR
Verification finale
1.
Connecter l'appareil a !'alimentation
principale
principale
2.
Verifier
et mettre !'alimentation
sous tension.
les
fonctions.
surface de
WIRES
221
<®
Page 51

EJ
PREPARATION
Conseils pour sauver
de
11 en erg ie
Les conseils suivants vous aideront
a utiliser cet appareil d'une facon
ecologique et pour sauver de l'energie.
• Decongelez les plats congeles avant
de
les cuire.
• Utilisez des ustensiles de cuisine avec
couvercles pour
a pas de couvert,
d'energie peut augmenter quatre fois
plus.
• Selectionnez
correspond
casserole a etre utilisee. Toujours
choisir
casserole pour vas plats. Les grandes
casseroles requierent plus d'energie.
• S'assurer d'utiliser des casseroles
a
surfaces
Les casseroles a fond epais offriront une
meilleure conduction de chaleur.
Vous pouvez sauver jusqu'a
d I electricite.
Les recipients et les casseroles
•
doivent etre compatibles avec
zones
recipients et des
pas
chauffante.
• Garder les zones de cuisson et
fond des casseroles propres. La
salete diminuera
chaleur entre
fond des casseroles.
Ia
bonne grandeur de
fond plat pour cuire avec des
de
de
etre plus petit que
le
brOieur qui
a
Ia
taille du fond
cuisson.
cuisson.
Ia
zone
Ia
cuisson. S'il
Ia
consommation
Le
fond des
casseroles ne doit
Ia
Ia
conduction de
de
cuisson et
de
1/3
les
plaque
n'y
Ia
le
le
•
Pour les longues cuissons, fermer
Ia
zone
de
cuisson 5 a 1 0 minutes
avant
Ia
fin du temps de cuisson.
Vous pouvez sauver jusqu'a
d'electricite
residuelle.
en
utilisant
Ia
chaleur
20%
Manipulation initiale
Premier nettoyage
de
1•appareil.
m IMPORTANT: Lorsque
vous
enlevez l'appareil pour
nettoyage eVou
Deconnecter
Enlever avec precaution l'appareil en
tirant vers l'exterieur.
L'appareil
precautions en
00
NOTICE: La surface peut etre
endommagee avec des detergents
ou des materiaux
Ne pas
poudre nettoyante/creme ou taus objets
pointus.
brOiures
peuvent produire des fumees toxiques
lorsqu'appliques sur une surface chaude.
1 . Enlever taus les materiaux
d'emballage.
2.
Essuyer les surfaces de l'appareil
avec un limge humidifie ou une
eponge et essuyer avec
!'alimentation principale AC.
est lourd, utiliser des
utiliser de detergents agressifs, de
etre prudent pour evite les
de vapeur. Plusieurs nettoyeurs
le
service,
le
manipulant.
de
nettoyage.
un
le
le
linge.
231@
Page 52

IJ
Comment
utiliser Ia plaque
Information generale • Ne jamais laisser des unites de
de cuisson surface sans surveillance a des
~
LID
Lorsque vous chauffez
laissez pas sans surveillance.
Ne jamais essayer d'eteindre le feu
avec de
le
Ia
brOieur/plaque
faire et telephoner au service d'incendie.
Utiliser seulement des pots ou des pans
a fond plat.
• utiliser des pans qui ant une capacite
• Ne pas placer
•
•
AVERTISSEMENT·. ajustements de haute temperature.
Un
Risque de feu en surchauffant
l'huile!
de
l'huile, ne
l'eau. Lorsque l'huile a cause
feu, couvrir immediatement
pan avec
suffisante pour
nourriture
renversera pas et rendra
non-necessaire.
brOieurs.
Toujours placer
des
les pans
toujours
glisser.
Get appareil est equipe vee une
unite
grandeur. Choisir des
que ant un fond plat assez large
pour couvrir
chauffant. L'utilisation d'ustensiles
sous-dimentionnes exposera une
partie
contact direct et peut faire
les
entre
ameliorera egalement l'efficacite.
un
couvercle. Eteindre
si
c'est securitaire
Ia
quantite de
a etre cuite aussi, cela
de
couvercles sur
les
pans au centre
brOieurs. Lorsque vous transferez
d'un
brOieur a
lever les pans, ne pas les
de
surface ou plus de differente
Ia
surface
de
!'element chauffant au
vetements.
l'ustensile et
Un
contact approprie
le
le
le
nettoyage
un
autre,
ustensiles
de
!'element
enflammer
brOieur
plat ou
le
le
dele
ne
les
• Vous assurer que les pans
Trues pour
plaque
• La surface de verre ceramique est
• Ne pas utiliser
• Utiliser
• Ne as utiliser
• Seulement certaines sortes
deversement causera
fumee
et des retombees graisseuses
peuvent
reflectriceou les bois de ruissellement
sont en place. L'absence
pans ou bois durant
exposer
en-dessous
s'enflammer.
Ia
le
filage ou des composants
a des dommages.
un
brUieur/
en verre ceramique
resistante
aux larges deviations
verre cramique pour garder
ou comme surface de coupe.
Ne pas cuire
des contenants
aluminium sur
lis pourraient laisser des marques
d'aluminium qui ne pourront pas
s'enlever completement.
les fonds mis a
pointus
aluminium. L'aluminium endommage
Ia
surface
verre, verre/ceramique, ceramique,
faience ou autres
sont
superieure sans
cause
temperature.
a
Ia
chaleur et insensibles
le
brOieur/plaque en
de
popcorm dans
pre-emballe
le
dessus de cuisson.
des pots ou des pans avec
Ia
terre. Des coins
eraflent sur
de
souhaitables dans une gamme
d'un
changement subit
Ia
de
pots ou de pans en
verre ceramique.
ustensiles en verre
qu'ils brisent a
de
Ia
de
ces
cuisson peut
de
temperature.
les objets
en
surface.
de
de
241
<®
Page 53

• Ne pas cuire
sur
le
dessus de cuisson.
• Pour des aliments conteant du sucre
sous n'importe
taus debordements et
des
que possible. Permettre au
dessus de cuisson de refroidir
peu. Alors, en portant des mitaines,
enlever les debordements alors que
Ia
surface est encore ti8de.
debordements de sure sont restes
sur une surface froide,
adherer
peuvent causer des piqOres et des
marques permanentes.
•
Si
une sponge humide ou
utilise pour nettoyer les deversements
sur
Ia
surface
prendre garde afin d'eviter une
brOiure par
nettoyeurs peuvent praduire des
fumees toxiques
une surface chaude. Les poignees
des
ustensiles devraient etre
tournees vers l'interieur et ne pas
s'etendre sur
adjacentes. Pour reduire
de
brOiures,
flammables, et
dOs
a un contact non-intentionnel
avec
l'ustensile,
l'ustensile devrait etre tournee pour
etre a l'interieur et
par-dessus
adjacentes.
Ia
nourriture directement
quelle forme, nettoyer
souillures
il
peuvent
au
dessus de cuisson et
de
cuisson chaude,
Ia
vapeur. Plusieurs
lorsqu'appliques sur
les
unites de surface
de
feu sur les materiaux
les
debordements
Ia
poignee
ne
pas s'etendre
les unites de surface
Les
eclaboussures
peuvent
endommager
Ia
surface de
ceramique et
peuvent causer
feu.
un
Si
des
un
linge est
les risques
de
le
utiliser
Ne pas
pots qui ant des
fonds concaves ou
convexes.
Utiliser des pots
ou des pans avec
les fonds lisses.
lis
assurent un
bon transfert
chaleur.
Si
Ia
pan est trap
petite, de
est gaspillee.
de
de
l'energie
& DANGER:
Basculement de Ia pan
Vous assurer que les poignees du plat
ne
collent pas sur
pour eviter qu'ils soient frappes par
accident.
enfants d'attraper les pans de cuisson.
• Vous assurer que les poignees
Ne pas entreposer des items
pour les enfants dans les armoires audessus
II
des pans ne soient attrapees
accidentellement ou cognees et ne
deviennent pas chaudes
des zones de
Evirer
les pans qui sont instables et
facilement basculables. Les pans qui
sont trap
rapidement lorsqu'emplies peuvnet
aussi
etre dangeureuses.
de
l'appareil ou derriere celui-ci.
les
bards
de
l'appareil,
doit aussi etre difficile pour les
a cause
chaleur adjacentes.
lourdes pour etre deplacees
d'interet
Ia
251@
Page 54

Les enfants grimpant sur l'appareil pour
chercher des items pourraient se
serieusement.
blesser
Comment utiliser le
brUieur/les plaques
1 4
3
Plaque
5,5-6,3
2 Plaque
7-8 po
Plaque
3
5,5-6,3
4 Plaque
po
sont des diametres recommandees
de
.&.
Ne laisser aucun objet tomber sur
Ia
(ex:
brOieur /Ia plaque.
Ne pas utiliser des plaques en verre
ceramique avec des fissures. L,eau
peut entrer dans
un court-circuit.
Si
n'importe quelle facon
visibles), eteindre l'e dispositif
immediatement pour reduire
risques de choc electrique.
de
cuisson a circuit simple
de
cuisson a circuit simple
de
cuisson a circuit simple
de
cuisson a circuit simple 7-8
Les dimensions susmentionnees
casseroles relatives aux brOieurs .
DANGER: Verre brise!
plaque. Meme de petits objets
saliere) peuvent endommager
les fissures et causer
Ia
surface est endommagee
(ex:
fissures
les
le
de
Si
le
dessus
des
solutions de nettoyage et des
eclaboussures pourraient penetrer
dans
creer un risque de choc electrique.
Contacter
immediatement.
Le
bruleur/la plaque de verre ceramique
equipe avec une lampe d'operation et
est
un
indicateur de chaleur residuelle.
L'indicateur
indique
Ia
ce soit eteint. (Lorsque
de
temperature
l'indicateur s'eteint.)
faible scintillement n'est pas un probleme
de
avec
residuelle.
Ia
plaque et reste allumee apres que
Ia
plaque descend sous une
Ia
lumiere de l'indicateur
de
cuisson devait casser,
le
dessus
de
position qui est allumee sur
de
cuisson brise et
un
electricien qualifie
chaleur residuelle
Ia
temperature
touchable,
Ia
Un
eclairage de
lumiere
OOPRE-AVIS:
Des plaques en verre ceramique qui
chauffent rapidement emettent une
lumiere brillante lorsqu'ils sont allumes.
Ne pas regarder
Allumer Ia plaque
Les boutons
de
Ia
plaque sont utilises pour operer
les
plaques. Pour obtenir
de cuisson
les
bouton
plaque au niveau correspondant.
Niveau 1 2
de
cuisson
Eteindre Ia plaque
Tourner
plaque a
le
Ia
Ia
lumiere qui brille.
de
contr61e du brOieur/
Ia
desiree, enfoncez et tourner
de
contr61e du brOieur
tiede bouillant, cuisant,
cadran de contr61e de
position Eteint
mijotant rotissant
(en
de
de
chaleur
puissance
de
3
Ia
haut).
Ia
261
<®
Page 55

R ENTRETIEN ET SOIN
Information generale
La duree de vie du produit sera amelioree
et
Ia
possibilite
si
le
produit est nettoye a intervalles
reguliers.
in.
DANGER:
Risques d'Eiectrocution!
Eteindre l'electricite avant
l'appareil pour eviter l'electocution.
& AVERTISSEMENT:
Des surfaces chaudes peuvent
causer des
Permettre a l'appareil de refroidir
avant
& PRE-AVIS:
La surface peut etre endommagee
avec des detergents ou des
materiaux
Ne pas utiliser
agressifs, de poudre nettoyante/
creme ou taus objets pointus. etre
prudent pour evite les brOiures de
vapeur.
produire des fumees toxiques
lorsqu'appliques sur une surface
chaude.
Ne pas
abrasif ou grattoir de
pour
porte du four puisqu'ils peuvent
egratigner
faire
Nettoyer
•
apres chaque utilisation. De cette
fac,;on,
residus de cuisson plus facilement,
en les evitant de brOier
fois que
Aucun agent de nettoyage special
•
n'est requis pour nettoyer l'appareil.
de
problemes diminuee
de
bruiOres!
de
le
nettoyer.
de
nettoyage.
de
detergents
Plusieurs nettoyeurs peuvent
utiliser aucun nettoyeur
metal pointu
le
nettoyage de
Ia
surface, ce qui pourrait
eclater
Ia
vitre.
le
produit soigneusement
il
sera possible d'enlever les
l'appareil sera utilise.
Ia
vitre de
Ia
prochaine
nettoyer
Ia
271@
Utiliser
a
pour nettoyer
linge sec pour
• Toujours s'assurer que tout exces
de
apres
debordement est immediatement
asseche.
• Ne pas utiliser d'agents nettoyants
qui contiennent
chlorure pour nettoyer les surfaces
acier inoxydable et
un linge doux avec
liquide (non abrasin pour essuyer ces
parties, en faisant attention d'essuyer
dans une direction.
00
Ne pas utiliser
pour
de l'eau tiede avec du liquide
laver,
un linge doux ou une eponge
le
produit et utiliser
le
sechage.
liquide est completement essuye
le
nettoyage et que tout
de
l'acide ou du
Ia
poignee. Utiliser
un
detergent
IMPORTANT:
de
nettoyeur a vapeur
le
nettoyage.
Comment nettoyer le
brUieur/la plaque
Plaques de ceramique
Essuyer
utilisant un linge mouille d'eau froide
de maniere
nettoyant sur
linge doux et sec. Des residus peuvent
causer des dommages
vitroceramique
cuisson sera
Les residus seches sur
vitroceramique ne doivent en aucune
circonstance
a crochet, de
similaires.
Ia
surface vitroceramique
a ne laisser aucun agent
celle-ci. Assecher avec
a
Ia
surface
lorsque
utilisee
etre grattes avec des lames
Ia
Iaine d'acier ou outils
Ia
surface de
Ia
prochaine fois.
Ia
surface
en
un
en
un
Page 56

Page 57

Page 58

Page 59

Page 60

Page 61

Page 62

Page 63

Page 64

Page 65

Page 66

Page 67

Page 68

Page 69

Page 70

Page 71

Page 72

Page 73

Page 74

Page 75

Page 76

Page 77

Page 78

Page 79

Page 80

Page 81

Page 82

Page 83

Page 84

Page 85

Page 86

Page 87

Page 88

Page 89

Page 90

Page 91

Page 92

 Loading...