

Page 1

Dishwasher
User manual
DWT 81900 FBI
DWT 81900 SS
Page 2
Dishwasher
User manual
DWT 81900 FBI
DWT 81900 SS
Page 3

To prevent accidents, which could cause serious injury or death, as well
as machine damage read these instructions before installation and / or
use.
CONTENTS
1. IMPORTANT SAFETY INSTRUCTIONS 1
2. RECYCLING 4
3. GETTING TO KNOW YOUR DISHWASHER 5
4. LOADING THE DISHWASHER 6
4.1 UPPER RACK 8
4.2 LOWER RACK 11
4.3 PROPER AND IMPROPER LOADING OF DISHWARE 17
5. WHAT SHOULD NOT BE WASHED IN YOUR DISHWASHER 18
6. OPERATING THE PRODUCT 19
PROGRAMME SELECTION / PROGRAMME CANCEL KEY 20
FUNCTION KEYS 20
PREPARING THE MACHINE 20
PROGRAMME SELECTION 20
6.4 AUXILIARY FUNCTIONS 23
HOMEWHIZ SETUP AND USER ACCOUNT SETTINGS 24
6.5 SCHEDULING THE WASHING TIME 28
6.6 STARTING THE PROGRAM 29
6.7 CANCELLING THE PROGRAM 29
6.8 SALT INDICATOR ( ) 29
6.9 RINSE AID INDICATOR ( ) 30
6.10 END OF PROGRAM 30
6.11 WATER CUT-OFF WARNING 30
6.12 OVERFLOWING WARNING 31
7. DETERGENT 32
7.1 ADDING DETERGENT 32
7.2 TABLET DETERGENTS 33
7.3 RINSE AID 34
8. ADJUSTING THE WATER SOFTENING SYSTEM 35
9. FILLING THE DISHWASHER SALT DISPENSER 36
10. CARE AND MAINTENANCE 37
10.1 CARING FOR YOUR DISHWASHER EXTERIOR 38
10.2 CARING FOR YOUR DISHWASHER INTERIOR 38
10.3 CLEANING THE FILTERS 39
10.4 CLEANING THE HOSE FILTER 40
10.5 CLEANING THE WASH ARMS 40
11. TROUBLESHOOTING 42
12. TECHNICAL FEATURES 46
13. WARRANTY STATEMENT FOR THE BLOMBERG DISHWASHERS 47
14. HOW TO GET SERVICE 49
Page 4

INTRODUCTION
Please read this user manual and
particularly the safety instructions
completely and carefully. They will save
you time and effort and help to ensure
optimum dishwasher performance.
Be sure to observe all listed warnings
and cautions. Look particularly for the
icons with exclamation marks inside.
The information icon will also provide
important references.
WARNING: Indicates a
potentially hazardous
A
A
C
situation which, if not
avoided, could result in death
or serious injury.
CAUTION: Indicates a
potentially hazardous
situation which, if not
avoided, may result in injury.
It may also be used to alert
against unsafe practices.
NOTICE: Indicates a
potentially hazardous
situation which, if not
avoided, may result
in damage to the
dishwasher, the tableware, the equipment or the
environment.
1. IMPORTANT SAFETY
INSTRUCTIONS
WARNING:When using the
A
dishwasher, follow basic
precautions, including the
following:
Read all instructions before
using the dishwasher! Save
these operating instructions
and pass them on to any
future user.
“This device complies with
Part 15 of the FCC Rules.
A
This equipment has been tested and
found to comply with the limits for a
Class B digital device, pursuant to
part 15 of the FCC Rules. These limits
are designed to provide reasonable
protection against harmful interference
in a residential installation. This
equipment generates, uses and
can radiate radio frequency energy
and, if not installed and used in
accordance with the instructions, may
cause harmful interference to radio
communications. However, there is
no guarantee that interference will
not occur in a particular installation.
If this equipment does cause harmful
interference to radio or television
reception, which can be determined
by turning the equipment off and on,
the user is encouraged to try to correct
the interference by one or more of the
following measures:
- Reorient or relocate the receiving
antenna.
- Increase the separation between the
equipment and receiver.
Operation is subject to the
following two conditions:
(1) this device may not cause
harmful interference, and
(2) this device must accept
any interference received,
including interference
that may cause undesired
operation.”
“No changes shall be made
to the equipment without the
manufacturer’s permission
as this may void the user’s
authority to operate the
equipment”
1
USA
Page 5

- Connect the equipment into an outlet
on a circuit different from that to which
the receiver is connected.
- Consult the dealer or an experienced
radio/TV technician for help.
• Use the dishwasher only for its
intended purpose as described in
this user manual. This appliance
is intended for normal household
use only.
• The manufacturer disclaims
responsibility for damage or
injury caused by improper use
of this appliance.
• The information in this user
manual must be followed to
minimize the risk of fire or
explosion and to prevent property
damage, personal injury or loss of
life.
• Do not operate your dishwasher
unless all the enclosure panels are
properly in place.
• Do not tamper with the controls.
• Do not abuse, sit on, stand in or
on the door or dish rack of the
dishwasher.
• The cup racks are designed to
support cups, glasses and kitchen
utensils. When the cup racks are
in the dishwasher do not lean on
or use the cup racks to support
your body weight.
• To reduce the risk of injury, do not
allow children to play in, on or near
the dishwasher.
• Use only detergents or rinse
aids recommended for use in a
household dishwasher and keep
them in a dry place out of the
reach of children. Check that the
detergent dispenser is empty
after the completion of each wash
program.
• Dishwasher detergents contain
chemicals that can cause
sickeness and may be if they are
inhaled or swallowed. Also, be
careful when opening the door
due to hot steam that is producded
during operation. Consult a doctor
immediately if detergent has been
swallowed or inhaled.
• if the hot water has not been used
in several weeks, we recommend
running the hot water taps to
remove any built up hadrogen
gases.
• Do not store or use flammable
liquids or vapors in the area of the
dishwasher.
• When loading items to be washed,
position sharp items so that they
are not likely to damage the door
seal and load sharp knives with
the handles up to reduce the risk
of cut-type injuries.
• Do not wash plastic items unless
they are marked “dishwasher
safe” or the equivalent. For plastic
items not so marked, check the
manufacturer’s recommendations.
• If a malfunction occurs, switch
off the appliance and turn off the
water supply to the dishwasher.
• Please do not attempt to carry the
dishwasher by yourself in order
to avoid potential injuries. Two or
more people are needed to move
a dishwasher.
• Before cleaning or carrying out
maintenance, switch off the
appliance, disconnect the power
plug and turn off the water supply.
• Repairs and technical
modifications must be carried
out exclusively by a Authorized
technician.
• If the dishwasher is not in
use for an extended period of
time (i.e. vacation home), we
recommend remove all items
from the dishwasher, leave the
2
USA
Page 6

door cracked open to allow air
to circulate and turn off both the
power and water supply to the
dishwasher.
• This appliance comes with a
three prong NEMA 5-15P 15A
power cord. It must be connected
to a Grounded and Polarized
wall receptacle that has been
installed and tested by an licensed
electrician and that it has been
installed based on all Local, State
and Federal Electrical codes.
WARNING:Improper
connection of the equipment-
A
• This appliance produces ozone
• Chidren should not operate this
• Be Careful to not leave the door
grounding conductor can
result in a risk of electric
shock. Check with a qualified
electrician or service
representative if you are in
doubt whether the appliance
is properly grounded. Do not
modify the plug provided with
the appliance, if it will not
fit the outlet, have a proper
outlet installed by a qualified
electrician.
within the washing compartment
during normal operation. Longterm exposure to ozone or
exposure at elevated levels may
result in respiratory problems,
especially for the infirmed, elderly
and children.
machine without adult supervision.
fully open when not being loaded
or unloaded to prevent someone
from tripping on the unit.
WARNING:If your
dishwasher is equipped with
A
A
SAVE THESE INSTRUCTIONS
• Service should be performed
• Do not operate the appliance if
• Before installation or service,
• For safety reasons, dishwasher
• Do not use any extension cord or
internal illumination, lamp
should only be replaced by
the Authorized Service Agent
in case of failures that may
occur on the lamp.
WARNING: This product
can expose you to chemicals
including Nickel (Metallic)
which is known to the State
of California to cause cancer.
For more information go to
www.P65Warnings.ca.gov
Note: Nickel is a component
in all stainless steel
and some other metal
components.
by a qualified installer. Work by
unqualified persons could be
dangerous and may void the
warranty.
damaged, malfunctioning, partially
disassembled or if it has missing
or broken parts.
disconnect the power supply to the
work area by unplugging the unit,
“tripping” the circuit breaker or
removing the fuse.
must be secured to adjacent
cabinetry using the brackets
provided. Failure to do this may
cause damage to property or
bodily injury.
portable outlet device to connect
the dishwasher to a power supply.
3
USA
Page 7

2. RECYCLING
• Remove the door to the washing
compartment when removing
an old dishwasher from service
or discarding it. Ensure that the
appliance presents no danger to
children while being stored for
disposal.
• Remove the door lock or door of
the washing compartment before
disposing dishwasher so that
children or small animals can not
trapped inside.
• Old appliances may contain
materials that can be recycled.
Please contact your local recycling
authority about the possibility of
recycling these materials.
• Please check the water supply
line periodically. It is susceptible
to breakage. It becomes less
flexible as time goes by.Replace
it immediately when it is torn, cut,
swollen or there is water leakage.
• Please keep the dishwasher
package out of the reach of
children after unpacking it.
WARNING:Danger of
suffocation! Ensure that
A
any plastic wrappings,
bags, small pieces etc. are
disposed of safely and kept
out of the reach of children.
4
USA
Page 8

3. GETTING TO KNOW YOUR DISHWASHER
1. Upper basket
2. Upper impeller
3. Lower impeller
4. Cutlery basket
5. Door
6. Model and Serial Tag
7. Control panel
8. Detergent and rinse agent dispenser
9. Lower basket
10. Filters
11. Salt container (Select Models)
12. Upper basket rail
13. Upper cutlery basket (Select Models)
14. Tabletop (Select Models)
15. Turbo fan heat drying system (Select Models)
5
USA
15
Page 9
4. LOADING THE
DISHWASHER
1. Pull the handle to open the door.
If the door is opened during
operation, the dishwasher will stop
running. Once the door is closed
the program will continue.
2. Remove coarse food leftovers
from tableware.
3. Now you can load the dishwasher.
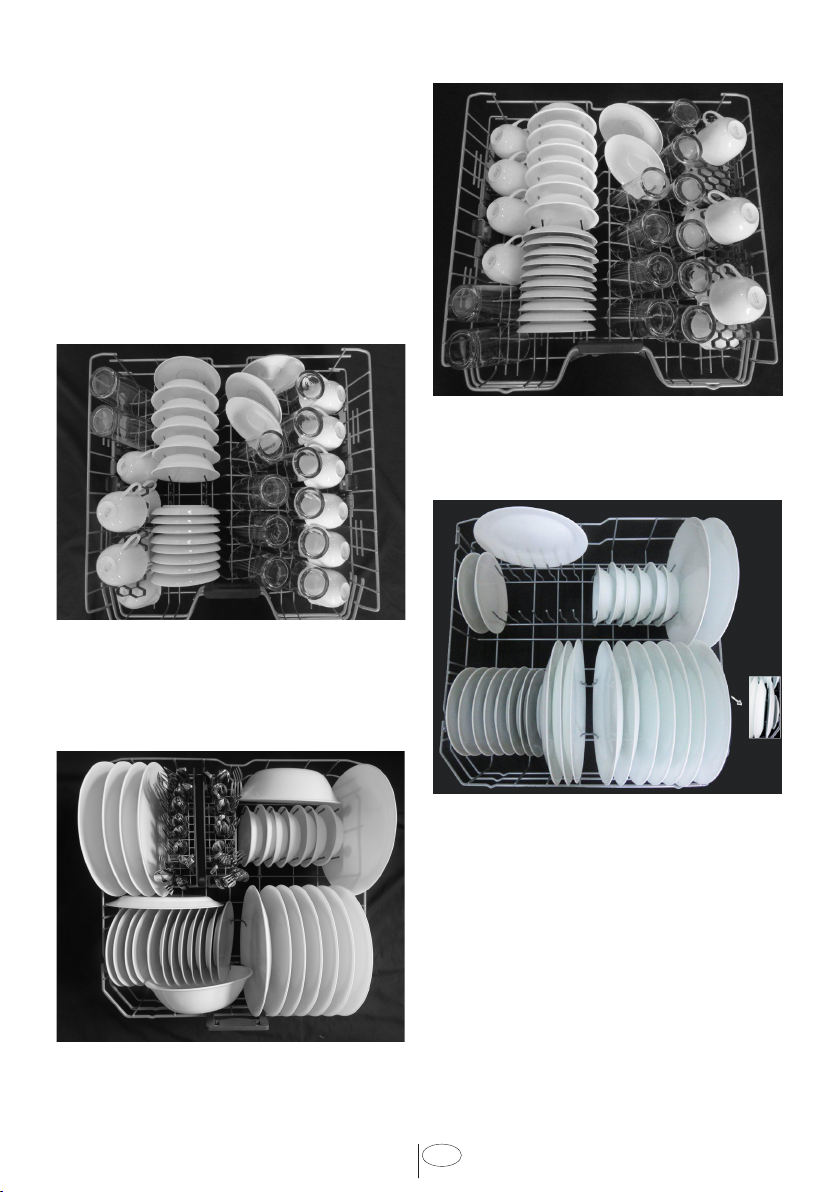
Upper rack (Standard Pattern)
Top rack load pattern for 12 place
settings according to the AHAM DW-1
Standards
Upper rack (International Pattern)
International Loading Pattern – Top
rack (12 place settings)
Lower rack (International Pattern)
Lower rack (Standard Pattern)
Bottom rack load pattern for 12 place
settings according to the AHAM DW-1
Standards
International Loading Pattern – Bottom
rack (12 place settings)
6
USA
Page 10

Upper cutlery basket (Select
Models)
International Loading Pattern – Upper
cutlery basket (12 place settings)
Upper rack (Select Models)
Lower rack (Select Models)
Additional Loading Pattern – Bottom
rack (10 place settings)
Upper cutlery basket (Select
Models)
Upper cutlery basket (MODEL
DEPENDING)
Additional Loading Pattern – Top rack
(10 place settings)
International Loading Pattern – Upper
cutlery basket (10 place settings)
7
USA
Page 11

A
CAUTION:Large knives and
other utensils with sharp tips
and edges must be placed
horizontally into the upper
rack due to risk of injury.
Other smaller knives and
sharp utensils should be
placed with sharp side down
in the cutlery basket.
• Do not overload your dishwasher
and pay attention to manufacturer
instructions regarding dishes
which are appropriate for use in for
a dishwasher. Only with suitable
dishes (mentioned in section 5)
will you obtain optimal washing
results with a sensible use of
energy.
CAUTION:Use extreme
A
A
C
• Your dishwasher holds a maximum
• Place all containers such as
• Small and light items can go into
• Long and narrow items are placed
• Place all large and very dirty items
• Load dishes accordingly and be
caution when removing
knives and other sharp
utensils from the dishwasher.
These items may have
shifted position during the
wash program, and may be
wet or slippery.
CAUTION:Hot steam can
escape! Danger of serious
burns or other injury.
NOTICE: 3rd basket should
be removed out of the
dishwasher during the tests
according to AHAM DW-1.
of 12 place settings.
cups, glasses and pots into the
dishwasher with the opening
facing downwards (so that no
water can collect).
the upper rack.
in the middle of the racks.
in the lower rack.
careful when loading glasses so
they do not hit each other during
the wash cycle. Also, make sure
that both wash arms are not in
contact with any dishware.
4.1 UPPER RACK
Load the upper rack with dessert
plates, cups, glasses etc.
ADJUSTABLE SHELVES
(Select Models)
Depending on the size of the glasses
and cups, the shelf height setting may
be adjusted.
1. Fold the shelf upwards A.
2. Positioning at the desired height B.
3. Fold the shelf again downwards C.
8
USA
Page 12

COLLAPSIBLE UPPER BASKET
WIRES
(Select Models)
You can use collapsible wires when
you need a larger space for your
dishes in the upper basket of your
machine.
To bring the collapsible wires into
horizontal position, grab the wire from
the middle position and push them
in the direction of arrow in the figure.
Place your larger dishes into the area
created. To bring the wires back to
vertical position, just lift them up.
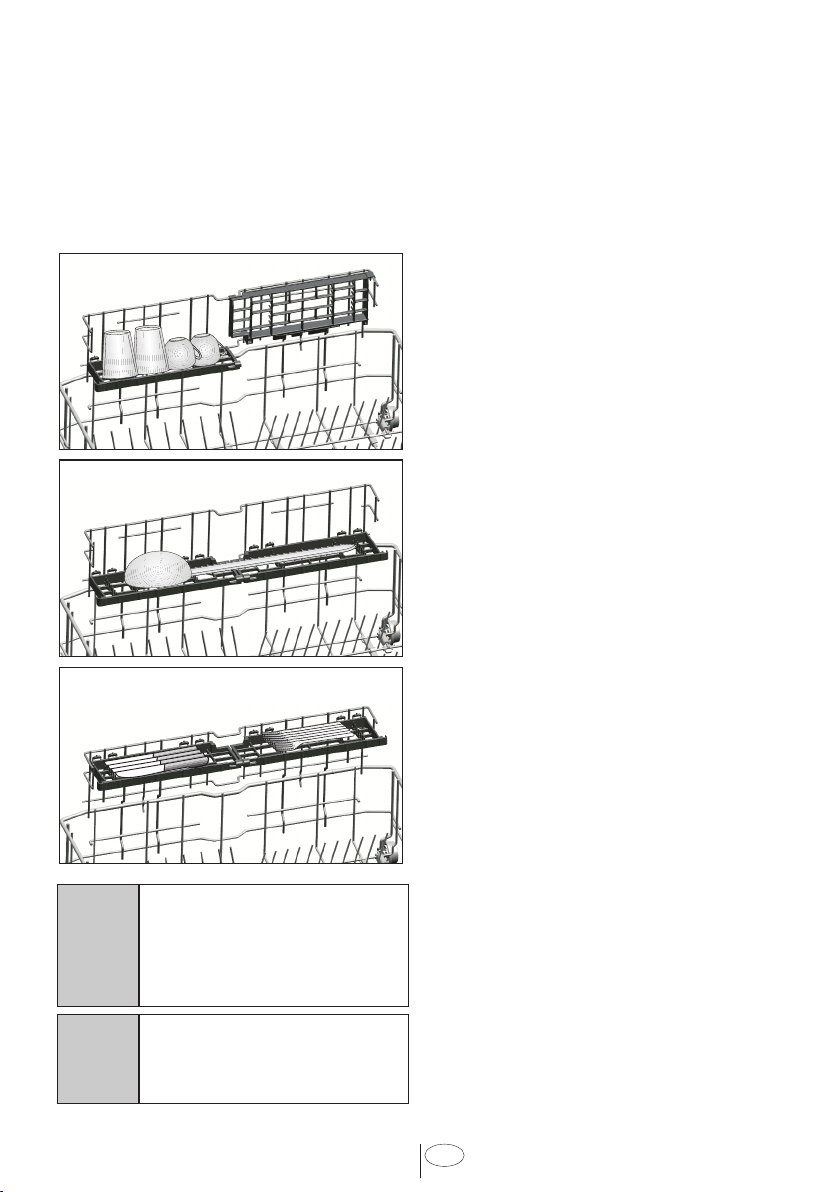
UPPER BASKET MULTIPURPOSE
SERVICE RACK
(Select Models)
This accessory located at the upper
basket of your machine allows you to
easily wash pieces such as extra long
ladles and bread knives.
You can lift up the upper basket
multipurpose service rack to remove it
if you do not want to use it.
C
Bringing the wires to the
horizontal position by
holding them from the
tips may cause them to
bend. Therefore, hold the
wires from their stems
while bringing them to
the horizontal or vertical
positions.
If you want to use the upper basket
multipurpose service rack again, you
can easily attach it to the side section
of your upper basket.
9
USA
Page 13

1
2
3
ADJUSTING THE HEIGHT OF THE
UPPER BASKET
(Select Models)
The upper basket height adjustment
mechanism has been designed for
you to create large spaces in the lower
or upper sections of your machine
depending on your needs by adjusting
the height in the upper or lower
direction while your basket is empty or
loaded.
Thanks to this mechanism, you can
use your basket in three different
positions, namely lower, middle and
upper positions (1, 2, 3).
1. To raise your basket, hold the
upper basket wires with both hands
while the basket is in the lowermost
position and pull them up (A).
2. You will hear a "Click" from
the right and left mechanisms,
indicating that the basket has
reached the next level. Release the
basket.
Repeat the process if the height is not
sufficient.
1
2
3
To lower the basket, while it is in the
uppermost position;
1. Hold the upper basket wires with
both hands, slightly lift up the
basket and simultaneously push
and release the latches shown in
the figure (B).
2. Lower the basket from its current
position to the lower one.
3. Release the basket after it has
reached one level down.
Repeat the process if the height is not
sufficient.
The movement mechanism
C
C
may not function properly
if the upper basket is
overloaded or if the weight
distribution is not balanced.
In heavier conditions, there
is the risk of falling one level
down.
Make sure that the
adjustment mechanism has
the same positions on the
right and left sides of the
upper basket.
10
USA
Page 14

HEIGHT SETTING
(Select Models)
In certain models, the height setting of
the upper rack may be changed using
the wheels which are present at two
height levels.
CAUTION:Make sure that
A
the rack is empty. Changing
the height setting while the
rack contains tableware
could cause the contents to
dislodge, causing personal
injury or damage to the
tableware.
3. Place the rack into the tracks
again at the desired height C.
4. Push the latches back into the
correct position.
1. Release the latches on both the
right and left tracks of the upper
rack by turning them to the outside
A.
2. Pull out the rack completely B.
4.2 LOWER RACK
Use the lower rack for plates, bowls,
pots etc.
11
USA
Page 15

COLLAPSIBLE LOWER BASKET
TINES
(Select Models)
There are foldable tines (A) located
at the lower basket of the machine
are designed for an easier placement
of large pieces such as pans, bowls,
etc. You can create larger spaces by
folding each tines individually or all of
them at once.
COLLAPSIBLE LOWER BASKET
TINES
(Select Models)
There are foldable tines (A) located
at the lower basket of the machine
are designed for an easier placement
of large pieces such as pans, bowls,
etc. You can create larger spaces by
folding each tines individually or all of
them at once.
To bring the collapsible tines into
horizontal position, grab the tines from
mid position and push them in the
directions of arrows (B). To bring the
tines back to vertical position, just lift
them up. Collapsible tines will click into
the latch again (C).
Bringing the tines to the
horizontal position by
C
holding them from the
tips may cause them to
bend. Therefore, it will be
appropriate to bring the tines
in the middle to horizontal or
vertical position by holding
them from their stems and
pushing in the direction of
arrow.
To bring the collapsible tines into
horizontal position, grab the tines from
mid position and push them in the
directions of arrows (B). To bring the
tines back to vertical position, just lift
them up. Collapsible tines will click into
the latch again (C).
Bringing the tines to the
horizontal position by
holding them from the
tips may cause them to
bend. Therefore, it will be
appropriate to bring the tines
in the middle to horizontal or
vertical position by holding
them from their stems and
pushing in the direction of
arrow.
12
C
USA
Page 16

SILVERWARE BASKET
(Select Models)
Silverware basket is designed to wash
your dishes such as knife, fork, spoon,
etc. in a cleaner manner.
Since the cutlery basket can be moved
(A, B), you can create a wider space
while placing your dishes to the lower
basket and free up space for your
dishes in different sizes.
SILVERWARE BASKET
(Select Models)
Silverware basket is designed to wash
your dishes such as knife, fork, spoon,
etc. in an efficient manner.
Since the silverware basket can be
moved (A, B), you can create more
space while placing your dishes in the
lower basket and free up space for
your dishes of different sizes.
C
NOTICE: When finished, test
to ensure that the spray arm
can still move freely.
13
USA
Page 17

TRAY WASH SUPPORTS
(Select Models)
Use the supports to wash trays in the
bottom basket.
See the Auxiliary functions section
for appropriate program and function
selection.
LOWER BASKET BOTTLE WIRE
(Select Models)
The bottle wire is designed for easier
washing of long pieces with wide
mouths. You may take out the bottle
wire from the basket when not in use
by pulling it out from both sides (H).
SOFTTOUCH ACCESSORY
(Select Models)
The SoftTouch Accessory found in the
lower basket of your machine enables
a safe washing for your fragile glasses.
LOWER BASKET GLASS HOLDER
(Select Models)
Lower Basket Glass Holder found
in the lower basket of your machine
enables a safe washing for your
oversized and tall glasses.
14
USA
Page 18
LOWER BASKET MULTIPURPOSE
/ HEIGHT ADJUSTABLE SERVICE
RACK
(Select Models)
This accessory located at the lower
basket of your machine allows you
to easily wash pieces such as extra
glasses, long ladles and bread knives.
C
A
You may use the racks as
required by moving them to
lower or upper position, or
close them to create a wider
space in your lower basket.
Make sure that the impeller
does not touch the dishes
you placed on the racks.
15
USA
Page 19
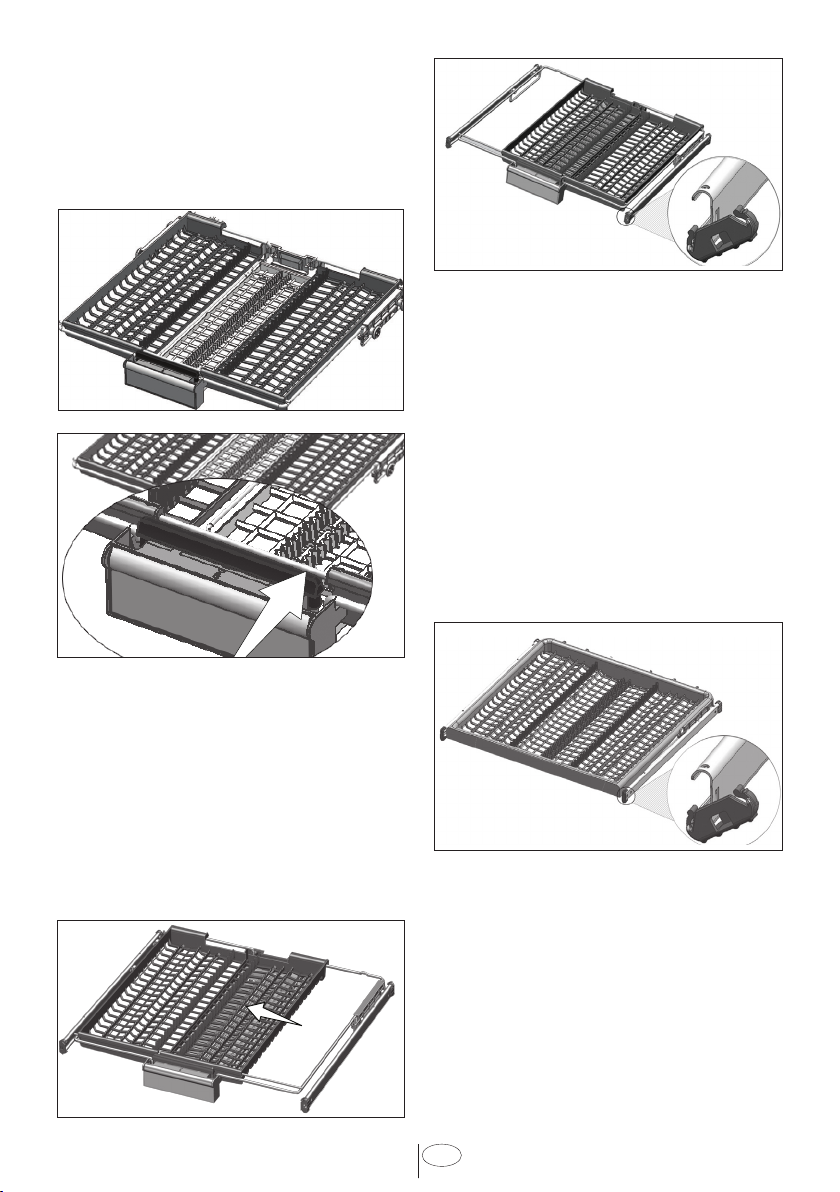
CEILING CUTLERY BASKET
(Select Models)
Ceiling cutlery basket is designed
to wash your cutlery items such as
forks, spoons and etc. by placing them
between the bars on the basket.
1
When the central tray is in the lower
position, you can load long/high items
such as coffee cups, ladles, etc. on the
tray. When the side trays lean on two
side walls, the handle can be pulled
to allow the central tray to rise and the
system to be locked.
CEILING CUTLERY BASKET
(Select Models)
Ceiling cutlery basket is designed
to wash your cutlery items such as
forks, spoons and etc. by placing them
between the bars on the basket..
In models with partial movement
feature, pushing the bar (1) on the
handle enables the central tray of the
basket to get to the lower position and
the system gets unlocked. Thus right
and left side trays can be used as
moving parts.
The free space enabled by the side
trays allows long parts to be loaded in
the upper basket.
16
USA
Page 20

4.3 PROPER AND IMPROPER LOADING OF DISHWARE
6
44 44 4
32 432
3
3
2
22
2
1
111
2
1
2
111
2
1: Salad Fork
2: Teaspoon
3: Dinner fork
4: Knife-solid handle
2 222
3
5
444
3
3333
5: Serving spoon
6: Serving fork
Sliding Cutlery Basket load pattern for 12 place
settings according to the AHAM DW-1 Standards
• Place all containers such as cups, glasses and pots into the dishwasher with
the opening facing downwards (so that no water can collect).
• The movement of the spray arms must not be hindered.
• Do not overload your dishwasher.
• Only with suitable dishes (mentioned in section 5) will you obtain optimal
washing results with a sensible use of energy.
3
2
2
4
3
222
1
2
1
1
2
1
2
222
5
44
incorrect incorrect
incorrect incorrect
17
USA
Page 21

5. WHAT SHOULD NOT
BE WASHED IN YOUR
DISHWASHER
• Rust-sensitive steel parts like iron
and cast iron that can rust and
stain other utensils and damage
the interior stainless steel liner
of the dishwasher and void the
warranty. Do not wash copper,
brass, pewter, bronze or tin.
• Cutlery with wooden or horn
handles and cutlery with motherof-pearl or porcelain handles will
deteriorate over time if put in the
dishwasher.
• Plastics may lose their shape
or color with hot water, please
follow the instructions of plastic
manufacturers. Be sure that plastic
items are marked “dishwasher
safe”.
• Glued dishes or cutlery are not
suitable for machine washing
since certain adhesives may get
soft or dissolve with hot water.
• Aluminum may fade over time.
Minerals in water and detergent
may cause the aluminum to
darken or spot.
• Sterling silver articles should not
be washed in the dishwasher
because they tend to discolor
and become dull by dishwasher
detergent.
• Silverware and stainless steel
items should not be in contact with
each other. Mixing these items can
cause staining. Remove and hand
dry these items immediately when
the program ends.
• Decorated glasses, porcelain, fine
china and china with gold rims
are sensitive to machine washing.
They may lose their patterns and
colors over time.
• Crystal and very fine glassware
may become opaque (etch) losing
their shine over time. You may
prefer to wash them by hand.
• Do not wash sponges or dish
cloths in dishwasher.
• Do not wash art and craft articles
in dishwasher.
• Disposable plastics and
disposable aluminum cannot
withstand high temperatures; do
not wash them in the dishwasher.
CAUTION: If in doubt,
A
C
CARING FOR YOUR TABLE-WARE
The combination of high temperatures
and dishwasher detergent may cause
damage to some items if they are
washed in the dishwasher. Remember,
if there is any doubt about any aspect
concerning items to be washed in the
dishwasher, follow the instructions from
the manufacturer of the items, or wash
the items by hand.
wash by hand or follow
the instructions from the
manufacturer of utensils,
dishes, glasses or pots and
pans.
Do not wash items soiled
with cigarette ash, candle
wax, varnish, paints or
chemicals since they can
damage your dishwasher.
NOTICE: We recommend
when buying new dishware,
try to choose ones that are
suitable for machine washing
(marked as dishwasher
safe).
18
USA
Page 22
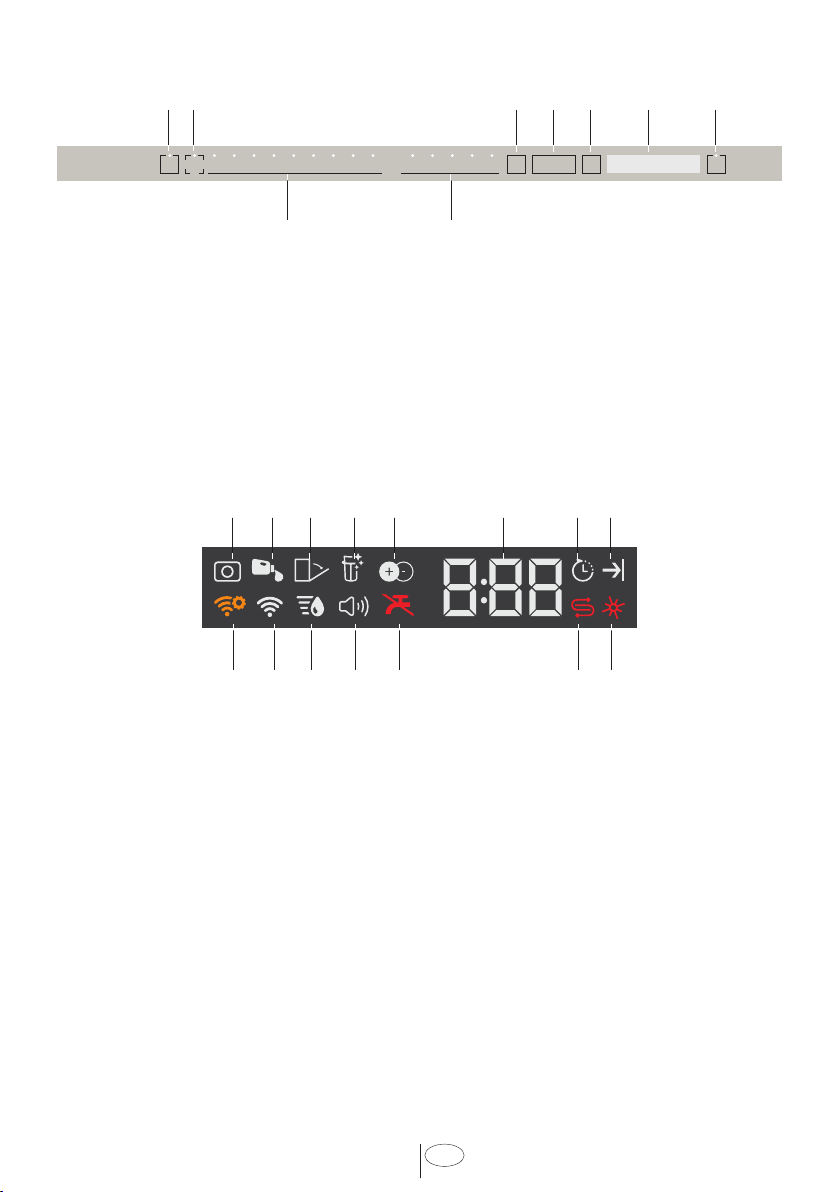
6. OPERATING THE PRODUCT
1 2 3
9
1. On / Off Key
2.
RemoteStart Key
3. Menu Key
4. Time Delay Selection / Menu
Direction Selection Keys
5. Selection / Confirmation Key
6. Display
7. Start / Pause / Cancel Key
10
11 121813 14 15 16 17
4 5 6 7
8
8. Function Selection Keys
F1
F2
F3
F4
F5
PowerWash Function
Rapid Clean Function
Super Gloss Function
Sanitize Function
Half Load Function
9. Programme Selection Keys
192021222324
10. Tablet Detergent Indicator (depends on the model)
11. Liquid Detergent Dosing Indicator (depends on the model)
12. Auto Door Open Indicator (depends on the model)
13. Filter Cleaning Function Indicator (depends on the model)
14. IonActive Function Indicator (depends on the model)
15. Delay Time / Programme Time Indicator
16. Delayed Start Indicator
17. End of Programme Indicator
18. Rinse Aid Indicator
19. Salt Indicator (Select Models)
20. Water Cut-off Indicator
21. Sound Settings Menu Indicator
22. Water Hardness Settings Menu Indicator
23.
HomeWhiz Indicator
24.
HomeWhiz Setting Indicator
19
USA
Page 23

On/Off Key
When you press the On/Off key, the
indicator lights illuminate on the display
for ON position. The lights turn off in
OFF position.
PROGRAMME SELECTION /
PROGRAMME CANCEL KEY
Select the desired programme using
the “programme selection keys” and
press the button.
To cancel the running programme,
open the door of the machine and
press and hold the Programme Start/
Pause/Cancel key for 3 seconds.
After the 3 - 2 - 1 countdown, 0:01 is
displayed, close the door of the product
and wait for the draining process
complete. Draining is completed in
2 minutes and the machine gives an
audible warning when it is completed.
FUNCTION KEYS
If you press any of the Function keys
during programme selection or time
delay selection, an affirmative key
signal will be heard provided that the
relevant function is supported by the
selected programme. Function will be
deemed selected when the indicator of
the selected function is lit.
To cancel the selected function, keep
the function key pressed until the
function indicator disappears.
4. Put adequate amount of detergent
into the detergent dispenser.
PROGRAMME SELECTION
1. Press the On/Off button to turn on
your machine.
2. Check the Salt and Rinse Aid
indicators and add salt and/or rinse
aid if needed.
3. Refer to the table of "Programme
data and average consumption
values" to determine a washing
programme suitable for your
dishes.
4. Selected programme will start
when you close the door of your
machine.
PREPARING THE MACHINE
1. Open the door of the dishwasher.
2. Place the dishes in accordance
with the instructions in the user
manual.
3. Make sure that the upper and lower
impellers rotate freely.
20
USA
Page 24

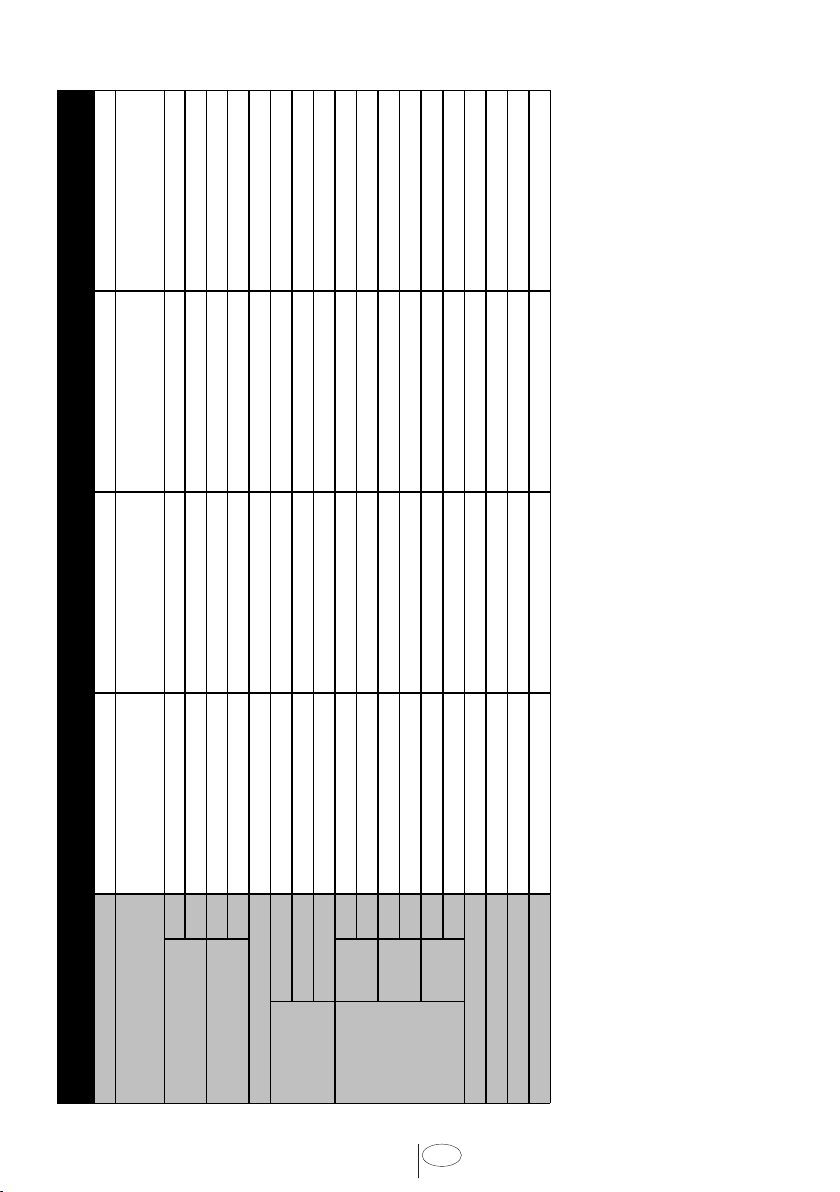
123456789
Auto Mixwash+ Pots & Pans+ Regular Wash * GlassCare ExpressDry Quick Wash Rinse & Hold Downlaod Cycle
142-157 131 158 122-131 113 120 113
122-131 151 167 142-157 149 160 131
0
------+--
++++++- - -
-+++-+- - 15-40 25-40 25-40 15-25 15 15-25 15
+++++- -+-
+++++++- -
++++++- - -
+-++- --0
100-152 182 122 100-152 101 58
9,0-21,2 19,2 20,2 9,0-21,2 13,6 10,4 11,6 4,2
2,38-5,55 5,02 5,34 2,38-5,55 3,40 2,70 3,10 1,10
The consumption values shown in the table were determined under standard conditions. For this reason, deviations are possi
conditions. * The energy-usage label is based on this program.
Recommended
Detergent in
Program number
Program name
Degree of dirtiness
Wash Temperatures
Rinse Temperatures
Water (gallons)
Duration (minutes)
Water (liters)
# Sensitivity: Public
0
- -
ble under practical
PROGRAM TABLE
50-55 55 70 50-55 45 49 45 -
(°C)
(°F)
Few -
Few - Medium
Medium High Medium Few
61-67 66 75 61-67 65 71 55 -
Medium - High
(°F)
(°C)
15 ml
25-40 40 40 25-40 25 25-40 15-25 - -
ml
+ 5 ml
15-25 ml
Hard
5-88 85-855-83-5- -
3-8 8 8 5 3-5 5 3 - -
15-40 40 40 25 15-25 25 15 - -
ml
tsp
tsp
water
Medium
water
3-8 5-8 5-8 3-5 3 3-5 3 - -
ml
tsp
Soft
water
35 15
detergent
21
amount
USA
Wash
Main wash
Sanitize
Dry
dispenser
section
Page 25
1234
----
++++
++++
855-
+-+-
+++-
+++-
+-++
100-152 182 122 100-152
9,0-21,2 19,2 20,2 9,0-21,2
2,38-5,55 5,02 5,34 2,38-5,55
Wash Temperatures
Rinse Temperatures
Sanitize
Water (gallons)
Main wash
Duration (minutes)
Water (liters)
PROGRAM TABLE
Recommended
detergent
amount
Detergent in
dispenser
section
Program number
Program name
Degree of dirtiness
# Sensitivity: Public
50-55 55 70 50-55
61-67 66 75 61-67
142-157 131 158 122-131
High Medium Medium -
122-131 151 167 142-157
40 25 25 -
5-8 3-5 3-5 -
25-40 15-25 15-25 -
85-85-88
40 25-40 25-40 40
* Pots & Pans DailyWash SilentWash ProCare
(°F)
(°C)
(°F)
15 ml
(°C)
ml
+ 5 ml
15-25 ml
Hard
ml
tsp
tsp
water
Medium
water
22
USA
ml
tsp
Soft
water
Wash
Dry
Page 26

6.4 AUXILIARY FUNCTIONS
Washing programs of your dishwasher
are designed to obtain the best
cleaning effect, considering the type
of the soiling, soiling degree and
properties of the dishes to be washed.
Auxiliary functions allow you save from
time, water and power.
Auxiliary functions may
C
C
Half Load function
It is used to operate the machine
without loading it completely.
1. Load your dishes in the machine as
2. Turn the machine on with On/Off
3. Select the desired program and
4. Close the door of the machine to
Rapid Clean Function
It shortens the time of the washing
cycle selected and decreases water
consumption by enabling washing
under higher pressure.
Super Gloss Function
It provides superior drying
performance.
cause changes in the
program duration.
Auxiliary functions are not
suitable for all washing
programs. Indicator of the
auxiliary function that is not
compatible with the program
will not be active.
you like. You can use both upper
and lower racks.
key.
press the Half Load key. The Half
Load indicator will light on the
display in the Function Selected
indicator.
start the program.
Sanitize Function
Sanitize function raises the water
temperature in the final rinse to
meet the requirements of NSF/ANSI
STANDARD 184 for Residential
Dishwashers. Certified residential
dishwashers are not intended for
licensed food establishments.
At the end of a succesfull
C
C
C
PowerWash Function
dishes places in the right side of the
lower basket. It will give better results
to place the most soiled dish to the
right front side.
C
23
USA
sanitization “SAN“ is
displayed on the display.
“SAN” is not displayed on
the display if the cycle is
interrupted or the water
could not be heated to the
required temperature.
Available programs are
indicated on Program Table
chart.
Note: Only sanitizing cycles
have been designed to meet
the requirements of NSF/
ANSI Standard 184 for soil
removal and sanitization
efficacy.
There is no intention, either
directly or indirectly, that
all cycles have passed
sanitization performance
tests.
PowerWash
impeller located
under the lower
impeller helps
washing your
heavily soiled
Do not try to remove the
PowerWash impeller!
Page 27

HomeWhiz Function
You can check your dishwasher and
learn about its status via your smart
device with the HomeWhiz function.
You can use your machine
C
C
C
The display when HomeWhiz is
enabled.
via your smart device while
the function is selected. You
can monitor your machine
through the application when
the function is not selected.
You can check the indicator
on the product to see if the
function is enabled or not.
If the function is disabled,
the Wi-Fi indicator will be off
or continuously flash at short
intervals. For example, when
the wireless connection
setting is off or the door of
the machine is open.
The function will be disabled
when the door of the
dishwasher is open or when
operations regarding On/
Off are performed on the
machine. It can be enabled
again with the remote control
key.
HOMEWHIZ SETUP AND
USER ACCOUNT SETTINGS
Install the HomeWhiz application from
the application store of your smart
device to use the WLAN function of
your machine. Make sure that your
smart device is connected to the
internet to use the application.
If you are using the application for the
first time, complete the registration
process with your e-mail address on
the application. Once you've completed
the registration process, you can use
all HomeWhiz supported appliances in
your house through this account.
You can tap "Add/Remove Appliance"
under the "Appliances" section to
see the appliances paired with your
account. You can perform the user
pairing processes of these appliances
from this page.
Initial setup
1 Tap "Add/Remove Appliance"
section on the HomeWhiz
application.
2 Tap "Tap here to setup a new
appliance".
3. When the product is off, press
the on/off and remote start keys
simultaneously to enter the settings
menu. Press the selection key
to set the product to “wireless
connection setup” status.
4. Then, in the settings section of
your smart device, connect to
“HomeWhiz xxx-xxxx” network
under the Wi-Fi settings. Password
of the network can be seen on the
HomeWhiz application.
5. Connect your smart device to the
HomeWhiz network and return to
the HomeWhiz application. On
the application, you can see the
dishwasher you are adding. Tap
Next to proceed to the next step.
6. Select the network to which you
want to connect your dishwasher
and enter the password.
24
USA
Page 28

7. While the dishwasher is connecting
to the selected network, you will
see the Wi-Fi icon ( ) flashing.
Once the connection has been
established, the said icon will
become on permanently.
8. Once your dishwasher is
connected to the selected network,
you need to connect to the same
network on your smart device. If
your smart device does not get
connected automatically, go to
its settings and connect it to the
network to which your dishwasher
is connected.
9. Return to the HomeWhiz
application and give a name to
your dishwasher. This is the last
step. You can see your product on
the “Products” page.
10. Once the setup of the dishwasher
has been performed successfully,
the product will show the main
screen automatically and return to
the use mode.
11. If the setup has failed, or if it could
not be completed within 5 minutes
in the setup mode, the Wi-Fi icon
will go off and the product will
switch to the off mode. To perform
setup again, please repeat the
steps starting from step 1.
Using the dishwasher on more than
one device
You can use your dishwasher on more
than one smart device. Install the
HomeWhiz application on the other
smart device to use this feature. You
need to log in with your account upon
launching the application.
If the account you have
C
Follow the steps below to use an
already setup dishwasher through a
new account.
1. Create a new account and use this
2. Tap “Add/Remove Appliance”
3. Tap (+) next to the dishwasher you
4. Your request to add the appliance
C
C
25
USA
logged on is the one to
which you have added
appliance(s) before, you can
start using your dishwasher
directly after logging in.
account to log into the HomeWhiz
application. Make sure that your
smart device and dishwasher are
connected to the same network.
on the Products page. You
can see the appliance and the
user it belongs to under “Other
Appliances” tab.
want to add and give a name to the
appliance.
will be sent to its owner via e-mail.
You can start to use the appliance
jointly once the owner confirms
your request.
Your smart device and
dishwasher do not need to
be connected to the same
network once the setup
processes are complete. You
can use your appliance as
long as your smart device is
connected to the internet.
You can tap "Add/Remove
Appliance" under the
"Appliances" section to
see the appliances paired
with your account. You
can perform the user
pairing processes of these
appliances from this page.
Page 29

HomeWhiz on/off
Press the remotestart key to enable
the function.
Product indicator when the function is
enabled.
If you press the remote start key while
the function is enabled, the Home
Whiz function will be disabled, and the
product indicator will return to the delay
time/programme time display. In the off
position, the HomeWhiz key LED will
go off.
You can check the indicator
C
Wireless connection is on / off When
the machine is on, press the “Menu”
key for 1 second to enter the settings
menu. Follow the screen and press
<- and +> keys on the panel, then wait
until the Wi-Fi connection indicator
comes on. Press the selection key
and if the Wi-Fi connection is on,
turn it off; if it is off, turn it on. In the
on the product to see if
wireless connection is
enabled or not.
If the wireless connection is
off, you can see that the WiFi icon is off.
If the Wi-Fi icon is on, this
means that the wireless
connection of the product
is on and the product is
connected to the wireless
network. If the Wi-Fi icon
is continuously flashing at
regular intervals, this means
that it is enabled but could
not connect or is trying to
connect the network.
26
wireless connection on/off settings
menu, if the wireless connection is
on, the Wi-Fi connection indicator will
light permanently; if it is off, the Wi-Fi
connection indicator will flash at short
intervals.
Once the wireless connection has been
turned “On”, your machine will connect
to the home network by using the setup
settings you made before.
Deleting the HomeWhiz settings
While the dishwasher is on, press the
“Menu” key for 1 second to enter the
settings menu. Follow the screen and
press <- and +> keys on the panel,
then proceed until the Wi-Fi setting
indicator comes on. Press and hold the
selection key for 5 seconds. After the 5
- 4 - 3 - 2 - 1 countdown on the display,
your settings will be deleted.
HomeWhiz troubleshooting
Follow these instructions if you
encounter a control or connection
problem. If it persists, take the next
step.
1. Check if your smart device is
connected to the internet.
2. Close the HomeWhiz application
on your smart device and start it
again.
3. Restart your smart device.
4. Check the wireless connection
status of your dishwasher. If
you see "WLAN: Off", switch it
to "WLAN: On" and wait for the
machine to connect. Then close
the HomeWhiz application on your
smart device and start it again.
5. If the connection cannot be
established following the
instructions above, repeat the initial
setup settings on the appliance.
6. If the problem persists, contact the
authorised service.
USA
Page 30

Changing the Download Cycle
You can use the HomeWhiz application
to change the Download Cycle, which
is the last program on the product.
You can check the Table of Program
Data and Average Consumption Values
to see what the downloaded programs
might be and the default Download
Cycle.
To change the Download Cycle:
• Connect to your product on the
HomeWhiz application.
• Turn on the Remote Control
function for the product.
• Go to the settings page of the
product on the HomeWhiz
application.
• On the settings page of the
product, proceed to the Download
Cycle Program page.
• On the Download Cycle Program
page, select a program to
download on your product.
• Select the desired program on the
Download Cycle page, and press
Download Cycle on the HomeWhiz
application.
• While the program is being
downloaded, you will see an
animation on the program and
HomeWhiz application.
• Once the download procedure
is complete, you can select and
install the Download Cycle on
the product or the HomeWhiz
application.
You can check the Table of
C
C
Program Data and Average
Consumption values to
see the programs you can
download on your product.
If you download another
program on the product, your
previous selection will be
cancelled.
You can download as many
C
Floor illumination
Illuminates to show program is still
running.
(Select Models)
Your machine reflects a light to the
floor during the washing process. This
light turns off after the washing process
is complete.
C
Interior Lighting
(Select Models)
Some models have interior lighting to
illuminate the interior when the door is
opened.
Changing the interior lighting
setting
1. After switching on your machine,
2. Press <- and +> to proceed to “L:”
3. Press the Menu key to exit the
programs as you wish on
the product, and change the
Download Cycle whenever
you want. You just need to
make sure that your smart
device and product are
connected to the internet
and the Remote Control
function of the product is
turned on.
Floor illumination cannot be
cancelled by the user.
press the Menu key for 1 second.
on the display. Select the position
you want with the Selection key.
Interior lighting is off in “L:0”
position and on in “L:1” position.
settings menu. Your setting will be
saved automatically.
27
USA
Page 31

Changing Warning Sound Volume
1. After switching on your machine,
press the Menu key for 1 second.
2. Press <- and +> to proceed to “S:”
on the display.
3. Each pressing on the Selection
key will change the warning sound
volume as “S:0” off, “S:1” medium
and “S:2” high.
4. Press the Menu key to exit the
settings menu. Your setting will be
saved automatically.
Factory setting of your
C
machine is "S:2".
6.5 SCHEDULING THE
WASHING TIME
Time Delay
If an economical electricity tariff is
applied in your region, you can use
the Time Delay function to wash your
dishes during appropriate hours.
You can delay the start of the selected
program until 24 hours.
1. Press the Time Delay function
key after selecting the washing
program and other auxiliary
functions.
2. Once you press the Time Delay
key, Display Information Line
will show "0:30" and Time Delay
indicator will start flashing.
3. Set the desired time by pressing
the Time Delay key. Time will
increase with increments of 30
minutes up to 6 hours and after
that in 1 hour increments up to 24
hours every time you press the key.
4. Close the door of your machine
after setting the Delayed Start.
Once the delay time is over,
the selected program will start
automatically.
Changing the settings while Time
Delay function is active
While the Time Delay function is
activated, you cannot make changes
in the washing program, auxiliary
functions or the duration of delay time.
Program and auxiliary
C
To cancel the Time Delay function
Open the door of the product Press
and hold the Program Selection /
Program Cancel keys for 3 seconds.
After the 3 - 2 - 1 countdown, 0:01 is
displayed, close the door of the product
and wait for the draining process
complete. Draining is completed in
2 minutes and the machine gives an
audible warning when it is completed.
C
C
functions cannot be set/
changed after the program
has started.
You can select and start a
new program following the
cancellation of Time Delay
function.
Time Delay function cannot
be set after the program
starts.
28
USA
Page 32

6.6 STARTING THE PROGRAM
Close the door of your machine to
start it after selecting the program and
auxiliary functions.
Select Models:
C
C
C
Your machine performs
water softening depending
on the hardness level of
the supply water. Washing
time can change while
the program is running
depending on the ambient
temperature where your
machine is installed,
temperature of the supply
water and amount of the
dishes.
Pay attention not to open the
door of the machine when
it is running. There may
be a rush of vapour when
you open the door of your
machine; be careful.
The machine will be
switched off if no button is
pressed within 5 seconds
after opening the door while
the machine is running.
The machine will remain
C
6.7 CANCELLING THE
PROGRAM
Open the door of the product press and
hold the Program Selection / Program
Cancel keys for 3 seconds. After the
3 - 2 - 1 countdown, 0:01 is displayed,
close the door of the product and wait
for the draining process complete.
Draining is completed in 2 minutes and
the machine gives an audible warning
when it is completed.
C
silent in pause mode for
some time in order to
remove the water from the
machine and on the dishes
completely and to have the
water softener cleaned, and
then it will resume running in
drying mode.
There might be residues
of detergent or rinse aid
in the machine and/or on
the pieces being washed
depending on the step the
program you have cancelled
was in.
C
After the door has been
opened, if any button is
pressed within 5 seconds
and the door is closed, the
selected program resumes;
otherwise, the machine will
be switched off.
Open the door after the
machine has been switched
off, press On/Off button
and close the door within 5
seconds. The program will
resume washing.
6.8 SALT INDICATOR ( )
(MODEL DEPENDING)
Please check the salt indicator on
the display to see whether there is
adequate amount of softening salt
in the dishwasher or not. You need
to refill the salt reservoir with salt
whenever salt indicator appears on the
display of your machine.
Adjusting the water hardness
level is explained in Water
Softening System section.
29
C
USA
Page 33

6.9 RINSE AID INDICATOR ( )
Please check the rinse aid indicator on the
display to see whether there is adequate
amount of rinse aid in the dishwasher
or not. You need to refill the rinse aid
reservoir with rinse aid whenever rinse aid
indicator appears on the display of your
machine.
Adjusting the amount of rinse aid
1. After switching on your machine,
press the Menu key for 1 second.
2. Using <- and +> keys, proceed to
“P:” on the display.
3. Set to the appropriate level with the
Selection key.
4. Press the Menu key to exit the
settings menu. Your setting will be
saved automatically.
No rinse aid dispensed in P:0 wash
position.
1 dose of rinse aid is dispensed in P:1
position.
2 doses of rinse aid are dispensed in
P:2 position.
3 doses of rinse aid are dispensed in
P:3 position.
4 doses of rinse aid are dispensed in
P:4 position.
6.10 END OF PROGRAM
When the program you have
C
selected comes to an end,
an audible warning signal
will warn you to turn off your
machine. This audible signal
will warn you with certain
intervals before it turns off.
End of Program indicator will light up
when the washing program is over.
1. Open the door of the machine.
2. Press On/Off key to turn off your
machine.
3. Close the tap.
4. Unplug the machine from the
socket.
For energy saving, the
C
C
machine is automatically
turned off following the
completion of the program or
if the program is not started.
Leave your dishes in the
machine for about 15
minutes to allow them cool
down after they are washed.
Your dishes will dry in a
shorter time if you leave
the door of your machine
ajar during this period. This
process will increase the
drying effectiveness of your
machine.
6.11 WATER CUT-OFF
WARNING
If mains water is cut or water inlet
tap is turned off the machine cannot
take water in and E:02 icon will flash
on the program indicator. As long
as the problem continues, washing
program is paused and the water inlet
is checked regularly by the machine;
when the water is restored E:02 icon
will disappear after a while and the
washing program resumes.
30
USA
Page 34

6.12 OVERFLOWING
WARNING
If the machine intakes too much
water or there is leakage at any of the
components then the machine will
detect this and E:01 icon will flash on
the Program indicator. As long as the
overflowing continues safety algorithm
will be active and try to discharge the
water. If overflowing stops and safety
is assured, E:01 icon will disappear.
If E:01 does not disappear, there
is a permanent fault. In this case
the authorised service should be
contacted.
31
USA
Page 35

7. DETERGENT
You can use powder, liquid/gel or tablet
detergents in the machine.
Only use in the machine
A
the detergents produced
particularly for use
with dishwashers. We
recommend you not to use
detergents that contain
chlorine and phosphate
as they are harmful for the
environment.
7.1 ADDING DETERGENT
Pay attention to the
C
A
warnings on the detergent
packaging to get better
washing and drying results.
Contact the manufacturer
of the detergent for further
questions.
Do not put solvents into the
detergent dispenser. There
is the risk of explosion!
C
Inside the detergent
dispenser there are level
markings that help you
use appropriate amount of
powder detergent. When
brimful, detergent dispenser
will contain 1.5 Ounces
(45 cm³) of detergent. Fill
detergent up to .5 Ounces
(15 cm³) or .85 ounces
(25 cm³) level marks in
the detergent dispenser
according to fullness of
the machine and/or soiling
degree of the dishes. One
tablet is enough if you are
using detergent tablets.
Put the detergent into the detergent
dispenser just before operating the
machine as illustrated below.
1. Push the latch to right to open the
detergent dispenser lid (A).
2. Put suggested amount of powder,
liquid/gel or tablet detergent in the
reservoir.
32
USA
Page 36
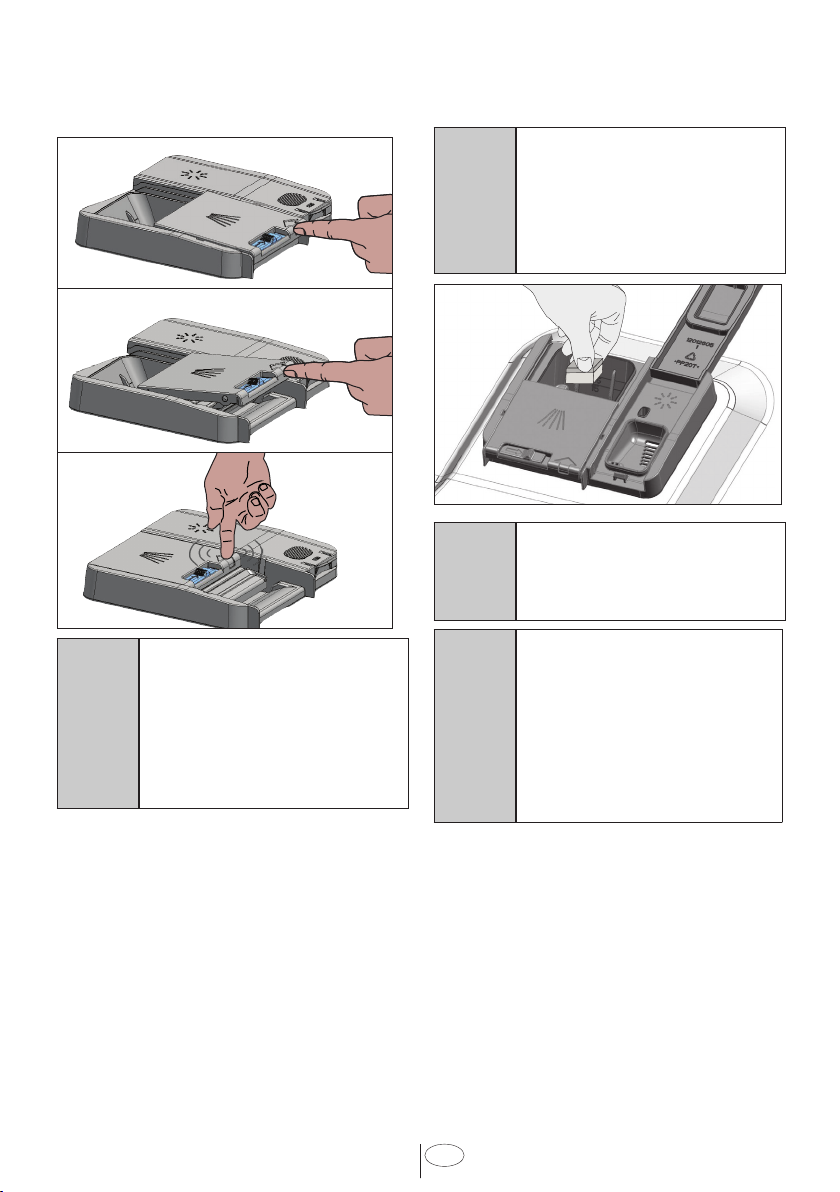
3. Push the lid of the detergent
1
dispenser to close it. A "click" will
be heard when the lid is closed.
2
3
must also be used together with the
detergent if the water hardness level is
above the mentioned level.
The best washing
C
C
performance in dishwashers
is obtained by using
detergent, rinse aid and
water softening salt
individually.
Observe the instructions of
the detergent manufacturer
on the package when using
tablet detergents.
Use powder or liquid/
C
7.2 TABLET DETERGENTS
In addition to the conventional
tablet detergents, there are also
commercially available detergent
tablets that show water softening salt
and/or rinse aid effect. Some types
of these detergents contain specialpurpose components such as glass
and stainless steel protectors. These
tablets show their effects up to a
certain water hardness level (59 gpg).
Water softening salt and rinse aid
gel detergent in short
programs without prewash
since the solubility of
the tablet detergent
changes depending on the
temperature and time.
Contact the detergent
C
When you switch to powder
detergent from tablet detergent:
1. Make sure that salt (Select Models)
2. Set the water hardness to the
3. After the empty washing cycle,
33
USA
manufacturer if your dishes
are wet and/or if you notice
limescale spots particularly
on your glasses after
the washing program is
over when using a tablet
detergent.
and rinse aid reservoirs are full.
highest level and perform an empty
run.
review the user manual and
readjust the water hardness level
so as to suit the water supply.
Page 37

4. Make the appropriate rinse aid
settings.
7.3 RINSE AID
The rinse aid used in
C
1. Open the lid of the rinse aid
2. Fill the reservoir until “MAX” level.
dishwashers is a special
combination that aims to
increase drying efficiency
and prevent water or lime
stains on the washed items.
For this reason, care must
be paid to have rinse aid in
the rinse aid reservoir and
to use rinse aids produced
specially for dishwashers
only.
reservoir with the help of the latch.
3. Slightly press the point (B) of the
reservoir lid to close it.
4. If there are stains on tableware
items after washing, level must
be increased and if there is a blue
trace after wiping them by hand, it
must be decreased. This is set to
position 3 as factory default.
The rinse aid adjustment is
C
C
described under "Adjusting
the amount of rinse aid" in
the section for operating the
machine.
Wipe clean any spilled
rinse aid outside the
reservoir. Rinse aid that
spilled accidentally will
cause foaming and it will
eventually decrease washing
performance.
34
USA
Page 38
8. ADJUSTING THE WATER SOFTENING SYSTEM
(Select Models)
Cleaning, rinsing and drying performance of your dishwasher will increase when
water softening system is adjusted properly.
Adjust the new water hardness level according to the Water hardness level
instruction in this booklet.
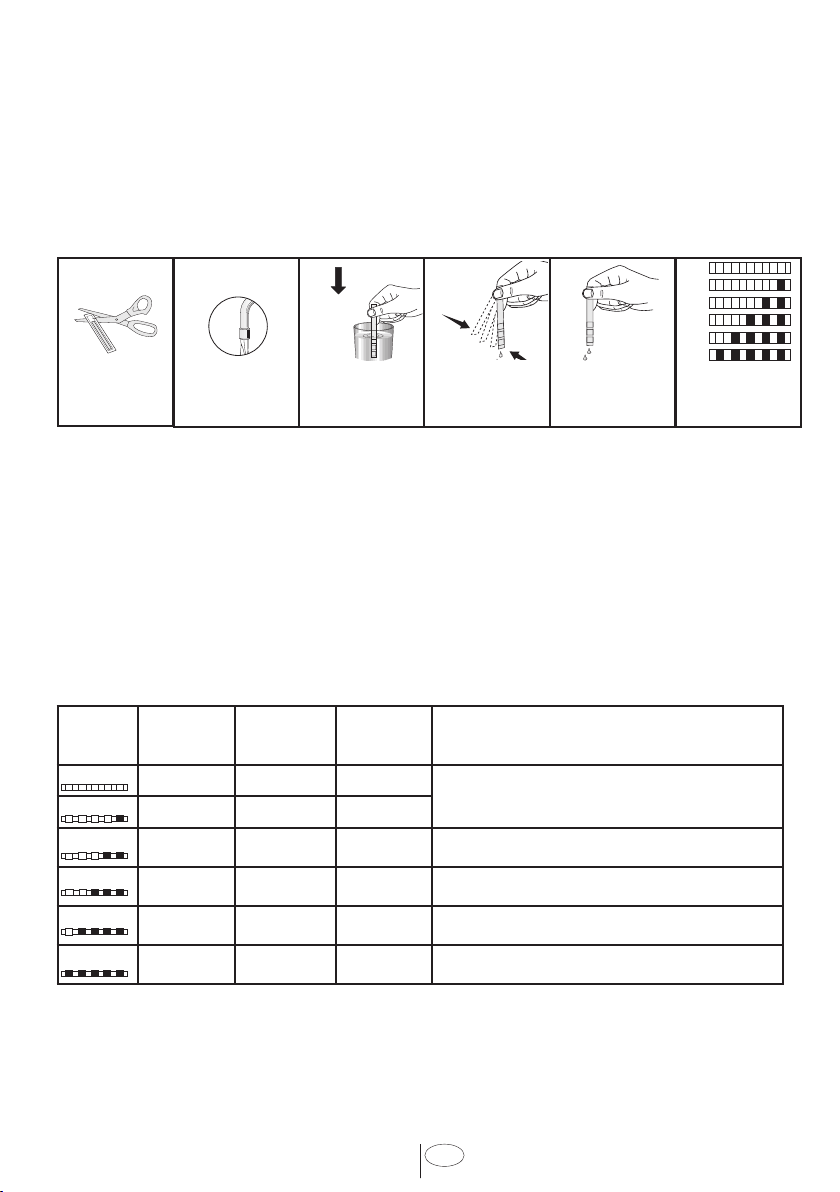
Use the test strip supplied with the product according to the steps given below to
determine hardness level of your supply water.
a b
Remove the test
strip from the
packet.
1 min.
Turn on the tap and
let the water run for
about a minute.
c
1 Second
Hold the test strip in
the water for about
a second.
d e f
1 Minute
Remove the test
strip from the water
and shake it.
Wait for 1 minute. The test strip shows
you the hardness
level.
After determining hardness level of the supply water:
1. After switching on your machine, long press the Menu key
2. Pres the settings menu key for 3 seconds to enter the Settings Menu.
3. Using <- and +> keys, proceed until the water hardness setting indicator
becomes on (“r” position will be displayed).
4. Using the Selection key, adjust water hardness level according to the hardness
of the supply water. For correct setting please see “Water hardness level setting
table”.
5. Press the Menu key to exit the settings menu. Your setting will be saved
automatically.
Water hardness level adjustment table
Hardness
Level
Level 0
Level 1
Level 2
Level 3
Level 4
Level 5
Grains Per
Gallon (gpg)
0-14 0-4 0-8
15-22 5-7 9-13
23-37 8-12 14-22
38-46 13-15 23-27
47-58 16-19 28-34
59-154 20-50 35-90
German Water
Hardness °dH
French Water
Hardness °dF
Water Hardness Level Indicator
Press the Selection key to switch the water
hardness level to position 1. (r1)
Press the Selection key to switch the water
hardness level to position 2. (r2)
Press the Selection key to switch the water
hardness level to position 3. (r3)
Press the Selection key to switch the water
hardness level to position 4. (r4)
Press the Selection key to switch the water
hardness level to position 5. (r5)
If the hardness level of the supply water is above 154 gpg (grains per gallon) or if
you are using well water, then it is recommended to use water purification devices
and special filters.
If the hardness level of the supply water is below 22 gpg, there is no need to use
salt in your dishwasher. If this is the case, “No Salt Warning Indicator” (if any)
illuminates continuously on the panel of your machine.
35
USA
Page 39
If the water hardness level adjustment
is set to level 1, the “No salt warning
indicator” will illuminate continuously
although it is not necessary to use salt.
If you use salt under this condition,
salt will not be consumed and the Salt
indicator will not illuminate.
If you move your house,
C
it is necessary to readjust
water hardness level of your
machine by considering the
information given above
according to the hardness
level of the supply water
in your new location. Your
machine will display the
most recently adjusted water
hardness level.
9. FILLING THE DISHWASHER
SALT DISPENSER
(Select Models)
Water softening system needs to be
regenerated in order for the product
operates with the same performance
continuously. Dishwasher salt is used
for this purpose.
Use only special softening
C
C
salts produced particularly
for the dishwashers in your
machine.
It is recommended to use
granule- or powder-formed
softening salts in the
water softening system.
Do not use salts that do
not completely dissolve in
water such as table salt or
rock salt. Otherwise the
performance of the system
may deteriorate in time.
Salt reservoir will be filled
C
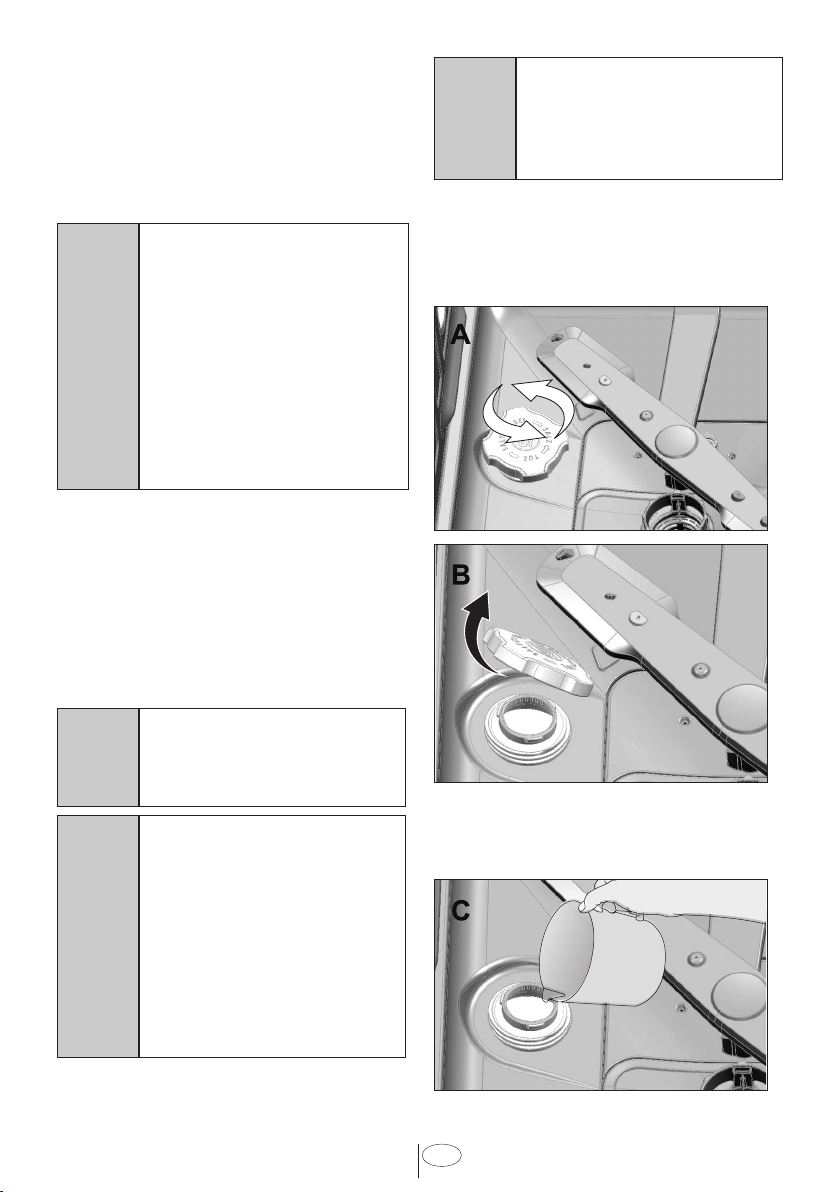
1. Firstly, take the lower basket out to
2. Turn the salt reservoir lid counter-
3. Add 4 cups of water to salt
with water when you start
the product. For this reason,
add salt before operating the
machine.
add softening salt.
clockwise to open it (A, B).
reservoir of your machine only in
initial use (C).
36
USA
Page 40

4. Fill the salt reservoir with salt by
using the salt funnel (D). To speed
up dissolution rate of salt in water,
stir it with a spoon.
You can put about 4.4
Pounds of softening salt into
C
5. Replace the lid and tighten it when
C
C
the salt reservoir.
the reservoir is full.
You need to add salt right
before starting the machine.
Thus, the overflowing
salty water will be flushed
immediately, preventing
the risk of corrosion in
machine. In cases where
you would not start washing
immediately, run your
machine empty in the
shortest program.
Since different salt brands
in the market have different
particle sizes and since the
water hardness may vary,
dissolution of the salt in
water may take a couple
of hours. Therefore, Salt
Indicator remains on for a
while after adding salt into
the machine.
10. CARE AND MAINTENANCE
WARNING:Before cleaning
or carrying out maintenance,
A
A
A
switch off the appliance,
disconnect the mains plug
and turn off the water tap.
WARNING:Do not repair
or replace any part of the
dishwasher or attempt any
servicing unless specifically
recommended by this
manual. We recommend
that the dishwasher only be
repaired by an authorized
service agent.
CAUTION :To avoid the
possibility of slipping,
keep the floor around the
dishwasher clean and dry.
Keep your appliance free
from the accumulation of
combustible materials, such
as lint, rags, and chemicals.
If the dishwasher is not in
use for an extended period
of time, we recommend you
check that the baskets are
empty, leave the inside of the
dishwasher clean, the door
cracked open to allow air to
circulate, turn off both the
power and water supply to
the dishwasher.
37
USA
Page 41

10.1 CARING FOR YOUR
DISHWASHER EXTERIOR
10.2 CARING FOR YOUR
DISHWASHER INTERIOR
CAUTION :Possible
A
Cleaning the control panel: Use only
soft cloth that is lightly dampened with
mild detergent. Clean the control panel
only with a moist cloth and clear water.
Cleaning the colored doors: Use only
soft cloth that is lightly dampened with
mild detergent.
Cleaning the stainless steel doors:
Use a soft cloth with a cleaner made
for cleaning stainless steel. For the
best results, apply the stainless steel
cleaner to a soft cloth and wipe the
surface in the direction of the grain.
Cleaning the door gasket: Regularly
clean the door gasket with a damp
cloth to remove food particles and
other debris. Use a gentle household
cleaner for the outside and the door
seals, and rinse thoroughly.
dishwasher damage:
Abrasive cleaners, scouring
pads, abrasive cloths (paper
towels) can damage the
dishwasher decorative door.
C
A
NOTICE: Cleaning your
dishwasher at regular
intervals ensures longer
product life and reduces the
risk of recurring problems.
Always disconnect the power
to machine before cleaning.
CAUTION :When cleaning
the underside of the main
filter, care must be taken on
the sharp outer edge to avoid
the risk of cut type injuries.
38
USA
Page 42

10.3 CLEANING THE FILTERS
Clean the filters at least once a week
in order for the machine operates
efficiently. Check if food residues are
left on the filters. If there are food
residues on filters, take them out and
clean well under running water.
1. Turn the micro filter (1) and coarse
filter (2) assembly counterclockwise
and pull it out from its seating.
2. Pull out the metal / plastic filter (3)
from the seating.
4. Clean all three filters under tap
water by means of a brush.
5. Replace the metal/plastic filter.
6. Place the coarse filter into the
microfilter. Make sure that it is
properly seated. Turn the coarse
filter clockwise until a “click” sound
is heard.
Do not use the dishwasher
C
C
without filter.
Incorrect placement of the
filters will reduce washing
efficiency.
3. Press the two tabs on the coarse
filter inwards and separate the
coarse filter from the assembly.
39
USA
Page 43

10.4 CLEANING THE HOSE
FILTER
Damages on the machine that may be
caused by impurities coming from the
urban supply water or your own water
installation (such as sand, dirt, rust,
etc.) can be prevented by means of the
filter attached to the water inlet hose.
Check the filter and the hose regularly
and clean them if necessary.
1. Turn off the tap and remove the
hose.
2. After taking out the filter, clean it
under running tap water.
3. Place the cleaned filter back to its
seat in the hose.
4. Install the hose to tap.
(Select Models)
10.5 CLEANING THE WASH
ARMS
Clean the wash arms at least once a
week in order for the machine operates
efficiently.
LOWER WASH ARMS
Check if the holes on the lower
wash arms (1) are clogged. If they
are clogged, remove and clean the
impeller. Pull the lower wash arms up
to remove it.
40
USA
Page 44

UPPER WASH ARMS
Check if the holes on the upper
impeller (1) are clogged. If they are
clogged, remove and clean the wash
arms. Turn its nut to left to remove the
upper wash arms.
Make sure that the nut is tightened well
when installing the upper wash arms.
41
USA
Page 45

11. TROUBLESHOOTING
Machine does not start.
• Power cable is unplugged. >>> Check if the power cable is plugged in.
• Cicuit Breaker is blown. >>> Check the Cicuit Breaker in your house.
• Water is cut. >>> Make sure that the water inlet tap is open.
• Door of the machine is open. >>> Make sure that you have closed the door of
the machine.
• On / Off button is not pressed. >>> Make sure that you have turned on the
machine by pressing the On / Off button.
Dishes are not washed clean
• Dishes are not placed orderly in the machine. >>> Load the dishes as
described in the user manual.
• Selected program is unsuitable. >>> Select a program with a higher
temperature and cycle time.
• Wash arms are stuck. >>> Prior to starting the program, turn the lower and
upper Wash arms by hand to make sure that they rotate freely.
• Wash arms holes are clogged. >>> Lower and upper Wash arms holes
might be clogged with small food particles and debris. Clean the Wash arms
regularly as illustrated in section “Cleaning and Care”.
• Filters are clogged. >>> Check if the filter system is clean. Clean the filter
system regularly as illustrated in section “Cleaning and Care”.
• Filters are installed incorrectly. >>> Check the filter system and make sure
that it is installed correctly.
• Baskets are overloaded. >>> Do not overload the baskets in excess of their
capacity.
• Detergent is stored under unsuitable conditions. >>> If you are using powder
detergent, do not store the detergent package in humid places. Keep it in a
closed container if possible. For ease-of-storing, we recommend you to use
tablet detergents.
• Detergent is not sufficient. >>> If you are using powder detergent, adjust the
amount of detergent according to the soiling degree of your dishes and/or
program definitions. We recommend you to use tablet detergents for optimum
results.
• Rinse aid is not sufficient. >>> Check the rinse aid indicator and add rinse
aid if necessary. Increase the rinse aid setting if there is enough amount of
rinse aid in the machine.
• Detergent dispenser lid is left open. >>> Make sure that the detergent
dispenser lid is closed tightly after adding detergent.
Dishes are not dry at the end of cycle
• Dishes are not placed orderly in the machine. >>> Place your dishes in a way
that no water will accumulate in them.
• Rinse aid is not sufficient. >>> Check the rinse aid indicator and add rinse
aid if necessary. Increase the rinse aid setting if there is enough amount of
rinse aid in the machine.
42
USA
Page 46

• Machine is unloaded right after the program is over. >>> Do not unload your
machine right after washing process is completed. Slightly open the door and
wait for evacuation of the steam inside for a while. Unload the dishes after
the pieces cool down to a touchable level. Start unloading process from the
lower basket. Thus, dropping of water remained on a piece at upper basket
onto the pieces at lower basket is prevented.
• Selected program is unsuitable. >>> Since rinsing temperature is low at
program with short duration, drying performance will also be low. Select
program with longer duration for a higher drying performance.
• Surface quality of the kitchen utensils is deteriorated. >>> Desired washing
performance can not be obtained at kitchen utensils with deteriorated
surfaces and it is not suitable to use such utensils in terms of hygiene
as well. Also, water can not flow easily on deteriorated surfaces. It is not
recommended to wash such kitchen utensils in dishwasher.
It is normal that drying complaints can be experienced with Teflon
C
Stains remaining on dishes when cycle has completed.
• Selected program is unsuitable. >>> Select a program with a higher
• Surface quality of the kitchen utensils is deteriorated. >>> Tea and coffee
• Detergent is stored under unsuitable conditions. >>> If you are using powder
Lime traces remain on dishes and glassware gains a misty appearance
• Rinse aid is not sufficient. >>> Check the rinse aid indicator and add rinse aid
• Water hardness setting is low or salt level is insufficient >>> Measure the
• Salt leakage exists. >>> Pay attention not to spill salt around the salt filling
kitchen utensils. It is associated with the structure of Teflon. Since the
surface tensions of Teflon and water are different, water droplets will
remain as beads on the Teflon surface.
temperature and cycle time.
stains or other dye spots may not be cleaned in dishwasher when they have
penetrated in deteriorated surfaces. Desired washing performance can not be
obtained at kitchen utensils with deteriorated surfaces and it is not suitable to
use such utensils in terms of hygiene as well. It is not recommended to wash
such kitchen utensils in dishwasher.
detergent, do not store the detergent package in humid places. Keep it in a
closed container if possible. For ease-of-storing, we recommend you to use
tablet detergents.
if necessary. Increase the rinse aid setting if there is enough amount of rinse
aid in the machine.
hardness of the supply water appropriately and check the water hardness
setting.
hole while adding salt. Make sure that the salt reservoir lid is tightly closed
after finishing the filling process. Run the prewash program to remove the salt
that spilled inside the machine. Since the salt granules that will remain under
the lid will dissolve during prewash, causing the lid loosen, check the lid once
again at the end of the program.
43
USA
Page 47

There is a different odor in the machine
A new machine has a peculiar odor. It will fade out after a couple of
C
• Filters are clogged. >>> Check if the filter system is clean. Clean the filter
• Dirty dishes are kept in dishwasher for 2-3 days. >>> If you are not going
Rust, discoloration or surface deterioration occurs on dishes
• Salt leakage exists. >>> Salt may cause deterioration and oxidation on metal
• Salty food remnants have remained on dishes for a long time. >>> If
• Electric installation is not grounded. >>>Check if your machine is connected
• Intensive cleansers such as bleaches are used. >>> Protective cover on
• Metal items particularly such as knives are used for purposes other then
• Silverware are made of low quality stainless steel. >>> Corrosion on such
• Kitchen utensils that are already corroded are washed in dishwasher. >>>
Detergent remains in detergent dispenser.
• Detergent dispenser was damp when adding detergent. >>> Make sure that
• Detergent is added long before the washing process. >>> Pay attention to
washing.
system regularly as illustrated in section “Cleaning and Care”.
to start the machine right after you have put the dishes into it, remove the
remnants on the dishes and run the Prewash program without detergent
every 2 days. In such cases, do not close the door of the machine completely
in order to avoid odor build up in machine. You can also use commercially
available odor removers or machine cleaners.
surfaces. Pay attention not to spill salt around the salt filling hole while adding
salt. Make sure that the salt reservoir lid is tightly closed after finishing the
filling process. Run the prewash program to remove the salt that spilled
inside the machine. Since the salt granules that will remain under the lid will
dissolve during prewash, causing the lid loosen, check the lid once again at
the end of the program.
silverware soiled with such foods will be kept waiting in machine, dirt must be
removed by prewash or dishes must be washed without being kept waiting.
to the actual grounding line. Otherwise, the static electric created in the
product causes arcs on the surfaces of metal items creating pores, removing
the protective cover on the surface and causing discoloration.
metal surfaces gets damaged and looses its efficiency in time when it gets in
contact with cleansers such as bleach. Do not wash your dishes with bleach.
their intended uses. >>> Protective cover on the edges of knives may get
damaged when they are used for purposes such as opening cans. Do not
use metal kitchen utensils out of their intended uses.
items is inevitable; they should not be washed in dishwashers.
Rust on a corroded item can migrate to other stainless steel surfaces and
cause corrosion on those surfaces as well. Such items should not be washed
in dishwashers.
the detergent dispenser is dried well prior to filling it with detergent.
add detergent shortly before start-up of the washing.
44
USA
Page 48

• Opening of the detergent dispenser lid is prevented during washing. >>>
Place the dishes in a way that will not prevent the detergent dispenser lid
from opening and the water going into the machine from impellers.
• Detergent is stored under unsuitable conditions. >>> If you are using powder
detergent, do not store the detergent package in humid places. Keep it in a
closed container if possible. For ease-of-storing, we recommend you to use
tablet detergents.
• Wash Arm holes are clogged. >>> Lower and upper Wash Arm holes might
be clogged with food remnants such as lemon pips. Clean the Wash Arm
regularly as illustrated in section “Cleaning and Care”.
Decorations and ornaments on kitchen utensils are being erased.
Decorated glasses and decorated luster porcelains are not suitable for
C
Dishes are scratched.
C
• Salt leakage exists. >>> Pay attention not to spill salt around the salt filling
• Water hardness setting is low or salt level is insufficient >>> Measure the
• Dishes are not placed orderly in the machine. >>> When placing the glasses
A smear remains on glasses that resembles milk stain which can not be
removed when wiped by hand. A bluish / rainbow appearance occurs when
the glass is pointed to light.
• Excessive rinse aid is used. >>>Lower rinse aid setting. Clean the spilled
• Corrosion has occurred on glass due to soft water. >>> Measure the
washing in the dishwasher. Manufacturers of glassware and porcelain
tableware items do not recommend washing such kitchen utensils in
the dishwashers either.
Kitchen utensils that contains or are made of aluminum should not be
washed in dishwasher.
hole while adding salt. Spilled salt can cause scratches. Make sure that the
salt reservoir lid is tightly closed after finishing the filling process. Run the
prewash program to remove the salt that spilled inside the machine. Since
the salt granules that will remain under the lid will dissolve during prewash,
causing the lid loosen, check the lid once again at the end of the program.
hardness of the supply water appropriately and check the water hardness
setting.
and other glassware into the basket lean them not against other dishes but
the edges or racks of the basket or the glass support wire. Striking of the
glasses to each other or to other dishes due to the impact of water during
washing can cause breaks, or scratches on their surfaces.
rinse aid when adding rinse aid.
hardness of the supply water appropriately and check the water hardness
setting. If your supply water is soft (<15 gpg), do not use salt. Choose
programs that wash in higher temperatures (140-149 degress Fahrenheit).
You can also use glass protective detergents that are commercially available.
45
USA
Page 49
Foam forms in the machine.
• Dishes are washed with hand-wash detergent by hand but not rinsed before
placing them into the machine. >>> Hand-wash detergents do not contain
antifoam. There is no need to hand-wash the dishes before placing them into
the machine. Removing the coarse soil on the dishes under tap water, with a
sponge or towel.
• Rinse aid has spilled into the machine when adding rinse aid. >>> Take care
that rinse aid is not spilled in the machine when you are filling it. Clean any
spilled rinse ait with the help of a tissue paper/towel.
• Lid of the rinse aid reservoir is left open. >>> Make sure that the lid of the
rinse aid reservoir is closed after adding rinse aid.
Kitchen utensils are broken.
• Dishes are not placed orderly in the machine. >>> Load the dishes as
described in the user manual.
• Baskets are overloaded. >>> Do not overload the baskets in excess of their
capacity.
Water remains in the dishwasher at the end of the program.
• Filters are clogged. >>> Check if the filter system is clean. Clean the filter
system regularly as illustrated in section “Cleaning and Care”.
• Discharge hose is clogged/blocked. >>> Check the discharge hose. If
necessary, remove the discharge hose, clear the blockage and insert is as
illustrated in the user manual.
If you cannot eliminate the problem although you follow the
C
instructions in this section, consult your dealer or the Authorized
Service Agent. Never try to repair a nonfunctional product yourself.
12. TECHNICAL FEATURES
Load capacity 16 place settings
Permissible water
pressure
Electrical connection 120 V (volts), 12 A (amps), 60Hz (hertz)
Total power 1400 W (watts)
Heater power 1100 W (watts)
NOTICE: Because we
C
continually strive to improve
our products, we may
change our specifications
and design without prior
notice.
This device corresponds to
the following directives:
UL 749 Household
Dishwasher directive.
4.35 - 145 psi (0.3 - 10 bars)
46
USA
Page 50

13. WARRANTY STATEMENT FOR THE BLOMBERG
DISHWASHERS
The warranties provided by Blomberg
in these statements only apply to
Blomberg dishwashers sold to the
original purchaser or homeowner in
the US and Canada. The warranty is
not transferable. To obtain warranty
service, please contact our nearest
distributor as listed by state. You
will need your dishwasher model
number, serial number, retailer name
and address, where purchased and
purchase date / installation date. This
warranty gives you specific legal rights,
and you may also have other rights
which vary from state to state.
“This product is fully tested and went
through official quality assurance
inspections before leaving the original
manufacturing site. Warranty terms
for this Blomberg household appliance
is not valid if the product is altered,
tampered, modifed, additional parts
assembled, fixed and re-packed by an
authorized distributor, servicer, a third
party retailer, reseller or by any other
unauthorized person(s)”
1 year * limited warranty from date of
first installation
Blomberg will repair or replace at no
cost to the consumer any defective
parts of the dishwasher if used under
normal household conditions or is
installed at an employee kitchen, office
use, lodges, primary care facilities such
as elderly homes, etc. (warranty is void
if the product is installed high traffic
locations such as dormitories, school
kitchens, restaurants, cafetaries etc.
Please consult Blomberg authorized
distributor prior to operating the
unit about the warranty disclaimer).
Service must also be performed
by an authorized Blomberg service
agency. (Cosmetic defects must be
reported within 10 business days from
installation)
2 year * ++ limited warranty from
date of first installation
(Parts only) Blomberg will repair or
replace any parts at no cost to the
consumer if material defects or
workmanship have caused the damage
or failure of these components. Again
the dishwasher must have been
used under normal household
conditions and not commercially as
stated above (Labor charges are the
responsibility of the consumer).
5 year * ++ limited warranty from
date of first installation
(parts only 3-5 years) Blomberg will
repair or replace any circuit boards or
nylon dishwasher racks (excluding
any plastic rack attachments) at
no cost to the consumer if material
defects or workmanship have caused
the damage or failure of these
components. The dishwasher must
have been used under normal
household conditions and not
commercially (Labor charges are the
responsibility of the consumer)
Lifetime limited warranty from date
of first installation * ++
(parts only) Blomberg will repair
or replace to the original owner
the stainless steel tub or door if
rust through occurs under normal
household use and normal water
conditions (no excessive chlorine).
Blomberg may, at its option, also
47
USA
Page 51

replace the whole dishwasher with
the same and/or equivalent model
with equal or better functionality if the
original model is no longer available.
(Labor, removal and installation
charges are the responsibility of the
consumer.)
Disclaimers of warranties and
exclusions:
Warranty does not cover service
costs by an authorized service
agent to correct installation,
electrical and plumbing problems
or educational instruction on the
use of the dishwasher. The warranty
also does not cover defects or
damage caused by an act of god
(such as storms, floods, fires,
mudslides, steam protection folio
etc.), damage cause by use of the
dishwasher for purposes other than
those for which it was designed,
misuse, disuse, abuse, accident,
alteration, improper installation,
maintenance, travel fees, service
calls outside normal service hours,
unauthorized service work.
TO THE EXTENT PERMITTED BY
LAW, THIS WARRANTY IS IN LIEU
OF ALL OTHER EXPRESSED AND
IMPLIED WARRANTIES, INCLUDING
THE IMPLIED WARRANTIES OF
MERCHANTABILITY AND FITNESS
FOR A PARTICULAR PURPOSE.
BLOMBERG UNDERTAKES NO
RESPONSIBILITY FOR THE
QUALITY OF THIS PRODUCT
EXCEPT AS OTHERWISE
PROVIDED IN THIS WARRANTY
STATEMENT. BLOMBERG ASSUMES
NO RESPONSIBILITY THAT THE
PRODUCT WILL BE FIT FOR ANY
PARTICULAR PURPOSE FOR
48
WHICH YOU MAY BE BUYING THIS
PRODUCT, EXCEPT AS OTHERWISE
PROVIDED IN THIS WARRANTY
STATEMENT.
Blomberg does not assume any
responsibility for incidential or
consequential damages. Such
damages include, but are not
limited to, loss of profits, loss of
savings or revenue, loss of use of
the dishwasher or any associated
equipment, cost of capital, cost of
any substitute equipment, facilities
or services, downtime, the claims of
third parties, and injury to property.
Some states do not allow the
exclusion or limitation of incidental
or consequential damages, so the
above limitations or exclusion may
not apply to you.
* installation date shall
refer to either purchase date or 5
business days after delivery of the
product to the home, whichever is
later.
++ parts replaced will assume
the identity of the original parts +
their original warranty.
No Other Warranties. This Warranty
Statement is the complete and
exclusive warranty from the
manufacturer. No employee of
Blomberg or any other party is
authorized to make any warranty in
Statement addition to those made in
this Warranty Statement.
USA
Page 52

14. HOW TO GET SERVICE
Please contact the Distributor for your
State or Province as listed on the
Distributor Contact List, or call our Toll
Free Number at 1 800 459 9848 for
direction to an Authorized Blomberg
Service Agent.
49
15 9778 01 00_AA_BLOMBERG_E8_USA/ 22-06-18.(16:15)
USA
Page 53

www.blomberginternational.com
info@blomberginternational.com
 Loading...