

Page 1

A Bloomberg Professional Service Offering
27" FLAT
PANEL
S-SERIES
Technical Information
Page 2
DC-IN
27" FLAT PANEL S-SERIES
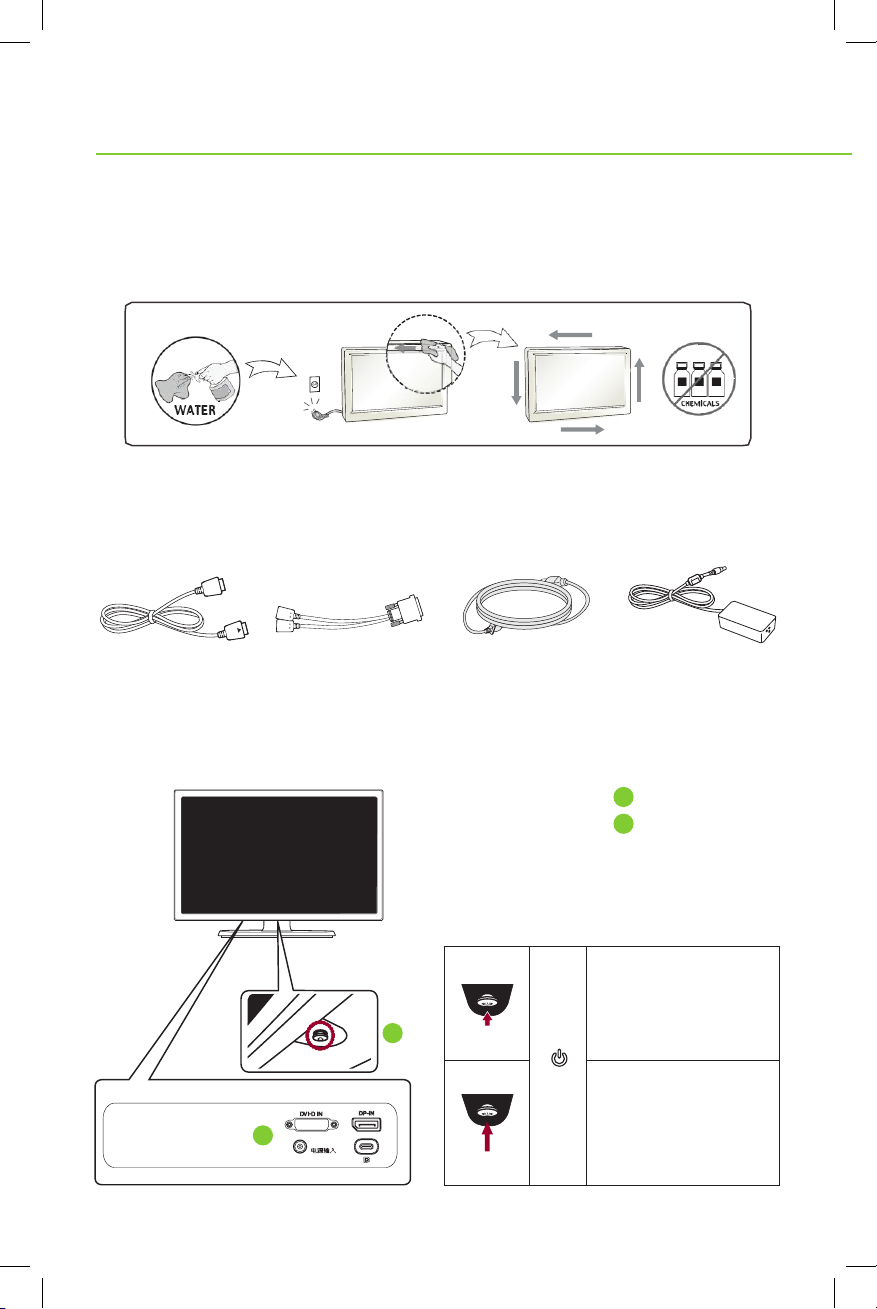
IMPORTANT PRECAUTIONS
- Spray water onto a soft cloth 2 to 4 times and use it to clean the front frame;
wipe in one direction only.
- Too much moisture may cause staining.
ASSEMBLING & PREPARING
Accessories Included
Display Port Cable Display Port Cable
(y-type)
Component & Button Description
1
2
Power Cord AC/DC Adaptor
Power button
1
Input connector
2
Power on
Press the joystick button
once with your finger to
turn on the monitor.
Power off
Press and hold the joystick
button once with your finger
to turn off the monitor when
the MENU OSD is off.
Page 3

MOVING & LIFTING THE MONITOR
- When holding the monitor, the screen should face away
from you to prevent it being scratched.
Adjusting the Stand Height
1) Place the monitor mounted on the stand base
in an upright position.
2) Pull out the locking pin at the bottom
rear of the stand body.
3) The height can be adjusted up to
130.0 mm (5.2 in.)
Caution – Once the pin is removed, it is not
necessary to re-insert it to adjust the height.
Warning – Do not put your fingers
or hand between the screen and
the base (chassis) when adjusting
the screen’s height.
Adjusting the Angle
1) Place the monitor in an upright position,
mounted on the stand base.
2) Adjust the angle of the screen. The angle of the screen
can be adjusted forwards or backwards from -5° to 20°
for a comfortable viewing experience.
Warning – To avoid injury to the fingers when adjusting the screen,
do not hold the lower part of the monitor’s frame as illustrated below.
Page 4

Pivot Feature
DC-IN
The pivot feature allows the monitor to rotate 90º clockwise.
Note – To avoid scratching the stand base, make sure that when rotating the monitor
using the pivot feature, the stand does not make contact with the monitor.
Note – An image displayed on the monitor’s screen does not rotate according
to the screen orientation. Adjust Settings accordingly.
1) Raise the monitor up to the maximum height.
2) Adjust the angle of the monitor in the direction
of the arrow as shown in the figure.
3) Rotate the monitor clockwise as shown in the figure to 90º.
USING THE MONI TOR
Connecting to a PC
This monitor supports the
“Plug and Play” feature.
- Plug and Play – A feature that allows
you to add a device to your computer
without having to reconfigure anything
or install any manual drivers.
Note:
Display Port Connection
A DMS-59 to dual Display Port Y-cable
is provided for connection to a PC with
a DMS-59 video output.
Connect your PC to the monitor using
the display port cable as illustrated below.
Press the menu button and then select
the input option from the input menu.
- When connecting the power cord to the
outlet, use a grounded (3-hole) multi-socket
or a grounded power outlet.
- The monitor may flicker when turned
on in an area of low temperature.
This is normal.
- Sometimes red, green or blue spots may
appear on the screen. This is normal.
WHEN MOUNTING WITHOUT A STAND
Monitor Mounting Plate Details
Page 5

SPECIFICATIONS
Model Number – BFP200-27
DISPLAY Screen Type 27" class (27.0" diagonal)
TFT (Thin Film Transistor) LCD
Liquid Crystal Display) Screen.
Diagonal length of the
screen: 68.47 cm
Pixel Pitch 0.1554mm x 0.1554mm
RESOLUTION Maximum Resolution 3840 x 2160 @ 60Hz
Recommended
Resolution
VIDEO SIGNAL Horizontal Frequency 30 Hz to 135kHz
Vertical Frequency 56 Hz to 61 Hz
Synchronization Separate Sync
INPUT CONNECTOR DVI-D, Display Port, USB-C
POWE R Voltage 19.0 V 3.3 A
Power Consumption
(Typ.)
DIMENSION Monitor Size (width x height x depth)
With stand 615mm x 528.3mm x 251.4mm (max)
Without stand 615mm x 365.1mm x 39.3mm
WEIGHT (WITHOUT
PACKAGI NG)
AC/DC ADAPTER ADS-110CL-19-3 190110G type, manufactured by Shenzhen
STAND ANGLE
ADJUSTMENT
ENVIRONMENTAL
CONDISTIONS
6.6 kg
Honor Electronic Co., Ltd.
Output: 19.0 V 5.79 A
Forwards/Backwards: -5° to 20° (Head)
Operating Condition Temperature: 10°C to 35°C;
Storing Condition Temperature: -20°C to 60°C;
2560 x 1440 @ 60Hz
On Mode: 45 W
Power Saving Mode ≤ 0.5 W
Off Mode ≤ 0.3 W
615mm x 398.3mm x 251.4mm (min)
Humidity: 10% to 80%
Humidity: 5% to 90%
POWER INDICATOR
MODE On Mode Power-saving Off Mode
LED COLOR Green Blinking Green Off
Page 6

FCC COMPLIANCE STATEMENT
This equipment has been tested and found to comply within the limits of a Class B digital device
pursuant to Part 15 of the FCC Rules. These limits are designed to provide reasonable protection
against harmful interference in a residential installation.
This equipment generates, uses and can radiate radio frequency energy and if not installed and
used in accordance with the instructions, may cause harmful interference to radio communications.
However, there is no guarantee that interference will not occur in a particular installation.
If this equipment does cause harmful interference to radio or television reception (which can be
determined by turning the equipment on and off), the user is encouraged to try to correct the
interference by using one or more of the following measures:
- Reorient or relocate the receiving antenna.
- Increase the separation between the equipment and the receiver.
- Connect the equipment into an outlet on a circuit different from
that to which the receiver is connected.
- Consult the dealer or an experienced radio/TV technician for help.
Caution – Changes or modifications not expressly approved by the party responsible for
compliance could void the user’s (or your) authority to operate the equipment. Only peripherals
(digital input/output devices, terminals, printers, etc.) certified to comply with the Class B limits
may be attached to this product. Operation with non-certified peripherals is likely to result in
interference to radio and TV reception. Only shielded signal cables may be used with this System.
CANADIAN DOC NOTICE
This Class B digital apparatus meets all requirements of the Canadian Interference-Causing
Equipment Regulations. Cet appareil numérique de la classe B respecte toutes les exigences
du Règlement sur le matériel brouilleur du Canada.
For additional information, please visit bloombergprofessional.com/hardware.
The BLOOMBERG PROFESSIONAL® service, BLOOMBERG Data and BLOOMBERG Order Management Systems (the “Services”)
are owned and distributed loca lly by Bloom berg Finance L.P. (“B FLP”) and its subsidiaries in all jurisdictions oth er than Arge ntina,
Bermuda, China, India, Japan and Kor ea (the “BLP Countri es”). BF LP is a wholl y-owned subsidiary of Bloombe rg L.P. (“B LP”).
BLP provides BFL P with all glo bal marketing and operational support and service for t he Services and distributes the S ervices
eithe r directly or through a non -BFLP subsidiary in the BLP Co untries. T he Services includ e electronic trading and order-routing
serv ices, whi ch are availa ble only to sophisticated institutional inves tors and only where the necessary l egal clearances have b een
obtai ned. BFLP, BLP and their af filiates do not provide investment ad vice or guarantee the accuracy of prices or infor mation in the
Serv ices. Nothing on the Services sh all consti tute an offering of finan cial instr uments by BF LP, BLP or their affiliates. BLOOMB ERG,
BLOOMBERG PROFESSIONAL, BLOOMBERG MARKETS, BLOOMBERG NEWS, BLOOMBERG ANYWHERE, BLOOMBERG
TRADEBOOK, BLOOMBERG TELEVISION, BLOOMBERG RADIO, BLOOMBERG PRESS and BLOOMBERG.COM are trademarks
and ser vice marks of BFLP or its subsidia ries. ©2017 Bloomberg Finance L.P. All rights reser ved. S753566181 0117
P/N O – MBM64076701 (1311-REV01)
 Loading...