

Page 1
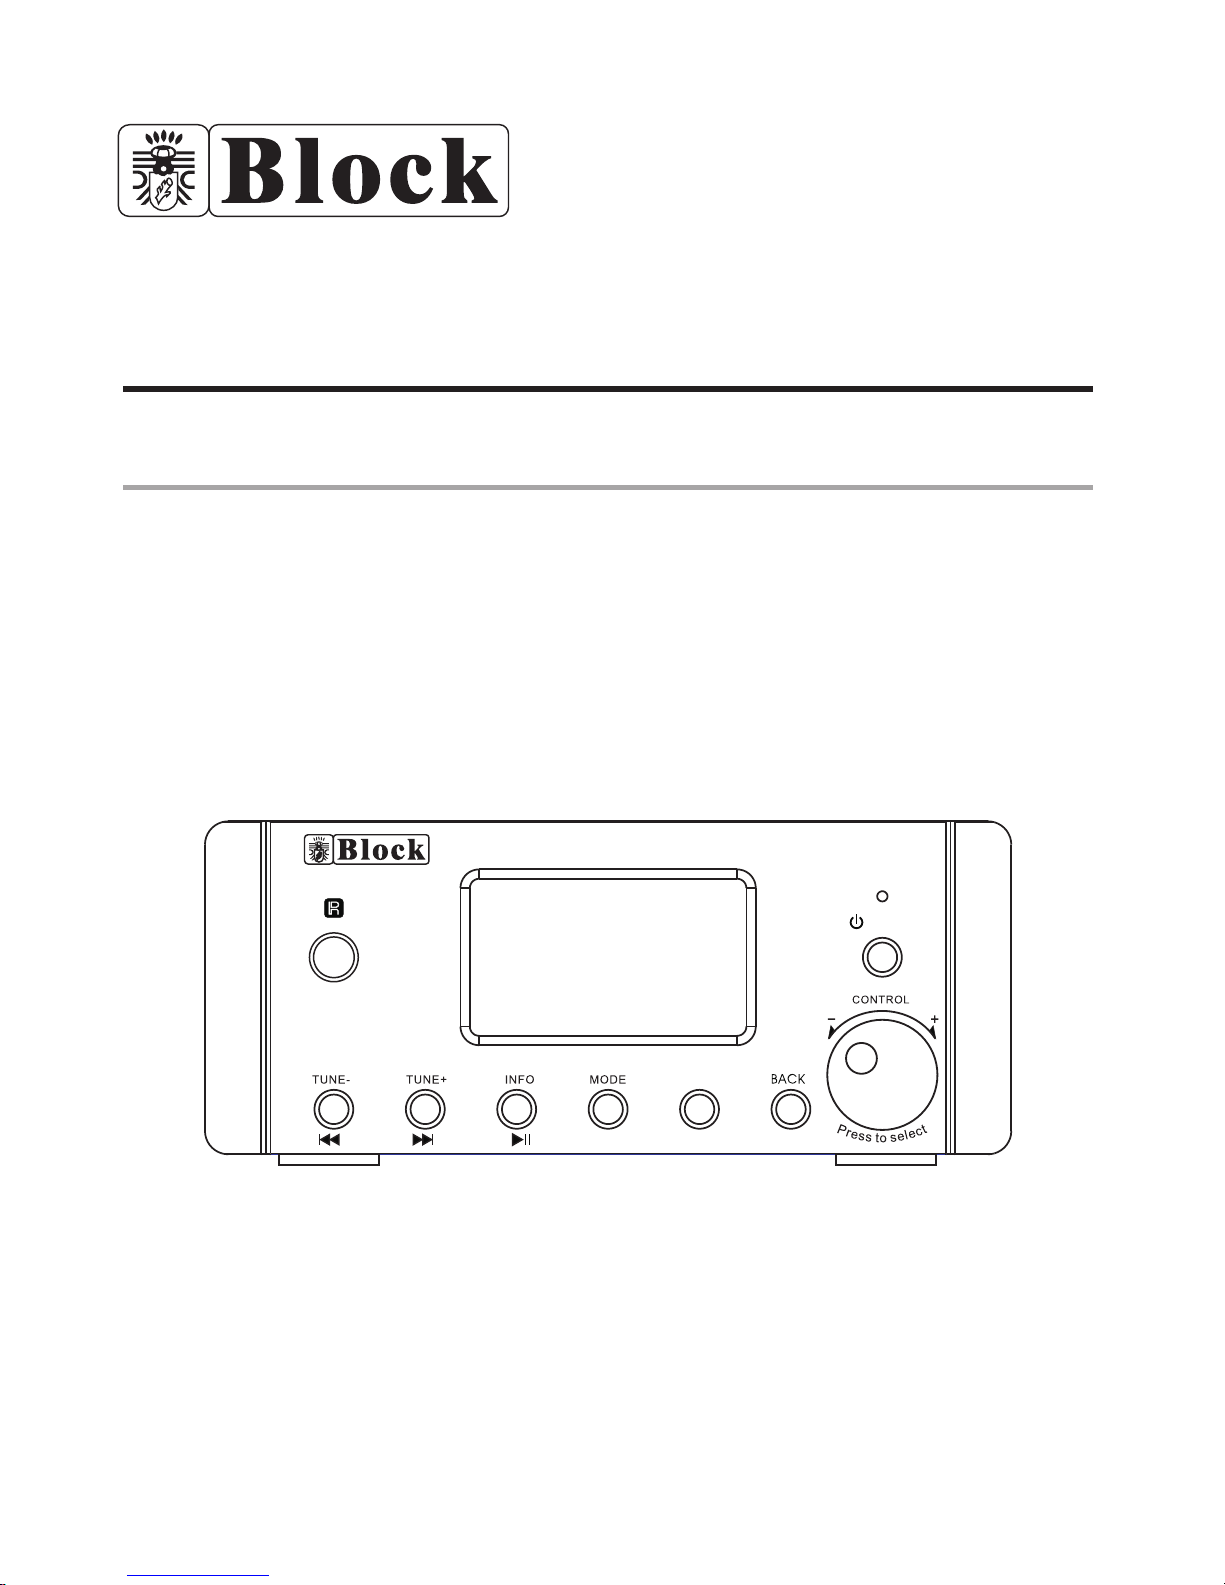
Bedienungsanleitung
WFR 700 WIFI Internet / FM Radio
PO WE R
ME NU
WF R 70 0
WiF i Inter net/F M recei ver
1--28
29--60
Instruction Manual
Page 2

-1-
Inhaltsverzeichnis
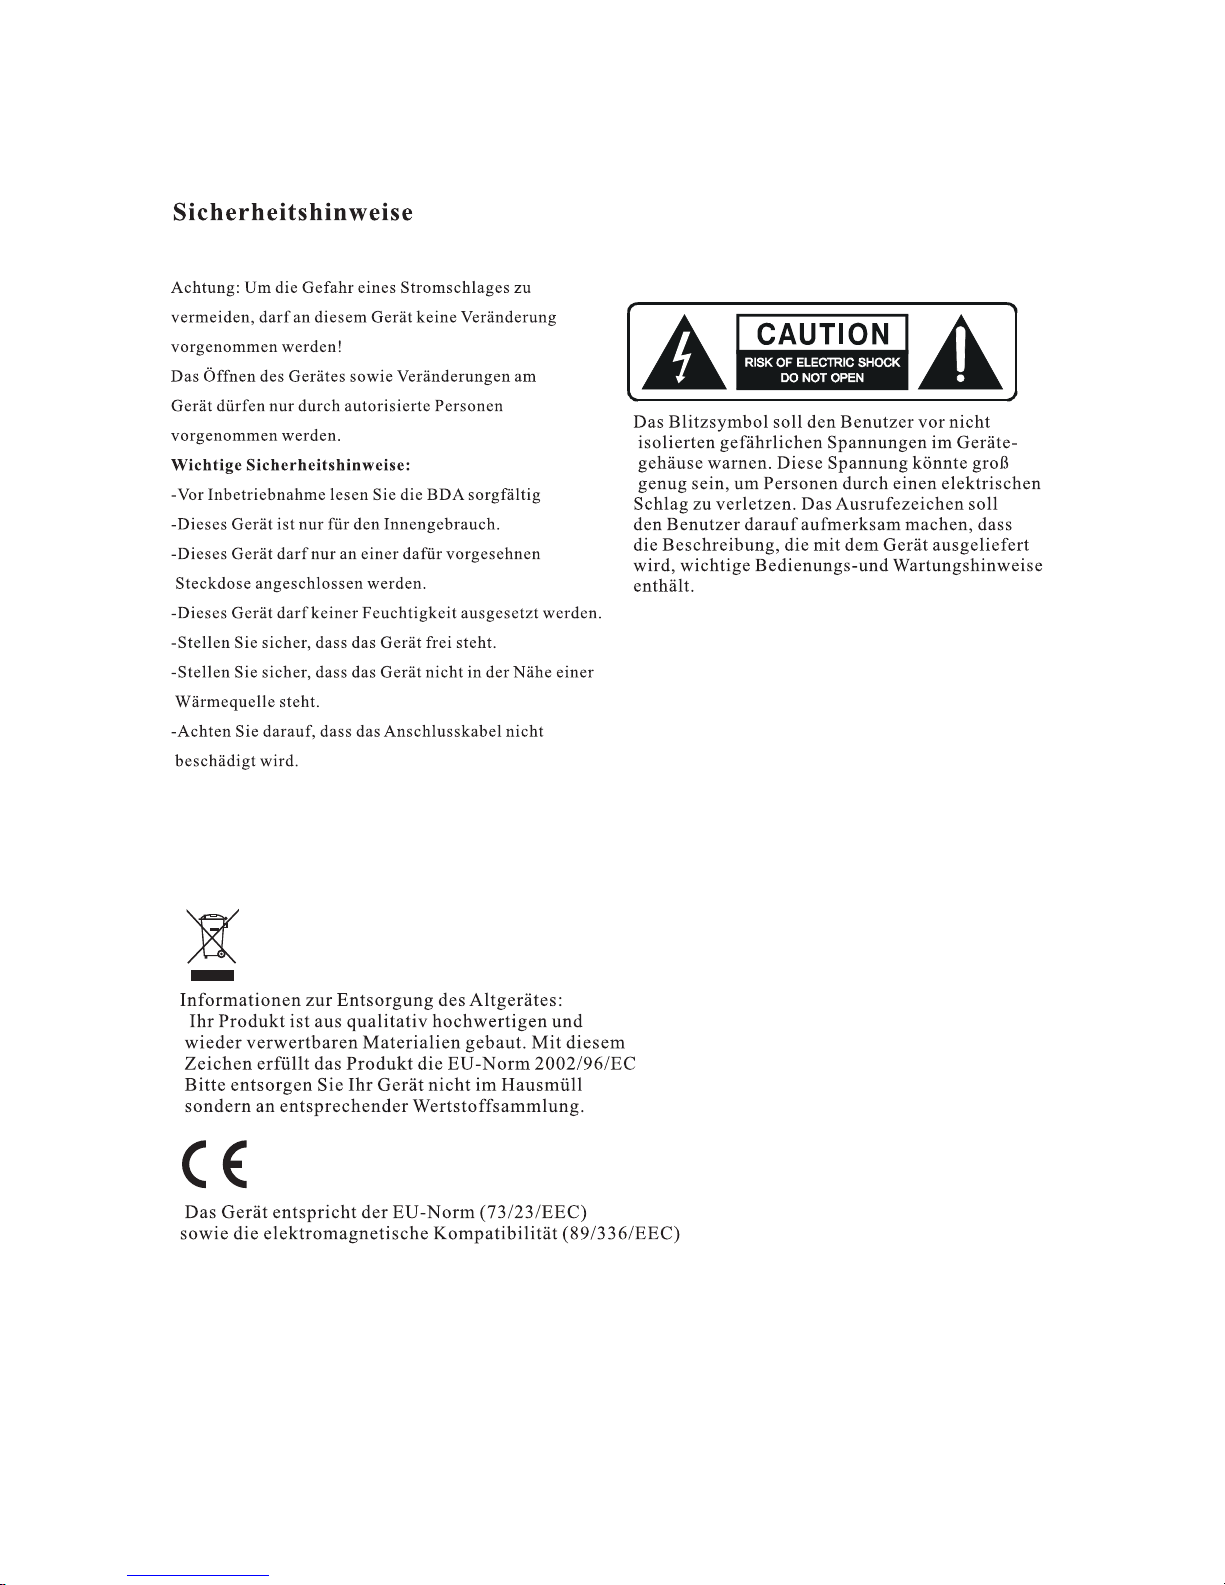
4 Abschnitt 1 Sicherheitshinweise
5-6 Sicherheits-und Warnhinweise
7 Abschnitt 2 Vor der Inbetriebnahme
8 Abschnitt 3 Bedienung des Gerätes
9 Fernbedienung
10 Abschnitt3 Anschlüsse am Gerät
11 Abschnitt 4 Anschlüsse
11 Anschluss am Strom
11 Antenne
11 Signal Eingänge
11 Netzwerk
11 W-LAN
12 Abschnitt 5 Generelle Funktionen
12 Installation (Setup)
12 UKW Einstellung
12 Sender speichern
13 Abschnitt 5 Sender speichern
13 Auswahl eines gespeicherten Senders
14 Abschnitt 6 Anschluss an ein Netzwerk
15 Abschnitt 7 Verbinden mit dem Netzwerk
16 Verbinden mit dem Netzwerk
17 Netzwerk Profile
18 Gespeicherte Sender
Page 3

-2-
19 Abschnitt 8 Musik Server
19 Musik Player
20 Informationen
21 Abschnitt 9 Internet Radioportal
22 Abschnitt 10 Generelle Funktionen
22 Alarm
22 Schlaffunktion
22 Software Upgrade
22 Werksrückstellung
23 Sprache
23 Zeiteinstellung
23 12/24 Stundenumstellung
24 Abschnitt 11 Fehlermeldung
25 Abschnitt 11 Fehlermeldung am Verstärker
26 Abschnitt 12 Problembehebung
27 Abschnitt 13 Pflege und Handhabung
28 Abschnitt 14 Technische Daten
Page 4

-3-
Sehr geehrter Kunde,
danke, dass Sie sich für dieses hochwertige Gerät entschieden haben.
Die Bedienungsanleitung wird ihnen eine generelle Übersicht darüber geben, wie Sie
dieses Gerät bedienen können.
Sie erhalten Sicherheitsinformationen und werden darüber informiert, wie Sie ihr
Gerät am besten reinigen.
Bitte nehmen Sie sich einige Minuten Zeit, die Bedienungsanleitung sorgfältig
durchzulesen. Sicherheits-und Bedienungsinformationen sind einzuhalten, damit das
Produkt langfristig und sicher funktioniert.
Bewahren Sie die Bedienungsanleitung gut auf, damit Sie bei einem Weiterverkauf
mitgegeben werden kann. Wenn Sie noch weitere Fragen zu diesem Gerät haben,
nehmen Sie bitte Kontakt zu einem autorisierten Fachhändler oder zu unserem
Servicepartner auf.
Im Falle eines Defektes, der durch Fehlbedienung oder durch Missbrauch des
Nichtbeachtens der Bedienungsanleitung auftritt, bitten wir um Verständnis, dass die
Garantie für diese Fehlbedienung erlischt. Ebenfalls kann keine Haftung für
Folgeschäden übernommen werden.
Dieses Produkt ist EMV zertifiziert und erfüllt alle Richtlinien und Anforderungen der
Europäischen Union. CE und ROHS Dokumentationen liegen vor.
Page 5
Abschnitt 1 Sicherheitshinweise -4-
Page 6

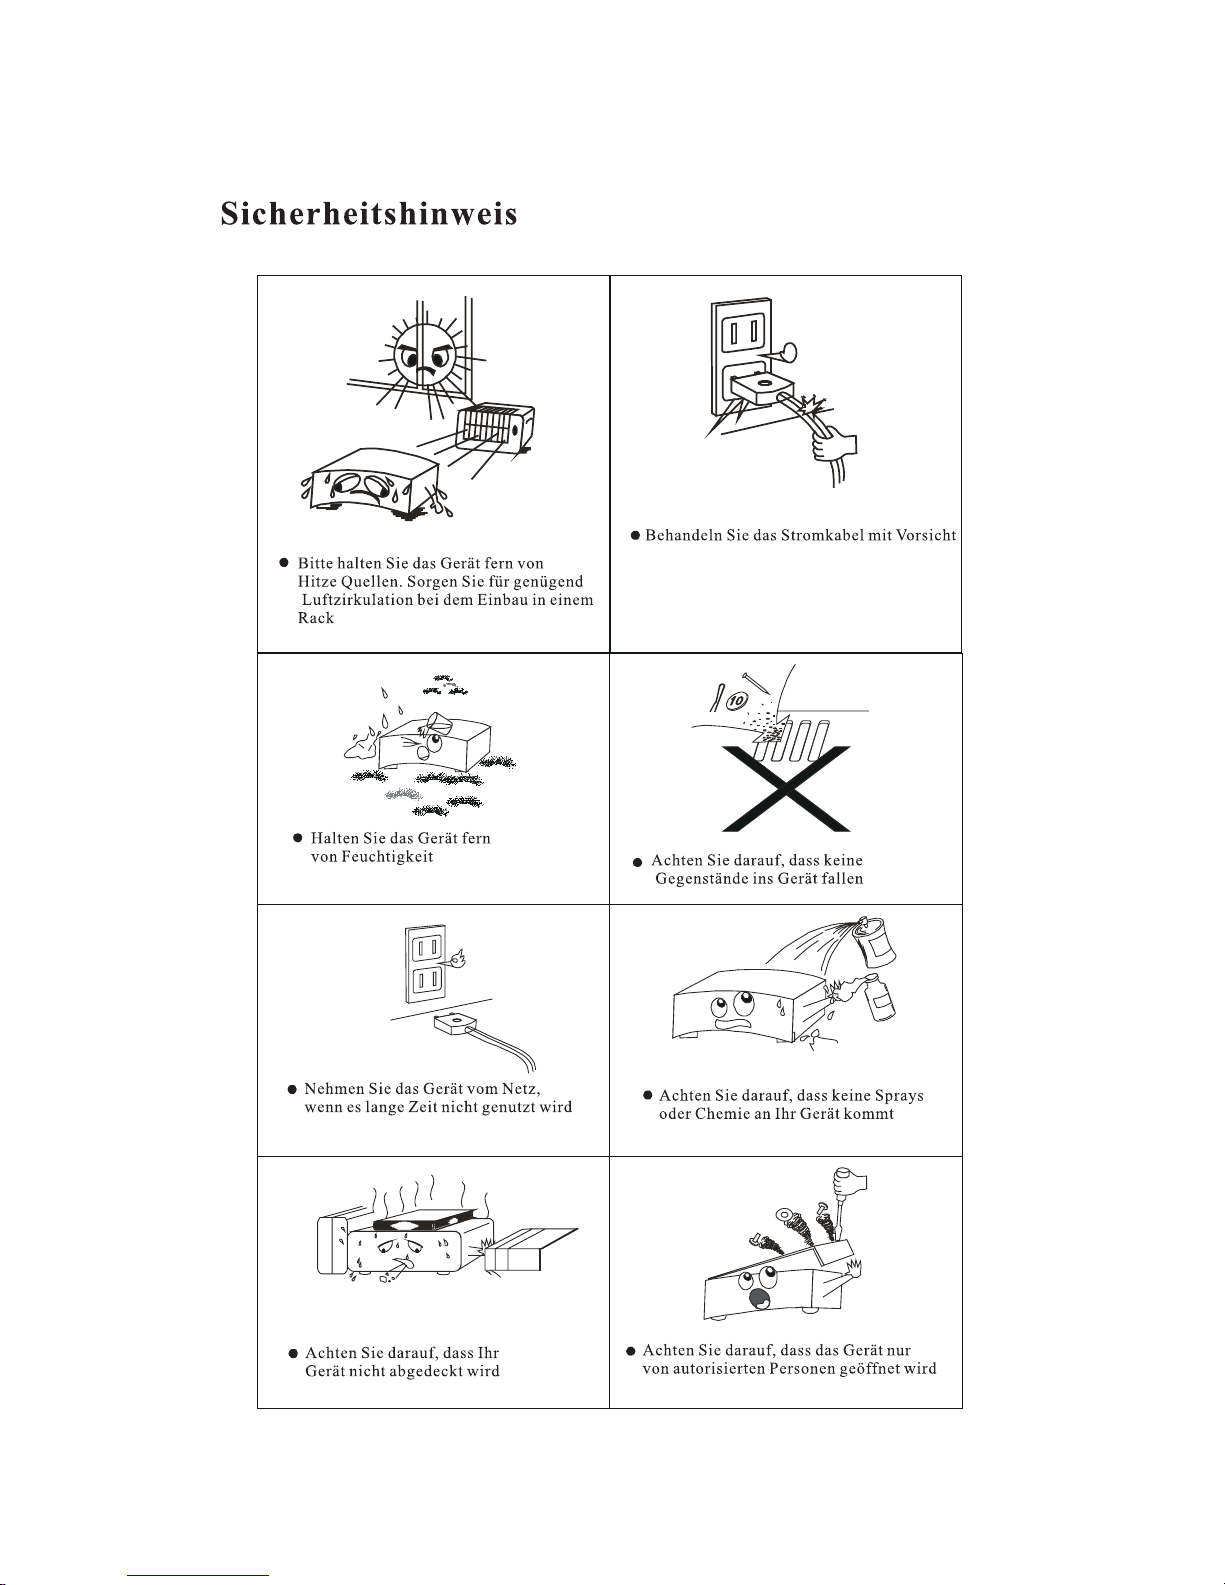
Abschnitt 1 Sicherheitshinweise -5-
Umgang mit Batterien
Batterien können brennbare Stoffe enthalten. Bei unsachgemäßer Behandlung können Batterien
auslaufen, sich stark erhitzen, entzünden oder gar explodieren, was Schäden für Ihr Gerät und Ihre
Gesundheit zur Folge haben könnte. Befolgen Sie folgende Hinweise: Halten Sie Kinder von Batterien fern.
Sollten Batterien verschluckt worden sein, melden Sie dies sofort Ihrem Arzt. Laden Sie niemals Batterien
(es sei denn, dies ist ausdrücklich angegeben). Entladen Sie Batterien niemals durch hohe
Leistungsabgabe. Schließen Sie Batterien niemals kurz. Setzen Sie Batterien niemals übermäßiger Wärme
wie Sonnenschein, Feuer oder dergleichen aus! Zerlegen oder verformen Sie Batterien nicht. Ihre Hände
oder Finger könnten verletzt werden oder Batterieflüssigkeit könnte in Ihre Augen oder auf Ihre Haut
gelangen. Sollte dies passieren, spülen Sie die entsprechenden Stellen mit einer großen Menge klaren
Wassers und informieren Sie umgehend Ihren Arzt. Vermeiden Sie starke Stöße und Erschütterungen.
Vertauschen Sie niemals die Polarität. Achten Sie darauf, dass die Pole Plus (+) und Minus (-) korrekt
eingesetzt sind, um Kurzschlüsse zu vermeiden. Reinigen Sie bei Bedarf Batterie- und Gerätekontakte vor
dem Einlegen. Vermischen Sie keine neuen und alten Batterien oder Batterien unterschiedlichen Typs.
Dies könnte bei Ihrem Gerät zu Fehlfunktionen führen. Darüber hinaus würde sich die schwächere Batterie
zu stark entladen. Entfernen Sie verbrauchte Batterien sofort aus dem Gerät. Entfernen Sie die Batterien
aus Ihrem Gerät, wenn dieses über einen längeren Zeitraum nicht benutzt wird. Ersetzen Sie alle
verbrauchten Batterien in einem Gerät gleichzeitig mit neuen Batterien des gleichen Typs. Isolieren Sie die
Kontakte der Batterien mit einem Klebestreifen, wenn Sie Batterien lagern oder entsorgen wollen.
Elektrogeräte nicht in Kin der han d!
Lassen Sie Kinder niemals unbeaufsichtigt elektrische Geräte benutzen. Halten Sie auch die
Verpackungsfolien von Kindern fern. Es besteht Erstickungsgefahr.
Sicheres Aufstellen
Verwenden Sie das Gerät ausschließlich in trockenen Räumen. Wenn Sie den Receiver von einer kalten in
eine warme Umgebung bringen, kann sich im Inneren des Receivers Feuchtigkeit niederschlagen. Warten
Sie in diesem Fall etwa zwei bis drei Stunden, bevor Sie ihn in Betrieb nehmen. Stellen Sie das Gerät auf
eine feste und ebene Oberfläche. Stellen Sie das Gerät mit mindestens 10 cm Abstand zur Wand auf.
Decken Sie die Belüftungsöffnungen nicht ab. Vermeiden Sie die Nähe von: – Wärmequellen, wie z. B.
Heizkörpern, – Geräten mit starken Magnetfeldern, wie z. B. Lautsprechern. Stellen Sie keine offenen
Brandquellen, wie z.B. brennende Kerzen, auf das Gerät. Stellen Sie das Gerät nicht auf empfindliche
Oberflächen.
Sicheres Anschließen
Schließen Sie das Gerät nur an eine gut erreichbare und fachgerecht installierte Steckdose mit 230 V ~ 50
Hz an. Der Netzstecker muss frei zugänglich sein, damit Sie das Gerät im Notfall einfach und schnell vom
Stromnetz trennen können. Verlegen Sie das Netzkabel so, dass niemand darüber stolpern oder darauf
treten kann. Verwenden Sie keine Verlängerungskabel. Knicken oder quetschen Sie das Netzkabel nicht.
Ziehen Sie das Netzkabel stets am Stecker aus der Steckdose.
Sicherer Gebrauch
Ziehen Sie den Netzstecker aus der Steckdose und entfernen Sie das Antennenkabel vom Gerät, wenn Sie
das Gerät längere Zeit nicht benutzen oder wenn sich ein Gewitter nähert. Das Netzkabel darf während des
Betriebs nicht um das Gerät gewickelt sein oder heiße Oberflächen berühren. Lassen Sie keine
Feuchtigkeit in das Gehäuse gelangen. Fassen Sie das Gerät, das Netzkabel und den Netzstecker nie mit
nassen Händen an. Es besteht die Gefahr eines elektrischen Schlags. Sollten Fremdkörper oder
Flüssigkeit in das Gerät gelangen, ziehen Sie sofort den Netzstecker aus der Steckdose. Lassen Sie das
Gerät von qualifiziertem Fachpersonal überprüfen, bevor Sie es wieder in Betrieb nehmen. Andernfalls
besteht die Gefahr eines elektrischen Schlags. Benutzen Sie das Gerät nie, wenn es beschädigt ist, oder
Sie Schäden am Netzkabel oder Stecker feststellen. Ziehen Sie bei Beschädigungen des Geräts sofort den
Stecker aus der Steckdose. Öffnen Sie nie das Gerät. Wenden Sie sich im Störungsfall an unser Service
Center oder eine andere geeignete Fachwerkstatt. Die Fernbedienung besitzt eine Infrarot-Diode der
Klasse 1. Betrachten Sie die LED nicht mit optischen Geräten.
Page 7
Abschnitt 1 Sicherheitshinweise -6-
Page 8

2
Vor der Inbetriebnahme
Bevor Sie Ihr Internet Radio benutzen, benötigen Sie:
●Einen Breitband - Internet Anschluss.
●Kabelloser Anschluss (Wi-Fi), angeschlossen an ein
Breitband - Internet, bevorzugt über einen Router.
● Wenn Sie keine kabellose Anschlussmöglichkeit haben,
können Sie einen Kabelanschluss verwenden. Ein
kabelloser Anschluss wird bevorzugt.
●Sie können im Menü zwischen kabellos und Kabelanschluss wählen.
●Wenn Ihr kabelloses Netzwerk auf Wired Equivalent Privacy (WEP) oder auf Wi-Fi
Protected Access (WPA) eingestellt ist, benötigen Sie den WEP oder WPA Code,
damit Ihr Internet Radio mit dem Router Daten austauschen kann.
Bevor Sie fortfahren, stellen Sie sicher, dass Ihr
drahtloses Netzwerk angeschaltet ist und zum Breitband
Internet Zugang hat. Um diesen Bereich des Gerätes zum
Laufen zu bringen, sollten Sie die Bedienungsanleitung
des Routers lesen.
Abschnitt 2 Vor der Inbetriebnahme-7-
Page 9
3
-
P O W E R
MENU
1 2 3
4
5
6
7
8
Abschnitt 3 Bedienung des Gerätes -8-
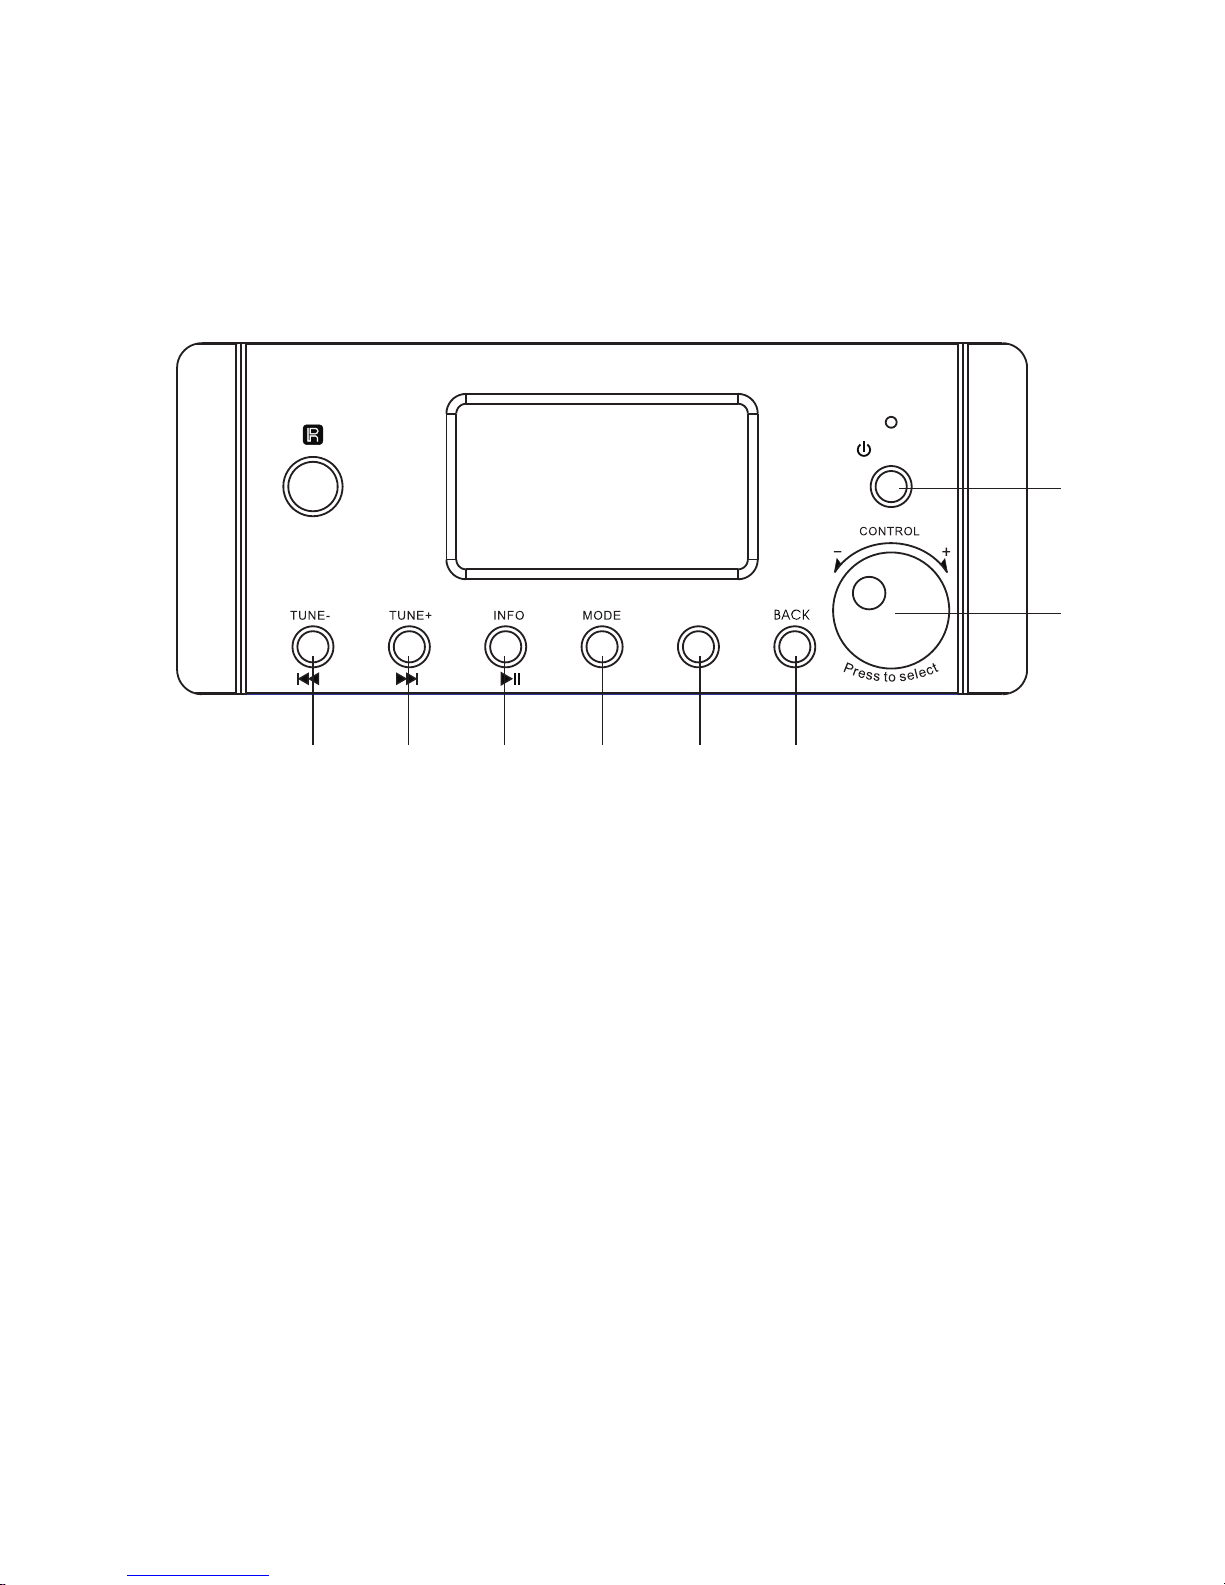
Bedienung des Gerätes
Vorderseite
1. Im Tuner Betrieb: Drücken Sie diese Taste, um automatisch Sender rückwärts zu
suchen.
Im Media Player Betrieb: Drücken Sie diese Taste, um zum vorherigen Stück zu
gelangen.
2. Im Tuner Betrieb: Drücken Sie diese Taste, um automatisch Sender vorwärts zu
suchen.
Im Media Player Betrieb: Drücken Sie diese Taste, um zum nächsten Stück zu
gelangen.
3. Im Tuner Betrieb: Drücken Sie diese Taste, um RDS Informationen zu bekommen.
Im Media Player Betrieb: Sie können ein Stück anhalten und wieder starten.
4. Mode Taste: Mit dieser Taste wählen Sie zwischen UKW; Internet Radio; Media
Player; Aux1; Aux2 und Aux3 aus.
5. Menü: Drücken Sie diese Taste, um in das Menü zu gelangen.
6. Back: Drücken Sie diese Taste, um im Menü eine Funktion zurück zu kommen.
7. Power: Drücken Sie diese Taste, um das Gerät an oder aus zu schalten.
8. Drehregler:
-Im normalen Betrieb regeln Sie die Lautstärke
-Im Menü wählen Sie die verschiedenen Punkte
-Drücken Sie den Regler, um einen Punkt zu bestätigen
Page 10
MOD E
SHI FT
P
MEN U
MUT E
INF O
ST/ MONO
ENT ER
1 2
3
4
5
PRE +
PRE -
CD P LAY ER
RA DI O
9 10
11
12
13
14
15
16
17
18
19
20
21
22
23
24
25
26
27
28
29
30
31
32
33
34
35
36
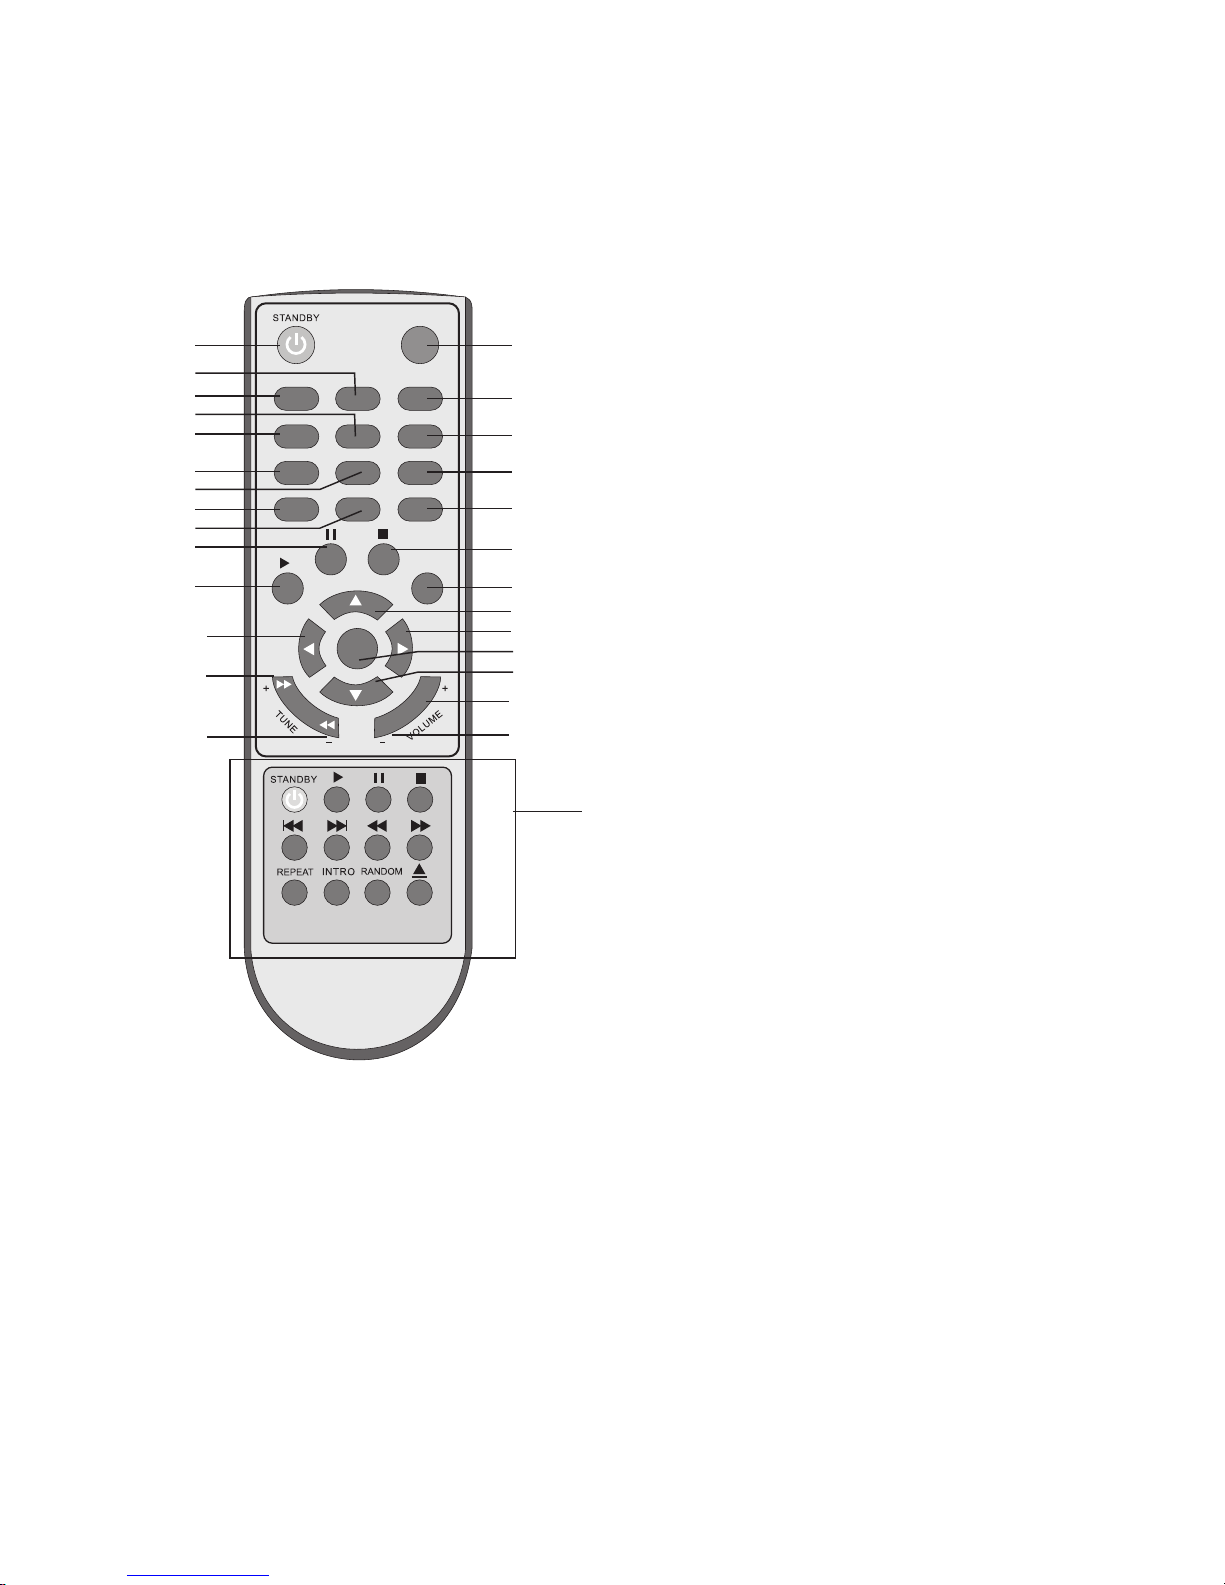
Fernbedienung
19. Info: Drücken Sie diese Taste, um RDS
Informationen zu bekommen
20. Mit dieser Taste kommen Sie zum
vorherigem Sender
21. Mit dieser Taste kommen Sie zum
nächsten Sender
22. Mute: Mit dieser Taste unterbrechen Sie
den Ton
23. Pause: Mit dieser Taste halten Sie ein
gespieltes Stück an
24. Play: Mit dieser Taste starten Sie die
Wiedergabe
25. Stopp: Mit dieser Taste stoppen Sie eine
Wiedergabe
26. Menü: Mit dieser Taste kommen Sie ins
Menü
27. Pfeil hoch: Im Radiobetrieb verstellen Sie
die Frequenz in 0,05 Schritten Im Menü
kommen Sie eine Funktion nach oben
28. Linker Pfeil:
Wenn Sie im Menü sind, kommen Sie mit
dieser Taste zum vorherigen Punkt
29. Pfeil Rechts
30. Enter: Mit dieser Taste bestätigen Sie
eine Eingabe
31. Pfeil nach unten:
32. Im Radiobetrieb drücken Sie diese Taste, um
automatisch den nä chsten Sender zu such en
Im Med ia Playerbetrieb drücken Sie diese Taste,
um das n ächste Stück zu wählen
33. Im Radiobetrieb drücken Sie diese Taste, um
automatisch den vorherigen Sender zu su chen
Im Med ia Playerbetrieb drücken Sie diese Taste,
um das vorher ige Stück zu wählen
34. Volume: Mit die ser Taste wählen Sie eine
höhe re Lautstärke
35. Volume: Mit die ser Taste wählen Sie eine
leisere Lautstärke
36. Diese Tasten sind für den CD Spieler
Abschnitt 3 Fernbedienung -9-
3
9.Standby Taste: Zum An/Aus schalten des
Gerätes
10. Mode: Drücken Sie diese Taste, um
zwischen UKW; Internet Radio; Media
Player; Aux1 Aux2 Aux3 zu wählen
11-15 Senderspeicher
16. Auswahltaste, um Sender über 5 zu
wählen z.B. um Station 6 zu wählen
drücken Sie diese Taste und die 1
17. P: drücken Sie diese Taste, um einen
Sender zu speichern
18. ST/Mono: Wechseln Sie zwischen
Stereo und Mono
Page 11
Aud ioBlo ck Boll manns weg 41 26 125 Old enbur g
M o de l: WF R 7 00
W i fi i n te rn et /F M r ec e i ve r
P o we r R at in g: A C 2 30 V 5 0H z
M a x P o w er C o ns um pt io n : 8 0W
AUX 1
AUX 2
AUX 3
AUX 3
AUX 2
AUX 1
Wi-Fi Antenna
Wi-Fi Antenna
1 2
3
4
5 6
7
8 9 10
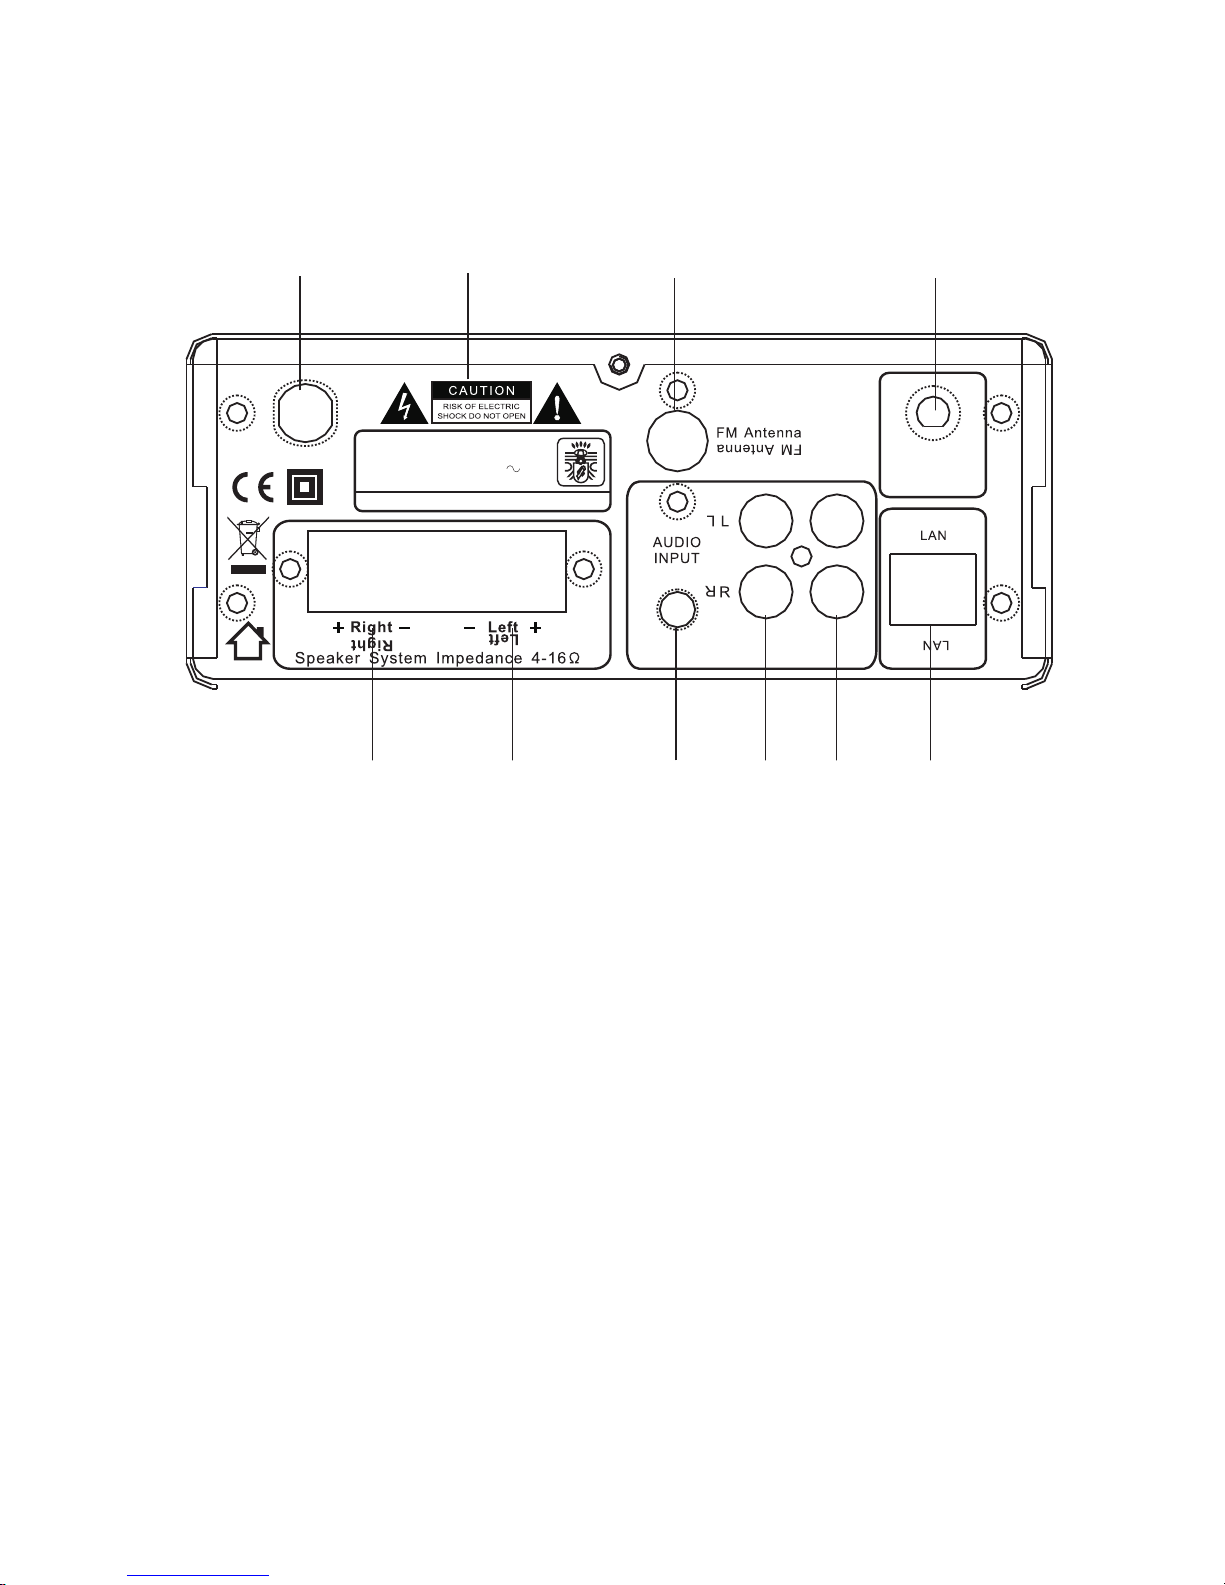
1. Netzkabel: Bitte vergewissern Sie sich, dass das Kabel in einem einwandfreien
Zustand ist und nicht beschädigt ist.
2. Warnhinweise: Diese Zeichen weisen darauf hin, dass es um hohe Spannungen
geht. Nicht öffnen! (Näheres auf den Seiten 5-7)
3. UKW Buchse: Schließen Sie hier die UKW Antenne an.
4. WIFI Buchse: Schließen Sie hier die 2.4G WIFI Antenne an.
5. Ausgang für den rechten Lautsprecher
6. Ausgang für den linken Lautsprecher
7. Anschluss für einen 3,5mm Stecker Aux3
8. Anschluss über Chinch Aux2
9. Anschluss über Chinch Aux3
10. LAN: Hier können Sie ein LAN Kabel anschliessen.
Anschlüsse am Gerät
Abschnitt 3 Anschlüsse am Gerät -10-
3
Page 12

4
-
Abschnitt 4 Anschluss -11-
Anschluss
Anschluss am Strom:
-Schließen Sie das Netzkabel an einer Steckdose an.
Antenne:
-Schließen Sie die UKW Wurfantenne am Gerät an.
Signal Eingänge:
-Schließen Sie hier den CD Spieler an.
Netzwerk:
-Schließen Sie hier ein RJ 45 Kabel an, um das Gerät mit ihrem Router zu verbinden.
Schließen Sie hier ein RJ 45 Kabel an, um das Gerät mit ihrem Router zu verbinden.
W-LAN:
-Um kabellos ins Internet zu gelangen, schließen Sie die WIFI 2.AG Antenne an das
Gerät an. Sie benötigen das Password für ihr Netzwerk!
Page 13

5
Abschnitt 5 Generelle Funktionen -12-
Generelle Funktionen
Setup
-Wenn das Gerät zum ersten Mal angeschlossen wird, werden Sie aufgefordert Region,
Zeit, Sprache usw. einzugeben. Wenn Sie das zu einem späteren Zeitpunkt wünschen,
gehen Sie wie folgt vor:
Menü > System Einstellung > Setup
Folgende Punkte können Sie im Setup einstellen:
-Sie können das Zeiteinstellungsformat umstellen (12 oder 24 Stunden)
-Sie können das Gerät auf „automatische Updates“ einstellen
-Sie können die Zeitzone einstellen (Deutschland + 01:00)
-Sie können ebenfalls einstellen, dass der Tagesstand gespeichert wird.
-Setzen Sie die LAN Region (in Europa ist das für dieses Gerät Deutschland)
UKW Einstellung
-Drücken Sie die Mode Taste bis im Menü „Radio“ steht, um den UKW Empfang zu
nutzen.
Sender speichern:
-Drücken Sie die Tune +/- Taste. Bestätigen Sie durch drücken des Control Reglers oder
starten Sie durch drücken der und Tasten den automatischen Sendersuchlauf.
Der Suchlauf stoppt automatisch, wenn er einen Sender gefunden hat. Sie können durch
drehen des Control Reglers eine Feinabstimmung vornehmen.
-Sie können ebenfalls verschiedenen Möglichkeiten im Radio Menü nutzen.
Scan Settings: Wählen Sie diese Option, um nur Sender mit hoher Leistung
abzuspeichern.
Auto Settings: Wählen Sie diese Option, um auch Sender mit schlechter Leitung (Mono)
abzuspeichern.
▲
▲
Page 14

Abschnitt 5 Generelle Funktionen -13-
-Drücken Sie STR/MONO oder ST/MO, um die Einstellung Stereo oder Mono
auszuwählen.
Sender speichern:
-Drücken Sie die Taste 1-5 und halten diese gedrückt, um die Stationen 1-5 zu belegen
-Um Stationen über 5 zu belegen, drücken Sie die „Shift“ Taste und drücken 1-5, um die
Stationen 6-10 zu belegen
10 Sender können Sie speichern.
Auswahl eines gespeicherten S enders:
-Es gibt verschiedene Wege gespeicherte Sender auszuwählen
-Drücken Sie eine Zahl, um einen gespeicherten Sender auszuwählen. Drücken Sie die
„Shift“ Taste und dann 1-5, um Senderspeicher zwischen 6 und 10 auszuwählen.
Beispiel:
Um den Senderspeicher 8 zu wählen, drücken Sie erst die „Shift“ Taste und dann die „8“.
-Drücken Sie kurz die „P“ Taste, eine Liste der gespeicherten Sender erscheinen im
Display. Drehen Sie den Control Regler oder benutzen Sie die Tasten und um
einen Sender auszuwählen. Bestätigen Sie den Sender durch drücken der Taste „Enter“
oder durch drücken des Control Reglers.
Durch drücken der Taste „P“ oder „Back“ verlassen Sie diesen Menüpunkt. Das
Menü wird nach einer Zeit automatisch geschlossen.
Senderinformationen:
-Drücken Sie die „Info“ Taste mehrfach, um verschiedene Informationen zu bekommen.
Die Art der Informationen hängen von dem gewählten Sender ab.
▲
▲
5
Page 15

6
Abschnitt 6 Anschluss an ein Netzwerk -14-
Anschluss an ein Netzwerk
-Sie benötigen einen Netzwerk Anschluss, um das Internet Radio oder den
Musikserver zu benutzen.
-Sie benötigen einen Router mit einem RJ 45 Kabel, oder einen W-LAN Router mit
dem dazugehörigen Passwort, um ins Netzwerk zu gelangen.
-Ihr Router benötigt einen Breitband-Internet-Anschluss, um das Internet Radio und
um Software Updates nutzen zu können.
-Wenn Sie den Punkt „Internet Radio“ oder „Musik Player“ auswählen, wird das Gerät
versuchen ins Netzwerk zu kommen. Wenn es das erste Mal ist, dass Sie versuchen
mit diesem Gerät ins Netzwerk zu kommen, startet das Setup automatisch. Um
manuell ins Netzwerk zu gelangen, gehen Sie wie folgt vor:
Menü > System Einstellung > Netzwerkeinstellung
Wenn Sie das Program gestartet haben, können Sie die folgenden Informationen
wählen.
-W-LAN Region (wählen Sie aus der Liste das gewünschte Land aus)
-Netzwerk Name (wählen Sie das gewünschte Netzwerk)
-Um ein kabelloses Netzwerk zu wählen, benötigen Sie das Passwort.
-Benutzen Sie die Navigationstasten oder den Control Regler, um den gewünschten
Punkt im Display auszuwählen. Drücken Sie die „Enter“ Taste oder den Control
Regler, um den ausgewählten Punkt zu bestätigen.
-Wählen Sie „BKSP“, um die letzte Eingabe zu löschen
-Wählen Sie „Cancel“, um ihre Eingabe rückgängig zu machen
-Wählen Sie „OK“, um das eingegebene Passwort zu bestätigen und um in das
ausgewählte Netzwerk zu gelangen.
-Das Gerät wird zum Punkt „Password“ zurückkehren, wenn keine Verbindung
hergestellt werden kann.
-Unter dem Menü Punkt Menü > System Einstellung > Netzwerk > Netzwerk Profil
können Sie nicht das gewählte Netzwerk ändern.
Page 16

7
Abschnitt 7 Internet Radio - 15-
-Drücken Sie die „Mode“ Taste oder wählen Sie im Menü Internet Radio, um ins
Internet Radio zu gelangen.
-Der WFR 700 empfängt tausende von Sendern aus aller Welt. Wenn Sie das Program
Internet Radio anwählen, wird sich der WFR 700 über das Radio Portal von Frontier
Selicon mit verschiedenen Kategorien versorgen. (z.B. Länder; Genres). Wenn Sie
einen Sender ausgesucht haben, wird sich das Gerät diesen Sender runterladen und
mit der Wiedergabe beginnen. Dieses Radioportal gibt ihnen verschieden
Möglichkeiten eigene Stationslisten zu erstellen. Um diese Möglichkeit zu nutzen,
müssen Sie ihren WFR 700 auf der Webseite registrieren.
-Unter dem Menüpunkt Menü > System Einstellung > Netzwerk finden Sie die
verfügbaren Netzwerke. Benutzen Sie die und Taste oder den Control Regler,
um ein Netzwerk auszuwählen. Bestätigen Sie durch enter oder drücken des Control
Reglers. Das Gerät wird versuchen eine Verbindung zu dem gewählten Netzwerk
herzustellen.
-(Netzwerkname) wählen Sie das Netzwerk
-(Erneute Suche) sucht erneut nach Netzwerken
-(Manuelle Eingabe) startet die Möglichkeit der manuellen Eingabe
1.Wählen Sie die gewünschte Art der Verbindung
-Über Kabel - oder kabellos
2.Wählen Sie den “DIRECT HOST CONFIGURATION PROTOKOL (DHCP)
DHCP Freigeben > Aktiviert die automatische Netzfreigabe
DHCP Abschalten >Deaktiviert den manuellen Zugang zur Netzfreigabe
3.IP Settin gs
Geben Sie ihre IP Adresse mit und oder mit dem Control Regler ein, nutzen Sie
die Tasten > und< um ein Feld auszusuchen. Bestätigen Sie mit „Enter“ oder durch
drücken der Control Taste.
Verbinden mit dem Netzwerk
▲
▲
▲
▲
Page 17

Abschnitt 7 Internet Radio -16-
4.Gateway Adresse
Wählen Sie die Gateway Adresse mit den Tasten und oder mit dem Control Regler,
nutzen Sie die Tasten > und < um ein Feld auszusuchen. Drücken Sie Enter und suchen
Sie das nächste Feld.
5.DNS
Nun setzen Sie eine und wenn gewünscht, eine zweite Adresse mit den Tasten und
oder mit dem Control Regler. Nutzen Sie die >und < Tasten, um ein Feld
auszuwählen. Drücken Sie „Enter“, um das nächste Feld zu wählen.
6.SSID
Wählen Sie die kabellose Netzwerk Identifikation. Nutzen Sie die Navigationstasten
oder den Control Regler, um auf den gewünschten Punkt zu kommen. Drücken Sie
„Enter“ oder den Control Regler, um einen ausgewählten Punkt zu bestätigen.
-Wählen Sie „BKSP,“ um zu dem letzten Punkt zurück zu gelangen
-Wählen Sie Cancel, um ihre Eingabe zu löschen
-Wählen Sie OK, um das eingegebene Passwort zu bestätigen, und um in das
ausgewählte Netzwerk zu gelangen
7.Identifikation
Setzen Sie nun die gewünschte Art der Identifikation.
Öffnen (PSK) Pree-Shared Key; WPA (WIFI Protected Access oder WPA 2
8.Verschlüsselungsart
Wählen Sie nun die dazugehörige Verschlüsselungsart
Abschalten (off) oder WEP (Wired Äquivalent Privacy), um es zu öffnen. TKIP
(Temporal Key Integrity Protocol) oder AES (Advanced Encryption Standard)
9.Schlüssel
Nun geben Sie das Passwort für das kabellose Netzwerk ein. Nutzen Sie die
Navigationstasten oder den Control Regler, um den gewünschten Punkt im Display
auszuwählen. Drücken Sie „Enter“ oder den Control Regler, um die Eingabe zu
bestätigen.
-Wählen Sie „BKSP“, um die letzte Eingabe zu löschen
-Wählen Sie „Cancel“, um die gesamte Eingabe zu löschen
-Wählen Sie „OK“, um ihr Passwort zu bestätigen und um in ihr gewünschtes Netzwerk
zu gelangen.
Das Gerät ist nun in der Lage, Daten von dem Netzwerk zu empfangen, welches Sie
eingegeben haben.
u
u
u
u
7
Page 18

Abschnitt 7 Internet Radio -17-
Netzwerk Profile
Sender
-Wählen Sie im Menü > System Einstellung > Netzwerk > Netzwerk Profile, um ein
nicht gewünschtes Netzwerk zu entfernen. Hier finden Sie eine Liste der genutzten
Netzwerke. Wählen Sie ein Profil mit den Tasten und aus und drücken Sie
„Enter“. Bestätigen Sie mit “Ja“, um ein Netzwerk zu entfernen.
Sender Auswahl
-Nutzen Sie die Navigationstasten oder drehen Sie den Control Regler, um im Menü
eine Senderliste zu öffnen. Nutzen Sie wiederum die Navigationstasten oder den
Control Regler, um einen Sender auszuwählen. Um Diesen Sender zu hören, drücken
Sie „Enter“ oder den Control Regler.
-Sie können ebenfalls nach einem Sender suchen, indem Sie wählen Menü > Sender
Liste > Suche Sender
.
-Benutzen Sie die Navigationstasten oder den Control Regler, um einen Punkt im
Menü auszuwählen. Drücken Sie „Enter“ oder den Control Regler, um diesen Punk
t zu bestätigen.
-Wählen Sie „BKSP“, um zu dem vorherigen Punkt zu gelangen.
-Wählen Sie „Cancel“, um ihre Eingabe zu beenden.
-Wählen Sie „OK“, um die Suche zu starten. Das Gerät sucht nach allen Sendern mit
den eingegebenen Charakteren. Nach der Suche werden alle gefundenen
Sender im Display angezeigt.
-Es gibt verschiedenen Möglichkeiten, um einen gespeicherten Sender aufzurufen.
-Drücken Sie die Zahlen für einen Sender von 1-5. Drücken Sie die „Shift“ Taste, um
zu den Sendern 6-10 zu gelangen.
Beispiel
Um den Sender 8 aufzurufen, drücken Sie die „Shift“ Taste und dann die Zahl 3
-Drücken Sie kurz die „P“ Taste. Im Display sehen Sie die gespeicherten Sender.
Nutzen Sie die Navigationstasten oder den Control Regler, um den gewünschten
Sender auszuwählen. Drücken Sie „Enter“ oder den Control Regler, um die Eingabe
zu bestätigen.
Um das Menü zu verlassen, drücken Sie die „P“ Taste oder drücken Sie den Control
Regler. Nach einer Weile schließt das Menü automatisch.
▲
7
▲
Page 19

Abschnitt 7 Internet Radio -18-
-Die folgenden Funktionen finden Sie unter dem Punkt „ Sender Liste“
Meine Favoriten / Sender / Podcast / Meine hinzugefügten Sender
-Wählen Sie „ zuletzt gehört“, um zu den zuletzt gehörten Sendern zu gelangen
Sender Informationen
-Drücken Sie mehrfach die INFO Taste, um verschieden Informationen zu bekommen.
Die Art der Informationen die Sie erhalten, hängen von dem gehörten Sender ab.
Sender speichern:
-Drücken Sie die Taste 1-5 und halten diese gedrückt, um die Stationen 1-5 zu belegen
-Um Stationen über 5 zu belegen, drücken Sie die „Shift“ Taste und drücken 1-5, um die
Stationen 6-10 zu belegen
10 Sender können Sie speichern.
7
Page 20

8
Musik Server
Abschnitt 8 Musik Server -19-
-Um die Funktion Musik von ihrem Computer abzuspielen - nutzen zu können, müssen
Sie erst Ihren Computer konfigurieren.
UPnP (Universal Plug and Play) erlaubt Geräten, wie diesem WFR 700, Musik vom
Computer wiederzugeben. Sie erhalten ebenfalls die Möglichkeit ein erweitertes
Menü, wie z.B. Künstler oder Genre zu nutzen.
Wenn Sie ein kompatibles Computersystem, wie Windows Media Player 10 oder
höher haben, sind Sie in der Lage mit diesem Gerät Musik auszutauschen. Sie
müssen nur den UPnP Server einstellen.
Urheberrechtliche Informationen
-Das Duplizieren, Nachmachen und Kopieren von urheberrechtlich geschützten
Materialien sowie das in Umlaufbringen, öffentliche Vorführen und Vermieten von
diesen Materialien ist, ohne schriftliche Genehmigung des Rechtinhabers, absolut
verboten.
-Das Gerät liest MP3 und WMA Files.
Zum Beispiel
Der meist benutzte UPnP Server ist Windows Media Player (Version10 oder höher).
Gehen Sie wie folgt vor, um den Media Player zu nutzen:
1.Vergewissern Sie sich, dass Ihr Computer mit dem Netzwerk verbunden ist.
2.Stellen Sie fest, ob der Computer an ist und in dem selben Netzwerk angeschlossen
ist.
3.Fügen Sie ihre Musik, die ihrem Gerät zur Verfügung stehen soll, der Windows
Media Player Bibliothek hinzu.
4.Mit der rechten Maustaste öffnen Sie das Dialogfeld. Wählen Sie „Media Sharing“.
Im Display erscheint: „Unknown Device“ wählen Sie diesen an und drücken Sie
„Allow“ und dann „ Accept“. Wählen Sie „OK“, um das Dialogfeld zu verlassen.
-Drücken Sie „Mode“ oder wählen Sie den Musik Player im Hauptmenü. Nutzen Sie
die Navigationstasten oder den Control Regler, um das gewünschte Stück unter
„Shared Media“ auszuwählen. Bestätigen Sie mit „Enter“. Nachdem der Kontakt
hergestellt ist, können Sie mit den Navigationstasten einen Titel nach dem andern
durch drücken der „Enter“ Taste hinzufügen. Die ausgewählten Stücke werden zu
ihrer „Playlist“ hinzugefügt.
Musik Player
Page 21

Abschnitt 8 Musik Server -20-
Informationen
8
-Drü cken Sie mehrfach di e INFO Taste, um verschieden Informationen zu bekommen.
Die Art der Informationen die Sie erhalten, hängen von dem gehörten Sender ab.
Page 22

9
Anschnitt 9 Internet Radio Seite - 21-
Internet Radioportal
-Die „Frontier Selicon“ Radio Webseite gibt ihnen die Möglichkeit, ihr Radio über
ihren Computer zu verwalten und ihre Senderlisten zu erstellen.
-Der Zugang ist kostenlos.
Um ihr Radio auf dieser Seite zu registrieren, benötigen Sie einen Zugangscode.
1. Wählen Sie im Menü Station List > Help > Access Code
2. Schreiben Sie den Zugangscode auf.
3. Gehen Sie auf die Webseite
4. Wenn das ihr erster Besuch auf der Seite ist, benötigen Sie ein Passwort
über ihre Internetadresse und ein Internet Radio.
5. Wenn Sie bereits registriert sind, wählen Sie My preferences > add
another wifi radio
6. Wenn Sie ihr Gerät registriert haben, können Sie Sender hinzufügen und
ihre Favoriten verwalten.
www.wifradio-frontier.com
Page 23

10
-
Generelle Funktionen
Alarm
Schlafunktion
Software Upgrade.
Werksrückstellung
-Sie können zwei verschiedene Alarmzeiten in Ihrem WFR 700 eingeben. Wählen
Sie im Hauptmenü den Punkt „Alarm“. Sie können nun zwischen Alarm eins und
zwei wählen. Sie können den Alarm mit an/aus aktivieren. Stellen der Alarmzeit:
Wählen Sie in der Option „Mode“ welchen Alarm Sie wünschen (z.B. Internet
Radio). Wählen Sie den Sender. Geben Sie ein, welchen Alarm Sie wünschen.
(z.B. Täglich-einmalig). Wählen Sie die Lautstärke. Bestätigen Sie alle Eingaben
mit „Save“. Ein Zeichen für Alarm wird im Display angezeigt.
-Wählen Sie im Hauptmenü den Punkt „Sleep“. Um den „Sleep“ Timer zu nutzen
, wählen Sie mit den Navigationstasten in 15 min. Schritten, wann sich das Gerä
t ausstellen soll. Bestätigen Sie die Eingabe mit“Enter“.
-Sie können manuell nach einem Software Upgrade suchen oder einen
automatischen Upgrade durchführen. Prüfen Sie unter Menü > System Settings
> Software Upgrade, ob das Gerät von Zeit zu Zeit eine automatische Suche
nach Upgrades durchführen soll. Wenn eine neue Software Version vorliegt,
werden Sie gefragt, ob Sie diese runterladen möchten.
Die Benutzer Einstellungen bleiben erhalten
-Wenn Sie diese Funktion auszuwählen, setzen Sie das ganze Gerät auf den
Auslieferungszustand zurück. Nur die Softwareversion und der Netzzugang
bleiben erhalten. Um diese Funktion zu wählen gehen Sie wie folgt vor:
Menü > System Settings > Factory reset.
Abschnitt 10 Generelle Funktion -22-
Page 24

Abschnitt 10 Generelle Funktionen -23-
Sprache
Zeiteinstellung
12/24 Stunden Display
-In System Settings > Sprache > wählen Sie die gewünschte Sprache
-Wählen Sie System Settings > Time Setup > stellen Sie die Zeit ein. Wählen Sie
automatisch, um die automatische Einstellung auszuwählen. Wenn Sie „Daylight
Saving“ auswählen, stellt sich ihr Gerät von Sommer - auf Winterzeit. In dem
Bereich „Time Zone“ können Sie ihre Zeitzone auswählen. Der WFR 700 wird sich
automatisch auf das Datum und die Zeit einstellen, sobald er Internet Empfang
hat. Sie können ebenfalls das Datum und die Uhrzeit manuell einstellen. Wählen
Sie „Date/ Time Setup“ Im Display sehen Sie: dd;mm;yyy und hh-mm.
-Das blinkende Feld können Sie mit den Navigationstasten verstellen. Bestätigen
Sie ihre Eingabe mit „Enter“.
-Um zwischen den Bereichen 12/24 Stunden zu wählen, wählen Sie „Set 12/24
Stunden“. Bestätigen Sie ihre Eingabe.
10
Page 25

Abschnitt 11 Fehlermeldung -24-
Fehlermeldung
Meldung
Angabe
Beispiel
Keine
Verbindung
Richtiges Passwort aber
kein Kontakt zum Router
Der Mac Filter ist am
Router deaktiviert
Format Error
Das File Format wird
nicht erkannt nabhängig
vom Netzwerk
Vergewissern Sie sich,
dass der Stream in WMA
ist. Wenn nicht, bitte
dekodieren
Netzwerk
Error
Falsche Informationen
werden vom Netzwerk
empfangen
Die Daten vom Server sind
nicht lesbar
Netzwerk
nicht
verfügbar
Probleme mit der
Verbindung zum
Computer
Der Router ist nicht
angeschaltet
Netzwerk
Zeitüberschreitung
Keine Antwort von dem
Netzwerk unabhängig vom
Netzwerk
Ein gewählter Sender,
der plötzlich nicht
mehrempfangbar ist
Kein UPnP
gefunden
Nicht
autorisiert
Update
fehlgeschlagen
Es wurde kein UPnP Server
gefunden
Falsche Eingabe bei dem
Passwort oder nicht beim
UPnP Server angemeldet
Software Update ist
fehlgeschlagen
11
Page 26

Problembehebung am Verstärker
Problem Möglicher Fe hler
Kein Strom, obwohl das
Gerät angeschaltet ist
Kein Ton
Kein Ton auf einem Kanal
Lautes Brummen
Schwacher Bass
Verzerrter Ton
- Das Stromkabel ist nicht
angeschlossen
- Die Steckdose ist defekt
- Die Sicherung im Gerät ist defekt!
Dieser Fehler muss durch einen
Techniker repariert werden
- Das Stromkabel ist defekt! Auch dieser
Fehler muss durch einen Techniker
repariert werden.
- Das Gerät ist gar nicht an
- Die Lautstärke ist zu niedrig
- Das Lautsprecherkabel ist nicht richtig
angeschlossen
- Kein Eingangssignal
- Am Gerät ist der falsche Eingang
eingestellt
- Der Audioeingang ist falsch
angeschlossen
- Der Eingangswahlschalter steht falsch
- Das Lautsprecherkabel ist falsch
angeschlossen
- Die Lautsprecher sind defekt
- Das Audiokabel ist nicht richtig
angeschlossen oder defekt
- Beim Plattenspieler ist die Erdung nicht
gelegt
- Ein Kassengerät steht zu nah am
Verstärker oder Fernseher
- Die Phase beim Lautsprecher ist nicht
richtig angeschlossen wechseln Sie +/-
- Die Lautstärke ist zu hoch- Der Bass
oder der Hochton ist zu hoch
- Am Lautsprecherkabel liegt eine
Brücke
Abschnitt 11 Fehlermeldung -25-
11
Page 27
12
Problembehebung
Abschnitt 12 Problembehebung -26-
Ihr gerade neu erworbenes Gerät ist mit der neusten Technik unserer Zeit ausgestattet
und sicher zu bedienen.
Probleme bei der Bedienung können auftreten, aber bevor Sie einen Servicetechniker
rufen, lesen Sie sich folgende Punkte genau durch.
Verzerr ter Ton oder kein Ton
-Kontrollieren Sie, ob die Kabel richtig angeschlossen sind
Die Fernbedienung funktioni ert nicht
-Kontrollieren Sie, ob die Batterien richtig eingelegt sind
-Sind die Batterien leer? Ersetzen Sie diese bitte durch neue
-Richten Sie die Fernbedienung zum Empfänger am Gerät
-Entfernen Sie alle Gegenstände zwischen der Fernbedienung und dem Gerät
-Stellen Sie fest, ob die Entfernung zwischen der FB und dem Gerät mehr als 8
Meter beträgt
Tasten funkt ionieren nicht (am Gerät/oder der Fernbedienung)
-Stellen Sie das Gerät aus und erneut wieder an. Alternativ nehmen Sie das Gerät
vom Strom und schließen es dann wieder an. (Das Gerät kann durch externe
Stromeinflüsse beeinflusst werden)
Störung im Empfang
-Der Sender ist nicht richtig eingestellt
-Die Antenne ist nicht richtig ausgerichtet
-Starten Sie erneut eine Sendersuche
Netzwerk Anschluss ist nicht möglich
-Das Netzwerk ist momentan nicht erreichbar. Versuchen Sie es zu einem
späteren Zeitpunkt noch einmal
-Der Router lässt keinen Anschluss zu, da das Gerät noch keine Adresse
bekommen hat. Fügen Sie die Adresse über Menü > System Settings > View
Settings den Router hinzu.
-Kontrollieren Sie die Entfernung zwischen Router und dem Gerät
-Ändern Sie die ausgewählte Entschlüsselungsmethode des Gerätes
-Gehen Sie über das Menü, um das Gerät manuell anzumelden
-Stellen Sie fest, ob eine Firewall das Gerät ablehnt
-Kontrollieren Sie das Netzwerkkabel
Reparaturen und Eingriffe in das Gerät, dürfen nur durch autorisiertes
Fachpersonal vorgenommen werden.
Page 28
Abschnitt 13 Pflege und Handhabung -27-
Pflege und Handhabung
Lesen Sie sich diese Bedienungsanleitung sorgfältig durch. Achten Sie darauf, dass
z.B. das Stromkabel nicht beschädigt ist.
Wenn Sie den Verdacht haben, dass das Gerät nicht mehr sicher zu nutzen ist, nehmen
Sie das Gerät vorsichtig vom Netz, indem Sie vorsichtig den Stecker aus der Steckdose
ziehen.
Transportieren des Gerätes
-Bitte bewahren Sie die Verpackung und die Bedienungsanleitung auf, damit Sie
das Gerät für einen Transport oder zum Verschicken ordnungsgemäß verpacken
können. Die Originalverpackung ist so entwickelt, dass Sie das Gerät sicher
transportieren oder verschicken können. Bewahren Sie bitte auch die
Bedienungsanleitung auf, damit Sie diese gegebenenfalls an Dritte weitergeben
können.
Reinigung des Gerätes
-Nehmen Sie das Gerät, bevor Sie es reinigen, vom Strom. Benutzen Sie nur
saubere und trockene Lappen, um ihr Gerät zu reinigen. Wenn das Gerät sehr stark
verschmutzt ist, können Sie das Gerät mit einem handfeuchtem Lappen und
mit milder Reinigungsflüssigkeit reinigen. Nutzen Sie niemals Flüssigkeiten, wie
Benzin, Alkohol oder Petroleum.
Sehr geehrter Kunde!
Wichtiger Hinweis!
Bitte beachten Sie, dass elektr onische Geräte
nicht im normalen Hausrat entso rgt werden
dürfen.
Kunden, die elektronische Geräte nutzen, sind
verpflichtet diese in speziell dafür vorgesehenen
und durch Schilder gekennzeichnete Stellen
abzugeben.
Für nähere Informationen, wo Sie diese dafür
vorgesehenen Stellen finden, wenden Sie sich bitte
an Ihre Müllabfuhr.
Das abgebildete Symbol bedeutet, dass Sie das
Gerät, die Verpackung und das Zubehör nicht mit
dem normalen Hausmüll entsorgen dürfen.
Bitte halten auch Sie sich an diese Verordnung, um
unseren Kindern eine besser Umwelt zu erhalten.
13
Page 29

14
Technische Daten
Technische Daten
Netzteil: AC 230V 50 Hz
Maximale Stromaufnahme: 80W
FM FREQUENCY RANGE: 87.5 – 108 MHz
Anschlüsse: UKW Antenne
3 X Stereo Eingänge
RJ 45 Anschluss
WIFI 2.4 Anschluss
1 X Stereo Lautsprecherausgang
Abschnitt 14 Technische Daten -28-
Page 30

32 Chapter 1
32
33 Chapter 2
36
37 Chapter 3
37
38
39
40
42 Chapter 4
42
42
42
42
42
43 Chapter 5
43
43
43
45 Chapter 6
46 Chapter 7
Table of contents
Information on handling batteries/rechargeable batteries
Intended use
Explanation of symbols
Safety information
Before use
The device
Front panel control
Remote control
Rear panel
Connection
Power supply
Antenna
Signal output
Network
W-LAN
Basic operation
Setup
FM operation
Stations
Connecting to a network
Internet radio
Connecting to a network
Network profle
Stations
29
46
48
48
Page 31

52
53
53
53
53
53
54
54
54
55
57
58
60
60
50
Chapter 9
Chapter 10
Chapter 11
Chapter 12
Chapter 13
Chapter 14
Chapter 8
50
51
Internet radio portal
General functions
Alarm
Sleep function
Software upgrade
Factory default settings
Language
Setting the time
12/24 hour display
Error messages
Troubleshooting
Specifcations
Technical data
Music server
Music player
Information
Delivery contents
30
Page 32

31
thank you for deciding on purchasing this quality product . This instruction manual will
give you a general idea of how this device operates, as well as provide you with informa-
tion on cleaning and safety procedures. Please take a few minutes to read and follow all safety
and operating instructions found in this manual carefully, in order to maintain this products
We assume no liability for damage occurred as a result of improper use or damage resulting
from the failure to comply with the safety instructions found in this manual, improper operation
or handling! Under such circumstances, all claims under warranty will become void. We assume
This product is EMV-certifed and fulfls all European and National guideline requirements. A
declaration of CE conformity has been established for this product. Certifcation has been
Dear customer,
documented and entrusted to the manufacturer.
no liability for the consequential damage!
Retain this instruction manual for future reference and pass it along with the device if handed
over to a third party. Should you have any additional questions regarding the operation or instal-
lation of this device or should any suggestions arise, please contract a specialized dealer or our
service team for furtuer information.
condition and ensure safe operation.
Page 33
The unit is a hi-fi stereo internet radio. This device can be used for internet radio
station reception by means of a (broadband) high-speed internet access via cable (Ethernet) or
W-LAN (Wi-Fi). FM radio reception is also possible via antenna. Music fles stored on a network
can also be used.
Please adhere to all of the safety information/instructions found in this instruction
manual!
Explanation of symbols
An exclamation mark is intended to inform the user of important information, operation or maintenance instructions or that special attention is required.
This symbol is intended to alert you to the presence of unprotected, live parts or components found within the product’s enclosure or of dangerous connections that upon
contact may be of sufcient magnitude to constitute a risk of electric shock. Cables
intended for such connections should only be connected by qualifed personnel or you
should only use ready to connect cables. There are no user-serviceable parts found
inside the device, therefore the device is never to be opened.
Intended use
1
Intented useChapter 1
32
Page 34
Safety information
Chapter 2
› In order to completely cut of the power supply to the device, unplug the power
plug from the wall outlet. Merely turning the device of with the ON/OFF button is not
sufcient enough. Make sure that receptacles are easily accessible.
2
We assume no liability for personal or property damage resulting from the failure
to comply with the safety instructions, improper operation and handling. Under
such circumstances, all claims under warranty will become void.
the following safety and hazard warnings are not only for the protection of your device, but also
serve as a protection against potential health hazards. Please take time to read the following
instructions carefully.
Dear customer,
› For safety and licensing (CE) reasons any unauthorized modifcation and/or change
on the device is prohibited and will void the warranty and all warranty claims.
› Any persons operating, installing, setting up, or servicing this device must be trained
and qualifed accordingly and observe these operating instructions.
› Ensure that the device has been set up accordingly by following all instructions
› This is a protection class II device. Make sure that the voltage supply of the power
outlet used meets the required voltage specifcations (230 V~/50 Hz).
› Power supply cables should be routed so that they are not likely to be walked on,
squished or pinched by items placed upon or against them, paying particular attenti-
on to cords at plugs, convenience receptacles, and the point at which they exit from
the device. Avoid exposing the cable to extreme heat or cold. Ignoring the above
mentioned could result in cable damage and present the dangerous risk of electric
found in the instruction manual.
› Should any evident damage be seen on the device or on the connection cables, do
not come in contact with or touch these. Switch of the corresponding circuit brea-
ker in the power distribution panel frst, before carefully unplugging the power plug
from the wall outlet. Do not operate this device further! Please contact or take it to a
qualifed service technician/specialty workshop.
shock.
33
Page 35
› Unplug the device from the power outlet, if it is not in use for a longer period of time.
› For safety reasons, always unplug the device from the power outlet during thunder
storms.
› Eliminate potential tripping hazards by routing cables in such a way that no one can
trip or stumble over them.
› Never use the device, if the power cable or device is damaged.
This device is not suitable for children under 3 years of age.
Small children are unaware of the serious and immediate dangers involved
when exposing themselves to or handling electronic devices. Furthermore,
this product contains small parts that could be swallowed.
› Keep packaging and protective foil away from children at all times to a void the dan-
ger of sufocation.
› The device should never come in contact with water or moisture.
› To prevent the risk of fre or electric shock make sure that liquids, such as dripping or
splashing water, rain or moisture, do not come in contact with the device and power
supply plug
› Operate this device in a moderate climate and never expose it to extreme tempera-
tures, such as high humidity.
› Condensation can build up suddenly, when this device is brought from a colder
into a warmer area (e.g. when transporting). Should this happen, allow the device to
warm up to room temperature frst before using.
› Care should be taken that liquids do not come in contact with the interior, this is
why containers containing liquids, e.g. bucket, vase or plants should never be placed
anywhere near this product, power supply plug inclusive. This could not only damage
the device, but also present a fre hazard.
Chapter 2
Safety information
› It is imperative to avoid contact with moisture, e.g. in the bathroom.
34
› Always pull on the plug’s grips and never on the cable to remove from a wall outlet.
Page 36
35
› Make sure the device is properly ventilated during operation and never operate it in
constricted areas, such as for example in a bookcase or shelf. Never block ventilation
openings with magazines, tablecloths, curtains or similar.
› Make sure the device is placed on a frm and stable surface.
› Never place any sources of fre on top of or near the device and power supply plug
(e.g. lighted candle).
› Please note that excessive sound pressure levels created when listening to loud vo -
lume levels with earphones or headphones can lead to permanent hearing damage.
› Please adhere to the additional safety information found in the individual chapters
of this instruction manual.
› When connecting other devices, please refer to the safety and operating instructions
found in the literature accompanying these devices.
› Please contact our technical hotline or a service technician for further information,
should you be in doubt about device operation, safety or when making connections
or if any questions arise that are not explained within this manual.
› Contribute to a better environment by using a designated disposal system (e.g. Dual
System in Germany) or recycling site for the disposal of packaging material.
Chapter 2 Safety information
Page 37

Before use
Please read this instruction manual thoroughly before operating this device and retain it for fur
ther reference, questions and use. Following and heeding all information found in this instruc
tion manual shall maintain this products condition and ensure safe operation.
This instruction manual contains information on how to operate and maintain this device.
Should a component require maintenance, servicing or repairs, then please consult a qualifed
dealer or service technician.
Chapter 2 Safety information
36
Page 38
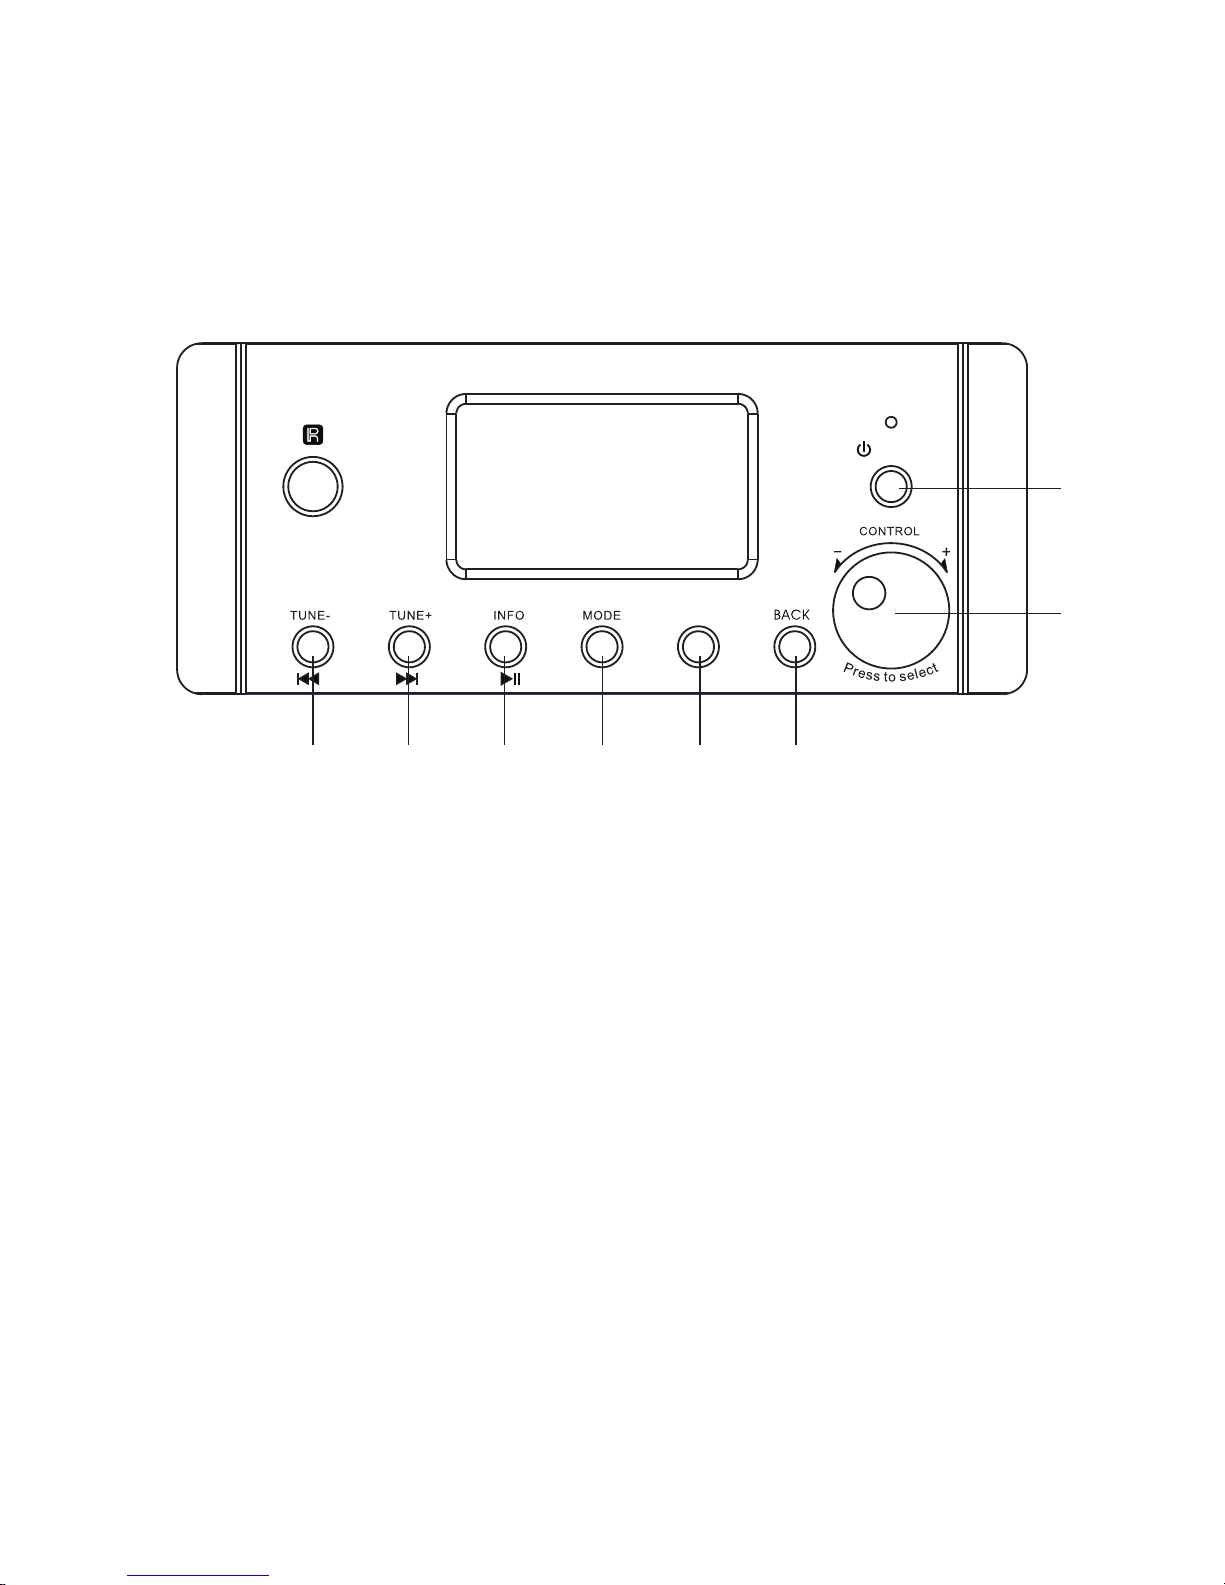
37
Chapter 3 The device
3
The device
-
1. WHEN PL AY MODE IS TUNER, PRESS TO AUTO SCAN PR EVIOUS STATION
WHEN PLAY MODE IS MEDIA PLAYER, PRESS TO SKI P TO PREVIOU S TR ACK.
2. WHEN PL AY MODE IS TUNER , PRESS TO AUTO SCAN NEX T STATION,
WHEN PLAY MODE IS MEDIA PLAYER ,PRESS TO SKI P TO NEXT TRACK.
3. WHEN PL AY MODE IS TUNER ,PRESS TO SEE INF ORMATION OF FM R DS OR DAB
WHEN PLAY MODE IS MEDIA PLAYER, PRESS TO PLAY, PRESS AGAIN TO PAUSE.
4. PLAY MODE CHANGE. PRESS TO SELECT ONE M ODE WITHI N FM, INTERNET RADIO,
MEDIA PLAYER , AUX1, AUX2, AU X3.
5. MENU: P RESS TO GO TO MENU S CREEN
6. BACK : PR ESS TO GO TO PREVI OUS MENU SCREEN
7. POWER S WITCH
8. UP DOW KNOB :
WHEN NOR MAL PLAYING, TU RN LEFT OR RIGH T TO ADJUST VOLUM E LEVEL.
WHEN IN ME NU SCREEN, TU RN LEFT OR RIGH T TO MOVE MENU I TEM.
PRESS TO CONFIRM THE SELECTION.
PO WE R
Wi Fi Int er ne t/ FM r ec ei ve r
ME NU
1 2 3
4
5
6
7
8
Front panel control
Page 39
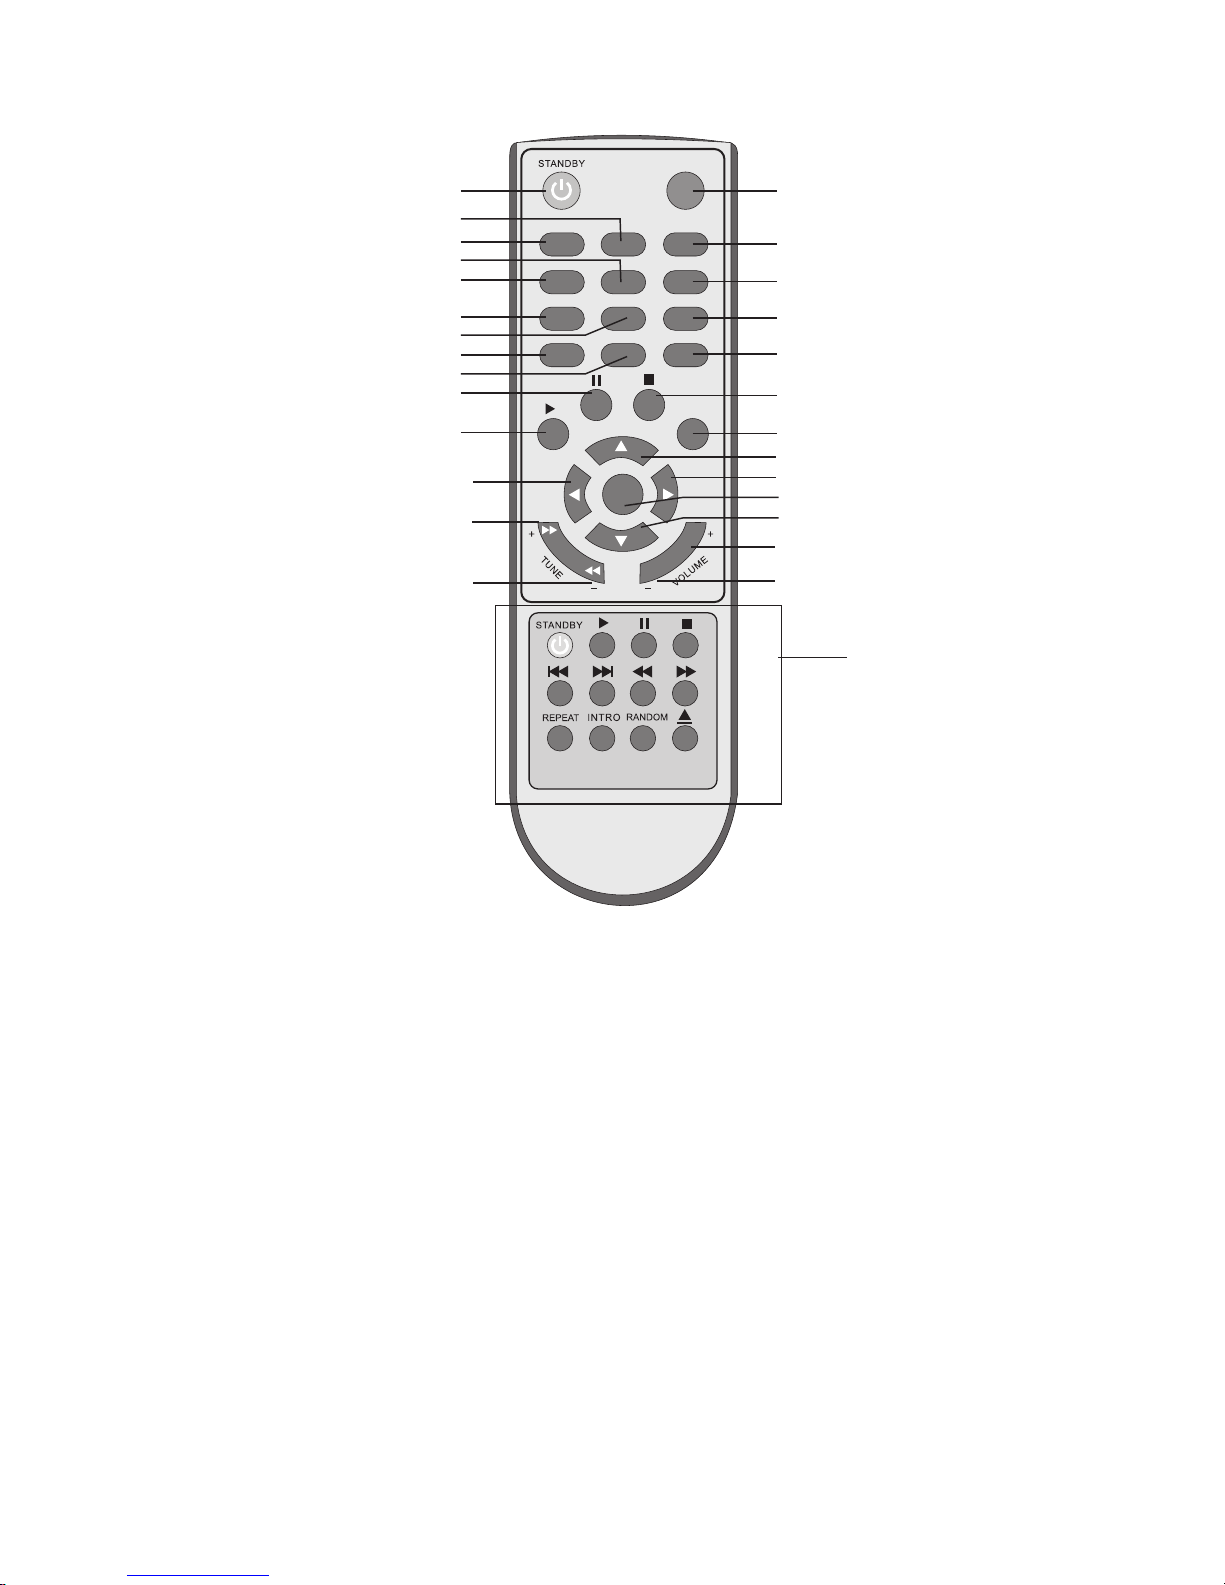
38
Chapter 3 The device
MOD E
SHI FT
P
MEN U
MUT E
INF O
ST/ MONO
ENT ER
1 2
3
4
5
PRE +
PRE -
CD P LAY ER
RA DI O
9 10
11
12
13
14
15
16
17
18
19
20
21
22
23
24
25
26
27
28
29
30
31
32
33
34
35
36
9. STANDBY KEY
10. PLAY MODE CHANGE. PRES S TO SELECT ON E MODE WITH IN FM, DAB, INTERNET RADIO,
MEDIA PLAYER , AUX1, AUX2, AU X3.
11--15: PRE SET STATION NU MBER.(1-5)
16. SELE CT PRESET NUMBE R OVER 5.
FOR EXAM PLE: SELECT 6, PRESS SHI FT AND PRESS 1, THEN 6 I S SELECTE D.
17. P. PRESS TO B ROWSE TUNER P RESET STATION
18. Ster eo/Mono change for FM
19. INFO , INFORMATIO N KEY FOR FM RDS OR D AB OR MEDIA TRAC KS
20. GO TO PREVIOUS PRESET STATION
21. GO TO NEXT PRESET STATION
22. MUTE
23. PAUSE
24. PLAY
25. STOP
26. MENU . PRESS TO GO TO MEN U SCREEN
27. WHEN P LAY MODE IS FM , PRESS TO UP SELECT FREQ UENCY BY 0.05 STEP.
WHEN IN ME NU SCREEN , PRESS TO TO UP ITEM
28. LEFT MOV E .
WHEN IN ME NU SCREEN, PRESS TO GO TO PRE VIOUS MENU SCREEN
29. RIGH T MO VE
30. ENTE R, CONFIRM KEY.
31. DOWN M OVE KEY
32. WHEN P LAY MODE IS TUNER , PRESS TO AUTO SCAN NE XT STATION,
WHEN PLAY MODE IS MEDIA PLAYER ,PRESS TO SKI P TO NEXT TRACK.
33.WHE N PLAY MODE IS TUNER, PRESS TO AUTO SCA N PREVIOU S STATION
WHEN PLAY MODE IS MEDIA PLAYER, PRESS TO SKI P TO PREVIOU S TR ACK.
34. VOLU ME LEVEL UP
35. VOLU ME LEVEL DOWN
36. THIS KEY IS FOR CD PLAYER.
Remote control
Page 40
39
Chapter 3 The device
Aud ioBlo ck Boll manns weg 41 26 125 Old enbur g
M o de l: WF R 7 00
W i fi i n te rn et /F M r ec e i ve r
P o we r R at in g: A C 2 30 V 5 0H z
M a x P o w er C o ns um pt io n : 8 0W
AUX 1
AUX 2
AUX 3
AUX 3
AUX 2
AUX 1
Wi-Fi Antenna
Wi-Fi Antenna
1 2
3
4
5 6
7
8 9 10
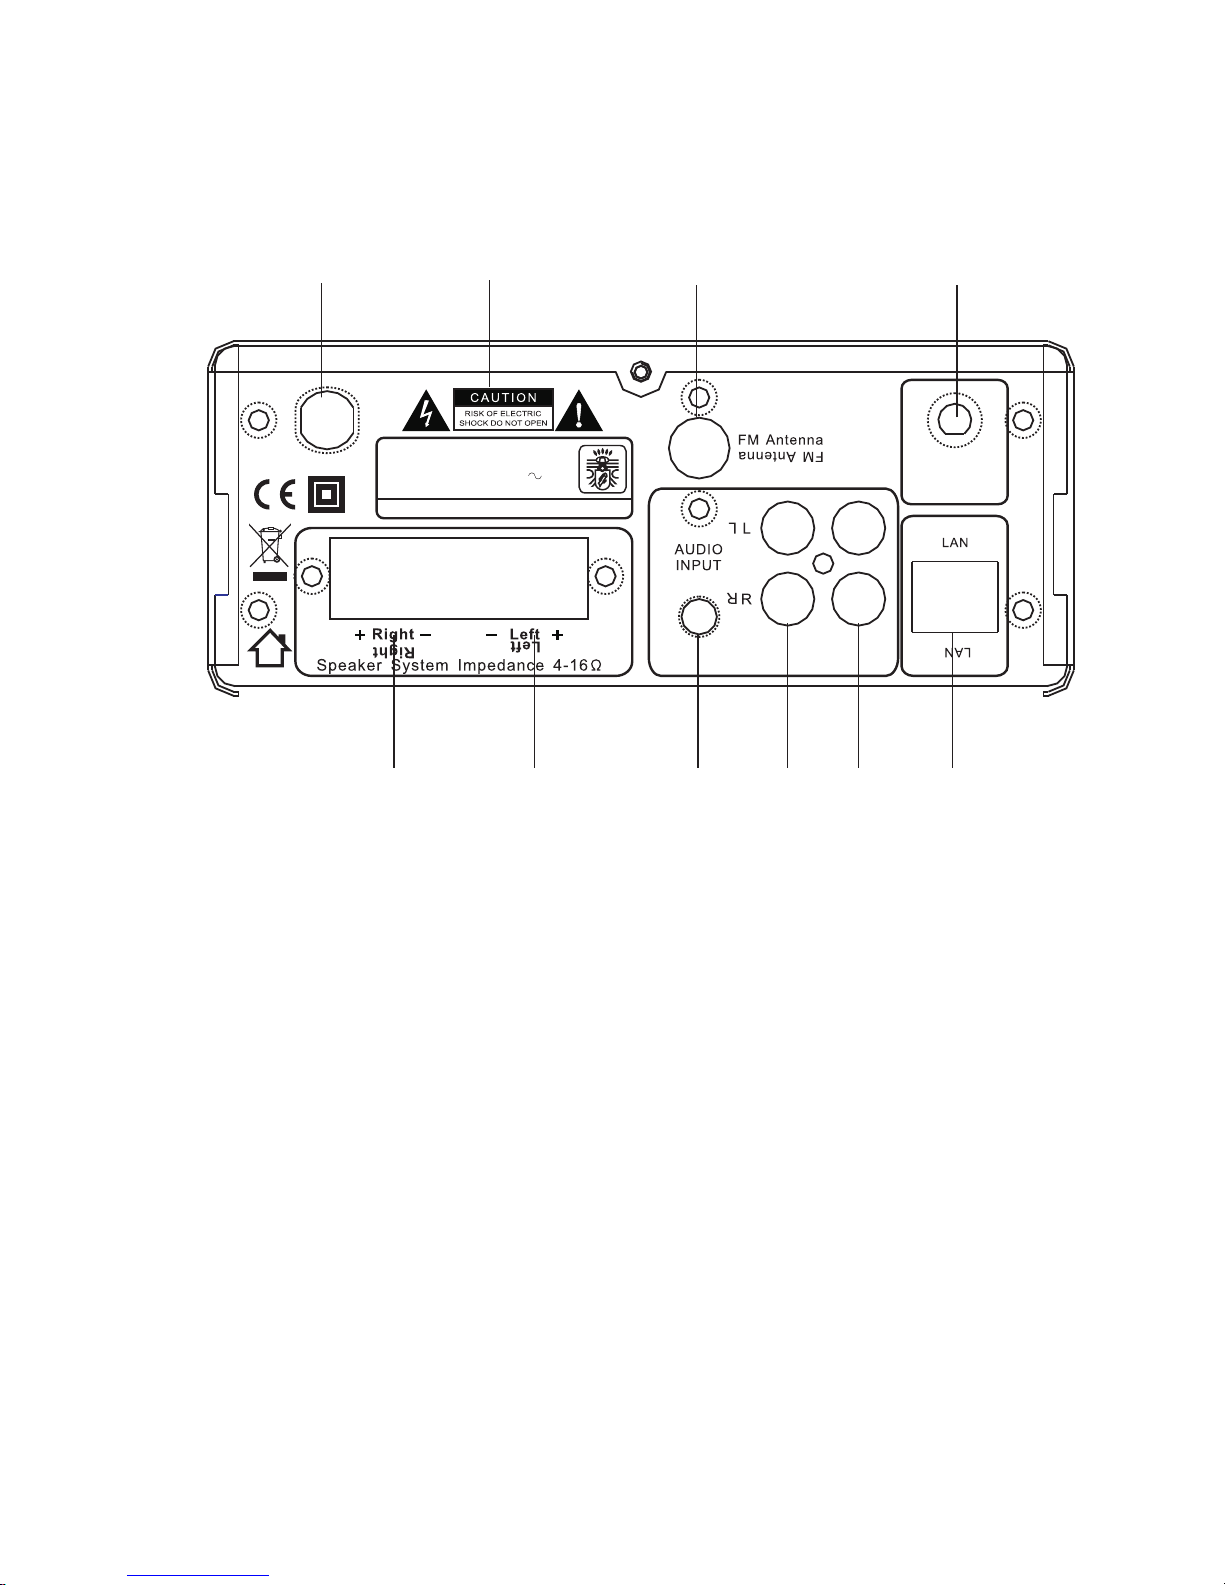
1. Power cord inlet : Please ensure that the input cable strain relief
bush is intact and has not been damaged.
2. Warning icons: Please be aware that this unit contains high voltages,
and should not be opened.
3. FM antenna input jack.
4. 2.4G wi-fi antenna input jack (for internet radio).
5. Right speaker output jack.
6. Left speaker output jack.
7. Input source 3.5mm jack for AUX3.
8. Input source RCA jack for AUX2.
9. Input source RCA jack for AUX3.
10. LAN wire input jack(for internet radio).
Rear panel
Page 41
40
Remove the used batteries. Insert new batteries and ensure correct polarity, as graphically dis-
Chapter 3 The device
Information on handling batteries/rechargeable batteries
› The remote control requires two „AAA” batteries for operation.
Inserting/changing batteries
Remove the battery compartment lid carefully.
played inside the compartment. Replace the battery lid carefully.
Information on handling batteries/rechargeable batteries
Please adhere to the following information when handling batteries and rechargeable
batteries.
› Keep batteries out of children’s reach.
› Batteries are hazardous waste and do not belong in household waste.
› Ensure correct polarity when inserting batteries.
› Always remove batteries when the remote control is not in use for longer periods of time.
ren and pets if swallowed. Seek emergency medical care immediately, should this happen.
› Never expose batteries to extreme temperatures, such as sunlight, fre, ovens, etc. there is the
risk of explosion!
› Make sure that batteries are not dismantled, short-circuited or are thrown into fre. Never recharge non-rechargeable batteries. There is a risk of explosion!
› Always follow manufacturer instructions, when recharging rechargeable batteries.
› Touching leaking or damaged batteries could cause skin burns. Use protective gloves suitable
for handling such batteries.
› Always ensure that the device has been turned of after use.
› Always change/replace all batteries at the same time.
› Clean battery and device contacts before inserting, where required.
› Never leave batteries lying around unsupervised.These could pose a choking hazard to child-
Page 42
Chapter 3 The device
41
Page 43

42
Power supply
› Plug the power cable into a correctly installed power outlet of your public power system.
Antenna
› Connect the FM antenna connector to the „F M Antenna” connection on the back of the device.
Signal output
› Connect these jacks to the respective jacks found on your amplifer. Ensure that connections
have been made properly (this normally means red to red and white to white).
Network
› A RJ45 cable is used to connect the LAN connection on the device to your router.
W-LAN
› For wireless operation, attach the antenna to the „Wi-Fi 2.4G Antenna“ connection. Your password may be required for the wireless network.
Chapter 4 Connection
4
Connection
-
Page 44

43
Chapter 5 Basic operation
5
Basic operation
Setup
› You will be asked if “Setup Wizard” is to be started, when the device is turned on for the frst
time. If you don’t want this to be installed or it is to be started at a later point in time, you will be
able to start this setup function again as follows:
MENU › System settings › Setup Wizard
The following will occur, if the „S etup Wizard” is carried out:
› You can select the desired time format (12/24 hour display).
› Whether and which source is to carry out automatic updates.
› Your time zone (Germany has the time zone +01:00)
› Set the daylight savings options ON/OFF
› Set the W-LAN region (Germany is „M ost of Europe“)
FM operation
› Press the „MODE“ button repeatedly or select „Radio Operation“ in the main menu for FM radio
operation.
Stations
Setting stations
› Press the „TUNE +/–“, „ENTER“, the „CONTROL” dial or press the „ “ and „ “ buttons down longer to start an automatic station search. The search function will stop, once a station has been
found. You can improve the frequency gradually in 0.05 MHz steps by pressing the „ “ and „ “
buttons down shortly or by turning the „C ONTROL” dial.
› You can access and use additional settings in the radio menu. Press the „MENU ” button.
Select the radio menu option in the main menu, if you have not already gained access to this
menu option.
Scan setting › Select this option to search and stop after a station with good reception has been
found.
Audio setting › Select this setting to play stations with weak signals in mono.
▲
▲
▲
▲
Page 45

44
Chapter 5 Basic operation
› Press „STR/MONO“ or „ST/MO“ to switch between two-channel stereo and one-channel mono
operation.
Storing stations
Selecting a preset station
› There are diferent ways of selecting a preset station.
› Press a numeric button to select a memory preset. Press the „SHIFT” button frst and then the
1 – 5 button to select a preset station between 6 and 10.
Example
To select station preset 8, press the „SHIFT ” butt on frst and then the number „3”.
› Press „P” down shortly to display a list of stored stations. Use the „ “ and „ “ buttons or turn
the „CONTROL“ dial to select the preferred station. Press the „ENTER” button or the „CONTROL”
dial to confrm and switch to the selected station. Press „ t“, „P“ or „BACK“ to exit this menu. The
menu will close automatically after a while.
Station information
› Press the „INFO“ button repeatedly to browse through diverse information. The type of infor
mation and whether information is displayed all depends on the broadcasting station.
▲
▲
> Press and hold the numeric key(1-5) to save the station to preset number(1-5).
If the preset number over 5, then press and hold “SHIFT” key, then press key(1-5) to save the
station to preset number(6-10).
10 memory presets are available for storing.
Page 46

45
Chapter 6 Connecting to a network
› You will need a network connection for „I nternet radio“ or „M usic player“ operation modes.
› You will need either a router and RJ45 cable or a W-LAN router together with the required password to establish a connection to your network.
› Your router must have a broadband internet connection for internet radio operation and to
perform software updates.
› When you select and „I nternet radio“ or „M usic player“ mode, your device will try to connect to
a network. If this is the frst time that a connection has been made or stored networks are not
accessible, then the „Network Wizard” will start. To start the „Network Wizard” manually, select
the following:
MENU › System settings › Network › Network Wizard
Once started you can enter the following information:
› W-LAN region (select a country/select a region from the list)
› Network name (select the desired network)
› An encrypted wireless network will require a password.
› Use the navigation buttons or the „CONTROL” dial to move the cursor through the displayed
characters. Press either the „ENTER” button or the „CONTROL” dial to confrm the selected character.
› Select „BKSP “ to delete the last character selected.
› Select „C ANCEL“ t o cancel your input.
› Select „OK“ to confrm the entered code and to try to establish a connection to the selected
network.
› The unit will return to the password entry window, if no connection could be made.
› Under the menu options MENU › System settings › Network › Network Profle you will not be
able to delete desired networks.
6
Connecting to a network
Page 47

46
Chapter 7 Internet radio
7
-
ration.
› The unit has access to thousands of stations and podcasts from around the whole world. If
you select the internet radio mode, then the unit will contact the Frontier Silicon Internet radio portal to access a list of stations that are organized into diferent categories, such as Country
or Genre. Once a station has been selected, the device will establish a connection to this station
and begin broadcasting. This internet portal also allows you to create several lists of your favorite
stations. In order to be able to use this extra feature, you will have to register your unit on the
internet portal website.
Connecting to a network
› You can use the options MENU › System settings › Network › Network Wizard to view a list of accessible networks. Use the „ S“ and „ T“ buttons or turn the „C ONTROL“ dial to select the desired
network. Once the „ENTER ” button or the „CONTROL” dial has been pressed, the device will try to
establish a connection to the selected network.
› [Network name] › Selects this network.s.
› [Rescan] › Repeats a search for available networks.
› [Wired] › Selects the network connected via cable.
› [Manual confg] › Starts the option for manual entry of network information:
1. Select the preferred connection type:
› Wired (via cable) or Wireless (via wireless network)
2. Select if the Direct Host Confguration Protocol (DHCP) is to be used:
DHCP enable › Activates use and switches to the automatic reception of network data.
DHCP disable › Deactivates use and carries on with the manual entry of network data.
3. IP settings
Set the IP address and the Subnet mask with „ “ and „ “ or with the „CONTROL“ dial. Use the
„ u“ and „t“ buttons to switch between felds. Press „ENTER“ to switch to the next feld.
› Press the „MODE”button repeatedlly or select „Internet radio”in the main menu for radio ope-
▲
▲
Page 48

47
Chapter 7 Internet radio
5. DNS
Now set the primary and secondary DNS address with „S“ and „ T“ or with the „C ONTROL“ dial.
Use the „ u“ and „t“ buttons to switch between felds. Press „ENTER“ to switch to the next feld.
For beyond a network:
6. SSID
Set the wireless network identifcation. Use the navigation buttons or the „CONTROL” dial to
move the cursor through the displayed characters. Press either the „ENTER ” button or the „C ONTROL” dial to confrm the selected character.
› Select „BKSP “ to delete the last character selected.
› Select „C ANCEL“ t o cancel your input.
› Select „OK“ to confrm the entered code and to try to establish a connection to the selected
network.
7. Authentication
Now set the preferred method of authentication.
Open, Pre-Shared Key (PSK), WPA (Wi-Fi Protected Access) or WPA2.
8. Encryption type
Now select the appropriate encryption type.
Disabled (of) or WEP (Wired Equivalent Privacy) for Open or PSK, TKIP (Temporal Key Integrity
Protocol) or AES (Advanced Encryption Standard).
9. Key
Now enter the code for the wireless network. Use the navigation buttons or the „CONTROL” dial
to move the cursor through the displayed characters. Press either the „ENTER” button or the
„CONTROL” dial to confrm the selected character.
› Select „BKSP “ to delete the last character selected.
› Select „C ANCEL“ t o cancel your input.
› Select „OK“ to confrm the entered code and to try to establish a connection to the selected
network.
Now the device will try to establish a connection using the data previously entered.
4. Gateway address
Set the Gateway address with „ “ and „ “ or with the „CONTROL“ dial. Use the „ u“ and „ t“
buttons to switch between fields. Press „ENTER“ t o switch to the next field.
u
u
Page 49

48
Chapter 7 Internet radio
Stations
› You can also search for a certain station by selecting MENU › Station List › Stations › Search stations.
› Use the navigation buttons or the „CONTROL“ dial to move the cursor through the displayed
characters. Press either the „ENTER“ button or the „CONTROL“ dial to confrm the selected character.
› Select „BKSP“ to delete the last character selected.
› Select „CANCEL“ t o cancel your input.
› Select „OK“ to start searching. The device will search for all stations with the same entered key
characters. Once a search has been completed, a list of all stations found will be displayed.
› There are various ways to select a stored station.
› Press a numeric button to select a memory preset. Press the „SHIFT” button frst and then the
1 – 5 button to select a preset station between 6 and 10.
Example
To select station preset 8, press the „SHIFT ” button frst and then the number „3”.
Network profle
› You can use the options MENU › System settings › Network › Network Profle to delete an unwanted network. Here you will see a list of the previously used wireless networks. Select a profle
with the „▲“ and „ “ buttons and press „ENTER“. Confrm with „YES” to delete.
▲
Selecting a station
to select a station. Press „
u
“, „ENTER“ or „CONTROL“ dial to switch to the selected station.
list. Use the „▲ “ and „ “ button or turn the „CONTROL“ dial to navigate through the menu and
▲
› You can use the „ “, „▲“ and „ “ button or turn the „CONTROL“ dial to open a menu sation
▲
▲
the „CONTROL“ dial to select the preferred station. Press the „ENTER” button or the „CONTROL”
dial to confrm and switch to the selected station. Press „
t
“, „P“ or „BACK“ to exit this menu. The
menu will close automatically after a while.
› Press „P” down shortly to display a list of stored stations. Use the „ “ and „ “ buttons or turn
▲
▲
Page 50

49
Chapter 7 Internet radio
› The following features are also available through the option „S tation List”:
My favorites / Stations / Podcasts / My added stations
› Select „Last List ened“ to gain access to a selection of the previously listened to stations.
Station information
› Press the „ INFO“ button repeatedly to browse through diverse information. The type of informati
on and whether information is displayed all depends on the broadcasting station.
Storing stations
> Press and hold the numeric key(1-5) to save the station to preset number(1-5).
If the preset number over 5, then press and hold “SHIFT” key, then press key(1-5) to save the
station to preset number(6-10).
10 memory presets are available for storing.
Page 51

50
Chapter 8 Music server
8
to allow access to files or media first.
UPnP (Universal Plug and Play) allows devices, such as the unit to play music from a shared
media library. You will also be able to browse through highlighted menus, such as Genre or Ar-
tist. If you have a suitable server system, such as for example, a PC with Windows Media Player
10 or later, you will be able to release the use of this music library to the unit for sharing. Only
the UPnP media service will have to be set up.
Copyright information
› The reproduction, duplication and copying of copyright protected material, as well as the dis-
tribution, circulation, public access to or even the rental of these, without explicit authorization
of the copyright holder, is strictly prohibited.
› The unit can read MP3 and WMA files.
For example:
The most commonly used UPnP server is the Windows Media Player (Version 10 or later). Pro
ceed as follows to set up for media fle sharing:
1. Make sure your PC is connected to the network.
2. Ensure that the unit has been turned on and is connected to the same network.
3. Add the audio files and folders to be shared with your unit to your Windows Media Player’s
media library.
4. Right click on media library to open the dialog screen and select under this option „Media
Sharing“. The following dialog displays your unit as being an „Unknown Device”. Select this
and press „A llow” and then „Accept”. S elect „OK ” t o exit the dialog screen.
Music player
› Press „MODE“ r epeatedly or select „MUSIC PLAYER“ in the main menu.
Use the navigation buttons to select the preferred file source under „Shar ed Media” and confirm
with „ENTER“. After a connection has been made you will be able to use the navigation buttons
to browse through the source and confirm your selection with „ENTER“. With the„▲“ and „ “
you can return to the previous or skip to the next song. If you keep the „ENTER“ button de
-
pressed, the selected song will be added to „M y Playlist”.
› In order for the unit to play music from your computer, you will have to configure your computer
Music server
▲
Page 52

51
Chapter 8 Music server
Information
› Press the „ INFO“ button repeatedly to browse through diverse information. The type of
information and whether information is displayed all depends on the broadcasting station.
Page 53

52
Chapter 9 Internet radio portal
› The Frontier Silicon Internet radio website allows you to listen to internet radio through your
computer and also lets you organize your favorite lists.
› This portal is free of charge.
To register your unit to this portal, you will require an access code:
1. Select in the menu Station list › Help › Get access code.
2. Note the access code.
3. Visit the website www.wifradio-frontier.com
4. If this is your first visit, an access code will be required, your e-mail address, a password and an
internet radio.
5. If you already have an account, log in and select My preferences › add another Wi-Fi radio.
6. Once your unit has been registered, you will be able to use the Favorites and Added sta-
tions functions.
9
Internet radio portal
Page 54

53
Chapter 10 General functions
Alarm
› You can set two diferent alarm times with the IR-1200. Select in the main menu the option
ALARM. Now you can select the alarm number one or two. You can activate or deactivate the
„ON/OFF“ this function. Set the alarm time. Select the option „MODE“ to select the type of alarm
to be used (e.g. internet radio). Select a memory preset. Select the frequency with which the
alarm function is to be used (e.g. daily, once, etc.). Select the alarm signal volume. Confrm all
settings with „SAVE“. An alarm icon can now be seen on display and the alarm will go of at the
preset time.
Sleep function
› In the main menu, select the menu option „SLEEP “ to set the sleep timer. Use the „S“ and „T“
buttons to set in 15 minute stages after which the device is to turn of. Confrm your selection
with „ENTER“.
Software upgrade
› You can search for a software upgrade manually and can also select under MENU › System set
tings › Software update, if the device is to automatically search for updates periodically. When a
new software version has been found, you will be asked if this is to be downloaded and installed.
All user settings are maintained.
Factory default settings
› Selecting this option resets all settings to a factory default setting. Only the software version
and the registration with the internet radio portal are maintained. You can select this option
under: MENU › System settings › Factory reset.
10
General functions
Page 55

54
Chapter 10 General functions
Language
› Select System settings › Languages to choose a preferred language.
Setting the time
› Select System settings › Time setup to set the time. Select „AUTO“ to activate an automatic time
adjustment. „Daylight savings” determines whether you would like to use a summer or winter
time and with the „Time zone” you can select your area’s time zone. The unit will automatically
be kept up to date from the select source, when information becomes available. You can also
set the date and time manually by selecting „Date/Time Setup”. The format for settings will be
displayed as follows: dd-mm-yyyy and hh-mm AM/PM.
› The blinking digit indicates the digit feld to be set. Use the navigations buttons to set the time
and date and the „ENTER“ butt on to confrm.
12/24 hour display
› To select between an 12 and 24 hour display, select „S et 12/24 hour“ to make your selection.
-
Page 56
55
Chapter 11 Error messages
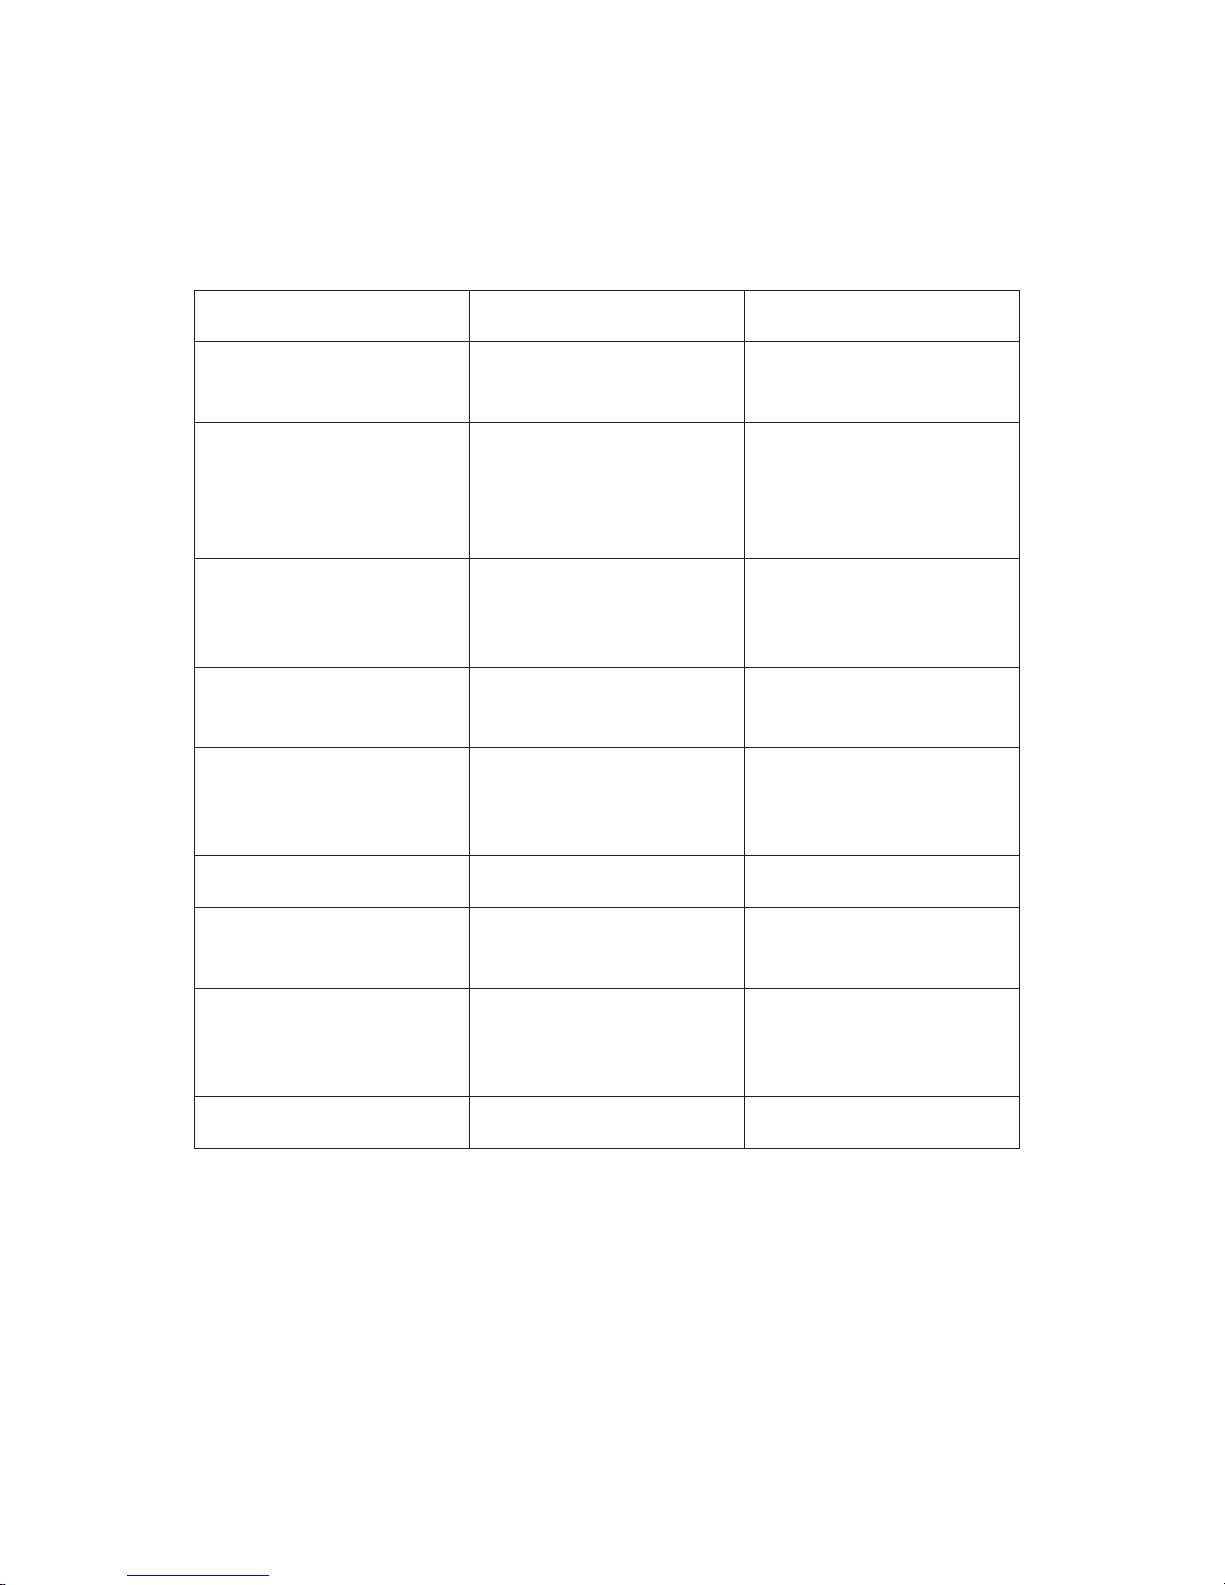
Message Description Example
Failed to connect Key entered correctly, but
the router rejects request.
MAC fltering is deactivated on the router.
Format error File format can not be reco-
gnized – independent of
the network.
Received *.wma , but
found that the stream
wasn’t WMA when trying
to decode.
Network error False information is being
received from the net work.
Data obtained from server
is unreadable.
Network not ready Problem with connection
to router.
The router is switched of.
Network timeout No response from the net -
work – independent of the
network.
Streaming IR station, which
suddenly becomes unavailable.
No UPnP media found No UPnP servers found.
No USB device found Trying to access USB menu,
but no USB plugged in.
Unauthorised Incorrect user name/pass -
word for CIFS or access not
granted by UPnP server.
Update failed Software Update failed.
11
Error messages
-
Page 57
-
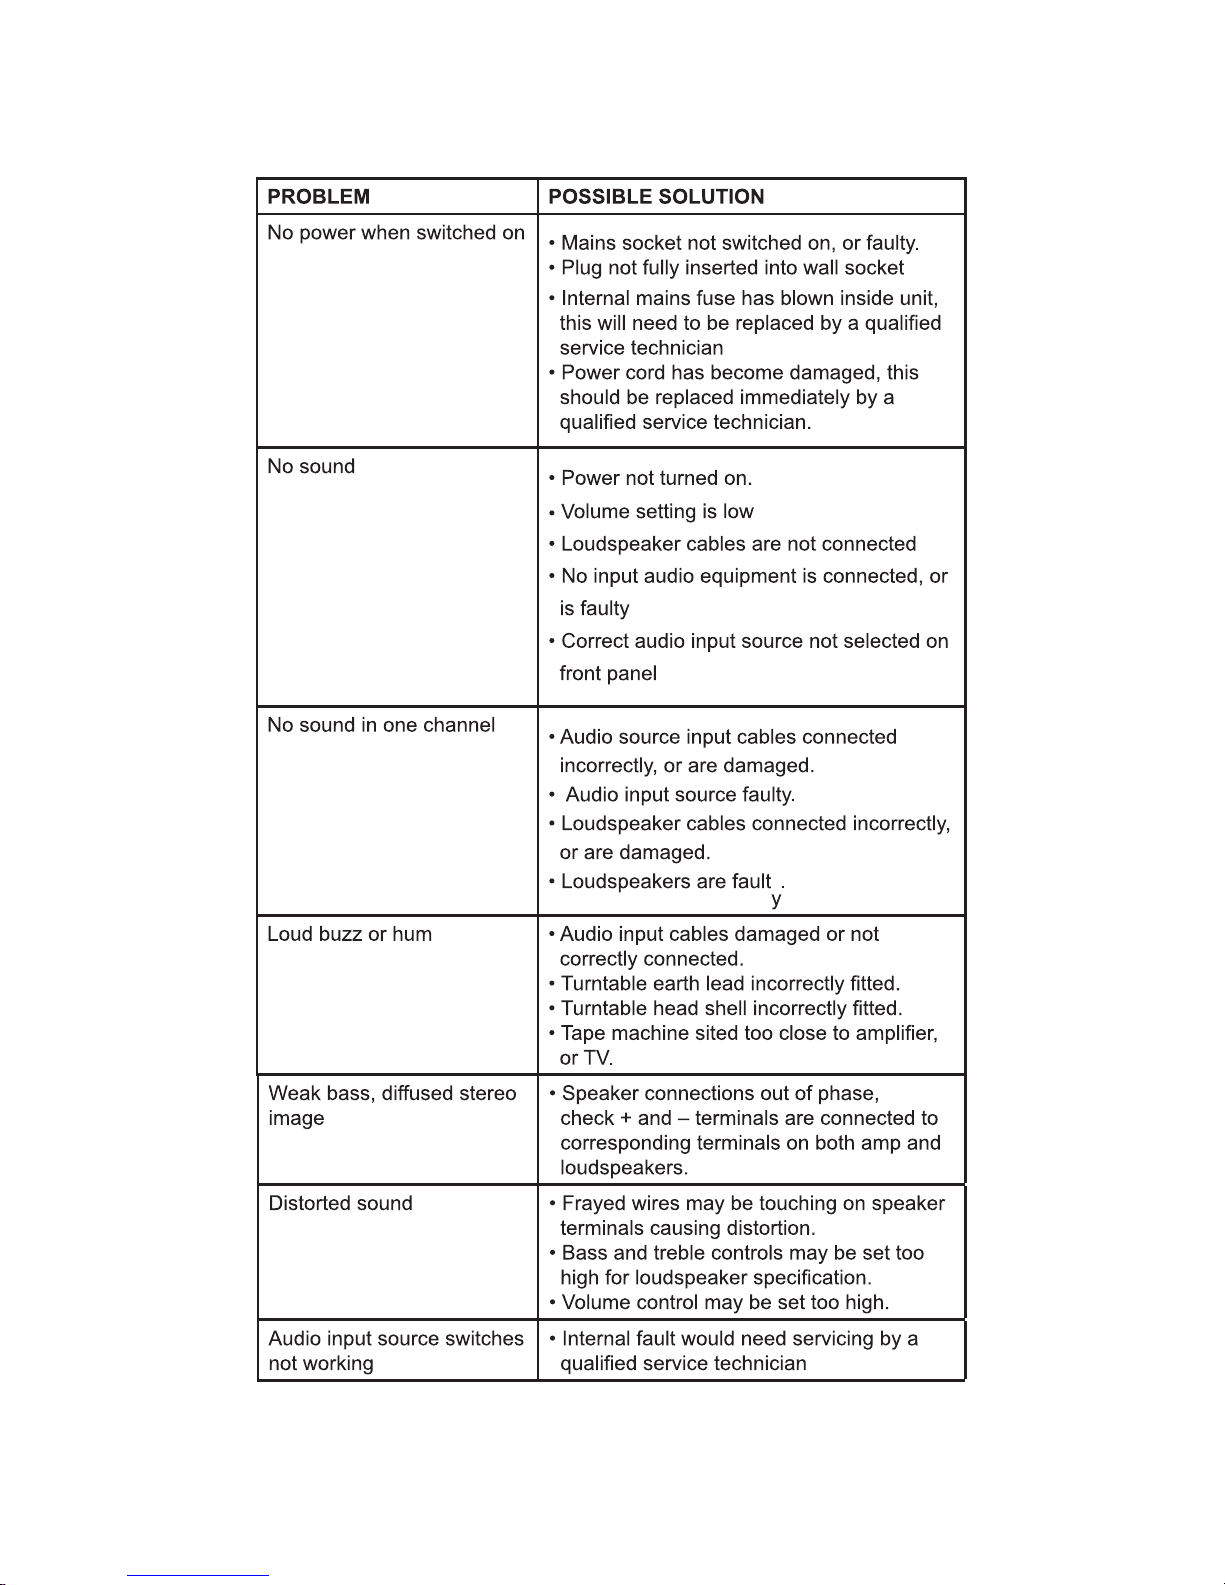
Troubleshooting of amplifier
56
Chapter 11 Error messages
Page 58

57
Chapter 12 Troubleshooting
The device you have just purchased is equipped with state-of-the-art technology and is safe to
operate. Nevertheless, problems or malfunctions may occur.
Before contacting a service technician, refer to the following possible solutions.
Distorted sound or no sound is audible.
› Check if all cables are properly connected.
Remote control is not working.
› Check if the batteries have been inserted correctly.
› If batteries are empty, replace them with new ones.
› Point the remote control to the remote sensor and press to operate.
› Remove any objects found between the remote control and the remote sensor.
› Make sure the distance between the remote control and the device does not exceed 8 m
Buttons do not function (on the device and/or remote control).
› Turn the device of and then on again. As an alternative, turn the device of, unplug it from the
power outlet and plug in again. (The device also may not be functioning due to a stroke of light
ning, static electricity or other external factors.).
Interference during reception.
› The reception frequency has not been set properly.
› The antenna has not been positioned properly.
› Start a station search.
Network connection is not possible.
› The network is not available at the moment. Try again later.
› The router restricts access to the listed MAC address of the unit. You can obtain this address
from MENU › System settings › View settings and add it to the router list.
› Check the distance to the router, in case you have a wireless network.
› Change the selected encryption method on the unit.
› Use the menu of the unit to set up the system manually.
› Check that your firewall is not preventing access.
› Check the network cable.
Any repairs other than those mentioned above are to be carried out solely by an aut-
horized technician.
12
Troubleshooting
Page 59
58
Chapter 13 Maintenance and handling
Carry out a technical safety inspection on a regular basis, e.g. check if the power cable or housing
may have become damaged.
If there is reason to believe that the device can no longer be operated safely, then disconnect it
immediately from the power supply and secure it against any unintentional operation. Carefully
remove the power cable plug from the wall outlet and where applicable switch of the corresponding circuit breaker frst.
It can be assumed that safe operation is no longer possible, if:
› there is visible damage to the device or power cable,
› the device no longer works,
› it has been stored for a longer period of time under unfavorable conditions
› or exposed to rigorous transport conditions.
Always adhere to the following safety instructions before cleaning and maintenance:
Live parts may be exposed, if the covering is opened or parts are removed.
› The device must be disconnected from the power supply source prior to service, maintenance
or repairs.
› Repairs are only to be carried out by qualifed personnel, who are familiar with the hazards involved and the relevant regulations.
Transporting or sending the device
› Please retain the original box and the packaging material in case you need to transport or send
the device out for maintenance at a later date. Please note that the device should be repacked
in the original packaging. The box and packaging have been especially developed for this device
in order to protect it during transport and against damage. Retain this instruction manual for
future reference and where required pass it along with the device if handed over to a third party.
It contains important information on initial operation and handling.
Keeping the external case clean
› Never use volatile fuids near the device, as for example insect spray. Avoid letting the device
come in contact with rubber or plastic products for longer periods of time. These could otherwise leave marks behind.
13
Maintenance and
handling
-
Page 60
59
Chapter 13 Maintenance and handling
Cleaning the device
› Unplug the power cable before cleaning. Always use a soft and dry cloth to clean the unit’s
exterior. If the device is extremely dirty you can use a soft cloth, dampened with water or a mild
cleaning solution to clean. Never use any abrasive or harsh cleaning agents (e.g. alcohol, benzine
or thinners) as these could damage the controls, casing or any markings and labels found on the
device.
Page 61

60
Technical data
› Operating voltage: AC 230 V/ ~ 50 Hz
› Max. power consumption: 80 W
› Frequency range: FM 87.5 – 108 MHz
› Connections: FM antenna connection (75 Ω)
3 x Stereo input source jack
RJ-45 jack
Wi-Fi 2.4 G connection
Chapter 14 Specifcations
14
Specifcations
1 x Stereo speaker output jack
NOTE: Specificati ons and des ign are subject to possible m odifica tions without notice
Page 62

 Loading...