

Page 1
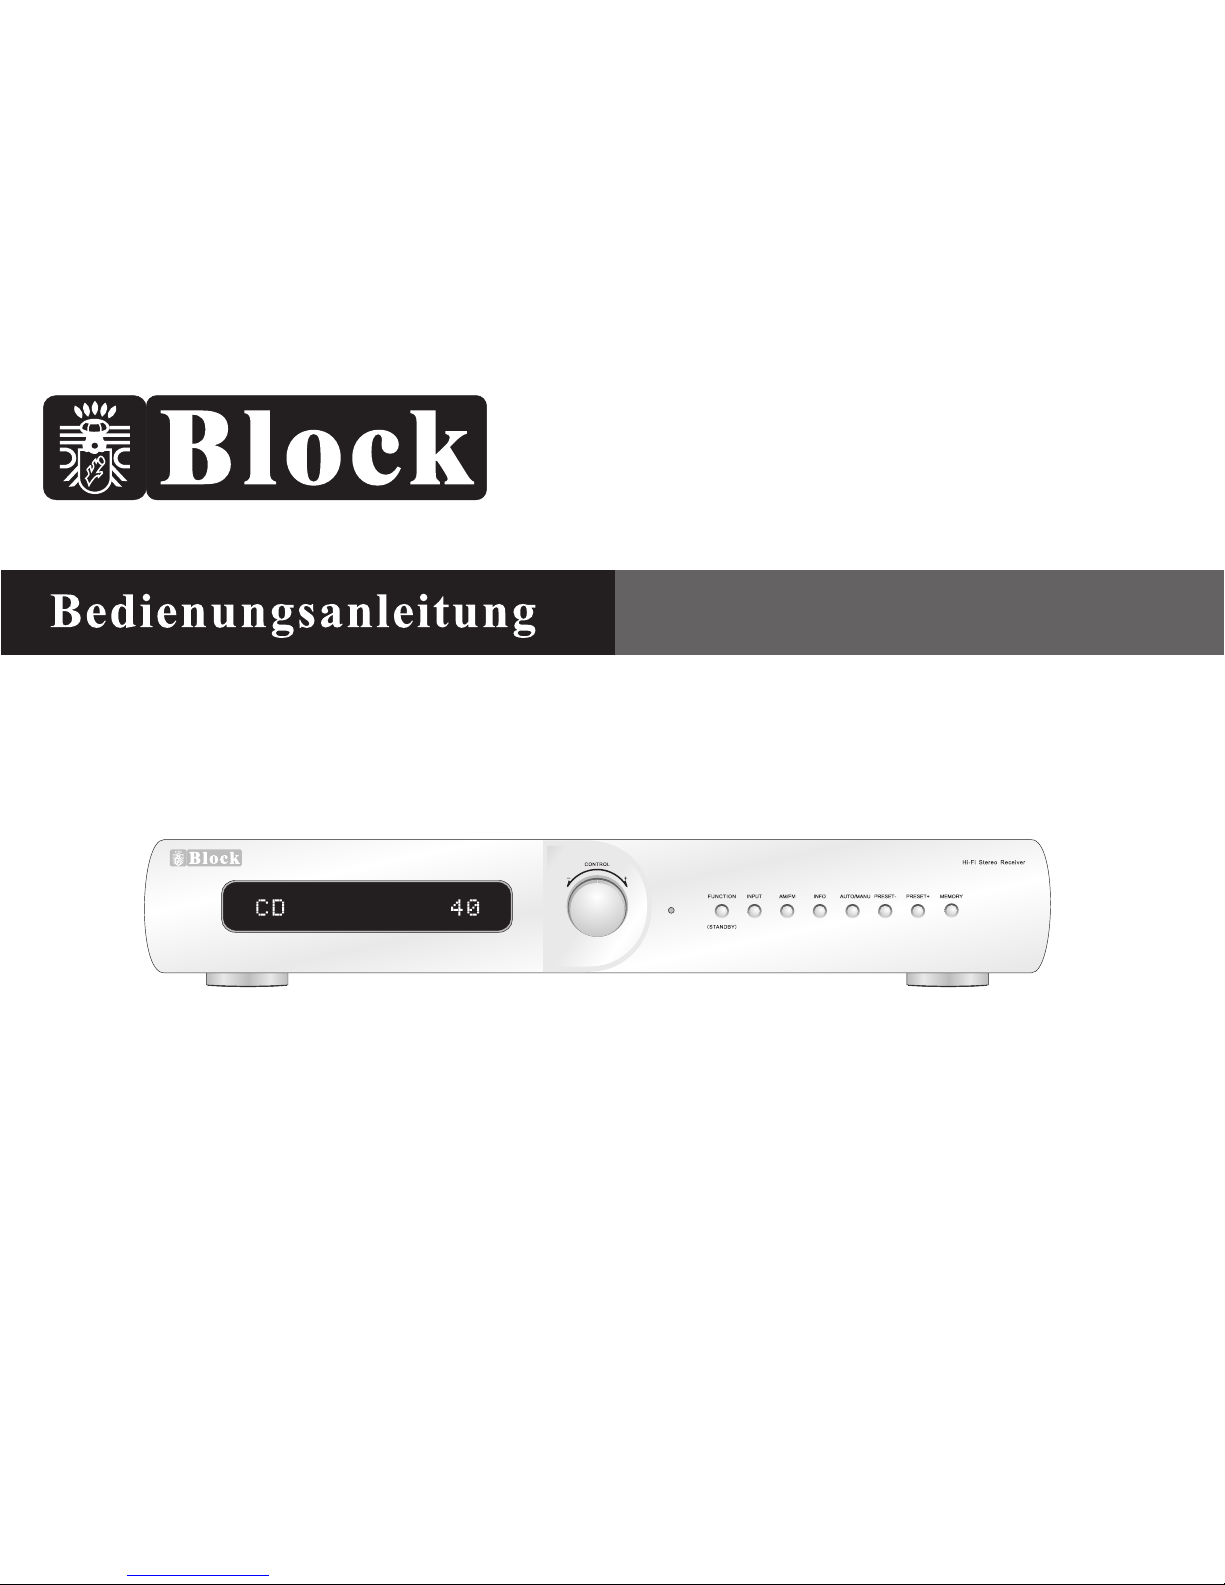
Hi-Fi Stereo Receiver VR 100
Instruction Manual
1--13
14--25
VR 10 0
Hi-Fi Stereo Receiver VR 100
Page 2
VR 100
8
9-10
11
12
5-6
7
13
Page 3
Page 4
Page 5
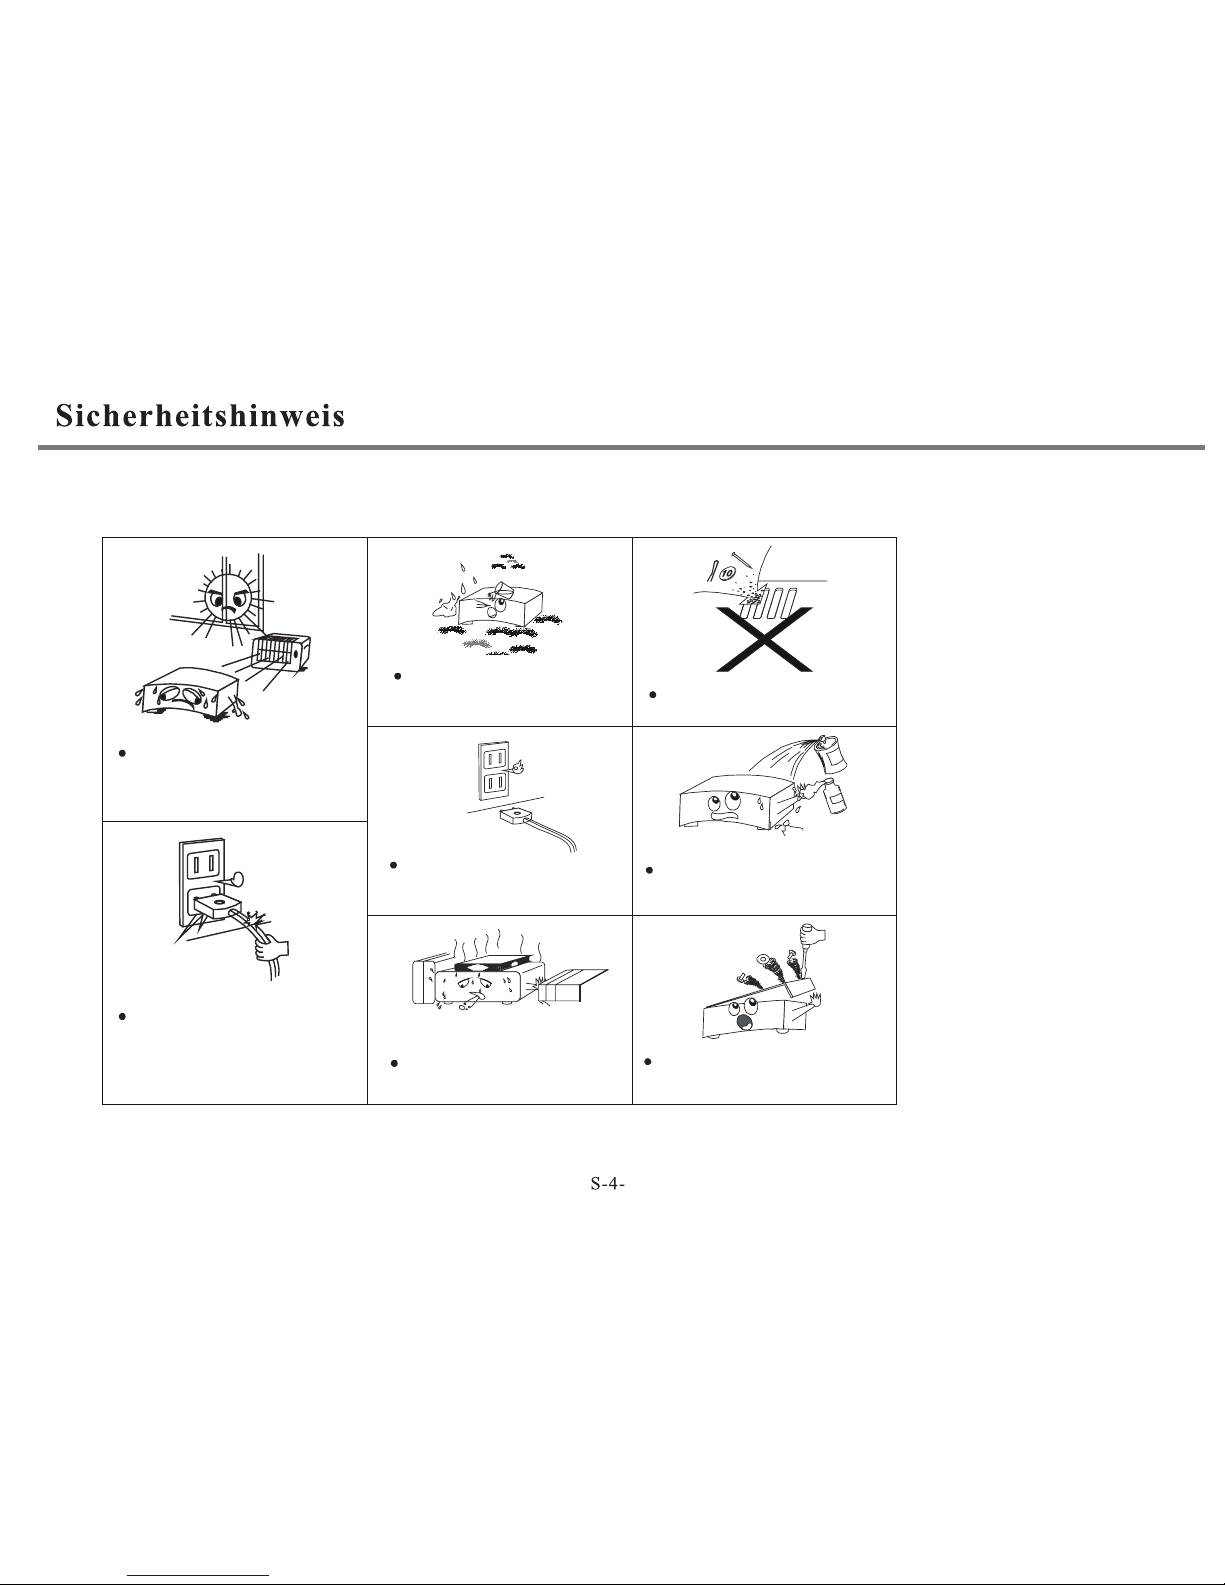
Bit te halt en Sie da s Gerät f ern von
Hit ze- que llen. S orgen S ie f ür
gen ügend L uftzi rkula tion be i dem
Ein bau in ei nem Rac k
Beh andel n Sie das S tromk abel mi t
Vorsi cht
Hal ten Sie d as Gerä t fern vo n
Feu chtig keit
Ach ten Sie d arauf , dass ke ine
Geg enstä nde ins G erät fa llen
Neh men Sie d as Gerä t vom Net z, wenn e s
lan ge Zeit n icht ge nutzt w ird
Ach ten Sie d arauf , dass ke ine Spr ays ode r
Che mie an Ih r Gerät k ommen
Ach ten Sie d arauf , dass Ih r Gerät n icht
abg edeck t wird
Ach ten Sie d arauf , dass da s Gerät n ur von
aut orisi erten P erson en geöf fn et wi rd
Page 6
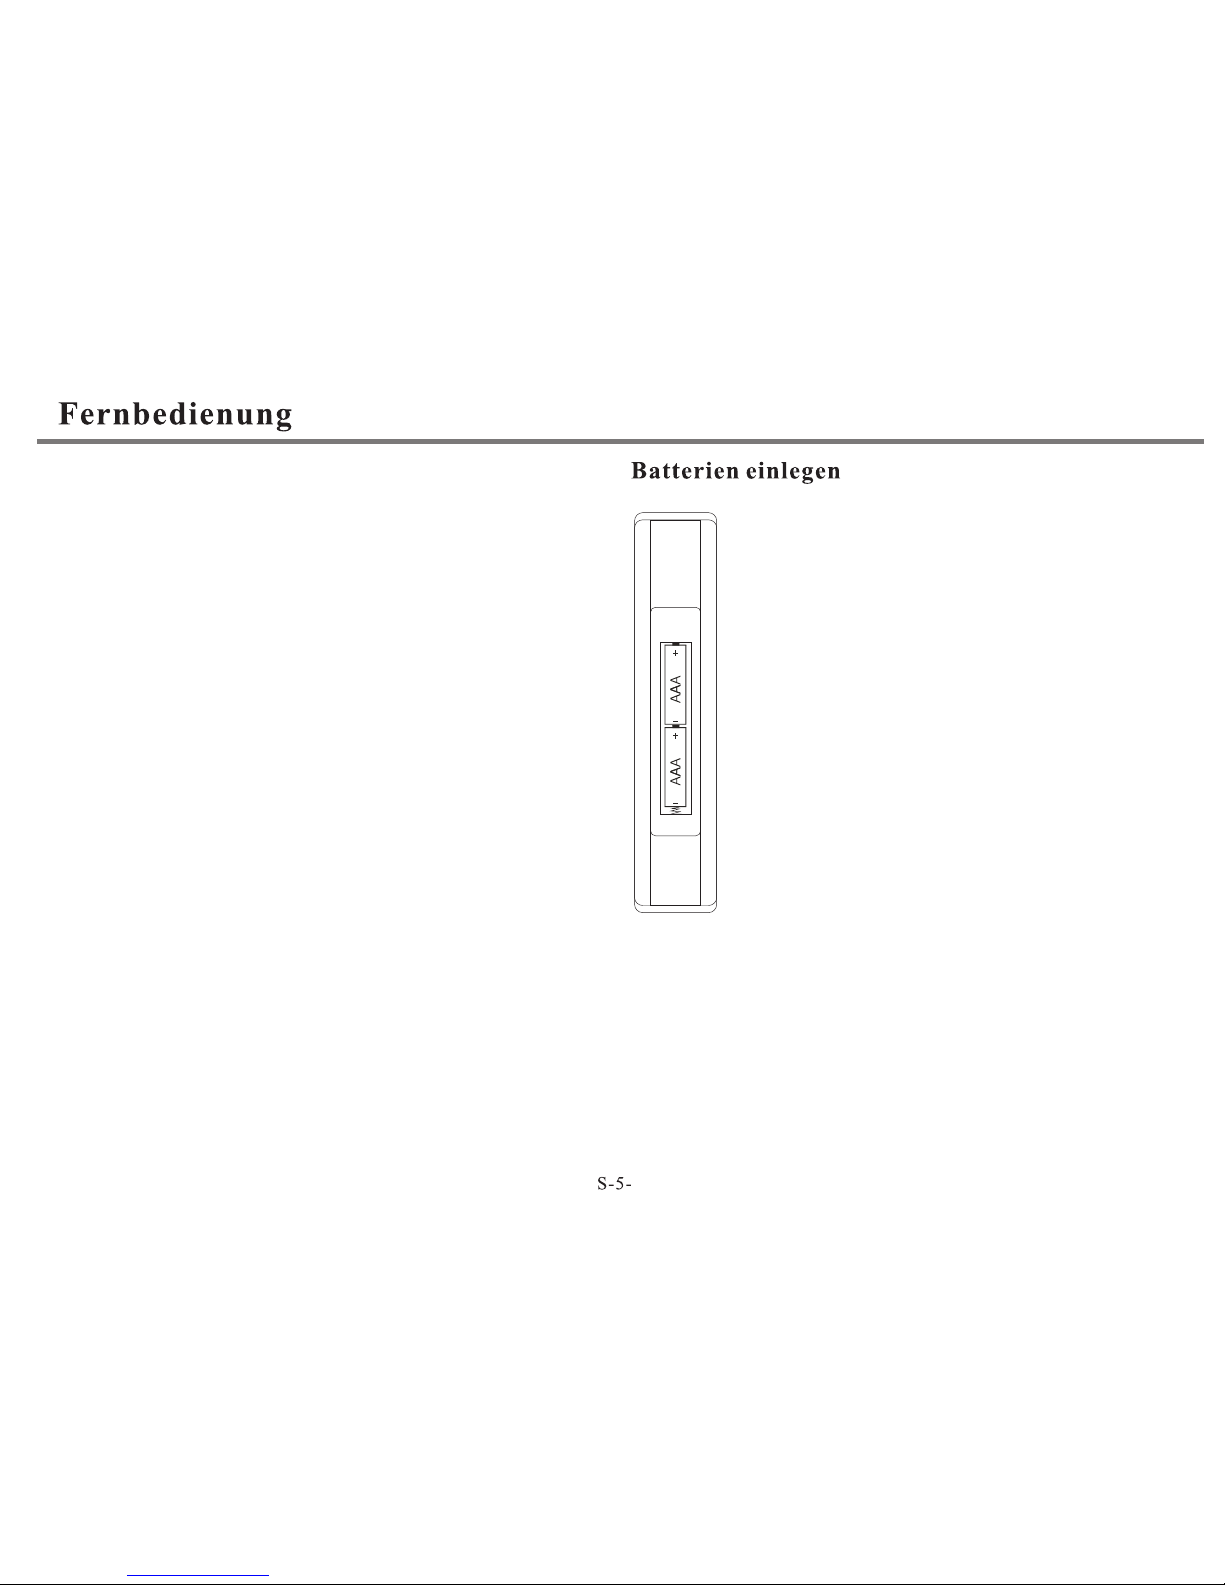
1. Neh men Sie d ie Batter ien aus
ihre r Verpac kung
2. Leg en Sie di e 2 „AAA“ B at terie n
unte r Beach tung der Po larit ät
seit enric htig ein.
3. Wenn di e Dista nz zwis chen de r
Fern bedie nung un d dem Gerät
abni mmt, li egt das an de r Ladun g
der Ba tteri en. In dies em Fall
entn ehmen S ie die Batt erien u nd
lege n Sie neu e ein.
Sie kö nnen Ih ren VR 1 00 über d ie Syst emfer nbedi enung
(opt ional ) fern be di enen. R ichte n Sie von I hrer Si tzpos ition
aus di e Fernb edien un g in Rich tung Ih res Ger ätes.
Achtung:
- Wenn sic h ein Hin derni s zwisc hen der F er nbedi enung u nd
Ihre m Gerät b efind et , kann da s die Bed ienun g
beei nträc htigen.
- Wenn Sie a ndere F ernbe dienu ngen od er S ender i n der
Nähe b enutz en, kan n da s ebenf alls zu S törun gen füh ren.
- Achten Si e darau f, dass S ie die Ba tteri en rich tig ein legen
Pola risie rung pl us z u + minus z u -
- Benu tzen Si e zwei glei che Alka li Batt erien
- Aufladb are Bat terie n könne n benut zt werd en, wir r aten
jedo ch davo n ab.
- Entf ernen S ie die Batt erien , wenn di e Fernb edien ung
läng ere Zei t nicht ben utzt wi rd (6 Mon ate ode r länge r)
- Ents orgen Sie Ihr e Altbat terie n nur in de r dafür
vorges ehenen Wertsto ffen tsorgun g (bei Ih rem Hän dler)
Wirkung sbere ich der F ernbe dienu ng
- Die Re ichwe ite der F er nbedi enung b eträg t ca. 7 Met er.
Sie so llte au f das Inf ra rotfe nster d es Gerä tes ger ichte t
werd en.
Dabe i ist ein e seitlic he Abwei chung v on 30 Gra d mögli ch.
Page 7
Bedi enung C 1 00
CD STANDBY
RADIO STANDBY
AMP STANDB Y
SPK A/B SPK A+B
IR100
INFO
MEMORY
P-MODE
F-SCAN
STEREO
MONO
AM
PR+
PR-
FM
INFO
R100
AUTO+
AUTO-
(FUNCT ION) (INPUT )
1
2
3
4
5
6
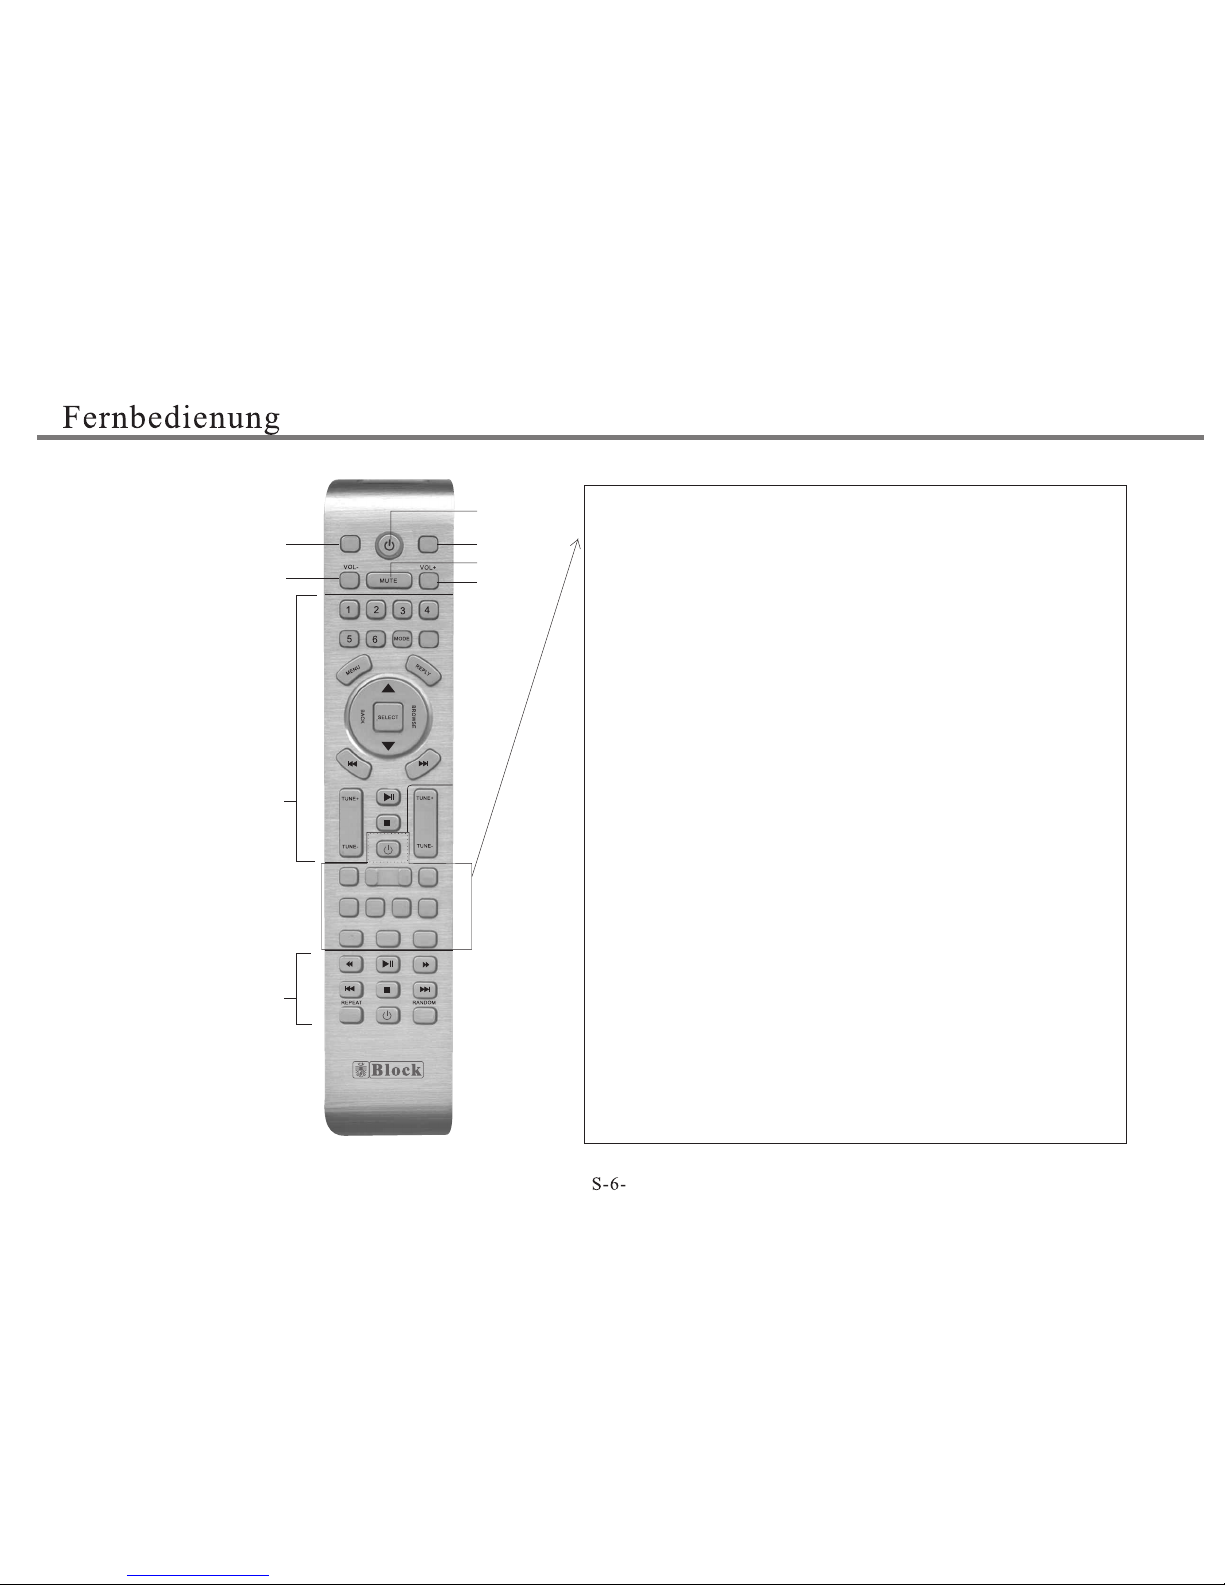
Bedi enung I R 100
1. Funktionstaste
Mit dieser Tast e kö nn en S ie
Einstellungen wie Bass,
Hochton, Balance und Reset
vornehmen.
2. Lautstärke –
3. Standby
4. Eingangswahl-Schalter
5. Mute
6. Lautstärke +
Standby:
Drücken Sie diese Taste, u m das G erä t aus zus cha lten.
Drücken Sie die Taste e rne ut, u m das G erä t wie der
anzuschalten.
AM/FM:
Mit dieser Taste w ähl en Si e zwi sch en (A M/F M)
Info:
Drücken Sie diese Taste, u m RDS I nfo rma tio nen z u seh en.
Stereo/Mono:
Mit dieser Taste w ähl en Si e zwi sch en Mo no un d Ste reo .
F-Scan:
Drücken Sie diese Taste fü r 2 sec ., um d en au tom atischen
Suchlauf zu starten. Die gefun den en Se nde r wer den i n den
Senderspeichern gespeichert.
PR+/-:
Wählen Sie zwischen den gespeicherten Sendern auf/ab
Auto+/-:
Drücken Sie diese Taste, u m den n äch ste n Sen der z u suc hen .
Memory:
Manuelle Möglichkeit die Sender zu speichern .
a. a.Nutzen Sie Tune +/- um den gewünscht en Se nde r
auszuwählen
b. Drücken Sie die „Memory“ Taste
c. Nutzen Sie die PR +/- Taste , um ei nen S pei che r zu wählen.
d. Nachdem der Sendersuchlauf angehalte n hat , drü cke n Sie
die Tast e PR +/ - für 2 s ec. d er Sender wird gespeichert.
Page 8
VR 10 0
Bedienung am Gerät
S-7-
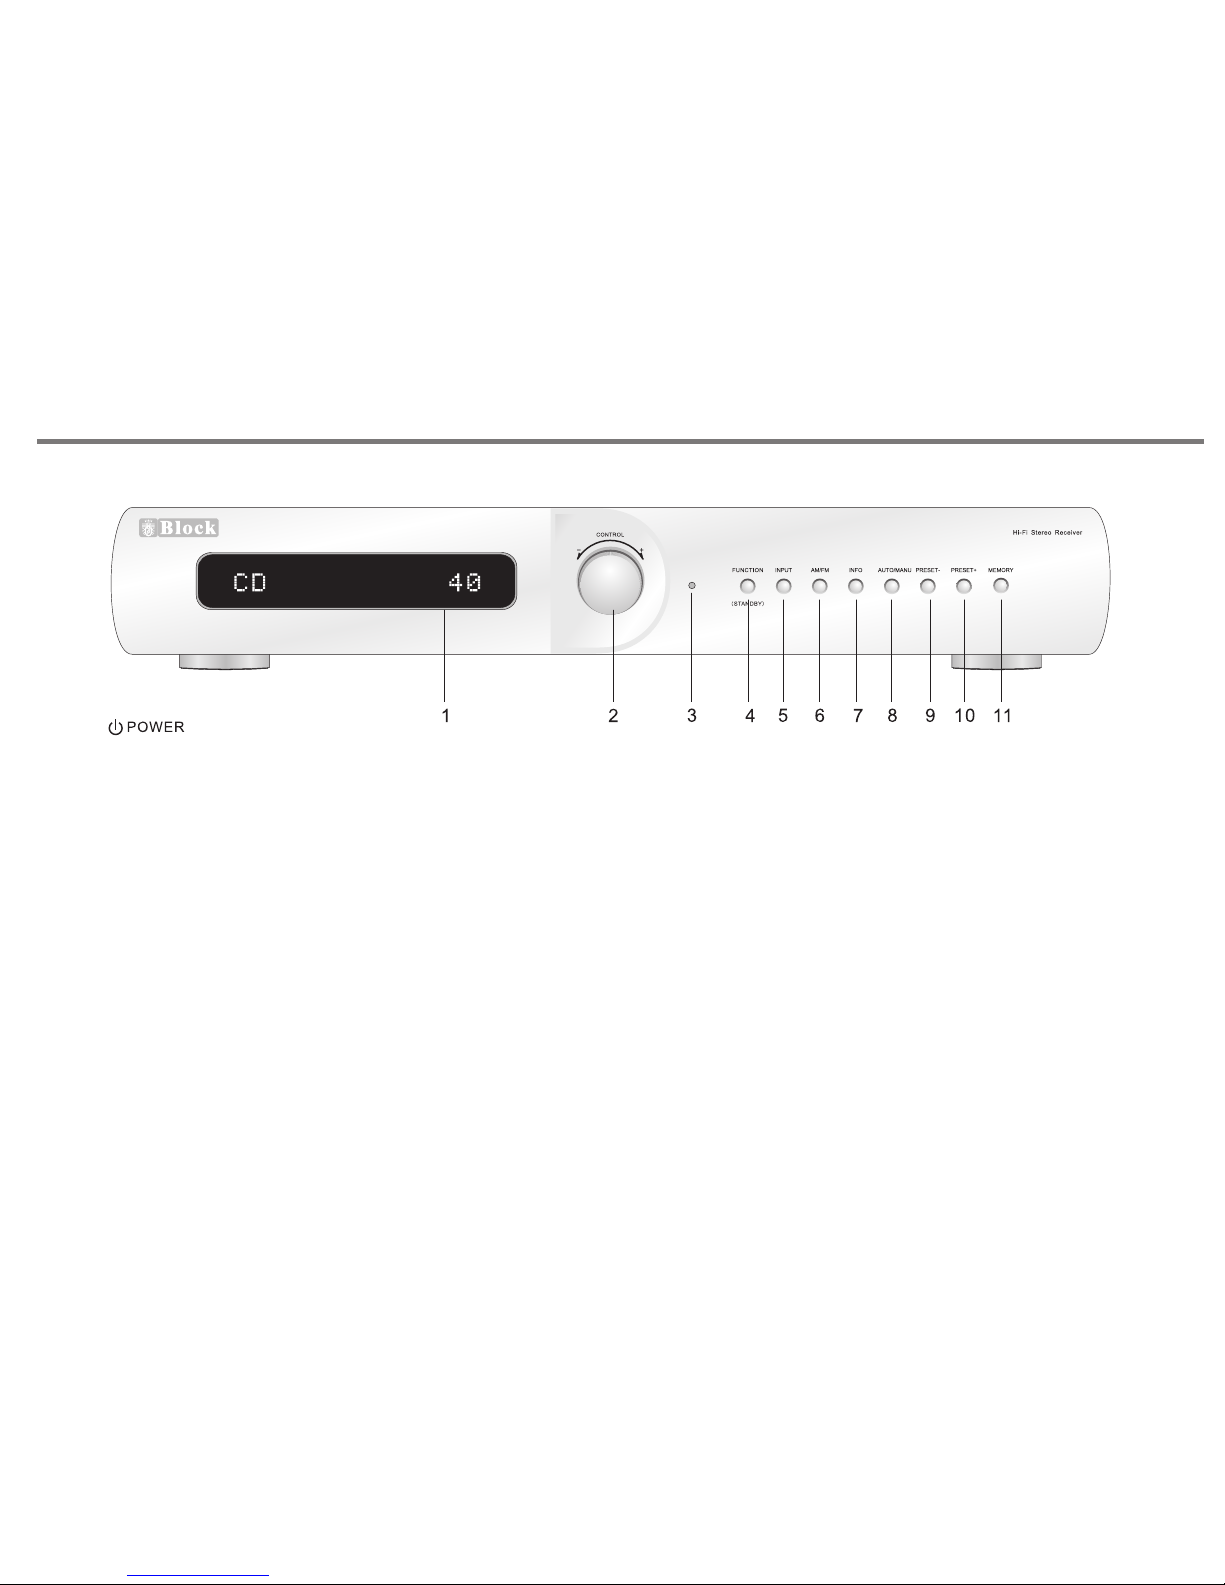
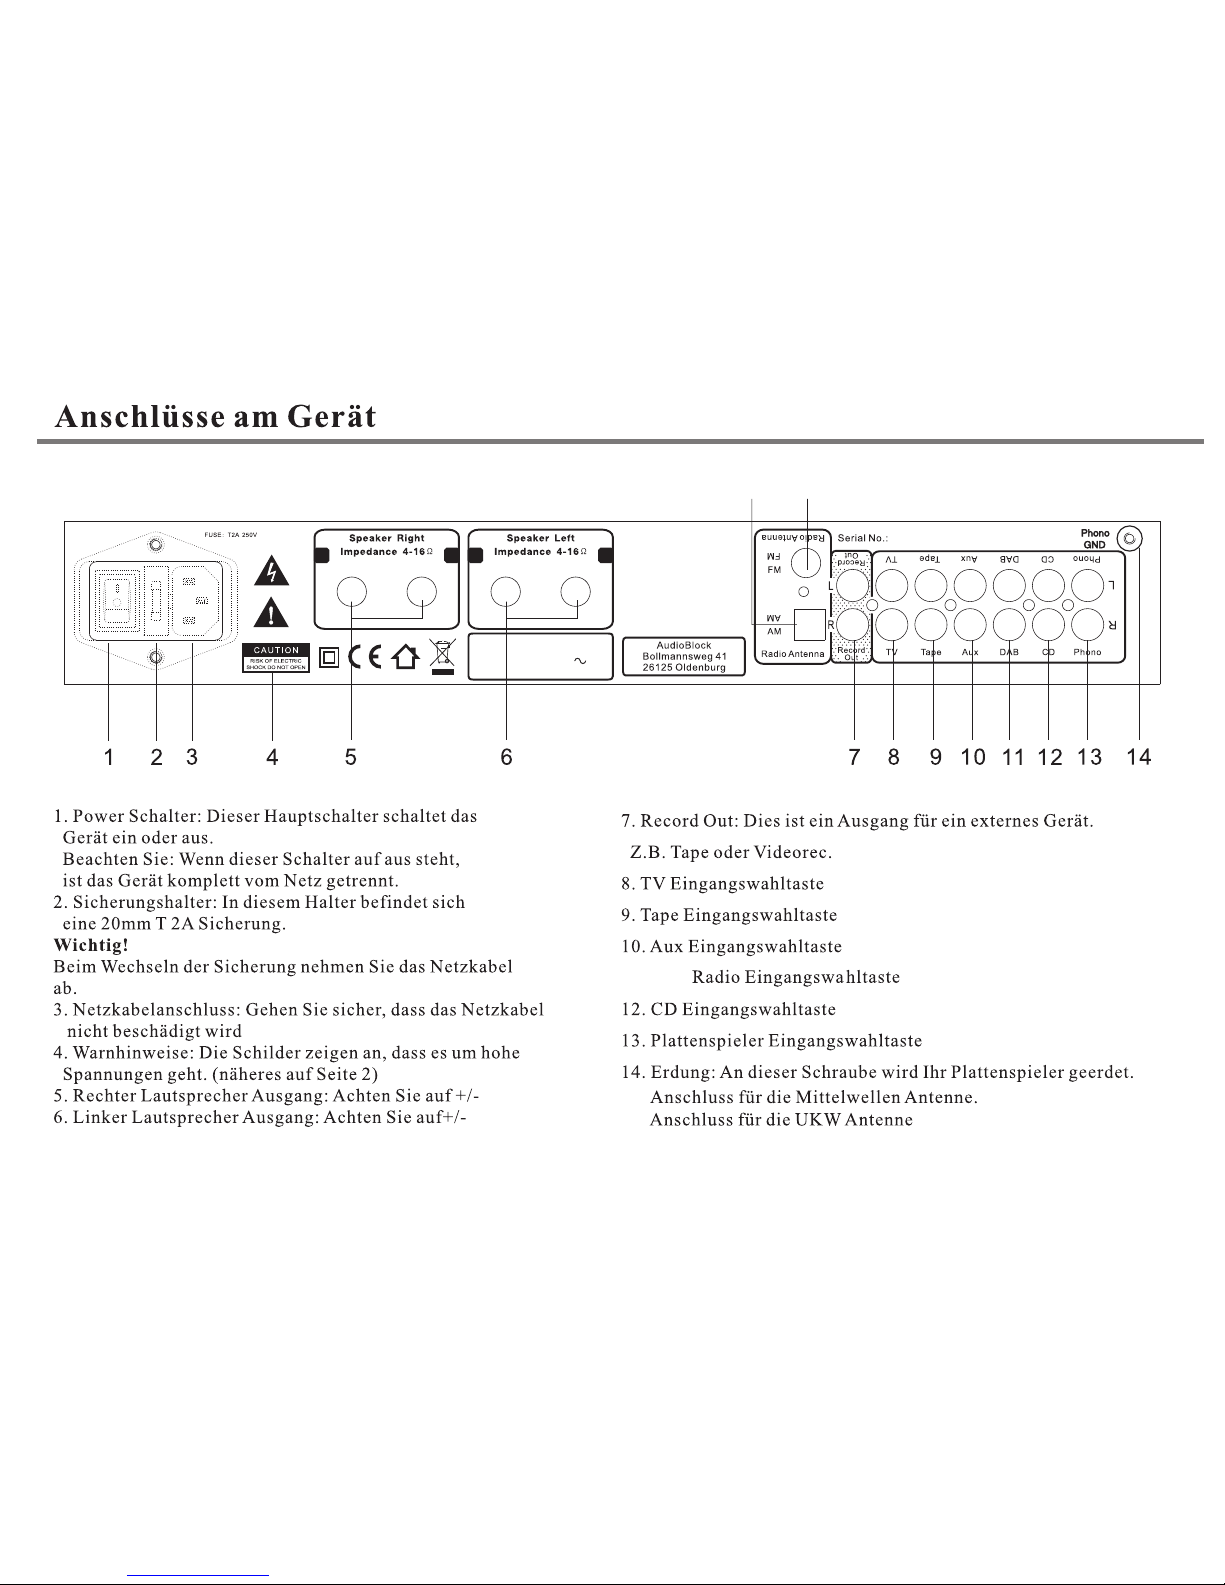
1. VFD D is pla y: I m Displ ay s ehen Si e, welc he L autst är ke
und we lc he Qu el le Sie ge wä hlt h ab en.
2. Dre hk ont ro ll-Kn op f: Mit di es em Kn op f verst el len S ie
die La ut stä rk e, Bass , Ho chton o der die B al ance.
3. LED L am pe: D ie se Lamp e le uch te t rot, we nn S ie das
Gerä t au sge sc halte t ha ben.
4. Fun kt ionst aste: M it d ieser Taste w äh len S ie d ie Funk ti on
an, di e Si e mit d em D rehkn op f verän dern wo ll en.
5. INP UT Ta st e: Drüc ke n Sie d ie se Taste, um di e Ei ngä ng e:
Tuner, TV, Tap e, AU X, DAB, C D, P hon e zu w ählen .
6. AM/ FM : Drü ck en Sie di es e Tast e, um AM/F M zu w ähl en .
7. INF O: D rüc ke n Sie die se Tas te f ür RDS In fo rma ti onen
8. AUTO/ MA NU: Drü ck en Si e di ese Taste län ge r als 2 s ec . um
den au to mat is chen Su ch lau f zu a ktivi er en.
Drüc ke n Sie d ie Taste k ur z, um m it d em Dreh kn opf d ie
Freq ue nz zu v er stell en .
9. Pre se t -: An wa hl gesp ei che rt er Send er a bwärt s..
10. Pr es et+ : Anw ahl ges pe ich er ter Sen de r aufwä rts.
11. Memor y: M anuel le S pei ch erung v on S end er n.
a. Drü ck en Si e Tun e +/- um ei ne n Sende r zu w ähl en .
b. Drü ck en Si e di e Memor y Tast e
c. Nut ze n Sie PR+ /- um ein en S ender sp eic he r auszu wä hle n.
d. We nn Si e ei nen Sen de r gef un den hab en , drü ck en Sie Taste
PRES ET + /- l änger a ls 2 s ec. , um d iesen S en der z u sp eiche rn .
Schalten Sie das Gerät mit der Power-Taste
auf der Rückseite ein!
Page 9
-+-
+
Mod el: VR 10 0
Hi- Fi Ster eo Rece iver
Pow er Rati ng:A C 230V 50 Hz
Max P ower Co nsump tion: 15 0W
15
16
15.
16.
.
11. DAB
S-8-
Page 10
CONTROL
P
t
r
c
e
e
s
l
s
e
t
s
o
R 100
AM/FM RDS PLL Tuner
-+-
+
Mode l: VR 100
Hi-F i Stere o Recei ver
Powe r Ratin g:AC 23 0V 50Hz
Max Po wer Con sumpt ion:1 50W
S-9-
Page 11
Page 12
S-11-
Page 13
S-12-
Page 14
K
4
0
S-13-
3
3
Page 15

INTRODUCTION & CONTENTS
Contents
Introduction & Contents
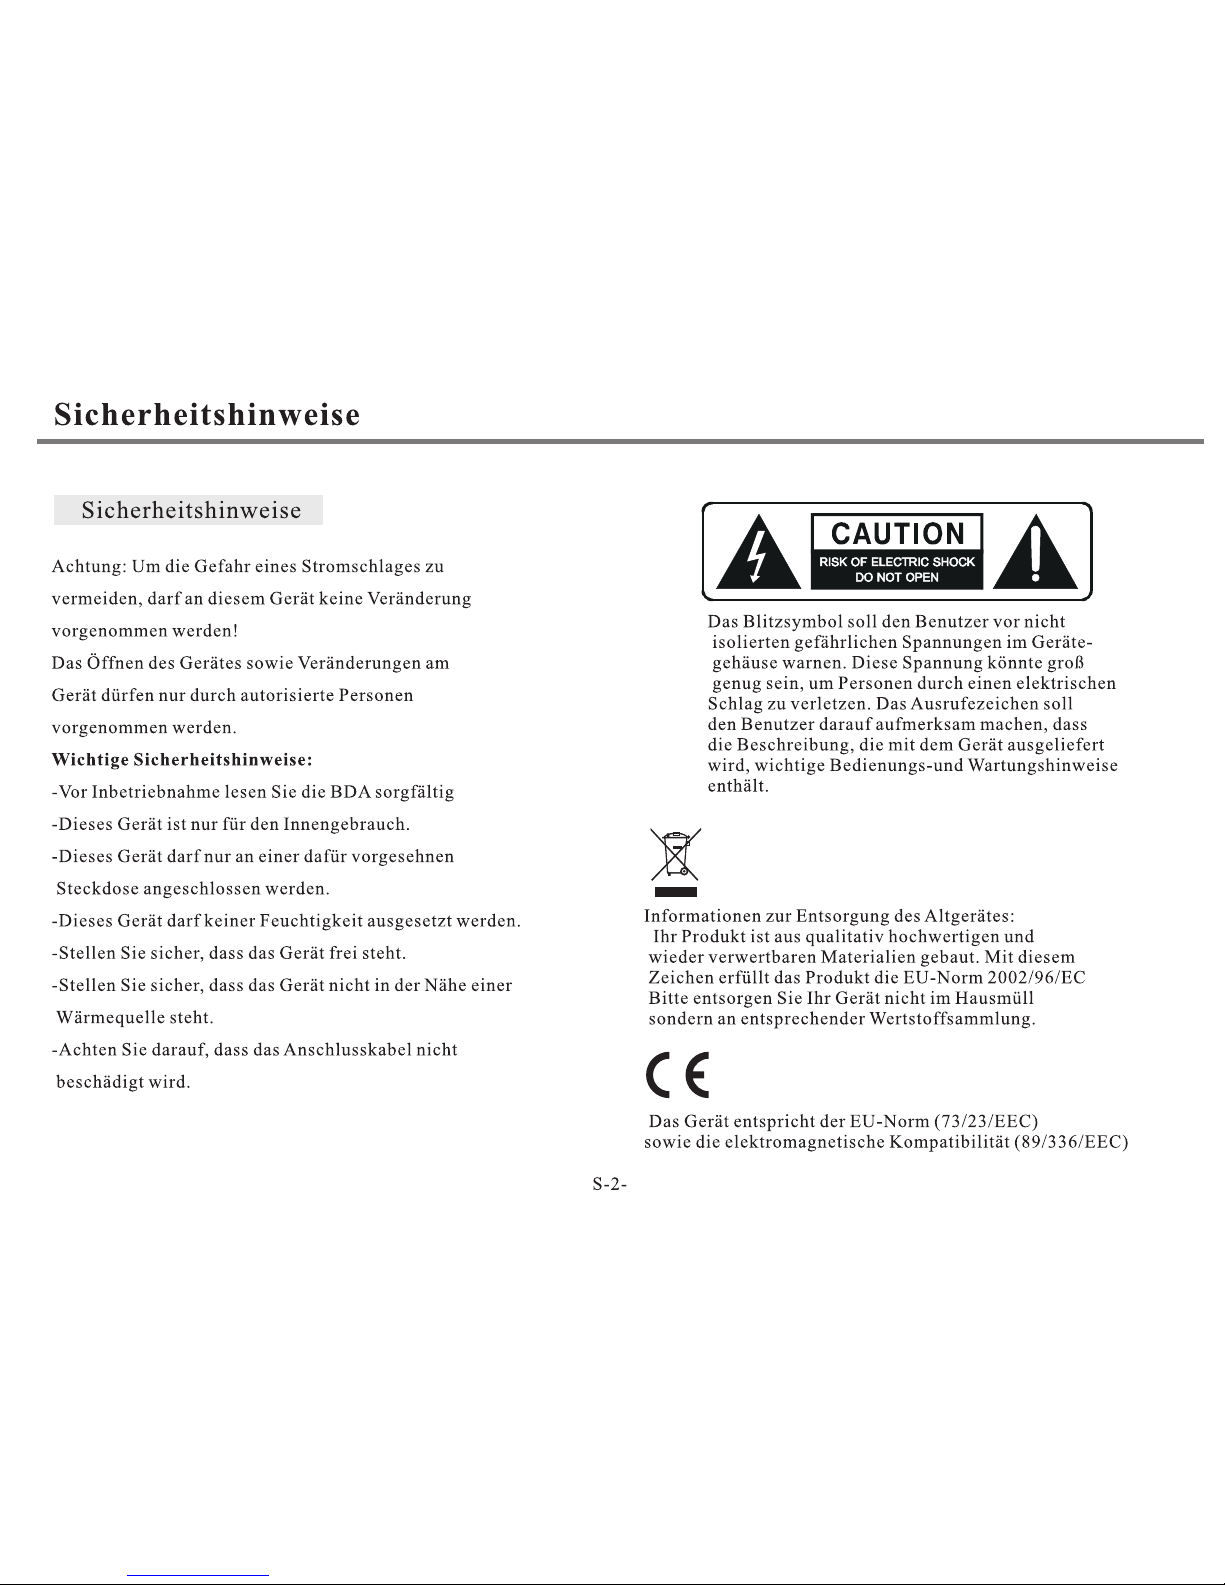
Safety instructions
Remote control
Front panel controls
Rear panel connections
Making the connections
Installation and position
Tro ubl e sho oti ng
Specifications
14
15,16
17-18
19
20
21-22
23
25
24
Congratulations on p urc has ing this VR 10 0 Receiver. It has bee n
developed fo llo win g an extensive re sea rch a nd development pro gra m
that has culminated in wha t w e rega rd as an exc eptional mid -ra nge
hi-fi product.
We tru st th at th is am pli fie r wil l giv e you h our s of li stening pleasure,
and provide years of unparalleled performance.
Please do not operate this product at high volume level s imm edi ate ly
after switching on.
Introduction
P14
Page 16
SAFETY INSTRUCTIONS
Safety Instructions
CAUTION: To reduce the ris k of e lec tri c sh ock , do n ot remove an y
cover.
N O U S E R- S E R V I CE A B L E PA R T S IN S ID E , RE F E R AN Y
SERV ICI NG TO QUALIFIED SERVIC E PER SON NEL .
IMPORTANT SAFETY IN STR UCT ION S
* Read and keep these instructions available for futu re re fer enc e.
* For indoor use only.
* The un it mu st only be co nne cte d to a su ita ble m ains power sup ply
using the mains power lead provided.
* To re duc e the r isk of fire or e lec tri cal shock, d o not e xpo se this
unit to rain or moisture.
* The ap par atu s sha ll no t be ex pos ed to d rip pin g or sp las hin g.
* No obj ect s filled w ith li qui ds, su ch as v ase s, sha ll b e p lac ed on
the apparatus.
* Un plu g the unit from the wal l soc ket duri ng lightning s tor ms an d
when it is not going to be used for a long period of time.
* Take car e that foreign obje cts do not en ter, or liquids are not
spilled, int o the enc los ure thr oug h any ope nin gs. If th is should
happen, r efe r to quali fie d servi ce p ers onn el befo re atte mpt ing to
use.
* Ensure ad equ ate ve nti lat ion - do not cov er thi s u nit with curtains,
etc.
* Do n ot i nst all near a ny h eat sourc e, s uch as rad iat ors , or ot her
equipment that produces heat.
* Protect the mains power cable from being damaged.
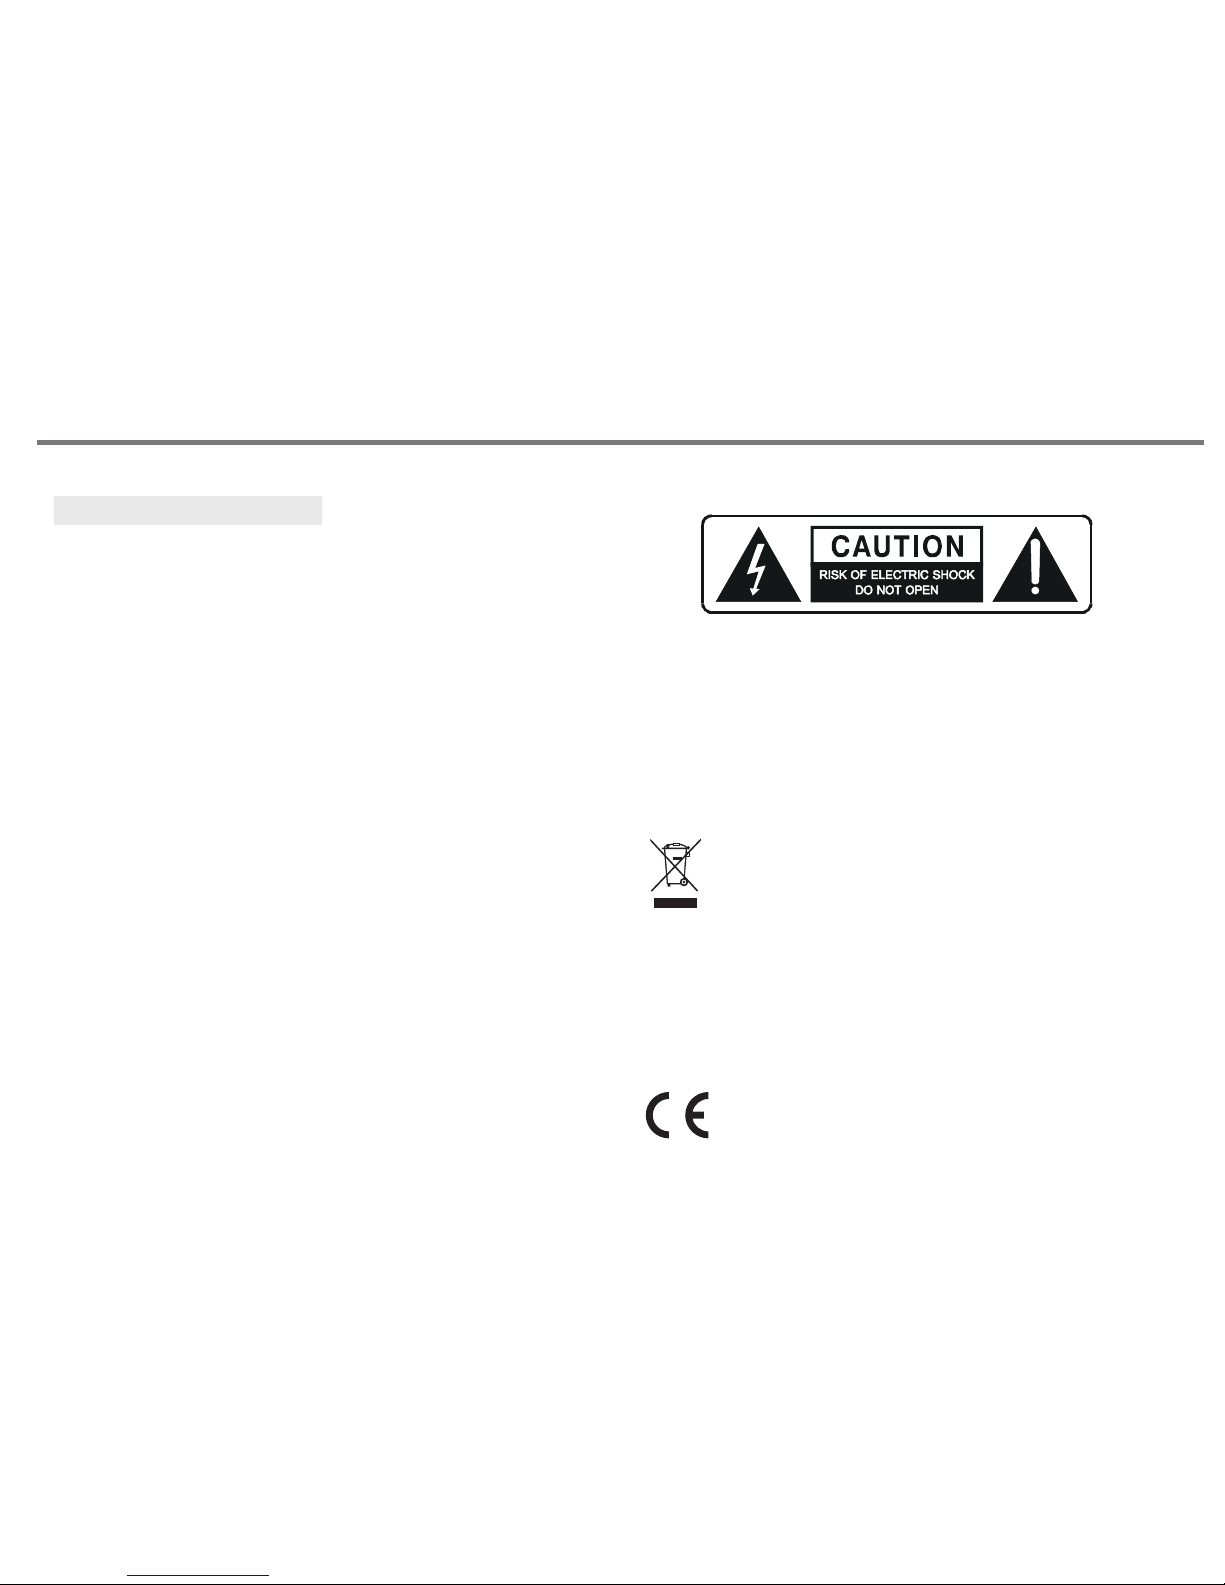
The lig htn ing flash s ymb ol wit h the ar row hea d within an eq uil ate ral
triangle is in ten ded to al ert the user to the pr ese nce of uninsulated
'dangerous volt age ' wit hin t he pr odu ct' s enclosure tha t may b e
suff ici ent t o con sti tut e a ris k of el ectric shock to persons.
The exc lam ati on point wi thi n an equ ila ter al tr ian gle is i nte nde d to
alert t he us er to im por tan t ope rat ing and mai nte nan ce ins tructions
in the service literature relevant to th is ap pli anc e.
"Information for the consumer"
Disposal of your old product
Your p ro du ct i s de si gn ed a nd m an uf ac tu re d wi th h ig h qu al it y ma te ri al s an d co mp on en ts ,
which can be recycled and reused.
When this crossed out wheeled bin symbol is attached to a product i t me an s th e pr od uc t is
covered by the European Directive 2002/96/EC.
Please make yourself aware of the local collection system for e le ct ri ca l an d
electronic products.
Please act according to your loca rules and do not dispose of your old products w it h
your normal household waste. Th e co rr ec t di sp os al o f yo ur o ld p ro du ct w il l he lp p re ve nt
potential negative consequences for the environment and human health.
This product complies with European low votage (73/23/EEC)
and electromagnetic compatibility (89/336/EEC) directives .
P15
Page 17
SAFETY INSTRUCTIONS
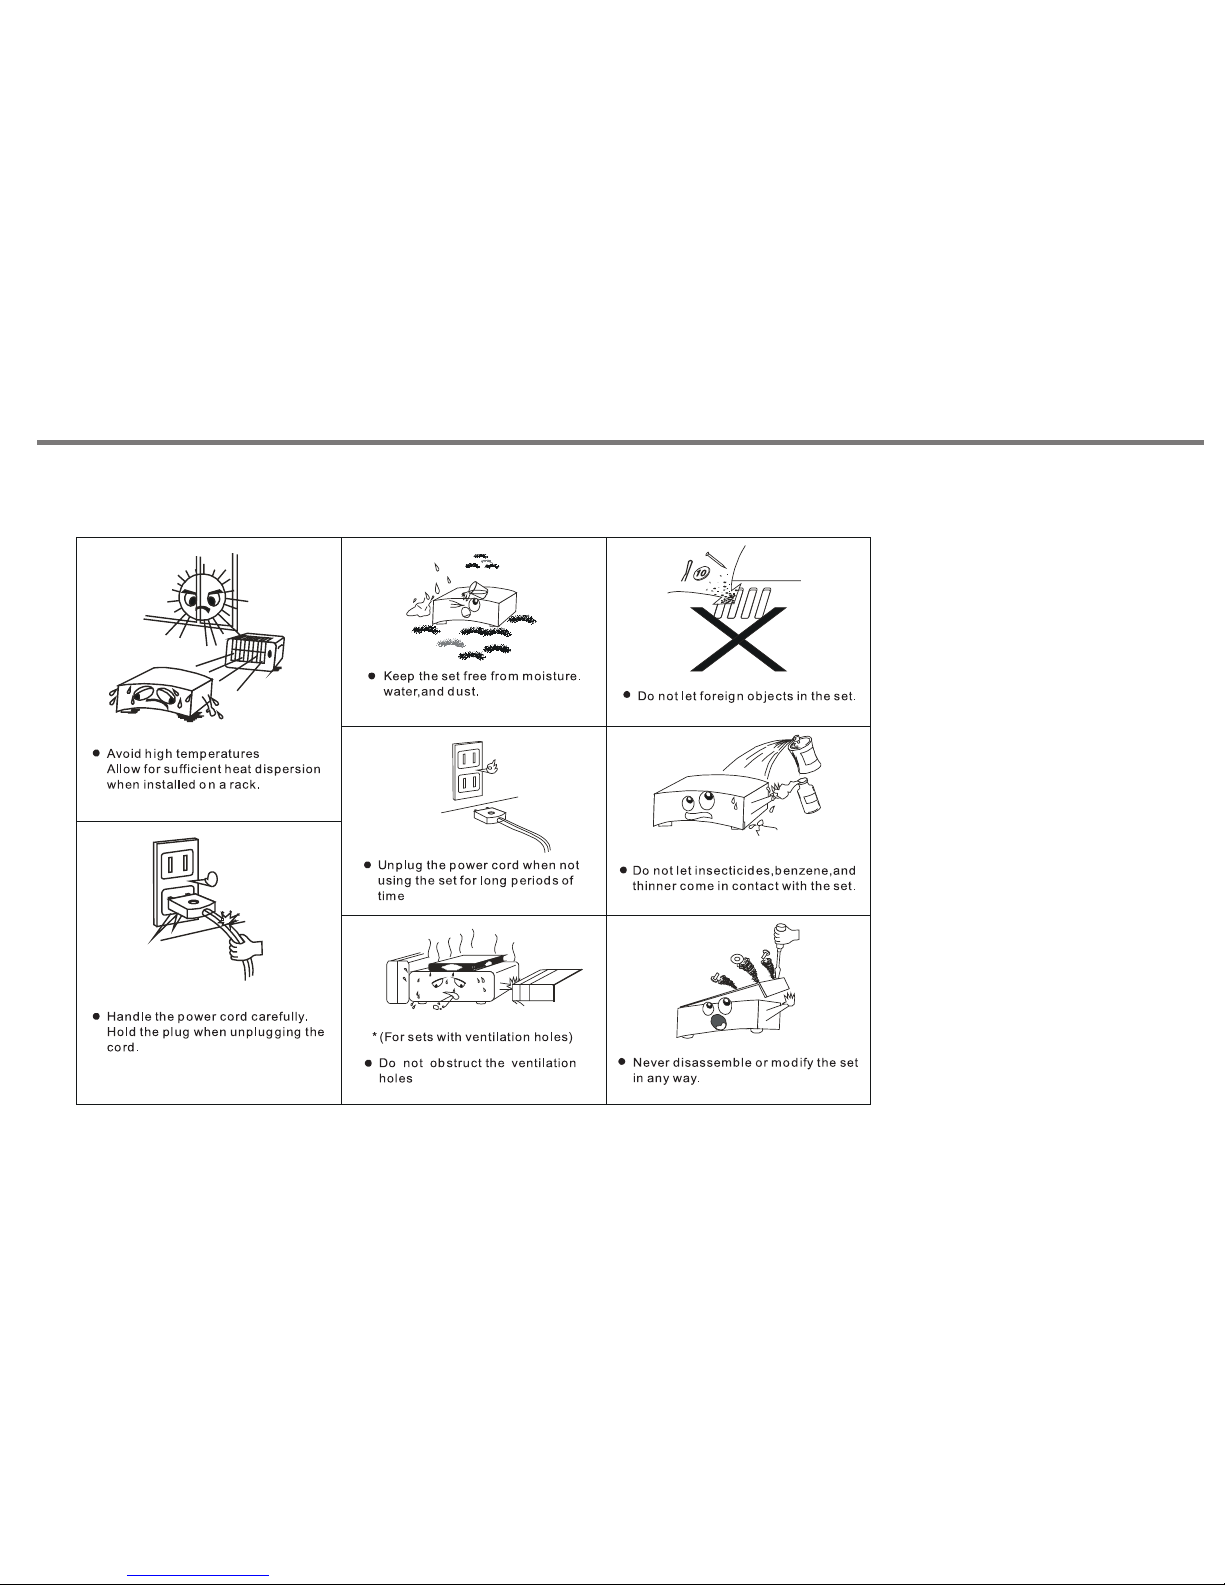
Notes On Use
P16
Page 18
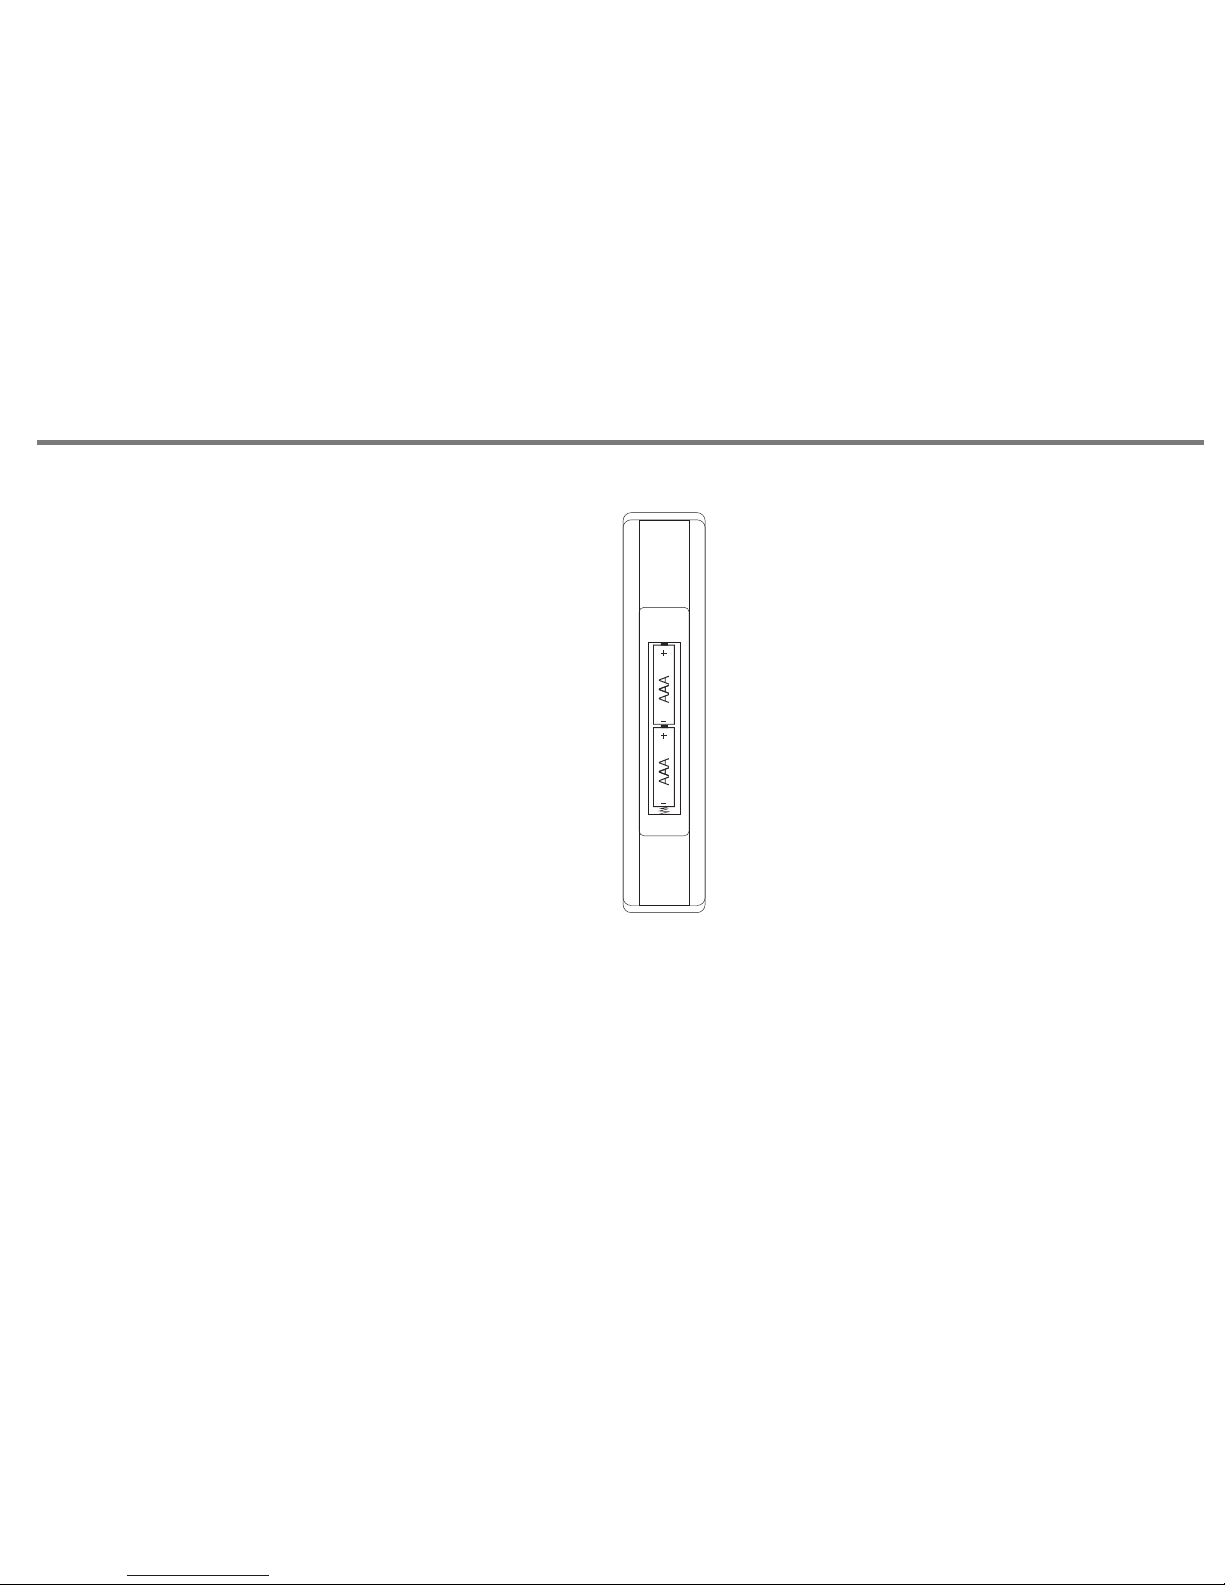
BATTE RY INS TAL LATION
By using the provided remote control unit the V R 100 c an be
controlled from your listening position. To use th e rem ote
control unit, point it at the REMO TE SE NSO R win dow o f the
receiver.
Notes:
-Even if the remote control unit is operat ed wi thi n the
effe cti ve ra nge , rem ote c ont rol o per ati on ma y be im pos sib le if
there are any obstacles between the unit and th e rem ote
control.
-If the remote control unit is ope rat ed ne ar ot her a ppl ian ce
which generate infrared rays, or if other rem ote c ont rol
devices using infrared rays are used near the unit, it ma y
operate incorrectly.
Precautions concerning batteries
-Be sure to insert the batteries with c orr ect p osi tiv e+ an d
negative - polarities.
-Use batteries of the same type. Neve r use d ifferent types of
batteries together.
- Rechargeable and non-rechargeable batteries can be used.
Refer to the precautions on their labels.
-When the remote control unit is not to b e use d for a l ong
time(more than a month), remove the b att eri es fr om th e
remote control unit to prevent them f rom l eak ing . If th e lea k,
wipe away the liquid inside the battery compartment and
replace the batteries with new ones.
-Do not heat or disassemble batteries and never dispo se of
old batteries by throwing them in a fire.
REMOTE CONTROL OPER ATI ON RA NGE
Use the remote control unit within a range of about 7
meters and the angles of up to 30 degrees aiming at
the remote sensor.
REMOTE CONTROL
P17
1. Rem ov e the b at tery co mp artme nt cove r.
2. Ins er t two " AA A" dry ba tt eries .
Make s ur e tha t th e batte ri es are in serte d wi th thei r
posi ti ve "+ " an d negat iv e "-" p ol es posi ti oned co rrect ly.
3. Clo se t he co ve r until i t cl icks.
If the d is tan ce r equir ed b etwee n the rem ot e contr ol u nit a nd
main u ni t dec re ases, t he b atter ies are e xh auste d. In thi s ca se,
repl ac e the b at terie s wi th ne w on e.
Page 19
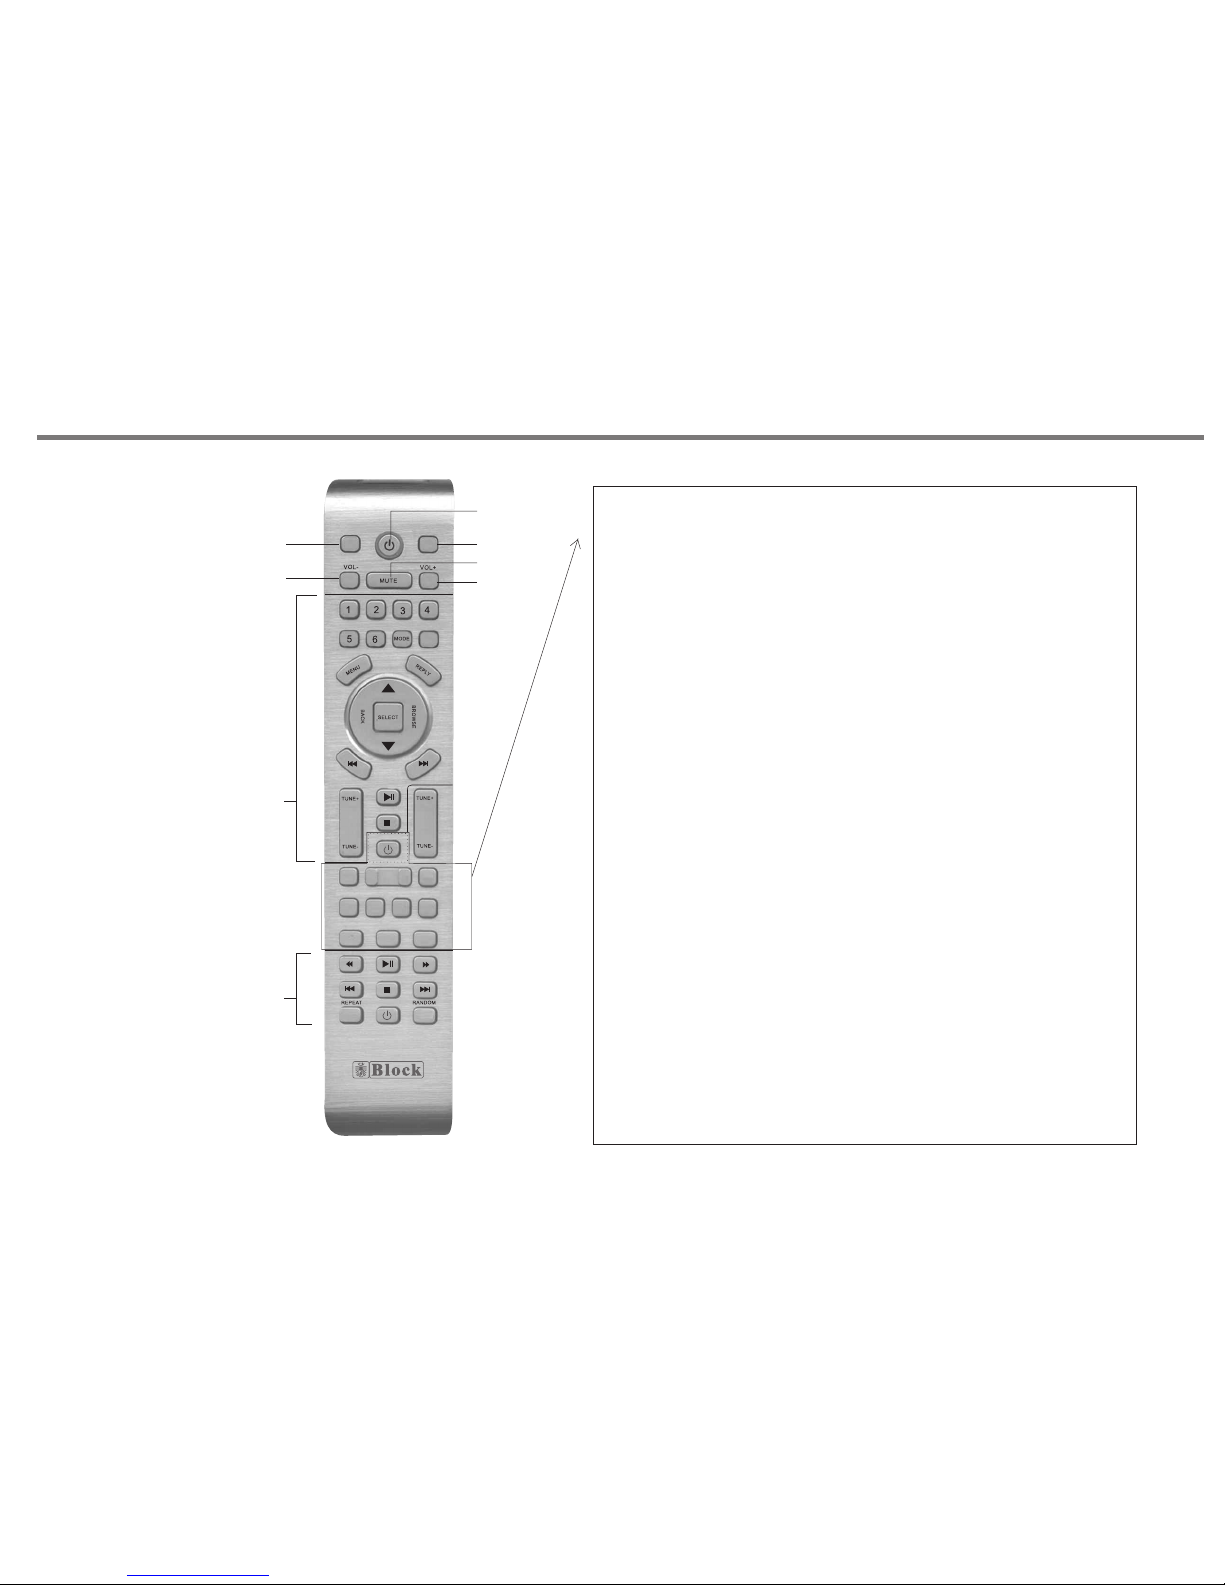
FOR C D PLAYER
C 100
CD STANDBY
RADIO STANDBY
AMP STANDB Y
SPK A/B SPK A+B
IR100
INFO
MEMORY
P-MODE
F-SCAN
STEREO
MONO
AM
PR+
PR-
FM
INFO
R100
AUTO+
AUTO-
(FUNCT ION) (INPUT )
1
2
3
4
5
6
FOR I NTERN ET
RAD IO IR 100
REMOTE CONTROL
1.FUNCTION BUTTON .
Allows access to menu features such
as bass, treble, balance, reset .
Use vol+/- button to adjust the level.
2. VOLUME-.
3. STAND BY.
4. INPUT SE LE CT.
5. MUTE
6. VOLUME+.
MEMORY: Ma nua l sav e the s tat ion t o pre set n umb er.
a. Use tune+/- key to s ele ct th e rad io fr equ enc y.
b. Press "MEMORY" k ey
c. Use PR+/- KEY t o sel ect the preset channel number
d. After stop press PR +/- k ey ab out 2 s eco nd,
the radio will save the fr equ enc y to th e las t pre set n umb er.
STAND BY:
Press this button t o tur n the u nit i nto s tan dby m ode , pre ss
again to turn on the unit.
AM/FM:
Band change. (AM/FM)
INFO:
Press this button to see i nfo rma tio n of FM R DS.
STEREO/MONO:
Stereo/Mono mode change, for FM onl y
F-SCAN:
Press and hold for 2 seconds to acti ve au to fu ll sc an fu nct ion .
Auto scan in full frequency range, and save s tat ion s to
preset number.
PR+/-:
Select preset station number up or do wn.
AUTO +/- :
Press to auto search next/p rev iou s sta tio n.
P18
Page 20
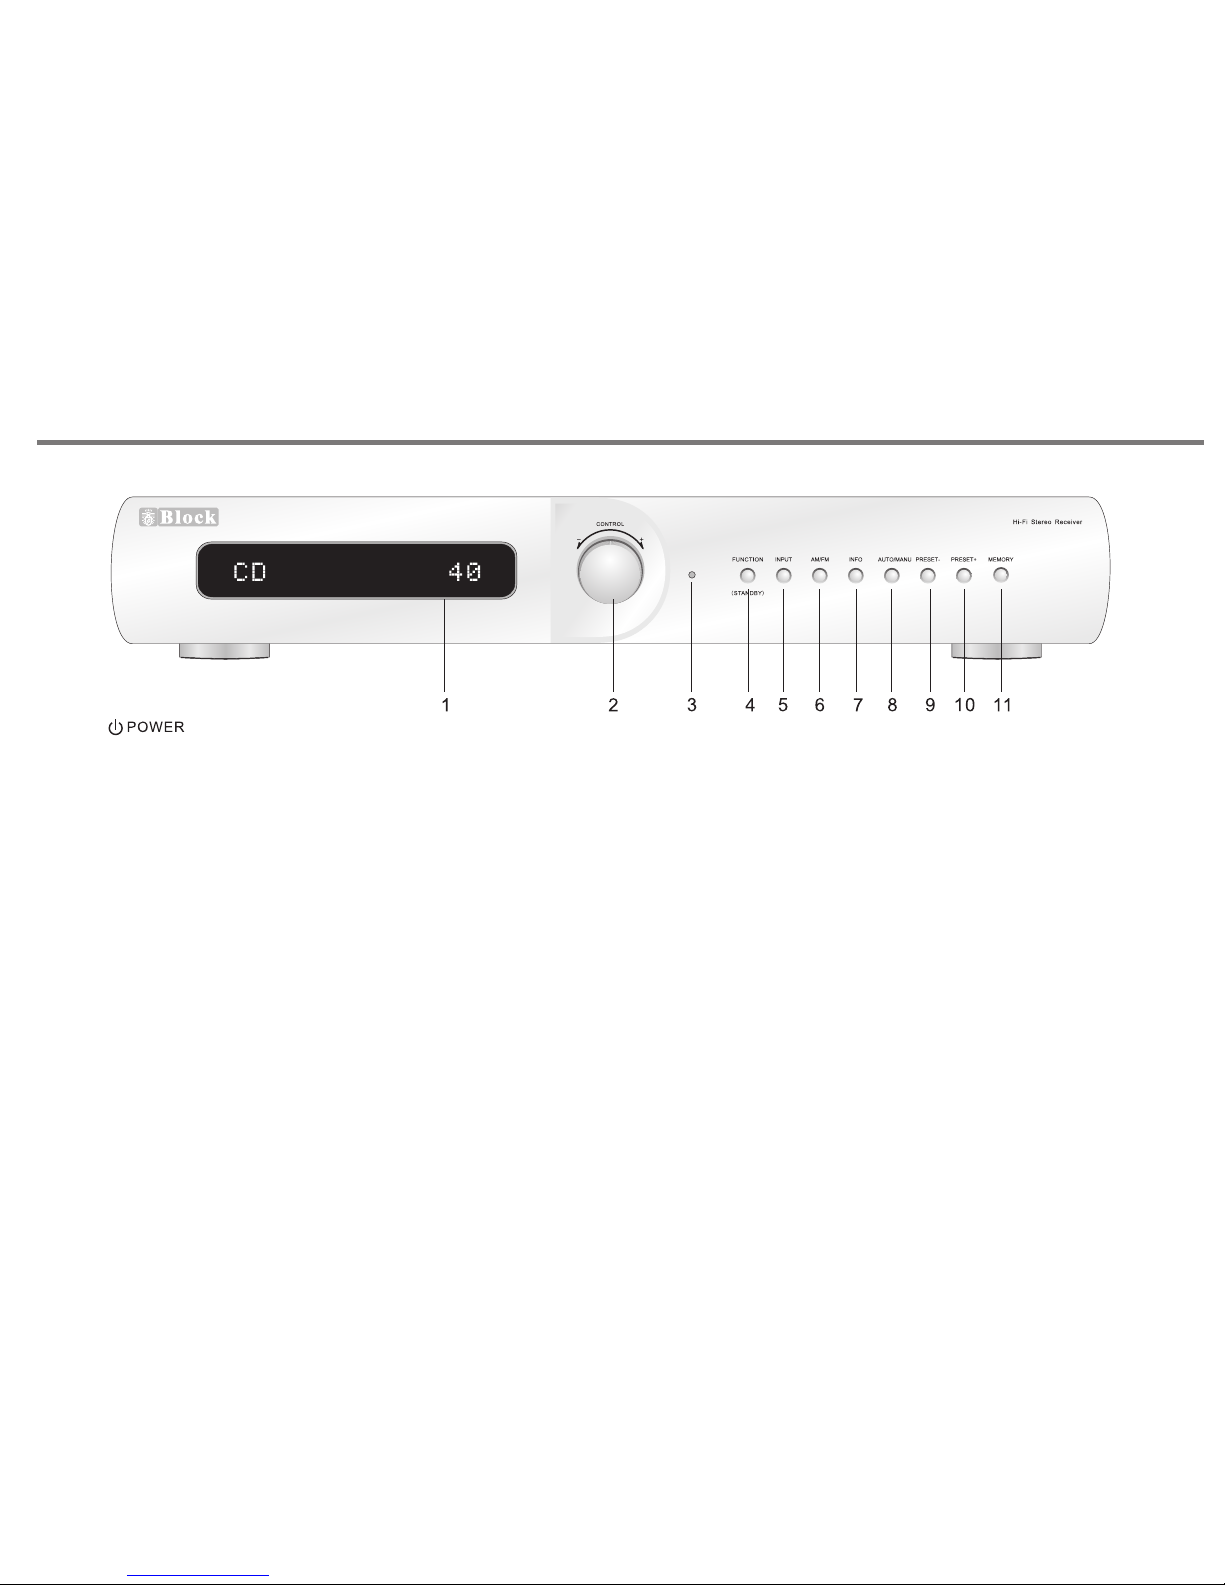
FRONT PANEL CONTROLS
1. VFD D IS PLAY. Wil l give th e in dic at ion of le ve l con tr ol and
inpu t so urc e se lecte d.
2. ROTARY CO NTR OL KNOB. Thi s al lows ad justm en t of
para me ter s su ch as vol um e, bass , tr ebl e, b alanc e.
3. LED I ND ICATO R, it wil l be t urn o n in r ed colo ur w hen t he u nit
is in st an dby m od e.
4. FUN CT ION B UT TO N. Al low s ac cess to m en u fea tu res suc h
as bas s, t reble , balan ce , reset .
Pres s an d hol d fu nctio n bu tton fo r 2 se con d, t he unit g o to
Stan db y mod e, p ress th is b utton a ga in re tu rn to nor ma l mod e.
5. INP UT B UT TO N. Pres s to s ele ct i nput so ur ce wi th in TUN ER,
TV, TAPE , AUX , DAB , CD , PHONE .
6. AM/F M. AM /FM ban d mode ch an ge swit ch .
7. INF O. P ress th is key to s ee i nform at ion o f FM R DS.
8. AUTO/M AN U. Pres s an d hol d fo r 2 secon ds t o act iv e AUTO
scan f un cti on . Auto sca n in f ull fre qu enc y ra nge, an d sa ve
stat io ns to pre set num be r.
Pres s th is bu tt on once a nd u se cont ro l kno b to a djust t un er fr eq uency.
9. PRE SE T-. Pr es et stat io n down se lect.
10. PR ES ET+ . Pr eset st at ion up se le ct.
11. MEMORY: Ma nu al save t he s tat io n to pres et n umb er.
a. Use t un e+/- ke y to s ele ct t he radi o fr equ en cy.
b. Pre ss " MEMORY" k ey
c. Use P R+ /- KEY to sel ec t the p re set cha nn el nu mb er
d. Afte r st op pres s PRESE T+ /- key ab ou t 2 sec on d,
the ra di o wil l sa ve the fr eq uency t o th e las t pr eset nu mb er.
P19
POWER SWITCH ON REA R PANE L,
TURN IT ON BE FOR E USE THE U NIT.
VR 10 0
Page 21
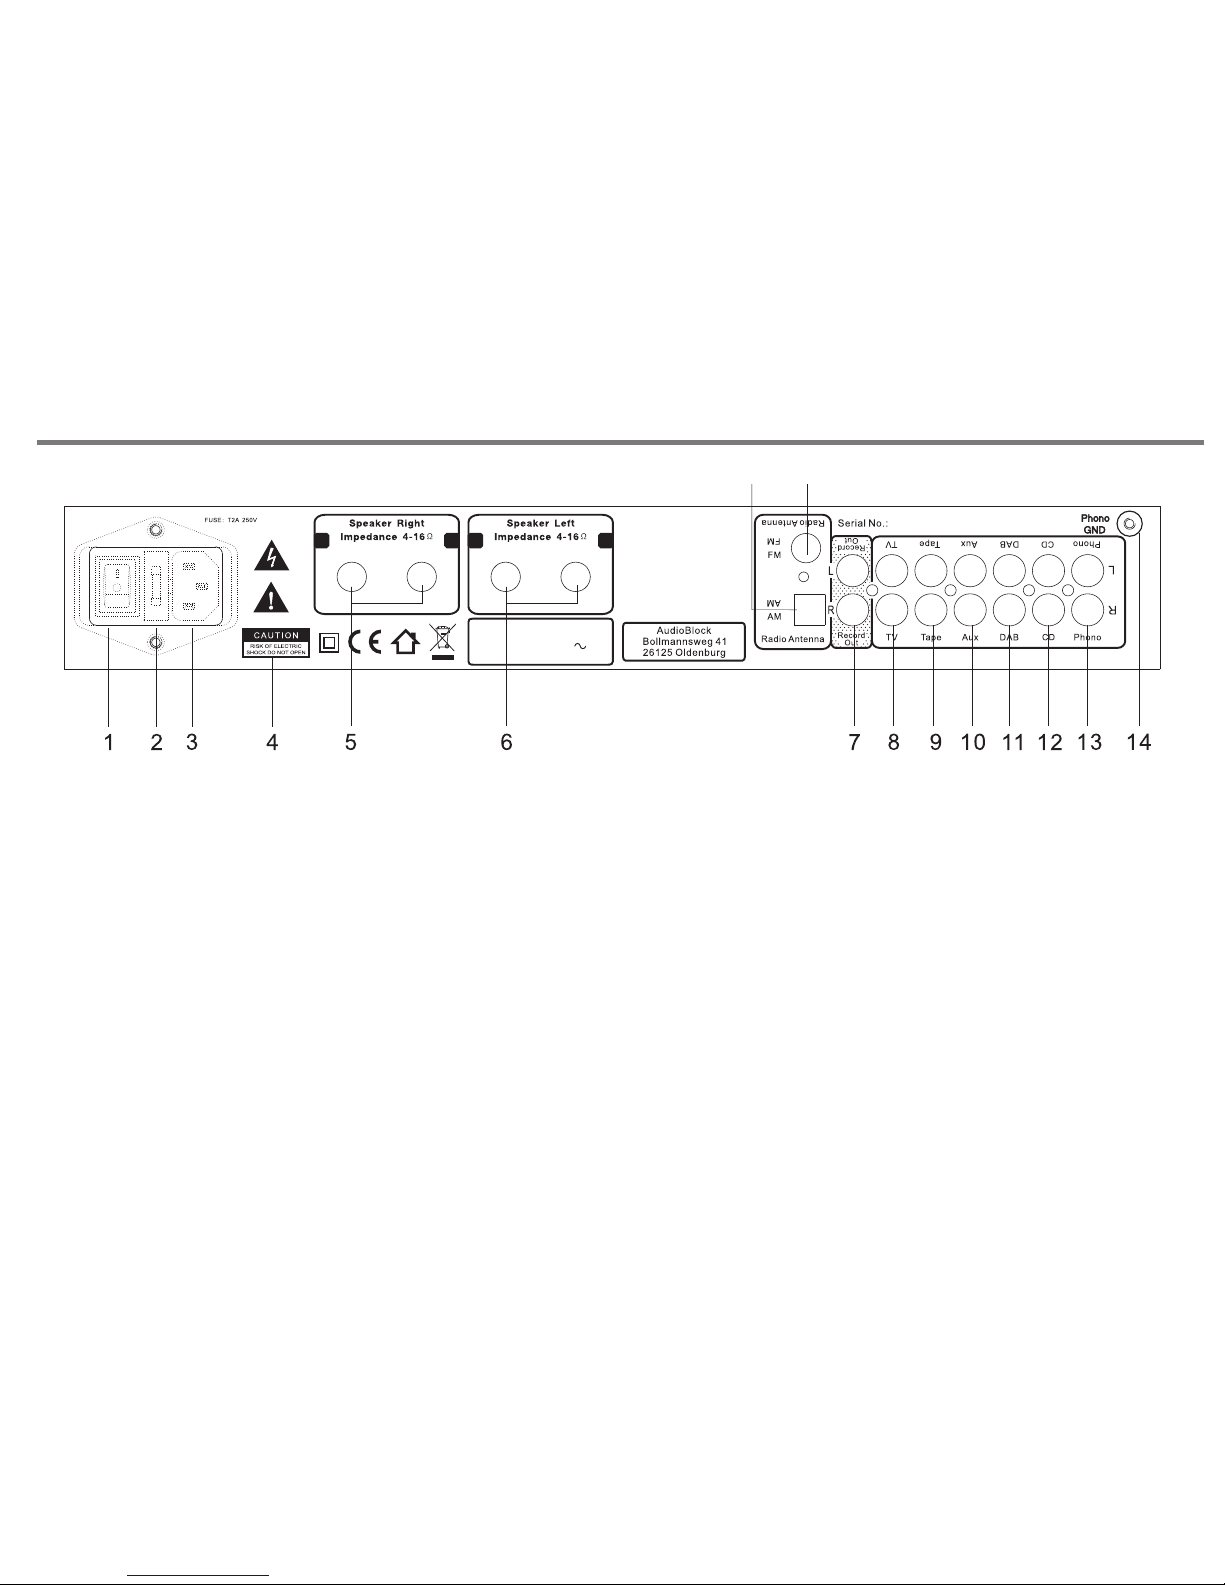
REAR PANEL CONNECTIONS
P20
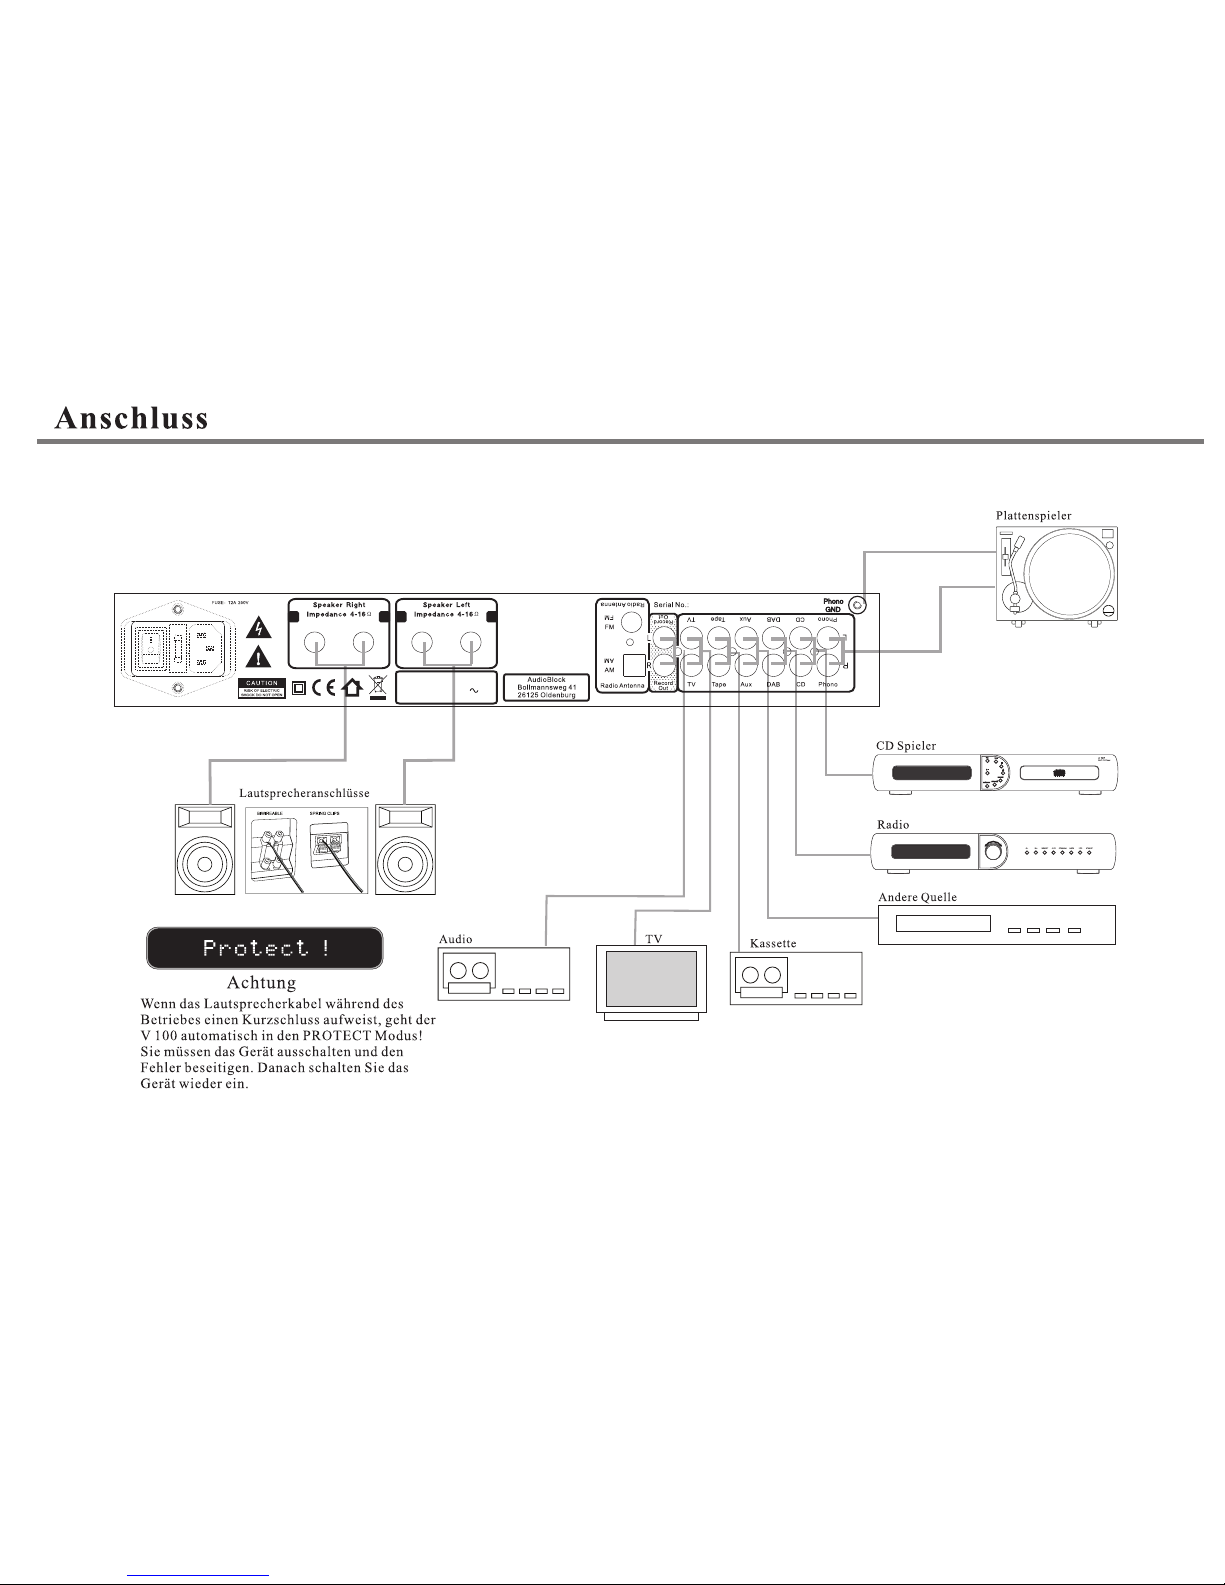
1. POW ER S WITCH : Sw itc he s mains p ow er on /o ff t o inter na l
comp on ent s, h oweve r pl ease no te that m ai ns powe r is s til l
appl ie d to th is u nit eve n th ough th is swit ch m ay be off.
2. FUS E HO LDE R: f itted w it h 20mm T 2A fuse ins id e.
" IMPO RTA NT:"
Remo ve t he ma in s plug fr om t he main s so cke t be fore at te mpt in g
to che ck / repla ce the fu se l ocate d on t his f us e holde r.
3. MAI NS C ABL E IN LET JA CK: P le ase ens ur e tha t th e input c ab le st ra in reli ef
bush i s in tac t an d has not b ee n damag ed.
4. WA RN ING I CO NS: Ple as e be aw ar e that th is u nit con tains h ig h volta ges,
and sh ou ld no t be o pened , pl eas e re fer to pa ge 2 o f this ma nu al.
5/6. L OU DSP EA KER OUT PU TS. Ple as e ens ur e that +/ - co nne ct ions ar e ma de
prop er ly be tw een rea r of t he ampl if ier a nd l oudsp ea ker s. E nsure w ir es ar e
not fr ay ed or tou ch ing .
7. LIN E OU TPU T SOCK ET S: This i s fo r conne ct ion to ex terna l am plifi ca tio n or
reco rd ing e qu ipeme nt .
8. TV INPU T SO CK ET.
9. TAP E IN PUT SOC KE T.
10. AUX I NP UT SOCKET.
11. DAB TU NER I NP UT SOCKET.
12. CD I NP UT SOCKET.
13. PH ON O INP UT SOC KE T. (For t he c onnec ti on of a t ur ntabl e)
14. PH ON O TE RMINA L EARTH PO ST. It i s neces sa ry to p ro vide a ch as sis
eart h co nne ct ion bet we en the tu rn tab le a nd the am pl ifi er. F ailur e to d o
this w il l resul t in a buzz in g or humm in g noi se f rom the l ou dsp ea kers.
15. AM ra di o ant en na.
16. FM r ad io an te nna.
-+-
+
Mod el: VR 10 0
Hi- Fi Ster eo Rece iver
Pow er Rati ng:A C 230V 50 Hz
Max P ower Co nsump tion: 15 0W
15
16
Page 22
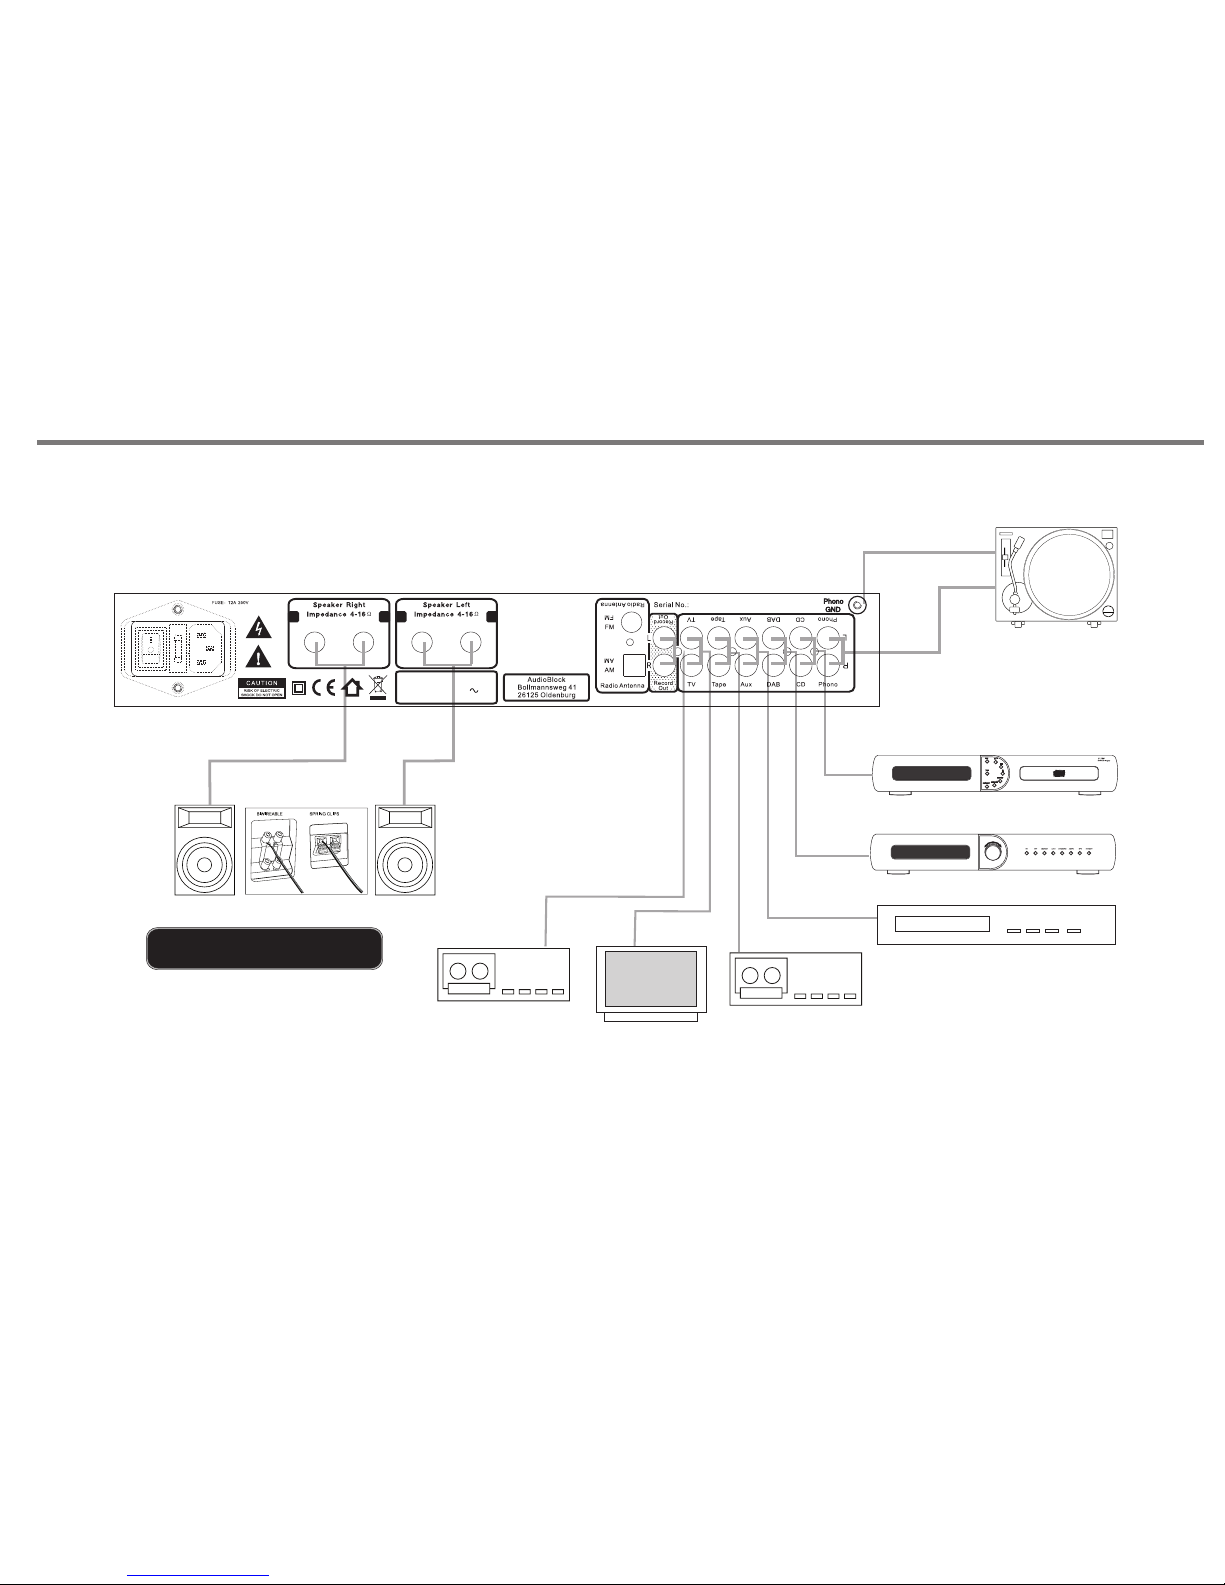
MAKING THE CONNECTIONS
P21
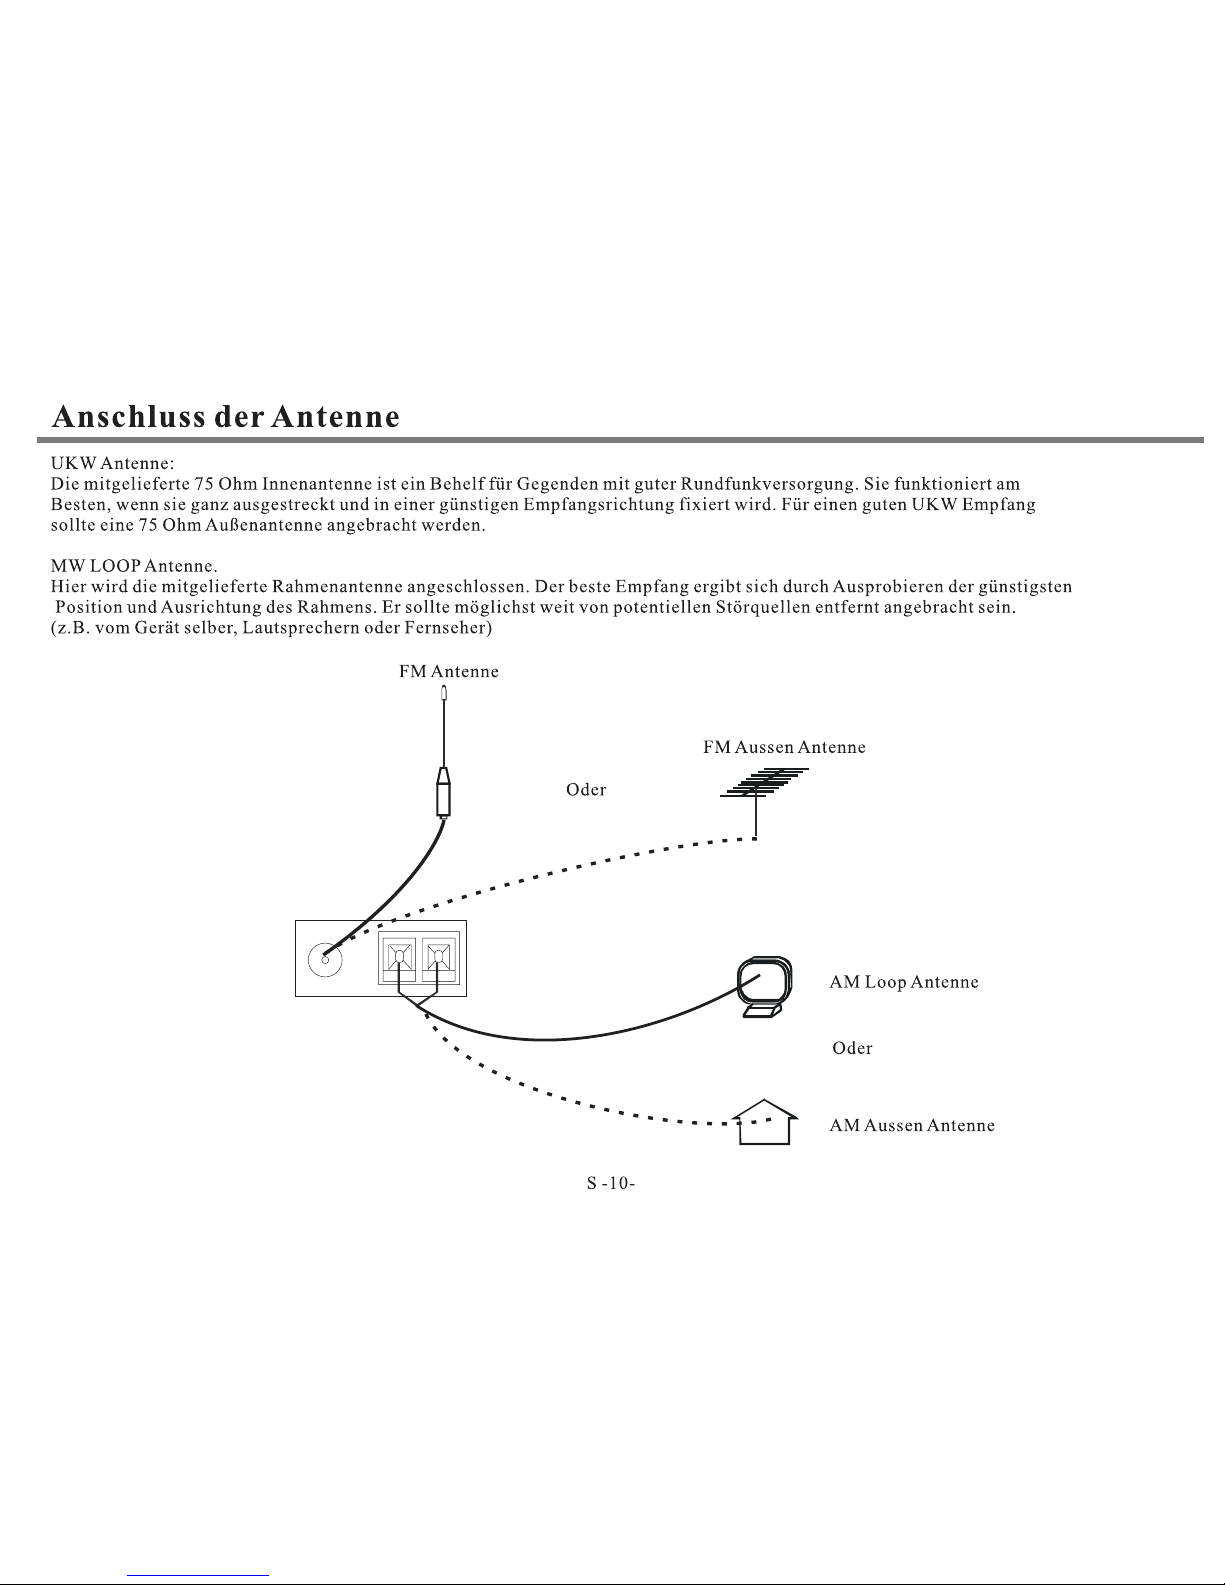
SPE AKER CO NNECT IONS
AUD IO RECO RDER
CAS SETTE D ECK
OTH ER AUDIO S OURCE
DAB TU NER
CD PL AYER
TUR NTABLE
CONTROL
P
t
r
c
e
e
s
l
s
e
t
s
o
R 100
AM/FM RDS PLL Tuner
TV
Protect !
If the spe aker cable is sho rted du rin g wo rki ng, V 100
wil l aut omati cally com e to pro tecti on m ode, and V FD
wil l d ispla y " Prot ect ! ". Now you nee d to tur n off
V 100 , chec k the spe aker ca ble, a nd ma ke sur e all
spe aker ca ble i s conn ected co rrect ly, the n tur n on
V 100 a gain. V 1 00 will r eturn t o norma l worki ng mode .
-+-
+
Mode l: VR 100
Hi-F i Stere o Recei ver
Powe r Ratin g:AC 23 0V 50Hz
Max Po wer Con sumpt ion:1 50W
Page 23
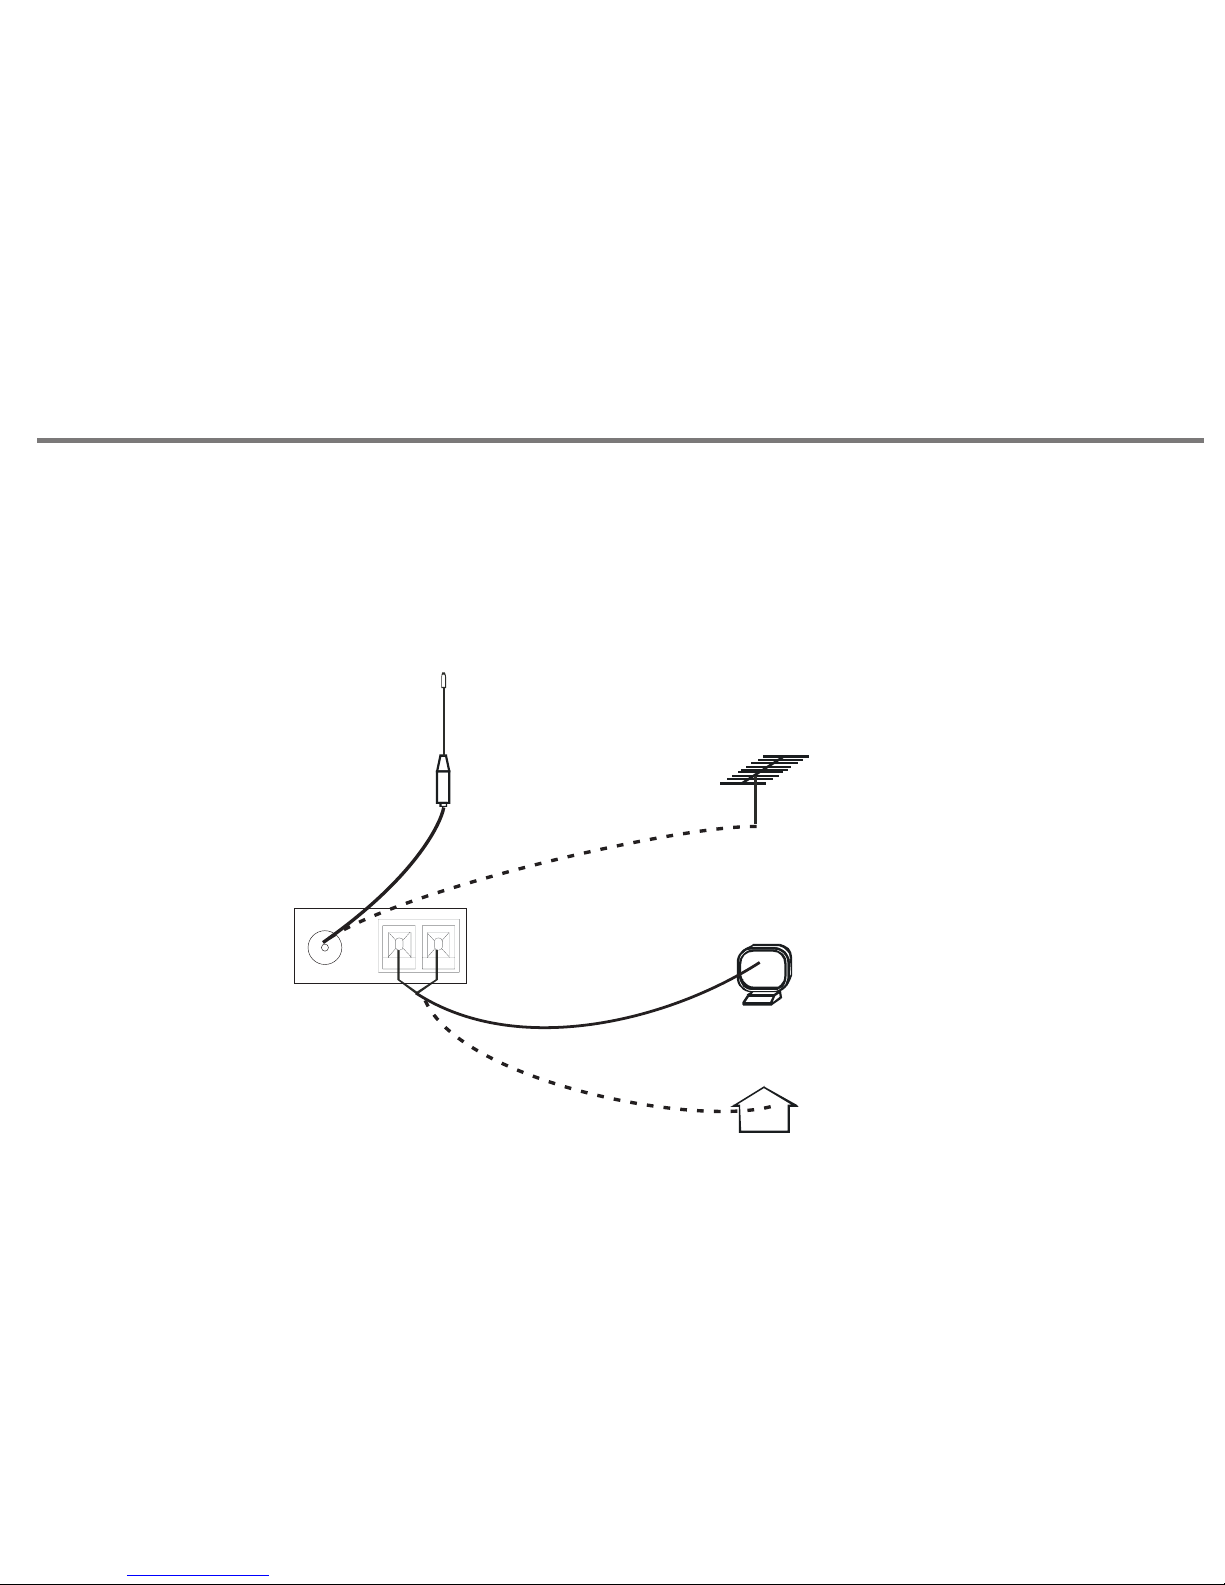
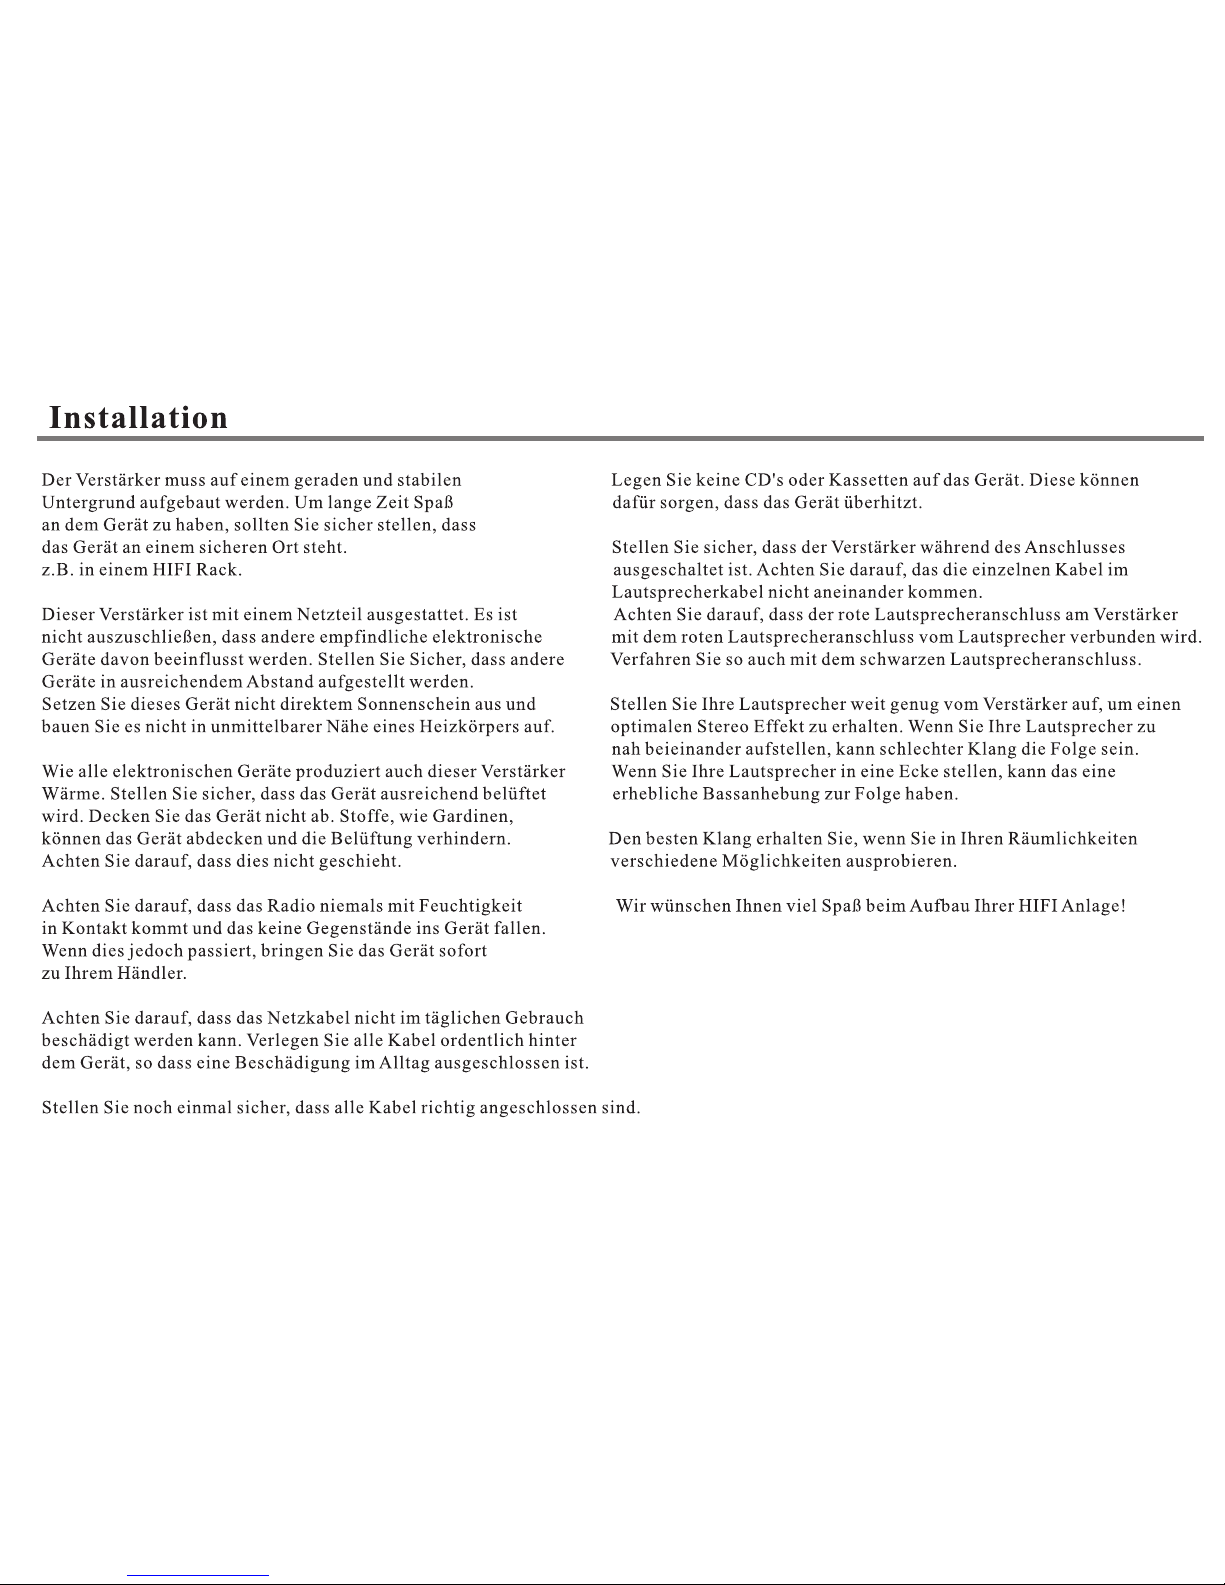
FM aerial
OR
FM external aerial
AM loop aerial
OR
AM external aerial
FM aerial
Connect an aerial to the FM 75 ohm socket ( a simp le wi re ae ria l is su ppl ied f or te mpo rar y use ). Ex ten d the l ead a nd mo ve th e
aerial around until you get the best reception. Fo r con tin ued u se, w e str ong ly re com men ded u sin g a 75 oh m out doo r FM ae ria l.
AM loop aerial
Connect each end of the single length antenna to the ante nna t erm ina ls. P lac e the a nte nna a s far f rom t he ma in sy ste m as
possible to prevent unwanted noise and to obtain optimum rece pti on. I f the AM l oop a eri al pr ovi ded d oes n ot re cei ve su fficient
reception, it may be necessary to use a n out doo r AM aer ial .
ANTENNA CONNECTIONS
P22
Page 24
INSTALLATION AND POSITION
V 1 0 0
V 100
P23
Page 25
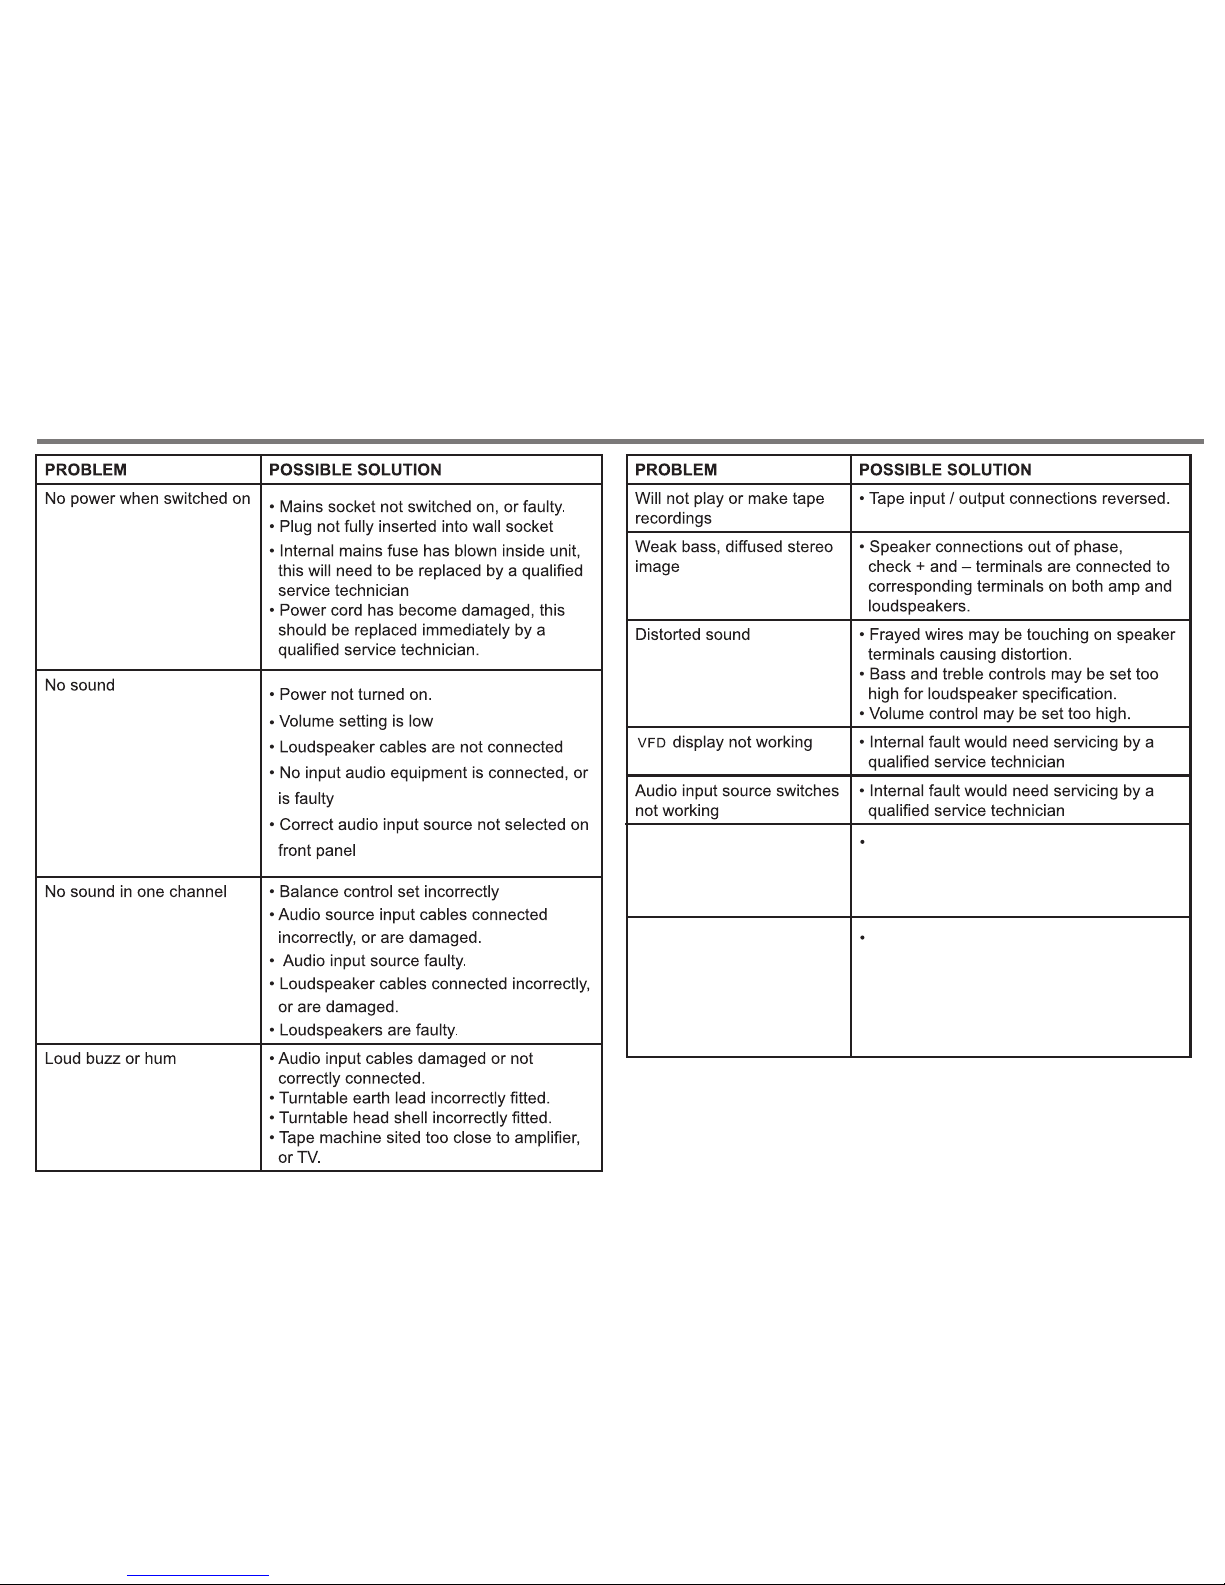
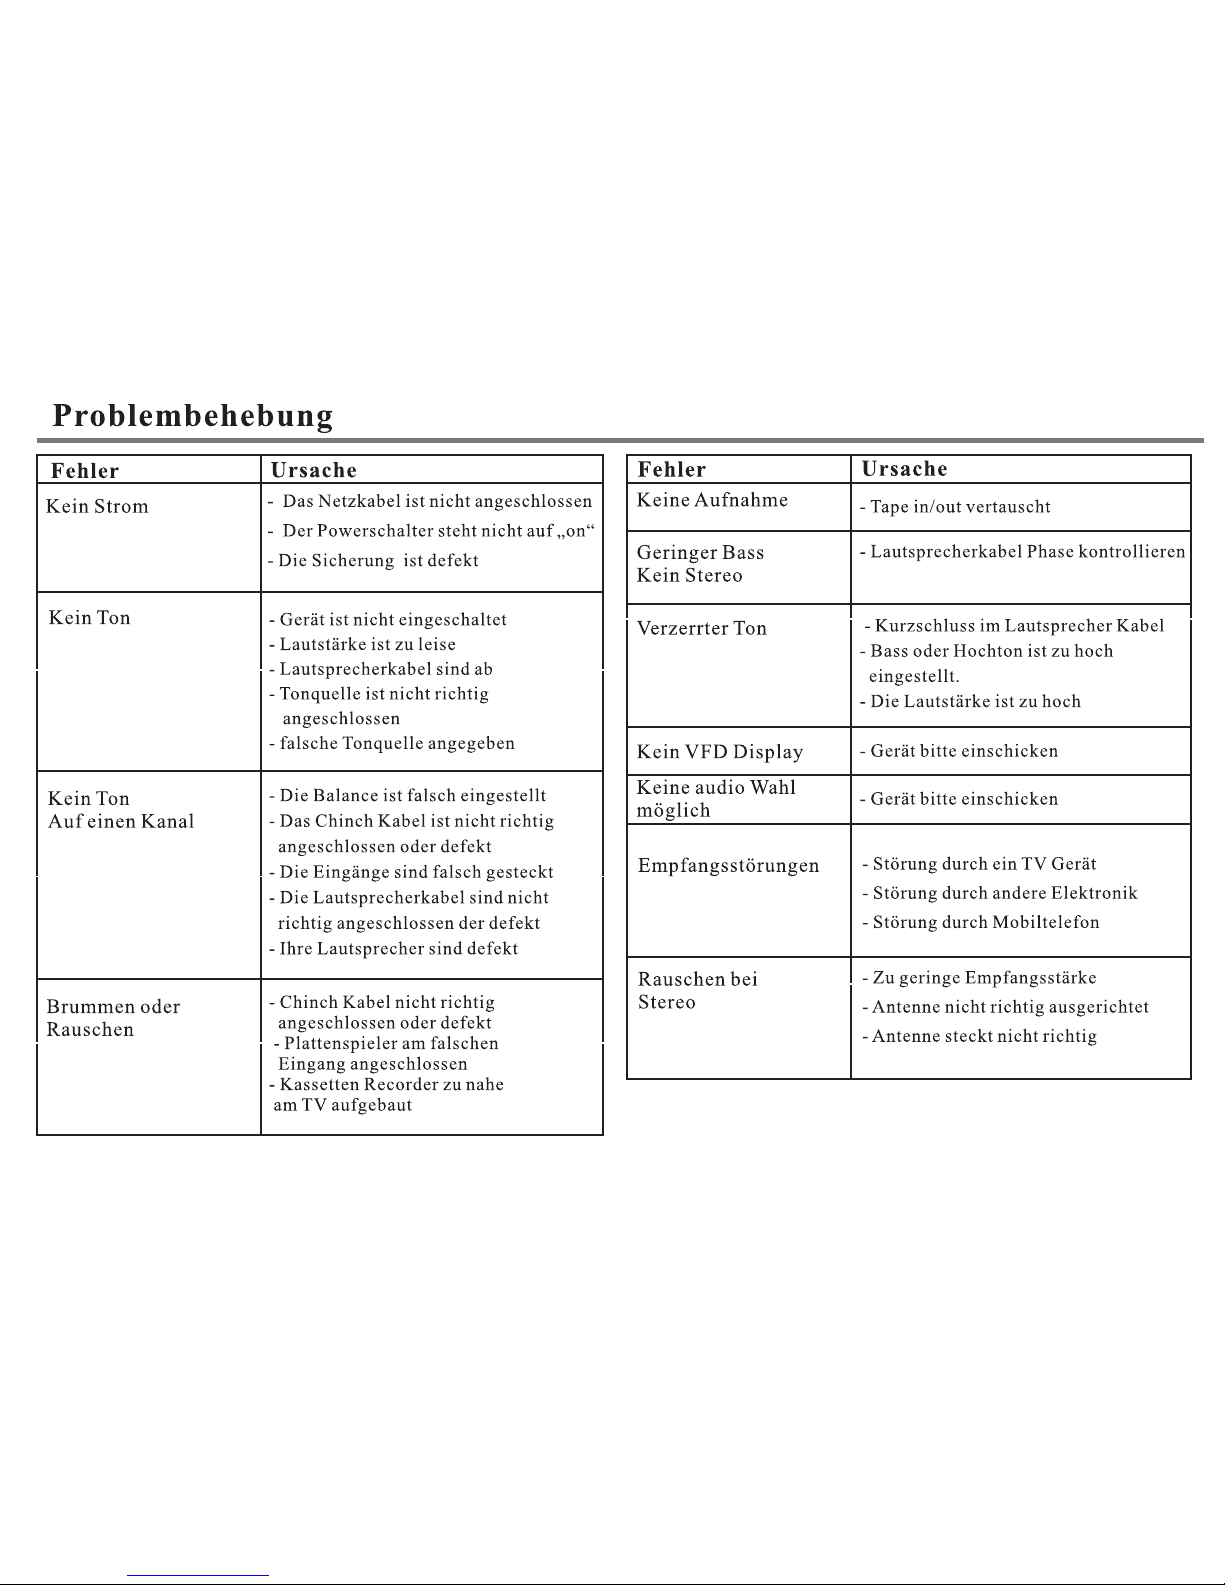
TROUBLE AND SHOOTING
P24
Nois e is e xce ss ive in bo th
ster eo a nd mo na ural
broa dc ast s.
Poor l oc ati on a nd/or d ir ect io n of the
ante nn a. Tra ns mitte d st ation i s too far
away.
An unu su al hi ss ing noi se i s
hear d wh en li st ening t o th e
broa dc ast i n st ereo, b ut n ot
hear d wh en li st ening
mona ur all y.
A sligh t no ise m ay b e heard b ec aus e th e
meth od u sed f or m odula ti on of FM
ster eo b roa dc asts in d if fe rent th an t hat
used f or m ona ur al broa dc ast s.
Page 26
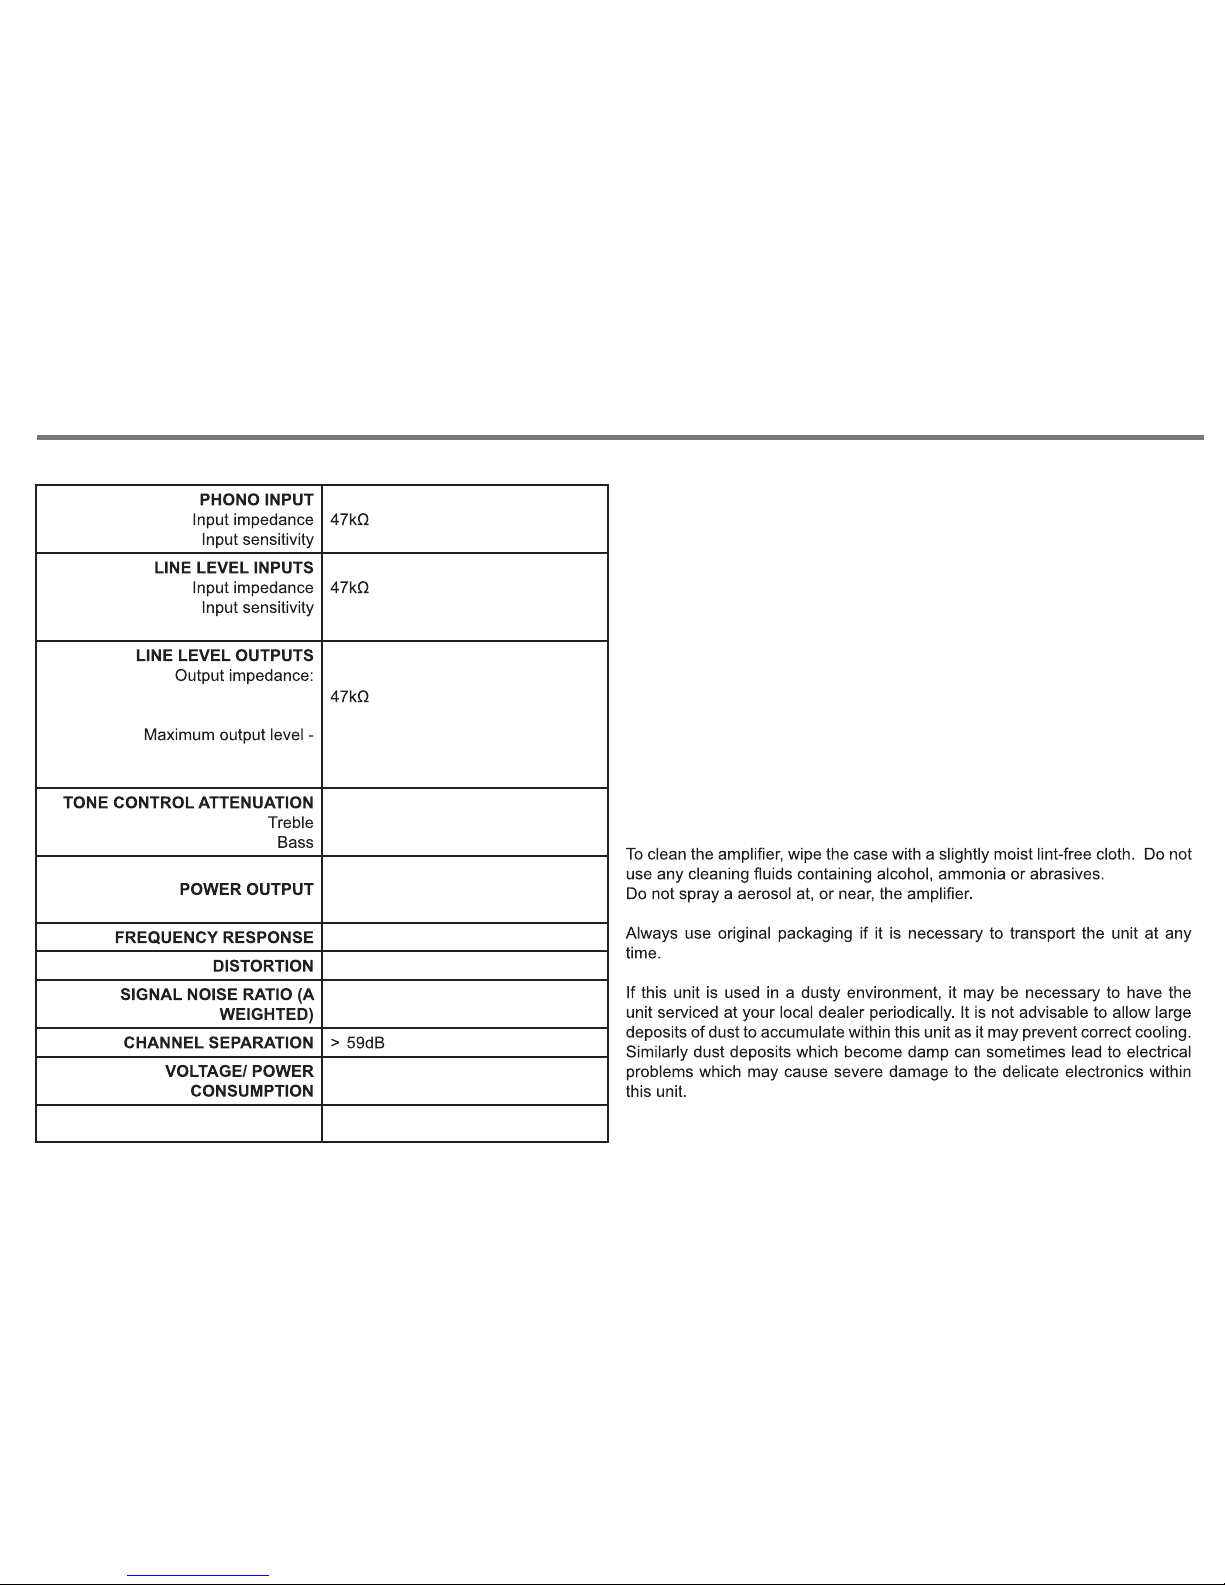
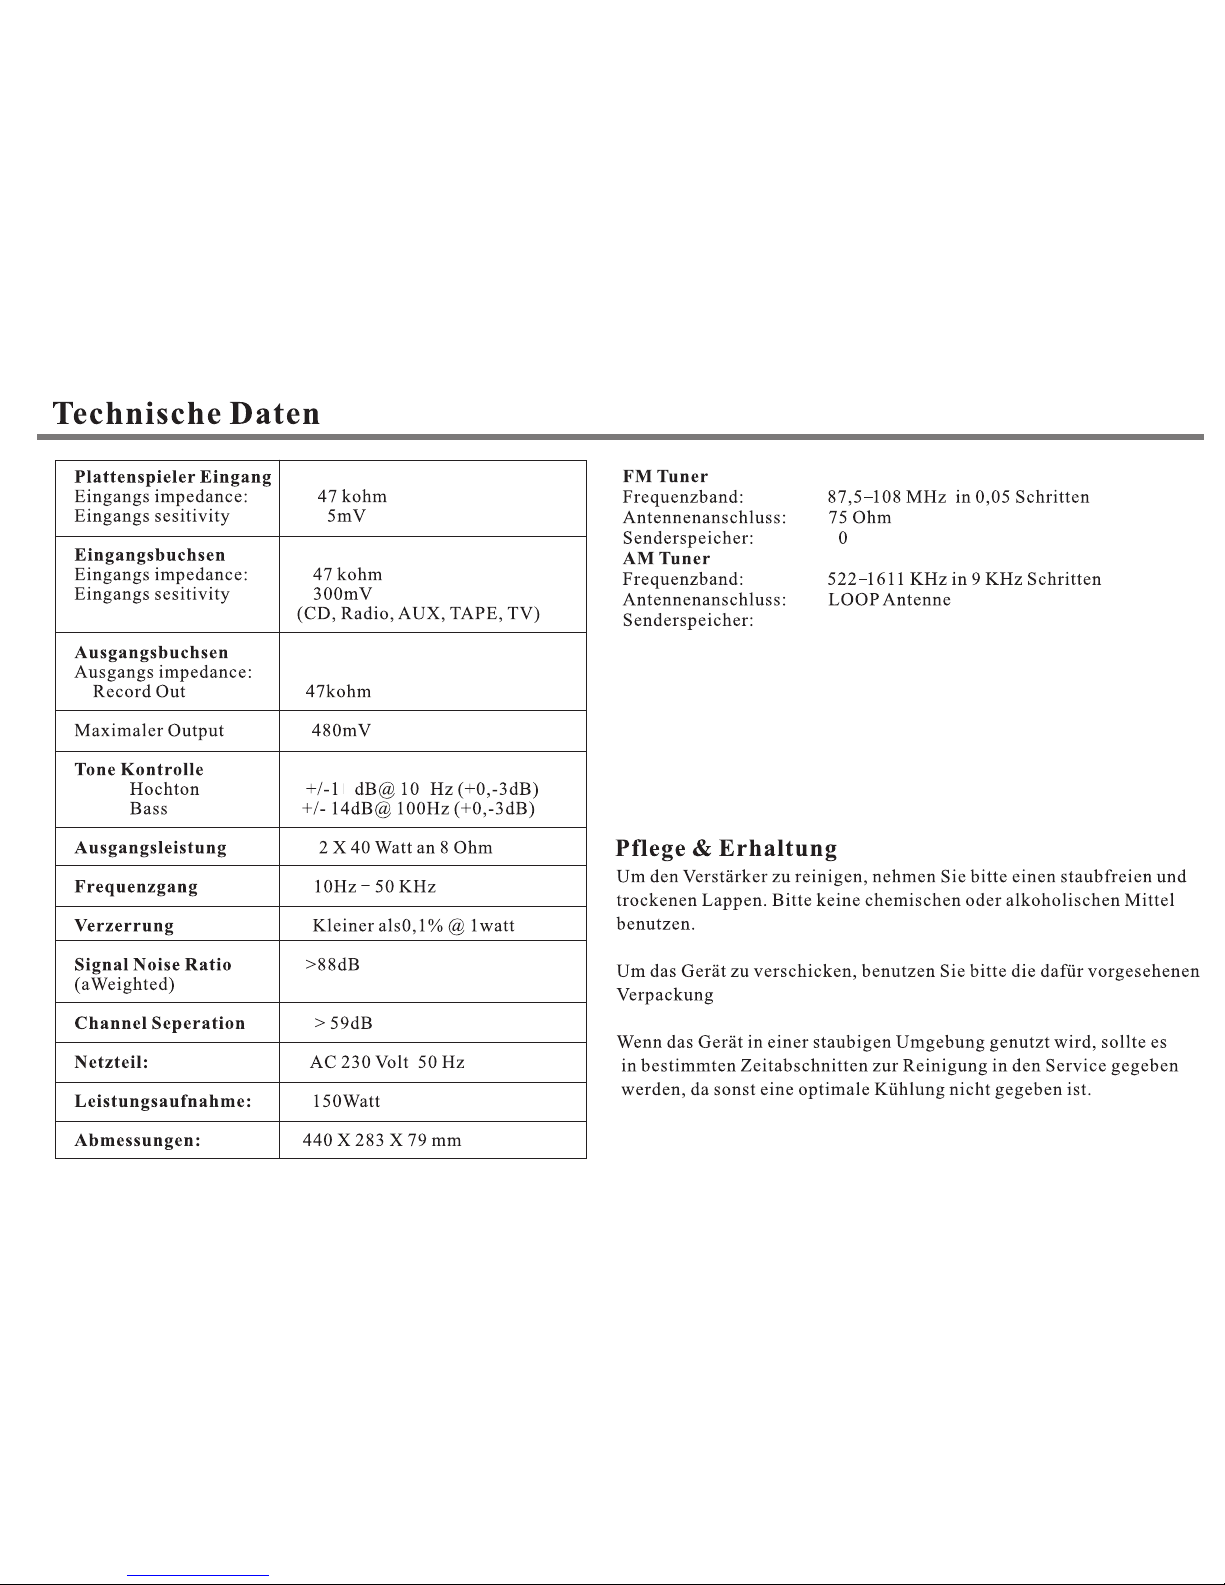
SPECIFICATIONS
(CD, DAB, AUX, TAPE , TV)
Less t ha n 0.1 % @ 1 wa tt
440 x 283 x 79mm (with feet)
5mV
300mV
480mV
P25
RECOR OUT
RECOR OUT
+/- 14dB @ 10K Hz (+0, -3dB)
+/- 14dB @ 100 Hz (+0, -3dB)
2 x 40 watts RMS @ 8 ohms
10Hz to 50KHz
> 88dB
AC 230V 50Hz / MAX 150W
DIMENSIONS (WxDxH)
CARE AND MAINTENANCE
FM TUNER SECTION
Freq ue ncy R an ge: 87. 5 - 10 8MHz 0. 05MHz s te p
Ante nn a Term inal: 7 5 oh m (un ba lance d)
Pres et S tat io ns : 30
AM TUNER SECTION
Freq ue ncy R an ge: 522 - 1 611 KH z 9KHz st ep
Ante nn a Term inal: L oo p Ante nn a
Pres et S tat io ns : 30
NOTE: S pe ci fi ca ti on s an d de si gn a re s ub je ct t o po ss ib le m od if ic at io ns w it ho ut n ot ic e
Page 27

 Loading...