

Page 1
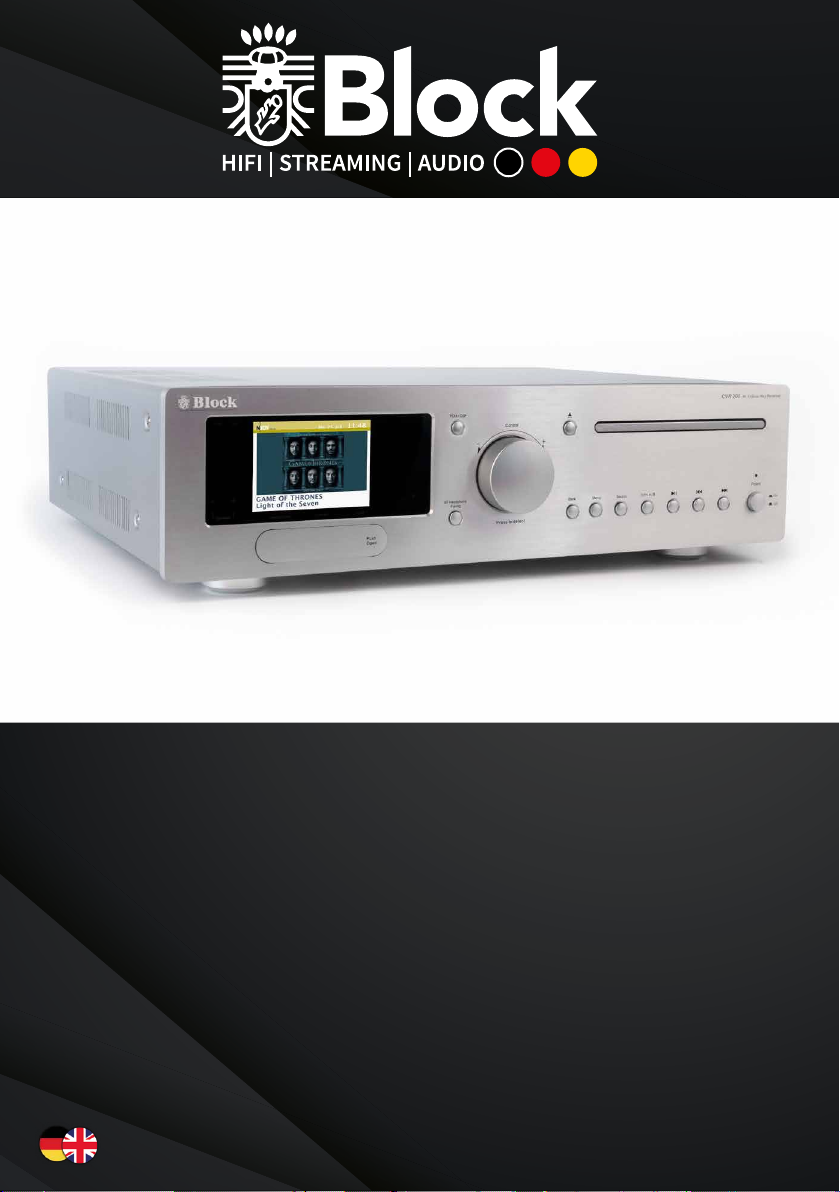
Bedienungsanleitung | Manual
CVR-200
Page 2
Sehr geehrter Kunde!
INHALTSVERZEICHNIS
Danke, dass Sie sich für dieses hochwertige
Gerät entschieden haben. Diese Bedienungsanleitung soll ihnen eine Übersicht darüber
geben, wie Sie Ihr Gerät bedienen können. Sie
erhalten Sicherheitsinformationen und werden
darüber informiert, wie Sie ihr Gerät am besten
reinigen. Die Sicherheits- und Bedienungsinformationen sind einzuhalten, damit das Produkt
langfristig und sicher funktioniert. Bitte nehmen Sie sich einige Minuten Zeit, um die Bedienungsanleitung sorgfältig durchzulesen. Bewahren Sie diese Bedienungsanleitung gut auf,
damit Sie bei einem Weiterverkauf mitgegeben
werden kann. Bedingt durch Softwareupdates
oder technische Weiterentwicklungen bei
Drittherstellern (z. B. Apps) können Teile dieser
Bedienungsanleitung aktualisiert werden. Bitte
besuchen Sie von Zeit zu Zeit unsere Webseite
„www.audioblock.com“, um zu prüfen, ob es
neuere Bedienungsanleitungen zum Download
gibt. Vergleichen Sie hierzu die Standangabe
auf dem Deckblatt mit der Angabe im Internet.
Wenn Sie noch weitere Fragen zu Ihrem Gerät
haben, nehmen Sie bitte Kontakt zu einem
autorisierten Fachhändler oder zu unserem
Service-Center auf. Im Falle eines Defektes, der
durch Fehlbedienung, Missbrauch oder Nichtbeachten der Bedienungsanleitung auftritt,
bitten wir um Verständnis, dass die Garantie
für diesen Defekt erlischt. Ebenfalls kann keine Haftung für Folgeschäden übernommen
werden. Dieses Produkt ist EMV zer tifiziert und
erfüllt alle Richtlinien und Anforderungen der
Europäischen Union. CE und ROHS Dokumentationen liegen vor.
Sicherheitshinweise ................................................................................................................................................................... 04
Vor der Inbetriebnahme ............................................................................................................................................................ 08
Bedienelemente am Gerät ....................................................................................................................................................... 09
Die Fernbedienung ..................................................................................................................................................................... 10
Aufbau des Gerätes .................................................................................................................................................................... 12
Erste Inbetriebnahme und Installation ................................................................................................................................. 13
Manuelle Installation (WL AN & LAN) ...................................................................................................................................... 14
Der Verstärker .............................................................................................................................................................................. 15
Das UKW Radio ............................................................................................................................................................................ 16
Das DAB+ Radio ........................................................................................................................................................................... 17
Das Internetradio ........................................................................................................................................................................ 18
Der Mediaplayer USB & DLNA ............................................................................................................................................. 19 -20
Musik streamen ........................................................................................................................................................................... 21
Spotify Connect & Undok ......................................................................................................................................................... 22
Bluetooth | Anlernen von Fremdfernbedienungen ............................................................................................................23
Einrichten von Multiroomsystemen & Anschlüsse ....................................................................................................... 24 -25
Frontale Anschlüsse: Line-In, USB .......................................................................................................................................... 25
Rückwärtige Ausgänge: Pre-Out, Rec-Out ............................................................................................................................25
Frontale Ausgänge: Kopfhörer .................................................................................................................................................25
Kurzanleitung Disc (Blu-ray, DVD & CD) Modus ................................................................................................................... 26
Fernbedienung im Blu-ray Modus ......................................................................................................................................... 27
Systemeinstellungen ................................................................................................................................................................. 28
Zusatzfunktionen + Fehlermeldungen ............................................................................................................................ 29-30
Pflege und Transport ................................................................................................................................................................. 31
Technische Daten ....................................................................................................................................................................... 31
Contents English ........................................................................................................................................................................ 33
2 3
Page 3
Sicherheitshinweise
Umgang mit Batterien
Achtung: Um d ie Gefahr eines Stro mschlages zu verme iden, darf an dies em Gerät keine Verän derung vorgenom men werden! Das Önen des Gerätes sowie Veränderungen am Gerät dürfen nur durch autorisierte Personen
vorgenommen werden.
Wichtige Sicherheitshinweise:
▶ Bitte lesen Sie vor der ersten Inbetriebnahme diese Bedienungsanleitung sorgfältig durch.
Dieses Gerät ist nur für den Gebrauch in geschlossenen Räumen.
▶ Dieses Gerät darf nur an einer dafür vorgesehenen Steckdose angeschlossen werden.
▶ Dieses Gerät darf keiner Feuchtigkeit ausgesetzt werden.
▶ Stellen Sie sicher, dass das Gerät frei steht.
▶ Stellen Sie sicher, dass das Gerät nicht in der Nähe einer Wärmequelle steht.
▶ Achten Sie darauf, dass das Anschlusskabel nicht beschädigt ist oder wird.
Informationen zur Entsorgung des Altgerätes:
Ihr Produkt ist aus qualitativ hochwer tigen und wieder verwertbaren Materialien gebaut. Mit diesem Zeichen
erfüllt das Produkt die EU-Norm 2002/96/EC. Bitte entsorgen Sie Ihr Gerät nicht im Hausmüll sondern an entsprechender Wertstosammlung. Sie sind verpflichtet elektronische Geräte, Zubehör und Verpackung in speziell dafür vorgesehenen und durch Schilder gekennzeichnete Stellen abzugeben. Für nähere Informationen, wo
Sie diese dafür vorgesehenen Stellen finden, wenden Sie sich bitte an Ihre Müllabfuhr. Bitte halten auch Sie sich
an diese Verordnung, um unseren Kindern eine besser Umwelt zu erhalten.
Das Gerät entspricht der EU-Norm (73/23/EEC)und erfüllt die elektromagnetische Kompatibilität
(89/336/EEC).
Das Blitz-Symbol soll den Benutzer vor nicht isolierten gefährlichen Spannungen im Gerätegehäuse warnen.
Diese Spannung könnte groß genug sein, um Personen durch eine n elekt rischen Schlag zu verletzen. Das Ausrufezeiche n soll den Benutzer darauf aufme rksam machen, da ss die Beschreib ung, die mit dem Gerät au sgeliefert
wird, wichtige Bedienungs- und Wartungshinweise enthält.
Batterien können brennbare Stoe enthalten. Bei unsachgemäßer Behandlung können Batterien auslaufen,
sich stark erhitzen, entzünden oder gar explodieren, was Schäden für Ihr Gerät und Ihre Gesundheit zur Folge
haben könnte.
Befolgen Sie folgende Hinweise:
▶ Halten Sie Kinder von Batterien fern.
▶ Sollten Bat terien verschluckt worden sein, melden Sie dies sofor t Ihrem Arzt.
▶ Laden Sie niemals Batterien (es sei denn, dies ist ausdrücklich angegeben).
▶ Entladen Sie Batterien niemals durch hohe Leistungsabgabe.
▶ Schließen Sie Batterien niemals kurz.
▶ Setzen Sie Batterien niemals übermäßiger Wärme wie Sonnenschein, Feuer oder dergleichen aus!
▶ Zerlegen oder verformen Sie Batterien nicht. Ihre Hände oder Finger könnten verletzt werden oder Batte-
rieflüssigkeit könnte in Ihre Augen oder auf Ihre Haut gelangen. Sollte dies passieren, spülen Sie die ent-
sprechenden Stellen mit einer großen Menge klaren Wassers und informieren Sie umgehend Ihren Arzt.
▶ Vermeiden Sie starke Stöße und Erschütterungen.
▶ Vertauschen Sie niemals die Polarität. Achten Sie darauf, dass die Pole Plus (+) und Minus (-) korrekt einge -
setzt sind, um Kurzschlüsse zu vermeiden.
▶ Reinigen Sie bei Bedarf Batterie- und Gerätekontakte vor dem Einlegen.
▶ Vermischen Sie keine neuen und alten Batterien oder Batterien unterschiedlichen Typs. Dies könnte bei Ih-
rem Gerät z u Fehlfunktione n führen. Darüber hinau s würde sich die schwäch ere Batterie zu s tark entladen.
▶ Entfernen Sie verbrauchte Batterien sofort aus dem Gerät.
▶ Entfer nen Sie die Batterie n aus Ihrem Gerät, we nn dieses über einen längeren Zeitra um nicht benutz t wird.
▶ Ersetzen Sie alle verbrauchten Batterien in einem Gerät gleichzeitig mit neuen Batterien des gleichen Typs.
Isolieren Sie die Kontakte der Batterien mit einem Klebestreifen, wenn Sie Batterien lagern oder entsorgen
wollen.
Bitte beachten Sie, dass wir für Änderrungen von Dienstan bei Drittanbietern keine Haung übernehmen.
4 5
Page 4
Sicherer Gebrauch
Sicherer Gebrauch
Elektrogeräte nicht in Kinderhand! Lassen Sie Kinder niemals unbeaufsichtigt elektrische Geräte benut zen.
Halten Sie auch die Verpackungsfolien von Kindern fern. Es besteht Erstickungsgefahr.
Sicheres Aufstellen
▶ Verwenden Sie das Gerät ausschließlich in trockenen Räumen.
▶ Wenn Sie das Gerät von einer kalten in eine warme Umgebung bringen, kann sich im Inneren des Gerätes
Feuchtigkeit niederschlagen. Warten Sie in diesem Fall etwa zwei bis drei Stunden, bevor Sie es in Betrieb
nehmen.
▶ Stellen Sie das Gerät auf eine feste und ebene Oberfläche.
▶ Stellen Sie das Gerät mit mindestens 10 cm Abstand zur Wand auf.
▶ Decken Sie vorhandene Belüungsönungen nicht ab.
▶ Vermeiden Sie die Nähe von Wärmequellen, wie z. B. Heizkörpern, oder Geräten mit starken Magnetfel-
dern, wie z. B. Lautsprechern.
▶ Stellen Sie keine oenen Brandquellen, wie z. B. brennende Kerzen, auf das Gerät.
▶ Stellen Sie das Gerät nicht auf empfindliche Oberflächen.
Sicheres Anschließen
▶ S chließen Sie das Gerät nur an eine gut er reichbare und fachgerecht installierte Steckdose mit 230 V ~ 50 Hz an.
▶ Der Netzstecker muss frei zugänglich sein, damit Sie das Gerät im Notfall einfach und schnell vom Strom-
netz trennen können.
▶ Verlegen Sie das Netzkabel so, dass niemand darüber stolpern oder darauf treten kann.
▶ Verwenden Sie keine Verlängerungskabel. Knicken oder quetschen Sie das Netzkabel nicht.
▶ Ziehen Sie das Netzkabel stets am Stecker aus der Steckdose.
▶ Ziehen Sie den Netzstecker aus der Steckdose und entfernen Sie das Antennenkabel vom Gerät, wenn Sie
das Gerät längere Zeit nicht benutzen oder wenn sich ein Gewitter nähert.
▶ Das Netzkabel darf während des Betriebs nicht um das Gerät gewickelt sein oder heiße Oberflächen be-
rühren.
▶ Lassen Sie keine Feuchtigkeit in das Gehäuse gelangen.
▶ Fassen Sie das Gerät, das Netzkabel und den Net zstecker nie mit nassen Händen an. Es besteht die Gefahr
eines elektrischen Schlags. Sollten Fremdkörper oder Flüssigkeit in das Gerät gelangen, ziehen Sie sofort
den Netzstecker aus der Steckdose. Lassen Sie das Gerät von qualifiziertem Fachpersonal überprüfen,
bevor Sie es wieder in Betrieb nehmen. Andernfalls besteht die Gefahr eines elektrischen Schlags.
▶ Benutzen Sie das Gerät nie, wenn es beschädigt ist, oder Sie Schäden am Netzkabel oder Stecker feststel-
len. Ziehen Sie bei Beschädigungen des Geräts sofort den Stecker aus der Steckdose.
▶ Önen Sie nie das Gerät. Wenden Sie sich im Störungsfall an unser Ser vice-Center oder eine andere geeig-
nete Fachwerkstatt.
▶ Die Fernbedienung besitzt eine Infrarot-Diode der Klasse 1.Betrachten Sie die LED nicht mit optischen
Geräten.
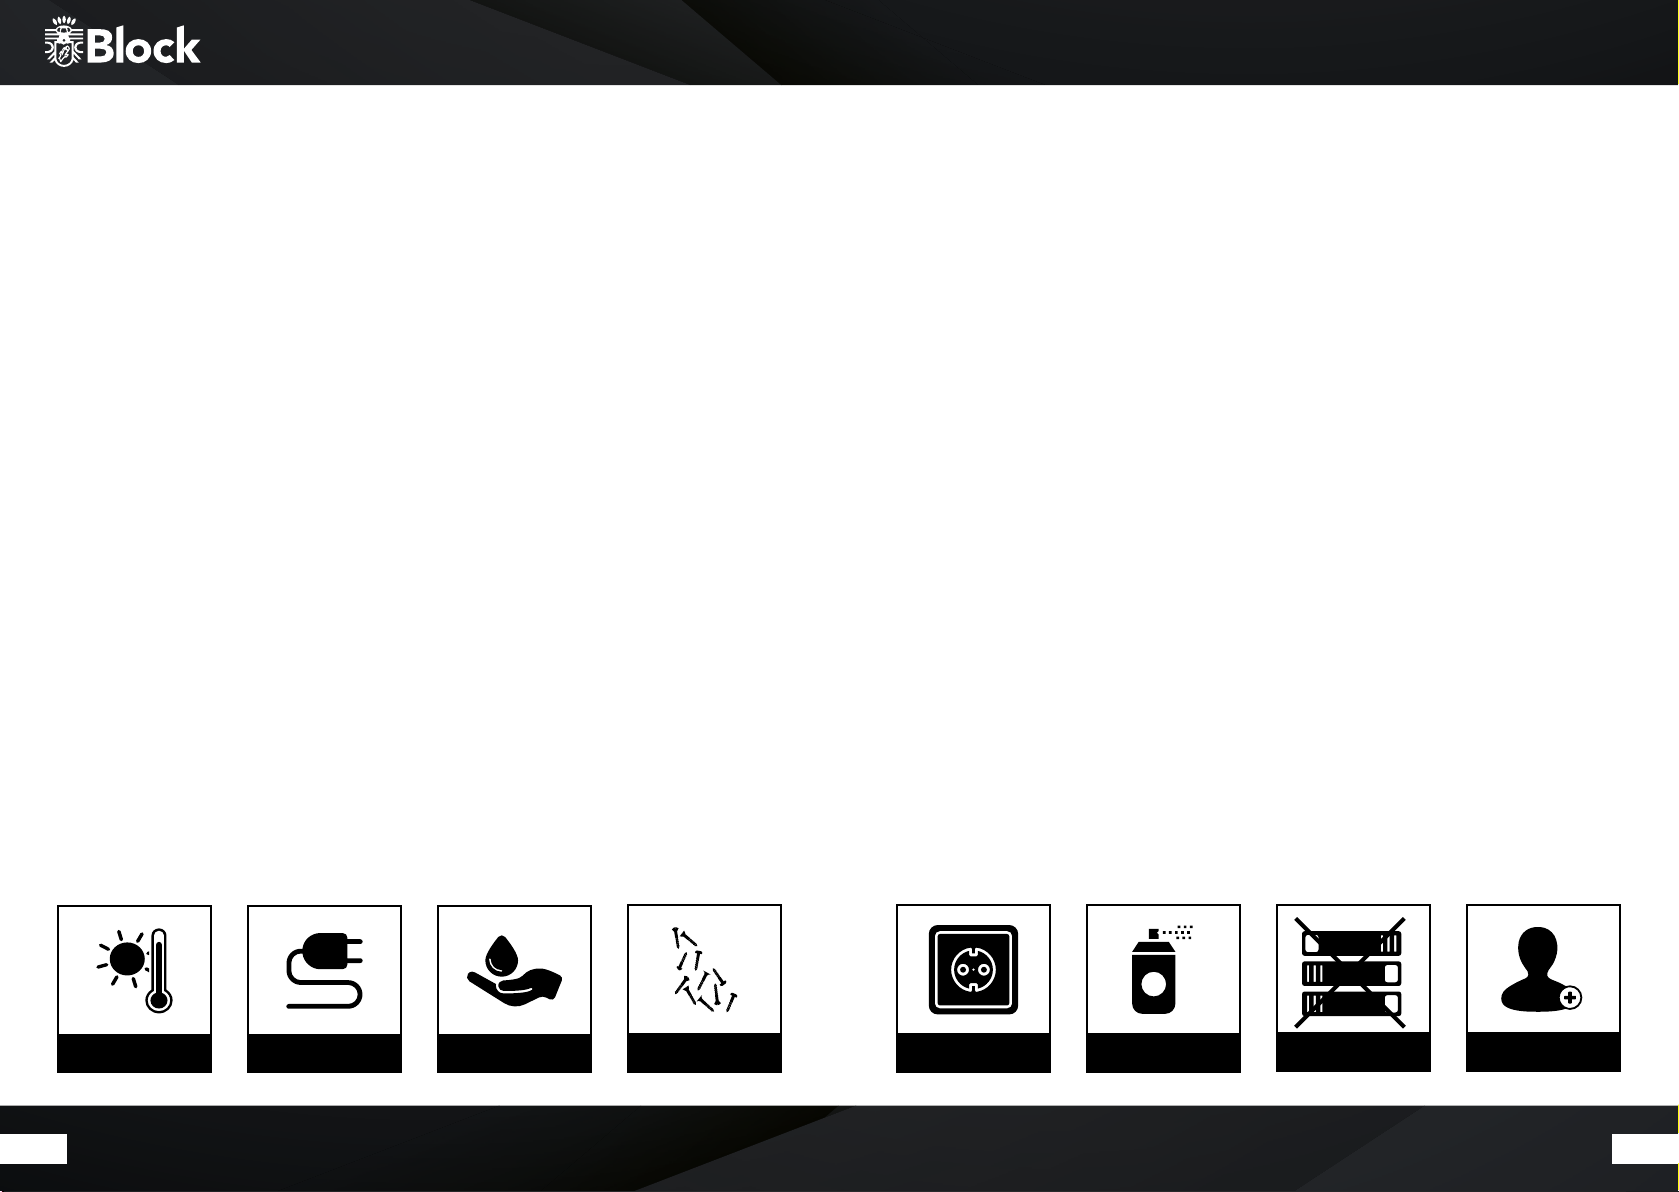
Halten Sie das Gerät fern von Hitzequellen!
Sorgen Sie für genügend Luzirkulation bei
dem Einbau in einem Rack!
Behandeln Sie das Stromkabel
stets mit Vorsicht!
Halten Sie das Gerät fern
von Feuchtigkeit!
Achten Sie darauf, dass keine
Gegenstände in das Gerät fallen!
Nehmen Sie das Gerät vom Netz,
wenn es lange Zeit nicht genutzt
wird!
Achten Sie darauf, dass keine
Sprays oder Chemie an Ihr Gerät
kommt!
Achten Sie darauf, dass Ihr Gerät
nicht abgedeckt wird!
Achten Sie darauf, dass das Gerät
nur von autorisierten Personen
geönet wird!
6 7
Page 5
VOR DER INBETRIEBNAHME
• Bevor Sie Ihr Internetradio, die Streamingfunktionalität oder die Bedienung per Smartphone-
App nutzen können, benötigen Sie:
• Einen schnellen Internetzugang.
• Einen Router, vorzugsweise mit WLAN (kabelloser Zugriffspunkt).
• Falls Ihr Router kein WL AN bietet, können Sie Ihr Gerät auch über ein Ethernetkabel anschlie-
ßen.
• Wählen Sie später bei der Einrichtung des Gerätes zwischen kabellos (WLAN) und Kabelan-
schluss.
• Wenn Ihr kabelloses Netzwerk auf Wired Equivalent Privacy (WEP) oder auf Wi-Fi Protected Ac-
cess (WPA) eingestellt ist, benötigen Sie den WEP oder WPA Code, damit Ihr Internet Radio mit
dem Router Daten austauschen kann.
• Bevor Sie fortfahren, stellen Sie sicher, dass Ihr drahtloses Netzwerk angeschaltet ist und zum
Breitband-Internet Zugang hat.
• Falls Sie Probleme haben, Ihr Gerät mit Ihrem Router zu verbinden, versuchen Sie bitte, diese
mithilfe der Bedienungsanleitung des Routers zu lösen.
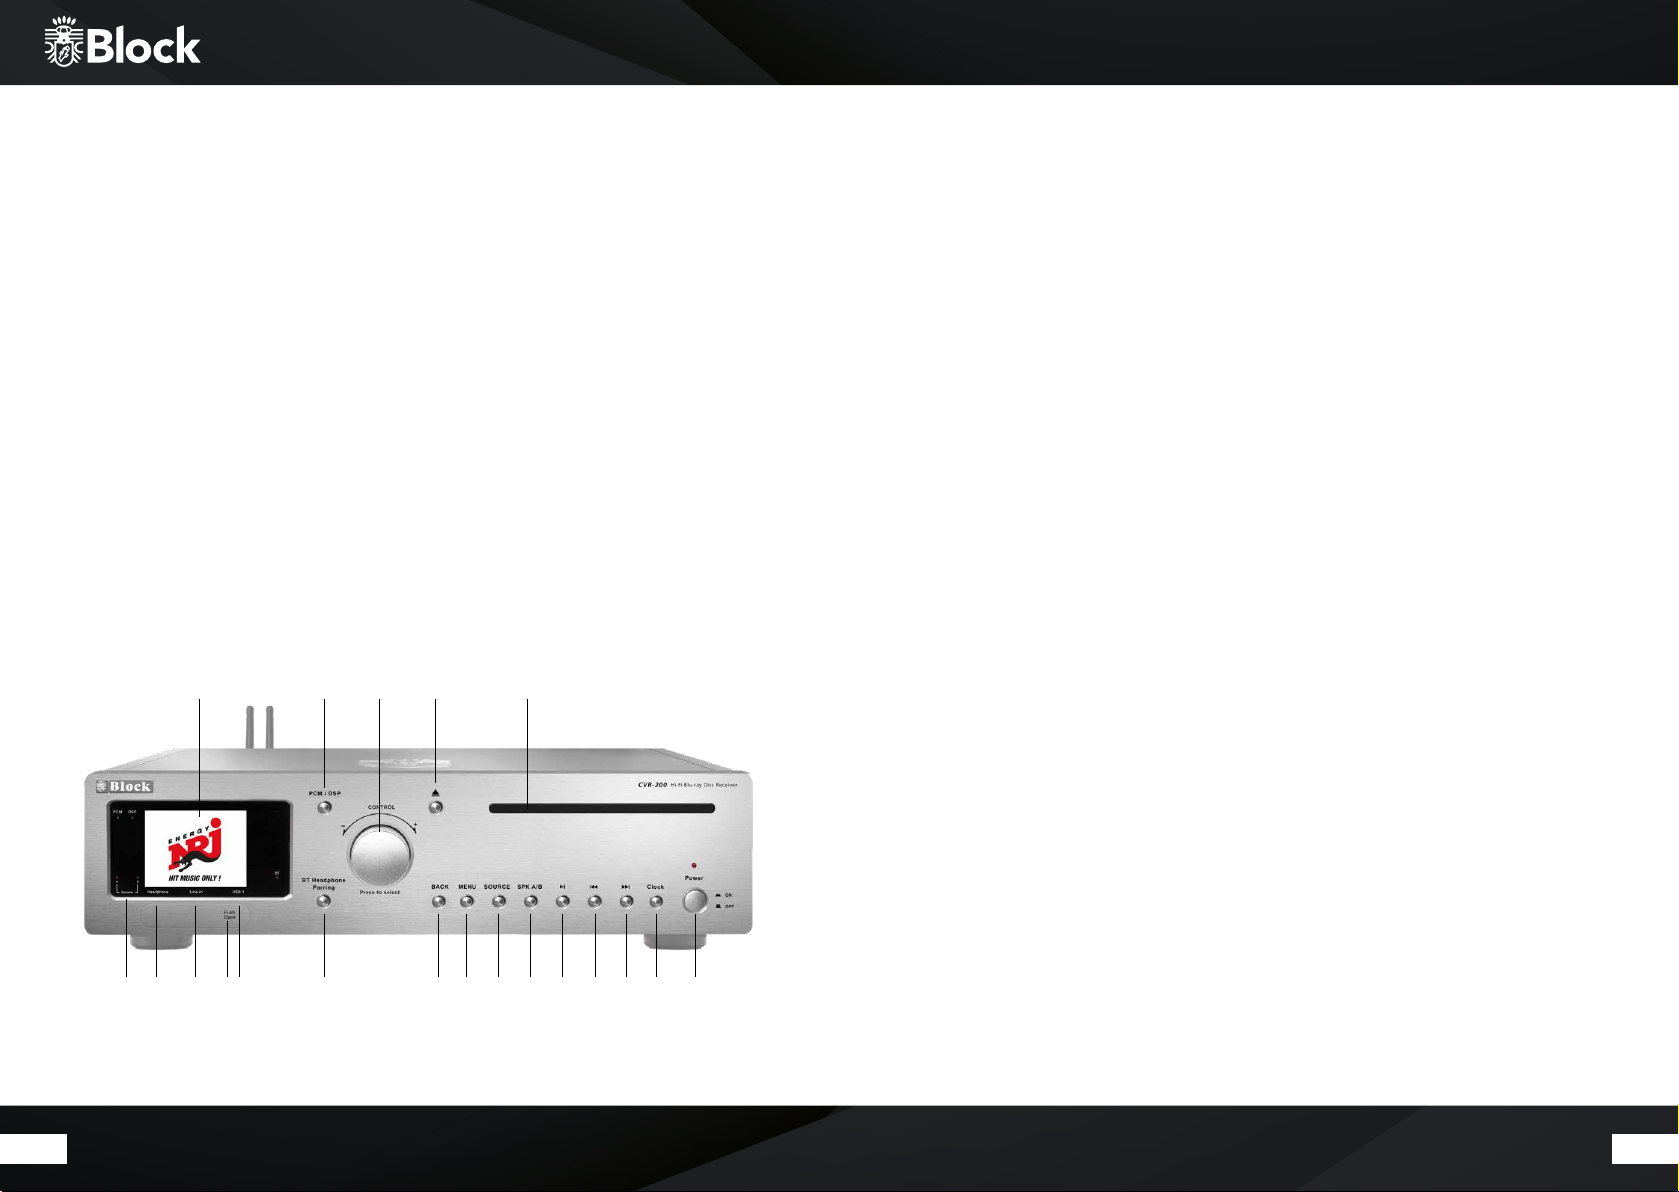
BEDIENELEMENTE AM GERÄT
11 10119
18
BEDIENELEMENTE AM GERÄT
1.
Taste „DISC“: Wir CD/Blu-ray/DVD aus. Beim
ersten Drücken dieser Taste wechselt das Gerät
in die Betriebsart „DISC-Player“.
2. Taste „Wiedergabe/Pause“: Nach einfachem Drü-
cken geht das Gerät auf Pause, nach nochmali-
gem Drücken wird die Wiedergabe fortgesetzt.
Wird diese Taste 5 Sekunden gehalten, wechselt
das Gerät in den Stopp Mode. Die Funktion der
Taste gilt für CD und Medienabspieler.
3. Taste „Vorwärts“: Im Radio-Betrieb sucht das
Gerät beim Drücken der Taste automatisch den
nächst höheren Sender. Im CD- und Medienab-
spieler-Betrieb wechselt das Gerät zum nächs-
ten Titel.
4. Taste „Zur ück“: Im Radio-Bet rieb sucht das Gerä t
beim Drücken der Taste automatisch den nächst
tieferen Sender. Im CD- und Medienabspieler-
Betrieb wechselt das Gerät zum vorherigen Titel.
5. Taste „Source“: Durch wiederholtes Drücken der
Taste werden die Quellen des Gerätes der Reihe
nach durchgeschaltet.
6. 6,3 mm Kopfhörer Anschlussbuchse
7. 3,5 mm Line-In Eingangsbuchse für Medienspie-
ler
8. USB Eingangsbuchse
9. Magnetische Abdeckklappe, zum Önen an der
Seite drücken.
10. Blu-ray / DVD / CD-Fach
11. Farbdisplay
12. Taste „Menü“: Durch Drücken dieser Taste gelan-
gen Sie in das Systemmenü.
13. Taste „Back“: Durch Drücken dieser Taste gelan-
gen Sie zum vorherigen Menüpunkt zurück.
14. Taste „Clock“: Durch Drücken der Taste wechselt
das Display zur Uhrzeit / Datum Anzeige. Nach
nochmaligem Drücken wechselt das Gerät wieder zur letzten Funktion.
15. Taste „Power“: Durch Drücken dieser Taste wird
das Gerät ein- und ausgeschaltet (Echter Netztrennschalter).
16. Anzeige der aktivierten Lautsprecherpaare
17. Taste um zwischen Lautsprecherpaar A, B und
A+B umzuschalten
18. Multifunktionsdrehknopf: Durch links /rechts
Drehung wird die Lautstärke angehoben oder
abgesenkt. Im Menümodus nach Drücken der
Menütaste werden durch Drehung die einzelnen
Punkte angewählt und durch Drücken des Multifunktionsdrehknopfes aktiviert.
19. PCM/DSP Zur Umwandlung von digitalen Mehr-
kanalton in ein Stereosignal
20. Taste BT Parring: Verbinden Sie Ihren Kopfhörer/
Lautsprecher als Ausgabegerät.
616 7 89
12 5 171320 2 4 3 14 15
8 9
Page 6
1
2
4
5
8
11
13
14
15
20
22
24
25
28
29 30
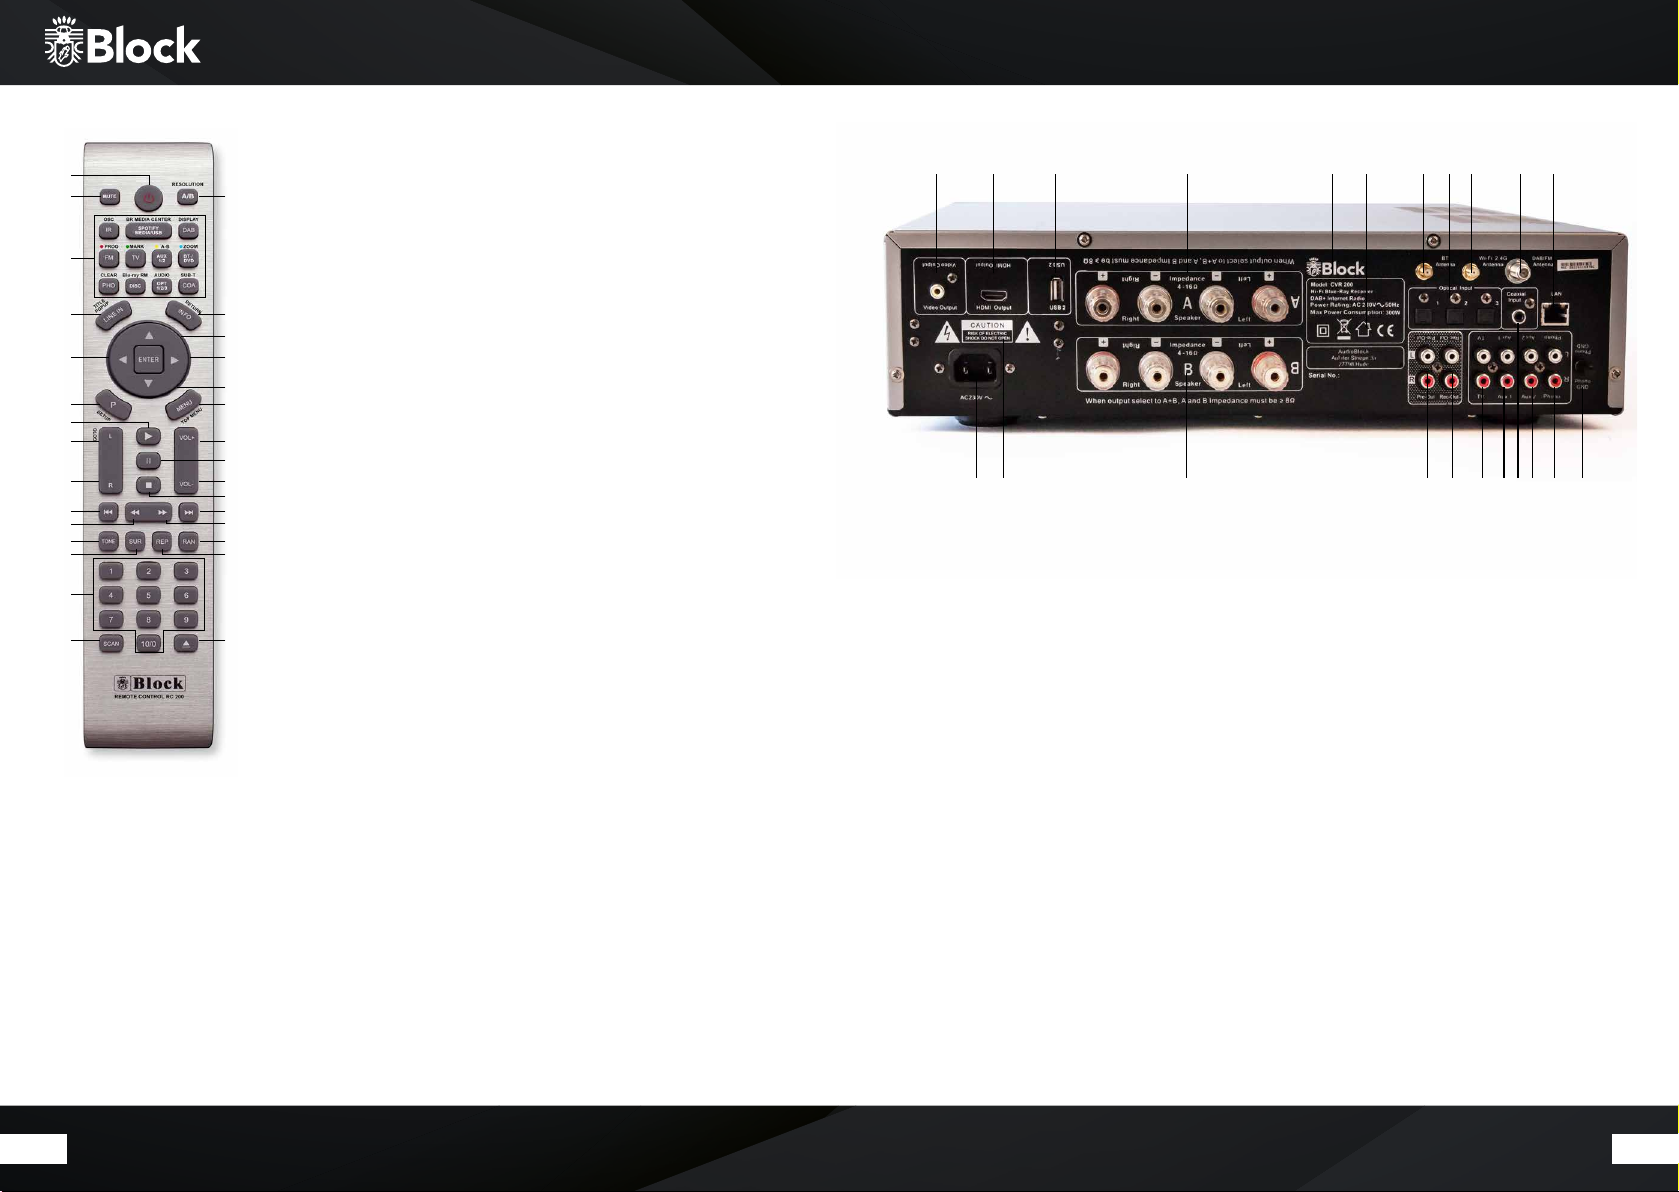
DIE FERNBEDIENUNG Anschlüsse am Gerät
DIE FERNBEDIENUNG
Taste „Standby“: Schaltet das Gerät in den „Clock“ Modus, im Display werden
1.
Uhrzeit und Datum angezeigt. Schalten Sie das Gerät am Netzschalter aus, um
3
6
7
9
10
12
16
18
17
19
21
23
26
27
Energie zu sparen.
2. Taste „Mute“: Schaltet den Ton aus.
3. Taste „A/B“: Schaltet die Ausgabe auf Lautsprecherpaar A , B oder beide.
4. Betriebsarten-Auswahltasten: • IR startet das Internet Radio.•Spotify |Media |
USB: Star tet den Medienab spieler oder die USB -Wiederg abe • Erneutes Dr ücken
schaltet in d en Spotif y-Modus • DAB s tartet de n DAB+ Radioempf ang • FM star tet
den UKW Radioempfang • AUX1 / AUX2 – Mehrmaliges Drücken schaltet durch
externen Eingänge auf der Rückseite des Gerätes.• BT: aktiviert den BluetoothEmpfang • Phono: Aktiviert den rückseitigen Phono-Eingang (Plattenspieler) •
DISC: Star tet den Disc-Modus • OPT: Mehrmaliges Drücken schaltet durch die
optischen Eingänge von 1-3 • COA: Aktiviert den rückseitigen Coaxial-Eingang.
5. Taste „Line-In“: Aktiviert den vorderen Ans chluss hinter der Magnetabdeckung
6. Taste „Info“: Durch Drücken diesen Taste können bei FM-, DAB+, Internetradio
und Medienplayer zusätzliche Informationen abgerufen werden.
7. Pfeil nach oben: Im FM Betrieb um die Frequenz in 0,05 MHz Schritten zu erhö-
hen. Im Menü um die verschieden Punk te anzuwählen.
8. Pfeil nach links: Um im Menü zur vorherigen Einstellung zu gelangen.
9. Pfeil nach rechts: Um im Menü ausgewählte Funktionen aufzurufen.
10. Pfeil nach unten . Im FM Betrieb um die Fre quenz in 0,05 MHz Sc hritten zu ver rin-
gern. Im Menü um die verschiedenen Punkte zu wählen.
11. Ta ste „P“: Ru im Radio -Betrieb v oreingestellte S ender auf oder s peicher t diese.
12. Taste „Menü“: Ru das Systemmenü auf.
13. Taste „Wiedergabe“
14. Taste „Balance“: Verschiebt die Lautsprecherbalance nach links
15. Taste „Balance“: Verschiebt die Lautsprecherbalance nach rechts
16. Taste „Volume +“: Erhöht die Lautstärke
17. Taste „Volume –“: Verminder t die Lautstär ke
18. Taste „Pause“
19. Tas te „ St opp“
20. Taste „Zurück “: Im Radio-Bet rieb sucht das Ger ät den nächst ti eferen Sende r. Im
CD- und Me dienabspieler-Modus spring t das Gerät zum vorherigen Titel.
21. Ta ste „Vorwärt s“: Im Radio-Bet rieb sucht das Ger ät den nächst höhe ren Sender.
Im CD- und Medienabspieler-Modus springt das Gerät zum nächsten Titel.
22. Taste „Schneller Rücklauf“: Nur für CD -Betrieb.
23. Taste „Schneller Vorlauf“: Nur für CD-Betrieb
24. Taste „Ton e“: A ktivier t die Höhen- und Ba ss-Einstellu ng. Das jeweilige Eins tellen
der Werte erfolgt mit den VOL- / VOL+ Tasten.
25. Taste „SUR“: Durch diese Taste werden verschiedene digitale Klangoptimierun-
gen eingeschaltet.
26. Taste „RAN “: Schaltet bei CD-Betrieb die zufällige Wiedergabe an bzw. aus.
27. Taste „REP“: Schaltet bei CD-Betrieb auf automatische Wiederholung.
28. Taste „1 – 10“: Ru im Radio-Betrieb die gespeicherte n Sender auf und wählt im
CD-Betrieb die einzelnen Stücke der CD an.
29. Taste „SCAN“: Sucht im DAB+ Betrieb automatisch alle verf ügbaren Sender.
30. Taste „CD“: Önet und schließt das CD-Fach.
3192021 5 18 6 141716 15
1
2 4 8 9 710 11 11 12 13
ANSCHLÜSSE AM GERÄT
1.
Netzanschluss: Das Netzanschlusskabel darf
keine Beschädigungen oder Defekte aufweisen.
2. Warnhinweise.
3. Lautsprecheranschlüsse A: Bitte achten Sie auf
den richtigen Anschluss von plus und minus!
4. Lautsprecheranschlüsse B: Bitte achten Sie auf
den richtigen Anschluss von plus und minus!
5. Typenbezeichnung und Stromspezifikationen.
6. Optische Eingänge 1-3: Schließen Sie hier ein
optisches digitales Kabel an.
7. Koaxialer Eingang: Schließen Sie hier ein koaxi-
ales Kabel an.
8. Pre-Out Ausgangsbuchsen: Zum Anschluss ei-
nes weiteren Verstärkers oder eines Subwoo-
fers.
9. Rec-Out Buchsen: Zum Anschluss eines Aufnah-
megerätes.
10. TV Eingangsbuchsen: Zum Anschluss eines TV-
Gerätes.
11. AUX 1 und 2 Eingangsbuchsen: Zum Anschluss
eines zusätzlichen Gerätes.
12. Phono Eingangsbuchsen: Zum Anschluss eines
Plattenspielers mit MM-System.
13. Ground-Schraubanschluss: Zum Anschluss ei-
nes Erdungskabels für Plattenspieler.
14. DAB+/ FM Antennenanschluss.
15. LAN Anschlussbuchse für RJ-45 Stecker
(Ethernet).
16. Bluetooth-Antennenanschluss
17. WLAN-Antennenanschluss
18. Prüfzeichen und Entsorgungshinweise.
19. USB 2
20. HDMI Ausgang zum TV
21. Video Ausgang zum TV
10 11
Page 7
Aufbau des Gerätes
Erste Inbetriebnahme und Installation
▶ Schließen Sie die UKW/DAB+ Wur fantenne am Gerät an.
▶ Schließen Sie Ihre Lautsprecher an. Sie können entweder die Verschraubung lösen und abisolierte Ka-
belenden einklemmen oder passende Lautsprecherkabel mit Bananensteckern direkt in die Anschlüsse
stecken. Sie können am CVR-200 zwei verschiedene Lautsprecher paare betreiben, ein Paar auf den mit „ A“
gekennzeichneten Anschlüssen, ein weiteres auf den mit „B“ gekennzeichneten Anschlüssen. Achten Sie
unbedingt auf die richtige Polung von Plus (rot) und Minus (schwarz). Wenn Sie zwei Lautsprecherpaare
an „A“ und „B“ anschließen möchten und diese parallel betrieben werden sollen, müssen beide Lautsprecherpaare mindestens 8 Ohm haben.
▶ Wenn Sie zusätzliche Eingangsquellen wie z.B. vom Tapedeck, TV, Sat-Receiver oder Plattenspieler an-
schließen möchten, verbinden Sie diese Geräte mit den entsprechenden Eingangsbuchsen des CVR-200
mittels passender Kabel. Ihnen stehen hierfür an der Rückseite 3 analoge Eingänge (TV, AUX1, AUX2), 1
analoger Phono-Eingang mit Vorverstärker für Plattenspieler mit MM-System (verbinden sie ein eventuell
vorhande nes Erdungskabe l mit dem Ground-Schr aubanschluss) und vie r digitale Eingänge (3x opti sch und
1x coaxial) zur Verfügung (Seite 11). An der Front steht zusätzlich ein analoger Line-In Anschluss bereit.
▶ Wenn Sie mit einem externen Gerät Aufnahmen der Signalquellen Ihres CVR-200 machen möchten, schlie-
ßen Sie dieses Gerät bitte an die REC-OUT Buchsen an. Dieser Ausgang gibt ein ungeregeltes Signal ohne
Lautstärke- oder Tonregelung des CVR-200 weiter.
▶ Wenn Sie einen weiteren (End-) Verstärker oder einen aktiven Subwoofer am CVR-200 benutzen möchten,
schließen Sie diesen bitte an die Pre -Out Buchsen des CVR-200 an. Dieser Ausgang gibt das vom C VR-200 in
Lautstärke und Tonregelung beeinflusste Signal weiter.
▶ Wenn Sie Ihren CVR-200 kabellos über ein bestehendes WLAN an das Internet anbinden wollen, montieren
Sie bitte die beiliegende WLAN-Antenne.
▶ Wenn Sie von eine m mobilen Gerät wie Smar tphone, Tablet-PC oder Laptop eine Blue tooth-Verbindung zu
Ihrem CVR-200 herstellen möchten, montieren Sie bitte die beiliegende Bluetooth-Antenne.
▶ Wenn Sie Ihren CVR-200 über Ethernet (kabelgebunden) an das Internet anbinden wollen, verbinden Sie
Ihren Router bitte mittels RJ-45 Kabel mit der Ethernet Buchse des C VR-200. (In diesem Fall, wird die WLAN
Antenne nicht benötigt.)
▶ Verbinden Sie den HDMI oder Video-Ausgang mit Ihrem Fernsehgerät.
▶ Schließen Sie das Netzkabel an das Gerät und eine Steckdose an.
Nachdem Sie Ihr Gerät sicher aufgestellt und alle Verkabelungen vorgenommen haben, können Sie Ihren
CVR-200 nun das erste Mal einschalten. Halten Sie bitte für eine eventuelle WLAN Installation Ihr Passwort
(Netzwerkschlüssel) und gegebenenfalls Ihre Netzwerkkennung (SSID) bereit. Nach dem Einschalten startet
der CVR-200 mit dem Einrichtungsassistenten.
Bitte bestätigen Sie die Frage nach dem Starten des Einrichtungsassistenten mit „Ja“Drücken Sie hier für die
Pfeiltasten der Fernbedienung bis „Ja“ aufleuchtet und bestätigen Sie mit der Taste „Enter“.
▶ Wählen Sie Ihr gewünschtes Uhrzeitformat, entweder 12 h oder 24 h Anzeige und bestätigen Sie mit der
Taste „Enter“.
▶ Wählen Sie im nächsten Schritt „Update from Net“. Falls keine Internetverbindung vorhanden ist, wählen
Sie „Update from DAB“ oder „Update from FM“ aus und bestätigen Sie mit der Enter-Taste. Ihr CVR-200
bezieht aus der angewählten Quelle zukünig vollautomatisch bei jedem Start seine Informationen zu
Uhrzeit und Datum.
▶ Bei der folgenden Zeitzoneneinstellung wählen Sie für Deutschland bitte UTC +1:00. Für andere Standorte
wählen Sie bit te Ihre passende Zeit zone aus und bestätigen Sie.
▶ In der folgenden Einstellung geben Sie bitte an, ob an Ihrem Standort zur Zeit Sommerzeit herrscht, dann
wäre die Eingabe „EIN“ richtig.
▶ In der folgend e Abfrage „Verbindung erhalten?“ sollten Sie mit „ Ja“ bestätigen, um Probleme beim Interne-
tempfang und Streaming zu vermeiden.
▶ Bei der Angabe WLAN Region wählen Sie bitte „Größter Teil Europas“.
▶ Es startet jet zt der WLAN Suchlauf und zeigt Ihnen alle gefundenen WLAN-Net ze (SSID) in Ihrer Umgebung
an. Wählen Sie Ihr WL AN-Net zwerk aus . Fall s Ihr WLAN nicht er scheint, könnte die s folgende Gründe hab en:
▷ WLAN Antenne nicht montiert.
▷ WLAN Signal zu schwach am Aufstellungsort (eventuell Antennen am Router und am CVR-200 anders
ausrichten oder einen WLAN-Repeater einsetzen).
▷ WLAN-SSID am Router unterdrückt, wählen Sie zur Eingabe „Manuelle Konfiguration“.
▷ Wenn Sie statt über WLAN den CVR-200 mit einem Ethernet-Kabel mit Ihrem Router verbinden
möchten, wählen Sie „Kabel“.
Falls Ihr Router WPS unterstützt, wählen Sie „Taste drücken“ und drücken Sie anschließend die entsprechende
Taste am Router. Alternativ können Sie auch „WPS überspringen“ auswählen und anschließend Ihr Netzwerkpasswort (WEP oder WPA) eingeben. In beiden Fällen sollten beide Geräte anschließend verbunden sein.
12 13
Page 8
Manuelle Installation WLAN
DER VERSTÄRKER
Sollten bei der Einrichtung mittels Assistenten Probleme aufgetreten sein, oder Sie eine
manuelle Einrichtung vornehmen wollen, gehen Sie bitte wie folgt vor:
▶ Drücken Sie die Taste „Menü“ auf der Fernbedienung. Wählen Sie erst „Systemeinstellungen“, dann „Inter-
neteinstellungen“, dann „Manuelle Einstellungen“, dann „Drahtlos“ mit Hilfe der Pfeiltasten auf der Fernbedienung.
▶ Wählen Sie im nächsten Schritt „DHCP ak tiv“ aus. Dies ist die Standardeinstellung aller gebräuchlichen In-
ternetrouter und nimmt Ihnen eine langwierige Net zwerkkonfiguration ab.* Bestätigen Sie die Einstellung.
▶ Geben Sie nun den Namen Ihres WLAN-Netzwerkes (SSID) ein, achten Sie auf korrekte Schreibweise und
Groß-/Kleinschreibung. Bestätigen Sie mit „Enter“.
▶ Wählen Sie nun die Ar t Ihres Passwor tschutzes aus (in der Regel WPA2 und AES). Konsultieren Sie im Zwei-
fel das Handbuch Ihres Routers.
▶ Geben Sie nun das Passwort Ihres WLAN- Netzwerkes ein, achten Sie auf korrekte Schreibweise und Groß-/
Kleinschreibung. Bestätigen Sie mit „Enter“.
▶ Der Router und Ihr CVR-200 sollten nun verbunden sein und ein Internetzugang bestehen,das Gerät zeigt
die Anzeige „Verbunden“.
Manuelle Installation Kabel (Ethernet)
Sollten Sie auf eine WLAN Verbindung verzichten wollen und den CVR-200 mittels Kabel
(Ethernet) an Ihren Router anschließen wollen, gehen Sie bitte wie folgt vor:
▶ Verbinden Sie eine freie LAN-Buchse an Ihrem Router und die LAN-Buchse am CVR-200 mit einem Ether-
netkabel (RJ-45).
▶ Drücken Sie die Taste „Menü“ am Gerät oder auf der Fernbedienung. Wählen Sie erst „Systemeinstellun-
gen“, dann „Interneteinstellungen“, dann „Manuelle Einstellungen“, dann „Kabel“.
▶ Wählen Sie im nächsten Schritt „DHCP ak tiv“ aus. Dies ist die Standardeinstellung aller gebräuchlichen In-
ternetrouter und nimmt Ihnen eine langwierige Net zwerkkonfiguration ab.* Bestätigen Sie die Einstellung.
▶ Der Router und Ihr CVR-200 sollten nun verbunden sein und ein Internetzugang bestehen, das Gerät zeigt
die Anzeige „Verbunden“.
* Sollten Sie die DHCP Funktion an Ihrem Router deaktiviert haben, wählen Sie bitte „DHCP inaktiv“ aus. In diesem Fall müssen Sie das Netzwerk
anschließend selbstständig konfigurieren, die dafür geltenden Regeln und Angaben sollten Ihnen bekannt sein. Für die erweiterte Konfiguration benötigen Sie eventuell die MAC-Adresse Ihres Block-Gerätes. Diese finden Sie unter Hauptmenü/Systemeinstellungen/Interneteinstellungen/Einstellungen
anzeigen/Mac-Adresse
Der CVR-200 ist mit einem hochwertigen Class-AB Verstärker mit einer Leistung von 2 x 100 Watt an 4 Ohm
(RMS) ausgestattet.
Mit folgenden Einstellungen können Sie das Klangbild verändern:
Lautstärke:
Mit den Tasten „VOL+“ und “VOL-“ auf Ihrer Fernbedienung oder am Gerät mit dem Multifunktionsdrehknopf
können Sie die Gesamtlautstärke des CVR-200 verändern. Bitte beachten Sie, dass bei verschiedenen Signalquellen bei gleicher Lautstärkeeinstellung am CVR-200 unterschiedliche Raumlautstärken aureten können.
Dies ist kein Defekt, sondern wird durch unterschiedliche Eingangspegel der angeschlossenen Signalquellen
verursacht. Sie können Die Lautstärkeregelungen für Lautsprecher Paar A oder B getrennt individuell einstellen. Lassen Sie beide Paara gleichzeitig laufen, wird die geringere Lautstärke übernommen und kann dann
angepasst werden.
Balance:
Mit den Tasten „L“ und „R“ auf Ihrer Fernbedienung können Sie die Balance zwischen den beiden
Lautsprechern verändern und somit den Klangmittelpunkt im Raum verschieben.
Bass:
Drücken Sie die Taste „Tone“ auf der Fernbedienung so o, bis im Display „Bass“ erscheint. Mit den Tasten
„VOL+“ und “VOL-“ auf Ihrer Fernbedienung können Sie nun den Bass anheben oder senken. Diese Funktion
deaktiviert sich nach kurzer Zeit.
Höhen:
Drücken Sie die Taste „Tone“ auf der Fernbedienung so o, bis im Display „Treble“ erscheint. Mit den Tasten
„VOL+“ und “VOL-“ auf Ihrer Fernbedienung können Sie nun die Höhen anheben oder senken. Diese Funktion
deaktiviert sich nach kurzer Zeit.
DSP-Einstellungen (Digital Sound Processing):
Drücken Sie die Taste „SUR“
Durch wiederholtes drücken dieser Taste werden verschiedene digitale Klangoptimierungen wie „Normal“,
„Live“, „Jazz“, „Rock“, „Hall“, „Classic“, „Pop“ und „Stadion“ eingeschaltet, mehrmaliges Drücken schaltet durch
die verschiedenen Modi hindurch. Probieren Sie aus, welche Einstellung Ihnen am Besten gefällt, im Modus
„Normal“ ist diese Funktion deaktiviert.
14 15
Page 9
DAS UKW RADIO
DAS DAB+ RADIO
Sie können Ihr UKW-Radio sowohl mit der beiliegenden Kombiantenne für UKW- und DAB+ Empfang, als auch
mit einer Hausantenne (Adapter liegt bei) nutzen. Das UKW-Radio können sie sowohl mit der Fernbedienung,
Taste „FM“ als auch am Gerät durch mehrmaliges Drücken der Taste „Source“ aktivieren.
Erstes Einrichten:
▶ Drücken Sie die Taste „Scan“ auf Ihrer Fernbedienung. Der Tuner sucht nun nach dem nächsten
verfügbaren Sender.
▶ Wenn Sie diesen Sender als Favoriten speichern möchten, drücken Sie nun die Taste „P“ auf der Fernbe-
dienung, wählen mit den Pfeiltasten einen freien Speicherplatz und drücken Sie „Enter“, bis die Meldung
„gespeichert“ erscheint. Sie können nun im Betrieb diesen Sender über die jeweilige Taste auf dem Nummernblock der Fernbedienung abrufen. Sie können jederzeit einmal belegte Senderspeicher auf diese
Weise auch mit neuen Sendern überspeichern.
▶ Wiederholen Sie die Schritte 1-2 so o, bis Sie alle gewünschten Sender gespeichert haben oder das Fre-
quenzband einmal durchlaufen ist. Sie können bis zu 10 Sender auf den entsprechenden Nummerntasten
speichern.
▶ Benutzen Sie bitte das kleine gelbe Empfangsqualitätssymbol in der unteren rechten Ecke des Displays,
um Ihre Antenne optimal auszurichten.
Im täglichen Betrieb:
▶ Starten Sie das UKW-Radio mit der Taste „FM“ auf Ihrer Fernbedienung.
▶ Über den Nummernblock Ihrer Fernbedienung können Sie Ihre gespeicherten Senderjederzeit wieder
abrufen.
▶ Das Radio verfügt über RDS, es werden aktuelle Informationen zum Programm wie z. B. Titel, Genre etc.
(abhängig vom Sender) im Display angezeigt. Durch ein- bis mehrmaliges Drücken der Taste „Info“ auf
Ihrer Fernbedienung können Sie weitere Informationen abrufen.
▶ Mit der Taste „Pfeil nach links“ auf der Fernbedienung (Seite 10/Punkt 8) können Sie weitere Einstellungen
am Gerät aufrufen:
▷ Suchlauf-Einstellungen: „Nur starke Sender“ - Ja/Nein
▷ Audio-Einstellungen: „Nur Mono“ Ja/Nein (Bei stark rauschenden Sendern „JA“ auswählen).
▶ Mit den Tasten „Vor“ und „Zurück“ können Sie auf dem Frequenzband zum nächst höheren oder tieferen
verfügbaren Sender wechseln.
Sie können Ihr DAB+ Radio sowohl mit der beiliegenden Kombiantenne für UKW- und DAB+ Empfang, als auch
mit einer Hausantenne betreiben. Ein Anschluss an das Kabelnetz ist zur Zeit nicht möglich, da die DAB+ Sender leider nicht eingespeist werden. Das DAB+ Radio können sie sowohl mit der Fernbedienung, Taste „DAB“,
als auch am Gerät durch mehrmaliges Drücken der Taste „Source“ aktivieren.
Erstes Einrichten:
▶ Drücken Sie die Taste „DAB“ auf Ihrer Fernbedienung. Es startet ein automatischer Suchlauf. Nach Ab-
schluss des Suchlaufes werden alle gefundenen Sender als Liste auf dem Display dargestellt.
▶ Wählen Sie mit den Pfeiltasten auf der Fernbedienung den gewünschten Sender aus und bestätigen Sie
mit der Taste „Enter“. Wenn Sie diesen Sender als Favoriten speichern möchten, drücken Sie nun die Taste
„P“ auf der Fernbedienung, wählen mit den Pfeilt asten einen freien Speicherplatz und drücken Sie „Enter “,
bis die Meldung „gespeichert“ erscheint . Sie können nun im Betrieb diesen Sender über die jeweilige Taste
auf dem Nummernblock der Fernbedienung abrufen. Sie können jederzeit einmal beleg te Senderspeicher
auf diese Weise auch mit neuen Sendern überspeichern.
▶ Drücken S ie die Tas te „Pfeil links“ auf der Fe rnbedienung um zur Lis te zurückzuke hren. Wiederho len Sie die
Schrit te 2-3 so o, bis Sie alle gew ünschten Sender ge speichert ha ben. Sie können bis zu 10 Sen der auf den
entsprechenden Nummerntasten speichern.
▶ Benutzen Sie bitte das kleine gelbe Empfangsqualitätssymbol in der unteren rechten Ecke des Displays,
um Ihre Antenne optimal auszurichten.
Im täglichen Betrieb:
▶ Starten Sie das DAB+ Radio mit der Taste „DAB“ auf Ihrer Fernbedienung.
▶ Über den Nummernblock Ihrer Fernbedienung können Sie gespeicherte Sender abrufen.
▶ Das DAB+ Radio verfügt über digitale Textfunktionen, die Ihnen im Display angezeigt werden. Durch ein-
bis mehrmaliges Drücken der Taste „Info“ auf Ihrer Fernbedienung können Sie je nach Sender weitere Informationen abrufen, mit der Taste „Enter“ schalten Sie die Darstellung auf Vollbild.
▶ Durch einmaliges Drücken der Taste „Pfeil nach links“ auf der Fernbedienung gelangen Sie zurück in die
komplette Senderliste.
▶ Durch zweimaliges Drücken der Taste „Pfeil nach links“ auf der Fernbedienung können Sie weitere Ein-
stellungen am Gerät aufrufen. Die Funktion DRC ist in Deutschland ohne Bedeutung, da die DAB+ Sender
diese nicht unterstützen, die Funktion „Ungültige kürzen“ entfernt nicht empfangbare Sender, z. B. nach
einem Umzug.
▶ Mit den Tasten „Vor“ und „Zurück“ können Sie innerhalb des Bouquets zum nächst höheren oder tieferen
Sender wechseln.
16 17
Page 10
Das Internetradio
DER MEDIENSPIELER (USB-FRONTANSCHLUSS)
Wenn Sie Ihren CVR-200 wie auf Seite 13 beschrieben an das Internet angeschlossen haben, können Sie nun
ohne weitere Einstellungen Internetradio empfangen. Ihr Internetradio verbindet sich vollautomatisch mit
einer der größten Datenbanken für Internet sender, in der weit über 25.000 Sender und Podcasts weltweit
gelistet sind. Das Internetradio können Sie sowohl mit der Fernbedienung, Taste „IR“ als auch am Gerät durch
mehrmaliges Drücken der Taste „Source“ aktivieren.
Im täglichen Betrieb:
▶ Starten Sie das Internetradio mit der Taste „IR“ auf Ihrer Fernbedienung.
▶ Auswahl von Sendern:
▷ Durch Drücken der Taste „Menü“ auf der Fernbedienung und Auswahl von „Zuletzt gehört“ werden Ih-
nen alle zulet zt gehörten Sender angezeigt.
▷ Durch Drü cken der Taste „Menü“ auf der Fe rnbedienung un d Auswahl von „Se nderliste/Ör tlich Deut sch-
land“ werden Ihnen alle deutschen Sender angezeigt, entweder alle verfügbaren Sender, nur die
beliebtesten, oder nach Genres sortiert.
▷ Durch Drücken der Taste „Menü“ auf der Fernbedienung und Auswahl von „Senderliste/Sender“ wer-
den Ihnen alle weltweit verfügbaren Sender angezeigt, entweder sortiert nach Land, Genre, populären
Sendern oder neuen Sendern. Sie haben hier auch die Möglichkeit, nach einem Sender durch Eingabe
des Namens zu suchen.
▶ Sie können wie bei der UKW oder DAB+ Funktion beschrieben, Sender auf den Nummernblock der
Fernbedienung speichern.
▶ Das Radio verfügt über digitale Textfunktionen, es werden aktuelle Informationen zum Programm wie z.
B. Titel, Genre etc. im Display angezeigt. Durch ein- bis mehrmaliges Drücken der Taste „Info“ auf Ihrer
Fernbedienung können Sie je nach Sender weitere Informationen abrufen.
Sie können einen Wechseldatenträger (z. B. USB-Stick oder USB-Festplatte mit eigener Stromversorgung) an
dem USB-Frontanschluss Ihres CVR-200 anschließen. Dieses Speichermedium muss FAT 32 formatiert sein, um
vom CVR-200 eingelesen werden zu können. Je nach Hersteller des Speichermediums kann dieser möglicherweise in seiner Größe beschränkt sein.
Der CVR-200 erkennt MP3-, WMA- und FL AC-Dateien mit einer maximalen Samplingrate von 48 KHz bei 16 Bit
(FLAC) und 320 kBit/s (MP3 und WMA).
Den USB-Medienspieler können sie sowohl mit der Fernbedienung, Taste „Media/USB“, als auch am Gerät
durch mehrmaliges Drücken der Taste „Source“ aktivieren.
Wählen Sie aus dem angezeigtem Menü „USB Abspielen“ aus, um Musik von Ihrem eingesteckten Speicherme dium abzuspielen. Der CVR-200 stellt Ihnen den Inhalt des Mediums auf dem Display dar. Innerhalb der Liste
können sie mit Hilfe der Pfeiltasten auf Ihrer Fernbedienung navigieren und die gewünschten Titel oder Ordner
mit „Enter“ auswählen und abspielen.
Sie können eigene Playlisten erstellen, indem Sie ein Musikstück auf dem Stick auswählen und dann den
Multifunktionsknopf am Gerät oder die Taste „Enter“ auf der Fernbedienung gedrückt halten. Dadurch wird das
Musikstück Ihrer Playliste hinzugefügt.
Die USB-Funktion ist in der Lage, zusät zliche gespeicherte Informationen zu den Titeln,
z. B. MP3- Tags auszulesen. Durch ein- bis mehrmaliges Drücken der Taste „Info“ auf Ihrer Fernbedienung
können Sie je nach Datei diese Informationen abrufen.
Zusätzliche Funktionen im Medienspieler Menü:
▶ Wiederholen: Bei angeschalteter Funktion werden einzelne Stücke, Playlisten oder der gesamte Inhalt
erneut abgespielt.
▶ Shule: Bei eingeschalteter Funktion werden Stücke innerhalb einer Playlist oder der gesamte Inhalt nach
dem Zufallsprinzip abgespielt.
18 19
Page 11
Der Medienspieler (DLNA)
MUSIK STREAMEN
Ihr neuer CVR-200 ist DLNA (Digital Living Network Alliance) zertifiziert. Das heißt Sie können nach dem DLNA
Standard auf entsprechende Musikquellen in Ihrem Heimnetzwerk zugreifen.
Wenn Sie Ihren CVR-200 wie auf Seite 13 beschrieben an Ihren Router angeschlossen haben, und dieser über
einen USB-Anschluss verfügt, können Sie auf dessen NAS-Funktionalität (Network Attached Storage) zurückgreifen. Schließen hierfür einfach eine handelsübliche USB-Festplatte an Ihren Router an und aktivieren Sie in
dessen Konfiguration die NAS-Funktionalität oder schließen Sie ein NAS-Laufwerk an Ihr Netz an. Ziehen Sie
bei Problemen, oder für weitere Hinweisen zur NAS-Funktionalität Ihres Routers bitte die Bedienungsanleitung
des Routers zu Rate. Auf diese Festplat te oder das NAS-Laufwerk können Sie dann nach Belieben Musikstücke
oder Ordner aufspielen. Dies ist die bei weitem günstigste Möglichkeit, für alle Ihre Geräte im Haushalt einen
einheitlichen DLNA-Medienserver zu installieren. Aktivieren Sie nun den Medienspieler, indem Sie auf der Fernbedienung die Taste „Media/USB“ drücken. Wählen Sie aus dem angezeigtem Menü „Gemeinsame Medien“
aus, um eine Liste aller als Medienser ver geeigneten Geräte in Ihrem Net zwerk einzusehen. Wählen Sie Ihren
installierten Medienserver aus und anschließend den Punkt „Musik“.
Die Inhalte Ihrer Festplatte werden Ihnen nun nach verschiedenen Gesichtspunkten wie z. B. „Interpreten“, „Alben“, „Alle Titel“, „Genres“ oder „Order“ vorsortier t angezeigt. Die Qualität dieser Sortierung hängt unmittelbar
mit der Qualität der aufgespielten Daten auf der Festplatte zusammen, sollten dor t z.B. die MP3-Tags fehlen,
werden die Musikstücke auch nicht gut vorsortiert.
Innerhalb der jeweiligen Listen können sie mit Hilfe der Pfeiltasten auf Ihrer Fernbedienung navigieren und
die gewünschten Titel oder Ordner mit „Enter“ auswählen und abspielen. Sie können am CVR-200 eine eigene
Playliste anlegen, indem sie bei ausgewählten Stücken die Taste „Enter“ lange gedrückt halten. Das aktuelle
Stück wird dann der Playliste hinzugefügt.
Die Medienspieler Funktion ist in der Lage, zusätzliche gespeicherte Informationen zu den Titeln, z. B. MP3Tags auszulesen. Durch ein- bis mehrmaliges Drücken der Taste „Info“ auf Ihrer Fernbedienung können Sie je
nach Datei diese Informationen abrufen.
Der DLNA-Medienspieler interpretiert MP3-, WMA- und FLAC-Dateien mit einer maximalen Streamgröße von 1,5
MBit/s. Andere Dateiformate können von vielen Routern mit NAS-Funktionalität schon direkt beim Streamen
auf ein vom CVR-200 Format konvertier t werden.
Lesen Sie hierzu bitte die Betriebsanleitung Ihres Routers.
Unter dem „Streamen“ von Musik im Heimbereich versteht man das Übertragen von Musikdaten von einem
externen Gerät wie einem Computer, Tablet-PC oder Smartphone an ein Abspielgerät wie z. B. Ihrem CVR-200.
Voraussetzung ist, dass diese Geräte sich im selben Net zwerk befinden (WLAN oder LAN). Wir stellen Ihnen
hier kurz für die gängigsten Geräte Streaming-Lösungen vor:
Apple® PC (Mac OS X®)
▶ Eine Nutzung der Airplay® Funktion von iTunes® ist mit dem CVR-200 nicht möglich.
▶ Trotzdem können Sie mit dem Apple Macintosh® streamen: Bitte installieren Sie einen Streaming-Server
wie z. B. die kostenlose Soware „Serviio®“*(www. http://serviio.org/download) und starten Sie diese.
Über die Funktion „Media/USB - Gemeinsame Medien“ finden Sie nun einen Ser viio®-Server, über welchen
Sie auf alle Musikstücke Ihres Apple Macintosh zugreifen können. Bei Problemen oder für weitere Informationen lesen Sie bitte die Installationsanleitung von Serviio®.
Windows® PC
▶ Ab Version 8 ist im Windows Media Player®* eine Streaming-Funktion integriert .
▶ Bitte aktivieren Sie diese (siehe Bedienungsanleitung von Windows Media Player®): Sie können anschlie-
ßend über die Funktion „Media/USB - Gemeinsame Medie n“ auf alle Musikstücke des Windows Media Player zugreifen. Bei Problemen oder für weitere Informationen lesen Sie bitte die Bedienungsanleitung von
Windows Media Player.
Streamen von Smartphone oder Tablet PC (Android®)
▶ Bitte lesen Sie die beiliegende Bedienungsanleitung für die App „
sik Ihres Android-Gerätes auf dem CVR-200 wiedergeben können. Viele aktuelle Android-Geräte verfügen
von sich aus schon über eine Funktion, um Musik auf einem DLNA Gerät wiederzugeben. Diese müssen in
der Regel auf Ihrem Android-Gerät als Medienserver freigegeben werden. Bitte lesen Sie hierzu auch die
Bedienungsanleitung Ihres Android-Gerätes.
UNDOK™
“ um zu erfahren,wie Sie die Mu-
Streamen von iPod®, iPhone® oder iPad® Geräten oder Tablet PC (iOS®)
▶ Bitte lesen Sie die beiliegende Bedienungsanleitung für die App „
sik Ihres iOS-Gerätes auf dem CVR-200 wiedergeben können. Damit die App „
von z.B. iTunes® zugreifen kann, *müssen Sie eine App wie z. B. das kostenlose „media:connect“ installieren und vorher starten.
UNDOK™
“ um zu erfahren, wie Sie die Mu-
UNDOK™
“ auf die Bibliothek
Streamingdienste
Zur Zeit sind eine Vielzahl an Streamingdiensten mit unterschiedlichsten Technologien am Markt. Wenn Sie
diese auf Ihrem CVR-200 nut zen möchten, verbinden Sie einfach Ihren CVR-200 mittels Bluetooth mit Ihrem
Handy, Tablet oder PC wählen Sie dort diesen als Ausgabegerät.
* Die Audio block GmbH ka nn leider keine G arantie für di e vollständ ige Funktions fähigkeit o der Richtigk eit der Besc hreibungen vo n Soware vo n
Fremdherstellern übernehmen, da diese ständigen Weiterentwicklungen oder Veränderungen unterliegen, die von der Audioblock GmbH nicht
beeinflusst werden können.
20 21
Page 12
SO NUTZEN SIE CONNECT (SPOTIFY)
Anlernen von Fremdfernbedienungen
Sie brauchen Spotify Premium, um Connect nut zen zu können. Details finden Sie auf dem beiliegenden Flyer.
▶ Stellen Sie mit Ihrem neuen Gerät eine Verbindung zu demselben WLAN-Netzwerk her, mit dem auch Ihr
Handy, Tablet oder PC verbunden ist (weitere Informationen finden Sie in der Gebrauchsanweisung).
▶ Önen Sie die Spotify-App auf ihrem Handy, Tablet oder PC und spielen Sie einen Song ab. Wenn Sie die
App auf Ihrem Handy nutzen, tippen Sie links unten im Bildschirm auf das Bild zum Song. Tablet- und PC-
Benutzer fahren bitte mit Schritt 4 fort.
▶ Tippen Sie auf das Connect-Symbol.
▶ Wählen Sie Ihr Gerät aus der Liste aus. Wenn es Ihnen nicht angezeigt wird, stelle Sie sicher, dass es mit
demselben WLAN-Netzwerk wie Ihr Handy, Tablet oder PC verbunden ist.
Fertig! Viel Spaß beim Musik hören!
Fernbedienung des Gerätes mit der App „UNDOK™“*
Wenn Sie ein iPhone®, iPod® oder iPad® besit zen, gehen Sie bitte in den Apple App-Store® und suchen Sie nach
dem Begri „undok“. Wichtig: Wählen Sie vorher „iPhone-Apps“ aus! Besitzen Sie ein Android-Gerät (Tablet-PC
oder Smar tphone), besuchen Sie Googles Play-Store® und suchen Sie nach dem Begri „undok“. Installieren
Sie anschließend die gefundene kostenlose APP auf Ihrem mobilen Gerät. Ganz wichtig: Für die Bedienung Ihres CVR-200 müssen Smar tphone/Tablet und der CVR-200 im selben WLAN-Netz angemeldet und der CVR-200
muss eingeschaltet sein!
▶ Starten Sie jetzt die App „UNDOK ™“. Die App sucht jetzt alle DLNA-fähigen Geräte im WLAN.
▶ Bitte wählen Sie Ihren CVR-200 aus den gefundenen Geräten aus.
▶ Ihr CVR-200 ist nun mit der App „UNDOK™“ verbunden und Sie können das Gerät fernbedienen:
▷ Funktion „Quelle“: Wählen Sie unter den verfügbaren Signalquellen die Gewünschte aus.
▷ Funktion „Durchsuchen“: Je nach gewählter Signalquelle sind hier die verschiedenen Optionen der
Signalquelle auswählbar. Bitte lesen Sie für eine Übersicht der Funktionen die jeweiligen Kapitel zu den
Signalquellen in dieser Bedienungsanleitung.
▷ Funktion „ Jetzt läu “: Ste llt Informationen und C over (falls vorhande n) z u dem aktuell gesp ielten Stück
oder Radiosender zur Verfügung.
▷ Zusatzfunktionen „Einstellungen“: Über dieses Menü können Sie das Gerät aus- und einschalten, die
Ton-Einstellungen verändern, die App beenden und weitere Einstellungen vornehmen.
*Für weite re Funktion en der App, z. B. d er Konfigura tion von Multi room-Syste men lesen Si e bitte die bei liegende Anl eitung „UNDOK ™ “.
Ihr CVR-200 kann die Codes von anderen Fernbedienungen lernen, z. B. von einer
Fernseherfernbedienung. Gehen Sie dazu wie folgt vor:
▶ Drücken Sie die Taste „Menü“ am Gerät für 3 Sekunden, das Gerät geht dann in den Lernmodus.
▶ Im Display erscheint: „Taste auf Block-FB drücken“. Drücken Sie nun eine Taste auf der Block-Fernbedie-
nung um eine zu übertragende Funktion auszuwählen.
▶ Im Display erscheint: „Code von Block-FB akzeptiert“ und kurz danach „Bitte Taste Fremd-FB drücken“.
Drücken Sie nun die Taste auf der Fremdfernbedienung die später die zu über tragende Funktion auslösen
soll.
▶ Im Display erscheint: „Tastencode wurde uebertragen“. Die Anzeige springt wieder zum 1. Punkt.
▶ Wiederholen Sie diese Schritte bis Sie alle Funktionen (maximal 50) an Ihre Fremdfernbedienung über-
tragen haben. Verlassen Sie die Programmierung indem Sie erneut die Taste „Menü“ am Gerät drücken.
Sollten Sie eine Taste falsch programmiert haben, wiederholen Sie einfach alle Schritte mit den richtigen
Tasten, das Gerät überschreibt dann die fehlerhaen Einstellungen.
▶ Zum Löschen aller Programmierungen drücken und halten Sie die „Back“ Taste am Gerät.
Externe Geräte über Bluetooth® anschließen
Ihr Gerät ist mit einer modernen Bluetooth®-Schnittstelle ausgestattet. Über diese können Sie jede beliebige Bluetooth®-Quelle mit dem CVR-200 koppeln. Mögliche Signalquellen sind Smartphones (iOS, Android,
Windows Phone), Tablet-PCs (iOS, Android, Windows 8) oder Medienspieler (iPod, ähnliche) mit Bluetooth®Funktion. Zum Aktivieren der Bluetooth®-Funktion drücken Sie am Gerät so o die Taste „Source“ bis Blue
tooth® im Display erscheint und aktivieren Sie bei Ihrem externen Gerät die Bluetoothfunktion.
Koppeln eines externen Gerätes mit dem CVR-200: Suchen Sie auf Ihrem externen Gerät nach bluetoothfä
higen Geräten in Ihrer Umgebung , wählen Sie Ihren CVR-200 aus und starten Sie das Pairing (Kopplung der
Geräte). Ziehen Sie bei Problemen, oder für weitere Hinweisen zum Pairing bit te die Bedienungsanleitung des
Gerätes zu Rate, welches Sie mit Ihrem CVR-200 koppeln möchten. Anschließend können Sie die Musikab
spielfunktion Ihres externen Gerätes aktivieren und Ihr CVR-200 spielt die Musik ab. Bitte beachten Sie, dass
Sie mit der integrierten Bluetoothfunktion ausschließlich Signalquellen koppeln können.
-
-
-
Verbinden Sie Ihren Bluetoothkopfhörer mit dem CVR-200
Mit dem CVR-200 haben Sie die Möglichkeit einen Bluetoothkopfhörer via Bluetooth zu verbinden. Bitte schalten Sie hierzu Ihren Kopfhörer in den Pairingmodus. Drücken Sie auf dem Gerät die
ring“ , nun schaltet Ihr CVR-200 in diesen Modus. Anschließend drücken Sie die Taste erneut. In diesem Modus
verbindet sich der CVR-200 automatisch mit Ihrem Kopfhörer (die Verbindung erfolgt nach ca. 10 Sekunden).
Möchten Sie den
Sekunden gedrückt.
Pairing
modus wieder ausschalten, halten Sie bitte die Taste „BT Headphone
Tast e „BT Headphone Pai-
Pairing
“ für ca. 3
22 23
Page 13
Einrichten und Bedienen von Multiroom-Systemen
Um Ihren CVR-200 in ein Multiroom-System einzubinden, z. B. mit der Smartbox SB-100 von Audioblock, lesen
Sie bitte die beiliegende Anleitung zur App „UNDOK™“, welche zur Konfiguration zwingend erforderlich ist.
Die optischen Anschlüsse
Die rückwärtigen optischen Anschlüsse des CVR-200 (auch S/PDIF® oder auch TOSLINK®) verarbeiten Lichtwellensignale in digitaler Form. Diese Anschlüsse sind besonders geeignet für externe CD-Spieler, Dat-Rekorder
oder auch viele moderne Fernseher. Bei den meisten Fernsehern muss die optische Audio-Ausgabe im Menü
des Fernsehers erst aktiviert werden. Bitte ziehen Sie die Bedienungsanleitung des externen Gerätes für den
Anschluss zu Rate. Ein geeignetes Kabel erhalten Sie im Zubehörhandel.
Der coaxiale Anschluss
Der rückwärtige coaxiale Anschluss de s CVR-200 verarbeitet Audiosignale in digitaler For m. Dieser Anschluss ist
besonders geeignet für externe CD-Spieler, Dat-Rekorder oder Sat-Receiver. Bitte ziehen Sie die Bedienungsanleitung des externen Gerätes für den Anschluss zu Rate. Ein geeignetes Kabel erhalten Sie im Zubehörhandel.
DIE AUX-Anschlüsse
Die rückwärtigen AUX-Anschlüsse des CVR-200 verarbeitet elektrische Hochpegel-Audiosignale in analoger
Form. Dieser Anschluss ist geeignet für alle externen Geräte mit analoger Audioausgabe. Bitte ziehen Sie die
Bedienungsanleitung des externen Gerätes für den Anschluss zu Rate. Ein geeignetes Cinch-Kabel erhalten Sie
im Zubehörhandel.
Der TV- Anschluss
Der rückwärtige TV-Anschluss des CVR-200 verarbeitet elektrische Hochpegel-Audiosignale in analoger Form.
Dieser Anschluss ist geeignet für alle externen Geräte mit analoger Audioausgabe, unter anderem für den Anschluss e ines TV, DVD-Spie lers oder Sat-Rec eivers mit analoger Au dioausgabe (z. B. übe r den Kopfhörer ausgang
des TV). Bitte ziehen Sie die Bedienungsanleitung des externen Gerätes für den Anschluss zu Rate. Ein geeignetes Cinch-Kabel erhalten Sie im Zubehörhandel.
Der Phono-Anschluss
Der rückwärtige Phono-Anschluss des CVR-200 verarbeitet elektrische Hochpegel-Audiosignale in analoger
Form. Dieser Anschluss ist geeignet für Plat tenspieler mit MM-Sys tem (gebräuchlich), nicht aber für MC(selten). Bitte ziehen Sie die Bedienungsanleitung des externen Gerätes für den Anschluss zu Rate. Bitte schließen
Sie ein gegebenenfalls vorhandenes Erdungskabel an den Plattenspieler und den CVR-200 an um ein Brummen zu
verhindern.Ein geeignetes Plattenspieler-Cinch-Kabel mit Erdung erhalten Sie im Zube
hörhandel.
Systeme
Der Pre-Out Ausgang
Der rückwärtige Pre-Out Ausgang sendet elektrische Hochpegel-Audiosignale in analoger Form. Diese Signale
werden in Klang und Lautstärke von den getroenen Einstellungen am CVR-200 verändert. Dieser Ausgang ist
besonders geeignet für einen zusätzlichen Verstärker, z. B. in einem zweiten Raum, einen aktiven Subwoofer,
oder Funk-Lautsprecher, z. B. für Terrasse oder Küche.
Der Rec-Out Ausgang
Der rückwärtige Rec-Out Ausgang sendet elektrische Hochpegel-Audiosignale in analoger Form. Diese Signale
werden in Klang und Lauts tärke nicht von den getroenen Eins tellungen am CVR-200 verän dert, sondern unveränder t von der jeweiligen Signal quelle weitergegebe n.Dieser Ausgan g ist besonder s geeignet für ein Auf nahmegerät wie Tonband oder Kassettenrekorder.
Video Output
Der rückwärtige Video Ausgang, dient zum Anschluss eines TV-Gerätes.
TV Out HDMI
Der rückwärtige HDMI Ausgang, dient zum Anschluss eines TV-Gerätes.
Die Lautsprecherausgänge
Der CVR-200 ist auf seiner Rückseite mit zwei hochwertigen vergoldeten Terminalpaaren zum Anschluss von
Lautsprecherkabeln ausgestattet. Der Anschluss von Kabeln kann sowohl über an den Kabeln montierten Bananensteckern (Steckermontage), als auch über die schraubbaren Terminalköpfe mit dem abisolierten Lautsprecherkabel (Schraubmontage) erfolgen.
Der Line-In Anschluss
Der hinter der magnetischen Abdeckung an der Front liegende Line-In Anschluss des CVR-200 verarbeitet elektrische H ochpegel-Audiosignale in analoger Fo rm. Dieser Ans chluss ist geeignet für alle ex ternen Geräte mit ana loger Audioausgabe, wie z. B. Medienspieler, iPod®, Smartphones etc. (Anschluss über den Kopfhörerausgang).
Bitte ziehen Sie die Bedienungsanleitung des externen Gerätes für den Anschluss zu Rate. Ein geeignetes 3,5
mm Kabel erhalten Sie im Zubehörhandel.
Der Kopfhörer Anschluss
An dem hinter der magnetischen Abdeckung an der Front liegende Kopfhöreranschluss des CVR-200 können
Sie einen handelsüblichen Kopfhörer mit 6,3 mm Klinkenstecker anschließen. Einen 3,5 mm Klinkenadapter für
kleinere Kopfhörerstecker erhalten Sie im Zubehörhandel.
24 25
Page 14
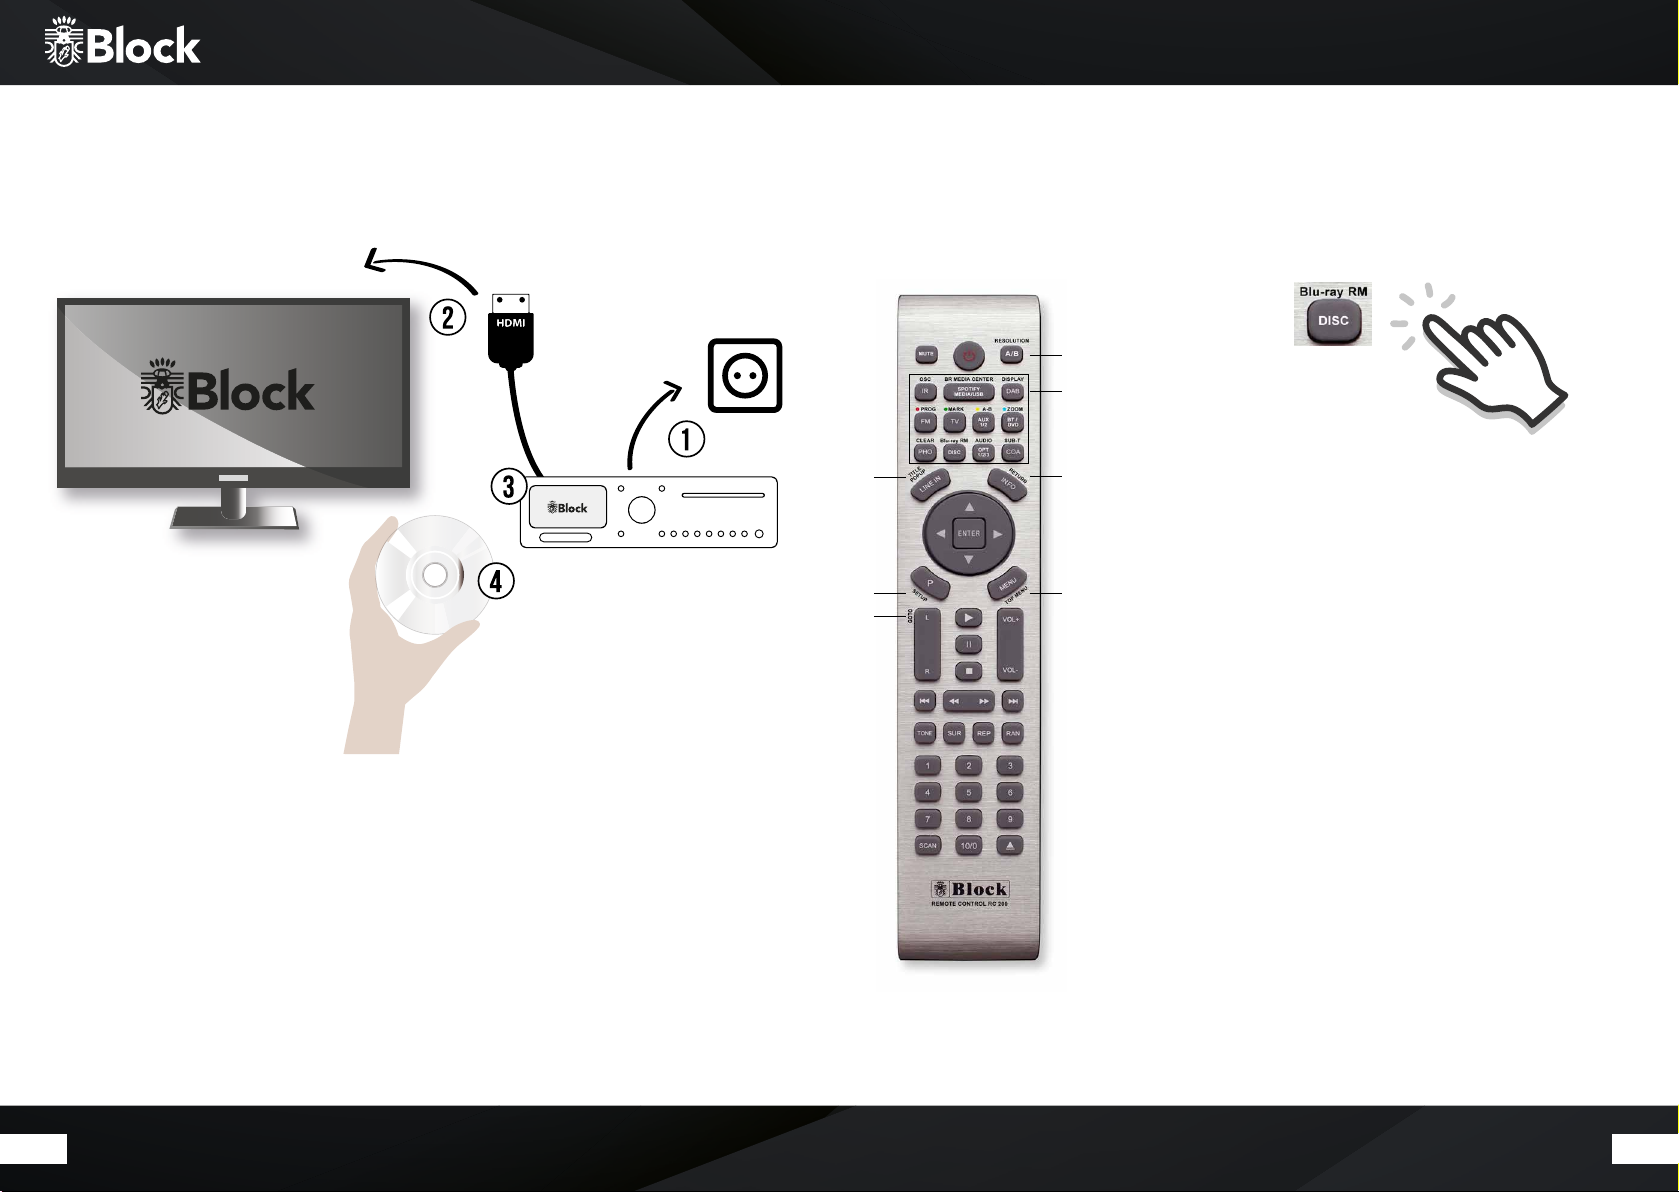
Kurzanleitung DISC Modus Blu-ray-player
Hier finden Sie eine Kurzanleitung zu Ihrer ersten Inbetriebnahme des Blu-Ray-Players. Für ausführliche Informationen besuchen Sie bitte unsere Homepage www.audioblock.com.
Die Fernbedienung im Blu-ray modus
Beachten Sie, dass sich die Tastenbelegung im Blu-ray Modus durch das betätigen der DISC Taste umstellt (Display
zeigt Blu-ray Remote an). Die Funktionen sind nun an den Blu-ray-Player angepasst, die Bezichnungen über den
Tasten sind aktiviert. Bitte beachten Sie, dass einige Funktionen der Auswahltasten abhänging von der eingelegten
Disc sind. S o kann es vorkommen da s beispielswei se Untertitel o der andere Funktio nen nicht zur Verfüg ung stehen.
1. Verbinden Sie den CVR-200 mit dem Strom und schließen Sie den Einrichtungsassistenten ab.
2. Verbinden Sie den CVR-200 mit Ihrem TV- Gerät.
3. Starten Sie nun den Blu-ray Player. Sie können über die Fernbedienung über die Auswahltaste „Disc“
zum Blu-ray Player gelangen. Drücken Sie die Taste erneut um die Fernbedienung in den Blu-ray Modus zu setzen. Nun gelten die Befehle die über den Auswahltasten Ihrer Fernbedienung stehen. Über die Fernbedienung
Taste „Setup“ haben Sie nun die Möglichkeit diverse Systemeinstellungen des Blu-ray- Players einzustellen.
Beispielsweise wählen Sie die Sprache aus.
4. Legen Sie nun eine Disc ein. Die Disc startet automatisch.
5. Durch Ihre Systemfernbedienung können Sie nun die individuellen Menüpunkte Ihrer Disc auswählen.
1
2
3
7
4
65
1. Resolution: Drücken Sie diese Taste, um die Auflösung des Fernsehbildschirms zu ändern.
2. Blu-ray Tastenfelder:
OSC: Einblendung des Bildschirmsmenü
BR MEDIA CENTER: Önet das Medienmenü
DISPLAY: Zusätzliche Informationen zur eingelegten Disc werden
angezeigt.
PROG: Programierungsfunktion der eingelegten Disc.
MARK: Setzten Sie hier Makierungen während der Wiedergabe. Zum
muss von Ihrer Disc unterstützt werden.
Informationen auf dem Bildschirm.
3. TITLE POPUP: Önen und schließen Sie das Discmenü.
4. RETURN: Zurück
5. SETUP: Önet das Setupmenü.
6. TOP MENU: Önen Sie das Blu-ray Player Menü.
7. GOTO: Disc beginnt am eingegebenen Zeitpunkt mit der Wiedergabe.
Für Blu-ray Modus DISC drücken!
Abrufen der makierten Stellen drücken sie die Taste erneut für ca. 3 Sek.
A-B
: Wiederholungsfunktion des von Ihnen ausgewählten Zeitraums.
ZOOM:
Wählen Sie zw ischen untersc hiedlichen Anzeigef ormate aus. Dies
CLEAR:
Löschen Sie alle getätigten Eintrage und folgen Sie den
Blu-ray RM
AUDIO:
SU B-T:
: Aktivieren Sie die Tastenbelegung des Blu-ray Players.
Wählen Sie eine Sprache aus.
Wählen Sie unterstützte Unter titel aus.
26 27
Page 15
Systemeinstellungen
Drücken Sie auf Ihrer Fernbedienung (Seite 10/Punkt 12) oder am Gerät (Seite 10/Punkt 12) die Taste „Menü“
und wählen Sie den Punkt Systemeinstellungen aus. Im folgenden Menü können Sie folgende Einstellungen
vornehmen:
Zusätzliche Komfortfunktionen
Drücken Sie auf Ihrer Fernbedienung oder am Gerät die Taste „Menü“ und wählen Sie den Punkt „Hauptmenü“ aus. Im folgenden Menü können Sie neben den schon bekannten Signalquellen auch „Schlummer“ und
„Wecker“ auswählen:
Interneteinstellungen:
In diesem Menü können sie die Einstellungen, die Sie für Ihren Internetanschluss vorgenommen haben verändern, z. B. wenn Sie den Standort wechseln. Weiterhin können Sie den Assistenten neu starten, oder die Verbindung komplett manuell einrichten. Lesen Sie hierzu Seite 13-14 dieser Bedienungsanleitung.
Sprache:
Wählen Sie hier Ihre gewünschte Anzeigesprache für das Gerät aus.
Werkseinstellungen:
Das Auswählen und Bestätigen diese Punktes setzt alle Einstellungen auf den Werkszustand zurück. Bitte nutzen Sie diese Funktion, wenn massive Problem mit dem Empfang von Daten aus dem Internet oder der allgemeinen Betriebssoware des Gerätes aureten. Sie sollten diese Funktion auch ausführen, wenn Sie das Gerät
einmal weiterverkaufen möchten. Ein Neustarten nach dem Ausführen der Werkseinstellungen startet wieder
den Einrichtungsassistenten.
Software Update:
Der CVR-200 prü regelmäßig, ob ein Update im Internet zur Verfügung steht und weist Sie darauf hin. Sie können dann wählen, ob das Update ausgeführt werden soll. Sie können diese Funktion hier abstellen (nicht empfohlen), oder die Betriebssoware auf Aktualität prüfen.
Software Upgrade:
Nur für authorisierte Block-Werkstätten nutzbar, für Endbenutzer ohne Funktion. Falls Sie diese Funktion anwählen, müssen Sie das Gerät anschließend neu starten.
Einrichtungsassistent:
Das Auswählen und Bestätigen diese Punktes startet den Einrichtungsassistenten. Alle Einstellungen, die Sie
dann vornehmen überschreiben die alten Einstellungen. Über den Einrichtungsassistenten können Sie auch
die Zeiteinstellungen (Sommer- und Winterzeit) ak tualisieren, falls es zu Problemen bei der automatischen Umstellung kommt.
Info:
Das Auswählen und Bestätigen diese Punktes zeigt Ihnen technische Informationen zu der installierten Sowareversion, die Hersteller-ID des Gerätes und des Namens unter dem Ihr Gerät im Netzwerk angezeigt wird.
Schlummer:
Wählen Sie „Schlummer“ auf ihrer Fernbedienung mit den Pfeiltasten aus und bestätigen Sie mit „Enter“. Es
erscheint die Anzeige „Schlummer Aus“. Mit den Pfeiltasten können Sie nun die gewünschte Dauer einstellen,
nach der das Gerät automatisch in den Standby-Modus schaltet.
Bestätigen Sie Ihre Wahl mit „Enter“. Verlassen Sie dieses Menü durch erneutes Drücken der Taste „Menü“.
Wecker:
Wählen Sie „Wecker “ auf ihrer Fernb edienung mit den Pfe iltasten aus und b estätigen Sie mit „ Enter“. Es ersch eint
das Menü „Wecker“. Sie haben nun die Möglichkeit, zwei verschieden Wecker einzustellen. Wählen Sie z. B. den
ersten Wecker aus. Im anschließenden Menü können Sie diesen We cker an und ausschalten, die Uhrzeit einstellen, zwischen Täglich, einzelnen Tagen, Wochenenden etc. wählen, die Signalquelle mit der Sie geweckt werden
möchten und die Lautstärke einstellen. Mit der Taste „Back“ kommen Sie wieder zurück in das vorherige Menü.
Die Weckfunktion ist nun aktiv.
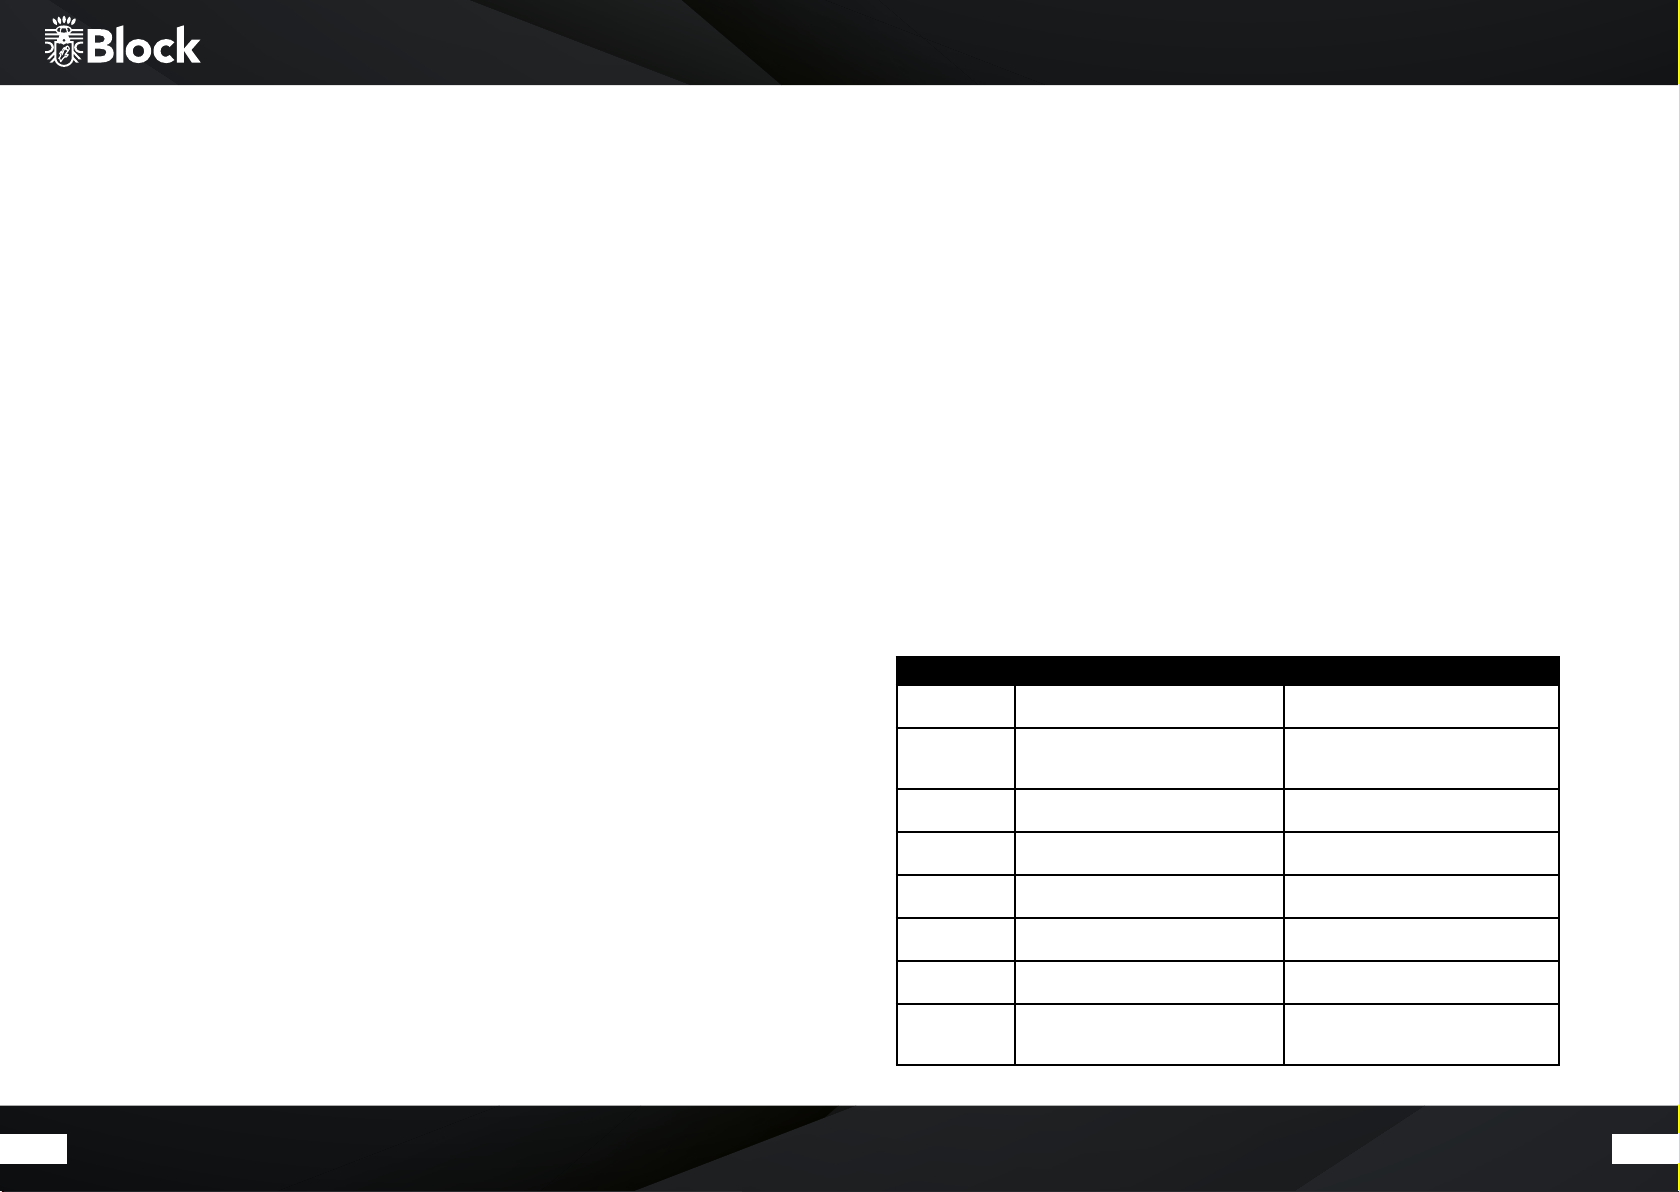
Fehlermeldungen und Problembehebung (Netzwerk)
Meldung Ursache Behebung
Keine Verbindung 1. Fal sches Pass wort
Format Error Das File Fo rmat wird nich t erkannt Vergew issern Sie si ch, dass der St ream in WMA,
Netzwerk Error Falsche Informationen werden vom Netzwerk
Netzwer k nicht
verfügbar
Netzwerk
Zeitüberschre itung
Kein UPnP gefunden Es wurde kein UP nP Server g efunden Stellen Sie sicher, dass Ihr Medienserver im selben
Nicht
autorisiert
Update
fehlgeschlagen
2. Richt iges Passwo rt, kein Kon takt zum Route r
empfangen
Proble me mit der Verbin dung zum Router Router e inschalten o der neu star ten
Keine An twort unab hängig vom Net zwerk D er gewählter S ender ist zu r Zeit nicht empf angbar,
Falsche E ingabe bei de m Passwor t oder nicht
beim UPnP Server angemeldet
Soware Update ist fehlges chlagen Prüfen Sie Ihre Net zwerkeinstellungen oder
1. Richti ges Passwo rt eingebe n
2. Mac Fil ter am Router dea ktiviere n
MP3, od er FLAC mit nic ht mehr als 48 K Hz codiert
ist. We nn nicht, bit te umcodiere n.
Die Daten v om Server s ind nicht lesb ar, eventuell
Neust art von CV R-200 und Router
bitte w echseln Sie d en Sender
Netz w ie Ihr CVR-200 un d eingeschal tet ist.
Geben S ie das richtig e Passwor t an.
versu chen Sie es zu ei nem späteren Ze itpunkt no ch
einmal.
28 29
Page 16
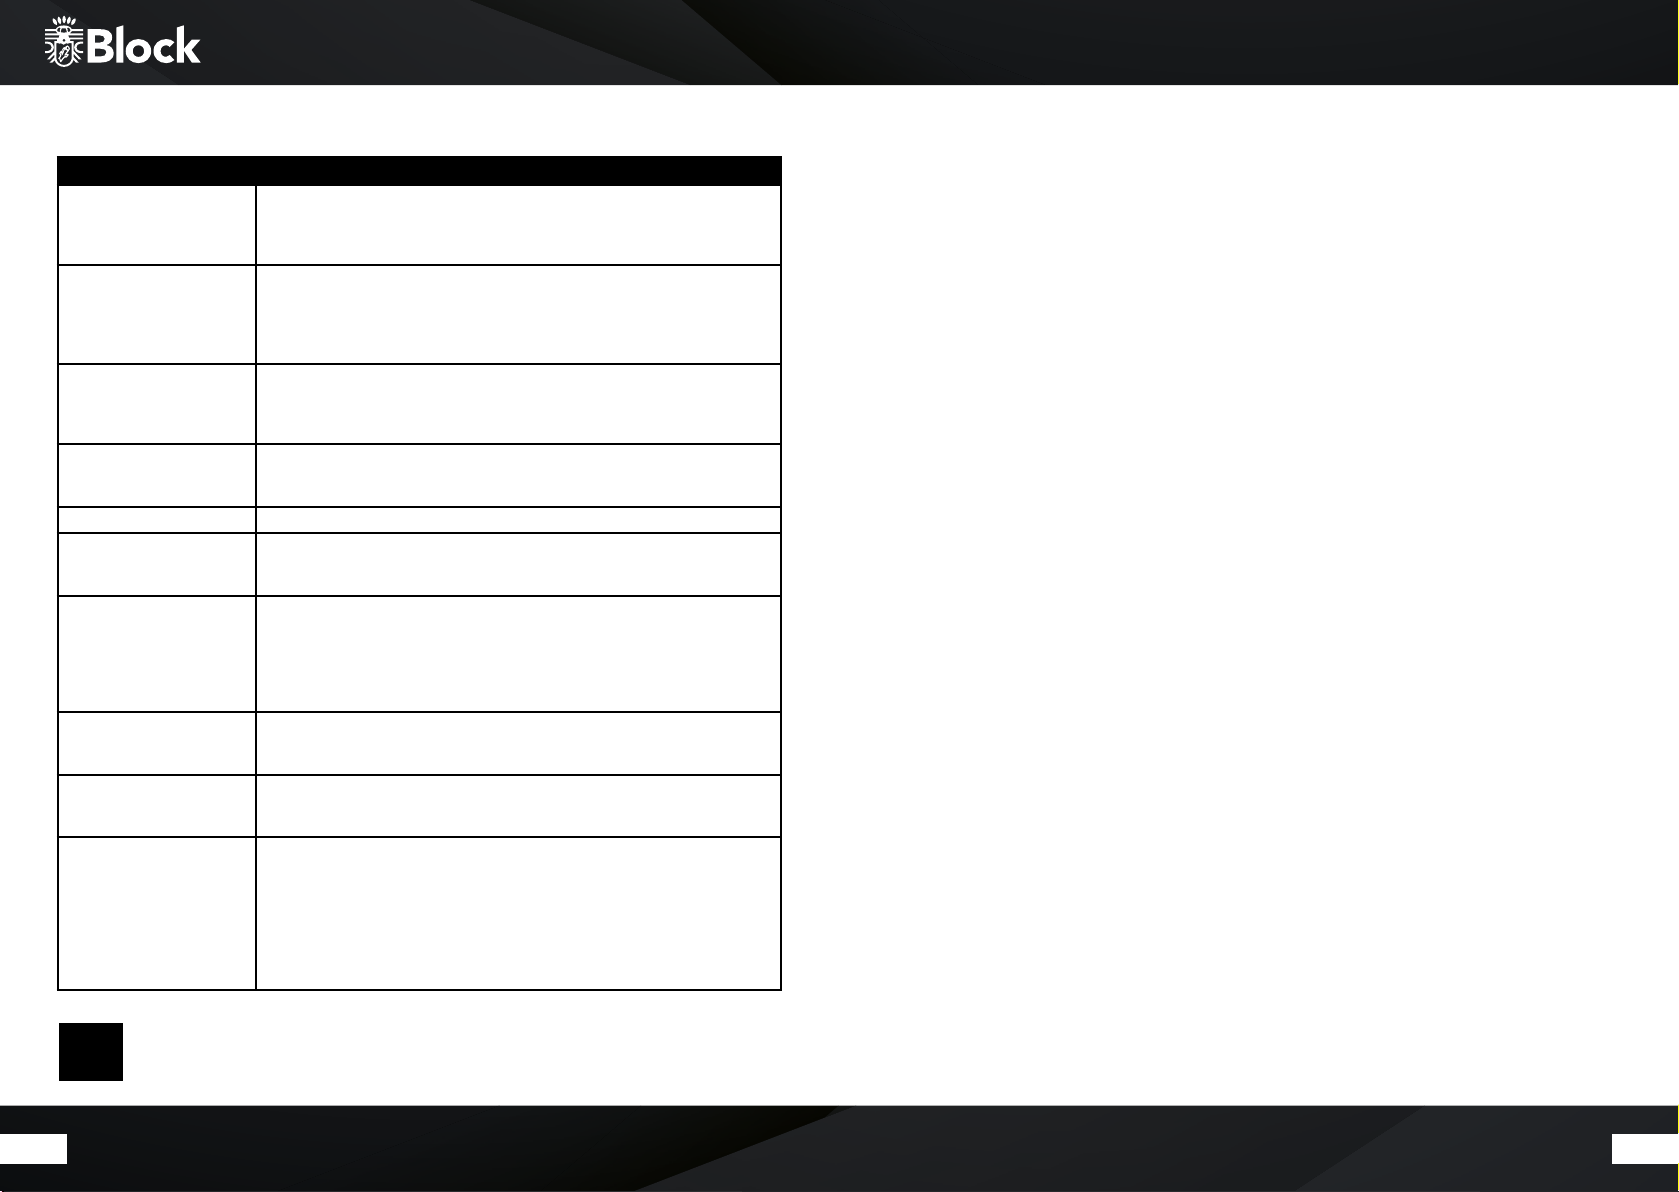
Fehlermeldungen und Problembehebung (Allgemein)
Fehlerbeschreibung Mögliche Ursache und Behebung
Kein Strom , obwohl das Gerät
angeschaltet ist
Ke in Ton - Das Gerät ist gar nicht an
Kein Ton auf einem K anal - Der Audioeingang ist falsch angeschlossen
Lautes Brummen - Ein Audiokabel ist nicht richtig angeschlossen oder defekt
Schwacher Bass - Die Phase beim Lautsprecher ist nic ht richtig angeschlosse n wechseln Sie +/-
Verzerrter Ton - Lautstär ke, Bass oder Treble sind zu hoch einge stellt
Die Fernbedienung funktio niert nicht
Tasten funktionieren n icht
(Gerät oder Fernbedienung)
Störung im Empfang - Der Sender ist n icht richtig einge stellt
Netz werk Anschluss ist nicht
möglich
Reparaturen und Eingrie in das Gerät, dür fen nur durch autorisier tes
!
Fachpersonal vorgenommen werden.
- Das Stromkabel ist nicht angeschlossen
- Die Steckdose ist defekt
Die Siche rung im Gerät ist defekt – Fehler muss dur ch einen Techniker repar iert werden
-
- Das Stromkabel is t defekt
- Die Lautstä rke ist zu niedrig
- Das Lautspre cherkabel is t nicht richtig ange schlossen
- Kein Eingangssignal
- Am Gerät ist der f alsche Eingang eingestellt
- Die Auswahl des Einganges ist falsch
- Das Lautspre cherkabel is t falsch angeschlosse n
- Die Lautspre cher sind defek t
- Beim Plattenspieler ist die Erdung nicht gelegt
- Ihr Gerät steht zu nah an einem anderen Gerät oder am Fer nseher
- Lautsprecher könnten defekt se in
- Am Lautspre cherkabel lie gt eine Brücke (Kurzsc hluss)
- Kontrollieren Sie, ob die Batte rien richtig eingelegt sind
- Sind die Batterien leer? Ersetzen Sie die se bitte durch Ne ue
- Richten Sie die Fernbedienung zum Empfänger am Gerät
- Entfernen Sie alle Gegens tände zwisch en der Fernbedienung und dem Gerät
- Stellen Sie fest, ob die Entfernung zwi schen der FB und dem
Gerät m ehr als 8 Meter bet rägt
- Stellen Sie das Gerät aus und erne ut wieder an.
- Alternativ neh men Sie das Gerät vom Strom und schließen es dann wieder an.
(Das Gerät kann durch ex terne Strome inflüsse beeinflusst werden)
- Die Antenne ist nic ht richtig ausger ichtet
- Starten Sie er neut eine Sende rsuche
- Das Netzwerk ist momentan nicht e rreichbar.
Versuch en Sie es zu einem späteren Zeitp unkt noch einmal
- Der Router läss t keinen Anschlus s zu, da das Gerät noch keine
Adresse bekommen hat. Starten Sie den Netzwerkassistenten
- Kontrollieren Sie die Entfer nung zwischen Router und dem G erät
- Ändern Sie die aus gewählte Verschlüsselung smethode de s Routers
- Stellen Sie fest, ob eine Firewall das Gerät ablehnt
- Kontrollieren Sie, wenn verwendet, das Netzwerkkabel
Pflege und Transport
Pflege und Reinigung des Gerätes
Nehmen Sie das Gerät, bevor Sie es reinigen, vom Strom. Benutzen Sie nur saubere und trockene Lappen, um
ihr Gerät zu reinigen. Wenn das Gerät sehr stark verschmutzt ist, können Sie das Gerät mit einem handfeuchten
Lappen und mit milder Reinigungsflüssigkeit reinigen. Nutzen Sie niemals Flüssigkeiten, wie Benzin, Alkohol,
Petroleum oder andere Lösungsmittel.
Transportieren des Gerätes
Bitte bewahren Sie die Verpackung und die Bedienungsanleitung auf, damit Sie das Gerät für einen Transport
oder zum Verschicken ordnungsgemäß verpacken können. Die Originalverpackung ist so entwickelt, dass Sie
das Gerät sicher transportieren oder verschicken können. Bewahren Sie bitte auch die Bedienungsanleitung
auf, damit Sie diese gegebenenfalls an Dritte weitergeben
können.
Technische Daten
Netzspannung: AC 230 V/ ~50 Hz
Leistungsaufnahme von 350 Watt (max.) | Standby: <2 Watt | Aus: 0 Watt
Anschlüsse:
▷ Antennenanschluss
▷ 3 x Stereo Eingänge (Cinch), 430 mV
▷ 1x Stereo Eingang (Phono MM), 5 mV
▷ 1x Stereo Eingang (3,5 mm Klinke), 430 mV
▷ Netzwerk: L AN oder WLAN, Bluetooth®
▷ 2 x USB Anschluss
▷ 3 x Optischer Digitaleingang (S/PDIF® oder auch TOSLINK®)
▷ 1 x Koaxialer Digitaleingang (Cinch)
Ausgänge:
▷ 6,3 mm Kopf hörer Anschluss
▷ analoger Pre-Out (Cinch)
▷ analoger Rec-Out (Cinch)
Eingebauter Verstärker mit 2 x 100 Watt RMS an 4 Ohm:
▷ Frequenzgang: 10 Hz - 30 KHz
▷ Signal Rausch Abstand: > 88 dB
▷ Kanaltrennung: > 60 dB
▷ Klirrfaktor: 0,007 %
▷ Lautsprecherausgänge: A | B und AB schaltbar
Eingebautes DAB+ Radio: 174.928 - 239.200 MHz • Eingebautes UKW-Radio: FM 87,5 - 108 MHz • Eingebautes
Internetradio mit über 25.000 Sendern und Podcast s weltweit • Eingebauter Disc Spieler (Blu-ray, DVD, HDCD/
CD-R/CD-RW/MP3) • Fernbedienungs-Lernfunktion • Eingebauter Medienabspieler (MP3, WMA, FL AC) • Abmessungen (B|H|T) | Gewicht: 430 x 121,5 x 330 mm | 9,8 kg
30 31
Page 17
Dear Costumer,
Contents
Thank you for choosing topurchase this high
quality device. This manual shall give you an
overview of how to operate your device. You
will receive safety information and you will be
informed about how to clean your equipment
best. The safety and operating information
must be strictly followed in order to ensure
the long-term and safe functioning of the product. Please, take some time to peruse the
manual carefully. The operating instructions
should be retained in a safe place for future
reference, to be given with a resale. Due to
software updates or technical developments
with third manufactures (e.g. Apps), parts of
this manual can be updated. Ever y now and
then please visit our website „www.audio-
block.com“ to check whether there are up-to-
date operating instructions for downloading.
For this purpose, compare the status on the
cover page with the information on the Internet. If you have any further questions regarding your device, please contact an authorized
specialist supplier or our service centre. In
case of a defect resulting from improper operation, misuse or non-observance of the operating instructions, please be aware that the
guarantee for this defect will be invalidated.
Besides, no liability can be accepted for consequential damages. This product is EMC certified and meets all the directives and requirements of the European Union. CE and RoHS
documentation are provided.
Safety instructions ..................................................................................................................................................................... 34
Before operating ......................................................................................................................................................................... 38
Controls on the device ..............................................................................................................................................................39
The remote control ....................................................................................................................................................................40
Connections to the device........................................................................................................................................................ 41
Initial commissioning and installation .................................................................................................................................. 43
Manuelle Installation (WL AN & LAN) ...................................................................................................................................... 44
The amplifier ................................................................................................................................................................................ 45
The FM radio ................................................................................................................................................................................ 46
The DAB + radio ........................................................................................................................................................................... 47
The internet radio ....................................................................................................................................................................... 48
The media player (USB front connection) ............................................................................................................................ 50
The media player (DLNA) .......................................................................................................................................................... 51
Music streaming-function ......................................................................................................................................................... 52
Spotify Connect .......................................................................................................................................................................... 53
Connecting external remote control ..................................................................................................................................... 54
Connecting external devices via Bluetooth® ....................................................................................................................... 55
Setting Up and operating Multi-room Systems ................................................................................................................... 56
Frontal connections: Line-In, USB .......................................................................................................................................... 57
Rear Outputs: Pre-Out, Rec-Out .............................................................................................................................................. 57
Frontal Outputs: Headphones ................................................................................................................................................. 57
Short manual disc mode and Blu-ray .................................................................................................................................... 58
The remote control in Blu-ray mode ...................................................................................................................................... 59
System settings ........................................................................................................................................................................... 60
Troubleshooting.......................................................................................................................................................................... 62
Care and transport ..................................................................................................................................................................... 63
Technical data ............................................................................................................................................................................. 61
32 33
Page 18
Safety instructions
Handling batteries
Caution: to avoid the risk of electric shock, do not modify this device! The opening of the device as well as changes in the appliance may be carried out only by authorized personnel. Impor tant security instructions:
▶ Before using the device for the first time, please read the operating instructions thoroughly.
▶ This device is to be used indoors only.
▶ This device may be connected only to a socket intended for it.
▶ This device is not to be exposed to humidit y.
▶ Make sure the appliance does not stand to close to other objects
▶ Make sure the appliance does not stand near a heat source
▶ Make sure that the connection cable is not damaged or is going to be damaged
Information on disposal of the old equipment:
Your product is made of high quality and recyclable materials. With this symbol, the product fulfils the
EU Directive 2002/96 / EC. Please do not dispose of your appliance in the domestic waste but in a suitable
separate collection of materials. Electronic devices, accessories and packaging shall be handled to special
places intended and marke d by signs for its purpose. For more information, where you find these places, please
contac t your local garbage disp osal service. Please, kee p to this regulation in order to give a bet ter environment
to our children.
The equipment complies with the EU norm (73/23/EEC). and fulfils the electromagnetic
compatibility (89/336/EEC).
Batteries may contain flammable substances. Improper handling can cause batteries to leak, strongly heat,
ignite, or even explode what, could damage your device and your health.
Follow these instructions:
▶ Keep children away from batteries.
▶ In case of bat teries have been swallowed, report this to your doctor immediately.
▶ Never charge batteries (unless specifically stated).
▶ Never discharge batteries by high power output.
▶ Never short - circuit batteries.
▶ Never expose batteries to excessive heat such as sunshine, fire or something similar.
▶ Do not disassemble or deform batteries. Your hands or fingers could be injured or battery fluid could get
into your eyes or on your skin. Should this happen, rinse the aected area with plenty of clear water and
inform your doctor immediately.
▶ Avoid strong jolts and vibrations
▶ Never exchange the polarity. Make sure that the poles Plus (+) and minus (-) are correctly inserted, to
prevent short circuits.
▶ If necessary, clean battery and device contacts before insertion. Do not mix new and old batteries or bat-
teries of dierent types. This could cause malfunctions on your device Besides, the weaker battery would
discharge too strongly.
▶ Remove any discharged batteries immediately from the unit.
▶ Remove the batteries from your device if they haven‘t been used for an extended period of time.
▶ Replace at the same time all discharged batteries in a device with new batteries of the same type. If I you
want to store or to dispose the batteries, isolate their contacts with an adhesive tape.
The flash icon shall warn the user of not isolated hazardous voltages in the device’s housing. This voltage could
be strong enough to injure people through an electrical shock. The exclamation mark shall draw the attention
of the user to the fact that the manual, delivered together with the device, contains important operating and
maintenance instructions.
Please note that we accept no liabilit y for problems that may arise from third-part y providers.
34 35
Page 19
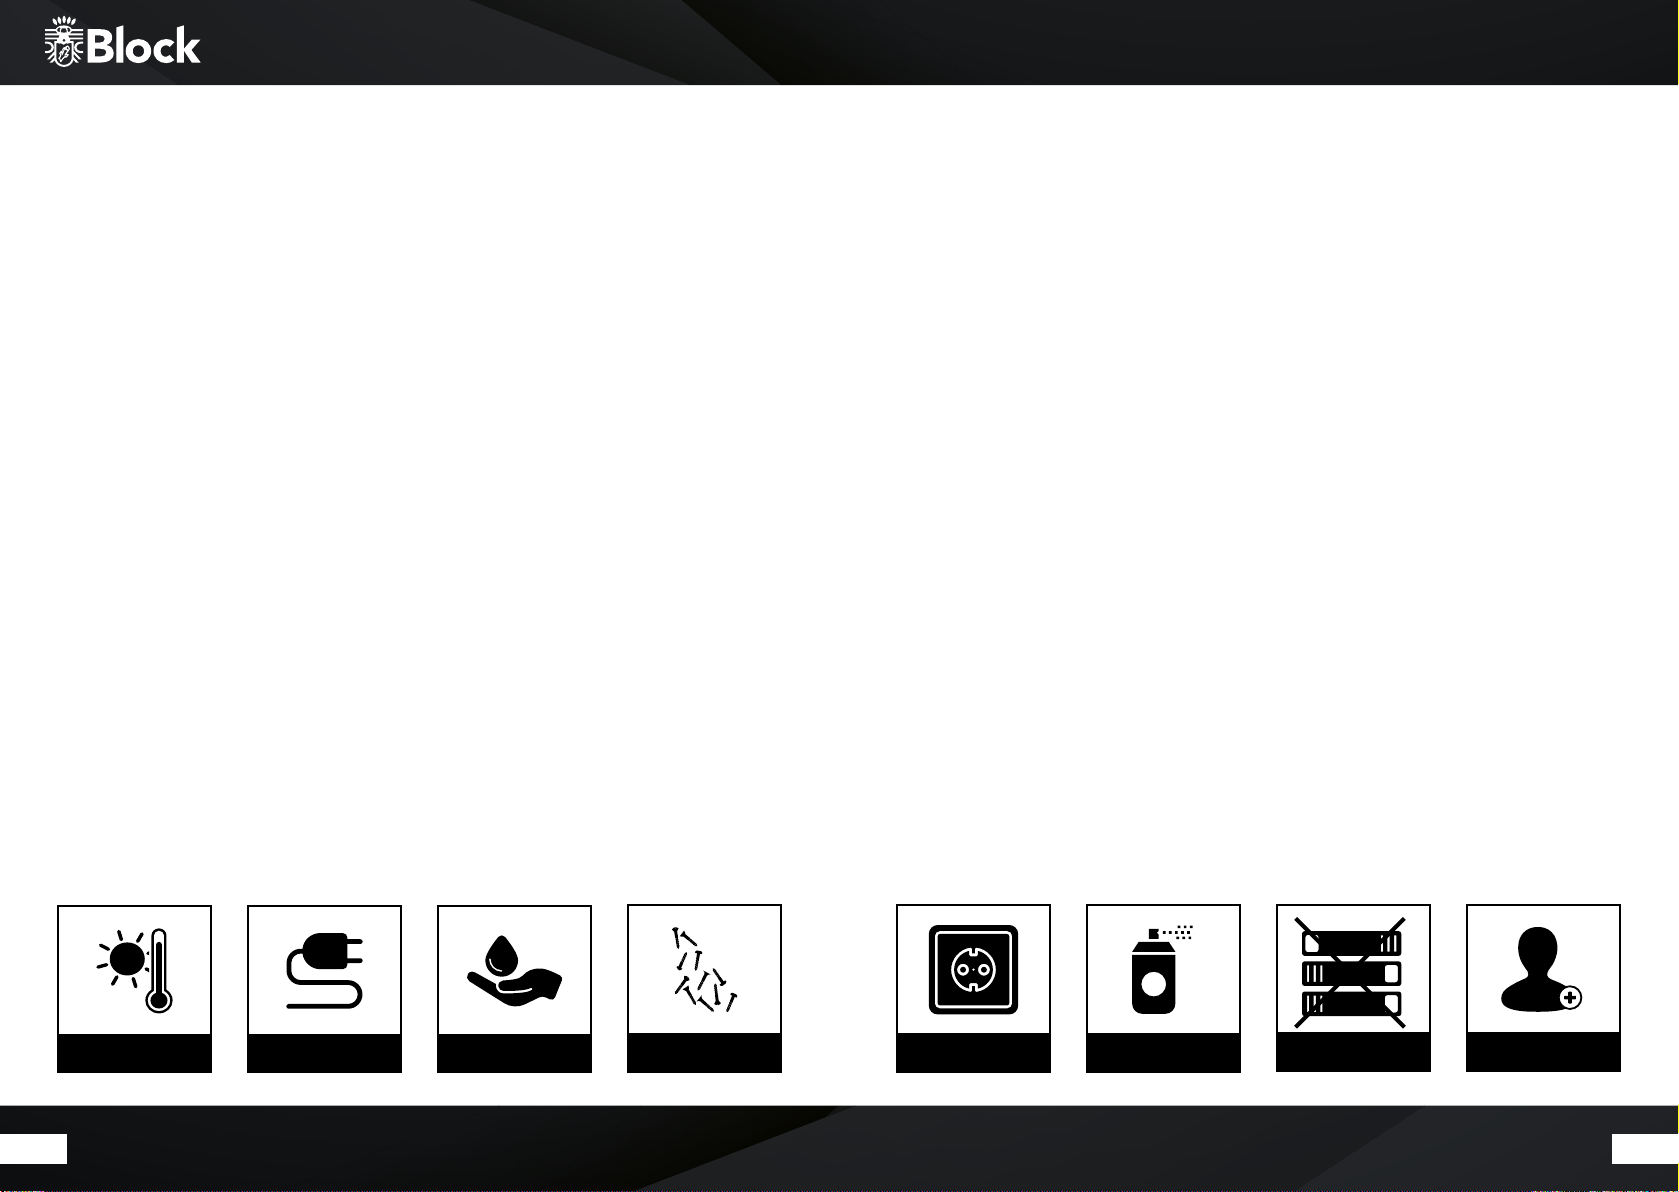
Safety instructions
Safe use
Do not let electrical appliances in children‘s hands! Never let children unattended to use electrical devices
Also keep the Packaging foils far away from children. There is a danger of shocking and suocation.
Safe positioning
▶ Use the device exclusively in dry rooms
▶ .If you bring the device from a cold into warm surroundings , it could be humid inside the equipment. In this
case, wait about two to tree hours before running it.
▶ Place the device on a firm and horizontal plane surface.
▶ Place the device with at least 10 cm of distance to the wall.
▶ Do not cover existing ventilation openings.
▶ Avoid the proximity of heat sources, such as radiators, or devices with strong magnetic fields, such as
loudspeakers.
▶ Do not place open sources of fire, such as burning candles, on the device.
▶ Do not place the device on sensitive sur faces.
Secure connection
▶ Connect the device only to an easily accessible and suitable installed socket. With 230 V ~ 50 Hz.
▶ The net plug mu st be of easy acces s so that the device c an be easily and quickly d isconnect fro m the power
supply, in case of emergency.
▶ Locate the power cable so that nobody can trip over it or step on it.
▶ Do not use extension cables. Do not bend or squeeze the net cable.
▶ Always pull the mains cable from the socket.
▶ Disconnect the power plug from the power socket and remove the aerial cable from the device if you do
not use the unit for a long time or when a thunderstorm is approaching.
▶ The net cable shall not be wrapped around the device dur ing operation nor in touch to hot surfaces. Avoid
humidity to enter the housing.
▶ Never touch the device, the net cable or the net plug with wet hands. There is a risk of electric shock.
Should an item or liquid get into the housing, immediately disconnect the device from the power supply
and have it checked.
▶ Have your equipment inspected by qualified personnel before restarting it. Otherwise there is the anger
of electric shock.
▶ Never use the device if it is damaged, or if there is any damage to the net cable or to the plugs. In case the
appliance is damaged, immediately pull the plug from the socket.
▶ Never open the device. In case of fault, please contact our service centre or any other specialized shop.
▶ The remote control has an infrared diode Class 1.
▶ Do not look at the LED with optical devices.
Keep the device away from heat sources!
Ensure suicient air circulation when
installing in a rack!
Handle the power cable
always with caution!
Keep the device away
of moisture!
Achten Sie darauf, dass keine
Be careful that none
Gegenstände in das Gerät fallen!
Objects fall into the device!
Remove the device from the power
if it is not used for a long time!
Make sure that no sprays or chemi-
cals get to your device!
Make sure that your device is not
covered!
Make sure that the device is only
opened by authorized persons!
36 37
Page 20
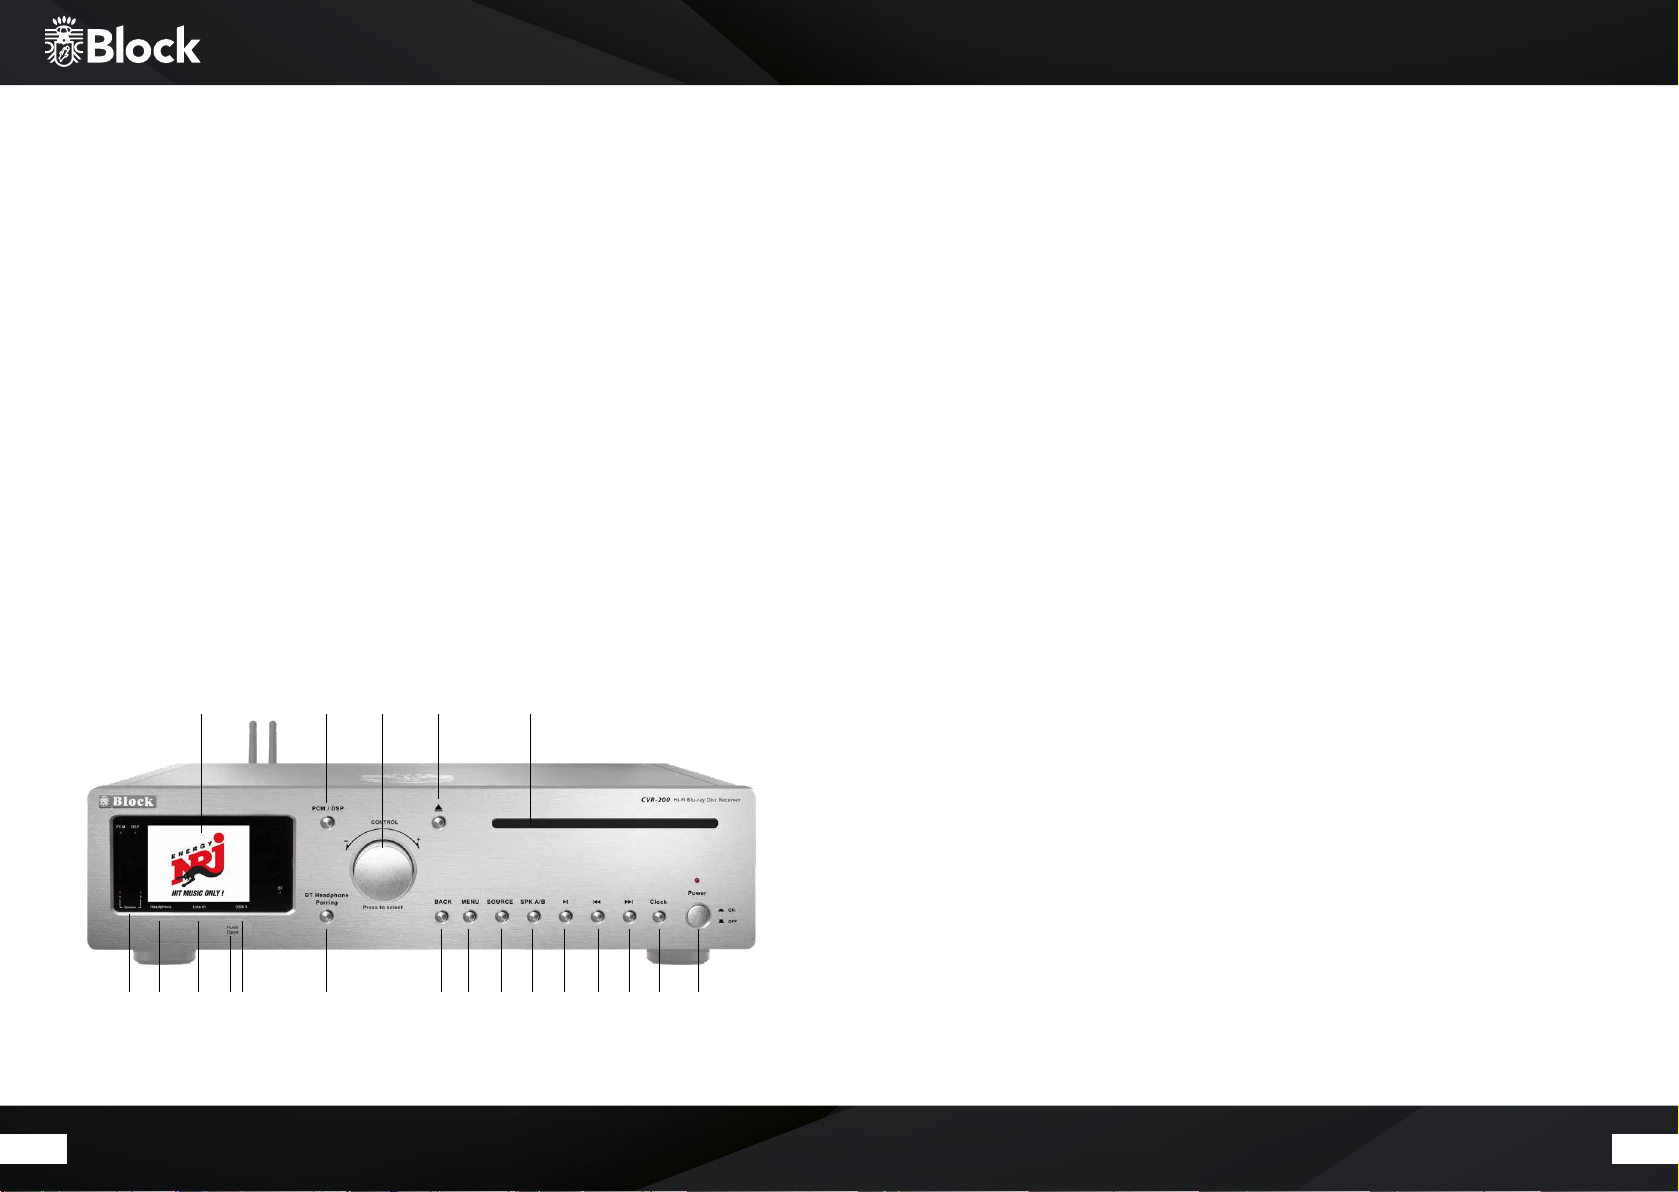
Before commissioning
Operating elements on the device
Before you can use your internet radio, streaming functionality or using a smartphone app, you will need:
• A quick Internet access.
• A router, preferably with WLAN (wireless access point).
• If your router does not provide WLAN, you can also connect your device via an Ethernet cable
• Later on, when setting up the device, choose between wireless (WLAN) and cable connection.
• If your wireless network is set to Wired Equivalent Privacy (WEP) or Wi-Fi Protected Access
(WPA), you will need the WEP or WPA code, so that your Internet radio can exchange data with
the router.
• Before you continue, make sure that your wireless network is switched on and has broadband
internet access.
• If you have any problem connecting your device to your router, please, try to solve them by
consulting the router’s operating manual.
BEDIENELEMENTE AM GERÄT
11 10119
18
1.
„CD“ button: opens or closes the CD case.
With the first pressure of this key, the device
changes to “CD” operation mode.
2. „Replay / paus e“ button: aer a simple p ressure,
the device stops on pause, aer a repeated one,
it continues on replay mode. If you press it for 5
seconds, the device will be on stop mode. This
key function is valid for CD and media players.
3. „Backward“ button: press this button on radio
mode and the device searches automatically
the transmitter before. On CD and media player
mode, the device changes to the track before.
4. „Forward“ button: press this button on radio
mode and the device searches automatically
the next transmitter. On CD and media player
mode, the device changes to the next track.
5. „Source“ button: by pressing this button re-
peatedly the devices will be connected in a se-
quence to its sources.
6. 6,3mm Headset Jack.
7. 3,5mm line-in input jack for media players.
8. USB input
9. Cover: Push to open the cover
10. Disc compartment
11. Colour display.
12. “Menu” button: by pressure of this key, you
reach in the s ystem menu. Pres s and hold about
2 seconds to go to remote learning screen.
Below is the detail of operations. follow up the
instruction on display screen, A) press one key
of local remote, B)then press and holding one
key of target remote. a key function learning
completed. Operate procedure ( A) and (B)
again to learn another key function.
13. Back“ button: press this button to return to the
previous menu item.
14. “Clock” button: it changes the display to show
to time and the date. You press it again to return
to the last function.
15. “Power“ button: press this button to turn the
unit on and o (Real power disconnector).
16. Display of the activated loudspeaker pair.
17. Button to switch bet ween loudspeaker pair A , B
and A + B.
18. Multifunction knob: with le / right rotation,
the volume can be raised or lowered. Press the
menu key, on the menu mode, the single points
are selected by turning and activated by pressing the multifunction rotary knob.
19. PCM|DSP button: press for change
20. BT Headphone parring: press the parring but-
ton for connect a Bluetooth Headphone/speaker.
616 7 89
12 5 171320 2 4 3 14 15
38 39
Page 21
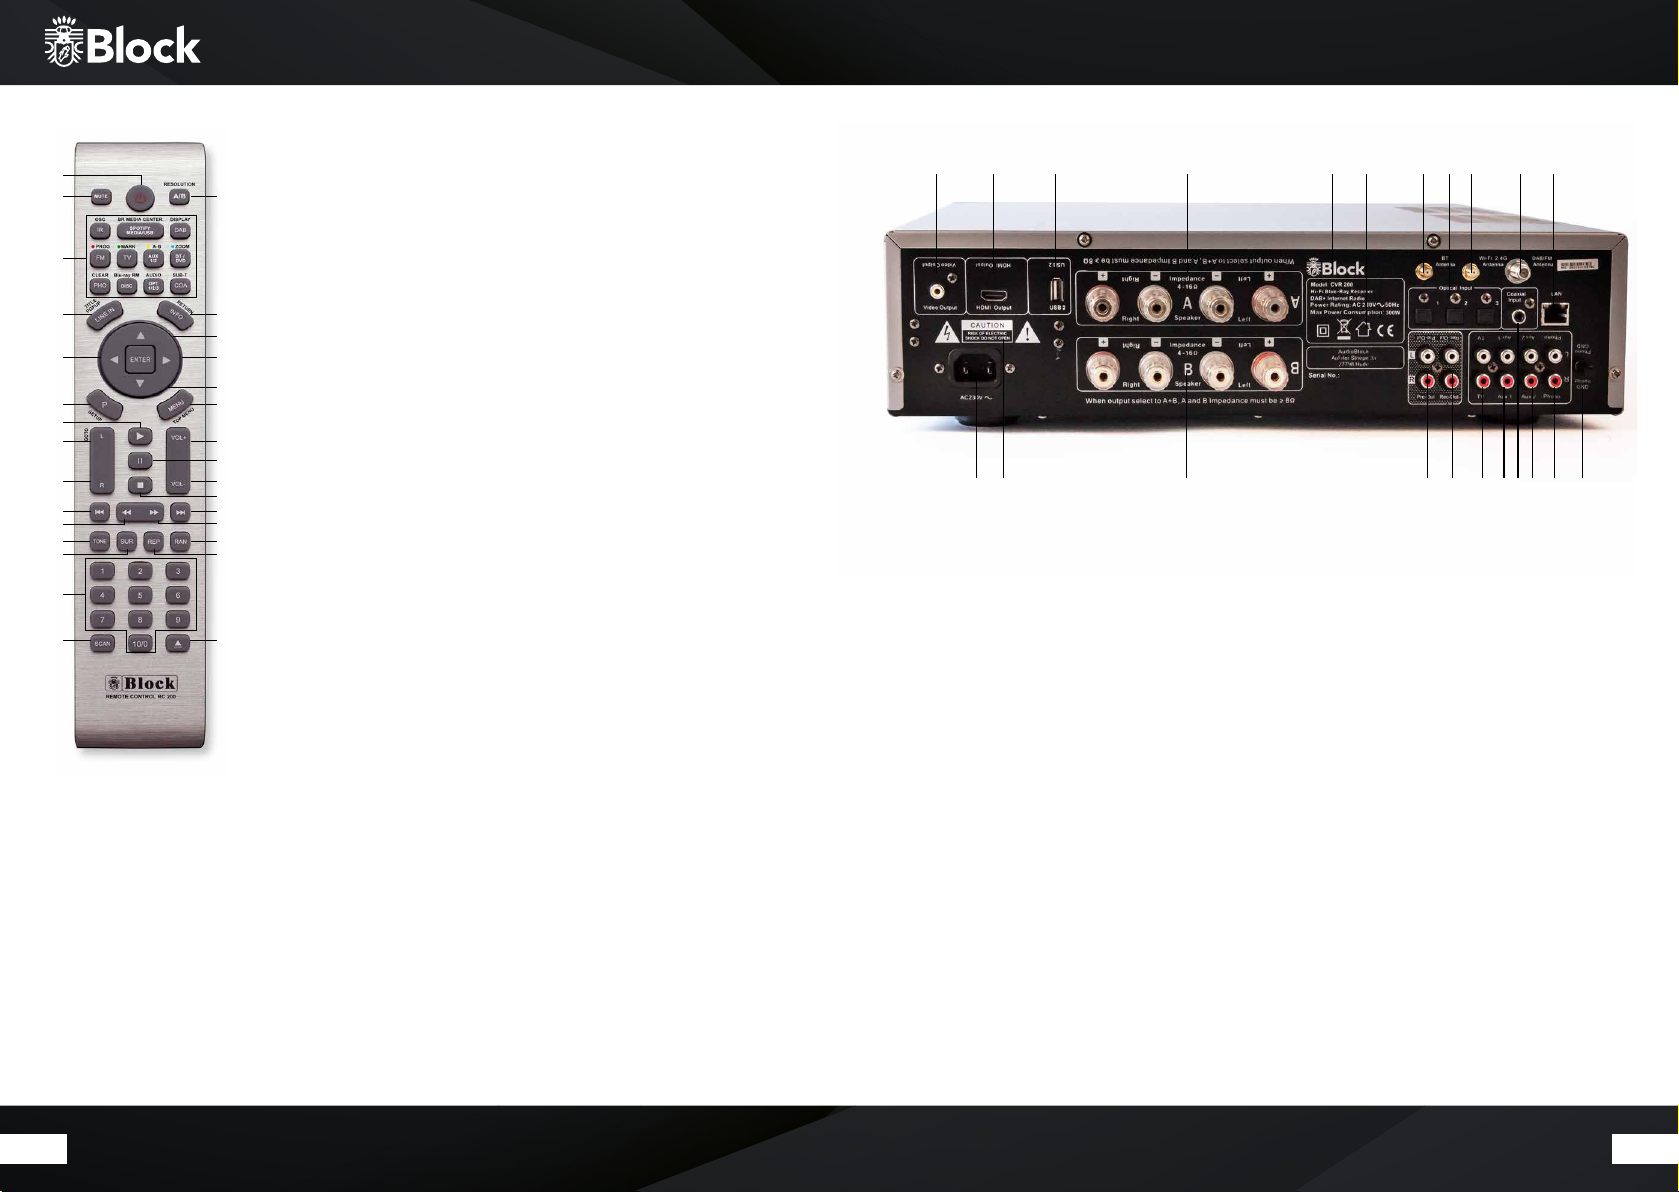
1
2
4
5
8
11
13
14
15
20
22
24
25
28
29 30
The remote control
1.
„Standby“ button: switches the device to „Clock“ mode, the display will show the
3
time and the date. To save energ y, s witch o the device in the net counter.
2. „Mute“ but ton: switches the sound o.
3. “A/B” button: switches the output to the speaker boxes A, B or both.
4. Operating Mode select button: • IR starts the Internet radio • Media / USB (SPO-
TIFY ): start s the media player or USB pla yback Press it aga in to switch in the Spot ify
mode. • DAB starts the DAB + radio reception. • FM starts the FM radio reception. •
6
7
9
10
12
16
18
17
19
21
23
26
27
TV / AUX1 AUX2 – his but ton activates all the external input s on the rear panel. • BT:
Pressing activates the Bluetooth mode. • Phono: activates the back-sided phono
input (record player) • DISC: starts the Disc modus. • OPT: pressing several times
switches on the optical input s from 1-3 • COA: activates the back-sided coaxial entrance .
5. „Line-In“ button: activates the front connector behind the magnetic cover.
6. „Info“ button: press t his button to sele ct FM, DAB +, Interne t radio and media playe r
additional information can be calle d up.
7. Arrow upwards: on FM mode to increase the frequency in 0.05 MHz . In menu to
selec t the dierent point s.
8. Arrow to the le: to reach the previous setting in the menu.
9. Arrow to the right: to access selected functions in the menu.
10. Arrow down: in FM mode by the frequency in 0.05 MHz increments to reduce. To
selec t the dierent point s in the menu.
11. „P“ button: recalls or saves pre-set transmitters in radio mode.Taste „Menü“:
12. „Menu“ button: displays the system menu.
13. “Play” button
14. Balance” button: moves the speaker balance to the le
15. “Balance” button: moves the speaker balance to the right
16. „Volume +“ button: increases the volume
17. „Volume“ button: reduces the volume
18. „Pause“ button
19. „Stop“ button
20. „Back“ button: on radio mode, the device searches the previous lower transmitter.
On CD and media player mode, the unit jumps to the previous track.
21. „Forward“ button: on radio mode, the device searches the next higher transmitter.
On CD and Media Player mode, the device jumps to the next track.
22. „Fast backward“ button: only on CD mode.
23. „Fast forward“ button: only on CD mode
24. „Tone“ button: activates the treble and bass settings.To adjust the volume, use the
VOL- / VOL + buttons.
25. „SUR“ button: press this but ton to switch the dierent digital sound optimization.
26. „RAN “ button: switches the random playback on / o during CD operation.
27. „REP“ button: switches to automatic replay during CD operation.
28. Button „1 - 10“: on radio mode, recalls on the stored transmitters and on CD mode,
it chooses the single pieces of the CD.
29. „SC AN“ button: searches automatically all available stations in DAB + mode.
30. „CD“ button: opens and closes the disc tray.
3192021 5 18 6 141716 15
1
2 4 8 9 710 11 11 12 13
Connections on the device
1.
Mains connection: the mains connection cable
may show no damages or defects.
2. warnings
3. Loudspeaker connection A: please en sure the
correct connection of plus and minus!
4. Loudspeaker connection B: please en sure the
correct connection of plus and minus!
5. Type designation and electric current specifications.
6. Optical Inputs 1-3: connec t here an optical digit al
cable.
7. Coaxial input: connect here a coaxial cable.
8. Pre-Out Output jack: to connect another
amplifier or a subwoofer.
9. Rec-Out jack: to connect a recording device.
10. TV input jack: to connect a T V set.
11. AUX1 and AUX2 input jack: to connect an
additional device.
12. Phonon input jack: to connect a record player
with MM system.
13. Ground screw connection: to connect a ground
cable for record player.
14. DAB + / FM aerial connection
15. Lan connector jack for RJ-45 plug (Ethernet)
16. Bluetooth-aerial connection
17. WLAN aerial connection
18. Inspection marks and disposal instructions.
19. USB 2
20. HDMI output
21. Video output
40 41
Page 22
Design of the device
First commissioning and installation
▶ Connect the FM / DAB + cable antenna to the device.
▶ Connect your speakers. You can either loose the screw connection and connect the stripped cable end or
connect the loudspeakers cable s with banana plugs directly into the connections. They can be connected
to the CVR-200 two dierent loudspeaker pairs, one pair on the „A“ to the marked connections and one
on the terminals labelled „B“. Make sure you have the correct polarity of the positive (red) and negative
(black). If you want to connect two pairs of speakers to „A“ and „B“ in a parallel operation, both loudspeaker pairs must have at least 8 ohms.
▶ 3. If you need additional input sources such as from the tape deck, TV, DVD player, satellite recei-
ver or disk players, connect these devices to the corresponding input jack of the CVR-200 using
suitable cables. For this purpose, you have 3 analogue inputs (TV, AUX, DVD), 1 analogue Phono
input with a preamplifier for record players with MM system (connect them eventually to an available earthing-conductor cable with the ground screw connection) and four digital grounding cables
(3x optical and 1x coaxial) are available. In addition, an analogue line-in connection is also provided at the
front.
▶ When using an external device to record the signal sources of your CVR-200, please connect this unit to the
REC-OUT jack. This output emits an unregulated signal without volume control or sound regulation from
the CV R-200.
▶ If you want to use another (high end) amplifier or an active subwoofer on the CVR-200, please connect it
to the pre-out jacks of the CVR-200. This output emits a signal from the CVR-200 influenced in volume and
tone control.
▶ When connecting your CVR-200 wireless over an existing WLAN to the Internet, please install the supplied
WLAN aerial.
▶ When connecting your CVR-200 to the Internet via Ethernet (wired), please connect your router using the
RJ-45 cable to the Ethernet socket of the CVR-200.
▶ Connect the power cable to the device and to a power outlet.
Aer you have safely installed your device and have carried out all the wirings, you can switch on your CVR-200
for the first time. Please hold your password (WEP or WPA) and, if necessary, your network identifier (SSID)
ready for a possible WLAN installation. Aer turning on, the CVR-200 will star t on CD mode.
▶ Please, confirm the question aer starting the equipment assistant wizard with “Yes”, press the arrows
keys of the remote control until “Yes” lights up and confirm with the key “Enter ”
▶ Select your desired time format, either 12 h or 24 h display and confirm with the key „Enter“.
▶ Select in the next step „Update from DAB“ (recommended) and confirm.
▶ Every time it starts, your CVR-200, will in future recover automatically from this source the information to
time and datum.
▶ For the following time zone se tting, please s elect for Germa ny UTC +1: 00. For other loc ations, please select
the appropriate time zone and confirm.
▶ In the following setting, please indicate whether your location currently has summer time, then „ON“
would be the correct input
▶ In the following query „Keep network connected?“, it should be confirmed with „Yes“ in order to avoid
interception and streaming problems.
▶ When choosing WLAN region, please choose “Most of Europe”.
▶ Now it starts searching a WLAN connection and shows you all found WLAN networks (SSID) in your sur-
rounding. Select your WLAN network. In case your WL AN does not appear, this could be due to the fol-
lowing reasons:
WLAN aerial not installed.
the router and on the CVR-200 or use a WLAN repeater).
WLAN SSID suppressed on the router, select the input “Manual configuration”.
If you connect the CVR-200 with an ethernet cable with your router, instead of using WLAN,
select “Cable”.
WLAN signal too weak at the installation place (perhaps it would be necessary to adjust the aerial to
▶ In case your router suppor ts WPS, select “Pres s key” and then pre ss the appropriate d button on the rou ter.
Alternatively you can also choos e “skip WPS” and sub sequently enter the networ k password (WEP or WPA).
Aerwards, in both cases the device should be finally connected.
42 43
Page 23
Manual WLAN installation
If any problem appears while setting up the assistant wizard, or you prefer to do a manual setup, please proceed as follows:
▶ Press the „Menu“ button on the remote control. Using the arrows keys on the remote control, choose first
„System Settings“, then select „Internet Settings“, then „Manual Settings“, then „Wireless“.
▶ Select in the next step „DHCP active“. This is the default setting of all conventional Internet router and it
takes a leng thy network configuration * Confirm the setting.
▶ Now enter the name of your wireless network (SSID), pay attention to the correct spelling and use of capi-
tal/small letters. Confirm with “OK”.
▶ Select the type of your password protection (usually WPA2 and AES). In case of doubt, consult the manual
of your router.
▶ Enter the password of your WLAN network, pay attention to the correct spelling and use of capital/small
letters. Confirm with “OK”.
▶ Now the router and your CVR-200 should be connected and an Internet connection should exist, „Connec-
ted“ shall appear on the display.
The amplifier
The CVR-200 is equipped with a high-quality AB class amplifier with an output of 2 x 100 watts to 4 ohms (RMS).
To change the sound, use the following settings:
Volume:
Use „VOL +“ and „VOL-“ buttons on the remote control or the multi-function knob on the device to change the
volume of your system overall.
Please note that for dierent signal sources, the volume of the CVR-200 can var y with the volume setting. This
is not a defect but it is caused by dierent input levels of the connected signal sources. You can customize the
volume controls for pair A & B speakers. If you run both pair at the same time, the lower volume is taken over
and can then be adjusted.
Balance:
Use the keys „L“ and „R“ on the remote control to change the balance between the two speakers and move to
centralise the sound in the room.
Manual Cables Installation (Ethernet)
Should you do without a WLAN connection and connect the CVR-200 to your router by cable (Ethernet), please
proceed as follows:
▶ Connect a free Lan jack to your router and to the Lan jack on the CVR-200 using a Ethernet cable (RJ-45)
▶ Press th e key „Menu“ on the device or on the remote control. Choose first „System Settings“, then „Internet
Settings“, then „Manual Settings „and then“ Cable „using the multi-function rotary knob.
▶ Next , select “DHCP „DHCP active“. This is the default setting of all conventional Internet router and it takes
a lengthy network configuration * Confirm the setting.
▶ Now the router and your CVR-200 should be connected and an Internet connection should exist, „Connec-
ted“ shall appear on the display.
* Should you have disconnected the DHPC function on you router, select please “DHPC inactive”. In this case, you must configure the Network, the rules
and specification should be known by now. For the configuration, you may need the MAC address of your Block device. You can find this under Menu/
System settings/Internet settings/Adjustment indicator/MAC address.
Bass:
To raise or lower the bass, press „Tone“ on the remote control until „Bass“ appears on the display. Use the „VOL
+“ and „VOL-“ buttons on the remote control. This function deactivates aer a short time
Volume:
Press „Tone“ on the remote control so oen, until „Treble“ appears in the display. Now press the „VOL +“ and
„VOL-“ buttons on the remote control to increase or decrease the volume. This function deactivates itself aer
a short time.
DSP-setting (Digital Sound Processing):
Press the „SUR“ but ton
This key, is used to switch on various digital sound enhancements such as „Normal“, “Live”, „Jazz“, „Rock“,
„Hall“, „Classic“, „Pop“ and „Stadium“, press several times to view the dierent modes. Try to find out which
setting suits you best, on the „Normal“ mode this func tion is deactivated.
44 45
Page 24
The FM radio
The DAB + radio
You can enjoy your FM radio with the supplied FM and DAB + reception combination, as well as with a house
antenna or a cable connection (adapter is included). You can activate the FM radio with the remote control,
pressing the „FM“ button as well as pressing “Source” on the device.
First setup:
▶ Press the key “Scan” on the remote control. The tuner will now search for the next available station
▶ If you want to save this station as favourite, press the „P“ button on the remote control, use the arrow keys
to select an available memory and keep pressing „Enter“ until the announcement „saved“ appears. Now
you can access this station by pressing the receptive key on the remote control‘s numeric keypad. You are
also able to overwrite memory stations that have been stored at any time with new stations.
▶ Repeat steps 1-2 until you have stored all the desired stations or until the frequency is run through once.
You can store up to 10 stations as favourites.
▶ Please use the little yellow reception quality icon in the lower right corner of the display to align your an-
tenna optimally.
Daily operation:
▶ Press the key “FM” on the remote control to start the radio.
▶ You can recall your stored transmitter at any time using the numeric keypad of your remote control.
▶ The radio disposes of RDS, it becomes up-to-date information about the program, e.g. title, genre, etc.
(depending on the transmitter). You can get more information by pressing the „Info“ button on your
remote control once or several times.
▶ By pressing the „le arrow“ on the remote, you can access additional settings on the device:
Scan settings: „Only strong transmitters“ - Yes / No
▶ Audio settings: „ Mono Only“ Yes / No (Select „YES“ for strong-sounding stations).
With the keys „For ward“ and „Back“, you can switch the frequency band to the nex t higher or lower available station.
*Please note that a DAB + reception is not possible at the moment using a cable connection because the DABBouquet is currently not fed into the cable network.
You can operate your DAB + radio with the enclosed combination aerial for FM and DAB + reception as well as
with a house antenna. A connection to the cable network is not possible at the moment, because the DAB +
transmitters are unfortunately not fed. You can ac tivate the DAB + radio with the remote control, „DAB“ button,
as well as by pressing repeatedly the „Source“ button.
Initial Set-up:
▶ Press the „DAB“ button on your remote control. It starts searching automatically. Aer the search is
complete, all the transmit ters found will be shown on the display.
▶ Use the arrow keys on the remote control to select the desired transmitter and confirm with „Enter“. If you
want to save th is station as a favour ite, press the „P “ button on the r emote control, choos e a with the arrow
keys a free storage space and press „Enter“ until the message „saved“ appears on the display. Now you
are able to operate this station by pressing the respective button on the numeric keypad on the remote
control. In this way, you can always overwrite the once occupied transmitter memory.
▶ Press the „le arrow“ button on the remote control to return to the list. Repeat steps 2-3 until you have
stored all the desired transmitters. You can store up to 10 channels as favourites.
▶ Please use the little yellow reception quality icon on the lower right corner of the display to align your
antenna optimally.
In daily operation:
▶ Start the DAB + radio using the „DAB“ key on your remote control.
▶ You can use the numeric pad of your remote control to retrieve stored stations.
▶ The DAB + radio disposes of digital text functions, which are shown on the display. By pressing the „Info“
key on your remote control once or several times, you can get further information depending on the trans-
mitter. Press „Enter“ to switch the display to full screen.
▶ Once you press the „le arrow“ button on the remote control you return to the complete station list.
▶ Press th e „le arrow“ but ton twice on the rem ote control to call other settings o n the device. The DRC f unc-
tion is not popular in Germany because the DAB + transmitters do not support this, the function „Invalid
shorten“ removes non-receivable transmitters, e.g. aer a move.
▶ Use the keys „Forward“ and „Back“ to change the station to the next higher or lower station.
46 47
Page 25
The Internet radio
In daily operation:
If you have your CVR-200 connec ted to the Internet as described, you shall receive Internet radio
without any further settings.
Your Internet radio shall be automatically connected to one of the largest databases of Internet transmitters,
with more than 25,000 broadcasters and podcasts worldwide. You can access the Internet radio pressing the
key “IR” on the remote control or just by pressing repeatedly the „Source“ button on the device.
▶ Start the Internet radio using the key „IR“ on your remote control.
▶ Selecting transmitters:
▷ By pressing the „Menu“ button on the remote control and selecting „Last listened“, the display will
show you all the last stations you have listened to.
▷ Press th e ”Menu” key on th e remote control an d choose sele ct „Stat ion list /My Favourite ” and the display
will show you all t he tr ansmit ter s that you hav e marke d as favo urites . Mark t hem as f avour ite so you c an find
them again q uickly. To select tran smitter as fav ourites, jus t press „Enter ” on the remote co ntrol for a long
time or hold t he mult ifun ct ion kn ob on th e dev ice pre ss ed. A n unlimite d numb er ca n be sav ed as f avour ite s.
If you want to delete one of the favourites, select it using the multif unction knob on the device and h old
it pressed until the equipment asks if the station should be deleted from the list of favourites.
▷ If you press the “Menu” button on the remote control and select „Channel list / Local Germany“, all
German s tations will be shown , either ever y available transmit ter, only the most po pular ones or sor ted
by genre.
▷ Pressing the „Menu“ button on the remote control and selecting „Channel list / station“ all available
stations worldwide will be shown, sorted by country, genre, popular stations or new stations. You also
have the option to search for a transmitter by entering the name.
▶ Just as described in FM or DAB + function, other than to “Favourites”, you can also save stations to the
remote control‘s number block.
▶ The radio dis poses of digital te xt function s; up-to-date inf ormation about th e program, such as tit le, genre,
etc., appears on the display. Pressing the „Info“ button on your remote control once or several times will
give you further information depending on the station.
48 49
Page 26
The media player (USB front port)
The media player (DLNA)
You can connect a removable disk (e.g. USB stick or USB hard disk with own power supply) to the USB front
port of your CVR-200. This memory medium must be formatted FAT 32 in order to be read by the CVR-200.
Depending on the manufacturer of the storage medium, this may possibly be limited in its size.
The CVR-200 recognizes MP3, WMA and FLAC files with a maximum sampling rate of 48 KHz at 16 bit (FLAC)
and 320 Kbit / s (MP3 and WMA). To activate the USB media player, you can press the „Media / USB“ key on
the remote control, or you just press the „Source“ key on the device several times. Select „USB Play“ from
the displayed menu to play music from your plugged-in storage media. The CVR-200 shows the contents of
the medium on the display. Within the list, you can navigate with the help of the arrow keys on your remote
control, press “Enter” to choose and play the desired tracks or folders. To create your own play list, you must
select a piece of music on the stick and then hold the multifunction button on the device for a while or just
press the „Enter“ key on the remote control. This will add the piece of music to your play list.The USB function
is capable of reading out additional stored songs information. E.g. read MP3 tags. By pressing the „Info“ key on
your remote control once or several times, you can retrieve this information depending on the file.
Additional features in the media player menu:
▶ Repeat: Wh en the function is switched on, individual tr acks, playlist s or the entire content will be replayed.
▶ Shule: When the function is activated, tracks are played within a Playlist or the entire content will be
replayed according to the random principle.
Your new CVR-200 is DLNA (Digital Living Network Alliance) cer tified. This means you can access, according to
the DLNA standard, the respective music sources in your home network.
If you have connected your CVR-200 to your router and has a USB por t, you can access its NAS (Network
Attached Storage) functionalit y.
Just connect a standard USB hard drive to your router and enable NAS functionality in its configuration or
connect a NAS drive to your network. In case of problems, or if you need further information on the NAS functionality of your router, please consult the router’s manual for help.
You can play the desired tracks or folders on this hard drive or NAS drive,. This is just the best way to install a
uniform DLNA media ser ver for all of your household devices.
Now, press the key „Media / USB“ on the remote control to activate the media player. Select „Shared Media“
from the displayed menu to view a list of all media-ser ver suitable devices on your network. Choose your
installed media ser ver and then select the option „Music“.
The contents of your hard drive will be pre-sorted displayed according to various criteria, for example,
„Ar tists“, „Albums“, „All Songs“, „Genres“, or „Order“. The qualit y of this sorting is directly related to the quality
of the recorded data on the hard disk; should the MP3 tags be missing, the songs will not be pre-sorted well.
Within the list, you can navigate with the help of the arrow keys on your remote control, press “Enter ” to
choose and play the desired tracks or folders.
To create your own play list on the CVR-200 you press the key „Enter“ on the
remote control. This current track will be added to your play list.
The media player function is capable of reading out additional stored songs information. E.g. read MP3 tags.
By pressing the „Info“ key on your remote control once or several times, you can retrieve this information
depending on the file.
The DLNA media player reads MP3, WMA and FLAC files up to a maximum
stream size of 1.5 MBit / s.
Other file formats when streaming can be conver ted from many routers with NAS functionality directly on the
CVR-200 format.
Please also read the operating instructions for your router.
50 51
Page 27
Music streaming
To use Connect (Spotify)
The „streaming“ of music in the home area means the transfer of music data from an external device such as a
computer, tablet PC or smartphone to a player, such as your CVR-200.
The prerequisite is that these devices shall be located in the same network (WLAN or LAN). We briefly introduce
you here to the most common device streaming solution:
Apple® PC (Mac OS X®)
▶ The use of the Airplay® function of iTunes® is not possible with the CVR-200.
▶ Nevertheless, you can stream with the Apple Macintosh®: Please install a streaming server, e.g. the free
sow are „Serv iio®“ * (Http://ser viio.org/download) a nd start it . Through the func tion „Media / USB - Share d
Media“ you will now f ind a Serviio ® server, which ca n be used to acces s all the music from your A pple Macintosh. In cas e of problems or for fur ther informat ion, please consult th e installation inst ructions for S erviio®.
.
Windows® PC
▶ A streaming function is integrated into the Windows Media Player® * up version 8,
▶ Please activate this (see Windows Media Player® user guide): You can then use the „Media / USB - Shared
Media“ function to access every song from the Windows Media Player. In case of problems For further
information please read the operating instructions of Windows Media Player.
Streaming from Smartphone or Tablet PC (Android®)
▶ Please read the enclosed operating instructions for the App „UNDOK ™“ to learn how you can play the
music of your Android device on the CVR-200. Many modern Android devices already dispose of a function
to play music on a DLNA device. These usually ne ed to be shared on your Android device as a media ser ver.
Please also read the operating instructions for your Android device.
Streaming from iPod®, iPhone®, or iPad® devices or Tablet PC (iOS
▶ Please read the enclosed operating instruction for the App „UNDOK ™“ to know how to play the music
from your iOS device on the CVR-200. In order to make the app „UNDOK ™“ to have access to the library of e.g. ITunes®, *you must have an app, e.g. the free „media: connect“ installed and started before.
®
Streaming services
At the moment, there are a large number of streaming ser vices with the most dierent technologies in the market. If you want to use it on your CVR-200, simply connect your CVR-200 via Bluetooth to your mobile phone,
tablet or PC. Select it as output device.
To use Connect you need Spotify Premium. Details can be found on the attached flyer.
▶ Connect with your new device the same wireless network that also connects your phone, tablet, or PC
(further information you find in the operation instructions).
▶ Open the Spotify app on your mobile, tablet or PC and play a song. If you are using the app on your phone,
tap the picture to the song in the lower-le corner of the screen. Tablet and PC users please go to step 4.
▶ Tap the Connect icon.
▶ Select your device from the list.
▶ If it is not indicated, make sure it is connected to the same wireless network as your phone, tablet, or PC.
Ready! Have fun listening to music!
Remote control with the app „UNDOK™“*
If you have an iPhone®, iPod®, or iPad®, please go to the Apple App Store® and look for the term „undok“.
Important: Select „iPhone Apps“ beforehand! If you have an Android device (tablet PC or smar tphone), visit
Google‘s Play-Store® and search for the term „undok“. Install the found free app on your mobile device. Important: To operate your CVR-200, the Smartphone / Tablet and the CVR-200 must be registered in the same WLAN
network and the CVR-200 must be switched on!
▶ Now star t the app „UNDOK ™“. The app will search for all DLNA-capable devices in the WLAN.
▶ Please choose your CVR-200 from the found devices.
▶ Your CVR-200 is now connected to the app „UNDOK ™“ and you can the operate the device:
„Source“ function: Select the desired source among the available signal sources.
▶ „Browse“ function: the many options of the signal source can be selected here, depending on the selected
signal source. For an overview of the functions, please look up in the manual the respective chapter on
signal sources.
▶ „Now running“ function: provides information and covers (if available) to the currently playing track or
radio station.
▶ Additional functions „Settings“: This menu allows you to switch the device o and on, change the sound
settings, terminate the app and make further settings.
* For this app additional functions, e.g. to configure Multi-room systems, please read the enclosed „UNDOK ™“
manual.
* Audiob lock GmbH unfor tunately c an not guarante e the full fun ctionalit y or accurac y of the desc riptions fro m third-par ty so ware manufac turers as t hese are subje ct to continu ous develop ments or chan ges which can n ot be influenc ed by Audiobl ock GmbH.
52 53
Page 28
Adapting external Remote controls
Your CVR-200 can learn the codes from other remote controls, e.g. from a T V remote control. Proceed as
follows:
• Press the „Menu“ button on the appliance for 3 seconds, then the device enters the learning mode
• „Press on Block FB button“ will appear on the display. Press a button on the remote control to select a
function to transfer.
• The following appears on the display: „Code from Block FB accepted“ and shortly aerwards „Please
press external FB key“. Now press the button on the extern remote control to release the function to be
transferred.
• „Key code has been transmitted“ appears on the display. Then it jumps back to fist point.
• Repeat these steps until all functions (max. 50) have been transferred to your remote control unit. Exit
the programming by pressing again the „Menu“ button on the device. If you have programmed a key
incorrectly, simply repeat all steps with the right keys, the device will over write the faulty settings.
• To delete all programs, press and hold the keys „Back“ on the device, and then restart the device com-
pletely.
Connect external devices via Bluetooth
Your device is equipped with a modern Bluetooth® inter face. This allows you to pair any Bluetooth® source
with the CVR-200. Possible sources are smartphones (iOS, Android, Windows Phone), Tablet PCs (iOS, Andro
id, Windows 8) or media players (iPod, similar) with Bluetooth® function. Connecting external devices via Bluetooth® Your device is equipped with a modern Bluetooth® interface. Through this you can pair any Bluetooth
source with the CVR-200. Possible sources with Bluetooth function are smartphones (iOS, Android, Win
dows Phone), tablets (iOS, Android, Windows 8) or media players (iPod, similar). To activate the Bluetooth®
function, press the „Source“ button until Bluetooth® appears on the display, then activate the Bluetooth
function on your external device. Pair an external device with the CVR-200: On your ex ternal device, search for
Bluetooth devices in your surroundings, select your CVR-200 and begin the pairing (coupling the devices) In
case of problems, or if you need fur ther information about the pairing, please consult the instruction manual
of the device you wish to pair with your CVR-200. Aerwards you can activate the music playback function of
your external device and your CVR-200 will play the music. Please note that you can only link sources using
the built-in Bluetooth function. The pairing of, for example, external speakers to the CVR-200 is not possible!
®
-
-
Connect your Bluetooth headset to the CVR-200
With the CVR-200 you have the possibilit y to connect a Bluetooth headset via Bluetooth. Please switch your
headphones to the parr y mode. press the „BT Headphone Parring“ button on the device. Then press the button
again and your CVR-200 will now search for your Bluetooth output device. In this mode the CVR-200 connects
automatically. If you would like to deactivate the parring mode again, please hold down the button „BT Headphone
Parring“ for approx. 3 seconds.
54 55
Page 29
Setup up and operation of multi-room systems
To integrate your CVR-200 into a multi-room system, e.g. to the Smar tbox SB-100 from Audioblock, please read the supplied instructions for the App „UNDOK ™“, which is mandatory for the configuration.
Please note that the multi-room functionality is only available from 01/2016 onwards!.
The optical connections
The rear optical connections of the CVR-200 (also S / PDIF® or TOSLINK®) process stereo light wave signals in
digital form (no Dolby® surround or similar). These connections are particular ly suitable for external CD players,
data record ers or many modern te levisions. For mos t televisions, th e optical audio outpu t on the TV menu mus t
first be activated. For the connection, please consult the operating instruction of the exter nal device. A suitable
cable is available in an accessory shop.
The pre-out output
The rear pre-out output sends high-level electrical audio signals in analogue form. These signals will not
change in sound and volume aer the settings made on the CVR-200. This output is particularly suitable for an
additional amplifier, e.g., an active subwoofer in a second room, or radio loudspeakers, e.g. for terrace or
kitchen.
The Rec-Out output
The rear rec-out output sends high-le vel electric al audio signals in analogue for m. These signals will not change
in sound and volume aer the settings on the CVR-200, but transmitted unchanged from the respective signal
source. This output is par ticularly suitable for recording devices such as tape recorder or cassette recorder. The
USB connection
The coaxial connection
The rear coaxial connector of the CVR-200 processes electrical stereo audio signals (no Dolby® surround or
similar) in digital form. This conn ection is par ticularly suitable for external CD players, data recorder s or satellite
receivers. For the connection, please consult the operating instruction of the external device. A suitable cable
is available in an accessor y shop.
The AUX connection
The rear AUX connector of the CVR-200 processes electrical high-level audio signals in analogue form. This
connector is suitable for all external devices with analogue audio output. For the connection, please consult the operating instruction of the external device. A suitable cinch cable is available in an accessory shop.
The TV and DVD connection
The rear TV and DVD connections of the CVR-200 process electrical high-level audio signals in analogue form.
These co nnections are suitable for all ex ternal devices w ith analogue audio outp ut, for example, for t he connection of a TV, DVD player or satellite receiver with analogue audio output (e.g. over the headphone output of the
TV). For the connection, please consult the operating instruction of the external device.. A suitable cinch cable
is available in the accessory shop.
The phono connection
The rear phono connector of the CVR-200 processes electrical high-level audio signals in analogue form. This
connection is suitable for record players with MM system (common), but not for MC systems (rare). For the connection, please consult the operating instruction of the external device. To prevent a hum, please connect an
existing earth cable to the record player and the CVR-200. A suitable disc player cinch cable with grounding is
available in the accessory shop.
The USB connection
See page 51 for a more detailed description of the USB front connector.
The line-in connector
The line-in connector located behind the magnetic cover at the front of the CVR-200 processes electrical highlevel audio signals in analogue form. This connector is suitable for all external devices with analogue audio
output, like media players, iPod®, smartphones etc. (connection over headphone output). For the connection,
please consult the operating instruction of the external device. A suitable 3.5 mm cable is available in the accessory shop
The headphone connection
The headphone jack of the CVR-200, located behind the magnetic cover on the front, allows you to connect a
commercially available headphone with 6.3 mm jack plug. A 3.5 mm jack adapter for smaller headphones can
be obtained from the accessor y shop.
The loudspeaker outputs
The CVR-200 is equipped at its back with two high-quality gold-plated terminal pairs for the connection of
loudspeaker cables. Cables can be connected either via banana plugs mounted on the cables (plug-in mounting) or via the screwable terminal heads with the stripped loudspeaker cable (screw mounting).
56 57
Page 30
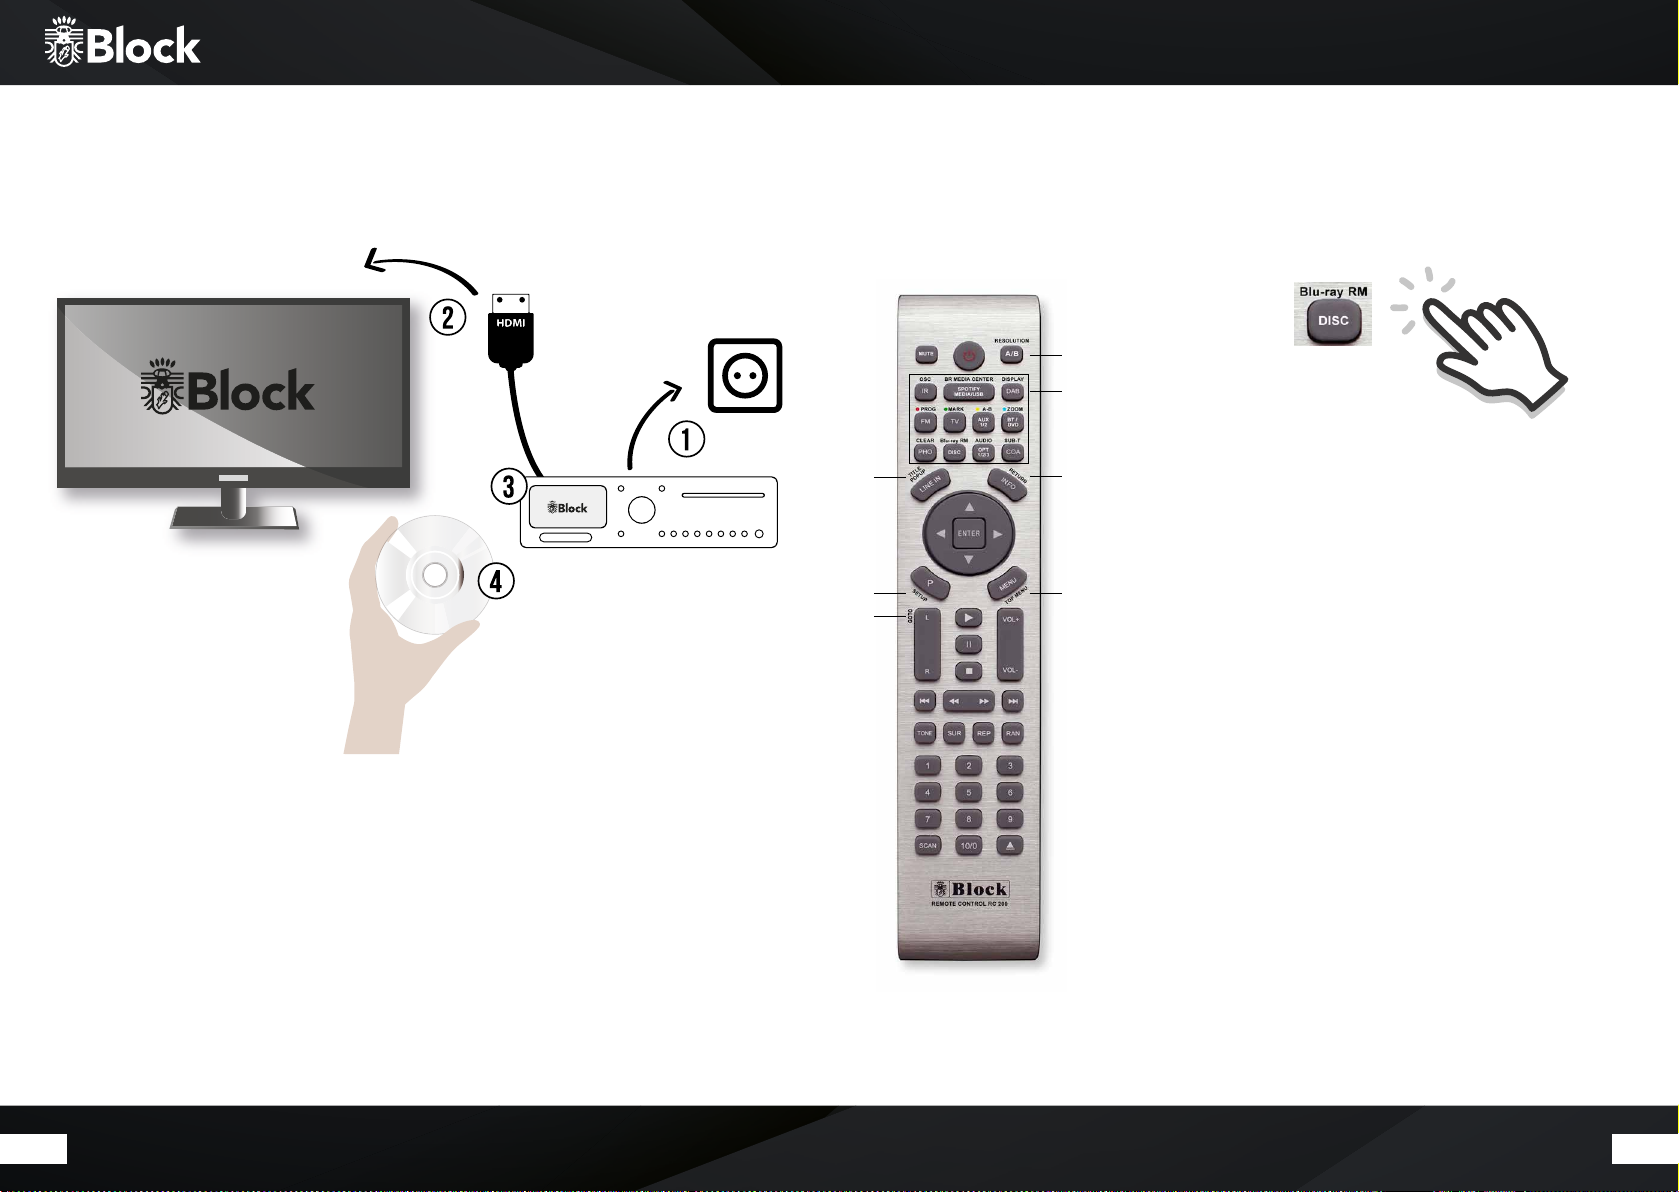
Short Manual Disc Mode Blu-ray Player
This is a short manual for the first commissioning of your new Blu-ray Player. For detailed information go to
www.audioblock.com
The Temote control in blu-ray mode
Note that button assingments change in Blu-ray mode by pressing the disc button. (Display news Blu-ray Remote)
The func tion are now adapted to the Blu-ray player. The descreption above the keys are activated. Please note that
same function of the selection buttons are dependent to the inser t disc. For example, suptitels or other features
may not be available.
1. Connect your CVR-200 to the mains and finish setup wizard.
2. Connect CVR-200 with your TV.
3. Star t your Blu-ray playe r. You can go t o there by pressing „ Disc“ on you remote contr ol. Press it again to se t you
RC into Blu-r ay mode. Now the comma nds wich are above the s election but tons of your RC apply. Wit h the setup
button you have the possibility to set various system settings of your Blu-ray player.
4. Insert the Disc. Disc star ts automatically.
5. With your RC you can choose individual manu intems of your disc.
1
2
1. Resolution: Press this button to change the resolution of the TV screen.
3
7
4
65
2. Blu-ray Tastenfelder:
OSC: To access On T V Screen Control Menu.
BR MEDIA CENTER: Press this key to open Blue-ray media source list
screen on TV, control together with moving keys(le,right,up, down,
ok) to select playing source within Blu-ray Disc, USB.
DISPLAY:
PROG: Press this key to open Program TV screen , control together
On the Blu-ray bookmark screen, press this key to delete bookmark.
MARK: Add b ookmark a t any point during p layback Vi deo. When pla ying
DVD disc, press and hold this key for about 3 seconds to open
bookmark list.
Blu- ray disc with boo kmark functio n, press this key to op en bookmark
screen on TV.
zoom out the picture. If the Blu-ray disc with bookmark function,
press this key to open bookmark screen on TV.
or turn o remote function for Blu-ray control.
3. TITLE POPUP: To open the Title menu of a disc.
4. RETURN: Return to a previous display menu.
5. SETUP: To open the setupmenu.
6. TOP MENU: To open the Blu-ray player menu.
7. GOTO: Disc starts playing at the specified time.
For Blu-ray modus push DISC
On TV s creen display the curr ent status or the disc information.
with moving keys (le,right,up, down, ok) to select playing track number
A-B: Press A-B can repeat playback of a user defined section. If the
ZOOM: During play video or photo files, press this key to zoom in or
CLEAR: To clear an entry, follow t he information on T V screen to do oper ate.
Blu-ray RM: When input soure is Blu-ray Disc, Press this key to turn on
AUDIO: Select an audio language.
SU B-T: Select a subtitle language on a disc.
.
58 59
Page 31
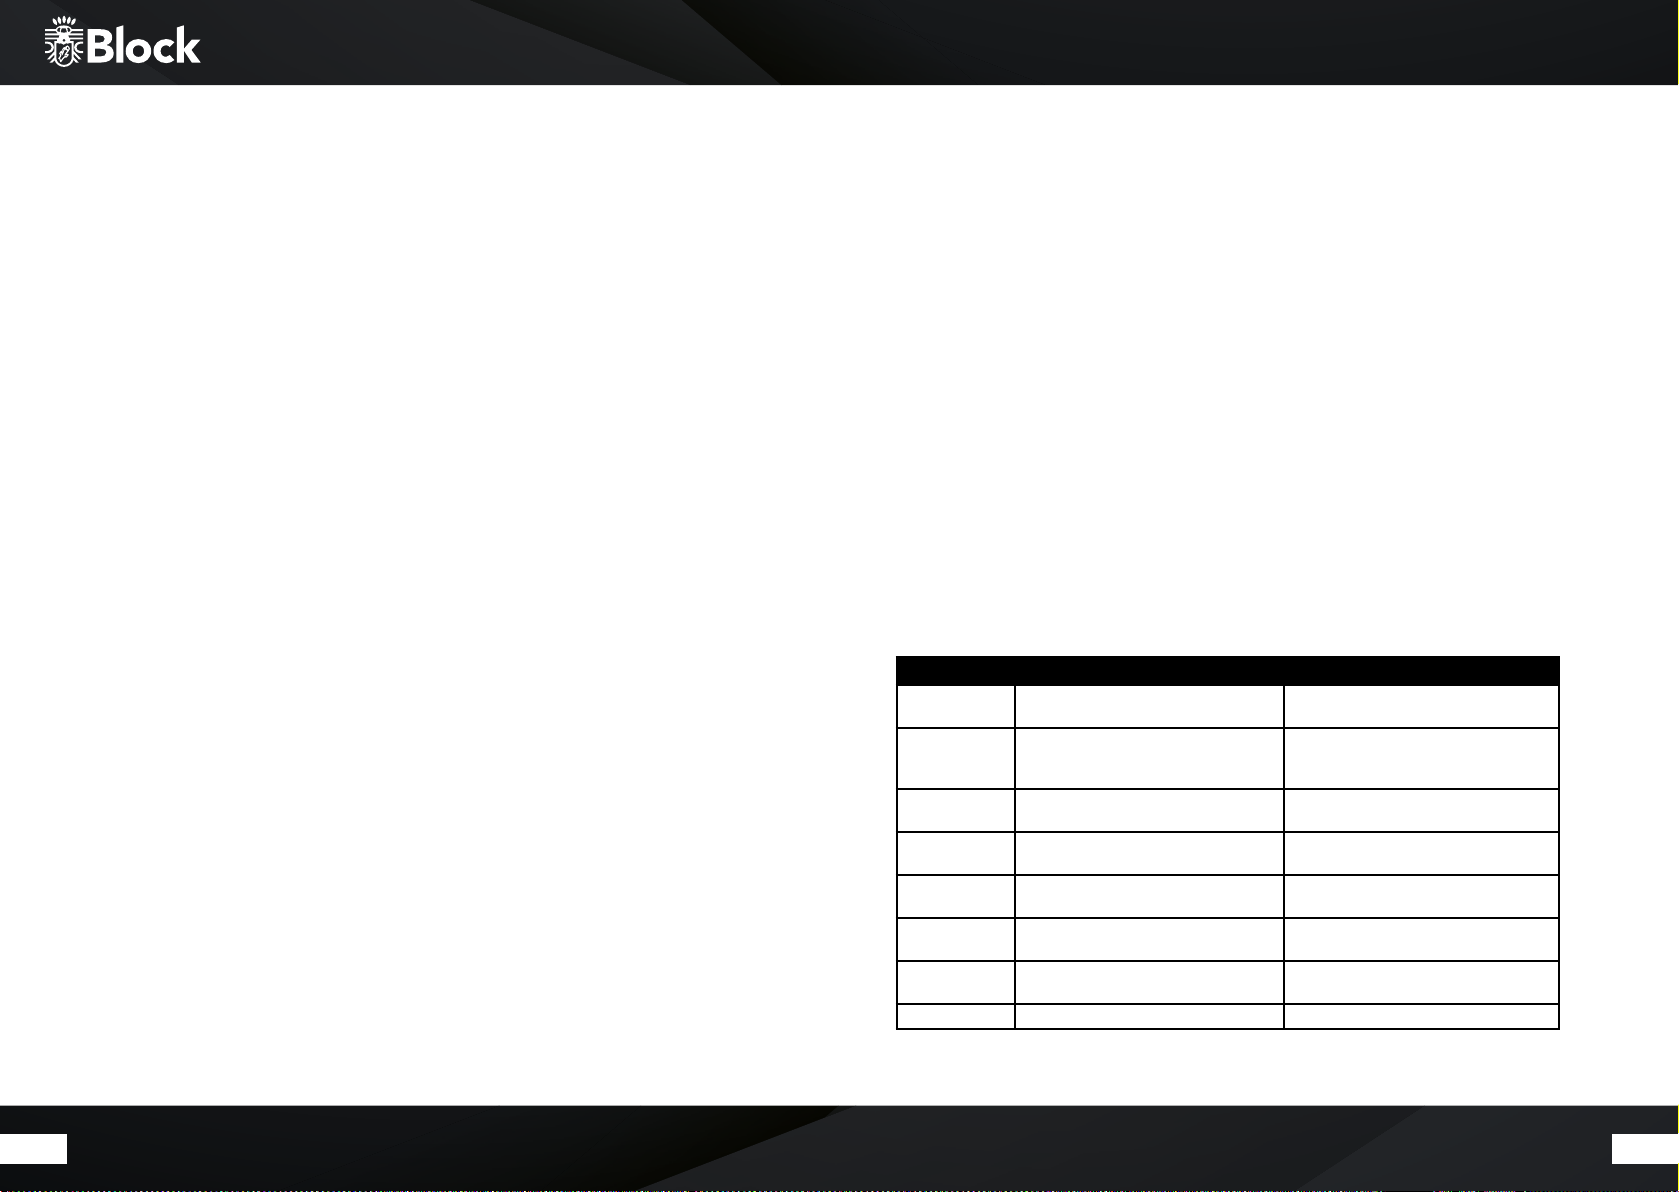
System settings
Press the „Menu“ button on your remote control or on the device and select the System settings item. In the
following menu you carry out the following settings:
Internet settings:
In this menu, y ou can change the set tings you have made for y our Internet connec tion, e.g. when y ou change the
location. You can also restart the assistant wizard, or manually set up the connection.
Language:
Select your desired display language for the device.
Default settings:
Selecting and confirming this item resets all settings back to the factory settings. Please use this feature if massive problem occurs with the receipt of data from the Internet or the general operating soware of the device.
You should also perform this function if you want to resell the device. Aer running the factory settings, a new
start requires a restart of the device wizard.
Software Update:
The CVR-200 checks regularly whether there is any update available on the Internet and points it out. You can
then cho ose to run the update. You ca n disable this feature (not rec ommended), or chec k the operating so ware
for update process.
Setup Wizard:
Selecting and confirming this item starts the setup wizard. All the settings you then make override the old settings. You can also use the setup wizard to update the time settings (summer and winter t ime) if problems occur
during the automatic changeover.
Info:
Selecting and confirming this point will show you technical information about the installed soware version,
the manufacturer ID of the device, and the name under which your device appears on the network.
Additional comfort features
Press th e „Menu“ button on your remote control or on the device and select „Main menu“. In the following m enu
you can also select „Snooze“ and „Alarm clock“ in addition to the already known signal sources:
Slumber:
Selec t „Snooze“ on your remote control using the arrow keys an d confirm with „Enter “. Th e „Sleep“ indicator ap pears . Use the arrow b uttons to s et the desire d time when t he device will au tomatically s witches to st andby mode.
Confirm your selection with „Enter“. Exit this menu by pressing the „Menu“ button again.
Alarm clock:
Select „Alarm clock“ on your remote control using the arrow keys and confirm with „Enter“. The „Alarm“ menu
appears . You can now set t wo dierent alarms. For example, e.g. the first alarm clock. In the next menu, you can
switch th e alarm on and o, set the cl ock, selec t between daily, indi vidual days, weeke nds, etc., the sig nal source
with which you want to wake up and adjust the volume. Press the „Back“ but ton to return to the pre vious menu.
The alarm function is now active.
Error Messages and Troubleshooting (Network)
Message Cause Troubleshoot
No connection 1. Incorrect password
Format Error The file f ormat is not rec ognized Make sure t he stream is en coded in WMA , MP3,
Network Error Wrong info rmation is re ceived from t he networ k The d ata from the se rver are no t readable, pos sibly
Netw ork not
available
Network timeout No resp onse o-lin e The sel ected sta tion is curren tly not availab le,
No UPnP found No UPnP se rver was fo und Make sure yo ur media ser ver is on the s ame net-
Not
authorized
update failed Sow are update faile d Check y our networ k setting s, or try ag ain later.
2. Corr ect passw ord, no conta ct to the route r
Problems connecting the router Switch on or rest art the rou ter
Wrong ent ry with th e password or n ot register ed
with th e UPnP serv er
1. Enter th e correct p assword
2. Disab le the Mac filte r on the router
or FLA C with no more th an 48 KHz. If not , please
re-encode.
rest art the CV R-200 and the rou ter
please c hange the tra nsmitter
work as y our CVR-200 and i s powered on .
Enter th e correct pa ssword.
60 61
Page 32
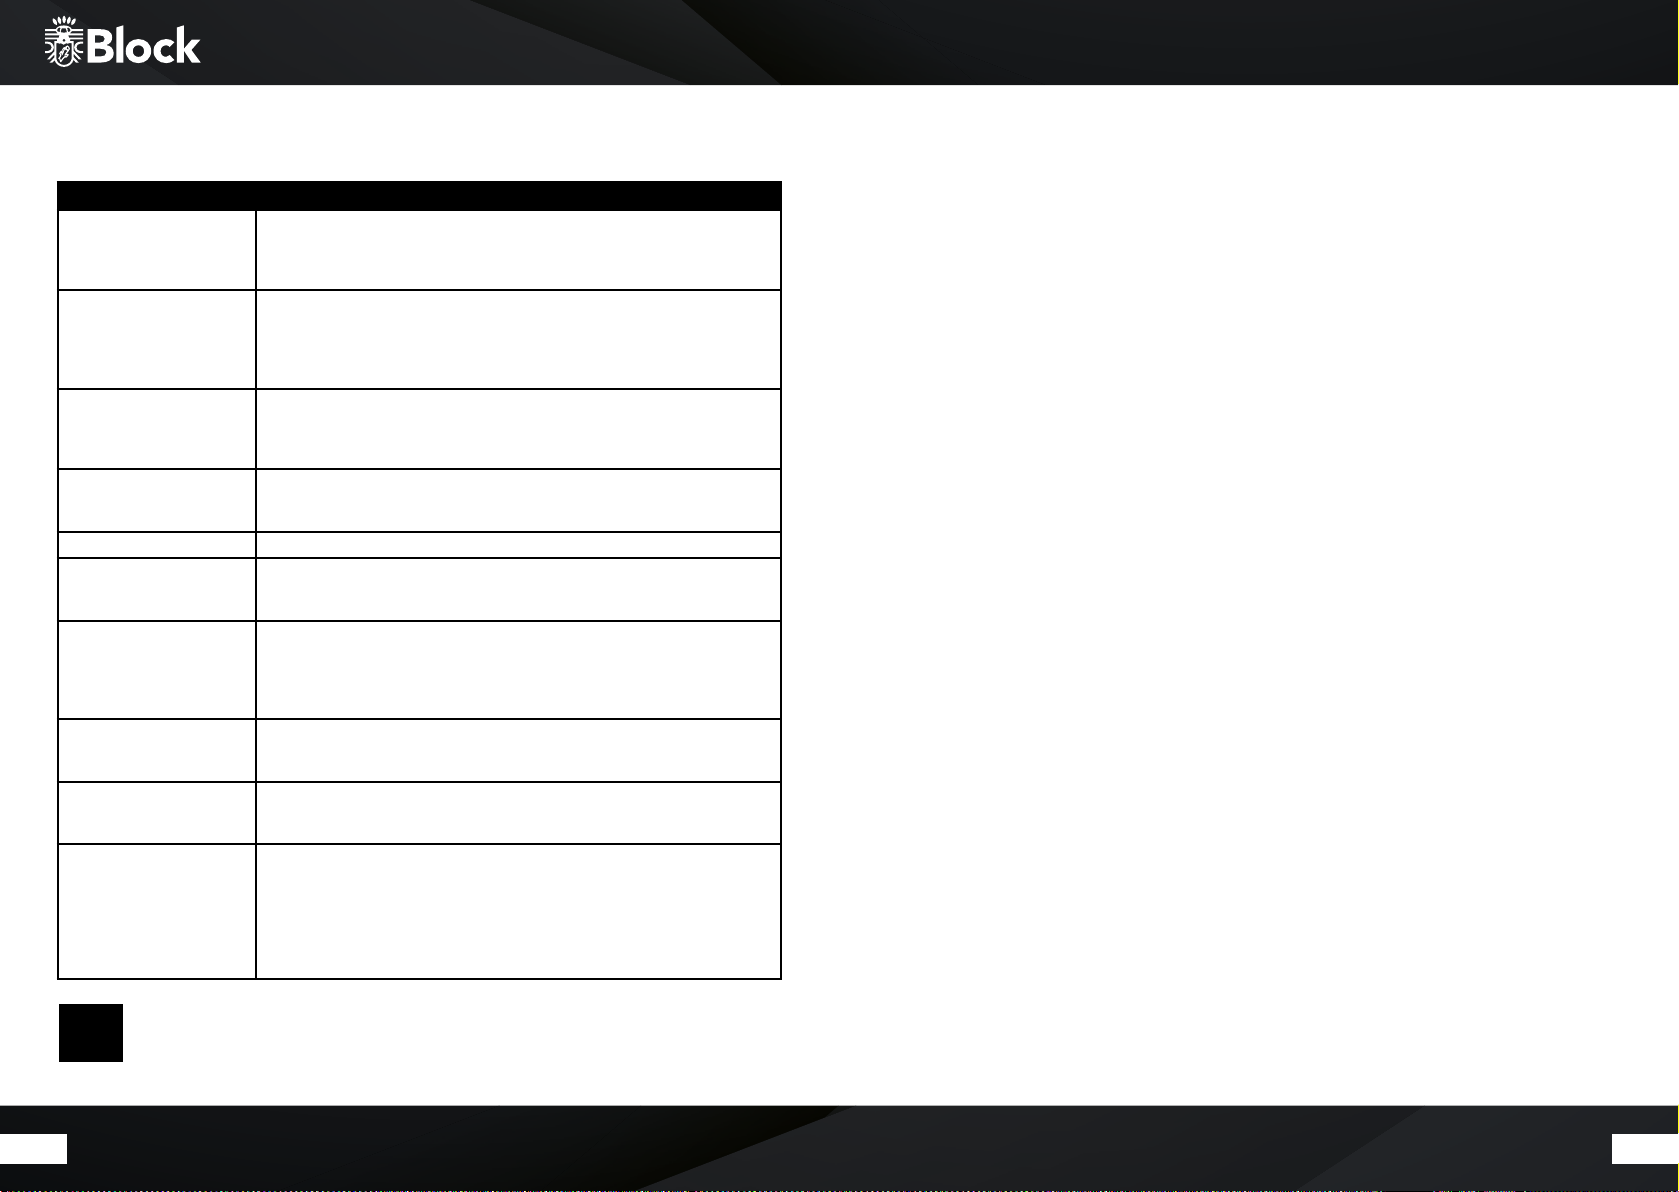
Error Messages and General Troubleshooting
Error Description Possible cause and remedy
No power e ven though the
unit is on
No sound - The unit is not on at all
No sound on a channel - The audio input is not connected correctly
Loud buzzing - An audio cable is not properly connected or defec tive
Weak bass - The phase of the loudspeake r is not connecte d correctly C hange +/-
Distorte d sound - Volume, bas s or Treble are set too high
The remote does not work - Make sure that the batte ries are inser ted correc tly
Keys do not work
(Device o r remote control)
Fault in reception - T he station is not s et correctl y
Network conne ction is not
possible
Repairs and interventions in the device may only be carried out by
!
authorized persons. Qualified personnel are made.
- The power cable is n ot connected
- The socket is defe ctive
- The fuse in the device is defe ctive - Fault must be r epaired by a technician
- The power cable is d efective
- The volume is too low
- The speaker cable is not connected properly
- No input sig nal
- The wrong input is set on t he device
- The sele ction of the input is incorrect
- The speaker cable is not connected corre ctly
- The speakers are defective
- The ear thing cable is not connecte d to the record player
- Your unit is too cl ose to another unit o r TV
- Speaker s may be defective
- There is a bridge (shor t circuit) on the loudspeake r cable
- Are the batterie s empty? Please replace them with new ones
- Point the re mote control at the receiver on the unit
- Remove all o bjects bet ween the remote control an d the unit
- Determine if the dis tance betwe en the FB and the de vice is more than 8 meters
- Turn the unit o and then on again.
- Alternatively, remove the dev ice from the power and then re connect it.
(The de vice can be influe nced by exter nal power inter ferences)
- The antenna is not properly aligne d
- Restart a station search
- The net work is current ly unavailable. Pleas e try again later
- The route r does not allow any po rt, since the device is not yet Addres s. Start the
network wizard
- Check the distance betwe en the router and t he device
- Change the s elected enc ryption method of the router
- Determine wheth er a firewall rejects the device
- Check , if used, the net work cable
Care and transport
Care and cleaning of the appliance
Before you clean it, disconnect it from the power supply. Use only clean and dry cloths to clean your appliance.
If the appliance is very dirty, you can clean the unit with a damp cloth and mild cleaning fluid. Never use liquids
such as gasoline, alcohol, petroleum or other solvents.
Transport The unit
Please keep the packaging and the instructions for use so that you can pack the unit properly for transporting
or shipping. The original packaging is designed so that you can safely transport or ship the device. Please keep
this manual for future reference.
Technical specifications
Mains voltage: AC 230 V / ~ 50 Hz
Power consumption of 350 wat ts (max.) | Standby: <2 watts | O: 0 watts
Connections:
▷ Antenna connection
▷ 3 x stereo inputs (RCA), 430 mV
▷ 1x stereo input (phono MM), 5 mV
▷ 1x stereo input (3.5 mm jack), 430 mV
▷ Network: LAN or WLAN, Bluetooth®
▷ 2 x USB connection
▷ 3 x Optical digital input (S / PDIF® or TOSLINK®)
▷ 1 x coaxial digital input (RCA)
Outputs
▷ 6.3 mm headphone jack
▷ Analogue pre-out (RCA)
▷ Analogue rec-out (RCA)
Built-in amplifier with 2 x 100 watts RMS at 4 ohms:
▷ Frequency response: 10 Hz - 30 KHz
▷ Signal-to-noise ratio:> 88 dB
▷ Channel separation:> 60 dB
▷ Distortion Factor: 0.007%
▷ Speaker outputs: A | B and DOWN
Built-in DAB + radio: 174.928 - 239.200 MHz • Built-in FM radio: FM 87.5 - 108 MHz • Built-in Internet radio with
more than 25,000 channels and podcasts worldwide • Built-in disc player (Blu-Ray, DVD, HDCD / CD-R / CDRW / MP3) • Remote control adapting function • Built-in media player (MP3, WMA, FL AC) • ADimensions (B | H
| T) | Weight: 430 x 121,5 x 330 mm 9.8 kg
Stan d 07|19
62 63
Page 33
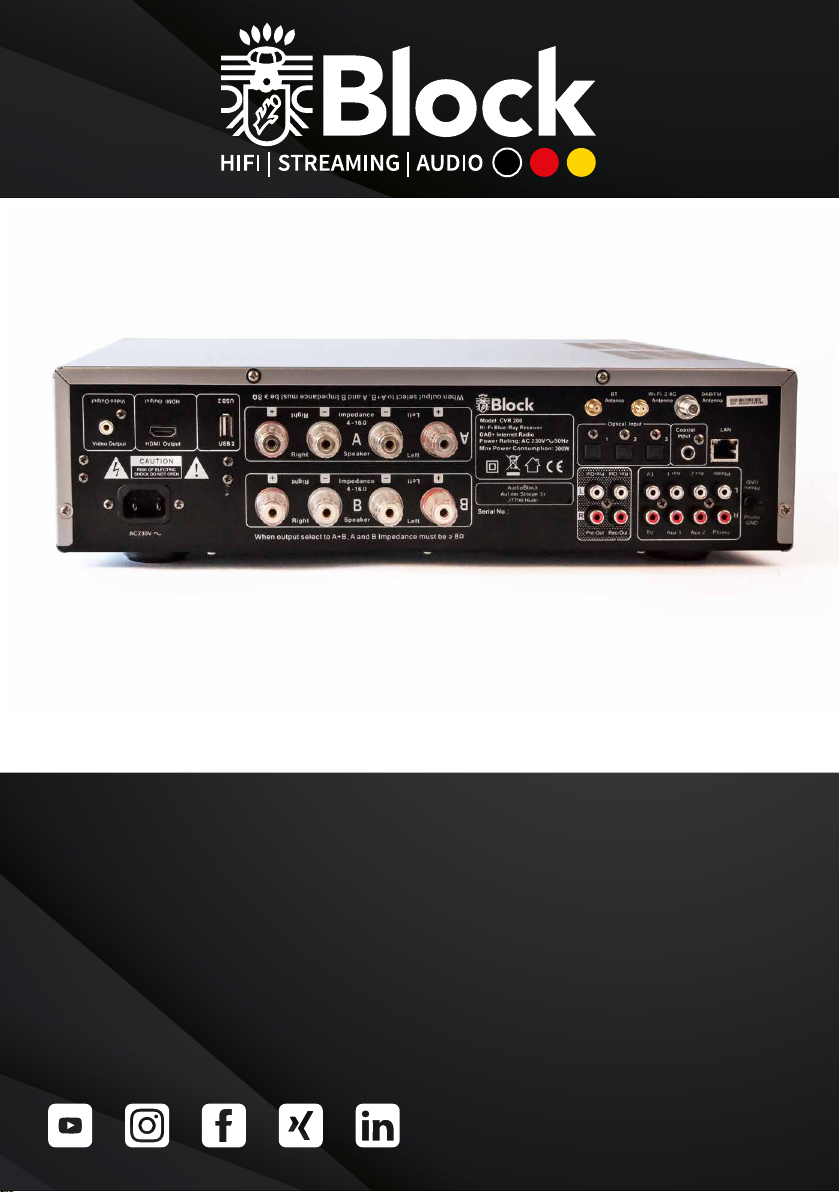
Audioblock GmbH
Auf der Striepe 3a | 27798 Hude
Tel.: +49 (0) 44 84 - 920 090 10 | E-Mail: [email protected]
www.audioblock.com
 Loading...