

Page 1
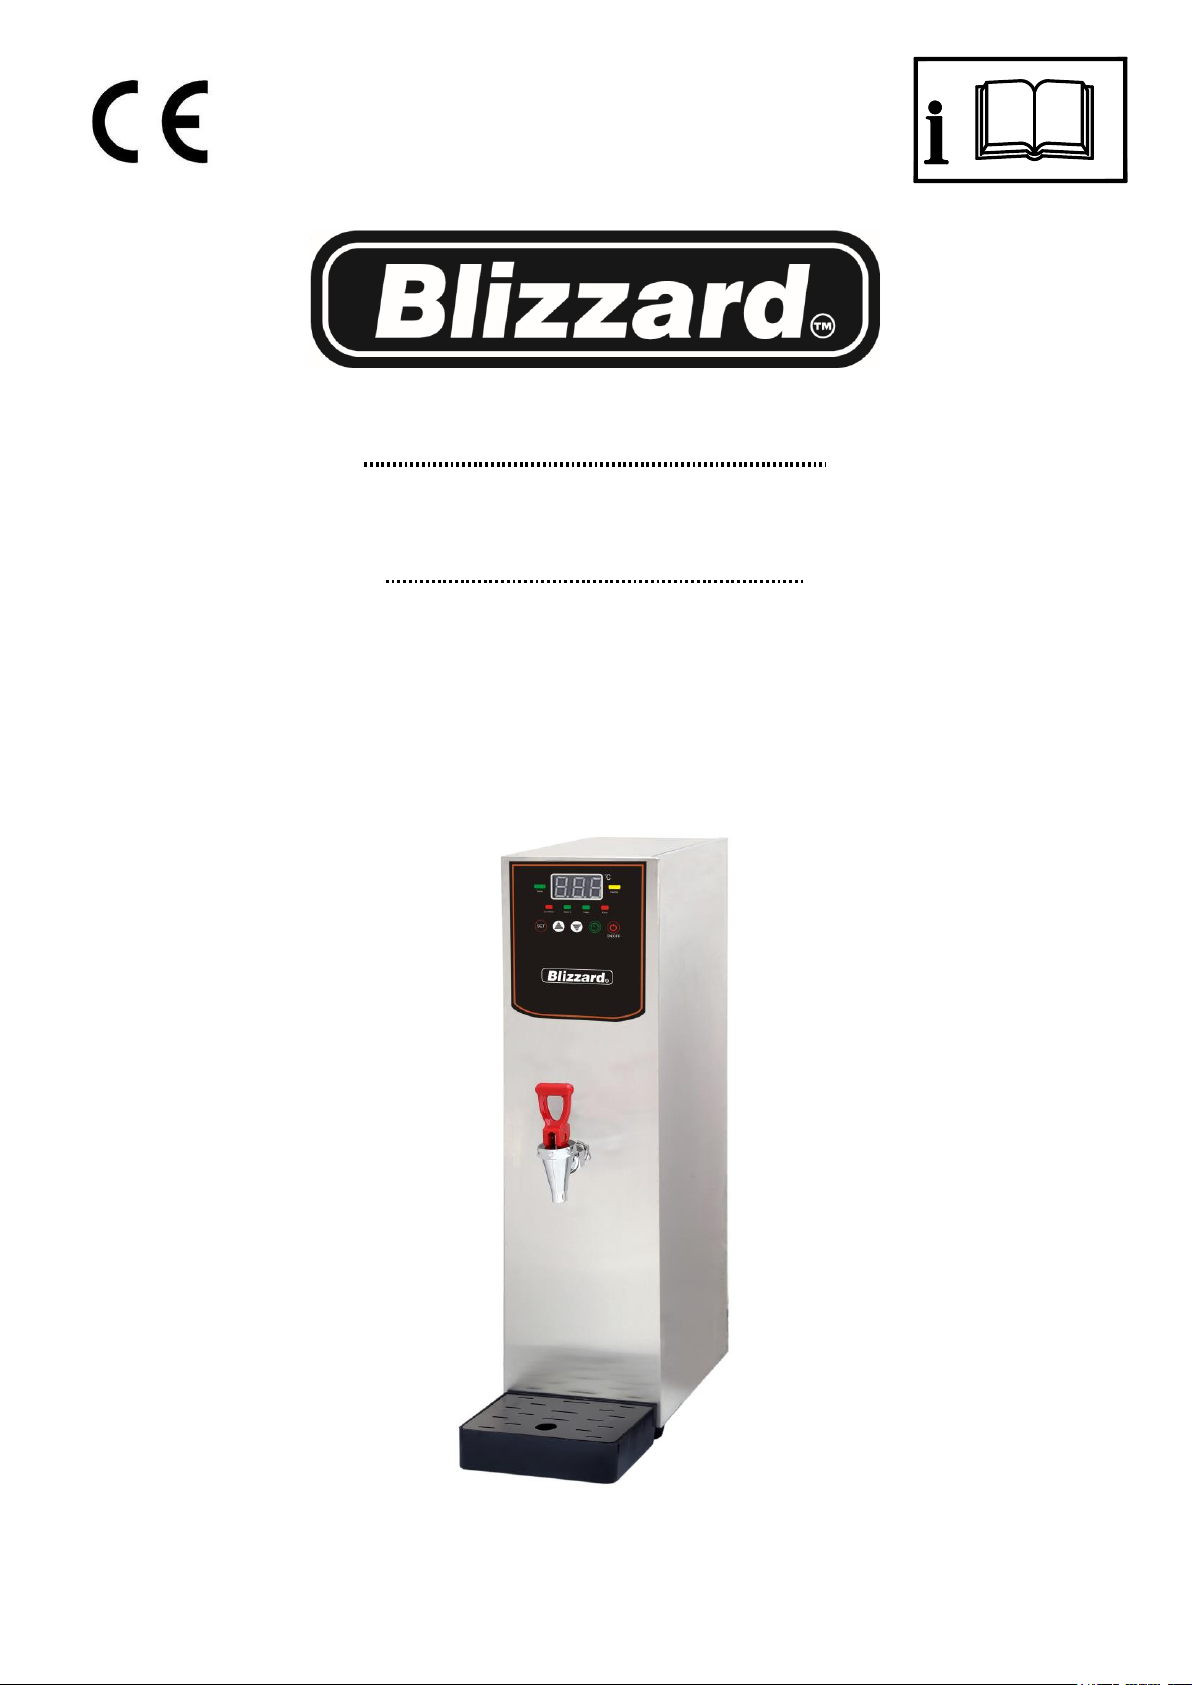
Auto-Fill Water Boiler
User Manuals
Thanks for your using of our company product, in order to ensure the product
performance give full play to the role, please have a read of this manual to avoid
unnecessary loss and damage, and get a further study of our product characteristic
installation and operation. Also please keep the manual for further reference.
Page 2

Using conditions:
Applicable water source: applicable for municipal water or other potable water,
PH between 6.5~8.5, from a filtered Soft water supply
Enter water pressure: 0.2~0.4Mpa (Rate of flow≥4L/min)
Enter water temperature: 0~40℃
Input voltage: ~220-240V±10%
Humidity: 10~60% (non condensing)
Ambient temperature: 5~40℃
Applicable Models:
AF10
Index
I. Safety instruction
II. Structure
III. Indicator display board description
IV. Working principle
V. Installation instruction
VI. Operation instruction
VII. Periodic inspection
VIII. Maintenance
IX. Specification
X. Error code and trouble shooting
XI. Electrical schematic diagram
Page 3

Ⅰ.Safety instruction
Warning:
1. Make sure the power supply coincides with the power transmission and distribution.
And the parameters of the power point should meet the requirements of power line.
2. The enter water pressure should be between 0.2-0.4Mpa (Rate of flow≥4L/min).
If the pressure is below the range, the water maybe not inflow normally; If the
pressure is above the range, it may damage the water inlet value.
3. Never alter the machine in any way, only the manufacturer specified spare parts can
be used for repairs
4. Keep the machine away from gas supply or any other flammable and explosive
objects.
5. Make sure the machine surface isn’t contact with any flammable and explosive
objects and used in a fire safety environment. Also, the water boiler should have at
least 50cm distance from any other machine.
6. Don’t do any dismounting which isn’t mention in manuals, and confirm whether
the ground wire has been connected fixed.
7. Don’t touch the water faucets with your hands and be careful not to be scalded.
8. The water boiler should be used indoor. Don’t set it up outdoor or used in humid
environment.
9. Don’t use damaged power line for connecting. Before using the water boiler, please
first replace the damaged spare parts to avoid leakage fault.
10. Before repair or maintenance, please first cut off the power and water.
11. Share ground wire with other machine is forbidden, so as to avoid being influenced
by another machines’ leakage fault.
12. Please confirm the water inlet hose is attached securely, check that the hose is not
kinked or trapped and is not leaking.
13. If the enter water pressure is higher than limit, or the water scale is too much, it may
give rise to overflow problem, Install filter and pressure regulator as required.
14. The water boiler must be installed and maintained by qualified electrician.
15. The water quality should reach the requirement as manual mention. If it isn’t
applicable for drinking, please set up a water filter.
Attention:
1. The steam vent at the rear should not touch adjacent surfaces leave a minimum
distance of 50mm.
2. Please don’t allow children to use the water boiler. Risk of scalding
3. Please use applicable municipal water through a water filter/softener.
4. Please avoid direct solar radiation which would highly increase machine
temperature and influence the electronic control circuit, or even damage it. So
please keep the humidity between 10~60%, and the ambient temperature should be
between 5~40℃.
5. The incoming water temperature should be above 5℃, not freezing. If the chamber
becomes frozen, it would be cracked and the parts would be damaged.
Page 4
6. Please don’t use corrosive cleanser to wipe the water boiler, or use hard objects to
strike or scratch it. Use only mild detergent, dry and apply stainless steel cleaner.
7. When not using for a long time, before restarting it, please first empty the chamber
and clean it, also check the integrity of the parts.
8. When water supply is cut off, don’t use the water boiler, when water supply resume,
please first empty and clean the chamber before using.
9. Do not soak the external surfaces of the water boiler, wipe down the exterior with a
damp cloth with mild detergent, wipe clean and dry.
10. Lime-scale can affect and damage internal components, it is imperative the water
supply is from a soft water supply of via a suitable water filter/softener. Failure of
the unit due to problems associated with water quality / pressure / installation /
incorrect use are not covered by the manufacturer’s warranty.
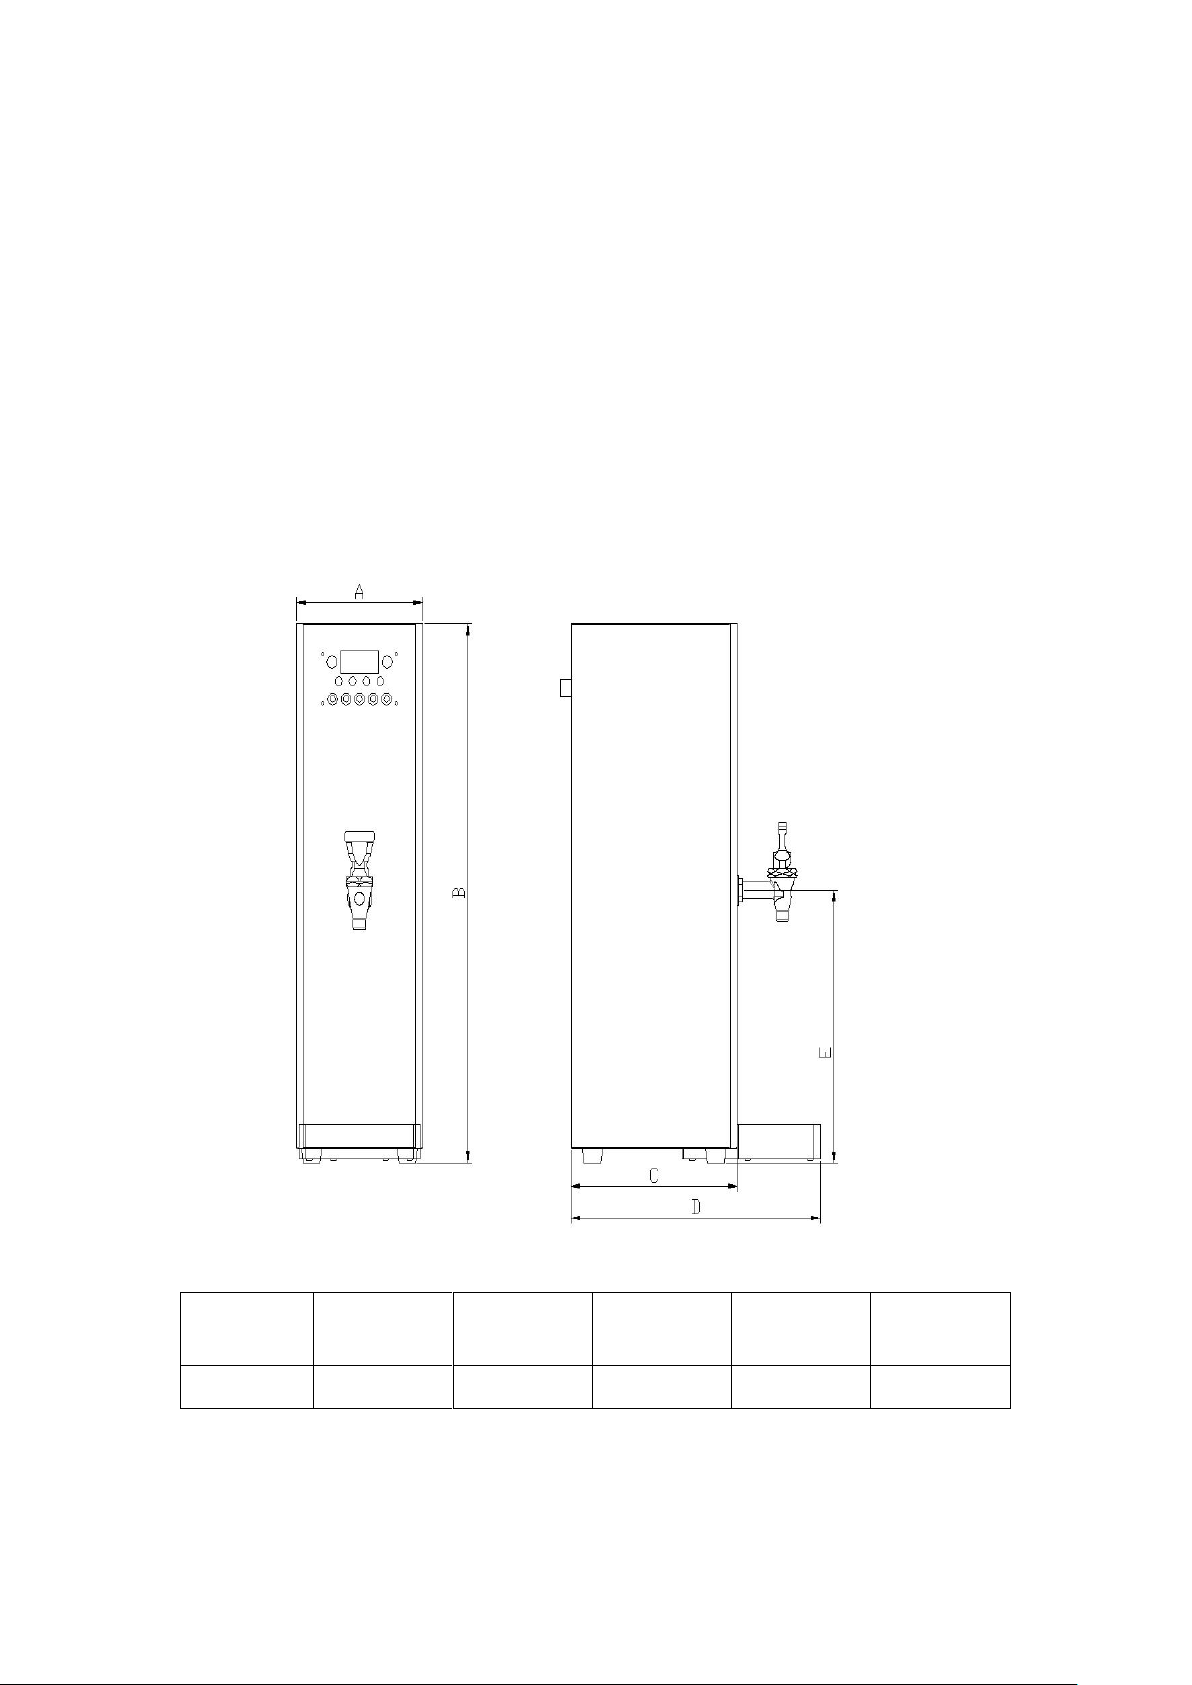
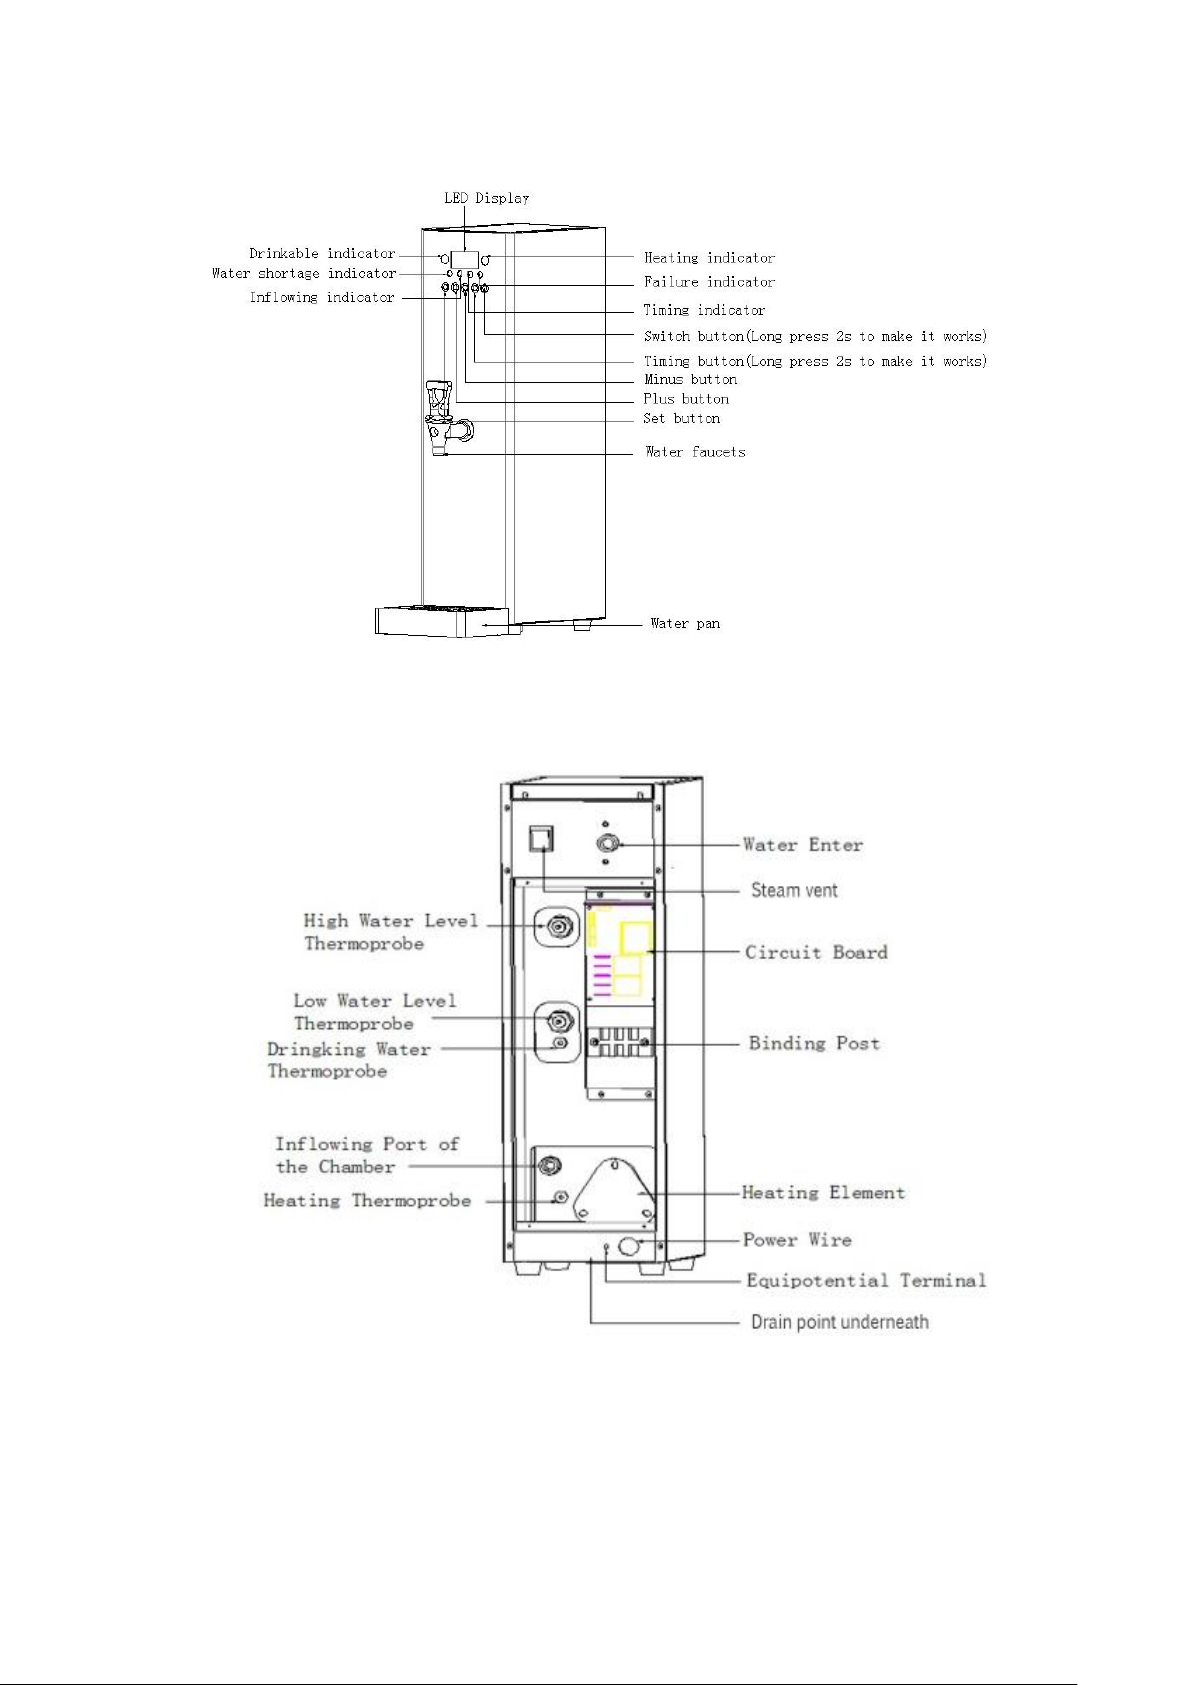
Ⅱ .Structure
Model
A
(MM)
B
(MM)
C(MM)
D
(MM)
E(MM)
AF10
190
630
240
360
300
Page 5
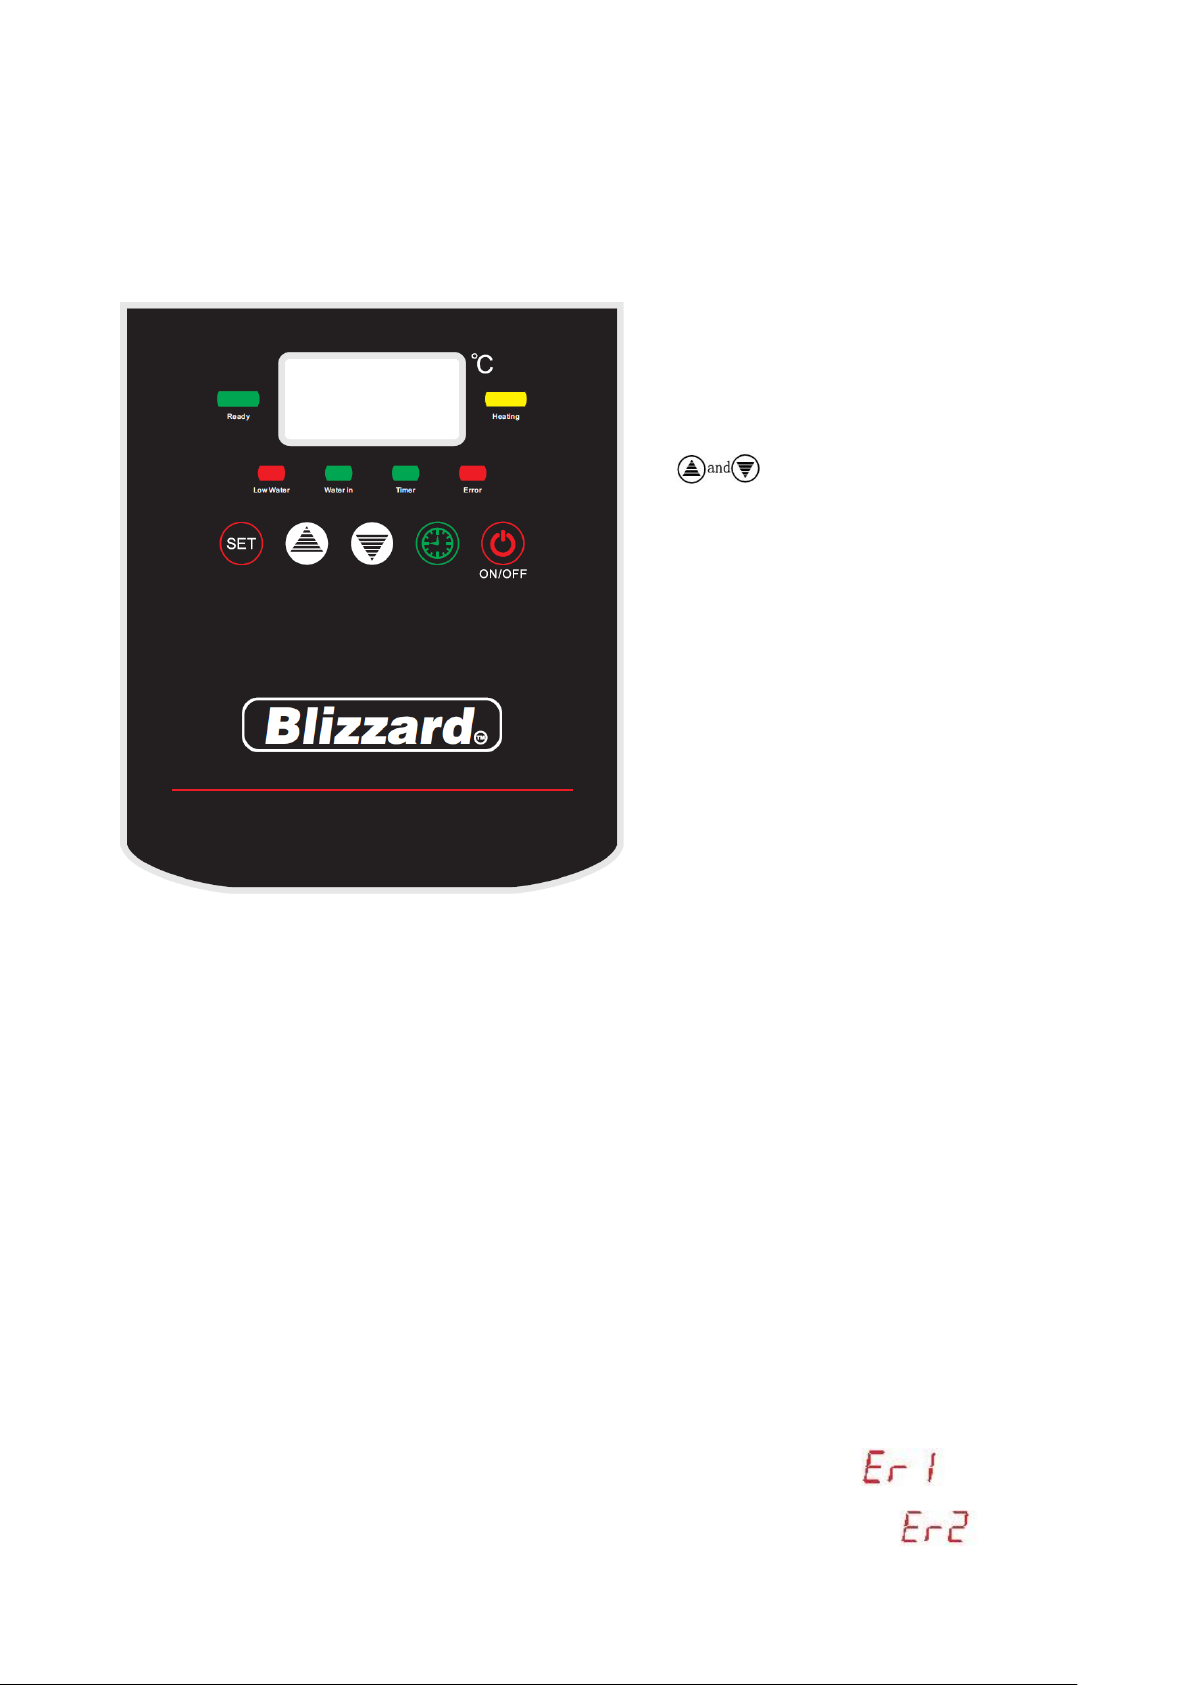
Ⅲ.Indicator display board description
1. Power switch (button)--to electrify
the circuit board and display the
“ELL” and temperature.
2. Timing switch (button)--for using
the timing function (programmable
when in the standby/off mode).
3. Set (button)--for setting the
parameters.
4. (button)—to plus or
minus the parameters.
5. Yellow light on—it means the
machine is working and the heating
elements start heating or reheating.
When the light off, the heating
elements stop.
6. Red light on—it means the
chamber is lack of water and the
machine automatically starts filling
water in. when the light off, the
water stop filling.
7. Green light on—it means the
magnetic value start to fill in the
chamber. When the light off, the
magnetic value stop working, also
the water stops filling in.
8. Timing function--green light on, now you can set up your needed time. When the
green light off, the setting operation finish, and the memory of the setting remains.
9. Error—when the red light on, it means there is something failure in the machine, and
the letter “Er” would be displayed on the display board. Please stop using the machine
and check what the failure is according to the error code.
10. Drinkable—when the green light on, it means the water have reached the preset
temperature and available to drink, when the green light off, the water is undrinkable.
11. The button of power supply and timer should be pressed for two seconds to make it
work.
Attention:
1. When the water boiler isn’t heating, the display board would show the current
temperature; “ELL” would be displayed when it is the first time filling water in or
it is lack of water.
2. Inflowing failure (the water fill in more than 45 minutes) display
3. Heating failure (heating over 35min but still less than 60℃) display
Page 6
Page 7

Ⅳ.Working principle
The technique of stepwise heating is used in this water boiler. The electrodes of
each water level and the accurate thermistor send their digital signal to the
microcomputer, then the computer control the heating element and the magnetic value
by calculating the signals, also coordinate the water temperature and the water inflow,
to make it only heat up one layer of water, boil it, then heat up another layer of water,
form in a stepwise heating cycle. Take advantage of this technique, the repeated heating
problem is eradicated, the productivity is highly increased but shorten the time to boil
the water.
--The LED display the current temperature, also the working condition of the machine
would be displayed on it.
--The PCB control the water temperature and water inflow, also it can keep the water
warm for a long time.
--Under fully automatic working, all the outlet water must have been boiled only once,
healthy to drink and safe to use.
--Safety alarm would be on if it has the danger of dry burning or if the temperature is
too high.
--Under PCB control, the failure condition would be displayed automatically.
--The top cap is of simple design, it is convenient for the user to clean the chamber
regularly.
--The back of the machine is easy to open, it need only 15 minutes to replace all the
parts, easy to maintain.
--The structure is all in stainless steel, make of beautiful and easy to clean.
Ⅴ. Installation instruction
1. The machine must be installed by suitably skilled technician, please have a
complete inspection of the machine and have a read of this manual, and check
whether the guarantee card and certification is within, keep them well in case of the
maintenance during the warranty.
2. The water boiler should be place on a solid and flat surface, and ensure the
environment around is ventilated, the temperature is less than 40 ℃ and the
humidity is less than 85%. To check whether the drain pipe is block or not, and keep
the machine away from inflammable and corrosive gas and liquid.
3. Please check whether the water source conform to the national drinking water
requirements. If the hardness of the local water is more than 300mg/L or the
incrustation is serious after heating, please install a water filter, or it will influence
the PCB control. If the tap water have a strong smell of chlorine, please install an
activated carbon water filter, or the chlorine would be heated and gasified, then
attach to the top cover and become rusty.
4. When installing the water supply pipe (supplied), ensure the water pipe is not
trapped, strained or kinked, flush the water inlet hose prior to connecting to the
boiler to avoid contamination or debris entering the boiler. The white adapter fitting
should be fitted to the water supply tap and held while tightening the water inlet
Page 8

hose to the adaptor fitting.. The water pressure should be within 0.2-0.4Mpa (Rate
of flow≥4L/min), if it is more than 0.4Mpa, the installer will need to add a reducing
value (ensure there are no water leaks on any joints).
5. The water boiler must have its dedicated power supply. Also the fuse and leakage
protector must be installed according to the product specification (the action current
of the leakage protector is 30mA).
6. This product belongs to Type “I” appliance, the yellow and green double color line
in the power line is the “ground lead”, and it should be connected sturdy to the
grounding device which is live up to electricity regulations of the state.
Warning: never connect the ground lead to water pipe and gas pipe.
Ⅵ. Operation instruction
1. First using the machine, please check if it is conforming to the installation
requirements. Then open the water switch, and check if all the joint of the machine
are fixed and have no leakage.
2. Switch on the main power, and turn on the power switch behind the machine, then
press the “Switch” button on the display board, “ELL” display on the LED and the
dry burning protection automatically launch, the magnetic value starts to inflow the
water. (to turn off the display board need to long press the “Switch” button for 5
seconds, by now the machine stop working but still on)
3. The yellow (heating) indicator light on, means the machine start heating: light off,
the heating stops. For the first time using, we suggest to open the faucets to have
one or two cycle pouring water to see if the inlet and outlet of water is working
normally.
4. When the yellow (heating) indicator light off, the green (drinkable) indicator light
on, it means that it has completed one rapid heating cycle. Before the chamber is
full, the yellow and green indicators would mutually light on, and the machine
would automatically process the “inflowing-heating” cycle. During the cycle, if the
green indicator light on and the LED display 100℃, it means the water have reached
the needed temperature and drinkable.
5. The steam would be gathered、cool down and outflow through the “Steam outlet”
which is set at the bottom of the machine. Please place in the wet pan which is
combined with the water boiler before using.
6. Machine data adjustment:
1) Long press the “Switch” button, to make the machine remain OFF, by now you
can set the data.
2) Machine remain OFF, long press the “Set” button for 3 seconds to display the
data, then use the “Plus” and “Minus” button to adjust the data, then press “Set”
button to switch or exit, and the data is automatically saved.
Page 9
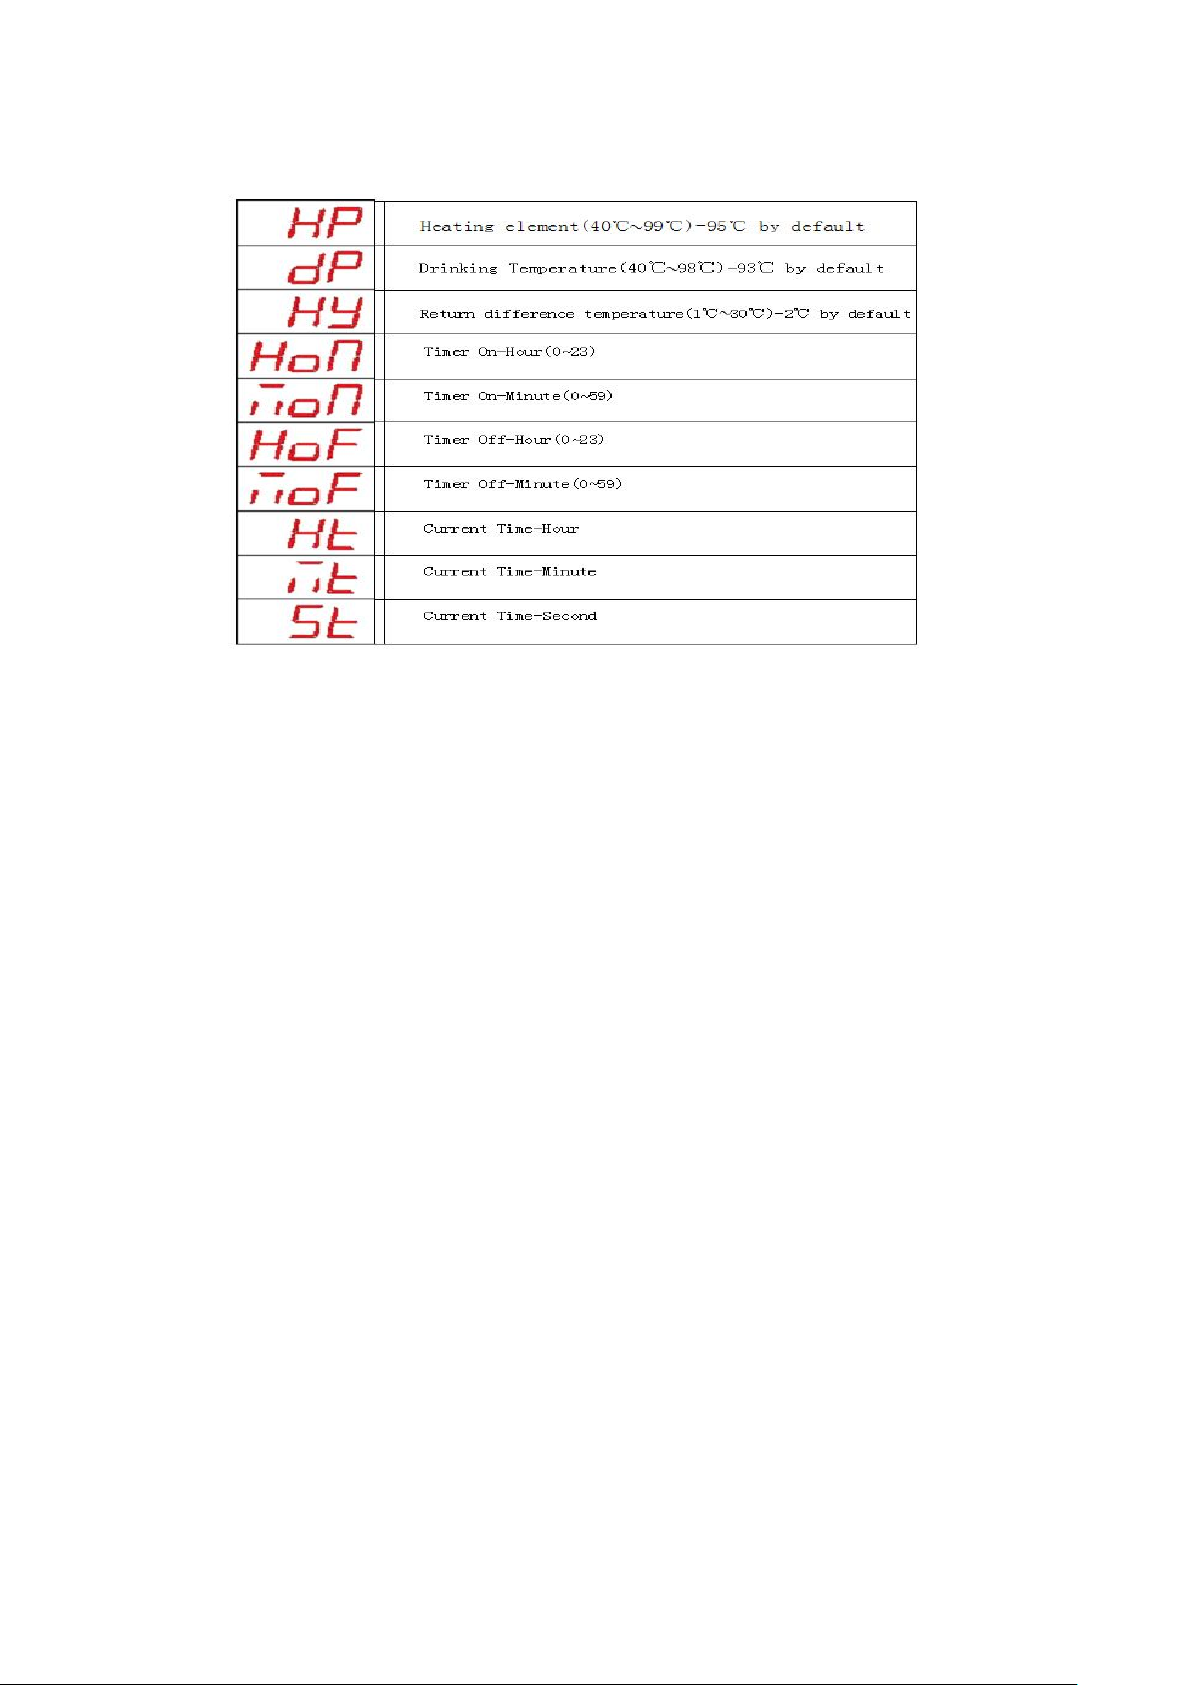
3) Display code representative function:
Remark:
● The heating temperature、drinking temperature and return difference temperature
have been set up well in factory, user cannot change the default temperature.
● The set time of the “Timer On” means the start working time of the machine.
● The set time of the “Timer Off” means the stop working time of the machine.
● Please set up the “Current Time” according to the local standard time.
7. The presets in factory:
1) Temperature: the green (drinkable) indicator light on when it reaches 93℃ (heat
up to 100℃ right along), the outlet water temperature is 93~100℃. The outlet
water temperature is the same as the displayed temperature.
2) Elevation: for adapting different regional pressure, user can contact the local sales
agent for help. By using the switch “Plateau area heating mode” in the circuit board
in the machine, user need not to have further adjustment generally.
8. Timer:
1) Machine remains OFF, first set up the “Current Time”, the display code can contrast
with the sheet above, and please set the time according to the local standard time.
Setting procedure: 1. press the “Set” button to switch “Hour”/”Minute”/”Second”
code; 2.press “Plus” or “Minus” button to set your needed time, then exit to save
the data; 3.repeat the procedure to set up other two data.
2) Setting “Timer On”, you can contrast with the sheet above when operating.
Procedure: 1. press “Set” button to switch between “Hour”/”Minute”; 2.press “Plus”
or “Minus” button to set your needed time, then exit to save the data; repeat the
procedure to set up another data.
3) Setting “Timer Off”, you can contrast with the sheet above when operating.
Procedure: 1. press “Set” button to switch between “Hour”/”Minute”; 2.press “Plus”
Page 10
or “Minus” button to set your needed time, then exit to save the data; repeat the
procedure to set up another data.
4) After finishing these three procedures before, press “Set” button to switch to OFF
status, long press the “Switch” button for 2 seconds, the machine start working,
then press the “Timing” button, the timing indicator light on, means the timing
function is effective.
Ⅶ. Periodic inspection
Inspection item
Content
Standard
Connection
To check whether the plug or power line are hot or loosen.
Once a
day
Drain outlet
To check whether the outlet is block
Once a
month
Chamber cleaning
At least once a season, both chamber and surface should be cleaned, can use a
nylon bundle to clean off the scale on the thermo probe and heating element and
loosen the nut of the drain outlet to drain out the waste water.
Once a
season
Ⅷ. Maintenance
1. The machine should have regular checking, if not using during holiday and a long
time, please turn off the power and water, and drain out all the water in the chamber
to avoid the burn-in of the parts and extend their service life.
2. Pay attention on cleaning the thermo probes and heating element, to avoid scaling
influence the working system. Also the cleanser which can be used for cleaning,
please combine with the actual circumstances to choose it. We suggest to clean the
machine once a season. (Recommend to be done by a skilled technician).
3. Open the top cover of the chamber, after cleaning or maintenance, please check
whether the seal ring is damaged and fixed, then fasten it again, replace the top
cover and try one or two heating cycle to ensure there is no steam leakage, or it may
influence the using safety and damage the machine. (Recommend to be done by a
skilled technician).
4. There is a drain outlet at the bottom of the machine, please drain out the water
regularly according to actual circumstances. All the power and water should be cut
off when operating, and please wait for a minute to cool down the water before
drain then out. Don’t knocking the machine or using sharp metal tools to clean
chamber.
5. When the cool water flowing out through the overflow tube or the machine doesn’t
heat, please immediately stop using it and check whether the magnetic valve is
blocked or the heating element is damaged, then clean it or replace it.
Page 11
6. The waterproofing grade of this machine is “IPXO”, when cleaning its case, please
first cut off the power, then wipe it with cloth. Corrosive cleanser can’t be used, and
don’t flush it directly or soak it.
7. If the power wire is damaged and need to replace, please first cut off the main power,
and replace with YZW Type、heat-resistant and anti-corrosion power wire, any other
power wire is forbidden.
Ⅸ. Specification
Model
Water Pressure
Power
Voltage
Frequency
Capacity
Productivity
Faucet
AF10
0.2-
2500W
~220-
50Hz
10L
35L/h
1
Ⅹ.Error code and trouble shooting
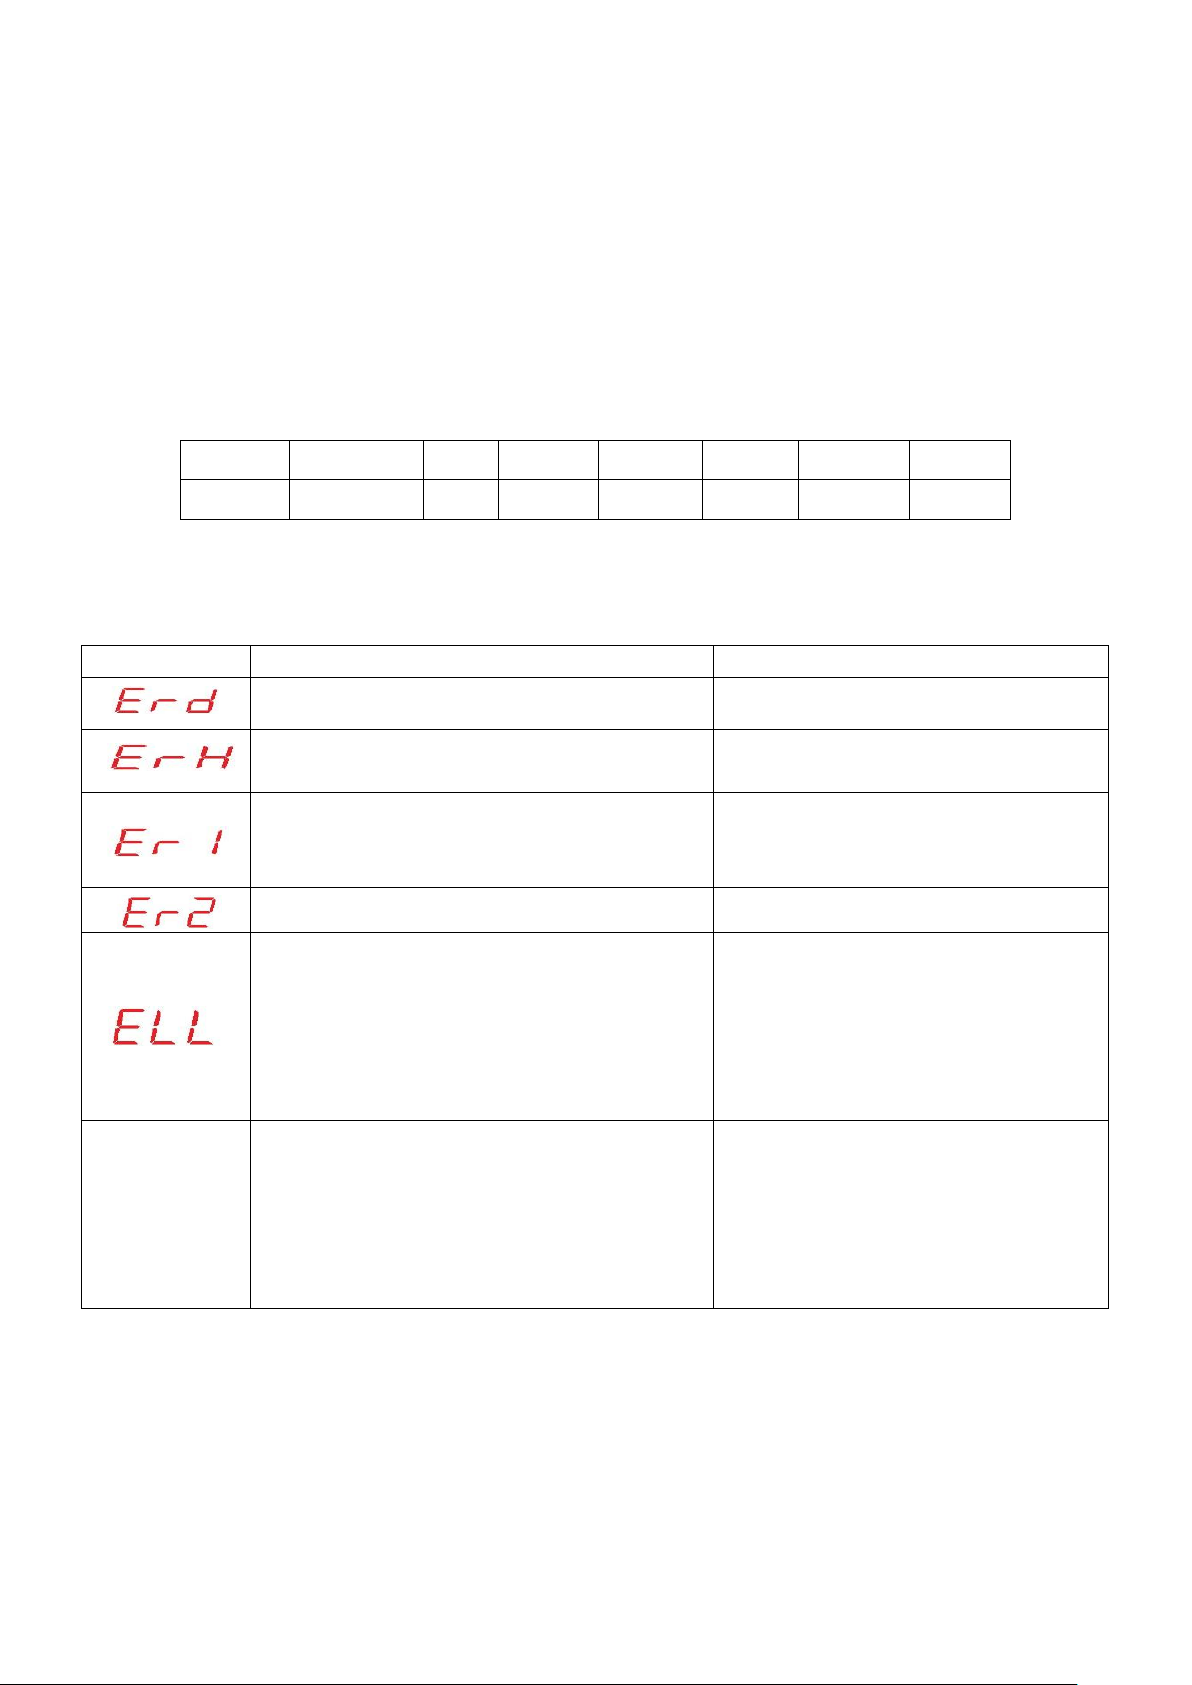
Display code
Failure
Solution
Drinking water thermo-probe failure
To check if its connection is loose
Heating thermoprobe failure
To clean up the scale attach on it and
check if its connection is loose
Inflowing failure (the water fill in more than
45 minutes
1. To check whether the water
resource is under normal supply.
2. To check the magnetic value.
Heating Failure
Replace the heating element
Water leakage
1. To check whether the water
resource is under normal supply.
2. To check the magnetic value,
replace it if needed.
3. To check whether the connection of
every thermo probes is fixed.
The timing
indicator
flashing
If there are some circuit failure appear in the
timer, the timing function would be invalid
To replace a new display board or
circuit board.
Pentland Wholesale Ltd, Blizzard House, Unit 17 Walker Industrial Estate,
Walker Road, Blackburn, Lancashire, BB1 2QE.
Tel: 01254 614444 www.pentlandwholesale.co.uk
Page 12
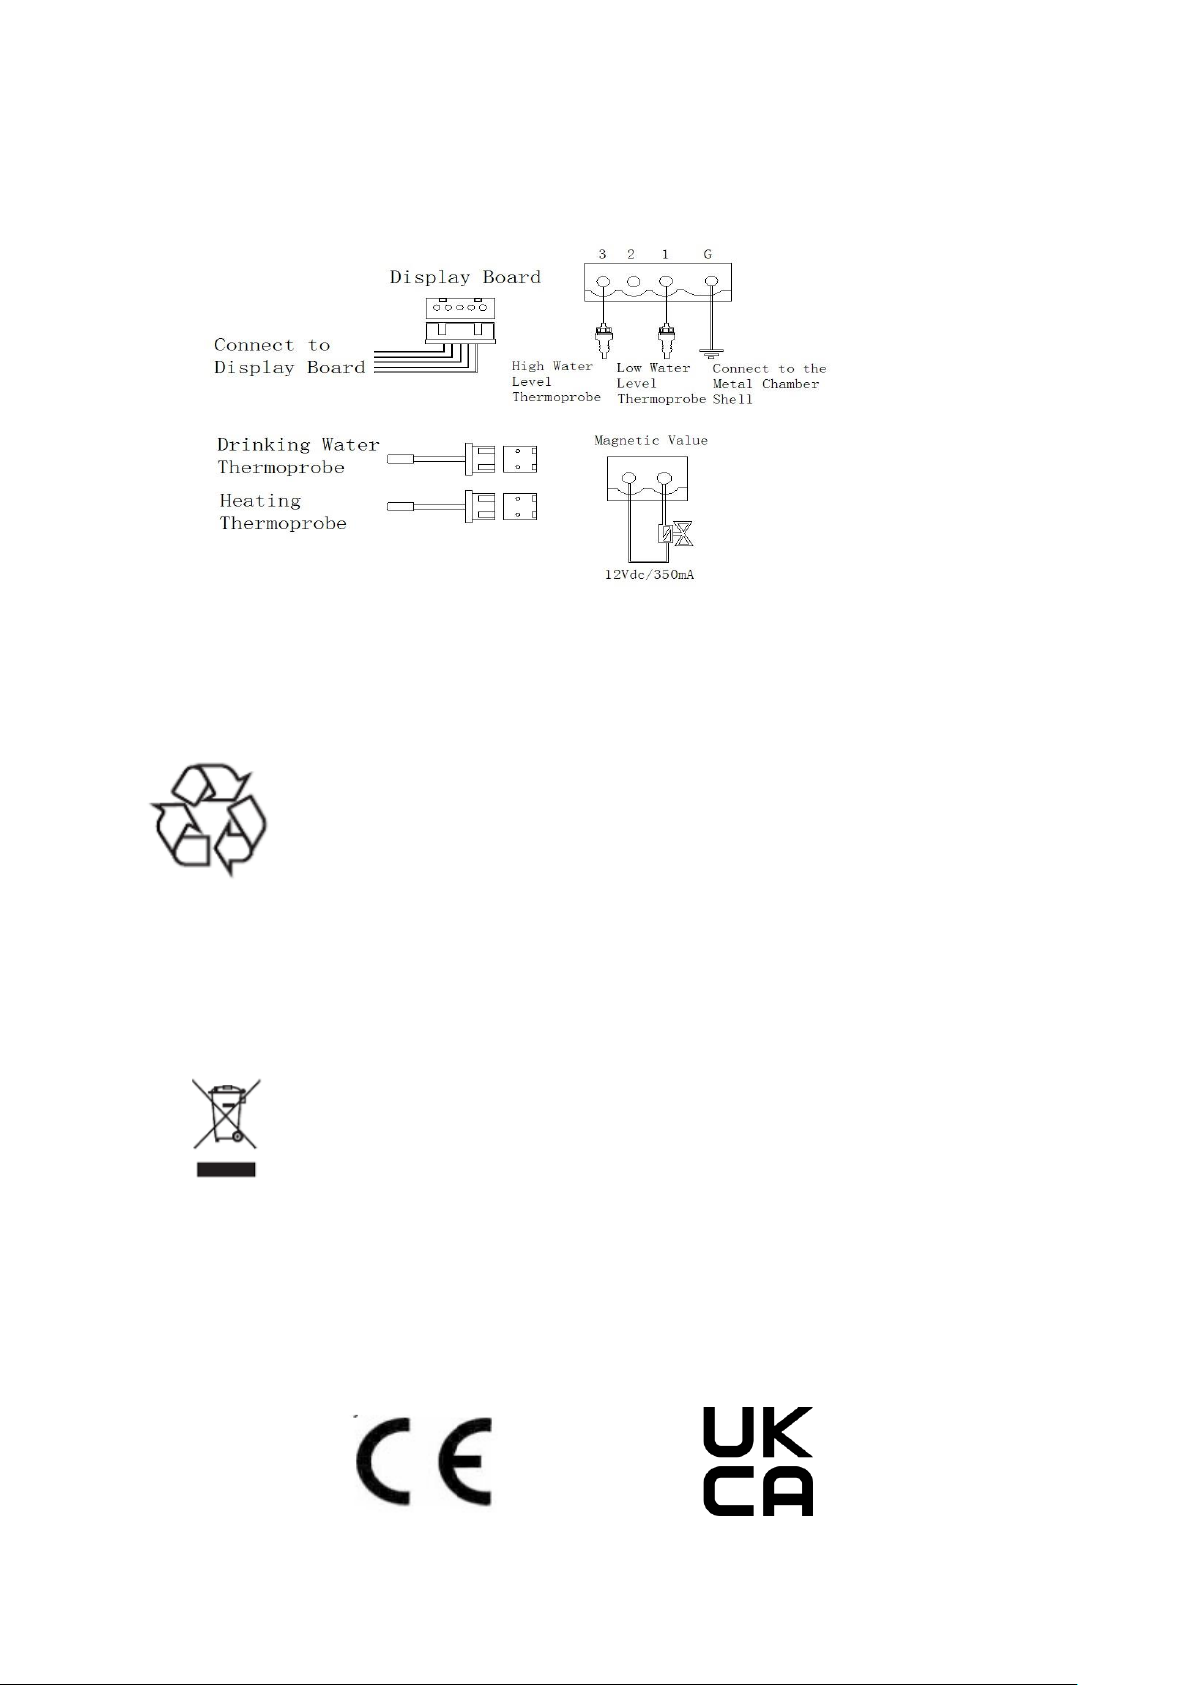
Ⅺ. Electrical schematic diagram
Disposal
EU regulations require product to be disposed of by specialist
companies who remove or recycle all gasses,
metal and plastic components.
Consult your local waste collection authority regarding disposal of
your appliance. Local authorities are not obliged to
dispose of commercial equipment but may be able to offer advice on
how to dispose of the equipment locally.
All packaging materials should be disposed of in an environmentally
friendly way.
Environmental protection
Discarded electric appliances are recyclable and should not be
discarded in the domestic waste! Please actively support us in
conserving resources and protecting the environment by returning
this appliance to the collection centers (if available).
Compliance
Parts have undergone strict product testing in order to comply with
regulatory standards and specification set by
international, independent, and federal authorities.
Products have been approved to carry the following symbol:
 Loading...