

Page 1
www.bi tzwol f.com
Simplified Mini Projector
-with WIFI Ready
User Manual
Model: BW-MP1
Page 2
Video:
3GP(H263,MPEG4)/AVI(XVID,DIVX,H264)/MKV(XVID,DIVX,H264)/FL
V(FLV1)/MOV(H264)/MP4(MPEG4,AVC)/MPG(MPEG1)/VOB(MPEG2)
/RMVB(RV40)
Audio:MP3/WMA/ASF/OGG/AAC/WAV
Image:JPG/PNG/BMP
Document:TXT
Product Parameters
Support Formats
LCD
1200 Lumens
800:1
800x480
1080p
LED
20000Hours
f=125
Manual
1.07M-3.8M
34-130 inch
4:3/16:9
Color
Keystone
Power Supply
Power
Input
Output
Speaker
System
Languages
Dimension
Weight
Wireless
16.7M
Manual ±15°
100-240V 50/60Hz
55W MAX
USB/SD/AV/HDMI/VGA/IR
3.5mm earphone
8Ω1W
Blitzwolf OS
23
201mm*153mm*67.5mm
1Kg
WIFI 2.4G
Image System
Brightness
Contrast
Native Res.
Highest Res.
Lamp
Lamp Life
Lens
Operation
Projection Dist.
Projection Size
Aspect Ratio
USB2.0
USB
HDMI
AV
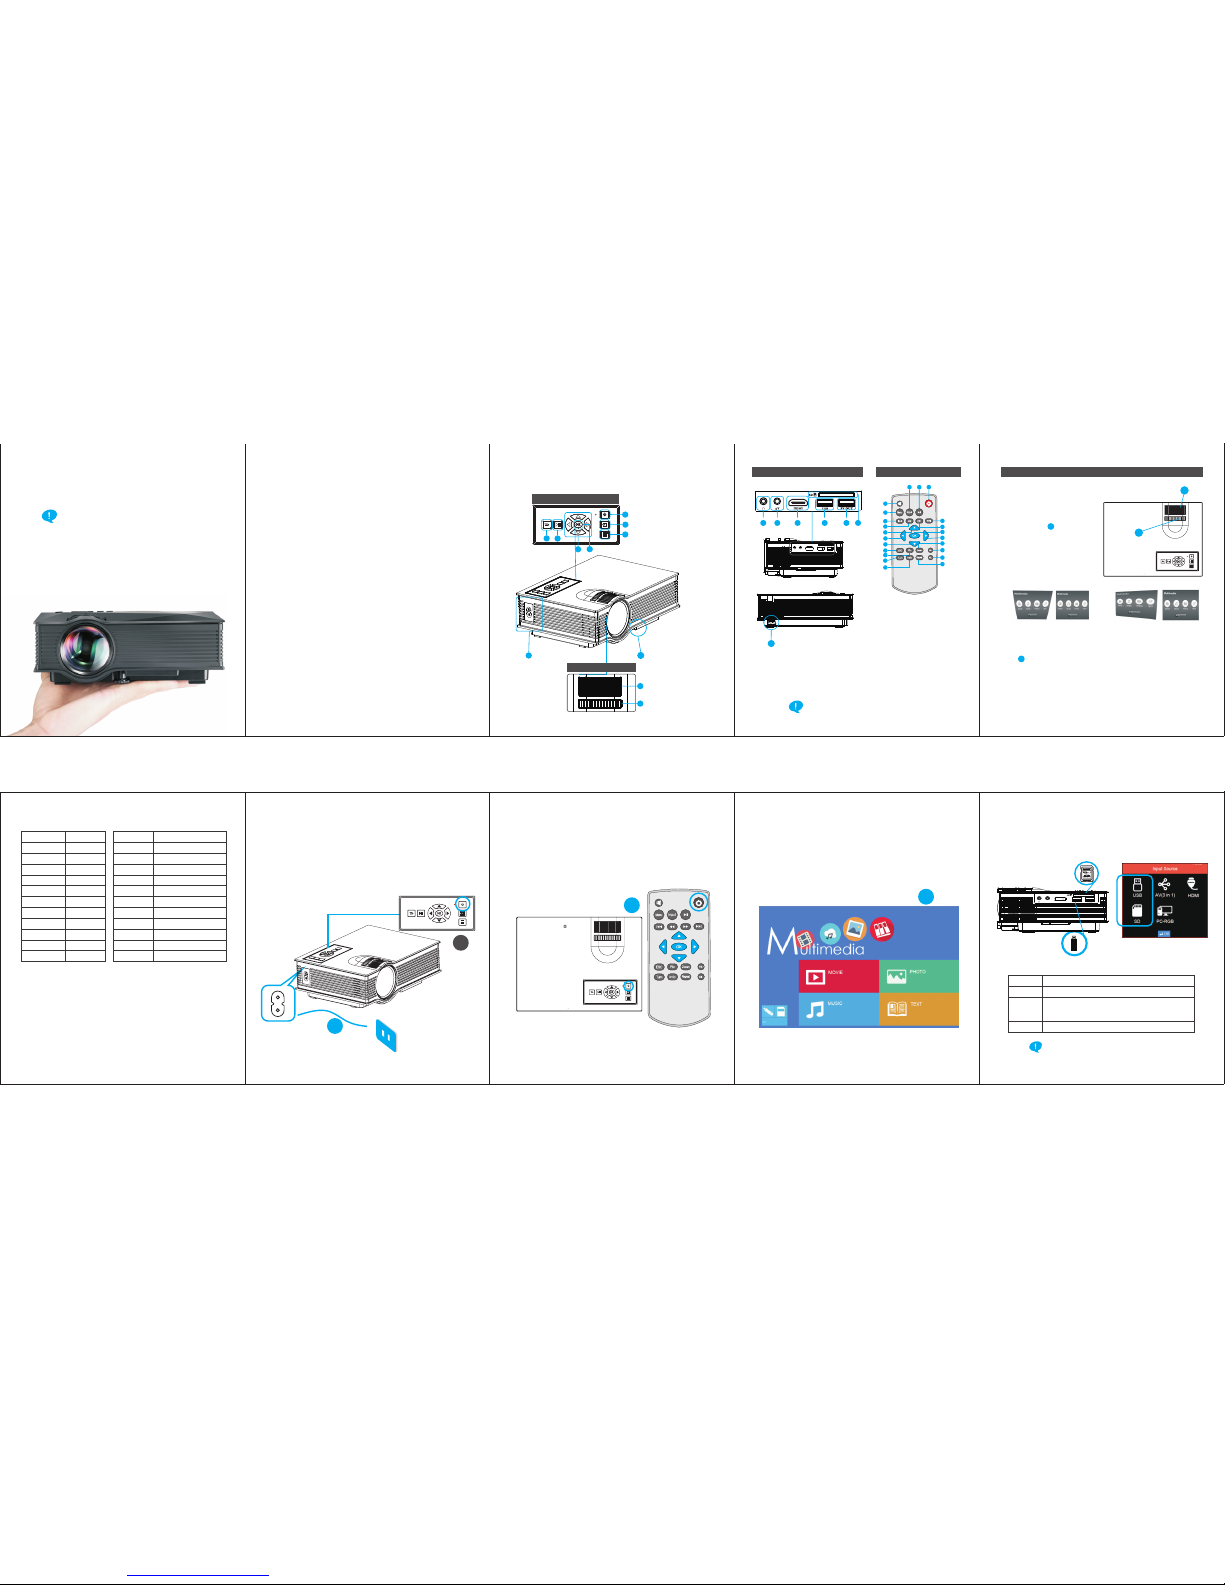
Basic Operation
A.Preparation
Setup
1. Connect the projector to the power cord, then plug the power cord into the
AC power outlet.
2. When the indicator light stops flashing the projector is in standby.
B.Power On/Off
Press the button on remote or projector.3.
1
2
3
C.Multimedia Boot Screen
If USB or SD input is selected the interactive multimedia screen will display.
You can select media to play by using the remote or projector buttons.
4.
4
Product Connection
A. Multimedia Channel
1. Insert the USB or SD card into relevant position as shown in picture below.
2.Choose signal source
(Default setting is USB input)
Supported multimedia formats
This projector does not support Dolby audio Format.
Audio
Picture
Video
TXT
MP3/WMA/ASF/OGG/AAC/WAV
JPEG/BMP/PNG
3GP(H263,MPEG4)/AVI(XVID,DIVX,H264)/MKV(XVID,
H264,DIVX)/FLV(FLV1)/MOV(H264)MP4(MPEG4, AVC)/
MPG(MPEG1)/VOB(MPEG2)/MPG(MPG-PS)/RMVB(RV40)
TXT
Due to continuous improvement,actual product may differ
slightly from what is shown in the manual.
Manual is for reference only.
1. Please read this manual carefully before using.
2. Use only the standard power cable to ensure stable power
supply.
3. Do not look into the lens while the projector is working.
4. No cloth, blanket or other material that could cover
ventilation holes should be placed around the projector
while it is operating.
5. Avoid contact with water or other liquids as this will damage
the projector.
6. Projector should be stored and operated in a clean and dry
environment.
7. Please disconnect the power supply when not in use.
8. Package with original foam packaging or other shockproof
material during transportation.
Safety Reminder
1. Exit
2. Play/Pause
3. Up/Down/Left/Right
4. Ok
5. Power
6. Input
7. Menu
Product Details
Keybo ard
1
2
3
4
5
6
7
Focus H andle
Keyst one Han dle
1
2
Lens
Remot e
1
2
3
4
5
6
7
8
9
10
11
15
16
17
18
19
20
21
22
12
13
14
Heigh t Adjus tment
AC Powe r
3
4
7
Input I nterf ace
1. 3.5mm audio output
2. 3 in 1 AV input
3. HDMI input
4. USB input
21
3
4
5
6
1.Input source
2.Play/Pause mode
3.Power
4.Next
5.Fast forward
6.OK
7.Right
8.Zoom
9.Vol+
10.Vol-
11.No function
Do not mix use old and new batteries.
For long term storage please remove batteries.
Remote should be pointed at the projectors IR receiver.
12.Information
13.Rotate screen
14.Image
15.Exit/Return
16.Down
17.Left
18.Up
19.Fast backward
20.Last
21.Menu
22.Mute
5. 5V 1A power output
6. SD card input
7. VGA input
befor e after
Focus
Put the projector with lens vertical to
the wall or screen, turn on the
projectorand then adjust focus
adjusting handle until the picture
is clear.
Keystone Correction
1
2
Focus /Keys tone
Solution
Rotate the keystone correction
nut , until image is corrected.
The keystone correction angel is
± 15º
Solution
Re-position the projector to
be parallel with the projecting
surface.
befor e after
Keyst one
Corre ction
Focus
1
2
Note: It will be difficult to focuse when the LED light is not vertically
projected to the wall, thus we highly recommend you to settle the
projector flat.
Page 3

B. VGA Input
Choose PC-RGB input, and connect projector with VGA device as below.
3. Select relevant icon and enter into the submenu.Movie for video files
Photo for picture files Music for audio file display TEXT for txt files display.
4. Press “OK” to choose the files you need to play, and press “▶|| To
display.
If you want to play certain files,press “OK” to confirm, and then press ▶
|| to display.
”
Switch to projection by computer:
Win 7 system: press"Fn"+”P”
Other system: press"Fn”+”F*”
Please Google for details.
During operation the 5V USB port can be used to charge a cellphone or tablet.
C. AV Input
Choose AV input, and connect projector as
shown below. Supports both PAL and NTSC input.
D. HDMI Input
1. Choose HDMI input, then connect projector as shown below
2. Format
Support:576P480P720P 1080P640*480 800*600 1024*768 1280*720
1440*900 1920*1080 1366*768 1280*800 1440*960 1600*1200 1680*1050.
This projector supports MHL cable and I-push connections.For a detailed
setup guide please refer to the related MHL or I-push device user guide.
, , , , , , , ,
, , , , , ,
E. Audio Output
Can connect with 3.5mm head phones or audio devices.
F. Other Connection
While working, 5V out can be used to charge cellphone or tablet .
OSD Menu Functions
B. Menu Item
Picture Menu:
Available adjustments are:
picture mode, color temperature
aspect ratio, noise reduction,
screen and rotate.
Audio Menu:
Available adjusting items are:
Sound mode, balance, auto
volume, surround sound and EQ.
A. Operation
Press “Menu” on the remote control, or “三”on the projector to get OSD,
and then press “◀/▶ until you get right menu. Use“▼/▲”to choose the
submenu you need to adjust.
”
Time Menu
Available adjusting items are:
Clock, off time, on time
:
While playing videos by USB or SD, press the “OK” button to enter the
submenu. In this
menu you can adjust playback and other settings.
Setup Menu
Available adjusting items are:
OSD Language
Restore Factory Default
Super Color
Software Update(USB)
:
Wireless Display
Wireless display function works on mobile devices with Android,
windows 8.1,IOS systems and macbook, DOES NOT support PC
or laptop with windows system. Please make sure your devices
support wireless display or airplay.
Step1: Press Input
and select BWLink mode, enter
BW-Link page.
For Android & Windows Phone
Step 2: You will see a page with
Mode(Miracast/DLNA) and
SSID, stay at Miracast page
and go to your mobile Devices.
If it’s not Miracast Mode, press
OK to switch, please wait for
few seconds till it’s changed.
b.Then click find device to begin
connection setup.
c.When connection succeeds,
mobile screen content will be
displayed on both your mobile
and projector.
For Android Phone
b.Go into this function and turn it
on, your mobile will begin searching
for BW-Link devices. Click the BWLink device to begin connection.
Step 2: Stay at the mode DLNA with SSID and password (Press OK to
switch from Miracast), then go to your mobile devices.
Step 3:
For Windows Phone
Yellow Video
White - A udio
Red - Aud io
-
Yellow
white
red
Video
Audio
Audio
High De finit ion Com ponen t
Video I nput
Analog Audio Output
c.When connection succeeds,your
computer screen content will be
displayed on both your computer
and projector.
For IOS Devices(iPhone & Macbook):
Step 1: Press Input and select BW-Link mode, enter BW-Link page. Make
sure your ISO version supports Airplay function.
BW-Link
BW-Link
BW-Link
BW-Link
BW-Link
WI-FI Ready
SSID:B W-Link-1 E000CE
Mode:M iracast
BW-Link
WI-FI Ready
BW-Link -XXXX XXX
BW-Link -XXXX XXX
SSID: BW-L ink-1E 000C E
BW-Link
WI-FI Ready
BW-Link
WI-FI Ready
BW-Link
WI-FI Ready
Page 4

Must Know Before Use!
1.This projector outputs definition of 800*480 at most, if you are playing
phone videos with lower than 480P definition, it will display as you phone
video. If the video is higher definition, it will display no more than 480P.
2.They input USB port is only for reading USB storage devices, can not be
used for transferring datas from computer or mobile devices.
3.This projector is made for home entertainment, not supposed to be used
on meeting of business presentation.
4.Due to DRM, there will be problem playing videos of YouTube and Netflix,
please contact YouTube/Netflix if they fail to play!
5.Due to the copyright, this projector is unable to play Dolby video source, if
you found there's no sound when playing HD video, please do as the
following steps to transcode the video.
Step 1: Download a video transcoder online, such as Handbrake,
Formatfactory or Compressor, you can Google it or download at other
software websites.
Step 2: Use the transcoder software to transcode the original video into
another format, such as .avi, .mp4, .wmv.
Step 3: Go to your WiFi page and
connect with BW-Link-xxxxxx,
password shown on the projector
screen.
Step 4: Click the Airplay and
choose the BW-Link-xxxxxx, turn
on the Mirroring.
 Loading...