

Page 1

Toll Free (888) 633-7840
www.blindschalet.com
Installation and Care Instructions : Clutch Operated Roller Shade
Tools Required:
Pliers
Carpenters level
Measuring tape
Power drill and drill bits
Screwdrivers or bits for drill
Starting installation: *The surface you are mounting shade on must be solid enough to support the
weight of shade and tension created by operation of chain operated clutch.
* Surface must be level or allow you to install mounting brackets level to each other.
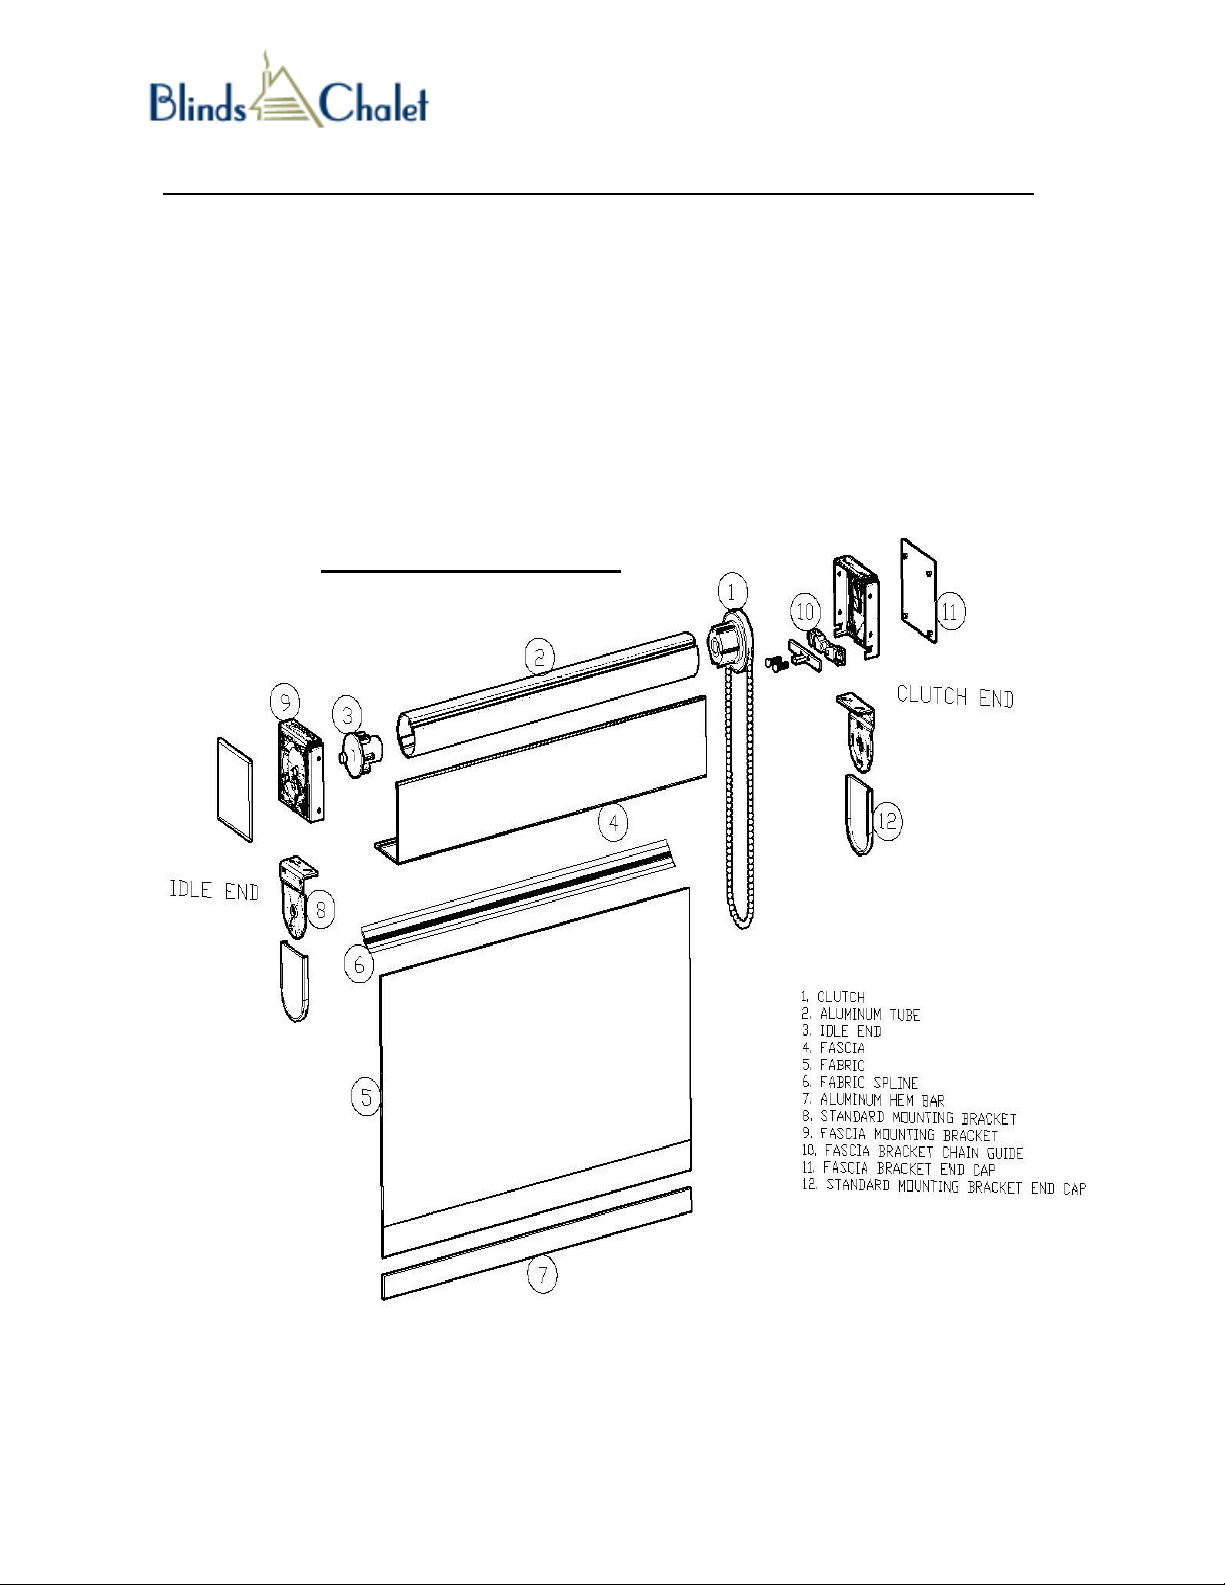
STEP 1: Installing Mounting Brackets
There are two mounting brackets for each shade. One for the clutch end (Has three rectangle shapes in
center of bracket) and one for the idle end (Has one circle shape in center of bracket). See Exhibit 1.
Position idle end bracket on correct side of opening in which you are mounting shade. Attach bracket using
fasteners designed for surface you are mounting on. A minimum of two fasteners per bracket is recommended. Refer to Exhibit 2 for correct orientation of brackets for both wall and ceiling mounts.
Refer to label on shade for shade width measurement, width will be the first number listed on label. Keeping that width in mind, measure from outside surface of bracket you just installed and mark position for
next bracket. Position clutch end bracket at your mark and secure with fasteners. Again Refer to Exhibit 2
for correct orientation of brackets for both wall and ceiling mounts.
August 2010
1
Note: **For Roller Shades with Standard Mounting Brackets, use
Steps 1 thru 3. For Roller Shades with Fascia, use Steps 1 thru 5.
Exhibit 1 Exhibit 2 Idle End
Clutch End
STEP 2: Mounting Shade:
Position shade with fabric going over the top of roll and down the back
side. The clutch side of the shade should line up with the clutch mounting
bracket if they do not match the shade roll is backwards or you have not mounted the brackets correctly.
When shade and brackets are lined up correctly you should insert the spring loaded idle end into the
mounting bracket and push gently to compress spring. Then swing clutch end of shade into mounting
bracket, line up the hook and nubs on the clutch with the bracket, insert into bracket and pull down gently
to lock shade to bracket. See Exhibit 2.
Shade is now ready to operate. Remove shrink wrap from shade roll. Remove chain from bag. Allow chain
to drop into its natural position. If you are using fascia mounting brackets (9) you need to install the chain
guide at this time. Refer to parts drawing for correct positioning of parts. Insert the two screws provided to
secure chain guide. Move safety hook on chain into lowest point on chain and secure to wall with proper
fastener. Do not put tension on chain with safety hook; chain should be loose as it hangs inside safety
hook.
STEP 3: Positioning Ball Stop:
Ball stops have been supplied with your shade which will be mounted on the chain to establish a top and
bottom stopping point.
Raise shade to the up most position of your choosing. Install the first ball stop on the top link of the chain;
just before it enters the chain guide. Use a pair of pliers to pinch the ball stop onto the chain. Now lower
the shade to the lowest position and install the second ball stop.
Critical Note: To insure you install ball stop on the correct side of chain watch the chain as you are raising
shade and install first ball stop on the side of chain that is going up into chain guide, the second ball stop
will be located on the opposite side of the chain.
Clutch End
Page 2
Toll Free (888) 633-7840
August 2010
www.blindschalet.com
Installation and Care Instructions: Clutch Operated Roller Shade with Fascia
STEP 4: Installing Fascia (Shades with Fascia (4) ONLY)
To install fascia (4) simply hook the long side of the fascia over the top of the fascia bracket (9) and then snap
bottom side onto the bottom of the fascia bracket. Check to insure both ends of the fascia are secure to the fascia
bracket.
STEP 5: Install Bracket Covers(11 OR 12).
If your shade is mounted inside the window cavity you will most likely not use a bracket cover.
For all other shades snap covers onto end of bracket. When using fascia bracket covers, match the studs on the
cover to the holes in bracket before snapping on.
Parts Diagram (Ceiling Mount)
2
Page 3

Toll Free (888) 633-7840
www.blindschalet.com
Chain Operated Clutch Operating Instructions
It is strongly recommended to use two hands when
operating (raising or lowering) the shade.
Lowering the Shade
Pull the back chain (closest to the window glazing)
down until the bead stop ball on the chain loop stops at
the shade bracket and the shade hembar is approximately ½” above the window sill.
Raising the Shade
Pull the front chain (furthest from the window glazing)
down until the bead stop ball on the chain loop stops at
the shade bracket and the shade hembar is at the top
of the window.
August 2010
3
Exhibit 3
Preventing Chain Breakage and Clutch Damage
It is important to always use two hands when pulling
on the bead chain. Pull the chain straight down. Do not
under any circumstances pull the bead chain at an
angle. Pulling the bead chain at an angle creates unnecessary pressure and strain on the bead chain and
clutch. This action inhibits the intended operation of
the clutch and can cause the shade to break
When lowering the shade, do not let go of the bead
chain as this action can cause the shade to lower
quickly causing harm to the clutch or bead chain
breakage. Allowing the bead chain to glide through
the operators hands with gentle pressure assists in
controlling the speed at which the shade will lower or
raise.
(Exhibit 3 to the right indicates a left side chain control
with a regular roll shade.)
Installation of the Chain Safety Clip
To prevent chain breakage and clutch damage as
well as promoting product safety, it is imperative
that the Chain Safety Clip shipped with every chain
operated clutch shade be installed to the wall or
window mullion. The Chain Safety Clip should be
installed so that the bead chain and bead stop balls
move smoothly through the opening of the clip.
Each chain operated clutch operated roller shade is
shipped from the factory with the Chain Safety Clip
pre-installed on the bead chain. Removal of this
device or failure to properly install it, can cause
damage to the clutch lifting mechanism and will
result in the voidance of the product’s limited life-
time warranty.
 Loading...