

Page 1
SETUP INSTRUCTIONS
PLEASE READ
IMPORTANT : The DisplayIT requires that a radio transmitter is connected to the timing system. If your
DisplayIT is not receiving information during a session, check with your timing and scoring team to see
if they are using the transmitter. Blind Apex provides those transmitters FREE to most racing organizations. However it is the responsibility of the timing team to connect the transmitter. If your organization
doesn’t have the transmitter, do not hesitate to contact us at 418 651 0752. We will provide the required
hardware FREE of charge to most racing organizations.
WARNING : This product is equipped with a radio receiver that descrambles copyrighted radio signals.
Any use of this product to tamper with, descramble, modify, or reproduce, in whole or in part, these signals in a manner not expressly authorized in writing by the manufacturer constitutes a violation of U.S.
and international copyright laws.
WARNING: This equipment is approved only for mobile and base station transmitting devices, separation distances of 20 centimeters or more should be maintained between the antenna of this device and
nearby persons during operation. To ensure compliance, operation at distances closer than this is not
recommended.
Page 2

CONNECTING THE UNIT
1. The unit requires a 12V-DC power connection. (It will run from 8V to 18V)
2. A fused connection to your car battery is preferred. A 250mA fuse is adequate.
3. You can connect either the black or white wire to the positive (+) terminal, and the remaining one to the negative (-)
terminal. In other words: Polarity doesn’t matter.
4. It is your responsibility to provide adequate electrical protection and proper connection. If you are not comfortable
ed automotive mechanic.
MOUNTING THE UNIT
1. The DisplayIT is a radio receiver that receives a signal from the timing room. Mounting the unit on your steering
oor would be a poor choice and some information might be missed. The
idea is to try to get a line of sight with the outside of the car.
2. Make sure the unit is secured properly.
3. IMPORTANT: The white wire coming out on top of the DisplayIT is the radio antenna. Do not cut, bend or modify this
wire. The length of the wire is critical to proper reception and must not be altered.
(transponder number assignment)
1. The 1st time you power the unit you will see a series of zeros ‘0’, these digits represent your car’s timing and scoring
transponder number.
2. In order to work properly, the unit must be programmed with this number.
3. Use the right button (yellow circle) to rotate between values (0,1,2…etc)
4. Use the left button (yellow circle) to change digit.
5. IMPORTANT: The number assignment is done from RIGHT TO LEFT.
6. Example: Your transponder number is: 0087351
7. The screen must look like this: 000 008 73 51
8. Leave the leading zeros.
9. Once you reach the last digit on the left, press the left button one more time to complete the process.
10. When completed, the unit will display the main screen (Track Time, Laps, OA)
11. The unit is ready to be used.
12. You can press the ‘ON’ button, this will reset the unit and display your number for 1/2 second.
ENTERING A DIFFERENT TRANSPONDER/TRANSMITTER NUMBER
erent number)
1. From the main screen press AND hold the left button for approximately 5 seconds or until the transponder number
is shown.
2. IMPORTANT: If the unit is near timing and scoring it might not enter transmitter programming mode since it might
receive some signals from the tower. Wait until the current session is over and try again.
3. Use the right button to change the digits (0,1,2…etc)
4. Use the left button to switch to the next digit
5. IMPORTANT: The number is entered from right to left
Page 3
TIPS AND VARIOUS INFORMATION ON THE UNIT
- After 10 minutes of inactivity the unit will automatically enter «standby» mode. The screen will display ‘OFF’. At this
point the unit is using approximately 10mA of current. We recommend that you disconnect the unit if you are not
using your vehicle for an extended period of time. (the unit uses approximately 60mA in normal operation mode).
- To turn on the unit after it went to standby mode simply press the ON button
- Your last 34 laps are stored in memory and can be recalled using the left button. Laps are stored in non-volatile memory and will remain in memory even if you power down the unit.
- Pressing and holding the right button will clear the lap memory
- Your unit is only as accurate as the timing system being used. The lap times are taken directly from the electronic
system.
eld is only available using the optional timing software and appropriate cable.Photo
- The OA (Over All Position) is only as accurate as the timing system. If the system is missing some cars, your position
ected.
-
cial. Scoring on the DisplayIT is ALWAYS provisional!
- The unit is splash water resistant (rain is OK, but this is not diving equipment)
- Like any vehicle information display (RPM, engine temperature…) this unit can be distracting. Make sure that you are
comfortable reading the unit and please… don’t blame us if you get distracted… staring at your RPM display will have
ect. You are using this product at your own risk!
WARNING: AN IMPROPERLY MOUNTED DISPLAYIT CAN BE EXTREMELY DANGEROUS. LIKE ANY
OTHER EQUIPMENT THAT YOU INSTALL IN YOUR RACING VEHICLE, MAKE SURE IT IS SECURELY
MOUNTED!
x it.
Page 4
)
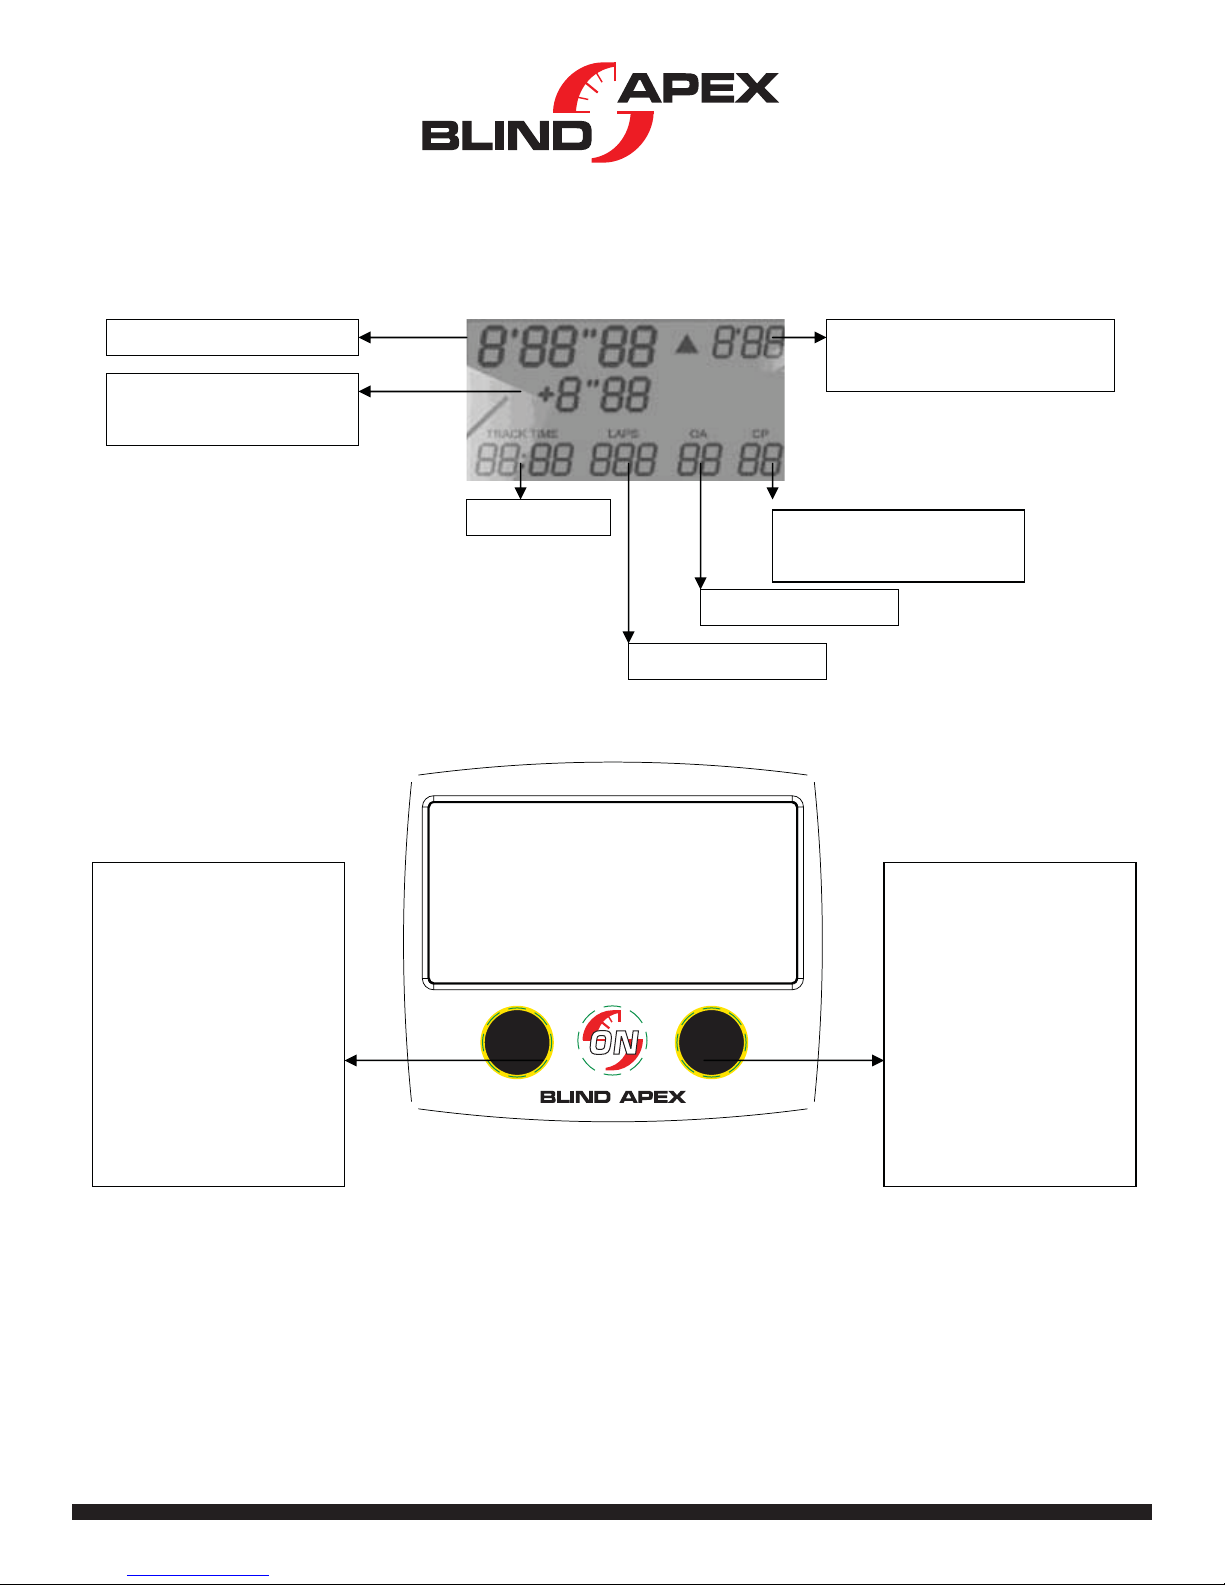
DISPLAY OVERVIEW
Last lap time (m:ss.ms
Gap with your best time
(+ or - s:ms)
KEYBOARD FUNCTIONS
1. Enter transponder
number: Press AND hold
for 5 sec. This button will
then scroll to the next
digit (right to left) every
time you press it.
2. Scroll lap times: Press
once per lap.
Track Time
Gap with the vehicle 1
position ahead (s:ms)
Class Position (optional)
Over All position
Total laps
1. Enter transponder
number: When in
transponder input mode
this button will rotate the
active digit.
2. Clear lap times: Press
AND hold for 5 sec.
 Loading...