

Page 1
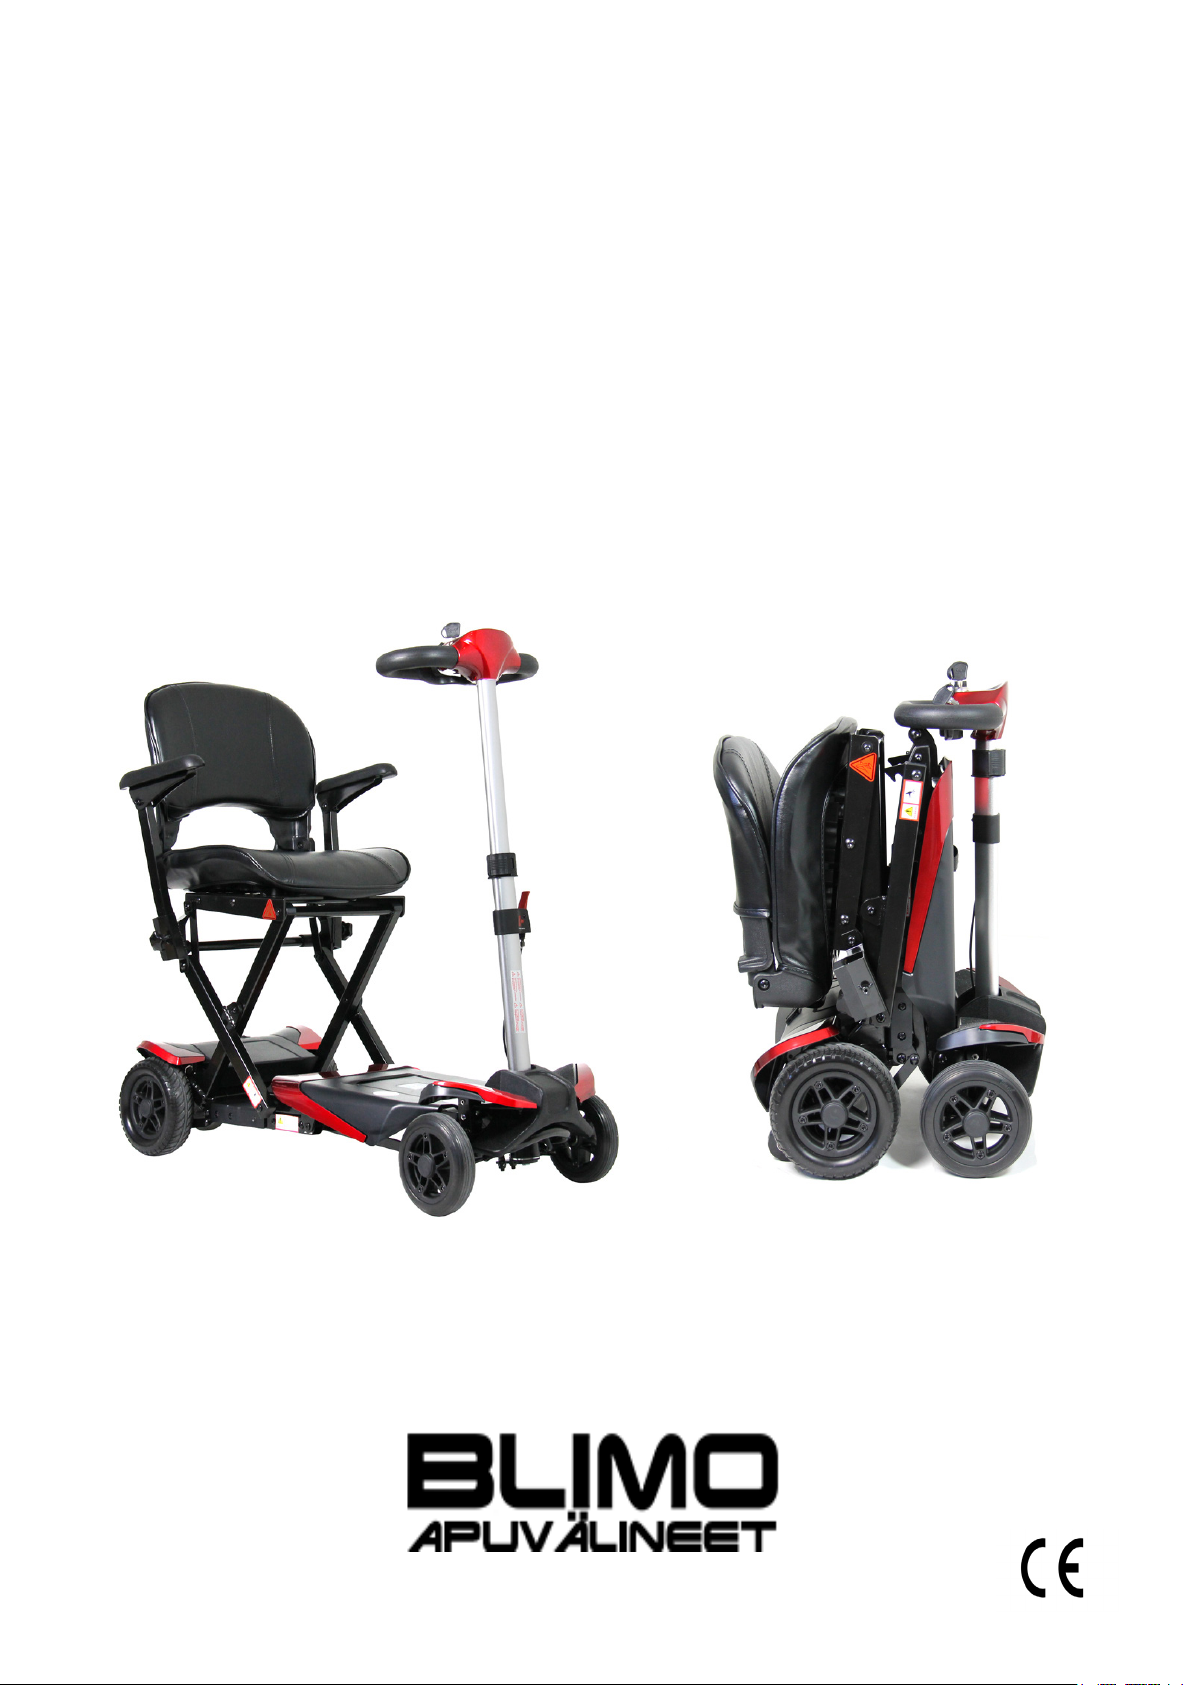
SOLAX TRANSFORMER
MANUAL
Page 2

CONTENTS
Introduction.........................................................................................2
Product overview...............................................................................3
Folding and unfolding..........................................................................4
Battery and charging.........................................................................5-6
Functions and features......................................................................7-9
Technical information..........................................................................9
Maintenance.........................................................................................10
Troubleshooting.....................................................................................10
Contact information..........................................................................11
Page 3

INTRODUCTION
Please read this manual carefully before using your Solax Transformer. If, despite
the user manual, any feature or function of your scooter is unclear or your device
is faulty, please contact our Blimo.se customer service and we will assist you with
your device.
This manual covers the features and functions of the Solax Transformer Walkway
Scooter, the components, the safety requirements and instructions, and the device
and battery maintenance instructions.
Please note that all information and illustrations in this manual are for reference
purposes only and the actual product may dier.
Before you start using your Solax Transformer scooter, please check that the package that you received contains all the parts:
- Solax Transformer scooter
- Battery
- Charger
- 2 x key
- 2 x Allen key
- User’s Guide
If any of these parts are missing from the delivery, please contact Blimo. customer service and we will assist you.
If there is any damage to the equipment or its packaging during transportation,
please contact our customer service as soon as possible to receive your order by
e-mail info@blimo. with pictures.
This appliance is not intended for use by children.
2
Page 4
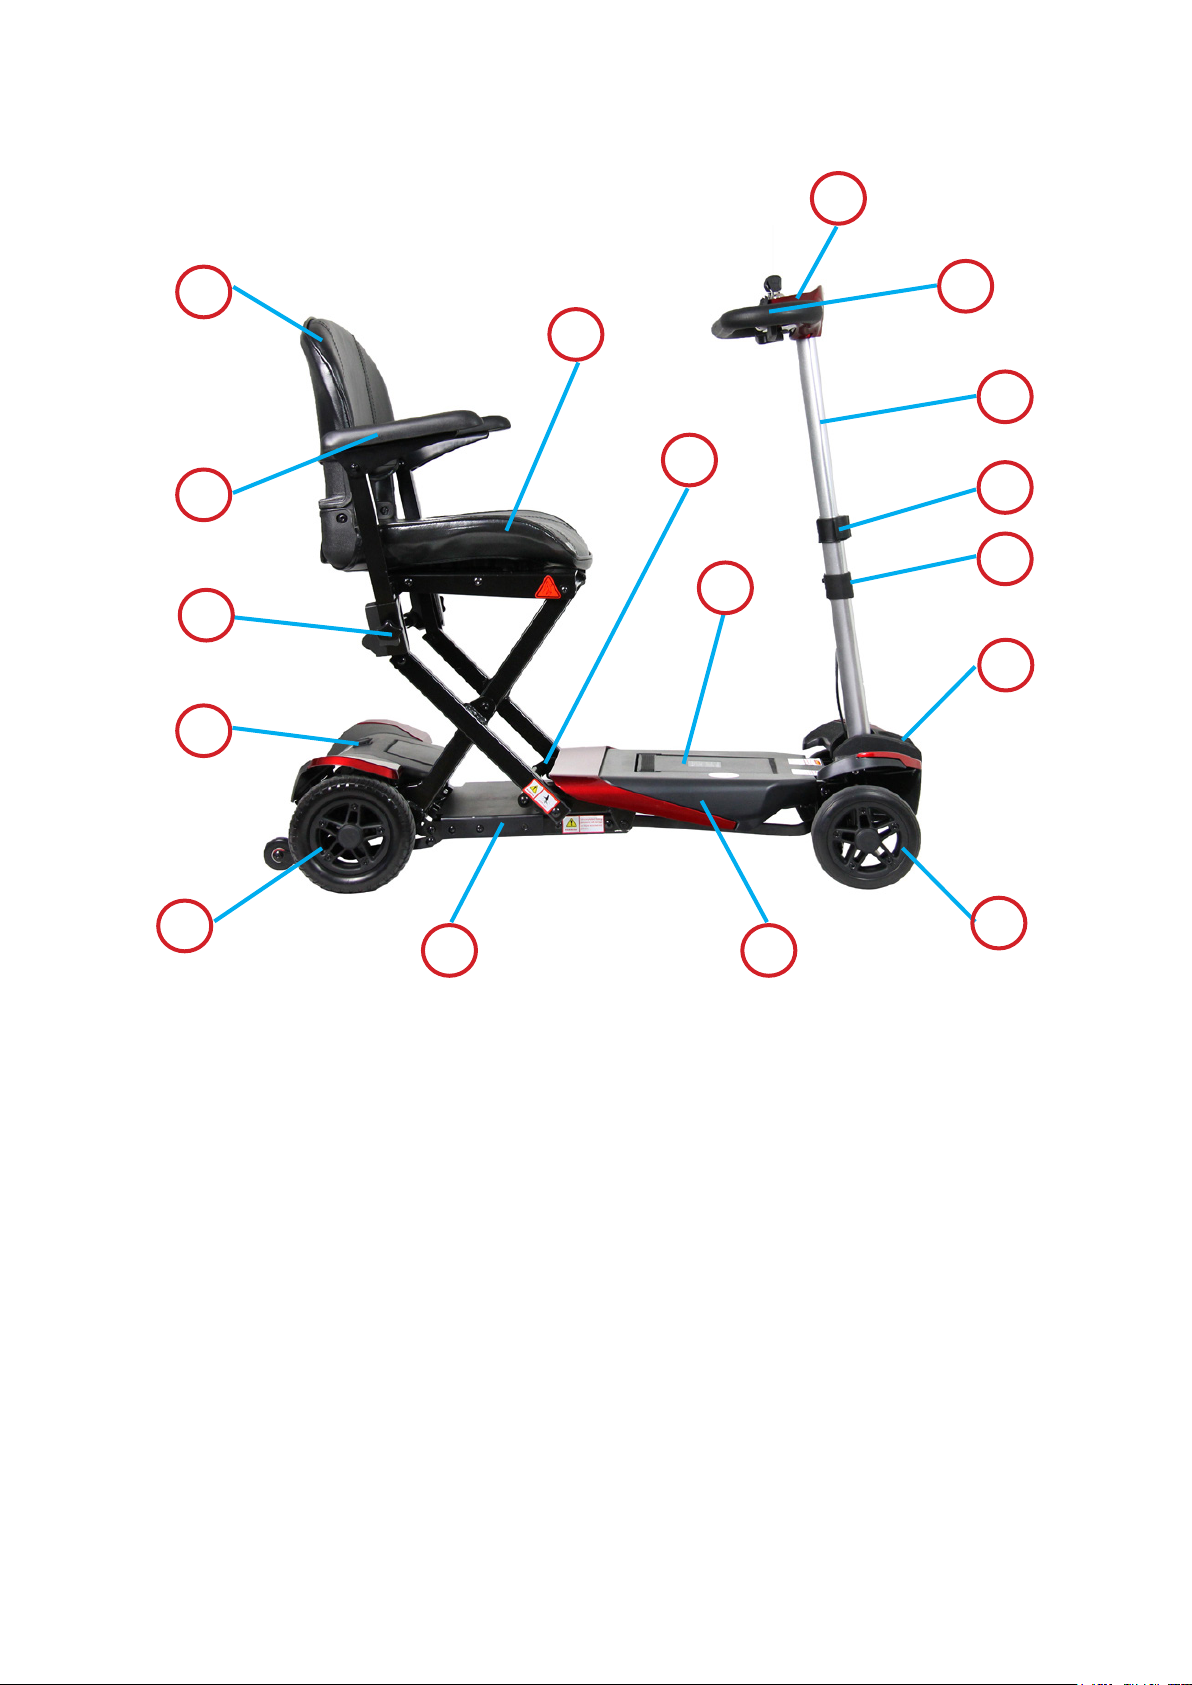
PRODUCT OVERVIEW
9
1
2
3
4
10
6
11
7
12
13
8
14
5
1. Back support
2. Hand support
3. Locking knob
4. Charging input
5. Back wheels
6. Seat
7. Folding/unfolding handle*
8. Battery
9. Control panel
*= In newer year models
**= In older year models
15
1617
10. Handle bar
11. Adjustable handle bar pole
12. Handle bar height adjuster
13. Release switch**
14. Front cover
15. Front wheels
16. Foot board
17. Back frame
3
Page 5
FOLDING AND UNFOLDING
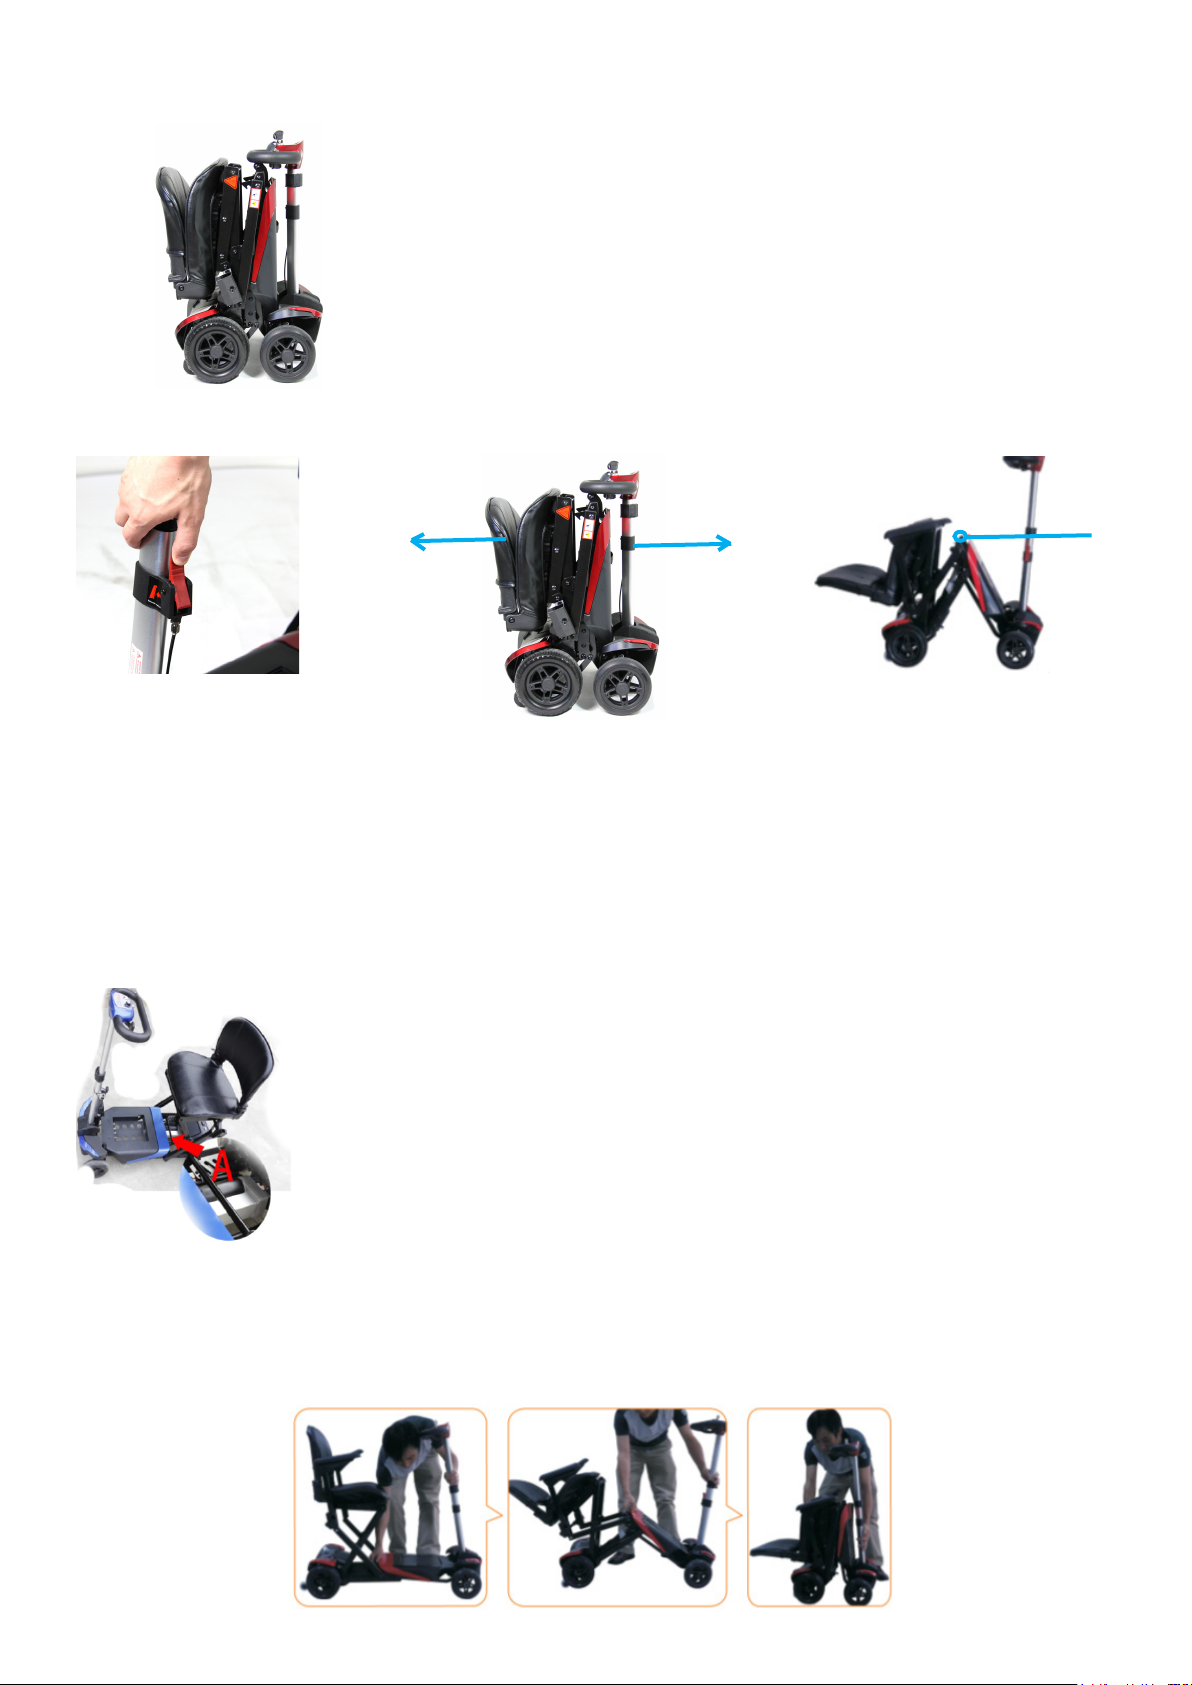
Opening the Solax Transformer from the folded mode
works in two dierent ways, depending on your device’s Year model. Folding works the same regardless of
the Year model.
UNFOLDING OLDER YEAR MODEL
1.
1. Press down on the release lever in the center of the handlebar post.
NOTE! Do not pull the lever!
2. While still holding the handlebar pillar while pressing the release lever, pull the seatback
back with one hand.
3. When the device is opened approximately halfway, you can release the release lever and
press down on the center of the frame. Press down on the frame until the device is fully
straightened.
2.
3.
UNFOLDING NEWER YEAR MODEL
1. In the newer model, opening is started by pressing the long lever
at the folding point of the frame.
2. The seat backrest is then pulled outwards as in step 2 of the older model opening.
3. When the device is opened halfway, press down on the device
frame, as in step 3 of opening the older model.
FOLDING
Pull the long lever of the frame fold point upwards (g 1), to move the front and rear of the
scooter closer to one another while lifting the center section (g 2). Lastly, push the handlebar
pole and the seat toward each other until the device locks into folded position (kuva 3).
1. 2. 3.
4
Page 6
BATTERY AND CHARGING
Your Solax Transformer scooter is delivered with one
maintenance free 24V 10Ah lithium battery. The
battery is charged with the included easy-to-use
29.4V 2A charger.
Please charge the battery fully before rst use.
Using the device with an uncharged battery may
damage the battery.
The battery starts to wear when you rst use it,
and the battery range decreases over time. Normal
battery life is 6 months to 3-4 years, depending on
how it is used and handled. Normally, the battery is
replaced with a new one before it runs out, due to
the reduced battery range.
Keep in mind that the battery range decreases as the temperature drops. If the temperature of
the batteries drops, for example, from 20 ° C to 5 ° C, the battery range may be nearly halved.
We do not recommend using the device in temperatures below -5 ° C.
When it is time to replace the battery, it is very important that the new battery is the right one.
Contact Blimo Customer Support to get the right battery!
It is also important that the battery is handled and used properly to avoid abnormal wear or
damage.
If you do not intend to use your Solax Transformer for an extended period of time, you should
charge the battery approximately every 30 days. During winter storage, the battery should be
stored at plus temperature.
BATTERY SAFETY GUIDE
1. Always charge the Solax scooter before charging, ie the ignition
key is in the OFF position.
2. Charge the batteries at least 12 hours before rst use.
3. Never charge batteries for more than 24 hours at a time.
4. Never charge the batteries if they are completely discharged,
this may brake or damage them.
5. Always charge the device before the battery charge drops below 20%.
6. Charge the batteries after each use.
7. Do not store batteries in freezing temperatures if they are not fully charged.
8. Never allow batteries to overheat, so do not expose batteries for example to direct sunlight.
9. Maintain the batteries during long-term storage by regularly charging them fully.
10. Always use the original charger designated for the device; charging with another charger
may damage the battery.
5
Page 7
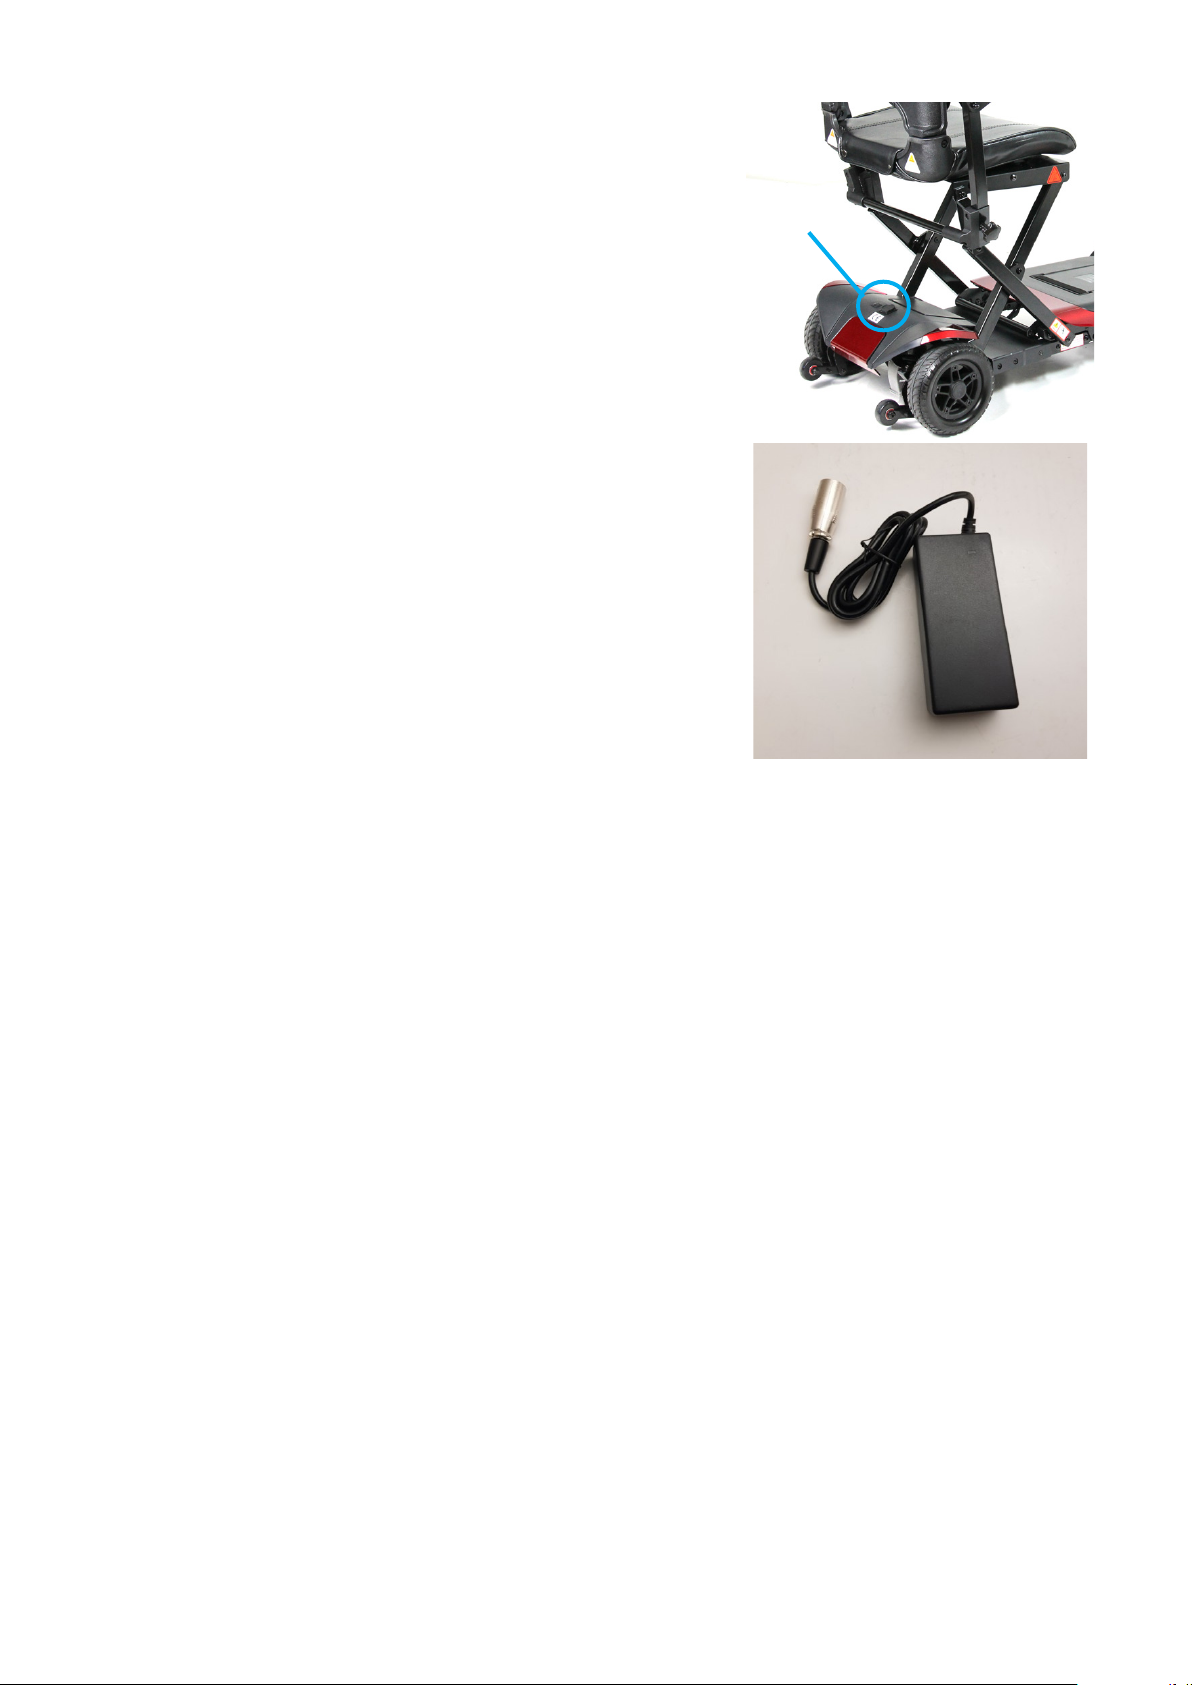
CHARGING THE BATTERY
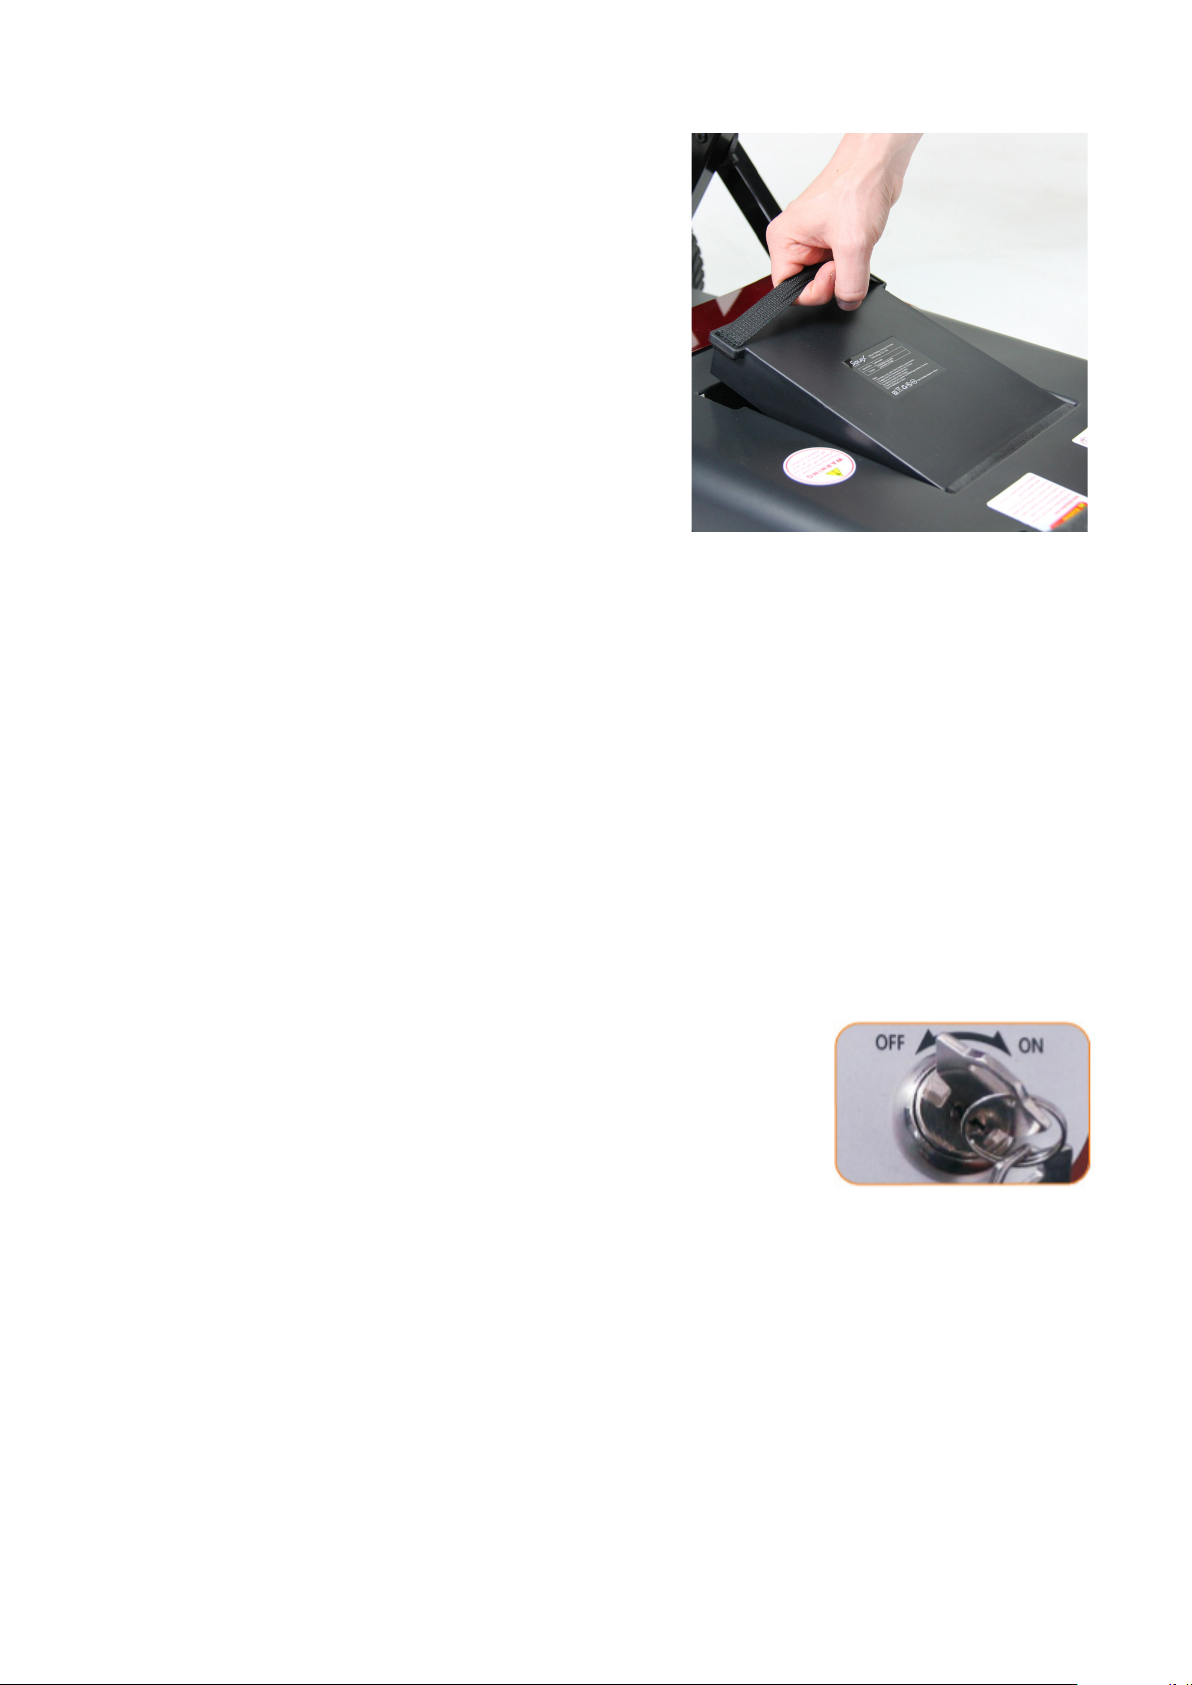
Before charging, always make sure that your Sloax scoo-
ter is turned o, that is, the ignition key is set to the OFF
position.
You can nd the battery charging input on the back of the
scooter, below the seat. First, plug the charger into a wall
socket, then open the rubber cover on the connector and
attach the metal charger head to the connector on the
scooter.
Pay attention to the pins on the charger charging head and
t them into the holes on the scooter charging connector.
The charger may need to be pressed slightly to secure it to
the charging connector, but do not use force.
The diode in the charger’s transformer indicates the charge
status.
When the light is red, the battery is charging.
When the light turns green, the battery is full and the charger can be disconnected from the scooter.
Also disconnect the charger from the wall outlet.
It is advisable to disconnect the charger from the scooter
shortly after charging is complete.
Do not keep the charger attached to the scooter for more
than 24 hours at a time.
Charging
input
The battery reaches its full capacity after a few full charges. So it is normal for the battery
range to be slightly defective at rst, and it is therefore particularly important to fully charge
the battery the rst ve times it is charged.
Charging time depends on how you use your device.
If the battery has sinked below 30%, normal charging takes about 12 hours, while if the scooter
has been driven less, it naturally takes less time to charge. You can see the charger transformer’s diode color when charging is complete and the battery is full.
We recommend charging the battery after each use.
HOW TO MAXIMIZE BATTERY RANGE AND LIFE
1. Charge the battery after each use.
2. Disconnect the charger from the scooter when the battery is fully charged.
3. Keep at least the battery at a constant indoor temperature when the scooter is not in use.
4. Charge the battery regularly for a longer period of storage, about once a month.
5. Drive your scooter at as steady a speed as possible and avoid multiple stops and acceleration
situations.
6. Low or medium speed consumes less battery than full speed.
6
Page 8
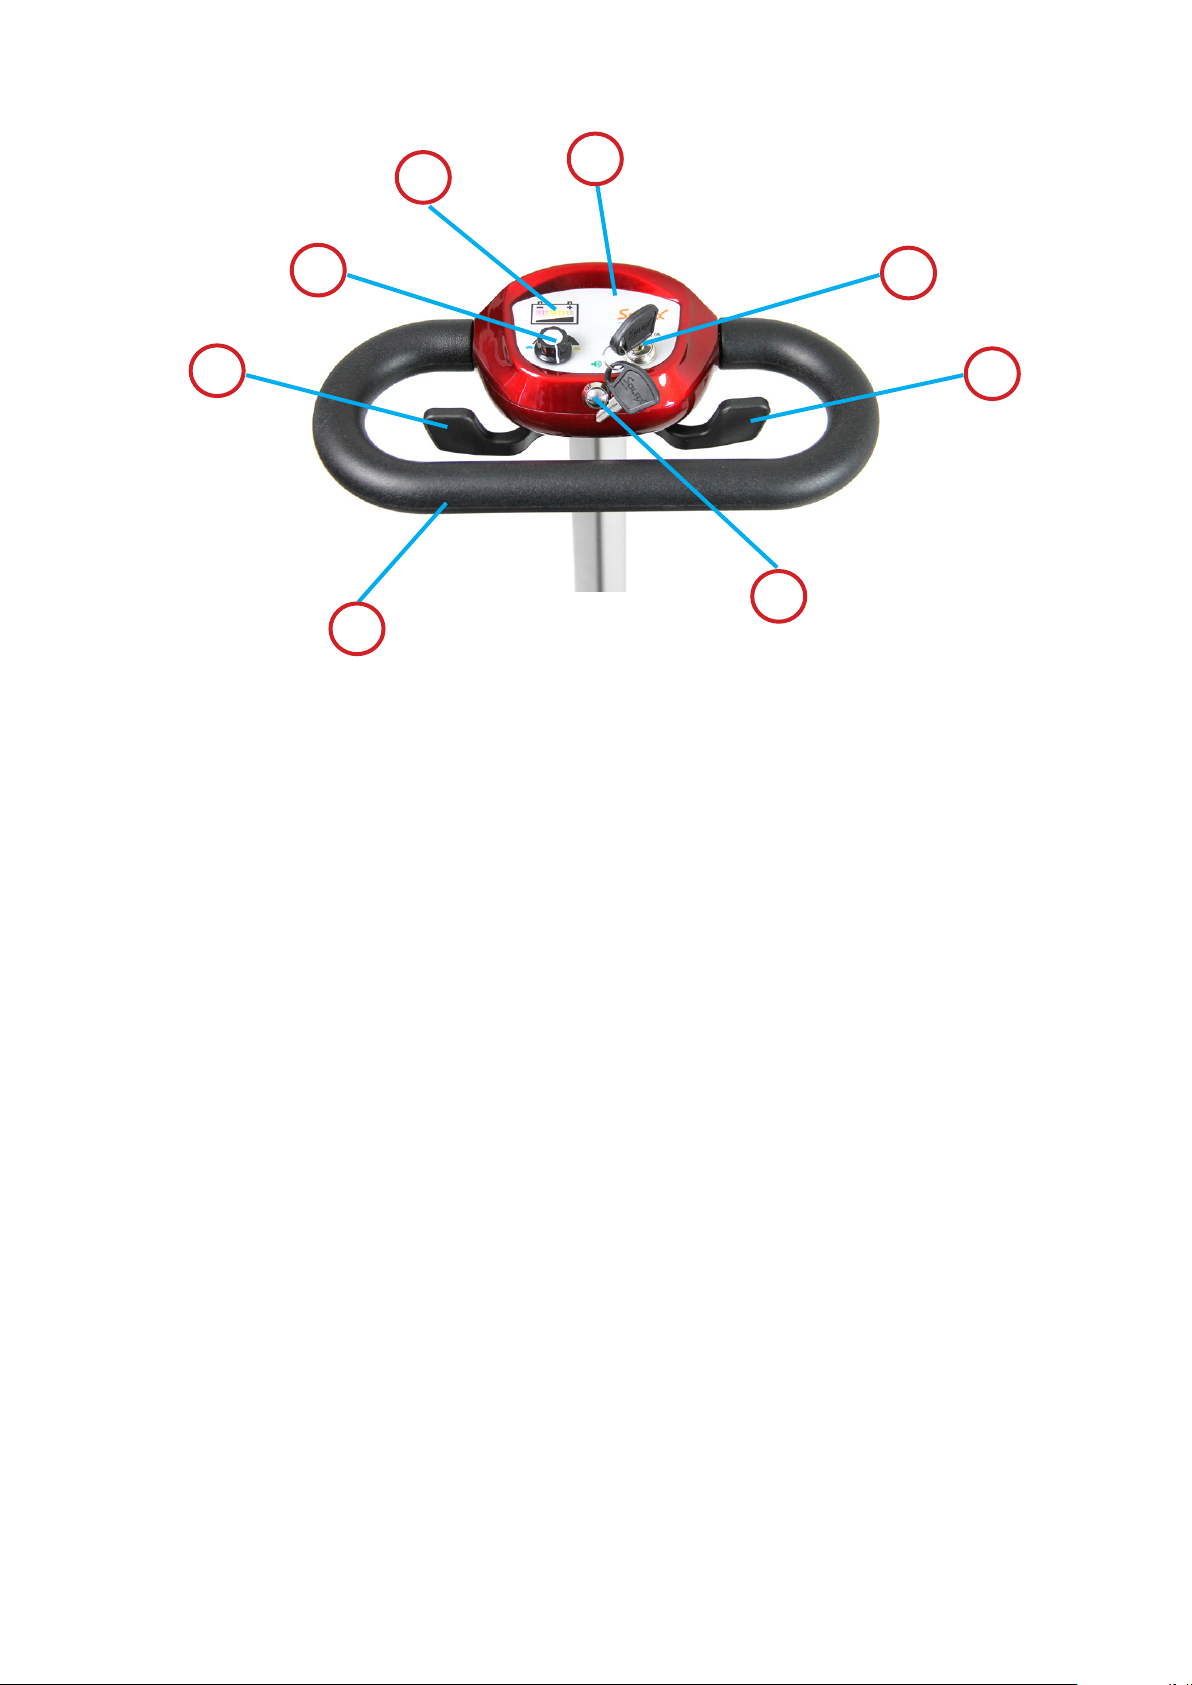
FUNCTIONS AND FEATURES
A
E
F
G
A) Battery indicator
B) Control panel
B
C
D
H
E) Speed controller
F) Reverse lever
C) Ignition lock
D) Throttle
DRIVING / STOPPING
The handlebar has two levers, D and F.
To move forward, pull the right lever (D) toward you. The throttle is innite, so the more you
push the lever, the faster the device will run. When you release the throttle lever, the unit will
brake automatically.
NOTE: Avoid releasing gas quickly, as the device will pull very hard. It’s nicer to drop the pace
slowly.
To reverse, pull the left lever toward you. During cancellation you will hear a warning signal
from the honk.
Slowing down the top speed also slows down the acceleration of the device. Slower top speeds
should be used when getting used to riding a scooter, and are also good for conned spaces such
as indoors.
G) Handle bar
H) Honk
TRAFFIC LAW
The Solax scooter is considered to be a bicycle-like device according to the Trac Code and
regulations. So you can ride your scooter wherever bicycling is allowed.
You can also drive with Blimo only on pedestrian roads. However, keep the speed at walking
speed (approx. 5-6 km / h) on the pedestrian streets. In trac, the scooter should be used on
the right side of the road and in dusk and darkness the headlights should be on.
7
Page 9
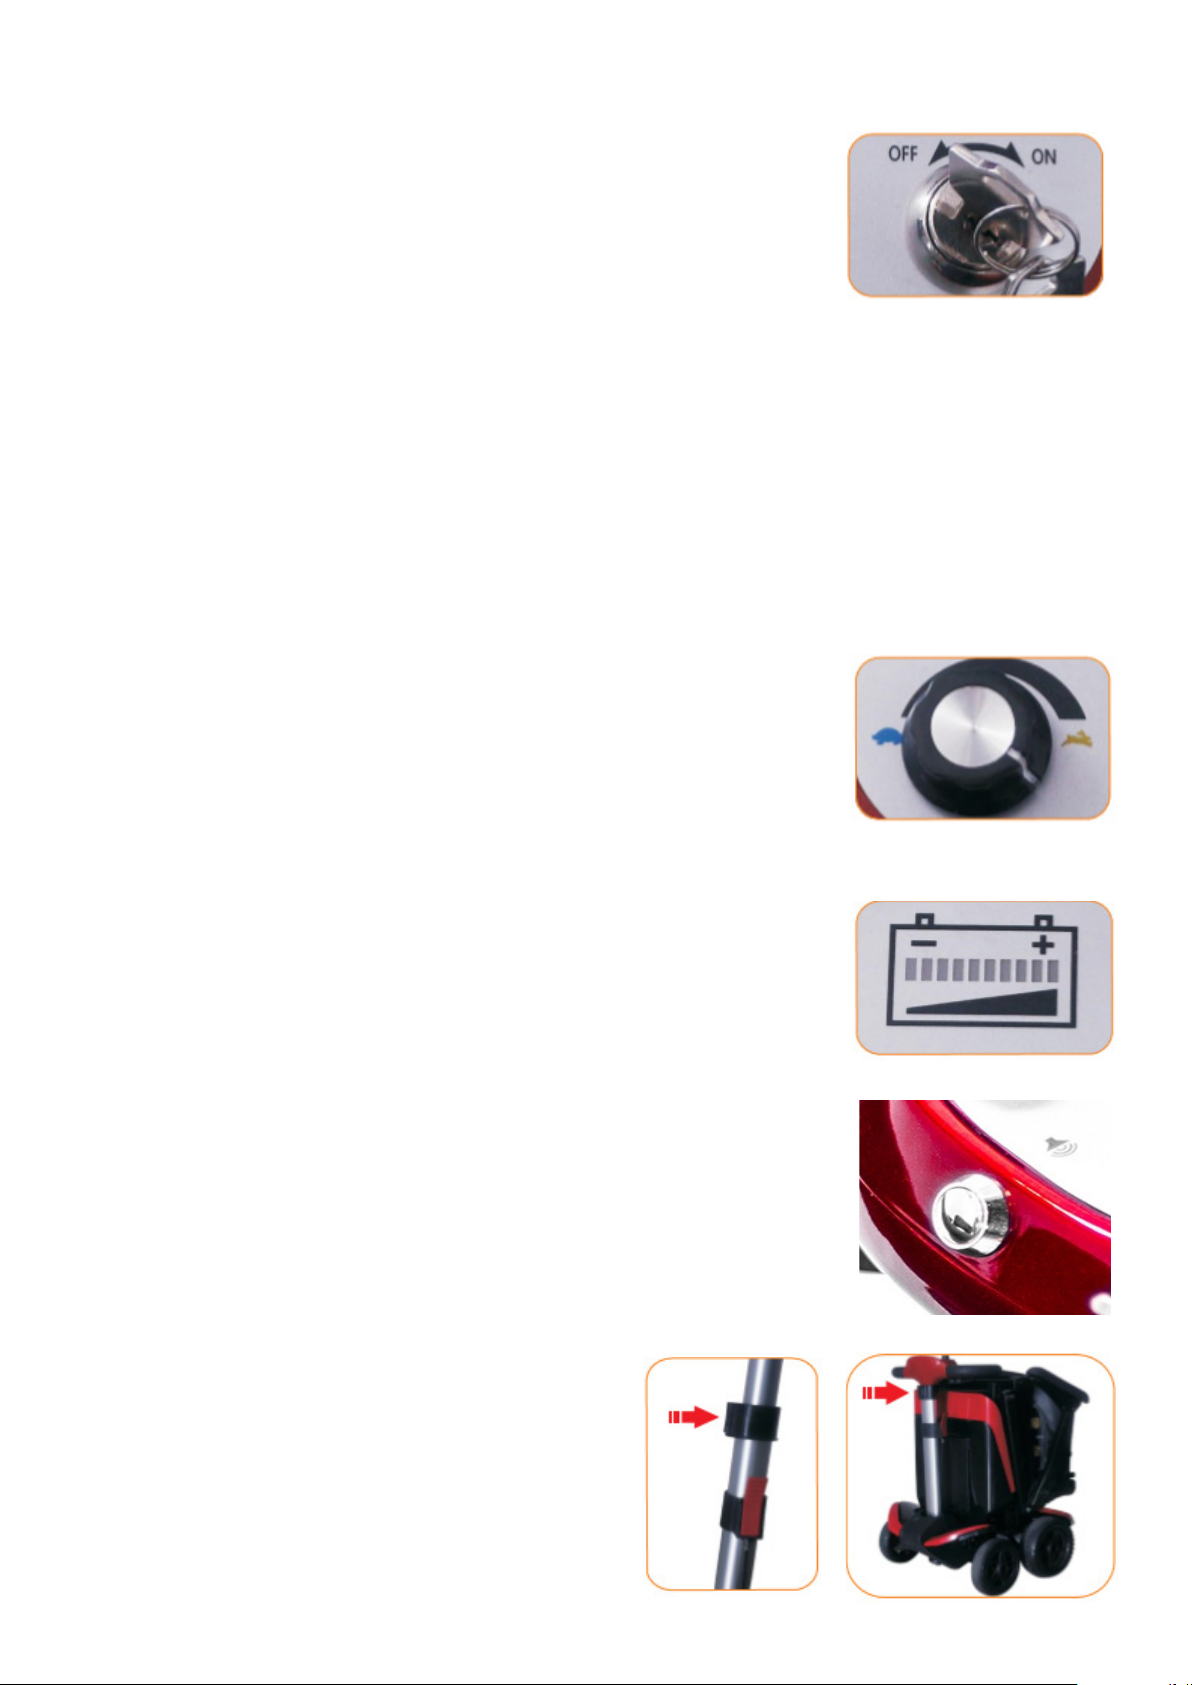
IGNITION LOCK AND KEY
Power management of the Solax Transformer scooter works by turning
the removable key in the ignition switch.
The ignition switch has two positions, ON and OFF.
The scooter cannot be driven without the key in the ignition switch
and turned to the ON position.
To start the Solax Transformer scooter, turn the key to ON. Now you
can drive your scooter normally.
To turn o the scooter, turn the key to OFF. It is advisable to turn o the scooter every time you
park the machine.
We also recommend that you remove the key from the ignition switch when the scooter is parked to prevent theft.
If the ignition key is removed from the ignition switch, or the key is turned to the OFF position
while driving, the magnetic brake of the scooter will automatically brake, and the scooter will
make a sudden stop.
SPEED CONTROLLER
The cruise control is used to adjust the scooter’s top speed. You can
adjust the speed from 0 km/h to 6 km/h. As you rotate the knob to the
left (toward the tortoise image), the top speed decreases, while turning the knob to the right (toward the rabbit image) increases the top
speed.
NOTE: Do not adjust the speed while driving or when reversing.
BATTERY INDICATOR
When the scooter is on, the battery indicator shows in real time how
much battery power is available. When all indicator lights, both green,
orange, and red, are lit, the battery is full. As the battery level drops,
the lights turn o one by one. When the display lights up in orange and
red, the battery is half full. It is good to charge the battery only when
the red lights are on, at the latest.
HONK
The honk button located on the front of the control panel, is easy to
use when needed. When you press the button, a beep sounds.
ADJUSTING THE HANDLE BAR HEIGHT
The height of the handlebar can be adjusted by
opening the height adjustment latch on the side
of the handlebar post, after which the top of the
handlebar can be raised to the desired height.
8
Page 10

USE YOUR SCOOTER SAFELY
• Do not operate your Solax Transformer scooter until you have read and incorporated the instructions for use and maintenance of this manual.
• Check the condition of the ground before driving. The scooter can be driven gently on the
lawn, but avoid driving on loose gravel, soft sand and o-road. Do not ride your scooter in an
area where you are not sure of the condition of the ground.
• Do not drive other people with the scooter, device is designed for one person at a time, exess weight or sitting for example on the hand supports may damage scooter.
• Do not use the device if you are under the inuence of alcohol or drugs.
• Make sure the seat is properly secured.
• Reduce speed when driving on uneven ground or over small obstacles.
• Always reduce speed before turning.
• Do not park the scooter on a slope.
• Use caution when in the vicinity of heavily tracked roads, or in crowded places, such as
squares, shopping malls or indoors.
• Hold the handlebar with both hands and keep both feet on the platform while riding the
scooter.
• If you are in a vehicle with a scooter, such as a bus, do not sit on the scooter.
• Do not tilt more than 15 degrees.
• Do not exceed the maximum carrying capacity of the scooter, ie 130 kg. This weight limit
includes the user as well as bags / groceries / other items to be carried.
• Do not reverse on uneven ground or on slopes.
• Do not drive on slippery or icy roads.
• Always protect the battery from frost.
• Never charge a frozen battery.
TECHNICAL INFORMATION
Motor 120W 24V
Battery 24V 10Ah lithium battery
Charger AC 29V 2A
Battery range Up to 20 km*
Total weight 24,5 kg
Weight (without battery) 22,5 kg
Total length 93 cm
Total width 45 cm
Seat width 43 cm
Seat hight from ground 56 cm
Clearance at the lowest point 36 mm
Tires (solid rubber) Front 6x1.5 inch
Back 7x2.36 inch
Maximum load 130 kg
Top speed 6 km/h
Maximum gradient 15 degrees
Turning circle 1,4 m
Brake Automatic, intelligent, regenerative and
electromagnetic
* = Depends on many external factors such as driving style, temperature, ground, etc.
9
Page 11

MAINTENANCE
Unlike internal combustion engines, electric motors do not require regular maintenance.
However, there are a few things you should do to make sure your Solax Transformer scooter is
working.
CLEANING
Clean the device and seat regularly with a damp cloth. Avoid spraying water directly toward the
unit as this may cause water to enter the electronic components.
The control panel and the device’s plastic covers are made of durable ABS plastic and nished
with a high quality paint nish. Do not use chemicals to clean the surfaces.
LONG TERM STORAGING
If you will not be using your scooter for an extended period of time, here are some things to
keep in mind:
1) Store the device in a dry environment.
2) Store the appliance in the extra degrees, otherwise the batteries may freeze.
3) Recharge the batteries at least once a month.
If it is not possible to take the scooter indoors for long-term storage, you can remove the battery from the unit to indoors. Also remember to charge the battery regularly when separated from
the device.
WIRES AND CONNECTORS
From time to time, check all scooter cables and connectors and charger cables for damage and
make sure they are secure.
MOTOR, BEARINGS AND TRASNSMISSION PARTS
• These parts are lubricated and sealed at the factory.
• These parts do not need to be lubricated.
• Store the device in a dry environment and do not expose the electrical components to
moisture. If parts come into contact with moisture, dry them before next use.
TROUBLESHOOTING
ISSUE CAUSE SOLUTION
The power turns o while
driving.
The scooters’ speed is low. 1. The speed control is set to
1. The key is turned to the
OFF position or removed from
the ignition switch.
2. The battery is not inserted
correctly.
3. Battery level is low.
slow.
2. Battery level is low.
1. Make sure the key is in the
ignition switch and turned to
the ON position.
2. Remove and reinsert the
battery.
3. Charge the battery (see
pages 5-6 of this manual).
1. Adjust the speed with the
speed control.
2. Charge the battery (see
pages 5-6 of this manual).
10
Page 12
CONTACT INFORMATION
Blimo
Nordbutiker i Sverige AB
Gösvägen 28
76141Norrtälje
SWEDEN
Phone: +46 8 123 507 20
E-mail: [email protected]
Org. 556908-9385
Frame number
Model
11
 Loading...