

Page 1
2.0
electric shutter controller
with μWiFi technology
TAKE CARE ABOUT THE SAFETY AND COMFORT OF YOUR FAMILY – OPEN AND CLOSE
THE ELECTRIC SHUTTER STRAIGHTWAY FROM YOUR MOBILE PHONE
User manual
SAFETY RULES
Do not connect the device to loads exceeding the permitted
values.
Connect only in accordance with the diagram presented in the
manual. Improper connections may be dangerous, it can damage
the controller, and loss the warranty.
DANGER! Risk of electric shock! Even with the device turned o,
the outputs may be live. All assembly work should be ALWAYS
performed with the power circuit disconnected.
The installation of the device to a power mains that does not
meet the quality requirements dened by PN-EN 50160, will
result in the loss of the warranty
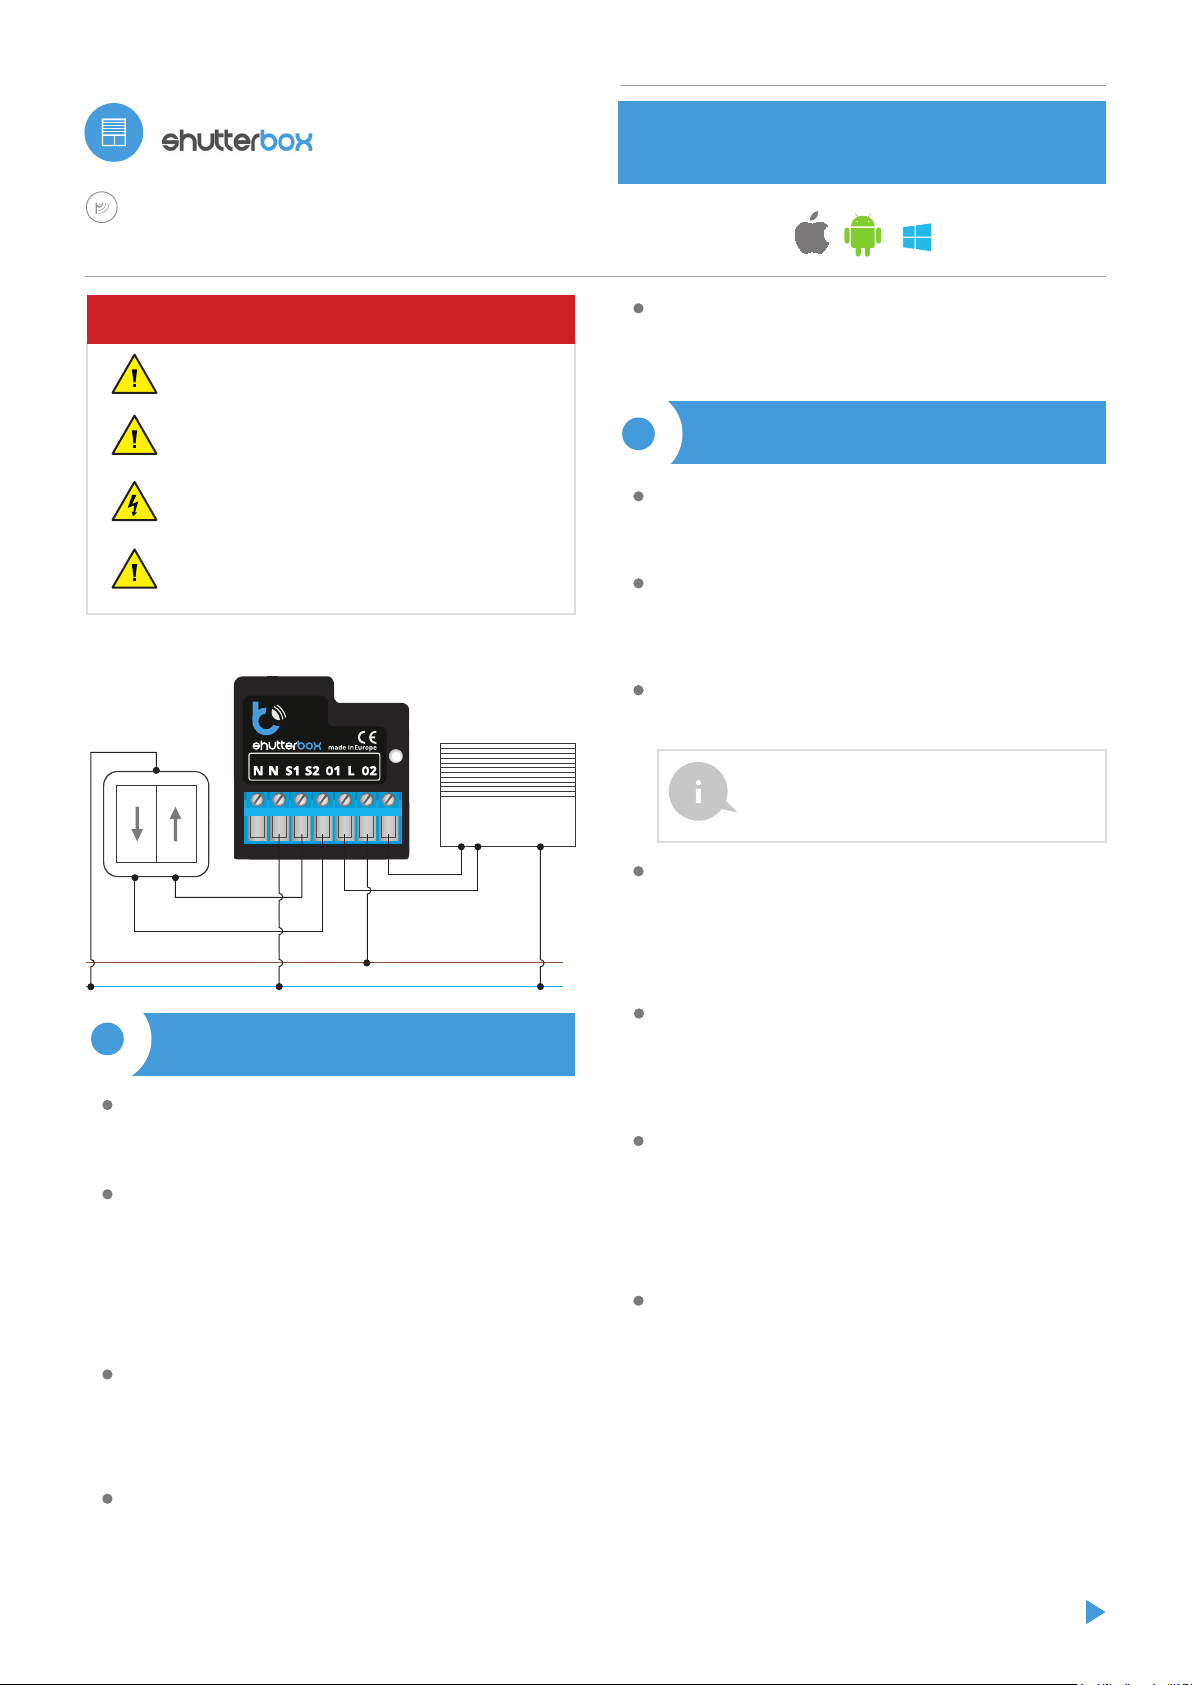
CONNECTION DIAGRAM
shutterBox 2.0
button
roller shutter controller 230 V AC, 5A max
electric shutter
1
Disconnect the supply voltage before installing the controller. Remember that
any mounting work should be carried out when the mains voltage is
disconnected (switch o the mains fuse or disconnect the power cord from
the mains socket).
The controller should be installed in a place protected against adverse
environmental conditions, protected from third party access - in the ush box
or inside the enclosure of the controlled device. Remember that metallic
elements (wires, housing parts) have a negative inuence on the range of the
device, and consequently the comfort of use. It is recommended that the
device be mounted in a stable and xed position. Due to the operating
voltage of the device it is necessary that the connectors of the controller be
protected against accidental contacts or short circuits, which could cause
electric shock or damage to the device.
Familiarize with the diagram and then proceed to install the controller. Pay
particular attention to the designation of the controller connectors. Start with
power wires - phase L (brown) and neutral N (blue). Then, connect the load. If
you only want a local control with a wall switch, connect the wall push-button
according to the diagram. To control using only your phone or Tablet, it is not
necessary to install the wall push-button.
The controller supports all types of double monostable push-button. The
order of connection of the S1 / S2 input, to the right / left push-button does
not matter at the installation stage - it can be set at a later stage of the
controller conguration.
INSTALLATION - BASICS
After making sure that the device is connected in accordance with the
diagram and that there are no metal components near the controller which
may accidentally cause short-circuit, start the device by turning on the power
(turning on the mains fuse or connecting the power cord to the power outlet).
2 FIRST START
Unlock your phone or tablet and download the free application wBox. If you
have an Android mobile device, you will nd the application in the Play Store.
For iOS devices the application is in the App Store. For phones with Windows
Phone, you can download the application from the Windows Phone Store.
By using your mobile phone or tablet, connect it to the device wireless
network. To do this, enter to your smartphone or tablet settings, then go to
setting of the WiFi network and nd the network name „shutterBox-
-xxxxxxxxxx” where xxxxxxxxxx is the serial number of the device. Connect to
this network.
Turn on the wBox application. A device will appear at the top of the screen. To
add it to the application, click on "plus" on the right side of the name. To
pre-congure the controller, click on the default device name.
You can also set the conguration using the web browser
of your phone / tablet. After connecting to the wireless
network of the controller, turn on the browser and go to:
http://192.168.4.1
Test the controller’s work by clicking on the arrow near to the area showing
the window. If the electric shutter is moving in a dierent direction than you
suppose, go to Settings ("Settings" button at the top-right corner of the
screen) and select "Enable" in the "Move direction swap" option. Remember to
save your settings by clicking the "save" button, then go to the main panel by
L
N
clicking the arrow at the top-left corner of the screen. Check again whether
the shutter moves as expected.
If you have connected the wall push-button, check its work. Single pressing of
the "down" button / "up" button, will cause that the roller shutters moves in
the desired direction to the end position. If the electric shutter goes in the
opposite direction to the expected, select "enable" in the "Inputs swap"
option. When the electric shutter is moving, pressing any of the wall switches
causes that the shutter will stop immediately.
The next step is to select the type of electric shutter controlled - in settings,
in the "control type" select the option "roller shutter" when your shutter has
mechanical limit switches (manually adjustable with a key) or "without
positioning" when the electric shutter has electronic control system
(e.g. soft-start / overload protection / electronic limit switch, etc.). Specify also
the time the blind needs to move between the limit switches positions - this is
the time at which the controller provides voltage to the electric shutter motor
(it is not advisable to disable the move timeout).
If the controlled electric shutter have a mechanical limit switch, is possible the
control to a certain point. To use this feature, calibrate the controller by
clicking the "auto calibration" button. Once the procedure is conrmed, the
electric shutter will open to the upper limit switch position, then will close to
the lower limit switch position and then will open again to the upper limit
switch position. During the calibration, do not perform any action. To check
the work of the control to a certain point, go to the main panel by clicking the
arrow at the top-left corner and then by moving the nger several times over
the area showing the window in extreme and intermediate positions, verify if
the electric shutter moves to the selected position in the animation. You can
also set your electric shutter position - to do this, set the electric shutter in the
desired position and then hold the heart icon for about 5 seconds. Then verify
the functionality - moving the electric shutter to another position, then click
on the heart icon. The electric shutter should be placed in your favorite
position.
Page 2
3
ACCESS POINT AND WIFI NETWORK SETTINGS
Once you turn on the controller for the rst time, you can proceed to its
further conguration. Being connected to the WiFi network emitted by the
device, in the control panel of the wBox application select the device, then go
to “settings” (button at the top-right corner of the screen).
You can change the name of the device that is displayed in the wBox
application. In addition, you can change the name and password of its
generated WiFi network. Remember that changing the network name or
password will disconnect the device immediately after you click the "save"
button, so re-connect to the device using the newly assigned network name
and password.
You can add the controller to your home WiFi network to control it through
this home network or from anywhere in the World. To do this, in the "Connect"
settings section, select a network name from the list and press "Connect". If is
required, enter the WiFi network password. During the connection of the
controller to your home network, the phone / tablet may disconnected from
the network. In this case, you will need to reconnect your phone / tablet to the
controller network.
Please remember that in order to control the device outside the local WiFi
network, from anyplace in the World by using the wBox application, the
option "Remote access enabled" in the controller settings must be set to "yes".
Once you've nished conguring the WiFi network, you can disconnect you
phone/tablet from the controller network and connect your mobile device
directly to your home WiFi network. The control from the wBox application
will work the same way as when the phone / tablet is connected to the
controller network. If the user leaves the local network, for example, leaving
home or using the mobile data, the wBox application will signal this state as
"remote mode". In this case, the devices can be controlled, but for security
reasons settings are not available.
TECHNICAL SPECIFICATIONS
Supply voltage 230V
Power consumption
Outputs number
Output type
Maximum current (total) 5A
less than 1W
2
relay
direct connection (as Access Point), Wi-Fi
Communication mode
Control with
connection via a standard router,
connection with access from any location
in the World (requires only access to the
Internet)
Apple iPhone, Apple iPad, iPad Mini,
Android, Windows Phone, computers and
mobile devices operating a fully HTML5,
Apple watch support coming soon
ADDITIONAL INFORMATION
LOCATION AND TIME OF THE DEVICE,
SCHEDULE
The controller has the ability to operate according to a certain schedule. To
make this possible, it is necessary to set the device time. Go to the "Settings"
(button at the top-right corner of the screen) and in the "device time" section,
click the "change time zone" button. Then select from the list your region and
location, conrming the selection by pressing "save". The device synchronizes
its time with the NTP server (if the controller is on a Wi-Fi network with
Internet access) or downloads the time from your phone / Tablet. It is
recommended that the controller was always connected to a Wi-Fi network
with Internet access so that the built-in clock is automatically synchronized.
In order to be able to control devices based on local sunrise and sunset, you
also need to select the location of the controller. Location selection is only
possible by having a direct connection between the phone / tablet and
controller. On the mobile device, should be enable the location sharing, then
turn on the native web browser and select the address: http://192.168.4.1 Go
to “Settings” (button at the top-right corner of the screen) and click "set
location". The browser will ask if you want to share the location - Allow. In the
"coordinates" section should show the approximate coordinates of your
location. If the "set location" button blinks on red color with the word "error",
or in the "coordinates" section has not changed from "not set" to numbers, an
error occurred while downloading the location. Make sure your phone / tablet
is connected directly to the controller and is controlled via the web browser of
your phone from the address http://192.168.4.1 (not in the wBox application!)
and also location sharing is enabled on your phone.
Adding entries to the schedule is made by clicking the "Add item" button in
the "schedule" section. Is possible to select the days in which the task will be
performed, the type of entry (at a specic time, or relative to the sunrise /
sunset - Only setting correctly the location) and set the task parameters. The
tasks set will be displayed in a list, each entry can be edited or deleted.
5AMaximum current (channel)
Max load 1000W
Inputs number 2
Input type logical, to N
Inputs voltage 230V
Galvanic isolation No
made of polyurethane composition not
Housing
Protection rating IP20
Dimensions
Transmission
Transmission frequency 2.4GHz
containing halogens, self-extinguishing for
thermal class B (130 °C)
39 x 41 x 21 mm
bi-directional, encrypted
μWiFi, compatible with WiFiCommunication standard
SOFTWARE UPDATE
To update the software in the controller, connect it to your home WiFi network
(see "Access Point and WiFi settings" section) which is connected to the
Internet. Go to “settings” (button at the top-right corner of the screen) and
click the "get new rmware" button in the nal section on settings. Wait about
1 minute, do not close the interface do not do any other actions. The device
will download the latest software. The software version number, hardware
version and device identier can be read at the bottom of the settings screen.
For more information visit our website
www.blebox.eu
Or send us an email to: [email protected]
Support is available at [email protected]
 Loading...