

Page 1

User Guide
™
3D Digital Photo Frame
Enjoy your 3D life ~~
Page 2

2
Table of Contents
INTRODUCTION .......................................................................................... 3
Main Features
Package Contents
GETTING STARTED..................................................................................... 3
OVERVIEW OF THE DPF CONTROL PANEL ............................................ 4
REMOTE CONTROL BUTTON FEATURES................................................ 5
LANGUAGE SETTINGS............................................................................... 6
PHOTOS & SLIDESHOW ……..................................................................... 7
View Thumbnail Photos & Full size Photos
Play Slideshow
MUSIC…........................................................................................................ 8
VIDEOS ………................................................................................................ 8
CALENDAR & CLOCK .................................................................................... 9
View Calendar with Slideshow
Set Date, Time, and Alarm
FILES IMPORT/EXPORT/DELETE ............................................................... 10
Import Files into Built-in Memory
Delete Files from Built-in Memory
CONNECT TO A COMPUTER ...................................................................... 11
MEMORY FORMAT & FACTORY DEFAULTS............................................... 11
Build-in Memory Format
Reset to Factory Defaults
Page 3
3
INTRODUCTION
Welcome to the Blazon 3D Digital Photo Frame (DPF). Now you can easily covert your 2D
pictures to 3D pictures, and experience the joy of making your own 3D pictures.
Main Features:
Five view angles
Simple Plug & Play
Displays 2D/3D digital photo files (JPEG)
Plays digital video files (AVI)
Plays digital Music files (MP3)
Displays Calendar/Clock with photo slideshow and Alarm function
Infrared Remote Control and control buttons on the frame
2 USB2.0 ports (One device & One Host)
2GB built-in memory
Package contents:
3D Digital Photo Frame
AC Power Adapter
Infrared Remote Control
USB cable
Red-Blue (anaglyph) glasses
Quick Start Guide
User Guide
GETTING STARTED
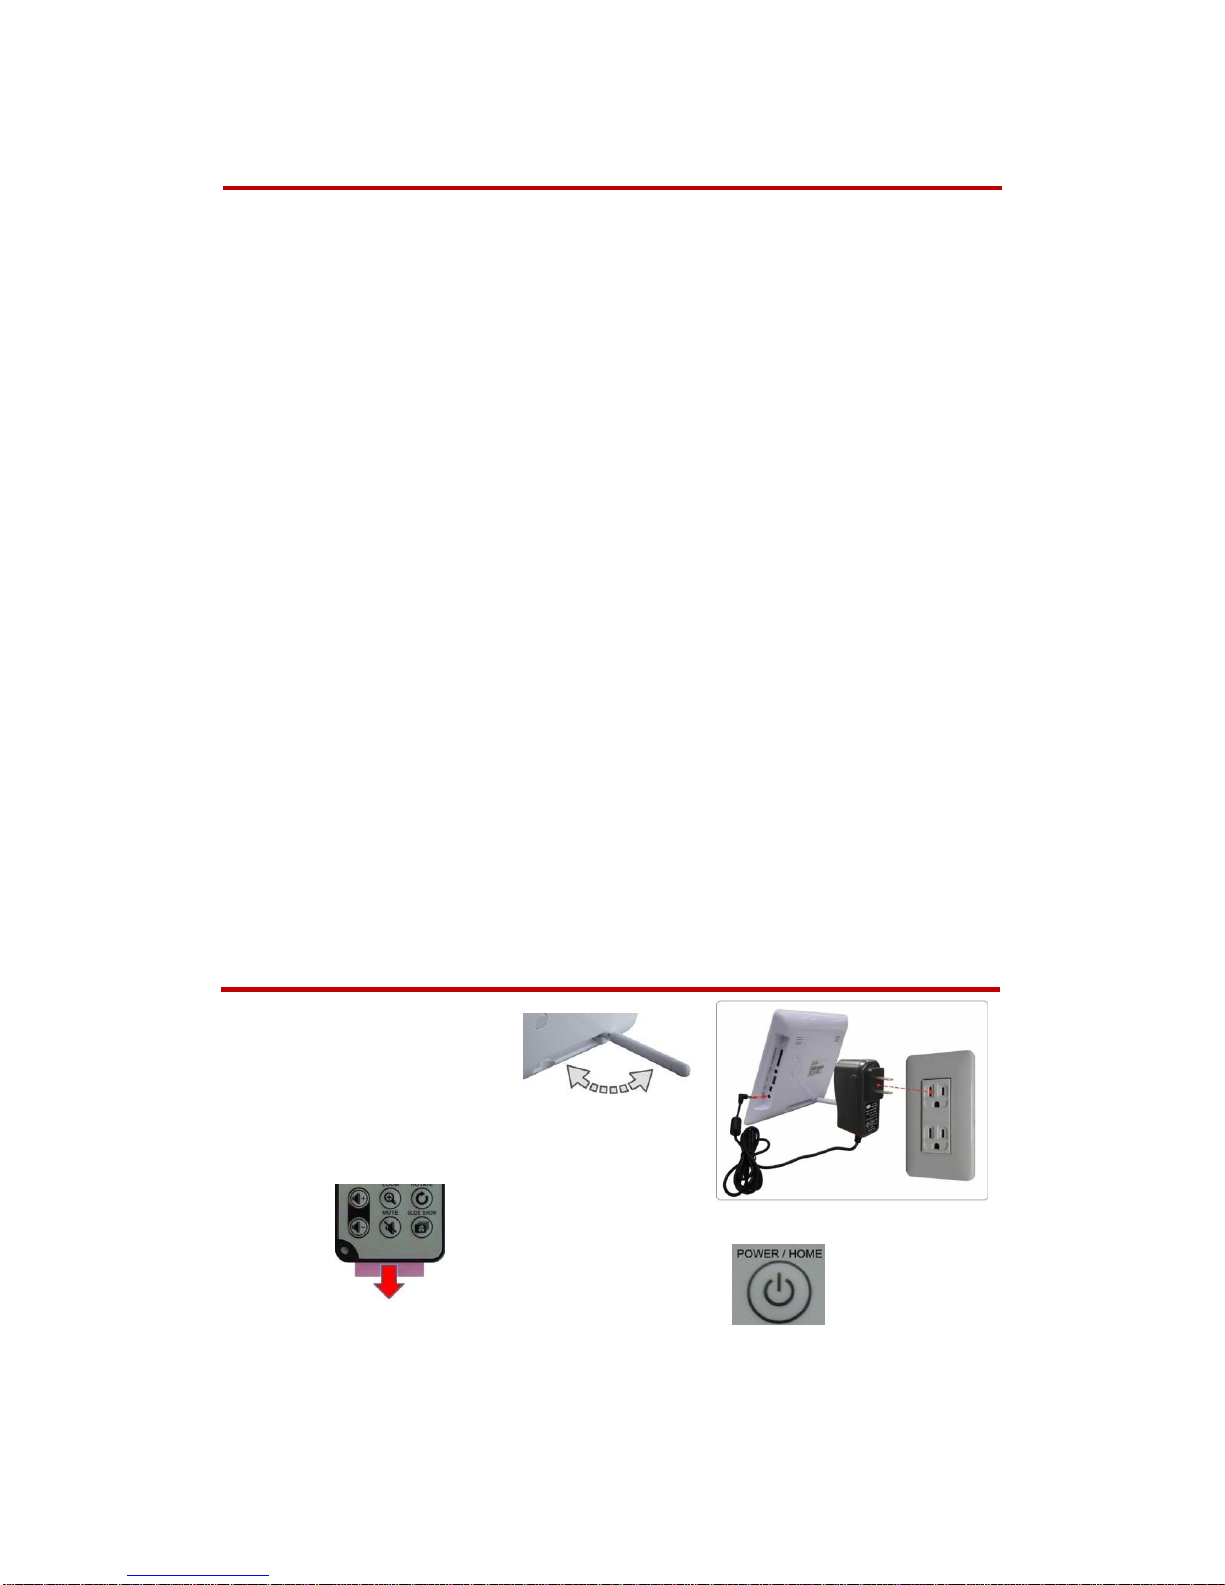
1. Setup the tabletop stand.
2. Plug in the AC power adapter.
3. Pull the plastic tab out of the remote control.
4. Press the Power Button on DPF or Remote Control.
Note: Before first time use the remote control, please pull the plastic tab sticker out of
the remote control. It protects the battery and the remote control will not work unless it
is removed.
Page 4
4
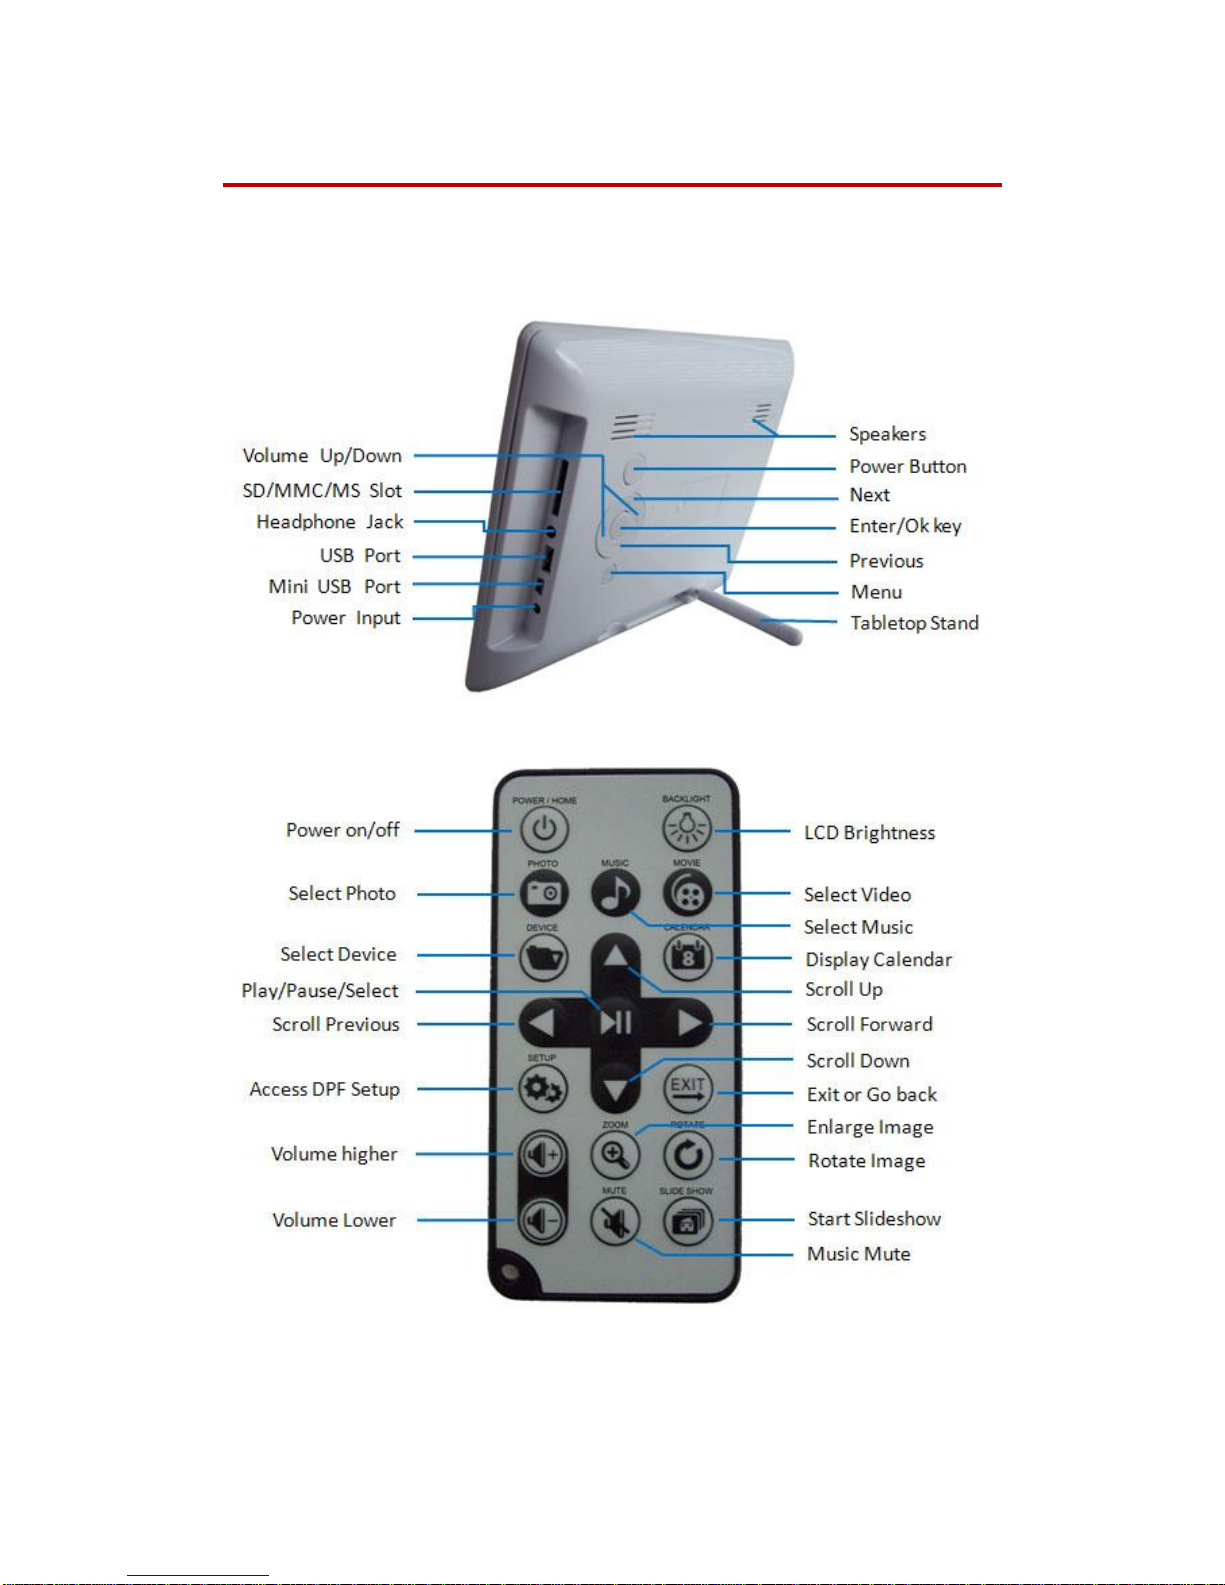
OVERVIEW OF THE DPF CONTROL PANEL
You can access all features and execute all functions by using the remote control or the
buttons on the rear side of the DPF.
Page 5
5
REMOTE CONTROL BUTTON FEATURES
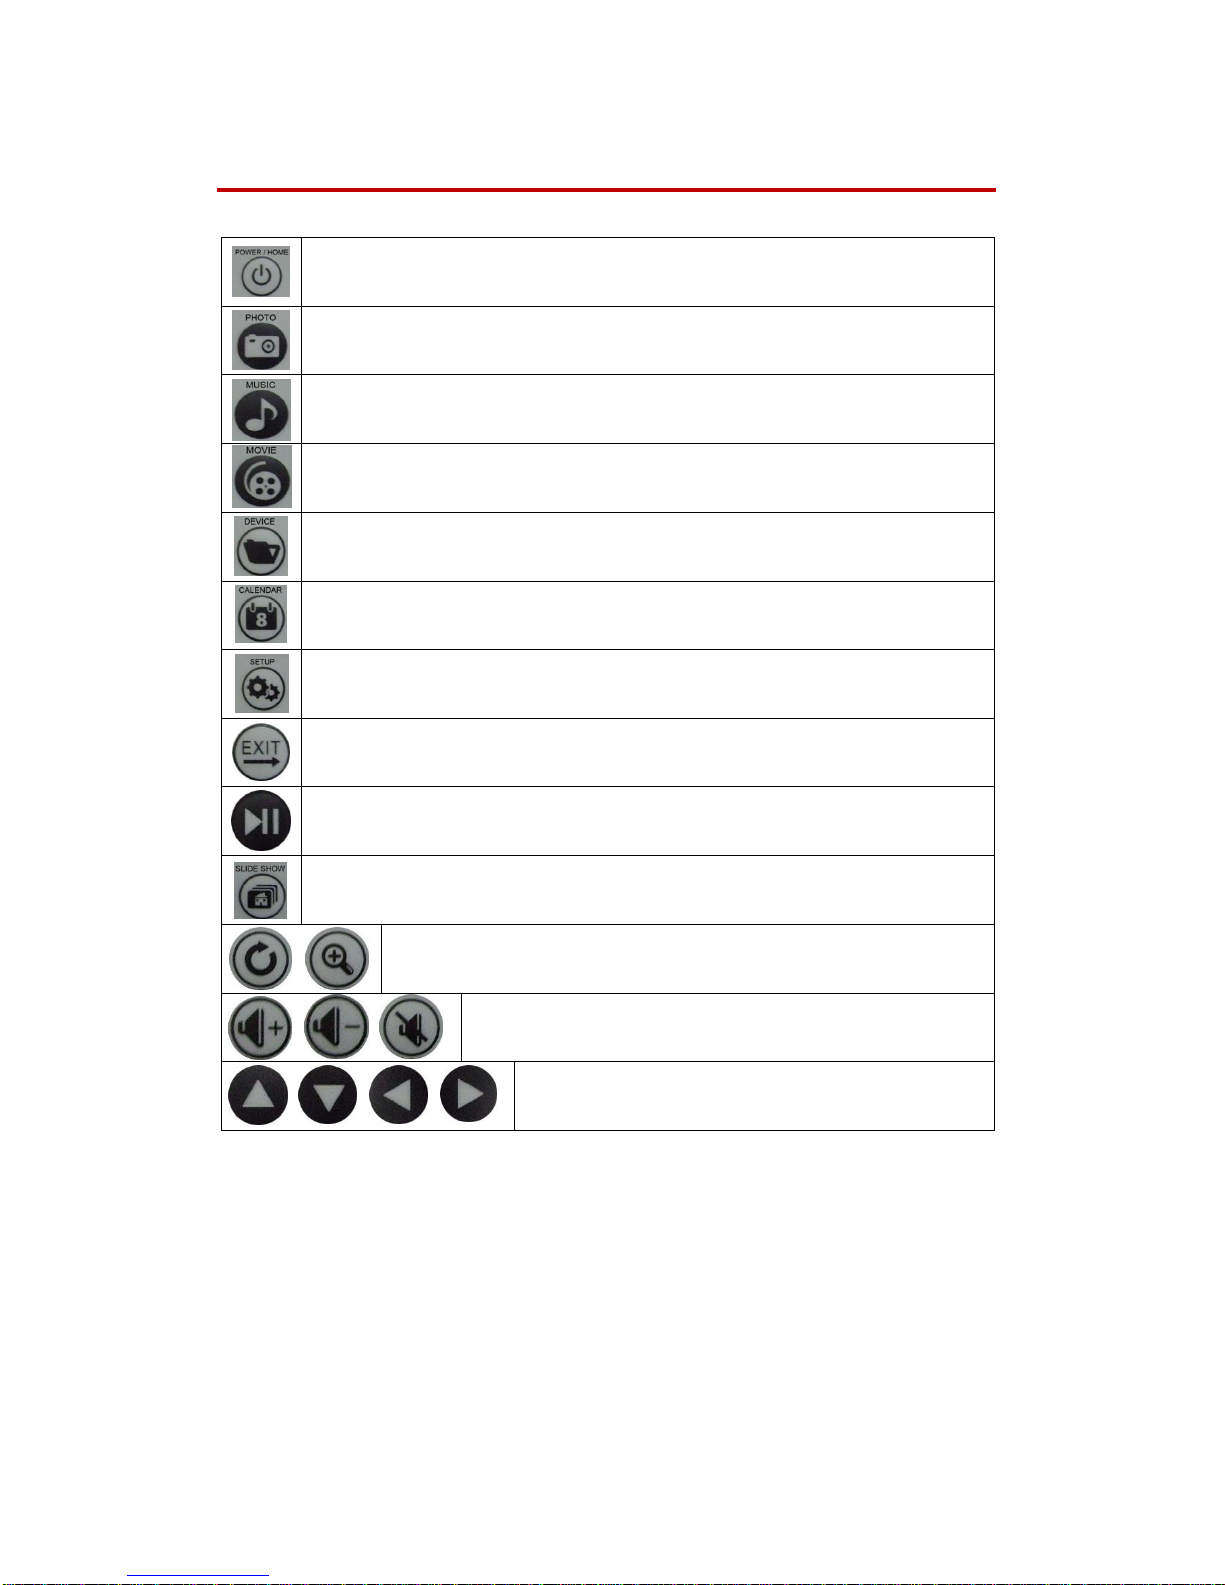
Power ON/OFF button and Home Menu.
The Home Menu is the entrance to the DPF functions.
Display all the pre-installed thumbnail photos.
Show the list of MP3 music files. Choose to play the songs from the
internal speakers or headphones.
Show the List of AVI video files.
Show all device sources. Select the device source where your favorite
photo, music, and movie files are installed.
Display calendar/clock screen.
The slideshow runs the photos found from the device you selected.
All function settings can be made based on your preference.
Exit the current screen or back to the previous screen.
Select the function you want to perform.
Play/pause music and video at any time.
Display all the photos found from the selected device in slideshow form.
Music from the same device source can be played along with.
Rotate or zoom-in the displayed photo.
Adjust the volume (up / down / mute).
Scroll Buttons.
Up, down, left, right.
Page 6
6
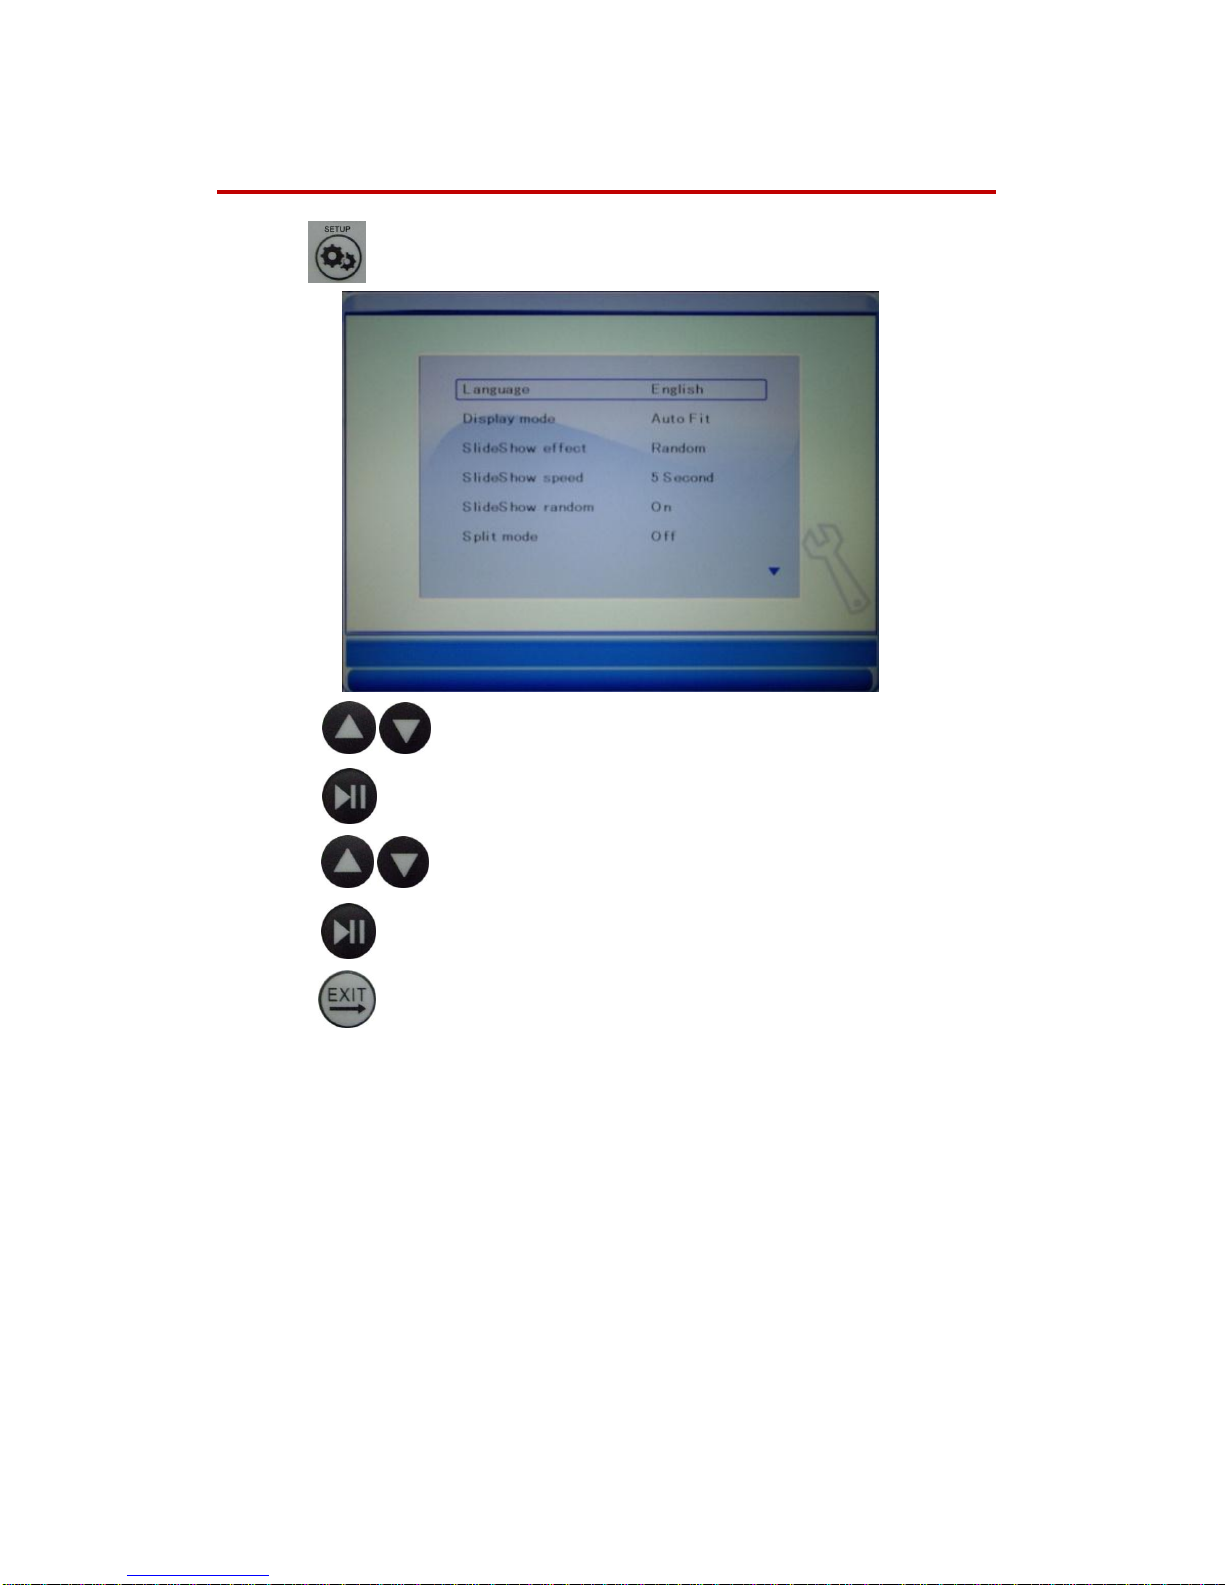
LANGUAGE SETTING
1. Press to enter the setup menu.
2. Press to scroll and stop on the highlighted item, “LANGUAGE”.
3. Press to enable language selection.
4. Press to select the language from the list.
5. Press to confirm the selected language.
6. Press to exit the SETUP.
Note: You can use the similar steps for the Settings of Display Mode, Slideshow Effect,
Slideshow Speed, Slideshow Random, Split Mode, Music Repeat, Video Mode and
Brightness.
Page 7
7
PHOTOS & SLIDESHOW
You can view photos individually or all photos as a slideshow and background music can
be played along with.
View Thumbnail Photos & Full size Photos
1. If you want to display the photos from built-in memory, please go to Step 4.
2. Insert a media device source; memory card (SD/MS/MMC) or USB flash drive.
3. Press to select the media device source.
4. Press to display all thumbnail photos on the selected source.
5. Use to scroll through individual photos.
6. Press to view an individual photo full screen.
7. You can use to view the next/previous photos.
Play Slideshow
1. Select a media device source.
2. Press to displays all the photos on the selected source as a slideshow.
3. Press to adjust the music volume or mute.
4. To stop the slideshow, press to exit the SLIDESHOW
Note: You can select slideshow effect, slideshow speed and slideshow random options on
the setup menu.
Page 8
8
MUSIC
1. Select the media device source.
2. Press to show the list of all available music files on the selected source.
3. Use to scroll through the music files on the list.
4. Press to play the selected music.
5. Press to adjust the music volume or mute.
6. Press to pause music and press to exit MUSIC.
Note: You can select music repeat option from the setup menu.
No Repeat -- play only one loop of all music files
Repeat Single – continuously play one single music file on the selected source
Repeat All – continuously play all music files on the selected source
Note: Music files must be standard MP3 format.
Video Play
1. Select the media device source.
2. Press to show the list of all movie files on the selected source.
3. Use to scroll through the movie files on the list.
4. Press to play the selected movie.
5. Press to adjust the volume or mute.
6. Press to pause the movie and press to exit MOVIE.
Note: Movie files must be motion JPEG AVI video files. If your movie file is not in AVI
format, you may have to convert its format by using a software converter.
Page 9
9
CALENDAR & CLOCK
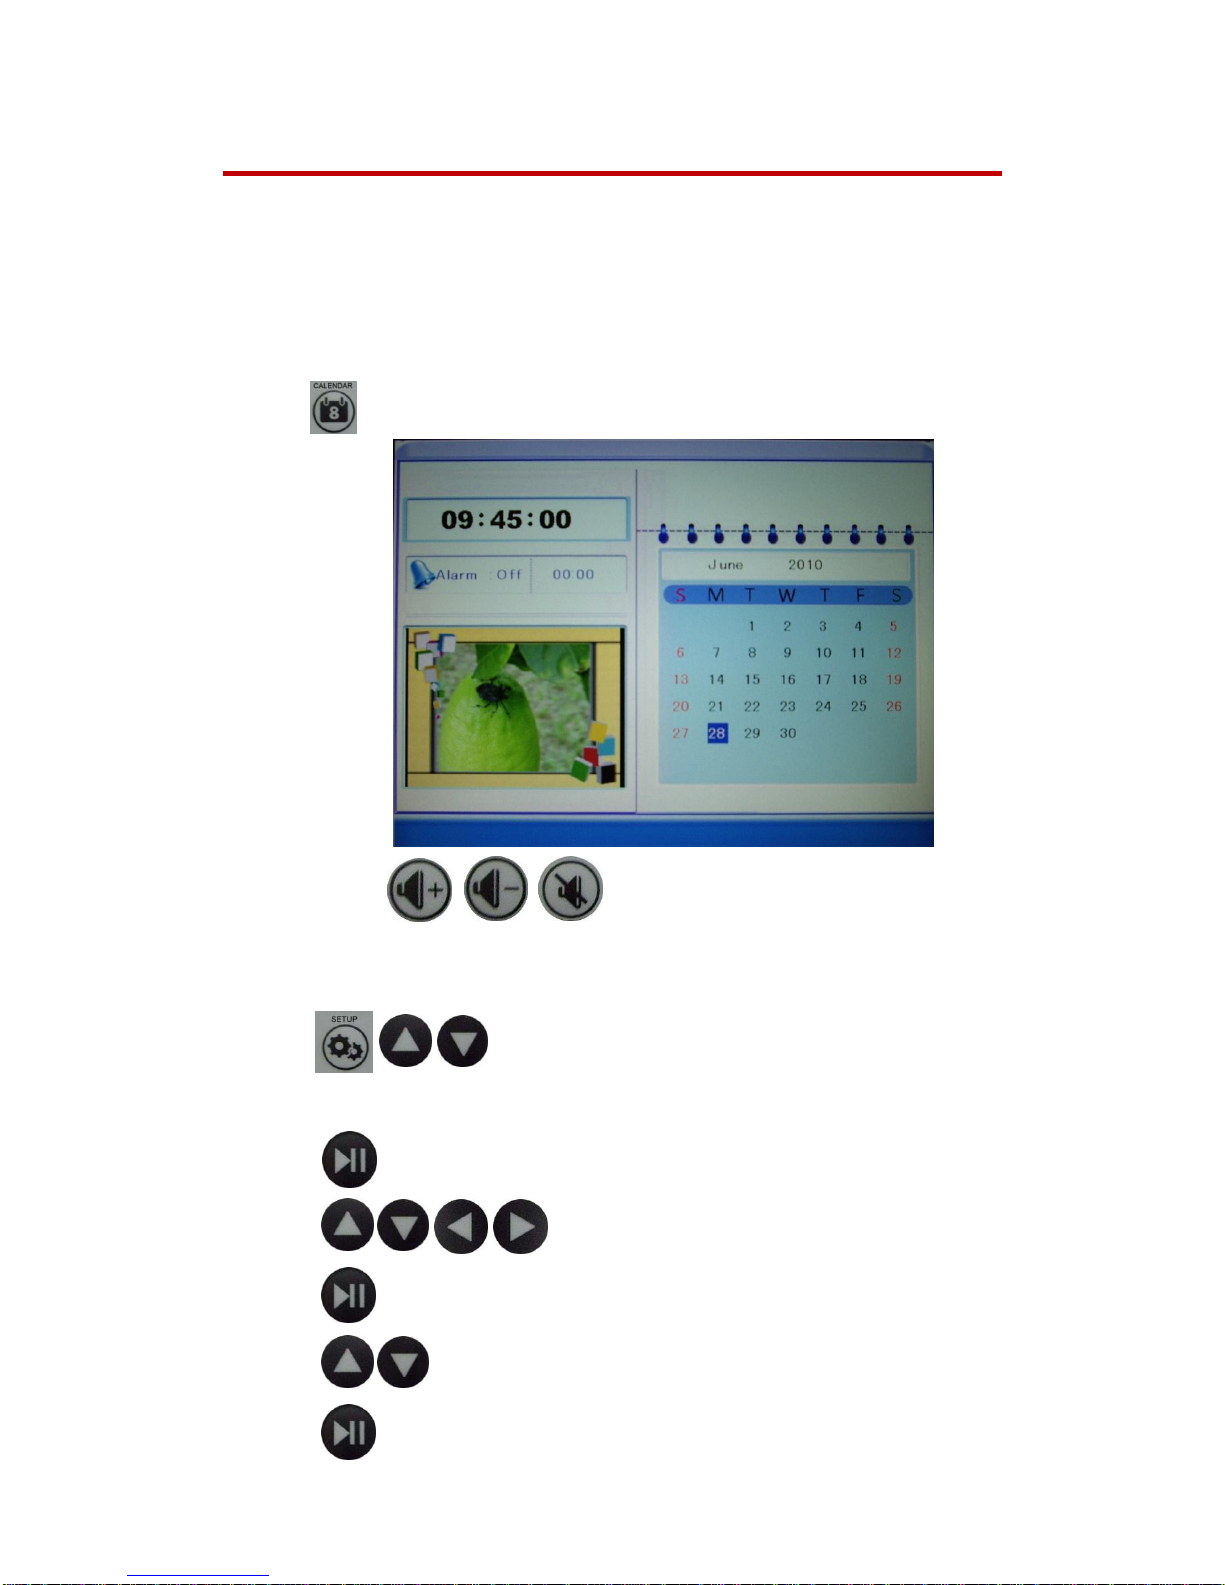
The DPF can be used as a personal desk calendar with a real-time clock and alarm. A
Slideshow with photos and music on the selected source also can be played along with.
Calendar with Slideshow
1. Select the media device source.
2. Press and below calendar screen with slideshow will be displayed.
3. You can press to adjust the volume or mute.
Date/time and Alarm Settings
1. Press to scroll and stop on the highlighted item, “CALENDAR
SETTING”.
2. Press to enable calendar settings.
3. Press to the field where the modification must be made.
4. Press to enable the modification of the specific field.
5. Press to adjust DATE/TIME or alarm ON/OFF.
6. Press to confirm the changes of calendar settings.
Page 10
10
FILES IMPORT/EXPORT/DELETE
Import Files into Built-in Memory
You can import photo/music/movie files from the external devices, such as memory card
(SD/MS/MMC) or USB flash drive. The number of files you can import depends on the file
size and available memory.
1. Insert a memory card (SD/MS/MMC) or USB flash drive into the DPF.
2. Press to select the media device source.
3. Press to confirm and enter the selected source.
4. Use to scroll through the files you want to copy/paste.
5. Press to enable the function of the selected file.
6. Press and select “Copy”, then press .
7. Press and start from Step 2 (select Built-In Memory) to Step 4, then move to
Step 8.
8. Press to enable the function of the selected file.
9. Press and select “Paste” item, press to finish importing the file.
Note: You can use the similar way on exporting the files from built-in memory to the
external devices.
Delete Files from built-in Memory
1. Use to scroll through the files you want to delete.
2. Press to enable the function of the selected file.
3. Press and select “Delete”, then press .
Page 11
11
Connect to a Computer
You can connect your DPF to a computer via the USB cable for files (photos, music,
movies ) importing/exporting/deleting.
1. Connect the small end USB cable to your DPF and large end to computer.
Your DPF will automatically stop all operations and go to “PC connection” status.
2. The built-in memory will automatically be detected by your computer. You can
import/export/delete files on built-in memory by simply dragging the files into the
drives.
MEMORY FORMAT & FACTORY DEFAULTS
Build-in Memory Format
1. Press to scroll and stop on the highlighted item, “LOCAL
FORMAT”.
2. Press to enable Local Format.
3. Press to select Yes/No.
4. Press to execute built-in memory formatting.
Reset to Factory Defaults
1. Press to scroll and stop on the highlighted item, “DEFAULT”.
2. Press to enable Default.
3. Press to select Yes/No.
4. Press to reset your DPF to factory defaults.
 Loading...