

Page 1

Overview
This product is a professional wire management system that is linked to your
smartphone. The WMS is designed for operating accessories (including lights, horns,
warning beacons, etc.) typically used on work or off-road vehicles (trucks, jeeps,
ATV/UTV, boats, heavy equipment, farm equipment, etc.).
The unit works on 12V DC and provides output to four terminals which are protected
by a 40A fuse.
Please note that before you can operate this system, you need to download and install
BLAZER LINK app for your smartphone.
Installation
1. Please read these instructions carefully before installing this product. It is
recommended to consult a professional installer to prevent damage to vehicle
and/or system.
2. Do not connect to 24V DC or higher voltage system, as this product is designed for
a 12V DC battery system. In case you have a larger than 12V DC system, check
vehicle owner’s manual to determine if a 12V DC output is available and how to
connect in order to use it safely, otherwise, the product will be damaged.
3. Find a suitable flat surface near the battery, clean the surface free of dirt and oil
and then affix the unit using provided adhesive strips and/or mounting holes.
4. Remove the 40Afuse from the holder and disconnect the vehicle battery.
5. Securely attach the positive (red) cable of the WMS unit to the positive terminal of
the battery (or battery cable) and the negative (black) cable of the WMS to the
negative battery cable or chassis.
6. Attach the auxiliary lights/equipment following correct polarity on the terminals and
not exceeding the maximum amperage of the channels (amperage printed on WMS
and corresponds to amperage printed on the remote control for each terminal).
See FIG 1
7. Reconnect battery cables.
8. Insert the 40Afuse back into its holders and snap the cover closed.
Main Unit
Page 1 of 06
CWL623 OWNER’S MANUAL
BLAZER-INTERNATIONAL.COM
1-800-241-3808
Page 2

App Instructions
9. Download and install BLAZER WMS app for your smartphone operating system.
Available on app stores.
10. For initial setup, tap the "radio" icon to go to the "Connect" screen.
Simply select the module and enter the appropriate numerical password.
11. Once connected, hit the back button to return to the main screen.
12. Now, select your vehicle type by tapping on the arrow to the right of the initial
schematic.
13. Next, select Light Position setup to assign lights to different locations on your
vehicle. Tap on the terminal and then tap on the desired location. Repeat this for
the remaining terminals and then hit enter to return to the main screen.
14. You are now set up to operate your Lights.
15. Activate the system by tapping the power icon It will turn green to indicate
is powered on .
16. Now, select a light. The light icon will turn blue to indicate it is the active selection.
17. You can turn on and off the light via the "individual Terminal ON/OFF" switch.
18. Note, terminal 2Ais used in conjunction with a warning light with different strobe
patterns built into it. Turning on and off this terminal advances the flash to the next
flash pattern. In absence of a warning light, this terminal can be used just like the
other terminals in order to power on and off lights etc..
a. Most warning lights with strobe function will have three wires. Black, red and
Black is to be connected to negative of 18A, red to positive terminal of
yellow is for advancing the strobe patterns. Consult with the
light to determine if yellow is on the negative side of the
and connect it to the appropriate polarity of
terminal 2A .
19. Terminal 2B has been specifically designated for additional light controls.
With applicable lights, you may use the respective sliders to adjust both
and flash speed.
.
that it
yellow.
18A and
manufacturer of the
circuit or on the positive side
brightness
Page 2 of 06
CWL623 OWNER’S MANUAL
BLAZER-INTERNATIONAL.COM
1-800-241-3808
Page 3

20.Once the lights have been set up as desired, the whole system can turned on and
off by the master power button . When this master power icon is grayed out,
lights will be off.
21. Additional features can be found in the settings tab indicated by the gear icon.
b. The Low VoltageAlarm - If the Blazer Link detects that your battery level is
lower than the set voltage, it will notify you via the alarm.
c. Timing Shutdown - allows you to set time period when you want your lights to
automatically turn off to prevent unnecessary battery draining.
d. You can also rename your device and set a new password.
22. Back on the main screen, select the Battery icon to view readout of your battery
level and voltage standing.Additionally, this is the icon that will turn red and notify
you when your battery level has reached the low voltage level you defined earlier
in the settings tab. It is also possible to pick one of the five audible sounds or
vibrator, which will alert you.
23. Once set up, try to manipulate each light to ensure that the system is working
without issue.
all the
,
Page 3 of 06
CWL623 OWNER’S MANUAL
BLAZER-INTERNATIONAL.COM
1-800-241-3808
Page 4

Input low voltage protection 9.5V +/- 0.3V DC
24in Double Row Spot and Flood
Specifications
Page 4 of 06
CWL623 OWNER’S MANUAL
BLAZER-INTERNATIONAL.COM
1-800-241-3808
Page 5
Troubleshooting
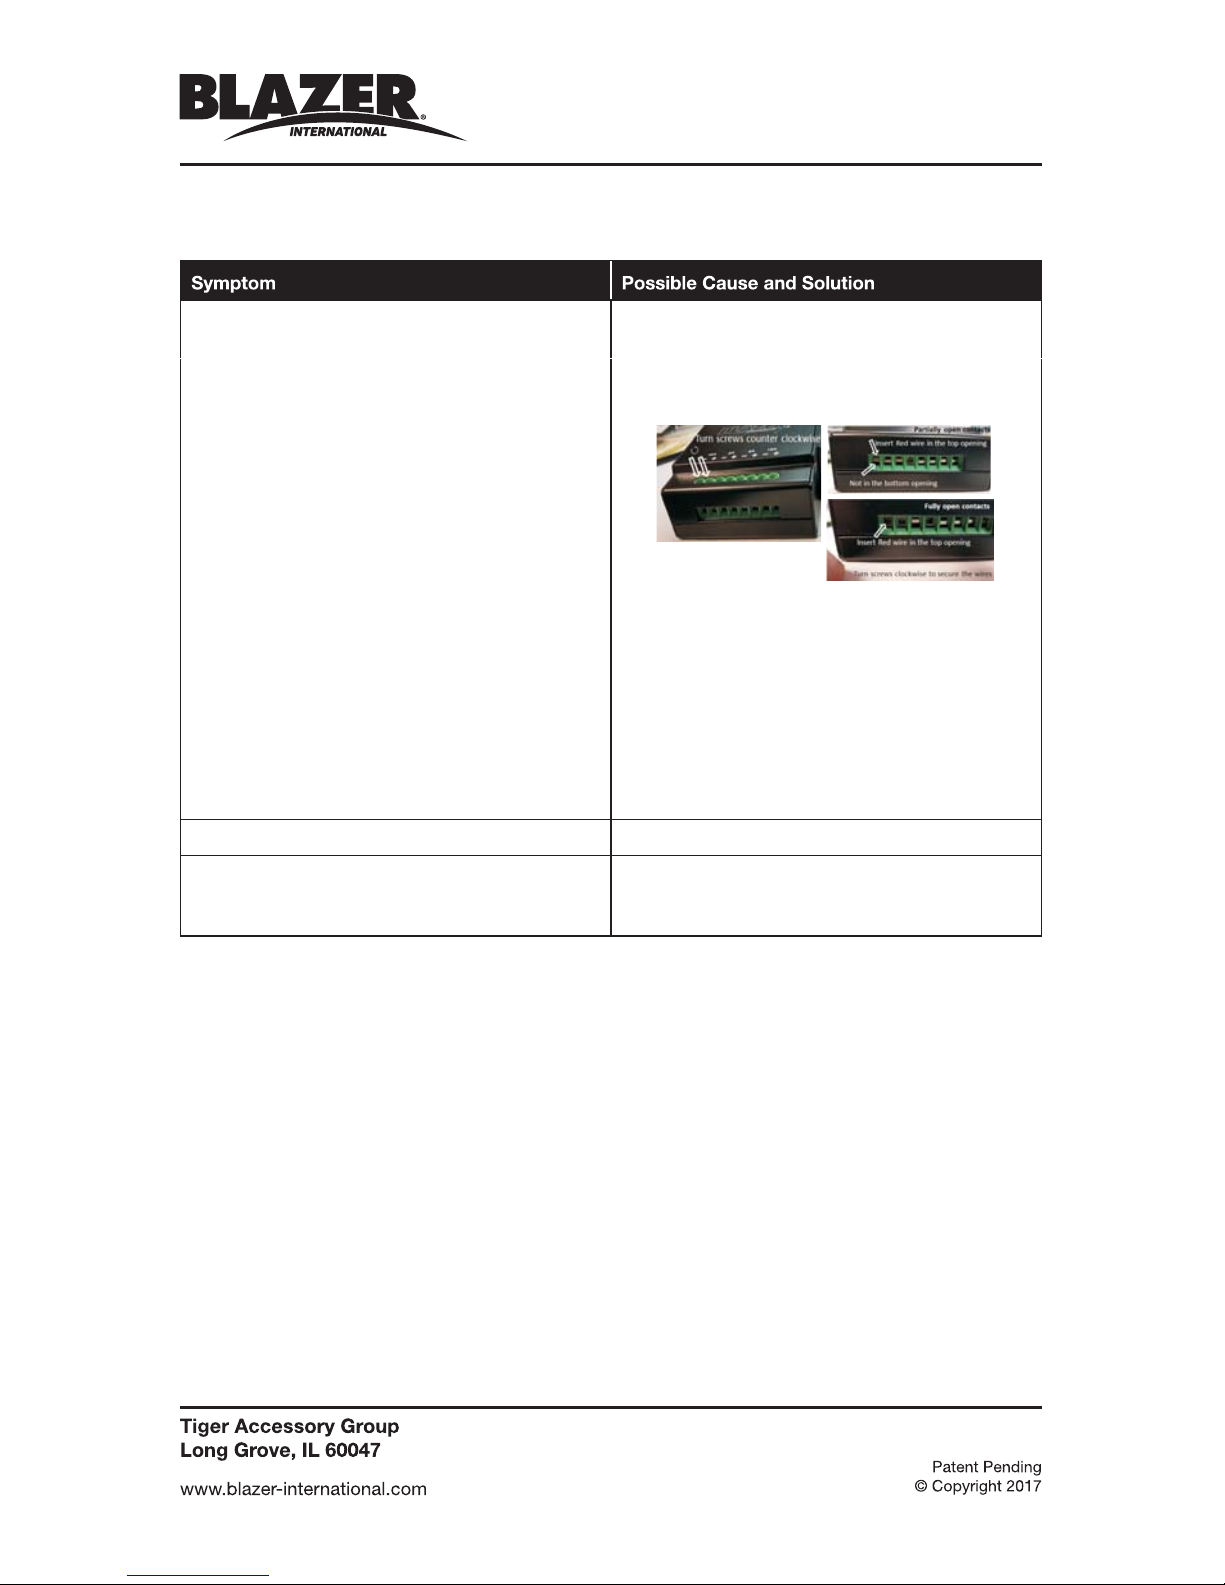
Auxiliary lights/equipment not operational.
1. Wires not connected properly in the
terminals
2. If the contacts don’t open, gently push
downwards on the screws
3. App on smartphone not connected (paired)
to the main unit. Reconnect
4. Vehicle battery voltage below 9.8V +/- 0.3V
DC. Charge battery.
5. Main unit not connected/ incorrectly
connected to the battery source.
Check connection and polarity of WMS.
6. Blown fuse/Replace fuse.
7. Pairing between the remote and main unit
disrupted. Pair the system
Some accessories/lights will not come on.
Light/accessory comes on momentarily.
Check wire polarity for those items.
That channel is being overloaded. Make sure
the amperage of the light is less than that
stated at the terminal (check fuse).
Page 5 of 06
Manufacturer:
TOKING AUTO INDUSTRIAL INT'L CO.,LTD.
A-202,ZHONGTIAN MCC,
TONGPU ROAD ACROSS XIDOUMEN ROAD,
HANGZHOU 310012 CHINA.
CWL623 OWNER’S MANUAL
BLAZER-INTERNATIONAL.COM
1-800-241-3808
Page 6

CWL623 OWNER’S MANUAL
BLAZER-INTERNATIONAL.COM
1-800-241-3808
Page 6 of 06
changes or modifications not expressly approved by the party responsible for compliance could
void the user’s authority to operate the equipment.
This device complies with Part 15 of the FCC Rules. Operation is subject to the following two
conditions:
(1) this device may not cause harmful interference, and
(2) this device must accept any interference received, including interference that may cause
undesired operation
Note: This equipment has been tested and found to comply with the limits for a Class B digital device,
pursuant to Part 15 of the FCC Rules. These limits are designed to provide reasonable protection
against harmful interference in a residential installation. This equipment generates, uses, and can
radiate radio frequency energy, and if not installed and used in accordance with the instructions,
may cause harmful interference to radio communications. However, there is no guarantee that
interference will not occur in a particular installation. If this equipment does cause harmful
interference to radio or television reception, which can be determined by turning the equipment
off and on, the user is encouraged to try to correct the interference by one or more of the following
measures:
– Reorient or relocate the receiving antenna.
– Increase the separation between the equipment and receiver.
– Connect the equipment into an outlet on a circuit different from that to which the receiver is
connected.
– Consult the dealer or an experienced radio/TV technician for help.
This equipment complies with FCC radiation exposure limits set forth for an uncontrolled
environment. This equipment should be installed and operated with a minimum distance of 20cm
between the radiator & your body. This transmitter must not be co-located or operating in
conjunction with any other antenna or transmitter.
This device complies with Industry Canada license-exempt RSS standard(s). Operation is subject to
the following two conditions: (1) this device may not cause interference, and (2) this device must
accept any interference, including interference that may cause undesired operation of the device.
Cet appareil est conforme aux CNR exempts de licence d'Industrie Canada. Le fonctionnement est
soumis aux deux conditions suivantes:
(1) Cet dispositif ne peut causer des interférences; et
(2) Cet appareil doit accepter toute interférence, y compris les interférences qui peuvent causer un
mauvais fonctionnement de l'appareil.
The device meets the exemption from the routine evaluation limits in section 2.5 of RSS 102 and
compliance with RSS-102 RF exposure, users can obtain Canadian information on RF exposure and
compliance.
Le dispositif rencontre l'exemption des limites courantes d'évaluation dans la section 2.5 de RSS
102 etla conformité à l'exposition de RSS-102 rf, utilisateurs peut obtenir l'information canadienne
surl'exposition et la conformité de rf.
This transmitter must not be co-located or operating in conjunction with any other antenna or
transmitter. This equipment should be installed and operated with a minimum distance of 20
centimeters between the radiator and your body.
Cet émetteur ne doit pas être Co-placé ou ne fonctionnant en même temps qu'aucune autre antenne
ouémetteur. Cet équipement devrait être installé et actionné avec une distance minimum de
20 centimètres entre le radiateur et votre corps.
 Loading...