

Page 1
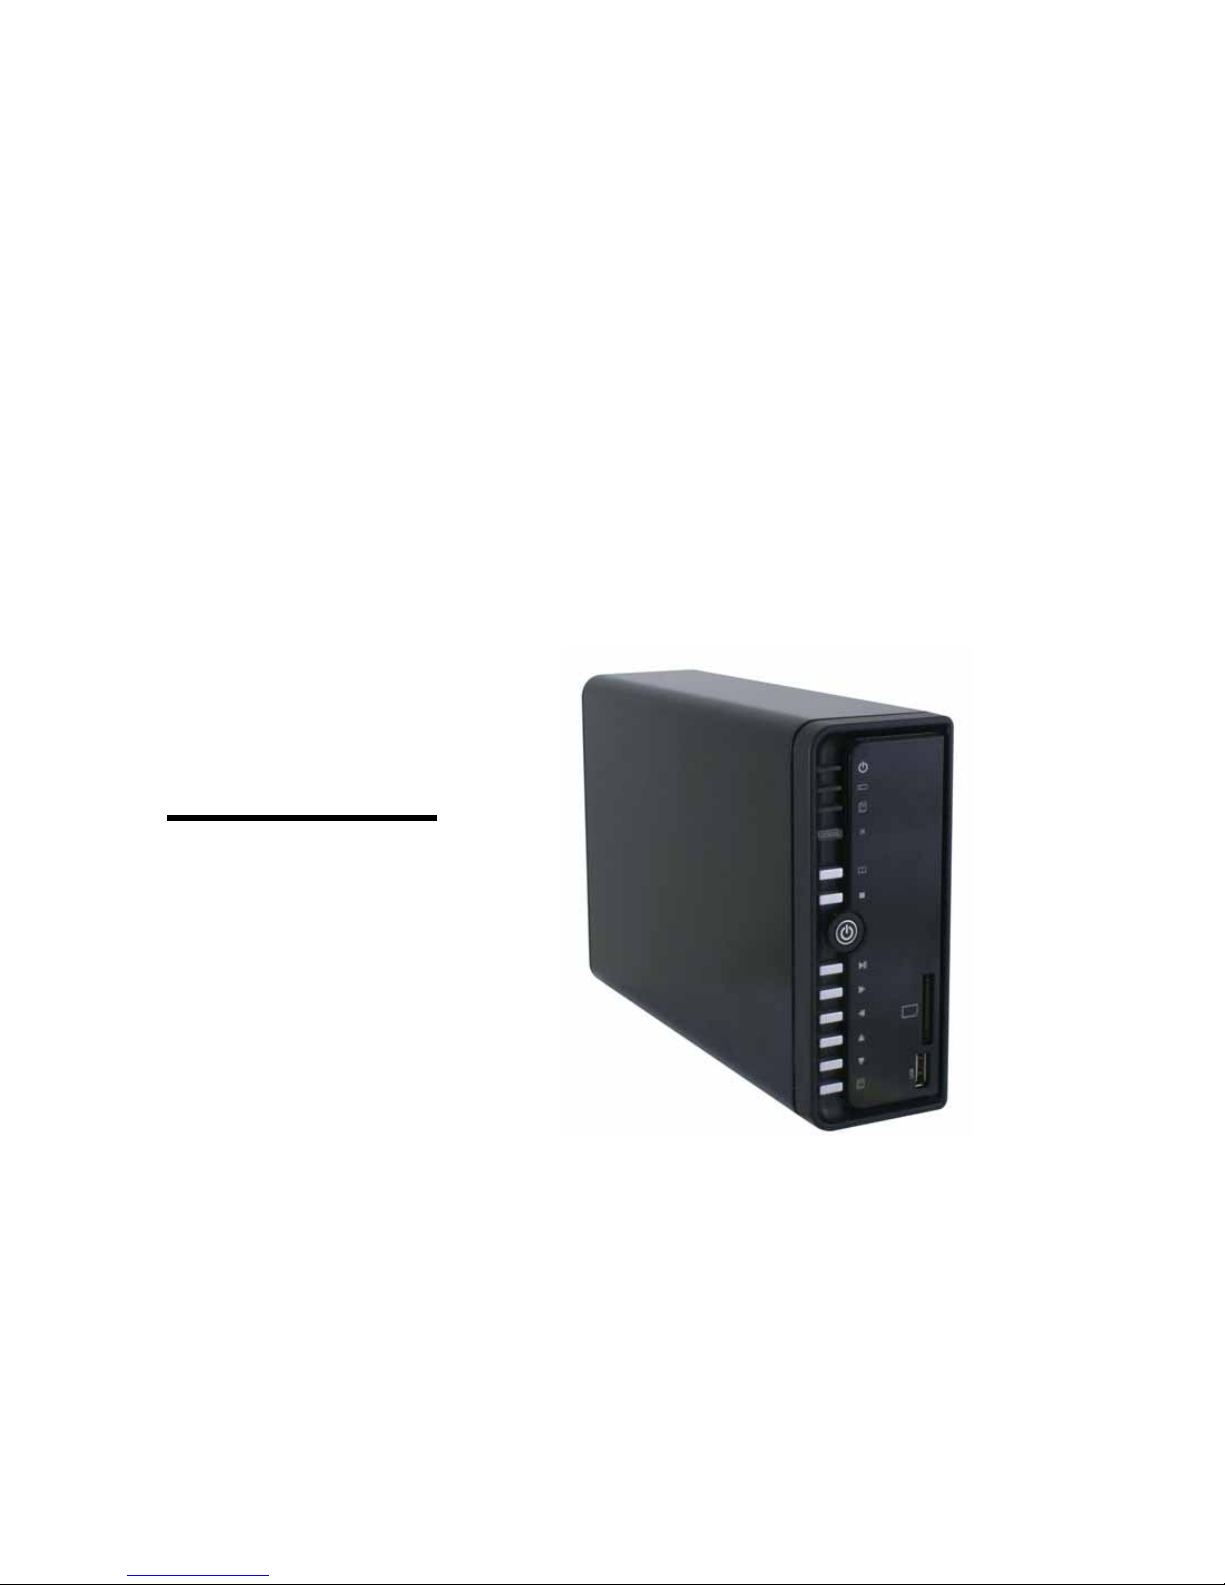
USER MANUAL
High Definition
HDD Multimedia Player
BM 3030
☆ Feature
☆ Installation Guide
☆ Management Guide
Page 2

BM3030 Multimedia Player User Manual
1
CONTENTS
1. Before You Get Started...……………………………………………………………………………..……………. 3
1.1 SAFTY INSTRUCTION……………………….……………………………………………….………………...3
1.2
TAKE A LOOK TO THE MEDIA PLAYER……………………………………………………….………..………4
1.3 Specification…………….....................................................................................................................................5
1.4 Package Contents…………………………………………………………………………………………...…. 8
2. EASY INSTALLATION GUIDE…………………………………………………………….…………..…………9
2.1 Front / Back Panel Introduce………………………………………………………………………………….9
2.2 Hardware Installation…………………………………………………………………………………………11
3. USING MEDIA PLAYER…………………………………………………………..……………………………...15
3.1
REMOTE CONTROL INTRODUCE……………………………………………..………………………………..15
3.2
GETTING STARTED……………………...………………………………………………………………….…..22
3.3 Format Hard Disc……………………………………………………………………………………………..26
3.4 The REC List………………………………………………………………………………………………….30
3.5 Timer Record Menu…………………………………………………………………………………………..31
3.5.1
CREATING A NEW SCHEDULE..............................................................................................................31
3.5.2
EDITING SCHEDULES...........................................................................................................................33
3.5.3
DELETING SCHEDULES........................................................................................................................34
3.5.4
VIEWING SCHEDULE STATUS VIEWING SCHEDULE STATUS ...............................................................35
3.5.5
VIEWING RECORDING HISTORY ..........................................................................................................36
3.6 Setup Menu……………………………………………………………………………………………………37
3.6.1
CHANGING SYSTEM SETTINGS ............................................................................................................37
3.6.2
CHANGING VIDEO SETTINGS...............................................................................................................41
3.6.3
CHANGING AUDIO SETTINGS ..............................................................................................................41
3.6.4
CHANGING RECORD SETTINGS……………………………………………………………………….46
3.6.5
CHANGING PHOTOS SETTINGS………………………………………………………………………..48
Page 3

BM3030 Multimedia Player User Manual
2
3.6.6 CHANGING NETWORK SETTINGS………………………………………………………………….….51
3.7 Browser Menu………………………………………………………………………………………………... 53
3.7.1
BROWSING MUSIC…………………………………………………………………………………....55
3.7.2
BROWSING PHOTOS………………………………………………………………………………. …56
3.7.3
BROWSING MOVIES…………………………………………………………………………………..57
3.7.4
BROWSING ALL………………………………………………………………………………………58
3.7.5 File Edit Menu ...................................................................................................................................59
3.8 File Copy Menu…………………………………………………………………………………………….. ..62
S
TEP 1. SELECT SOURCE DEVICE…………………………………………………………………………63
STEP 2. SELECT DESTINATION DEVICE………………………………………………………………...…64
STEP 3. SELECT COPY FILES OR FOLDERS…………………………………………………………………..65
STEP 4. SELECT THE FOLDERS OF DESTINATION…………………………………………………………...66
4.
Utilities……………………………………………………………………………………………………………67
■ Transcode server………………………………………………………………………………………….67
Page 4

BM3030 Multimedia Player User Manual
3
1. Before You Get Started
1.1 Safety Instruction
1. Always unplug the power cable before inserting Hard Drive.
2. A power supply with a different voltage rating will damage and make void of this product warranty.
3. Keep this equipment away from humidity or any type of moisture.
4. Do not drop or shack the device.
5. Do not press or put any weight on the device.
6. Do not clean the device with alcohol, thinner or benzene.
Page 5
BM3030 Multimedia Player User Manual
4
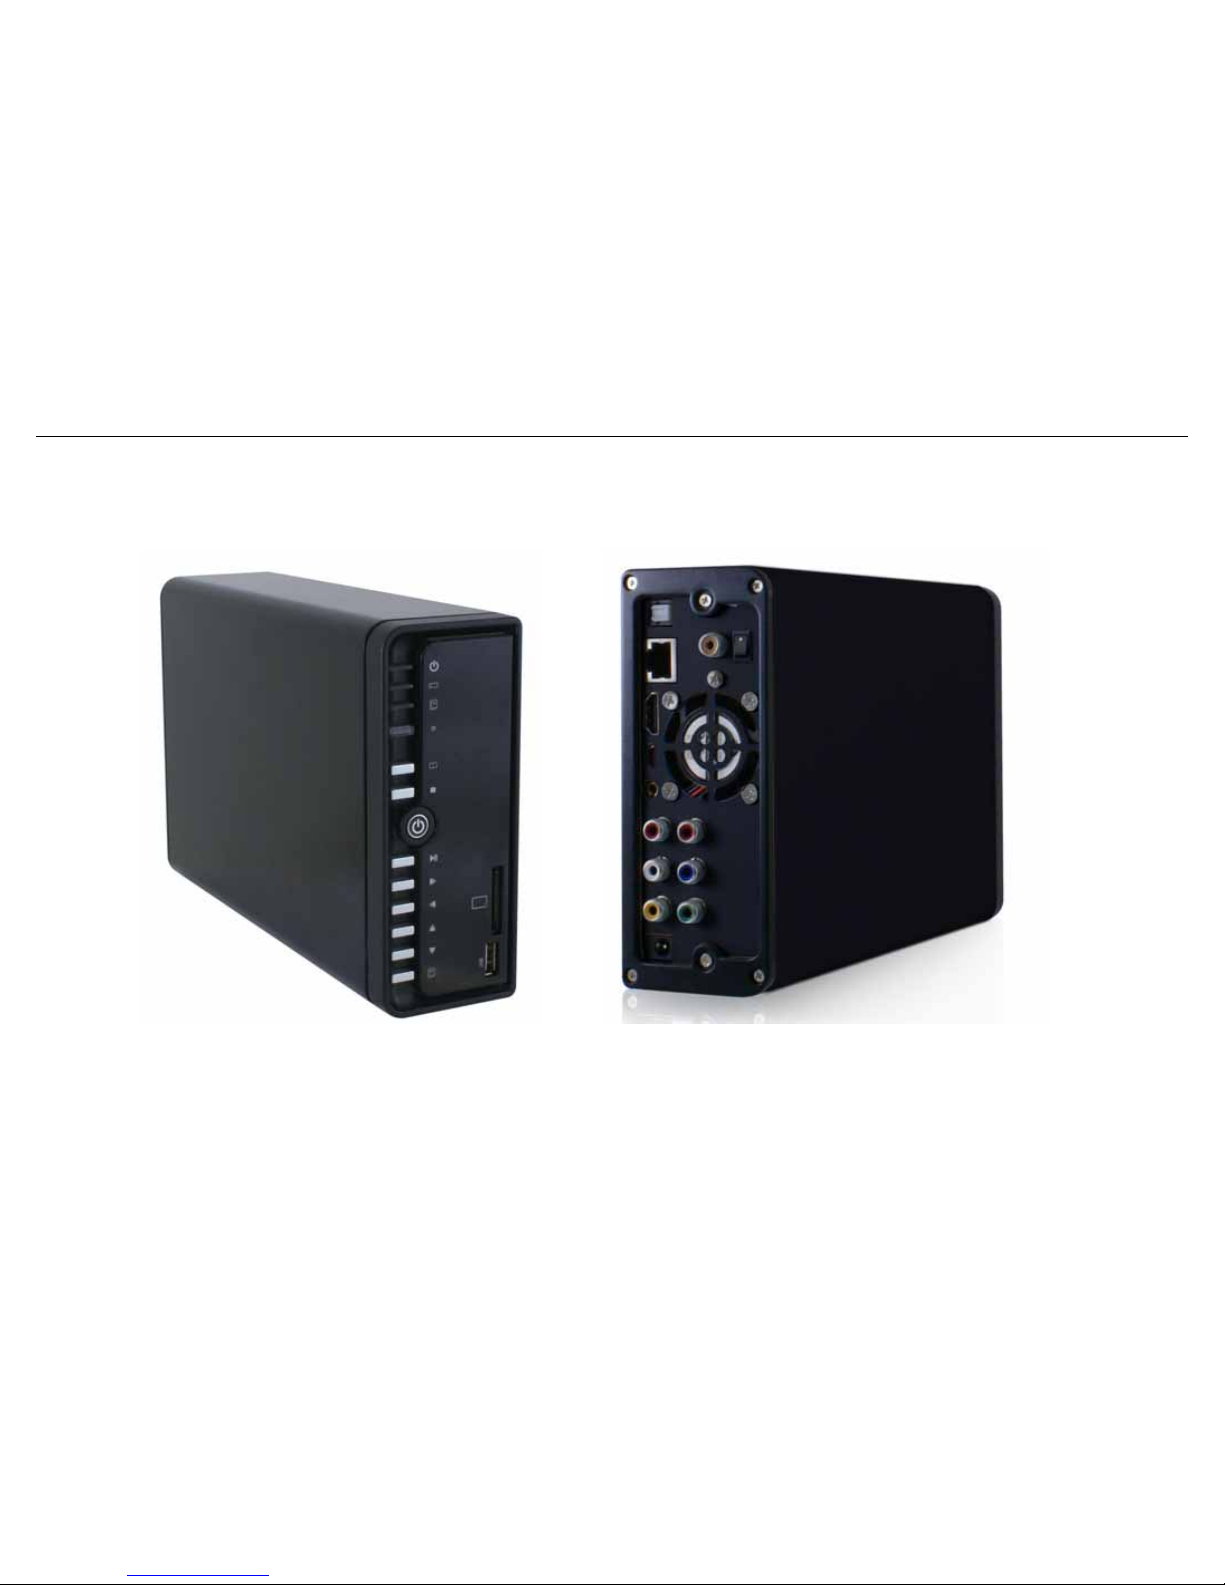
1.2 Take a look to the Media Player BM3030
Front Panel Rear Panel
Page 6
BM3030 Multimedia Player User Manual
5
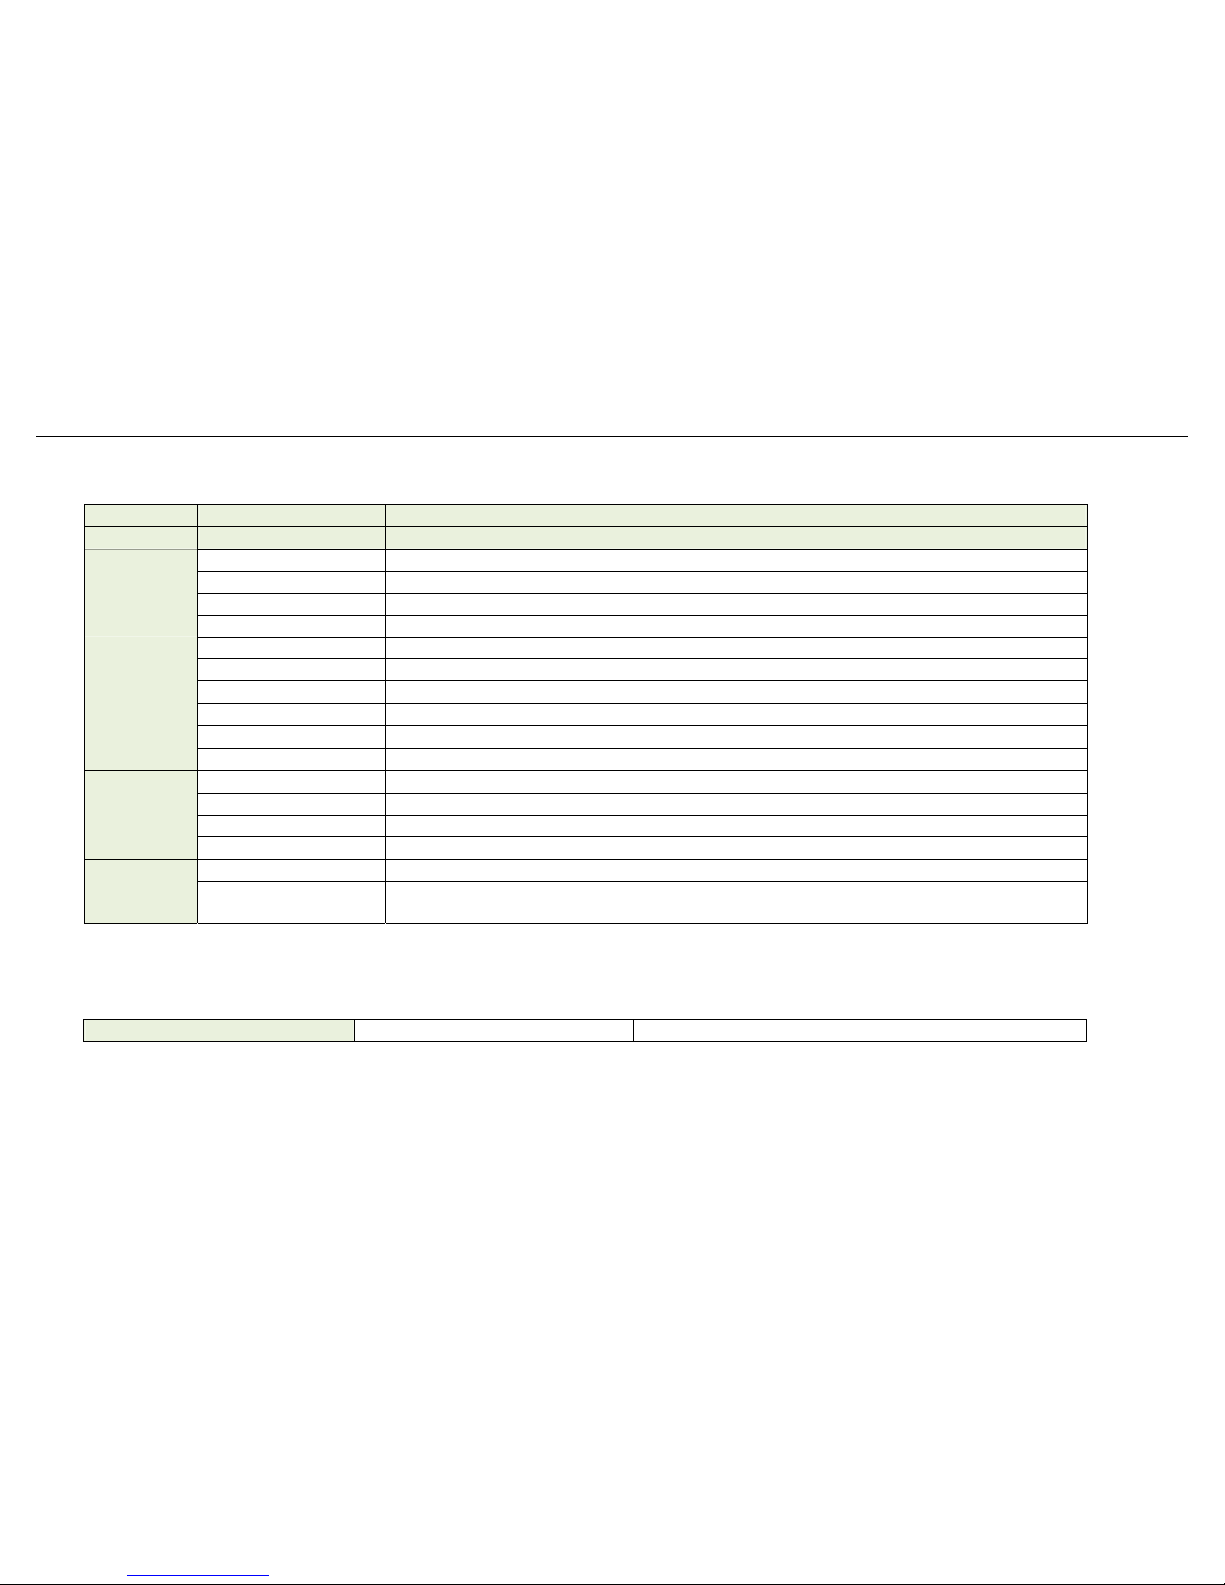
1.3. BM3030 Specification:
■ Hardware Spec
Feature Description
Main Board Main Chipset RTD1262 256pin LQFP
Ethernet x 1
IrDA Receiver x 1 (for Remote Controller)
USB Device x 1 (USB type B USB connector)
System I/O
Power Jack 12V Adaptor
HDMI Output X 1
CVBS Input+ L/R 3 in 1
YPbPr Output RCA x 3
CVBS Output+ L/R RCA x 3
Fiber Optical Output x 1
AV I/O
Co-axial Output x 1 RCA
LED 1 Power (Red & Green)
LED 2 Recording
LED 3 One Touch Copy ( Card Reader to HDD )
Front Panel
Buttons(9) Power/One Touch Copy/ Up/Down/Right/Left/Enter(play)/Stop/Return(Guide)
USB Host X 1 (Connect other device)
Option
Board &
I/O
Card Reader x 1 (SD /SDHC/ MS )
■ Wireless Dongle: (Option)
External Option Device Wireless USB Dongle 802.11g Wireless USB Dongle
Page 7
BM3030 Multimedia Player User Manual
6
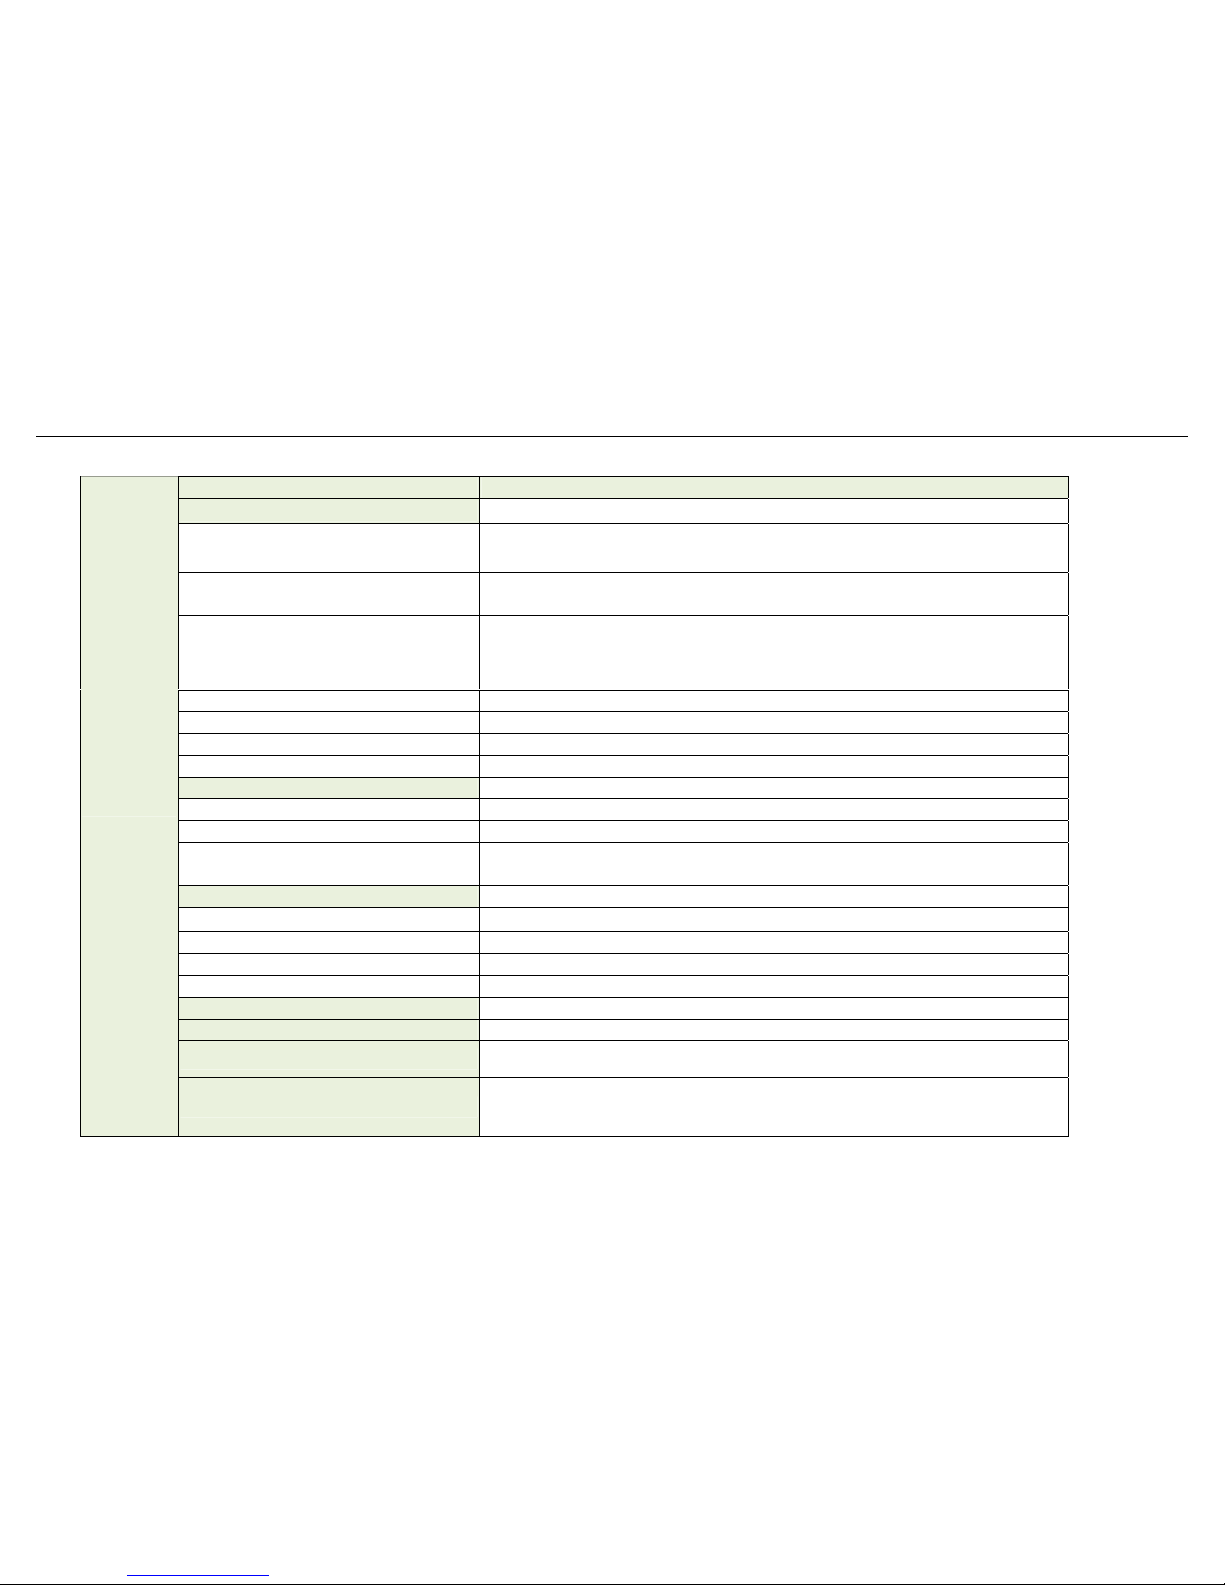
■ Software Spec
Feature Description
Video
High Definition Video Playback
MPEG1 (dat, mpg), MPEG2 (vob, mpg, ts), MPEG4 (avi, divx, xvid),mkv, iso,
ifo up to 1080i output
Trick Play
FF/FR: 1.5, 2, 4, 8, 16, 32x
Slow: 3/4, 1/2, 1/4, 1/8, 1/16x
Smooth Playback
3/4, 1/2, 1.5, 2x Video and Audio smooth playback
*The 1.5 and 2x audio in HD Movie will be turned off
Zoom in 2, 3, 4, 8x
DivX subtitle Supported SRT, SMI, SUB, SSA
CM skip step forward 30sec
Instant Replay step backward 10sec
Photo
High Definition Photo Playback JPG/JPEG/BMP
Preview, Rotate and Zoom in 2, 4, 8, 16x with high speed & high resolution
Transition effect
Cross fade, Left to right, top to button, waterfall, snake, dissolve, Strip Left
Down, All Effect Shuffle
Music
MP3, WMA, AAC,OGG
Trick Play FF/FR: 2, 4, 8, 16, 32x
Music and Photo Mix play Music on Photo’s Directory/Play List
Music Play List yes
Screen Saver yes
One Touch Copy Copy Photos from USB mass storage and memory card
Ethernet Streaming playback (video, audio, image) via Network
Playback
Real-time Tra nscoding
Transcoding on PC (RM, RMVB, WMV, H.264...) and real-time streaming
playback via network
Page 8
BM3030 Multimedia Player User Manual
7
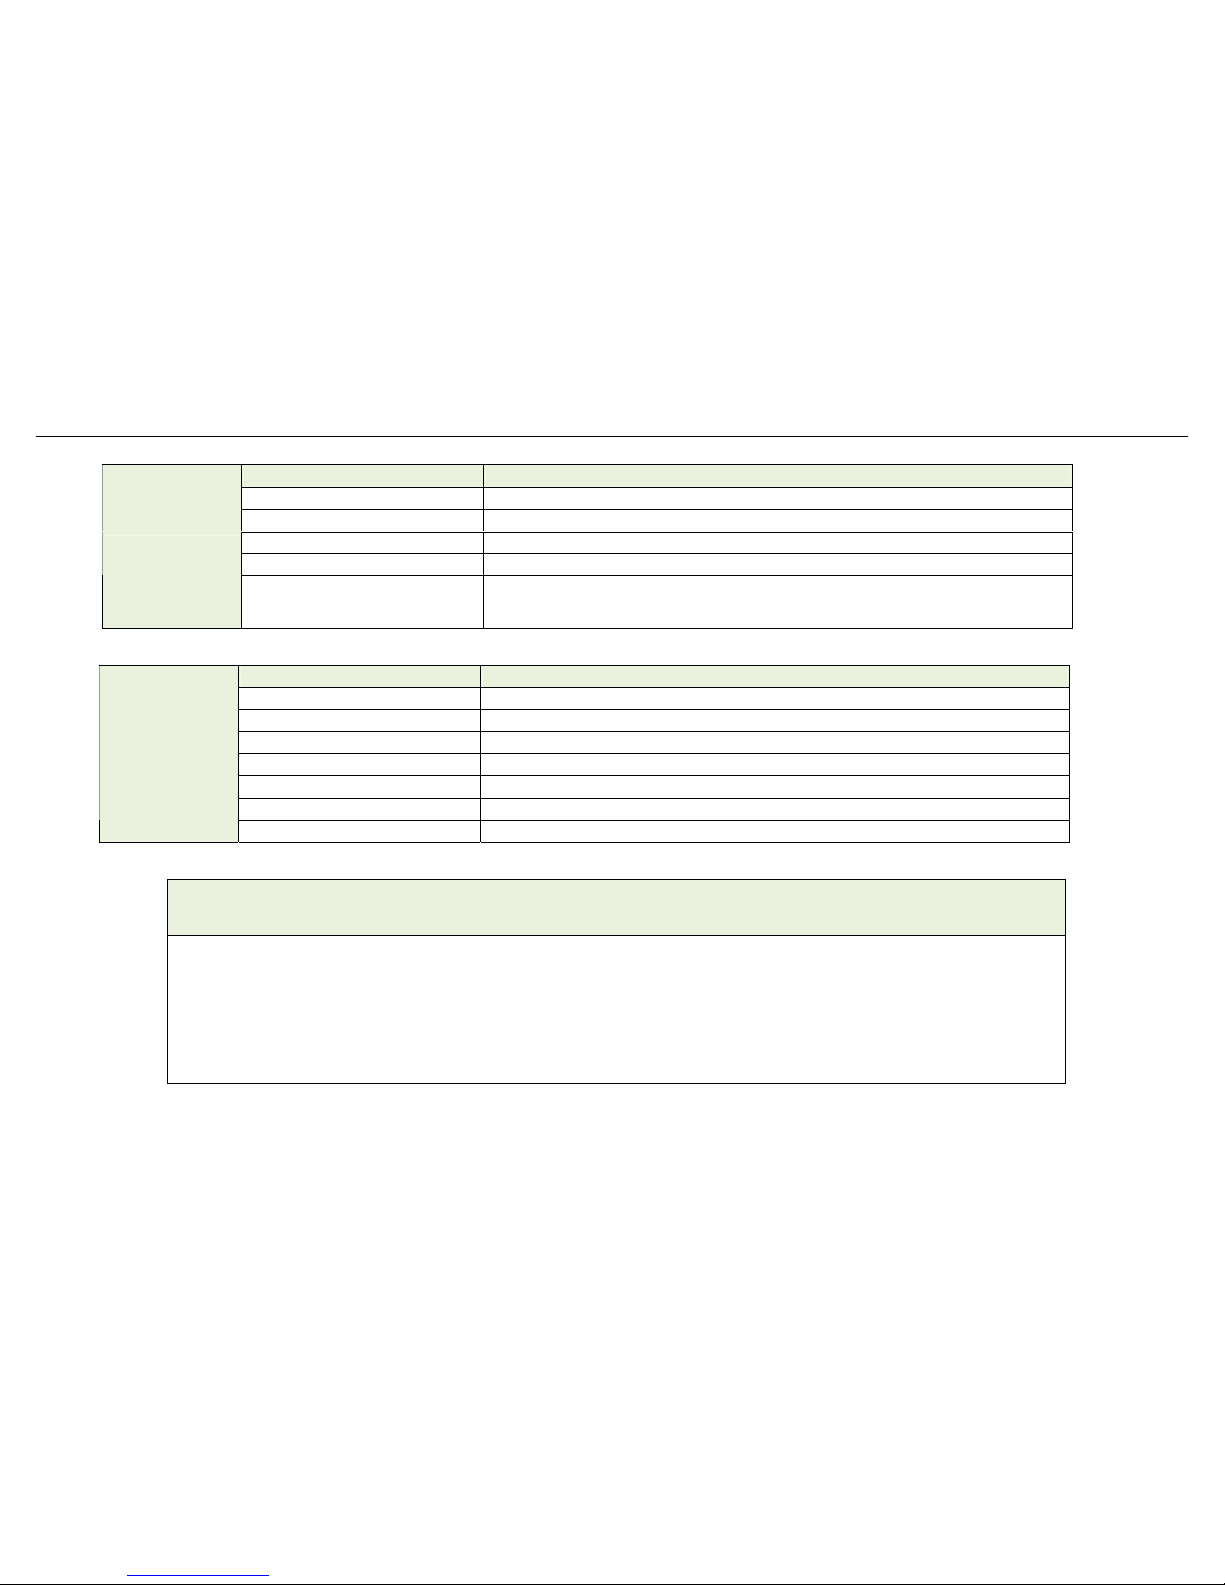
VIDEO RECORDING MODE
Mode DVD 80 GB 120 GB 160 GB HDD
HQ 1hr 16hrs 24hrs 33hrs
SP 2hrs 32hrs 48hrs 66hrs
LP 3hrs 48hrs 72hrs 99hrs
EP 4hrs 64hrs 96hrs 132hrs
SLP 6hrs 96hrs 144hrs 198hrs
Feature Description
One Touch Record Record to FAT32 HDD
Recording Quality Adjustable HQ/SP/LP/EP/SLP
Recording HDD & USB selectable
Time shift HDD
Recording
Schedule Recording
The Schedule Recording menu allows you to create, edit and delete
recording schedules and view all schedule status and history.
Feature Description
OSD Scrolling Text or File Name
Partition NTFS+FAT32
Multi-Language UI English, Español, François, Deutsch, Italiano, Dutch
FAT32 for Recording & File copy
NTFS for Multi-media file storage (only read)
TV System NTSC/480P/PAL/576P/720p@60, 50HZ/1080i@60, 50HZ
System
File Copy HDD<->Net , USB<-> HDD, USB<->Net
Note: The specifications and design of this product are subject to change without notice.
Page 9
BM3030 Multimedia Player User Manual
8
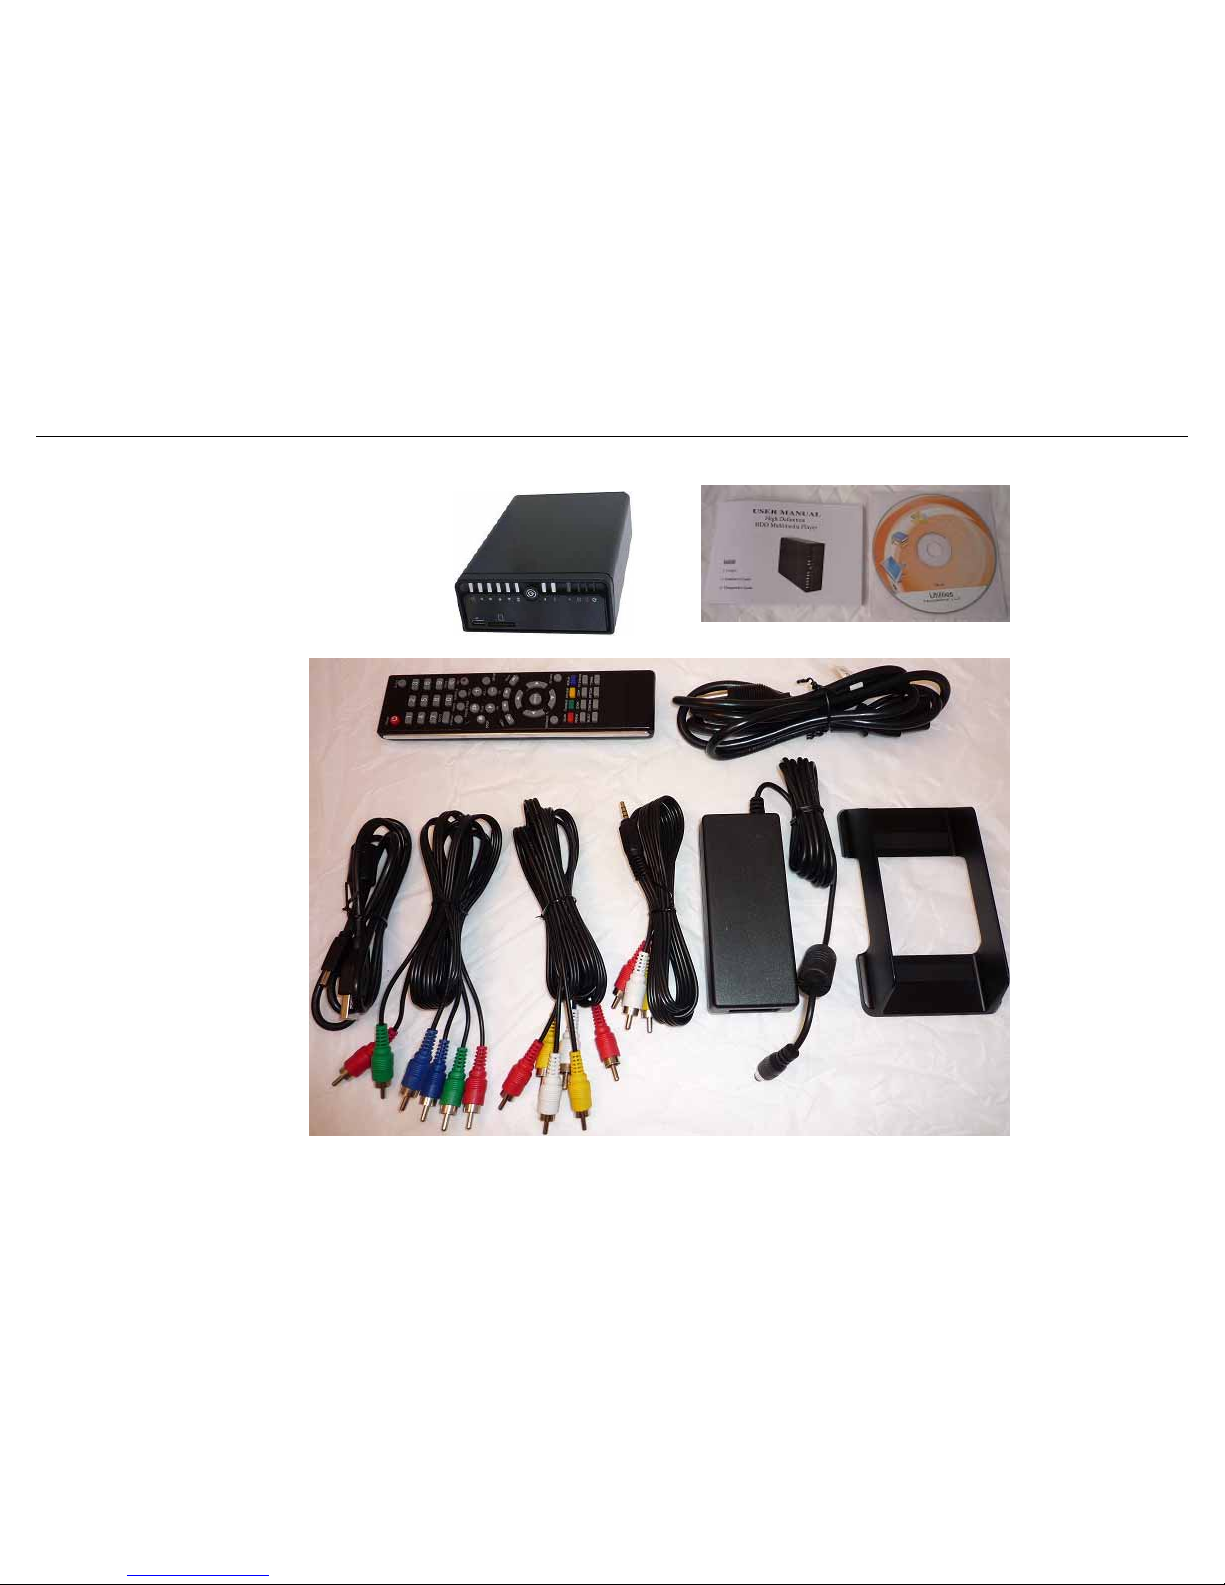
1.4 BM3030 Package Contents:
■ Multimedia-Player Unit x 1
■ DC Power Adapter x 1
■ AV Cable x 2 -(RCA x3 , 3 IN 1)
■ USB Cable x1
■ YPbPr Cable x1
■ Remote Control x1
■ Tools CD x1
■ User Manual x1
■ Plastic Stand x1
■ Screw Package
Page 10
BM3030 Multimedia Player User Manual
9
2. BM3030 Easy Installation Guide
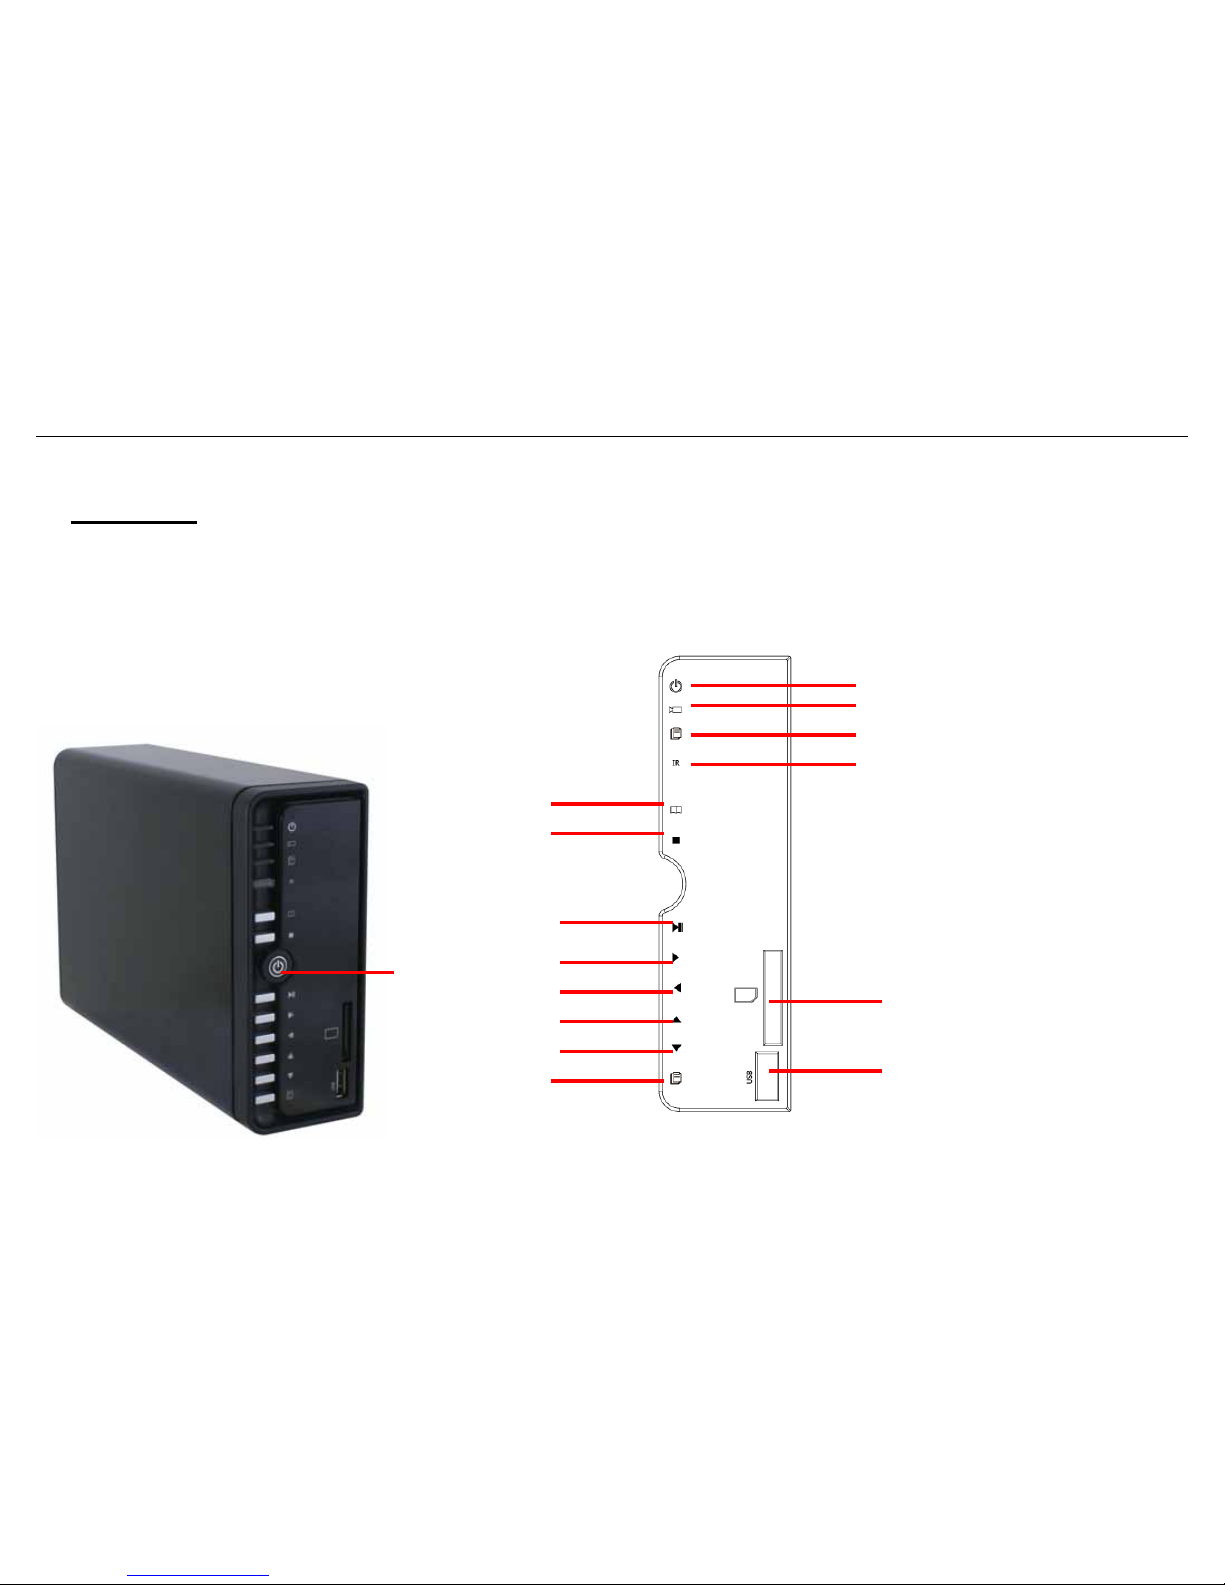
2.1 Front / Back Panel
Power LED
Recording LED
One T ouch Copy LED
IrDA Receiver
Card _Reader (SD/SDHC/MS)
USB Host (Connect other device)
Down
One Touch Copy
Up
Left
Right
Stop
Enter (play)
Return (Guide)
Power
Page 11
BM3030 Multimedia Player User Manual
10
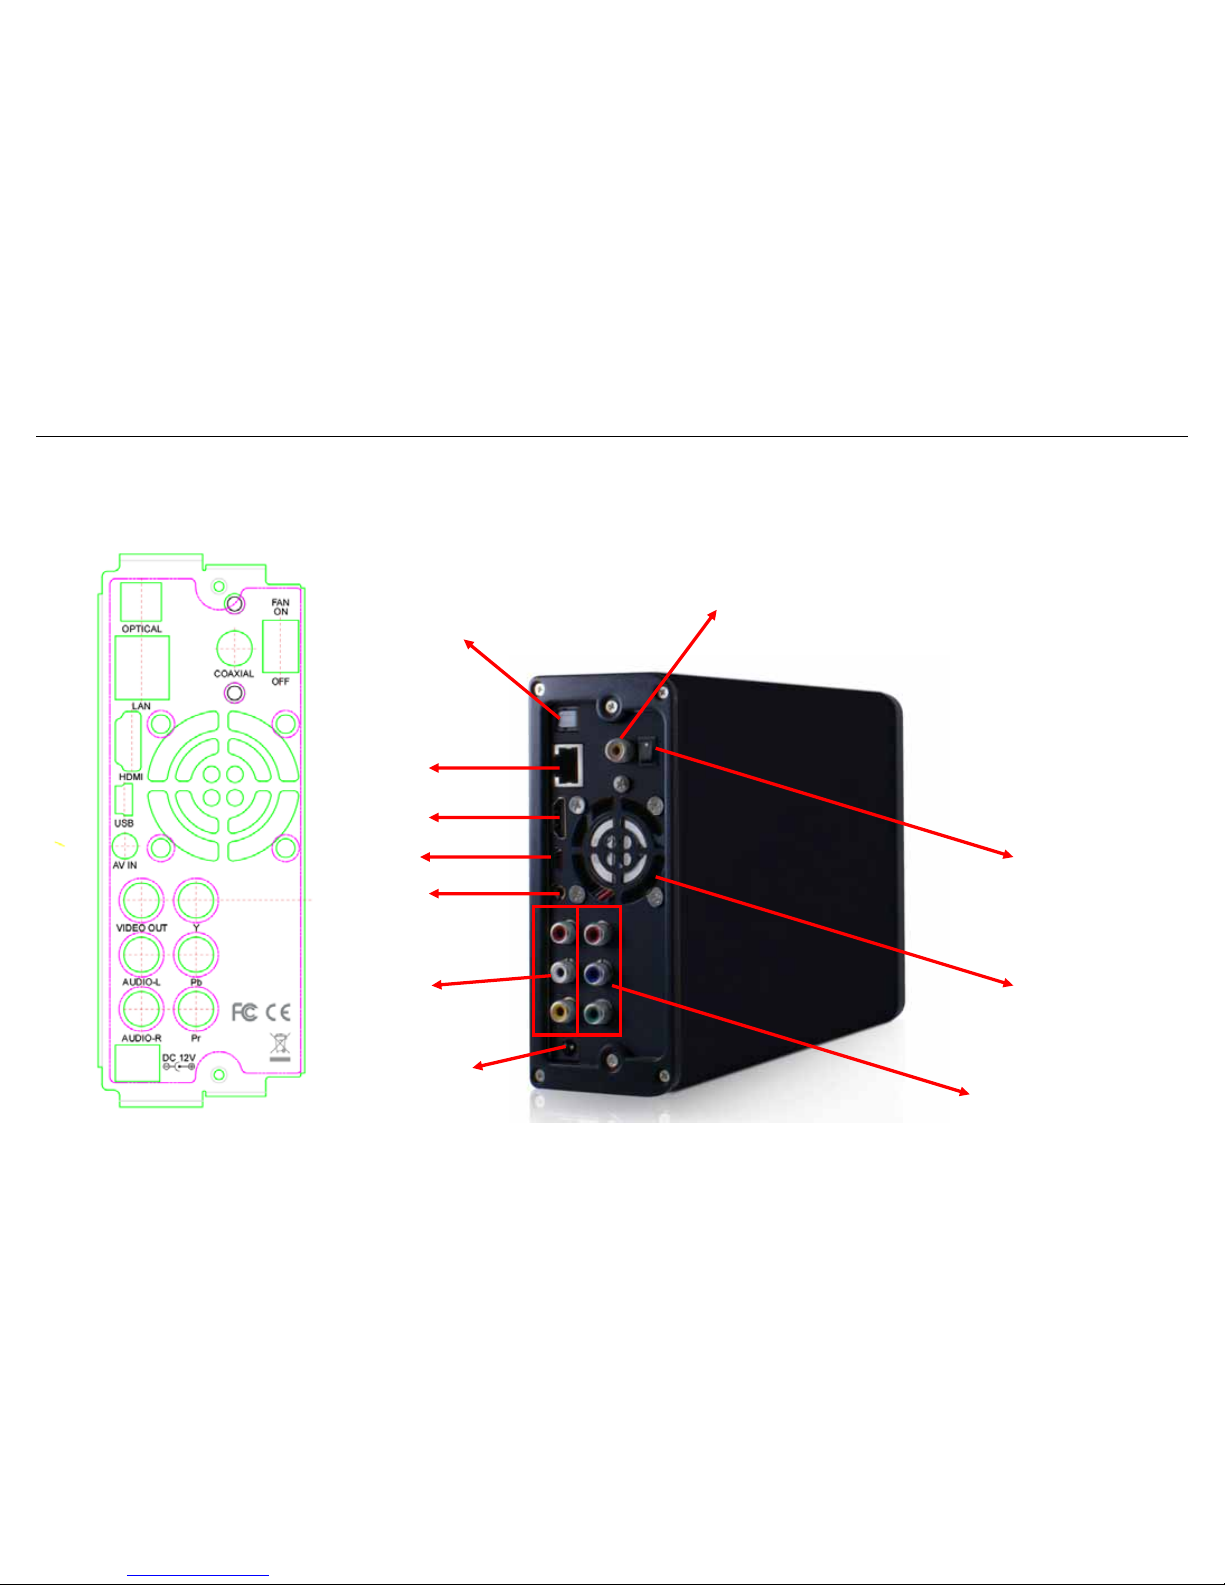
Cooling Fan
Power ON/OFF
YPbPr
LAN
HDMI
Mini USB b
AV_IN
AV_OUT
Fiber Optical Output
Co-axial Output
DC 12 Power In
Page 12
BM3030 Multimedia Player User Manual
11
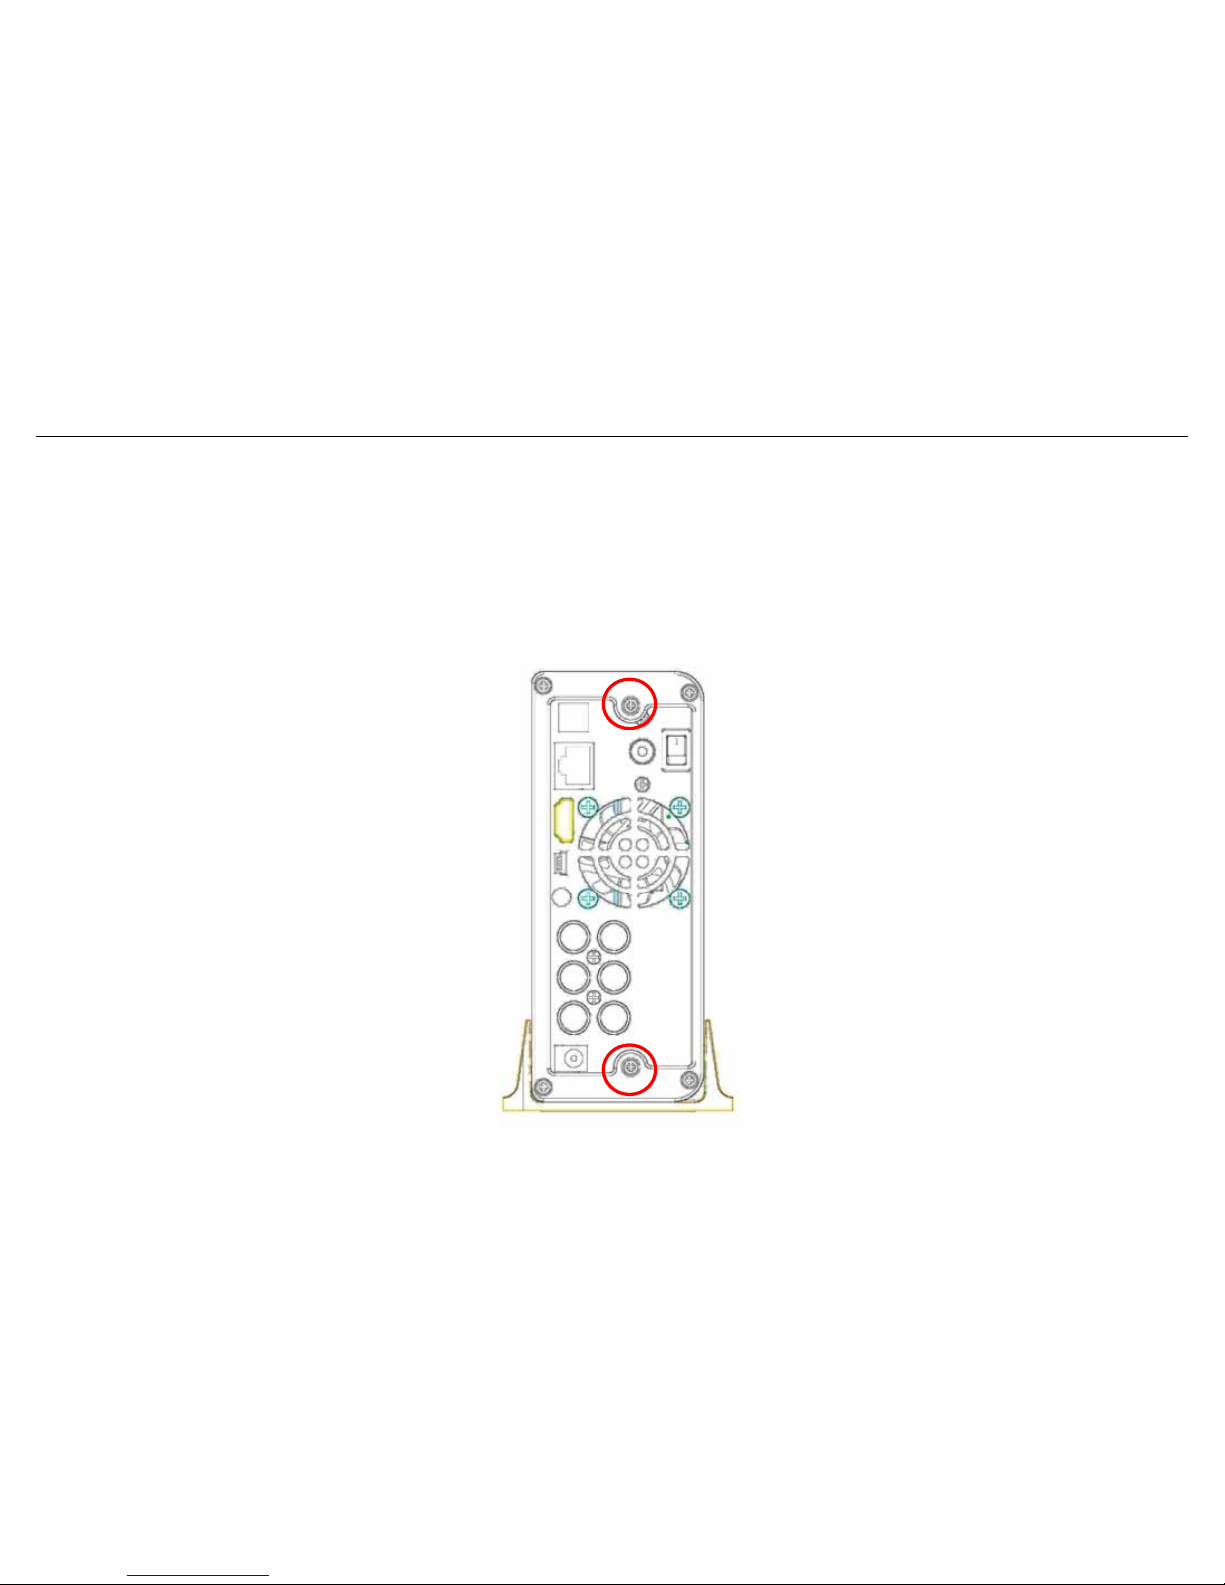
2.2 Hardware Installation
■ Install a Hard Disk Drive for the Device
1. Unscrew the 2 screws and pull out the tray.
Page 13
BM3030 Multimedia Player User Manual
12
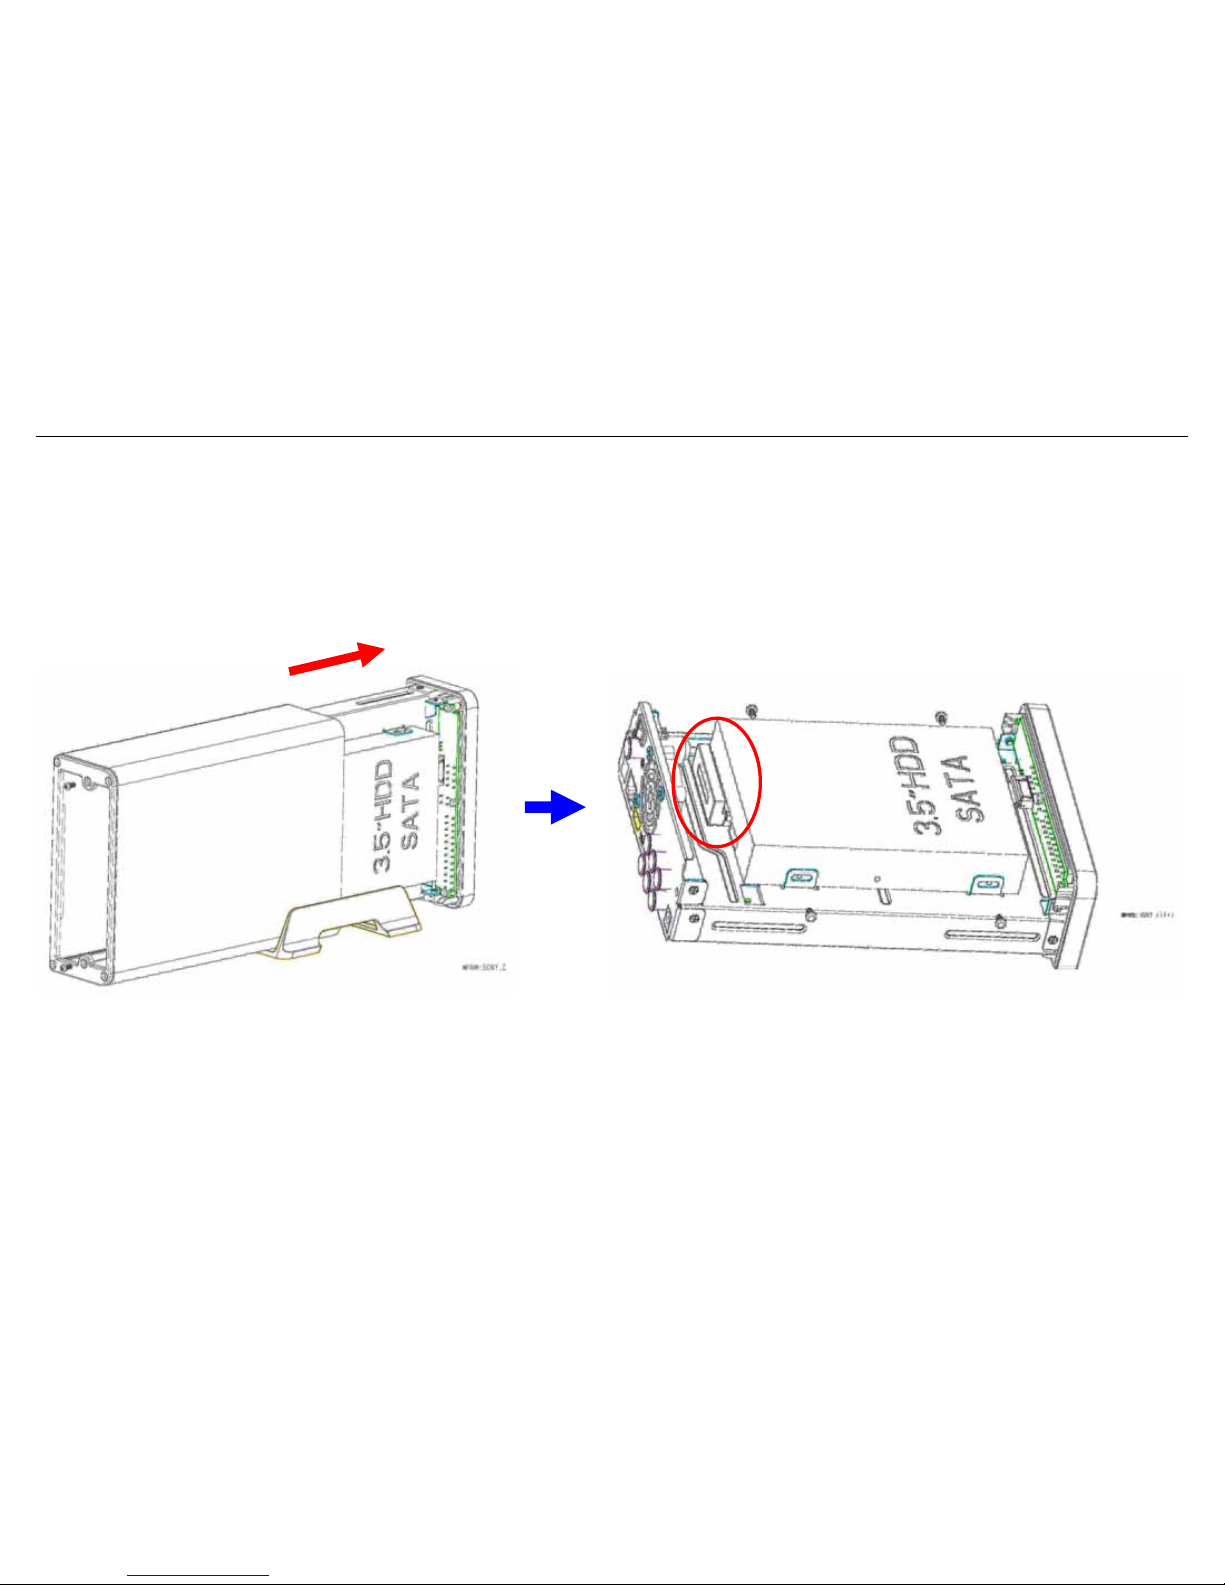
2. Place the Hard Disk drive evenly on the hard disk drive base.
Slide the Hard Drive to connect to the connector (cable) on the device.
Page 14
BM3030 Multimedia Player User Manual
13
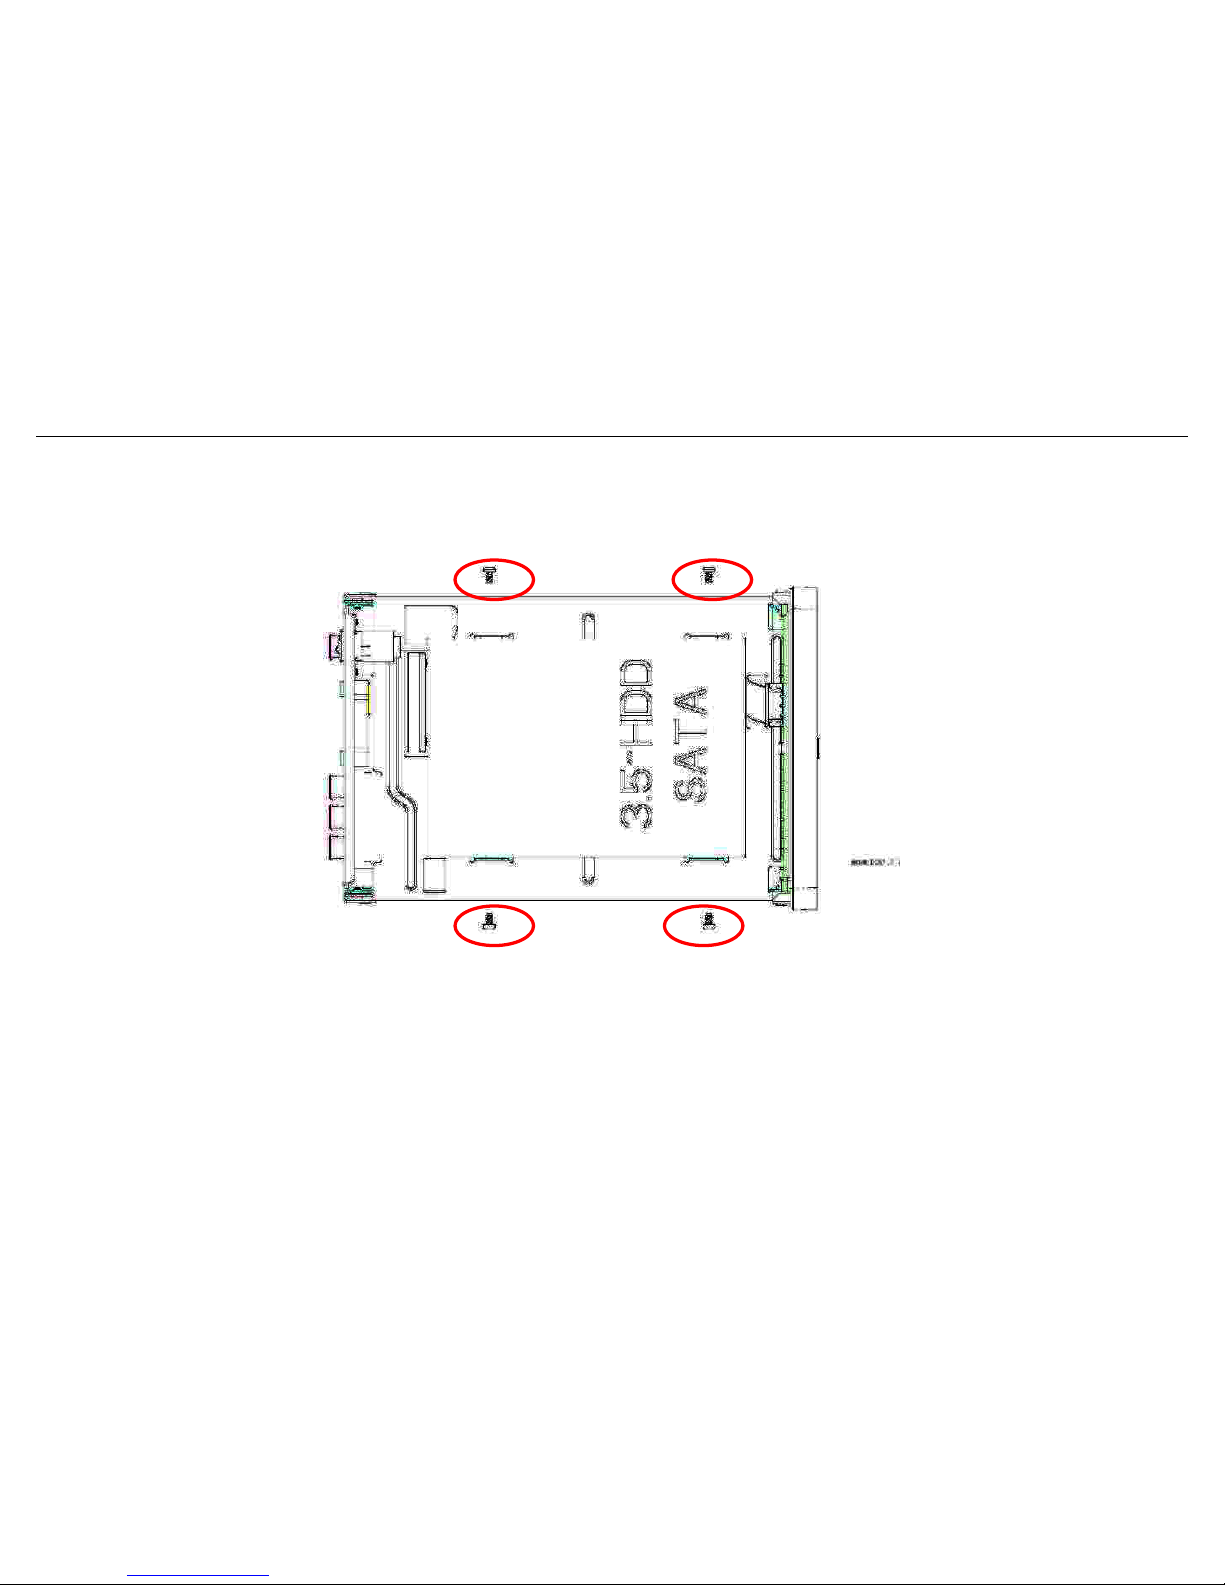
3. Secure your hard disk with the included screws in the package.
Page 15
BM3030 Multimedia Player User Manual
14
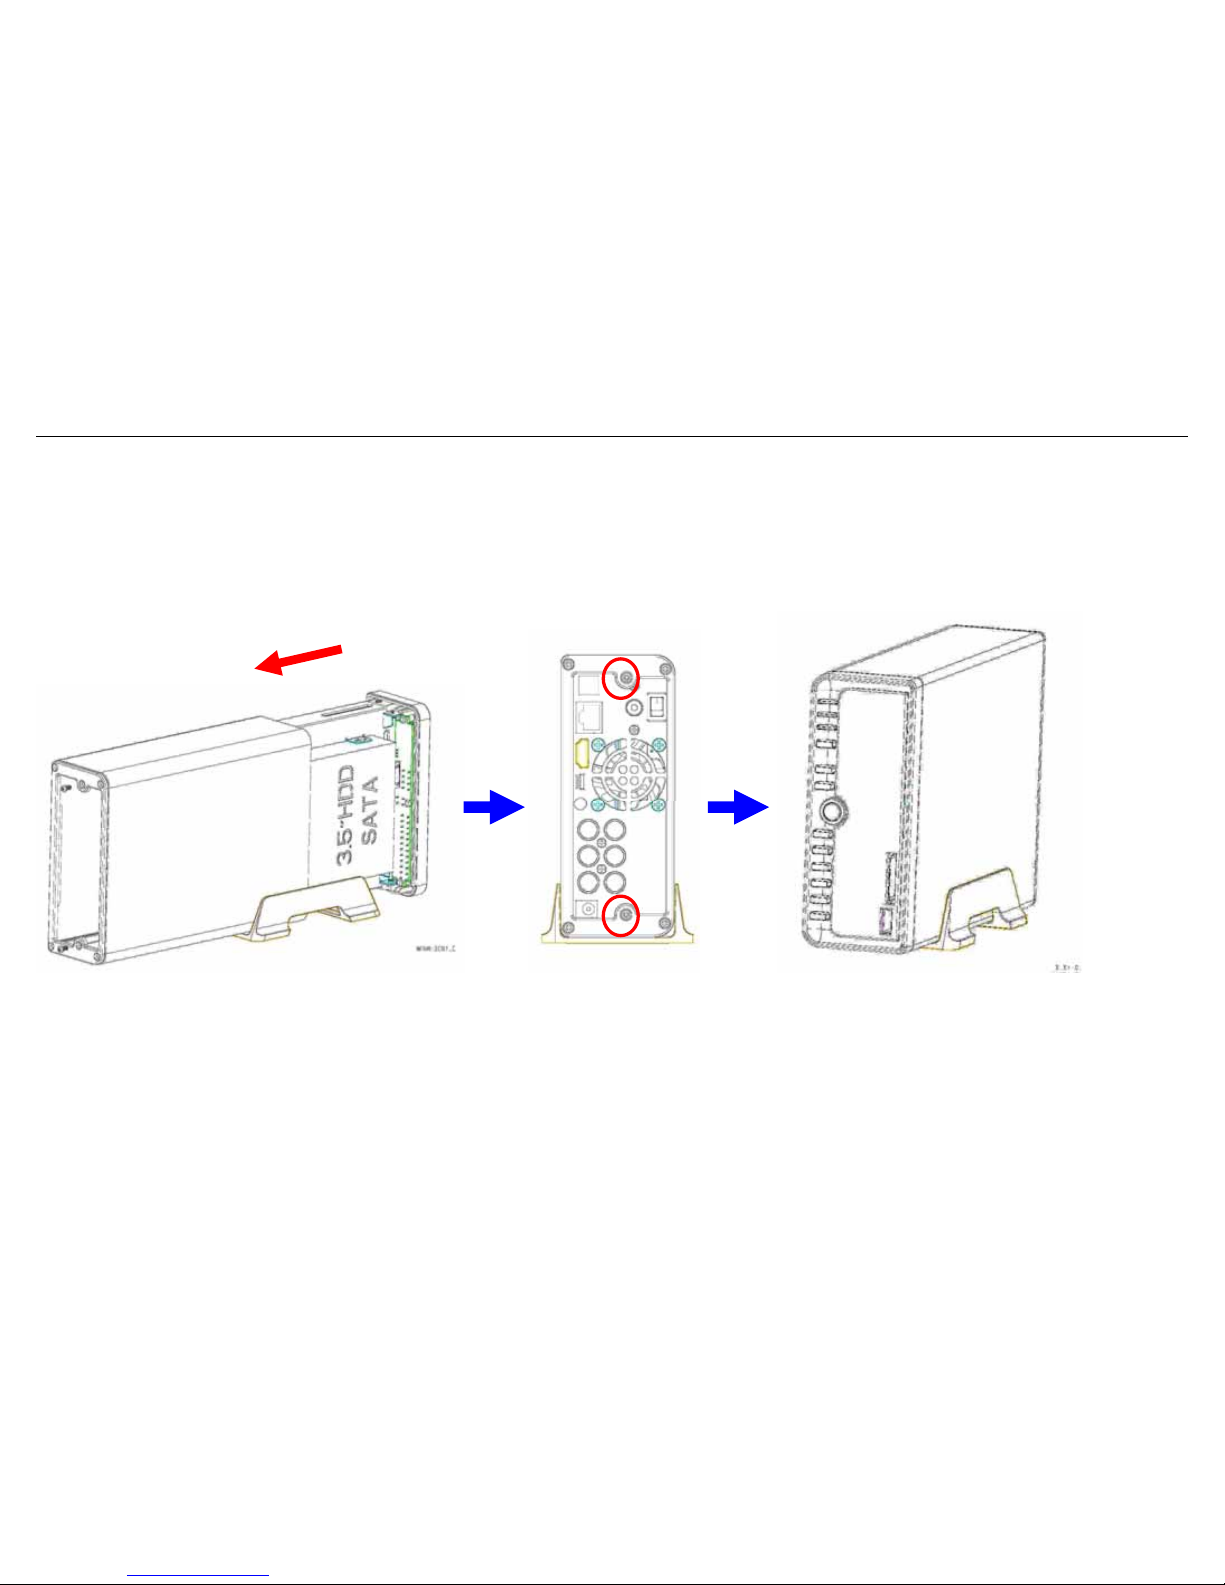
4. Push tray into Aluminum housing and screw the two pieces together.
Page 16
BM3030 Multimedia Player User Manual
15
3. Using BM3030 Media Player
3.1 Remote Control
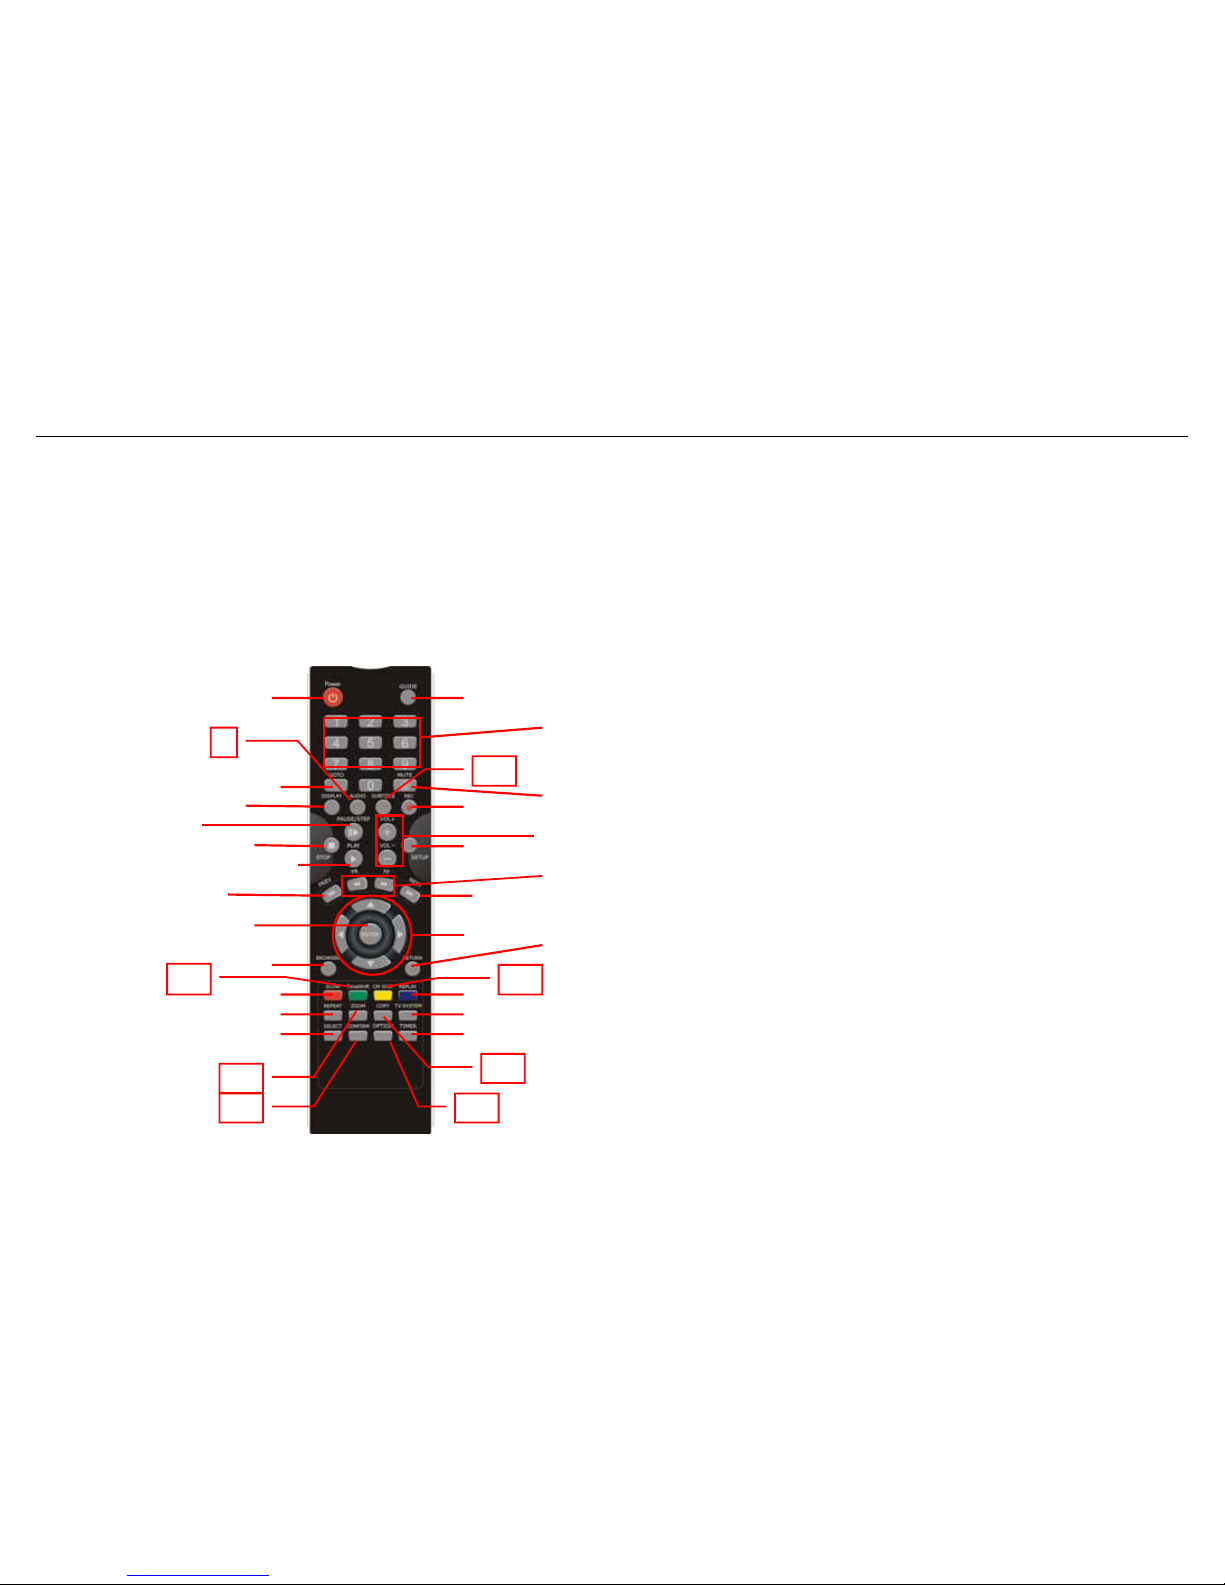
All procedures in this manual can be carried out using the remote control buttons. Certain functions can also be
carried out using the front panel at the front of the Multi media Player.
See the following for details on each button and its function:
1. POWER 2. DISPLA Y 33. Copy
3. AUDIO 4. Number buttons
5. GOTO 6. SETUP
7. ENTER 8. BROWSER
9. STOP 10. PLAY
11. PREV 12. SLOW
13. TIMESHIFT 14. REPEAT
15. ZOOM 16. SELECT
17. CONFIRM 18. GUIDE
19. REC 20. SUBTITLE
21. TIMER 22. VOL+/-
23. MUTE 24. OPTION
25. Navigation buttons 26. RETURN
27. PAUSE/STEP 28. NEXT
29. FR/FF 30. INS REPLAY
31. CM SKIP 32. TV SYSTEM
24
33
3
20
31
17
15
13
1
5
2
27
9
10
11
7
8
18
23
19
22
6
28
25
26
29
30
32
21
12
14
16
4
Page 17
BM3030 Multimedia Player User Manual
16
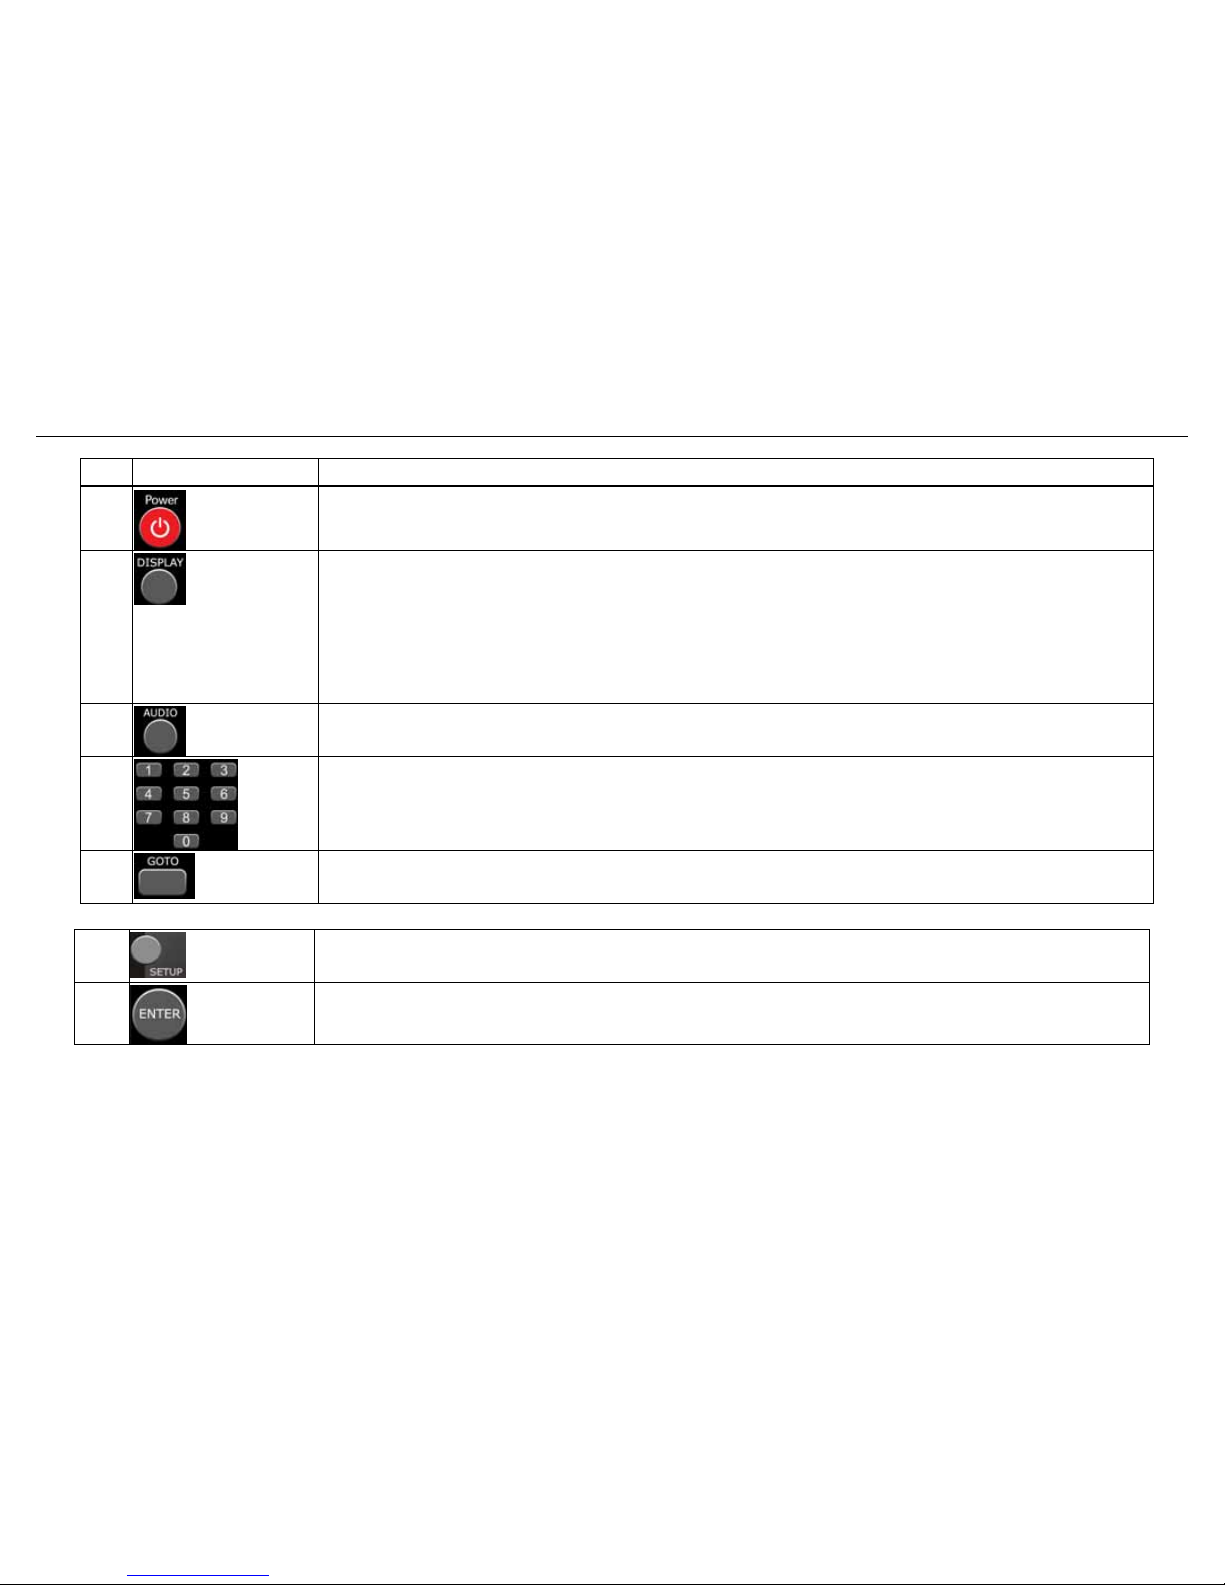
No. Button Function
1
POWER button:
Press to POWER on or off the AV HDD recorder.
2
DISPLAY button:
Press to display current status.
Press during playback and an onscreen display will appear; showing track number and time
elapsed/remaining.
Press during recording and an onscreen display appears, showing the recording quality setting
and time elapsed.
3
AUDIO button:
Press to select an audio track on a HDD or USB file.
4
Numeric buttons:
Press to enter channel numbers or numeric input when changing settings.
5
GOTO button:
Press to jump to a specific point on the disk or title. Specify the point using Title, Chapter and Time.
6
SETUP button:
Press to access the Setup Menu directly to change system settings.
7
ENTER button:
Press to select confirm in menus.
Page 18
BM3030 Multimedia Player User Manual
17
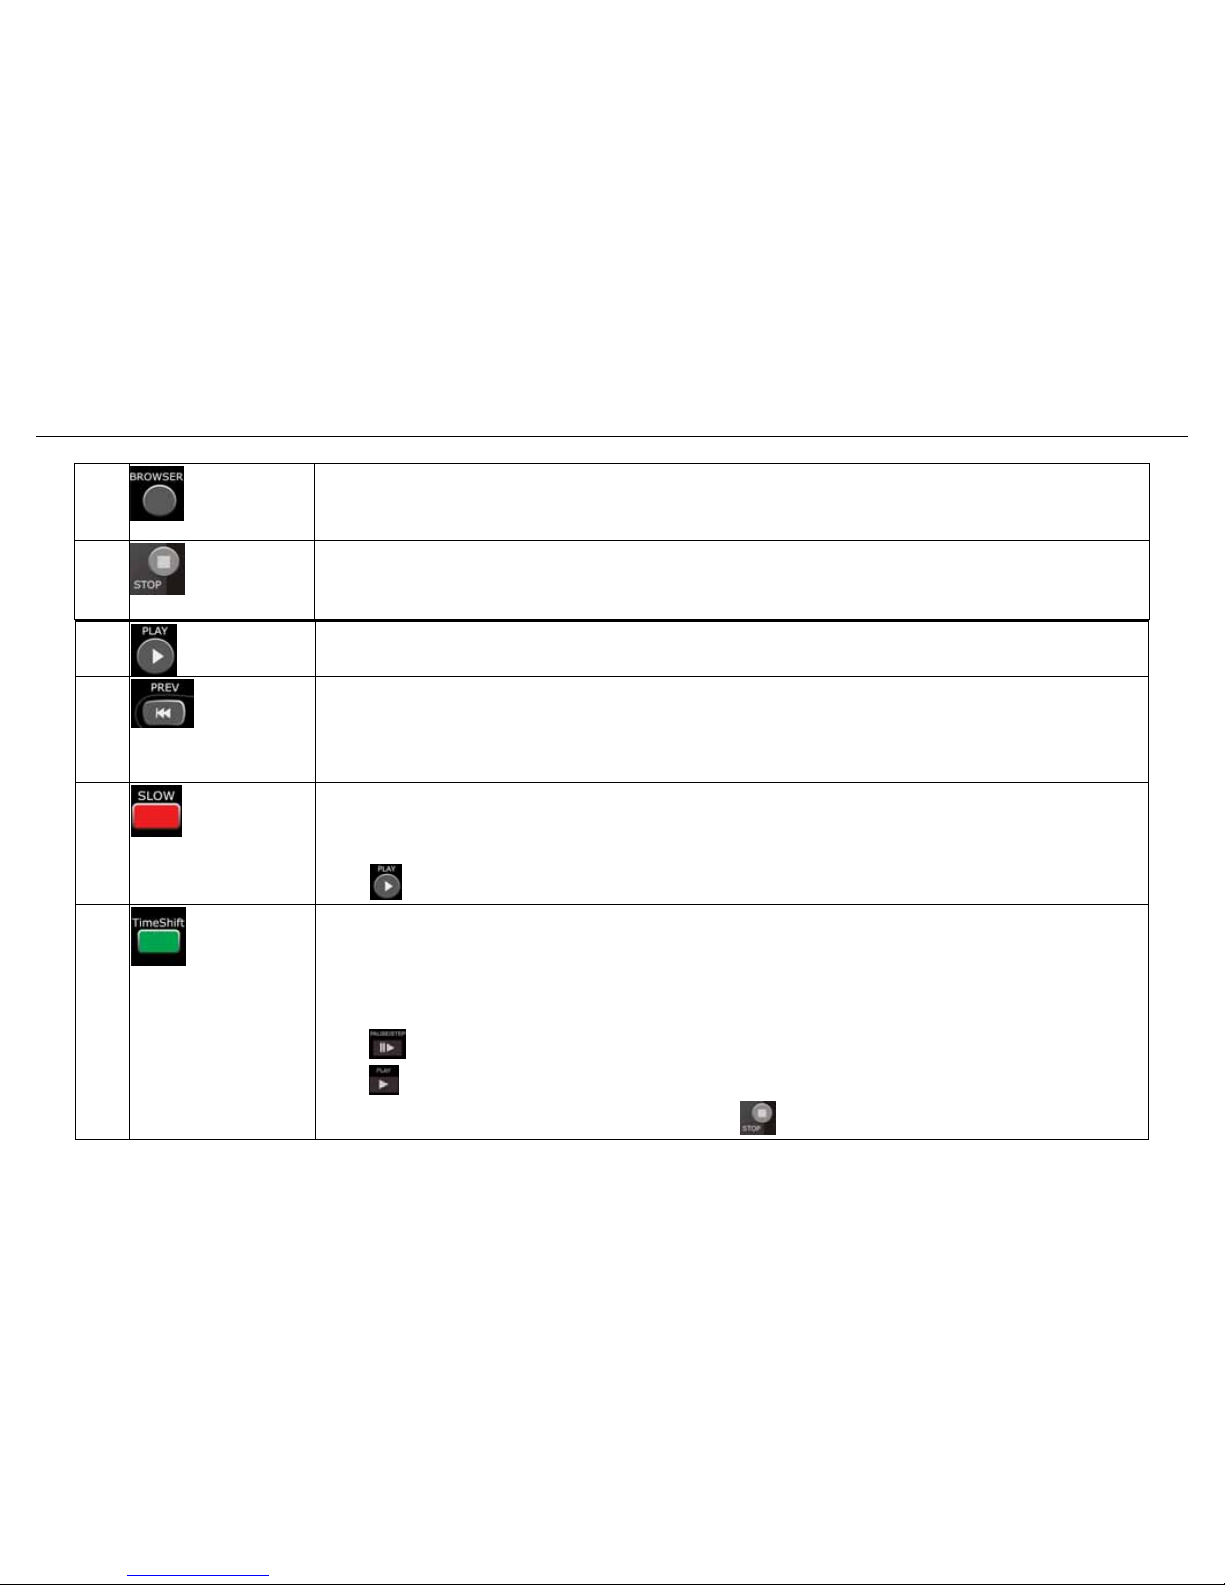
10
PLAY button:
Press to begin playback of a DVD or HDD title.
11
PREVIOUS buttons:
z Press to go to the previous step on a HDD or USB file when playing music.
z Press to page up the file list at Browser.
z When play photo, the button is enable; play Movie and Mp3 file, the button is disable.
12
SLOW MOTION button:
Press to play back in slow motion. Three motion settings are available.
Five slow motion levels (3/4, 1/2, 1/4, 1/8 and 1/16x) are available.
Press
to resume regular playback.
13
TIME SHIFT button:
Press to activate the time shift function, which allows you to have the live TV to be paused and
resume the program from the point you left it. While paused, the program is recorded into the HDD,
as long as space is available.
Press to activate TIME SHIFT function and wait for the PLAY arrow to appear on the screen.
Press
and the program will be paused.
Press
to resume viewing the program.
Time shift mode remains active until you press the
button.
8
BROWSER button:
Press to browse the music, photo, movie and all files on USB or HDD.
9
STOP button:
Press to stop playback.
Page 19
BM3030 Multimedia Player User Manual
18
14
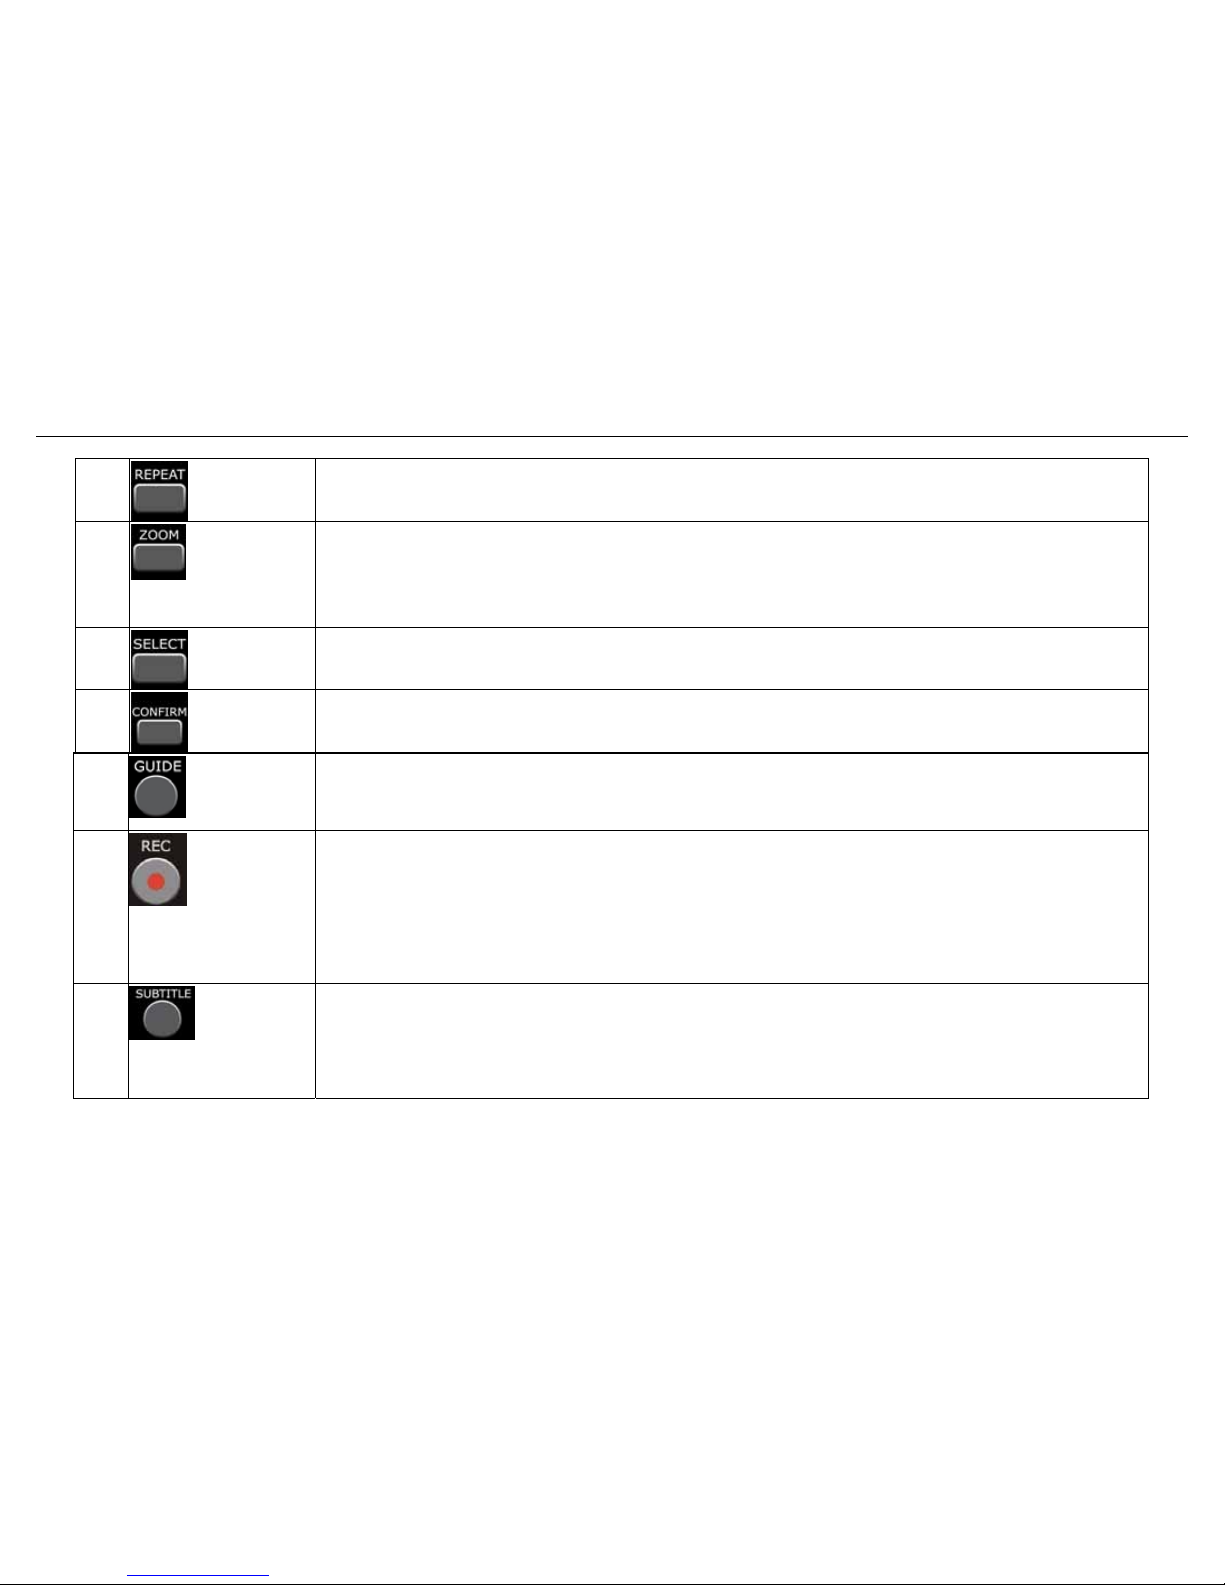
REPEAT buttons:
Press REPEAT 1 / ALL to set repeat option - Chapter, Title or Off.
15
ZOOM button:
Press to zoom in/out when playing back photos or Video programs.
Photo zoom levels:2X, 4X, 8X and 16X.
Video zoom levels:2X, 3X, 4X and 8X.
16
SELECT buttons:
Press to select file or folder to rename or delete.
17
CONFIRM button:
Press to select” confirm”.
18
GUIDE button:
Press to view the Guide menu. See “3.2 Getting Started” for more details.
19
RECORD button:
Press to begin recording or to resume when recording has been paused.
Press repeatedly to set OTR length (30 Mins / 60 Mins / 90 Mins / 120 Mins / 180 Mins /240
Mins/Off).
20
SUBTITLE button:
Press to activate available subtitles when play the DIVX file.
DivX subtitle supported: SRT, SMI, SUB, SSA format file.
Page 20
BM3030 Multimedia Player User Manual
19
21
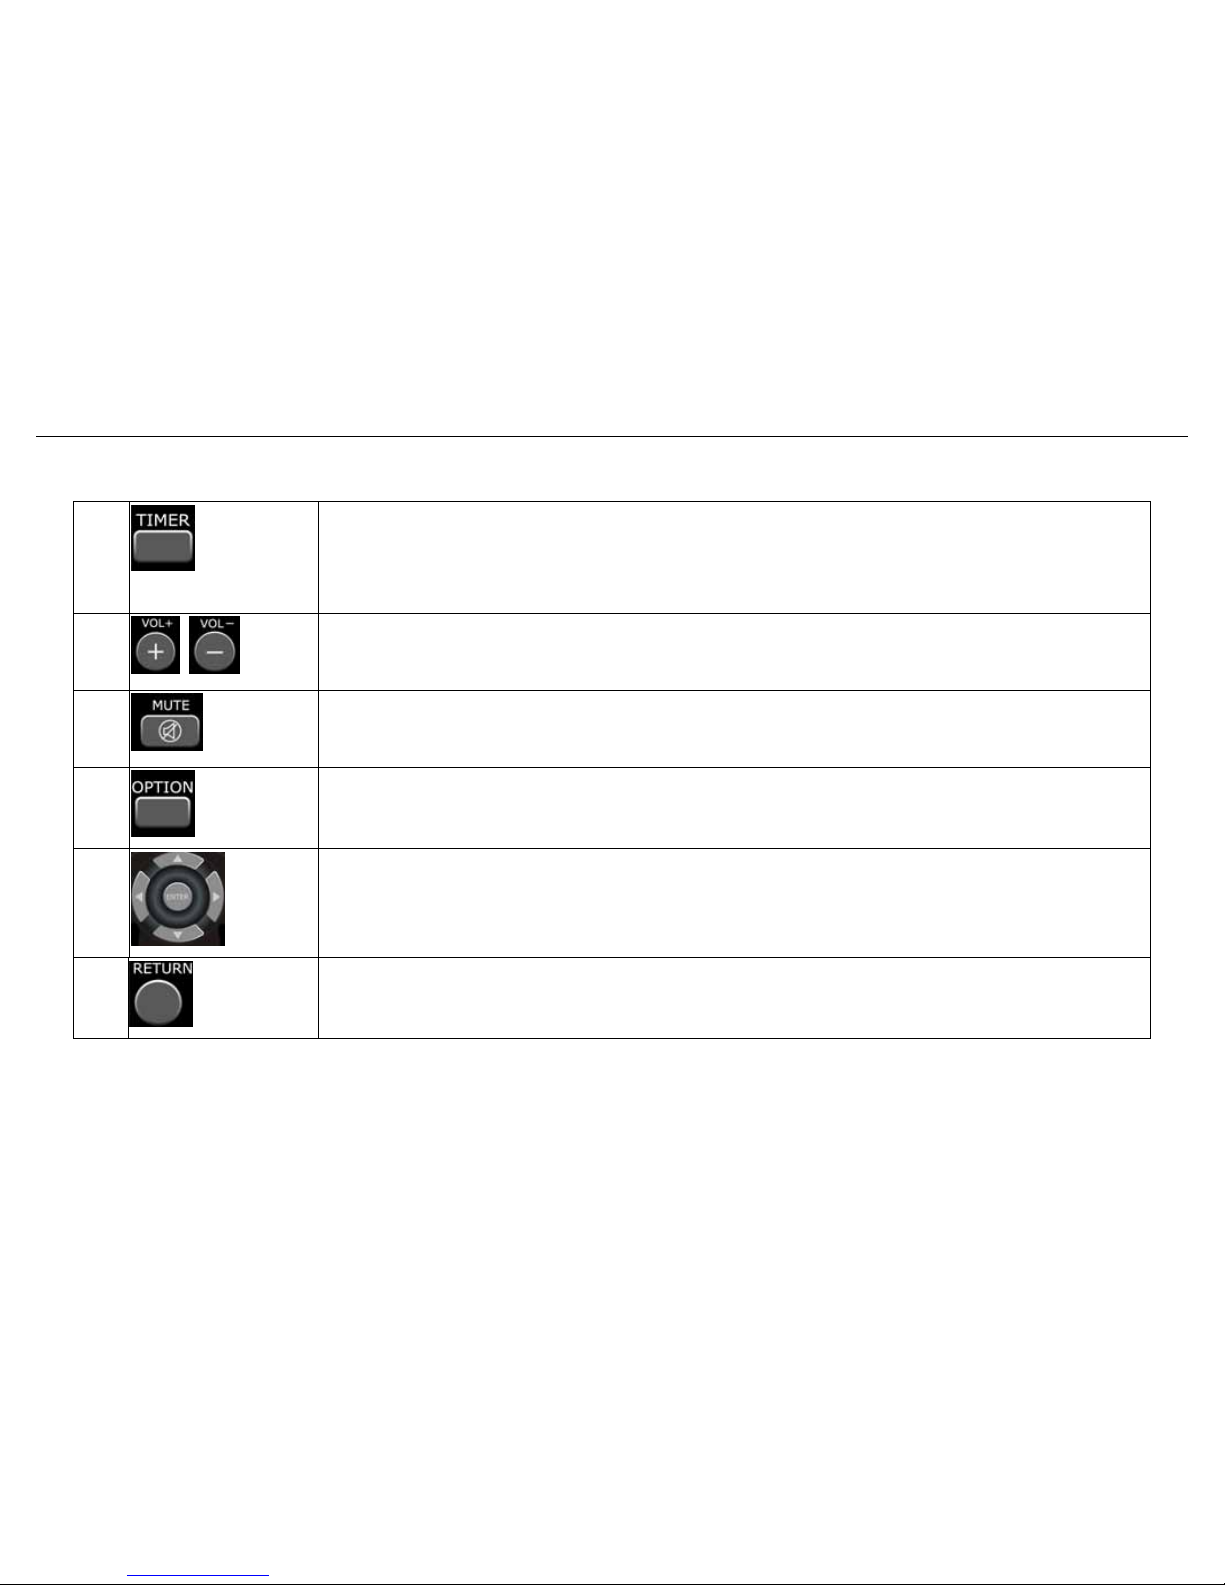
TIMER button:
Press to enter the Timer Menu directly to add, edit and delete recording schedules. See “Creating a
New Schedule” for more details.
22
VOL + / - buttons:
Press to increase or decrease the volume.
23
MUTE button:
Press to mute audio output, and press again to resume.
24
OPTION button:
Press to select option bar.
25
Navigational buttons:
Press the arrow buttons to navigate the menus.
26
RETURN button:
Press to return to the previous screen when navigating the menus.
Page 21
BM3030 Multimedia Player User Manual
20
27
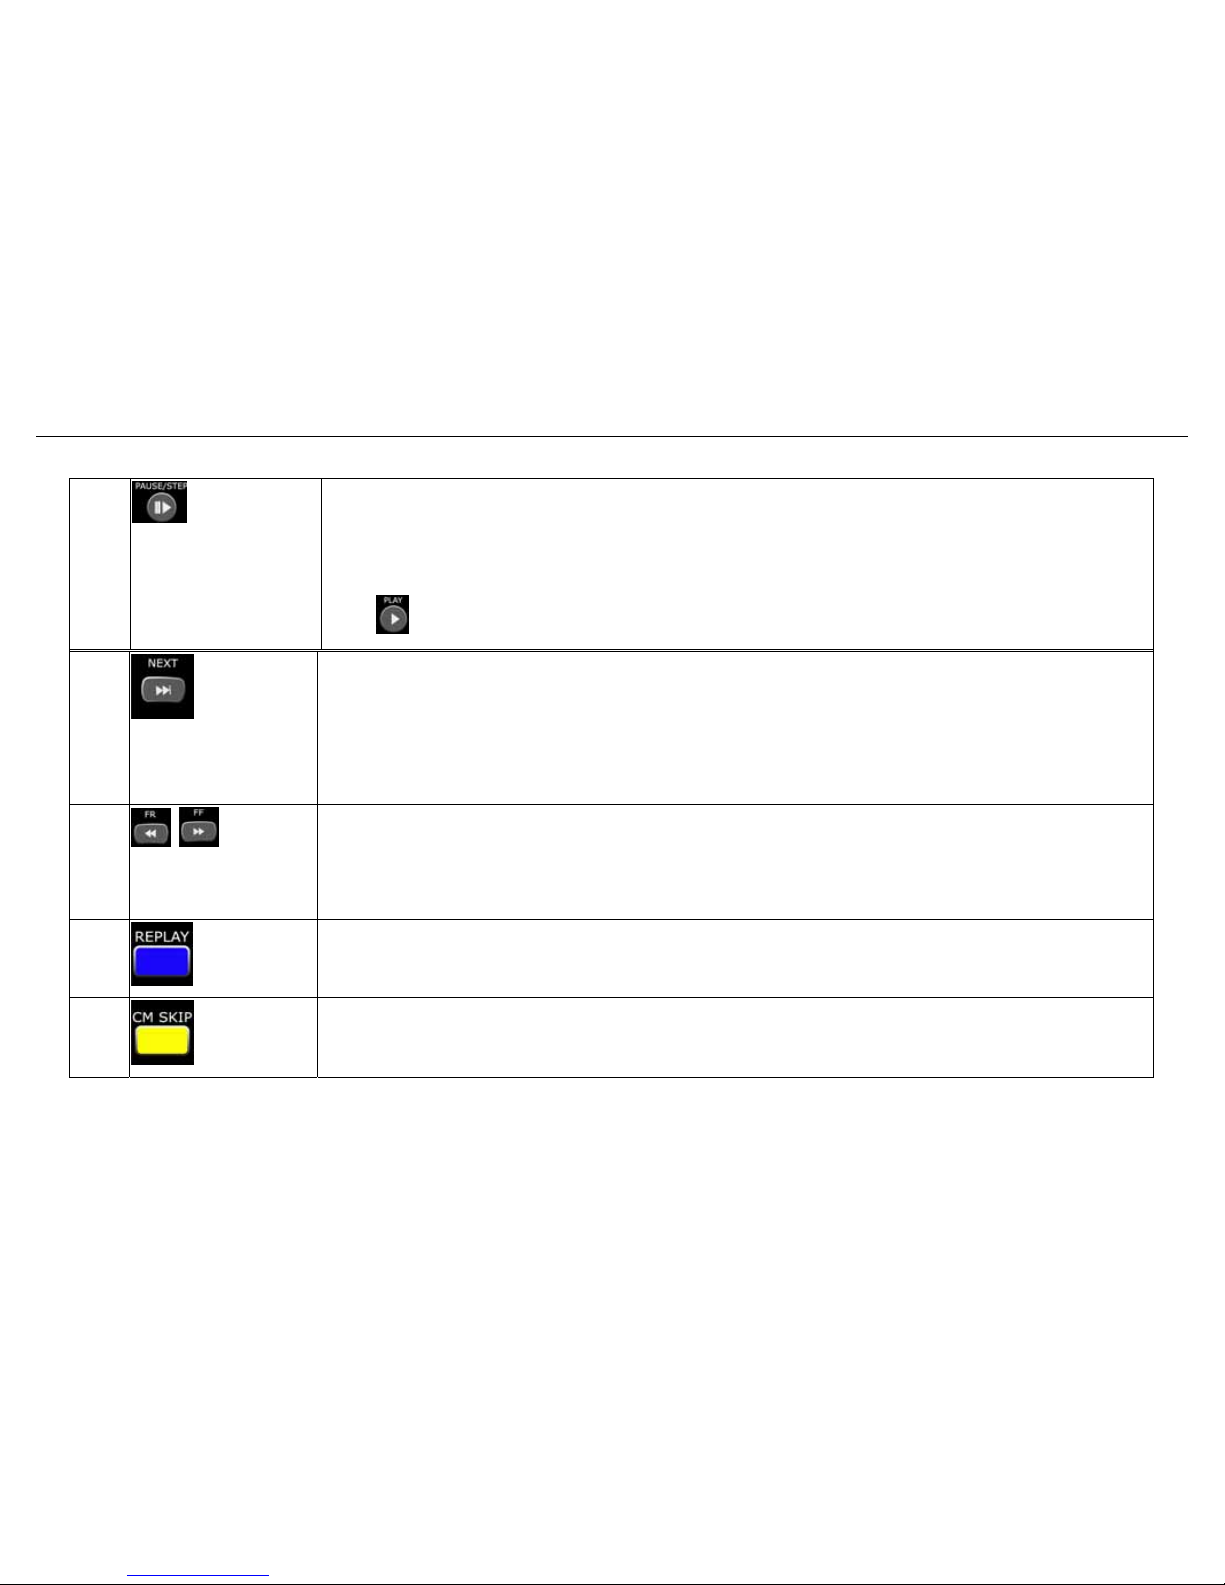
PAUSE / STEP button:
Press to pause the current playback.
Press again to step to the next frame.
Press
to resume playback.
28
NEXT buttons:
z Press to go the next on a HDD or USB file when playing music.
z Press to page down the file list at Browser.
z When play photo, the button is enable; play Movie and Mp3 file, the button is disable.
29
FAST REWIND / FAST FORWARD buttons:
Press to fast rewind or fast forward the current playback.
Press repeatedly to select faster rewind or fast forward speeds.
30
INS REPLAY button.
Press to backward 10 seconds of the current playback, which suitable for sport program.
31
CM SKIP button:
Press to advance 30 seconds when in playback or record mode.
Page 22
BM3030 Multimedia Player User Manual
21
32
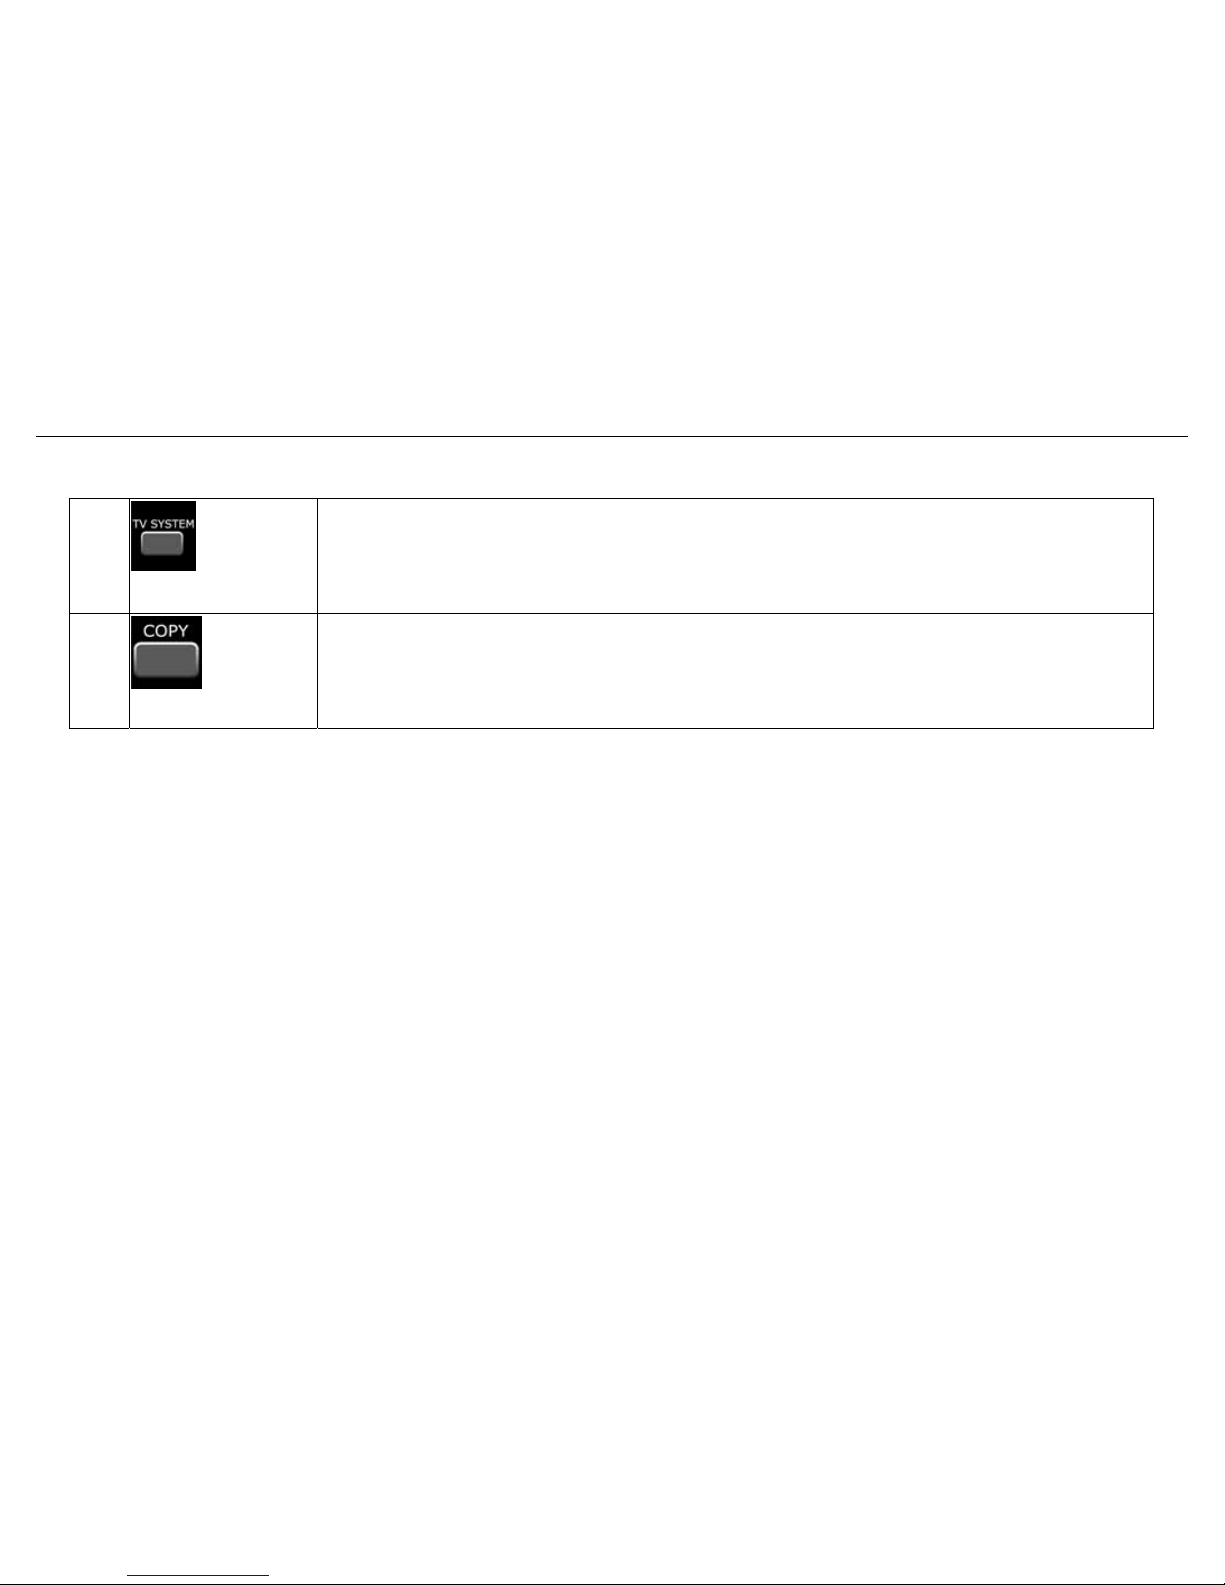
TV SYSTEM button:
Press to switch between NTSC Interlaced, NTSC Progressive,
PAL Interlaced, and PAL Progressive.
33
COPY button:
Press to copy file from one device to other.
See “FILE COPY MENU” for more details.
Page 23
BM3030 Multimedia Player User Manual
22
3.2 Getting Start
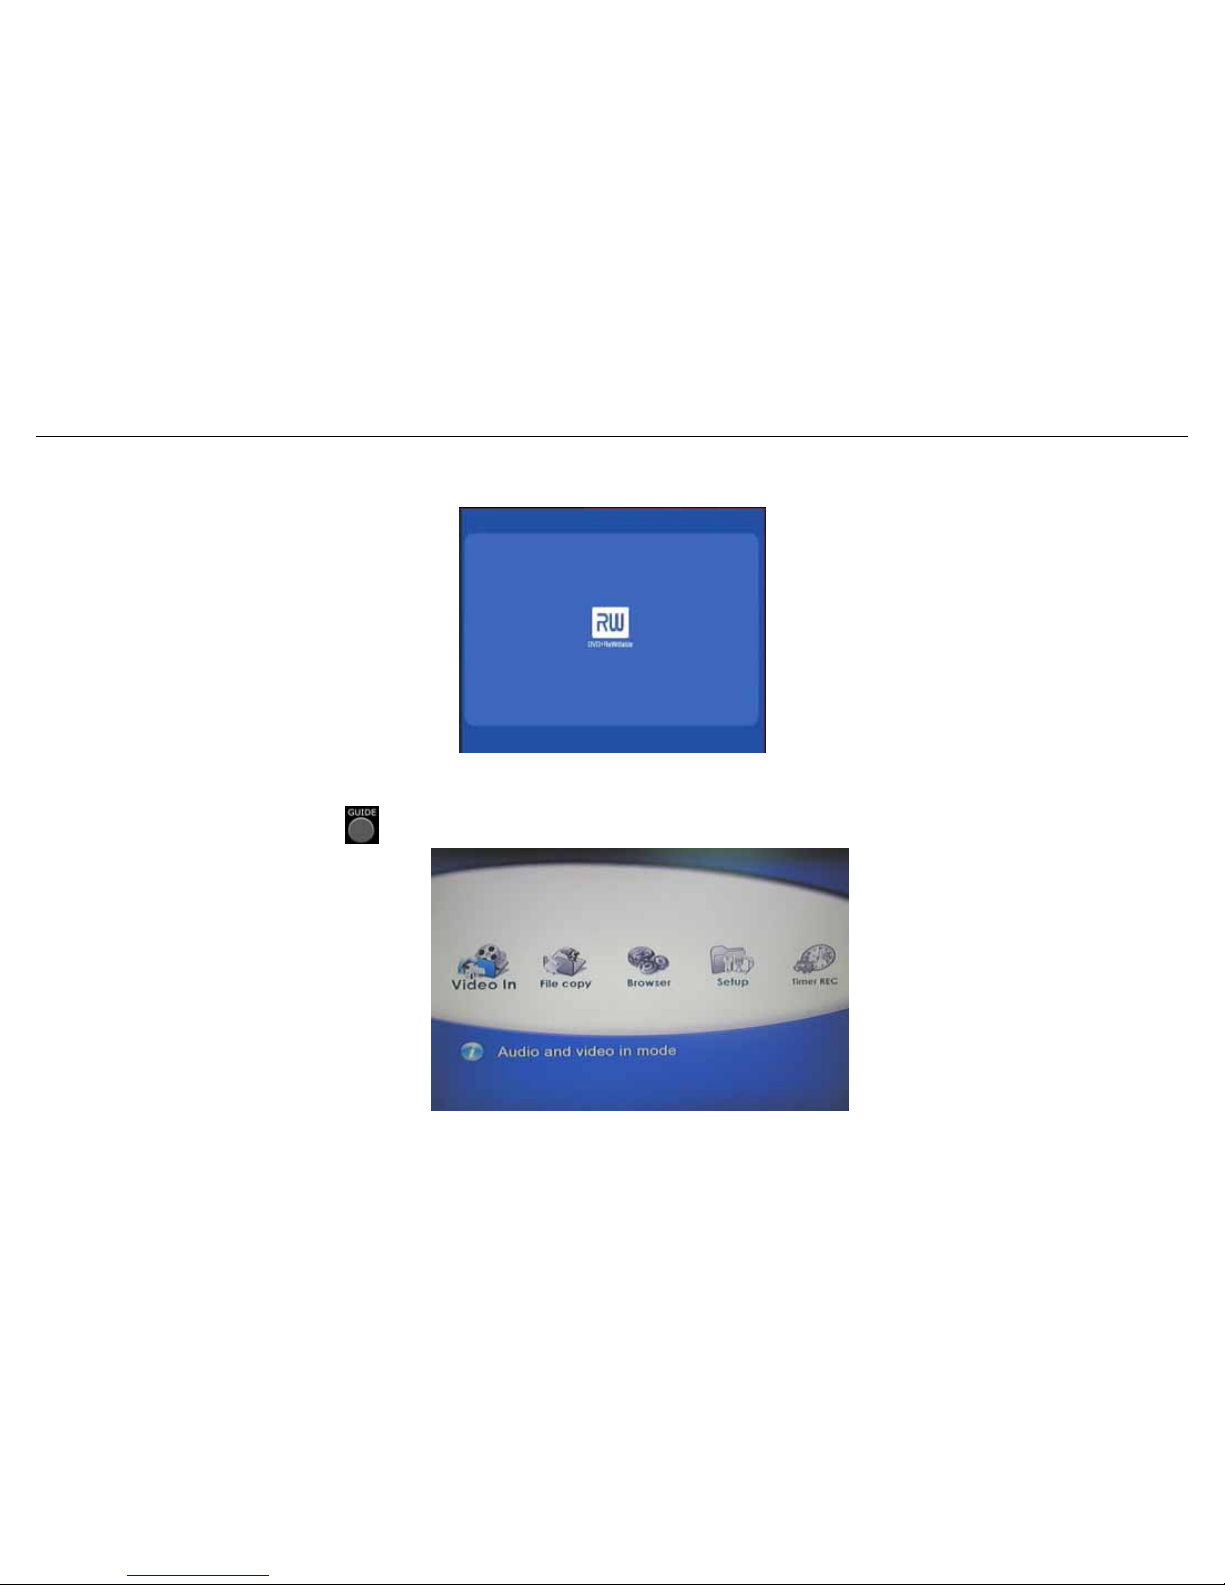
■ Power on the BM3030 Multimedia player system, you will see the start-up page.
■ After few seconds, the menu will be displayed on your TV.
■ To enter the menu, press on the remote control.
Page 24
BM3030 Multimedia Player User Manual
23
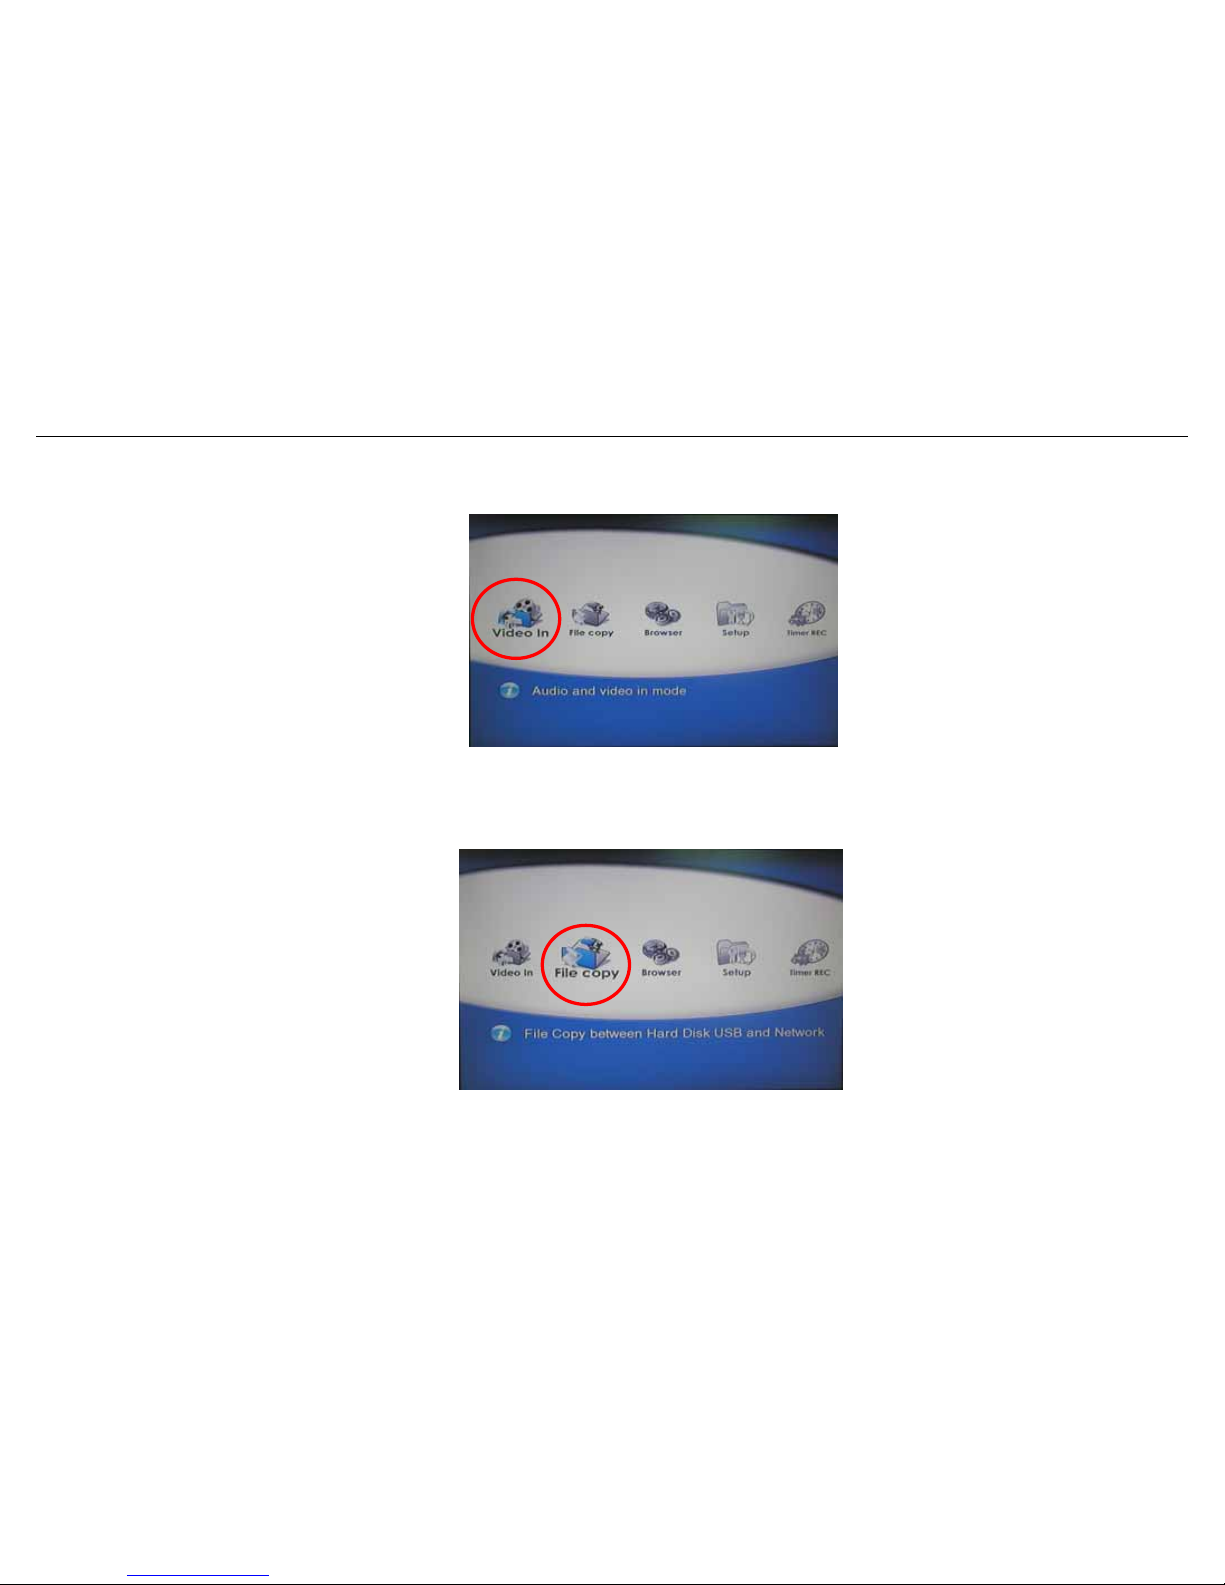
Selecting Video In
To select an input source, select Video In button on the guide menu page.
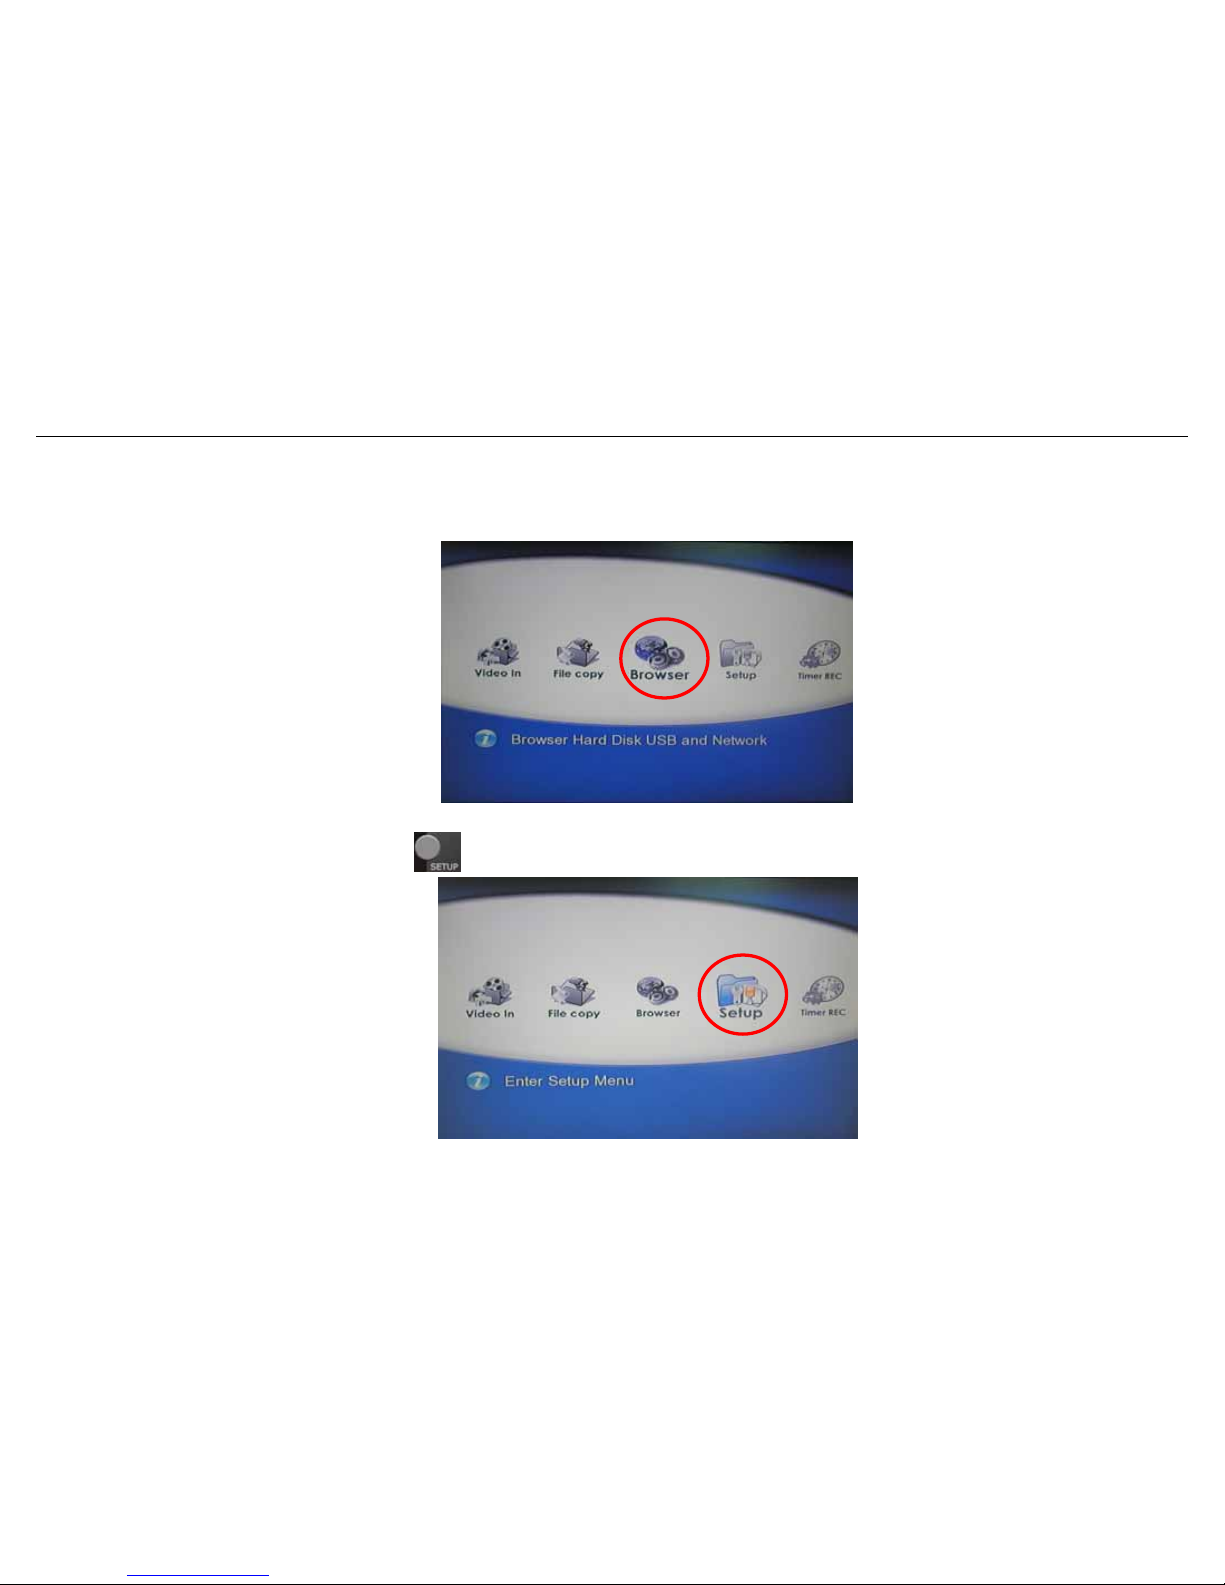
Selecting file Copy
A video clip recorded in HDD or USB disk is called a Title.
Select Browser button on the guide menu page to browse the files which under the “My Recording” folder.
Page 25
BM3030 Multimedia Player User Manual
24
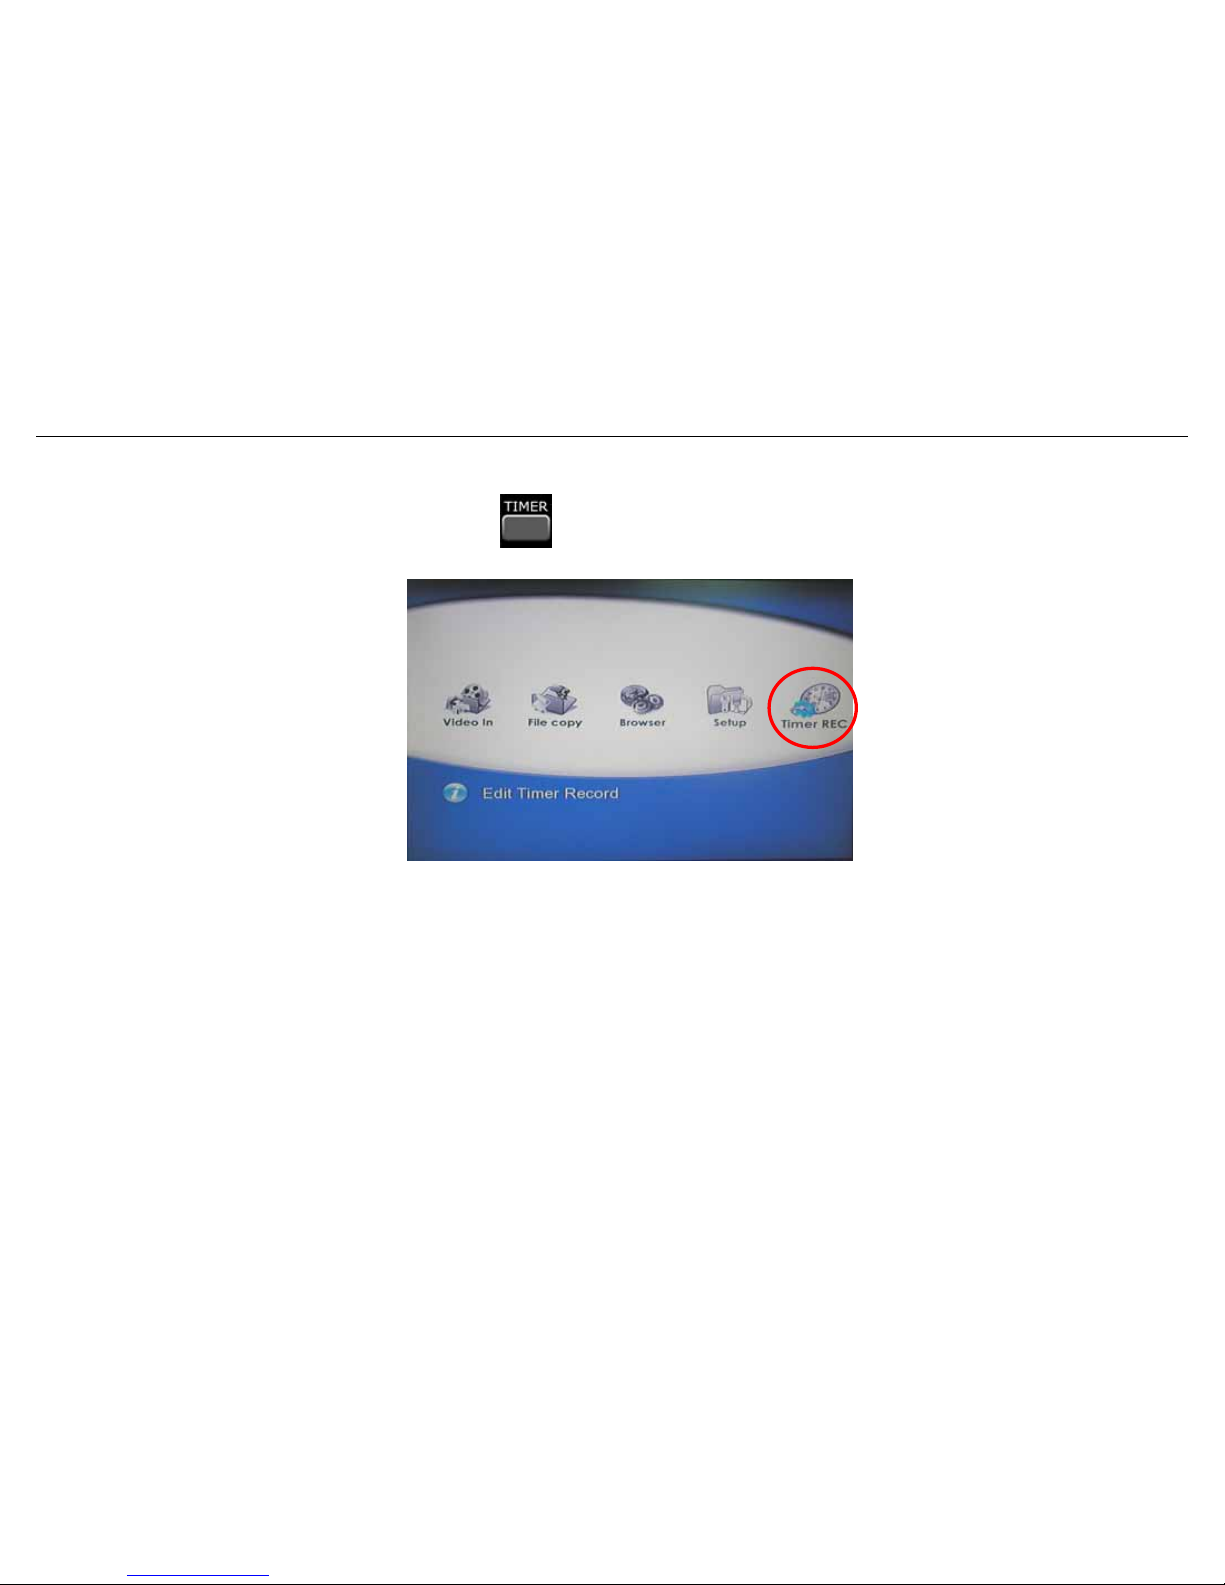
Selecting Browser
Select Browser button on the guide menu page to browse movie, photo, and music files stored either in a HDD,
USB, card reader, NET or a USB device.
Selecting Setup
To enter the setup menu, select on the remote control or select Setup button on the guide menu page.
Page 26
BM3030 Multimedia Player User Manual
25
Selecting Time REC
To enter the Time REC setup page, select on the remote control or select Timer REC button on the guide
menu page.
Page 27
BM3030 Multimedia Player User Manual
26
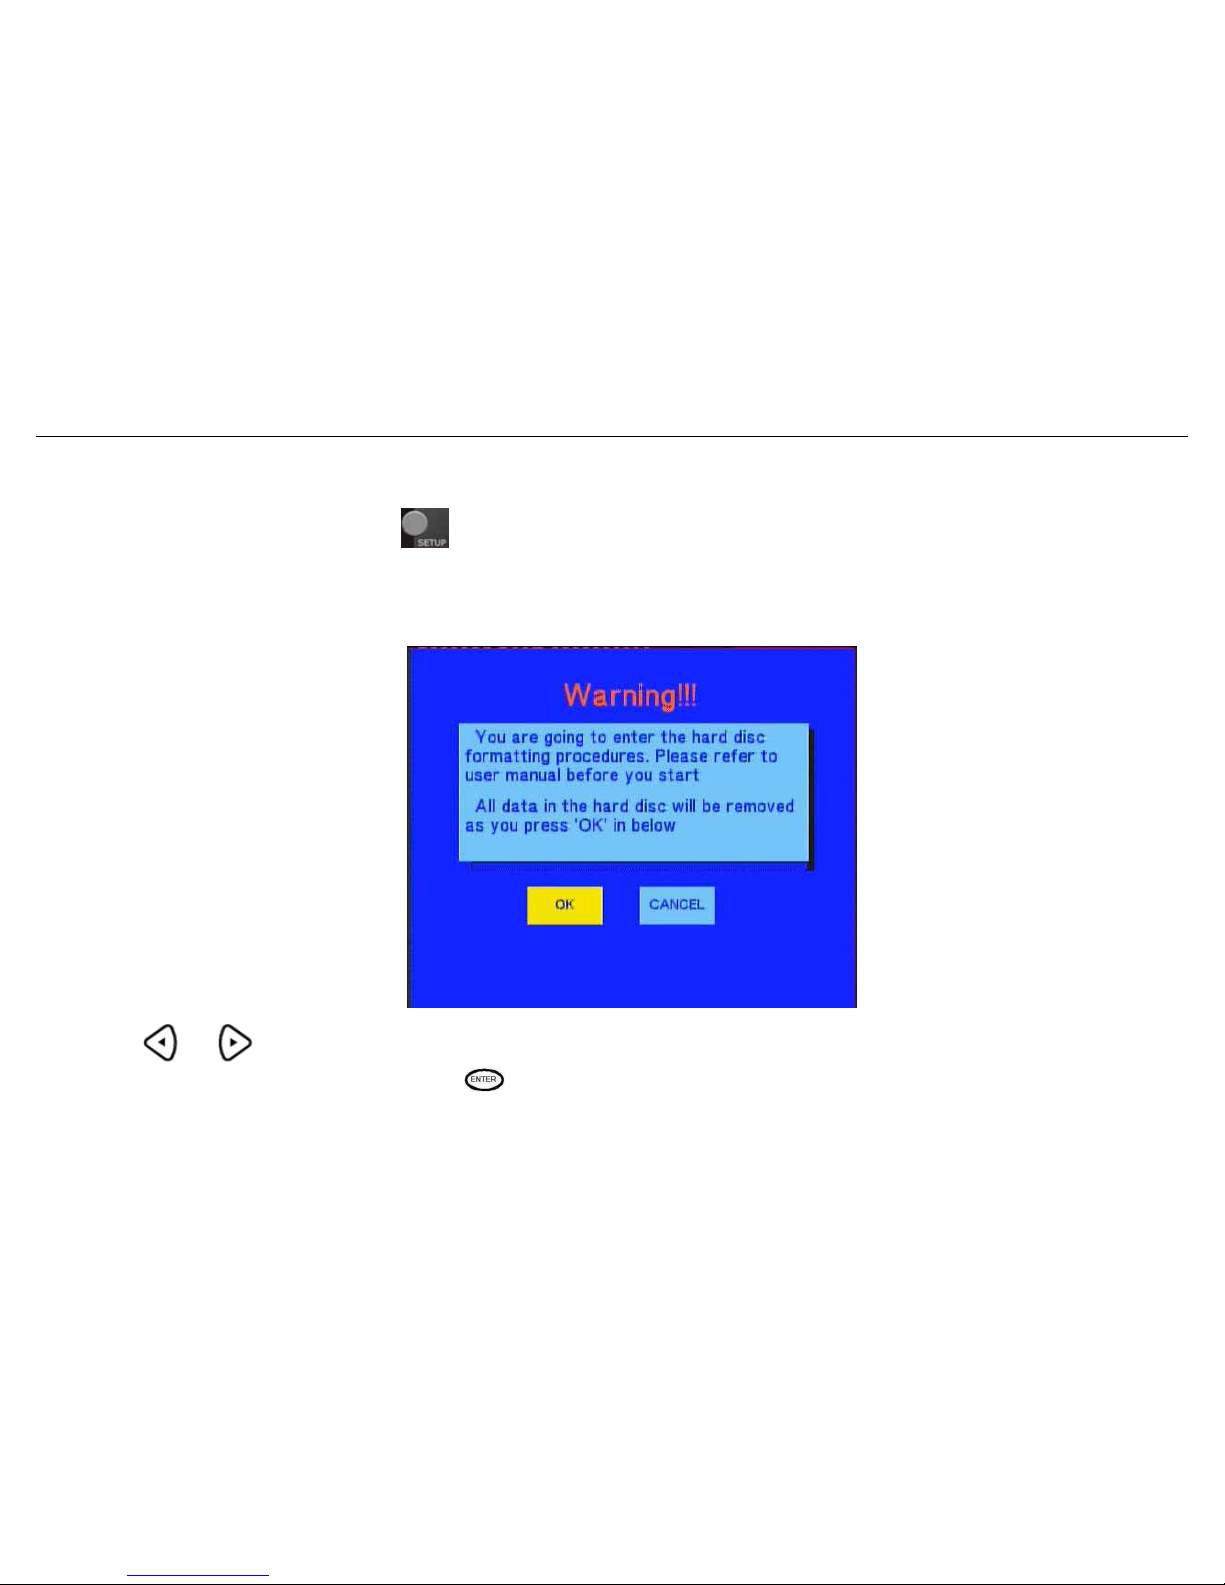
3.3 Format Hard Disc
Whenyouinstallaharddiskinthesystematthefirsttime,thesystemwillremindyoutoentertheharddisk
formatinterface.Youcanalsopress
intoSetupmenuandselectHDDFormattoFormatHDD.
First, a “Warning” page will be pop up.
Press or on the remote control and select your choice.
When the OK button highlighted, press
to enter the next step. Otherwise, select cancel to return to the previous
step.
Page 28
BM3030 Multimedia Player User Manual
27
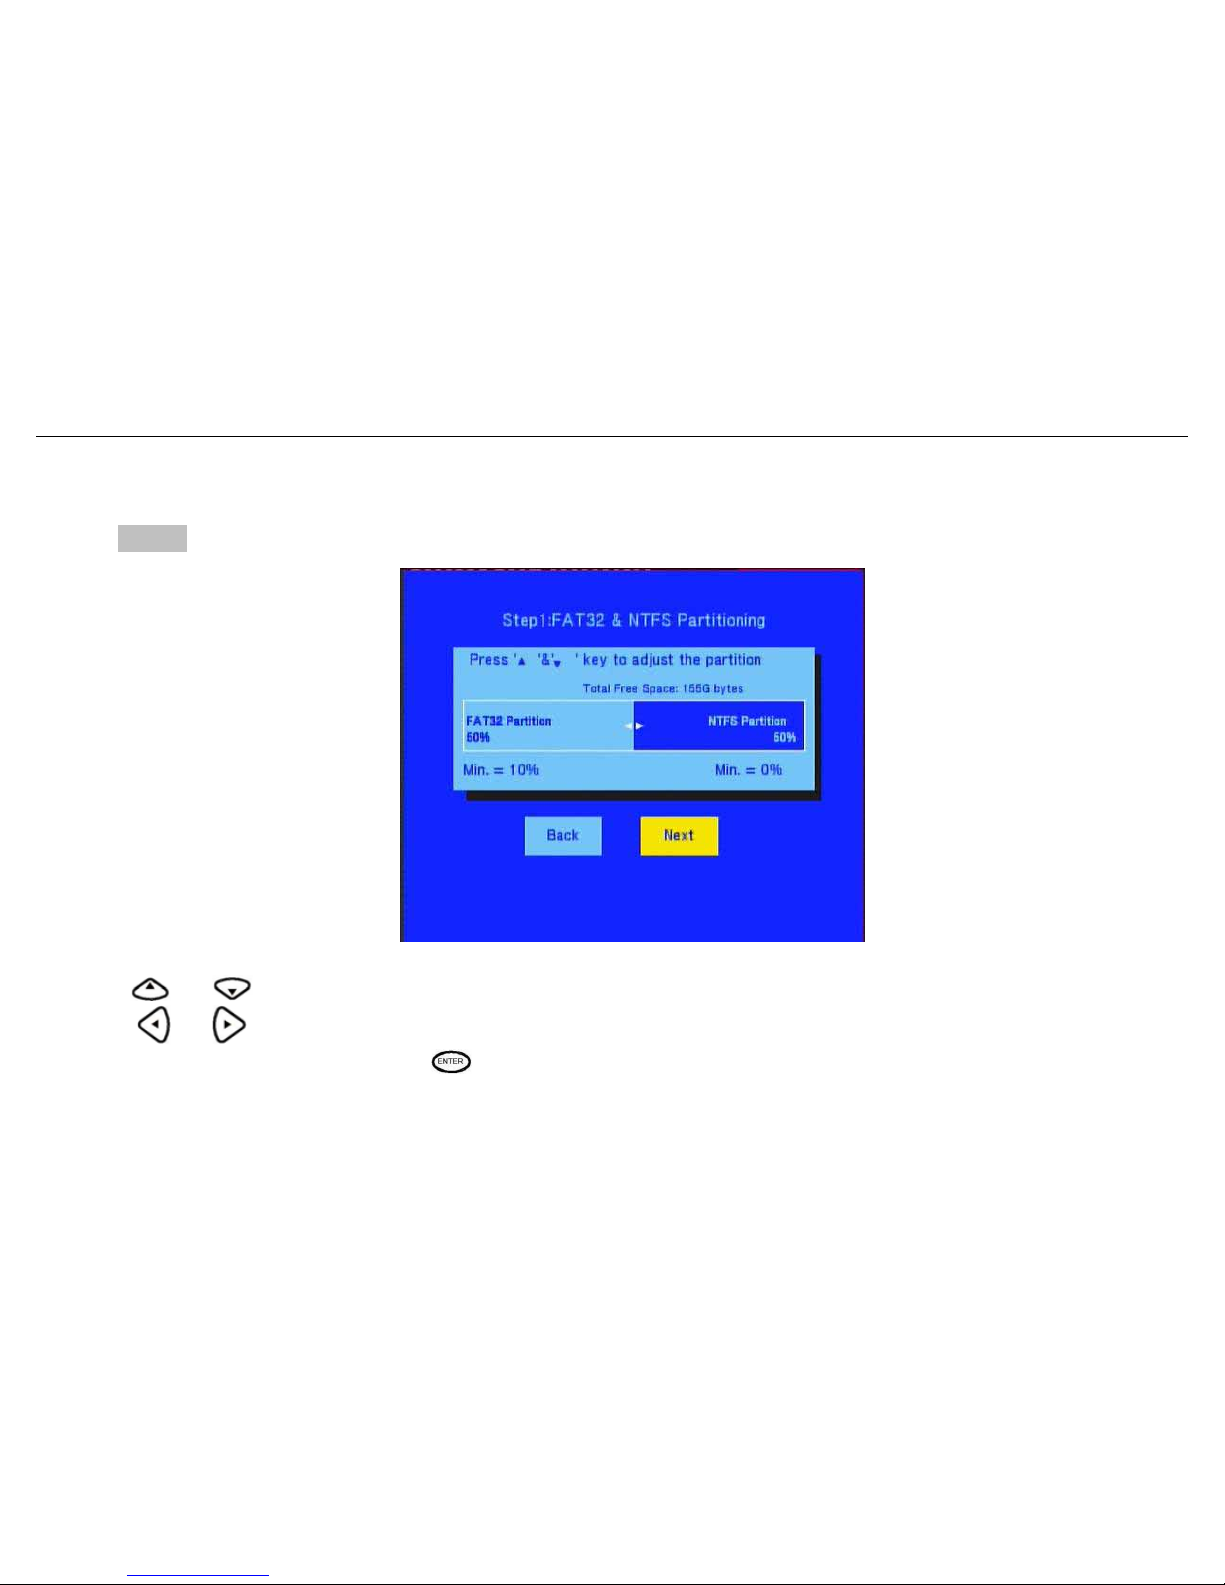
Step 1: Please adjust the hard disk capacity according to the information on your TV screen.
Use or to adjust the Fat32 and NTFS partition.
Press
or on the remote control to select “Back” or “Next”.
When Next button highlighted, press
to enter the next step. Otherwise, select back button to return to the
previous step.
Page 29
BM3030 Multimedia Player User Manual
28
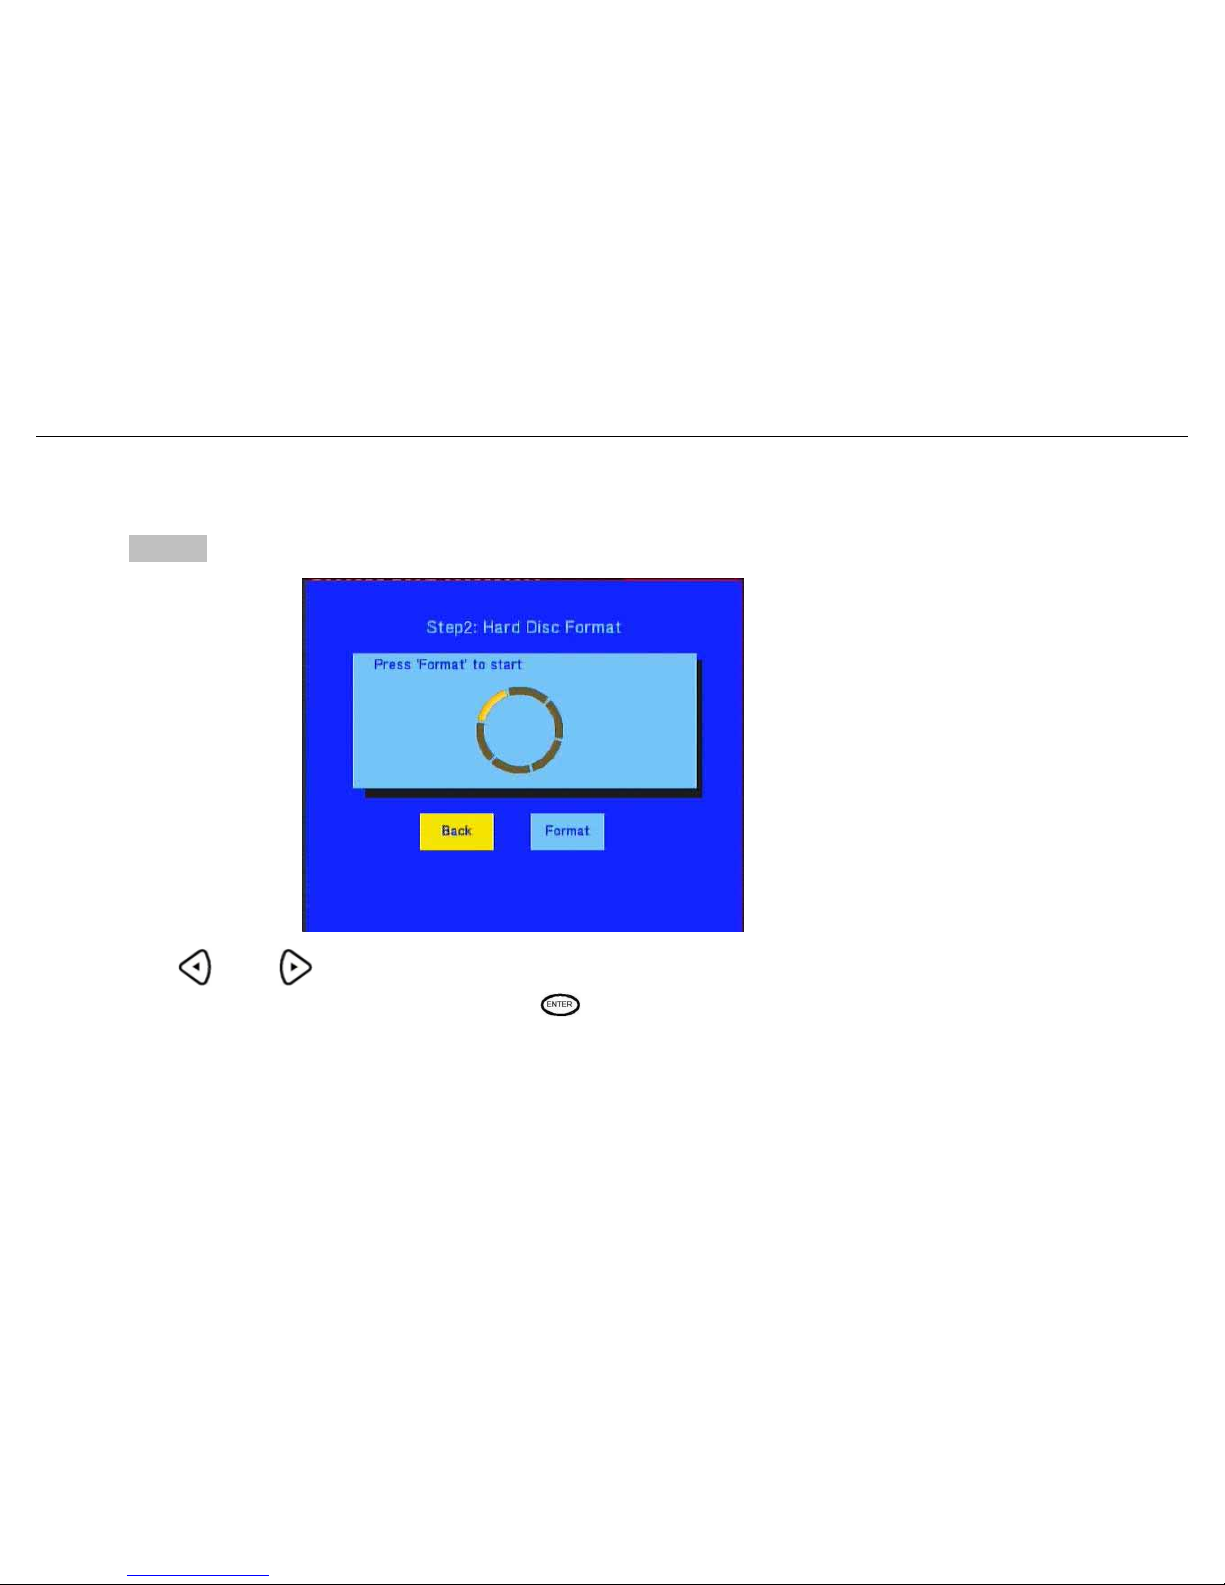
Step 2: Hard disk format
Press and on the remote control to select “Back” or “Format”.
When the Format button highlighted, press
to start. Otherwise, select Back bu tton to back to the previous
step.
Page 30
BM3030 Multimedia Player User Manual
29
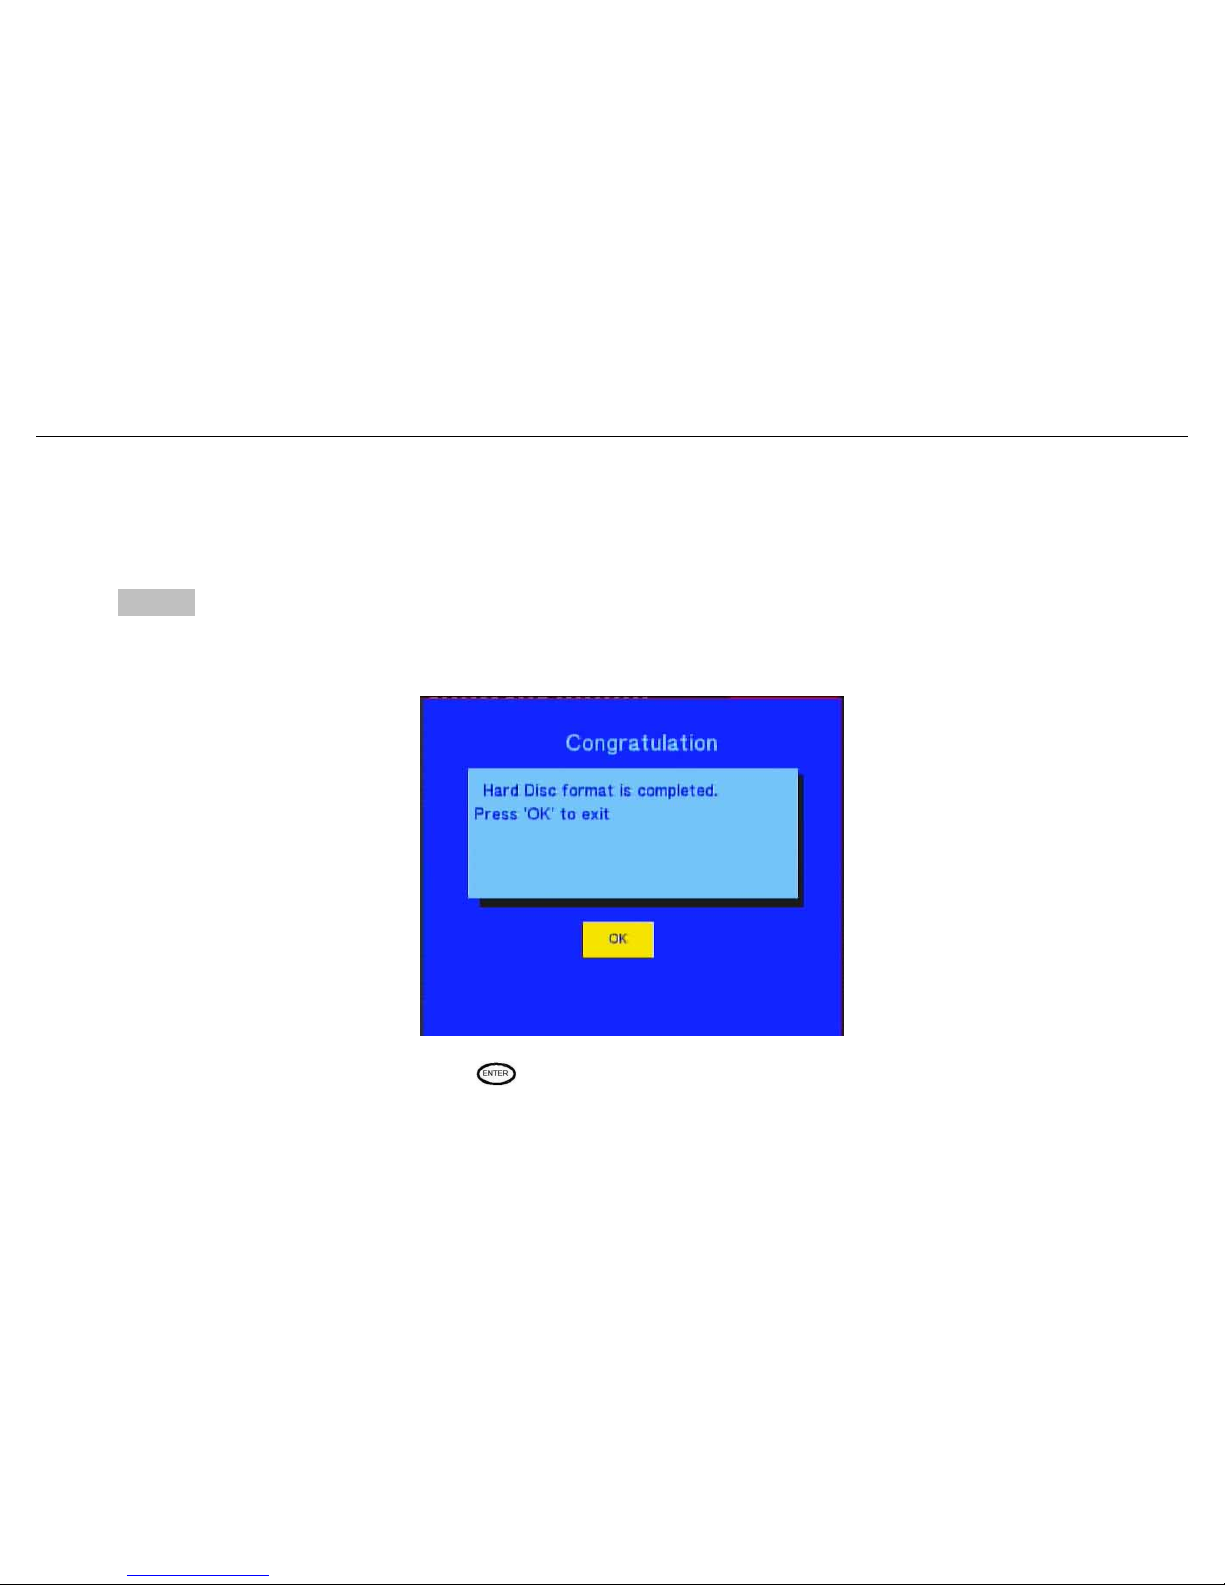
Step 3: Congratulation page
When complete the format, the system will display the congratulation page.
Select OK button and press to exit.
Page 31
BM3030 Multimedia Player User Manual
30
3.4 The REC List
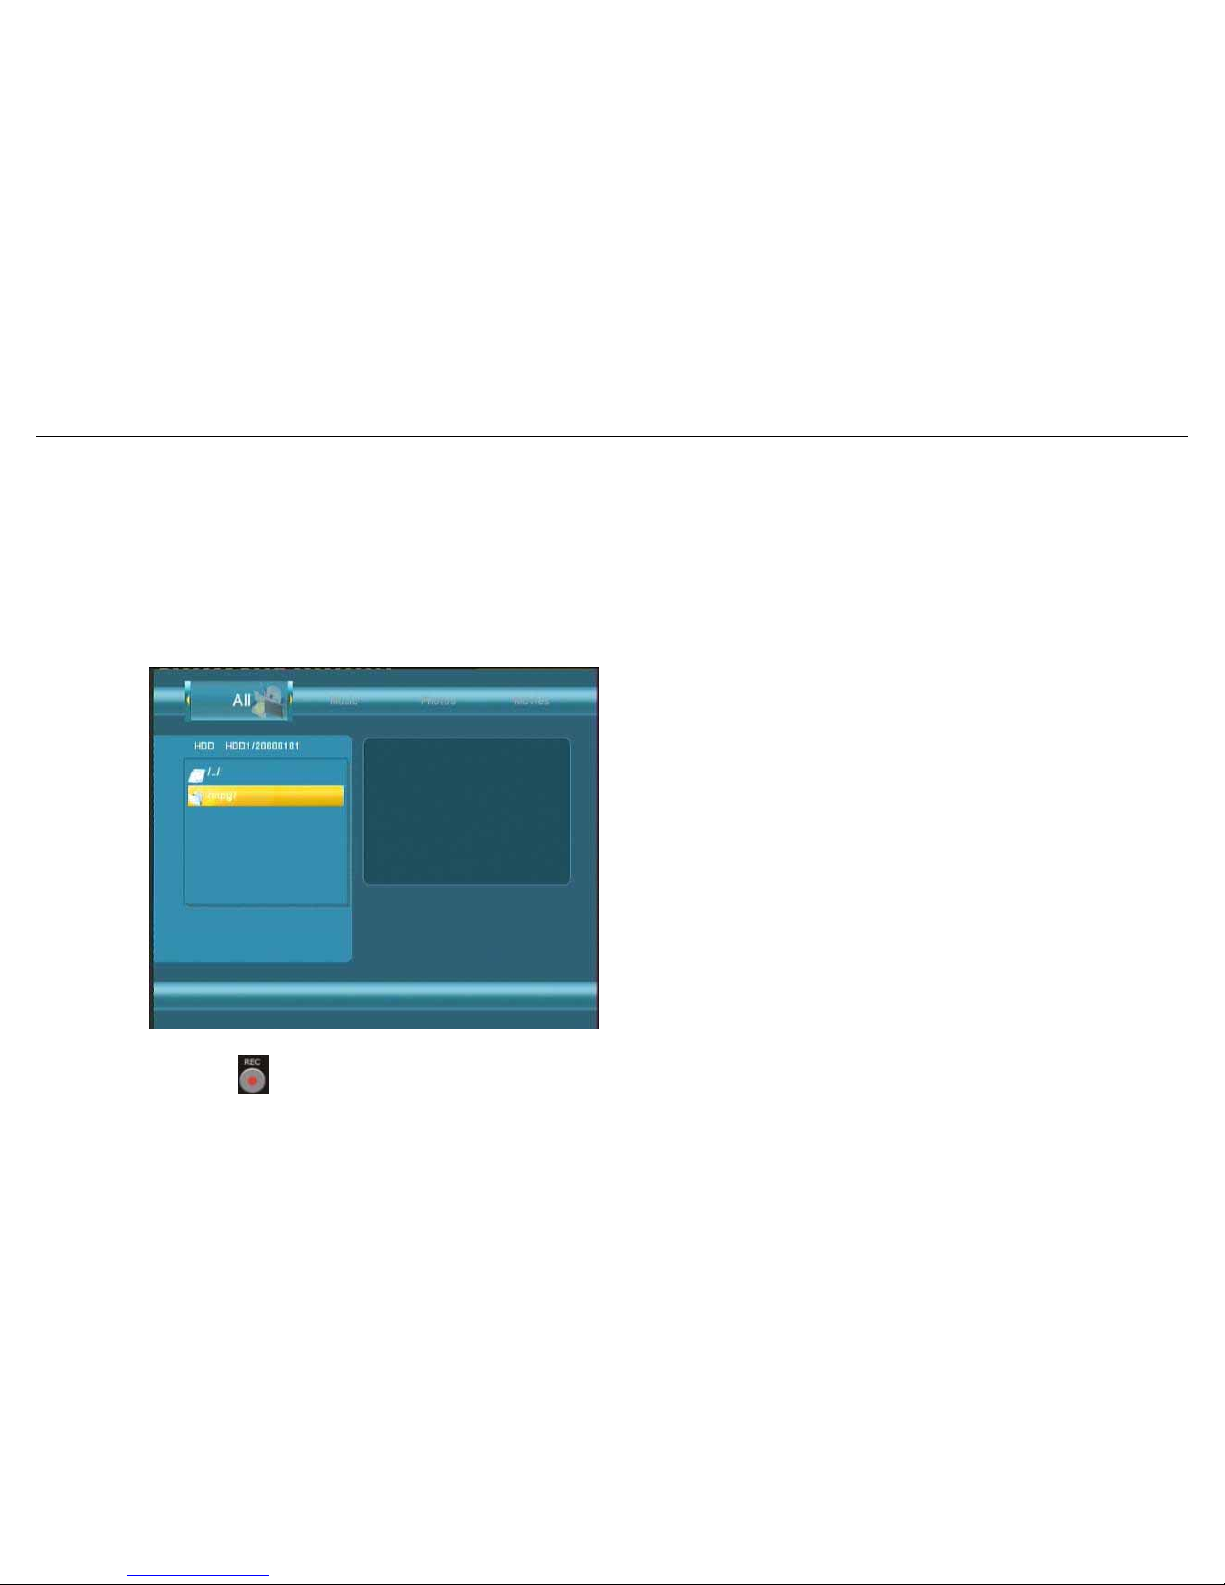
The REC List menu allows you to play all saved titles.
When you press
to begin to record, system will make a “My Recordings” folder at “HDD1” or USB device
automatically at the first time. And your recoded movie files will be saved at this folder. The file name will be renamed
accordingly as recording time.
REC List Menu
Page 32
BM3030 Multimedia Player User Manual
31
3.5 Timer Record Menu
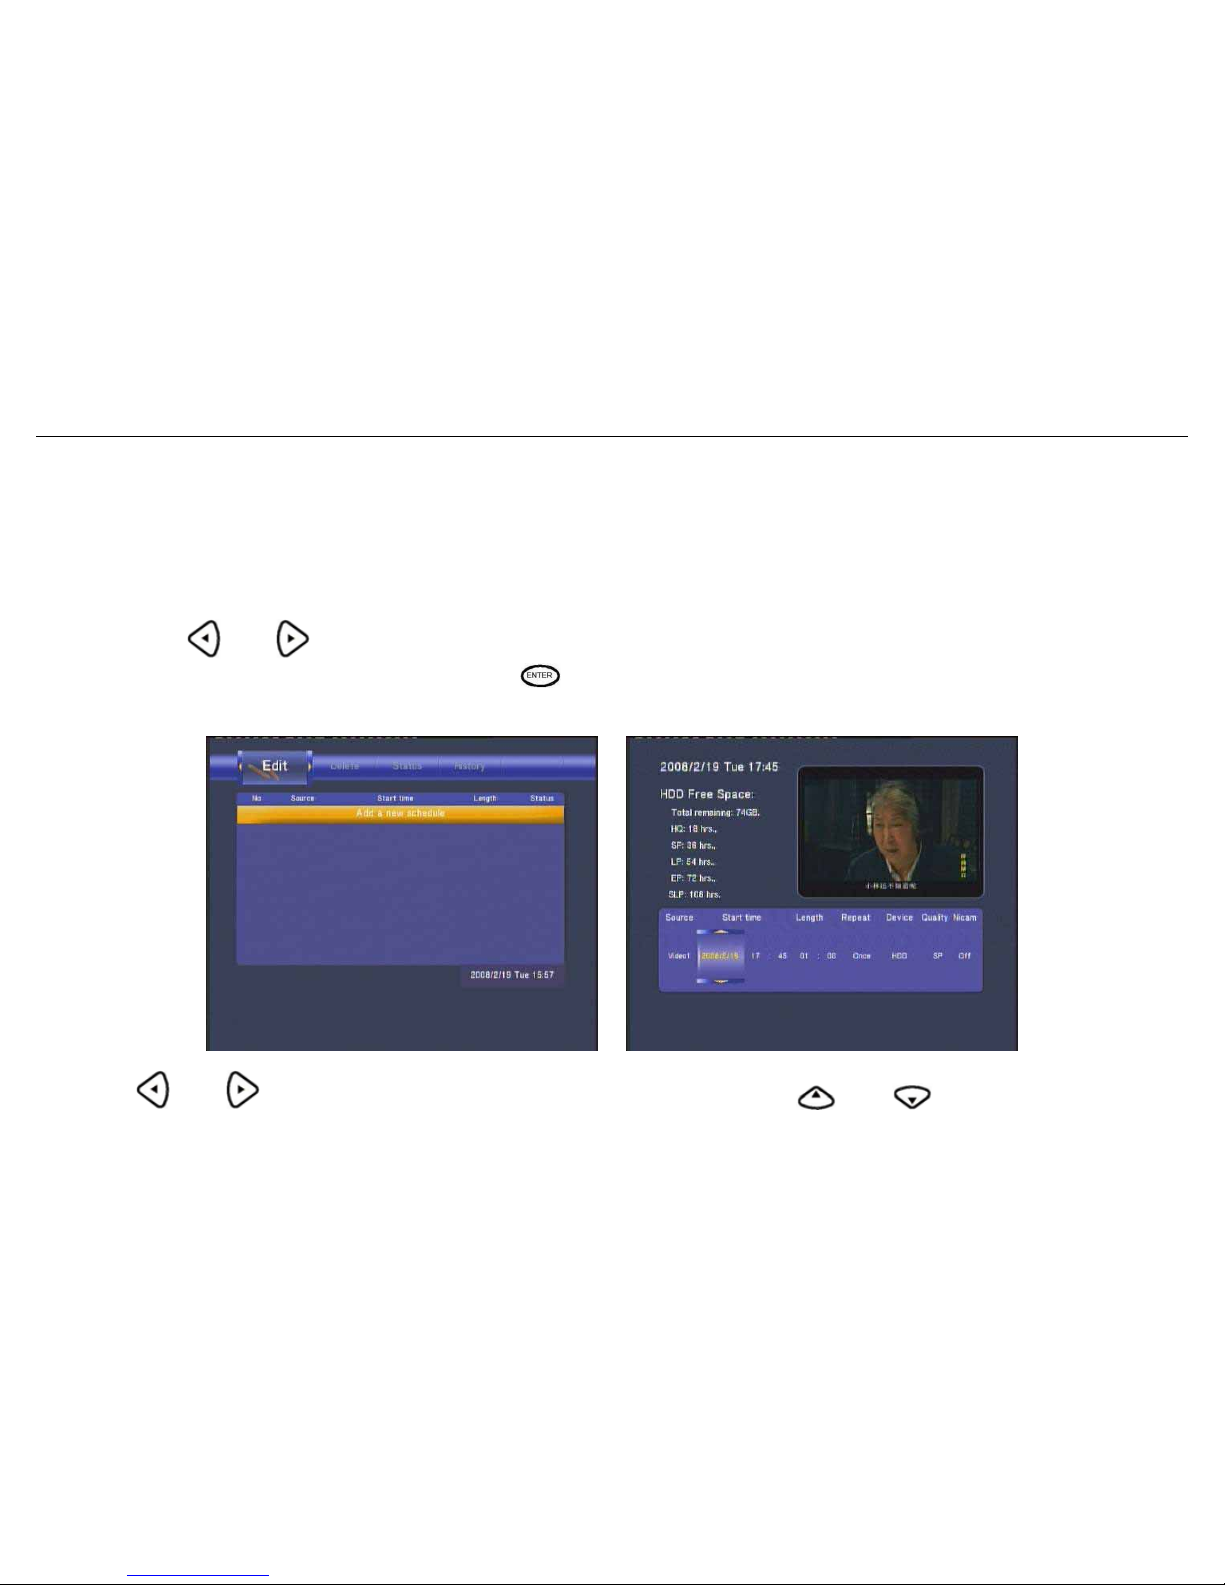
TheTimerRecordmenuallowsyoutocreate,editanddeleterecordingschedulesandviewallschedule
statusandhistory.Toenterthemenu,selectTimerRecordfromtheGuidemenu.
3.5.1 Creating a New Schedule
Press and on the remote control to select the Edit tab from the menu bar.
Select “Add a New Schedule” and press
. The schedule setting screen appears.
Use and on the remote control to move between fields and press and to adjust each setting.
Page 33

BM3030 Multimedia Player User Manual
32
Start Time
Enter the date and time of the recording.
Length
Enter the length of the recording
Repeat
Select how often you want the schedule to record. Choose from
Once, Everyday, Mon-Fri, Mon-Sat or for an individual day of the week.
Quality
Select the recording quality. Choose from HQ, SLP, EP, LP and SP.
The higher the quality, the more space required on the hard drive.
See HDD/USB Free Space on the left of the screen for details of how long
you can record for using each setting.
Preview
This small preview window will show the current program of the select
channel.
Page 34
BM3030 Multimedia Player User Manual
33
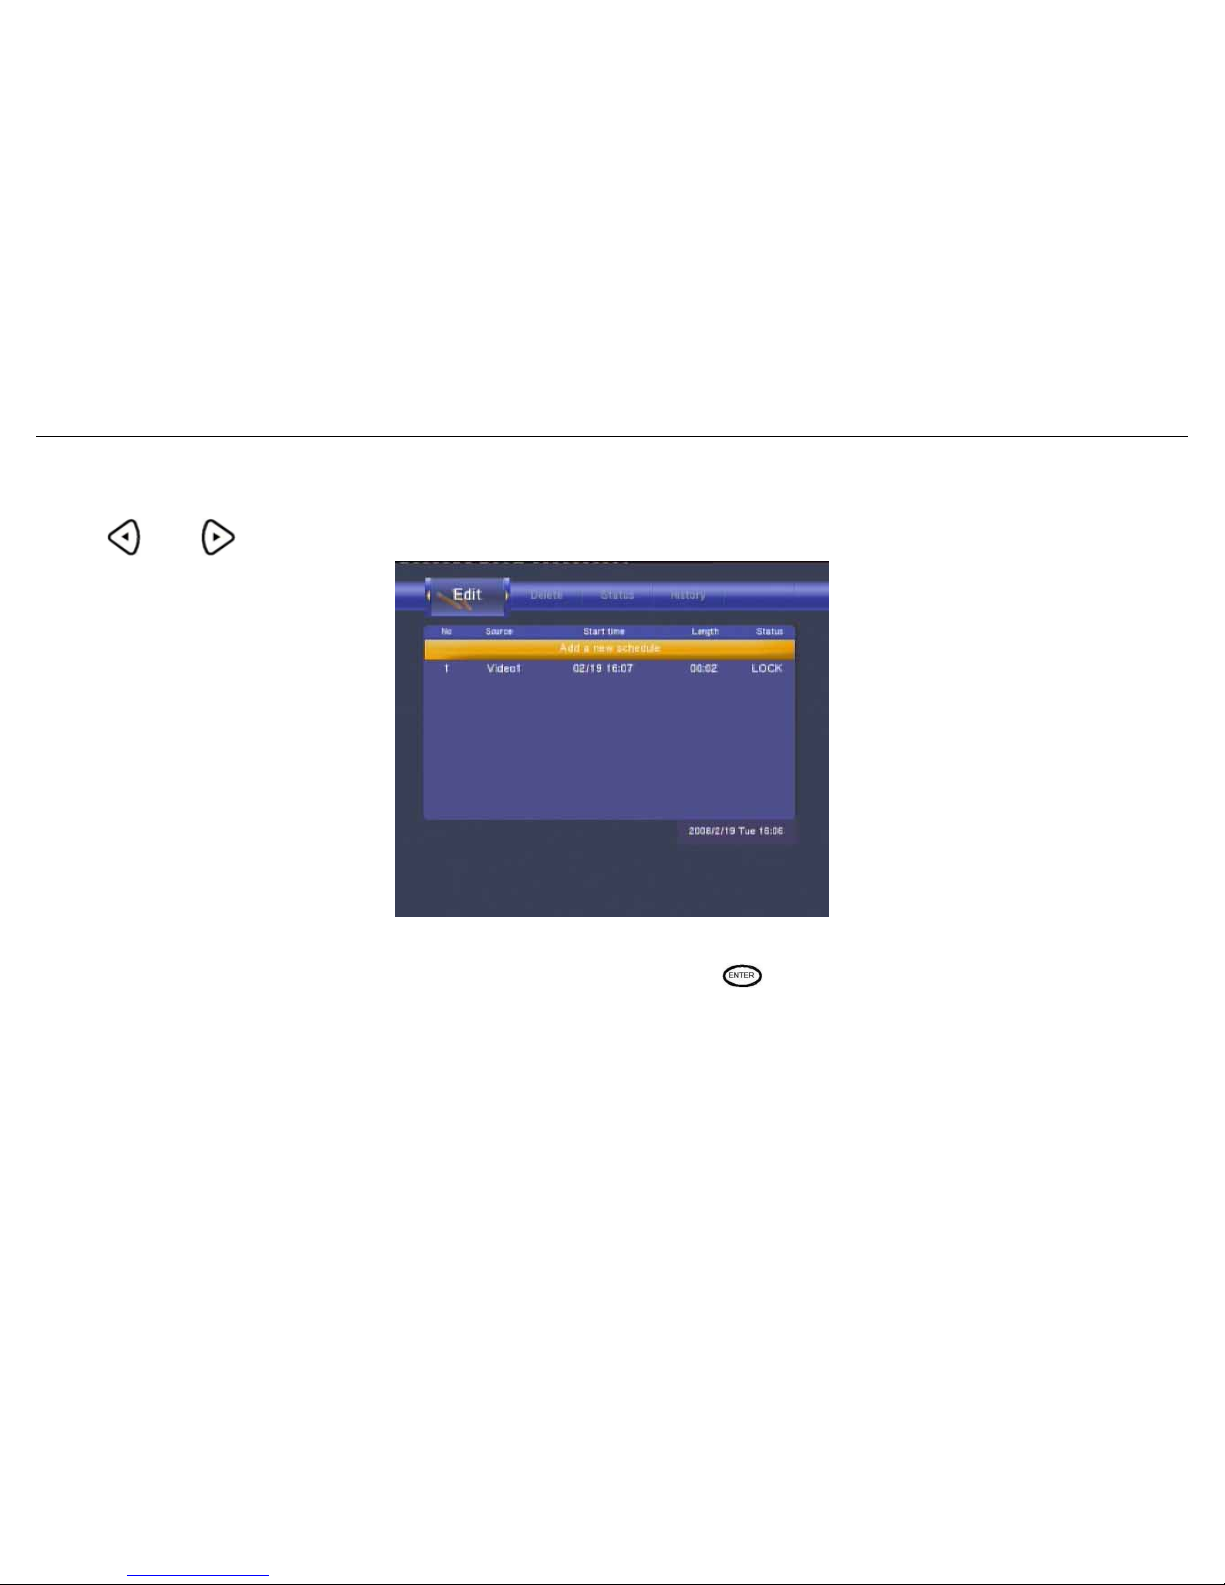
3.5.2 Editing Schedules
Press
and on the remote control to select the Edit tab from the menu bar.
Select the schedule you want to edit from the list and press
.
The schedule setting screen appears.
Modify the schedule as described in “Creating a New Schedule”.
Page 35
BM3030 Multimedia Player User Manual
34
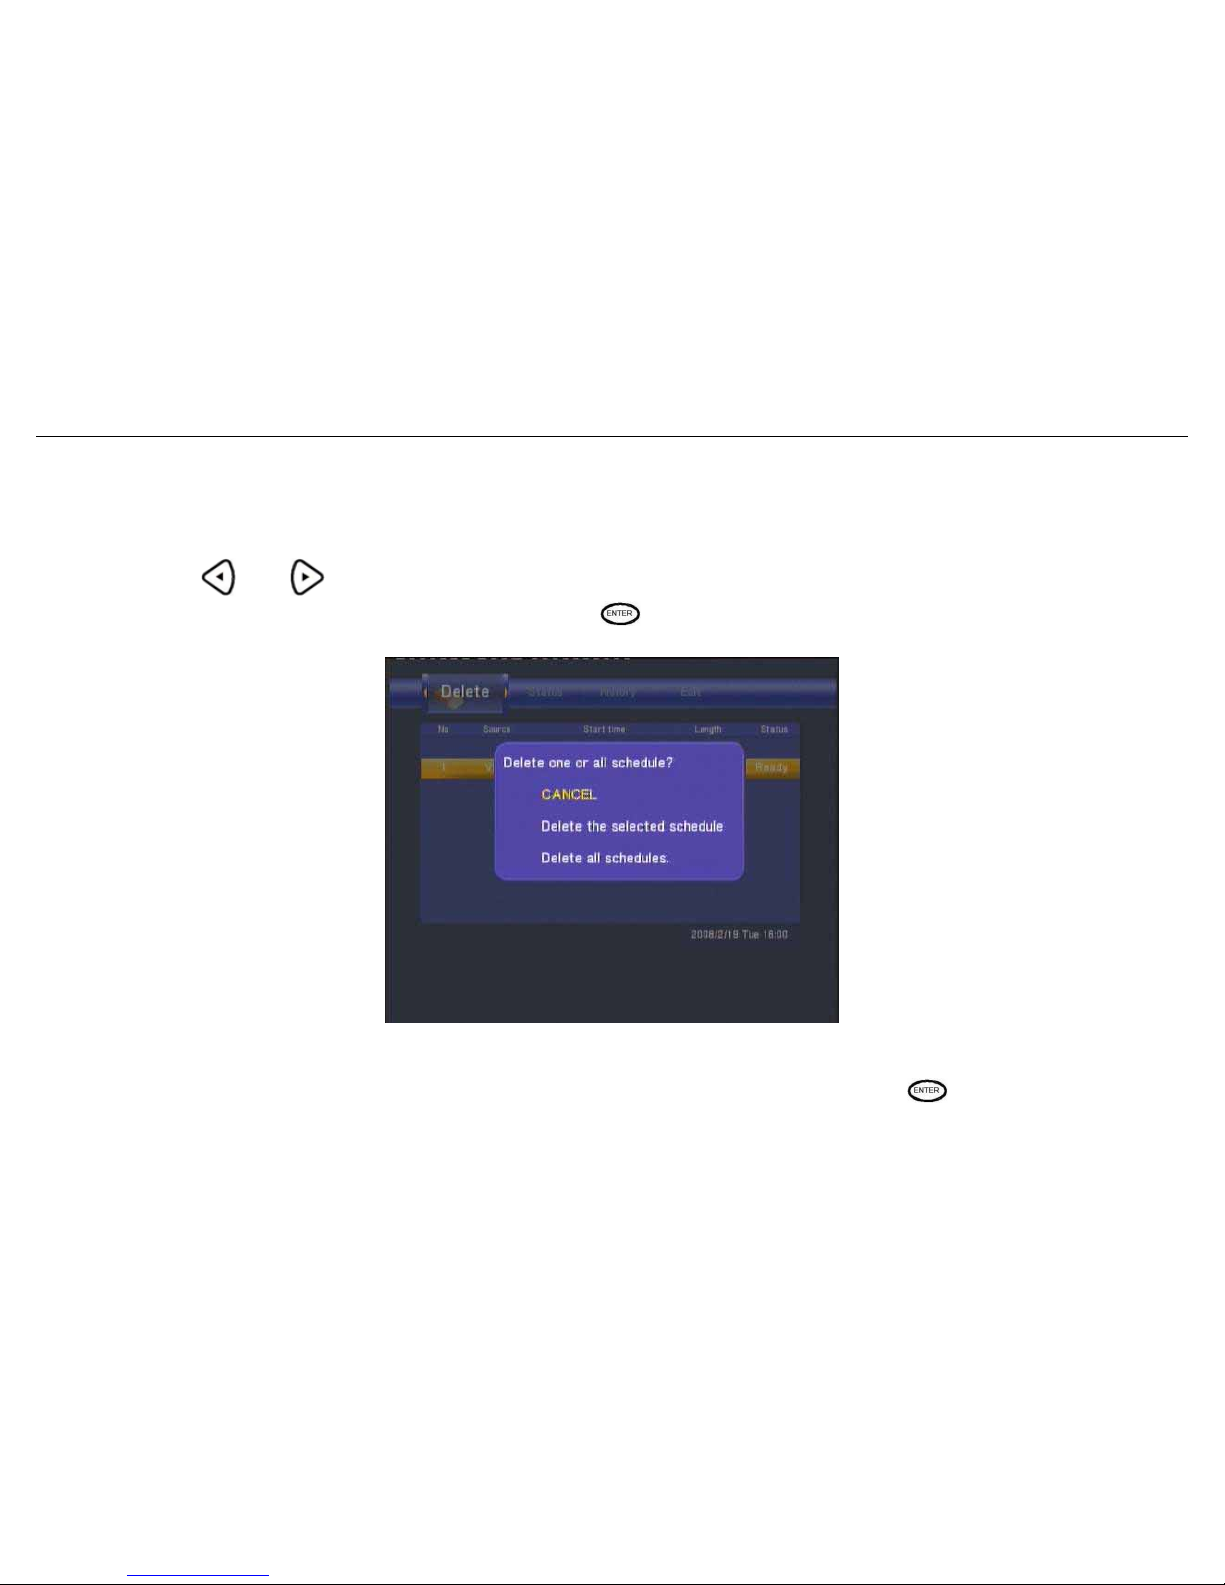
3.5.3 Deleting Schedules
Press and on the remote control to select the Delete tab from the menu bar.
Select the schedule you want to delete and press
. A confirmation message appears.
Select CANCEL, Delete the selected schedule or Delete all schedules. Press to confirm.
Page 36
BM3030 Multimedia Player User Manual
35
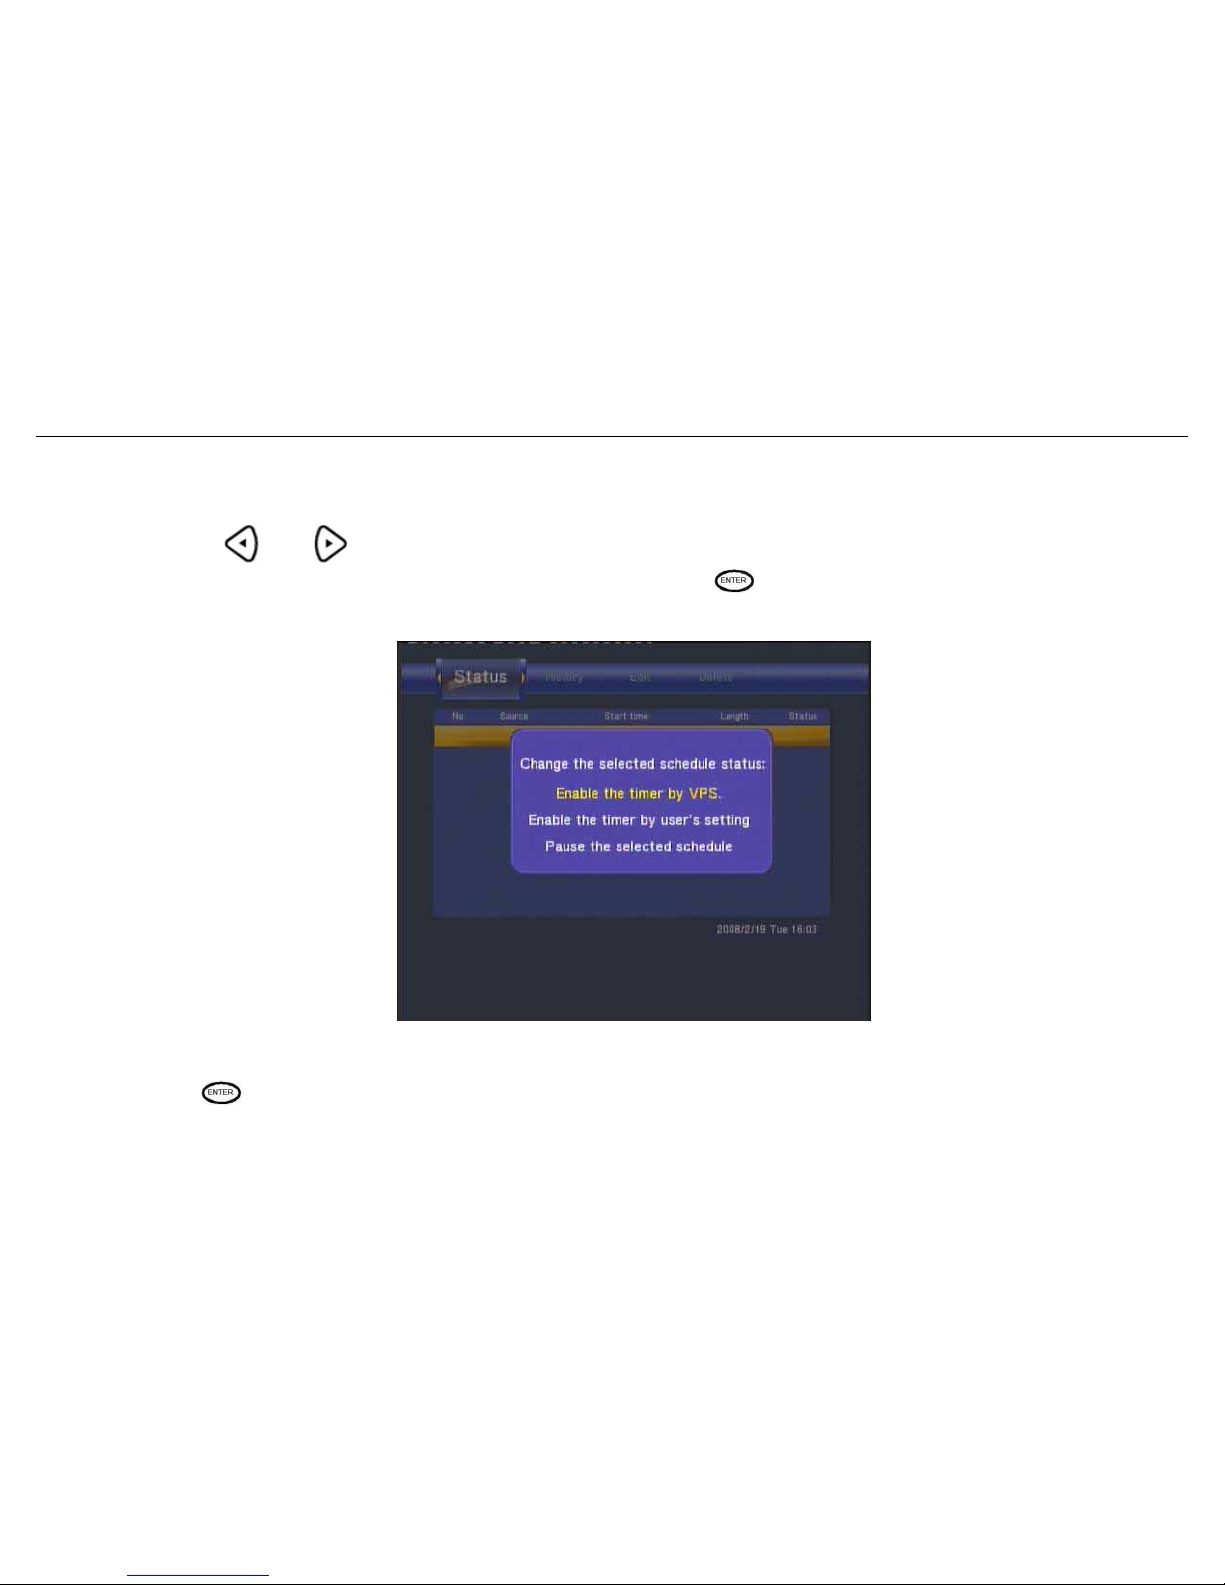
3.5.4 Viewing Schedule Status Viewing Schedule Status
Press
and on the remote control to select the Schedule tab from the menu bar.
The schedule list is displayed. Select a schedule and press
.
Select Enable VPS, Disable VPS or Pause the selected schedule.
Press
to confirm.
Page 37
BM3030 Multimedia Player User Manual
36
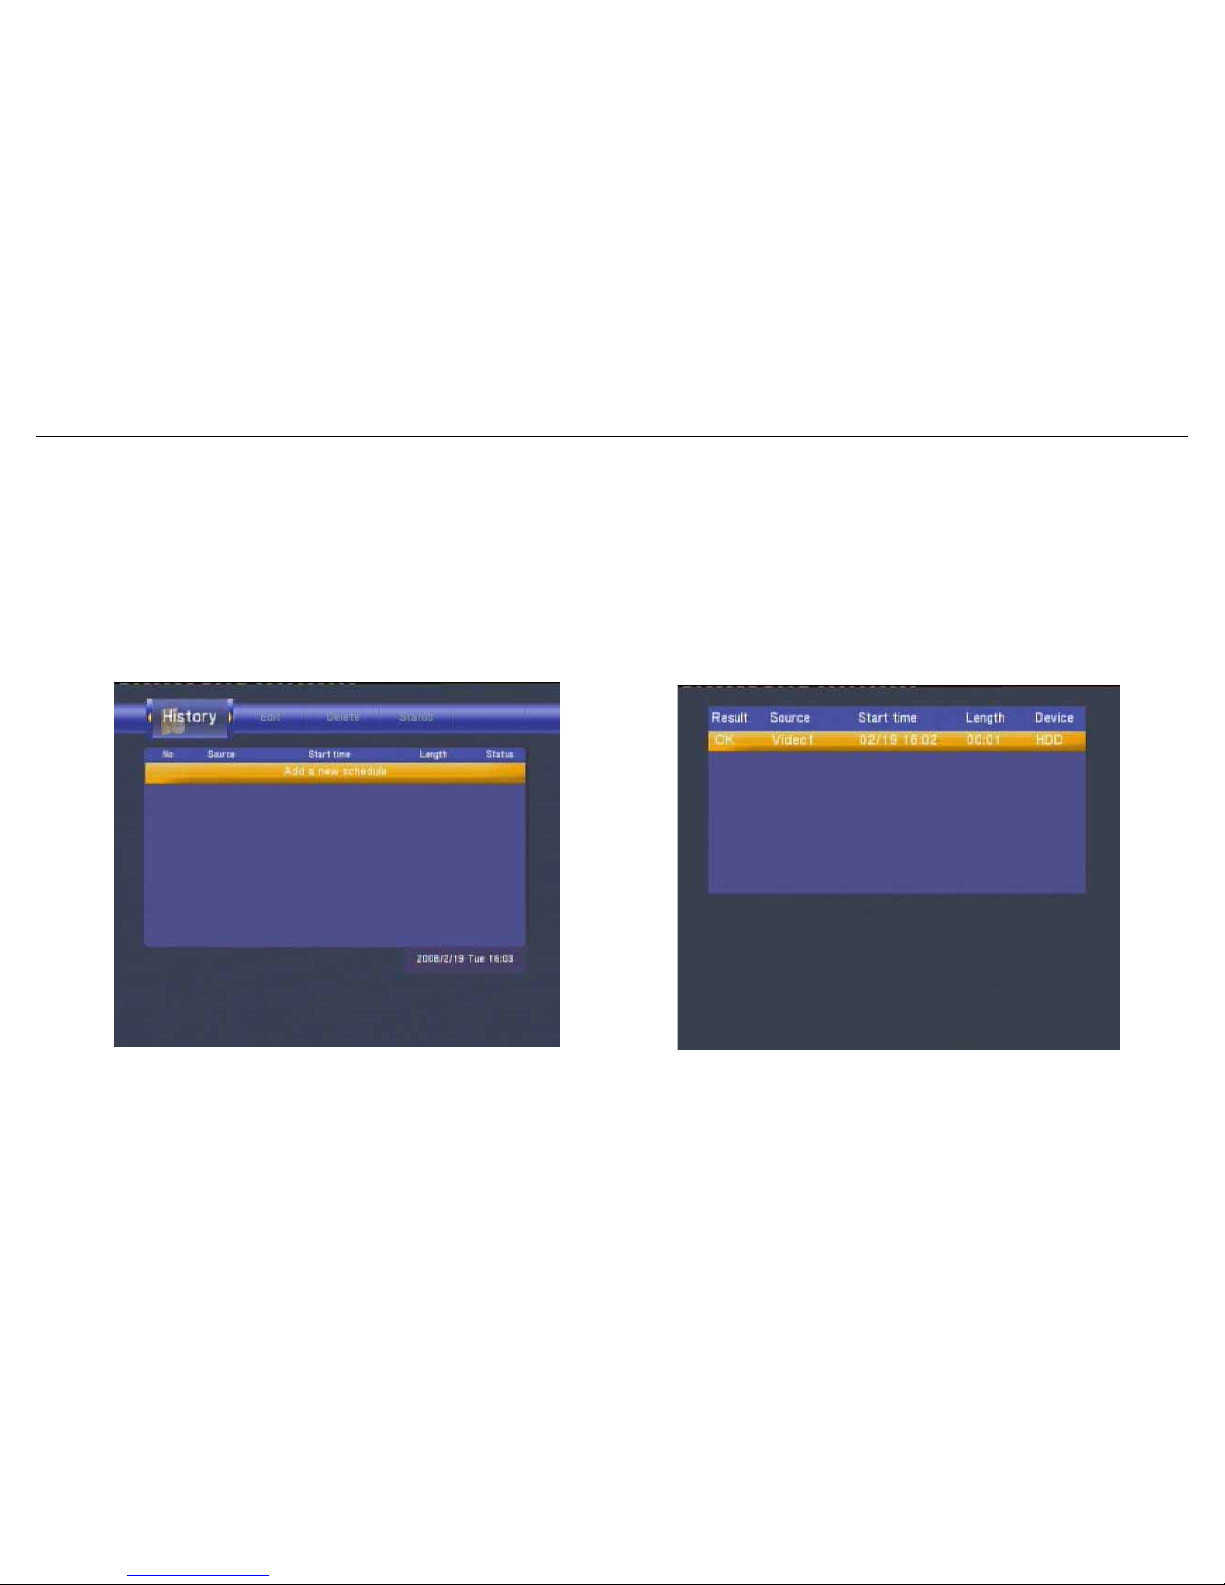
3.5.5 Viewing Recording History
Press the left and right navigation arrows on the remote control to select the History tab from the menu bar.
Here you can view a complete history of all recordings that were set.
Page 38
BM3030 Multimedia Player User Manual
37
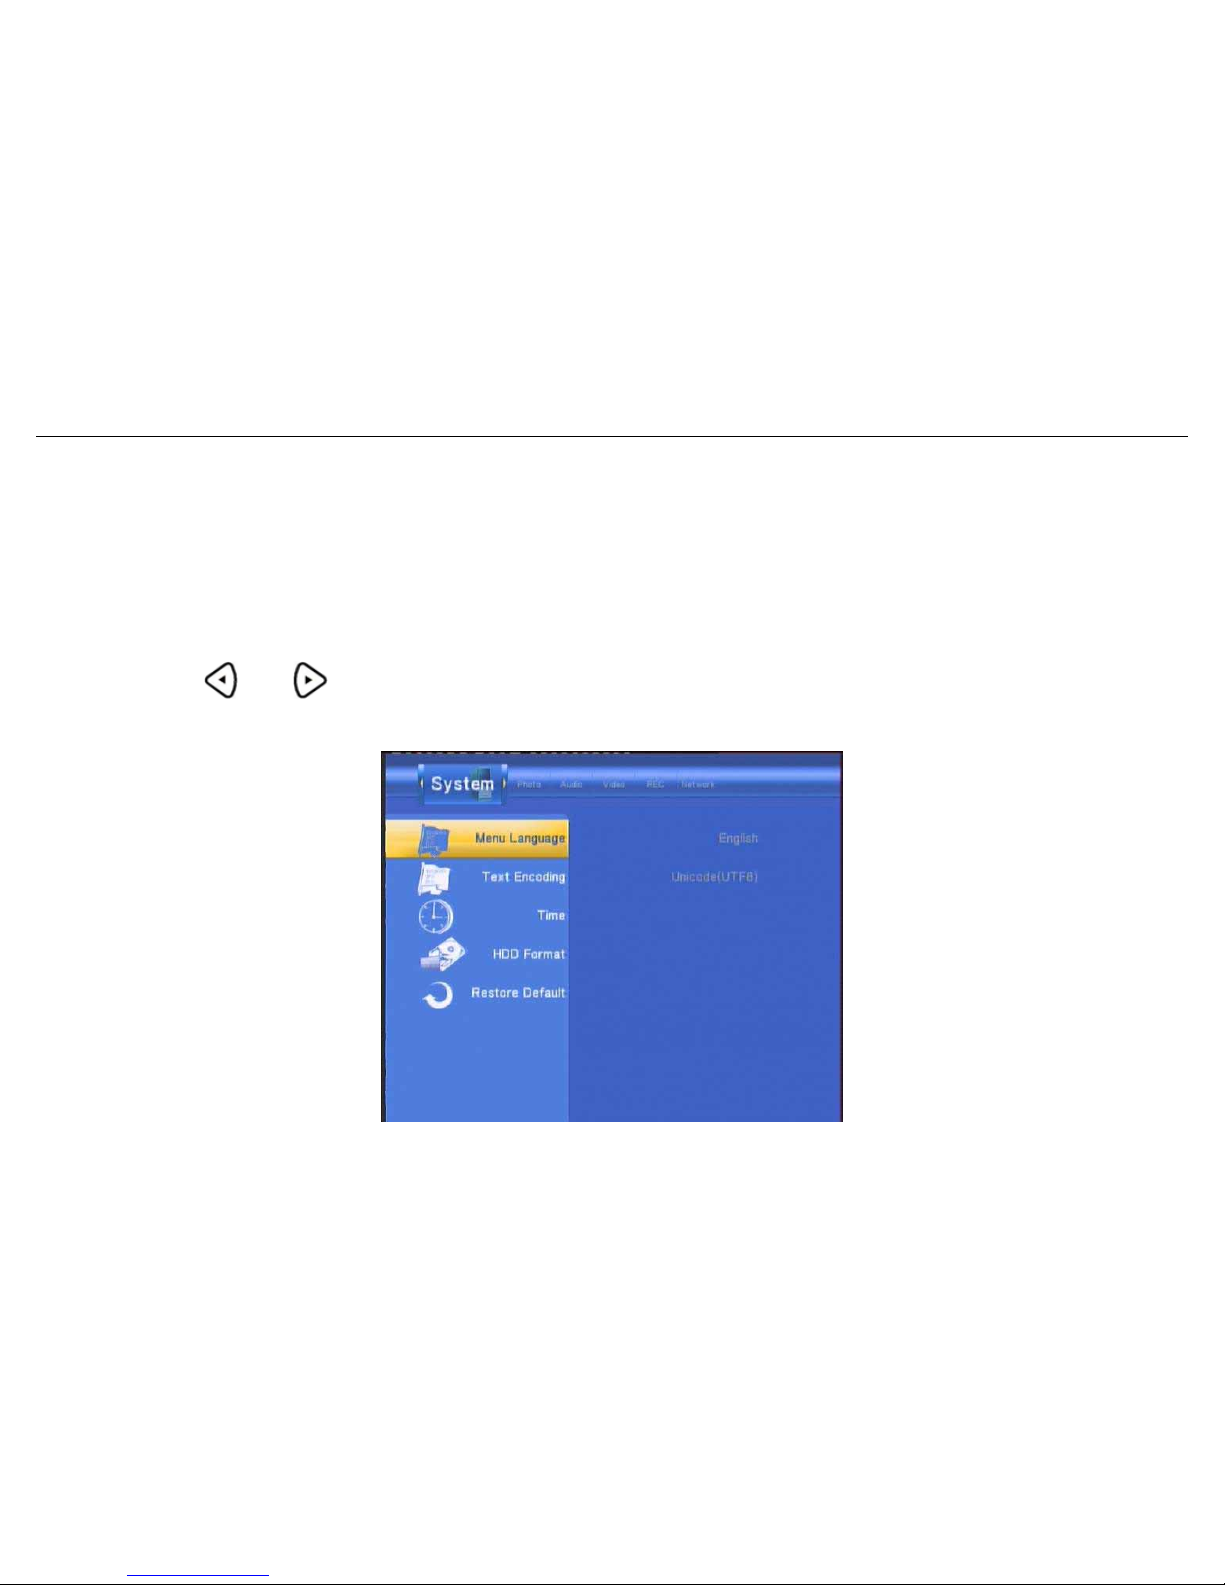
3.6 Setup Menu
The Setup Menu allows you to configure video, record and system settings.
To enter the menu, select Setup from the Guide menu.
3.6.1 Changing System Settings
Press and on the remote control to select the System tab from the menu.
Page 39
BM3030 Multimedia Player User Manual
38
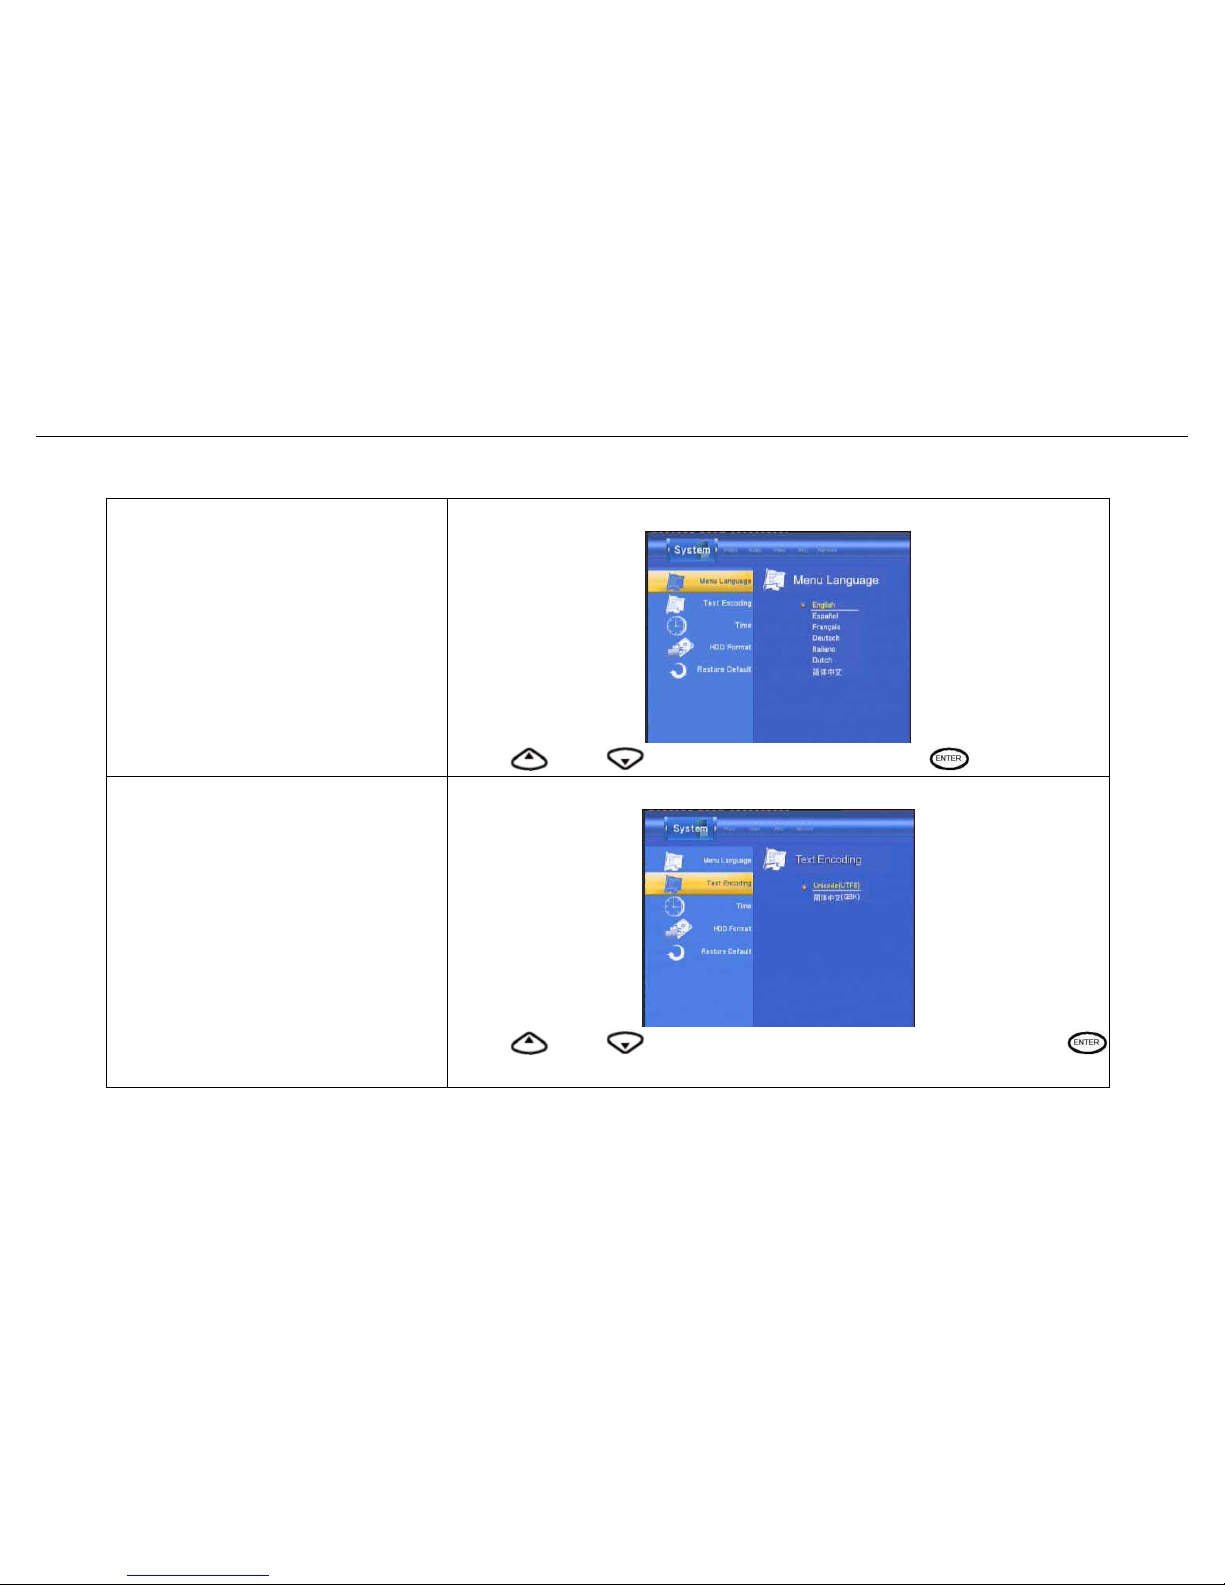
Menu Language
Select to choose the OSD (On Screen Display) language.
Press and to select the language. Press to confirm.
Text Encoding
Select to choose the text encoding language.
Press and to select the text encoding language. Press
to confirm.
Page 40
BM3030 Multimedia Player User Manual
39
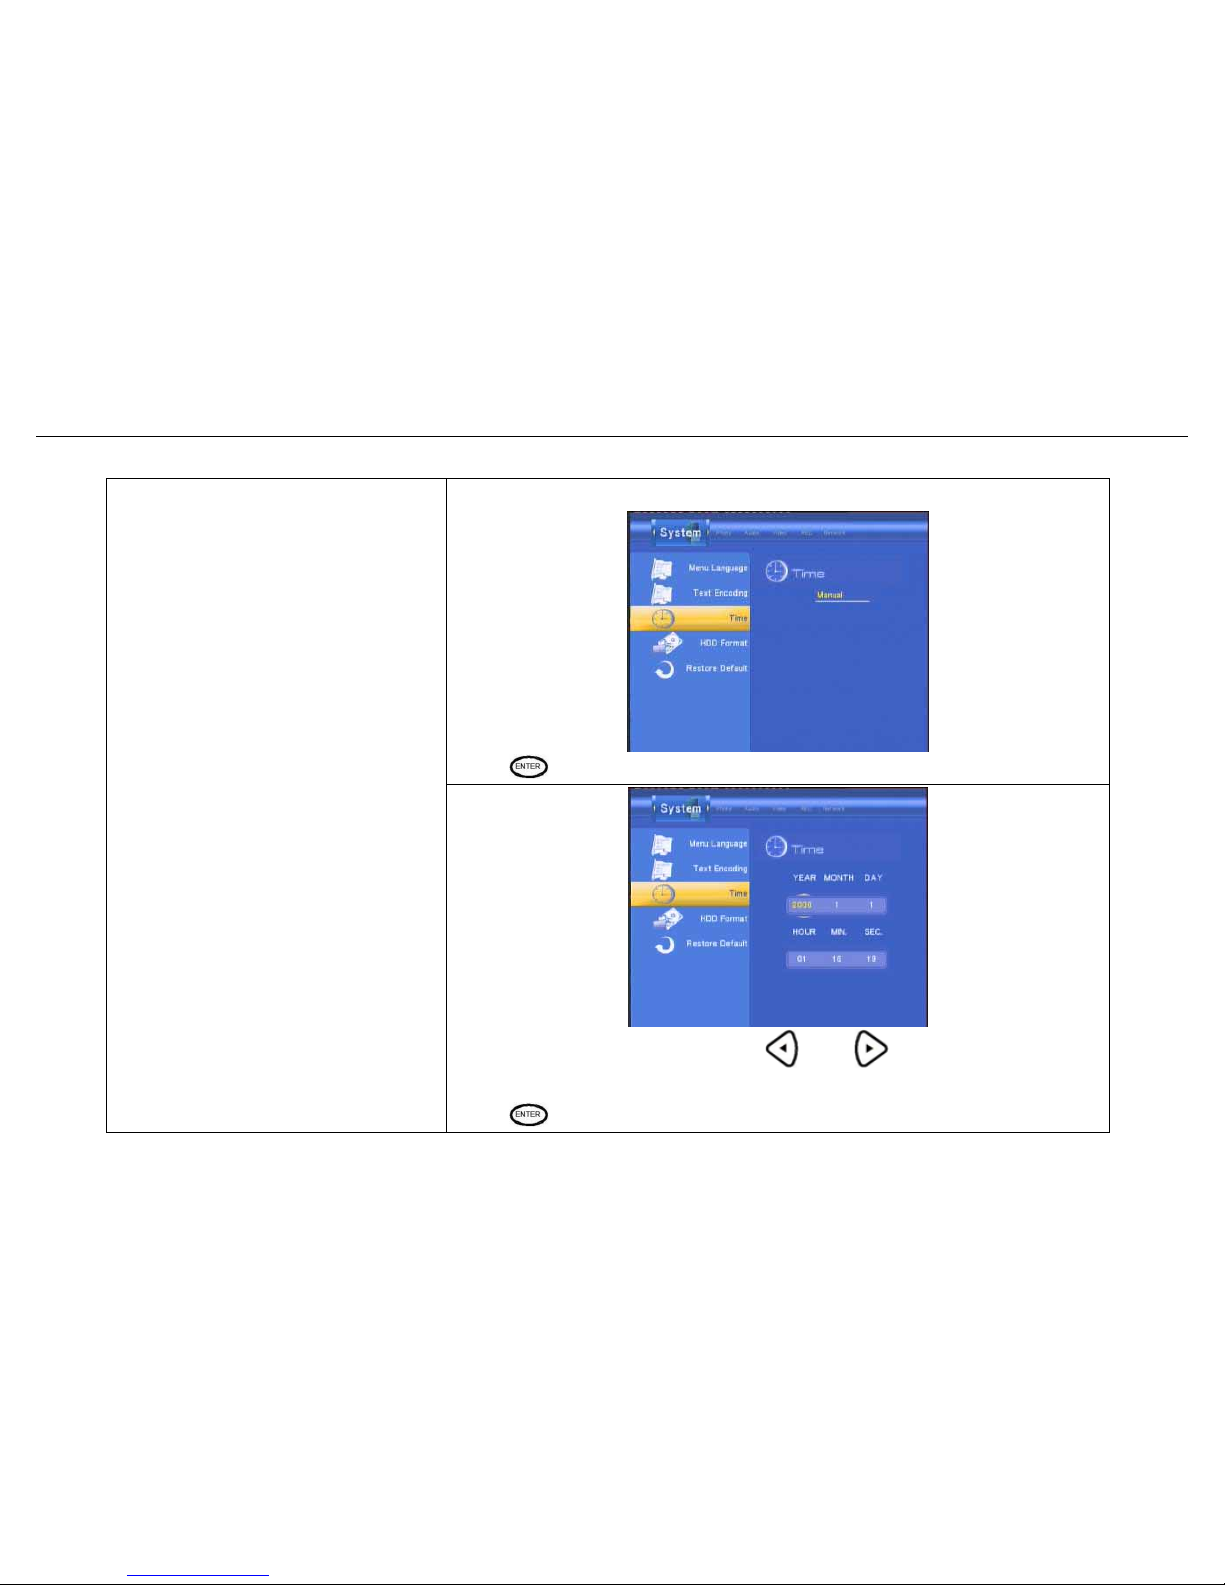
Select to set the system time.
Press and enter Manual setup.
Time
Enter the system menu and press and to select each field
and the up and down navigation arrows to adjust each setting.
Press
to confirm.
Page 41
BM3030 Multimedia Player User Manual
40
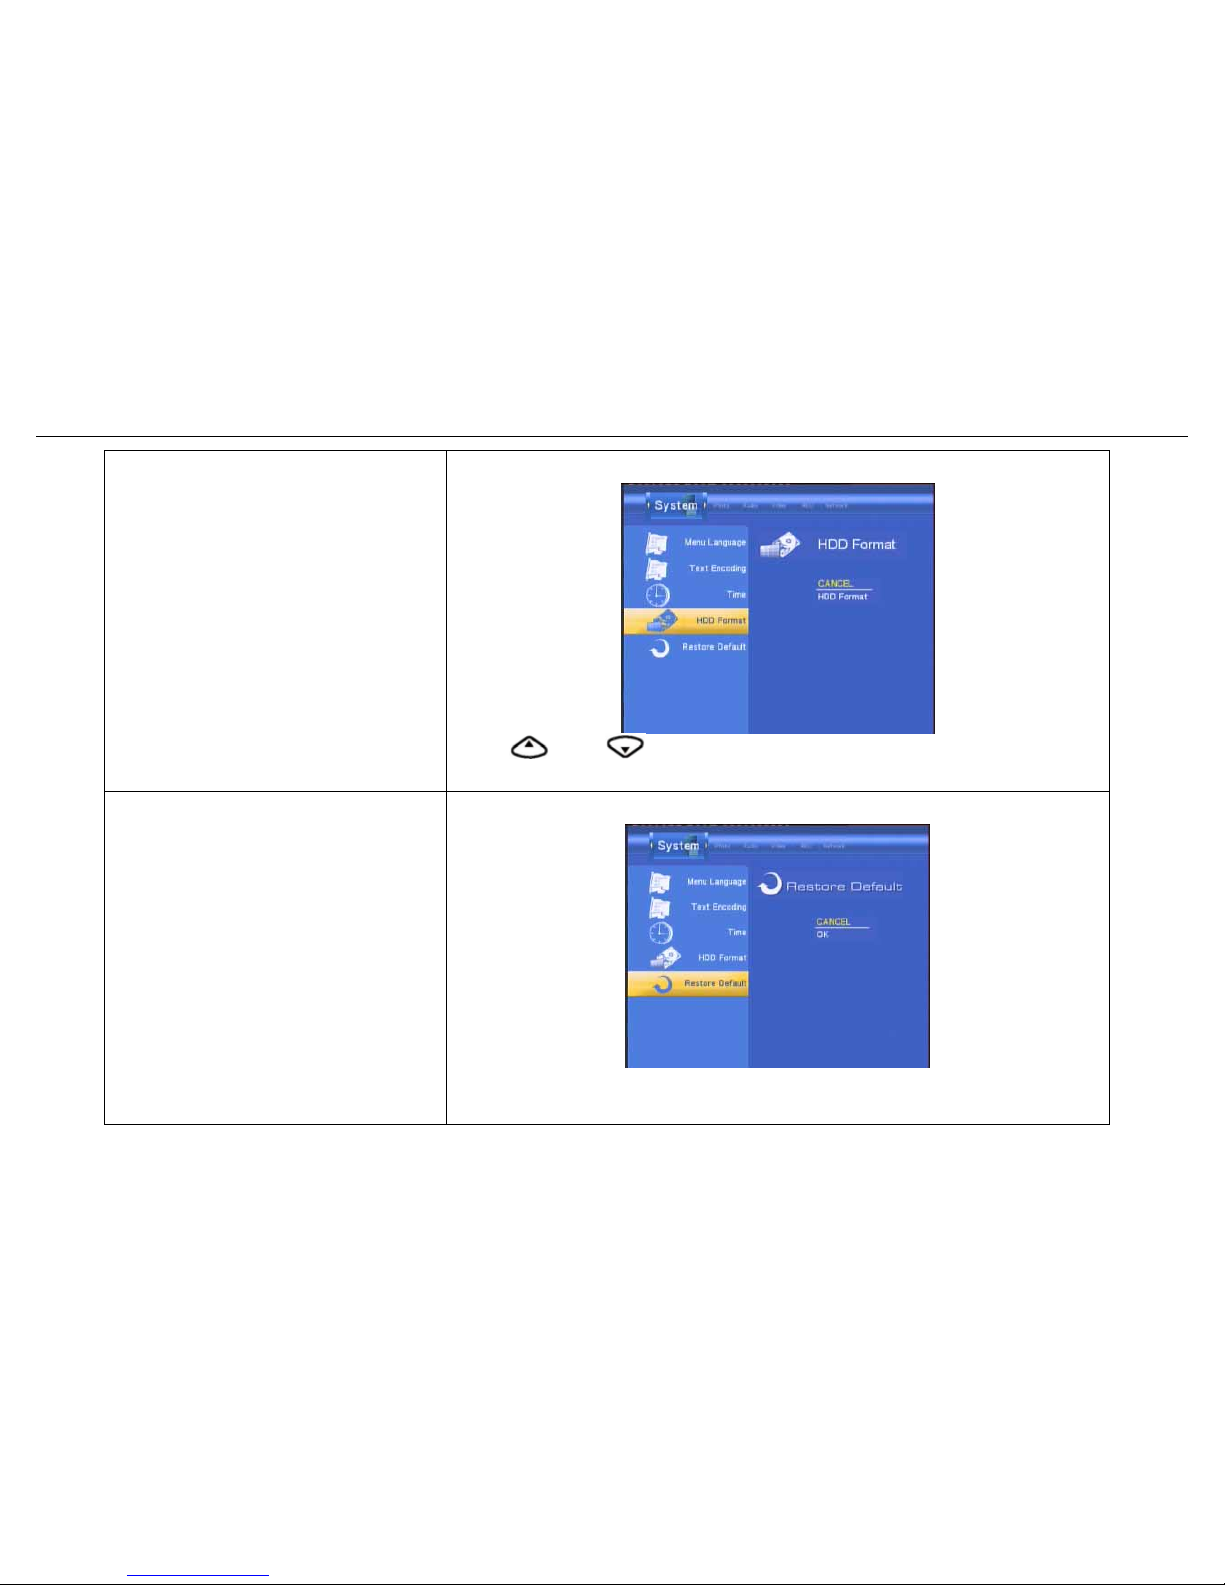
HDD Format
Select to HDD Format.
Press and button on the remote control to select Cancel or
CONFIRM from the menu.
Restore Default
Select to restore factory defaults.
A confirmation message appears. Select CONFIRM and press
RETURN to restore all settings to defaults.
Page 42
BM3030 Multimedia Player User Manual
41
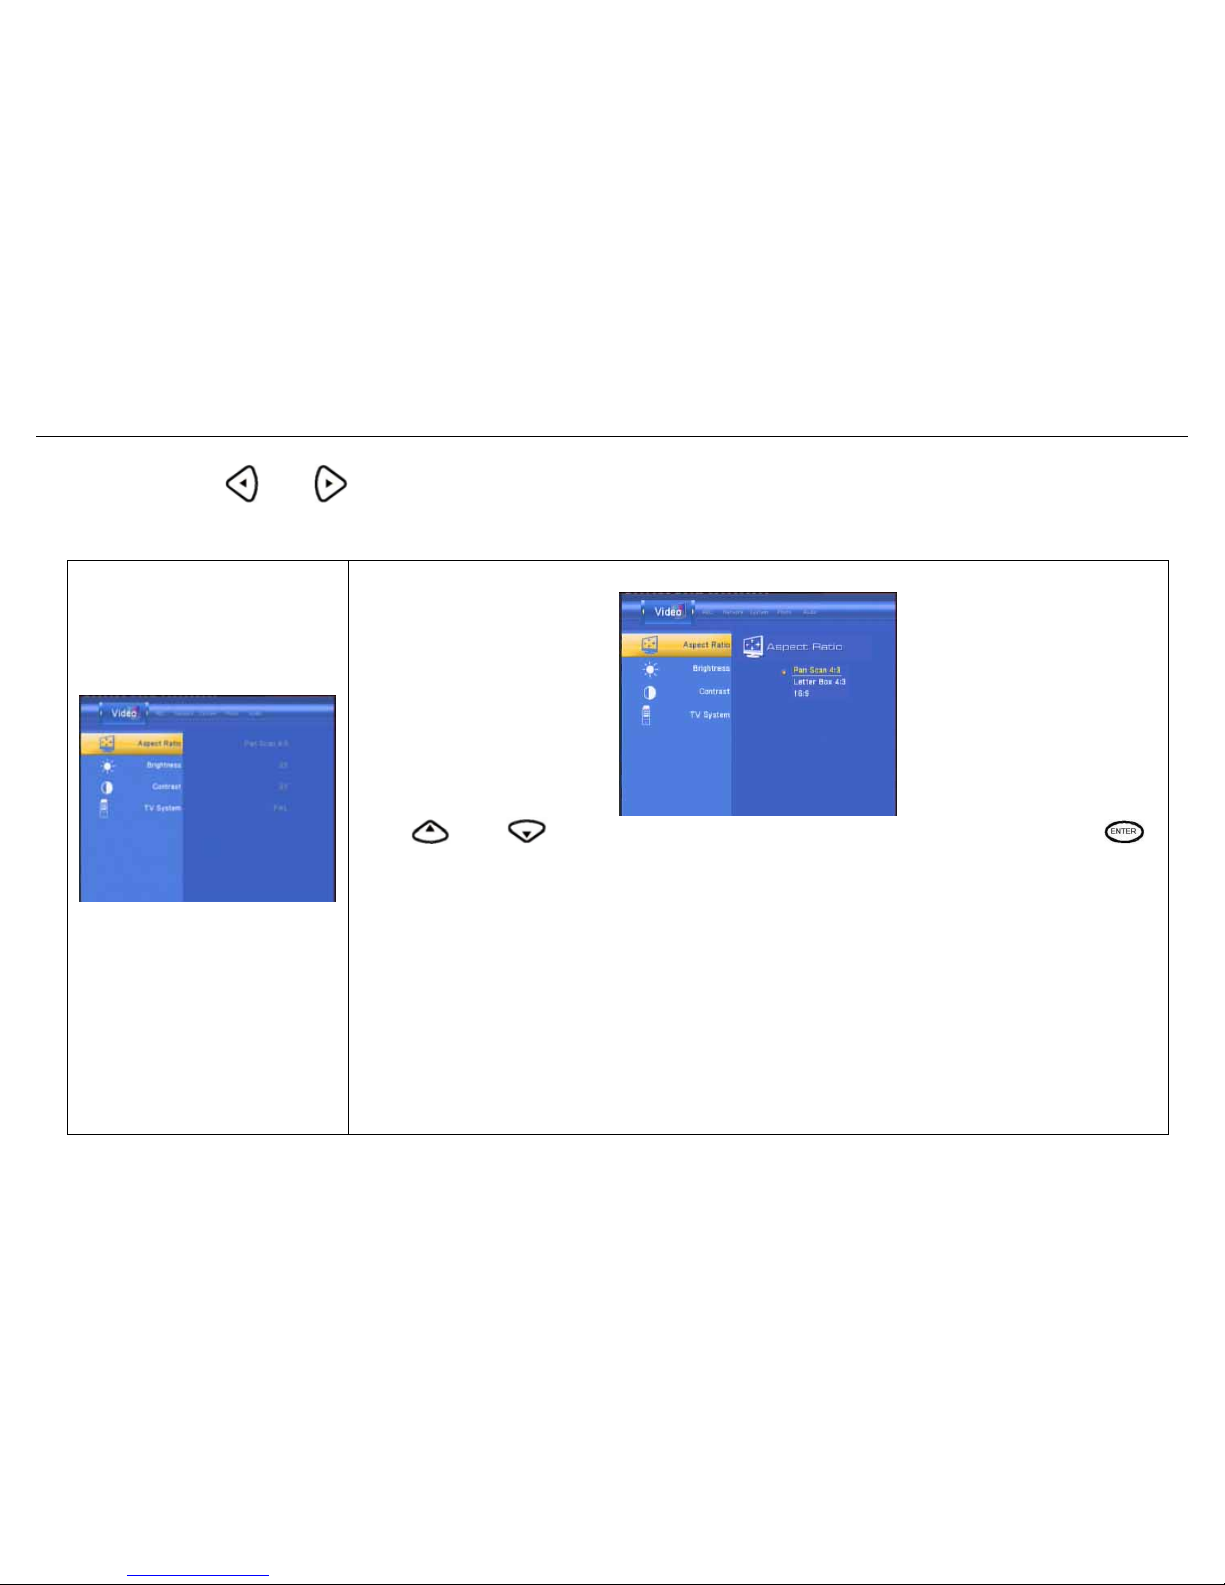
3.6.2 Changing Video Settings
Press
and on the remote control to select the Video tab from the menu bar.
Aspect Ratio
Select to set aspect ratio.
Press
and to select from Pan Scan 4:3, Letter Box 4:3 or 16:9. Press
to confirm.
Pan Scan 4:3: Display a wide picture on the entire screen and cuts off the redundant
portions. Select when a standard 4:3 TV is connected.
Letter Box 4:3: Display a wide picture with two black borders on the top and bottom
of 4:3 screen Select when a standard 4:3 TV is connected.
16:9: Compress the image to convert the whole image. Select when a 16:9 TV is
connected.
Page 43
BM3030 Multimedia Player User Manual
42
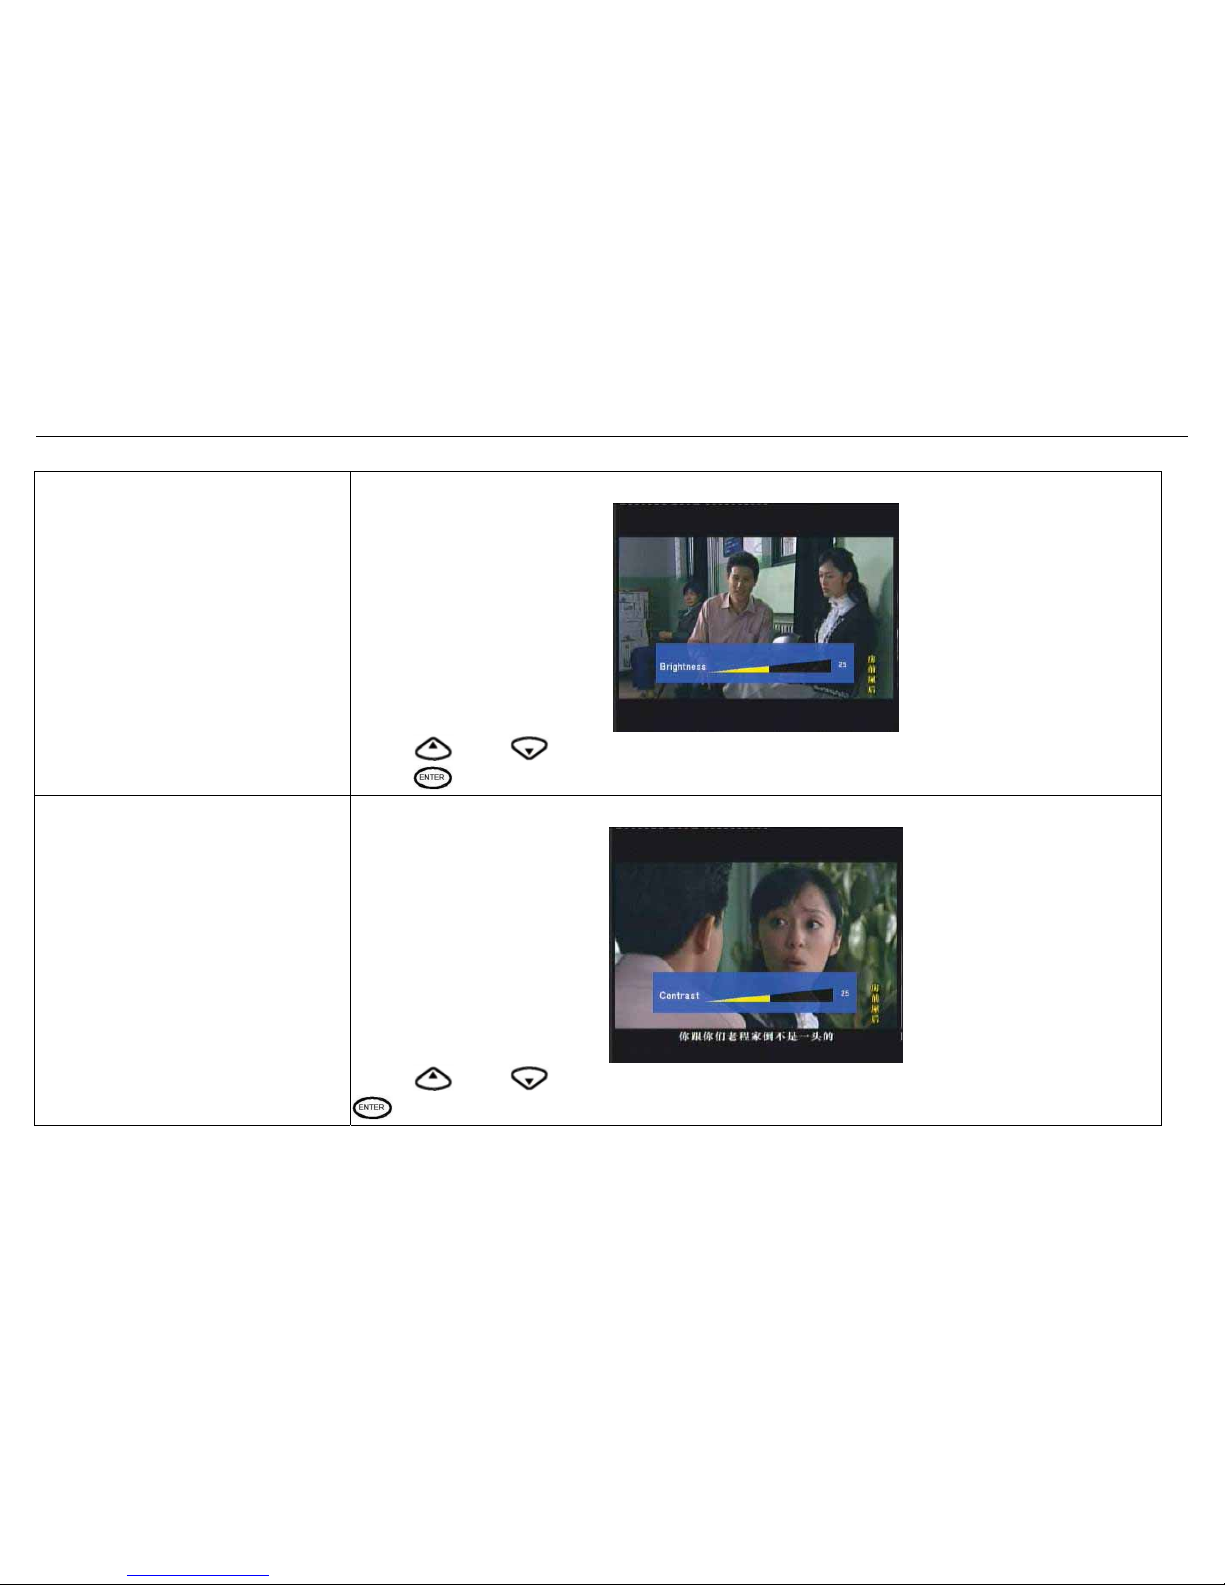
Brightness
Select to set brightness levels.
Press
and to adjust brightness. The new setting is previewed onscreen.
Press
to confirm.
Contrast
Select to set contrast levels.
Press
and to adjust contrast. The new setting is previewed onscreen. Press
to confirm.
Page 44
BM3030 Multimedia Player User Manual
43
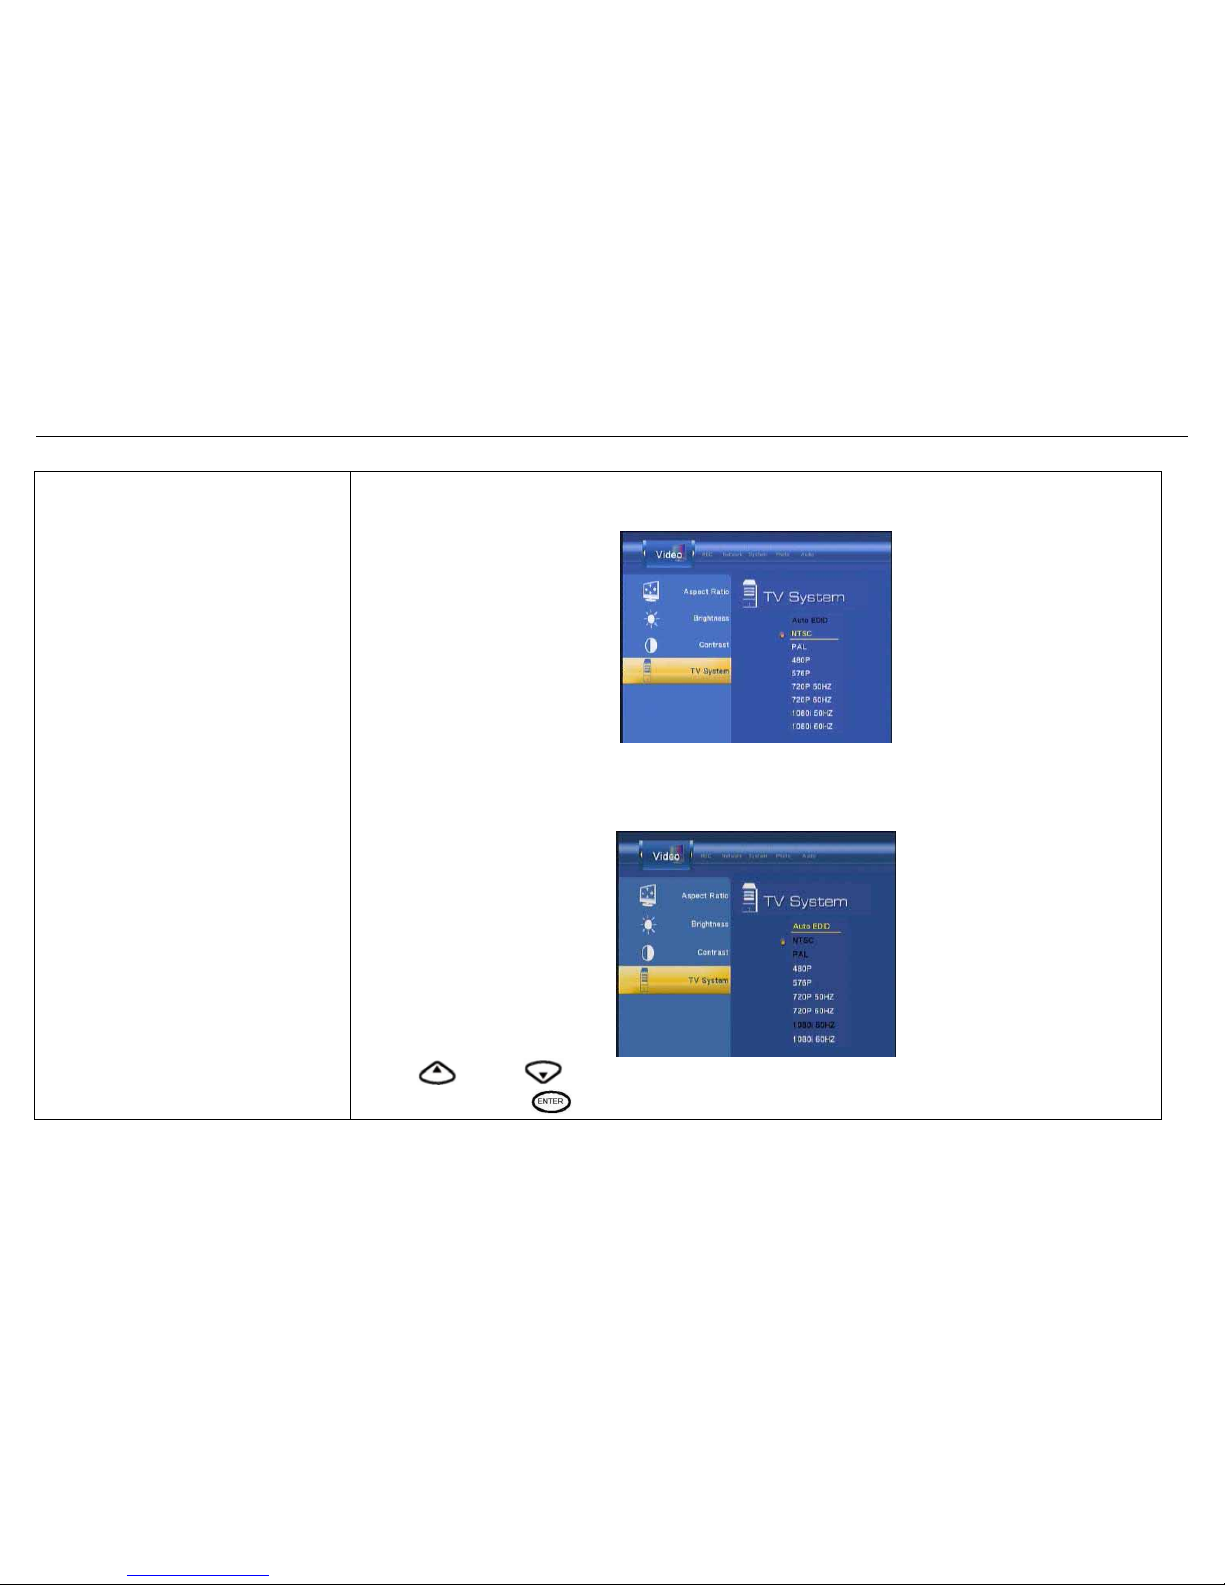
TV System
Select to adjust TV system.
When insert HDMI TV, TV System only choose
Auto EDID, 480P, 576P, 720P 50HZ, 720P 60HZ and 1080i 60HZ.
Press
and to set the HD Resolution, depending on your viewing
preferences. Press
to confirm.
Page 45
BM3030 Multimedia Player User Manual
44
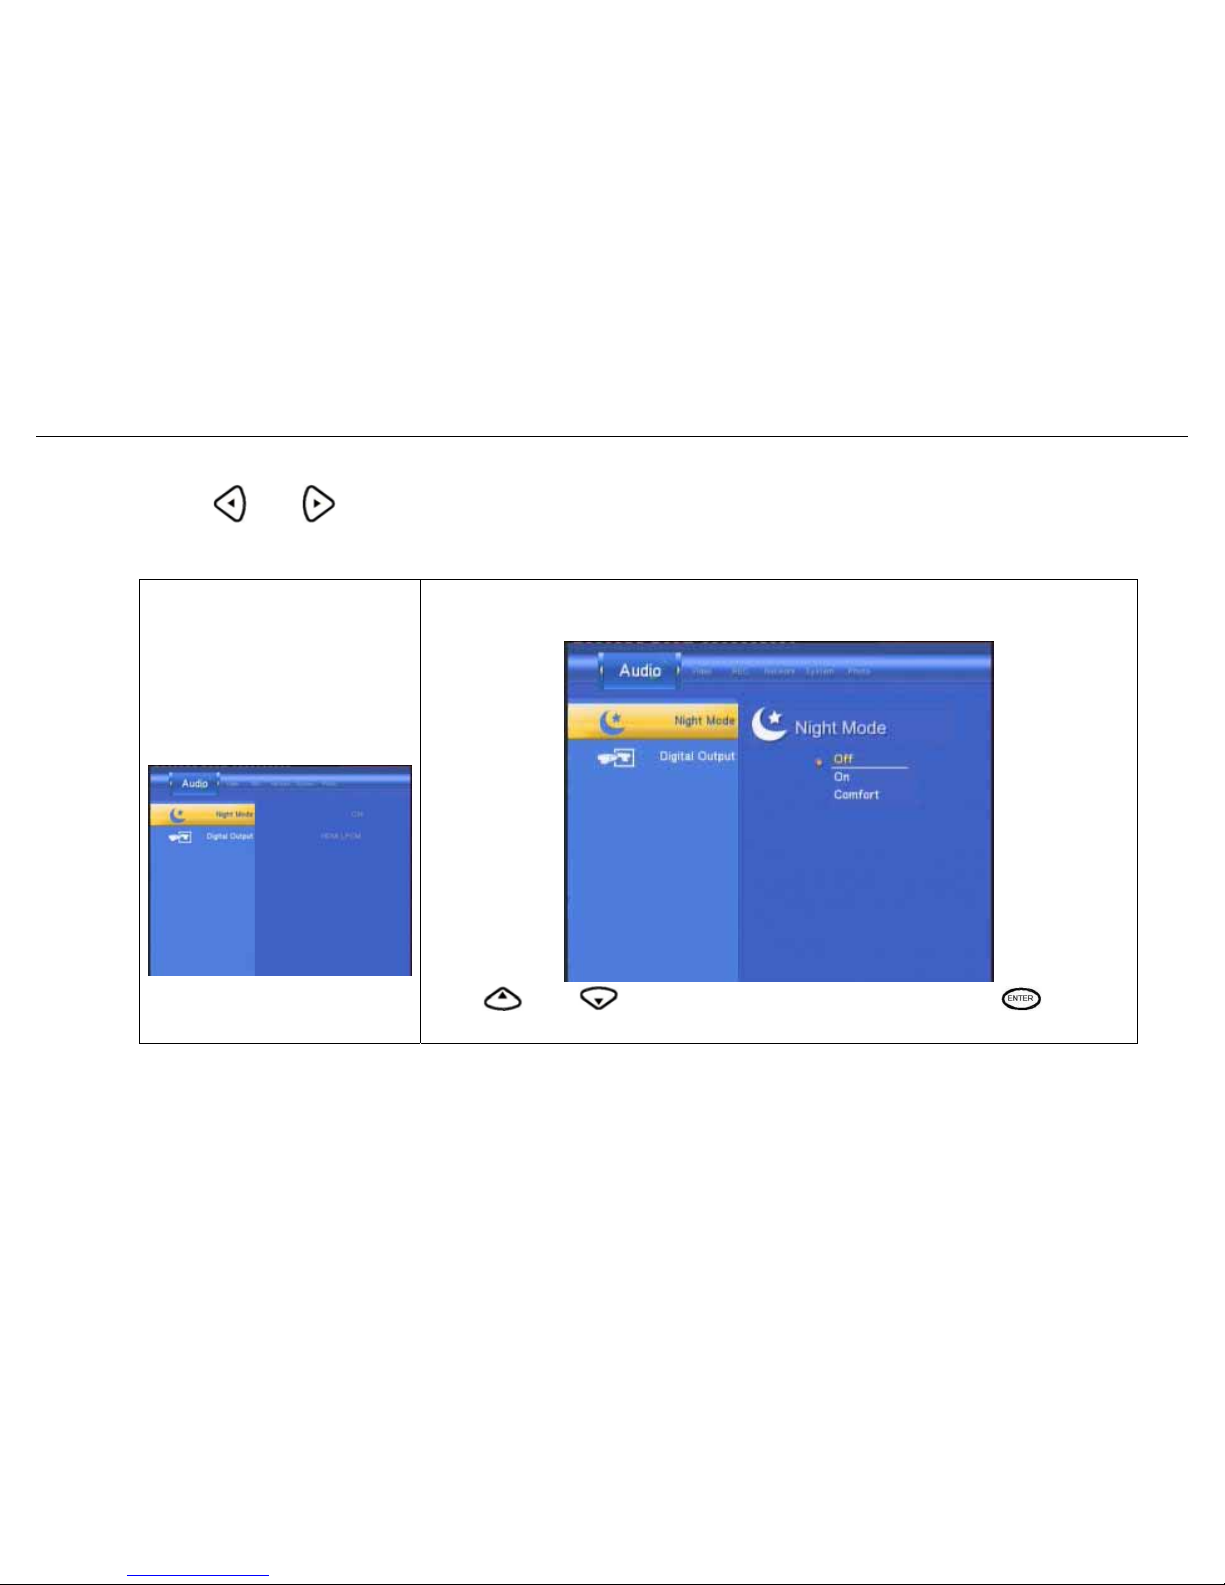
3.6.3 Changing Audio Settings
Press and on the remote control to select the Audio tab from the menu bar.
Night Mode
Select to toggle Night Mode on and off.
This function reduces the maximum dynamic audio range.
Press
and to enable or disable the function. Press to
confirm.
Page 46
BM3030 Multimedia Player User Manual
45
Select to set Digital output type.
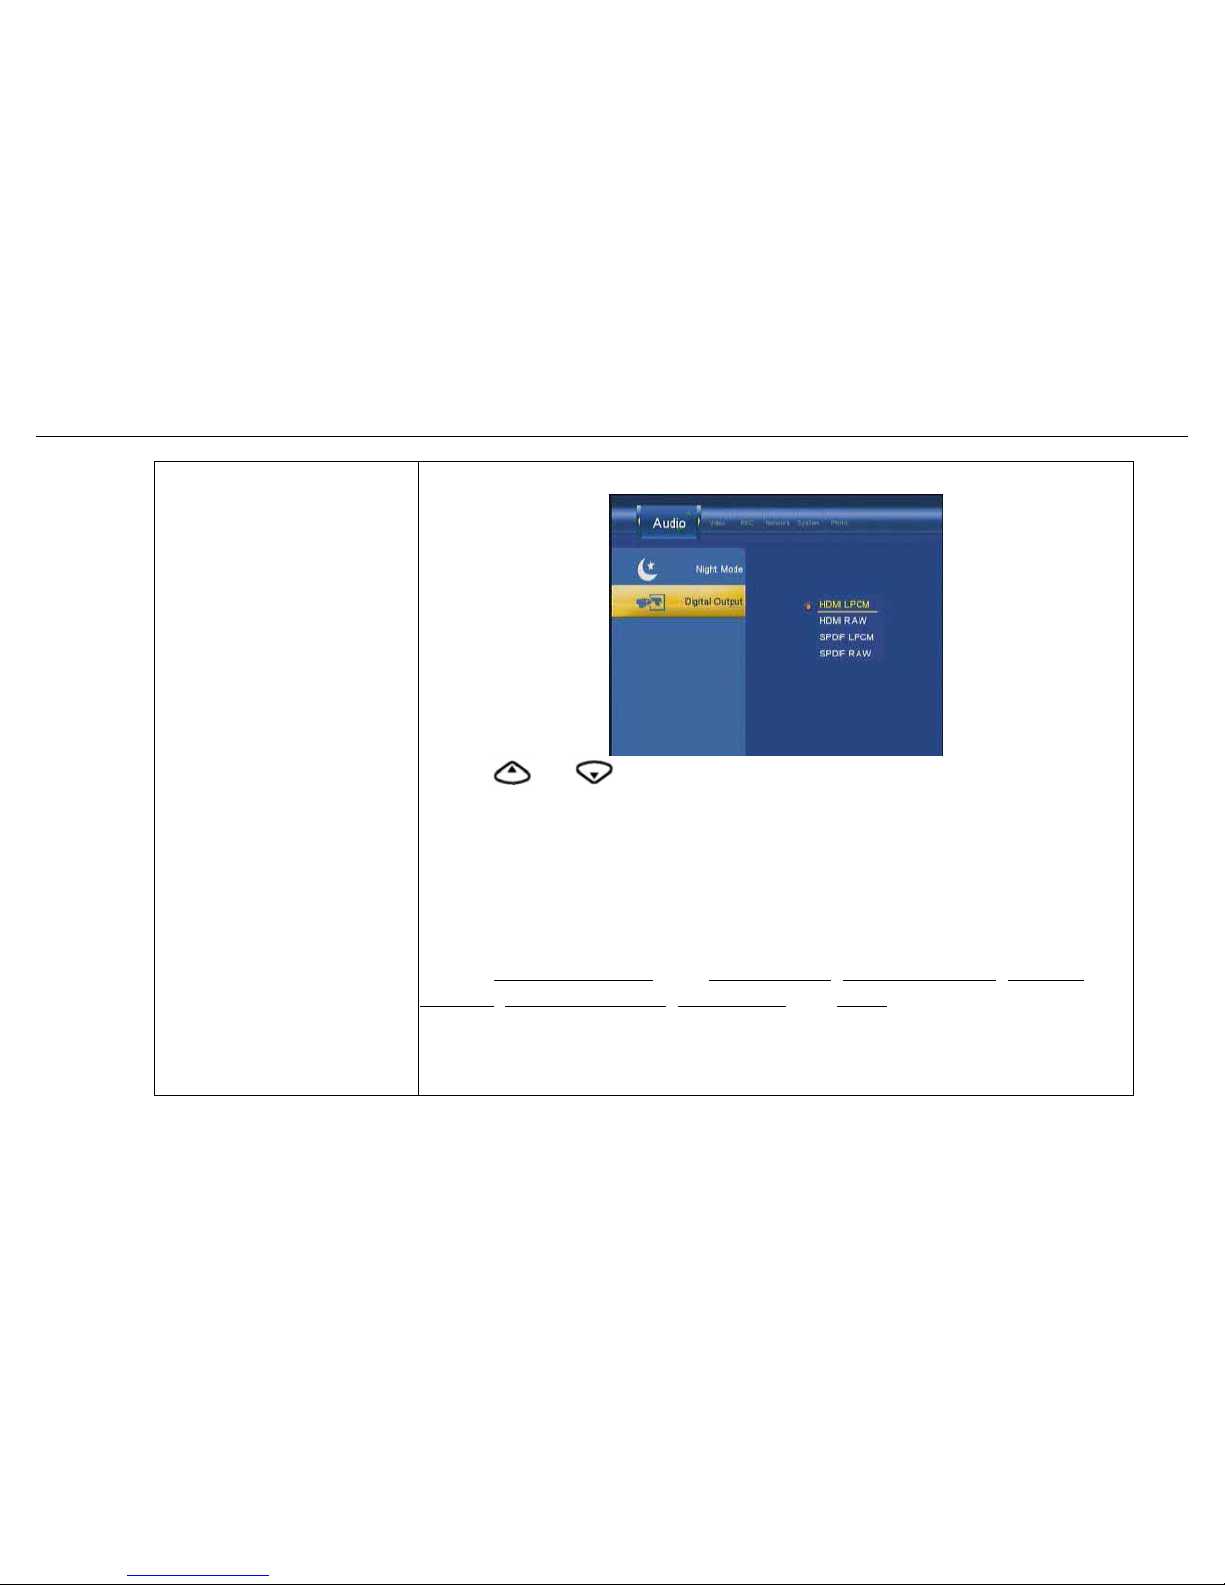
Press
or to select from HDMI and SPDIF RAW or LPCM.
S/PDIF (Sony/Phillips Digital Interface Format) carries digital audio signals
between the DVD recorder and other component devices, such as a home
theater setup with surround sound.
The HDMI (High Definition Multimedia Interface) is a compact
audio/video connector interface for transmitting uncompressed digital
streams. It represents a digital alternative to consumer analog standards
such as Radio Frequency
(RF) coaxial cable, composite video, S-Video,
SCART
, component video, D-Terminal, and VGA.
RAW data is the original bit stream and will provide a better audio output
quality.
LPCM is the default setting, and provides 2 channels audio output.
Page 47
BM3030 Multimedia Player User Manual
46
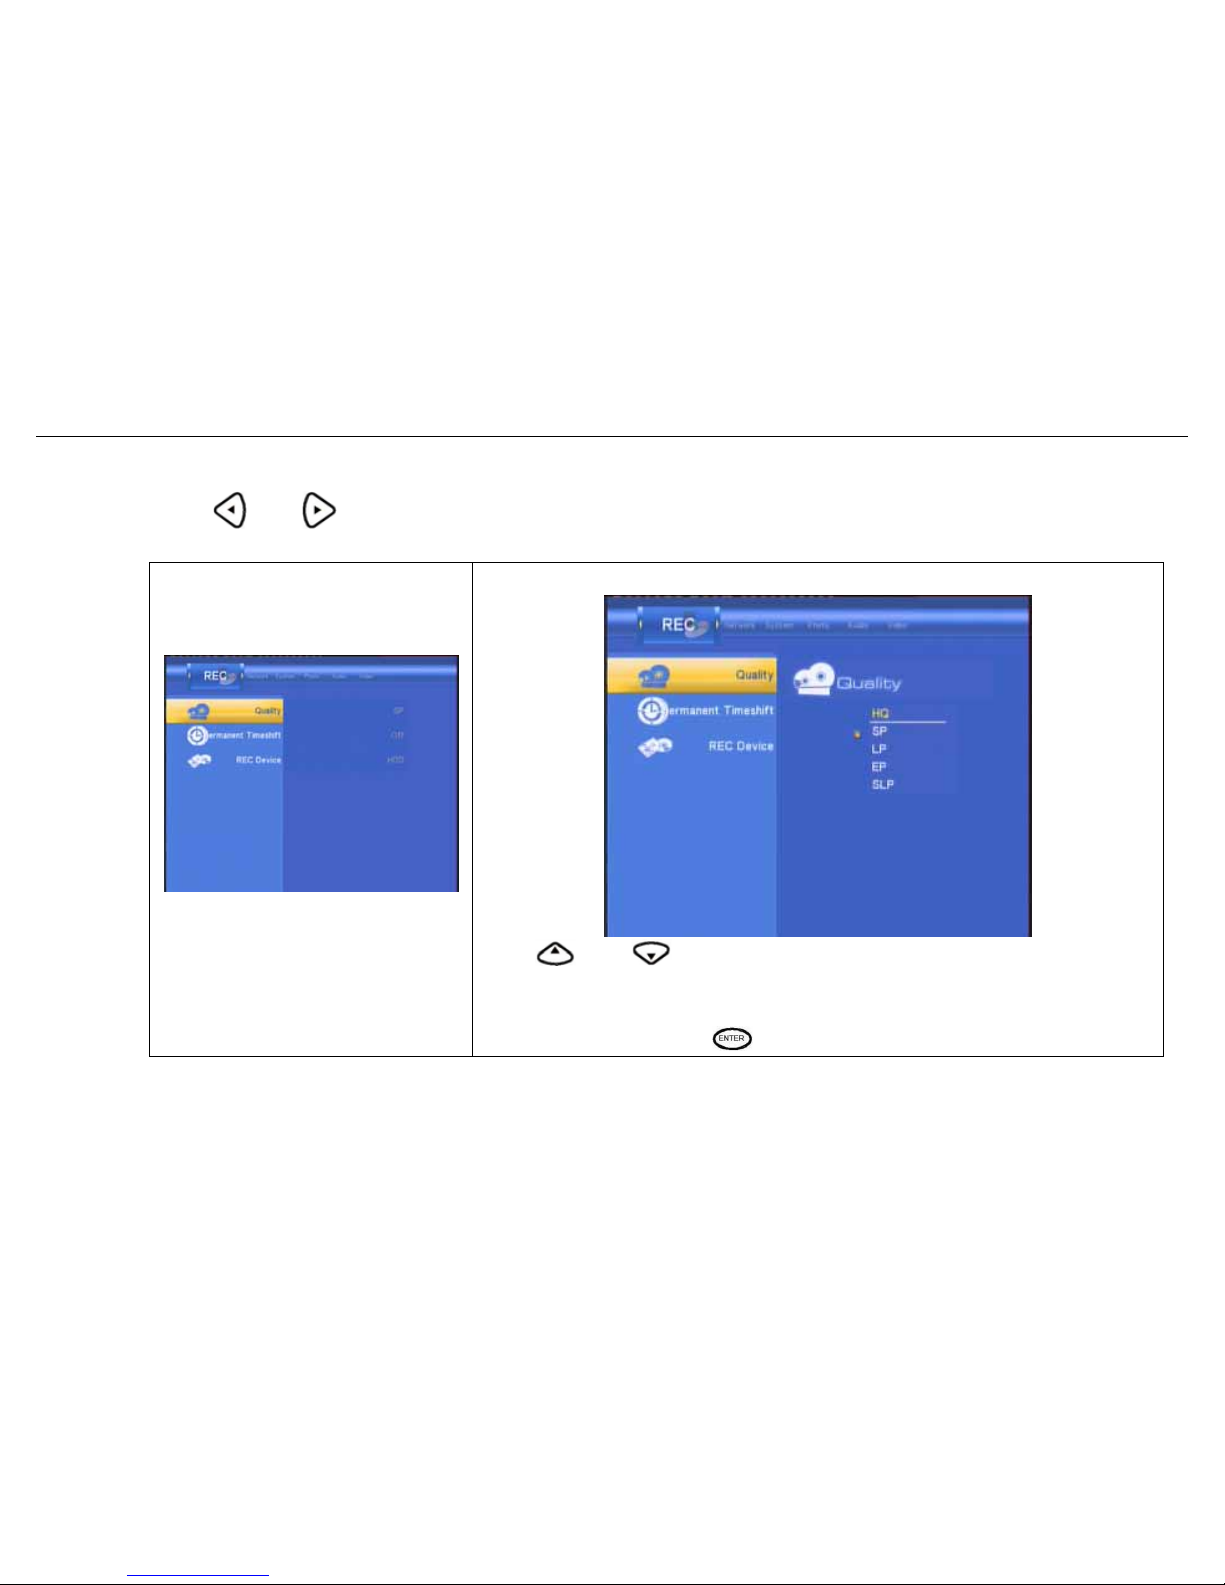
3.6.4 Changing Record Settings
Press
and on the remote control to select the Record tab from the menu bar.
Quality
Select to set the default recording quality setting.
Press
and to select the quality setting you require.
The highest quality setting is HQ which requires the most storage space.
The other settings reduce recording quality sequentially but also require
less storage space. Press
to confirm.
Page 48
BM3030 Multimedia Player User Manual
47
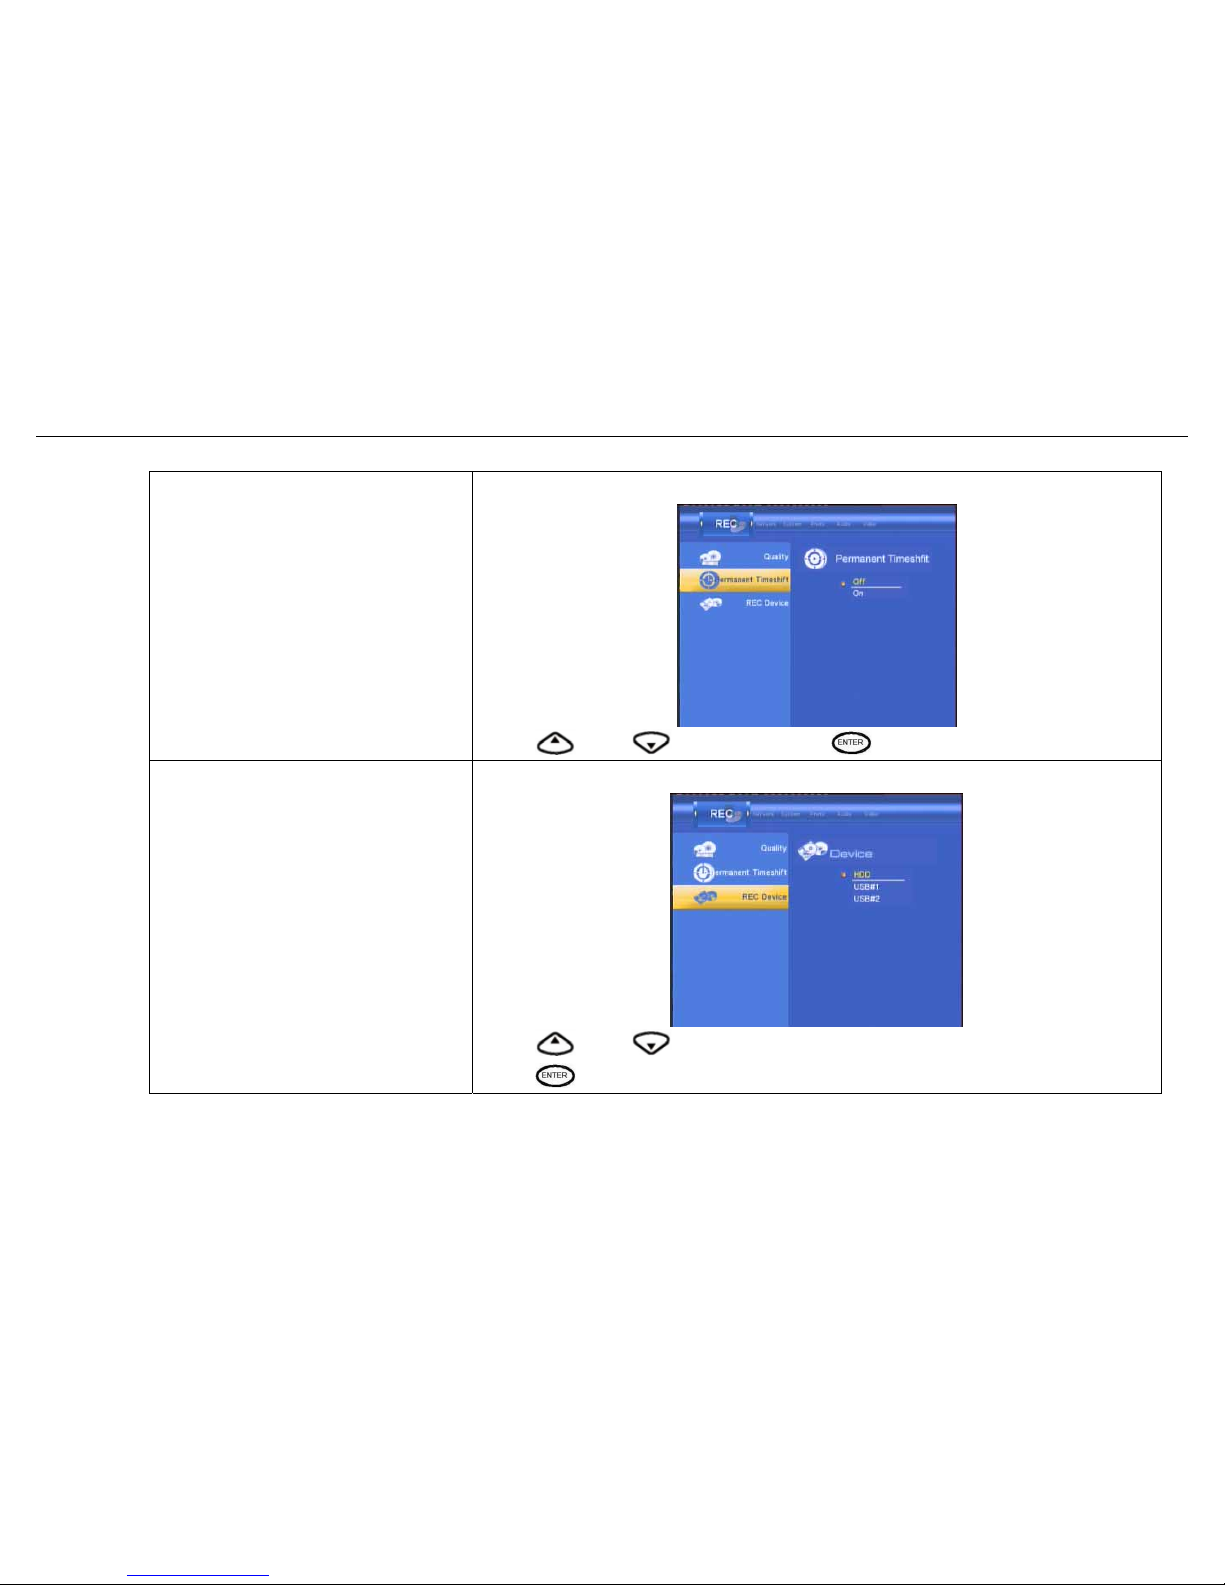
Permanent time shift
Select to set the Permanent time shift on or off.
Press
and to select. Press to confirm.
Record Device
Select to choose the device to which to record.
Press
and to select to record on either HDD or USB.
Press
to confirm.
Page 49
BM3030 Multimedia Player User Manual
48
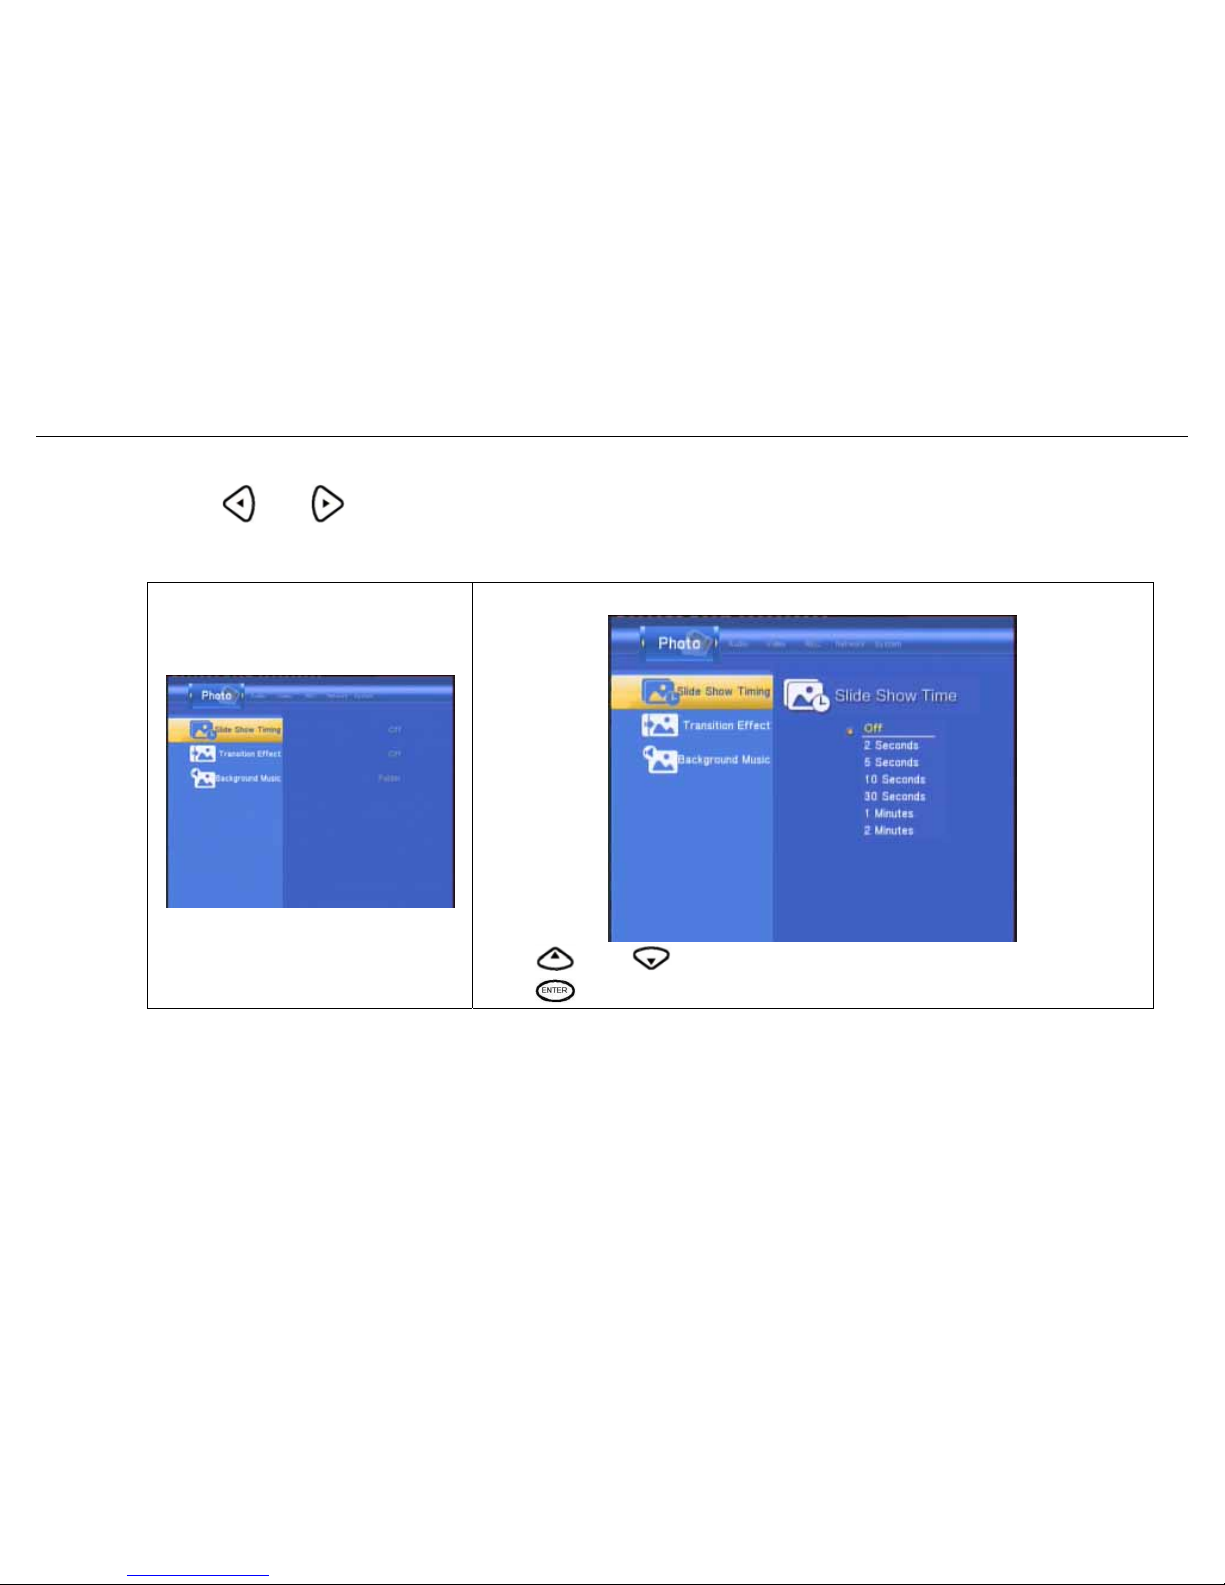
3.6.5 Changing Photos Settings
Press and on the remote control to select the Photos tab from the menu.
Slide Show Time
Select to set slide show time.
Press
and to select the interval you require.
Press
to confirm.
Page 50
BM3030 Multimedia Player User Manual
49
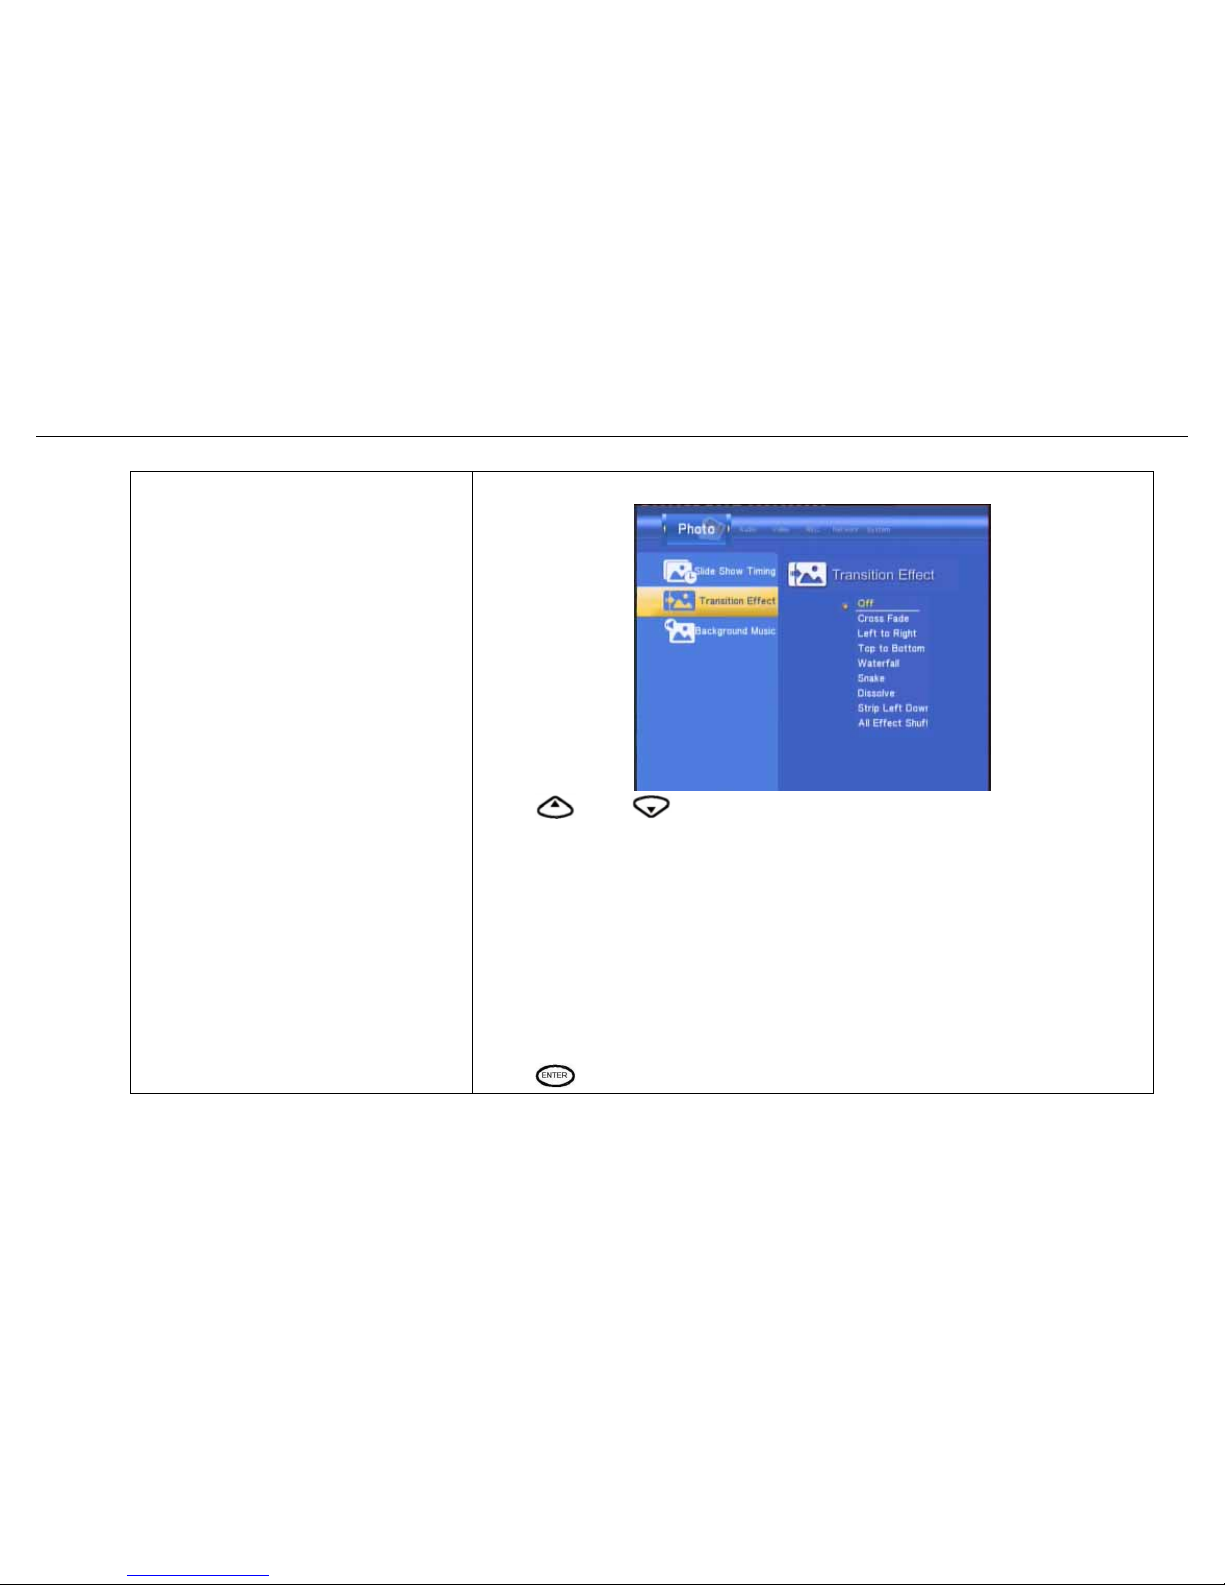
Transition Effect
Select to set the transition effect of photos.
Press
and to select the transform of photo you require:
1) Cross Fade – fade in and fade out
2) Left to Right- from left to right
3) Top to Bottom- from top to bottom
4) Waterfall--like a steep descent of water from a height
5) Snake – like snake motion
6) Dissolve – like water dissolve
7) Strip Left Down – like strip cover from top of left to bottom of right
8) All Effect Shuffle – shuffle in and out
Press
to confirm.
Page 51
BM3030 Multimedia Player User Manual
50
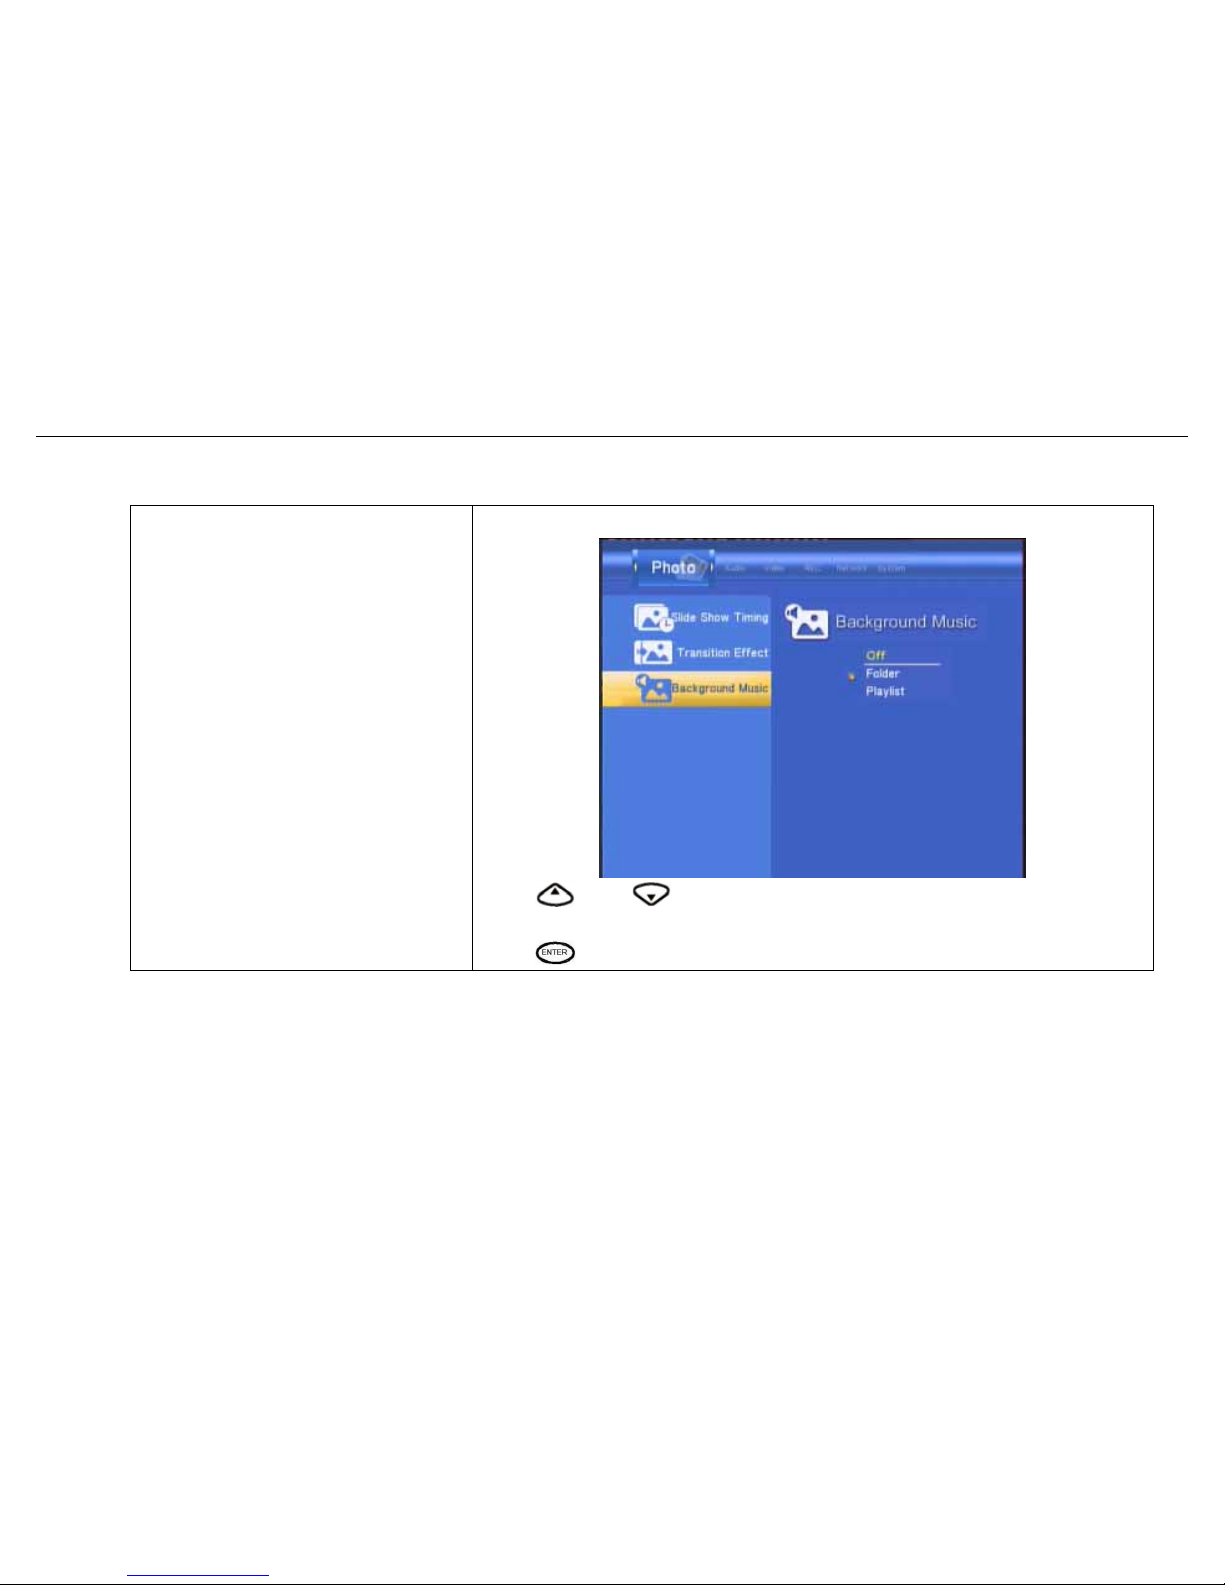
Background Music
Select to play the music file under the same folder.
Press
and to select the position of the background music.
Select “off” to close the function.
Press
to confirm.
Page 52
BM3030 Multimedia Player User Manual
51
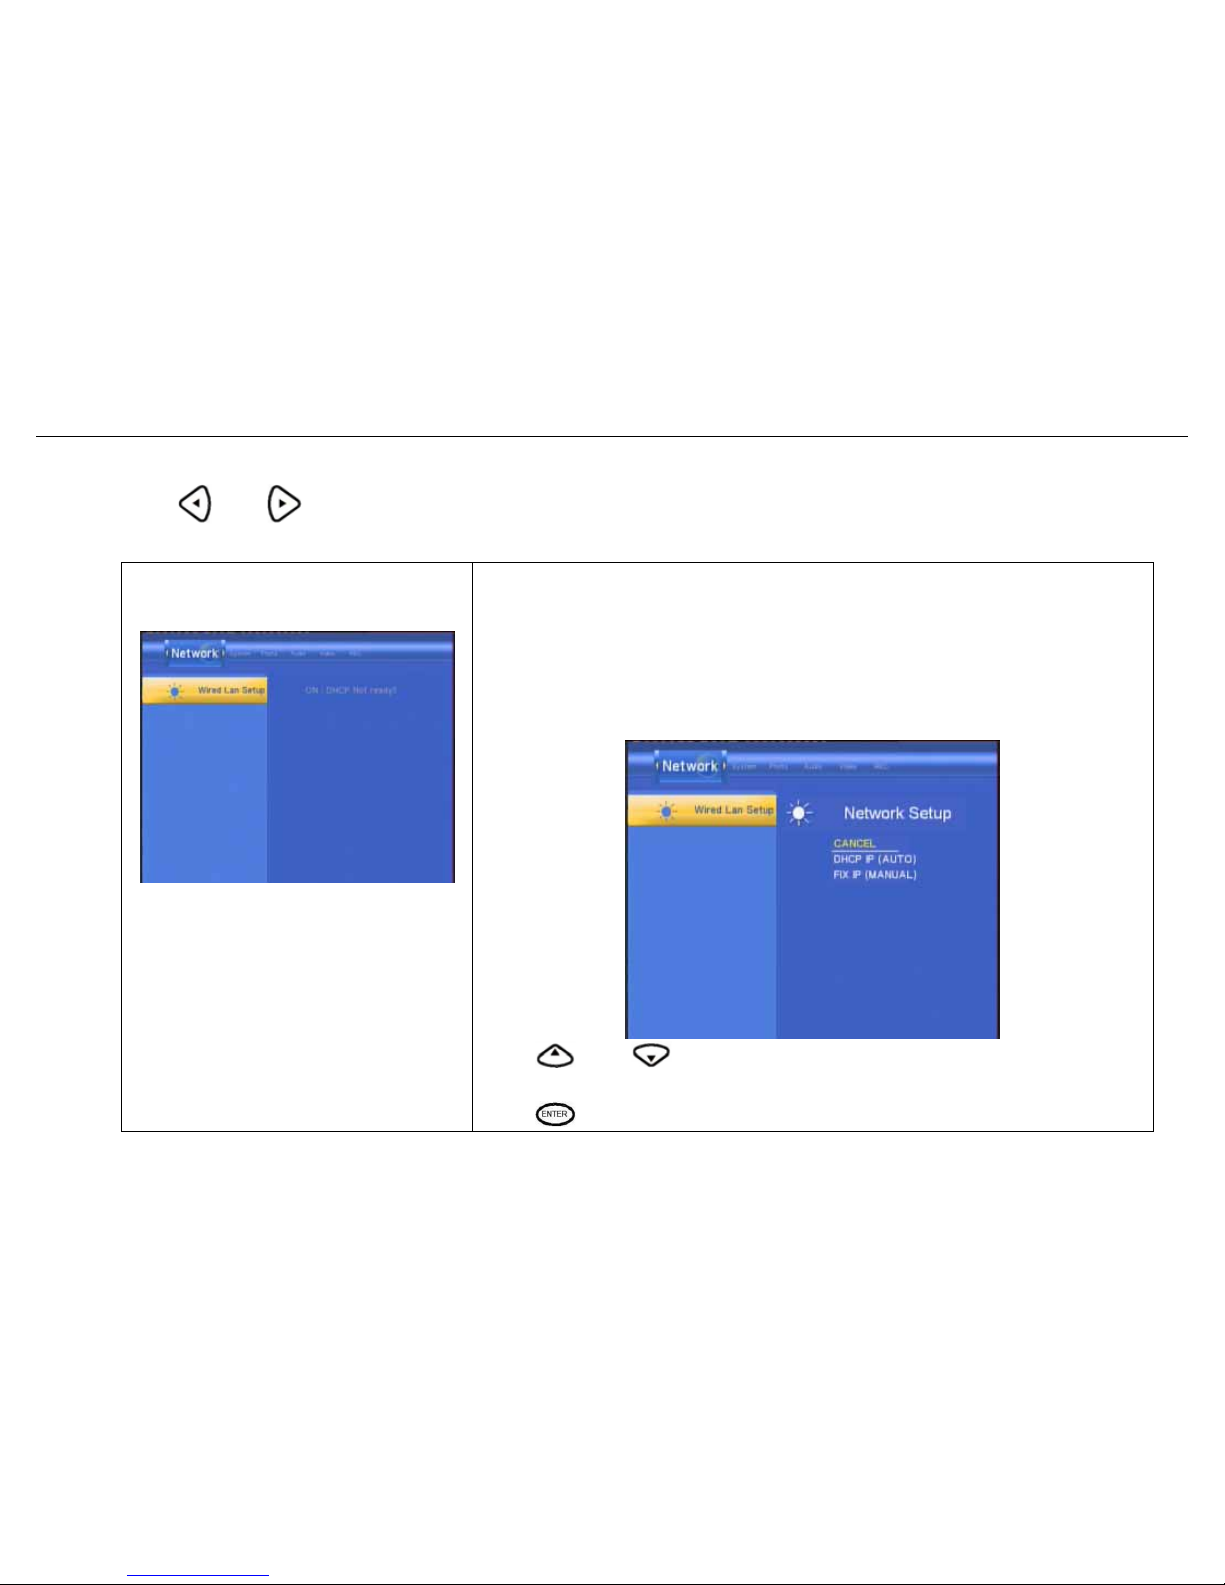
3.6.6 Changing Network Settings
Press and on the remote control to select the Network tab from the menu.
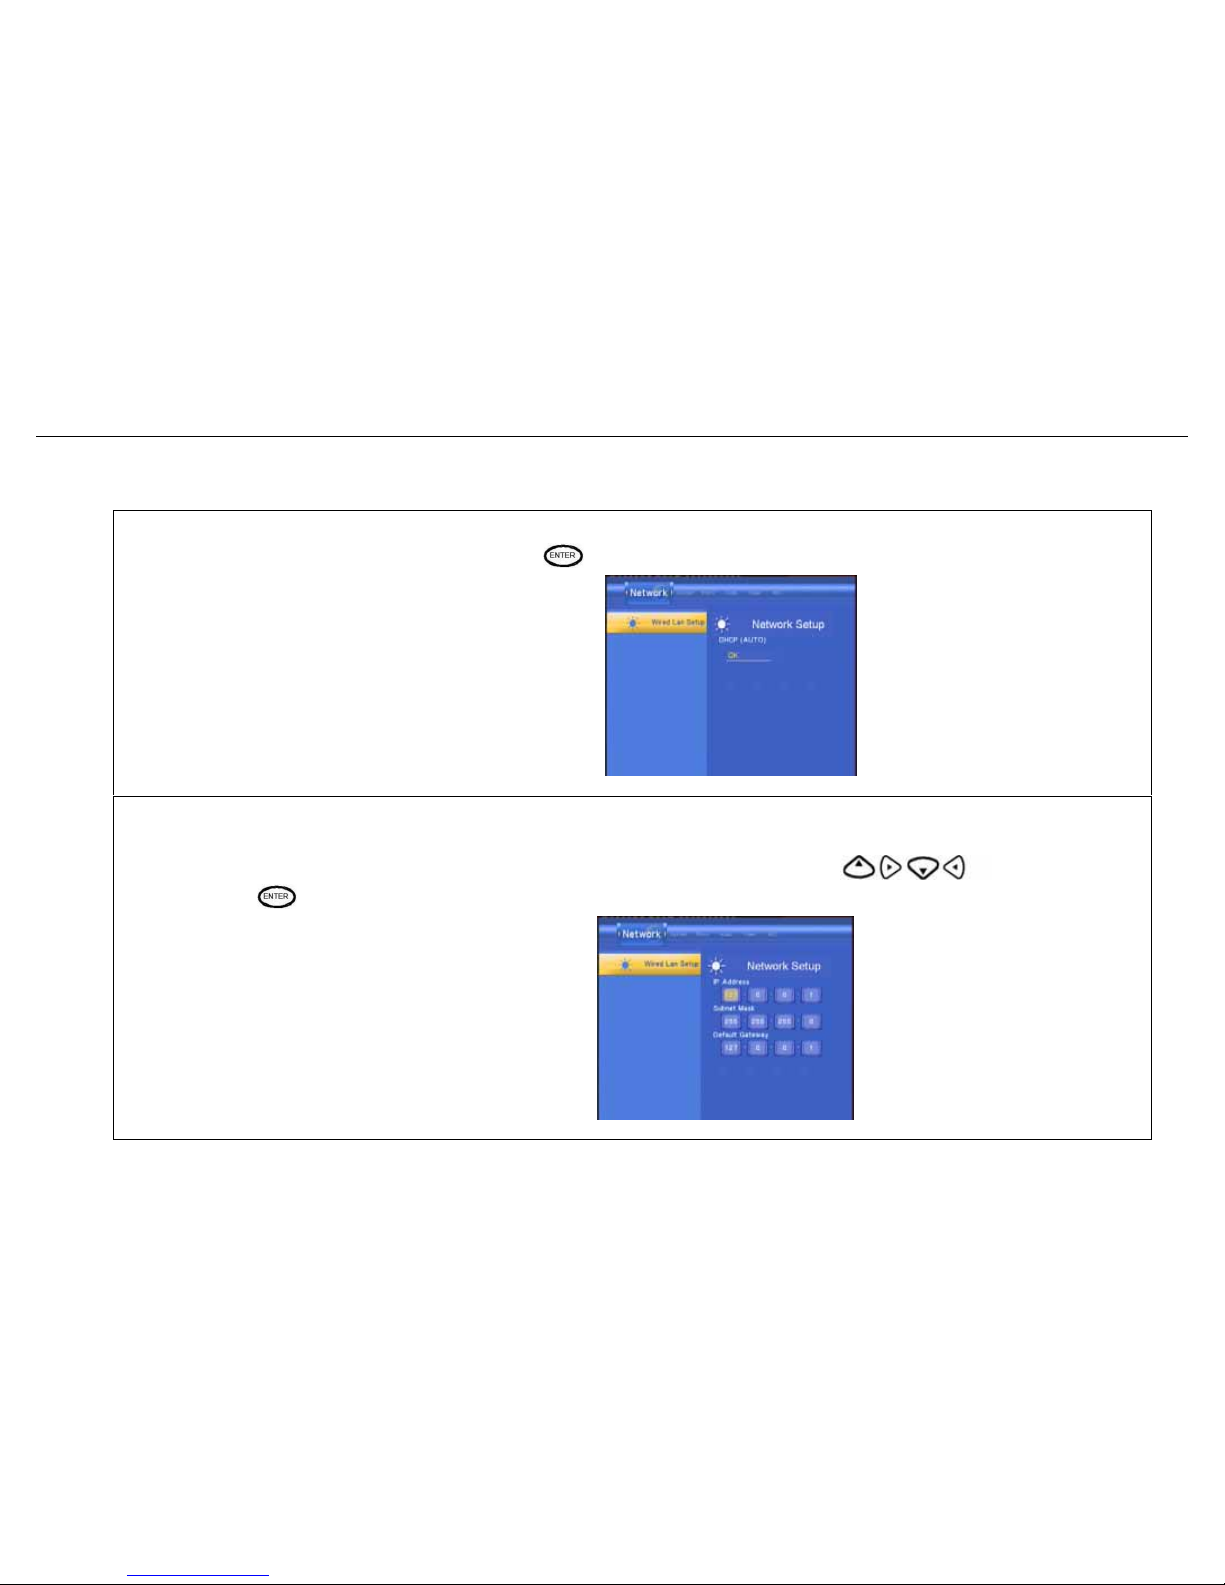
Wired LAN Setup
Select to set the Network Setting. Before use the Network functions,
please check following items:
1) Connect the MKAVHDD to Network first.
2) Please enable NetBIOS of TCP/IP on computer.
3) Please turn off your PC’s firewall.
4) Please share the folders which you wish to browse in your PC.
Press
and to select DHCP (AUTO) or FIXED IP
(MANUAL).
Press
to confirm.
Page 53
BM3030 Multimedia Player User Manual
52
DHCP DNS(AUTO)
Set the DNS server IP address by auto. Press
to confirm.
FIX IP (MANUAL)
Using Fixed IP, it is required to enter followings. IP address, Subnet Mask, Default Gateway. For further
assistant to above settings, please contact to the network administrator. Press
to enter the IP
address. Press
to confirm.
Page 54
BM3030 Multimedia Player User Manual
53
3.7 Browser Menu
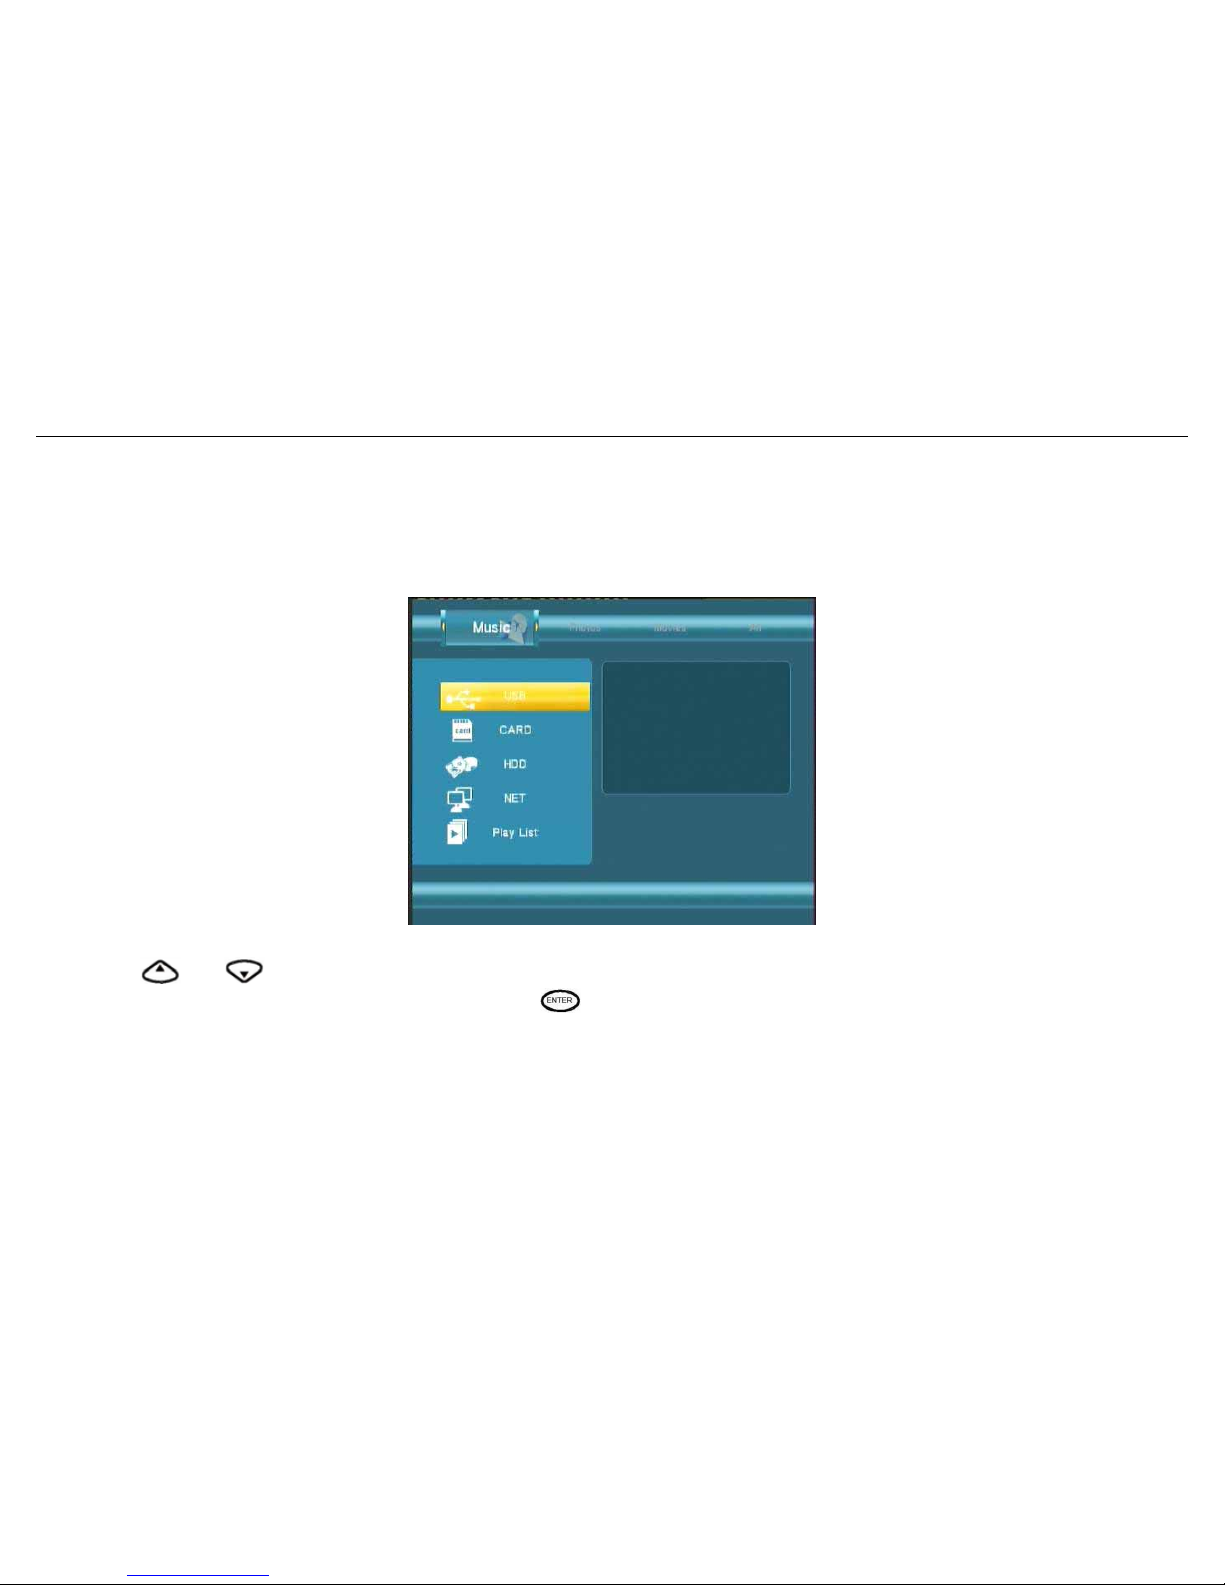
The Browser menu allows you browse and play music, photo and movie files stored on a HDD or an external USB
device and Card reader, Network. To enter the menu, select Browser from the Guide menu.
Press and to select the device on which the media is stored. Choose from HDD, USB (for media stored on an
external flash disk), Card reader, NET and press
.
When data on HDD, USB device or Card reader is connected the system to Network, you can also browse photos,
listen to MP3 files, and watch videos.
Page 55
BM3030 Multimedia Player User Manual
54
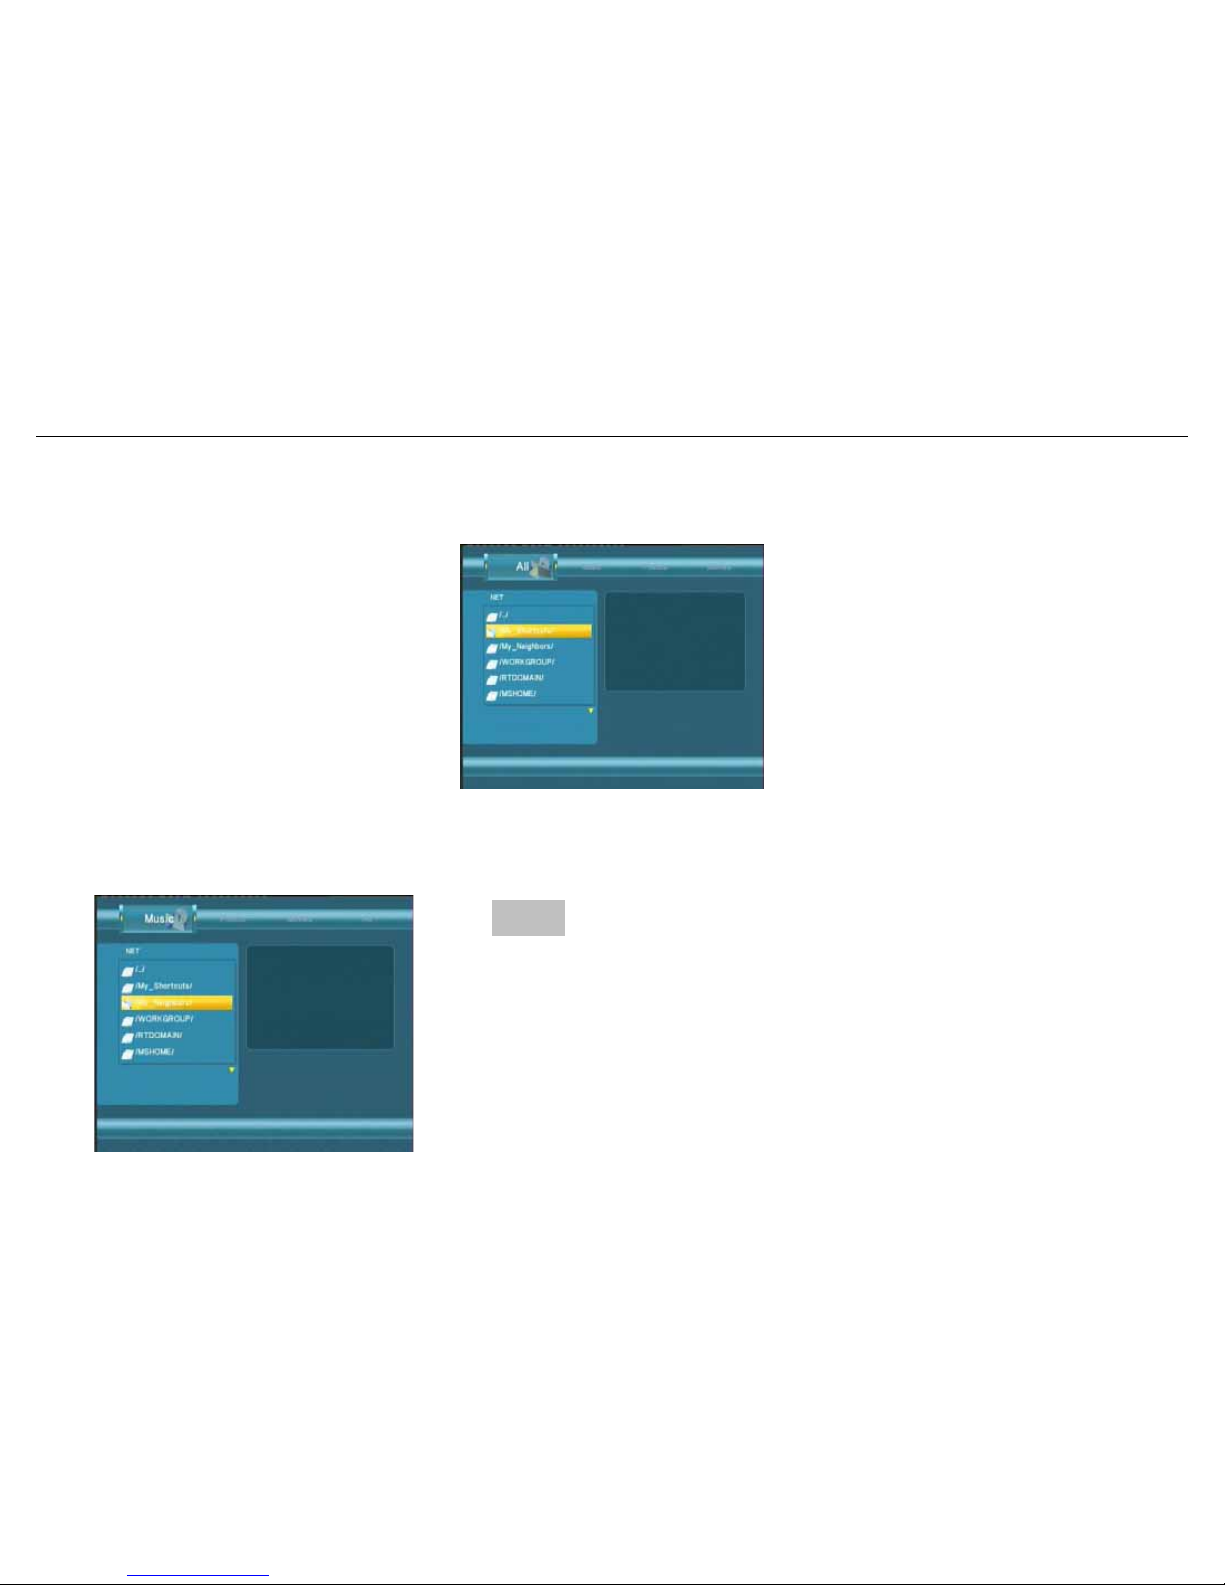
My Short Cut
When you are browsing NET, you can choose the PC name from the menu or you can set “Specific File Server IP”
and access it from “My Short Cut” in the menu.
My Neighbors
When you are browsing NET and installing “Transcode Server” in your PC. You can choose the PC name from the
menu or you can select “My Neighbors” to access.
Note:
If you install the “Transcode Server” in your PC, the system will
support the H.264*, RMVB*, WMV*, RM*… formats playback
through the NET*.
*All the trademarks belong to their respective owners.
Page 56
BM3030 Multimedia Player User Manual
55
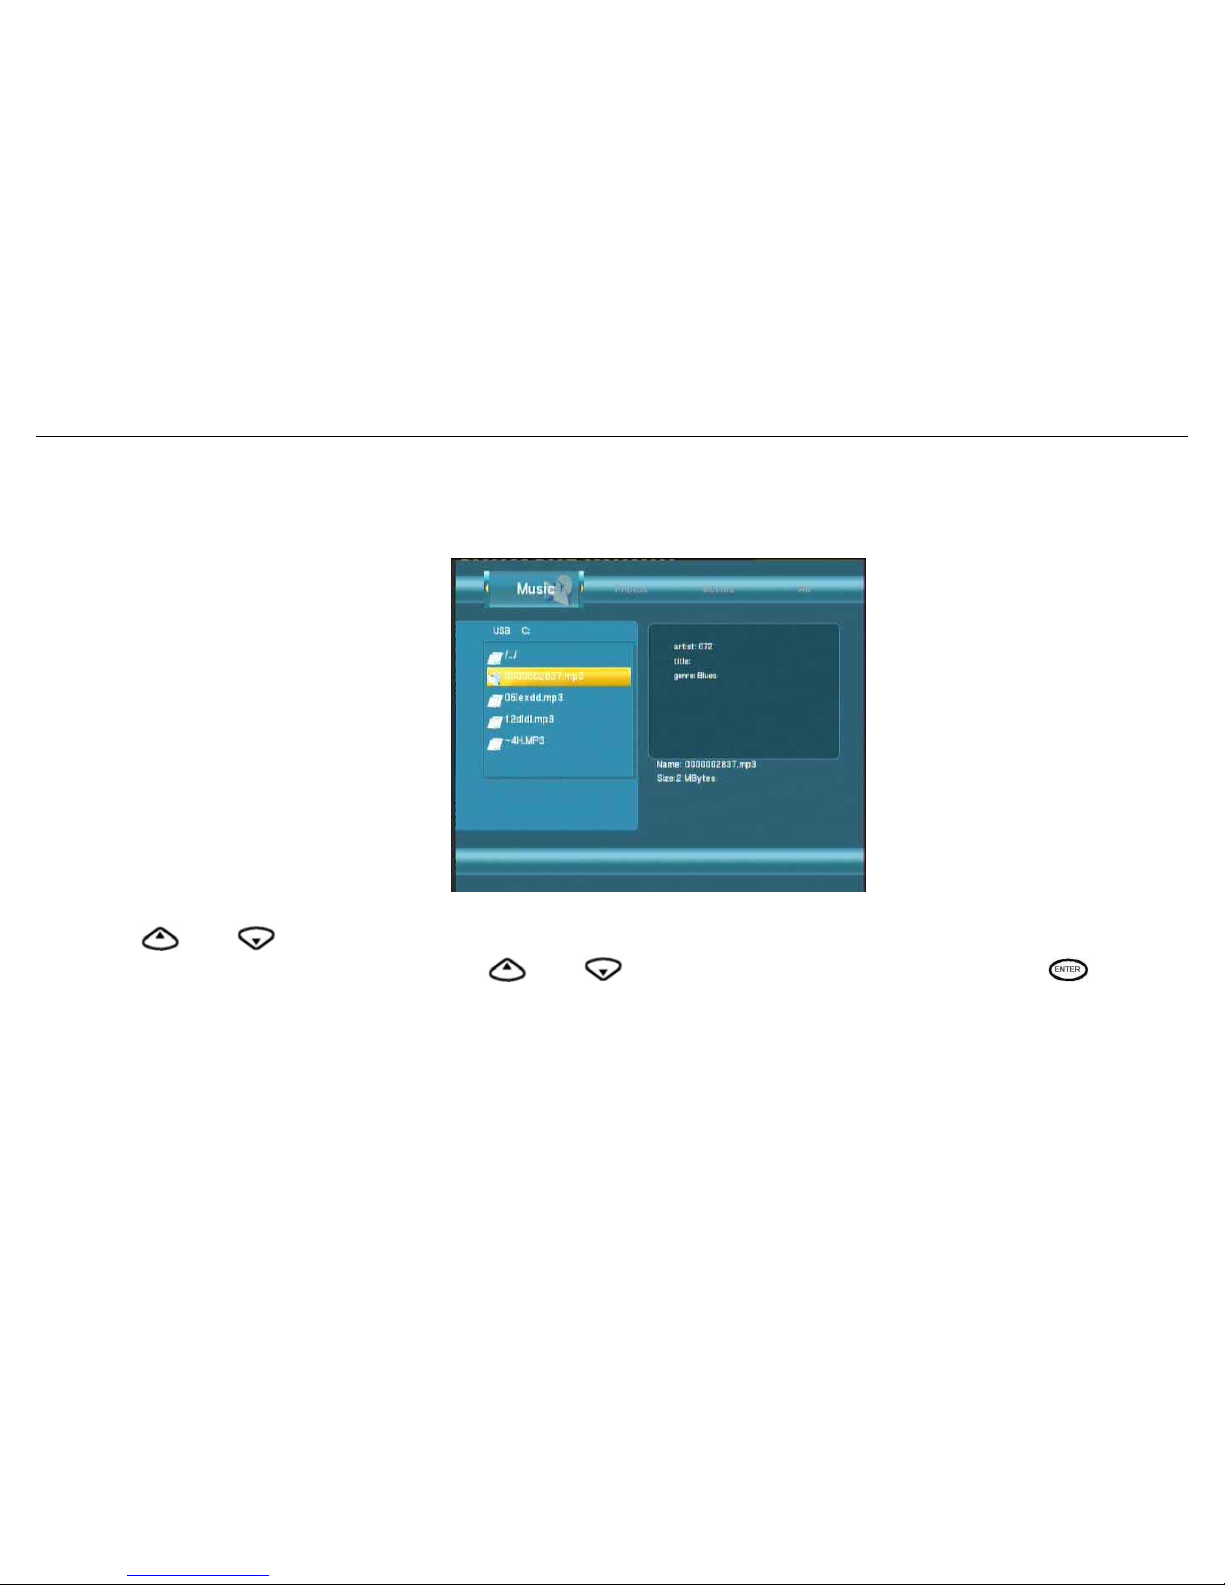
3.7.1 Browsing Music
Use the left and right navigation arrows to select the Music tab.
Press and to select the folder containing your audio files. A thumbnail strip appears at the bottom of the
screen, along with song information. Press
and to select the file you want to play and press .
This browsing music function supports Mp3, WMA, AAC and OGG format Playback.
Page 57
BM3030 Multimedia Player User Manual
56
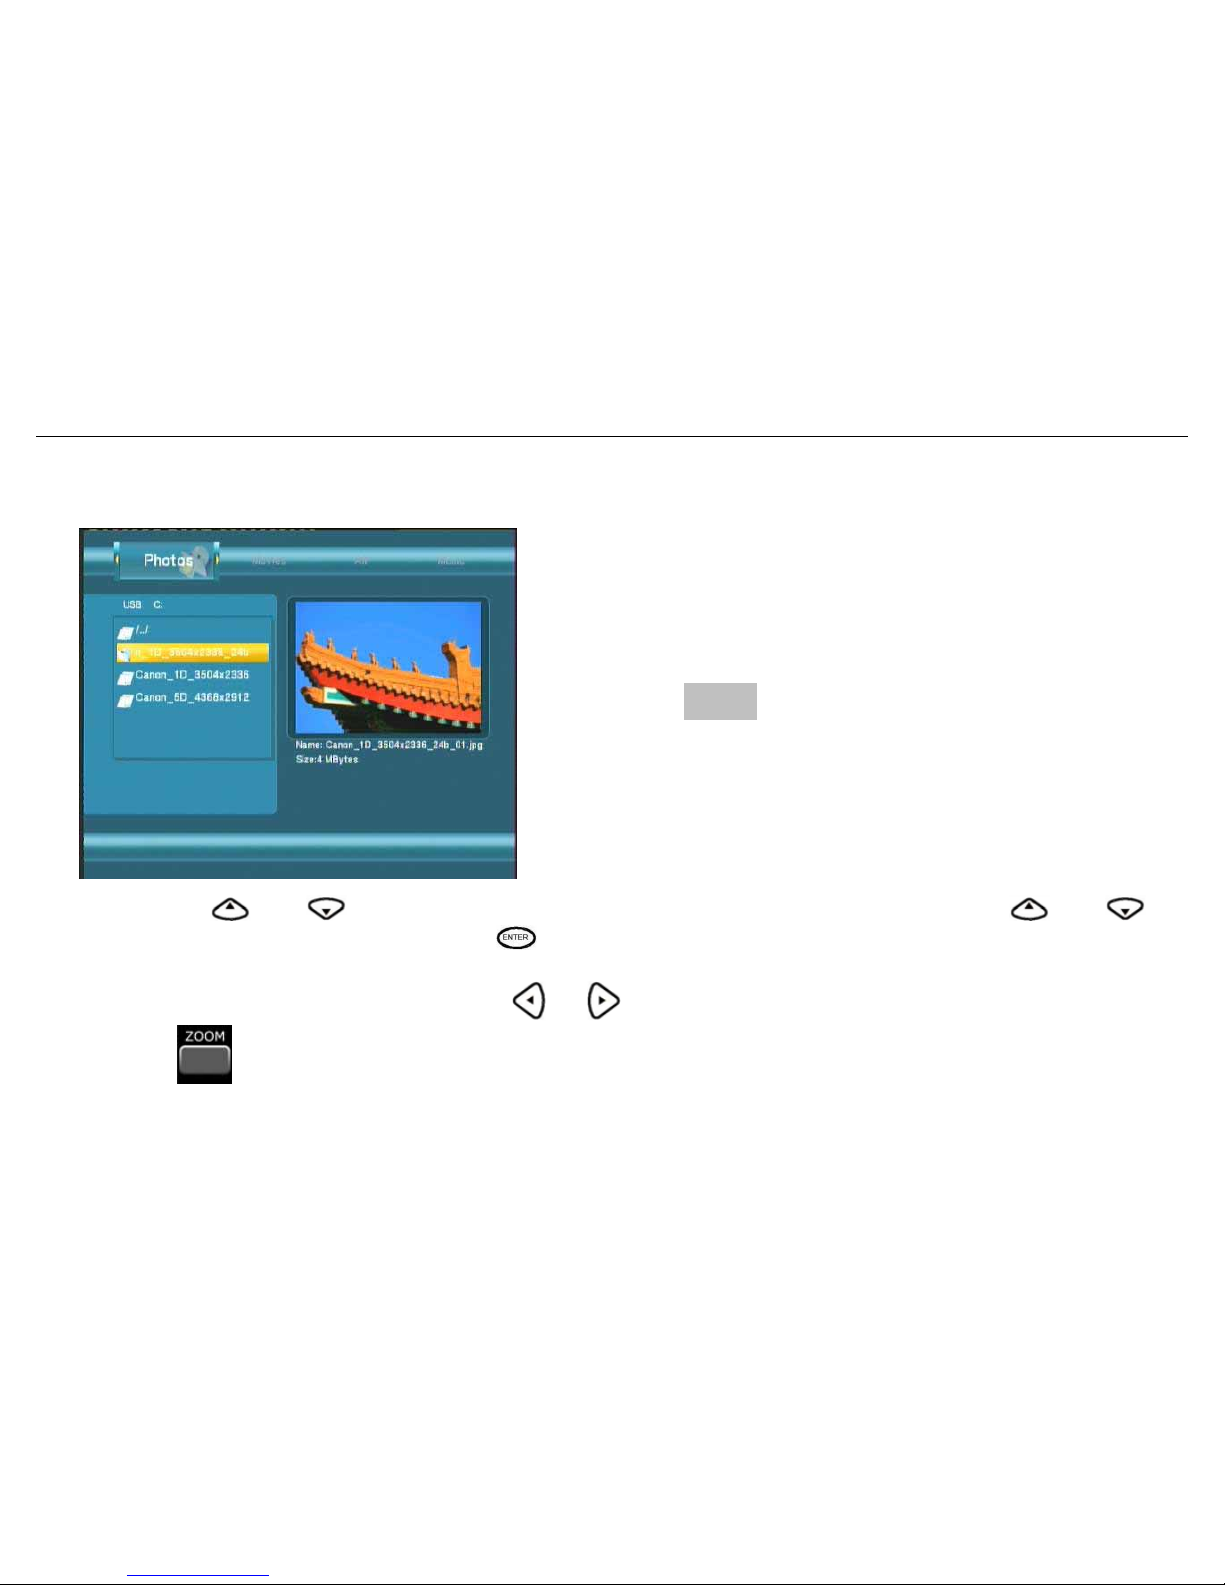
3.7.2 Browsing Photos
Use the left and right navigation arrows to select the Photos tab.
Press and to select the folder containing your photo files. Enter the folder press and to
select the photo you want to view and press
, the photo will be displayed full screen.
While browsing a photo, you can press
or to rotate a photo in any angle. Besides rotating a photo, you
can press to zoom in/out that photo, three zoom levels are available.
This browsing photos function supports High Definition Photo (JPG, PEG and BMP) Playback.
Note:
1. When the photo is displayed in full screen mode,
the slide show starts automatically.
2. While listening to MP3 files, you can browse the
photos at the same time.
Page 58
BM3030 Multimedia Player User Manual
57
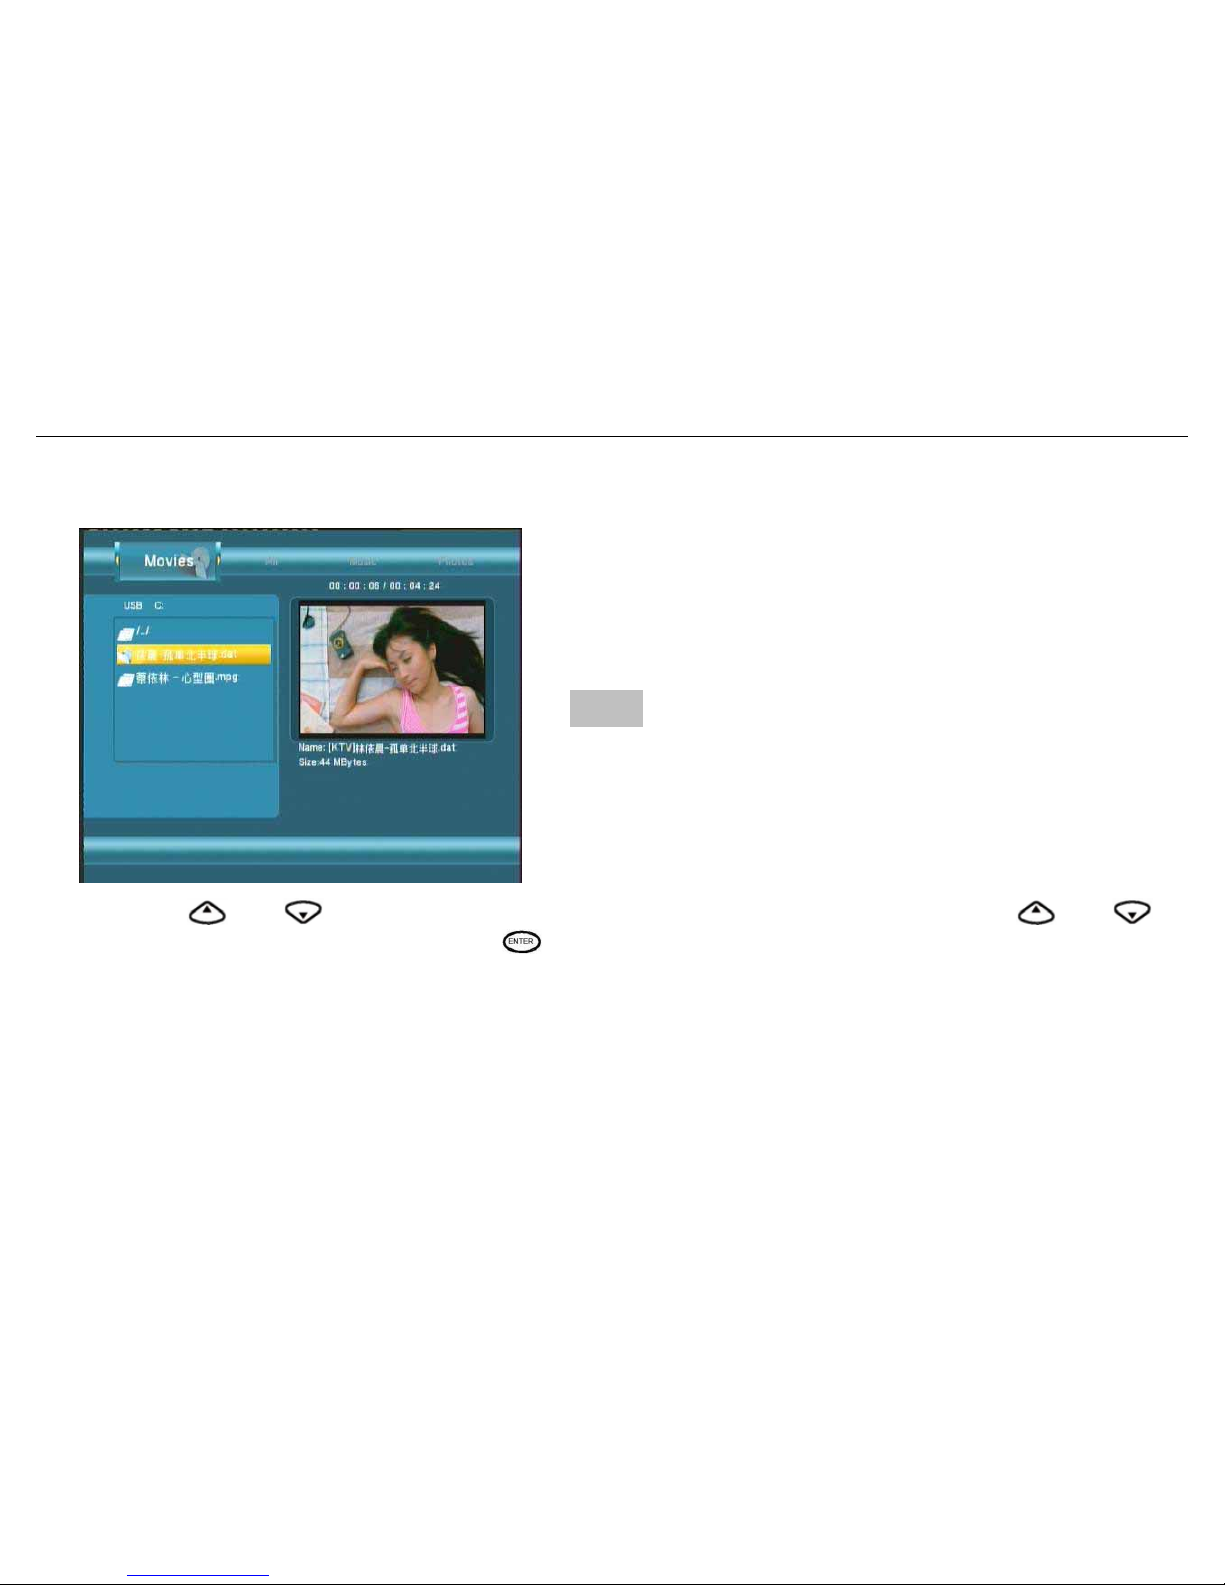
3.7.3 Browsing Movies
Use the left and right navigation arrows to select the Movies tab.
Press and to select the folder(s) containing your movie files. Enter the folder press and to
select the movie you want to view and press
. The movie is played full screen.
This browsing movies function supports High Definition Video (720P, 1080i) Playback.
For example:
1. MPEG1(DAT ,MPG)
2. MPEG2(VOB, MPG, TS)
3. MPEG4(AVI,DIVX,XVID)
Note:
When play the HD Video, you can adjust HD Video output
to as same as movie resolution.
See “HD Output of SETUP menu” for more details.
Page 59
BM3030 Multimedia Player User Manual
58
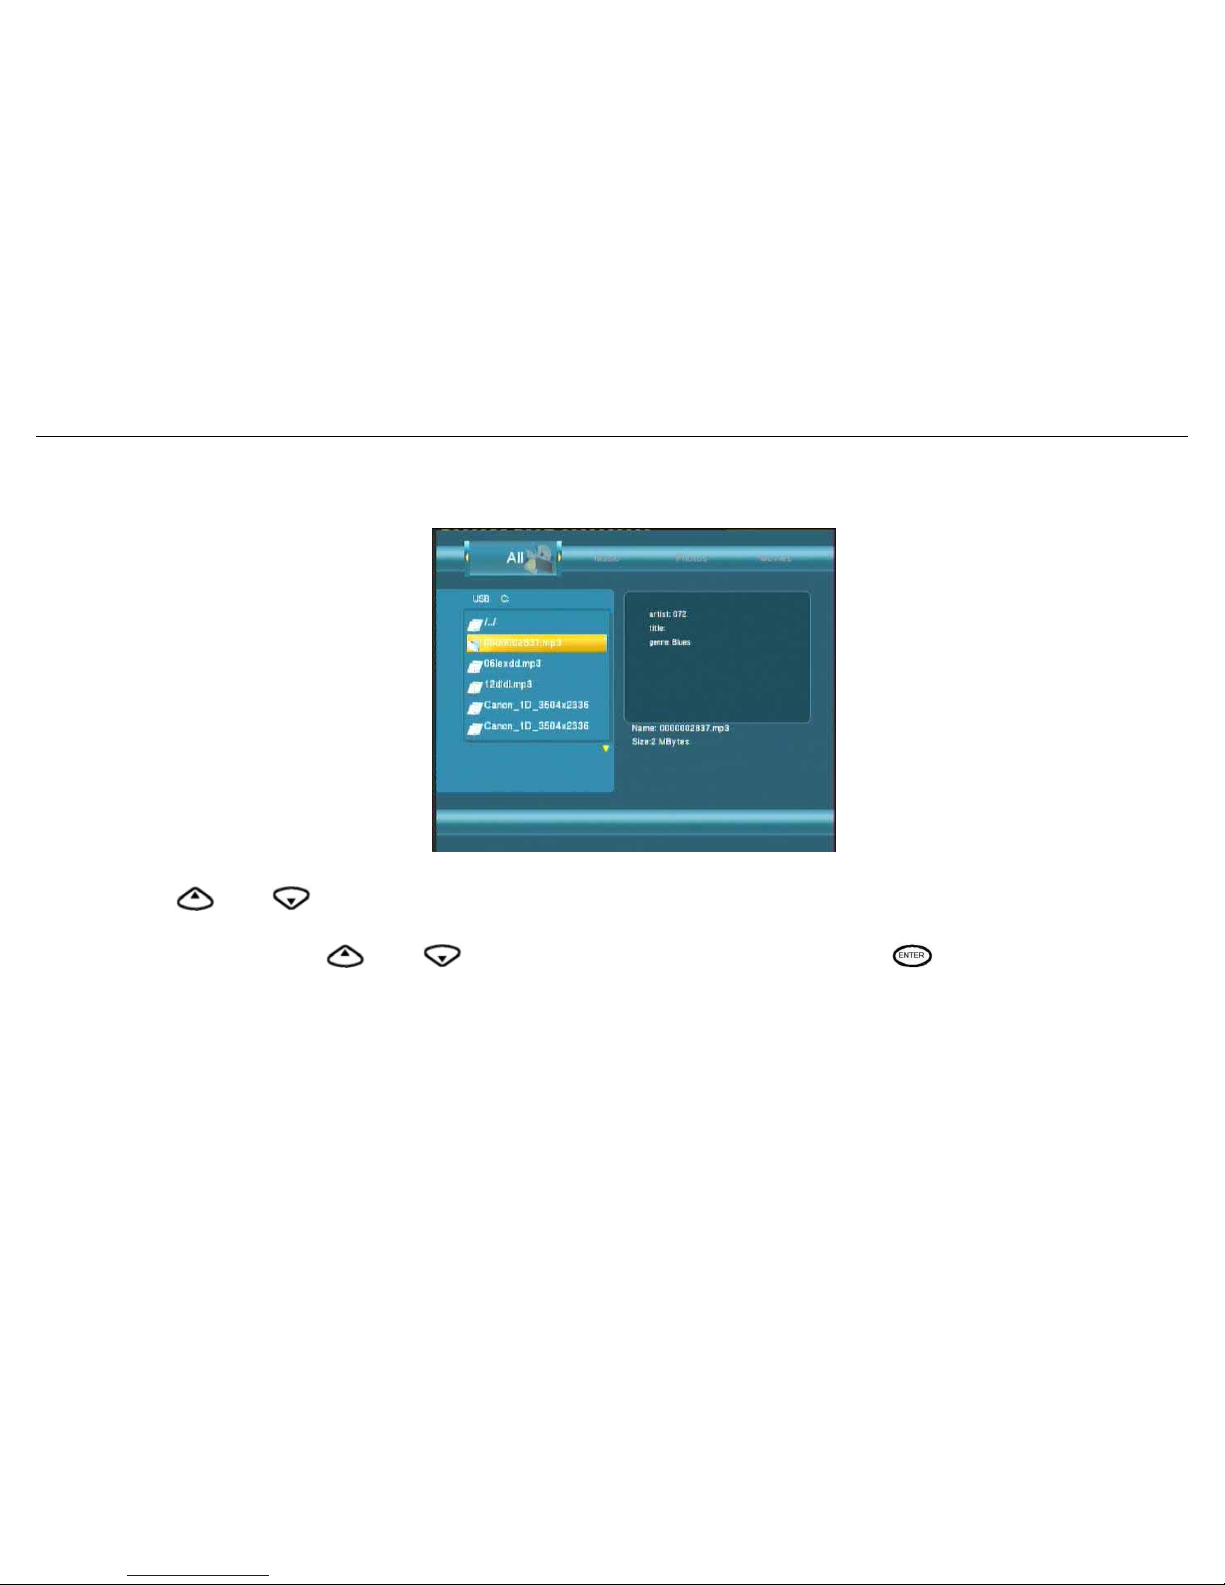
3.7.4 Browsing All
Use the left and right navigation arrows to select the “All” tab.
Press and to select the folder(s) containing your all files (Beside Music, Photo and Movie).
Enter the folder press
and to select the file you want to view and press to play.
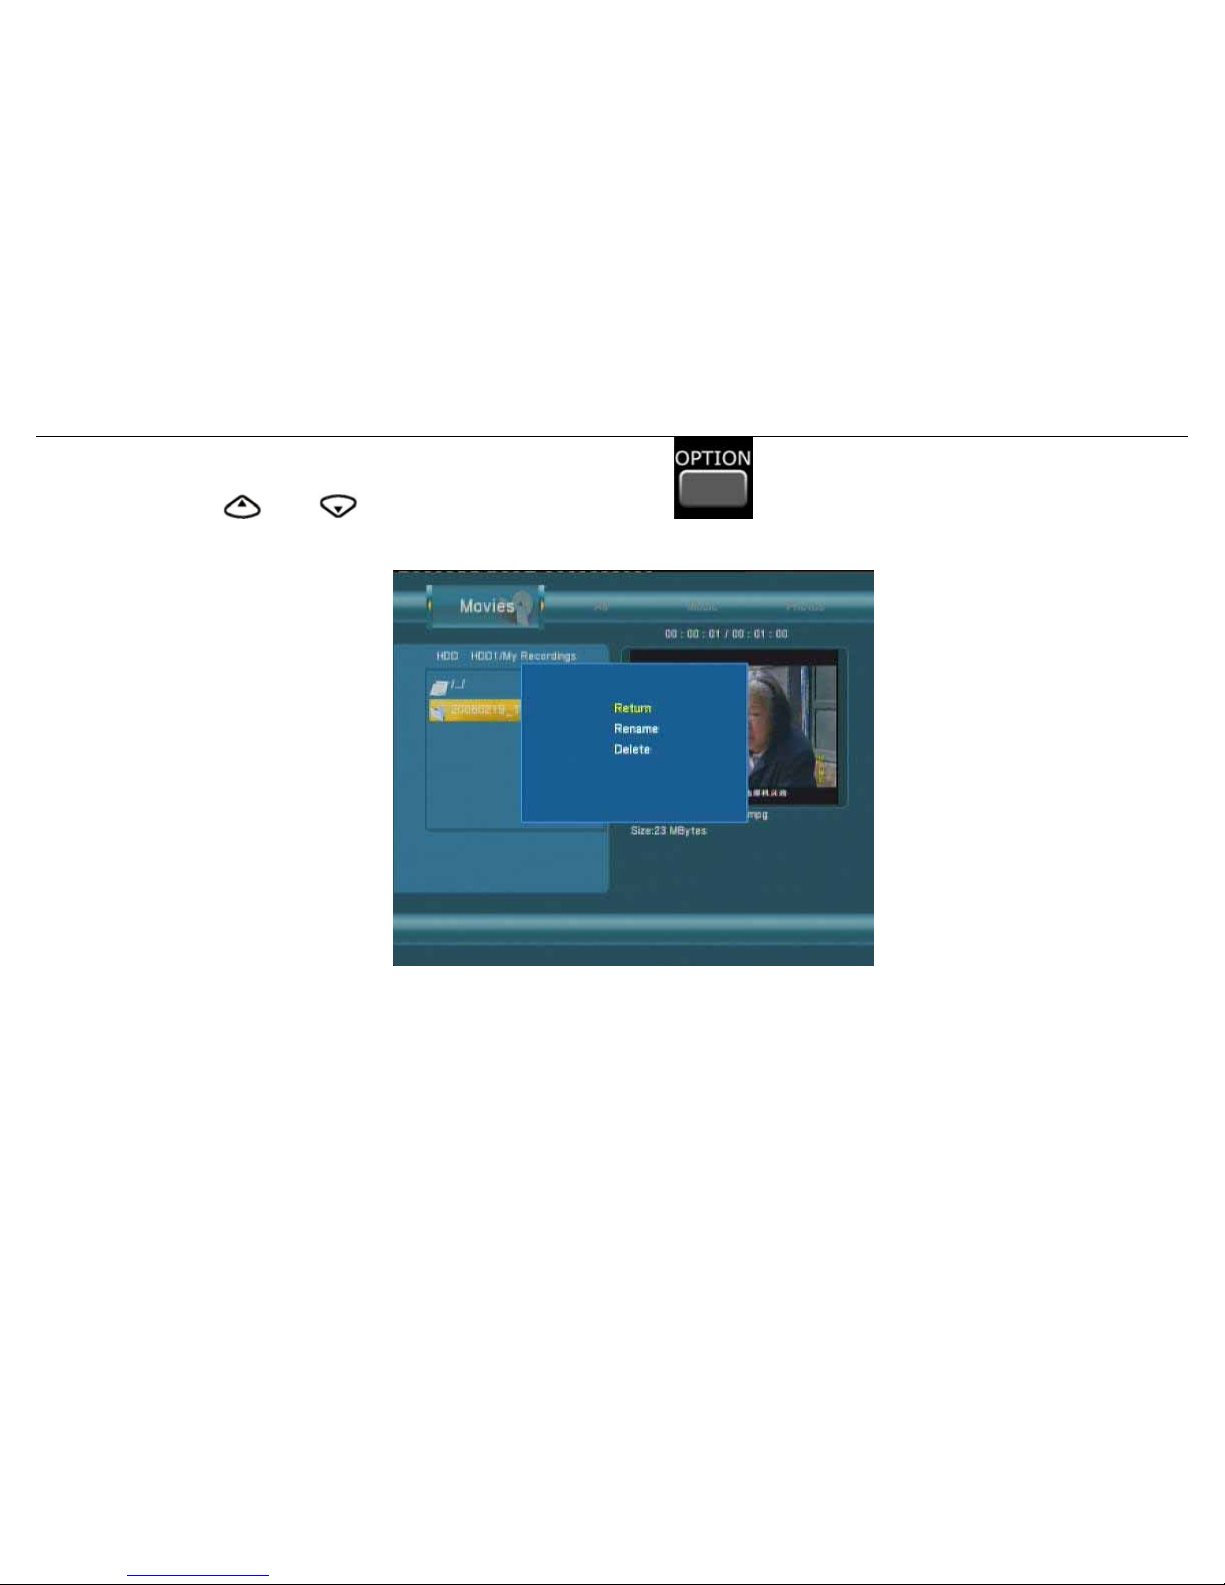
3.7.5 File Edit Menu
Page 60
BM3030 Multimedia Player User Manual
59
Press and to select the file or folder, press to display the Edit tab.
Page 61
BM3030 Multimedia Player User Manual
60
Return Select to return to the main screen.
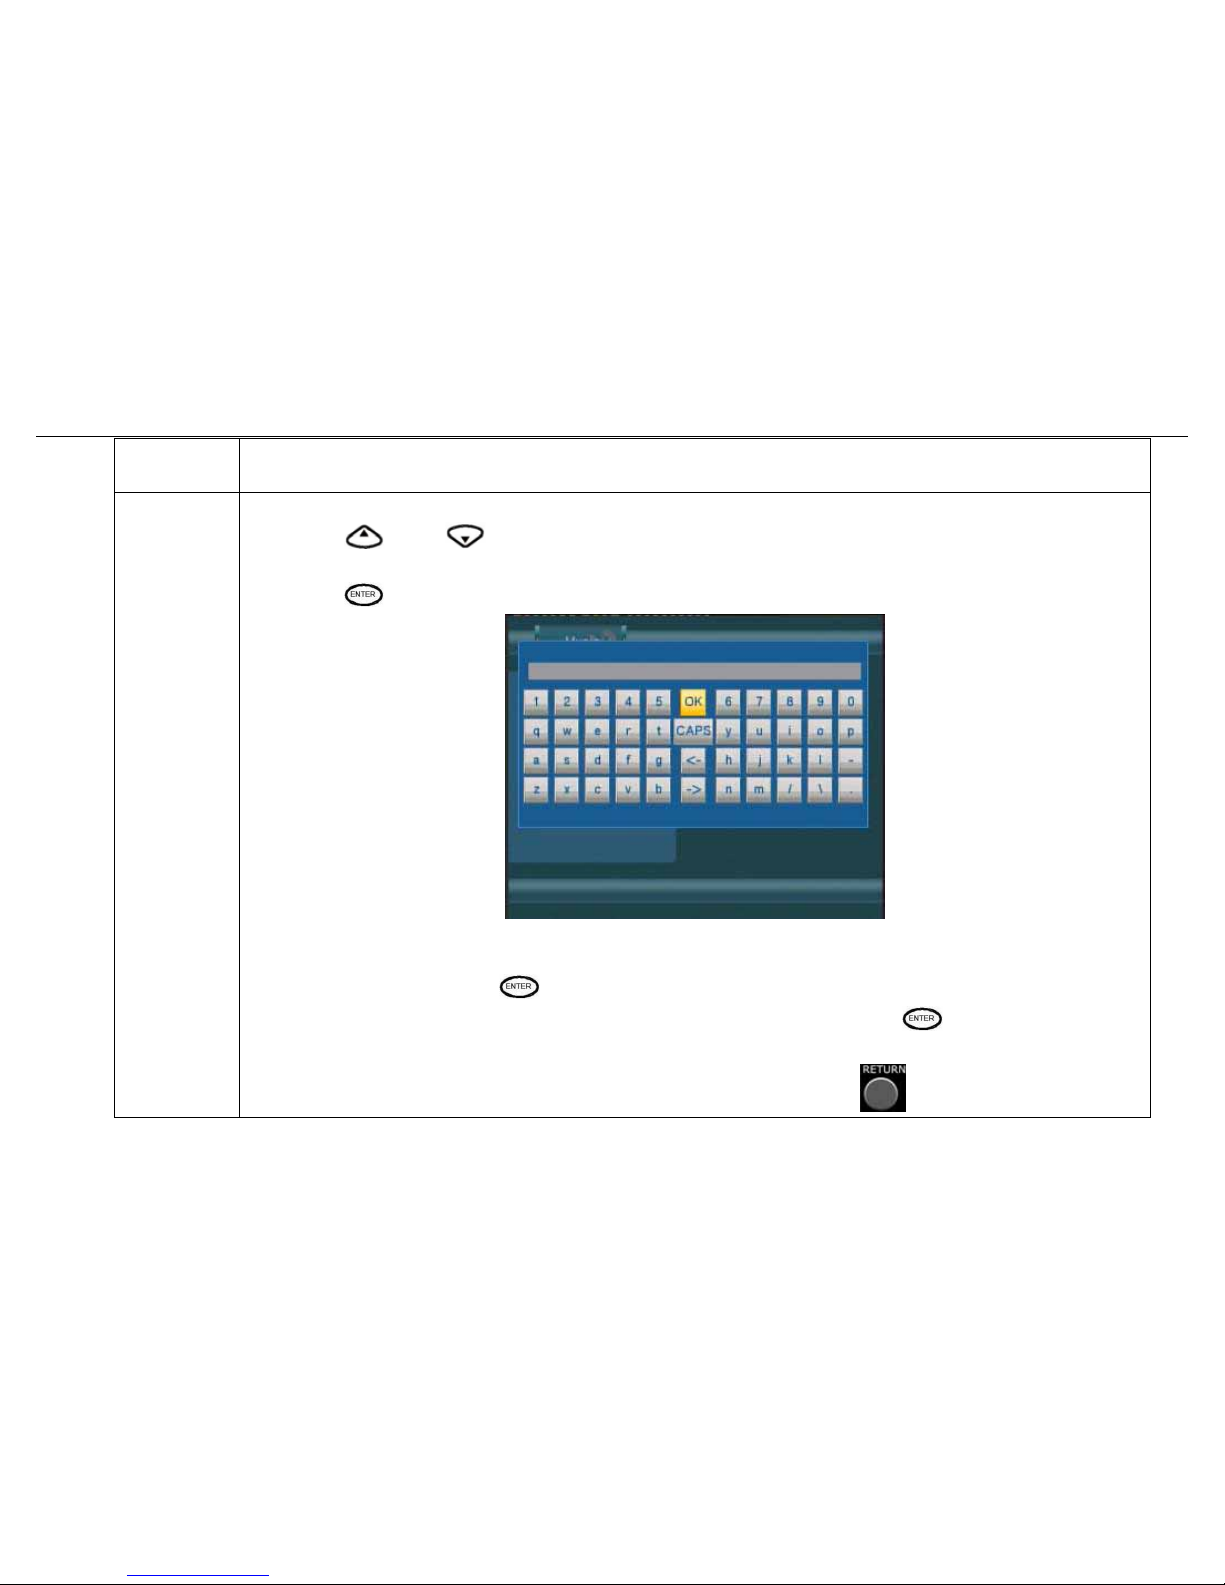
Rename
To rename a file, do the following steps:
1. Press
and on the remote control to select the Rename tab from the menu
bar.
2. Press
on the remote control. The name entry screen appears.
3. Use the navigation arrows to select letters and numbers. Select CAPS to toggle
between uppercase and lowercase letters. Press <- to delete a letter. Press -> to
insert a space. Press
to input each letter or number.
4. Once you have entered the new name, select OK and press
to confirm all
changes.
If you want to cancel the naming during the process, press
Page 62
BM3030 Multimedia Player User Manual
61
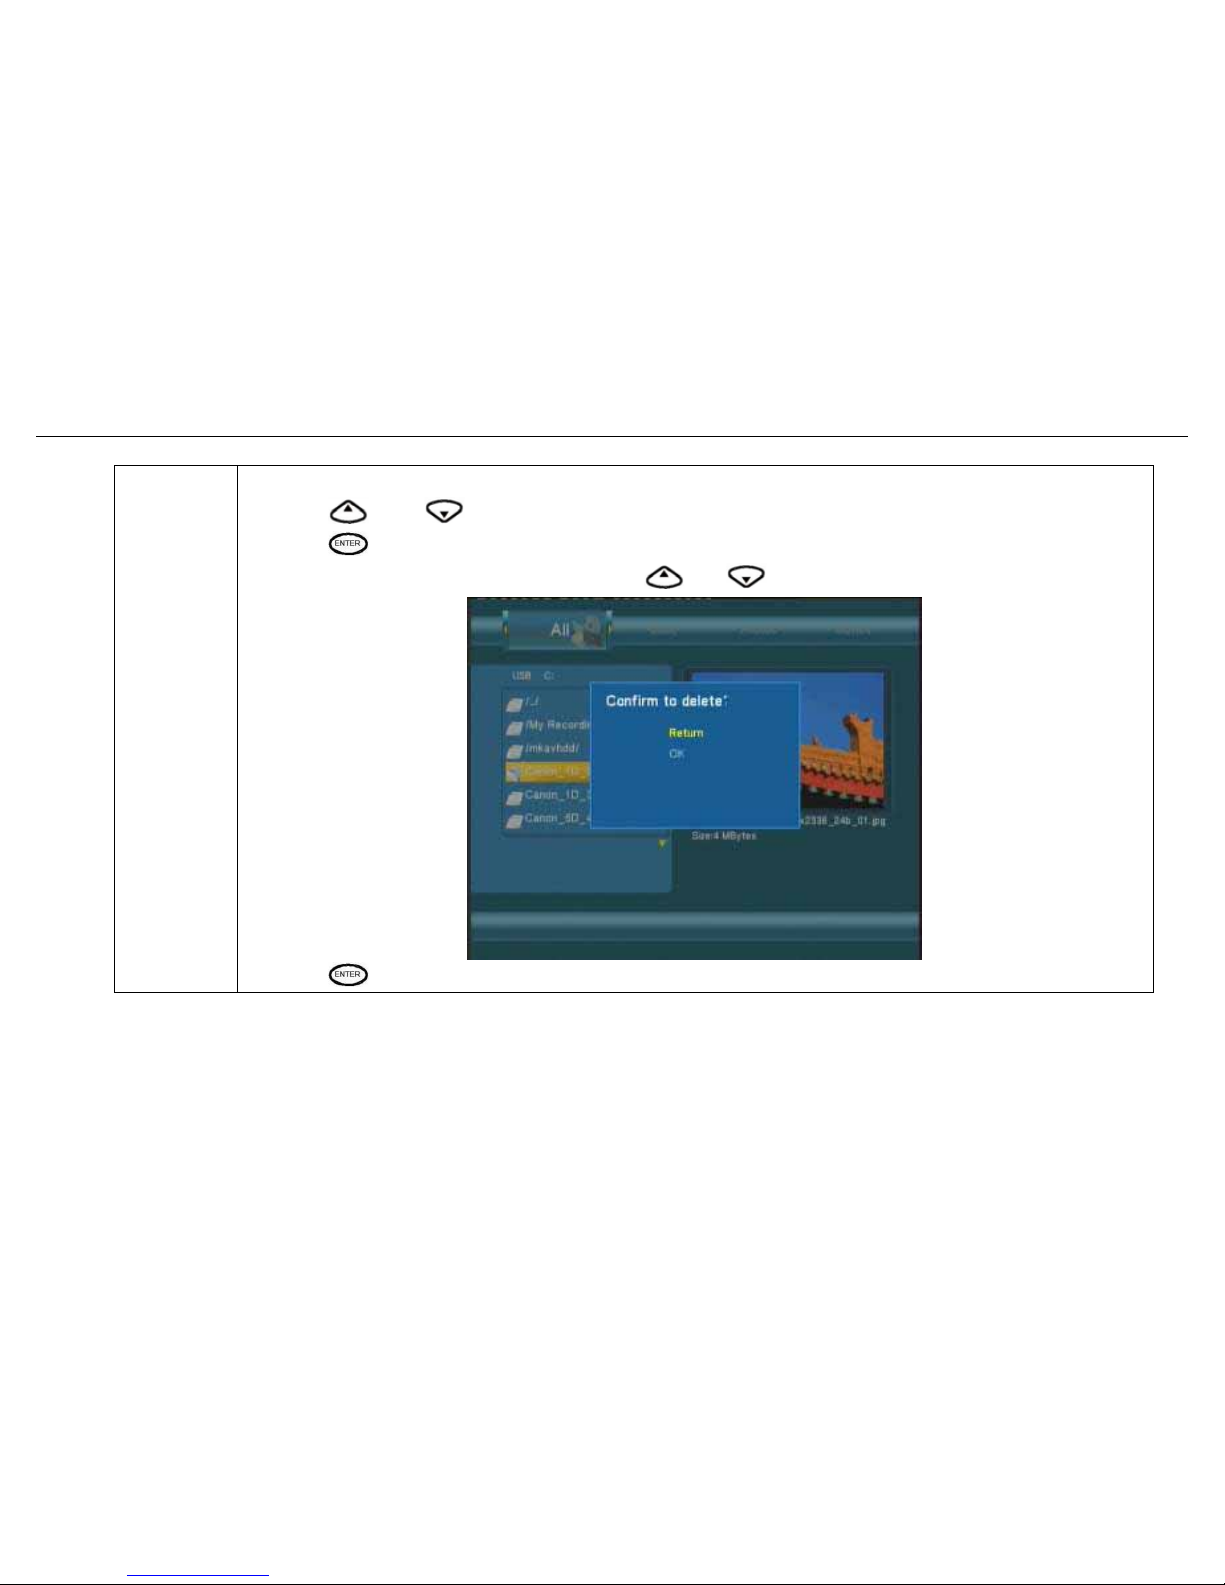
Delete
To delete a title, complete the following steps:
1. Press
and on the remote control to select the Delete tab from the menu bar.
2. Press
to confirm and delete the file.
3. A confirmation message appears. Press
or and select OK.
4. Press
to delete the selected file. To cancel delete, select Return.
Page 63
BM3030 Multimedia Player User Manual
62
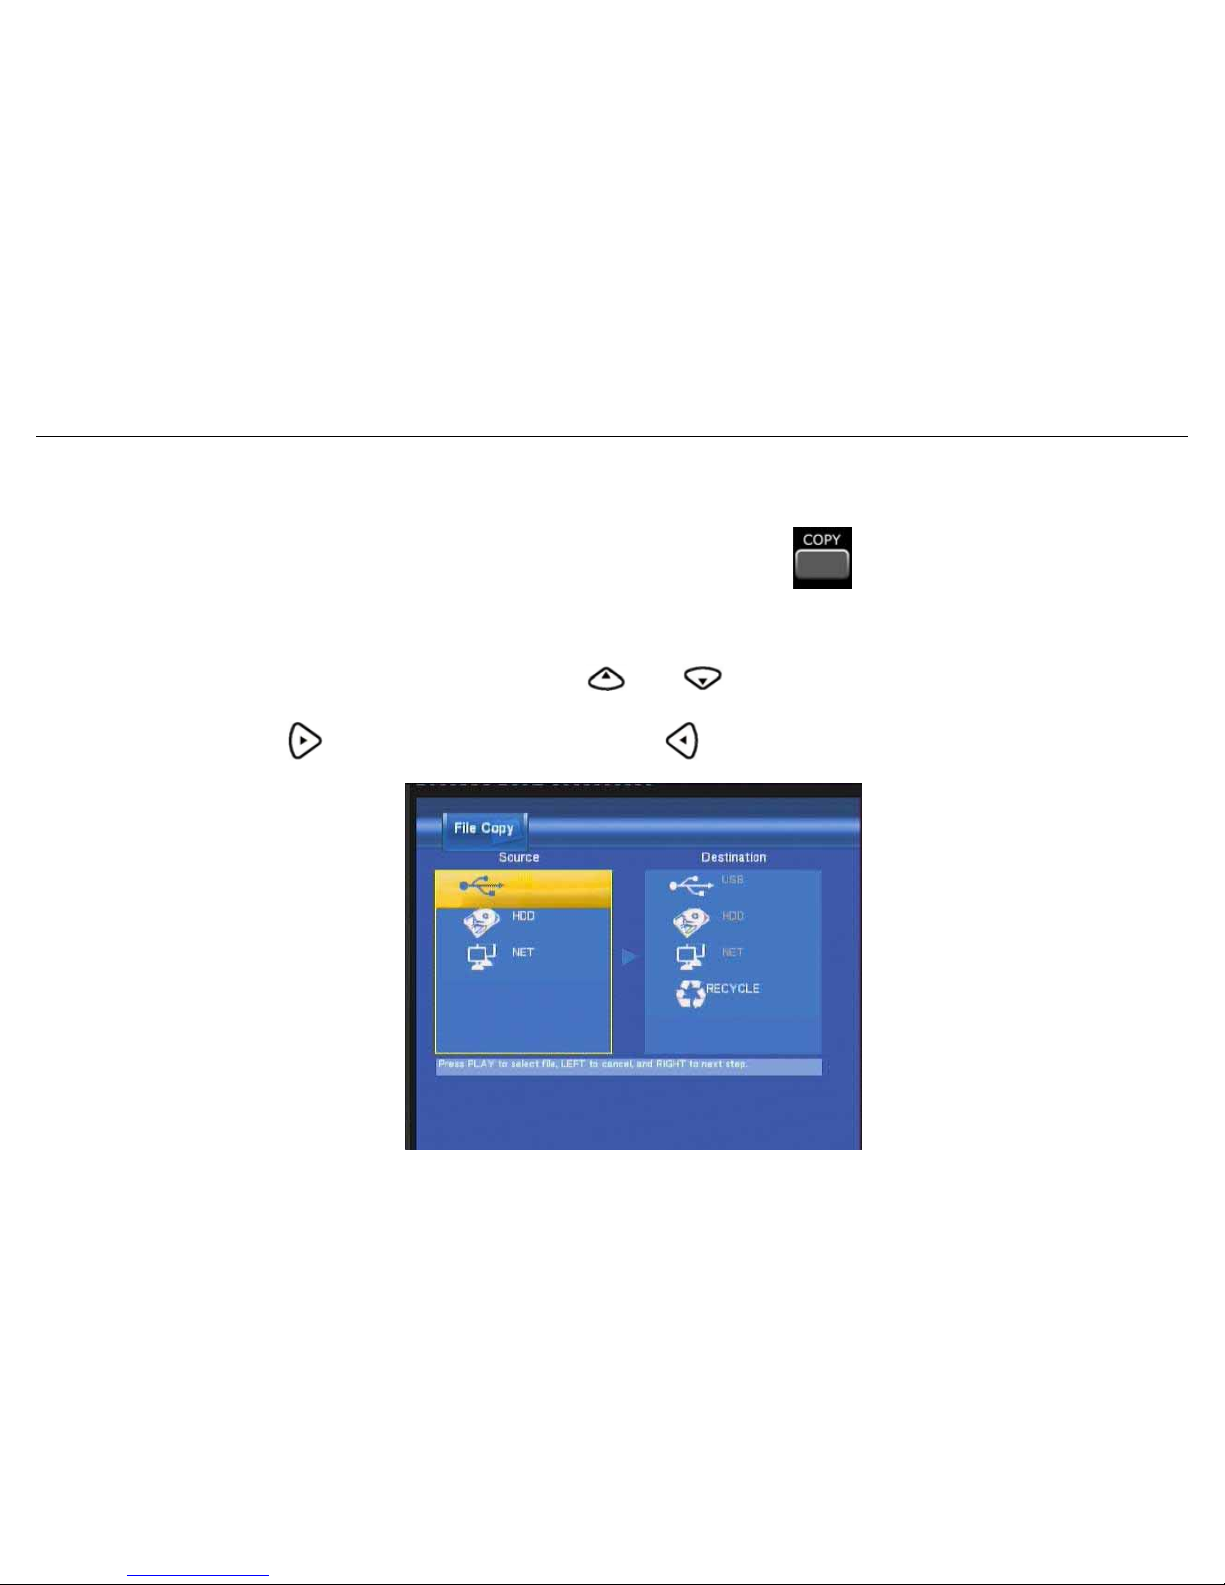
3.8 File Copy Menu
The Setup Menu allows you to copy files among NET, USB and HDD.
To enter the menu, select File Copy from the Guide menu or select
on the remote control.
Step 1. Select Source Device
When you enter the File copy interface, press and to select the device which your want
to copy first.
Then press
to select Destination Device, press to return.
Page 64
BM3030 Multimedia Player User Manual
63
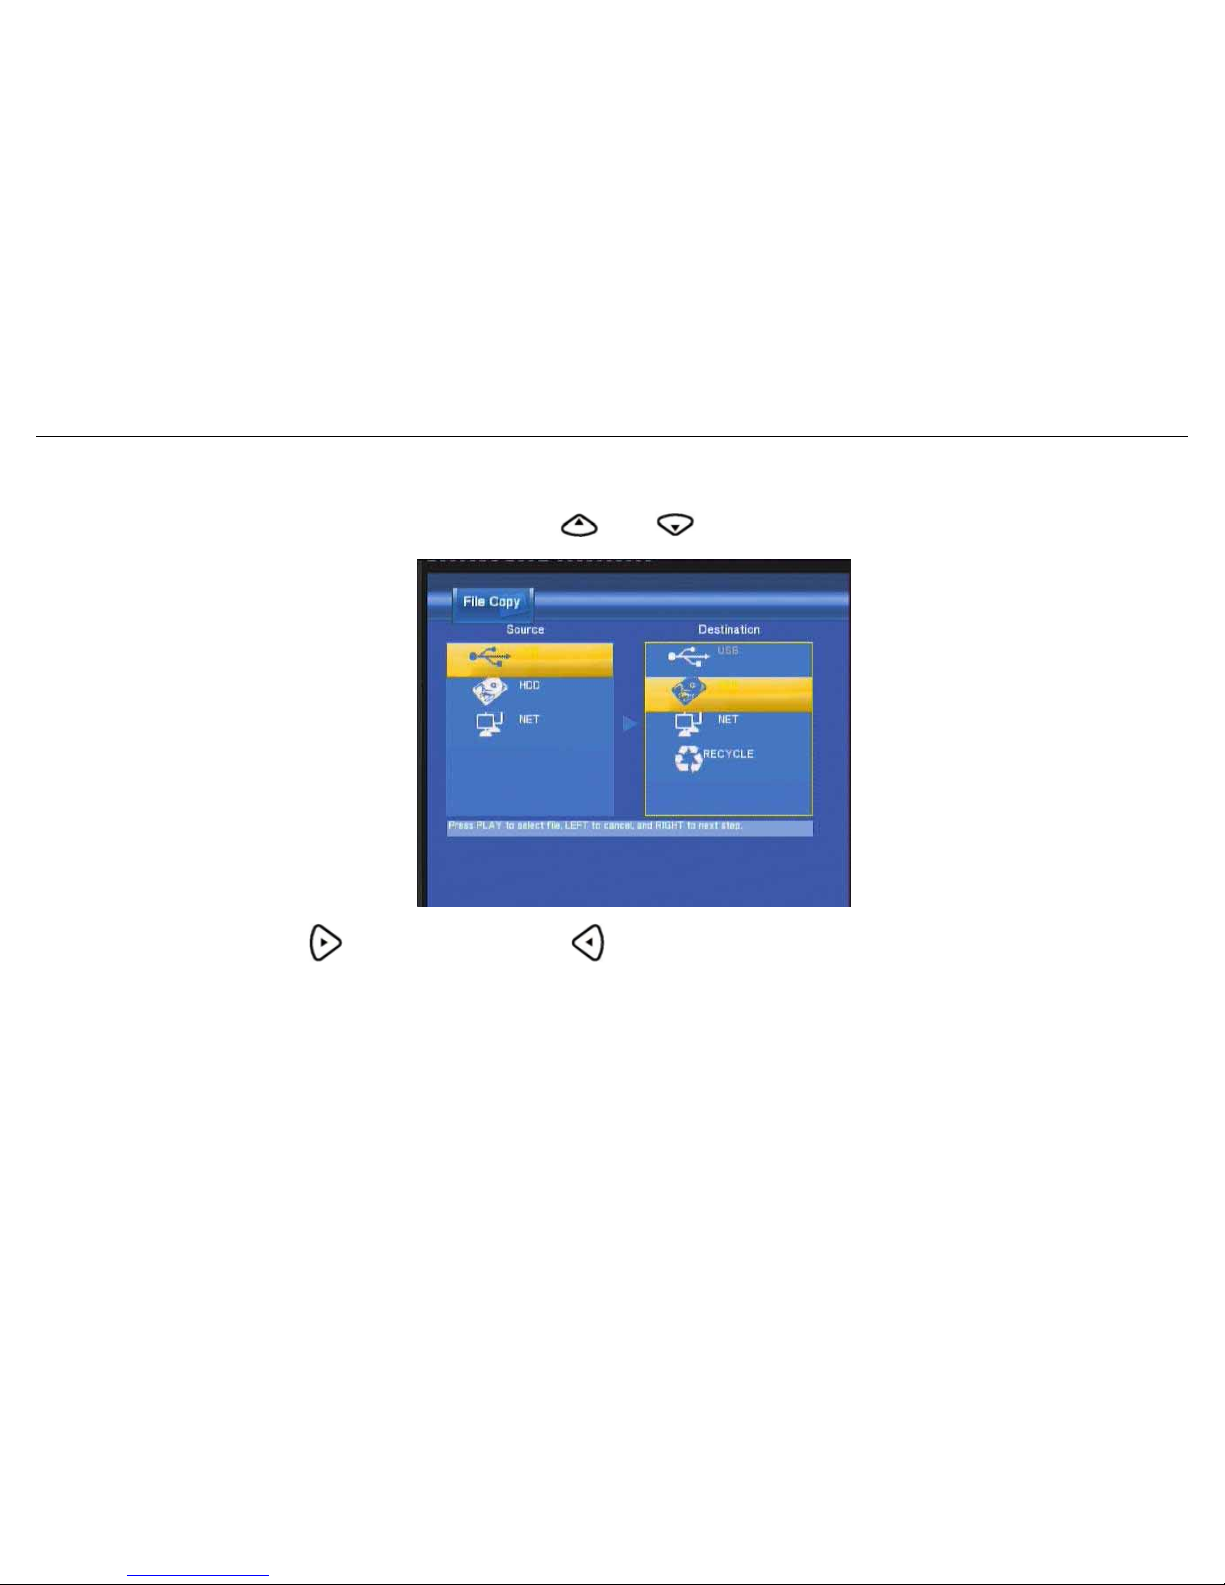
Step 2. Select Destination Device
When enter into Destination sector, press and to select the device of the Destination.
Then press to next step, and press to return.
Page 65
BM3030 Multimedia Player User Manual
64
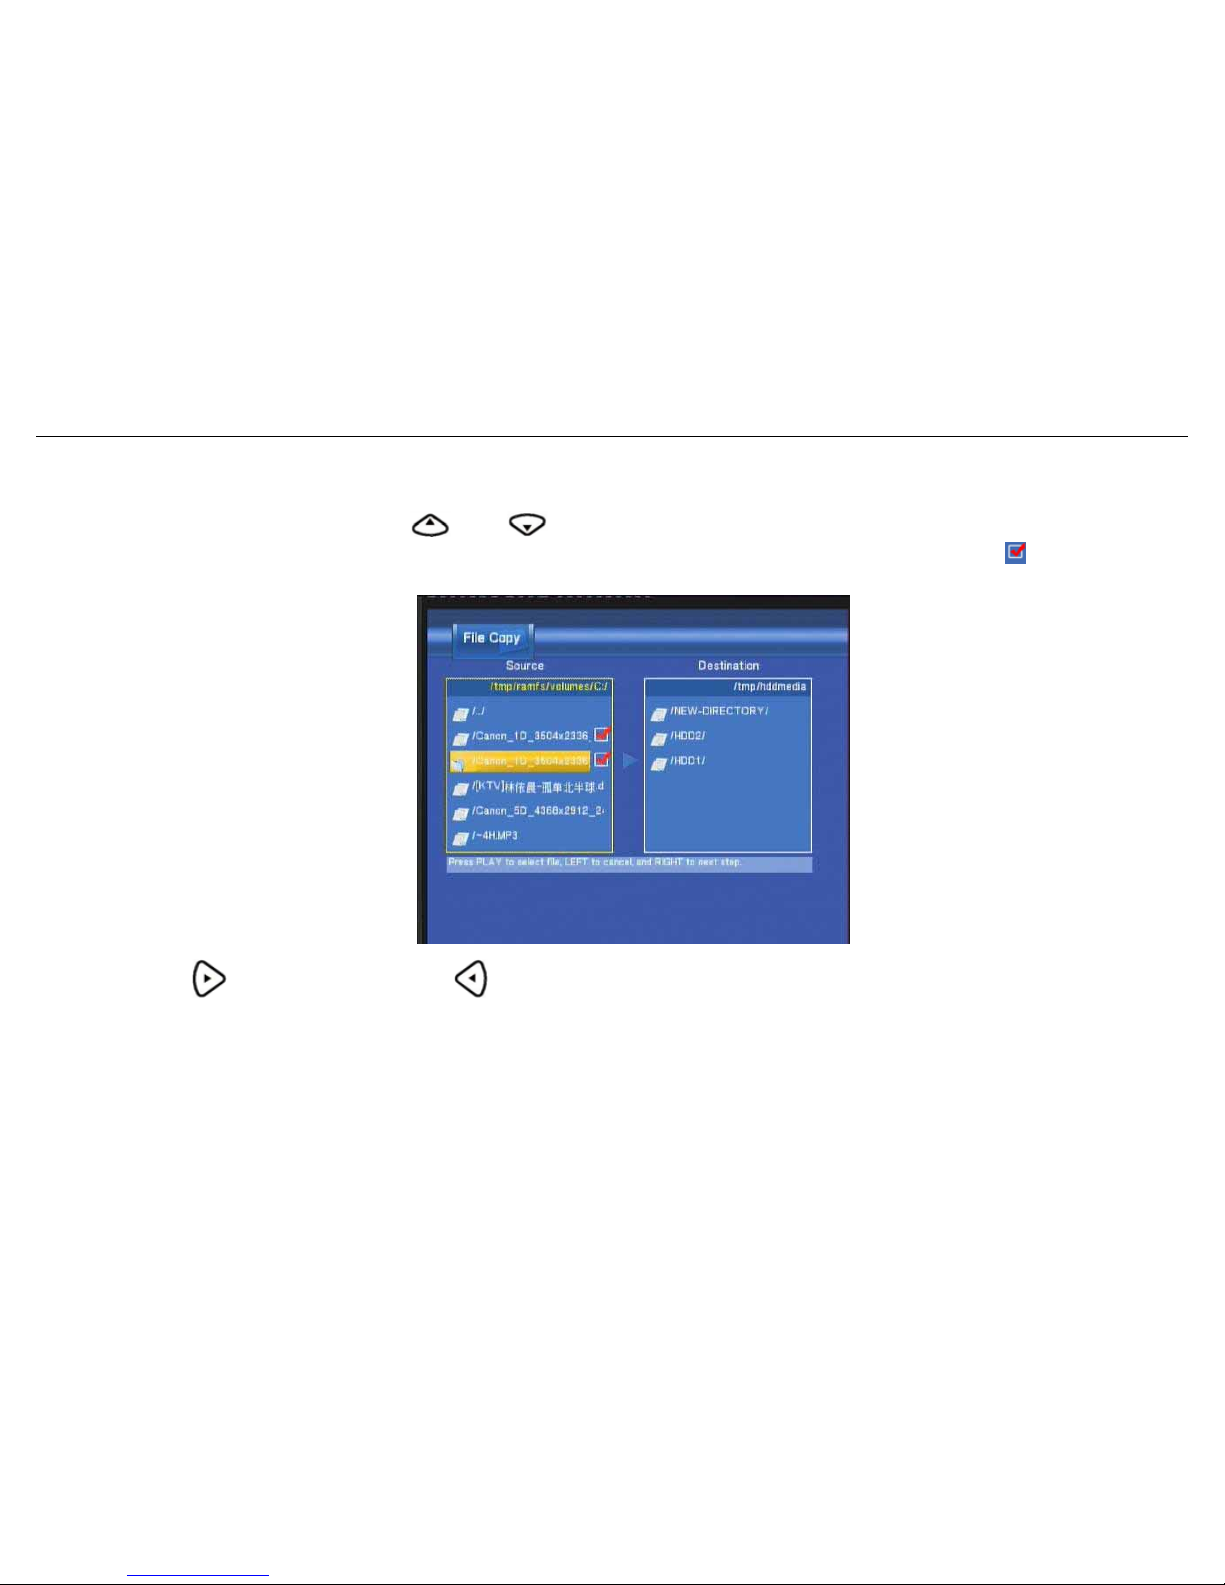
Step 3. Select copy files or folders
At “Source” sector, press and to select and press “Enter” to select file or folders which you
want to copy. When you succeed to select, at the right side of file or folder name will display
.
Then press to next step, and press to return.
Page 66
BM3030 Multimedia Player User Manual
65
Step 4. Select the folders of Destination
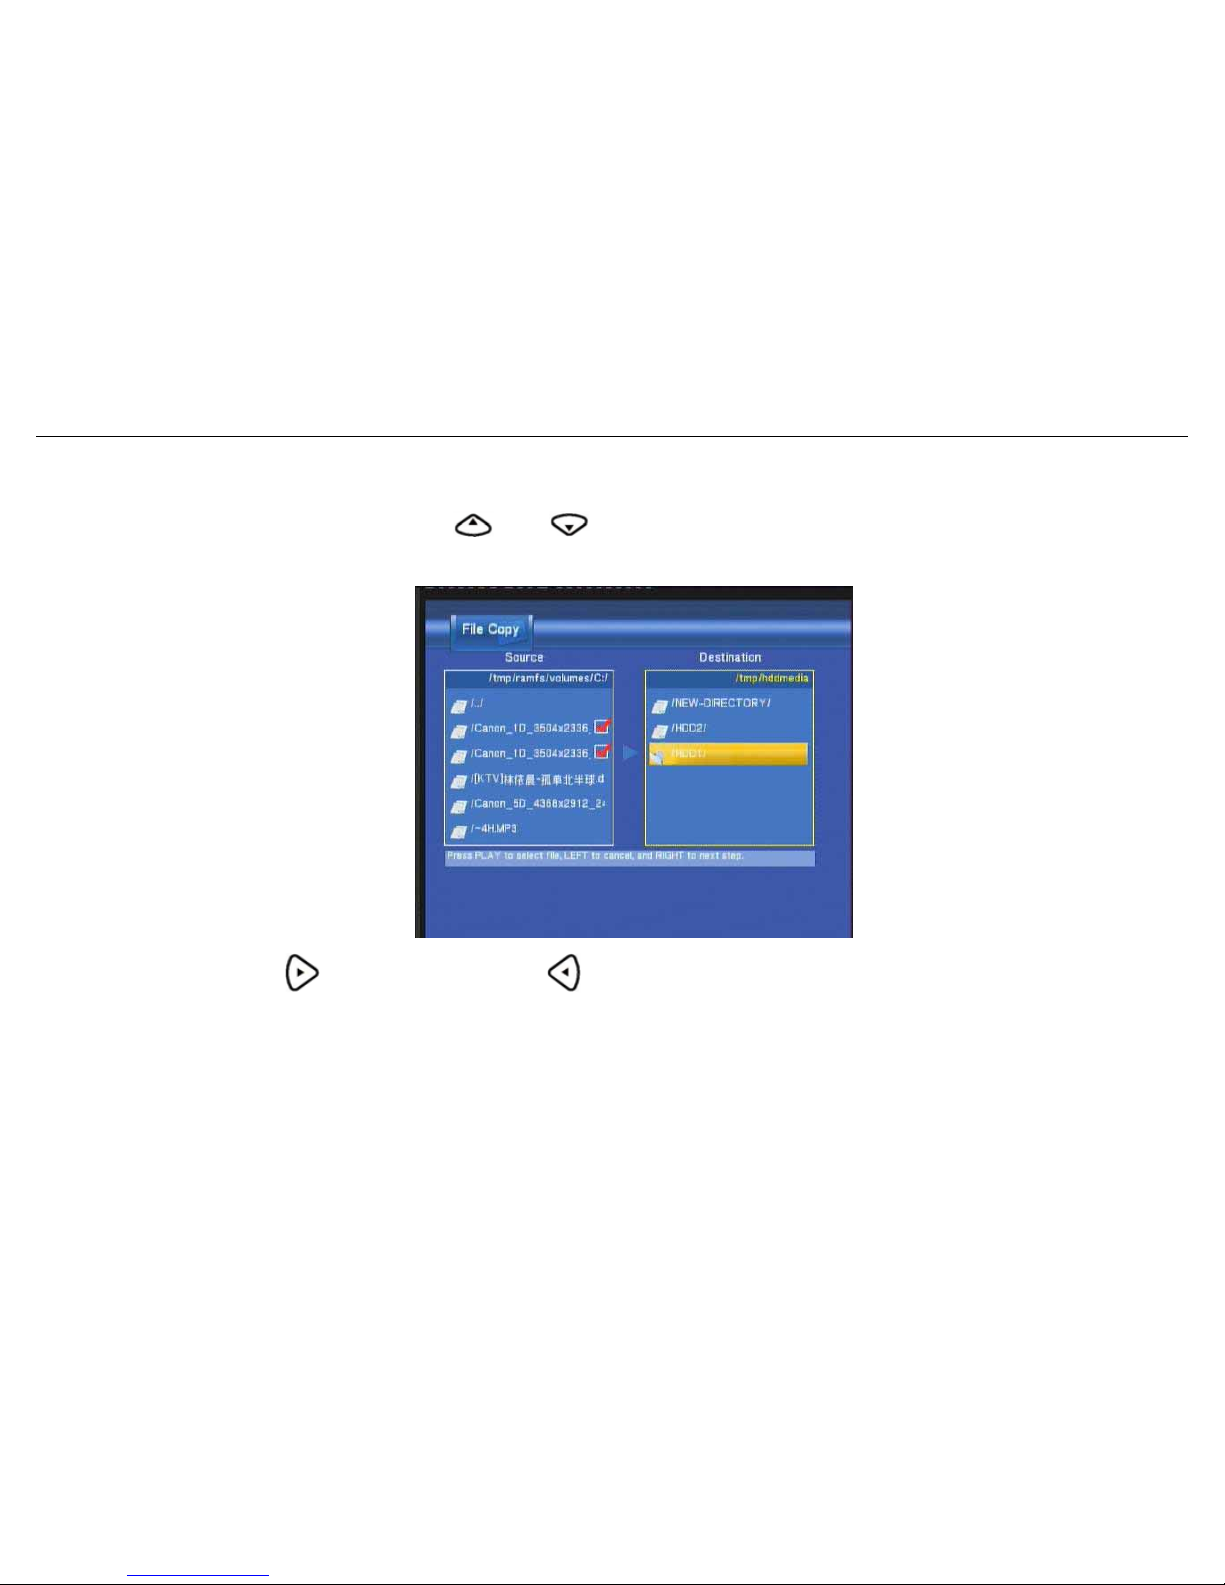
At “Destination” sector, press and to select a folder of the "Destination".
Then press to next step, and press to return.
Page 67
BM3030 Multimedia Player User Manual
66
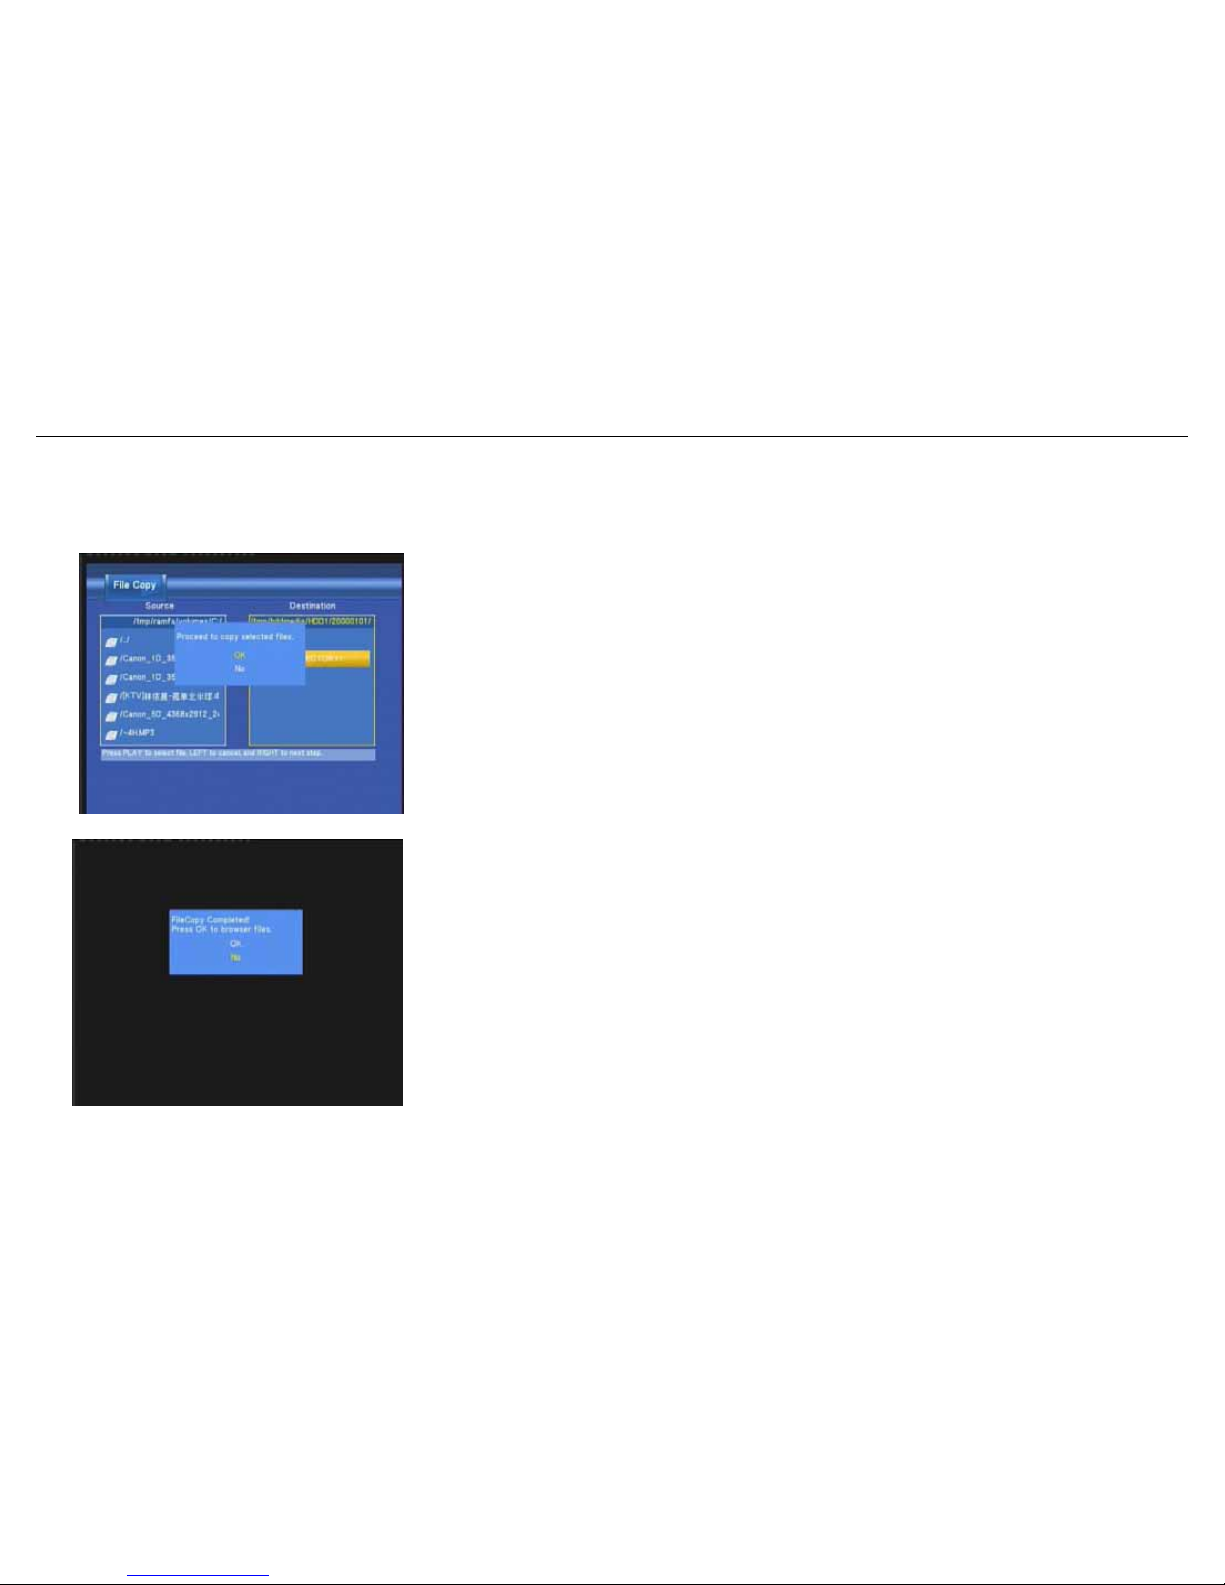
Step 5. Copy Status
At “Pop” menu, select OK to copy, select No to cancel.
When copy succeeds, the system will display “File Copy Completed!”;
if failed, the system will display “File Copy failed!”.
When the File Copy completed! You can select “OK” to browser files,
or select “No” return to Video1
Page 68
BM3030 Multimedia Player User Manual
67
4. Utilities
■ Transcode Server
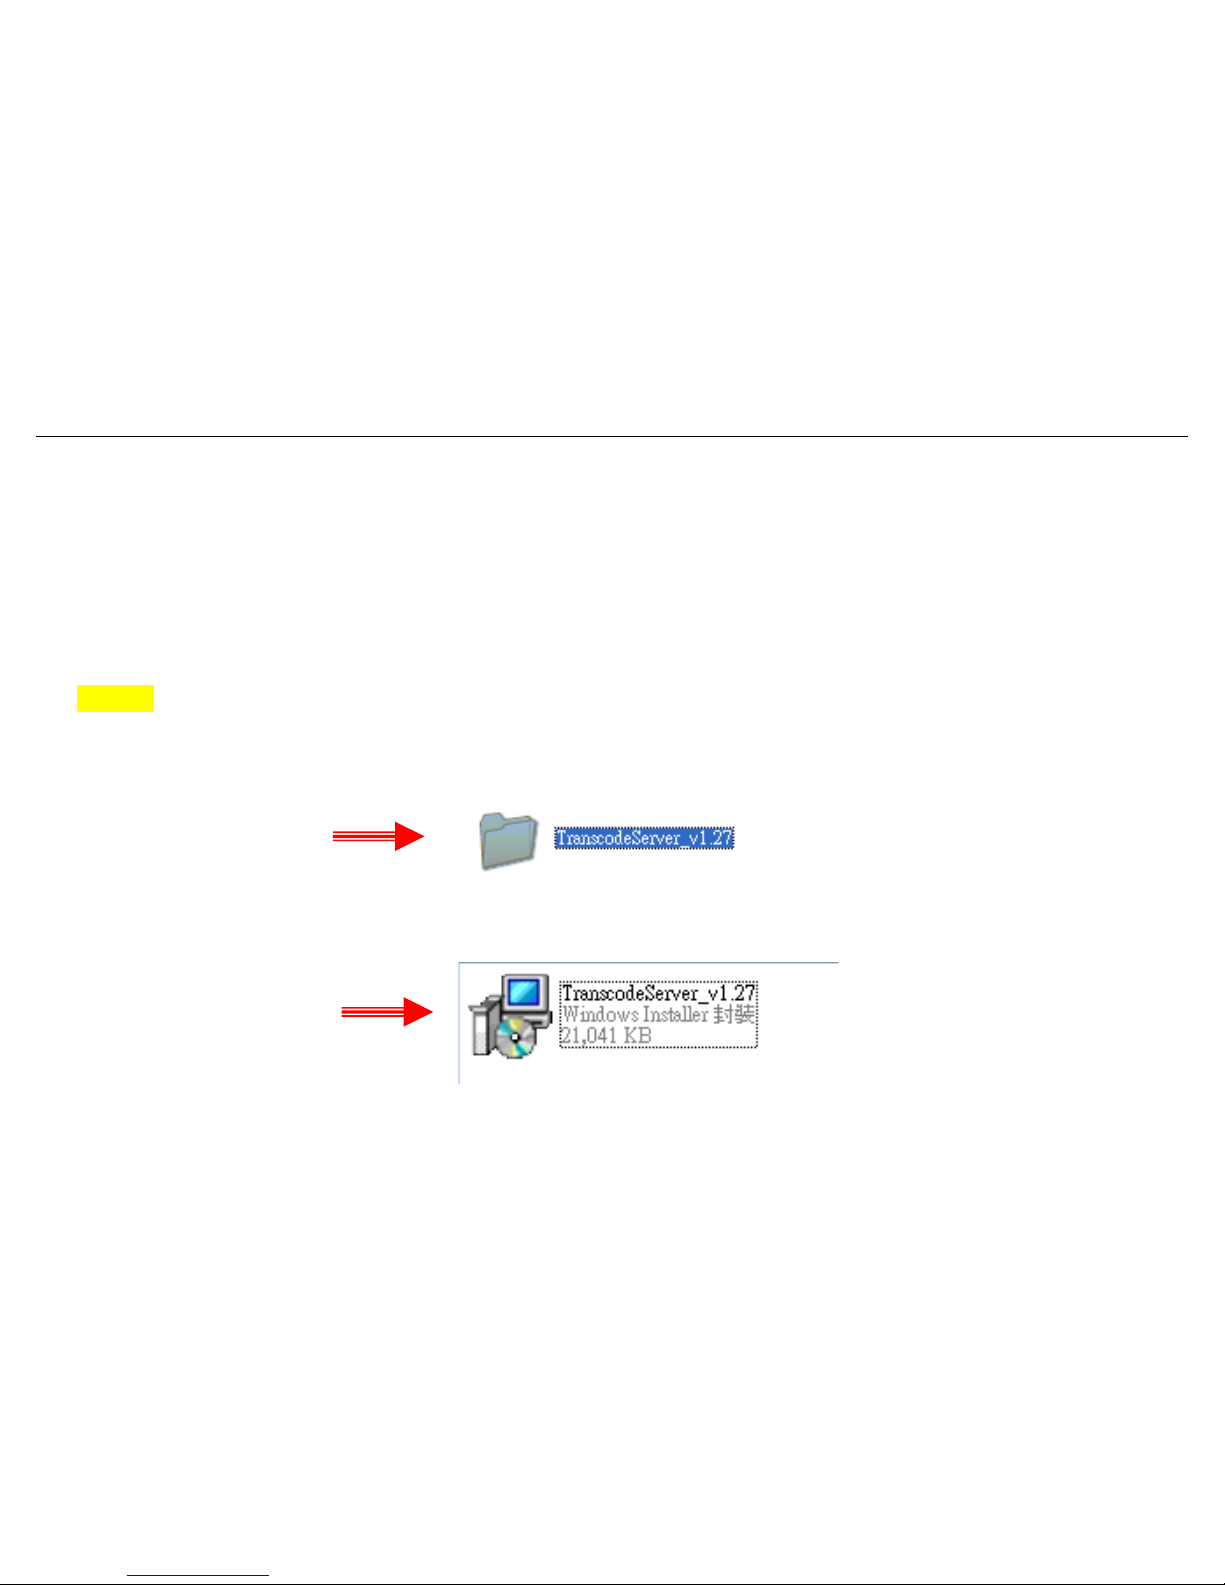
Transcoding on PC (RM, RMVB, WMV, H.264...) and real-time streaming playback via network.
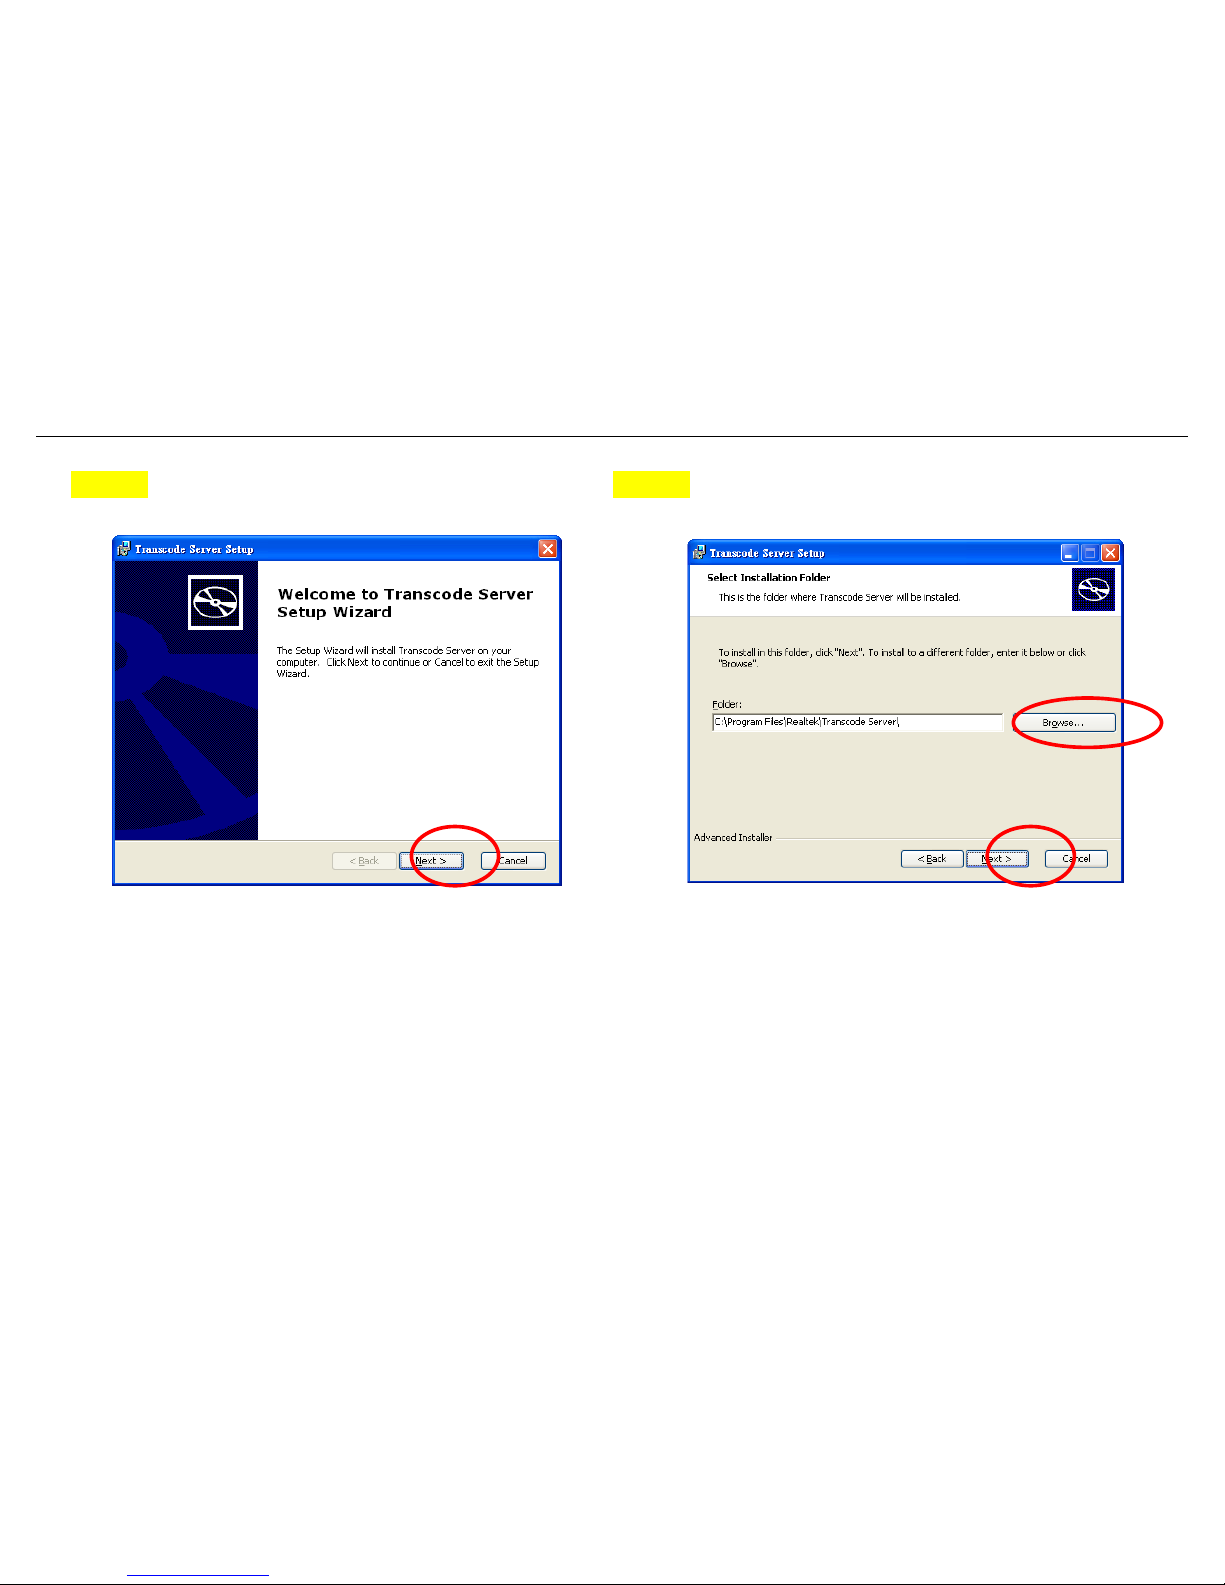
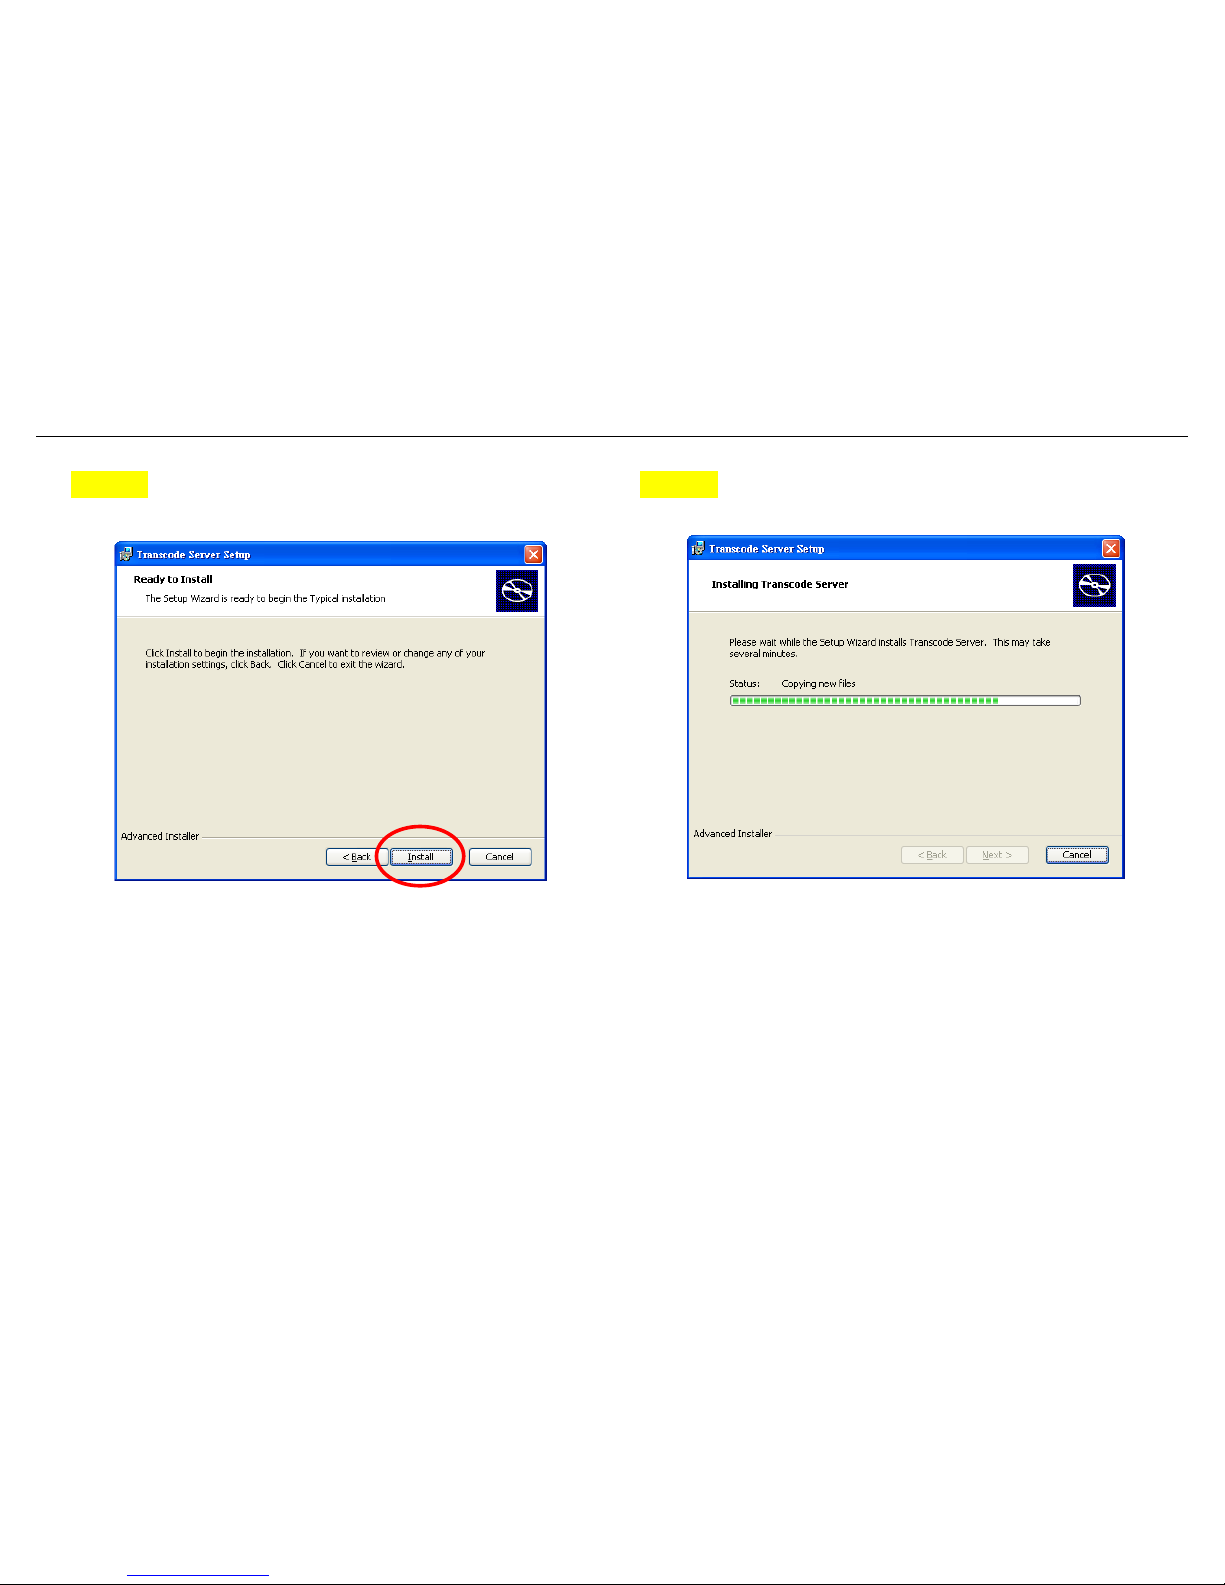
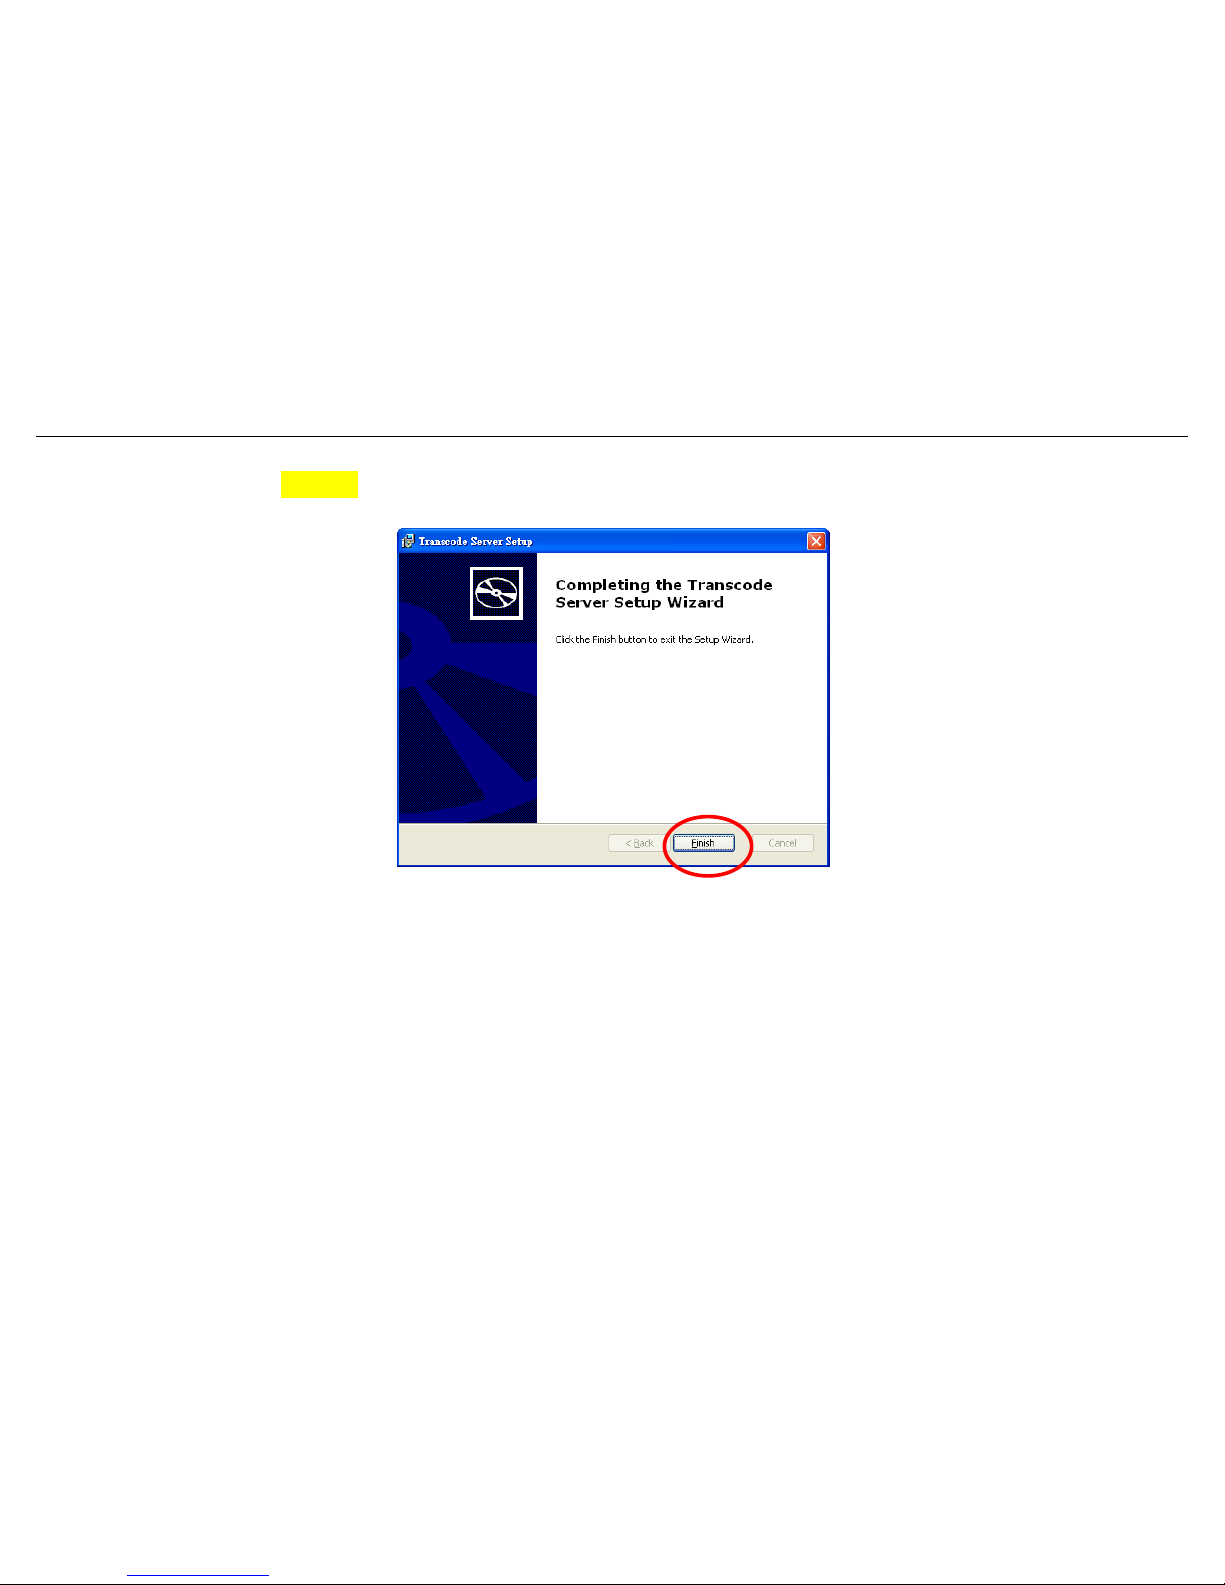
Please follow the instructions to install the software.
Step 1:
Insert CD, copy the contents of the Transcode server to the designated directory.
Double click to run the program. Transcode server will then automatically installation.
Page 69
BM3030 Multimedia Player User Manual
68
Step 2: “Next” Step 3: “Browser folder”
Page 70
BM3030 Multimedia Player User Manual
69
Step 4: “Install” Step 5: “Copying new files”
Page 71
BM3030 Multimedia Player User Manual
70
Step 6: “Finish”-You can start use the software.
Page 72
BM3030 Multimedia Player User Manual
71
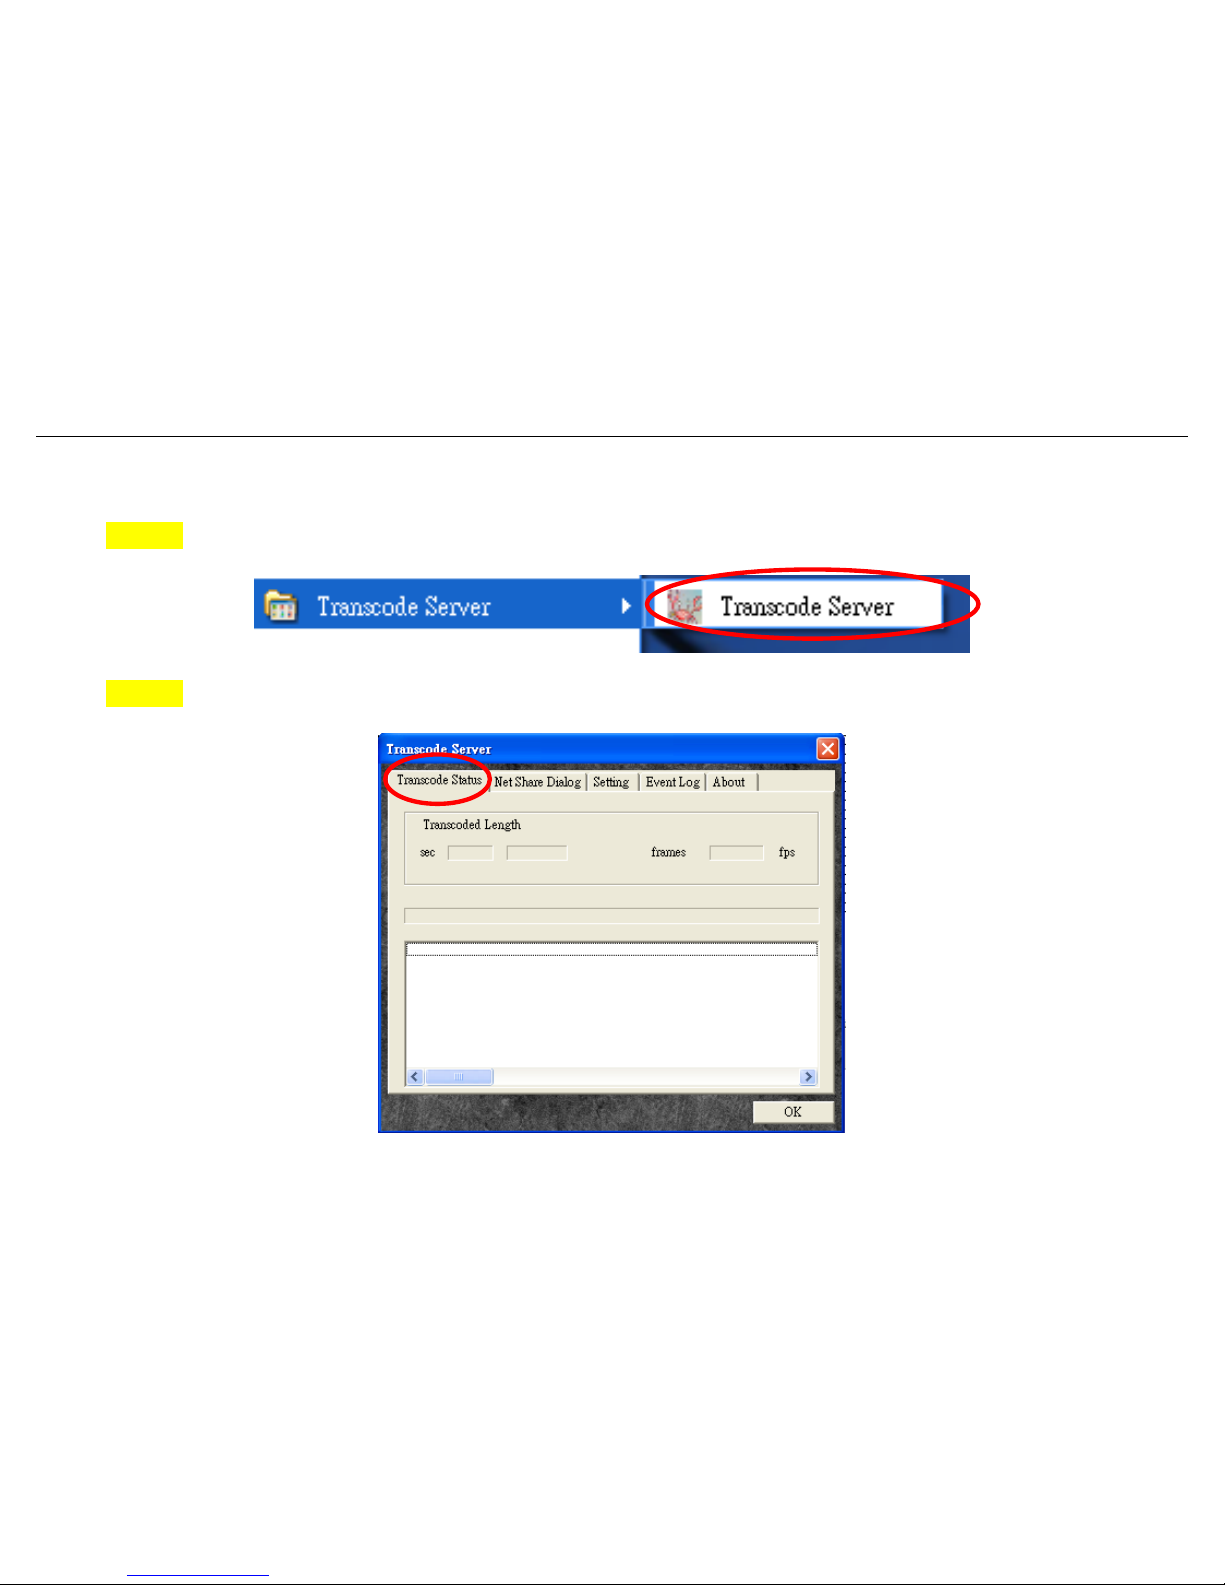
■ Run the software
Step 1: Double click to run the program. You can enter the software page.
Step 2: Transcode Status: Transcoding information.
Page 73
BM3030 Multimedia Player User Manual
72
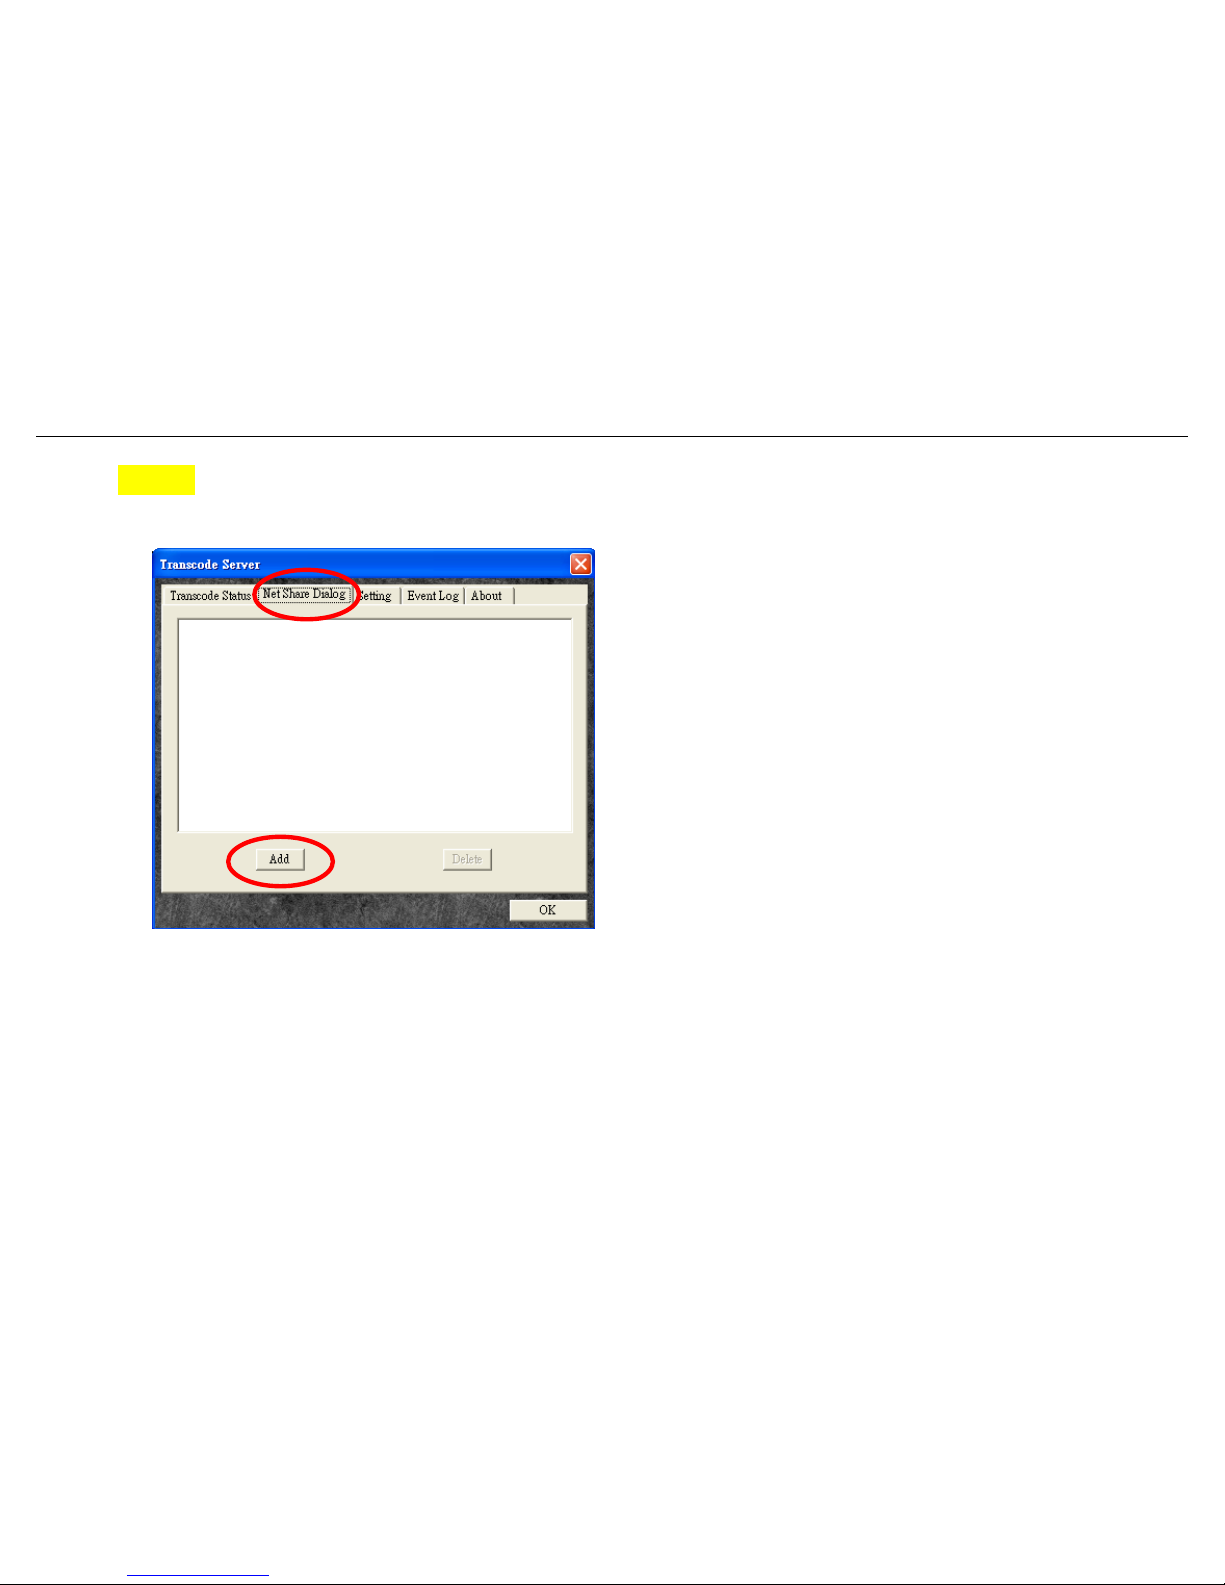
Step 3: Net Share Dialog:
Add your files on PC (RM, RMVB, WMV, H.264...) and real-time streaming playback via network
Page 74
BM3030 Multimedia Player User Manual
73
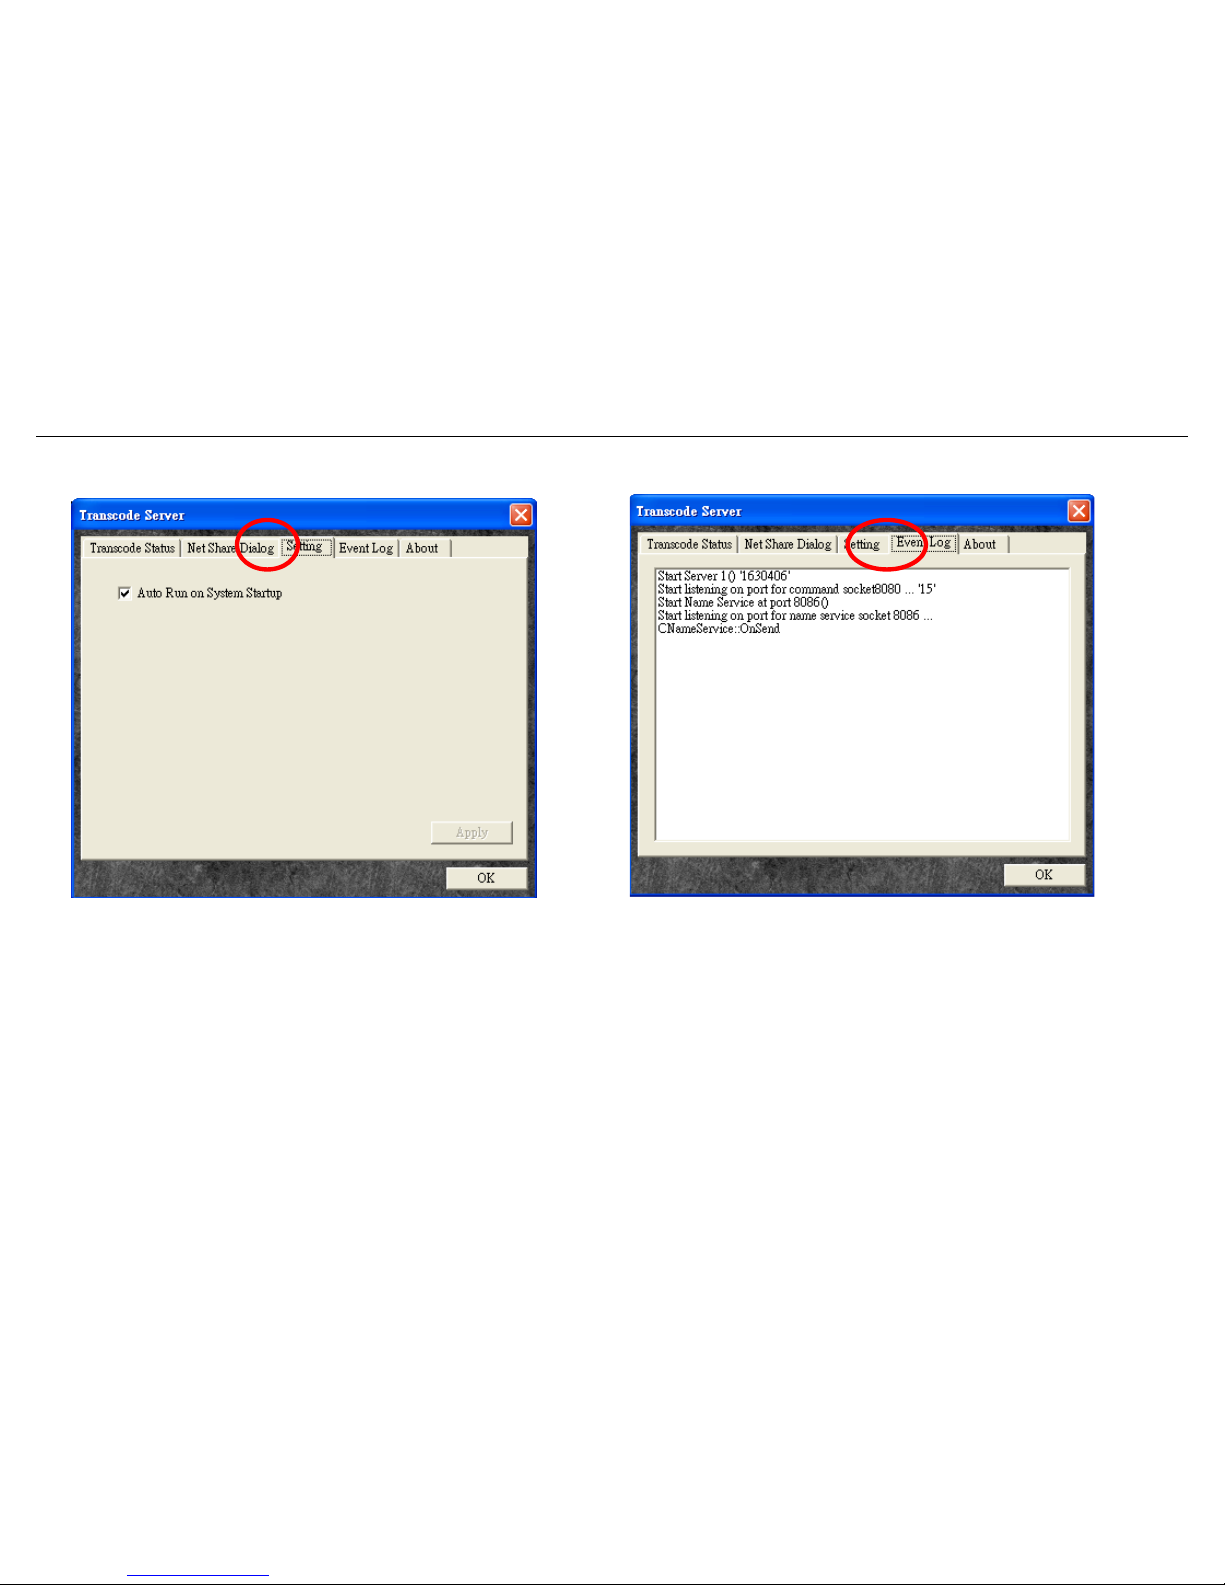
Setting:Auto Run System Starup “Yes” or “No”. EventLog: Event log is helpful for troubleshooting
Page 75
BM3030 Multimedia Player User Manual
74
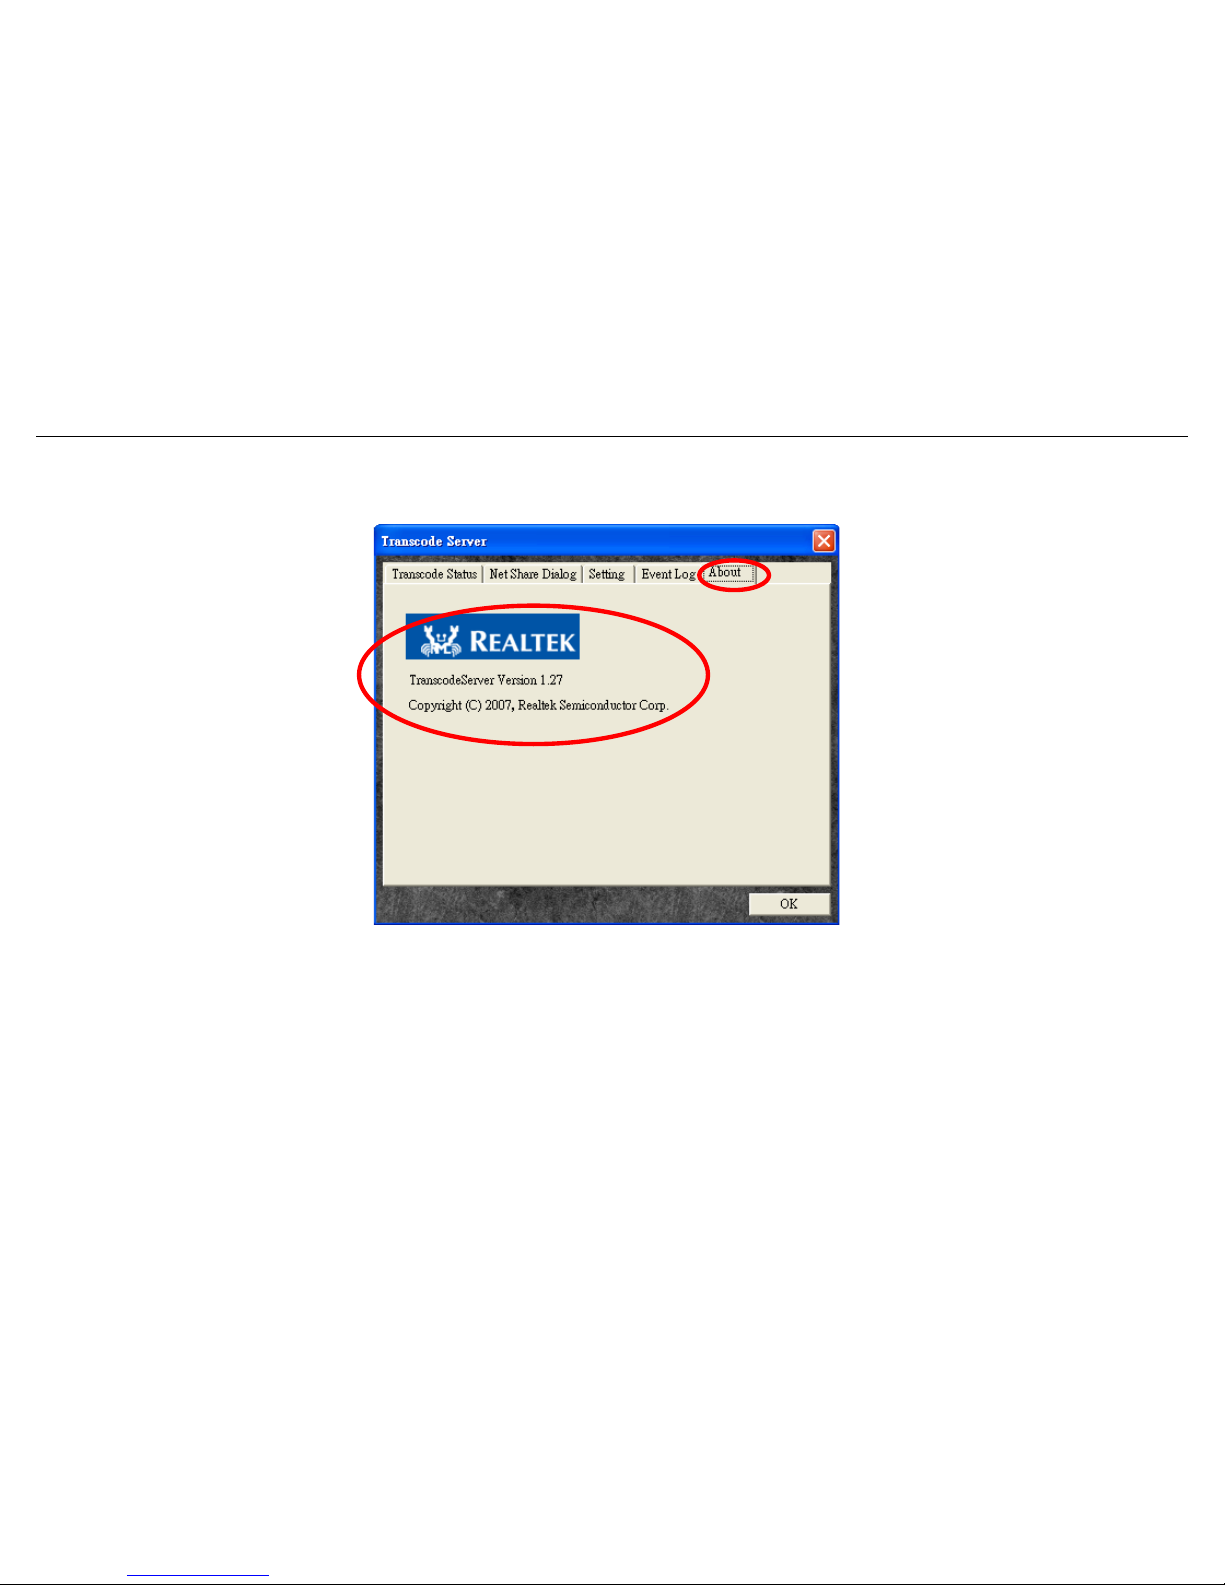
About:
Transcode server Version information.
M0-90-475G
 Loading...