

Page 1
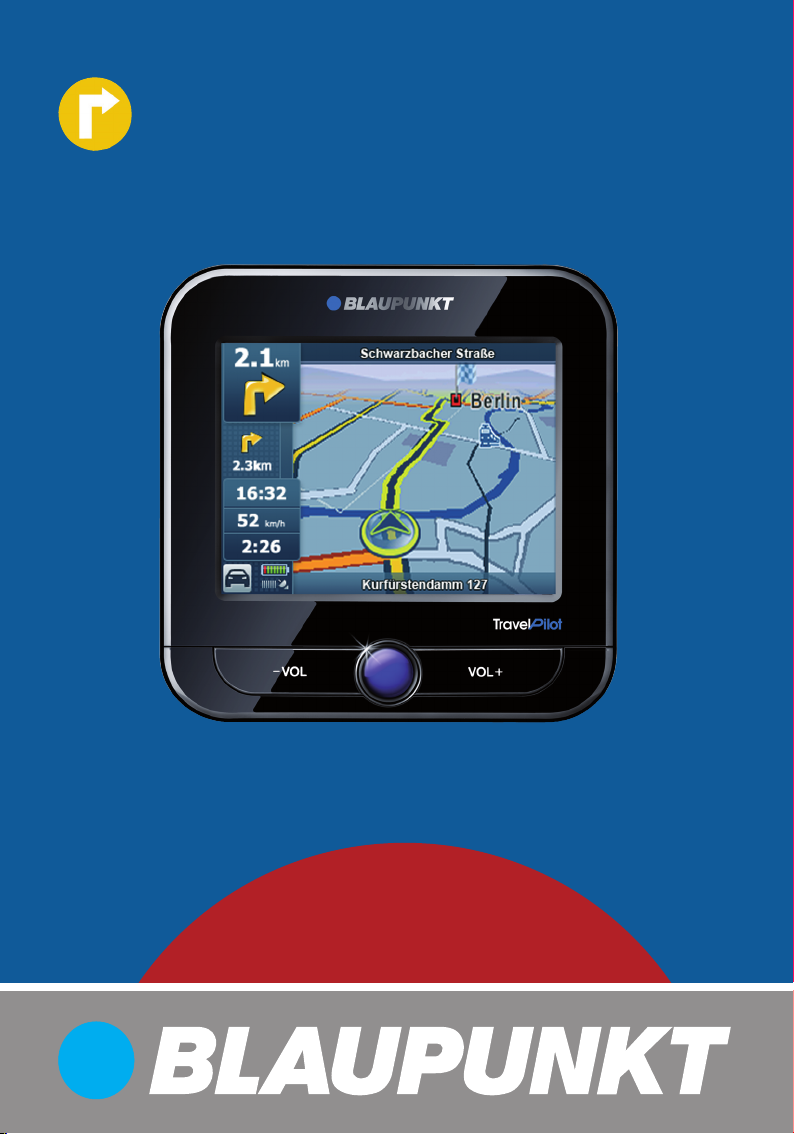
Mobile Navigation
TravelPilot 100 EE
www.blaupunkt.com
Operating and installation instructions
(long version)
Page 2
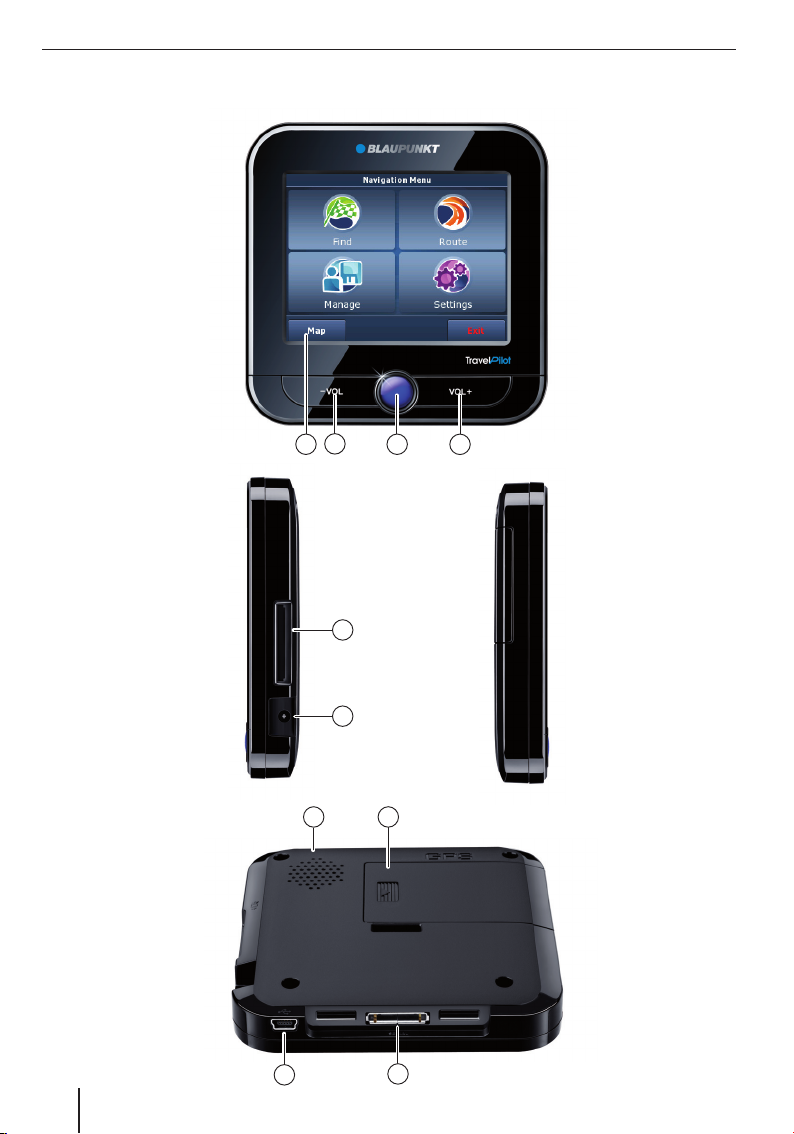
Device overview
Device overview
2
1
8
3
5
6
7
4
9
10
2
Page 3

1 Display (Touch screen): Simple and intuitive
operation by touching the buttons on the
display.
2 VOL -: Reduce the volume
3 On/off switch:
Long press (longer than 3 seconds):
•
Turns the device on or off.
Short press: Opens the main menu.
•
4 VOL +: Increases the volume
5 Memory card slot
6 Socket for power supply (mains charger or
charger cable for the cigarette lighter)
7 Battery compartment cover
8 Photosensor for switching mechanism of
day and night display (top side) as well
as for controlling the display brightness
(automatic)
9 USB connection for data transfer
: Serial connection
(for future upgrading)
Device overview
3
Page 4

Contents
Device overview ..................................2
Safety notice .......................................7
Warning symbols used ...........................7
Intended use ........................................7
Road safety ..........................................7
General safety information ......................7
Tips about using the CD/DVD ..................8
Cleaning tips ........................................8
Disposal tips .........................................8
First operation ....................................8
Scope of delivery ..................................8
Screen protector ...................................8
Charging the battery ..............................8
Turning the device on .............................9
Setting the language ..............................9
Selecting simple mode/advanced mode ....9
Mounting in the vehicle ........................9
Attaching the suction cup mounting
plate ...................................................9
Attach the cup retainer ........................10
Attach the device in the retainer ............10
Removing the device ............................10
Removing the suction cup
mounting plate ...................................10
Switching on /off ...............................10
Switching on .......................................10
Switching off ......................................10
Reset .................................................10
Using the menus ................................11
Simple mode/advanced mode ...............11
Changing modes ..............................11
Main Menu .........................................11
Navigation menu .................................11
Advanced menu Route* .....................11
Advanced menu Manage * ..................11
Buttons ..............................................12
Keyboard ...........................................12
Lists ..................................................12
Information about GPS .......................12
GPS functionality ................................12
Displaying GPS info .............................12
Making basic adjustments ..................13
Setting the time zone ...........................13
Activating the PIN request.....................14
Setting up the PIN request .................14
Blocking/unblocking the device ..........14
Changing the PIN .............................14
Navigation ........................................15
Starting navigating ..............................15
Destination input (search menu) ............15
Entering an address ..........................15
Selecting a destination from the
favourites ........................................16
Selecting one of the last destinations ..16
Entering coordinates * .......................16
Selecting a destination from
the map* .........................................16
Points of interest (POI) .........................17
Select the POI in a specifi ed location ...17
Select a POI in the local area, in the
area of the destination, or on the
route ..............................................17
Selecting POIs on the map .................17
Selecting a POI according to stored
criteria ...........................................18
Route planning * ................................18
Manually entering the route ...................18
Starting route planning .........................18
Route information ...............................19
Itinery ...............................................19
Changing the route ..............................19
Saving a route .....................................20
Loading a route ...................................20
Deleting routes ...................................20
Fly over/simulation * ..........................20
Starting fl y over/simulation ..................20
Ending fl y over/simulation ....................20
4
Page 5

Contents
Further functions after entering
the destination ..................................21
Saving destinations .............................21
Saving an entered destination/one of the
previous destinations as favourite .......22
Fixing the route settings .......................22
Starting to navigate ...........................23
Start navigation...................................23
On reaching the destination ..................23
Ending navigation ................................23
GPS reception lost ...............................24
Speech output during navigation ...........24
Map display during navigation ...............24
Navigation aids ................................24
Trip information display .....................25
Speed limit......................................25
Further functions during navigation ........25
Cancelling navigation ........................25
Skip next destination ........................25
Working with the map ........................26
Display map ....................................26
Shift and scale map ..........................26
Tap in the map .................................26
Buttons ..........................................26
Quick Menu ........................................27
Manage .............................................27
Changing stored routes* .......................27
Manage the last destination ..................28
Managing favourites .............................28
Selecting a POI according to stored
criteria ...............................................28
Managing user data .............................28
Managing POIs* .................................29
Creating a new group ...........................29
Change group details ...........................29
Distance for superimposing POI
symbols ..........................................29
Renaming a group ............................29
Changing a group symbol ..................29
Deleting a group ...............................29
Change POI details ..............................29
Renaming a POI ...............................30
Changing a POI symbol .....................30
Changing a POI position ....................30
Entering a new telephone number .......30
Entering new additional info ...............30
Deleting a POI ..................................30
Assigning a POI to a new group ...........30
Recording a route* .............................31
Recording routes .................................31
Replaying recorded routes ....................31
Editing track recording
(track information) ..............................31
Renaming saved routes .....................31
Assigning the track with a new colour ..31
Displaying the route on the map .........31
Deleting a track record ......................31
Exporting saved routes......................31
Settings in the navigation menu ..........32
Settings in simple mode .......................32
Map display* .......................................32
3D settings......................................32
Colour profi le ..................................33
2D terrain .......................................33
Street names ...................................33
Lane info .........................................33
Route planning settings* .......................33
Navigation settings* .............................34
Hold road position ............................34
Replanning after deviating from route ..34
Reactivating position fi xing ................34
Automatic overview mode .................34
Audio settings* ....................................35
Setting the dynamic volume ...............35
Regional settings* ................................35
Program language settings .................35
Setting the announcement language ...35
Units settings ..................................35
5
Page 6

Contents
Warning settings* ................................35
Warning while exceeding
the speed limit ................................36
Change speed camera
warning settings ...............................36
Activating warnings in
pedestrian mode ..............................36
Activating safety mode ......................36
Menu settings* ....................................36
Activating the animation ....................37
Selecting a background .....................37
Track information settings* ...................37
Making update interval settings ..........37
Activating auto save ..........................37
Set maximum route memory ..............37
Create NMEA/SIRF log ......................37
Product information* ............................37
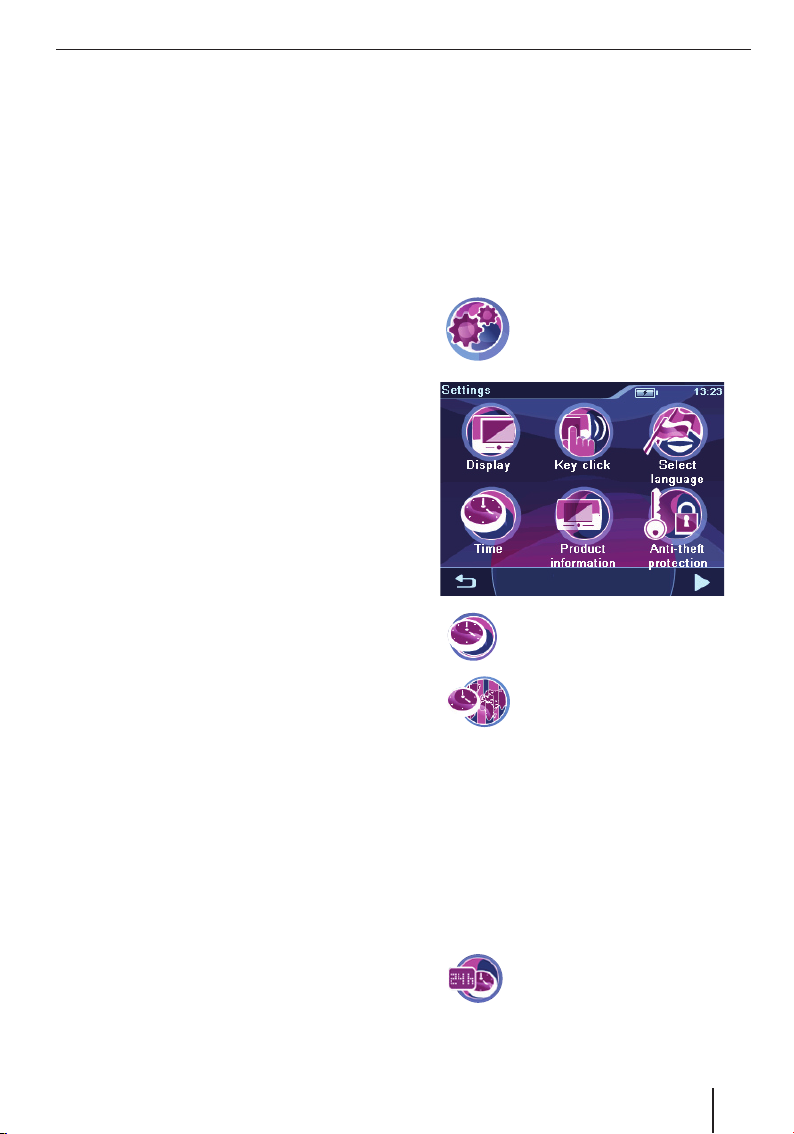
Device settings ..................................38
Display ...........................................38
Key clicks ........................................38
Language .......................................38
Time...............................................39
Product information .........................39
Anti theft protection .........................39
Factory settings ...............................39
Calibrating the touchscreen ...............39
Software ...........................................40
Newly installing the navigation software ..40
Updating the navigation software ...........40
Service .............................................40
Guarantee .........................................40
Technical Data ...................................40
Problem assistance table ...................41
6
Page 7
Safety notice
Safety notice
It is in your own interest to read the following
safety references carefully before you operate the
device.
Warning symbols used
In this chapter warning symbols highlight
important notices to you and for this device.
DANGER!
Warns against injury or possible danger
to life
DANGER!
Warns against accidents
Intended use
This device was conceived for mobile use in
vehicles.
Special information regarding the navigation
of trucks, buses and motor homes, such as
height and width restrictions as well as maximal
permissible road weights are not contained in the
navigation data!
Offroad navigation (offroad navigtion) is possible
with this navigation device.
Road safety
The navigation device does not relieve you of your
responsibility as a driver for correct and prudent
behaviour on the road. Always consider the
relevant traffi c regulations that apply.
Use your device in such a way that you can always
steer your vehicle properly. If in doubt stop the
vehicle and then operate the device with the
vehicle stationary.
General safety information
Consider the following tips in order to protect
yourself and the device against defects and
against injuries or possible mortal danger due to
fi re or explosion:
Protect the equipment against becoming
•
wet or damp as it is not waterproof or
splash-proof.
Do not open or change the device. It could
•
be otherwise become damaged and catch
fi re or explode. Or corrosive fl ammable liquid
could leak out of the battery.
Do not locate the device in very low (under
•
-20 °C) or very high temperatures (over
60 °C), e.g. near to fi re, heaters or in the
parked car under direct sunlight. Otherwise
condensation may form in the device or it may
become overheated. The device or battery
could become deformed and even ignite or
explode. Or corrosive fl ammable liquid could
leak out of the battery.
If you come into contact with fl uid from the
•
battery, especially in the eyes or on the skin,
rinse immediately with water and contact a
doctor.
Remove the device from the power supply
•
when you turn your vehicle off, since it will
continue to use up power and otherwise the
vehicle battery could become discharged.
Do not however, pull out the power supply
plug from the connection on the device. The
cable can become damaged and also cause an
electric shock.
7
Page 8
Safety notice | First operation
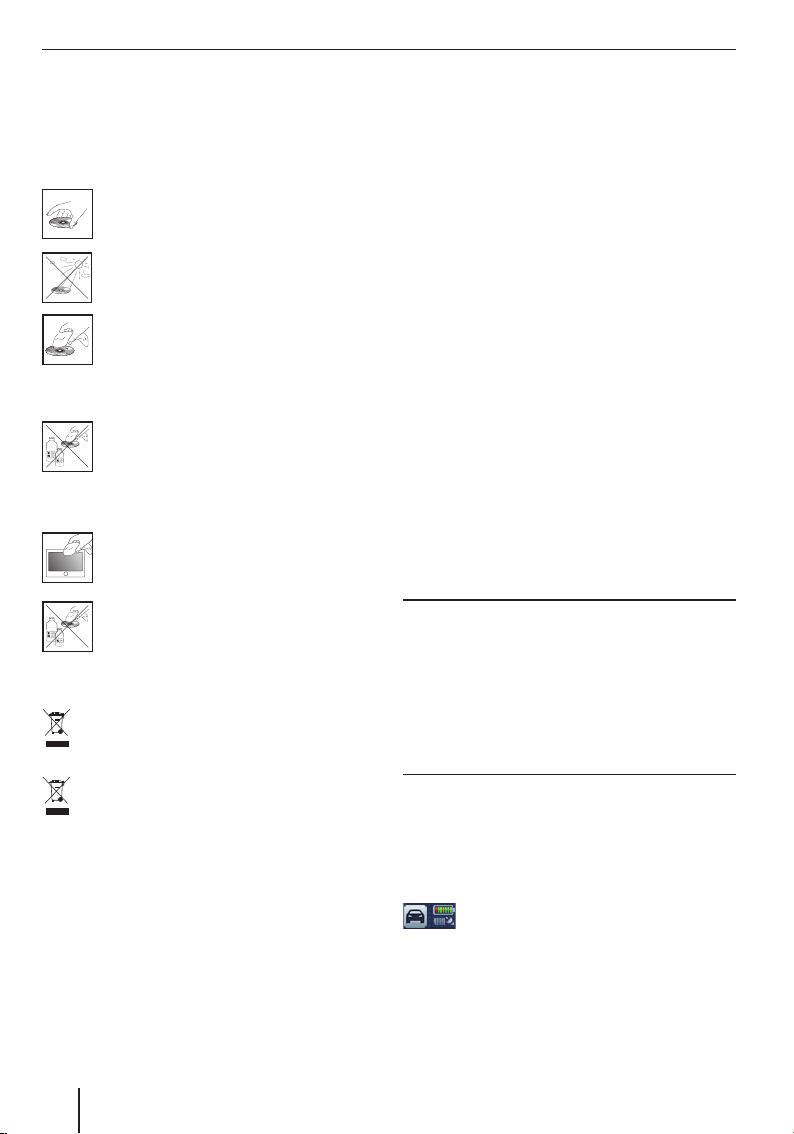
Tips about using the CD/DVD
A CD/DVD is included with the device, which
contains navigation software and a digital map.
In order to protect the CD/DVD against dirt and
damage please consider the following info:
Store the CD/DVD in its case. Only touch
to edges of the CD/DVD.
Do not place the CD/DVD and its case in
direct sunlight.
Only use a clean CD/DVD. Clean the
CD/DVD with a soft, lint free cloth from
the inside outward.
Never clean the CD/DVD in the direction
of play.
Do not use solvents even on the printed
side of the CD/DVD.
Cleaning tips
Clean the display with a dry, soft cloth.
Water and other fl uids can destroy the
display.
Do not use any strong solvents for cleaning
the casing. Use only a dampened, lint free
cloth.
Disposal tips
For the disposal of the old equipment make
use of the return and collecting systems
available.
Do not throw defective batteries into the
domestic waste, separate these out and
place them in the appropriate collecting
points.
First operation
Scope of delivery
The following specifi ed parts are included in the
delivery:
Navigation device
•
Suction cup mounting plate
•
Charging cable for the cigarette lighter
•
Operating instructions
•
Backup DVD
•
Note:
We recommend the use of original Blaupunkt
accessories (www.blaupunkt.com).
Screen protector
Remove the protective fi lm carefully from the
display.
Charging the battery
The battery may be discharged on purchase of
the navigation device. Charge the battery before
using the device.
CAUTION!
Non-certifi ed battery chargers can destroy
batteries.
Use only the original battery charger from
Blaupunkt for operation and charging in order
to correctly charge and to protect against
overvoltage.
Depending on the kind of use you can operate
the device for up to 3 hours with the installed
battery. Charging takes about 2 to 3 hours. The
charging status is located on the map display of
the navigation in the bottom left hand corner.
The upper symbol on the map display
button indicates the charging status.
If the charge of the battery becomes very weak the
navigation device will display it.
Attach the mains battery charger or the
쏅
charger cable for the cigarette lighter to the
charging socket.
8
Page 9
First operation | Mounting in the vehicle
A
Note:
The battery is equipped with a protection from
overheating from excessive current fl ow. The
protection prevents the overloading of the
battery starting from an ambient temperature
over 45 °C.
Turning the device on
A
Press the on/off switch for longer than 3
쏅
seconds.
Setting the language
When you switch the equipment on for the fi rst
time, a dialogue menu is indicated in which you
can select a language and a voice.
쏅
Select your preferential language and voice in
the dialogue menu.
쏅
Follow the instructions.
The language is then loaded. The end user
licence agreement (EULA) is then displayed.
쏅
Tap on the button Accept to accept the
contract.
Selecting simple mode/advanced
mode
After you have set the language and confi rmed the
licence agreement, 2 modes for the operation are
offered.
Note:
The mode can be changed over at any time
(see chapter "Using the menus, Simple mode/
advanced mode").
Tap on the button to select the mode:
쏅
Simple Mode:
–
Clear operation for fast destination input.
Access to the most important functions
and settings. Values are fi xed for the
remaining settings, which are optimum
for the simple use of the device.
Advanced Mode (or expert mode):
–
Access to additional functions and
settings of the device (in this manual
marked by a star "*" ).
Mounting in the vehicle
For temporary assembly in the vehicle a mounting
plate is attached to the navigation device for
attachment to the windscreen.
DANGER!
Assembly in an unsuitable place can
cause injury.
Install the navigation device in such a way that your
view is not obstructed and you are not distracted
from the traffi c.
Do not mount the device in the blowing up vicinity
of any airbag.
Make sure that no passengers can be endangered
by the device during emergency braking.
Examine in regular intervals the fi rm fi xing of
the mounting plate. Changes in the ambient
temperature can reduce the adhesion.
Attaching the suction cup mounting
plate
Find a suitable place in the vehicle for
쏅
mounting.
The screen must be free from dust and grease.
Clean the screen if required with a screen
cleaning cloth.
9
Page 10
Mounting in the vehicle | Switching on /off
쏅
Press the suction cup of the mounting against
the screen.
쏅
Fold the lever at the mounting plate toward
the screen.
Attach the cup retainer
The suction cup mounting plate has two supports
for the cup retainer.
쏅
Push the cup retainer onto the supports until
they engage.
Attach the device in the retainer
The device has two recesses on the lower surface
and a recess on the back for the retainer.
쏅
Place the device with the lower surface fi rst
on the retainer and press it to the rear.
The clamp support of the retainer must
engage audibly into the device back.
쏅
Align the mounting plate.
Removing the device
Press the clamp support downward.
쏅
The device is then detached from the
retainer.
Remove the device.
쏅
Removing the suction cup mounting
plate
If you change vehicles, you can remove the
mounting plate very simply.
Fold the lever at the mounting plate away from
쏅
the screen.
Remove the suction cup carefully at the edge
쏅
of the screen, so that air can come between it
and the screen.
Take the suction cup off carefully from the
쏅
screen.
Switching on /off
With the on/off switch you can turn the device on
or off as well as opening the main menu.
Switching on
Press the on/off switch for longer than 3
쏅
seconds.
Switching off
Press the on/off switch for longer than 3
쏅
seconds.
The device is then in stand-by mode and
remains ready for use. Only after 20 minutes
are all functions completely switched off.
Note:
Also in the switched off state the equipment
uses a small quantity of energy. If you use the
device again after a longer period, charging of
the battery may be necessary.
Reset
If the device does not function properly, a reset
may help.
Press the on/off switch for longer than 14
쏅
seconds.
The equipment is switched off and
automatically restarts.
10
Page 11
Using the menus
Using the menus
Simple mode/advanced mode
2 modes are available for the operation of the
device: The simple mode for fast destination input
and the advanced mode with many additional
settings and functions. The modes can be changed
at any time.
Note:
Additional functions and settings of the
advanced mode are marked by a star "*" in
this manual.
The provided short manual contains detailed
information regarding the simple mode.
Changing modes
쏅
쏅
쏅
쏅
Main Menu
Tap on the symbol in the main menu.
The Navigation Menu is displayed.
Tap on the symbol in the navigation
menu.
The Settings menu is displayed.
Tap on the button Advanced Mode to select
the advanced mode.
-orTap on the button Simple Mode to select the
simple mode.
You can access the navigation and the settings
from the main menu.
Press the on/off switch briefl y in order to get
쏅
to the main menu from any other menu.
Navigation menu
If you have selected the advanced mode the
additional functions Route and Manage are
available.
쏅
Advanced menu Route*
Advanced menu Manage *
Tap on the symbol in the main menu.
The Navigation Menu is displayed.
You can only then access the Route menu
if you have already entered a destination
or planned a route with several
intermediate objectives.
In the Route menu you will fi nd an
overview and auxiliary functions for the
computed routes. You can work on, or fl y
over the routes. You can fi nd descriptions
about this in the chapters "Route planning"
and "Fly over/simulation".
In the Manage menu you change the
saved route and manage the whole route
record. In addition you can edit the last
destinations and favourites, administer
POIs and change stored search criteria
for POIs. You can fi nd descriptions about
this in the chapters "Manage" and
"Managing POIs".
11
Page 12
Using the menus | Information about GPS
Buttons
Tap on this button in order to return to the
previous menu.
Tap on this button in order to turn to the
next page in the menu.
Done: Tap on this button in order to confi rm an
entry or a setting.
Keyboard
If a keyboard is needed (e.g. for typing in a
destination) a virtual keyboard appears on the
display. You can then make all inputs by tapping
with your fi nger.
These keys can be found on the keyboard:
Delete last character
쏅
Tap on an entry in order to select it.
Information about GPS
The GPS (Global Positioning System) makes
world-wide navigation and detection possible via
satellites for positioning.
GPS functionality
The navigation device measures the current
position of your vehicle via GPS and compares
these coordinates with its digital map. The digital
map contains the coordinates of the special
destinations, roads and places, which you can
see on the display of the navigation device. From
this the device computes the route to your entered
destination.
Enter a blank space
Change between upper & lower case
Display special character pallet
Set keyboard layout according to
region
During input the device automatically
supplements characters if possible, and only
offers letters on the keyboard which can
logically follow.
Lists
Often you can display lists, from which you can
select an entry (e.g. a destination). If you enter
for example an incomplete name of a place, a list
with possible results is indicated.
In order to display a list with further suitable
entries tap on the Done. Longer lists take more
time to be displayed.
쏅
Tap on one of the buttons in
order to leaf through the list.
Displaying GPS info
Information about the GPS reception of the
device, your current position and your speed can
be found in the menu GPS Info.
쏅
Tap on the button in the Navigation Menu on
the Map.
The map is displayed.
쏅
쏅
Tap on the symbol.
The Quick Menu is displayed.
Tap on the button GPS.
The GPS-Data menu is displayed.
12
Page 13
Information about GPS | Making basic adjustments
This information can be found in the menu.
Accuracy: Signal strength of the GPS
–
satellites
In addition, the number of received GPS
–
satellites is represented by bars (the
colour represents the signal strength).
For navigation signals at least 3 satellites
are needed.
Latitude/Longitude: Current position in
–
latitude/longitude
Elevation : Current height above sea
–
level
Speed : Current speed of the vehicle
–
Time: Current time, which is sent by the
–
GPS satellite
Note:
Buildings, tunnels and external infl uences can
disturb the view to the sky and thus the GPS
reception of the navigation device.
Making basic adjustments
Before you start navigating to a destination, make
these basic adjustments:
Set the time zone for your location, so that
•
during navigation the correct arrival time is
indicated to you.
•
Activate the PIN request in order to block the
use of the equipment from unauthorized use.
Setting the time zone
쏅
쏅
Tap on the symbol in the main
menu.
The Settings menu is displayed.
Tap on the symbol.
The Time menu is displayed.
쏅
Select your time zone from the list of available
쏅
time zones.
Note:
The display of the state capitals in the
respective zone facilitates the selection for
you. "GMT" stands for Greenwich Mean Time,
the mean solar time at the prime meridian
without consideration of summer time.
쏅
Tap on the button OK.
쏅
Tap on the symbol.
A list of available time zones is
displayed.
Tap on the symbol in order to change
between the 24-hour and 12-hour
displays.
13
Page 14

Making basic adjustments
쏅
쏅
Tap on the symbol to activate
summer time (ticked) or to deactivate
it (not ticked).
Note:
Adjust the settings if the time has changed at
your location, or if you must adapt to another
time zone.
Tap on the button to leave the menu.
Activating the PIN request
You have the possibility with the PIN request of
blocking the use of the device to unauthorised
access. Thus each time that you switch the
device on your PIN (Personnel Identity Number)
is queried which you have set up. You can change
the PIN at any time. If you forgot the PIN, you
can unblock the device with the PUK (Personnel
Unblocking Key), which you can set up. The PUK
cannot be changed.
Note:
With the PIN input you have only 3 attempts
to enter the correct PIN and then 3 attempts
to enter the correct PUK. If you enter a wrong
PUK for the third time, your device will
become irrevocably blocked and you will have
to return the device to Blaupunkt Service.
Setting up the PIN request
쏅
Tap on the symbol in the main
menu.
The Settings menu is displayed.
The initial set up is followed by the invitation to
enter a PUK. The PUK serves for the unblocking of
the device if you forget the PIN.
Follow the instructions and enter the PUK of
쏅
your choice.
Tap on the button OK.
쏅
In order to safely store your PUK:
Register on the Internet at http://puk.
쏅
blaupunkt.com and follow the instructions.
Blocking/unblocking the device
Requirement:
You have set up the PIN request.
•
Tap in the Anti Theft Protection menu on the
쏅
button Protection Setup to block the device
(ticked) or to unblock it (not ticked).
The PIN request is displayed.
Enter your PIN.
쏅
Tap on the button OK.
쏅
Changing the PIN
Tap in the Anti Theft Protection menu on the
쏅
button Change PIN Code.
The PIN request is displayed.
Follow the instructions and enter the PIN of
쏅
your choice.
Tap on the button OK.
쏅
쏅
쏅
쏅
쏅
쏅
14
Tap on the symbol.
The Anti Theft Protection menu is
displayed.
Tap on the button Protection Setup.
Tap on the button OK.
The PIN request is displayed.
Follow the instructions and enter the PIN of
your choice.
Tap on the button OK.
Page 15

Navigation
Navigation
The navigation equipment does not relieve you
of your responsibility as a driver for correct and
prudent behaviour on the road.
DANGER!
Diverting your attention away from
the road can cause accidents!
Do not operate the device while driving.
Look at the display in a safe traffi c environment.
Notes:
•
Plan the route before you start.
•
Use the basic settings initially.
Starting navigating
쏅
Destination input (search menu)
In the destination input you have the possibility
of entering an address, or selecting a destination
from the memory (favourites), of selecting one of
the last destinations, entering coordinates* or to
select a POI.
쏅
Note:
You can only select destinations (countries,
cities, roads, house numbers, POIs), which
are contained in the digital map.
Tap on the symbol in the main
menu.
The Navigation Menu is displayed.
From this menu you can change
directly to the map or to the
destination input.
Select in the menu Navigation Menu
on the symbol.
The Find Menu is displayed.
Entering an address
쏅
쏅
쏅
쏅
쏅
쏅
쏅
쏅
쏅
Tap on the symbol.
The Find Address menu is displayed.
Note:
The entering of country, city and road do
not need to be repeated each time. Only if
your destination is at another location than
the previous one, must you re-enter the
destination address.
Tap on the button <Country> in order to
select another country.
Tap on the button <City> and enter the city or
the postal code.
-orTap on the symbol in order to pull
up a display a list of previously
entered cities.
Select a city from the list.
Tap on the button City Centre in order to
select the city centre.
-or-
Tap on the button <Street Name> and enter
the street.
Tap on the button <House Number> and
enter the house number.
-or-
Tap on the button Street Midpoint to select
the midpoint of the selected street.
15
Page 16

Navigation
-orTap on the button Intersection and enter the
쏅
road which crosses the entered road.
The map is displayed.
Tap on the button Set as Destination.
쏅
The route is computed and the navigation is
started.
Note:
You have the possibility after entering the
•
destination of starting the navigation or
e.g. of storing the destination. For this,
read the chapter "Further functions after
entering the destination".
•
The navigation starts as soon as a GPS
signal is received.
Selecting a destination from the favourites
Requirement:
•
You have stored at least one destination
previously as a favourite (see chapter "Further
functions after entering the destination").
쏅
Tap on the symbol.
The Favourites menu is displayed.
Tap on the desired symbol.
쏅
The address of the destination is displayed.
Tap on the button Set as Destination to start
쏅
the navigation.
Selecting one of the last destinations
쏅
Tap on the symbol.
The History menu is displayed.
Tap on the desired symbol.
쏅
The address of the destination is displayed.
Tap on the button Set as Destination to start
쏅
the navigation.
Entering coordinates *
Only available in advanced mode:
쏅
Tap on the symbol.
The Coordinate Input menu is
displayed.
An example of coordinates in
degrees of longitude and latitude is
displayed.
Tap on the button Coordinate Display
쏅
Format to swap the coordinates between the
decimal and GMS format (Degrees, Minutes
and Seconds).
Tap directly on the latitude in order to select
쏅
it.
With the button N/S you can change between
the northern and southern latitudes.
Tap directly on the longitude in order to select
쏅
it.
With the button E/W you can change between
the east and west longitudes.
Tap on the button Done.
쏅
Tap on the button Set as Destination to start
쏅
the navigation.
Selecting a destination from the map*
Only available in advanced mode:
Tap on the button Plan on Map.
쏅
The map is displayed.
Shift and scale the map, as described in the
쏅
chapter "Working with the map".
Tap on the location or the street of your
쏅
choice.
The place is marked and its name indicated in
the lower display bar.
Tap on one of the buttons in order to select
쏅
a location as a destination or a stopover on a
route.
Add Start: Using a location for navigation
–
and starting navigation
16
Page 17

Insert Via: Adding a location on a route
–
as a stopover
Continue: Adding a location as a
–
stopover on the current route. Further
places can be entered in the map as
stopovers or a destination.
Remove : If you mark a destination, the
–
button is displayed. The destination is
removed.
쏅
Tap on the button Set as Destination to start
the navigation.
Points of interest (POI)
Points of interest (or POI's) are specifi c locations
such as parking and petrol stations wihch are
stored in the digital map.
쏅
Select the POI in a specifi ed location
쏅
Enter an address (see chapter "Entering an
쏅
address")
Select the POI category.
쏅
Select the POI.
쏅
Tap on the button Set as Destination to start
쏅
the navigation.
Select in the menu Find Menu on
the symbol.
The menu Where to search? is
displayed.
Tap on the menu Where to search?
on the symbol.
The Find POI By Address menu is
displayed.
Navigation
Select a POI in the local area, in the area of the
destination, or on the route
쏅
쏅
쏅
쏅
쏅
쏅
Selecting POIs on the map
쏅
쏅
쏅
쏅
쏅
쏅
쏅
Tap on the menu Where to search?
on the symbol in order to search for a
POI near to your current position.
-or-
Tap on the menu Where to search?
on the symbol in order to search for a
POI near to your destination.
Note:
The destination area which you last started
navigating to is selected as the destination.
-or-
Tap on the menu Where to search?
on the symbol in order to search for a
POI along the currently selected
route.
Select the POI category.
Select the POI.
Tap on the button Set as Destination to start
the navigation.
Tap on the menu Where to search?
on the symbol.
The map is displayed.
Shift and scale the map, as described in the
chapter "Working with the map".
Select the location of your choice.
The place is marked and its name indicated in
the lower display bar.
Tap on the button OK.
Select the POI category.
Select the POI.
Tap on the button Set as Destination to start
the navigation.
17
Page 18

Navigation | Route planning
Selecting a POI according to stored criteria
The search criteria enables a quick search of the
POIs. The POIs are divided in such a way in certain
categories, e.g. Parks, shopping and eating.
Tap on the menu Where to search? on the
쏅
button Saved Search Criteria .
Select one of the stored criteria.
쏅
A list of the associated POIs is displayed.
Select the desired POI.
쏅
The map is displayed.
Tap on the button Set as Destination to start
쏅
the navigation.
Route planning *
Requirements:
You have entered a destination and started
•
navigating
Manually entering the route
If you would like to enter a route with another
position than your current GPS position, proceed
as follows:
Enter the route as usual in the destination input.
쏅
Enter an address (see chapter "Destination
input")
Note:
You can enter favourites like an address and
edit it in the route planning.
쏅
Tap on the map on the button More Options.
쏅
Tap on the button Set as Start.
The selected address will be set as the starting
point of the route.
쏅
Looking for a further address in order to set a
stopover or a destination.
쏅
Tap on the button Set as Destination to select
the address as a destination.
-or-
쏅
Tap on the map on the button More Options.
쏅
Tap on the button Insert as Via to select the
address as a stopover.
18
Starting route planning
쏅
Tap on the symbol in the navigation
menu.
The Route menu is displayed.
Page 19

Route information
The Route Information menu contains information
about the route, e.g. about the travel time and
distance with the current route settings (mode).
쏅
쏅
쏅
쏅
쏅
쏅
쏅
쏅
쏅
Tap on the symbol.
The menu Route Information is
displayed.
Tap on the button Plan on Map in order to
display the route on the map.
Tap on the button Start Navigating to start
the navigation.
Tap on the button to leave the menu.
-orTap on the button Delete Route to delete the
current route.
-orTap on the button Settings to change the
route settings.
The menu Route Settings is displayed.
Tap on the button Vehicle to select the speed
profi le.
The profi le "Emergency" is particularly meant
for rescue services and leads you also down
one-way streets or special routes.
Tap on the button Road Types Used for Route
Planning in order to permit certain kinds of
road (ticked) or to avoid them (not ticked).
Tap on the button Route Calculation Method
to select the type of route calculation:
Fas t: The route with the fastest travel
–
time is computed.
Route planning
–
Short: The route with the shortest travel
distance is computed.
–
Easy: The route with the simplest routing
and fewest crossings is computed.
–
Economical: The route with the lowest
travel costs as possible (fuel economy) is
computed.
쏅
Tap on the button to leave the menu.
Itinery
In the Itinery menu you can have an overview of
the route displayed.
쏅
쏅
쏅
Tap on the symbol.
The Itinery menu is displayed.
Tap on the button Modus in order to swap
between the "Itinery", "Detailed instructions"
and "Road list" views.
Tap on the button to leave the menu.
Changing the route
쏅
쏅
Tap on the point of route which you want to
shift or delete.
쏅
-or-
쏅
Tap on the button Remove to remove the
route point from the route list.
-or-
쏅
Tap on the button Optimise to optimise the
route.
쏅
Tap on the symbol.
The points on the route are
displayed.
Tap on the button in order to
shift the destination in the route
list up or down.
Tap on the button to leave the menu.
19
Page 20

Route Planning | Fly over/Simulation
Saving a route
쏅
쏅
쏅
Tap on the symbol to save the route.
The keyboard is displayed.
Type in a name for the route.
Tap on the button Done.
The route is saved under the name you gave
it.
Loading a route
Requirements:
•
You have saved at least one route (see: "Saving
a route").
Note:
If you load a stored route the current route is
overwritten.
쏅
쏅
Tap on the symbol.
The saved routes are listed.
Tap on a route in the list which you would like
to load.
Deleting routes
쏅
쏅
Tap on the symbol.
An inquiry is then displayed.
Tap on the button Ye s to delete the route.
Fly over/simulation *
Plan your holiday trip comfortably from home and
provide youself with an overview of the distance
and travel time - also without GPS reception.
Select fl y over or simulation: Fly over consists of a
fast display of the route without audio instructions.
With simulation the route is simulated with audio
instructions and a realistic speed.
Starting fl y over/simulation *
Requirement:
You have planned a route (See: "Route
•
planning").
•
If no GPS reception is available you must set
the starting point (see: "Route planning").
쏅
Tap on the Route Menu on the button Fly Over
to fl y over the route.
-or-
쏅
Tap on the Route Menu on the button Simulate
to simulate the route with audio instructions.
Note:
During simulation/fl ying over you have the
same possibilities as during a navigation (see
chapter "Map display during navigation").
After the simulation/fl y over the Route Menu
is displayed.
20
Ending fl y over/simulation
Tap on the map display on the button Stop.
쏅
Page 21

Further functions after entering
the destination
Requirements:
You have entered a destination as described
•
in the chapter "Destination input"
-orYou have entered a POI as described in the
•
chapter "Points of interest"
-orYou have selected a position in the map as
•
described in the chapter "Working with the
map", "Tap in the map".
The map is displayed.
Tap on the button Set as Destination to start
쏅
the navigation.
-orOnly available in advanced mode: Tap on the
쏅
button Insert Via* to add the location as a
stopover.
Note:
A stopover can only be inserted if you have
previously specifi ed a destination.
-orOnly available in advance mode: Tap on the
쏅
button Place Pin* to start the navigation.
-orTap on the button More Options * to show
쏅
additional buttons.
-orOnly available in advanced mode: Tap on the
쏅
button Routing Methods* in order to indicate
the computed routes on the basis of available
route variants.
Select the route which best suits your needs.
쏅
-or-
Further functions after entering the destination
쏅
Only available in advanced mode: Tap on
the button Set as Start* to use the selected
address as the starting point for the route.
-or-
쏅
Only available in advanced mode: Tap on the
button Continue* to use the selected address
as the last destination of the route.
The old destination remains as a stopover.
-or-
쏅
Only available in advanced mode: Tap on the
button Save as POI* to save the selected
address as a POI.
-or-
쏅
Only available in advanced mode: Tap on the
button Save as Camera* to save the selected
address as a location where a speed camera
is located.
-or-
쏅
Only available in advanced mode: Tap on
the button Add to Favourites* to save the
selected address as a favourite.
Note:
The offer of the functions depends on whether
you have already entered a destination or are
entering a new destination. Buttons which
are available only in the advanced mode are
marked with a star "*".
Saving destinations
There are two lists in which individual destinations
are saved:
In the Favourites
•
In the list Last Destinations
•
All destinations in which the route has been started
are automatically stored in the Last Destinations.
The previous 100 destinations are saved.
Every entered destination and those in the Last
Destinations list can be permanently stored in
the Favourites. That is particular sensible if you
frequently travel to this destination.
21
Page 22

Further functions after entering the destination
Destinations from the Favourites can be renamed
(see: "Manage").
You can delete individual destinations again from
both lists (see "Manage").
Saving an entered destination/one of the
previous destinations as favourite
Requirements:
You have entered a destination as described
•
in the chapter "Destination input"
-orYou have selected a destination from the
•
History list as described in the chapter
"Destination input".
The map is displayed.
쏅
Tap on the button Add to Favourites to call up
the additional menu.
A list is displayed.
쏅
Select a list point under which you would like
to store the selected address.
Note:
You can select an empty list point or overwrite
an existing one.
The keyboard is displayed.
쏅
Give the destination a name and tap on the
button Done.
The destination is then saved in the
Favourites.
쏅
Tap on the button Settings.
쏅
The menu Route Settings is displayed.
Tap on the button Vehicle in order to select
쏅
the speed profi le.
The profi le "Emergency" is particularly meant
for rescue services and leads you also down
one-way streets or special routes.
Tap on the button Road Types Used for
쏅
Route Planning to select specifi c types of
road (ticked) or to avoid them (not ticked).
Tap on the button Route Calculation Method
쏅
to select the type of route calculation:
–
–
–
–
Tap during the navigation in the
map display on the symbol for the
next instruction for directions.
The menu Route Information is
displayed.
Fas t: The route with the fastest travel
time is computed.
Short: The route with the shortest travel
distance is computed.
Easy: The route with the simplest routing
and fewest crossings is computed.
Economical: The route with the lowest
travel costs as possible (fuel economy) is
computed.
Fixing the route settings
The Route Information menu contains information
about the route, e.g. about the travel time
and distance with the current route settings
(method).
The route settings can be changed at any time. If
you change the settings travel time and distance
can also change.
22
Page 23

Starting to navigate
DANGER!
Not adhering to traffi c regulations
can cause accidents.
Only follow the directions if the state of the road
and the traffi c regulations allow it. The navigation
device will bring you to your destination even if
you have to deviate from the planned route.
Starting to navigate
Note:
You can orient yourself at any time on the map
or arrow representation.
Start navigation
When you start the navigation a route with your
settings is computed (see "Fixing the route
settings"). The destinations are automatically
stored in the "Last Destinations".
Requirements:
You have entered a destination as described
•
in the chapter "Destination input".
-orYou have entered a POI as described in the
•
chapter "Points of interest".
-orYou have planned a route as described in the
•
chapter "Route planning".
Tap on the button Set as Destination.
쏅
The route is computed and the navigation is
started. The map is displayed.
Note:
Navigation only then starts when a GPS signal
is received.
The so-called "Carsor" shows you your
position.
The compass shows your current
direction.
Note:
If you enter a further destination during an
active navigation and start the navigation, you
have two possibilities:
•
You can set the destination as a stopover.
Then the route is recalculated and the
stopover is the next destination.
•
Or you start a new navigation to the entered
destination.
On reaching the destination
As soon as the destination is reached, the message
"You have reached your destination" is issued. You
current position is then marked on the map.
Ending navigation
Tap on top action arrow on the map.
쏅
The menu Route Information is displayed.
Tap on the button Skip Next Via to stop the
쏅
navigation.
Tap on the button Delete Route to stop the
쏅
navigation.
An inquiry is then displayed.
쏅
Tap on Yes to stop the navigation.
The map is displayed.
23
Page 24

Starting to navigate
-orTap on No to continue navigating.
쏅
GPS reception lost
If during navigation the GPS reception is disturbed
over longer period of time, the navigation is
stopped. As soon as the reception is re-established
the device automatically recognizes whether your
position has changed and computes the route
again if necessary. You can then simply continue
navigating.
Note:
External infl uences can disturb the view
to the sky and thus the GPS reception of
the navigation device. Refer to the chapter
"Problem assistance table".
Speech output during navigation
Your navigation device supports navigation with
spoken recommendations and states turning
points in time.
쏅
Press on the keys VOL - or VOL + to change
the speech output volume.
Map display during navigation
During navigation different navigation aids and
route information are superimposed on the map
display.
DANGER!
Neglecting the layout of the road can
cause accidents.
The information on the digital road maps cannot
be considered as being up to date due to short
term changes (road works etc.).
Additional information such as speed limits can
only be displayed if they are included in the digital
map.
Sign-posting and road layout always take priority
over information from the navigation device.
Navigation aids
24
The so-called "Carsor" shows you your
position.
Top fi eld: Name of the next street
Lower fi eld: Name of the current street
The action arrow top left indicates the
next action and the distance to it.
The action arrow bottom left indicates
the next but one action and the distance
to it.
Page 25

Click on the action arrow to display the Route
쏅
Information menu.
Tap on the lower action arrow to display the
쏅
Itinery menu.
Trip information display
The Destination menu contains information about
the route, e.g. the travel time and distance.
쏅
Tap on the symbol.
The Destination menu is displayed.
Starting to navigate
Further functions during navigation
Requirements:
Starting to navigate
•
-orRoute simulation (demo)
•
Cancelling navigation
쏅
In case you have entered a stopover:
쏅
Tap on the button Skip Next Via.
쏅
Tap on the button Delete Route.
A request appears
쏅
Tap on Yes to stop the navigation.
The map is displayed.
-or-
쏅
Tap on No to continue navigating.
Tap on the action arrow top left
during navigation.
The menu Route Information is
displayed.
Tap on the different buttons in order to display
쏅
the data during the navigation.
You can select a maximum of 3 buttons. The
selected buttons are then marked.
Speed limit
In the left area of the map if you are driving
too fast the speed limit is shown (see
chapter "Navigation settings").
Note:
The speed limit can be shown only if it is
activated in the settings (see chapter "Settings
in the navigation menu ").
Skip next destination
Requirements:
•
Route with at least 1 stopover (Route
planning)
쏅
쏅
Tap on the symbol to go to the
Destination.
The Destination menu is displayed.
Tap on the button Next Via Point to skip the
next stopover.
The route is recalculated and the destination
after next is started.
25
Page 26

Working with the map
Working with the map
Display map
Tap on the navigation menu on the button
쏅
Map.
쏅
Shift and scale map
In order to see the desired target area on the map,
you can shift the map view and scale the map (to
make it larger or smaller).
쏅
쏅
쏅
쏅
쏅
쏅
Tap in the map
쏅
쏅
쏅
Tap on the symbol to close the map
view and to return to the navigation
menu.
Tap on any place on the map in order to display
additional buttons.
Tap on the symbol to fade
buttons in or out.
Tap on one of the symbols to
make the map larger or
smaller.
Tap on the map and shift the map in the
desired direction.
Tap on one of the symbols to tilt
the map in 3D-view.
Tap on one of the symbols to
rotate the map in 3D-view.
Note:
When a GPS signal is received, the device
points the horizontal angle automatically in
the driving direction.
Tap on any place on the map in order to display
additional buttons.
Tap on a place (the road or a POI) on the
map.
The place is marked and its name indicated in
the lower display bar.
Tap on the button Cursor in order to
use further functions after entering
the destination.
Note:
If you tap on any place in the map during
navigation, an auxiliary menu with further
functions is displayed. For more on this,
read the chapter "Further functions during
navigation".
Buttons
These buttons are available on the map view:
쏅
쏅
쏅
쏅
쏅
쏅
Tap on the button Menu to go to the
navigation menu.
Tap on the button 2D or 3D to
swap between the 2D and 3D
views.
Tap on the button Detour to go to the
Detour menu.
Note:
In the Detour menu you can quickly add POIs
as a destination or a stopover (during active
navigation).
Tap on the symbol to go to the Find
Menu.
Note:
If you already entered a destination, the
upper and lower action arrow and the Route
Information menu appears.
Tap on the symbol to go to the Quick
Menu (see chapter "Quick Menu").
Tap on the symbol to go to the
Destination (see chapter "Map
display during navigation).
Note:
The display of the buttons differs depending
on which settings you made in the Destination
menu.
26
Page 27

Working with the map | Manage
Quick Menu
In the Quick Menu make the settings which are
often used during navigation.
쏅
쏅
쏅
쏅
쏅
쏅
쏅
Tap on the symbol to go to the Quick
Menu.
Note:
If you have activated the button Quick Menu,
the respective button is marked.
Adjust the volume control in order to change
the volume for navigation announcements.
Tap on the symbol in order to
switch between the day and night
views.
Tap on the symbol to activate the
route record (ticked) or to
deactivate it (not ticked).
Tap on the symbol to fade the 3D
objects in or out.
Note:
3D objects such as important
buildings and POIs can only be
displayed if they are included in
the digital map.
Tap on the symbol in order to
select the speed profi le.
The route will be recalculated if
necessary.
Tap on the button GPS to display the GPS
reception.
Manage
In the Manage menu you can manage different
route options, your user data as well as the
favourites and last destinations.
How you work on POIs and symbol as well as
changing groups are described in the chapter
"Managing POIs".
The chapter "Recording a route*" describes how
you record, reproduce and export routes on to
memory cards.
Changing stored routes*
Routes which you have created and stored can be
renamed and deleted.
쏅
쏅
쏅
쏅
쏅
쏅
Tap on the symbol in the navigation
menu.
The Manage menu is displayed.
Select in the menu Manage on the
symbol.
The Saved Routes menu is displayed.
The saved routes are listed.
Tap on the button to leaf
through the menu.
Tap in the list on a button in order to rename
the desired route.
The keyboard is displayed.
Give it a new name and tap on the button
Done.
Tap on the button to delete a route.
-orTap on the button Clear All to delete all the
쏅
saved routes.
In both cases a query is displayed.
Tap on the button Ye s to delete the route, or
쏅
all routes.
-orTap on No to cancel the process.
쏅
27
Page 28

Manage
Manage the last destination
쏅
쏅
쏅
Tap on the symbol.
The Manage History menu is
displayed.
Tap on the button Clear History to delete the
list.
-or-
Tap on the symbol to delete the last
destination.
Managing favourites
Requirements:
You have saved at least one favourite.
•
쏅
쏅
쏅
쏅
Tap on the symbol.
The Manage Favourites menu is
displayed.
Tap on the favourite to change the name.
Tap on the button Clear All to delete the list.
-or-
Tap on the symbol to delete a saved
destination.
Selecting a POI according to stored
criteria
The search criteria enables a quick search of the
POIs. The POIs are divided in such a way in certain
categories, e.g. Parks, shopping and eating.
쏅
쏅
쏅
쏅
Select in the menu Manage on the
symbol.
The menu Manage Saved Search
Criteria is displayed. The criteria are
listed.
Tap on a search criteria to change the name.
Tap on the button Clear All to delete the list.
-or-
Tap on the symbol to delete a POI.
Managing user data
Tap on the Manage menu on the button User
쏅
Data Management.
The User Data Management menu is
displayed.
Tap on the button Remove Pins to delete your
쏅
set pins.
-orTap on the button Backup User Data to
쏅
secure your user data.
Note:
In order to be able to secure your user data, a
memory card must be placed in the card slot.
The data can be stored only on a memory
card.
-orTap on the button Restore User Data to
쏅
restore your user data.
Note:
In order to restore your user data, you must
have the data previously secured on a memory
card.
-orTap on the button Delete User Data to delete
쏅
your user data.
-or-
쏅
Tap on the button Reset All Settings in order
to reset the settings in the navigation menu.
28
Page 29

Managing POIs
Managing POIs*
In the Manage POI menu you can manage and
delete your POIs. You have the following settings
options:
Create new group
•
Change group details
•
Change POI details
•
쏅
쏅
쏅
Creating a new group
Create groups in order to sort your POIs.
쏅
쏅
Change group details
You can work on and set the POI groups, starting
from which distance a POI symbol is superimposed
on the map.
Distance for superimposing POI symbols
쏅
쏅
If the group has further sub-groups, you can
likewise set the distance of the POI display. If the
same setting is to be used for all sub-groups:
쏅
Select in the menu Manage on the
symbol.
The Manage POI menu is displayed.
Tap on the button My POI or All in order to
change between your provided and all POIs.
Tap on the button to leaf
through the menu.
Tap on the button New Group.
The keyboard is displayed.
Give the group a name and tap on the button
Done.
The POI group will be placed on the list.
Tap on the button Edit in the Manage POIs.
Tap on the button with the desired distance.
Tap on the button Same Visibility in
Subgroups to activate the distance (ticked)
or to deactivate it (not ticked).
If you have made changes in the settings:
쏅
Renaming a group
쏅
쏅
쏅
쏅
Changing a group symbol
쏅
쏅
쏅
쏅
Deleting a group
You can delete a group with all contained POIs.
쏅
쏅
쏅
쏅
Tap on the button to leave the menu.
Tap on the button Edit in the Manage POIs.
Tap on the button Rename.
Type in a name.
Tap on the button Done.
Tap on the button Edit in the Manage POIs.
Tap on the button with the blue symbol.
A list of symbols is displayed.
Tap on the button to leaf through
the list of symbols.
Tap on the desired symbol.
In Manage POIs tap on the button Edit.
Tap on the button Remove.
Tap on the button Ye s to delete the group and
all POIs.
-orTap on No to cancel the process.
Change POI details
Working on individual POIs of a group and entering
additional information. A POI can also be assigned
to another group.
쏅
Tap on the button of the group. A list of POIs
is displayed.
29
Page 30

Managing POIs
Tap on the button with the name of the POI
쏅
which you want to change.
The details are displayed.
Renaming a POI
Tap on the button with the name of the POI.
쏅
The keyboard is displayed.
Give the group a name and tap on the button
쏅
Done.
Changing a POI symbol
Tap on the button with the blue symbol.
쏅
A list of symbols is displayed.
쏅
Tap on the button to leaf through
the list of symbols.
쏅
Tap on the desired symbol in order to assign
it to the POI.
Changing a POI position
쏅
Tap on the symbol.
The map is displayed with the position
of the POI.
쏅
Tap on the desired position on the map.
쏅
Tap on the button Select.
The new position is allocated.
Deleting a POI
Tap on the button Delete.
쏅
Tap on the button Ye s to delete the group and
쏅
all POIs.
-orTap on No to cancel the process.
쏅
Assigning a POI to a new group
Tap on the button Change Group.
쏅
A list of groups is displayed.
쏅
Tap on the button to leaf through
the list of groups.
Tap on the desired group.
쏅
Tap on the button Add here.
쏅
The POI is assigned to the new group.
Entering a new telephone number
쏅
Tap on the symbol.
The Phone Number Input is displayed.
쏅
Give the telephone number a name and tap on
the button Done.
Entering new additional info
쏅
Tap on the symbol.
The Extra Info is displayed.
쏅
Provide the information and tap on the button
Done.
30
Page 31

Recording a route*
In the Manage Saved Routes menu mark the route
and manage saved routes.
쏅
Recording routes
쏅
쏅
쏅
Replaying recorded routes
If you have already stored track information, these
are displayed in a list.
쏅
쏅
Editing track recording
(track information)
If you want to work on the recorded routes, look on
the map and export the geo data onto a memory
card.
쏅
Renaming saved routes
쏅
Tap on the symbol in the navigation
menu.
The Manage menu is displayed.
Tap on the symbol.
The Manage Track Logs menu is
displayed.
Tap on the button Record to start recording.
The map is displayed.
Tap on the button Stop Recording to stop
recording.
Tap on the button to start a recorded
route.
Tap during the playback on the stop symbol in
order to stop it.
Tap on the button with the name of the saved
track record.
The menu Track Information is displayed.
Tap on the button with the name of the saved
route.
The keyboard is displayed.
Recording a route
Give it a new name and tap on the button
쏅
Done.
Assigning the track with a new colour
The track is indicated in the selected colour on the
map.
Tap on the button with the desired colour.
쏅
-orTap on the button in order to fade out the
쏅
route on the map.
Displaying the route on the map
Tap on the button Fit to Screen.
쏅
The route is displayed on the map.
Deleting a track record
Tap on the button Delete.
쏅
Tap on Yes to stop the track recording.
쏅
-orTap on No to cancel the process.
쏅
Exporting saved routes
The routes are exported in GPS Exchange Format
(short form: GPX format). This is geo data, which
can be exchanged between devices and be worked
on by numerous programs and Web services.
You will need a memory card for the export. Which
memory cards are supported can be found in the
technical data.
Push your memory card into the card slot with
쏅
the contacts forward until the card docks.
Tap on the Track Information menu on the
쏅
button Export.
The route is stored in GPX format on the
memory card.
In order to remove the memory card:
Press the memory card carefully into the card
쏅
slot until it becomes unlocked.
31
Page 32

Settings in the navigation menu
Settings in the navigation menu
쏅
쏅
In the menu you can change the mode.
Tap on the button Simple Mode to change to
쏅
simple mode.
Note:
Additional functions and settings of the
advanced mode are marked by a star * in this
manual.
The provided short manual contains detailed
information regarding the simple mode.
Settings in simple mode
In the navigation menu tap on the button
쏅
Settings.
쏅
쏅
쏅
쏅
In the Settings menu you can change the
mode.
쏅
Tap on the button Advanced Mode to change
to advanced mode.
Tap on the symbol in the main
menu.
The navigation menu is displayed
Tap on the symbol.
The Settings menu is displayed.
Tap on the Settings menu on the
symbol to select the language for the
navigation.
Tap on the Settings menu on the
symbol to select another background
for the navigation menu.
Tap on the Settings menu on the
symbol to select the voice for the
speech output.
Tap on the symbol in order to display
product information.
Map display*
You can change these settings:
3D settings
•
Colour profi le
•
2D terrain
•
Street name display
•
Lane info
•
쏅
3D settings
In the 3D settings you can specify which of the
available 3D objects are to be displayed on the
map. In addition you can specify how detailed this
representation is to be.
쏅
쏅
쏅
쏅
Select in the menu Settings on the
symbol.
The Map Screen Settings is
displayed.
Tap on the button Landmarks in order to
activate or deactivate the 3D settings for
landmarks.
Tap on the button Elevated Roads in order
to activate or deactivate the 3D settings for
elevated roads.
Tap on the button Building Visibility in order
to change between the settings of "Off",
"Far", "Middle" or "Near".
Tap on the button Terrain Detail Level in
order to change between the settings of
"Off", "High", "Middle" or "Low".
Note
The settings of landmarks, elevated roads,
building display and terrain detail are only
correctly displayed if they are saved on the
digital map.
32
Page 33

Settings in the navigation menu
Colour profi le
In the Colour Profi les menu you have the possibility
of selecting different colour profi les for the day
and night views.
Tap on the button Night Mode to turn night
쏅
mode on or off.
Note:
You can easily select this function if necessary
in the Quick Menu (see chapter "Buttons on
the map display").
Tap on the button Daytime Colour Profi le
쏅
in order to select a colour profi le for the day
view.
Tap on the button Night Colour Profi le in
쏅
order to select a colour profi le for the night
view.
2D terrain
3D info can also be indicated in the 2D view by
colours or shading.
Tap on the button Elevation on 2D-Map in
쏅
order switch the elevation of the area in the
2D view on or off.
Street names
If you feel the display of street names during
navigation is disturbing, you can turn it off as
follows:
Tap on the button Show Street Names in
쏅
order to switch the display of street names in
the map display on or off.
Note:
As soon as you shift the map manually,
the street names are displayed for better
orientation - even if you have deactivated the
setting in this menu.
Lane info
Some roads contain lane information so that
you can organise yourself correctly at the next
crossing. This setting specifi es whether the
display of the lane info is to appear on top, at the
bottom, or not at all on the map.
쏅
Tap on the button Lane Information to
swap between the settings of "Off", "Top", or
"Bottom".
쏅
Tap on the button to leave the menu.
Route planning settings*
쏅
쏅
쏅
쏅
Select in the Settings menu on the
symbol.
The menu Route Settings is
displayed.
Tap on the button Vehicle in order to select
the speed profi le.
Note:
The profi le "Emergency" is particularly meant
for rescue services and leads you also down
one-way streets or special routes.
Tap on the button Road Types Used for
Route Planning to select specifi c types of
road (ticked) or to avoid them (not ticked).
Tap on the button Route Calculation Method
to select the type of route calculation:
Fas t: The route with the fastest travel
–
time is computed.
Short: The route with the shortest travel
–
distance is computed.
Easy: The route with the simplest routing
–
and fewest crossings is computed.
Economical: The route with the lowest
–
travel costs as possible (fuel economy) is
computed.
33
Page 34

Settings in the navigation menu
Navigation settings*
You can change these settings:
Hold road position
•
Replanning after deviating from route
•
Fixing the position
•
Automatic overview mode
•
쏅
쏅
Hold road position
쏅
With activated functioning the position indication
of your vehicle is adapted to the road system. If
you navigate as a pedestrian, this function is
automatically deactivated and your exact position
is indicated.
Replanning after deviating from route
쏅
Your route is automatically recalculated, should
you deviate from it. If this function is deactivated,
navigation is stopped until you return to the
original route.
If you select another starting point than your
current GPS position, the function is automatically
deactivated.
Select in the menu Settings on the
symbol.
The Navigation Settings is displayed.
If you have made changes in the settings:
Tap on the button to leave the menu.
Tap on the button Keep Position on Road to
activate this function (ticked) or to deactivate
it (not ticked).
Note:
If this function is deactivated, also switch
off the error correction for the GPS position.
Your indicated location can be affected by
positioning errors.
Tap on the button Off-route Recalculation to
activate this function (ticked) or to deactivate
it (not ticked).
Reactivating position fi xing
If you have turned or shifted the map and remain
inactive for a certain time, the map fi xes itself on
your position and re-activates an automatic map
turn. Here you can determine the inactive period
after which this happens.
Tap on the slider on the button Restore
쏅
Lock-to-Position to set the timeframe for the
position fi xing. The extreme position on the
right deactivates the function ("Off").
Automatic overview mode
Tap on the button Automatic Overview to
쏅
activate this function (ticked) or to deactivate
it (not ticked).
With activated functioning the map switches to the
overview mode until the next action on your route
falls below a certain distance. In the overview
mode the map is made smaller and represented
in 2D.
You can make further settings for the automatic
overview mode:
Tap on the symbol with the three points in
쏅
order to display further settings.
Tap on the slider to change the following
쏅
settings:
Turn Distance for Overview: Distance
–
up to an action, starting from which the
map changes into the overview mode
Default Zoom Level: Map scale for the
–
overview mode
34
Page 35

Settings in the navigation menu
Audio settings*
쏅
쏅
Setting the dynamic volume
쏅
You can make further settings for the dynamic
volume:
쏅
Using the Minimum Speed slider you can specify,
starting from which speed the volume is gradually
increased.
Using the Maximum Speed slider you can specify,
starting from which speed the loudest volume is
set.
Select in the menu Settings on the
symbol.
The Sound Settings is displayed.
If you have made changes in the settings:
Tap on the button to leave the menu.
Tap on the button Dynamic Volume in order
to let the volume automatic increase starting
from a certain speed.
Tap on the button Dynamic Volume Settings
in order to display further settings options.
Regional settings*
You can change these settings:
•
Program language
•
Announcement language
•
Units
쏅
쏅
Select in the menu Settings on the
symbol.
The Regional Settings menu is
displayed.
If you have made changes in the settings:
Tap on the button to leave the menu.
Program language settings
The button displays which program language is
used at present.
쏅
Tap on the button Program Language in order
to select from a list of available languages.
Setting the announcement language
The button indicates the presently used
announcement language, the used voice and
indicates its version number.
쏅
Tap on the button Voice Profi le in order to
select from a list of available languages and
voices.
Units settings
The button displays which units are being used at
present.
쏅
Tap on the button Units in order to decide on
the units used for the distance.
Note:
If you select a unit which is not supported
by the selected announcement language, a
warning appears.
Warning settings*
You can change these settings:
•
Warning while exceeding the speed limit
•
Speed camera warning
•
Warnings in the pedestrian mode
•
Safety mode
쏅
쏅
Select in the menu Settings on the
symbol.
The Warning Settings is displayed.
If you have made changes in the settings:
Tap on the button to leave the menu.
35
Page 36

Settings in the navigation menu
Warning while exceeding the speed limit
Tap on the button Warn When Speeding to
쏅
activate this function (ticked) or to deactivate
it (not ticked).
The maps can contain information about the
permitted maximum speed. If the function is
activated, you receive a warning if you drive too
fast.
Note:
The speed information is not available for
each region. Please ask your dealer.
Tap on the symbol with the three points
쏅
in order to have further settings options
indicated.
Tap on the slider In built-up areas in order
쏅
to set a tolerance value for in town. 100%
corresponds to the exact speed limit.
Tap on the slider Elsewhere in order to set
쏅
a tolerance value for out of town. 100%
corresponds to the exact speed limit.
There are two different kinds of warnings:
Tap on the button Audible Warning in order
쏅
to switch the warning on (ticked) or switch
the warning off (not ticked).
Tap on the button Visible Warning in order
쏅
to switch the warning sound on (ticked) or
switch it off (not ticked).
Change speed camera warning settings
Note:
Radar warnings are illegal in some countries.
It is your responsibility to guarantee that
the use is permitted for this function in the
country concerned.
Tap on the button Speed Camera Warning to
쏅
activate this function (ticked) or to deactivate
it (not ticked).
You can make further settings for the speed
camera warnings:
쏅
Tap on the symbol with the three points
in order to have further settings options
indicated.
쏅
Tap on the button Audible Warning in order
to activate this kind of warning ("simple"),
before reaching ("Before reaching") or
deactivated ("Off").
쏅
Tap on the button Visible Warning to activate
this warning function ("On") or to deactivate
it ("Off").
Activating warnings in pedestrian mode
쏅
Tap on the button Warn if too fast for a
Pedestrian to activate this function (ticked)
or to deactivate it (not ticked).
If you activated this function you receive a warning
if you move too fast for the pedestrian mode. You
are asked automatically whether you want to
change into auto mode.
Activating safety mode
쏅
Tap on the button Safety Mode to activate
this function (ticked) or to deactivate it (not
ticked).
With the activated safety mode you cannot use
the touchscreen if you drive faster than 10 km/h
(6 mph).
Menu settings*
You can change these settings:
Animation
•
Background
•
쏅
Tap on the Settings menu on the
button to leaf through the second
page of the menu.
36
Page 37

Settings in the navigation menu
쏅
쏅
Activating the animation
쏅
Selecting a background
쏅
Tap on the symbol.
The Menu menu is displayed.
If you have made changes in the settings:
Tap on the button to leave the menu.
Tap on the button Animation to activate
animated menus (ticked) or to deactivate it
(not ticked).
Tap on the button Background in order to
select one from a list of available background
images.
Track information settings*
You can change these settings:
Update interval
•
Auto save active
•
Maximum track memory
•
Create NMEA/SIRF log
•
쏅
쏅
쏅
Tap on the Settings menu on the
button to leaf through the second
page of the menu.
Tap on the symbol.
The menu Track Log Settings is
displayed.
If you have made changes in the settings:
Tap on the button to leave the menu.
When fewer position indications are to be stored,
less memory is needed for the recording.
Activating auto save
쏅
Tap on the button Enable Auto-saving to
automatically save routes (ticked) or to
deactivate it (not ticked).
The display Track Log Database Size shows you
how much memory is occupied by automatic route
recordings.
Set maximum route memory
쏅
Via the sliding control of the button Track Log
Max. Size you can set how much memory is
available for automatic route recording.
If the memory limit is reached, the oldest
automatic route recording is deleted.
Create NMEA/SIRF log
You have the possibility of transferring the received
GPS data as a text fi le on the memory card. They
can however not be displayed via the application,
but must be transferred to a computer.
쏅
Tap on the button Create NMEA/SIRF Log to
activate this function (ticked) or to deactivate
it (not ticked).
Product information*
쏅
Tap on the symbol in the second page
of the navigation menu.
The About menu is displayed.
Here you will fi nd information about the
software and the installed digital map.
Making update interval settings
Via the sliding control of the button Update
쏅
Interval you can control in which temporal
distances position indications are stored
during a route recording.
37
Page 38

Device settings
Device settings
Settings in the Settings menu:
Display
•
Key sounds (sounds of the buttons)
•
Language
•
Time
•
Product information
•
Anti theft protection
•
On the second page of the menu you will fi nd
these settings:
Factory settings
•
Calibrate touchscreen
•
쏅
쏅
If you have made changes in the settings:
쏅
Display
In the map settings you can select between the
day and night view or activate the automatic
change-over (see chapter "Working with the map",
"Changing map settings").
In the Display menu you can set the display
brightness for the day and night.
Beyond that it is possible to adjust the switching
threshold for the automatic change-over. With this
you can select when it switches between day and
night view.
쏅
Tap on the symbol in the main
menu.
The Settings menu is displayed.
Tap on the button to leaf through
this menu.
Tap on the button to leave the menu.
Tap on the symbol.
The Display menu is displayed.
Tap on the button Miniimum brightness
쏅
Night to set the night time brightness.
Tap on the button Switch Threshold to set
쏅
the automatic change-over.
A lower value states that e.g. already with
dusk it switches to night view. A higher value
causes a change-over only with darkness.
Key clicks
In the Key Clicks menu you can set the volume of
the key clicks, or mute them ("0"). In addition you
have the choice between different key clicks.
쏅
쏅
쏅
쏅
Language
In the Language menu you can set, in which
language the menus are to be displayed. The
acoustic outputs take place likewise in the set
language, if available. If the selected language is
not available for the acoustic output, this takes
place in English.
쏅
쏅
쏅
Tap on the symbol.
The Key Clicks is displayed.
Tap on the desired key click.
Tap on the button Volume.
The Key Click Volume is displayed.
Tap on one of the buttons in
order to set the volume.
Tap on the symbol.
A list of available languages is
displayed.
Tap in the list on the language, which you
would like to use for menus and acoustic
output.
Tap on the button OK.
Tap on the button Maximum brightness Day
쏅
to set the daytime brightness.
38
Page 39

Device settings
Time
In the Time menu you can make the
settings for the time such as time zone
and summer time. Only with the correct
settings can the correct arrival time be indicated
to you during navigation. Refer to the chapters
"Making basic adjustments" and "Setting the time
zone".
Product information
쏅
Tap on the symbol.
Product information about the
device, like the version of the used
map and the navigation software are
indicated.
Anti theft protection
In the Anti-Theft Protection menu you
can assign a PIN and a PUK to your
navigation device in order to protect it
against unauthorised use. Refer to the chapters
"Making basic adjustments" and "Activating the
PIN request".
Factory settings
In the Factory Settings menu you can set
navigation software back to the factory settings.
Note:
If you set the equipment back to the factory
settings, your personal settings and stored
destinations are deleted.
쏅
Select in the second page of the
menu Settings on the symbol.
The menu Factory Settings is
displayed.
쏅
Tap on the symbol, in order to reset
the settings for the navigation.
Tap on No to cancel the process.
쏅
Calibrating the touchscreen
You can re-align the touchscreen (calibrate it) if it
reacts inaccurately to contacts.
쏅
Select in the second page of the
menu Settings on the symbol to start
the calibration.
Follow the instructions on the display in order
쏅
to calibrate the touchscreen.
Tap on Yes to reset the settings to the factory
쏅
settings.
The map is displayed.
-or-
39
Page 40

Software | Service | Guarantee | Technical Data
Software
Newly installing the navigation
software
The navigation software for your navigation device
is included in the enclosed CD/DVD for reinstalling
or repair with instructions.
Updating the navigation software
In order to always keep your navigation device
up to date, Blaupunkt offer software updates at
regular intervals. These can be downloaded from
the Blaupunkt Internet site under www.blaupunkt.
com.
Service
In some countries Blaupunkt offer a pickup and
repair service.
If your device should have to be returned for
service to Blaupunkt, you can request a collection
service for your device over the Internet.
Under www.blaupunkt.com you can determine
whether this service is available in your country.
Guarantee
For our products bought within the European
Union we offer a manufacturer's guarantee. For
devices bought outside of the European Union the
guarantee conditions published by our responsible
representative are valid.
The guarantee conditions can be called up or
requested by you directly under www.blaupunkt.
com:
Blaupunkt GmbH, Hotline
Robert-Bosch-Str. 200
D-31139 Hildesheim
Technical Data
Dimensions (W x H x D)
99 x 99 x 16.9 mm
Weight
Approx. 175 g
Operating temperature
-20 °C ... 60 °C
Storage temperature
-30 °C ... 70 °C
Power supply
Battery: Li-lon, 3.7 V/850 mAh
Charging cable for the cigarette lighter:
12 V input
Mains power supply: Input 100 to 240 V
(50/60 Hz), output 12 V /max. 1 A
Display
3.5 ˝ Touchscreen TFT LCD colour display 4:3,
320 x 240 Pixel
Audio
Built-in loudspeaker, min. 1 W
GPS receiver
Integrated, QuickFind technology Centrality GPS,
32 channels
Platform
Dual core Centrality Atlas III processor
(400 MHz)
Internal 64 MB SDRAM memory
1 GB NAND fl ash memory
Memory card slot: SD cards, MMC and SDHC max.
4 GB
USB
USB 2.0
Operating system
Microsoft Windows CE 5.0
40
Subject to change
Page 41

Problem assistance table
Problem Cause Measure
The device does not work, or
works incorrectly
The display remains dark when
I turn on the device.
The battery is empty even
though I haven't used the
device in a while.
The device does not react when
I tap on a button.
The device does not issue
speech recomendations.
The operating system is
overloaded.
The display can temporarily
lose contrast due to long and
strong exposure to the sun and
high temperatures.
At very high temperatures the
device protects itself against
overheating by turning off.
The battery is not fully charged. Completely recharge the
In the switched off state the
device uses a small quantity of
energy. This can mean that the
battery is discharged after a
few days.
The battery will not fully charge
during short journeys.
The operating system is
overloaded.
The speech instruction is
deactivated.
The volume of the speech is
too low.
Do a reset (see chapter
"Switching on/off")
Reset the factory settings
(see chapter "Settings"). All
personal settings are deleted!
Reinstall the navigation
software with the help of the
CD/DVD.
Place the device for
approximately 10 minutes in
the shade and restart it.
battery (see chapter "Charging
the battery").
In order to ensure that the
battery lasts up to 3 hours in
navigation mode, fully charge
the battery.
Always operate the device in
the vehicle with the charger
cable in the cigarette lighter.
Do a reset (see chapter
"Switching on/off")
Activate the speech output in
the settings.
Increase the volume during
speech output.
Problem assistance table
41
Page 42

Problem assistance table
Problem Cause Measure
The device can receive no, or
only a weak GPS signal.
After switching on, the device
needs about 1 minute before it
is ready to navigate. With initial
switiching on, the device needs
a bit more time and a strong
GPS signal.
In buildings the GPS signal is
Go into the open and raise the
device up a bit. Your device
will be operational at the latest
after 2 to 5 minutes. After
that your device will be able
to navigate under less ideal
conditions.
usually limited.
Strongly metalised windscreens
can disturb the GPS reception.
Try to locate the device
somewhere else in the vehicle.
Connect an external GPS
antenna.
Refl ections and
compartmentalisation due
to e.g. multistorey (or tall)
buildings, tunnels, mountains
or sheet metal work
Heavy snow or extreme weather
The device must have a clear
view of the sky. Wait until
the GPS reception becomes
available again. The navigation
will then automatically
proceed.
Transport of the vehicle by train
or ferry.
The device does not recognise
my memory card.
The memory card is not
compatible with this device.
The memory card was
formatted with a wrong fi le
Use a compatible memory card.
(see chapter "Technical data")
Format the memory card in the
fi le system FAT16 or FAT32.
system.
Due to technical advancements Blaupunkt cannot guarantee the
perfect functioning of memory cards of different manufacturers
and types. Try a memory card of another manufacturer or with
another capacity.
42
Page 43

43
Page 44

Country: Phone: Fax:
Germany (D) 0180-5000225 05121-49 4002
Austria (A) 01-610 39 0 01-610 39 391
Belgium (B) 02-525 5444 02-525 5263
Denmark (DK) 44-898 360 44-898 644
Finland (FIN) 09-435 991 09-435 99236
France (F) 01-4010 7007 01-4010 7320
Great Britain (GB) 01-89583 8880 01-89583 8394
Greece (GR) 210 94 27 337 210 94 12 711
Ireland (IRL) 01-46 66 700 01-46 66 706
Italy (I) 02-369 62331 02-369 62464
Luxembourg (L) 40 4078 40 2085
Netherlands (NL) 00 31 24 35 91 338 00 31 24 35 91 336
Norway (N) +47 64 87 89 60 +47 64 87 89 02
Portugal (P) 2185 00144 2185 00165
Spain (E) 902 52 77 70 91 410 4078
Sweden (S) 08-7501850 08-7501810
Switzerland (CH) 01-8471644 01-8471650
Czech. Rep. (CZ) 02-6130 0446 02-6130 0514
Hungary (H) 76 511 803 76 511 809
Poland (PL) 0800-118922 022-8771260
Turkey (TR) 0212-335 07 23 0212-346 00 40
http://www.blaupunkt.com
© 2008 All rights reserved by Blaupunkt. This material may be reproduced, copied or distributed
for personal use only.
This product is protected by certain intellectual property rights of Microsoft. Use or distribution of
such technology outside of this product is prohibited without a license from Microsoft.
Blaupunkt GmbH,
Robert-Bosch-Straße 200, D-31139 Hildesheim
08/08 CM-AS/SCS (GB) 8 622 406 174
 Loading...