

Page 1
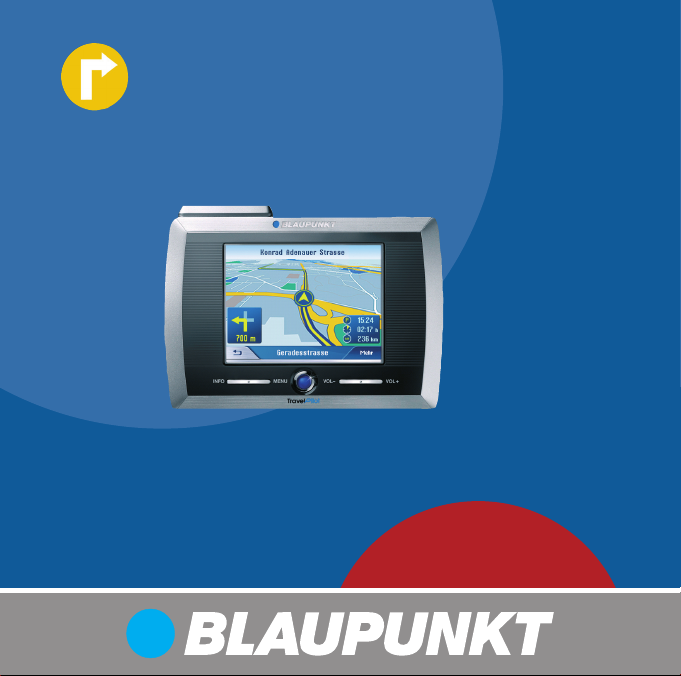
Mobile Navigation
TravelPilot MP3 Edition
Operating and
Mounting Instructions
Page 2

Device Overview
Device Overview
1
2
3
4
5
6
2
Page 3
The following button are located below the display:
1 INFO: Repeats the last travel in-
struction.
2 MENU: Opens the start screen of
the device.
3 On/Off switch:
Short press: Starts the device in the
previously used mode or switches the device to a state of rest.
Long press (longer than three seconds): Switches the device off.
4 VOL−: Decreases the volume.
5 VOL+: Increases the volume.
6 Touchscreen: All entries and the
control of TravelPilot are carried
out in a simple and intuitive way
by touching the buttons displayed
on the touchscreen.
Device Overview
9
8
7
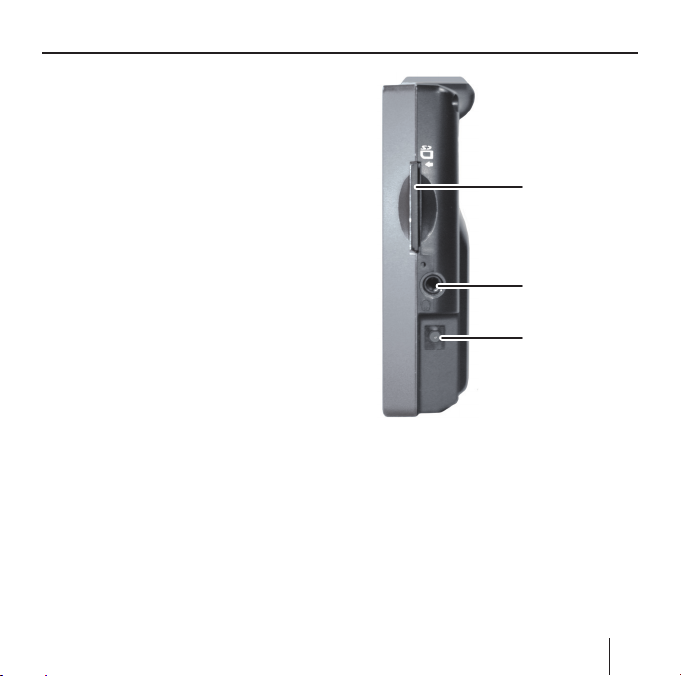
The right side features the following
elements:
7 Socket for connecting the Travel-
Pilot with the charger or the cigarette lighter wire.
8 Headphone jack
9 SD card slot
3
Page 4

?>
Device Overview
The underside features the following
controls:
<=
;
:
: Battery compartment cover
; Battery main switch
< GPS antenna socket for connect-
ing an external GPS antenna.
= Support
4
> Socket for connecting the Travel-
Pilot to the cradle. The cradle
provides additional functions. For
further information, please read
the "Cradle" chapter.
? Reset button. Restarts the Travel-
Pilot.
Page 5

Contents
Device Overview ......................2
Safety Warnings .....................10
Safety Warnings for Navigation .. 10
Safety Warnings for Handling
the TravelPilot ........................... 10
Initial Startup of TravelPilot ..11
TravelPilot Scope of Delivery ........ 11
Protective Films and Covers ......... 12
Switching the Main Switch On/Off . 12
Setting the Language .................... 13
Reset ............................................. 13
Charging the Battery .............13
Installation in the Vehicle .....14
Attaching the Support ...............15
Removing the Support ...............15
Attaching TravelPilot .................. 15
Attaching the Cradle .................. 15
Installing TravelPilot in the
Cradle ........................................ 16
Removing the TravelPilot .......... 16
Switching on/off ....................16
Switch-on ................................... 16
Activating the Idle State ............. 16
Switch-off .................................. 16
Reactivating ............................... 16
Operating the Navigation
Menus .....................................17
Software Keyboard ....................... 17
Entering Blank Spaces ............... 17
Deleting Characters ................... 17
Switching between Number,
Special Character and
Character Input .......................... 17
Lists .............................................. 17
Buttons ......................................... 18
Information ................................... 19
Traffi c Jam Reports.................... 19
GPS Status ................................ 20
Navigation ..............................22
General Notes about the
Navigation ..................................... 22
Starting the Navigation ................. 22
Entering a Destination ............... 23
5
Page 6

Contents
Navigating Home ........................ 23
Showing a Map .......................... 23
Traffi c Jam Reports.................... 23
Settings...................................... 23
Exiting the Menu ........................ 24
Additional Functions .................. 24
GPS Info ..................................... 24
Route Planning ........................... 24
Performing Basic Settings ............ 24
Setting the Time Zone ...............24
Entering the Home Address ....... 25
Specifying a Destination ...............26
Entering a Destination ............... 26
Entering a Destination Country . 27
Entering a Destination Address . 28
Additional Functions ................. 29
Selecting a Point of Interest ......... 29
Point of Interest in the Current
Vicinity ....................................... 29
Additional Functions ................. 31
Point of Interest at a Specifi c
Location ..................................... 32
Special National Destination ..... 34
6
Copying a Destination from
the Map......................................... 36
Moving the Map Section ............ 36
Copying the Destination
from the Favorites ......................... 39
Copying a Favorite for
Destination Guidance ................ 39
Additional Functions ................. 40
Copying one of the Recent
Destinations .................................. 40
Additional Functions ................. 41
Using Home Address as
Destination ................................... 41
Managing Destinations ..........42
Saving Destinations ...................... 42
Saving one of the Recent
Destinations ............................... 43
Renaming a Destination ............. 43
Deleting a Destination ............... 44
Deleting the Complete List ........ 44
Route Planning with Stages...45
Entering Destination Points ....... 45
Adding a Route Point .................46
Page 7

Contents
Editing, Saving and Managing
Routes ........................................ 46
Changing the Order ................... 47
Deleting a Route Point ............... 47
Deleting a Complete Route List .47
Managing Routes .......................... 48
Saving a route ............................ 48
Loading a route .......................... 48
Calculating a Route ....................... 48
Displaying the Route on the Map . 49
Simulation (demo mode) ........... 49
Specifying Route Options ......49
Destination Guidance ............51
Disturbed GPS Reception .......... 52
Quitting the Destination
Guidance.................................... 52
Reaching the Place of
Destination ................................ 52
Working with the Map ...........53
Map Operation .............................. 53
Showing a Map .......................... 53
Touching the Map ...................... 53
Buttons ......................................... 54
With Map View without
GPS Reception ........................... 54
With Map View with
GPS Reception ........................... 54
Additional Functions .................. 57
Day/Night Mode ......................... 57
Mute ........................................... 57
Settings...................................... 57
Block Road, Unblocking ............. 57
Inserting an Interim Destination . 57
Route Options ............................ 58
Next Destination ........................ 58
Map Display during
Destination Guidance ............59
Navigation Tools ......................... 59
Route Information ...................... 60
Signpost Information ................. 60
Speed Limit ...............................60
Showing Additional
Map Information ........................... 61
Map Information ........................ 61
Route Information ...................... 62
Signpost Information ................. 62
Speed ........................................ 62
7
Page 8

Contents
Additional Functions during
Navigation ..............................64
Inserting an Interim Destination ... 64
Approaching the Next Destination . 65
Blocking route segments .......65
Manual Blocking......................... 65
Unblocking ................................. 66
Using the TMC Functionality ......... 67
Traffi c Reports with TMC ........... 67
TMC Mode of Operation ............ 67
Showing TMC Messages ............ 68
Refreshing TMC Messages ......... 68
Closing the TMC Messages
Menu .......................................... 68
Including TMC Messages in
Route Calculation ......................68
Automatic Route Change ........... 69
Manual Route Change ................ 69
Including/Ignoring Additional
Traffi c Report ............................. 69
Confi guring TravelPilot /
Basic Settings ........................70
Settings ........................................ 70
Factory Settings ......................... 70
8
Map Information ........................ 71
Route Information ...................... 71
Signpost Information ................. 72
Speed ........................................ 72
Volume ....................................... 73
Touchscreen Calibration ............ 73
Auto Mode .................................73
Route Options ............................ 74
Route Planning ........................... 74
Time Calculation ........................ 75
Units of Measure / Formats /
Language ................................... 75
TMC ........................................... 75
Home Address ........................... 76
Product Information .................. 76
GPS Mode of Operation ........76
MP3/WMA Mode ...................77
Preparing the SD Card .................. 77
Inserting the SD Card ................... 78
Selecting MP3/WMA Mode ........... 78
Starting Playback .......................... 78
Selecting a Directory .................... 78
Selecting a Directory via Button . 79
Page 9

Contents
Selecting a Directory via File
Browser .....................................79
Selecting Tracks/Files ................... 79
Selecting a Track via Button ...... 80
Confi guring the Display ................ 80
Random Track Play (Mix/Shuffl e) . 80
Repeated Directory Play (Repeat) . 81
Quitting Playback .......................... 81
Selecting the Equalizer ................. 81
Removing the SD Card .................. 82
Picture Viewer .......................82
Starting the Picture Viewer........... 82
Starting the Slide Show ................ 83
Setting the Time for the
Slide Show .................................... 83
Quitting the Slide Show................ 84
Selecting a Directory .................... 84
Selecting a Directory via Button . 84
Selecting a Directory/
Picture via File Browser ............. 84
Selecting a Picture ........................ 85
Selecting a Picture via Button.... 85
Confi guring the Display ................ 85
Adjusting the Picture to the
Display Format .............................. 86
Removing the SD Card .................. 86
Installing Street Maps ...........87
Removing the SD Card ............... 87
Cradle ....................................88
Cradle Installation ........................88
Connection Blocks of
Blaupunkt Car Sound Systems
for TravelPilot ............................. 89
Accessories (not included) ....90
Steering Wheel Remote
Control RC 09 ...............................90
Technical Data ........................91
Warranty ................................91
Disposal of old unit ...............91
Fault Removal / Frequently
Asked Questions FAQ ............92
9
Page 10
Safety Warnings
Safety Warnings
The following safety instructions
must be read before operating your
TravelPilot for the fi rst time.
Safety Warnings for Navigation
Warning:
Do not operate the TravelPilot while
driving under any conditions.
View the display only when stopped.
If you are distracted by the Travel-
Pilot, turn it off while driving.
The street routing and traffi c signs
have priority over the instructions of
the navigation system.
Follow the instruction of the TravelPilot only if circumstances and traffi c regulations allow! TravelPilot will
bring you to your destination even if
you have to deviate from the planned
route.
Failure to follow these instructions
may result in an accident that causes death, serious injury or property
damages.
10
Notes:
• Routes are best planned before
starting your trip. If you want to
enter a new route while on the
road, please head for the next
parking or rest area!
• If you do not understand the voice
information while driving or if you
are not sure what to do at the next
intersection, use the map or arrow
display for quick orientation, but
only when the vehicle is not moving.
Safety Warnings for Handling the
TravelPilot
Warning:
Protect the device against moisture
since it is not waterproof and not
splashproof.
Notes:
• Remove the power supply connec-
tor of the TravelPilot if you switch
off the engine since the GPS receiver constantly uses electricity
Page 11

Initial Startup
and could discharge the vehicle
battery.
• Do not unplug the connector by
pulling on the wire. The wire could
be damaged!
• Do not use harsh solvents to clean
the device; use only a damp, lintfree cloth.
Initial Startup of
TravelPilot
If you are starting up the TravelPilot
for the fi rst time, you must switch
on the main switch and set your preferred language for the menus and
the voice output.
TravelPilot Scope of
Delivery
The scope of delivery contains the
following components:
• TravelPilot MP3 Edition
• Suction cup holder
• Power supply and charger
• Connector charger for connecting
to cigarette lighter
• Operating instructions
• DVD with road map and restore
program
• Cradle
11
Page 12
Initial Startup
Protective Films and Covers
Prior to the initial use, remove the
protective fi lms from the display and
front of the housing. Before using
the cradle, please remove the elastic
cover at the bottom of the housing.
Before inserting an SD card, please
remove the dummy card. To protect
the contacts, you can apply the elastic cover and dummy card again after
using the TravelPilot.
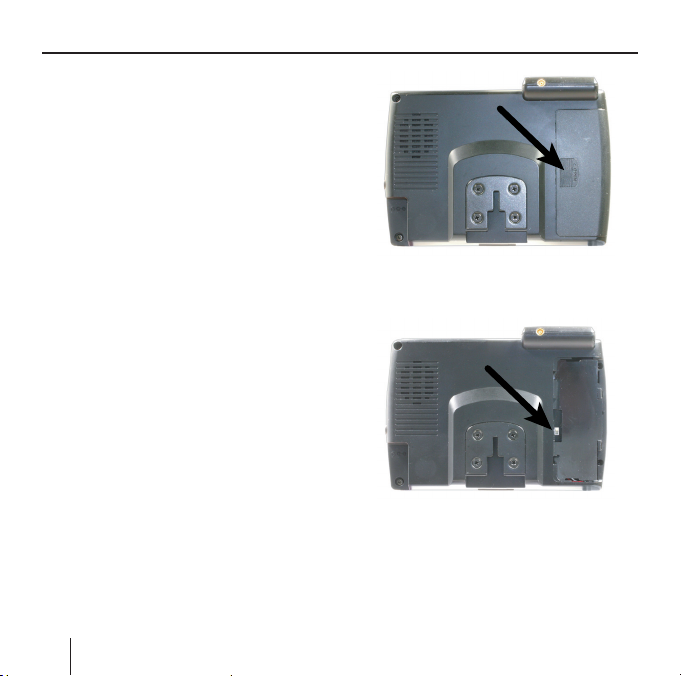
Switching the Main Switch
On/Off
The main switch allows for switching
the TravelPilot on and off. In its delivery state, the TravelPilot is switched
off via main switch.
➜ Press on the hatched area on the
cover of the battery compartment
(see arrow) and push the battery
compartment cover to the outside
of the device.
The main switch is on the left side of
the battery.
➜ Use the tip of a ball-point pen and
push the main switch to the ON
position.
12
Page 13
Charging the Battery
Setting the Language
If the TravelPilot was switched off
using the main switch, US English
is used as the standard language. If
necessary, you may have to set the
desired language for the menus and
the voice output:
➜ Switch on the TravelPilot using the
On/Off switch
➜ Touch Settings. Touch
until Language appears. A list with
available languages is displayed.
➜ Touch the language in the list that
you want to use for menus and
voice output.
The language is loaded and the
main menu is displayed.
.
or
Reset
The TravelPilot can be restarted by
using the Reset button.
➜ For this purpose, press the Reset
button ? on the underside of the
TravelPilot.
Charging the Battery
The built-in battery allows for operating the TravelPilot battery-operated
for up to four hours. The usage time
is dependent upon the type of operation.
The charge indicator of the battery
is located in the top center of the
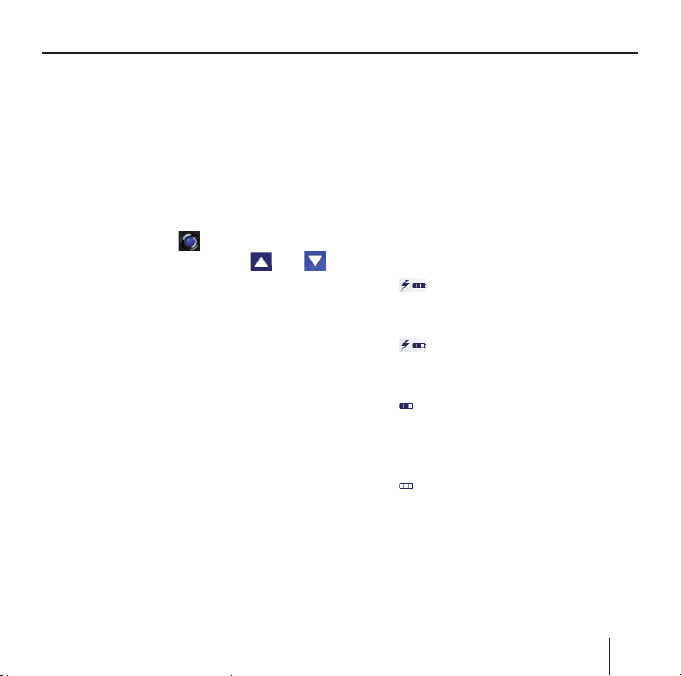
screen. The symbols have the following meaning:
–
: The device is supplied by
an external power source. The
battery is fully charged.
: The device is supplied by
–
an external power source. The
battery is being charged.
–
: The device is supplied by
its internal battery. The charge
state of the battery is suffi cient.
–
: The device is supplied by
its internal battery. The charge
state of the battery is low.
13
Page 14
Installation in the Vehicle
The number of dark block segments
on the battery indicates the charge
state of the battery (0 to 3 segments).
Note:
If the charge state of the battery
is very low, a warning message is
displayed.
➜ To charge the battery, attach the
supplied charger or the cigarette
lighter wire to the charging socket.
Note:
Use only original chargers for operating and charging the battery.
The charging time is approx.
6 hours.
Note:
Do not discard any batteries in the
household trash; instead, return
them to the corresponding collection sites.
14
Installation in the
Vehicle
For temporary installation in a vehicle, the TravelPilot features a suction
cup holder with a suction cup to attach it to the windshield.
Warning:
The TravelPilot should be in a location
that does not block the driver's view
and does not distract the driver.
The TravelPilot should be mounted
either on the center console or the
middle of the instrument panel. If
mounted on the instrument panel,
insure that it is below the top of the
instrument panel.
Insure that the TravelPilot is located
in an area that will not be contacted
if the vehicle's airbags deploy.
Ensure that the TravelPilot does not
pose a threat to passengers in the vehicle in case of emergency braking.
Read the vehicle owner's manual regarding airbags and other vehicle features before selecting a safe location.
Page 15

Installation in the Vehicle
Failure to follow these instructions may
result in an accident that causes death,
serious injury or property damages.
Attaching the Support
The TravelPilot can be installed in the
vehicle in a simple and safe way using
the supplied suction cup holder.
➜ Locate a suitable place for install-
ing the TravelPilot.
To ensure a perfect hold, the glass
must be free of dust and oil. If necessary, clean the glass fi rst using
the supplied lens cleaning tissue.
➜ Press the suction plate of the sup-
port against the glass.
➜ Push the lever on the suction sup-
port towards the glass.
➜ The holder can now be adjusted.
The track for mounting the TravelPilot must be aligned vertically.
Removing the Support
If you change vehicles, you can simply
remove the support.
➜ Push the lever on the suction sup-
port away from the glass.
➜ Carefully loosen the suction plate
at the edge from the glass so that
air can enter between suction cup
and glass.
➜ Carefully pull the suction cup off
of the glass.
Attaching TravelPilot
The TravelPilot features a mount for
the track of the suction cup holder.
➜ Carefully push the guide of the
TravelPilot over the track of the
suction cup holder.
Attaching the Cradle
The cradle features a mount for the
track of the suction cup holder on the
rear side. The last pages of these in-
15
Page 16

Switching on/off
structions provide information about
connecting the cradle to your car
sound system.
➜ Carefully push the guide of the
TravelPilot over the track of the
suction cup holder.
Installing TravelPilot in the Cradle
The cradle features a track for mounting the TravelPilot on the inside.
➜ Carefully push the guide of the
TravelPilot over the track of the
suction cup holder.
Removing the TravelPilot
➜ Pull the TravelPilot up and out of
the cradle or the support. If necessary, securely support the cradle
or the support.
Switching on/off
Switch-on
➜ To switch on the TravelPilot, push
the button
The device switches on and dis-
plays the previously active display
(menu, destination guidance).
16
below the display.
Activating the Idle State
➜ To activate the idle state, briefl y
push the button
play.
The TravelPilot switches to the
idle state.
Switch-off
➜ To switch off the device, press and
hold the button
4 seconds.
The TravelPilot is switched off.
Note:
A complete switch-off of the
TravelPilot is only necessary if you
do not operate the device for an
extended period of time or if you
want to load new map material
from the memory card.
Reactivating
➜ In this state, the power-on button
must be pressed for longer than
4 seconds to switch on the Travel-
Pilot.
below the dis-
for longer than
Page 17

Operating the Navigation Menus
Operating the
Navigation Menus
Software Keyboard
If text entries are required, the touchscreen displays a software keyboard.
You can perform all entries using your
fi nger. Only capital letters can be entered.
You do not have to enter any special characters when entering city or
street names. The TravelPilot completes these characters automatically.
Entering Blank Spaces
➜ To enter a blank space, touch the
button
Deleting Characters
➜ To delete the last character, touch
the
button
Switching between Number, Special
Character and Character Input
➜ To enter numbers, such as post-
code, touch the button
To return to the character entry
mode,
➜ touch
To enter a special character,
➜ touch the
character keyboard is displayed.
As soon as you enter a special
character, the character keyboard
is automatically displayed again.
Note:
Special characters do not have to
be entered when entering address
information, but they may be help-
ful for the description of stored
destinations and routes.
button. The special
Lists
In many cases, you can display lists
from which you can select an entry.
17
Page 18
Operating the Navigation Menus
This is the case, for example, if you
do not enter the complete name of a
place during the entry. After every entry of a letter, the text fi eld shows the
fi rst entry that starts with the previously entered characters. To display a
list with additional matching entries,
touch the List button.
The end of the list features entries
what contain the sequence of previously entered characters not at the
beginning, but in the middle or at the
end.
One entry of the list is always selected.
➜ The selected entry can be selected
by touching the OK button.
These lists contain the following buttons:
• : Touch the OK button to
accept the selected entry. However, you can also directly touch an
entry to accept it.
18
• : Touch this button to scroll
up in the list by one page (5 ele-
ments).
• : Touch this button to scroll
down in the list by one page
(5 elements).
• To scroll through the list by several
pages, repeatedly touch the corre-
sponding button.
Note:
If the list features more than 5 ele-
ments, the scroll bar indicates the
current position in the list.
• : Touch this button to return
to the entry without selecting a
list element.
Buttons
Buttons are located on all menus of
the TravelPilot:
• : Touch this button to return
to the previously opened menu.
If you are in the Navigation menu,
this button takes you to the Blau-
Page 19
Operating the Navigation Menus
punkt start screen. Here, you can
open another application, such
as the MP3 player or the Picture
Viewer, or reopen the navigation.
• More: Touch this button to obtain
access to additional functions. Depending on the menu in which this
button is located, different functions are offered.
If this button is deactivated, no additional functions are available.
Information
From the Navigation menu, you can
display the current traffi c jam reports and the current GPS status at
any time.
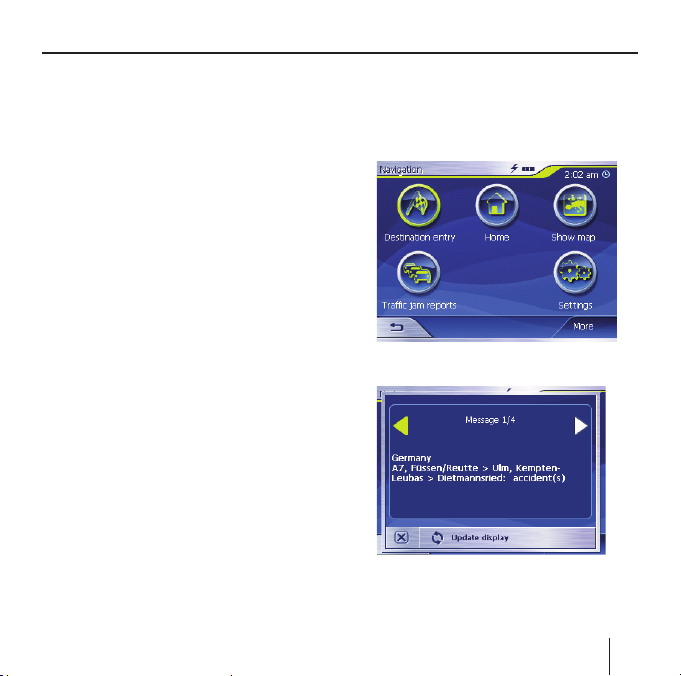
Traffi c Jam Reports
If you connected the TravelPilot to
a Blaupunkt TMC car sound system,
your TravelPilot is supplied with TMC
messages that allow for the calculation of dynamic routes while including the current traffi c situation. You
can also use the TravelPilot to show
the TMC messages on the display.
➜ In the Navigation menu, touch the
Traffi c jam reports button.
The TMC messages menu displays.
19
Page 20
Operating the Navigation Menus
➜ Touch the arrow buttons in the
Message area to change between
the individual TMC messages.
For each TMC message, the street
number (motorways, regional and
local street) as well as the type of
jam is displayed.
➜ Touch the Update display button
to display TMC messages that arrived since you opened the TMC
messages menu.
➜ Touch the button to close the
TMC messages menu.
To display and include TMC messages during navigation, please read the
section "Using the TMC Functionality".
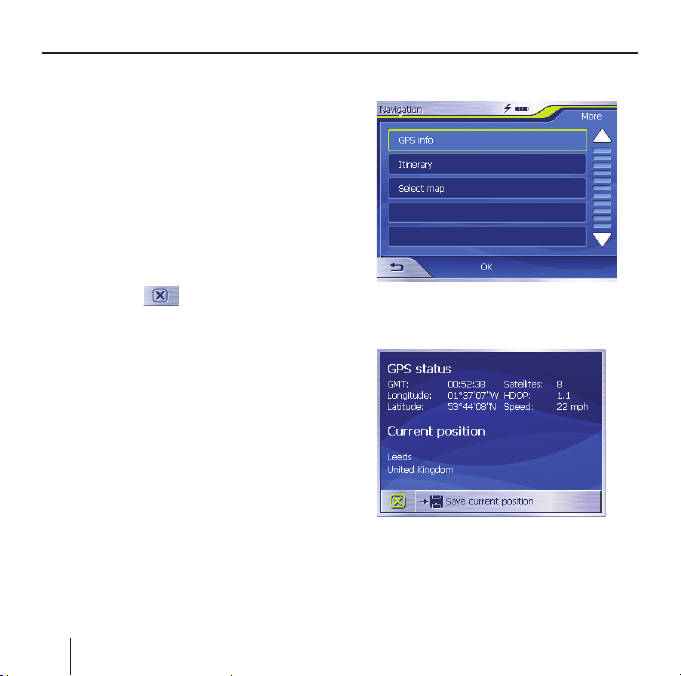
GPS Status
The GPS status menu contains infor-
mation about your current position
and your current speed limit. In addition, you can also save your current
position.
➜ In the Navigation menu, touch the
More button.
20
The following window displays:
➜ Touch the GPS Info button.
The GPS Status menu displays.
• GMT: Greenwich Mean Time Lon-
don time without daylight savings
time.
Page 21

Operating the Navigation Menus
• Longitude/Latitude, current Posi-
tion: Information of the east longitude and north latitude.
• Satellites: Number of satellites
received. The navigation requires
signals from at least three satellites.
• HDOP: Horizontal Dilution of Pre-
cision. Indicates the quality of the
positioning. Theoretically, values
from 0 to 50 are possible, whereby
the following applies: The lower
the value, the more precise the
positioning (value 0 = no deviation
from the actual position). Values
up to 8 are acceptable for navigation.
• Speed: Indicates the current
speed of the vehicle.
• Position: Indicates the address of
the current position (if possible).
• Save current position: Touch this
button to save the current posi-
tion to the favorites.
• Touch the button to close the
GPS window.
21
Page 22
Navigation
Navigation
General Notes about the
Navigation
The use of the TravelPilot is at your
own risk.
Warning:
Do not operate the TravelPilot while
driving under any conditions.
View the display only when stopped.
If you are distracted by the Travel-
Pilot, turn it off while driving.
The street routing and traffi c signs
have priority over the instructions of
the navigation system.
Follow the instruction of the TravelPilot only if circumstances and traffi c regulations allow! TravelPilot will
bring you to your destination even if
you have to deviate from the planned
route.
22
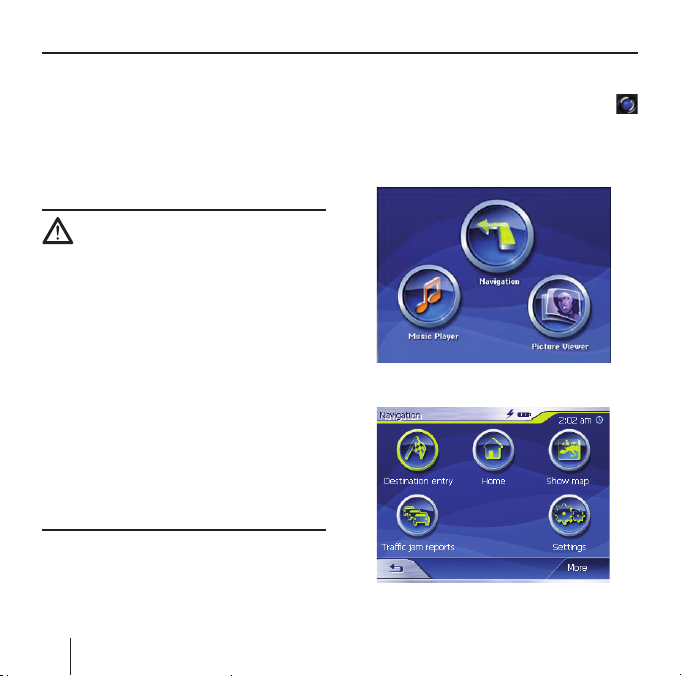
Starting the Navigation
➜ Switch on the device using the
button.
➜ In the start screen, touch the Navi-
gation button.
The Navigation menu displays.
Page 23

Navigation
The Navigation menu allows access to
all the functions of the navigation.
Note:
The TravelPilot always starts with
the screen that was active when
you switched off the device.
Entering a Destination
➜ Touch the Destination entry but-
ton to enter a destination for the
navigation.
For further details, please read the
section "Entering a Destination".
Navigating Home
➜ Touch the Home button to use
your stored home address as the
destination for the navigation.
For further details, please read the
section "Using the Home Address".
Showing a Map
➜ Touch the Show map button to
display the loaded street map.
For further details, please read the
section "Working with the Map".
Traffi c Jam Reports
➜ Touch the Traffi c jam reports but-
ton to obtain an overview of the
currently valid traffi c reports that
were received by your radio sys-
tem.
Note:
This function is only available if
the TravelPilot is connected to a
Blaupunkt car sound system with
TMC output.
Settings
➜ Touch the Settings button to ad-
just the settings of your Travel-
Pilot.
For further details, please read the
section "Confi guring TravelPilot".
23
Page 24
Navigation
Exiting the Menu
➜ In the Navigation menu, touch
to quit the navigation. The
TravelPilot start screen displays.
Additional Functions
➜ Touch the More button to gain ac-
cess to additional functions of the
Navigation.
The list of additional functions displays.
It contains the following functions:
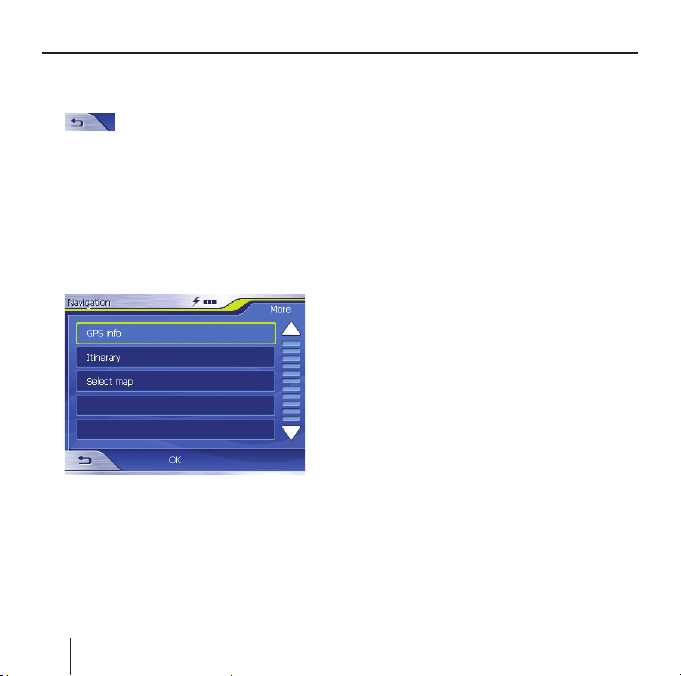
GPS Info
➜ Touch the GPS Info button to ob-
tain information about the current
24
GPS status and about your current
position.
Route Planning
➜ Touch the Itinerary button to plan
a route with several stages.
For further details, please read the
section "Route Planning with Stages".
Performing Basic Settings
Before you work with the TravelPilot,
• you should set the time zone of for
your position so that the correct
arrival times are displayed during
the navigation, and
• you should enter your home ad-
dress to quickly navigate home
from any location.
Setting the Time Zone
➜ In the Navigation menu, touch the
Settings button.
The Settings menu displays.
Page 25
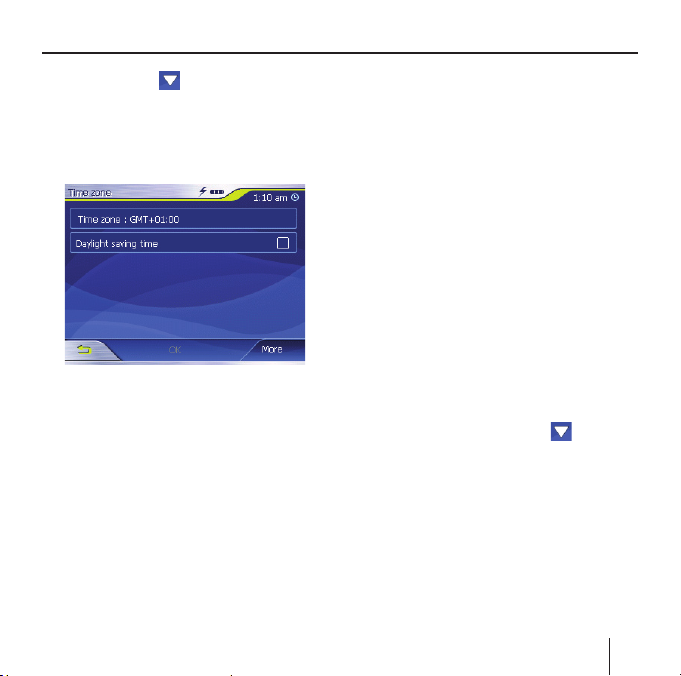
Navigation
➜ Touch the button until the
screen displays the Time zone
button.
➜ Next, touch Time zone.
The Time zone menu displays.
➜ Touch Time zone.
➜ Touch the time zone in the list that
is valid for your current position
(GMT without daylight savings
time).
Note:
The selection is facilitated by the
display of the capitols in the re-
spective time zone.
➜ Touch the OK button.
➜ If daylight savings time currently
applies to your position, touch the
Daylight saving time button.
The button displays a check mark.
Note:
If the time is changed at your position or if you drive into a different time zone, you must adjust the
corresponding settings.
➜ Touch the OK button.
The Navigation menu displays.
Entering the Home Address
➜ In the Navigation menu, touch the
Settings button.
The Settings menu displays.
➜ Repeatedly touch the
until the Home address button
displays.
➜ Touch the Home address button.
The Home address menu displays.
buttons
25
Page 26
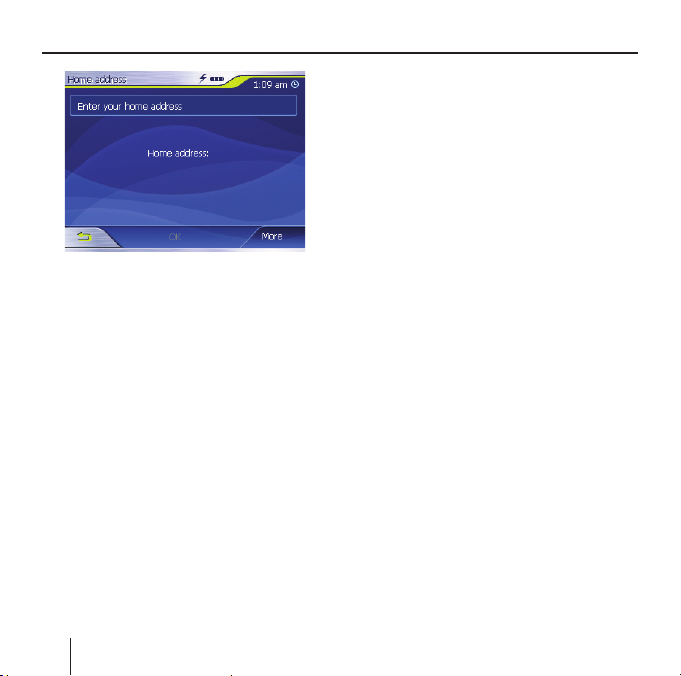
Navigation
➜ Touch the Enter your home ad-
dress button.
The Destination entry menu dis-
plays.
➜ Touch the Address button and en-
ter your home address. See "Entering a Destination Address".
➜ Touch the Set as home address
button.
The address is copied into the
Home address menu.
➜ Touch the OK button.
The Navigation menu displays
again.
Specifying a Destination
This section contains information
about the different methods for entering, selecting and managing destinations with the TravelPilot.
How to start the navigation to a destination is described in the chapter
"Destination Guidance".
Entering a Destination
With the TravelPilot, you can enter or
select destinations in different ways:
• Entering a destination address
• Selecting a point of interest
• Copying a destination from the
map
• Copying a destination from the fa-
vorites
• Reusing one of the recent destina-
tions
• Using the home address
26
Page 27
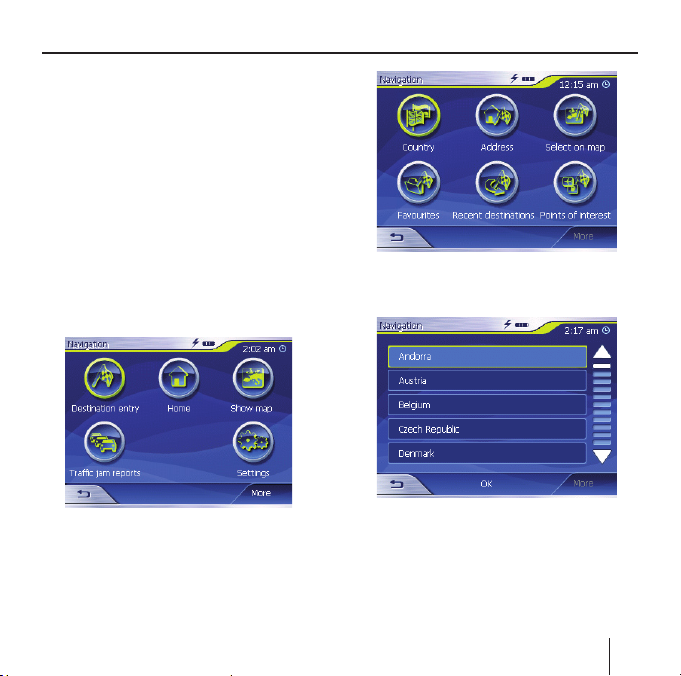
Entering a Destination Country
First, enter the country in which your
destination is located.
Note:
This entry does not have to be
repeated. If your destination is in
a different country than the pre-
vious one, you must re-enter the
country.
➜ In the main menu touch the Navi-
gation button.
The Navigation menu displays.
Navigation
➜ Touch the Country button.
The list of countries displays.
➜ Touch the Destination entry but-
ton.
The Destination entry menu dis-
plays.
➜ Touch the country in which your
destination is located.
The Destination entry menu dis-
plays again.
27
Page 28
Navigation
Note:
You can only select countries which
are at least partially displayed on
the currently loaded map.
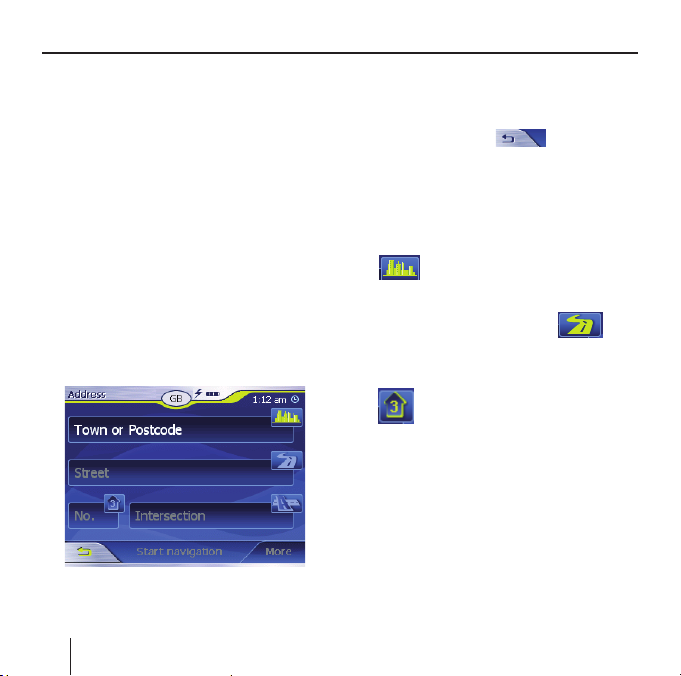
Entering a Destination Address
➜ In the main menu touch the Navi-
gation button.
The Navigation menu displays.
➜ In the Navigation menu, touch the
Destination entry button.
The Destination entry menu dis-
plays.
➜ Touch the Address button.
The Address menu displays.
28
Note:
If the country containing your destination is not displayed in the top
line, touch the
select the correct country. How to
select a country is described in
the chapter "Entering a Destination Country".
➜ Touch the Town fi eld and enter
the target location. You
can enter either the post-
code or the name of the location.
➜ Touch the Street fi eld
enter the street.
➜ If you know the house number of
your destination, touch the House
Number fi eld to enter the
house number.
Note:
If no house number is stored for
the specifi ed street in the maps,
the House Number fi eld is deactivated.
➜ If you want to defi ne an intersec-
tion as the destination, touch the
button and
and
Page 29

Navigation
Intersection fi eld to enter
the crossroad to the de-
fi ned street.
Note:
How to save a defi ned destination
is described in the chapter "Saving
one of the recent destinations".
Additional Functions
➜ Touch the More button to gain ac-
cess to additional functions of the
Address menu.
The list of Additional functions
displays.
The list of Additional functions con-
tains the following functions:
• Route options:
– Here you can set the route op-
tions for the next navigation.
For further details, please read the
chapter "Specifying route options".
• Show on map:
– Select this button to view the
specifi ed address on the map.
For further details, please read the
chapter "Working with the map".
• Save:
– This function allows you to save
the specifi ed address to your
favorites.
For further details, please read the
chapter "Saving one of the recent
destinations".
Selecting a Point of Interest
Special destinations, also referred to
as POI (Point of interest), are part of
the map and can be displayed on the
map. The points of interest include
airports and ferry harbours, restaurants, hotels, fi lling stations, public
facilities and more. Special destinations can be used as navigation destinations.
Point of Interest in the Current
Vicinity
Note:
Special destinations from the current vicinity can only be selected if
the GPS reception is suffi cient for
determining the position.
29
Page 30

Navigation
➜ In the main menu touch the Navi-
gation button.
The Navigation menu displays.
➜ In the Navigation menu, touch the
Destination entry button.
The Destination entry menu dis-
plays.
➜ Touch the Points of interest but-
ton.
The Point of interest menu dis-
plays.
➜ Touch the ... nearby button.
30
The submenu displays.
➜ Touch the Surrounding
are looking for a point of interest.
➜ Touch the Category fi eld
which you want to look for points
of interest.
Only those categories are available
for selection for which points of interest can be located in the current
vicinity.
➜
Radius fi eld and select
the radius in which you
and select the category
(e.g. petrol station) from
Touch the Subcategory
fi eld and select the subcategory (e.g. Aral, BP,
Page 31

Navigation
Shell, etc. from which you want to
look for points of interest.
Only those subcategories are avail-
able for selection for which points of
interest can be located in the current
vicinity.
➜ Touch the Point of interest
fi eld to select a specifi c
target.
The keyboard is displayed. If you
know a part of the description of
the point of interest, it can be en-
tered here to shorten the list.
➜ Touch the List button.
A list with points of interest ap-
pears. The points of interest dis-
played correspond to the selected
category and subcategory. They
also contain the characters you
entered (if you entered any char-
acters).
➜ Touch the entry of the point of in-
terest to which you want to navi-
gate.
➜ If you desire more detailed infor-
mation about the point of interest,
touch the More button, followed
by Show details.
➜ Touch the OK button to accept the
selected point of interest.
Note:
You do not have to fi ll out the
fi elds Category and Subcategory.
They are only intended to restrict
the list of points of interest in the
Point of interest fi eld. This list can
quickly become very extensive,
particularly at larger locations.
How to save a defi ned destination is
described in the chapter "Saving one
of the Recent Destinations".
Additional Functions
➜ Touch the More button to gain ac-
cess to additional functions of the
Point of interest menu.
The list of Additional functions
displays.
The list of Additional functions contains the following functions:
• Route options:
– Here you can set the route op-
tions for the next navigation.
For further details, please read the
chapter "Specifying Route Options".
31
Page 32

Navigation
• Show on map:
– Select this button to view the
specifi ed address on the map.
For further details, please read the
chapter "Working with the Map".
• Save:
– This function allows you to save
the specifi ed address to your
favorites.
For further details, please read the
chapter "Saving one of the recent
destinations".
Point of Interest at a Specifi c
Location
➜ In the main menu touch the Navi-
gation button.
The Navigation menu displays.
➜ Touch the Destination entry but-
ton.
The Destination entry menu dis-
plays.
➜ In the menu, touch the Points of
interest button.
32
The Point of interest menu dis-
plays.
➜ In the Point of interest menu, touch
the ...in a town button.
The submenu displays.
Page 33

Navigation
Note:
If the country containing your destination is not displayed in the fi rst
line, touch the
and select the correct country.
How to select a country is described
in the chapter "Entering a Destination
Country".
➜
which you are looking for a point
of interest. You can enter either
the postcode or the name of the
location.
Touch the Location fi eld
and enter the location in
button twice
➜ Touch the Category fi eld
and select the category
(e.g. culture) from which
you want to look for points of interest.
Only those categories are available
for selection for which points of interest can be located in the specifi ed
town.
➜ Touch the Subcategory
fi eld and select the sub-
category (e.g. museum,
theatre, ...) from which you want
to look for points of interest.
Only those subcategories are available for selection for which points of
interest can be located in the specifi ed town.
➜ Touch the Point of Inter-
est fi eld.
The keyboard is displayed.
If you know a part of the description of the point of interest, it can
be entered here to shorten the
list. However, you may also continue without an entry.
33
Page 34

Navigation
➜ Touch the List button.
A list with points of interest ap-
pears. The points of interest displayed correspond to the selected
category and subcategory. They
also contain the characters you
entered (if you entered any characters).
➜ Touch the entry of the point of in-
terest to which you want to navigate.
➜ If you desire more detailed infor-
mation about the point of interest,
touch the More button, followed
by Show details.
➜ Touch the OK button to accept the
selected point of interest.
Special National Destination
➜ In the main menu touch the Navi-
gation button.
The Navigation menu displays.
34
➜ Touch the Destination entry but-
ton.
The Destination entry menu dis-
plays.
➜ In the menu, touch the Points of
interest button.
The Point of interest menu dis-
plays.
➜ In the Point of interest menu, touch
the ...nationwide button.
Page 35

Navigation
The submenu displays.
Note:
If the country containing your
destination is not displayed in the
fi rst line, touch the
twice and select the correct country. How to select a country is described in the chapter "Entering a
Destination Country".
➜ Touch the Category fi eld
and select the category
(e.g. airport) from which
you want to look for points of interest. The selection offers only
categories whose points of interest have a national meaning.
button
➜ Touch the Point of Inter-
est fi eld.
The keyboard is displayed.
If you know a part of the description of the point of interest, it can
be entered here to shorten the
list. However, you may also continue without an entry.
➜ Touch the List button.
A list with points of interest ap-
pears. The points of interest displayed correspond to the selected
category. They also contain the
characters you entered (if you entered any characters).
➜ Touch the entry of the point of in-
terest to which you want to navigate.
➜ If you desire more detailed infor-
mation about the point of interest,
touch the More button, followed
by Show details.
➜ Touch the OK button to accept the
selected point of interest.
35
Page 36

Navigation
Copying a Destination from
the Map
This function allows you to select the
destination for a navigation directly
on the map. In addition to towns and
streets, you can also quickly select
points of interest.
➜ In the main menu touch the Navi-
gation button.
The Navigation menu displays.
➜ Touch the Destination entry but-
ton.
The Destination entry menu dis-
plays.
➜ In the destination entry, touch the
Select on map button.
The map is displayed.
Moving the Map Section
To view the desired destination area
on the map, you can move the map
section and zoom in/out.
• Zooming / Moving
– Touch the Zoom
, button to switch be-
tween zoom and pan mode.
– Zoom
In the zoom mode (button not
pressed), you can zoom in and
out on the map. You can zoom
in by plotting a diagonal start-
ing in the top left corner. You
can zoom out by plotting a di-
agonal starting in the bottom
right corner.
/ Pan
36
Page 37

Navigation
– Move
In the move mode (button
pressed), you can move the
map. For this purpose, touch
the map, hold the pen or your
fi nger pressed and move the
map area in the desired direction.
➜ Touch the town (street or point of
interest) to be defi ned as the destination for a few seconds.
The town is identifi ed by an or-
ange-dotted circle.
Information about the selected
location is loaded from the data
stock and displayed. Below the
information fi eld are buttons with
which several functions can be
called that are available for the selected route location.
You have the following options:
• Touch the Start navigation but-
ton to use the selected location as
place of destination for the navigation.
37
Page 38

Navigation
Notes:
– This function is only available
with GPS reception.
– If you use this function during
a navigation, all previously defi ned route locations (stages
and destination points) are deleted!
• Touch the Save button to save
the selected destination. You can
select the destination at any time
from the list of favorites.
• Touch the Search nearby button
to search for a point of interest in
the vicinity of the selected destination.
• Touch the Add button to add the
selected destination to the end
of a route (as the last stage). The
route point is subsequently identifi ed on the map by a fl ag and also
entered in the route point list in
the Itinerary menu.
38
Note:
If you use this function during a
navigation, the route is immediately recalculated and the navigation
is subsequently continued.
• Touch the Interim destination
button to add the selected destination to a route (as the next stage
to be approached). The route is
immediately recalculated and the
navigation is subsequently continued.
• Touch the button to return to
the map view without executing a
function.
Page 39

Copying the Destination
from the Favorites
The favorites contain all the destinations you saved using the Save button.
You can perform the following in this
menu:
• Accepting destinations for the
navigation,
• renaming navigation destinations,
and
• deleting saved destinations.
Copying a Favorite for Destination
Guidance
➜ In the main menu touch the Navi-
gation button.
The Navigation menu displays.
➜ Touch the Destination entry but-
ton.
The Destination entry menu dis-
plays.
➜ Touch the Favorites button.
The Fav ori tes menu displays.
Navigation
➜ Touch the desired destination.
Note:
If you want to view the address
of a saved destination, touch this
destination. Touch More, followed
by Show details.
➜ Touch the OK button.
The Address menu displays. The
address of the selected destination is entered in the corresponding fi elds.
How to delete or rename a saved destination is described in the chapter
"Managing Destinations".
39
Page 40

Navigation
Additional Functions
➜ Touch the More button to gain ac-
cess to additional functions of the
Favori tes menu.
The list of Additional functions
displays.
It contains the following functions:
• Show details:
– Touch the Show details button
to show the address of the selected destination.
• Delete entry:
– Touch the Delete entry button
to delete the selected destination.
• Delete all:
– Touch the Delete all button to
delete all the destinations from
the Favori tes .
For further details, please read the
chapter "Deleting a Destination".
• Rename entry
– Touch the Rename entry but-
ton to change the designation
of the selected destination.
40
Copying one of the Recent
Destinations
The destinations approached last are
automatically stored in the Recent
destinations list.
You can perform the following in this
list:
• Accepting a destination for the
navigation,
• saving a navigation destination in
the Favori tes , and
• deleting entries from the Recent
destinations list.
➜ In the main menu touch the Navi-
gation button.
The Navigation menu displays.
➜ Touch the Destination entry but-
ton.
The Destination entry menu dis-
plays.
➜ Touch the Recent destinations
button.
The Recent destinations menu dis-
plays.
Page 41

➜ Select the desired destination.
➜ Touch the OK button.
The destination is copied and the
address is entered in the corre-
sponding fi elds.
Additional Functions
➜ Touch the More button to gain ac-
cess to additional functions of the
Recent destinations menu.
The list of Additional functions
displays.
It contains the following functions:
• Show details:
– Touch the Show details button
to show the address of the selected destination.
Navigation
• Delete entry:
– Touch the Delete entry button
to delete the selected destination.
• Delete all:
– Touch the Delete all button to
delete all the entries of the Re-
cent destinations list.
• Save under favorites:
– Touch the Save under favorites
button to save the selected
destination in the Favori tes .
Using Home Address as
Destination
If you home address is saved, you can
quickly navigate home from any location.
How to save your home address is
described in the chapter "Home address".
➜ In the main menu touch the Navi-
gation button.
The Navigation menu displays.
➜ Touch the Home button.
41
Page 42

Managing Destinations
The route calculation is performed
and the navigation starts.
Note:
The route type used for the route
calculation is automatically select-
ed from the setting which you de-
fi ned in the Routing options menu.
42
Managing Destinations
Two lists are available in which individual destinations are saved:
• In the Favori tes
• In the Recent destinations list
Each destination you specify and the
destinations from the Recent destina-
tions list can be saved in the Favor ite s.
This is particularly useful if you want
to approach this destination repeatedly.
Destinations from the Favor ite s can
be renamed.
You can delete individual destinations
from both lists.
Saving Destinations
Prerequisite:
• You specifi ed a destination as de-
scribed in the chapter "Entering a
Destination".
➜ Touch the More button.
➜ Touch Save.
Page 43

Managing Destinations
A menu for entering a name is dis-
played.
➜ Enter a name for the destination.
➜ Touch the OK button.
The destination is saved in the Fa -
vorites.
Saving one of the Recent
Destinations
Prerequisite:
• You opened the Recent destina-
tions list as described in the chap-
ter "Copying one of the Recent
Destinations".
➜ Select the destination which you
want to save in the Favo rites.
➜ Touch the More button.
➜ Touch Save under favorites.
A menu for entering a name is dis-
played.
➜ Enter a name for the destination.
➜ Touch the OK button.
The destination is saved in the Fa -
vorites.
Renaming a Destination
➜ Open the Favori tes menu as de-
scribed in the chapter "Copying the
Destination from the Favorites".
➜ Select the destination to be re-
named.
43
Page 44

Managing Destinations
➜ Touch the More button.
➜ Touch Rename entry.
A menu for entering a name is dis-
played.
➜ Enter a new name for the destina-
tion.
➜ Touch the OK button.
The destination is renamed.
Deleting a Destination
Prerequisite:
• You opened the Favo rites as de-
scribed in the chapter "Copying the
Destination from the Favorites"
- or -
• you opened the Recent destina-
tions list as described in the chap-
ter "Copying one of the Recent
Destinations".
➜ Select the destination to be de-
leted from the list.
➜ Touch the More button.
➜ Touch Delete entry.
A confi rmation menu is displayed.
➜ Touch OK to delete the destina-
tion.
The destination is deleted from
the list.
Deleting the Complete List
Prerequisite:
• You opened the Favo rites as de-
scribed in the chapter "Copying the
Destination from the Favorites"
- or -
• you opened the Recent destina-
tions list as described in the chap-
ter "Copying one of the Recent
Destinations".
➜ Touch the More button.
➜ Touch Delete all.
A confi rmation is displayed.
44
Page 45

➜ Touch OK to delete the list
- or ➜ touch
not to delete the list.
Route Planning
Route Planning with
Stages
You can also perform the route planning without GPS receiver, e.g. in the
comfort of your home. Defi ned routes
can be saved for reuse so that you
can plan any number of routes, e.g.
for your vacation.
Entering Destination Points
A route is planned as follows:
➜ In the Navigation menu, touch the
More button.
➜ Touch Itinerary.
The Itinerary menu displays.
➜ Touch the Add button to defi ne
the fi rst route point.
45
Page 46

Route Planning
The Destination entry menu dis-
plays.
➜ Defi ne the route point similar to
the destination entry. For more information, see the chapter "Enter-
ing a Destination".
➜ Touch the Add button.
The Itinerary menu displays. The
defi ned destination is listed as
route point 1.
➜ Repeat the steps for all additional
destinations to be added to the
route.
46
Adding a Route Point
➜ Touch the Add button to defi ne
another route point.
The Destination Entry menu dis-
plays.
➜ Enter a new route point similar to
the destination entry.
The new route point is inserted at
the end of the route list.
Editing, Saving and Managing
Routes
You can plan any number of routes,
e.g. for your vacation. They can be
saved and used for navigation at a
later time.
You can insert additional route points
in the routes at any time, change the
order of route points or display the
route on the map.
The Itinerary menu provides various
buttons for this purpose:
➜ Touch the route point you want to
select.
Page 47

Route Planning
If the list features more than 3 entries, use the following buttons:
➜ Touch the
the list by one page (3 elements).
➜ Touch the
the list by one page (3 elements).
To scroll up or down the list by sev-
eral pages,
➜ touch the corresponding button
repeatedly.
Note:
If the list features more than 3 ele-
ments, the scroll bar indicates the
current position in the list.
Changing the Order
button to scroll up
button to scroll down
• Move route point up:
➜ Select the route point to be
moved.
➜ Touch the More button.
➜ Touch the Move target up button.
The Itinerary menu is displayed
again, the selected route point is
moved up in the route list by one
position.
➜ Repeat this process until the route
point appears at the correct posi-
tion in the route list.
• Move route point down:
➜ Select the route point to be
moved.
➜ Touch the More button.
➜ Touch the Move target down but-
ton.
The Itinerary menu is displayed
again, the selected route point is
moved down in the route list by
one position.
➜ Repeat this process until the route
point appears at the correct position in the route list.
Deleting a Route Point
➜ Select the route point to be de-
leted.
➜ Touch the More button.
➜ Touch Delete from route.
The route list is displayed again.
Deleting a Complete Route List
➜ While the route list to be deleted
is displayed, touch the More button.
➜ Touch Delete the complete list.
47
Page 48

Route Planning
Managing Routes
Saving a route
➜ Touch the More button.
➜ Touch Save route.
A menu for entering a name is dis-
played.
➜ Enter a name for the route.
➜ Touch OK.
Note:
The route points are saved. If you
load a saved route, it must be re-
calculated.
Loading a route
➜ Touch the More button.
➜ Touch Load route.
➜ Select the desired route.
➜ Touch OK.
Calculating a Route
A planned route can also be calculated without GPS reception so that you
can gain an overview of the trip.
In this case, the fi rst defi ned route
point is set as the starting point of
the route.
48
Note:
For a navigation, the current position is the starting point. The fi rst
stage is the travel to the fi rst defi ned route point.
➜ Touch the Calculate button to cal-
culate the complete distance as
well as the estimated travel time
of the route.
The route is being calculated. A
window displays the progress of
the calculation.
After the calculation is complete,
the Itinerary menu displays the
complete trip from the fi rst to the
last route point and the estimated
travel time for this trip instead of
the Calculate button.
In addition, the distance from the
previous route point and the estimated travel time for this stage are
displayed for each route point.
Page 49

Specifying Route Options
Displaying the Route on the Map
➜ Touch the Show on map button
to display the entire route on the
map.
The map is displayed.
The route is highlighted in blue.
The specifi ed route points are
identifi ed by fl ags.
Simulation (demo mode)
➜ Touch the map. A selection menu
appears. Touch "Simulation". The
route is automatically travelled
and driving recommendations are
output.
➜ Touch
tion, otherwise the simulation is
repeated.
Note
The simulation distance must be
less than 60 miles.
to end the simula-
Specifying Route
Options
In the Routing options menu, you can
defi ne the speed profi le of your vehicle, select the type of routing and exclude certain streets from usage. The
route options remain valid for each
destination guidance until the next
change of the route options.
➜ In the Navigation menu, touch the
Settings button.
The Settings menu displays.
➜ Touch the
the list by one page (5 elements).
➜ Touch the
the list by one page (5 elements).
To scroll up or down the list by sev-
eral pages,
➜ touch the corresponding button
repeatedly.
➜ In the Settings menu, touch the
Routing options button.
button to scroll up
button to scroll down
49
Page 50

Specifying Route Options
The Routing options menu dis-
plays.
➜ Touch the Speed profi le fi eld to
change between the available profi les.
➜ Touch the Type of routing fi eld
to change between the various
modes:
• Dynamic route (TMC)
– This option requires that an
external TMC receiver is connected.
With this option, traffi c an-
nouncements are incorporated
in the calculation of the route.
Without TMC reception, the
Fast Route is calculated.
50
• Fast route
– This option calculates the
shortest route for the required
time.
• Short route
– This option calculates the
shortest route for the miles to
be travelled.
➜ Sequentially touch the fi elds Mo-
torways, Ferries and Toll roads
and specify whether they should
be included in the route calcula-
tion or avoided.
• Permitted
– This option includes the cor-
responding street type in the
calculation of the route.
• Avoid
– This option avoids the corre-
sponding street type as far as
possible.
• Forbidden
– This option does not include
the corresponding street type
in the calculation of the route.
Page 51

Destination Guidance
Prerequisite:
• You specifi ed a place of destina-
tion as described in the chapter
"Entering a Destination"
- or -
• you selected a place of destination
from the Favor ite s as described in
the chapter "Copying the Destination from the Favorites"
- or -
• you selected a place of destination
from the Recent destinations list as
described in the chapter "Copying
one of the Recent Destinations"
- or -
• you planned or loaded a route (as
described in the chapter "Route
Planning with Stages").
➜ Touch the Start navigation but-
ton.
The route is being calculated.
The map is displayed. Your current
position is represented by a yellow
triangle. The route is highlighted
in blue.
Destination Guidance
Notes:
•
The route is calculated using the
currently valid settings for the
route calculation. The settings for
the route options can be viewed
and changed via the Routing op-
tions menu. For detailed information, please read the chapter
"Specifying route options".
• If the navigation for a route is start-
ed, the starting point is always the
current position. The fi rst stage of
the route is the fi rst defi ned route
point.
51
Page 52

Destination Guidance
Disturbed GPS Reception
A message appears after entering the
destination if no adequate GPS signal
is received.
You have the following options:
• Open the battery cover and en-
sure that the switch inside is set
to "ON".
• If you are in an enclosed room,
move to the outside. The Travel-
Pilot requires a vertical line to-
wards the sky.
If the GPS reception is disturbed
during the destination guidance, the
navigation is stopped.
As soon as the reception is re-established, the navigation system automatically recognizes whether your
position has changed and, if neces-
52
sary, recalculates the route. At that
time, you can simply continue your
navigation.
Quitting the Destination Guidance
➜ Touch this button
the destination guidance.
A confi rmation dialogue appears.
➜ Touch OK to quit the destination
guidance.
If you quit the destination guidance
before reaching your destination, the
Navigation menu opens. You can now
enter a new destination or continue
the navigation to the original destination by selecting the original destination again from the "recent destinations".
Reaching the Place of Destination
As soon as you have reached the destination point, the message "You have
reached your destination" appears.
At this point, the map displays only
your current position (yellow arrow).
to quit
Page 53

Working with the Map
Working with the Map
Map Operation
In this section you learn which information and which processing options are available in the map view.
Depending on whether you display a
map without or during the navigation,
different options are available for operation.
Showing a Map
You can display the map
• during route planning,
• to display destinations on the
map, or
• to copy destination from the map
for the navigation.
You can open the map view as fol-
lows:
• Via the Show map button in the
Navigation menu.
• Via the Select on map button in
the Destination entry menu.
• Via the Show on map button in the
additional functions in the Address
menu after selecting a destination.
Touching the Map
➜ Briefl y touch the map to display
additional functions.
Depending on whether you are currently in an active navigation or only
display the map, only certain functions are available.
➜ Touch the map for a few seconds
to display information about the
location you touched, and you can
also select it as navigation destination.
For further details, please read
the section "Copying a Destination
from the Map".
53
Page 54

Working with the Map
Buttons
Different buttons are available in the
map view with which you can adjust
the display according to your needs.
With Map View without GPS
Reception
• Show/hide buttons
– More
This button allows you to hide
the other buttons to gain a
better overview of the map.
Touching it again redisplays
the auxiliary buttons.
With Map View with GPS Reception
• Auto mode
– More
Touch this button to restore
the standard view of the map
after making changes. In doing
so, the settings for the map
orientation and auto zoom are
applied, the auxiliary buttons are hidden and the map
is centred according to your
position.
54
• The Change button allows you to
display additional options in
map view.
• Fix position / Fix map
– This button is only active dur-
ing a navigation. Touch the Fix
position /Fix map
button to toggle the map view
between "Position fi xed" and
"Map fi xed".
– Map fi xed
In this mode (button not
pressed), the map is fi xed and
the current position (yellow ar-
row) moves across the map.
Note:
This mode is automatically set as
soon as you move the map; otherwise, the map would constantly
jump back to the current position.
This mode should also be set if
you want to select destination
points from the map during the
navigation.
Page 55

Working with the Map
– Position fi xed (standard set-
ting)
In this mode (button pressed),
the map is continually moved
so that the current position
(yellow arrow) is always closely
centred in the bottom third of
the map.
• Zooming / Moving
– Touch the Zoom /Pan
, button to switch be-
tween zoom and pan mode.
– Zoom
In the zoom mode (button not
pressed), you can zoom in and
out on the map. You can zoom
in by plotting a diagonal start-
ing in the top left corner. You
can zoom out by plotting a di-
agonal starting in the bottom
right corner.
– Move
In the move mode (button
pressed), you can move the
map. For this purpose, touch
the map, hold the pen or your
fi nger pressed and move the
map area in the desired direction.
• Showing the complete route
– Touch this button to dis-
play the complete route on the
map.
• Map in travel direction /
Map to north
– Touch the In travel direction
/ To north button
to toggle the map view between
travel direction and aligned to
north.
– Map in travel direction
Touch this button (button not
pressed) to align the map in the
travel direction.
– Align map to north
Touch this button (button
pressed) to align the map in the
direction north.
• 3D-view
– Touch this button to display
the map in a three-dimensional
representation from a bird's
eye view.
55
Page 56

Working with the Map
• 2D-view
– Touch the More, button to dis-
play the map in two-dimensional form again.
• Zoom out
– Touch this button to zoom
out of the map.
• Zooming level bar between the
buttons /
– Touch one of the sections of
the bar to zoom in or zoom out
of the map.
• Zoom in
– Touch this button to zoom in
on the map.
• TMC status
– TMC reception
Touch this button to dis-
play current traffi c announcements.
– : No TMC receiver / no
TMC signal
Without a connected TMC re-
ceiver or without TMC signal,
this function is not available.
A description of the TMC func-
tionality can be found in the
chapter "Using the TMC Functionality".
• : Close map / Quit naviga-
tion
– Touch this button
close the map or to quit the
navigation.
to
56
Page 57

Working with the Map
Additional Functions
➜ Briefl y touch any position on the
map to activate additional functions. Depending on whether you
are currently in a navigation or
only display the map, only certain
functions are available.
The menu with the additional func-
tions displays.
Day/Night Mode
➜ Touch the Night mode, button
to set the map display "Night" or
"Day".
Mute
➜ Touch the Mute button to switch
the voice instructions on or off.
Settings
➜ Touch the Settings button to dis-
play the Settings menu.
For further details, please read the
section "Settings".
Block Road, Unblocking
The Block road button is only available during a navigation. For further details, please read the section
"Blocking Route Segments".
Inserting an Interim Destination
➜ Touch the Interim destination
button to insert a new interim destination during the navigation.
The route is recalculated so that
this interim destination can be approached as the next destination.
57
Page 58

Working with the Map
Afterwards, all subsequent route
points are selected.
For further details, please read the
section "Inserting an Interim Destination".
Route Options
➜ Touch the Route options button to
change the route options.
For further details, please read the
section "Routing options".
58
Next Destination
This function is only available during
a navigation on a route with at least
one interim point. Use this function
if you want to skip the next route
point.
➜ Touch the Next destination but-
ton to approach the next to one
route point.
The route is recalculated so that
the next to one route point can be
approached as the next destination.
For further details, please read the
section "Approaching the Next Destination".
Page 59

Map Display during a Destination Guidance
Map Display during
Destination Guidance
During a navigation, the map display
shows different navigation tools,
route information and one additional
button:
Navigation Tools
The left and lower area of the map display the following navigation tools:
• In case of actions that must be
executed in brief succession, the
next to one action is displayed in
the small upper arrow fi eld.
• The yellow triangle represents
your position on the map. A continually changing map section ensures that the current position is
always closely centred on the map
(so-called moving map).
• The large lower arrow fi eld dis-
plays the next action and the distance to the next action.
- If you come closer to the action
location, a bar is displayed to
the right of the large arrow fi eld
instead of the distance:
59
Page 60

Map Display during a Destination Guidance
– The more yellow bars are dis-
played, the closer you are to
the location of the next action.
• The upper street fi eld displays the
next street name.
• The lower street fi eld displays the
current street name.
Route Information
The right area of the map displays the
following route information:
– : This symbol represents
stages. All information below it
refers to the next destination.
–
–
–
60
: Estimated time of ar-
rival.
: Estimated remaining
travel time.
: Remaining miles to
destination.
Signpost Information
The upper area of the map displays
signpost information you must follow:
Note:
This information can only be displayed if it is part of the map material.
Speed Limit
The right area of the map displays any
speed limit that may apply:
Note:
This information can only be displayed if it is part of the map material.
Page 61

Warning:
The information on the digital road
maps may be incorrect due to shortterm changes (construction, etc.)!
The traffi c situation and the local
signpost information have priority
over the information of the TravelPilot.
Showing Additional Map
Information
You can use the TravelPilot to defi ne
which additional information is displayed on the map. All settings are
performed in the Settings menu.
The additional information on the
map is activated as follows:
➜ Open the Settings menu by touch-
ing the Settings button in the Navigation menu or by briefl y touching
any position on the map and then
selecting the Settings entry.
Working with the Map
Map Information
➜ Touch Map information.
➜ Activate the Info bar entry so that
the compass and your current
speed are displayed on the map in
the lower right border.
➜ Activate the Point of interest en-
try so that all points of interest
(Points of Interest) are displayed
on the map (default setting).
61
Page 62

Map Display during a Destination Guidance
➜ Activate the Street names 2D en-
try so that the street names are
displayed on the map (only possible in 2-D display).
➜ Touch the
to the Settings menu.
Route Information
➜ Select the Route information set-
ting with the button.
➜ Switch the desired route informa-
tion on or off with the corresponding buttons.
62
button to return
The corresponding information for
the next stage (upper area) and
the complete route (lower area) is
displayed on the map.
➜ Touch the button to return
to the Settings menu.
Signpost Information
➜ Touch Signpost information.
The Signpost information menu dis-
plays.
➜ Touch the Show traffi c signs but-
ton to activate or deactivate the
display of the exit signs.
➜ Touch the
to the Settings menu.
Speed
➜ Touch Speed limit.
button to return
Page 63

Map Display during a Destination Guidance
The Speed limit menu displays.
In the Speed limit menu you can defi ne whether speed limits should be
displayed during the navigation and
whether you should be warned audibly if you are exceeding the speed
limit.
• Display signs
➜ Touch the Show traffi c signs but-
ton to change between the modes
Show traffi c signs : Always, On
speeding only or Never.
• Warning in a town:
– The Warning in built-up areas
button shows the level of the
speed-reading at which you are
audibly warned inside of buildup areas.
➜ Touch the Warning in built-up ar-
eas button to change the value or
to set it to Never.
• Warning outside of towns:
– The Warning outside built-up
areas button shows the level of
the speed-reading at which you
are audibly warned outside of
build-up areas.
63
Page 64

Additional Functions during Navigation
➜ Touch the Warning outside built-
up areas button to change the
value or to set it to Never.
Warning
•
– Activate the Warning button to
receive an audible warning.
➜ Touch the OK button to save your
settings.
Your settings are accepted and
displayed on the map.
64
Additional Functions
during Navigation
The following functions can be used
during a navigation:
Inserting an interim destination
•
Skipping a stage
•
Blocking route segments
•
Using the TMC functionality
•
Inserting an Interim
Destination
During the navigation, you can insert
a new interim destination at any time.
The route is then recalculated so that
this interim destination can be approached as the next destination. After reaching the interim destination,
all remaining places of destination
are selected.
An interim destination is created as
follows:
Prerequisite:
You are in the map display during
•
a navigation.
➜ Briefl y touch any position on the
map.
Page 65

Additional Functions during Navigation
➜ Touch the Interim destination
button.
The Destination entry menu dis-
plays.
➜ Enter the place of destination as
described in "Entering a Destination".
➜ Touch the Set as route point but-
ton.
The route is recalculated and the
defi ned interim destination is selected as the next route point.
Note:
You can also select the interim
destination directly from the map
as described in the section "Copying a Destination from the Map".
Next, touch Interim destination.
Approaching the Next
Destination
This function is only available during
a navigation on a route with at least
one interim point.
Use this function if you want to skip
the next route point.
➜ Touch the Next destination but-
ton to approach the next to one
route point.
The route is recalculated so that
the next to one route point can be
approached as the next destination.
Blocking route
segments
Manual Blocking
You have the option of manually
blocking a route segment located on
your route to evade the road section
blocked for navigation. After a manual
blocking, the route is recalculated.
65
Page 66

Additional Functions during Navigation
Supposing that you are on the motorways and hear a traffi c announcement on the radio about a traffi c jam
of 5 miles on your route. In this case,
you can use a manual blocking of the
section to evade the traffi c jam.
The manual blocking is only applicable to the current navigation and is no
longer available for a new navigation
or after a restart of the program.
Route segments are blocked as follows:
Prerequisite:
You are in the map display during
•
a navigation.
➜ Briefl y touch any position on the
map.
➜ Select the Block road entry.
The Block road menu displays.
➜ Enter the number of miles, start-
ing with your current position,
which you want to block.
The route is recalculated and the
blocked route segment is evaded.
The blocked segment is marked in
red.
Unblocking
➜ Briefl y touch any position on the
map.
➜ Select the Block road entry.
The road blocking is cancelled and
the navigation uses once again the
original calculated route.
66
Page 67

Additional Functions during Navigation
Using the TMC Functionality
Traffi c Reports with TMC
The Traffi c Message Channel (TMC)
supplies your TravelPilot with traffi c
reports. This is made possible by a
Blaupunkt car sound system with
TMC receiver that receives the traffi c
reports broadcast by the radio stations.
TMC Mode of Operation
The Traffi c Message Channel, or TMC,
is a standard defi ned throughout Europe that can be used by all radio
stations and is broadcast using the
RDS signal (Radio Data System) of
a radio programme. The traffi c situation on motorways and some federal highways is monitored by traffi c
jam sensors or traffi c jam detectors
and the police. These traffi c data
are forwarded to the traffi c control
centres, which analyse the data and
transmit them to the radio stations.
From there, the data are transmitted
directly via TMC.
The TMC receiver fi lters the digital
traffi c data from the RDS signal and
forwards them to the TravelPilot. Current traffi c obstructions (e.g. constructions or traffi c jams) are then
graphically displayed on the map and
in a list.
The transmitted traffi c reports can
be incorporated in the route calculation by the TravelPilot and used for
calculating an alternative route in
case of disturbances on the calculated route.
This allows the TravelPilot to present
a dynamic navigation that is adjusted
to the traffi c situation.
If you connected a TMC receiver that
supplies the TravelPilot with current
traffi c reports and allows for the calculation of dynamic routes (traffi c
jam bypass), you can view the traffi c
reports directly in TravelPilot.
67
Page 68

Additional Functions during Navigation
Note:
This function can only be used if
you connected an external TMC receiver, e.g. a corresponding Blaupunkt car sound system.
Please ensure that the TravelPilot
is always switched on fi rst, followed by the TMC radio. The TMC
reception is indicated by the TMC
symbol
with connected TMC radio and
TMC station.
➜ Touch the More button.
➜ Touch the
The TMC messages menu displays.
68
in the map display
symbol.
Showing TMC Messages
➜ Touch the arrow buttons in the
Message area to change between
the individual traffi c reports.
For each TMC message, the street
number (motorways, regional and
local street) as well as the type of
jam is displayed.
Refreshing TMC Messages
➜ Touch the Igno button to display
TMC messages that arrived since
you opened the TMC messages
menu.
Closing the TMC Messages Menu
➜ Touch the
TMC messages menu.
Including TMC Messages in Route
Calculation
In the settings for TMC, you can defi ne how TMC messages that are applicable to your route should be incorporated.
How to defi ne this setting is described in the chapter "Settings".
button to close the
Page 69

Additional Functions during Navigation
Automatic Route Change
Prerequisite:
You confi gured the TravelPilot so
•
that route changes are performed
automatically (default setting).
The report of traffi c obstruction on
your route results in the automatic
calculation of an escape route.
Manual Route Change
Prerequisite:
You confi gured the TravelPilot so
•
that you must manually confi rm
route changes.
If a traffi c obstruction on your route
is reported, an information window
appears.
You can now decide whether to evade
the traffi c obstruction or to ignore it.
Evade:
•
➜ Touch the Evade button to incor-
porate the reported traffi c obstruction on your route.
The TravelPilot calculates an es-
cape route so that the traffi c obstruction is evaded.
Ignore:
•
➜ Touch the Ignore button to ignore
the reported traffi c obstruction on
your route.
Including/Ignoring Additional
Traffi c Report
You can subsequently change the
defi ned setting at any time. For this
purpose, proceed as follows:
➜ Touch the
The TMC messages menu displays.
➜ Search for a traffi c obstruction on
your route using the arrow buttons
in the Message area.
Traffi c obstructions that are locat-
ed on your route are identifi ed by
on the route in the Message area.
➜ Touch the Status button and se-
lect whether the traffi c obstruc-
tion should be ignored or evaded.
symbol.
69
Page 70

Confi guring TravelPilot
Confi guring TravelPilot /
Basic Settings
Settings
You can perform settings in the TravelPilot for the following areas:
• Factory settings
• Map information
• Route information
• Signpost information
• Speed
• Volume
• Touchscreen calibration
• Auto mode
• Routing options
• Route planning
• Time zone
• Format
• TMC
• Home address
• Voice output
• Product information
• Language
70
➜ In the Navigation menu, touch the
Settings menu to confi gure the
TravelPilot.
➜ If you made changes to the set-
tings, you can touch the OK button
of the Settings menu to accept the
changes you made.
- Or ➜ Touch the
Settings menu without saving the
changes.
Factory Settings
In the Factory settings menu, you can
reset the navigation software to the
factory settings.
➜ Touch the Factory settings but-
ton.
A confi rmation is displayed.
➜ Confi rm the reset to the factory
settings by touching OK.
To avoid resetting the device,
➜ touch the
button to exit the
button.
Page 71

Confi guring TravelPilot
Map Information
In the Map information menu, you can
perform the following settings:
• Info bar
– If you activate the entry, the
compass, altitude and current
speed are displayed on the
map in the lower right border.
• Points of interest
– If you activate the entry, the
map displays all the points of
interest (Points of interest).
• Street names 2D
– If you activate the entry, the
map displays all the street
names.
Route Information
In the Route information menu, you
can perform the following settings:
• Dist. to fi nal dest., Time to fi nal
dest., ETA at fi nal dest.
– If you activate the entries, the
map displays the estimated
time of arrival, the estimated
travel time and the remaining
miles to the destination point.
• Dist. to next dest., Time to next
dest., ETA at next dest.
– If you activate the entries, the
map displays the estimated
time of arrival, the estimated
travel time and the remaining
miles to the next stage destination.
Note:
This information is only displayed
if you navigate to several loca-
tions.
71
Page 72

Confi guring TravelPilot
Signpost Information
In the Signpost information menu,
you can specify whether signpost
information, which you are to follow,
should be displayed during the navigation or not.
➜ Touch the Show traffi c signs, but-
ton to activate or deactivate the
display.
Note:
This information can only be displayed if it is part of the map material.
Speed
In the Speed limit menu you can defi ne whether speed limits should be
displayed during the navigation and
whether you should be warned audibly if you are exceeding the speed
limit.
• Display signs
➜ Touch the Show traffi c signs but-
ton to change between the following modes:
72
– Show traffi c signs: Always,
– Show traffi c signs: On speed-
ing only or
– Show traffi c signs: Never
• Warning in a town
– The Warning in built-up areas
button shows the level of the
speed-reading at which you are
audibly warned inside of buildup areas.
➜ Touch the Warning in built-up ar-
eas button to change the value or
to set it to Never.
• Warning outside of towns
– The Warning outside built-up
areas button shows the level of
the speed-reading at which you
are audibly warned outside of
build-up areas.
Page 73

Confi guring TravelPilot
➜ Touch the Warning outside built-
up areas button to change the
value or to set it to Never.
• Warning
➜ Activate the Warning button to re-
ceive an audible warning.
Note:
This information can only be displayed if it is part of the map material.
Warning:
The information in the map material
may be incorrect due to short-term
changes (construction, etc.)!
The traffi c situation and the local
signpost information have priority
over the information of the navigation system.
Volume
In the Volume menu, you can set the
volume.
➜ For this purpose, touch the Vol-
ume fi eld and select a different
value.
Touchscreen Calibration
In the Touchscreen calibration menu,
you can recalibrate (align) the touchscreen if it responds imprecisely to
touches.
➜ Touch the Start calibration button
and follow the instructions on the
display.
Auto Mode
In the Auto mode menu, you can perform the following settings:
• Begin with
– Select whether the map should
be displayed in 3-D view or in
2-D view by default.
73
Page 74

Confi guring TravelPilot
• 3D auto zoom
– Select whether you desire auto
zoom or no auto zoom as default in 3-D view during a navigation.
• 2D auto zoom
– Select whether you desire
low auto zoom, standard auto
zoom, high auto zoom or no
auto zoom during a navigation
with 2-D view.
Note:
For 2-D and 3-D auto zoom, the
zoom depth is changed in reference to your speed: If you travel
slowly, the scale becomes smaller.
If you travel faster, the scale becomes larger. The deeper the auto
zoom, the smaller the scale of the
map.
• 2D-view
– Select whether the map should
be oriented to the north or in
driving direction by default during a navigation with 2-D view.
74
Route Options
In the Routing options menu, you can
defi ne the speed profi le of your vehicle, select the type of routing and
exclude certain streets from usage.
The route options remain valid for
each destination guidance until the
next change of the route options. For
further details, please read the chapter "Specifying Route Options".
Route Planning
In the Itinerary menu, you can defi ne
whether the calculation for the next
stage should automatically be performed after reaching a stage.
If the automatic calculation is activated, the route to the next stage destination is automatically calculated
upon reaching a stage.
If the automatic calculation is deactivated, you can navigate to the next
stage destination by briefl y touching
any position on the map and selecting the Next option.
Page 75

Confi guring TravelPilot
Time Calculation
In the Time zone menu, you can set
the time zone that is valid for your
position. This setting is important for
the correct calculation of estimated
arrival times.
• Time zone
➜ Touch this fi eld to set the time
zone valid for your position.
• Daylight saving time
➜ Touch this fi eld to toggle between
daylight savings time (button with
check mark) and winter time (button without check mark).
Note:
If the time is changed at your location or if you drive into a different
time zone, you must adjust the
corresponding settings.
Units of Measure / Formats /
Language
In the Format menu you can specify
which units of measure should be
used for times and distances and the
language to be used for the menus
and voice output of the TravelPilot.
• Time
➜ Touch this fi eld to toggle between
12-hour and 24-hour display.
• Distance
➜ Touch this fi eld to toggle between
the display in kilometres and
miles.
• Language
➜ Touch this fi eld to select among
the available languages.
TMC
In the TMC menu you can specify
whether the TravelPilot should automatically perform route changes in
case of traffi c obstructions or wait
for manual confi rmation.
Note:
A detailed description of the TMC
functionality can be found in the
chapter "Using the TMC Function-
ality".
75
Page 76

Confi guring TravelPilot GPS
Home Address
In the Home address menu, you can
store your home address so that you
can quickly navigate home from any
location.
➜ Touch the Enter your home ad-
dress button.
➜ Touch the Address button and
enter your home address in the
"Entering a destination address"
section.
➜ Touch the Set as home address
button.
The address is copied into the
Home address menu.
Product Information
➜ Touch this fi eld to display the ver-
sion of the map being used and
the version of the navigation software.
76
GPS Mode of Operation
The Global Positioning System (GPS)
was developed in the 70's by the US
military.
GPS is based on a total of 24 satellites that are orbiting the earth and
sending out signals. The GPS receiver
receives these signals and calculates
its distance to the individual satellites using the propagation time of
the signals. This information is then
used to determine its current geographical position.
The positioning requires signals from
at least three satellites, and starting
with the fourth one it is also possible
to determine the altitude above sea
level. The positioning is carried out
with an accuracy to 10 feet.
Navigation with GPS. The provided
maps also contain the geographical
coordinates of the displayed points
of interest, streets and towns. This
allows the navigation system to calculate a route from a starting point to
a place of destination.
Page 77

GPS MP3/WMA Mode
If the TravelPilot receives the signals
from at least 3 satellites, it can determine its position and display it on the
map. This position can then be used
as the starting point for a route calculation. Since a positioning and position display is carried out once every
second, you can view your movement
on the map.
MP3/WMA Mode
The TravelPilot can be used to play
MP3 audio fi les in MP3 format and
WMA from SD cards. The playback
utilizes either the internal loudspeaker, headphones connected via the
headphone jack or a car sound system connected via the cradle.
Preparing the SD Card
The TravelPilot can play MP3/WMA
fi les from SD cards. The SD cards
should be formatted using either the
FAT 32 or FAT 16 format.
The MP3/WMA fi les can be stored either at the top directory level or in
folders on the SD card. You can also
mix MP3/WMA fi les and other fi les
(e.g. .jpg fi les) in one folder. In MP3/
WMA mode, all other data are ignored
by the TravelPilot and only MP3/WMA
fi les are being played.
77
Page 78

MP3/WMA mode
Inserting the SD Card
The SD card slot is located on the
right side of the TravelPilot.
➜ Push the SD card into the SD card
slot according to the marking on
the slot until the card engages.
Selecting MP3/WMA Mode
If you are in a different operating
mode,
➜ press the MENU button below the
display to display the main menu.
The main menu displays.
➜ Touch the Music Player button.
78
The Music menu displays:
Starting Playback
If you selected the Music Player, the
fi rst title in the fi rst directory recognised by the TravelPilot is displayed.
➜ Touch the
playback.
button to start the
Selecting a Directory
You can select a directory either by
using the buttons in the Music menu
or by using the fi le browser. The directory is displayed in the Music menu
under the current track.
Page 79

MP3/WMA mode
Selecting a Directory via Button
➜ To select the next higher direc-
tory, touch the
Music menu.
➜ To select the next lower directory,
touch the
menu.
Selecting a Directory via File
Browser
➜ In the Music menu, touch the More
button.
The menu with the additional func-
tions is displayed.
➜ Touch the Browser button.
button in the
button in the Music
The fi le browser is displayed.
➜ Touch the desired directory.
The directory is displayed.
➜ Touch the track to which you want
to listen.
The Music menu is displayed again
and the selected track starts play-
ing.
Selecting Tracks/Files
You can select tracks by using the
buttons in the Music menu or by using
the fi le browser. How to select tracks
using the fi le browser is described in
the section "Selecting Directories via
File Browser".
79
Page 80

MP3/WMA mode
Selecting a Track via Button
➜ To select the next track in the di-
rectory, touch the
Music menu.
➜ To select the previous track in the
directory, touch the
the Music menu.
The next or previous track starts
playing.
button in the
button in
Confi guring the Display
You can defi ne whether the tracks in
the Music menu are displayed with
their fi le names or with the information from the ID3 tags. The display of
ID3 tags requires that they are stored
on the SD card together with the
tracks.
➜ In the Music menu, touch the More
button.
80
➜ Touch the ID3-Tag button. The
function is activated if a check
mark is displayed behind ID3 tag.
➜ Touch the
The Music menu is displayed
again.
button.
Random Track Play
(Mix/Shuffl e)
You can play all the tracks of a directory in random order.
➜ In the Music menu, touch the More
button.
➜ Touch the Mix button. The func-
tion is activated if a check mark is
displayed behind Shuffl e.
➜ Touch the
The Music menu is displayed again.
The shuffl e function is activated
and displayed in the menu (see
the marking):
button.
Page 81

Repeated Directory Play
(Repeat)
You can repeatedly play all the tracks
of a directory.
➜ In the Music menu, touch the More
button.
➜ Touch the Repeat button. The
function is activated if a check
mark is displayed behind Repeat.
➜ Touch the button.
The Music menu is displayed
again.
MP3/WMA Mode
Quitting Playback
➜ To quit the playback, touch the
button.
Playback is stopped.
Selecting the Equalizer
Various equalisers are available for
the MP3/WMA mode: Normal, Classic, Rock, Pop and Jazz.
➜ In the Music menu, touch the More
button.
➜ Touch the Equalizer button. The
selected equaliser is displayed be-
hind Equalizer.
➜ Touch the
The Music menu is displayed again.
The selected equaliser is displayed
(see the marking).
button.
81
Page 82

Picture Viewer
Removing the SD Card
➜ You quit the MP3/WMA mode by
touching the button in the
Music menu.
➜ Carefully push on the SD card in
the slot until it disengages.
The SD card is ejected a little bit
and can be removed.
Picture Viewer
The TravelPilot can also be used to
view pictures that are stored on the
inserted SD card. For this purpose,
the pictures must be stored in the
.jpg or .bmp format on the card. The
JPG fi les can be stored either at the
top directory level or in folders on
the SD card. You can also mix JPG
fi les and other data (e.g. MP3 fi les)
in one folder. In the Picture Viewer
mode, only the .jpg (.bmp) fi les in a
folder are displayed and others are
ignored.
Starting the Picture Viewer
If you are in a different operating
mode,
➜ press the MENU button below the
display to display the main menu.
The main menu displays.
82
Page 83

Picture Viewer
Starting the Slide Show
If you started the Picture Viewer,
the fi rst picture in the fi rst directory
recognized by the TravelPilot is displayed.
➜ Touch the
slide show with all the pictures in
the current directory.
button to start a
➜ Touch the Picture Viewer button.
The Pictures menu displays.
The fi rst picture in the fi rst direc-
tory recognised by the TravelPilot
is displayed.
Setting the Time for the
Slide Show
For a slide show, you can set the display time of the individual pictures of
a folder. You can select from 5, 10, 15
and 20 seconds.
➜ In the Pictures menu, touch the
More button.
83
Page 84

Picture Viewer
➜ Touch the Slideshow button re-
peatedly until the desired time is
displayed.
➜ Touch the
The Pictures menu is displayed
again.
button.
Quitting the Slide Show
➜ To quit the slide show, touch any
position on the display.
The slide show is stopped and the
Pictures menu is displayed again.
Selecting a Directory
You can select a directory either by
using the buttons in the Pictures
menu or by using the fi le browser.
Selecting a Directory via Button
➜ To select the next higher directory,
touch the
menu.
➜ To select the next lower directory,
touch the
menu.
84
button in the Pictures
button in the Pictures
Selecting a Directory/Picture via
File Browser
➜ In the Pictures menu, touch the
More button.
The menu is displayed.
➜ Touch the Browser button.
The fi le browser is displayed.
Page 85

➜ Touch the desired directory.
The directory is displayed.
➜ Touch the picture you want to dis-
play.
The Pictures menu is displayed
again and the selected picture is
displayed.
Selecting a Picture
You can select pictures by using the
buttons in the Pictures menu or by
using the fi le browser. How to select
pictures using the fi le browser is described in the section "Selecting a Directory/Picture via File Browser".
Picture Viewer
Selecting a Picture via Button
➜ To select the next picture in the di-
rectory, touch the
Pictures menu.
➜ To select the previous picture in
the directory, touch the
in the Pictures menu.
The next or previous picture is dis-
played.
button in the
button
Confi guring the Display
You can defi ne whether the directory
name is displayed.
➜ In the Pictures menu, touch the
More button.
85
Page 86

Picture Viewer
➜ Touch the Show Folder button.
The display of the directory name
is activated if a check mark is dis-
played.
➜ Touch the
The Pictures menu is displayed
again.
button.
Adjusting the Picture to the
Display Format
You can defi ne that pictures which
are stored in portrait format, are automatically rotated for maximum utilisation of the display.
➜ In the Pictures menu, touch the
More button.
➜ Touch the Rotate button.
The automatic rotation is activated
if a check mark is displayed.
➜ Touch the
The Pictures menu is displayed
again.
button.
Removing the SD Card
➜ You quit the Picture Viewer mode
by touching the button in
the menu.
➜ Carefully push on the SD card in
the slot until it disengages.
The SD card is ejected a little bit
and can be removed.
86
Page 87

Installing Street Maps
Installing Street Maps
The road map of the country in which
the TravelPilot was purchased is preinstalled in the memory of the TravelPilot.
You can purchase additional road
maps for most European countries
on SD card or CD-ROM.
The preinstalled road map is also
contained on the enclosed CD-ROM
for a future restore.
To install a road map from the CDROM, copy it from the CD-ROM to an
SD card and install the road map as
described below.
➜ Switch on the TravelPilot by press-
ing the button for a few seconds.
➜ Insert the new memory card into
the SD card slot according to the
marking on the card slot. The card
slot is located on the right side of
the device.
➜ Switch on the TravelPilot again by
pressing the button for a few seconds.
➜ In the main menu, touch the Navi-
gation button to start the naviga-
tion.
➜ Touch the More button.
➜ Touch the Select Map button.
➜ Select the desired map in the list.
➜ Touch the OK button.
➜ Determine whether to load the
content of the road map into the
main memory of the device or
whether the TravelPilot should
load the data from the SD card
during the navigation.
Note:
If you load the new road map into
the main memory, the previously
installed road map is overwritten.
➜ Touch the OK button.
The selected road map is activated
and the Navigation menu displays.
Removing the SD Card
➜ Carefully push on the SD card in
the slot until it disengages.
The SD card is ejected a little bit
and can be removed.
87
Page 88

Cradle
Cradle
The cradle allows for adding additional functions to the TravelPilot.
If you installed the cradle in your vehicle and connected it to a Blaupunkt
car sound system, the following functions are available:
• TMC data transfer to the Travel-
Pilot with the use of a suitable car
sound system (with TMC output).
• TravelPilot power supply.
• Muting the radio for travel instruc-
tions.
• GALA, speed-dependent volume
control.
• Line out. Voice output and music
playback of the TravelPilot via the
loudspeakers of the car sound system.
• Speed signal to continue navigat-
ing during GPS shadowing (tunnel).
88
Cradle Installation
• Removal of your Blaupunkt TMC
radio. Please read the radio instal-
lation instructions for this pur-
pose.
• Connect the cradle adapter cable
between your radio and the exist-
ing connecting cable.
C
A
B
A
• Reinstall the radio according to
the radio installation instructions.
Page 89

Cradle
Connection Blocks of Blaupunkt
Car Sound Systems for TravelPilot
C-1 C-2 C-3
7
10 131619
14
91215
C
B
A
581114 17
2
1
234
3
1
4
2
6
3
18
20
5
7
6
8
5
7
6
8
A B
1
Gala/speedometer
22Radio Mute Speaker out RR3 Sub out 3 Speaker out RF+
4 Permanent +12V 4 Speaker out RF5 Aut. antenna 5 Speaker out LF+
6 Illumination 6 Speaker out LF7 Kl.15/Ignition 7 Speaker out LR+
8 Earth/GND 8 Speaker out LR-
1 Speaker out RR+
C2
7 Telephone AF In +
Telephone
8 AF In –
9 Radio Mute
10 RC +12V
11 Remote Control
12 RC - GND
C3
13 Bus (TMC) - In
14 Bus (TMC) - Out
15 Permanent +12 V
16 +12V
17 Bus (TMC) - GND
18 AF-AUX 1 GND
19 CDC IN L (AF-AUX 1 L)
20 CDC IN R (AF-AUX 1 R)
89
Page 90

Accessories
Accessories
(not part of the scope of delivery)
Steering Wheel Remote
Control RC 09
The RC 09 steering wheel remote
control allows you to operate the
TravelPilot safely and conveniently
from your steering wheel.
90
• With the buttons , , and
, you can move the selection
mark (yellow) in the menus and
lists.
• The button has the same func-
tion as the OK button in the lists
and menus.
• The button is used to exit the
menus and lists. It has the same
function as the button.
• By pressing the button, you can
conveniently open the TMC menu.
• The button allows you to repeat
the last voice output of the navigation.
Page 91

Technical Data Warranty
Technical Data
TFT display
Active colour matrix,
3.5 inch diagonal,
320 x 240 pixel
Audio
Built-in loudspeaker:
Mono, 8 Ohm, max 2 W
Audio output via cradle:
Stereo, Vmax=1 Veff, Rtyp=600 Ohm
Battery
Voltage: 3.7 V
Capacity: 2000 mA
Cigarette lighter wire
Input voltage: 12 to 24 V
Fuse in the connector: 2 A
Charger
Input voltage: 90 to 240 V
50/60 Hz
Output voltage: 12 V
Output current: max. 0,8 A
rms
AC,
Warranty
We provide a manufacturer's warranty for our products purchased within
the European Union. For devices purchased outside the European Union,
the warranty terms issued by our respective responsible domestic agency are valid.
The warranty terms can be called
up under www.blaupunkt.com or requested directly from:
Blaupunkt Service Center
3230 N Mannheim Road
Franklin Park, IL 60131.
Disposal of old unit
Do not dispose of your old unit in
the household trash!
Please use the return and collection
systems available to dispose of the
old unit.
91
Page 92

FAQ
Fault Removal /
Frequently Asked
Questions FAQ
Why does the TravelPilot require
GPS reception?
The system must know where it is located or where it is moving. This is
accomplished with the help of GPS
satellites. Without GPS reception,
navigating is not possible.
I have bad or no satellite reception.
What can I do to improve it?
One obstacle could be the metalevaporated windshield or a windshield heater. The metal evaporation
prevents the GPS signals from reaching the built-in antenna of the TravelPilot. As an alternative, an external
GPS antenna (e.g. outside the vehicle) must be connected.
Blaupunkt offers an optional external
antenna as an accessory.
92
No GPS Reception
If your TravelPilot should be without
GPS reception for an extended period of time (which could occur if the
device is switched off, e.g. after air
travel), perform a GPS reset:
• If necessary, separate the Travel-
Pilot from the power plug.
• Open the battery cover and set
the switch to "OFF".
• Wait 10 seconds and set the
switch to "ON".
• Move to the outside. The Travel-
Pilot automatically searches for
GPS signals. After a few minutes,
your TravelPilot is operational
again.
The loudspeaker of the TravelPilot is
too soft for me; what can I do?
The use of the cradle in conjunction
with a car sound system with Tel.-In/
Aux-In allows for using the loudspeakers for the playback.
Page 93

FAQ
The built-in loudspeaker does not
meet my quality demands. What can
I do?
The TravelPilot can be connected to a
car sound system with Tel.-In/Aux-In,
so that the loudspeakers can be used
for the playback. The sound should
improve signifi cantly.
In which countries is TMC reception
possible?
The following countries currently offer TMC: Germany, Denmark, Sweden, Finland, Great Britain, Belgium,
Netherlands, Austria, France, Switzerland, Italy, Spain.
The following countries plan on introducing TMC in the near future: Hungary, Czech Republic, Portugal.
Additional countries will follow.
What is the SD slot of the TravelPilot used for?
The SD slot is used to accept SD
cards with a capacity of up to 2 GB.
The following data can be stored on
the SD card:
Navigation data of other countries
•
(depth-digitised)
MP3/WMA fi les for playback
•
Pictures in the JPEG format.
•
How can I listen to MP3/WMA music?
With the help of a PC, the MP3/WMA
fi les are stored on the card which is
then inserted in the SD card slot of
the TravelPilot. In conjunction with
the cradle, they can also be played
over the car sound system.
Can the navigation software be
changed?
Yes. Depth-digitised data are provided on SD cards. Simply insert the
card in the SD card slot and you can
immediately navigate with the new
data.
The internal navigation software remains intact and you can use either
the internal navigation software or
the one on the SD card for the selection.
93
Page 94

FAQ
Is the old internal navigation software overwritten with a change of
the navigation software?
No, the system can navigate with
the internal as well as the external
data. If the external data (SD card)
are used for navigation, the SD slot
for the MP3/WMA playback for the
TravelPilot is unavailable during this
time.
Can the internal navigation software
be changed?
Yes. The data of the SD card can be
loaded in the internal memory. For
this purpose, insert the card in the
SD card slot and initiate the loading
process via menu.
How long does the loading take from
the SD card to the internal memory?
The loading process lasts approx. 15
minutes and is dependent upon the
data size. For this reason, the individual countries are delivered as completely manufactured maps.
94
The data do not have to be loaded
from the SD card into the internal
memory.
Is it possible to play WMA fi les with
DRM protection?
The playback of WMA fi les with Digital Rights Management protection
(WMA-DRM) is not possible since the
license key is not transferred during
the transfer of the WMA fi le from the
PC.
The playback of WMA fi les without
DRM protection is, of course, possible.
Can the GPS antenna prefi tted in
the vehicle be connected?
No, this requires an antenna matched
to the TravelPilot.
Most antennas requiring a 5-volt operating voltage, and the TravelPilot
provides 3 volt for the GPS antenna.
Page 95

Does the connection of the remote
control (RC09 available as an option) require an external infrared
receiver?
No. The infrared receiver is integrated in the TravelPilot.
Which cards can I use?
Commercial SD or MMC cards. We
tested SanDisk and Kingston.
Which data format is required for an
SD card?
FAT 16/32.
FAQ
95
Page 96

Country: Phone: Fax:/www:
Germany (D) 0180-5000225 05121-49 4002
www.blaupunkt.com
Austria (A) 01-610 39 0 01-610 39 391
Belgium (B) 02-525 5444 02-525 5263
Denmark (DK) 44-898 360 44-898 644
Finland (FIN) 09-435 991 09-435 99236
France (F) 01-4010 7007 01-4010 7320
Great Britain (GB) 01-89583 8880 01-89583 8394
Greece (GR) 210 94 27 337 210 94 12 711
Ireland (IRL) 01-46 66 700 01-46 66 706
Italy (I) 02-369 62331 02-369 62464
Luxembourg (L) 40 4078 40 2085
Netherlands (NL) 00 31 24 35 91 338 00 31 24 35 91 336
Norway (N) +47 64 87 89 60 +47 64 87 89 02
Portugal (P) 2185 00144 2185 00165
Spain (E) 902 52 77 70 91 410 4078
Sweden (S) 08-7501850 08-7501810
Switzerland (CH) 01-8471644 01-8471650
Czech. Rep. (CZ) 02-6130 0446 02-6130 0514
Hungary (H) 76 511 803 76 511 809
Poland (PL) 0800-118922 022-8771260
Turkey (TR) 0212-335 06 71 0212-346 00 40
USA (USA) 800-950-2528 www.blaupunkt.com/us
Blaupunkt GmbH,
Robert-Bosch-Straße 200,
D-31139 Hildesheim
09/06 CM-AS/SCS1 (US/GB)
8 622 405 222
96
 Loading...