

Blaupunkt TP EX-V GG User Manual
Navigation
TravelPilot EX-V
Operating and installation instructions
www.blaupunkt.com
Overview
2
RC 09H remote control handset
12
11
13
10
14
9
2675 8431

Overview
Monitor
1 Screen for displaying the symbol and map displays.
2 Infrared receiver for the RC 09H remote control handset.
3 Left +/- rocker switch for adjusting the brightness.
4 SRC button
Video source selection switch (navigation / external video input on the computer).
5 Blue button for switching the monitor on/off.
6 MODE button
For adjusting the 16:9 picture format (Full / Normal / Cinema).
7 Right +/- rocker switch for adjusting the contrast.
8 Brightness sensor.
RC 09H remote control handset
!
9
button for opening the menus for
dynamic route guidance and manual
traffic congestion detour.
:
button, correction button for deleting letters during character input
and for jumping back to the previous
menu.
;
buttons for selecting
menu items and letters.
OK
<
button for selecting menu items.
= Side button for activating the keypad
illumination.
>
button for repeating the last navigation voice output and for opening
the information menu. List entries
that are marked with “…” will be displayed in their entirety.
Plus Point: The optional RC 09
steering-wheel mounted infrared remote control can also be used for
operating the TravelPilot EX-V in the
same way conveniently from the
steering wheel.
3

Safety Information
The TravelPilot EX-V has been designed for use in cars.
Such special information as height restrictions or maximum permissible loads as required for lorries or busses have
not been included on the navigation DVDs.
Using the system while driving
If you do not pay attention to the current traffic situation at all times, you could easily cause serious traffic accidents.
To avoid being distracted by the TravelPilot EX-V, please observe the following information:
• Before you use the system for the first time, make yourself familiar with the TravelPilot EX-V and its operation.
• Find a suitable place to stop when you would like to re-program the TravelPilot EX-V.
• Never operate the TravelPilot EX-V while driving unless the traffic conditions permit.
• Do not make a destination entry unless your vehicle is stationary.
4
Laser product
The internal DVD drive is a class 2 laser product with a visible/invisible laser beam whose radiation can be dangerous
for humans. The DVD drive must only be used in accordance with the specified instructions. Never open the housing
and never try carrying out any repairs yourself. Only allow servicing and repairs to be carried out by trained personnel.

Contents
Overview .............................................. 2
Safety Information............................... 4
Introduction ......................................... 6
General Information ............................ 7
About these operating instructions ........ 7
Accessories (not included) .................... 7
How navigation works ........................... 8
Switching the unit on ............................. 8
Quick Reference ................................ 10
Meaning of the icons in the menus ..... 10
Marking menu items ............................ 10
Selecting menu items .......................... 10
Exiting menus...................................... 10
Entering a destination directly in just
a few steps .......................................... 11
Saving the current destination with a
short name before beginning route
guidance.............................................. 15
An example of route guidance using
the map display ................................... 15
Entering destinations ....................... 19
Entering the destination when you
know the address ................................ 19
Selecting special destinations
(car parks, petrol stations, etc.) ........... 23
Entering destinations using
coordinates.......................................... 26
Entering destinations in map mode ..... 27
Destinations in the destination
memory ............................................... 30
Route guidance ................................. 31
Starting route guidance ....................... 31
Restarting interrupted route guidance . 31
Adjusting the volume of the voice
output .................................................. 32
Requesting destination and route
information .......................................... 32
Route guidance in the arrow symbols
mode ................................................... 34
Route guidance with map display ....... 35
Selecting the type of map display ....... 36
Using the traffic congestion function ... 41
Dynamic route guidance with TMC .. 44
Switching TMC on/off .......................... 45
Selecting the TMC station with the
TMC D-Namic tuner box ..................... 45
Selecting the TMC station with the
car radio .............................................. 46
Calculating the route with TMC while
route guidance is in progress .............. 47
Displaying traffic messages ................ 47
Selecting route options .................... 49
Altering route options prior to route
guidance.............................................. 49
Altering the route options while route
guidance is in progress ....................... 50
Saving your settings ............................ 50
Destination memory ......................... 51
Saving destinations ............................. 52
Deleting destinations from the
destination memory ............................. 54
Resorting the destination memory ...... 55
Tour memory ..................................... 56
Entering tour destinations ................... 56
Sorting the tour list .............................. 58
Deleting tour destinations.................... 58
Deleting the whole tour ....................... 59
Starting route guidance to a tour
destination ........................................... 59
Other functions ................................. 60
Map display without route guidance .... 60
Accessing the on-board computer ...... 60
System settings ................................. 62
Accessing the main menu for system
settings ................................................ 62
Audio/video settings ............................ 62
Basic settings ...................................... 65
Other settings ...................................... 68
Calibration settings.............................. 72
Restarting the device software ............ 73
Appendix ............................................ 74
Changing the navigation DVD-ROM ... 74
Compatible navigation DVD-ROMs..... 74
Care tips for DVD-ROMs..................... 74
Wide screen monitor settings .......... 76
Symbols on the map and their
meaning ............................................. 78
Glossary ............................................. 80
Index ................................................... 81
Installation instructions.................... 83
5

Introduction
Dear Customer,
Congratulations on buying the TravelPilot EX-V. You can rest assured that you have
made the right choice by buying the TravelPilot EX-V.
The TravelPilot EX-V is a reliable and easy-to-use navigation system that will lead
you with precision through the traffic to your destination.
These operating instructions will take you step by step through the functions of the
TravelPilot EX-V and will answer the most frequently asked questions. You will find
further information on using these instructions in the section entitled “About these
operating instructions”.
If you have any further questions or comments regarding the TravelPilot EX-V, please
do not hesitate to call our telephone hotline or contact your Blaupunkt dealer. The
international telephone hotline numbers are printed on the last page of these instructions.
We provide a manufacturer guarantee for our products bought within the EU. You can
view the guarantee conditions at www.blaupunkt.de or ask for them directly at:
Blaupunkt GmbH
Hotline
Robert-Bosch-Str. 200
D-31139 Hildesheim
Notice regarding liability
Despite constant technical developments, the navigation system may in isolated cases provide incorrect or unoptimised navigation due to improper operation, changes to
the traffic flow regulation, construction sites, traffic load, errors or missing information
on the navigation data media or general calculation and positioning errors. Blaupunkt
does not accept liability and does not provide compensation for any damages or other
drawbacks arising from this.
6

General Information
About these operating instructions
These operating instructions were written to provide you with information on the operation and functions of your TravelPilot EX-V and to allow you to operate the equipment easily and correctly.
Please read these instructions carefully before you use your TravelPilot EX-V for the
first time and keep them handy for future reference in the car.
To allow you to find information quickly and easily, the following icons have been used
in these instructions to indicate the individual steps:
1. … This icon indicates steps you must perform in order to complete a function.
✔ The way in which the equipment should react after you perform a function is
indicated like this.
Plus Point: This indicates special information and tips on how to use the
TravelPilot EX-V.
Note
If you decided in favour of the version equipped with the wide vision TV
monitor, you will find separate operating instructions for the monitor
enclosed.
Accessories (not included)
RC 09 infrared steering-wheel remote control
RC 09 infrared steering-wheel remote control allows you to conveniently operate the
TravelPilot EX-V directly from the steering wheel.
TMC D-Namic tuner box
For dynamic navigation (automatic detours around traffic congestion), the TravelPilot
EX-V must be connected to a TMC source (Traffic Message Channel). It is possible to
purchase a “TMC D-Namic tuner box” as an accessory to receive TMC data.
RC 09 infrared steering-wheel remote control
7

General Information
You can also use the TMC data received by a Blaupunkt car radio. To find out which
Blaupunkt car radios are equipped to receive TMC data and relay this information to
the TravelPilot EX-V, please contact your Blaupunkt specialist dealer or ring the Blaupunkt telephone hotline. The hotline number is listed on the last page of these instructions.
How navigation works
Your TravelPilot EX-V uses GPS, a satellite-supported locating system, to determine
the current position of the vehicle. GPS stands for Global Positioning System, a system which can be used to reliably determine your location anywhere in the world. A
“gyroscope” and the electronic speedometer signal are also used to track the vehicle’s movements. The TravelPilot EX-V navigation system compares this data with
the data stored in digital form on the navigation DVD-ROM and uses it to calculate the
routes in route guidance.
If the TravelPilot EX-V is connected to a TMC source (“TMC D-Namic tuner box” or
appropriately equipped car radio), it will be able to take the current traffic situation into
account when calculating the route. For more information on TMC, please refer to the
section on “Dynamic Route Guidance with TMC”.
Switching the unit on
If the TravelPilot EX-V has been properly connected to the vehicle ignition and continuous plus, the TravelPilot EX-V will switch on automatically when you start your vehicle.
8
General Information
5
Operating introduction
When the system is started for the first time, an operating introduction explaining the
functions of the remote control will appear. Then you can select whether or not this
introduction is shown each time the TravelPilot EX-V is switched on.
Plus Point: You can activate or deactivate the operating introduction at any
time in the “Settings” menu. For more information, please refer to the section
on “Settings”, “Switching the operating introduction on/off”.
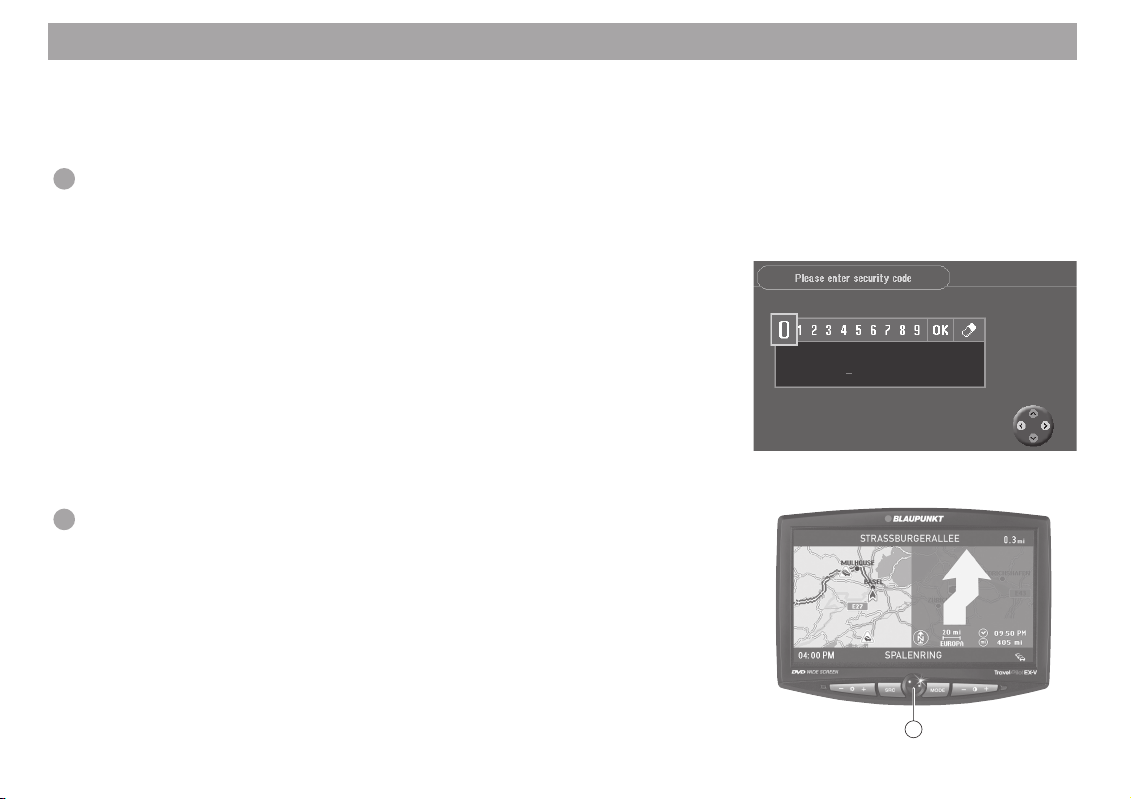
Theft protection system
It is possible to activate a coding for your TravelPilot EX-V so that the TravelPilot
EX-V cannot be operated after it has been disconnected from the battery (e.g. in the
event that it is stolen).
If the coding is active, it will be necessary to enter the code number before the unit
can be operated again after it has been disconnected from the battery. You will find
the code number in the TravelPilot EX-V equipment passport. Never keep this pass-
port in your vehicle!
For more information on activating/deactivating the coding and how to switch on coded equipment after it has been disconnected from the battery, please refer to the
section on “Settings”, “Activating/deactivating the safety code”.
Plus Point: This electronic theft protection system prevents unauthorised
persons from using the TravelPilot EX-V after it has been removed from the
vehicle.
Switching off the monitor
If required, you can switch off the display by pressing the blue button 5 on the monitor. Spoken driving recommendations are played even if the display is switched off.
The display can be switched on again by pressing the blue button 5 once more.
9
Quick Reference
Meaning of the icons in the menus
In various menus, functions are activated and actions carried out by marking and
confirming icons. The most important icons are shown and explained here:
- Icon: for starting the route calculation and route guidance
- Icon: for saving addresses and settings
- Icon: for deleting addresses after they have been entered / for resetting
the on-board computer
- Icon: for activating the list function when entering a destination
- Icon: all options are activated
- Icon: all options are deactivated
Marking menu items
Use and on the remote control to move the selection bar.
Plus Point: The operating assistant (highlighted in the picture) indicates in
yellow which directional arrows on the remote control can be used in the current menu.
Selecting menu items
Press OK on the remote control to select a marked menu item.
Exiting menus
If you would like to exit a menu, press on the remote control.
10

Quick Reference
The following three examples have been included to familiarise you quickly with the
basic functions of the TravelPilot EX-V:
– Direct destination entry in a city indicating the street and a junction
– Entering a name for the destination and saving it in the destination memory
– Route guidance using the map: altering the map scale and the map informa-
tion
For more information on entering destinations, please refer to the section on “Entering destinations”.
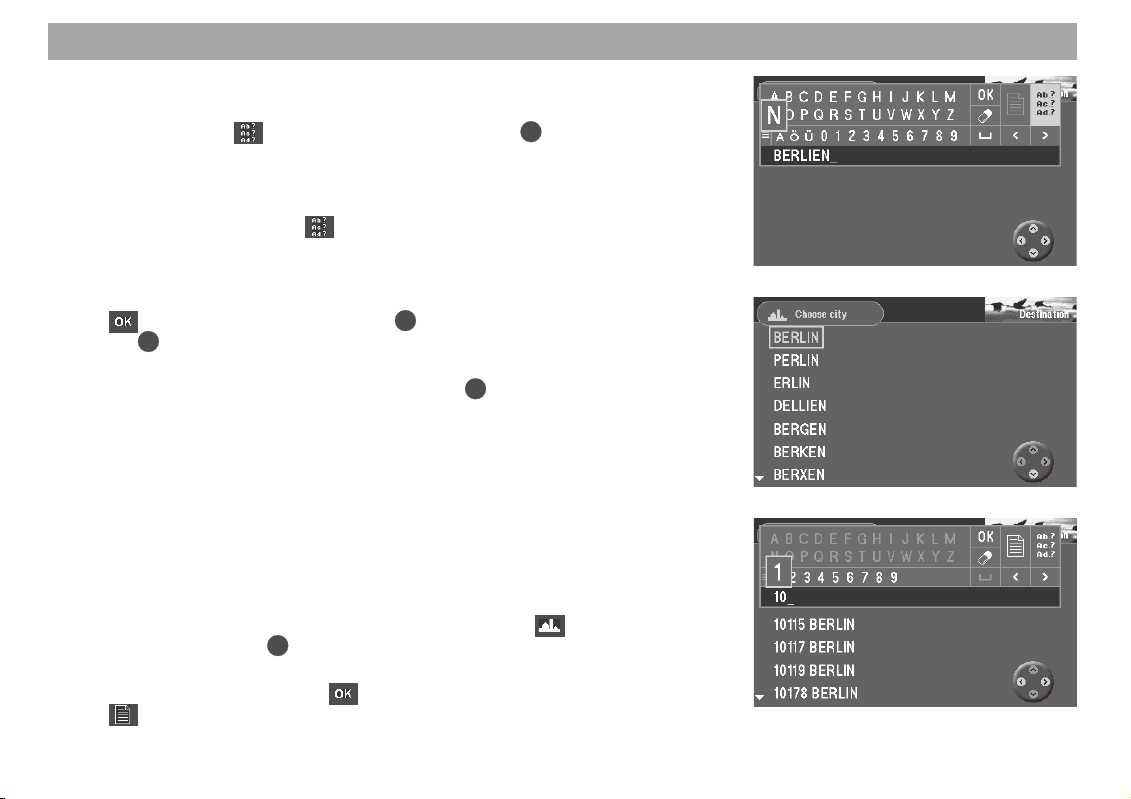
Entering a destination directly in just a few steps
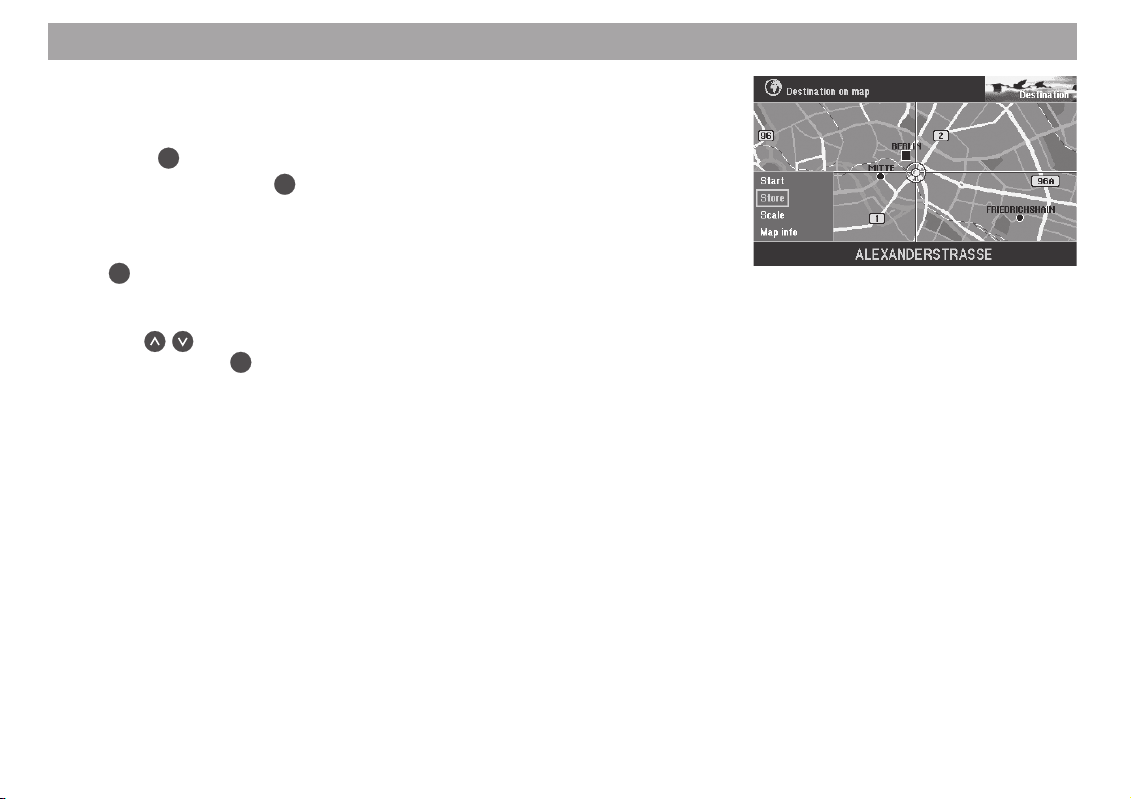
The following is an example of how to enter a destination.
Country: Germany
City/town: Berlin
Street: Alexanderplatz
Junction: Alexanderstraße
Country:
1. Switch on the vehicle ignition.
The main menu will appear. ✔
OK
2. Select “Destination” in the main menu. Press
The “Destination” menu will appear. ✔
The navigation DVD contains all the road network data for the countries that are stored
on the DVD. When you enter a destination for the first time, the system will ask you to
select a country so that it can load the corresponding lists. Generally, this will be the
country in which you are currently located.
Note
The selected destination country will remain stored in memory until you
select a new one.
.
11
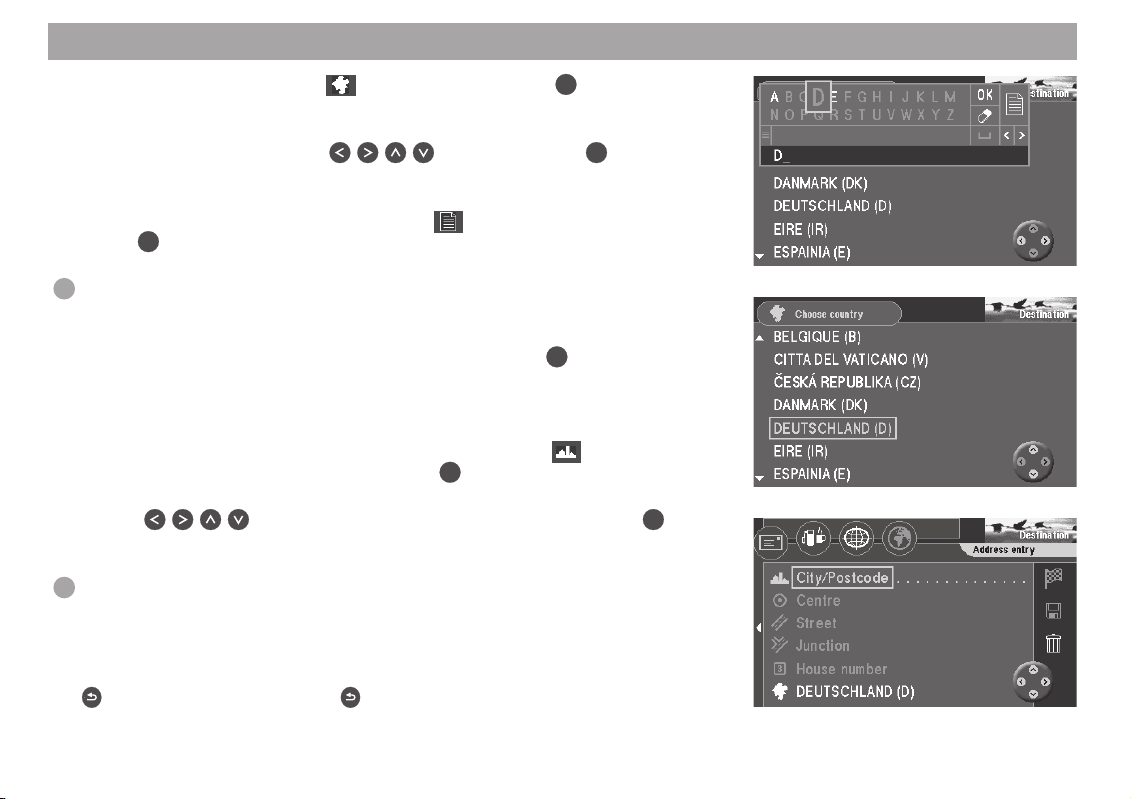
Quick Reference
3. Mark the line containing the icon (country). Press the OK button.
The speller (letter selection field) for entering the country name is displayed. ✔
4. Mark the letter “D” using the
In the list (beneath the letters field), the system will then display the first
country beginning with the letter “D”. ✔
5. To switch to the list of countries, mark the
OK
button.
the
The country list is displayed. ✔
Plus Point: The country names are shown in the respective country’s languages and together with the country code. You will therefore find Finland
listed as both “FINLAND (FIN)” and “SUOMI (FIN)”.
6. Mark “DEUTSCHLAND (D)” in the country list. Press the
The “Destination” menu is displayed again. ✔
City/town:
7. The selection marker is positioned automatically over the
code) in the “Destination” menu. Press the
The character set used to enter the name of the city/town will appear. ✔
8. Use
on the remote control to mark the letter “B”. Press OK.
The first city/town starting with the letter “B” will appear on the list (below the
character set). ✔
Plus Point: The last 20 cities/places that were entered will be saved automatically. This enables you to find frequently selected cities/places quickly since
these are fully displayed in the input box after you enter the first letter.
Note
You can delete letters that you have entered by repeatedly pressing the
button. A long press on the button will close the input menu.
buttons. Press the OK button.
icon in the speller and press
OK
button.
icon (city/post-
OK
button.
12
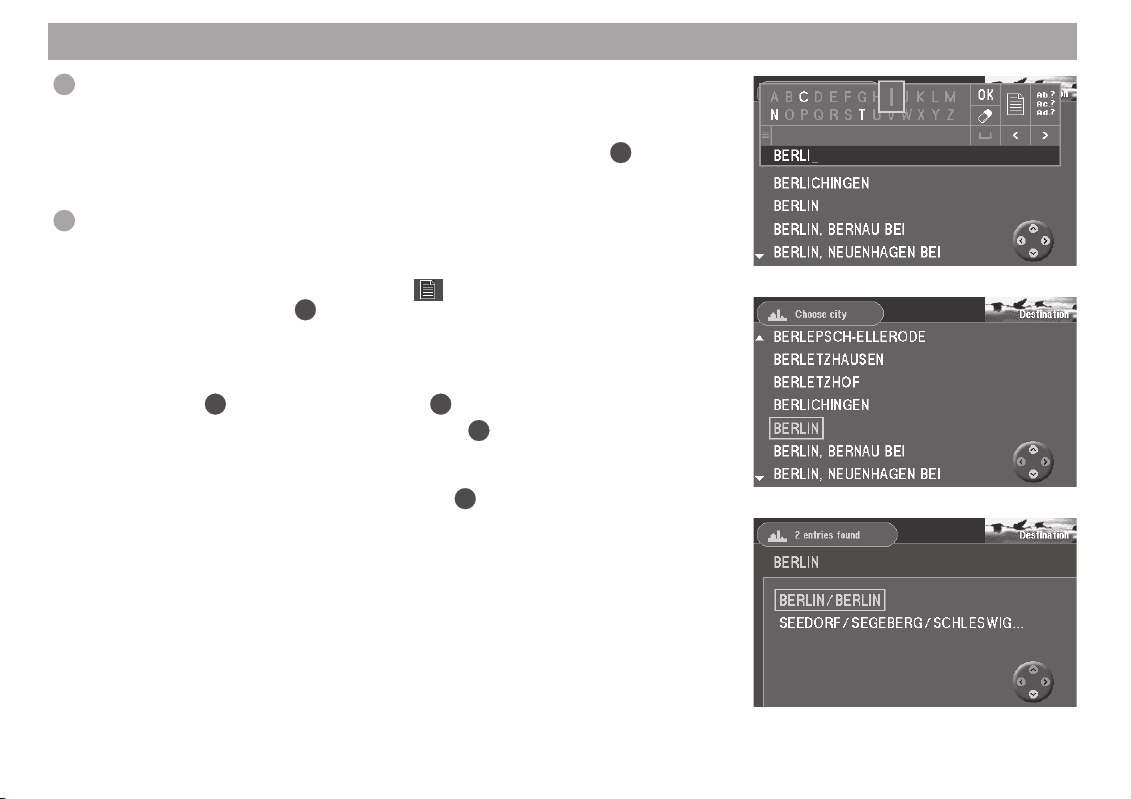
Quick Reference
Plus Point: With each letter you enter in the name, the list will automatically
forward to the corresponding place names. This helps you to find the name
of the city/town you are looking for quickly.
9. Mark the letters “E”, “R”, “L” and “I” one after the other and press
letter.
“BERLIN” will appear on the list. ✔
Plus Point: Those letters that cannot logically follow on from the ones you
have just entered will be displayed greyed out and therefore cannot be selected.
10. To switch to the list of places, mark the
OK
tion field) and press the
button.
The list of places is displayed. ✔
Note
To select the first place in the displayed list, mark “OK” in the speller and
OK
then press the
button or just press the OK button for a longer period.
11. Mark “BERLIN” on the place names list. Press
Because Berlin is listed twice for Germany (as the capital city and as a part
of Segeberg), an additional menu to specify the city/town will appear. ✔
12. Mark “BERLIN” in the selection menu. Press
The “Destination” menu will appear again on the screen. ✔
icon in the speller (letter selec-
OK
.
OK
.
OK
for each
13
Quick Reference
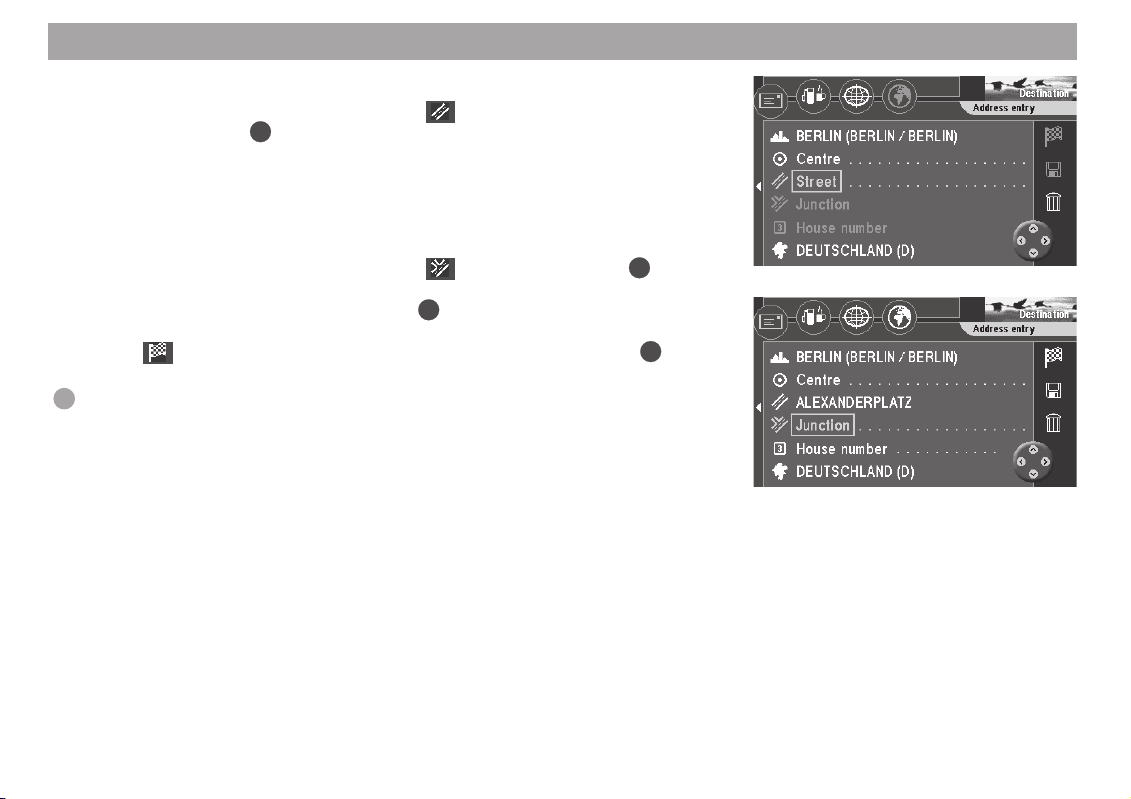
Street:
13. The selection bar will automatically mark
OK
tion” menu. Press
.
The character set used to enter the street name will appear. ✔
Enter the letters for “Alexanderplatz” in the same way as described for entering the city/town.
Junction:
14. The selection bar will automatically mark
The selection list displaying the available junctions will appear. ✔
Select “ALEXANDERSTRASSE”. Press
The “Destination” menu will appear. ✔
The
icon is marked. You can now start route guidance using the OK but-
ton.
Plus Point: After you have entered your destination completely and before
you begin route guidance, it is possible to save the destination in the destination memory.
(street icon) in the “Destina-
(junction icon). Press OK.
OK
.
14
Quick Reference
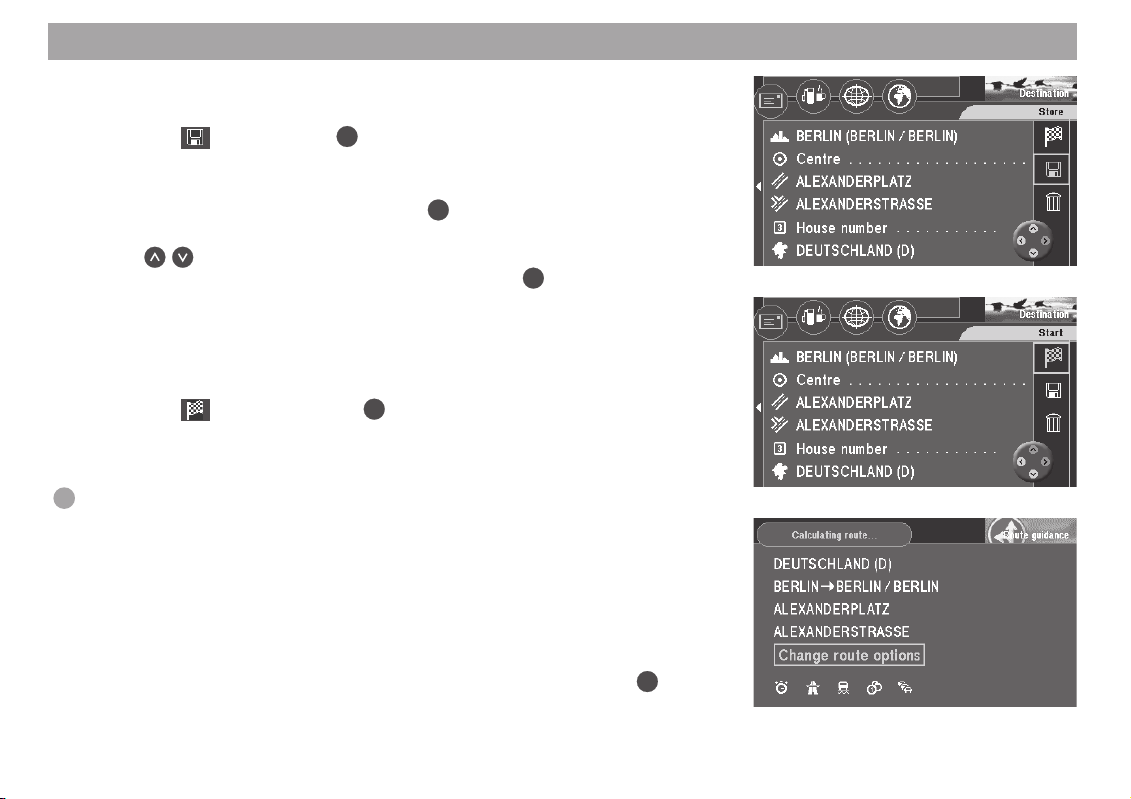
Saving the current destination with a short name before beginning route guidance
1. Mark the icon. Press the OK button.
The speller for entering the destination name will appear. ✔
2. Enter a name for your destination, e.g. “HOTEL”, as described above.
OK
3. Mark “OK” in the character set and press
The “Store destination” menu will appear. ✔
4. Use
to move the name of the destination to the position in which you
would like to save it in the destination memory. Press
The main menu will appear. ✔
An example of route guidance using the map display
After you have entered your destination, you can start route guidance.
1. Mark the
A menu indicating the data on the current destination will appear. ✔
You will hear the following voice output: “The route is being calculated.” You
can use this menu to alter the route options.
Plus Point: You can alter the route options at any time while route guidance
is in progress. For more information, please refer to the section on “Selecting
route options”, “Altering route options while route guidance is in progress”.
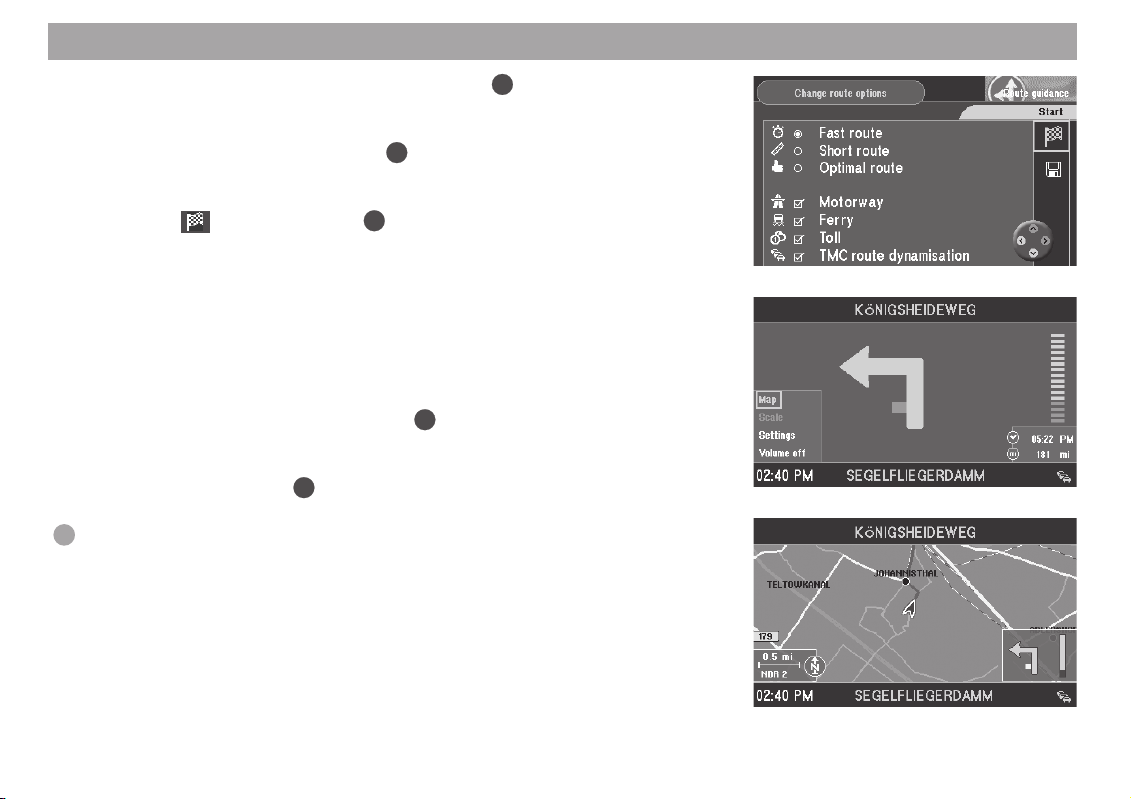
Altering the route options before beginning route guidance
The example of route guidance will be calculated using the route options for “Short
route” and “Avoid motorways”.
2. When the menu indicating the destination data appears on the screen, the
selection bar will mark the “Change route options” menu item. Press
The “Change route options” menu will appear. ✔
icon and press the OK button.
.
OK
.
OK
.
15
Quick Reference
3. Move the selection bar to “Short route” and press OK.
You have now selected the “Short route” option. ✔
4. If “Motorway” is activated (a checkmark will appear in the box), move the se-
lection bar to “Motorway” and press
“Motorway” will be deactivated. There will no longer be a checkmark in front
of “Motorway”. ✔
5. Mark the
icon and press the OK button.
You will hear the following voice output: “The route is being calculated.” ✔
After the route has been calculated, route guidance will begin. You will hear
the first spoken driving recommendation for route guidance. The system will
use the display mode selected last (arrow symbol route guidance or map display).
Switching to map display
6. If the display mode used last was arrow symbol route guidance, you can
switch to map display as follows: Press
progress.
A selection menu will appear at the bottom left-hand edge of the screen. ✔
OK
7. Select “Map” and press
.
The map display will appear. ✔
Plus Point: You can use the selection menu while route guidance is in
progress to switch quickly back and forth between the symbol and map display modes.
OK
.
OK
while route guidance is in
16
Quick Reference
Altering the map scale
If your destination is located at a considerable distance away from your current position, you may want to select a map scale which offers you a better overview of your
complete route. Once you get closer to your destination, you can alter the map scale
to obtain more detailed information on the area surrounding your destination.
8. Press
A window in which you can alter the map scale will appear. ✔
9. Use
The map will appear in the scale selected. ✔
Displaying information on the map
As you get closer to your destination, you can have such additional information as the
locations of parking garages, public institutions or petrol stations displayed on the
map.
In this example of route guidance, parking garages/car parks and petrol stations will
be displayed on the map.
10. Press
A selection menu will appear at the bottom left-hand edge of the screen. ✔
11. Select “Settings” and press
The “Settings” menu will appear. ✔
12. Select
The “Map info” selection menu will appear on the screen. ✔
Press
A checkmark will appear in the box to the left of the menu item. ✔
Plus Point: You can easily tell whether an option is active or not; if it is, there
will be a checkmark in front of the menu item.
13. Use
A checkmark will appear in the box to the left of the menu item. ✔
while the map is on display.
to select the desired map scale. Press OK.
OK
while route guidance is in progress.
OK
.
and press OK.
to select “Car park” and press OK.
to select the “Petrol station” menu item and press OK.
17
Quick Reference
18
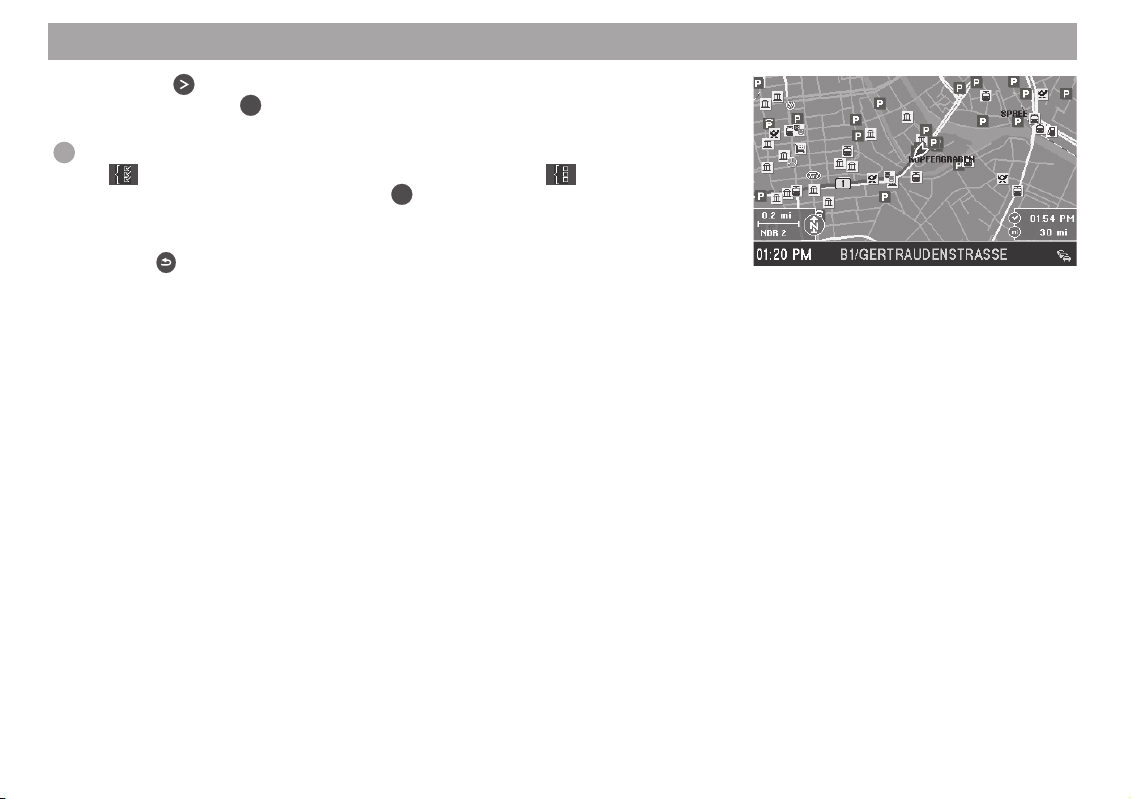
14. Use the button to select the “OK” menu item on the right side of the
OK
menu. Press the
button.
The map display containing the selected icons appears. ✔
Plus Point: If you want to display all the information on the map, mark the
icon (if you want to hide all the information mark the icon) on the
OK
right side of the menu and press the
button.
15. When you have reached your destination and route guidance ends, the map
display will remain active. If you would like to enter a new destination,
press
.
The main menu will appear. ✔
For more information on route guidance and a detailed description of route guidance
and display modes, please refer to the section on “Route guidance”.
Entering destinations
Using the four icons on the top line of the “Destination” menu you can enter your
destination in the following ways:
With the envelope icon, you can enter a destination directly if you know the
exact address. You can use the “Country”, “City/Postcode”, “Centre”,
“Street”, “Junction” and “House Number” menu items for this.
Using the petrol pump / cup icon, you can make your selection from a list of
special destinations such as car parks, hospitals, petrol stations, restaurants
and other public facilities. You can select these destinations for the area
around your current vehicle position, for the area around the last destination
that you navigated to or for the area around any place. Furthermore, all the
destinations stored on the navigation DVD are contained in an alphabetically
sorted list.
You can use the coordinate grid to enter your destination using coordinates.
Use the globe icon to enter a destination directly on the map.
In addition, you can also recall a saved destination from the destination memory to
use as your new destination.
Entering the destination when you know the address
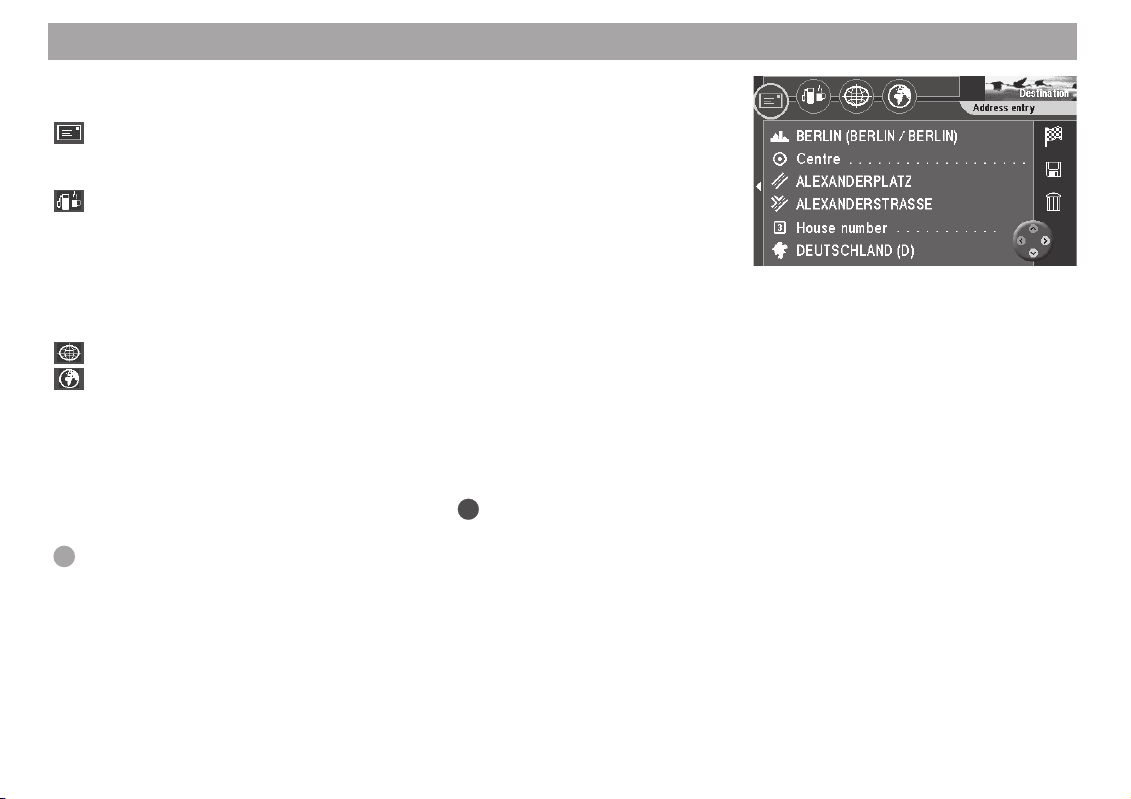
1. Select “Destination” in the main menu. Press OK.
The “Destination” menu will appear. ✔
Plus Point: Each time you access the “Destination” menu, the envelope will
automatically be selected for the direct entry of an address.
You can refer to the quick guide for an example on how to enter an address directly for
a city/place, street and junction in a destination country. If you are not sure of the
correct spelling of a city/place name or street name, you can activate the fault-tolerant
destination input function. It recognises spelling mistakes and suggests similar sounding
names. You can also enter a city/place directly using the postcode. In addition, you
can select a centre or a house number as part of the address.
19
Entering destinations
Activating fault-tolerant destination input
1. If you are not completely sure of the spelling of a city/place name or street
name, mark the
Note
The fault-tolerant destination input function is only available if the appropriate data for the city/place names and street names are present on the
navigation DVD. If not, the
be marked.
2. Now enter the city/place name or street name as you remember it.
3. To switch to the list of names that match what you have entered, mark the
icon in the speller and press the OK button or press and hold down
OK
button for longer.
the
The list is displayed. ✔
4. Mark the desired item in the list and press the
Entering a city/place name directly using the postcode
The advantage of entering the postcode is that when you subsequently enter the
street name, the system will only display the streets that are relevant to the selected
postcode. This feature is only available if the postcodes are present on the navigation
DVD.
Note
Postcodes that are assigned to PO boxes cannot be used when entering
a destination.
1. In the “Destination” menu, mark the item displaying the
code) and press the
2. Use the numbers list below the speller to enter the postcode. Confirm the
first item in the list using the
icon.
icon in the speller and press the OK button.
icon is displayed greyed out and cannot
OK
button.
icon (city/post-
OK
button.
icon or open the list of postcodes using the
20

Entering destinations
3. Mark the desired postcode. Press the OK button.
The “Destination” menu is displayed. ✔
Selecting a town centre (part of town) as your destination
In large cities you can also enter a part of the city as your destination.
1. To enter a town centre as your destination, first enter the town.
The “Destination” menu will appear. ✔
2. Mark
Now you will see a list of the city centres available (for a maximum of 12 entries) or a character set (for more than 12 entries). ✔
3. Use the speller to enter the name of the required centre or confirm the existing entry. Confirm the first entry in the list using the
of centres using the
4. Mark the centre you wish to select. Press
The “Destination” menu will appear. ✔
The selection marker is positioned over the
route guidance using the
titled “Route Guidance”.
(icon for the centre). Press OK.
icon.
OK
button. For further details, read the chapter en-
icon or open the list
OK
.
icon. You can now start
21
Entering destinations
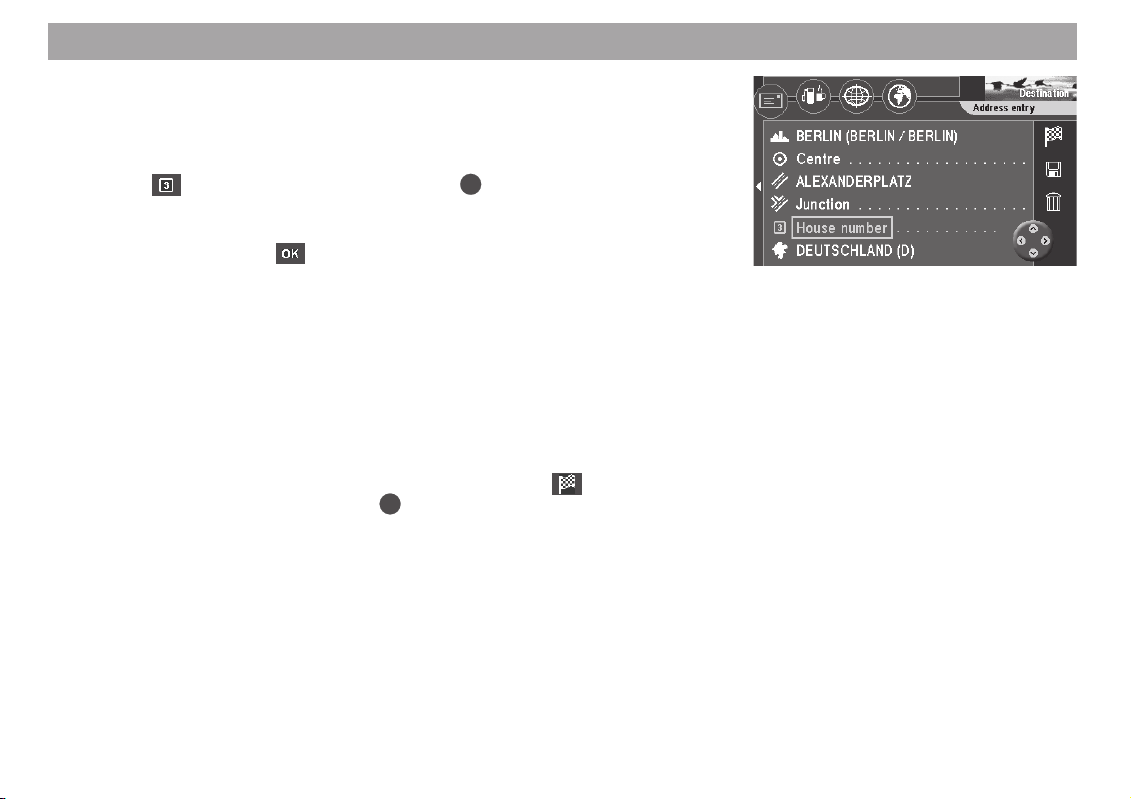
Entering the house number
The house number can also be added to the destination entry. This feature is only
available if the corresponding data are present on the navigation DVD.
1. First enter a city and a street.
2. Mark
A list of numbers representing the house numbers will appear. ✔
3. Enter the house number using the numbers list. Confirm what you have entered by pressing the
There are two possible scenarios:
• If you have entered a house number that is present on the navigation
• If you have entered a house number that is not present on the navigation
In both cases, the selection marker is positioned over the
now start route guidance using the
read the chapter entitled “Route guidance”.
(icon for the house number). Press OK.
icon.
DVD, the “Destination” menu will be displayed with the house number
you have entered. ✔
DVD, a list will be displayed containing the available house numbers or
house number ranges. Once you have confirmed an item from the list,
the “Destination” menu will be displayed with the selected house number
range. ✔
OK
button. For further details, please
icon. You can
22
Entering destinations
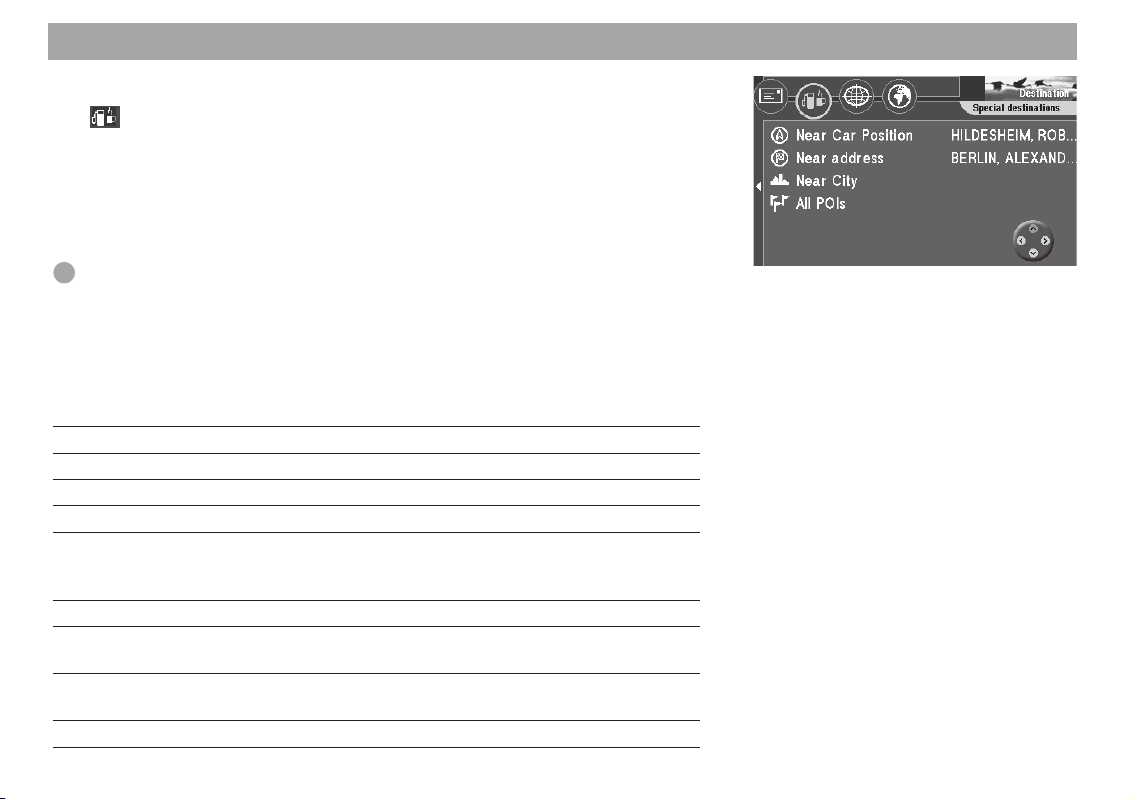
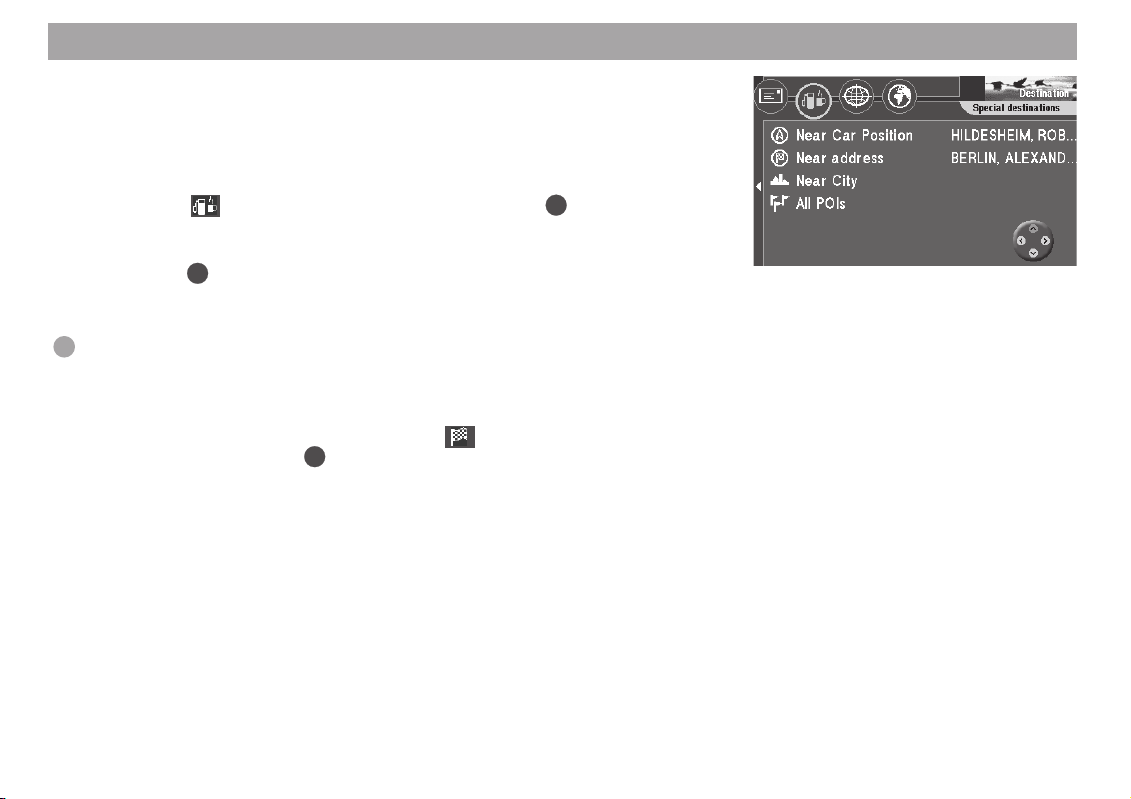
Selecting special destinations (car parks, petrol stations, etc.)
The icon (petrol pump / cup) gives you access to various destinations that you
can use for entering a destination. You can select these destinations according to
your current vehicle position (“Near Car Position”), the last active navigation destination (“Near address”) or any place (“Near City”). The destinations are displayed sorted
according to their distance.
In addition, you can select a destination from an alphabetically sorted list of all the special destinations (“All POIs” - points of interest) that are stored on the navigation DVD.
Plus Point: This is helpful, for instance, when you are looking for the nearest
petrol station.
Selecting special destinations in the area around your position, last destination or around any place
The special destinations are assigned to various categories and subcategories.
Categories Subcategories
Restaurants –
Hotel/Motel –
Shopping –
Banking & Business Post office
Travel Exhibition Centre, motorway exit, motorway service station,
car rental, train station, airport, ferry port, mountain pass,
border crossing, parking, tourist information
Public buildings Public authority, embassy
Automobile Car dealer, petrol station, practice grounds for road
users
Leisure Leisure park, golf course, cinema, museum, sports
facilities, theatre, tourist attraction, wine cellar, zoo
Emergency Police, hospitals
23
Entering destinations
Note
If there are no data available on the navigation DVD for some of the categories they will not be displayed.
1. To select a special destination, select the
OK
menu. Press the
button.
The “Special destinations” menu is displayed. ✔
2. Move the selection marker over the point of reference that you want (“Near
Car Position”, “Near address” or “Near City”).
3. If you have selected “Near City”, you must first select a city/place that you
want the destinations to relate to.
Plus Point: Enter the destination here in the same way as described for the
direct destination entry.
Once you have selected a city/place, the list of the available special destination categories will be displayed. ✔
4. Select the category that you want. Press the
Depending on the category you have selected, the list of available subcategories or the list of available special destinations will be displayed. ✔
5. If applicable, select the desired subcategory. Press the
available special destinations is displayed. ✔
6. Select the desired destination. Press
OK
The name of the destination will appear in a menu. ✔
The selection marker is positioned over the
OK
route guidance using the
button. For further details, read the chapter en-
titled “Route Guidance”.
icon in the “Destination”
OK
button.
OK
.
icon. You can now start
button. The list of
24
Entering destinations
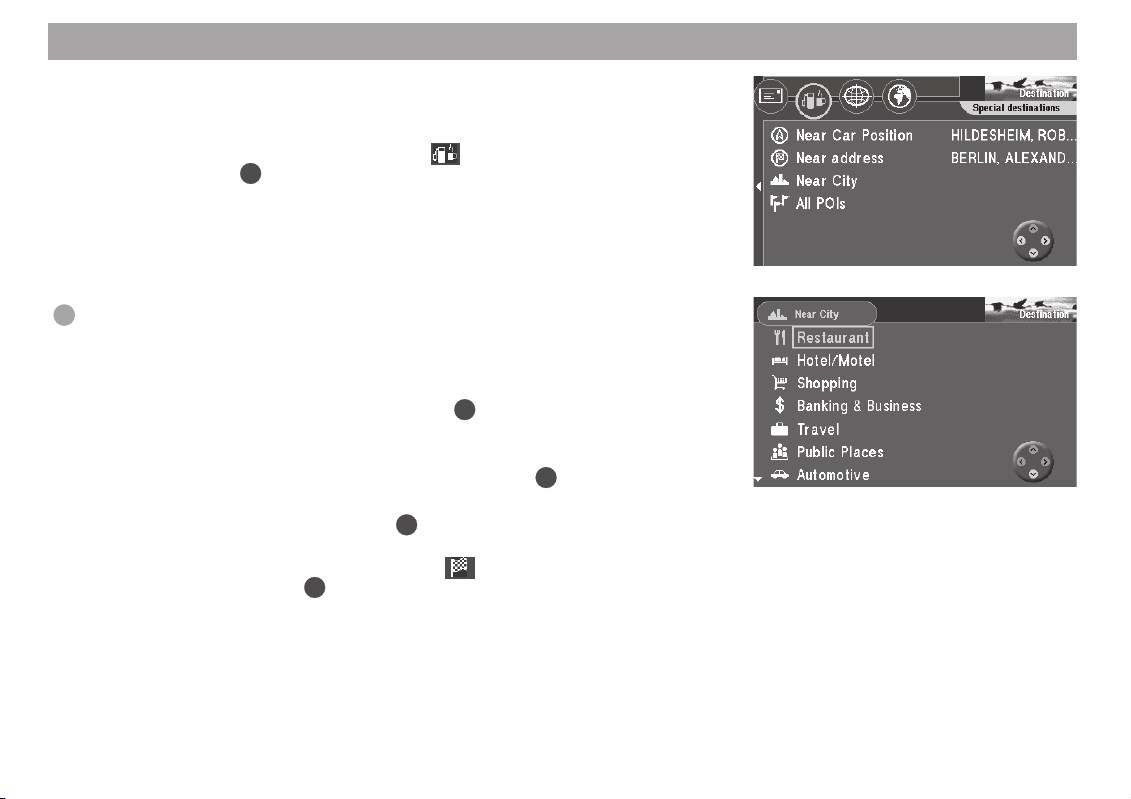
Selecting destinations from the list of all special destinations
You should know the name of the special destination that you want if you want to
select a destination from the list of all special destinations (points of interest).
1. In the “Destination” menu, first select a country in which the special destination is located so that the appropriate lists are loaded.
2. Select the
The “Special destinations” menu is displayed. ✔
3. Move the selection marker over the “All POIs” (points of interest) menu item.
Press the
The speller for entering the destination name is displayed. ✔
4. Now enter the name of the desired special destination.
Plus Point: You enter the destination here in the same way as you would enter a destination directly.
Once you have selected the special destination, the destination’s address
will be displayed in a menu. ✔
The selection marker is positioned over the
route guidance using the
chapter entitled “Route guidance”.
icon in the “Destination” menu. Press the OK button.
OK
button.
icon. You can now start
OK
button. For further details, please read the
25
Entering destinations
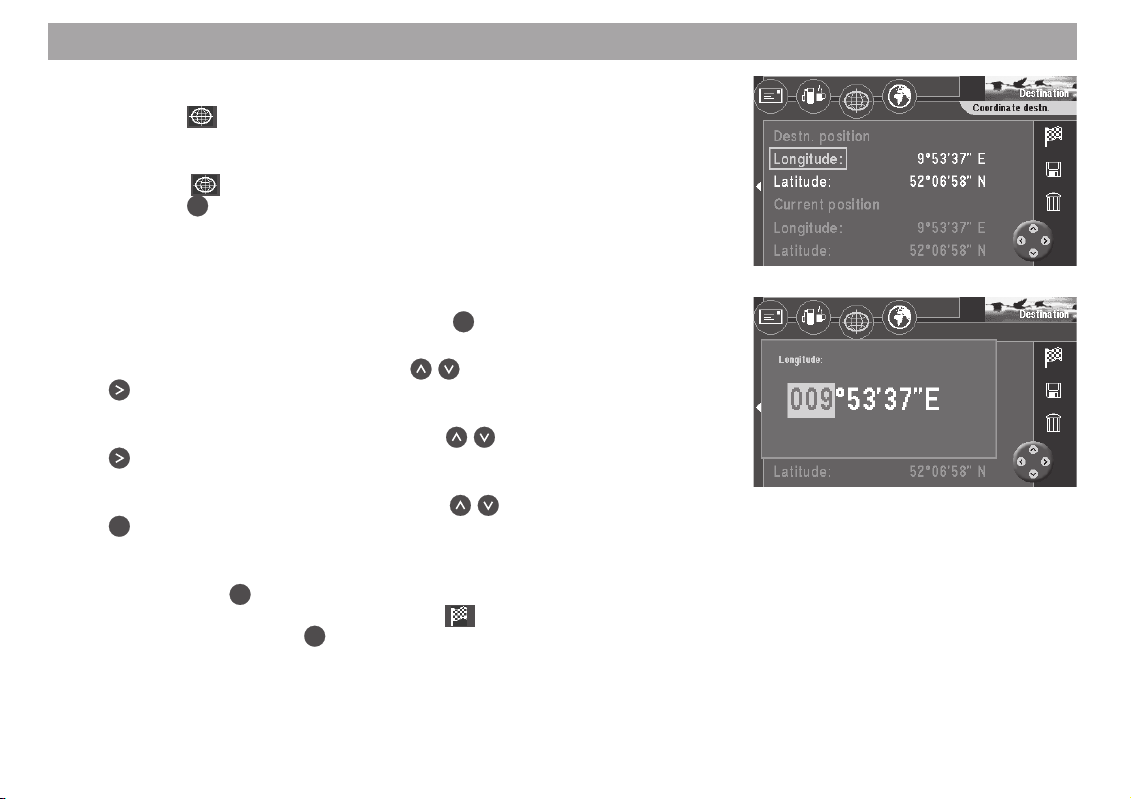
Entering destinations using coordinates
You can use the icon (coordinate grid) for entering your destinations as coordinates. To do so, you will need to enter the coordinates in degrees of longitude and
latitude.
1. Select the
Press the
The coordinate input menu is displayed. ✔
You can now enter the coordinates you want under “Destn. position”. If satellite reception in your area is sufficient, your current position is also shown under “Current position”.
2. Select the “Longitude” menu item. Press the
The field for entering the number of degrees is marked. ✔
3. Enter the number of degrees using the
button.
The field for entering the number of minutes is marked. ✔
4. Now enter the number of minutes using the
button.
The field for entering the number of seconds is marked. ✔
5. Now enter the number of seconds using the
OK
button.
The coordinate input menu is displayed again. ✔
6. Now enter the latitude coordinates in the same way.
Then press the
The selection marker is positioned over the
route guidance using the
titled “Route Guidance”.
Note
The switch between north/south and east/west when entering the coordinates takes place automatically when the number of degrees is entered.
icon in the top line of the “Destination” menu.
OK
button.
OK
button.
buttons. Then press the
buttons. Then press the
buttons. Then press the
OK
button.
icon. You can now start
OK
button. For further details, read the chapter en-
26
Entering destinations
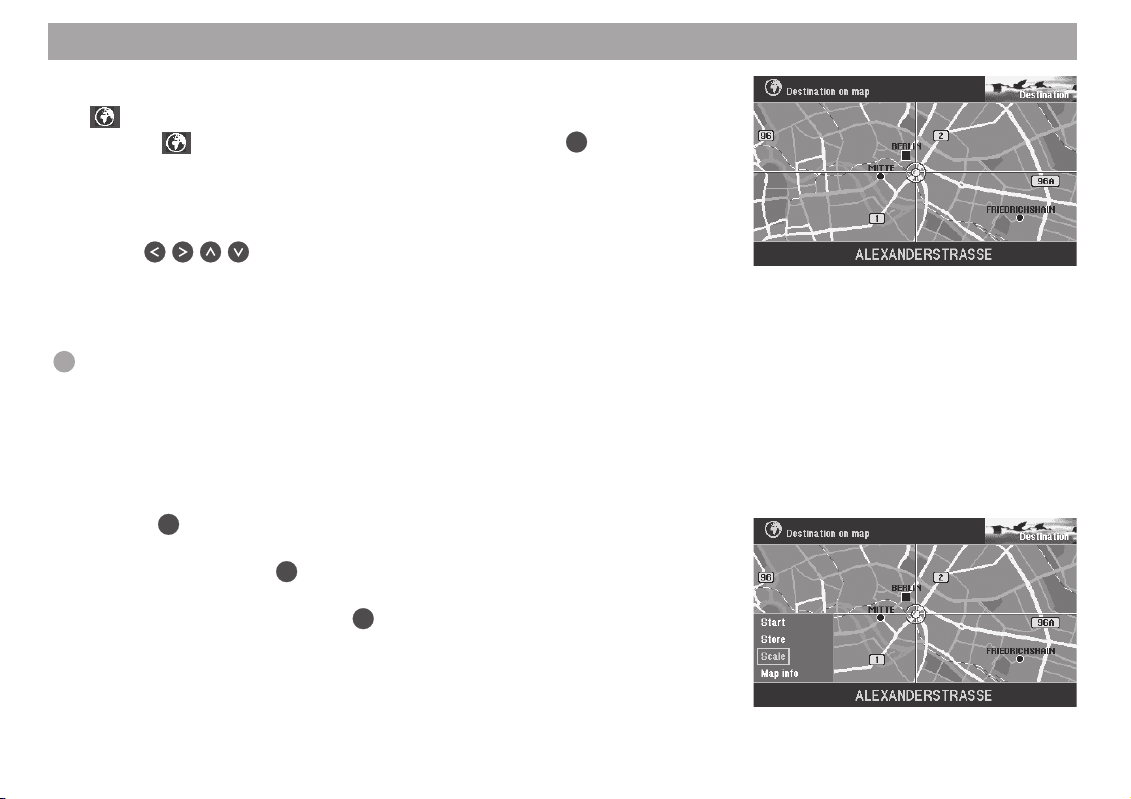
Entering destinations in map mode
Use (the globe icon) to determine a destination for navigation in map mode.
1. Select
A map which indicates north facing up will appear. ✔
The map will show the surroundings of the last active destination. If no destination has been entered, the map will indicate the current vehicle location.
Use the cross wires to select the destination.
2. Use
rection of the desired destination.
The cross wires will move across the display. ✔
If you move the cross wires over the edge of the map, the next section of the
map will appear automatically.
Plus Point: Depending on the map scale, the name of the street or the name
of the town/city over which the cross wires are passing will appear on the
line below the map.
Adjusting the map scale
If the destination is far away from your current location, you can alter the map scale,
allowing you to move the cross wires quickly over long distances.
1. Press
A selection menu will appear. ✔
2. Select “Scale”. Press
A window you can use to alter the map scale will appear. ✔
3. Select the desired scale. Press
The map will appear in the new scale. ✔
on the top line of the “Destination” menu. Press OK.
on the remote control to move the cross wires in the di-
OK
while the map is on display.
OK
.
OK
.
27
Entering destinations
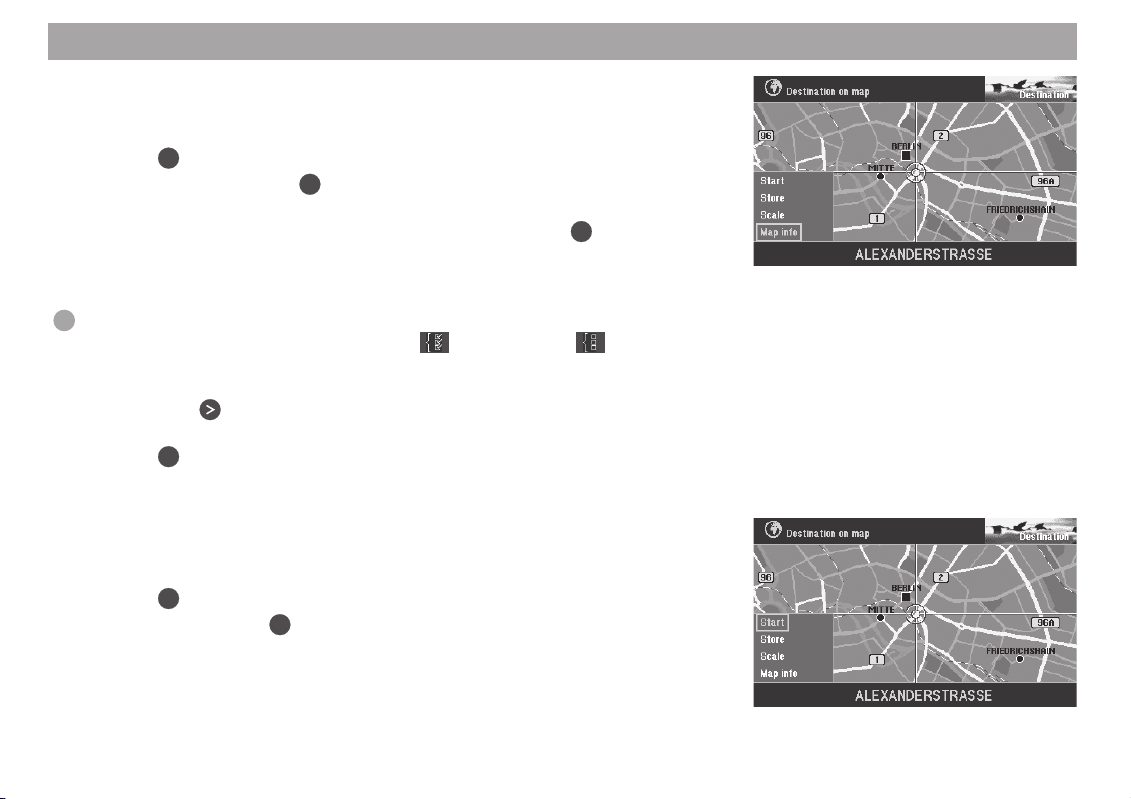
Displaying information on the map
You can also have such additional information as car parks and petrol stations displayed in symbol form on the map.
OK
1. Press
2. Select “Map info”. Press
A selection list containing the information available will appear. ✔
3. Mark the information you want displayed on the map. Press
lection.
A “checkmark” should appear in front of every type of information you want
displayed. ✔
Plus Point: If you wish, you can optionally display all the information on the
right side of the menu at the same time (
do so, select the corresponding icon.
4. Once you have selected all of the information you want displayed on the
map, press
“OK” on the right side of the menu is marked. ✔
5. Press
The map displaying the information selected will appear. ✔
Starting route guidance
Once you have determined the destination on the map, you can start route guidance
directly.
1. Press
2. Select “Start”. Press
A menu containing the data on the current destination will appear. ✔
You will hear the following voice output: “The route is being calculated.”. You
can also alter the route options in this menu.
For more information, refer to the section on “Selecting route options” and
“Route guidance”.
to open the selection menu.
OK
.
.
OK
.
OK
to access the selection menu.
OK
.
OK
for each se-
icon) or hide it ( icon). To
28
Entering destinations
Saving the destination on the map before starting route guidance
If you have marked the destination with the cross wires, you can save it in the destination memory and use it for route guidance later.
OK
1. Press
2. Select “Store”. Press
The character set used to enter a short name for the destination will appear. ✔
3. Enter a name for the destination and leave the speller by pressing the
OK
the speller.
The “Store destination” menu is displayed. ✔
4. Use
memory. Press
The main menu will appear. ✔
to access the selection menu.
OK
.
button for longer than two seconds or by marking and confirming “OK” in
to move the short name to the desired position in the destination
OK
.
29
Entering destinations
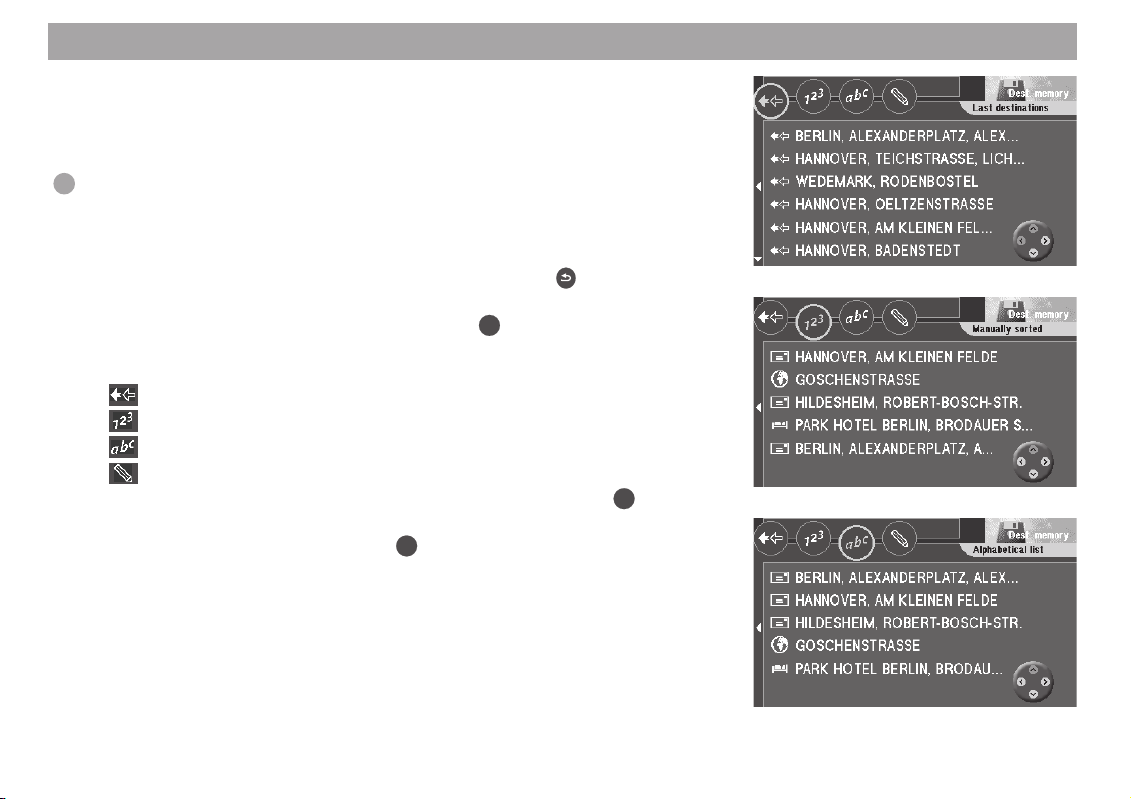
Destinations in the destination memory
The destination memory is used to save frequently used destinations, to give them a
short name (for identification purposes) and to recall them at a later date for route
guidance.
Plus Point: The TravelPilot EX-V automatically saves the last 10 destinations
used.
Selecting a destination from the destination memory
Starting point: You are currently in the main menu. If not, press
main menu.
OK
1. Select “Dest. memory” in the main menu. Press
.
The “Dest. memory” menu will appear. ✔
The icons in the top icon bar represent:
Memory for the last 10 destinations
Individually sorted destination memory
Alphabetically sorted destination memory
Edit destination memory (delete, save and sort destinations)
2. Select the icon of the destination memory you want to use. Press
The destinations saved there will appear. ✔
OK
3. Select the desired destination. Press
.
A menu containing the data on the current destination will appear. ✔
You will hear the following voice output: “The route is being calculated.” You
can also use this menu to alter the route options.
For more information, read the sections on “Selecting route options” and
“Route guidance”.
to return to the
OK
.
30
 Loading...